Office 2016 For Dummies (2016)
Part V
Getting Organized with Outlook
Chapter 15
Calendars, Contacts, and Tasks
In This Chapter
![]() Setting an appointment
Setting an appointment
![]() Storing names and addresses
Storing names and addresses
![]() Tracking your tasks
Tracking your tasks
Outlook 2016 is more than just an e-mail program; it’s also a complete personal organizer to help you keep track of appointments, names and addresses, and to-do tasks. With Outlook helping keep your life organized, you no longer have an excuse not to get anything done on time — unless, of course, you really don’t want to do it.
Setting Appointments
Everyone can get busy and miss deadlines and appointments. To avoid this problem, let Outlook keep track of your schedule. That way, you’ll know what days and times you’ll be busy and when you’ll be free to do anything else.
Making an appointment
Before you can add an appointment to Outlook, you need to decide which day that appointment will occur and what time it will start. You can also add details such as how long it should last and where it takes place, but the important part is to define the date and time. To do this, you need to look at the Outlook calendar.
Outlook offers several ways to display its calendar:
· Day: Displays a single time divided into 24 hours
· Week: Displays a single week divided into five or seven days
· Month: Displays a single month divided into days
Outlook lets you define starting and ending times of an appointment in half-hour increments such as 1:30 or 11:00 whether you’re using the day, week, or month calendar. To set an appointment, follow these steps:
1. Click the Calendar icon in the bottom-left corner of the Outlook window.
Outlook displays the Calendar view.
2. Click the Home tab and then click the Day, Work Week (5 days), Week (7 days), or Month icon in the Arrange category.
Outlook displays the Calendar based on the time frame you choose, such as Work Week or Month, as shown in Figure 15-1.
 You can also click the New Appointment icon on the Home tab to define an appointment.
3. Double-click the day (or time if you’re in the Day calendar) where you want to schedule an appointment.
Outlook displays the Appointment window, as shown in Figure 15-2.
4. Click in the Subject text box and type a brief description of your event, such as Another meeting with Mike or Meet with client.
5. (Optional) Click in the Location text box and type the location of your appointment, such as Break Room 10 or Back alley near the dumpster.
If you often set appointments for specific locations, Outlook will remember these locations. In the future, just click the downward-pointing arrow in the Location text box and then click a previously used location in the list that appears.
6. Click in the Start Time list box and choose a time.
You can also type a time directly in the Start Time list box, such as 9:53, or even choose a different date.
If the Start Time and End Time list boxes appear dimmed, make sure you clear the All Day Event check box.
7. Click in the End Time list box and choose a time.
You can also type a time directly in the End Time list box, such as 2:23, or even choose a different date.
8. Click in the big text box and type any additional information you want to store about your event, such as items you need to bring or information you want to recall about the person you’re meeting.
9. Click the Save & Close icon in the Actions group.
Outlook displays your appointment in Day, Week, or Month view of the calendar, as shown in Figure 15-3.
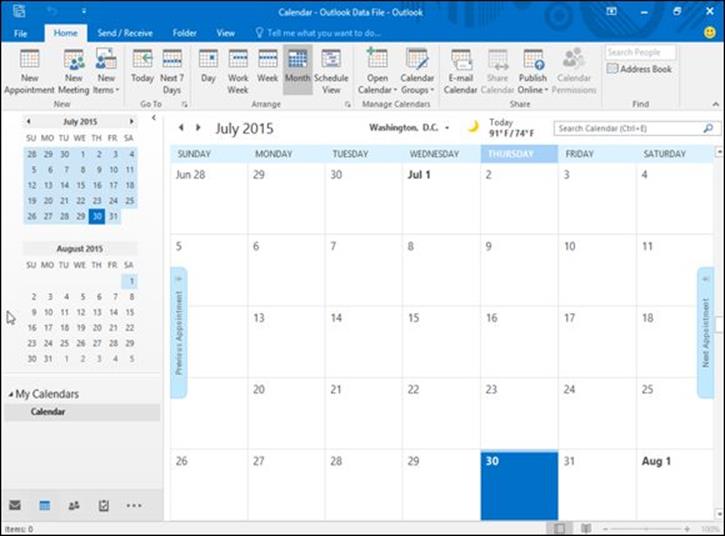
Figure 15-1: The month Calendar view in Outlook.
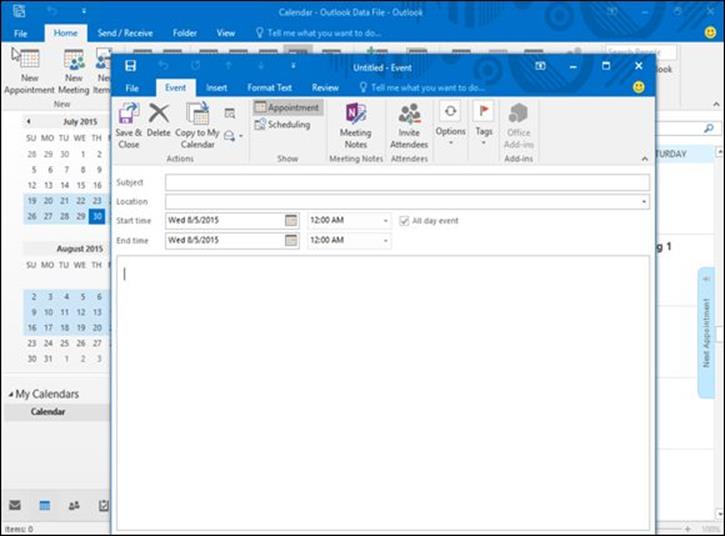
Figure 15-2: The Appointment window lets you define a start and end time.
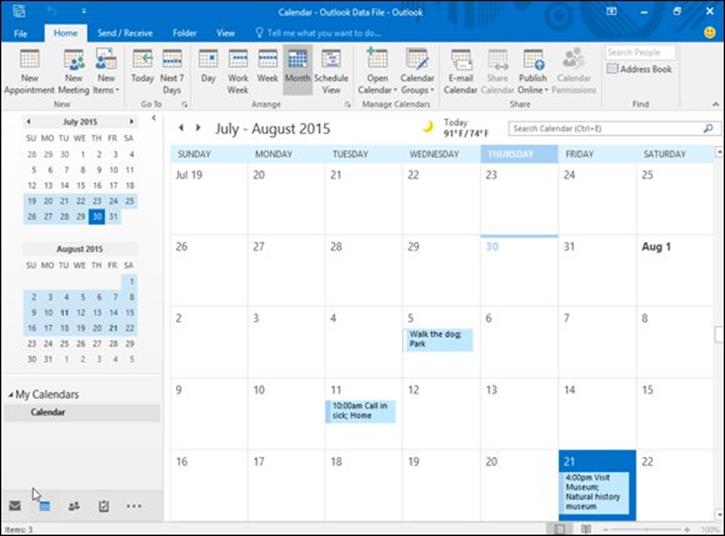
Figure 15-3: Outlook’s calendar shows all stored appointments.
 If you need to edit an appointment, just double-click it to display the Appointment window again. You can also drag an appointment from one location on the calendar to another to switch it to a different time or date.
Viewing appointments
If you store several appointments on the same day, you may find it hard to keep track of them all. To help you out, Outlook can display your appointments as a picture so you can see the times and dates when you have something planned.
To see your appointments onscreen, click the Home tab, click on a day that you want to view, then click the Schedule View icon in the Arrange group. Outlook displays your appointments so you can quickly spot your free and busy times, as shown in Figure 15-4.
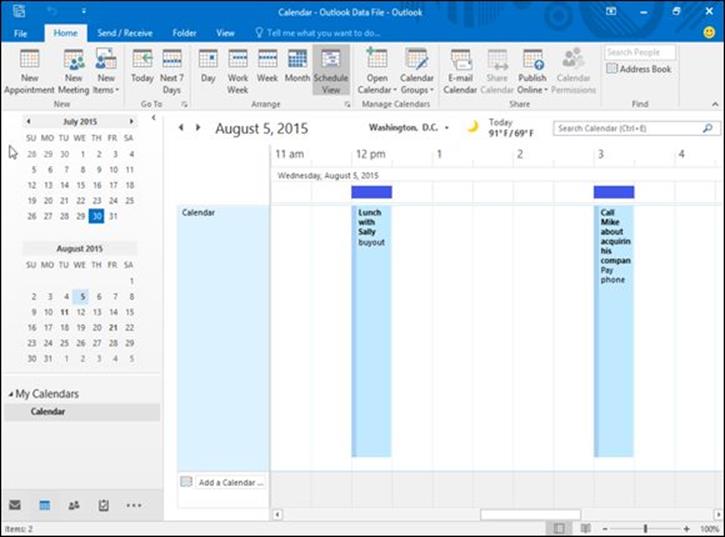
Figure 15-4: The Schedule view lets you see all appointments on a single day.
You can also view your appointments by moving the mouse pointer over the Calendar icon in the bottom-left corner of the Outlook window, and when a calendar pops up, click a date to view your appointments for that day (as shown in Figure 15-5).
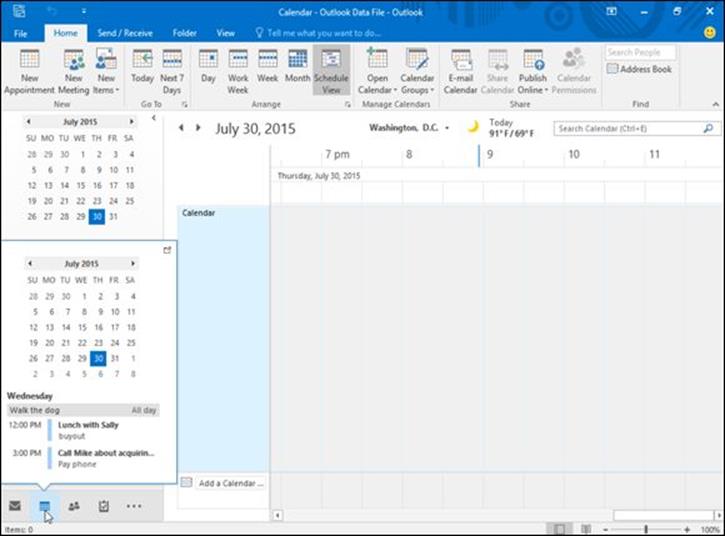
Figure 15-5: The Calendar icon lets you view your appointments for a day any time you’re using Outlook.
Deleting an appointment
After an appointment has passed or been canceled, you can delete it to make room for other appointments. To delete an appointment, follow these steps:
1. Double-click an appointment to open the Appointment window.
2. Click the Delete icon (or press Ctrl+D).
Outlook deletes your appointment.
For another way to delete an appointment, follow these steps:
1. Click an appointment on the calendar.
Outlook displays a black border around your chosen appointment and displays the Appointment tab.
2. Click the Delete icon.
Outlook deletes your appointment.
If you delete an appointment by mistake, press Ctrl+Z to recover it.
Storing Names and Addresses
Everyone has important names, addresses, e-mail addresses, and phone numbers that need to be saved. Rather than use Access or another complicated database program to store this type of information, it’s much easier to use Outlook.
Adding a name
To store a name in Outlook, follow these steps:
1. Click the People icon in the bottom-left corner of the Outlook window.
Outlook displays the Contacts view.
2. Click the Home tab and click the New Contact icon in the New group.
Outlook displays a Contact window, as shown in Figure 15-6.
3. Type the information you want to store about each person, such as the name in the Full Name text box.
You can store as much or as little data about a person as you want. For example, you may not want to store someone’s home phone number or IM (instant messaging) address.
4. Click the Save & Close icon.
Outlook saves your information.
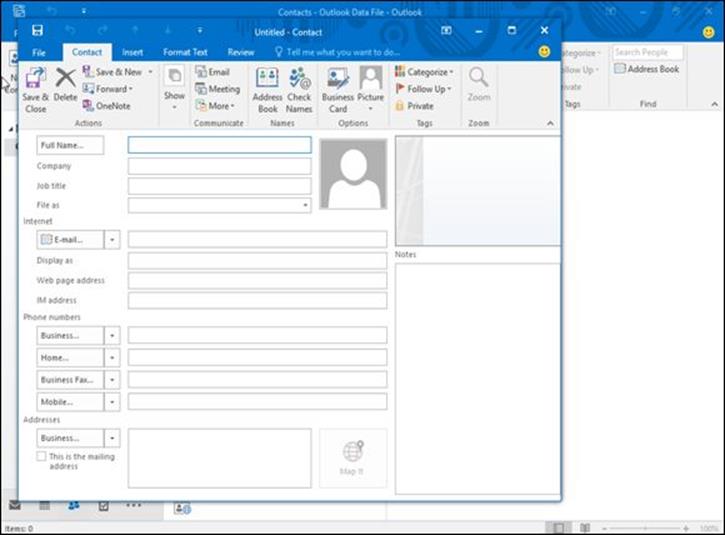
Figure 15-6: The Contact window lets you add data about a person.
If you click the Save & New icon instead of the Save & Close icon in Step 4, another blank Contact window appears so you can keep adding new names to your Outlook contact list.
Viewing names
After you’ve stored one or more names in Outlook, you’ll probably need to find them again. If you just want to browse through your list of names, follow these steps:
1. Click the People icon in the bottom-left corner of the Outlook window.
Outlook displays the Contacts view.
2. Click the Home tab and click the People, Business Card, Card, Phone, or List icon in the Current View group.
The People view displays lists of people alphabetically. The Business Card displays names and additional information as large windows, as shown in Figure 15-7. The Card view displays names as smaller windows, allowing you to see more names on the screen. The Phone view helps you find a specific phone number. The List view organizes people by company.
If you click a name, you can delete it by clicking the Delete icon on the Home tab.
3. Double-click a name to open the Contacts window.
The Contacts window opens, allowing you to edit or add new information to your chosen contact.
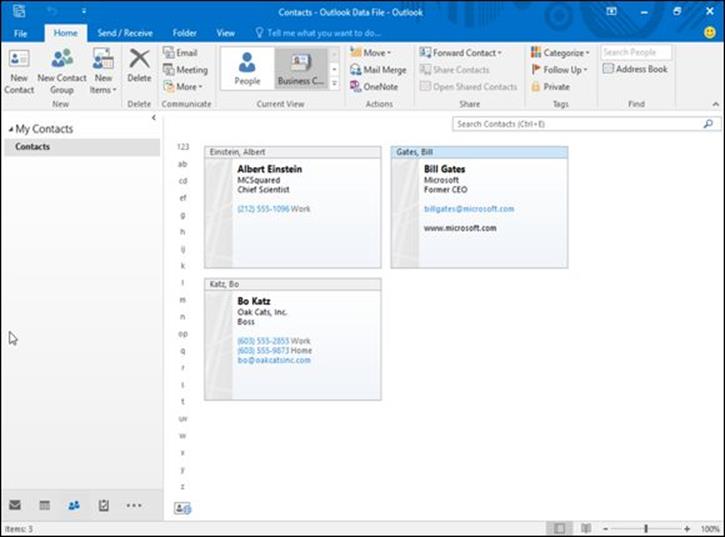
Figure 15-7: The Business Card view.
Searching names
If you know all or part of a name or other information about a person, you can exhaustively browse through your entire list of stored contacts. However, it’s much easier to just search for that information instead.
That way, if you know you want to find a person named Bill, you just have to search for “Bill.” Likewise, if you know you need to call someone located in the 408 area code, you can just search for “408,” and Outlook will show you all contacts with a phone number in that particular area code.
Searching makes it easier to find a particular name. To search for a name, follow these steps:
1. Click People icon in the bottom-left corner of the Outlook window.
Outlook displays the Contacts view.
2. Click the Home tab and click in the Search People text box in the Find group (or press Ctrl+ E).
The cursor appears in the Search Contacts text box.
3. Type as much data as you can about the person you want to find, typing (for example) all or part of a name or phone number.
4. Press Enter.
Outlook displays all contacts that match your search criteria that you typed in Step 3.
5. Click a contact you want to view (or click away from the Search People list to make the list go away).
Outlook displays your chosen contact or all your contacts once more.
You can also search for a name by moving the mouse pointer over the People icon in the bottom-left corner of the Outlook window. A window pops up with a search people text box on top; there you can type all or part of a name (as shown in Figure 15-8).
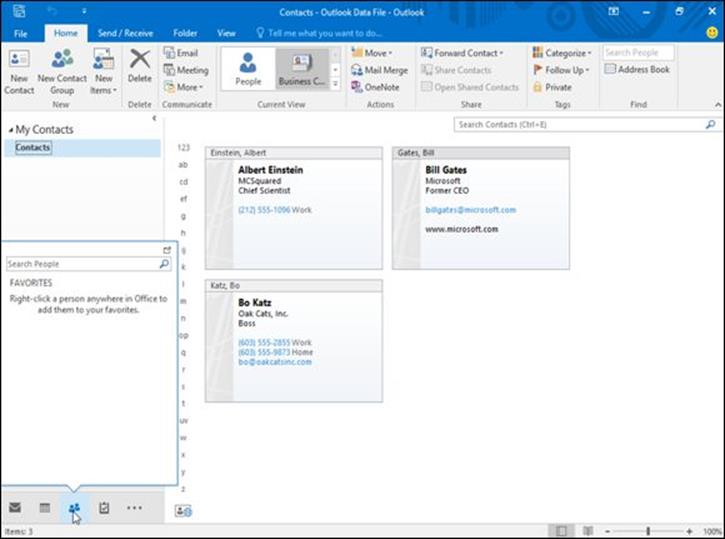
Figure 15-8: A search people window appears when you click the People icon.
Managing Tasks
Everyone’s busy. However, the big difference between busy, efficient people and overwhelmed people is that busy people simply know how to manage their tasks so they get things done.
Microsoft OneNote 2016
If you need to take notes in meetings, you’re probably dragging your laptop around and typing notes in a Microsoft Word document. There’s nothing wrong with that, except that by the end of the meeting, your notes will appear in one long document and you’ll need to edit those notes so you can keep track of everything you wrote.
While you can use Microsoft Word to jot down notes, you may prefer using a more specialized note-taking program called Microsoft OneNote 2016. Like Microsoft Word, Microsoft OneNote lets you type and store notes. However, the program goes much farther than that.
OneNote lets you divide your notes into sections to help you find what you need. Instead of typing everything on a single page (as Microsoft Word forces you to do), OneNote lets you create one section for action items and another section for upcoming meetings to keep a project on track.
Now when you want to read your notes, you don’t have to scroll through endless pages (the way you do in Microsoft Word). Instead, you can just flip to the section that contains the information you want to find. Think of the difference between trying to find information printed on a scroll of paper (Microsoft Word) or information organized in separate sections like tabs in a notebook (OneNote).
If you have a microphone and a webcam, you can even capture audio and video to store in your notes. That way you can capture an entire classroom lecture or meeting in audio or video, and then jot down notes at the same time. To review, you can study your written notes as well as replay the audio or video to catch something you may have missed earlier.
Because notes don’t always rely on words, OneNote also lets you draw pictures, which can be handy for capturing ideas visually. Now you can use both your left brain (words) and right brain (pictures) to capture notes during any classroom lecture or meeting.
More important, OneNote can link to Outlook to share data. If you’re in a meeting, you may need to write down a task for yourself and a future appointment. Now, you can retype all that information into Outlook later, or you can just transfer that data from OneNote to Outlook with a click of the mouse. When you work with Outlook, OneNote lets you capture information and store it in Outlook so you can keep track of your busy schedule.
OneNote can be a great note-taking program by itself, but when combined with Outlook, the two programs make an efficient information-gathering system.
To help you manage your tasks, Outlook lets you store your most important tasks and assign due dates and priorities. Now at a glance, you can see what’s most important for you to focus on. By spending more of your time on important tasks and less of your time on trivial matters, you’ll become more efficient (provided you actually do the work you’re supposed to be doing).
Storing a task
A goal is simply a dream with a deadline. When storing tasks in Outlook, you need to define what it is that you want to do and set a date for when you want to complete it.
To store a task in Outlook, follow these steps:
1. Click the Tasks icon in the bottom-left corner of the Outlook window.
Outlook displays the Tasks view (as shown in Figure 15-9).
If you just need to store a quick task, click in the Type A New Task text box in the middle pane, type a brief description of your task, and press Enter.
2. Click the Home tab and click the New Tasks icon in the New group.
Outlook displays a Task window, as shown in Figure 15-10.
3. Click in the Subject text box and type a brief description of your task, such as Sell produce to my neighbor or Meet with informant.
4. (Optional) Click in the Start Date list box and click a date to start your task. Then click in the Due Date list box and click a date when you want to complete that task.
You don’t have to add a start and end date, but it’s a good idea to do so to help you measure your progress (or lack of progress) on your task.
5. (Optional) Click in the Status list box and choose an option such as In Progress or Waiting On Someone Else.
6. (Optional) Click in the Priority list box and choose an option such as Low or High.
7. (Optional) Click in the % Complete box and click the up/down arrows to define what percentage you’ve completed of the task.
8. Click in the big text box to describe more details about your task.
9. Click the Save & Close icon.
Outlook displays your task, as shown in Figure 15-11.
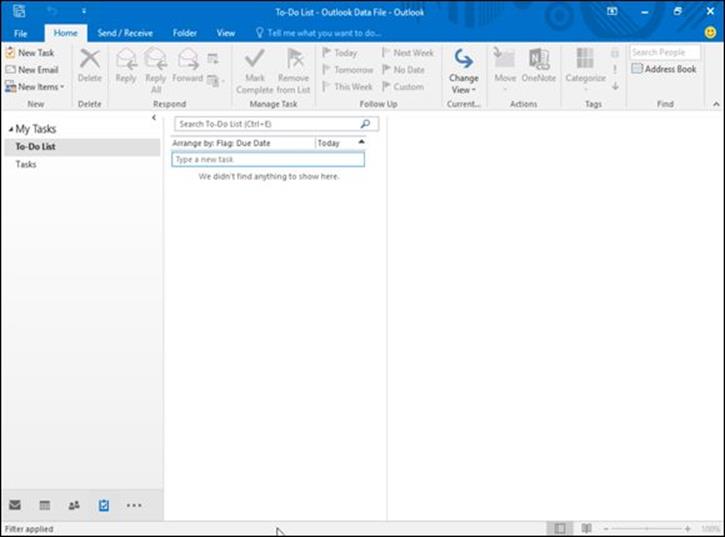
Figure 15-9: Type a new task in this window.
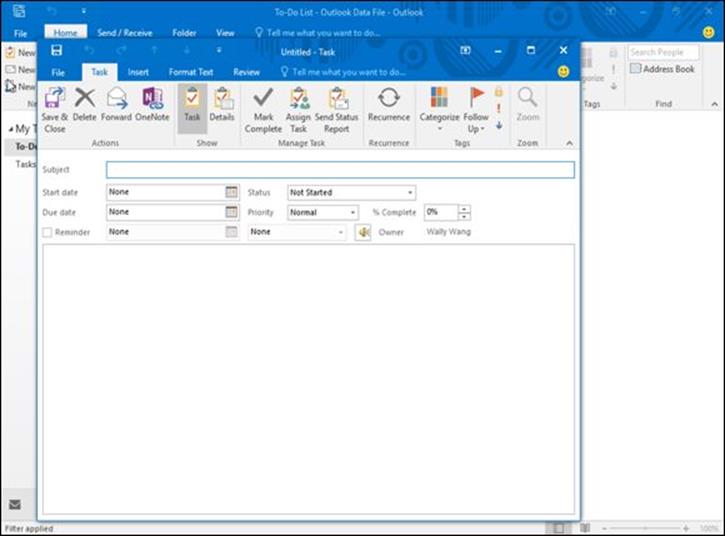
Figure 15-10: The Task window lets you jot down information about your important tasks.
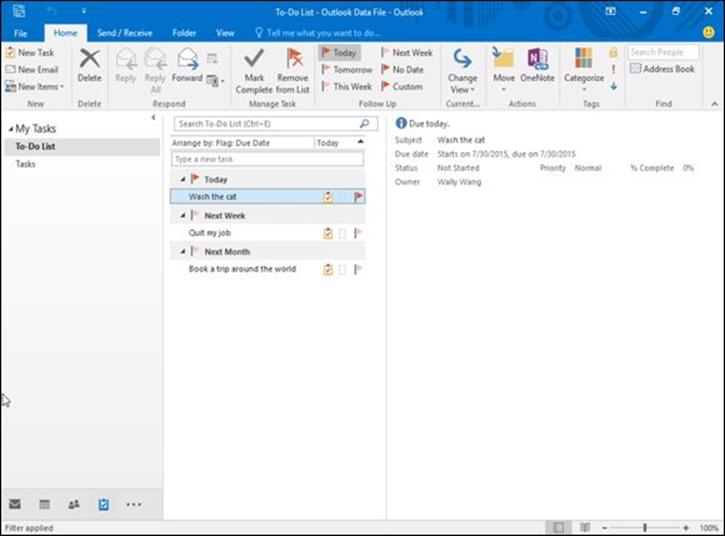
Figure 15-11: Outlook displays a list of tasks.
If you double-click a task, you can open the Tasks window so you can edit or add information to your chosen task.
Searching tasks
If you have a lot of tasks, you may want to find a particular one. To find a particular task, you can search for it. That way, if you know you want to find a task involving “Chemicals,” you can just search for “chemicals,” and Outlook will display that task right away.
To search for a task, follow these steps:
1. Click Tasks in the bottom-left corner of the Outlook window.
Outlook displays the Tasks view. You can browse through this list of tasks to find the one you want. However, if you have many tasks, you may want to let Outlook search for them instead.
2. Click the Home tab and click in the Search To-Do List text box (or press Ctrl+ E).
The cursor appears in the Search To-Do text box.
3. Type as much data as you can about the task you want to find.
Outlook displays all tasks that match the search criteria that you typed in Step 3.
4. Click the Close icon in the Search text field.
Outlook displays all your tasks once more.
Viewing tasks
As you store tasks in Outlook, you’ll have tasks in various levels of completion, tasks involving different people, tasks coming due sooner than others, and tasks associated with certain people. To help you see only certain types of tasks, such as tasks due in the next seven days, Outlook can show different views of your task list.
To change views of your list of tasks, follow these steps:
1. Click Tasks in the bottom-left corner of the Outlook window.
Outlook displays the Tasks view.
2. Click the Home tab.
3. Click the Change View icon in the Current View group.
Outlook displays a list of different ways to view your tasks (as shown in Figure 15-12).
4. Click on a view icon such as Next 7 Days or Overdue.
Outlook displays all your tasks that meet your chosen criteria.
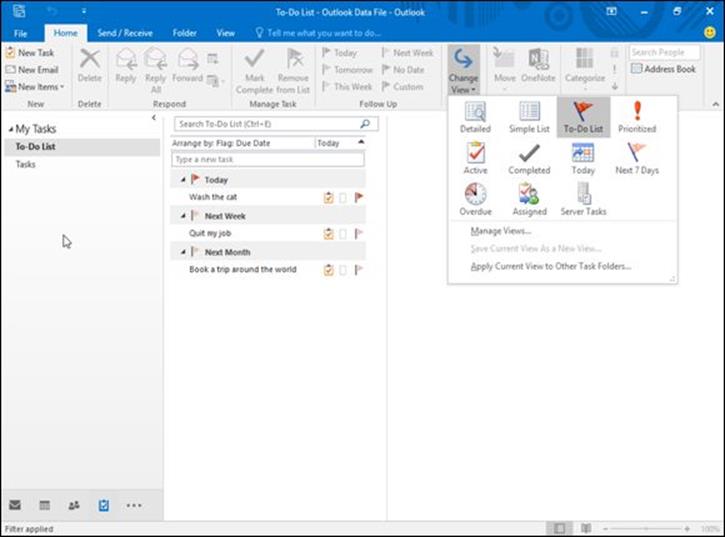
Figure 15-12: Outlook provides different ways to view your tasks.
All materials on the site are licensed Creative Commons Attribution-Sharealike 3.0 Unported CC BY-SA 3.0 & GNU Free Documentation License (GFDL)
If you are the copyright holder of any material contained on our site and intend to remove it, please contact our site administrator for approval.
© 2016-2026 All site design rights belong to S.Y.A.