Pro Office 365 Development, Second Edition (2014)
Chapter 10. Integrating Office 365 Technologies with REST APIs and MVC
Details are important. Background information is helpful. Visuals are nice. But as developers, we just want to learn by doing. In this chapter, we will build an ASP.NET MVC application that implements the Office 365 APIs.
The Plan
All good projects begin with a plan, or some problem to solve. For this project, we will create an application that simulates a Sales Lead Management system. The starting point will be Sales Lead e-mails, which would be generated from an external source. This could be directly from a website or from some internal system within a company. For our application, we will simply create them by hand and e-mail them to ourselves.
The application will present the e-mails to the user as a list of their sales leads. The user will be able to View their Leads, Assign Leads to another sales person, or Set an Appointment regarding the lead. As an addition to setting the appointment, the system will allow them to see the appointments already in their calendar.
Figure 10-1 illustrates the use cases for this system.
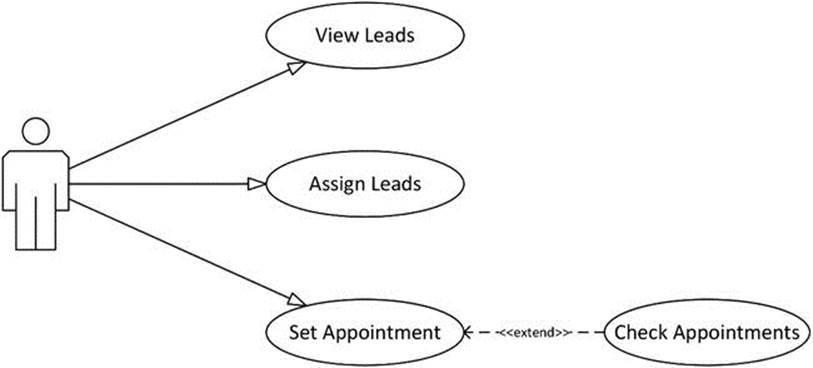
Figure 10-1. Sales Lead System use case diagram
The Setup
This application will simulate a sales lead system that integrates with other processes and workflows in an actual company. That being the case, this system depends on some external data. We will set up the data before building the application.
Products
If our system will process sales leads, we need something to sell. We will start by creating our own Subsite within Office 365 SharePoint. Then we will create a custom list of products.
1. First, create a new subsite from the Team Site in SharePoint Online. This is done by navigating to Site Contents from the Team Site, and clicking on New Subsite. The New Site form appears similar to Figure 10-2.
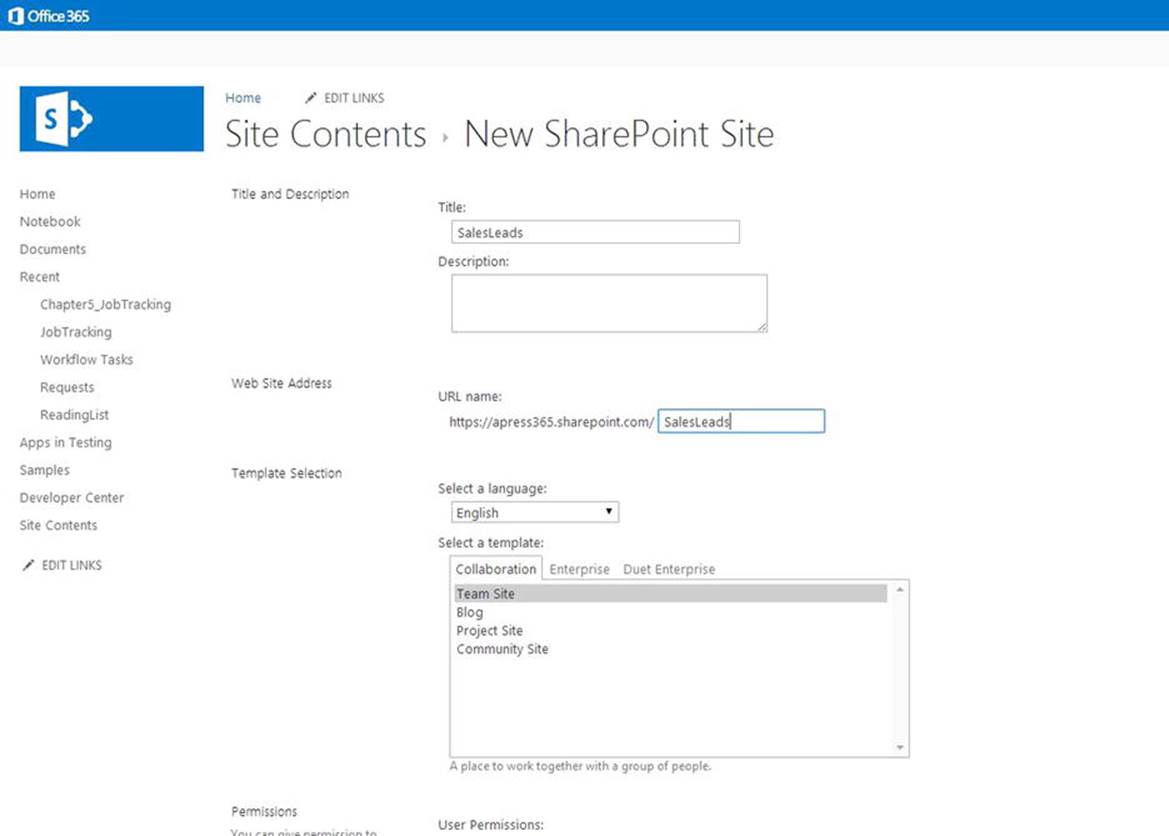
Figure 10-2. New SharePoint subsite form in Office 365
2. Use the form to create a new subsite. We will add the product list within this subsite.
![]() Note For this code in this example, the Web Site Address is expected to end with SalesLeads. If you use something different, you will need to remember to adjust your code accordingly.
Note For this code in this example, the Web Site Address is expected to end with SalesLeads. If you use something different, you will need to remember to adjust your code accordingly.
3. Navigate to the new subsite. Navigate to the Your Apps section and click on the Custom List. You should see a dialog similar to Figure 10-3.
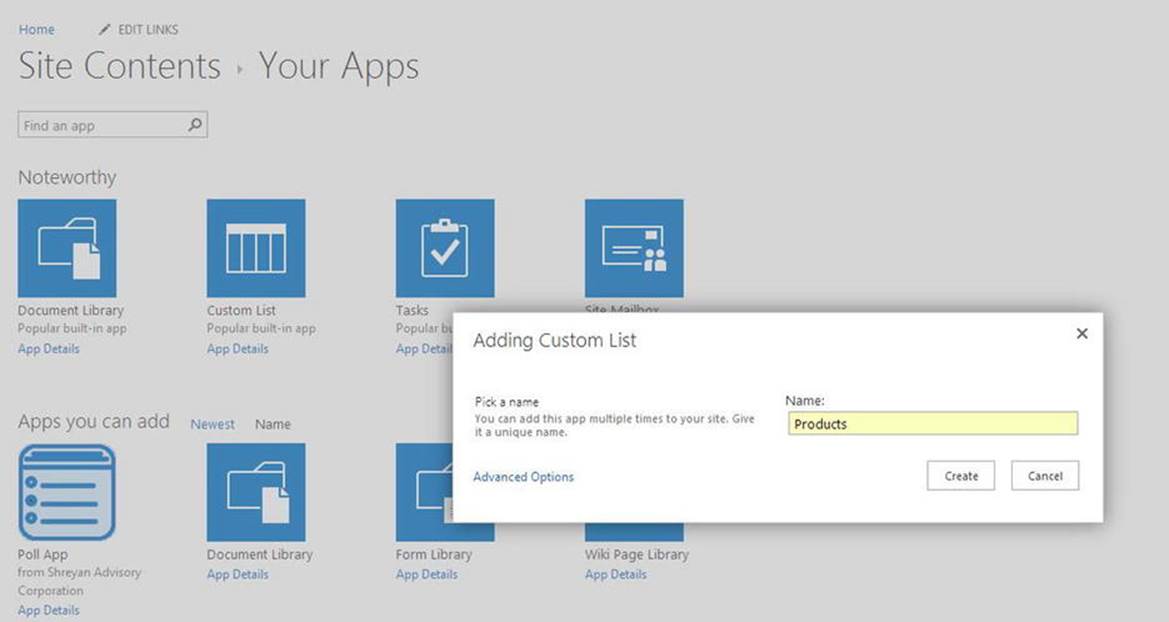
Figure 10-3. Adding Custom List in SharePoint Online
4. Add columns to the list.
5. Add items into the list. Your list should look similar to Figure 10-4.
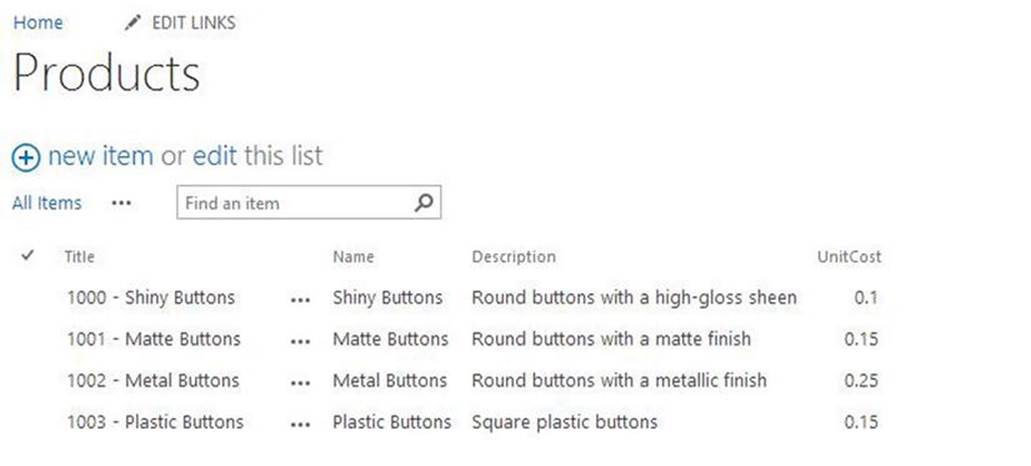
Figure 10-4. Product list items in SharePoint Online
![]() Note When accessing data from custom lists in SharePoint, the field names for the custom columns are internal values set by SharePoint. They are not the nice titles added when the column is created. For this chapter, we will only handle the Title column, and have structured the data accordingly. Other considerations and coding solutions would be implemented in an actual production environment.
Note When accessing data from custom lists in SharePoint, the field names for the custom columns are internal values set by SharePoint. They are not the nice titles added when the column is created. For this chapter, we will only handle the Title column, and have structured the data accordingly. Other considerations and coding solutions would be implemented in an actual production environment.
Sales Contacts
The Use Case diagram includes the ability to assign a lead to another sales person. For this functionality, we will use Contacts as the sales personnel. To assign a lead, the application will forward the e-mail to the Contact. To control the full cycle, we will create users in Office 365, so that we have Exchange Mailboxes. Then we will create Contacts within Outlook.
1. Navigate to your Office 365 Portal at https://portal.office.com.
2. Navigate to the users & groups section within the portal.
3. Create a couple of users to use as Sales Contacts. The New User form is shown in Figure 10-5.
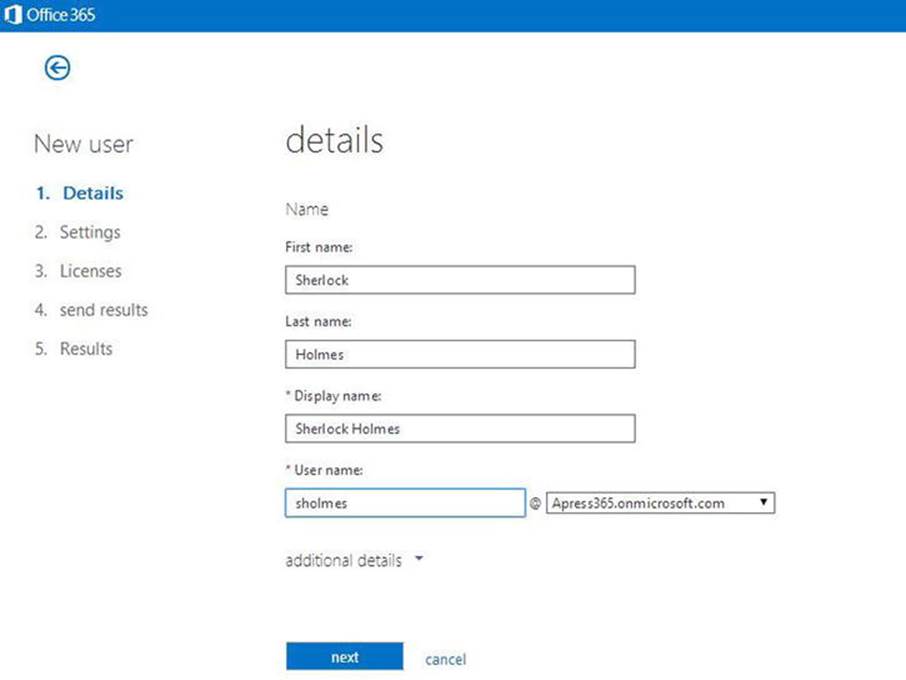
Figure 10-5. New User details form in Office 365
4. Navigate to Outlook Online.
![]() Note Ensure the same account used to set up the Contacts and E-mails (later in the chapter) is the same account used during application testing.
Note Ensure the same account used to set up the Contacts and E-mails (later in the chapter) is the same account used during application testing.
5. Navigate to the People section of Office 365.
6. Create a new Contact for each user that was created in the previous steps. The new Contact form is shown in Figure 10-6. Make sure to enter the Office 365 e-mail addresses.
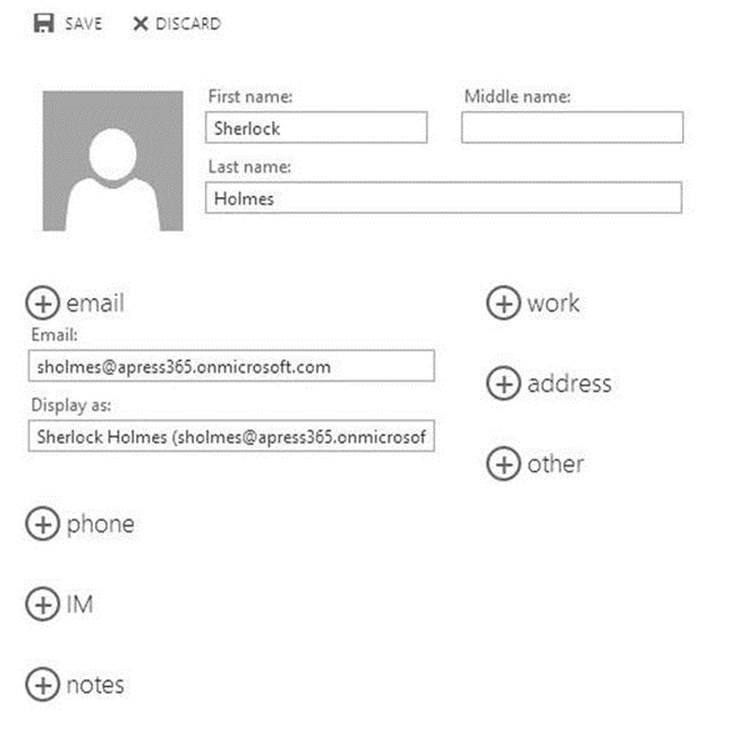
Figure 10-6. New Contact form in Office 365
Sales Leads
The application begins with the Sales Leads, which are specialized e-mails. To create the lead data, you will send these specialized e-mails to your Office 365 email. For this application, you can send these e-mails from any mailbox you choose.
The primary concern for this application is the Subject line. This application expects the subject line to include the SKU of the product for the potential customer. This information is expected to come in the format of “[SKU:####]”. For the sales lead e-mails, make sure the subject includes that phrase with a SKU from the Products list. The rest of the e-mail is displayed, but is not expected in any specific format. Figure 10-7 displays a possible example.
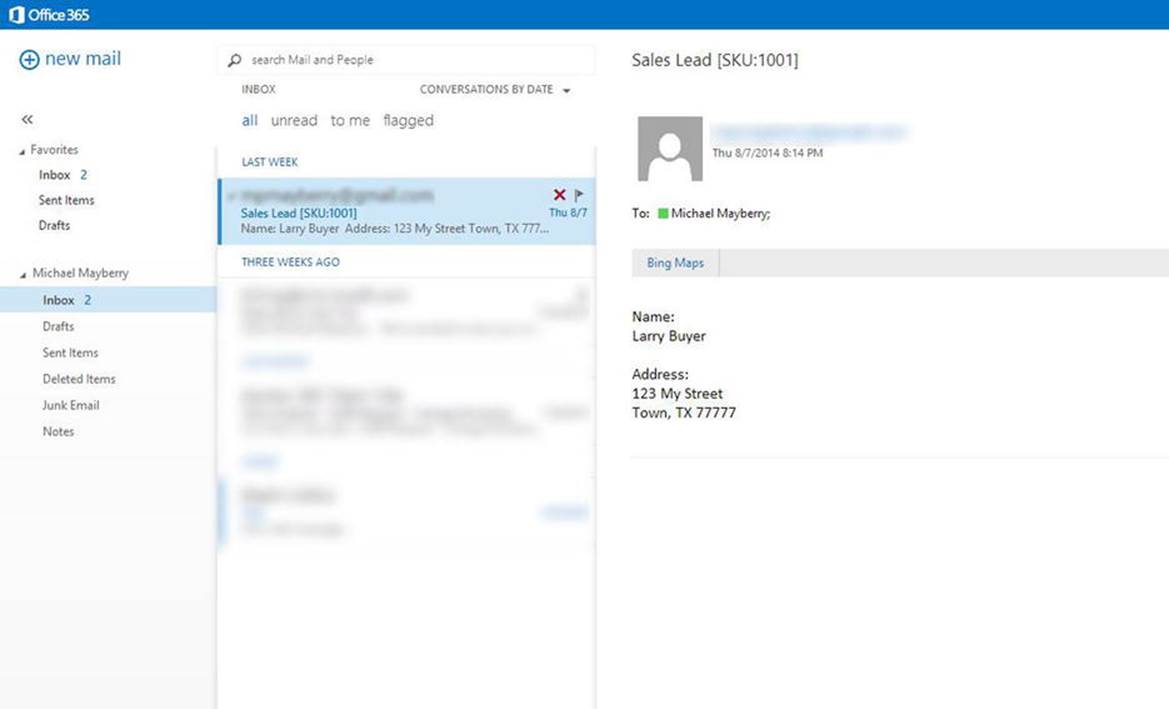
Figure 10-7. Sales Lead email in Outlook Online
The Sales Lead MVC Application
Now we will create the Sales Lead application using ASP.NET MVC. This application requires the Visual Studio Office 365 API Tools. Ensure this extension is installed. Installation of these tools is covered in Chapter 8.
Create a New ASP.NET MVC Application
We will begin by creating the new project and setup authentication with Office 365.
1. Create a new ASP.NET MVC Application named SalesLeadMVC, as shown in Figure 10-8.
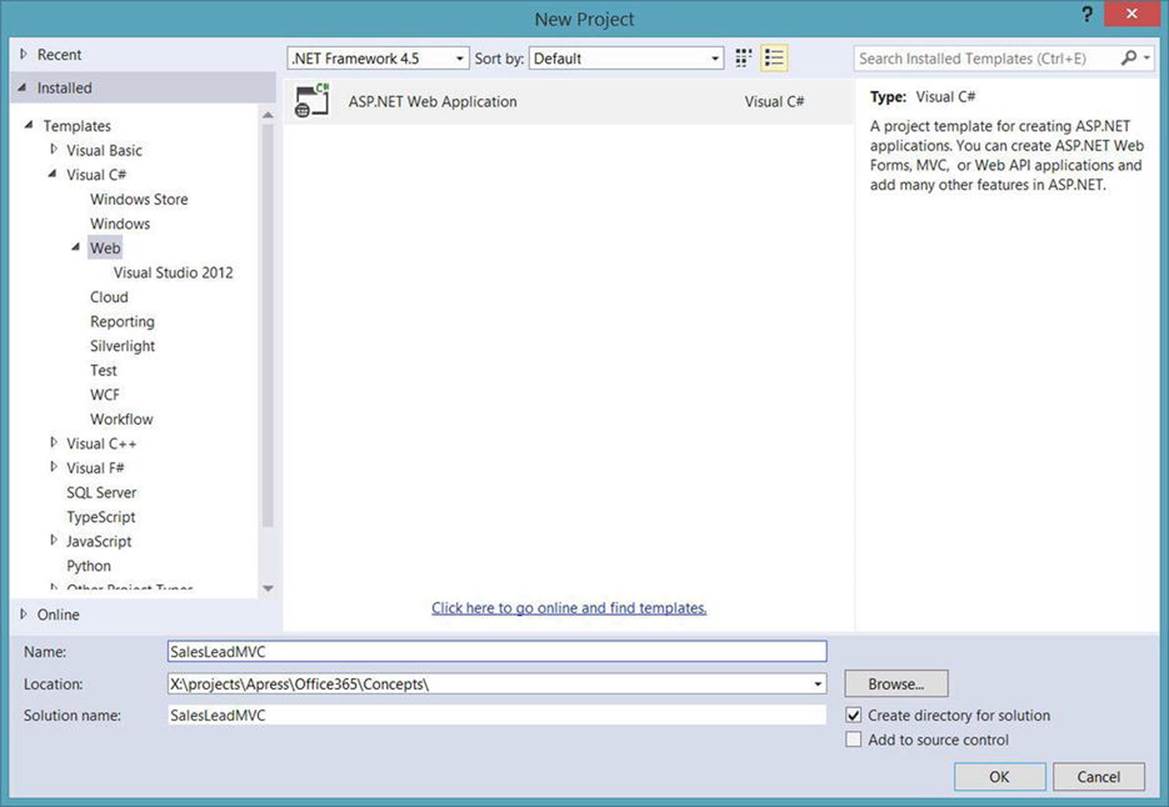
Figure 10-8. New ASP.NET MVC Application in Visual Studio 2013
2. Choose the MVC template and core references, as shown in Figure 10-9.
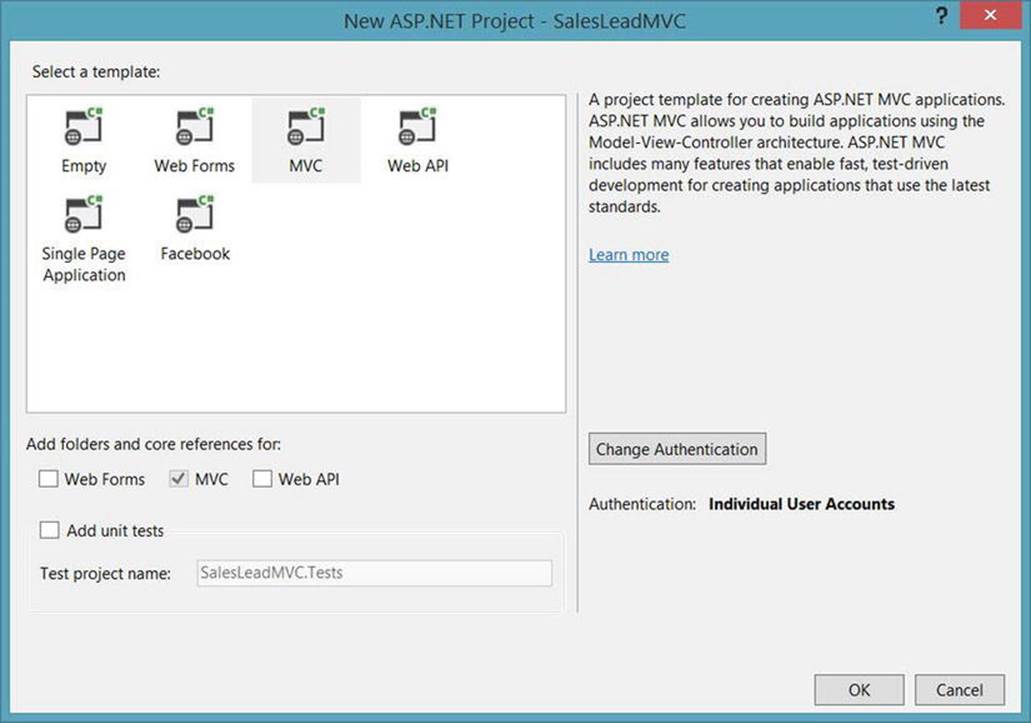
Figure 10-9. MVC template in Visual Studio 2013
3. This application will use Office 365 Authentication. To configure this, click the Change Authentication button. Enter your Office 365 domain and select the “Single Sign On, Read directory data” option for the Access Level. Your screen should appear similar to Figure 10-10.
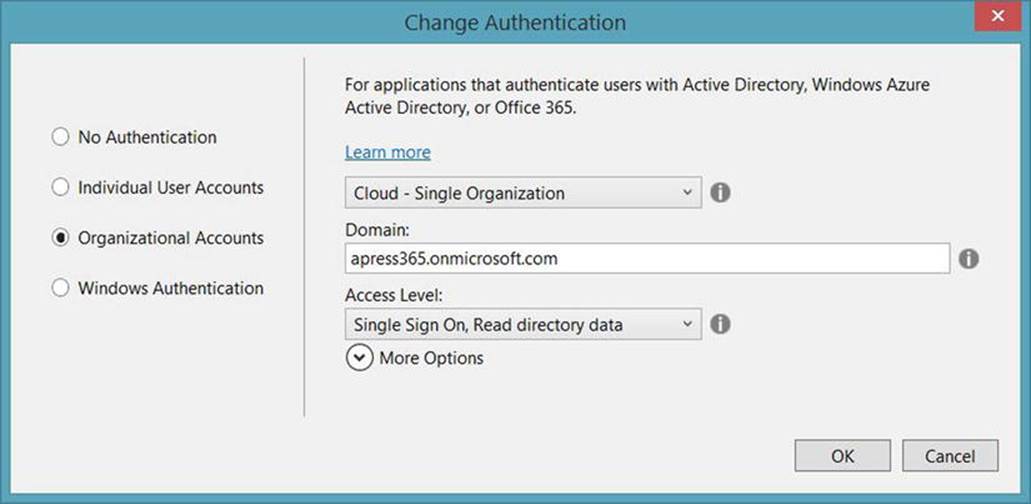
Figure 10-10. Configure Office 365 Authentication for ASP.NET MVC project
4. You will be prompted to enter your Office 365 credentials, as shown in Figure 10-11.
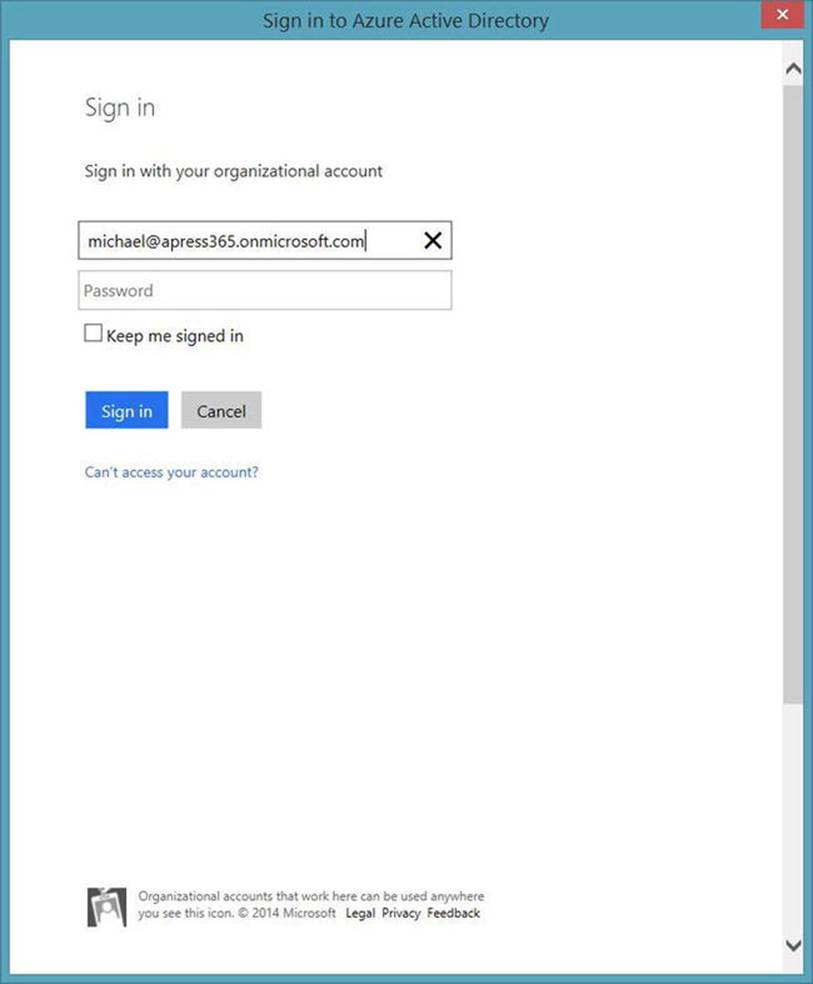
Figure 10-11. Office 365 Sign in for authentication configuration
5. If everything is done correctly, the screen should reflect the authentication settings, as seen in Figure 10-12.
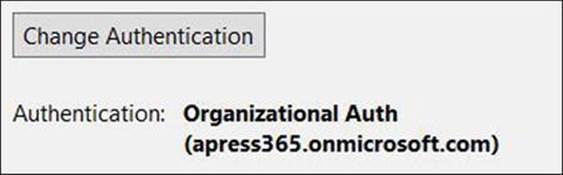
Figure 10-12. Authentication settings once configured for Office 365
6. Click OK. Visual Studio will create the solution and project files.
![]() Note The project needs to be configured to use Office 365 services. Office 365 also requires registration of every application. This can be done manually. However, the preferred method, and much easier method, is to use the Visual Studio Office 365 API Tools.
Note The project needs to be configured to use Office 365 services. Office 365 also requires registration of every application. This can be done manually. However, the preferred method, and much easier method, is to use the Visual Studio Office 365 API Tools.
7. Navigate to the Services Manager to configure the Office 365 services and register the application within Azure AD. This is done through the Add Connected Services option under the Project menu, as shown in Figure 10-13.
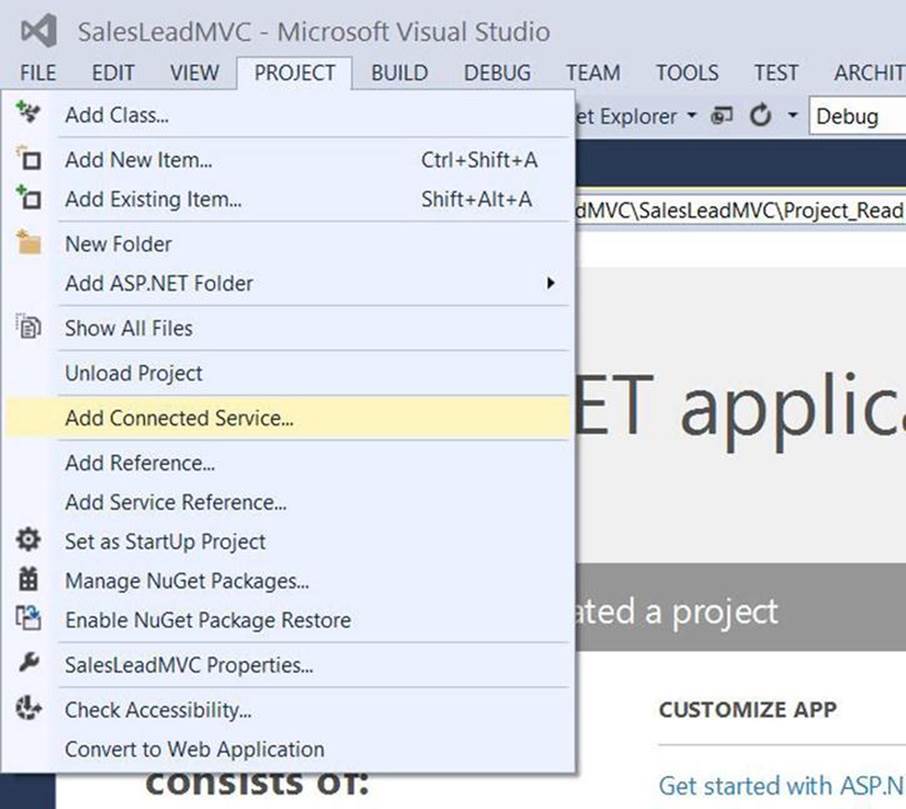
Figure 10-13. Services Manager in Visual Studio 2013
8. You may need to sign in at this point. If so, click the sign in link and provide your Office 365 credentials.
Once authenticated, Visual Studio will register the application. As part of the registration process, the redirect URLs are added within the configuration information. The ASP.NET MVC application has been created with two local URLs. One for HTTP and one for HTTPS. The HTTPS local URL is automatically added as a redirect URL in the application registration. Visual Studio will then display a prompt before it adds the HTTP URL. This prompt appears similar to Figure 10-14.
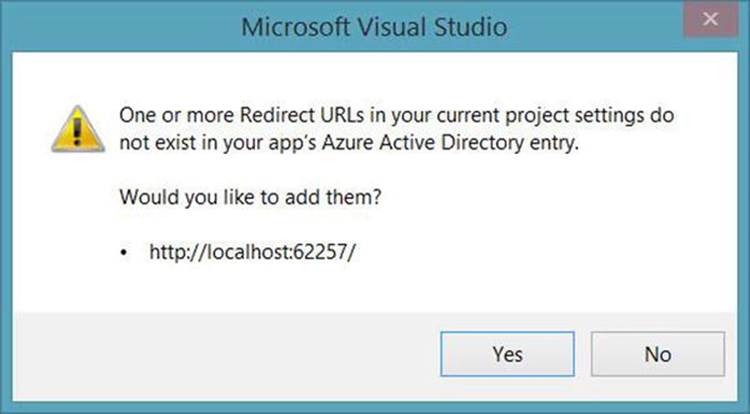
Figure 10-14. Prompt for URL configuration during application registration
9. Click “No”.
WHY CLICK “NO”?
Navigating into the Azure Portal can confirm how this application is being configured. Visit https://manage.windowsazure.com and navigate to your Office 365 configuration. Navigate to the Applications page. It should include the SalesLeadMVC application, as shown in Figure 10-15.
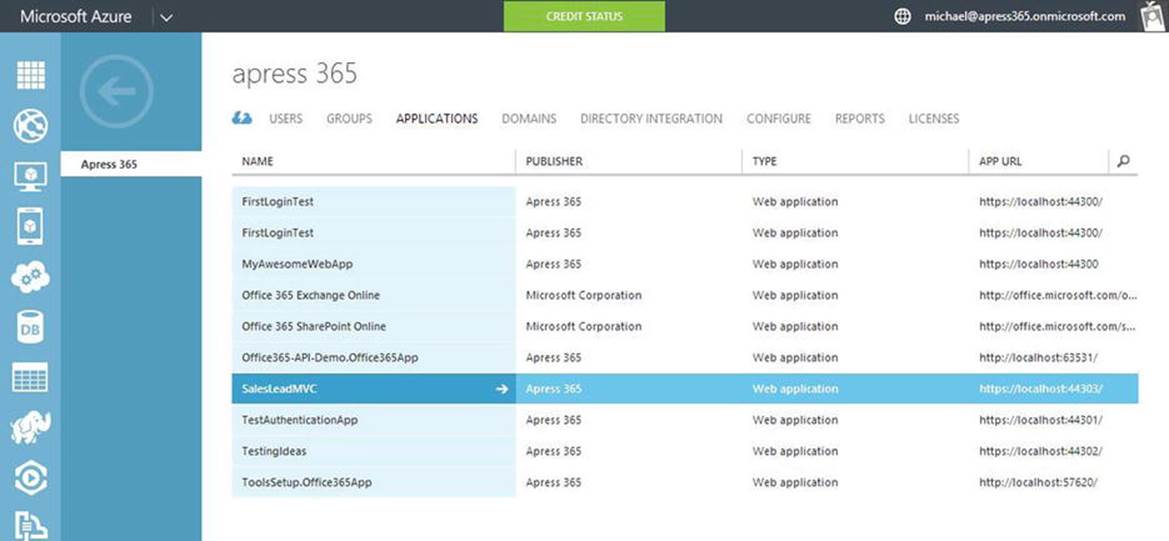
Figure 10-15. Azure Application configuration and registration
Select the SalesLeadMVC application and navigate to the Configuration page. Find the “single sign-on” section. The local HTTPS URL should already be listed, similar to Figure 10-16.
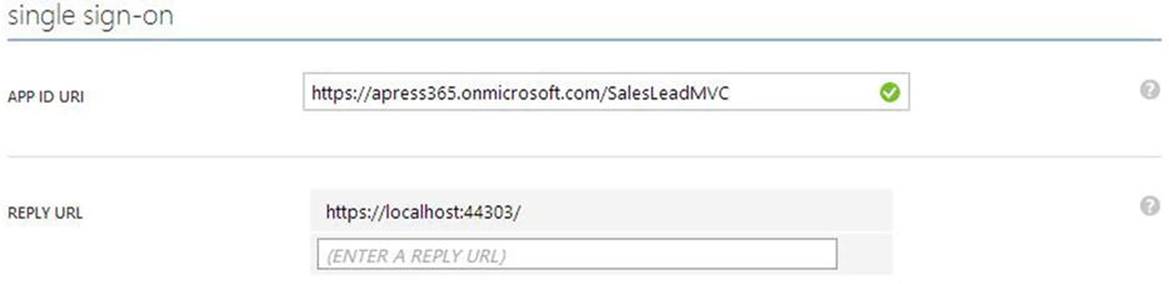
Figure 10-16. Single sign-on configuration for Office 365 applications
If the local HTTP URL is also registered, then Azure will/may use the non-SSL URL to redirect traffic during the authentication process. However, this causes an error as SSL is required for the process. Therefore, in the prompt shown in Figure 10-14, click No.
After the services have been accessed and the application registered, Visual Studio will add necessary reference libraries. The installation process also adds sample code to help demonstrate how to use the client libraries for Office 365. Figure 10-17 shows how the solution should look once configuration is complete.
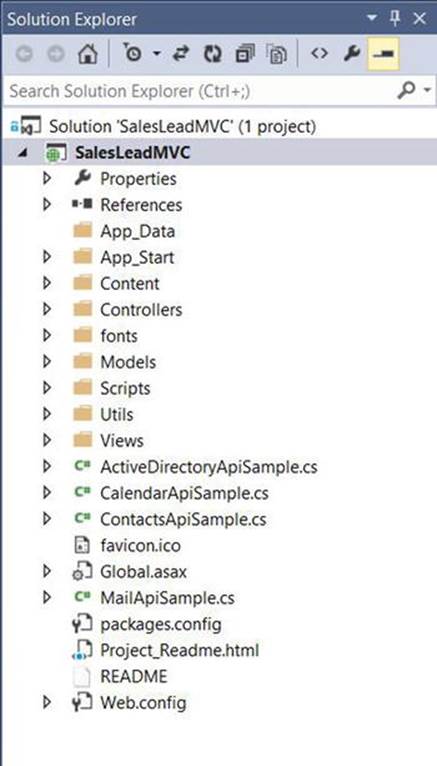
Figure 10-17. Solution Explorer with sample code files added after Office 365 configuration
Build MVC Application using Office 365 APIs
Now the project is ready to add code. The following steps will integrate Office 365 services into the MVC application. We will use the client libraries as well as access the Office 365 REST APIs directly.
10.Begin with adding the SalesLeadController. Right click the Controllers folder, click Add and choose the Controller option, as shown in Figure 10-18.
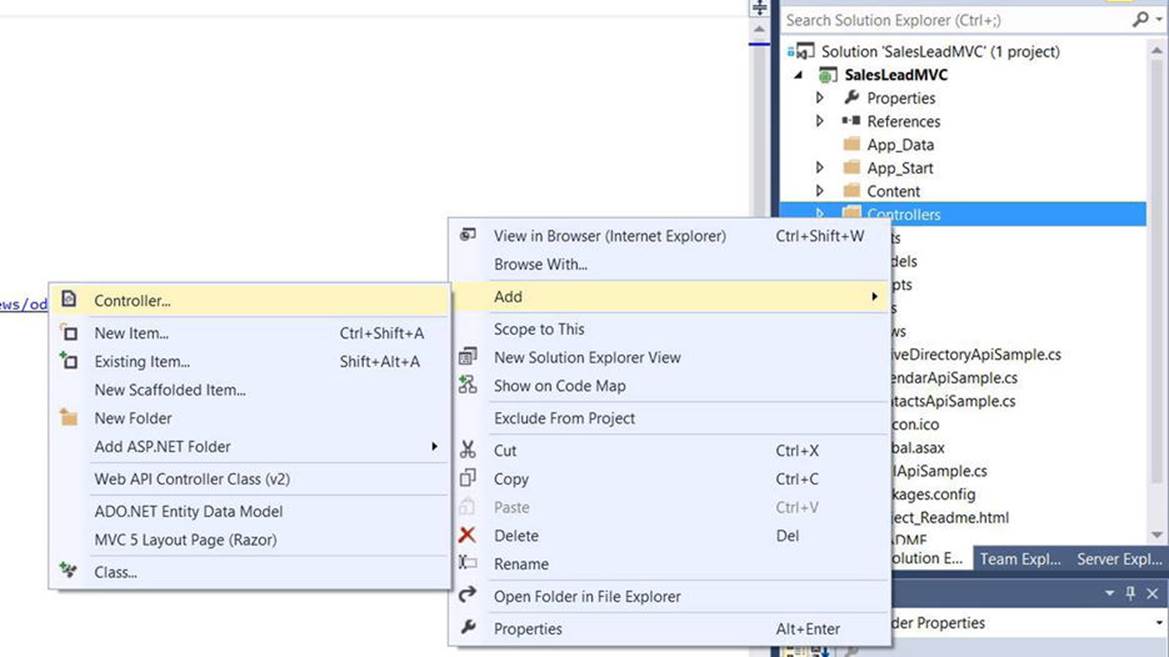
Figure 10-18. Add new Controller to MVC application
11.In the Add Controller prompt, type “SalesLeadController” as the controller name. Your screen should appear similar to Figure 10-19.
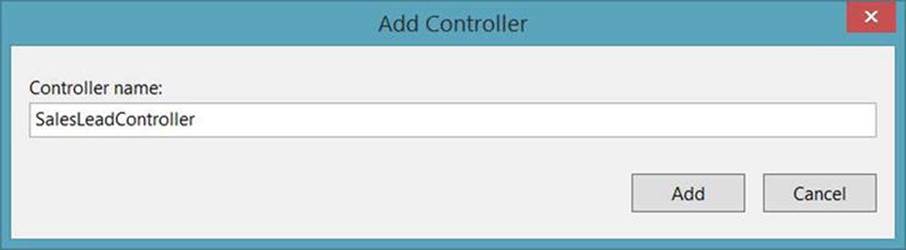
Figure 10-19. Add SalesLeadController
12.We will use a ModelView class in the controller, so we will add that now. Right click the Models folder, click Add and choose Class, as shown in Figure 10-20.
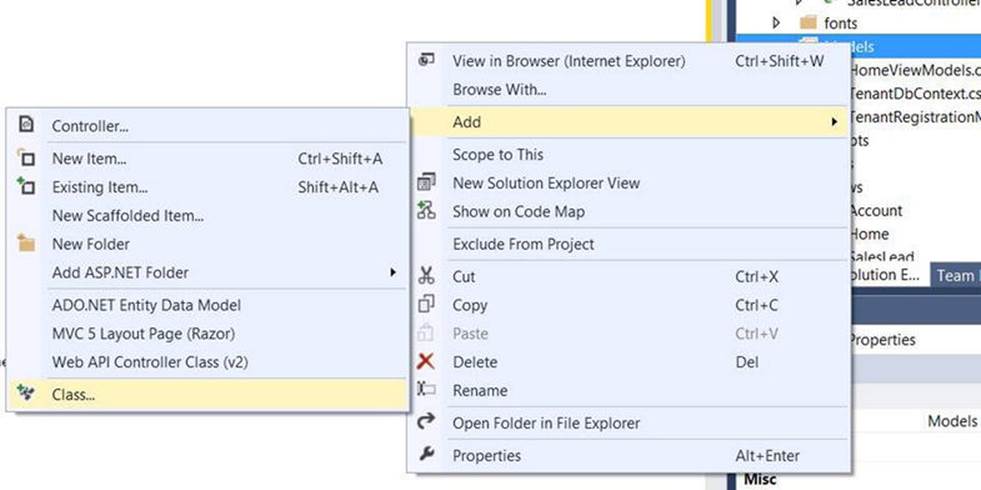
Figure 10-20. Add Class to Models folder in MVC application
13.In the Add New Item dialog, ensure Class is chosen and type in “LeadContactViewModel” in the Name field, as shown in Figure 10-21.
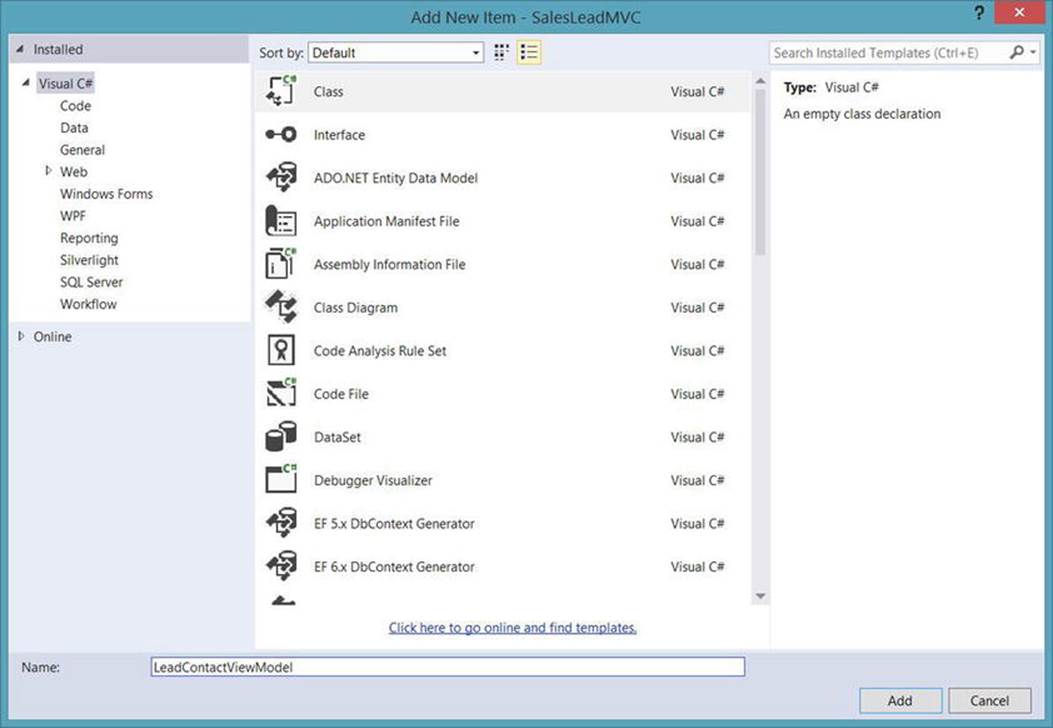
Figure 10-21. Add LeadContactViewModel to MVC application
14.Enter the code from Listing 10-1 as the LeadContactViewModel class.
Listing 10-1. LeadContactViewModel Class
public class LeadContactViewModel
{
public LeadContactViewModel()
{
leads = new List<LeadInfo>();
salesStaff = new List<SalesPerson>();
}
public List<LeadInfo> leads { get; set; }
public List<SalesPerson> salesStaff { get; set; }
public string selectedLeadID { get; set; }
public string selectedSalesStaffID { get; set; }
}
15.The LeadContactViewModel class uses a couple of other custom classes, namely LeadInfo, SalesPerson, and Product. The code for these classes can be found in Listing 10-2. Add this code to the LeadContactViewModel.cs file.
Listing 10-2. Custom Classes LeadInfo, SalesPerson, and Product
public class LeadInfo
{
public string ID { get; set; }
public string sku { get; set; }
public string email { get; set; }
public string message { get; set; }
public DateTime dateReceived { get; set; }
public string productRequest { get; set; }
}
public class SalesPerson
{
public string ID { get; set; }
public string name { get; set; }
public string email { get; set; }
}
public class Product
{
public string Title { get; set; }
}
![]() Note For this demo application, the code for these custom classes is simply added to the same file as the ViewModel. These classes are only used by the ViewModel, so it works nicely.
Note For this demo application, the code for these custom classes is simply added to the same file as the ViewModel. These classes are only used by the ViewModel, so it works nicely.
16.Now we will build the SalesLeadController. To begin, add the constant values from Listing 10-3 to the beginning of the Controller class. The values of the Resource ID and Service Root URIs are found in the sample code that is generated in Visual Studio Office 365 Tools.
Listing 10-3. SalesLeadController Constants for Office 365 Services
const string ExchangeResourceId = "https://outlook.office365.com";
const string ExchangeServiceRoot = "https://outlook.office365.com/ews/odata";
const string SharePointResourceId = "https://apress365.sharepoint.com";
const string SharePointServiceRoot = "https://apress365.sharepoint.com/_api";
17.Add a method for creating an ExchangeClient to access the Exchange Services through the client library. The GetExchangeClient() method is in Listing 10-4.
Listing 10-4. GetExchangeClient() Method
private async Task<ExchangeClient> GetExchangeClient()
{
Authenticator authenticator = new Authenticator();
var authInfo = await authenticator.AuthenticateAsync(ExchangeResourceId);
return new ExchangeClient(new Uri(ExchangeServiceRoot), authInfo.GetAccessToken);
}
![]() Note The code in this chapter relies on multiple Namespaces added to the Controller. When a class is referenced in the code, but the Namespace is not found, Visual Studio will indicate the code. The Namespace can be resolved by either right clicking on the class name and clicking Resolve, or moving the cursor to the class name and using the Ctrl + “.” shortcut key. Either method will add the proper using statement to the class file.
Note The code in this chapter relies on multiple Namespaces added to the Controller. When a class is referenced in the code, but the Namespace is not found, Visual Studio will indicate the code. The Namespace can be resolved by either right clicking on the class name and clicking Resolve, or moving the cursor to the class name and using the Ctrl + “.” shortcut key. Either method will add the proper using statement to the class file.
This method is essentially copied from the sample files installed by the Visual Studio Office 365 API Tools. This code handles authentication and returns an ExchangeClient for accessing the Office 365 services for Mail and Contacts.
Now we will move to build the first controller action for returning data from the Office 365 APIs. We will begin with the SaleLeadController.Index() action. This method accesses the Exchange service to query the user’s inbox for any Sales Lead e-mails. Since the lead e-mail only includes the SKU of the product, the action also accesses the SharePoint service to query the product information from the custom list we setup. The resulting page will also present the option for assigning a lead to another sales person. This option requires a list of Contracts. The action method queries the Exchange service for the list of Contracts.
18.Add the Index() Controller Action. The code for this method is in Listing 10-5.
Listing 10-5. Index() Action for the SalesLeadController
//
// GET: /SalesLead/
public async Task<ActionResult> Index()
{
LeadContactViewModel vm = new LeadContactViewModel();
var client = await GetExchangeClient();
var messageResults = await (from i in client.Me.Inbox.Messages
where i.Subject.Contains("[SKU:")
orderby i.DateTimeSent descending
select i).ExecuteAsync();
foreach (var message in messageResults.CurrentPage)
{
LeadInfo newContact = new LeadInfo();
newContact.ID = message.Id;
newContact.email = message.From.Address;
newContact.message = message.BodyPreview;
newContact.dateReceived = message.DateTimeReceived.Value.DateTime;
//look up product from SKU
var beginPos = message.Subject.IndexOf("[", 0) + 1;
var endPos = message.Subject.IndexOf("]", beginPos);
string skuLine = message.Subject.Substring(beginPos, endPos - beginPos);
List<Product> products = await GetProducts();
var product = products.Where(p => p.Title.Contains(skuLine.Split(':')[1])).SingleOrDefault();
newContact.productRequest = product.Title;
vm.leads.Add(newContact);
}
//get the sales staff from outlook
var contactsResults = await (from i in client.Me.Contacts
orderby i.DisplayName
select i).ExecuteAsync();
foreach (var contact in contactsResults.CurrentPage)
{
SalesPerson person = new SalesPerson();
person.ID = contact.Id;
person.name = contact.DisplayName;
person.email = contact.EmailAddress1;
vm.salesStaff.Add(person);
}
return View(vm);
}
HOW THE CODE WORKS
The first thing to notice is that the action is an async method and returns a Task<ActionResult>. The method needs to handle asynchronous calls to the Office 365 services, so it will need to be asynchronous itself.
Once the ExchangeClient is created through our private method, the Inbox is queried for Sales Lead e-mails, using the following code:
var messageResults = await (from i in client.Me.Inbox.Messages
where i.Subject.Contains("[SKU:")
orderby i.DateTimeSent descending
select i).ExecuteAsync();
This code uses LINQ to query the Inbox.Messages collection, looking for any item with the phrase “[SKU:” in the subject. The ExchangeClient object handles the request anc creates all of the necessary HTTPS traffic for sending the request to the Office 365 services and receiving the data back. As the developer, this “plumbing” is hidden. Querying the Office 365 Inbox follows the same methodology as querying any other data source. This allows for rapid development and ease of maintenance. Although, this also requires a dependency on the functionality of the client libraries. This is a factor we will address later in this chapter.
The method then loops through the results to populate new LeadInfo objects for display on the screen. The data from the Message items are simply copied into the LeadInfo objects.
The subject line contains the SKU. This value is used to get the product information from the custom list in the SharePoint site. This is done through the following code section:
//look up product from SKU
var beginPos = message.Subject.IndexOf("[", 0) + 1;
var endPos = message.Subject.IndexOf("]", beginPos);
string skuLine = message.Subject.Substring(beginPos, endPos - beginPos);
List<Product> products = await GetProducts();
var product = products.Where(p => p.Title.Contains(skuLine.Split(':')[1])).SingleOrDefault();
newContact.productRequest = product.Title;
First, the SKU value is parsed from the subject line. The full list of products is queried from SharePoint through the private GetProducts() method. The code for the GetProducts() method is in Listing 10-5, found later in this chapter. Then the products are queried for any item that has the SKU value as part of the title. The found product item is then used to populate the productRequest property on the ClientInfo object.
![]() Note When the custom list was created, the formula of <SKU>-<Name> was used for the Title field. Since the Title field is the only field returned with a known property name, this was chosen to make searching for a specific product easier.
Note When the custom list was created, the formula of <SKU>-<Name> was used for the Title field. Since the Title field is the only field returned with a known property name, this was chosen to make searching for a specific product easier.
The ClientInfo item is then added to the collection property of the ViewModel object.
The next section of code queries the ExchangeClient. This time, a list of Contacts is returned.
//get the sales staff from outlook
var contactsResults = await (from i in client.Me.Contacts
orderby i.DisplayName
select i).ExecuteAsync();
Again, LINQ is used to query the Clients collection and return the items. The list of Contacts is used to populate the salesStaff collection property of the ViewModel.
The ViewModel is then passed to the View for display.
The GetProducts() method, used to query the SharePoint services, needs to be added to the Controller.
19.Add the code from Listing 10-6 to the Controller class.
Listing 10-6. GetProducts() Private Method for Querying SharePoint Custom List
private async Task<List<Product>>GetProducts()
{
//get authorization token
Authenticator authenticator = new Authenticator();
var authInfo = await authenticator.AuthenticateAsync(SharePointResourceId);
HttpClient httpClient = new HttpClient();
httpClient.BaseAddress = new Uri(SharePointResourceId);
httpClient.DefaultRequestHeaders.Authorization = new AuthenticationHeaderValue("Bearer", await authInfo.GetAccessToken());
httpClient.DefaultRequestHeaders.Add("Accept", "application/json;odata=nometadata");
var listResponse = httpClient.GetAsync("/SalesLeads/_api/web/lists/getbytitle('Products')/items").Result;
var responseContent = await listResponse.Content.ReadAsStringAsync();
var json = JObject.Parse(responseContent);
List<Product> products = json["value"].ToObject<List<Product>>();
return products;
}
HOW THE CODE WORKS
So far, the code has only used the Office 365 client libraries for accessing the online services. This method needs to access SharePoint lists, which is not currently available through the client libraries. In fact, this functionality is not yet available through the Office 365 APIs. However, there are SharePoint APIs we can use. Thankfully, authentication is the same for both, so we can still use the client libraries to make authentication easier.
To access the SharePoint REST APIs, we use the HttpClient object. We start with authorization. We copy the code from the sample files for authentication. This will get us an access token. Once we create the HttpClient object, we have to add this access token to the Headers, using the following line:
httpClient.DefaultRequestHeaders.Authorization = new AuthenticationHeaderValue("Bearer", await authInfo.GetAccessToken());
For processing, we want to ensure the data is returned in JSON. We also do not need the extra OData metadata included, so we use the following code to add the “Accept” header and control the data type returned from the service:
httpClient.DefaultRequestHeaders.Add("Accept", "application/json;odata=nometadata");
Now the request is ready. The API for the ListItems is a GET method. We will use the GetByTitle API to access the list, and the items endpoint to return the data elements. This is achieved in the following line:
var listResponse = httpClient.GetAsync("/SalesLeads/_api/web/lists/getbytitle('Products')/items").Result;
The rest of the code receives the JSON response and parses the data into the proper object for processing in the Action method. The list of products is returned.
The Controller Action code is complete, but the View is not available. Now we are ready to add the View.
20.Right click the method name (Index) and click on Add View. In the Add View dialog, set the View Name to Index, the Template to Empty and select the LeadContactViewModel as the Model class. Leave the other default options. When your screen appears similar toFigure 10-22, click Add.
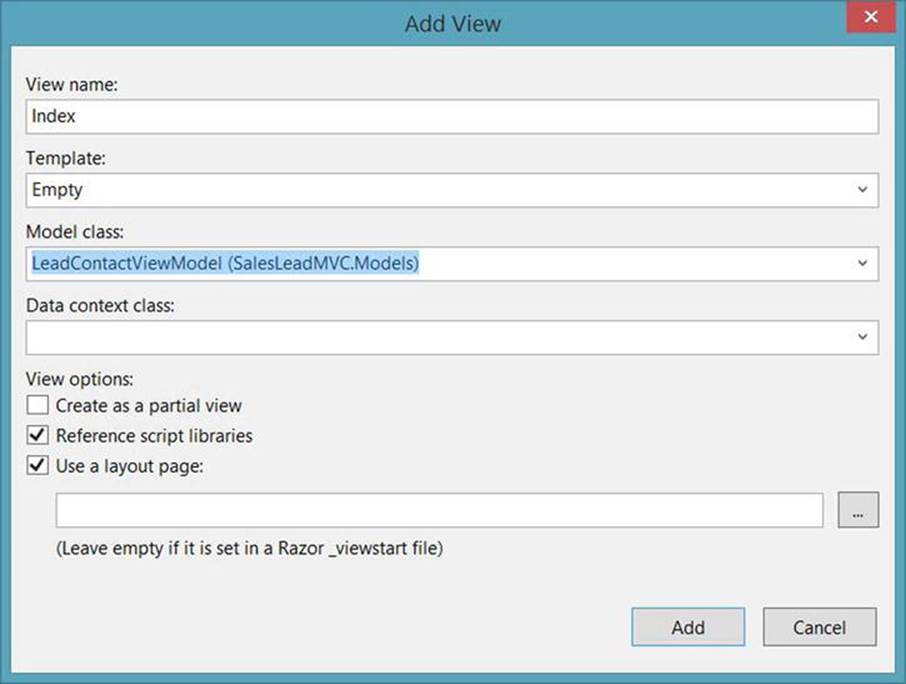
Figure 10-22. Add SalesLead.Index View to MVC application
21.Once the file has been created, use the code from Listing 10-7 to complete the View.
Listing 10-7. Index() View for SalesLead Controller
@model SalesLeadMVC.Models.LeadContactViewModel
<h2>Leads</h2>
@using (Html.BeginForm("Index"))
{
<table width="800">
<thead>
<tr>
<th>Select Lead</th>
<th>
Lead Information
</th>
<th>
Date Received
</th>
<th>
Product Request
</th>
<th></th>
</tr>
</thead>
@foreach (SalesLeadMVC.Models.LeadInfo lead in Model.leads)
{
<tr>
<td style="vertical-align:middle;">
<input type="radio" id="selectedLeadID" name="selectedLeadID" value="@lead.ID" />
</td>
<td style="white-space: pre-line;">
@lead.message
</td>
<td>
@lead.dateReceived
</td>
<td>
@lead.productRequest
</td>
<td>@Html.ActionLink("Set Appointment", "LeadAppointment", new { leadID = lead.ID })</td>
</tr>
}
</table>
<fieldset>
<legend>Assign Lead</legend>
<label>Sales Person:</label>
@Html.DropDownListFor(x => x.selectedSalesStaffID, new SelectList(Model.salesStaff, "ID", "name"), "Select a Contact")
<label></label>
<input type="submit" value="Submit" />
</fieldset>
}
This View is simple MVC razor syntax for creating the Sales Lead page. A table is created for the lead information. The page loops through the leads property of the Model class to build the rows of the table. The final column contains an ActionLink to the LeadAppointment Action, which we will set up later in this chapter.
A form is set up to allow the user to reassign the lead to another sales person. The salesStaff collection property of the Model class is used to populate a drop list control. A radio button in each row allows the user to select a lead. They can then choose a Contact from the drop list. The Submit button then posts the form to the SalesLead Controller.
The Controller and View are ready. Now we simply need a way to call the Action. For this application, we will simply add a menu item to access this page.
22.Add the code below to the Views\Shared\_Layout.cshtml file, just after the other menu items.
<li>@Html.ActionLink("Sales Leads", "Index", "SalesLead")</li>
The necessary action methods for the links and submit button are not available yet. Clicking on those items will result in errors. Knowing this, run the application to view the Sales Leads page.
The first thing you will encounter is the Office 365 authentication process, which results in a Sign In screen hosted from Microsoft. As long as everything builds properly, your screen should appear similar to Figure 10-23.
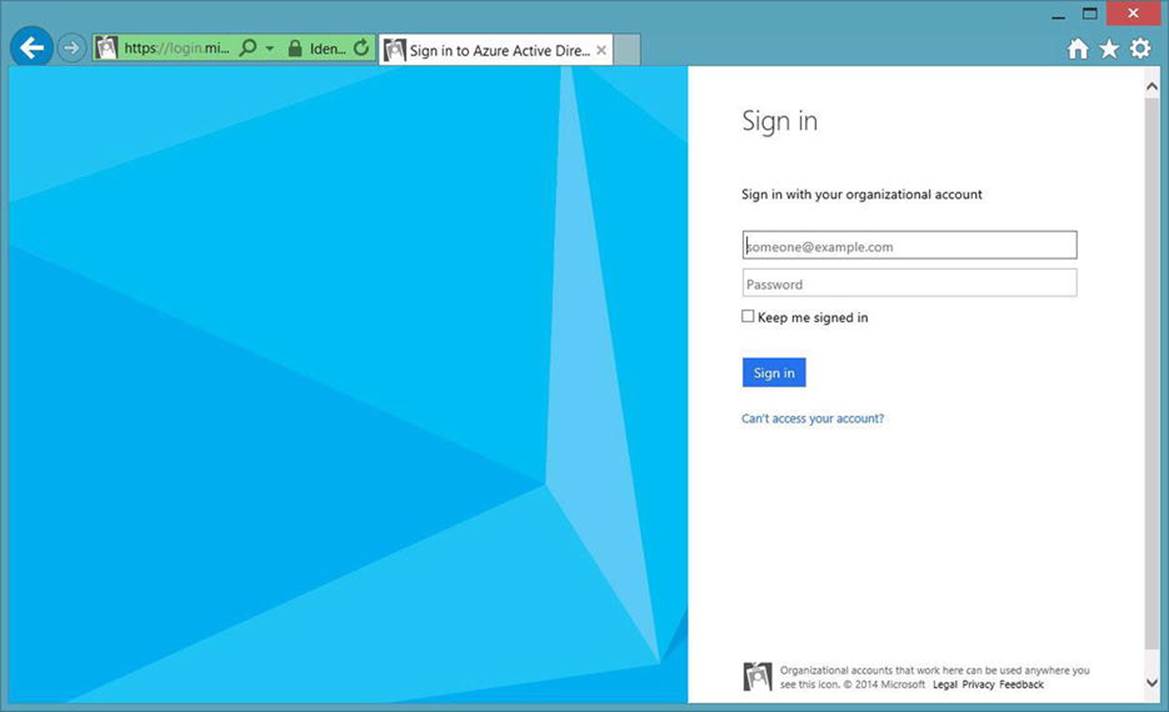
Figure 10-23. Office 365 Sign In
23.Enter your Office 365 credentials and click Sign in. This should redirect you back to your localhost URL and display your application in the browser. You should see something similar to Figure 10-24.
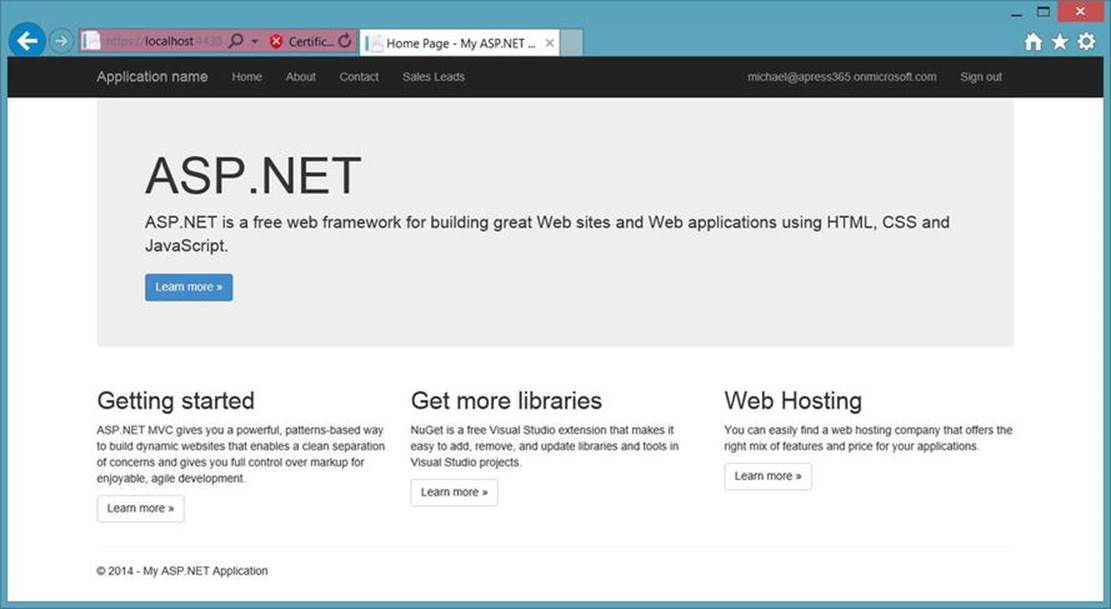
Figure 10-24. First Run of Sales Lead Application
24.You should notice your login information on the top right side of the menu bar. Also, you should have a Sales Leads link in the menu. Click the Sales Leads link. You should then view a page similar to Figure 10-25.
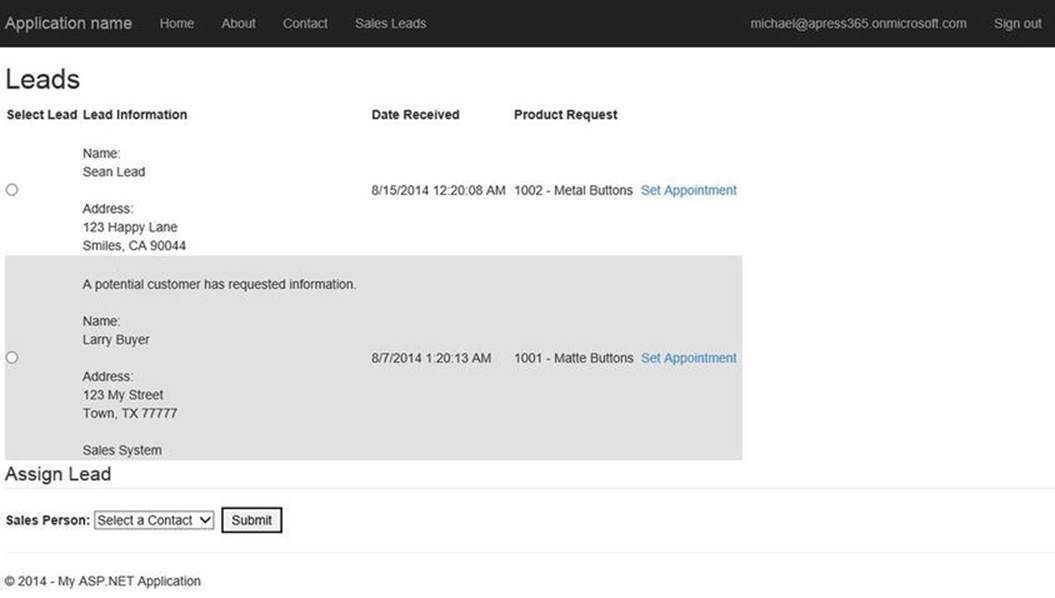
Figure 10-25. Sales Leads Page Displaying Office 365 Data
25.Confirm the list of leads is the e-mails you sent into your Office 365 mailbox. Confirm the drop list contains the Contacts you created in Office 365.
26.Return to Visual Studio to continue building the rest of the application. Begin with adding the POST method to accept the submit from the Sales Lead page. This method will forward the message to the chosen Contact and remove the message from the current Inbox. This code is in Listing 10-8
Listing 10-8. HttpPost Index() Action
[HttpPost]
public async Task<ActionResult> Index(LeadContactViewModel vm)
{
var client = await GetExchangeClient();
var contactResults = await (from i in client.Me.Contacts
select i).ExecuteAsync();
var contact = contactResults.CurrentPage.Where(c => c.Id == vm.selectedSalesStaffID).SingleOrDefault();
//USE HTTPCLIENT
//get authorization token
Authenticator authenticator = new Authenticator();
var authInfo = await authenticator.AuthenticateAsync(ExchangeResourceId);
//send request through HttpClient
HttpClient httpClient = new HttpClient();
httpClient.BaseAddress = new Uri(ExchangeResourceId);
//add authorization header
httpClient.DefaultRequestHeaders.Authorization = new AuthenticationHeaderValue("Bearer", await authInfo.GetAccessToken());
//prepare POST content for forward request
ForwardMessage forwardContent = new Models.ForwardMessage();
forwardContent.Comment = "This lead has been reassigned to you";
forwardContent.ToRecipients.Add(new Recipient() { Address = contact.EmailAddress1, Name = contact.DisplayName });
//convert POST content to JSON
StringContent postContent = new StringContent(JsonConvert.SerializeObject(forwardContent));
postContent.Headers.ContentType = new MediaTypeHeaderValue("application/json");
//send forward request
var forwardResponse = httpClient.PostAsync("/ews/odata/Me/Inbox/Messages('" + vm.selectedLeadID + "')/Forward", postContent).Result;
//delete message to remove from INBOX/Lead List
//send delete request
var deleteResponse = httpClient.DeleteAsync("/ews/odata/Me/Inbox/Messages('" + vm.selectedLeadID + "')").Result;
//refresh leads
vm.leads.Clear();
var messageResults = await (from i in client.Me.Inbox.Messages
where i.Subject.Contains("[SKU:")
orderby i.DateTimeSent descending
select i).ExecuteAsync();
foreach (var message in messageResults.CurrentPage)
{
LeadInfo newContact = new LeadInfo();
newContact.ID = message.Id;
newContact.email = message.From.Address;
newContact.message = message.BodyPreview;
newContact.dateReceived = message.DateTimeReceived.Value.DateTime;
vm.leads.Add(newContact);
}
return View(vm);
}
HOW THE CODE WORKS
This Action begins similar to the GET version. An ExchangeClient is created and used to query a list of contacts. This returns the full list of contacts from Office 365. However, the Action code needs only the one the user selected to assign the lead. So, the list is then queried further to find the one with the correct ID.
During development of this application, the first attempt included using the contact.Id property in the initial query against the Exchange service, through the ExchangeClient. The code was similar to the following:
var contactResults = await (from i in client.Me.Contacts
where i.Id == vm.selectedLeadID
select i).ExecuteAsync();
However, this resulted in error. The error message stated “The property ‘Id’ does not support filtering.” A couple of different methods were attempted, but the error remained. It was deemed this might be a bug in the Preview version of the API or the Tools.
Once the proper contact is available, the plan is to forward the e-mail and delete it from the current Mailbox. Then, refresh the Messages from Outlook and display the same View to the user.
The HttpClient is used to accomplish the Forward and Delete methods, accessing the Office 365 REST APIs directly, rather than through the client libraries.
The HttpClient object is initialized and configured similar to the example earlier. The authorization process returns an access token, which becomes part of the Headers content. The previous example used the HttpClient to access a GET endpoint. The Forward endpoint expects a POST. Before sending the request, we must prepare the client. This is done through the following code section:
//prepare POST content for forward request
ForwardMessage forwardContent = new Models.ForwardMessage();
forwardContent.Comment = "This lead has been reassigned to you";
forwardContent.ToRecipients.Add(new Recipient() { Address = contact.EmailAddress1, Name = contact.DisplayName });
//convert POST content to JSON
StringContent postContent = new StringContent(JsonConvert.SerializeObject(forwardContent));
postContent.Headers.ContentType = new MediaTypeHeaderValue("application/json");
First, a C# object (ForwardMessage) is populated from the contact information. The code for this object is found in Listing 10-9. This object is then converted to JSON using the JsonConvert.SerializeObject method. This is then used to create a StringContent object. This content object is required by the PostAsync method, used in the following section to send the request to the Office 365 service.
//send forward request
var forwardResponse = httpClient.PostAsync("/ews/odata/Me/Inbox/Messages('" + vm.selectedLeadID + "')/Forward", postContent).Result;
This line calls the HttpClient.PostAsync() method, specifying the Forward endpoint and passing the JSON content.
Once the message has been forwarded, it needs to be deleted from the current Inbox. This is achieved through the following line of code:
//send delete request
var deleteResponse = httpClient.DeleteAsync("/ews/odata/Me/Inbox/Messages('" + vm.selectedLeadID + "')").Result;
This line calls the HttpClient.DeleteAsync method. This sends a HTTP DELETE request to the specified URL. For this request, it is the URL of the specific message.
The remaining section of the Action method repeats the code from the previous example to query the ExchangeService to receive the list of Sales Leads messages and add them to the ViewModel class. This ViewModel class is then passed to the same View and returned to the user.
Listing 10-9. ForwardMessage Class
public class ForwardMessage
{
public ForwardMessage()
{
ToRecipients = new List<Recipient>();
}
public string Comment { get; set; }
public List<Recipient> ToRecipients { get; set; }
}
At this point, the View Leads Use Case has been implemented. The Assign Lead Use Case has also been implemented. That leaves the Set Appointment and Check Appointments Use Cases remaining. Begin with the Set Appointment, which is called when the Submit button is clicked on the Sales Lead page.
27.Add the LeadAppointment action to the SalesLead Controller. The code is in Listing 10-10.
Listing 10-10. LeadAppointment Action
[HttpGet]
public async Task<ActionResult> LeadAppointment(string leadID)
{
var client = await GetExchangeClient();
LeadAppointmentViewModel vm = new LeadAppointmentViewModel();
vm.leadID = leadID;
//look up lead information
//get authorization token
Authenticator authenticator = new Authenticator();
var authInfo = await authenticator.AuthenticateAsync(ExchangeResourceId);
HttpClient httpClient = new HttpClient();
httpClient.BaseAddress = new Uri(ExchangeResourceId);
httpClient.DefaultRequestHeaders.Authorization = new AuthenticationHeaderValue("Bearer", await authInfo.GetAccessToken());
var response = httpClient.GetAsync("/ews/odata/Me/Inbox/Messages('" + leadID + "')").Result;
if (response.StatusCode == HttpStatusCode.OK)
{
var responseContent = await response.Content.ReadAsStringAsync();
var message = JObject.Parse(responseContent).ToObject<Message>();
vm.appointmentMessage = message.BodyPreview;
}
return View(vm);
}
This Action uses the HttpClient object to access the Office 365 REST APIs directly. This action results in displaying information only, so the message is retrieved from the Exchange service and used to populate the LeadAppointmentViewModel class.
![]() Note The examples using the HttpClient contain similar, even repetitive, code used to create and configure the object. These steps were purposefully left within the method to aid in demonstration. For a production-level application, this functionality would likely be moved to libraries, similar to the client libraries included in the Visual Studio Office 365 API Tools.
Note The examples using the HttpClient contain similar, even repetitive, code used to create and configure the object. These steps were purposefully left within the method to aid in demonstration. For a production-level application, this functionality would likely be moved to libraries, similar to the client libraries included in the Visual Studio Office 365 API Tools.
28.Add a new class to the Models folder called LeadAppointmentViewModel. The ViewModel code is in Listing 10-11.
Listing 10-11. LeadAppointmentViewModel
public class LeadAppointmentViewModel
{
public LeadAppointmentViewModel()
{
appointmentDate = DateTime.Now;
currentAppointments = new List<Event>();
}
public string leadID { get; set; }
public DateTime appointmentDate { get; set; }
public string appointmentMessage { get; set; }
public string appointmentTitle { get; set; }
public List<Event> currentAppointments { get; set; }
}
The LeadAppointment Action requires a new View for displaying the form for setting the appointment.
29.Add a new View to the Views\SalesLead folder called LeadAppointment. Set the Template to Empty and the Model class to the LeadAppointmentModelView class. The code for this view is Listing 10-12.
Listing 10-12. LeadAppointment View
@model SalesLeadMVC.Models.LeadAppointmentViewModel
<h2>Lead Appointment</h2>
@using (Html.BeginForm("LeadAppointment"))
{
@Html.HiddenFor(x => x.leadID)
@Html.HiddenFor(x => x.appointmentMessage)
<div class="well">
<h3>Lead Information</h3>
<div style="white-space: pre-line;">
@Model.appointmentMessage
</div>
</div>
<fieldset>
<legend>Set Appointment</legend>
<label>Appointment Date:</label><br />
@Html.TextBoxFor(x => x.appointmentDate)
<input type="button" value="Check Appointments" onclick="checkAppointments();" /><br />
<input type="submit" value="Set Appointment" style="margin-top:40px;" />
</fieldset>
}
<div id="currentAppointments" style="margin-top:40px;"></div>
@section scripts
{
<script>
function checkAppointments() {
var currDate = $('#appointmentDate').val();
var url = '/SalesLead/CheckAppointments?appointmentDate=' + currDate.split(' ')[0];
$.get(url, function (data) {
$('#currentAppointments').html(data);
});
return false;
}
</script>
}
HOW THE CODE WORKS
This View creates the form for setting the appointment. This essentially consists of a text box for the date/time for the appointment. This page also allows the user to check their current appointments for the given date, in order to ensure they set the new appointment for a time when they are free.
The JavaScript function checkAppointments()calls the CheckAppointments Action on the SalesLead Controller.
function checkAppointments() {
var currDate = $('#appointmentDate').val();
var url = '/SalesLead/CheckAppointments?appointmentDate=' + currDate.split(' ')[0];
$.get(url, function (data) {
$('#currentAppointments').html(data);
});
return false;
}
The script uses jQuery to access the form elements on the page. The current date is retrieved from the “appointmentDate” field. The date is then used to create the URL. The jQuery method get() is used to make an AJAX call back to the application. The results from that HTTP call are used to populate a DIV on the screen. The user can enter a date and click the “Check Appointments” button and view the current appointments for the given date.
To complete the application, we must implement an Action to accept the POST from the LeadAppointment form.
30.Add the POST Action LeadAppointment to the SalesLead Controller. The code is in Listing 10-13.
Listing 10-13. POST LeadAppointment
[HttpPost]
public async Task<ActionResult> LeadAppointment(LeadAppointmentViewModel vm)
{
var client = await GetExchangeClient();
Event appointment = new Event();
appointment.Subject = "Sales Lead Meeting";
appointment.Start = new DateTimeOffset(vm.appointmentDate);
appointment.End = new DateTimeOffset(vm.appointmentDate.AddMinutes(30));
appointment.BodyPreview = vm.appointmentMessage;
await client.Me.Events.AddEventAsync(appointment);
return RedirectToAction("Index");
}
This Action uses the Office 365 client libraries to create a new calendar event for the chosen date. The message content from the chosen lead is used as the content of the Event. A new Event object is instantiated and populated from the POST data. The AddEventAsync() method is called and passed to the populated Event object.
Once the method completes, the user is redirected back to the Index action. The final implementation is the CheckAppointment Action and View.
31.Add the CheckAppointment Action to the SalesLead Controller. The code is in Listing 10-14.
Listing 10-14. CheckAppointment Action
[HttpGet]
public async Task<ActionResult> CheckAppointments(DateTime appointmentDate)
{
CheckAppointmentsViewModel vm = new CheckAppointmentsViewModel();
var client = await GetExchangeClient();
var appointmentResults = await (from i in client.Me.Calendar.Events
where i.Start >=new DateTimeOffset(appointmentDate)
select i).ExecuteAsync();
foreach (Event appointment in appointmentResults.CurrentPage)
{
vm.appointments.Add(appointment);
}
return PartialView("_CheckAppointments", vm);
}
This action uses the Office 365 client libraries to access the ExchangeClient and query the events for the given date. The CheckAppointmentViewModel is populated and passed to the View. It is important that this returns a PartialView. This means only the rendered HTML from the View is returned and not any additional markup from Layouts or other processing. This action is called from an already rendered page. The returned markup is inserted into a DIV in the browser. Only the View code is wanted, not any added scripts, CSS references, or any additional markup.
32.Add a new class to the Models folder called CheckAppointmentViewModel. The code for the ViewModel is Listing 10-15.
Listing 10-15. CheckAppointmentViewModel
public class CheckAppointmentsViewModel
{
public CheckAppointmentsViewModel()
{
appointments = new List<Event>();
}
public List<Event> appointments { get; set; }
}
33.Add a new View to the Views/SalesLead folder called _CheckAppointments.cshtml. Set the Template to Empty, the Model class to CheckAppointmentsViewModel, and check the PartialView check box. The underscore prefix in the name denotes this is a Partial View. The code for this view is in Listing 10-16.
Listing 10-16. _CheckAppointments View
@model SalesLeadMVC.Models.CheckAppointmentsViewModel
<fieldset>
<legend>Current Appointments</legend>
<table width="600">
<thead>
<tr>
<th>
Date
</th>
<th>
Appointment
</th>
</tr>
</thead>
<tbody>
@foreach (Microsoft.Office365.Exchange.Event appointment in Model.appointments)
{
<tr>
<td>
@appointment.Start.Value.DateTime
</td>
<td>
@appointment.Subject
</td>
</tr>
}
</tbody>
</table>
</fieldset>
This completes all Use Cases for this application. Ensure the project builds successfully and runs the application. Confirm it performs as expected.
34.Assign a lead to another sales person. Run the application and navigate to the Sales Lead page. Choose a lead by clicking on the radio button. Select a contact from the droplist. Click the Submit button. You should return to the Sales Lead page, only the selected lead should not appear on your screen.
35.Log into your Outlook online account to confirm the lead was sent to the chosen contact. Look in the Sent Items folder and you should see the forwarded leads. Figure 10-26 shows a similar situation.
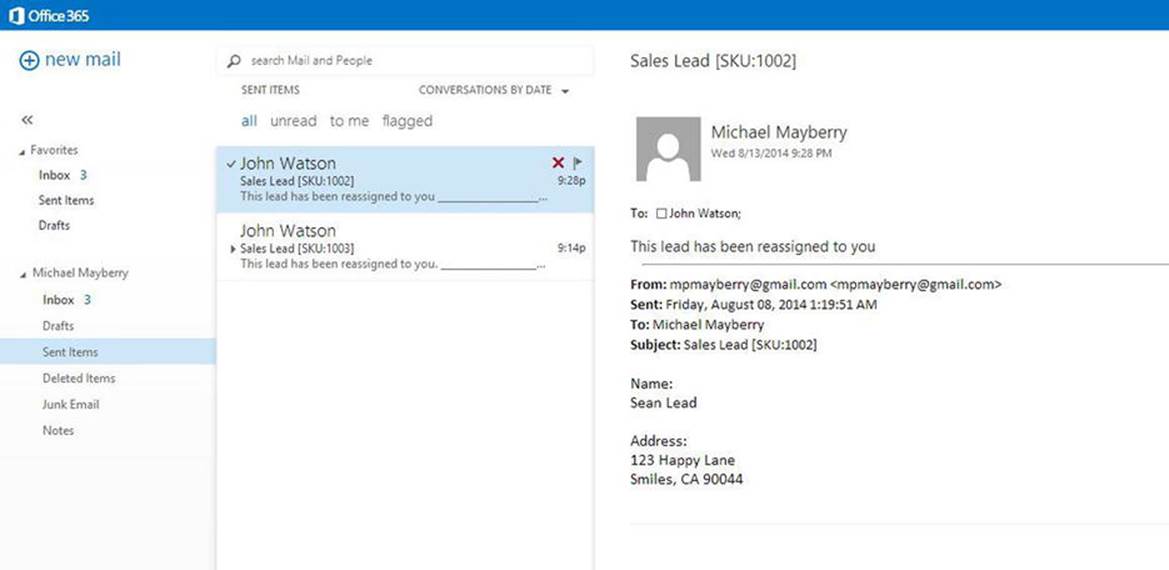
Figure 10-26. Message Items Forwarded Through MVC Application
36.Click the “Set Appointment” link on one of the leads displayed on the screen. You should see a screen similar to Figure 10-27.
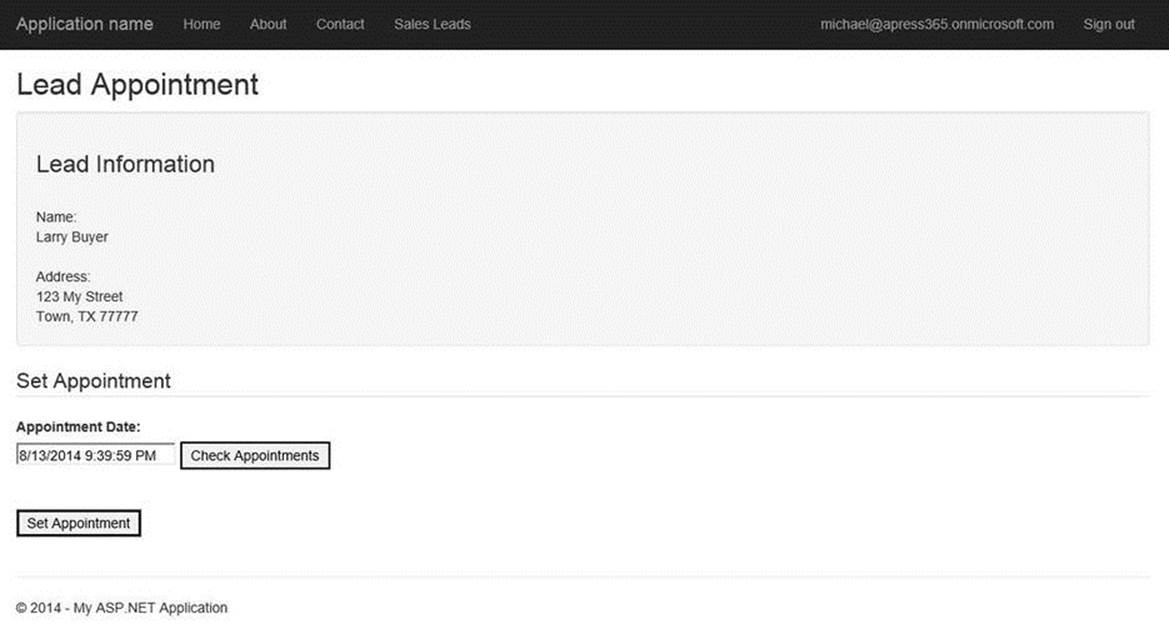
Figure 10-27. Lead Appointment Page
![]() Note The Check Appointments functionality relies on existing Events in the user’s calendar. Before testing this section of the application, access your online calendar and create some Events manually.
Note The Check Appointments functionality relies on existing Events in the user’s calendar. Before testing this section of the application, access your online calendar and create some Events manually.
37.Enter a date you know has some events on your calendar and click the Check Appointments button. You should see events appear, similar to Figure 10-28.
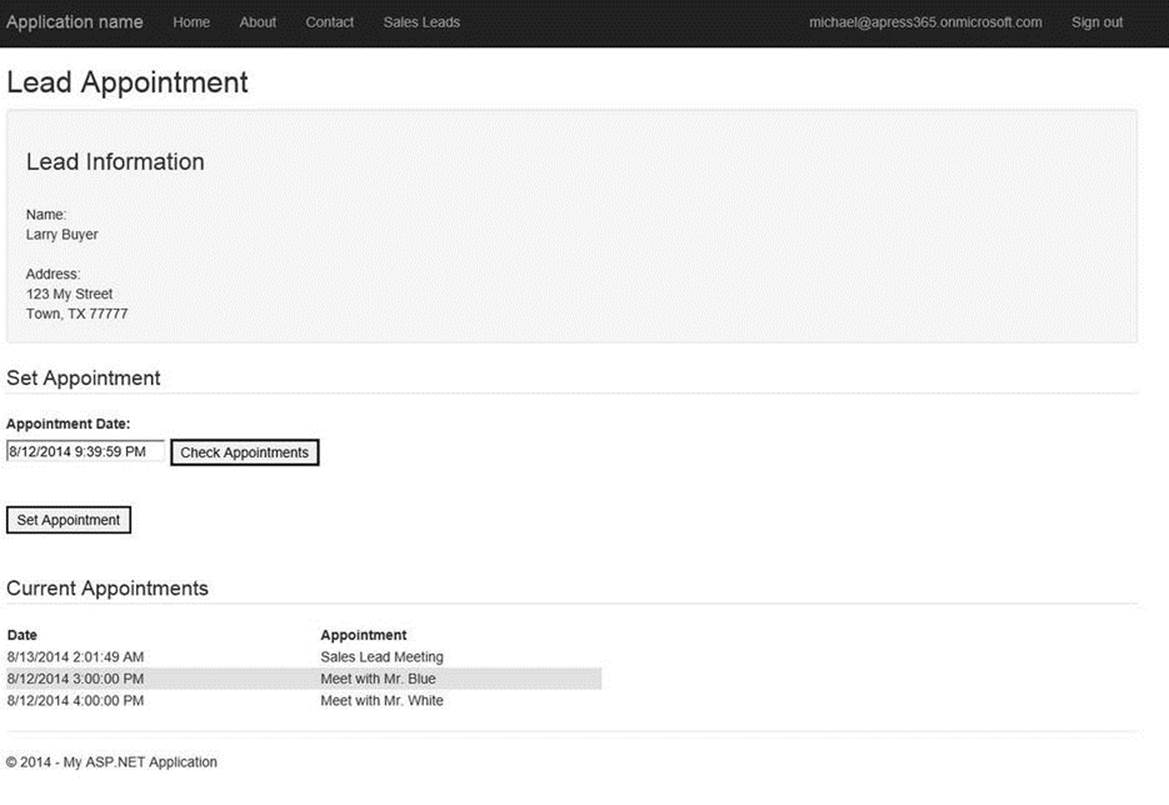
Figure 10-28. Check Appointments Results
38.Enter a date and time and click the Set Appointment button. Log into your online calendar to ensure the event was added. You should see items similar to Figure 10-29.
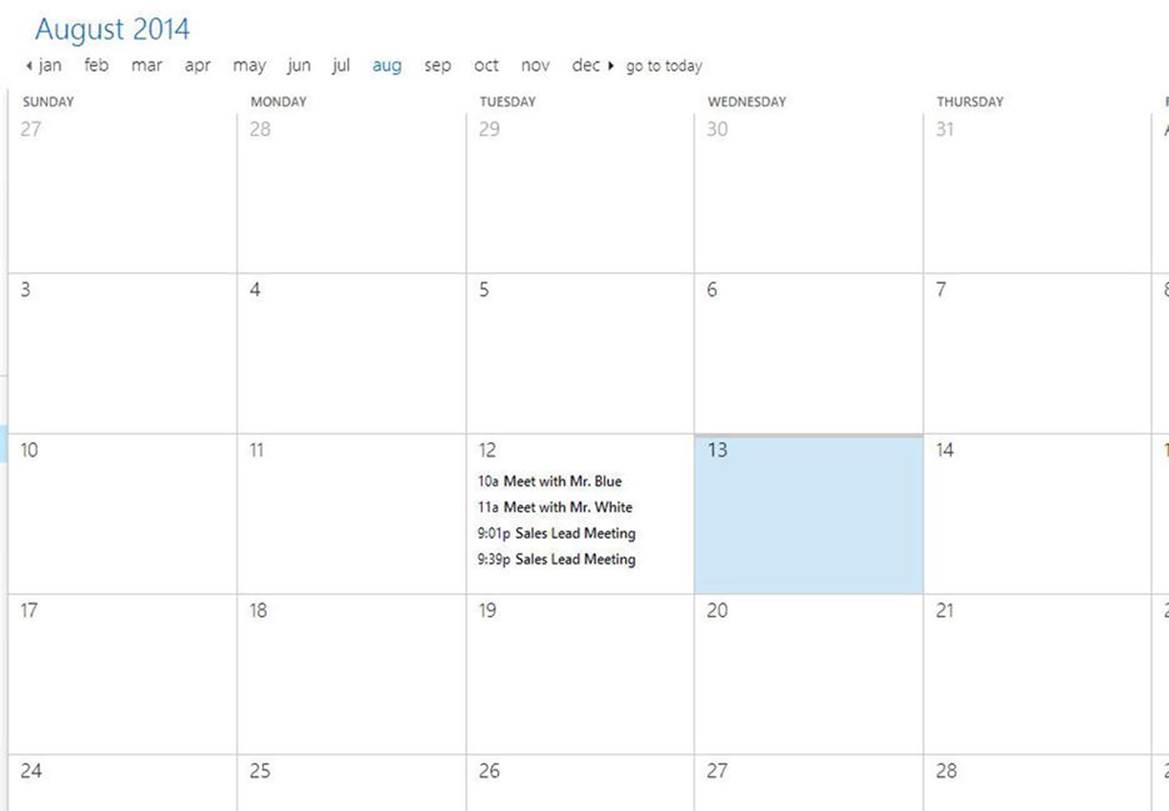
Figure 10-29. Online Events with Added Appointments from MVC Application
Summary
In this chapter, you build an ASP.NET MVC application that consumes the Office 365 APIs. This application demonstrates how easy it can be to incorporate Office 365 data into a custom application. The methodologies in this chapter can be used for any type of application development, not only ASP.NET MVC.
The Visual Studio Office 365 Tools were installed and configured to aid in authentication and application registration. This is not required for application development, but it does help. The functions performed by these tools can be done manually as well.
The Office 365 client libraries were used to demonstrate how to access Office 365 services through familiar .NET coding and methodologies, such as LINQ. These libraries aid in the communication between the application and the services, handling the common, but necessary, “plumbing” required for consuming the Office 365 APIs.
This chapter also demonstrated how to consume the Office 365 APIs directly, using the HttpClient object. JSON content was both consumed from the services and passed into the APIs to achieve desired functionality.
The primary purpose of this section was to introduce the Office 356 APIs and demonstrate how developers could integrate them into custom applications. The current functionality of the APIs is limited, as they have only been released as Preview services. However, Microsoft is dedicated to this direction of service and the ability of developers to extend the Office 365 experience through custom applications will only improve with time.
All materials on the site are licensed Creative Commons Attribution-Sharealike 3.0 Unported CC BY-SA 3.0 & GNU Free Documentation License (GFDL)
If you are the copyright holder of any material contained on our site and intend to remove it, please contact our site administrator for approval.
© 2016-2026 All site design rights belong to S.Y.A.