Pro Office 365 Development, Second Edition (2014)
Chapter 2. Creating Your Web Presence
In this chapter, we’ll demonstrate an important feature of Office 365; it’s a great platform to build an external public-facing web site. This is used as your online presence; the place where customers can find you, learn about your products and services, and ultimately contact you.
Designing a Web Site
Your public web site is primarily content based. The purpose of most of the other features you’ll be working on in this book will be to create, modify, and use data. This one, however, is focused on displaying static content to a relatively broad audience. The pages are mostly read-only, and the majority of your work in building a content-based website is creating the content, which includes text, images, video, and other visual components.
With that in mind, you should start by deciding what the website needs to communicate. This includes the technical details such as contact information and a description of the products or services that you provide. This also includes more intangible aspects; what types of emotions should your site evoke? For example, the fictitious company for this project provides interior design services. So you’ll want to include lots of pictures of pretty interiors. From the first look of the home page, you want your potential customers to say “Wow, I wish my home looked like that!”
Collecting the Content
The first step of the design process is to decide what information the web site needs to provide. Generally, this will include contact details like e-mail, phone number and physical address as appropriate. This will vary depending on the type of business and the way your organization operates. If you have one or more physical locations where you receive customers, including an interactive map will add a nice touch.
Another key content that you’ll need to provide is a description of the products and/or services that you want to advertise. What do you have to offer and why should a potential customer consider doing business with you. If you have a lot of products, you should summarize the types of products that are available. You can highlight specific items that you want to promote or provide as examples. At this level, a lot of details will tend to send your audience elsewhere.
![]() Tip If you have an e-commerce business where you sell products online, you will need a true shopping cart application. You won’t be able to implement this on an Office 365 platform. The site I’m describing here will provide information about your company and then link to your shopping cart.
Tip If you have an e-commerce business where you sell products online, you will need a true shopping cart application. You won’t be able to implement this on an Office 365 platform. The site I’m describing here will provide information about your company and then link to your shopping cart.
It’s a good idea to provide some background information about your business. What is your vision, business culture, and mission? Perhaps a brief history of your organization would be helpful. Also, consider including corporate highlights and accomplishments. Mission statements, corporate strategies, and core beliefs can be used as content as long as they are written from the customer’s perspective.
![]() Note I am using business terminology here but the same concepts also apply for non-profit organizations. What is the mission of your organization? What resources do you provide? What actions from potential constituents do you want to inspire? The content of your web site should answer these questions.
Note I am using business terminology here but the same concepts also apply for non-profit organizations. What is the mission of your organization? What resources do you provide? What actions from potential constituents do you want to inspire? The content of your web site should answer these questions.
As you think through these topics, you should create a list of site pages. You don’t have to finalize the content of each page but you should at least identify the pages that are needed. You can create pages from templates and fill in the details later.
If you have more than five or six pages you should also consider how these should be organized. The navigation controls provide several options for navigating to all of your site pages. Since we only have a few pages you’ll use the default single-level control arranged vertically. However, if you have a lot of pages, you should think through how these can be grouped and then decide the best way to arrange the navigation controls.
In addition to the standard navigation controls, you should add custom links to key pages in your site. If your primary goal of your site is to drive potential customers to your shopping cart, then you should have easy to find buttons or links to take them there.
Uploading Images
As we said earlier, our site will have lots of pictures and the first step is to collect the images that we want to use and upload them to a document library. You don’t have to do this; images can be used from your local computer. In this case, SharePoint maintains an asset libray to store the images. Doing this yourself will allow you to better organize them and include additional metadata that will be helpful when maintaining your site.
Typically, when your Office 365 account is set up, two sites are created for you. The Team site is only available to authenticated users and is where you’ll keep all your internal lists and libraries. The Public site can be made available to everyone and should contain the outward-facing content. Click the Sites link in the menu bar at the top of the Office 365 page and you’ll see the available sites similar to Figure 2-1.
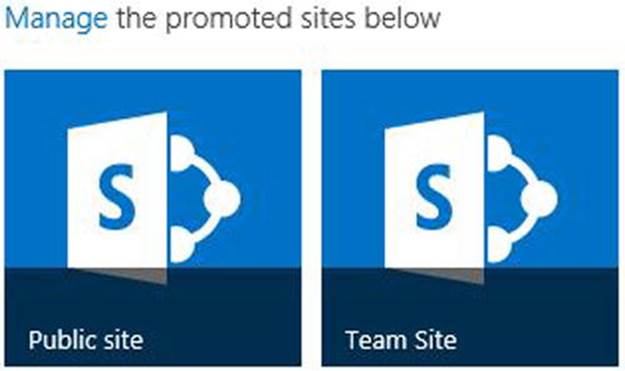
Figure 2-1. Getting to the public website
Click on the Public site button and your initial home page will be displayed.
![]() Tip If you don’t see the Office 365 menu bar at the top, click the Sign In link in the header.
Tip If you don’t see the Office 365 menu bar at the top, click the Sign In link in the header.
The public site already has a picture library called Photos that you can use. To access that, click on the settings icon to the right of the menu bar (it looks like a gear). This will display a list of actions; click the Site contents link as shown in Figure 2-2.
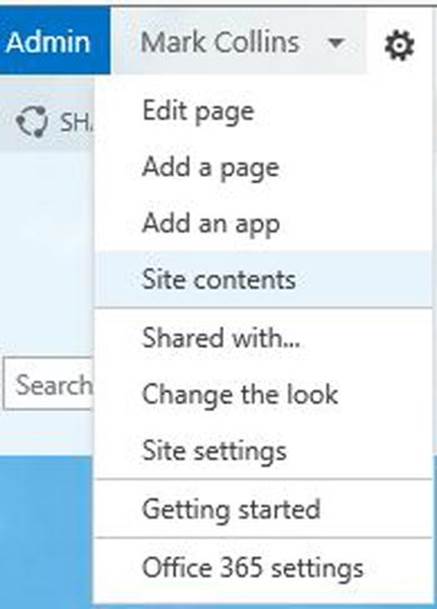
Figure 2-2. Navigating to the site contents
The Site Contents page shows all of the lists and libraries that have been created to store elements for your website. For example, the Pages library contain the pages used and the Posts library stores your blog posts. Click the Photos app to shows the contents of this library, which should be empty. Click the new link, which will display the Add a picture dialog box shown in Figure 2-3.

Figure 2-3. The Add a picture dialog box
Managing Images with Windows Explorer
You can click the browse button and then browse to a local folder and select an image to be uploaded. If you have a lot of files to upload, however, there’s an easier way. Click the Upload files using Windows Explorer instead link.
![]() Note This feature is only available when using Internet Explorer.
Note This feature is only available when using Internet Explorer.
You may see the warning shown in Figure 2-4. If so, just click the Allow button.
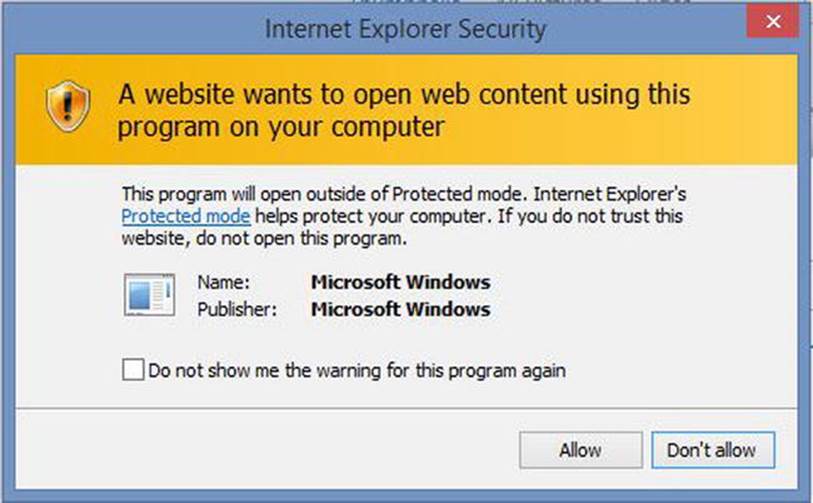
Figure 2-4. Internet Explorer Security warning
Also, this feature will only work if the Office 365 site has been configured as a trusted site. You will get an error similar to the one shown in Figure 2-5 if the trust has not been setup.
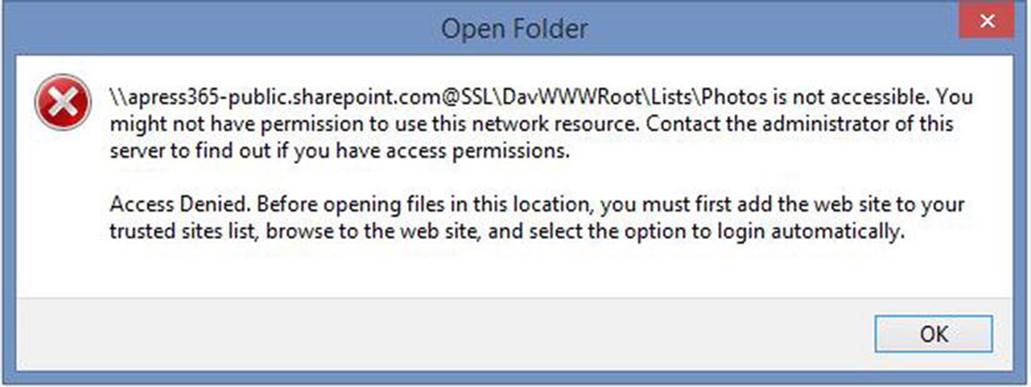
Figure 2-5. Error displayed when the site is not trusted
This is easy to fix. While on the Office 365 site in Internet Exporer, click the Tools menu and select the Internet Options link. Go to the Security tab and select Trusted sites. Click the Sites button and then click the Add button to include the current site in your list of trusted sites. Close these dialog boxes and then, from the Add a picture dialog box, click the Upload files using Windows Explorer instead link again. This will open Windows Explorer and it should look similar to Figure 2-6.
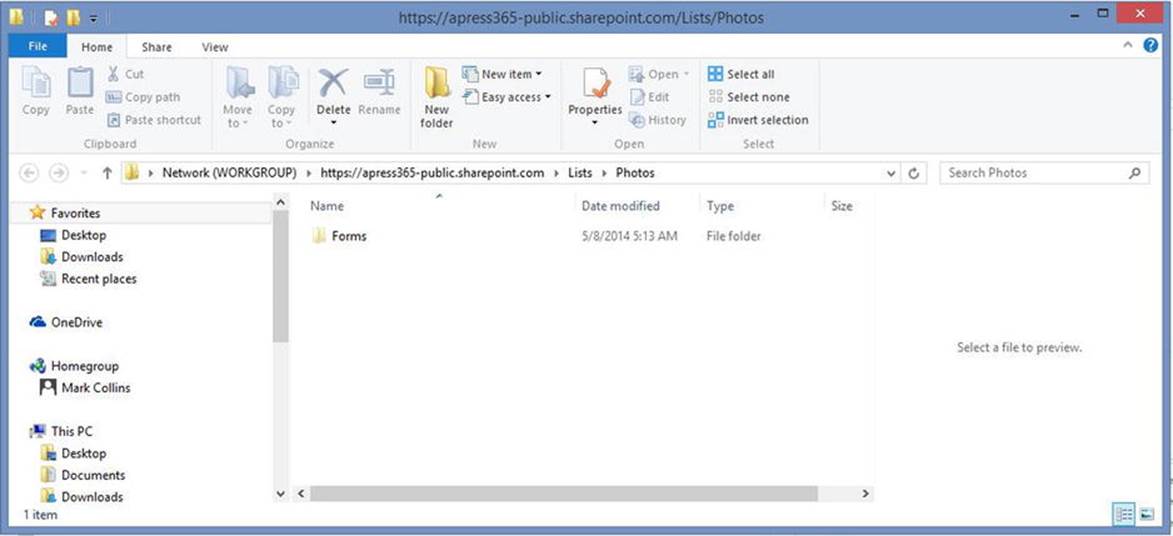
Figure 2-6. Displaying your Photos library in Windows Explorer
By going through these steps, you now have a path from Windows Explorer directly to this document library. Now you can view and edit its contents just like you would a local folder. Drag all of your images to this folder.
Managing Your Pictures
When you’re done, close Windows Explorer and go to your Photos library from Office 365. You should see your images as shown in Figure 2-7.
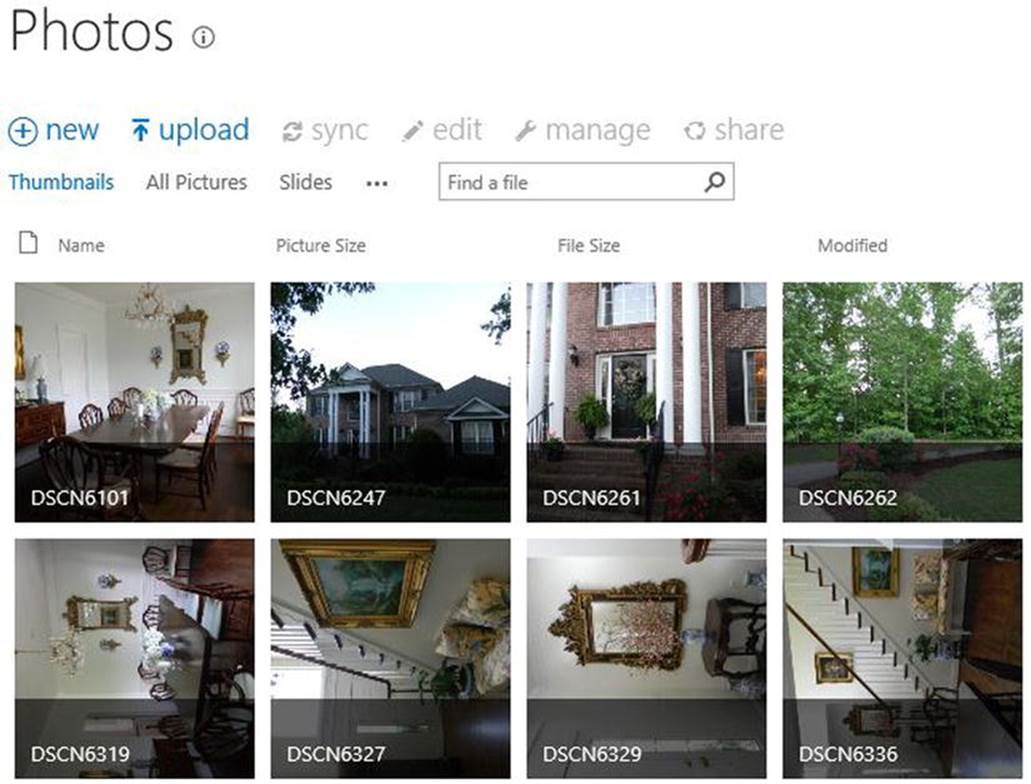
Figure 2-7. Displaying the Photos library
![]() Caution You may have noticed that some of the pictures are sideways. This is a bug in how Office 365 handles JPEG files that exists at the time of this writing, which may be fixed by the time you read this. Essentially, with newer JPEG files, when an image is rotated, instead of translating all of the pixels, an attribute is updated indicating the correct orientation. However, not all applications honor this attribute. For more information, there is a good article at http://office-watch.com/t/n.aspx?a=1766 that explains this. To resolve the issue, you’ll need to convert your image to a different format such as PNG.
Caution You may have noticed that some of the pictures are sideways. This is a bug in how Office 365 handles JPEG files that exists at the time of this writing, which may be fixed by the time you read this. Essentially, with newer JPEG files, when an image is rotated, instead of translating all of the pixels, an attribute is updated indicating the correct orientation. However, not all applications honor this attribute. For more information, there is a good article at http://office-watch.com/t/n.aspx?a=1766 that explains this. To resolve the issue, you’ll need to convert your image to a different format such as PNG.
Once the files have been uploaded, you can append some metadata to help you organize them. If you hover over the thumbnail, you’ll see an elipses that you can click to display a larger image. In this quick view pop-up dialog box there will be another elipses that you can click to bring up a context-sensitive menu. From this menu, select the Edit Properties link. Fill in the appropriate information as shown in Figure 2-8 and then click the Save button. You’ll notice that the title you entered is now displayed instead of the file name.
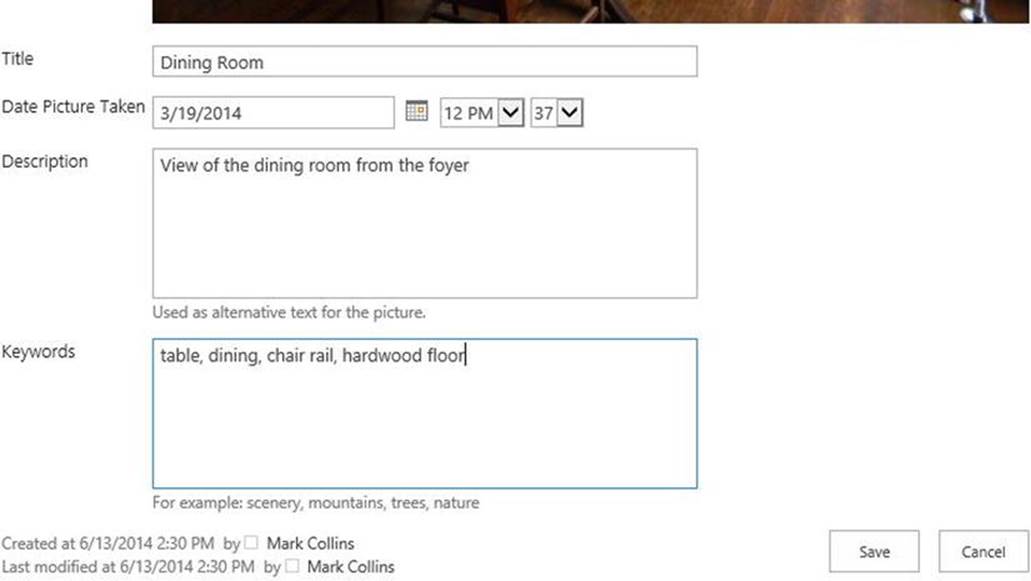
Figure 2-8. Entering the image metadata
Designing the Overall Site
SharePoint Online provides a design facility that allows you to easily modify the visual aspects of the web site. This tool only works with public-facing web sites. This is fairly intuitive to use so I will just walk through the steps we used to customize the site. Feel free to explore all of the capablities of the designer and try out several styles.
The initial home page will look similar to Figure 2-9.
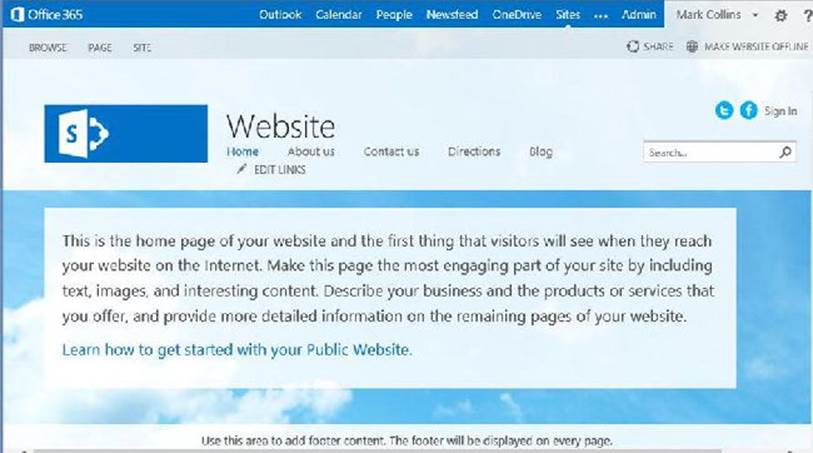
Figure 2-9. The initial public website
The light blue banner at the top is the page header, which is generally the same across all of your pages. The SharePoint icon on the left is the site logo. The header contains a title and a set of links which are used to navigate the site. There are also some social media links and a search field. We’ll start by changing the logo and then reconfigure the site layout, color schemes, and fonts.
At the top of the page you’ll find the BROWSE, PAGE, and SITE links. If you don’t see these, click the Sign In link. These are only available to authenticated users. The SITE tab of ribbon is shown in Figure 2-10 and illustrates the things you can configure at the site level.
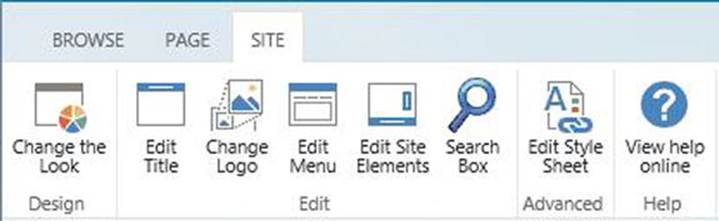
Figure 2-10. The SITE tab of the ribbon
Click the Edit Title button and enter a more suitable title for your site. In ours, we used Apress Interiors.
Changing the Logo
Click the Change Logo button, which will display the Change Logo dialog box shown in Figure 2-11.
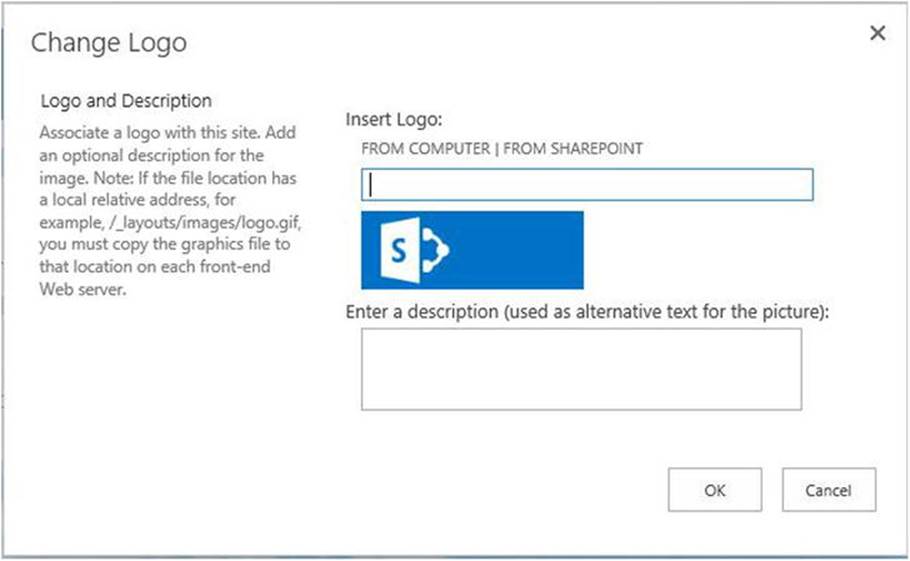
Figure 2-11. Updating the logo image
The dialog shows the image currently being used for the logo. Notice that there are two links for assigning an image: FROM COMPUTER and FROM SHAREPOINT. Since we have already uploaded all of our pictures, we’ll use the later. This will display the Select an Asset dialog box. Select the Photos library and then click the image that you want to use as shown in Figure 2-12 and click the INSERT button.
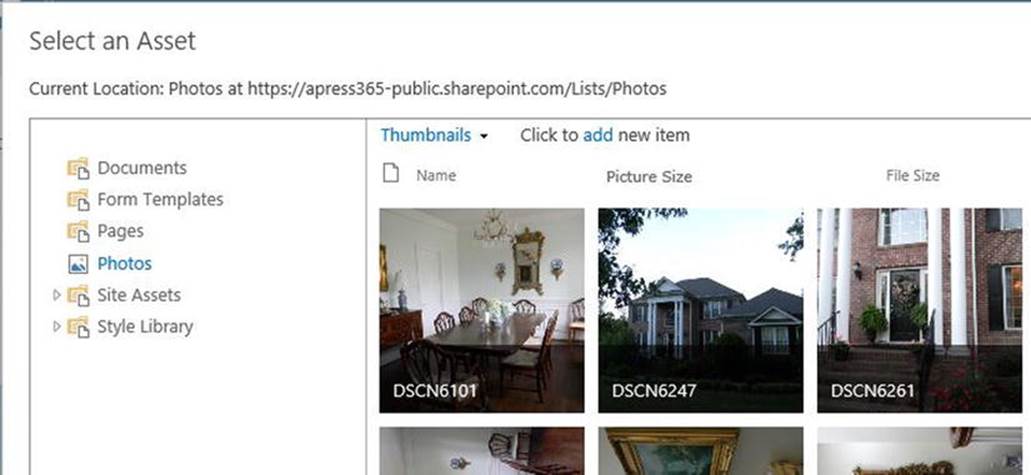
Figure 2-12. Selecting an image from Photos library
Changing the Look
From the SITE tab of the ribbon, click the Change the Look button. This will display a large collection of themes. You can thumb through over 50 pre-set themes and this may seem like a lot to choose from. However, each of these is simply a combination of four design elements:
· Background image
· Color scheme
· Layout (for example, where the links are located)
· Font set
We’ll choose Estate since real estate is in a similar field, but we will later change all four of these elements individually. After this is selected, a sample page is displayed. On the left side you can set each of these elements individually. Select the Colors, Site Layout, and Fontsthat are shown in Figure 2-13.
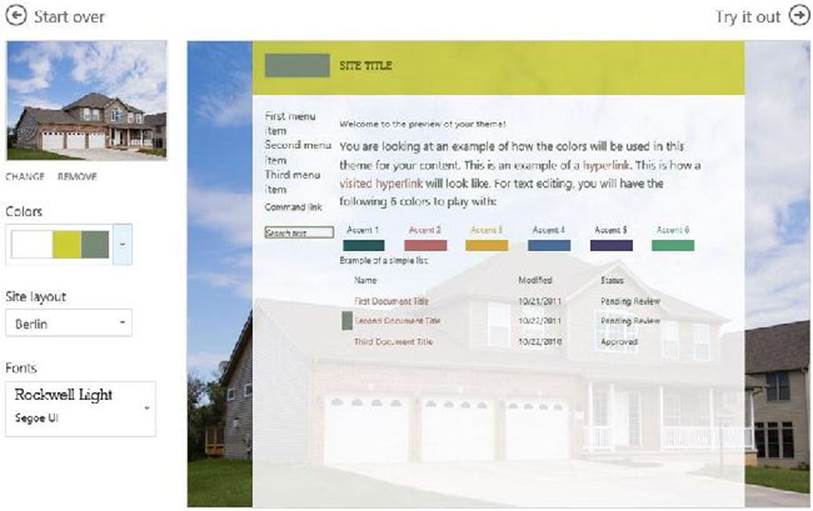
Figure 2-13. Displaying the selected style elements
Now you’ll change the background image. If you don’t want any image, just click the REMOVE link under the thumbnail image. To use a different image you can simply drag a file from Windows Explorer onto the thumbnail. Another way to specify the image is to click the CHANGE link, which will display the Add a document dialog box shown in Figure 2-14.
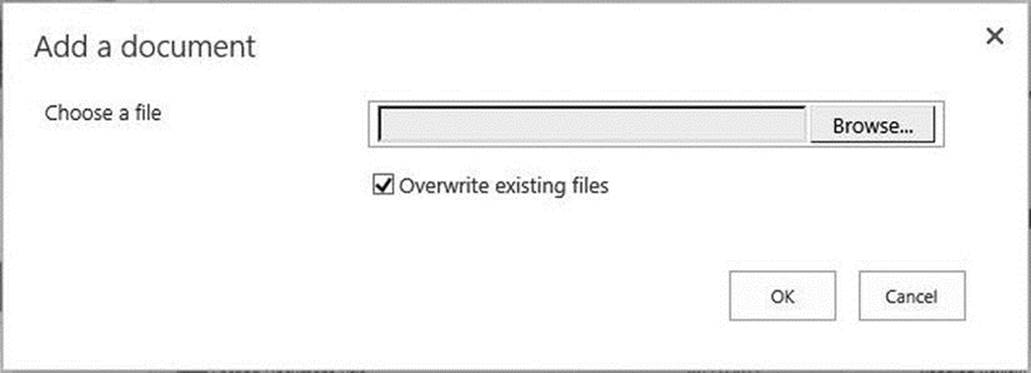
Figure 2-14. Adding a background image
![]() Note There is no option to select an image from SharePoint. This seems like an oversight and may be corrected in subsequent updates.
Note There is no option to select an image from SharePoint. This seems like an oversight and may be corrected in subsequent updates.
Click the Browse button and select an image from your local computer.
Adjusting the Menu
The layout we chose has the navigation links on the left site of the page. You can rearrange the order of the links, hide some of them, change the text that is displayed, and add new links. Notice the EDIT LINKS link below the menu; you’ll use this to put the menu in edit mode where you can make adjustments. You can also click the Edit Menu button from the SITE tab of the ribbon; both actions do the same thing.
Click the EDIT LINKS link. Links that are hidden will have a dash icon to the right and those that are displayed will have an icon that looks like an eye as shown in Figure 2-15.
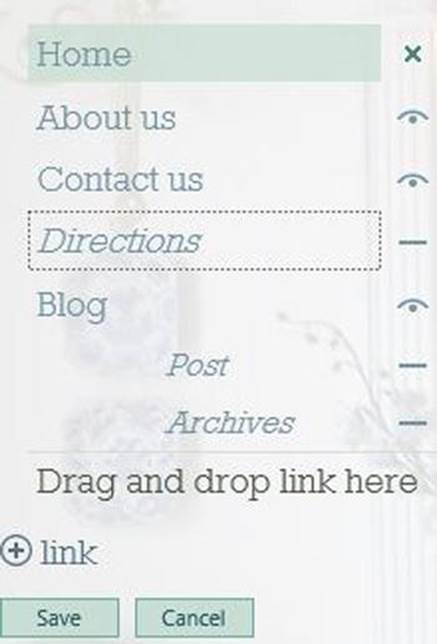
Figure 2-15. Modifying the menu items
You can click these icons to toggle whether a link is hidden or not. You can also click a link and drag it to a new location. We chose to hide the Directions link as this is not important to our site.
If you want to add a new link, click the link link. You’ll see a dialog box where you enter the text to be displayed and the URL that the link should go to. You can create links that go to pages outside of your site if you want to.
When you have finished making changes, click the Save button.
Hiding the Search Box
For the next change, you’ll remove the search field from the header. In our site, we decided not to enable this feature. From the SITE tab of the ribbon, click the Search Box button, which will display the Search Box dialog box shown in Figure 2-16.
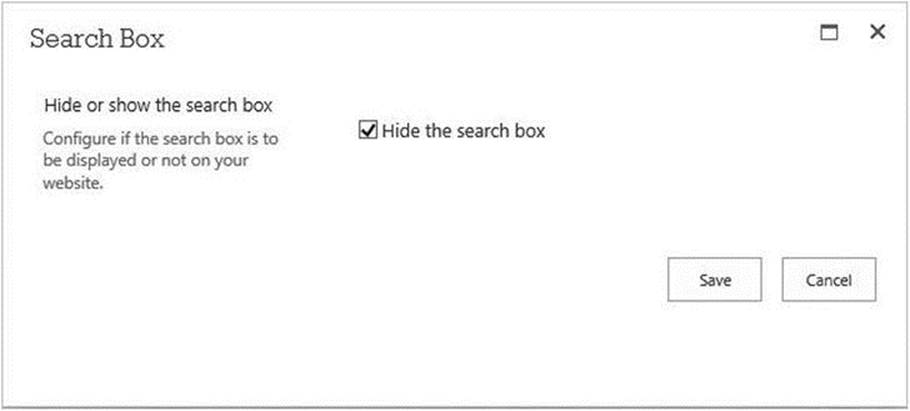
Figure 2-16. Hiding the search box
To remove the search box, just select the Hide the search box check box and click the Save button.
Modifying Site Elements
There are two site elements on the initial website, PageHeader and PageFooter. If you go to the Site Contents page, you’ll find a Site Elements library with two items in it. Select this library and the edit the PageFooter elements. The dialog box will look similar to Figure 2-17.
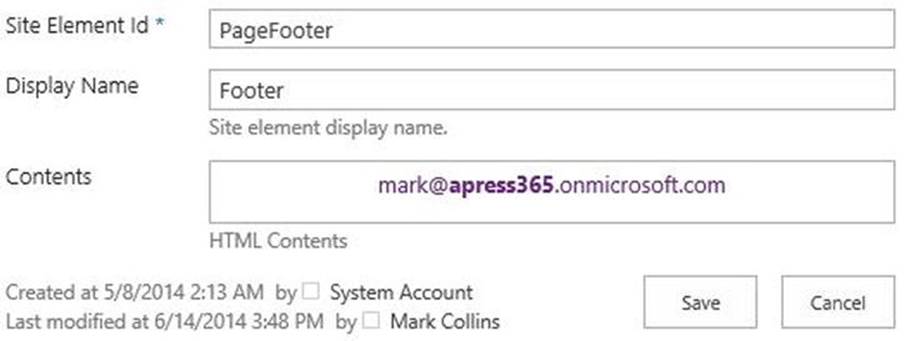
Figure 2-17. Changing the footer text
We modified the contents to include an e-mail address. We also used the format actions in the ribbon to make apress365 bolded. When you’re done, click the site logo or the Home link to display the updated Home page.
You can also edit these site elements directly from any page. Go to the SITE tab of the ribbon and click the Edit Site Elements button. This will draw a border around both the PageHeader and PageFooter elements. You can edit the text, change fonts, and so on right from the page. The FORMAT tab of the riboon will also appear to give you various formatting options. Just click anywhere outside of these two elements to leave edit mode.
Modifying the Home Page
With the overall site configuration complete, you’ll now modify the home page. Each page is stored in the Pages library, which you can see from the Site Contents page. From this library you can view and edit your existing pages as well as creating new ones. However, the easiest way to edit a page is to simply navigate to it, and use the PAGE tab of the ribbon, which is shown in Figure 2-18.

Figure 2-18. The PAGE tab of the ribbon
Go to the Home page, if not already there, and click the PAGE link to access the ribbon. The first thing you’ll need to do is to put the page in edit mode by clicking the Edit button. The Home page will have a series of pictures on the right-hand side of the page. Then you’ll add a large picture in the main part of the page along with some text.
Click the Page Layout button in the ribbon, which will show a list of available layouts as shown in Figure 2-19.
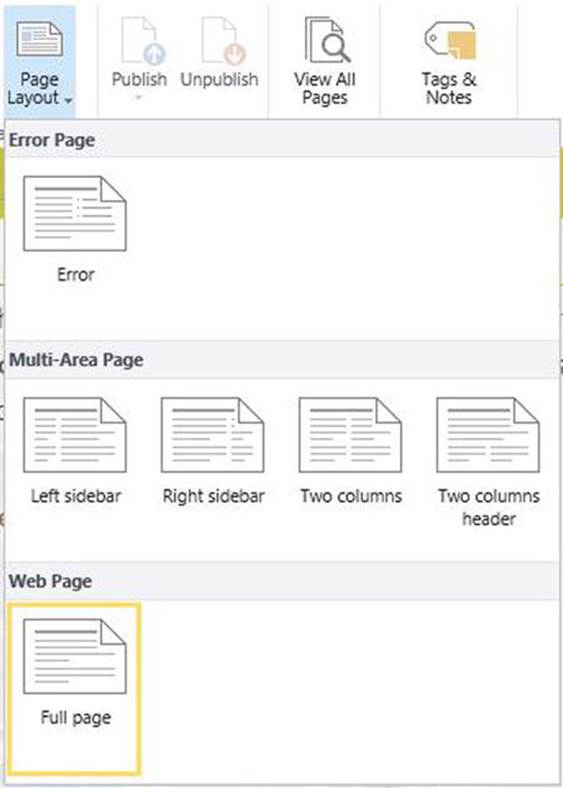
Figure 2-19. Choosing a page layout
Select Right sidebar. The page will be displayed with two areas labelled Page Content. Click inside the sidebar area and then select the INSERT tab of the ribbon. You’ll notice that there are several types of elements that can be added, including pictures, videos, and app parts.
Click the Picture button and a dropdown will be displayed for you to specify where the picture will be loaded from as shown in Figure 2-20.
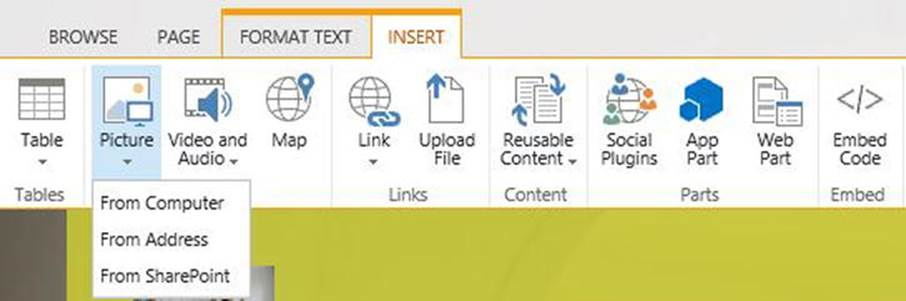
Figure 2-20. Inserting a picture
Click the From SharePoint link and then select one of the images in your Photos library. After the image is inserted, the IMAGE tab of the ribbon will appear. The images we’re using are a bit large so we’ll need to shrink them to a reasonable size. Select the Lock Aspect Ratio checkbox and then set the Horizonal Size to 200px as shown in Figure 2-21.

Figure 2-21. Configuring the image properties
When you tab off this field, the Vertical Size will be recalculated automatically. You can also adjust some of the spacing or alignment parameters, if necessary. Repeat this process to add several more images.
Then click inside the main content area and remove the existing text. Start typing some text in this area and the FORMAT TEXT tab of the ribbon will appear. Insert a picture in the main section and then add some more text. You can select the image and resize it to fit the width of the content area.
When you’re done making changes, click the Save button in the ribbon. Several options will appear as shown in Figure 2-22.
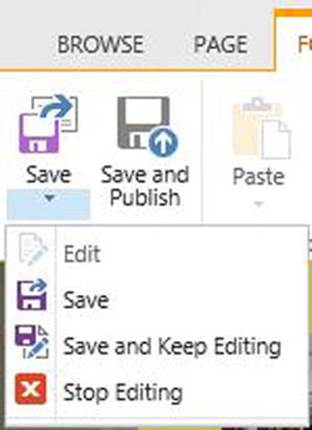
Figure 2-22. Saving the changes
If you want to discard your changes, use the Stop Editing link. If you’re done making changes use the Save link, which will return the page to a read-only state.
Making the Website Public
Initially, your website is not available to non-authenticated users. You’ll now make it public so others can see it. In the Office 365 menu bar there is a MAKE WEBSITE ONLINE link. (If your site is already public, the link will read MAKE WEBSITE OFFLINE.) Click this link and the pop-up shown in Figure 2-23 will be displayed.
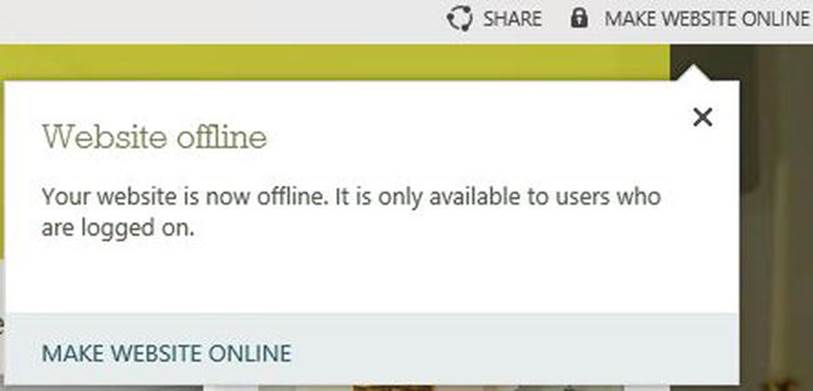
Figure 2-23. Setting the website status
Click the MAKE WEBSITE ONLINE link at the bottom of this window. The confirmation message shown in Figure 2-24 will appear. Click the Make online button to confirm.
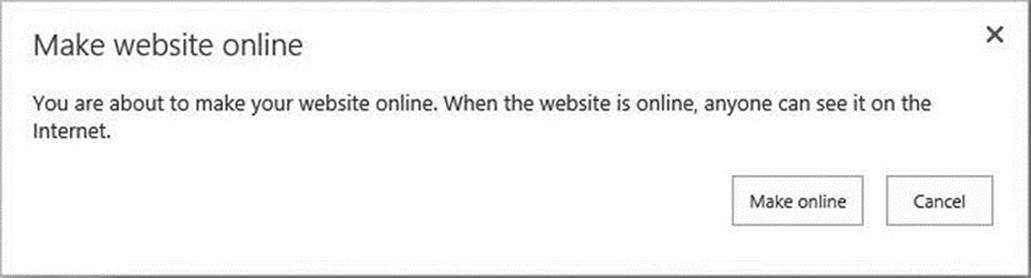
Figure 2-24. Confirming public access
The website is now public. Vistors can now see your site, which will look similar to Figure 2-25.
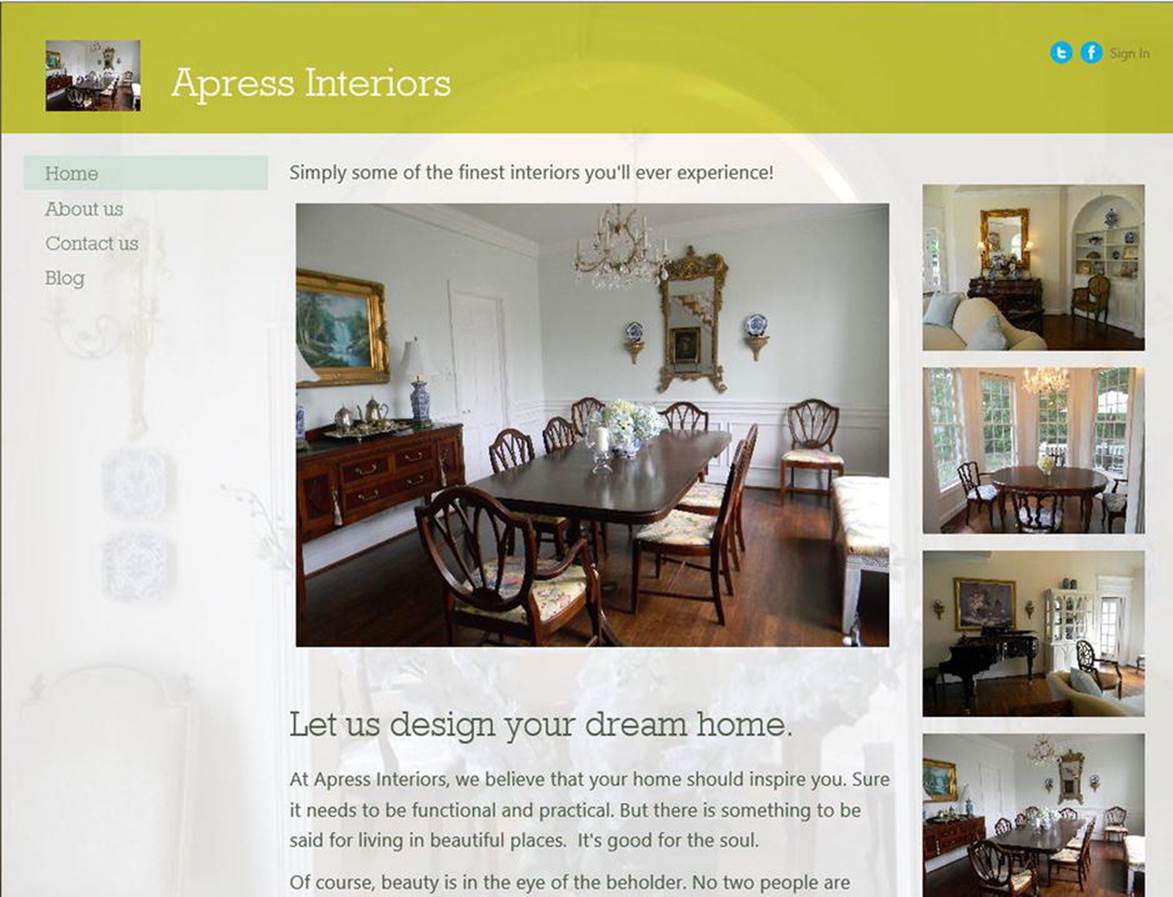
Figure 2-25. The finished website
Advanced Editing
With the basic website complete, we’ll look at some advanced editing options.
SharePoint Content
All of the content for your public website is stored in a collection of lists and document libraries within SharePoint. You can view and edit all of this from the Site Contents page. You used this earlier to add images to the Photos library. Understanding these libraries will help you better utilize the features provided. Go to the Site Contents page (you can get there from the Settings icon). The default set of libraries will look similar to Figure 2-26.
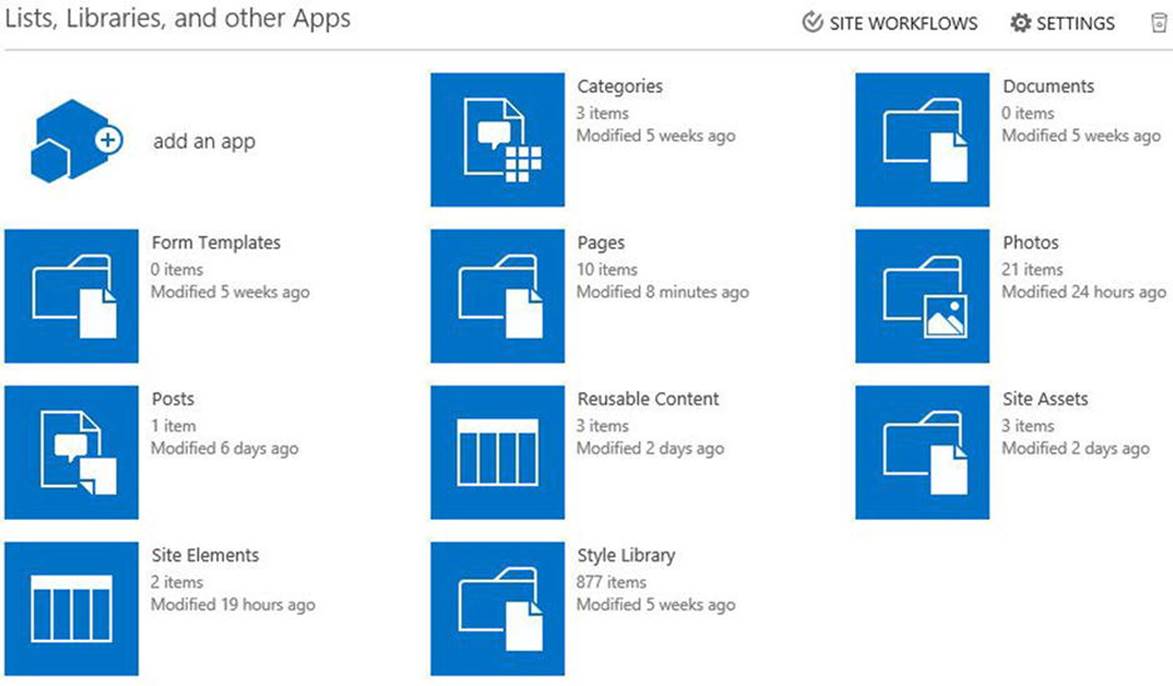
Figure 2-26. The Site Contents page
You’ve already used a couple of these (Photos and Site Elements). Now we’ll explain how some of the others are used.
Using Reusable Content
The Reusable Content library can be used to store bits of content that you may reuse on multiple pages. For example, look at the initial contents that were created for you, which is shown in Figure 2-27.

Figure 2-27. The initial Resuable Content library
The default library includes a Byline, Copyright, and Quote entries. If you want to include a byline on a page, for example, you can select it from the INSERT tab of the ribbon as shown in Figure 2-28.
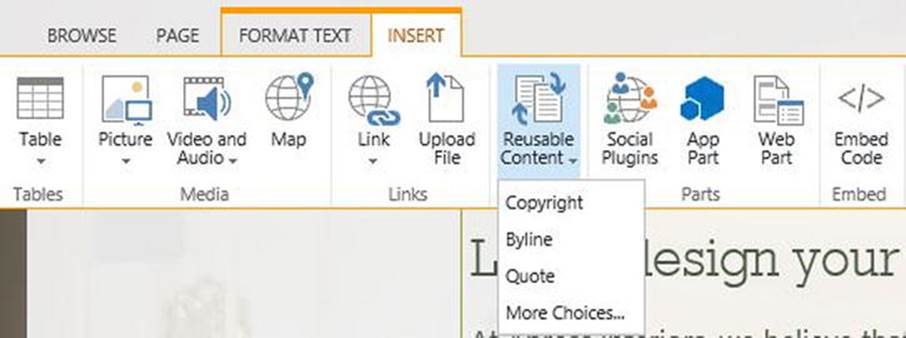
Figure 2-28. Adding reusable content
One nice benefit of using resuable content is that if you need to update it, just modify the text in the Reusable Content library and every page that uses it will be updated automatically. You can disable this feature, if you want to. If you edit one of the items in the Reusable Content library, the page will look like Figure 2-29.
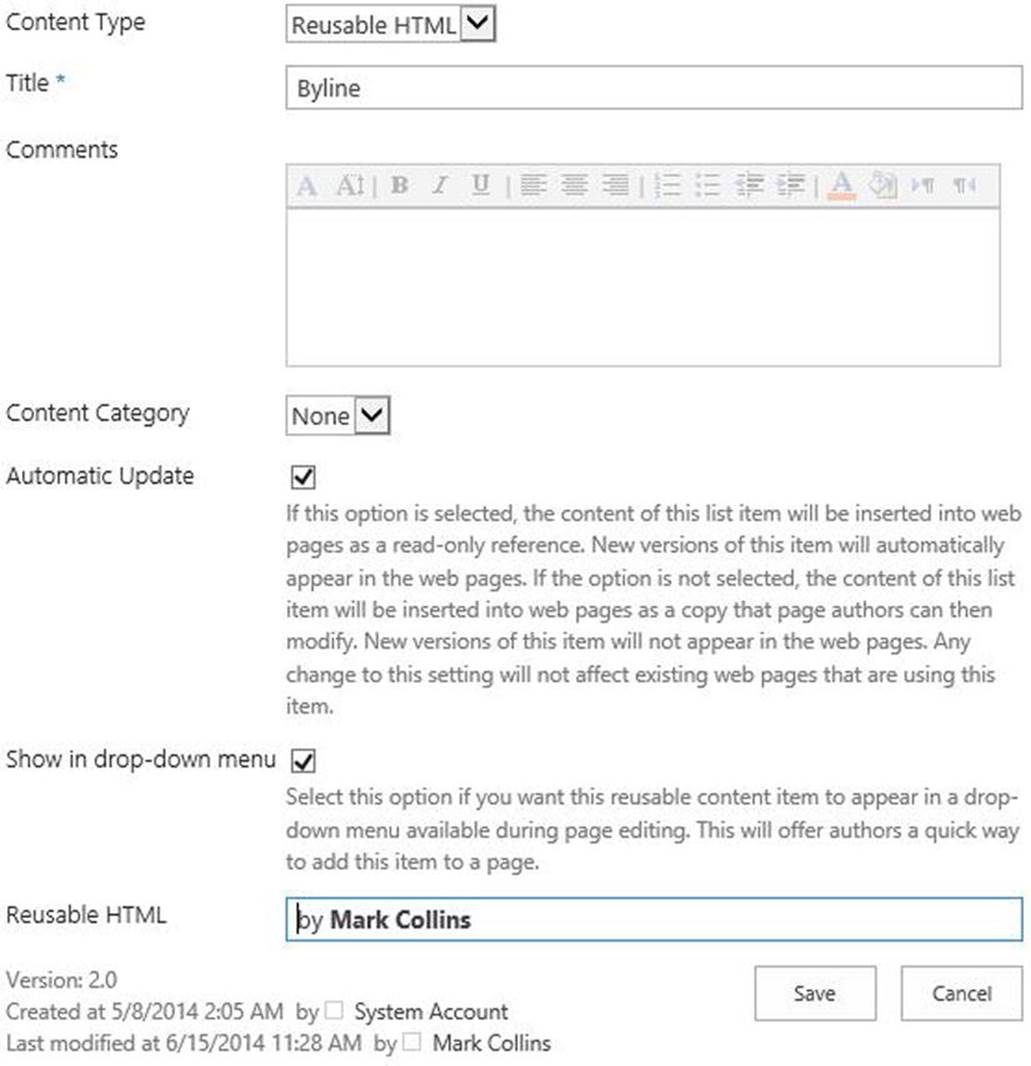
Figure 2-29. Modifying a resuable content item
You can also hide this item from the dropdown list in the INSERT tab of the ribbon. You will want to do this if an item is being discontinued. You can’t delete it if it is already referenced, but you can prevent new pages from using it.
Notice that the Content Category dropdown only includes a None value. If you want to add more categories, you will need to modify the content type. To do this, while displaying the list of items, click the LIST tab of the ribbon and then click the List Settings button. In theSettings page, scroll down to the Columns section and find the Content Category column. Notice that the type is Choice, which means that this column has a fixed set of allowed values. Click the Content Category link, which will display the Edit Column page. In theAdditional Column Settings section, add some other values to the existing None value and click the OK button at the bottom of the page. If you edit one of the existing Reusable Content items, you’ll see that there are additional values in the category dropdown.
Adding Blog Categories
When you create a new blog post you can assign one or more categories to the post. The category is useful for searching or filtering posts in a blog. Initially, only Opinions, Events, and Ideas are supported. However, you can add more categories to the Categories list.
From the Site Contents page, select the Categories list, which will look similar to Figure 2-30.
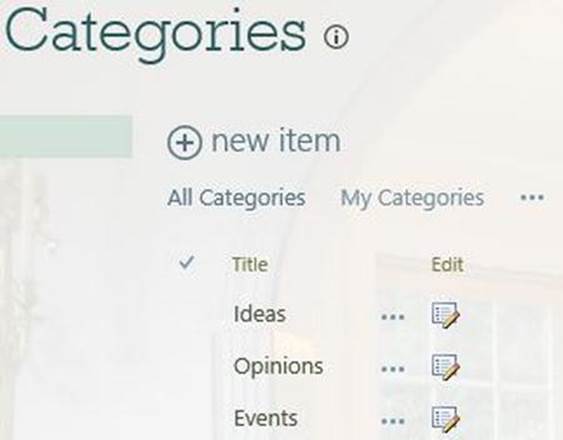
Figure 2-30. Showing the existing categories
Click the new item link to add other categories. These will then be available in the Category field when creating a new blog post.
Using the Pages Library
The actual content of each web page is stored in the Pages library. There are about ten pages created for you, which are listed in Figure 2-31.
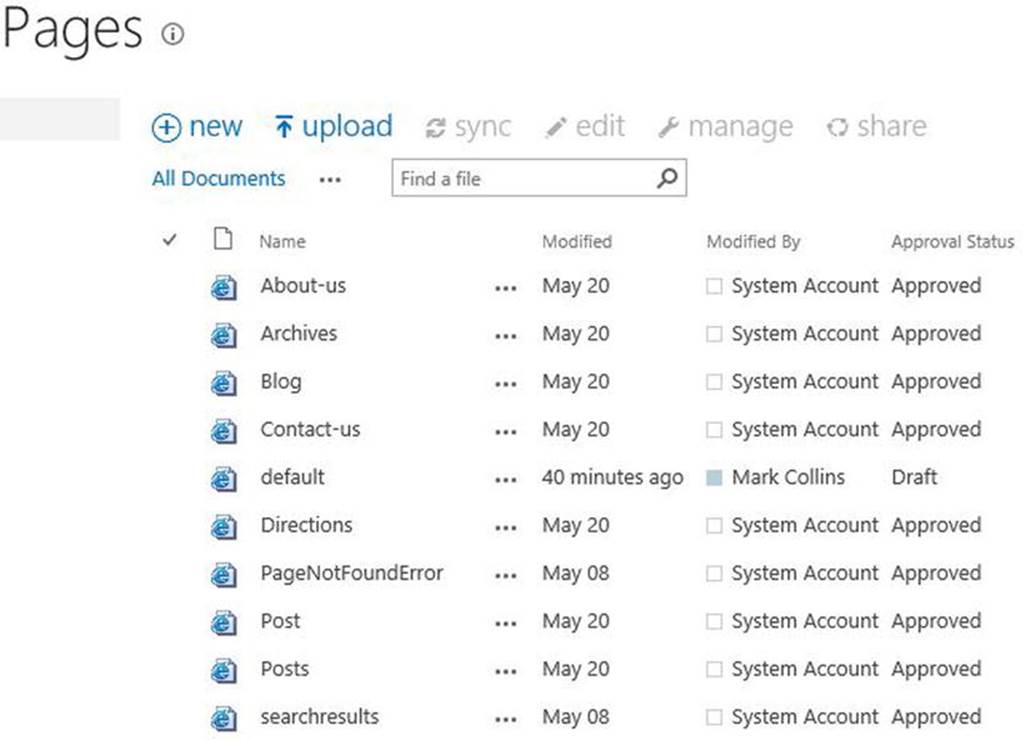
Figure 2-31. Listing the contents of the Pages library
If you have a lot of pages, you’ll find this very useful because it gives you a quick summary of all the pages, including when it was last updated, by whom, and its current status.
![]() Note The Draft status means that the page has been modified but these changes are not yet published to the live site.
Note The Draft status means that the page has been modified but these changes are not yet published to the live site.
Click the elipses next to the Home page (default) and then click the elipses in the quick view dialog and select the Edit Properties link. This will display the page shown in Figure 2-32.
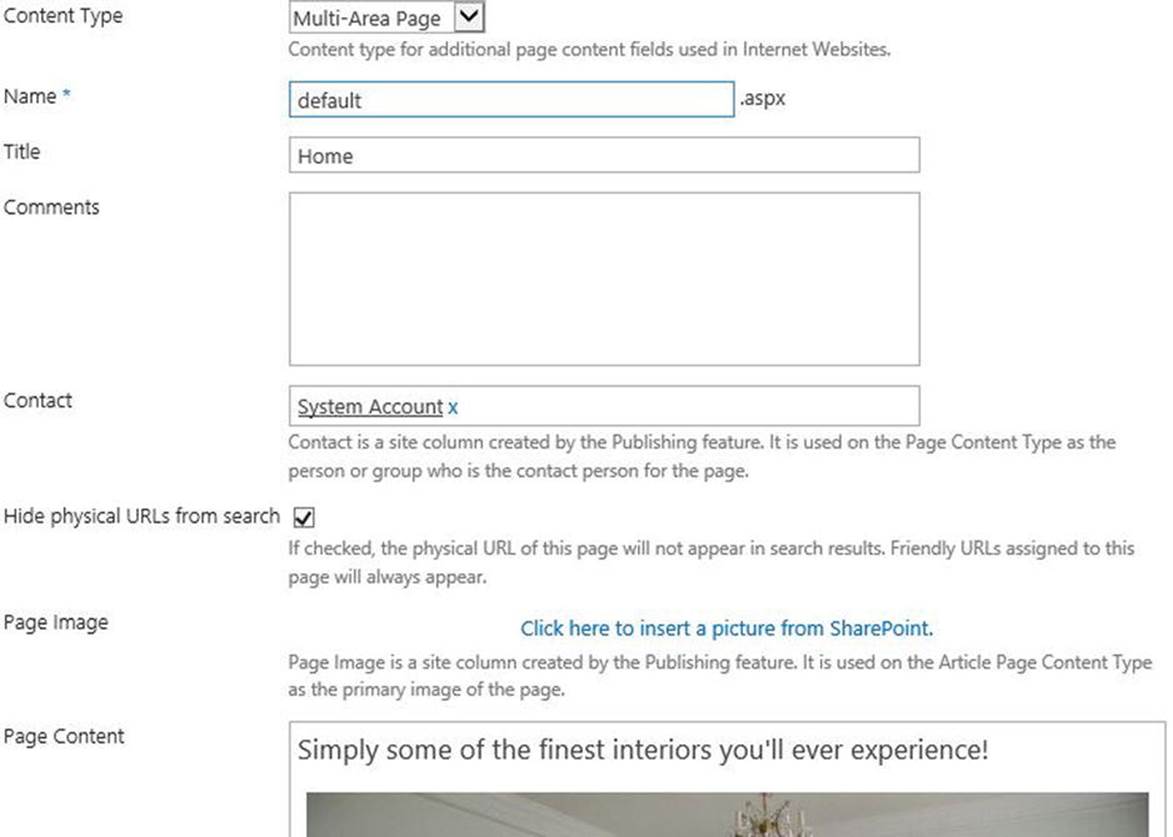
Figure 2-32. Editing the Home page properties
This page includes both metadata fields such as Comments and Contact as well as the actual content, which is defined in the Page Content fields. Since this is a multi-part page (in this case with main and sidebar sections), there are multiple Page Content fields.
You can edit the content from this page. If you click inside one of these fields, the ribbon will automatically expand to include the appropriate editing commands. For example, if you click on an image, the IMAGE tab will appear. If you prefer to edit from the actual web page, from thePages library, click the elipses on the page you wish to edit. Then, from the quick view pop-up, click the Open link. Then, use the PAGE tab of the ribbon to begin editing the page.
Modifying the Style Sheet
If you are comfortable with editing Cascading Style Sheets (CSS) you can have even more control over the look of your website. Ultimately, your web pages, which include HTML content, JavaScript, and CSS, are sent to a browser to be rendered. While some of the HTML includes in-line styles, most of it applies classes to an element and relies on the style sheets to define the layout, color, and fonts. By modifying the styles you can affect the look of your site.
![]() Note If you’re new to cascading style sheets the W3C School provides a great tool for learning and practicing. Go to this site, http://www.w3schools.com/css/DEFAULT.asp to start. You can edit CSS and see in real time how these styles affect the rendering.
Note If you’re new to cascading style sheets the W3C School provides a great tool for learning and practicing. Go to this site, http://www.w3schools.com/css/DEFAULT.asp to start. You can edit CSS and see in real time how these styles affect the rendering.
Go to the SITE tab of the ribbon and click the Edit Style Sheet button. A style sheet similar to the one shown in Figure 2-33 will be displayed.
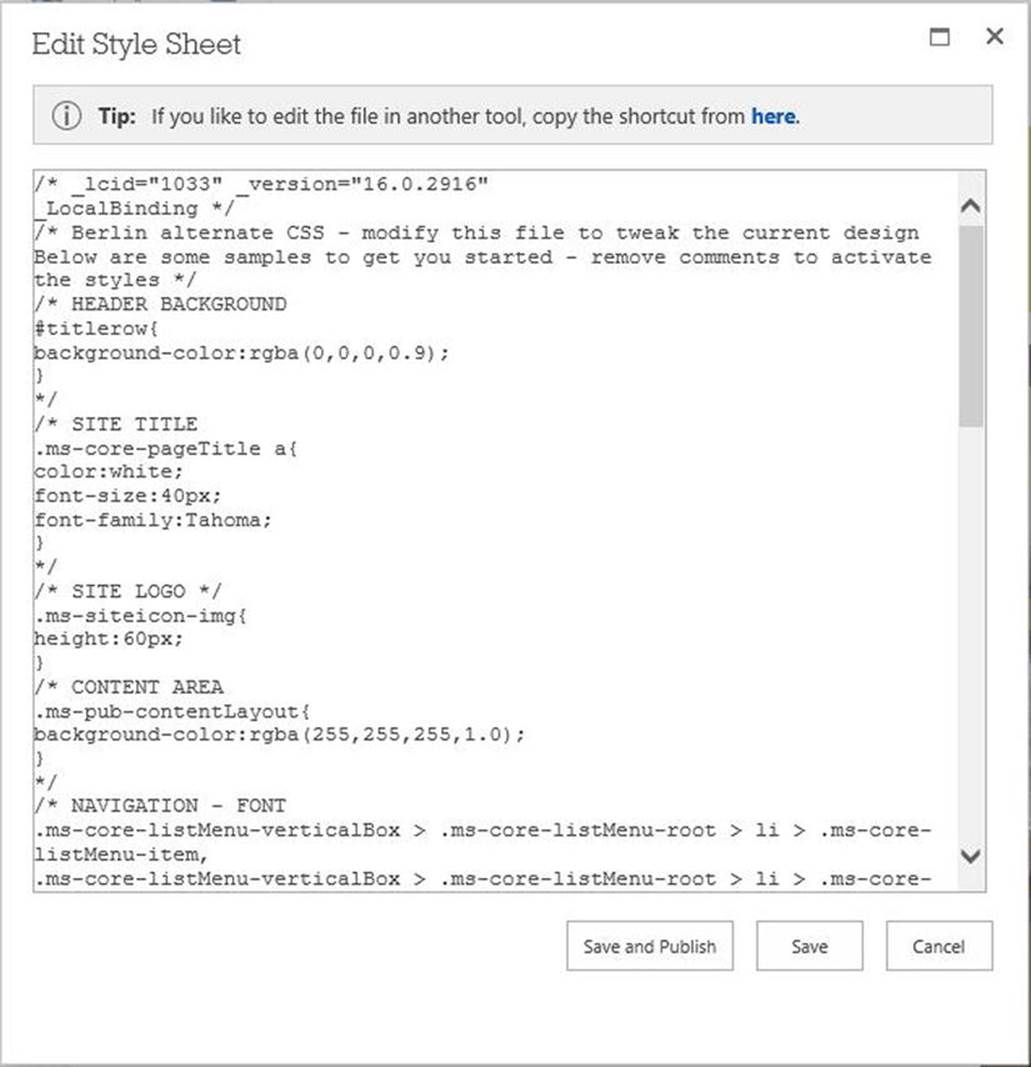
Figure 2-33. Editing the style sheet
This is the actual style sheet that is included with your web pages. You can display a page, view the source, and verify this file is included. You’ll find a link tag similar to this, and if you click on the href, the contents will be displayed.
<link rel="stylesheet"
type="text/css"
href="/_catalogs/masterpage/en-US/berlin-alternate.css?ver=29d6a5e7-b9f3-4817-a98a-0ea147d38fab"/>
However, notice that all of the styles have been commented out. The actual default styles are defined in other CSS files. The file displayed in Figure 2-33 is just a sample of the common elements that you might want to change. You can remove the comments, modify the styles, and click the Save button.
For our site, we want to make the logo a little bit bigger and change the background color of the side bar. Edit the style sheet and replace the SITE LOGO section with the following:
/* SITE LOGO */
.ms-siteicon-img{
height:60px;
}
Then replace the RIGHT SIDEBAR LAYOUT section with this:
/* RIGHT SIDEBAR LAYOUT */
.twoColumnRightLayout-right{
background-color:rgba(90,80,100,1.0);
}
Notice that as you type, the style changes are displayed immediately. If you’re happy with the result, click the Save and Publish button to make these changes to the live site.
![]() Tip You are not limited to changing the styles in the sample file; you can modify the styles for any class. To find the appropriate class name, use an inspector in your browser tools or view the source.
Tip You are not limited to changing the styles in the sample file; you can modify the styles for any class. To find the appropriate class name, use an inspector in your browser tools or view the source.
Employing Search Engine Optimization
Search Engine Optimization (SEO) is a very broad and important topic. One popular SEO technique is to include metadata in your site pages that provide information to the search engine to help find relevant content and to influence what is displayed in the search results. We are not going to explain SEO in this book but we do want to show you how you can adjust the metadata to accomplish your SEO strategies.
Adding Meta Tags
Metadata is included in your pages using meta tags, which are look like this:
<meta name="" content="" />
![]() Tip This page provides a good overview of the meta tags that the Google search engine recognizes: https://support.google.com/webmasters/answer/79812?hl=en
Tip This page provides a good overview of the meta tags that the Google search engine recognizes: https://support.google.com/webmasters/answer/79812?hl=en
To add meta tags to your pages, you’ll need to go to the Site Settings page You can get there by clicking the Settings icon in the menu bar and then selecting the Site settings link as shown in Figure 2-34.
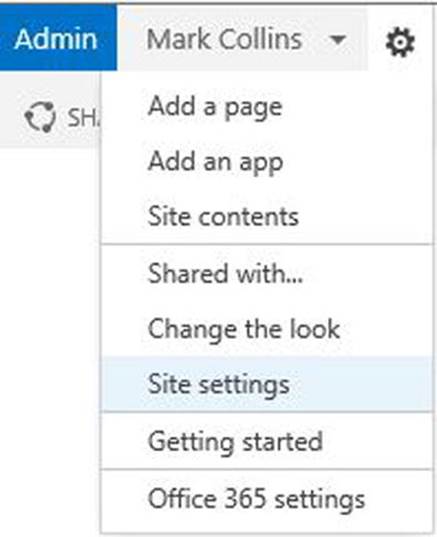
Figure 2-34. Navigating to the Site Settings page
The Site Settings page contains a number of links that navigate to pages that are used to configure various settings including user permissions and site collection administration. The two links related to SEO configuration are highlighted in Figure 2-35.

Figure 2-35. The Site Settings page
Click the Search engine optimization settings link. The first part of this page is shown in Figure 2-36.

Figure 2-36. The Search Engine Optimization Settings page
To embed meta tags, select the Include these meta tags in pages radio button and then enter the desired tags in the text box.
![]() Tip You may want to use some of the search engine’s webmaster tools to view and optimize how they view your site. In order to do this, you will need to prove that you “own” this site. One of the easiest ways to accomplish this is to generate a meta tag on their site and embed it into yours. The search engine’s verification process will then look for the tag. The Search Engine Optimization Settings page is where you’ll embed the verification tag.
Tip You may want to use some of the search engine’s webmaster tools to view and optimize how they view your site. In order to do this, you will need to prove that you “own” this site. One of the easiest ways to accomplish this is to generate a meta tag on their site and embed it into yours. The search engine’s verification process will then look for the tag. The Search Engine Optimization Settings page is where you’ll embed the verification tag.
Using Canonical URLs
Search engines will rate how popular a particular page is by how many times someone follows a link to the page. Sometimes a page may have different links to it. This is especially true when URL parameters are used. Some parameters are used to filter the content. In this case, diferent parameters will result in different content. For this reason, search engines generally treat these as different URLs.
However, some parameters may not have any affect on content. In this case, different URLs result in the same content but the URL’s popularity rating will be artificially diluted because they are considered different pages. To improve the rating you’ll want to combine these so the search engine treats this as a single, or canonical URL.
![]() Tip This article explains the benefits and approach to using canonical URLs: https://support.google.com/webmasters/answer/139066?hl=en&ref_topic=4617741.
Tip This article explains the benefits and approach to using canonical URLs: https://support.google.com/webmasters/answer/139066?hl=en&ref_topic=4617741.
The second half of the Search Engine Optimization Settings page allows you add parameter filters, which is shown in Figure 2-37.
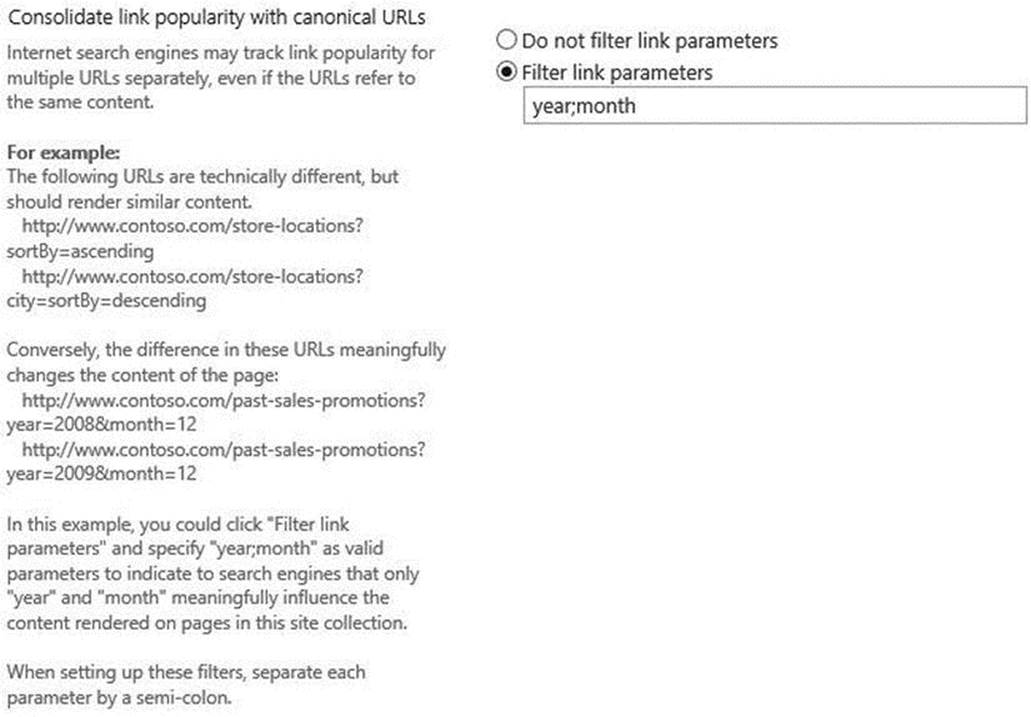
Figure 2-37. Entering filter parameters
The page itself explains how to do this. Just select the Filter link parameters radio button and then enter the parameters that truly affect the content that is returned. These should be separated by a semicolon. In the example given, the filter should be year;month.
Adding Videos
As more people have access to broadband, video is becoming an increasingly important aspect of a web site. I’ll show you two ways to add video to your site. A simple way to incorporate video is to take advantage of existing hosting services such as youtube.com. The video is uploaded to their site and streamed from there; you simply embed the video viewer in your web page. However, you can also host the video on your Office 365 site. I’ll show you how to use both techniques.
Creating a Video Library
Before you start adding videos to your site, you’ll create an asset library to store them. As you did with images, this will allow you to organize them and include metadata that will be helpful in maintaining your site.
Go to the Site Contents page and click the add an app link. In the section called Apps You Can Add, select the Asset Library app, and enter the name Video when prompted.
Linking to a Hosting Service
The easiest way to show a video is by simply adding a hyperlink to the URL of the hosting service. For example, you could add a hyperlink to this video:
https://www.youtube.com/watch?v=BQjBrt9LriY
However, you would have then navigated your potential customer away from your site and they would now be on the youtube site. There is a better way; instead of linking to the youtube site, you can embed the video inside your page using an iframe. When you view a video on one of these hosting sites, there are some controls underneath it similar to those shown in Figure 2-38.

Figure 2-38. The video controls on youtube
When you click the Share link, the window will open and show the URL for this video. If you click on the Embed link you’ll see more options as shown in Figure 2-39.
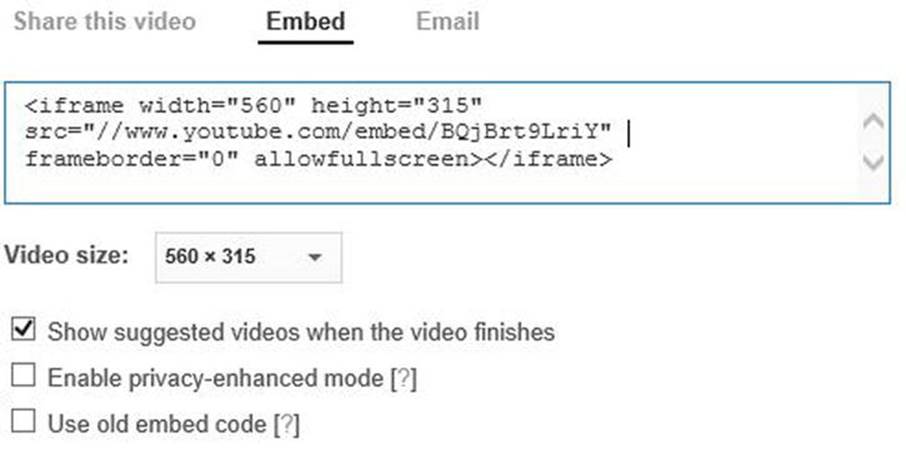
Figure 2-39. Generating the embed HTML
You can select the options you want such as the window size and the embedded HTML will be generated for you. The generated HTML for embedding this video is:
<iframe width="560"
height="315"
src="//www.youtube.com/embed/BQjBrt9LriY"
frameborder="0"
allowfullscreen>
</iframe>
Go to the Videos library, which will be empty. Go to the FILES tab of the ribbon and click the New Document button. This will display the dropdown shown in Figure 2-40 where you can select the content type.
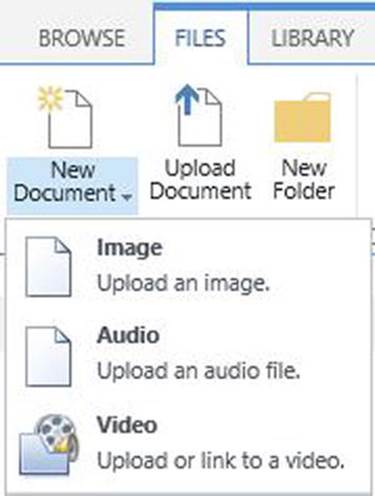
Figure 2-40. Selecting the content type
Select the Video link. In the edit page that is displayed, select the Provide code to embed a video from the web radio button. Enter a name for the video and paste in the embedded code as shown in Figure 2-41.

Figure 2-41. Entering the video details
You can click the Preview button to verify the embed code is correct. Click the OK button when you’re done. The page will then display the intial video frame as well as all of the metadata fields that you can enter to organize your assets. You can also load a thumbnail image by clicking the Change thumbnail link.
Uploading Your Own Videos
Now you’ll add a video that will be hosted within SharePoint. From the FILE tab, click the New Document button and then select the Video link just like before. In the page that is displayed, select the Upload a video from my computer radio button and browse to your video file as shown in Figure 2-42.
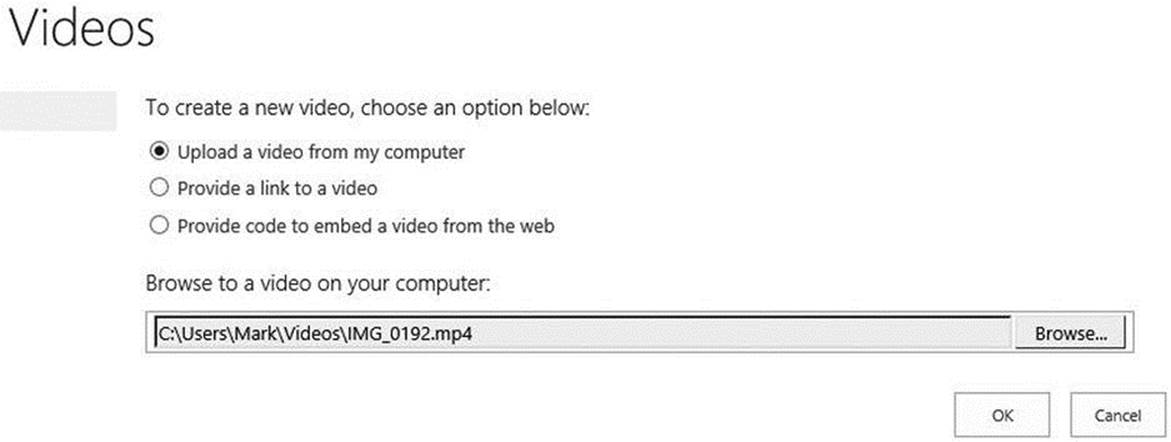
Figure 2-42. Uploading a video
![]() Tip The only video format that is currently supported is MP4. This, of course, can change and more options may be available later. If you need to convert a video file to MP4, I found this free site to work very well: http://video.online-convert.com/convert-to-mp4. Convert your files to MP4 before trying to upload them to SharePoint.
Tip The only video format that is currently supported is MP4. This, of course, can change and more options may be available later. If you need to convert a video file to MP4, I found this free site to work very well: http://video.online-convert.com/convert-to-mp4. Convert your files to MP4 before trying to upload them to SharePoint.
With a SharePoint hosted video, you have the option of capturing a thumbnail from the video itself. Click the Change thumbnail link to see the available options, which are shown in Figure 2-43.
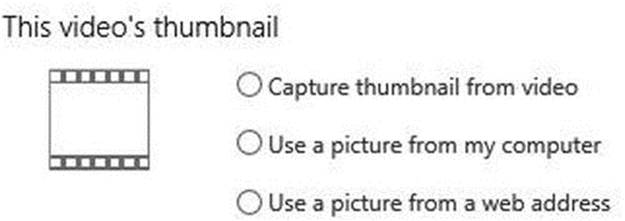
Figure 2-43. Thumbnail options
Select the Capture thumbnail from video radio button and then click the play button on the video. When the video is displaying the desired frame, click the camera button at the top of the video as shown in Figure 2-44. You can also use the left and right arrows to step through the video.
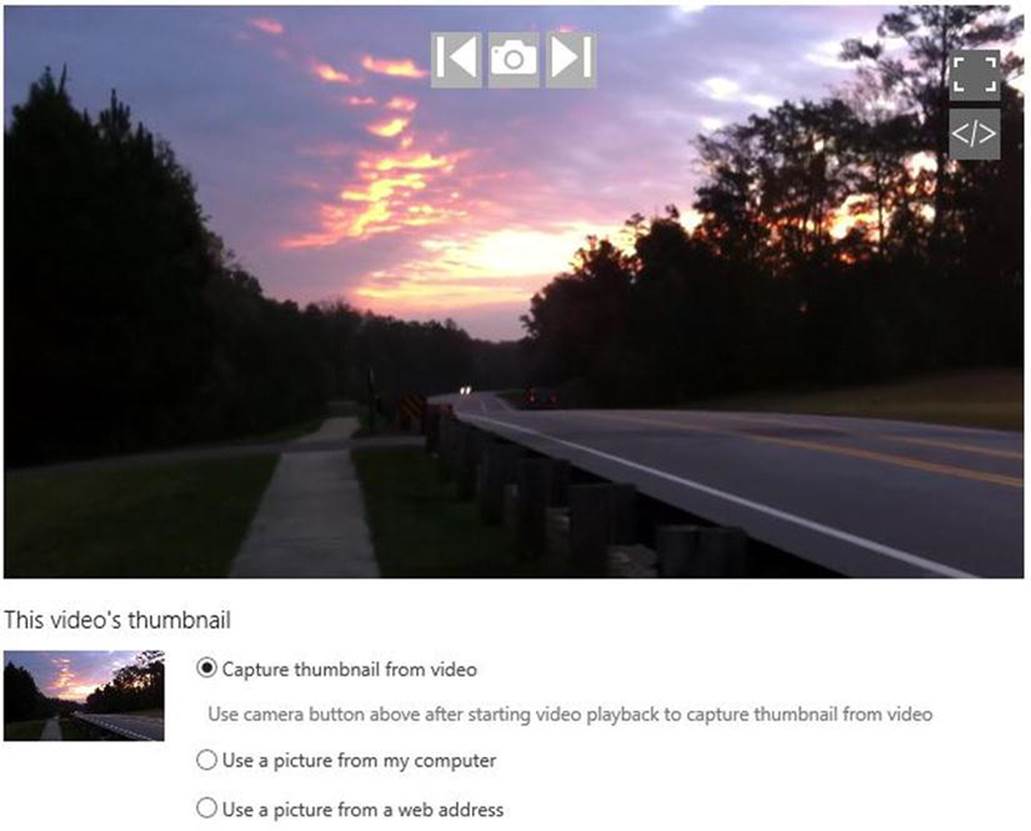
Figure 2-44. Capturing a thumbnail from the video
As with images, you can enter metadata information for each video. The edit form is shown in Figure 2-45.
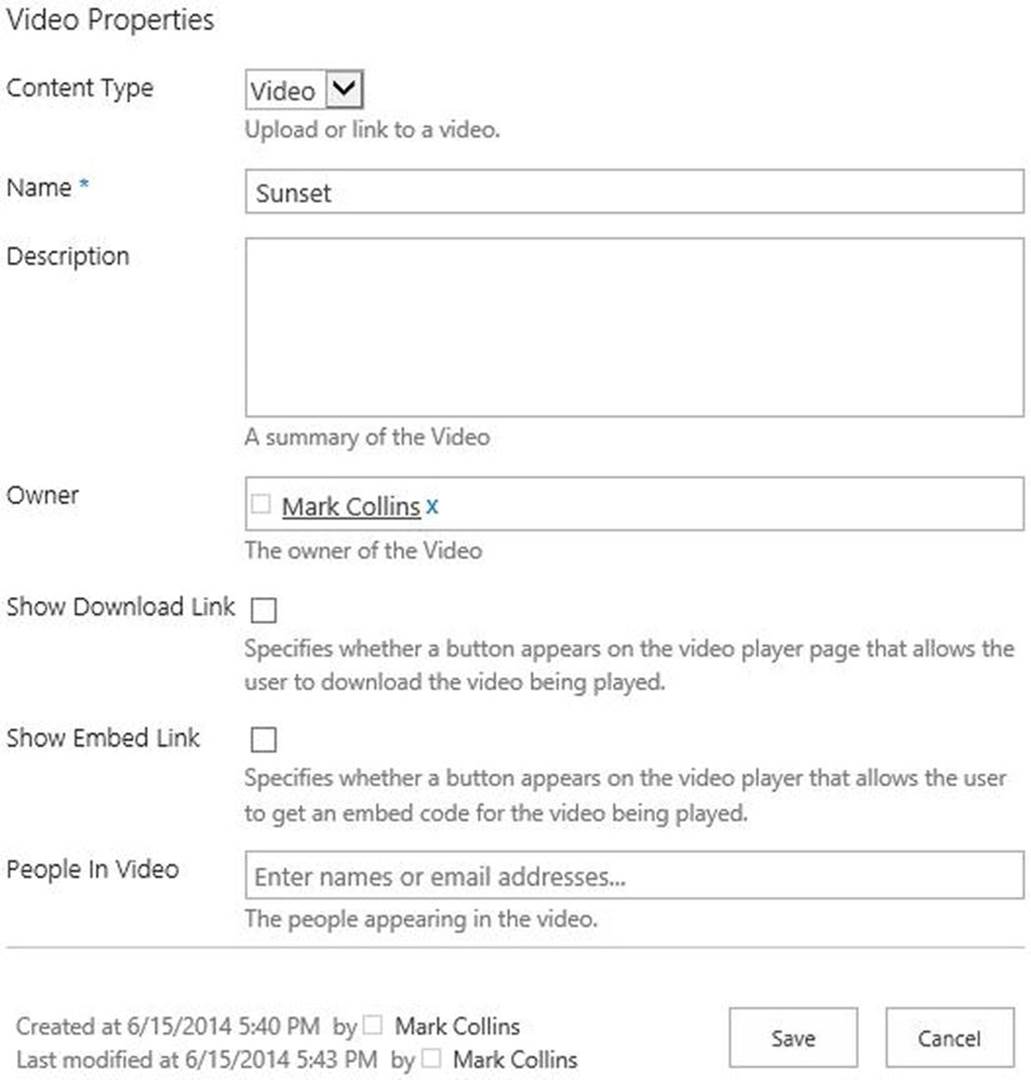
Figure 2-45. Editing the video properties
Click the Save button when you have finished editing the properties. Go to the Videos library and you should have two videos as shown in Figure 2-46. One video uses an embedded link and the other is hosted on Sharepoint.
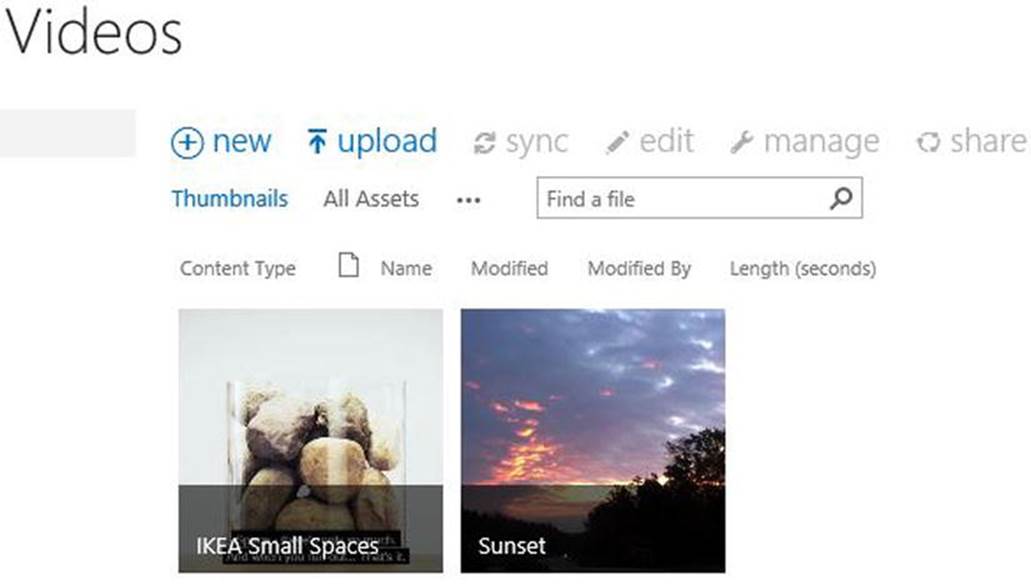
Figure 2-46. The completed Videos library
Adding Videos to Your Page
Regardless of where the image is hosted, once it is in your Videos library, the process for adding it to a page is the same. Go to one of your pages and click the Edit button from the PAGE tab of the ribbon. Then go to the INSERT tab and select the Video and Audio button. You’ll see a dropdown with your options as shown in Figure 2-47.
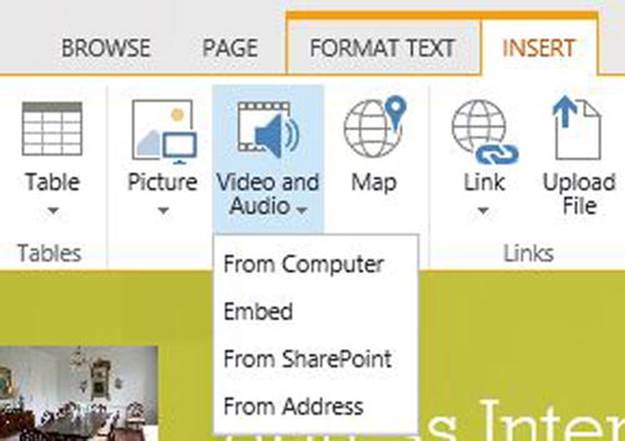
Figure 2-47. Adding videos to your page
Click the From SharePoint link and then select the Videos library. Select an image and the video will be added to the page.
Summary
In this chapter you created a professional looking website. The site uses color, images, and videos to make a great impression. A public-facing website is very different from the typical SharePoint site. It is more content based and less functional than most internal sites. The design facility provides some great features for designing public web sites. And with the ability to include custom images and videos you can implement a full-featured web site on your Office 365 platform. Also, the SharePoint libraries provide an exellent facility for managing all of your web content.
The techniques used in this chapter include:
· Customizing the look of the website
· Uploading and using custom images
· Using the SharePoint libraries to manage content
· Embedding video from other hosting services
· Planning and organizing content for a public-facing website
All materials on the site are licensed Creative Commons Attribution-Sharealike 3.0 Unported CC BY-SA 3.0 & GNU Free Documentation License (GFDL)
If you are the copyright holder of any material contained on our site and intend to remove it, please contact our site administrator for approval.
© 2016-2026 All site design rights belong to S.Y.A.