Pro Office 365 Development, Second Edition (2014)
Chapter 3. Developing SharePoint Apps in Visual Studio
In this chapter we’ll show you how to create SharePoint apps using Visual Studio 2013. An integrated SharePoint development environment was introduced with Visual Studio 2010 but, to be honest, it just wasn’t that great. With the improvements in 2012 and 2013, Microsoft really raised the bar!
For starters, Visual Studio can now work directly with a cloud-hosted SharePoint server such as Office 365. Previously, you had to install the SharePoint products on your development machine in order to develop and test. Now, you can point Visual Studio to your Office 365 site and you’re ready to go. They also made some really nice improvements to the tools for designing lists and content types. No more manually editing XML files and guids.
In this chapter, you’ll first create a list using the list designer and deploy it to Office 365. This will leverage all of the standard SharePoint forms for viewing and editing your list using what is sometimes referred to as the “SharePoint way”. This is simple, easy, and provides a consistent UI that your users are likely very familiar with.
However, you may want to provide a custom UI using the standard web development technologies like HTML, CSS, and JavaScript. With the JavaScript Client Object Model your UI can access and manipulate server components such as lists and list items. We’ll show you how to leverage this to create a list with a custom UI. You’ll also create a custom tab on the SharePoint ribbon. To round out the chapter, you’ll create an App Part that provides a view into your list, which you can drop onto any SharePoint page.
Enabling the Developer Feature
The development experience is really sweet; you code the app, hit F5, and the app is automatically deployed and launched, allowing you to set breakpoints and step though your JavaScript code. Previously this was only available with a local installation of SharePoint. Now you can do this with a remote on-premise server or cloud-hosted server. This, however, may cause some legitimate concerns from your system administrators. Think about it: developers pushing out applications to a live production site without any sort of control process.
To address these concerns, this ability is turned off by default. You’ll need to enable it before you can deploy your first app. This F5 deployment, also known as side loading, is only available on a SharePoint site that has the Developer feature activated. This is a hidden feature so you’ll need to run a PowerShell script to enable it.
![]() Caution The Development feature should only be enabled on sites that are used for development purposes. Enabling this on a production site can open up vulnerabilities. Also note that if your SharePoint site was provisioned as a test site using NAPA or other type of development platform, this feature may have already been enabled for you.
Caution The Development feature should only be enabled on sites that are used for development purposes. Enabling this on a production site can open up vulnerabilities. Also note that if your SharePoint site was provisioned as a test site using NAPA or other type of development platform, this feature may have already been enabled for you.
You will need to install the SharePoint Online Management Shell, which you can get from this site: http://www.microsoft.com/en-us/download/details.aspx?id=30359. The download page is shown in Figure 3-1. Click the Download button to start the installation.
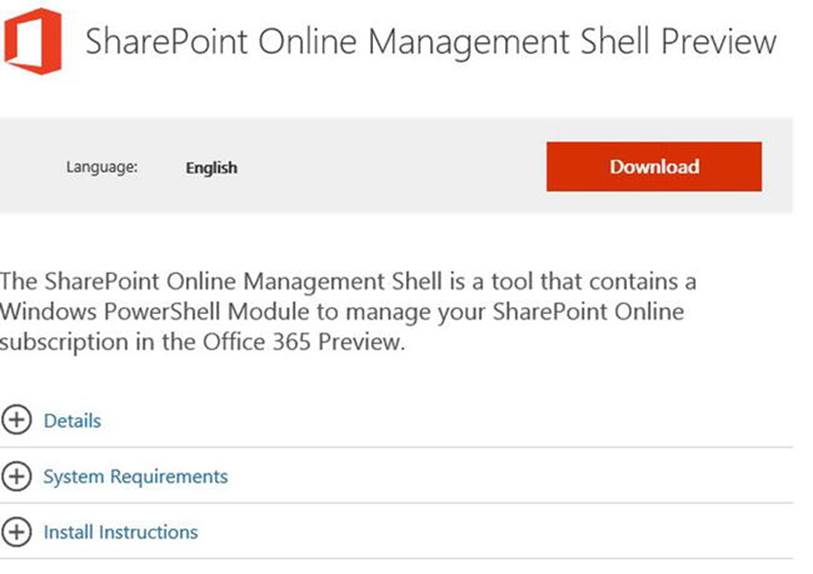
Figure 3-1. Downloading the SPO Management Shell
Then select either the 32-bit or 64-bit version when prompted. You may have to enable pop-ups to start the download. Follow the instructions to complete the installation.
Now you’re ready to create and execute the PowerShell script. Using a text editor, create a file with a .ps1 extension and enter the text shown in Listing 3-1. This file is also available in the download folder from the Apress site.
Listing 3-1. Power Shell script
$programFiles = [environment]::getfolderpath("programfiles")
add-type -Path $programFiles'\SharePoint Online Management Shell\Microsoft.Online.SharePoint.PowerShell\Microsoft.SharePoint.Client.dll'
Write-Host 'To enable SharePoint app sideLoading, enter Site Url, username and password'
$siteurl = Read-Host 'Site Url'
$username = Read-Host "User Name"
$password = Read-Host -AsSecureString 'Password'
if ($siteurl -eq '')
{
$siteurl = 'https://apress365.sharepoint.com'
$username = 'mark@apress365.onmicrosoft.com'
$password = ConvertTo-SecureString -String ********' -AsPlainText -Force
}
$outfilepath = $siteurl -replace ':', '_' -replace '/', '_'
try
{
[Microsoft.SharePoint.Client.ClientContext]$cc = New-Object Microsoft.SharePoint.Client.
ClientContext($siteurl)
[Microsoft.SharePoint.Client.SharePointOnlineCredentials]$spocreds = New-Object Microsoft.SharePoint.Client.SharePointOnlineCredentials($username, $password)
$cc.Credentials = $spocreds
#Write-Host -ForegroundColor Yellow 'SideLoading feature is not enabled on the site:' $siteurl
$site = $cc.Site;
# This guid identifies the Development Feature
$developerFeature = new-object System.Guid "e374875e-06b6-11e0-b0fa-57f5dfd72085"
$site.Features.Add($developerFeature, $true, [Microsoft.SharePoint.Client.FeatureDefinitionScope]::None);
$cc.ExecuteQuery();
Write-Host -ForegroundColor Green 'Developer feature enabled on site' $siteurl
#Activated the Developer Site feature
$test = Read-Host 'Enter to continue'
}
catch
{
Write-Host -ForegroundColor Red 'Error encountered when trying to enable Developer feature'
$siteurl, ':' $Error[0].ToString();
$test = Read-Host 'Enter to continue'
}
The point of this script is that it enables the development feature, which is identified by a “magic” guid: e374875e-06b6-11e0-b0fa-57f5dfd72085. This script prompts for three pieces of information:
· Site Url: This is the root address of the Team Site
· User Name: The user name (email address) of a user with admin privileges on the SharePoint site
· Password:
The script was coded to provide default values so you don’t have to enter them when the script runs. The listing includes the values we used (minus the password) as an example. Make sure to change these with appropriate values for your environment.
After creating the file, from Windows Explorer, right-click the file and select the Run with PowerShell link. If you have hard-coded the information in the script, just press Enter when prompted for the URL, name, and password. Otherwise, enter the valid values when prompted. The result should look like Figure 3-2.
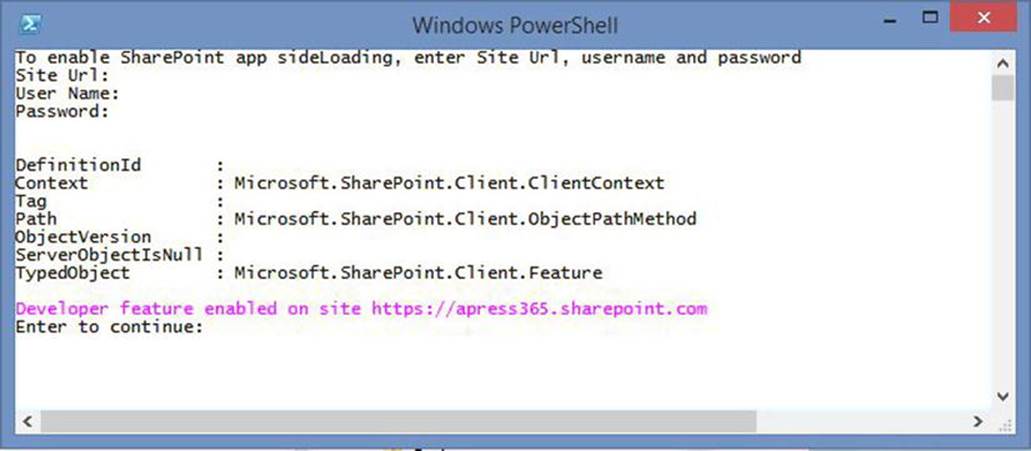
Figure 3-2. Running the PowerShell Script
Now go to your Team Site and you’ll notice that a new Apps in Testing page, shown in Figure 3-3, has been created for you.
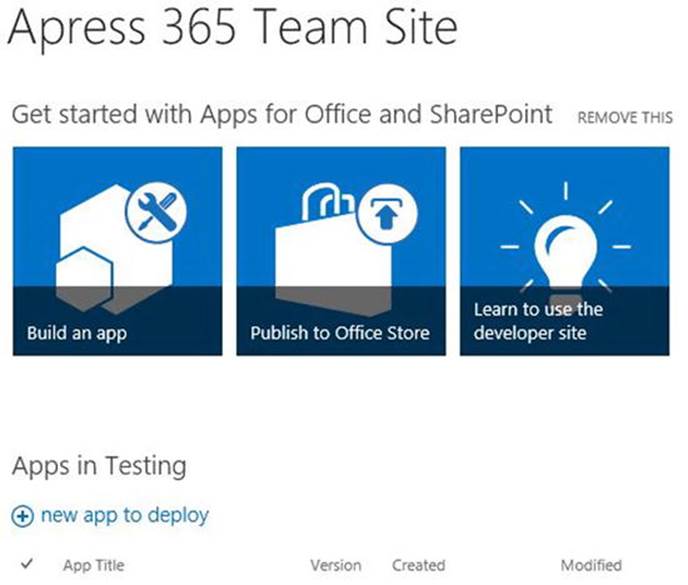
Figure 3-3. The new Apps in Testing page
This page has some links at the top that provide some developer resources. You can hide this by clicking the REMOVE THIS link. This page also lists all of the apps that have been deployed using the Sideloading (F5) feature. This list will be empty, for now.
Creating a SharePoint List
Now that your development environment is set up, let’s build some SharePoint apps using Visual Studio 2013. The first one will be a list that includes the standard SharePoint UI. This is very simple process but will provide an opportunity to test the F5 deployment feature and also look at what is created for you, under the covers. Subsequent apps will demonstrate how you can develop your own UI using HTML, CSS, and JavaScript.
![]() Tip In the new SharePoint 2013 model, everything is an “App”. Even the basic Task List, Calendar, and Document Library that you are probably very familiar with are now called apps. Actually, they are both: there is underlying list with an app around it that provides the presentation layer. This is primarily a presentation shift in the SharePoint UI; underneath we still have the core list, library, and content type objects. Visual Studio, for the most part, still calls them lists.
Tip In the new SharePoint 2013 model, everything is an “App”. Even the basic Task List, Calendar, and Document Library that you are probably very familiar with are now called apps. Actually, they are both: there is underlying list with an app around it that provides the presentation layer. This is primarily a presentation shift in the SharePoint UI; underneath we still have the core list, library, and content type objects. Visual Studio, for the most part, still calls them lists.
Creating the Visual Studio Project
You’ll now create a new project in Visual Studio, using the new project template to setup all of the SharePoint connections that are required.
1. Open Visual Studio 2013 and from the Start page, click the New Project link. In the Installed Template section you’ll find the Office/SharePoint folder. Select the Apps sub-folder. We’re using C# but if you want to use VB, you’ll find a similar folder structure under the Visual Basic folder. Select the App for SharePoint template and enter CustomTaskList for the project name as shown in Figure 3-4.
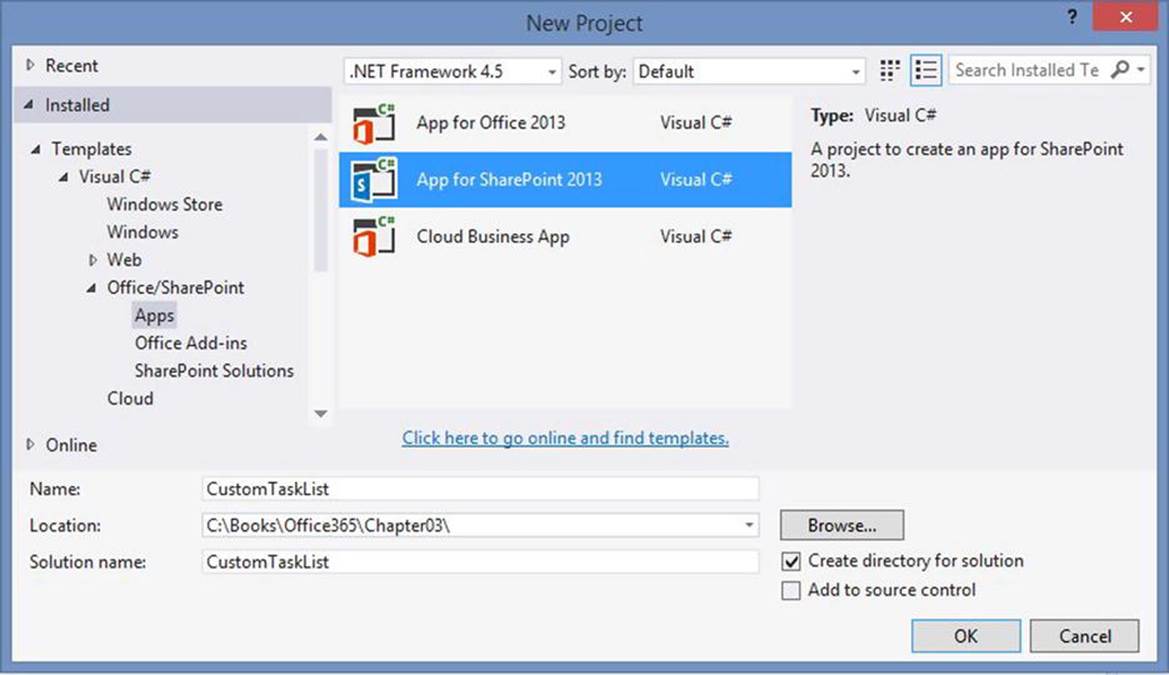
Figure 3-4. Creating a SharePoint App project
2. The project template needs a couple of pieces of information. First enter the URL of your SharePoint site. This is probably your domain name (without the onmicrosoft.com) with sharepoint.com appended to it. If you’re not sure, just go to your team site and get its URL from the browser, ignoring anything after .com. Also, select the SharePoint-hosted option as shown in Figure 3-5.
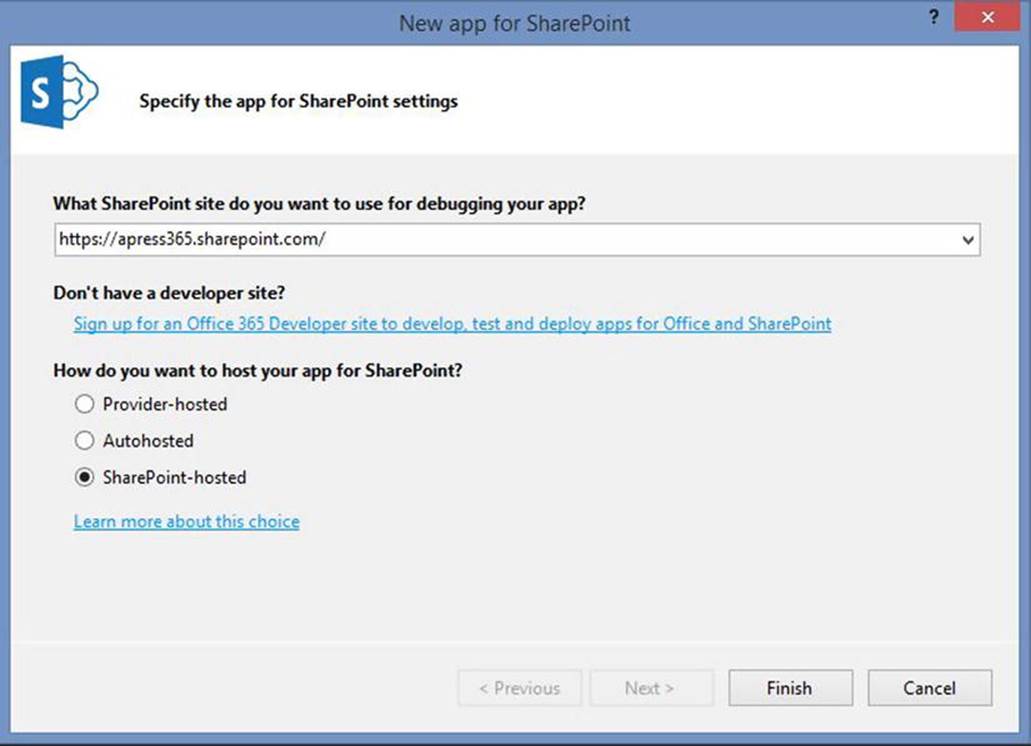
Figure 3-5. Specifying the host site and hosting options
3. Visual Studio will then connect to your site and you may be prompted to provide credentials as demonstrated in Figure 3-6. Enter a username and password of an account with admin privileges on the site. I recommend that you select the Keep me signed in check box. This will save you from having to re-enter your credentials every time you hit F5 to debug your app.
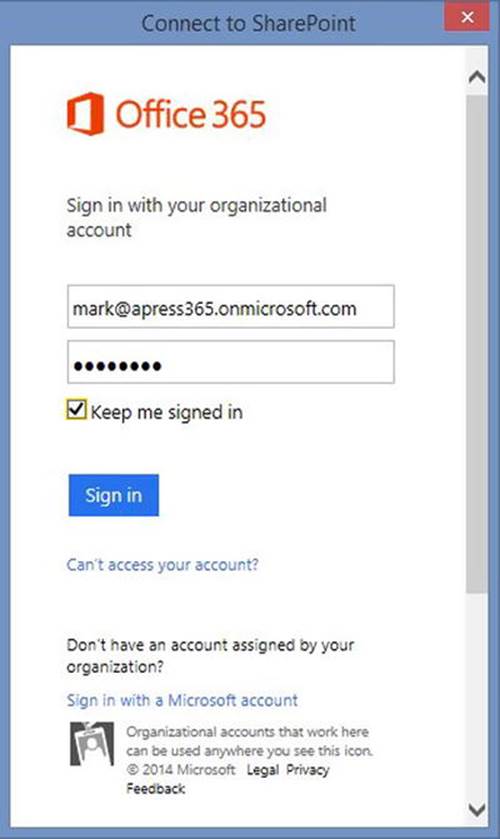
Figure 3-6. Signing in to Office 365
Now you have your Visual Studio project created and linked to your SharePoint site. Of course there’s not much in it yet. We’ll get to that shortly.
Exploring the Project Elements
Before we start designing the new list, let’s briefly explore what was just created for you. Go to the Solution Explorer and expand the folders. You should see elements similar to Figure 3-7.
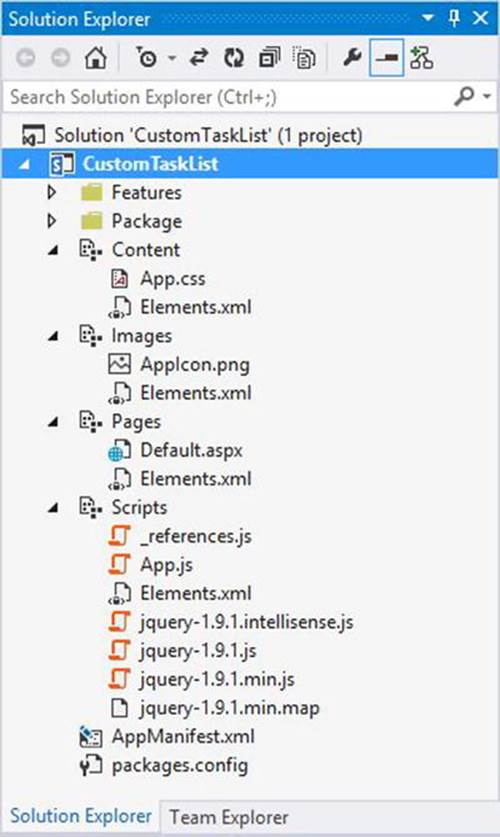
Figure 3-7. The initial solution elements
There are Features and Package folders that contain some SharePoint stuff. When your app is deployed to a SharePoint site, Visual Studio creates a deployment package and the contents of these folders are used to do that. If you have developed SharePoint apps before, this will be familiar to you. If not, the good news is that you rarely have to deal with these; Visual Studio takes care of most of this for you.
In the Content folder you’ll find an App.css file and the Scripts folder contains some JavaScript files including jQuery. If you’re a web developer that will be a hopeful sign.
Notice that in each folder there is an Elements.xml file. This is used to indicate the files that need to be deployed and where they need to go. Again, Visual Studio takes care of most of this for you. Here is a sample file:
<?xml version="1.0" encoding="utf-8"?>
<Elements xmlns="http://schemas.microsoft.com/sharepoint/">
<Module Name="Images">
<File Path="Images\AppIcon.png" Url="Images/AppIcon.png" ReplaceContent="TRUE" />
</Module>
</Elements>
Now select the project and look at Properties window. This contains some of the information you entered when setting up the project such as the URL of the SharePoint site.
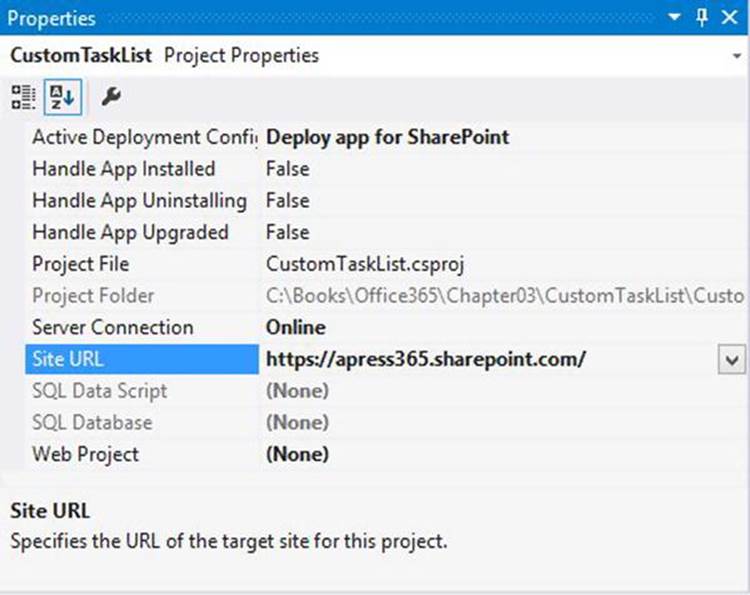
Figure 3-8. The project properties
![]() Caution If you downloaded projects from the Apress site, you will need to change the Site URL properties. Just go to the Properties window and enter the correct URL here.
Caution If you downloaded projects from the Apress site, you will need to change the Site URL properties. Just go to the Properties window and enter the correct URL here.
Adding a List
Let’s add a list to your project. You can create a blank list without any columns and then add the needed columns. However, if your list is similar to an existing list, you can save some time by starting with this list and then make your modifications. In this project, we’ll use the Tasks list as our starting point.
1. From the Solution Explorer, right-click the project and select the Add and then New Item links. In the Add New Item dialog box, the Office/SharePoint folder should already be selected. There are a number of different types of elements that can be added. For now, select the List item and enter CustomTaskList for its name, as shown in Figure 3-9.
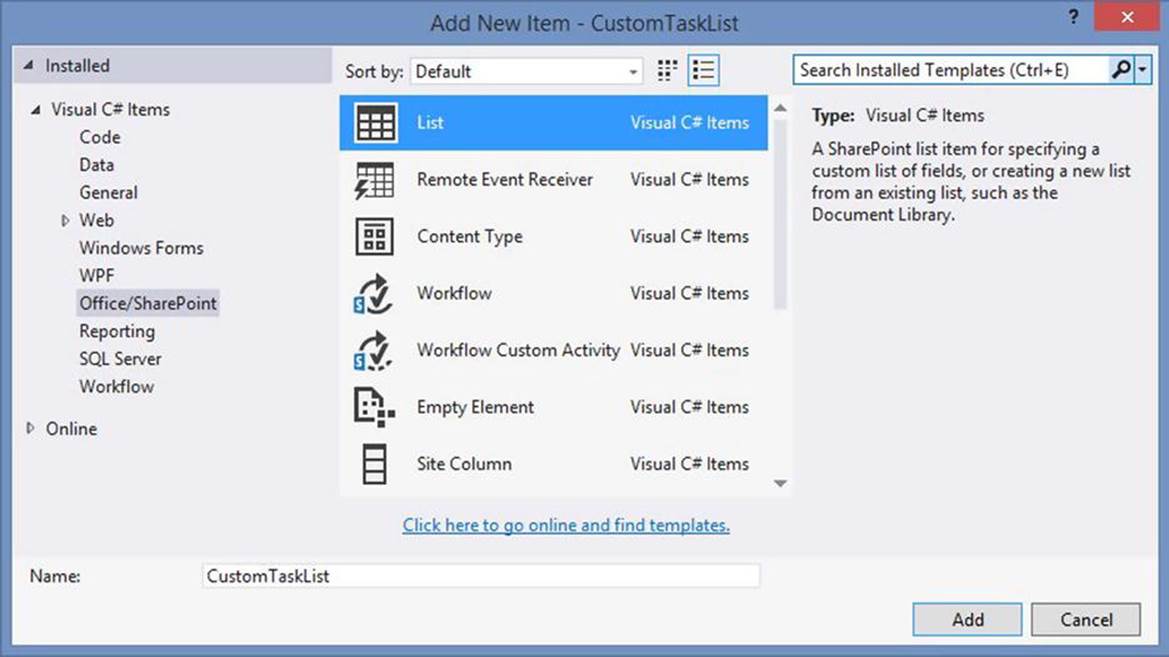
Figure 3-9. Adding a new List to a project
![]() Note In this sample you’ll create a list with a set of columns. However, in a properly architected SharePoint solution, you should create reusable columns (called Site Columns) and organize them into content types. A list can contain multiple content types and its set of columns will be a super-set of the columns in each of the content types. This is beyond the scope of this chapter, but will be covered, briefly, in Chapter 4. We have also provided a SharePoint Primer in Appendix A that explains site columns and content types. The tools in Visual Studio 2013 allow you to construct these elements.
Note In this sample you’ll create a list with a set of columns. However, in a properly architected SharePoint solution, you should create reusable columns (called Site Columns) and organize them into content types. A list can contain multiple content types and its set of columns will be a super-set of the columns in each of the content types. This is beyond the scope of this chapter, but will be covered, briefly, in Chapter 4. We have also provided a SharePoint Primer in Appendix A that explains site columns and content types. The tools in Visual Studio 2013 allow you to construct these elements.
2. The List template will then prompt you for some additional information. The name that is displayed will default to the name of the list. Enter Custom Tasks instead.
3. Then you have two options for creating a list. The first is to create a new list template and a new instance of it. This gives you the ability to customize the columns in your list. The second option is to create a new instance of an existing template. You can’t modify the columns but simply create another copy of an existing list. For example, you’ll use this option if you need a new task list for a different project but you don’t need to change the columns. For this project, however, select the first option and select the Tasks list as shown in Figure 3-10 and click the Finish button.
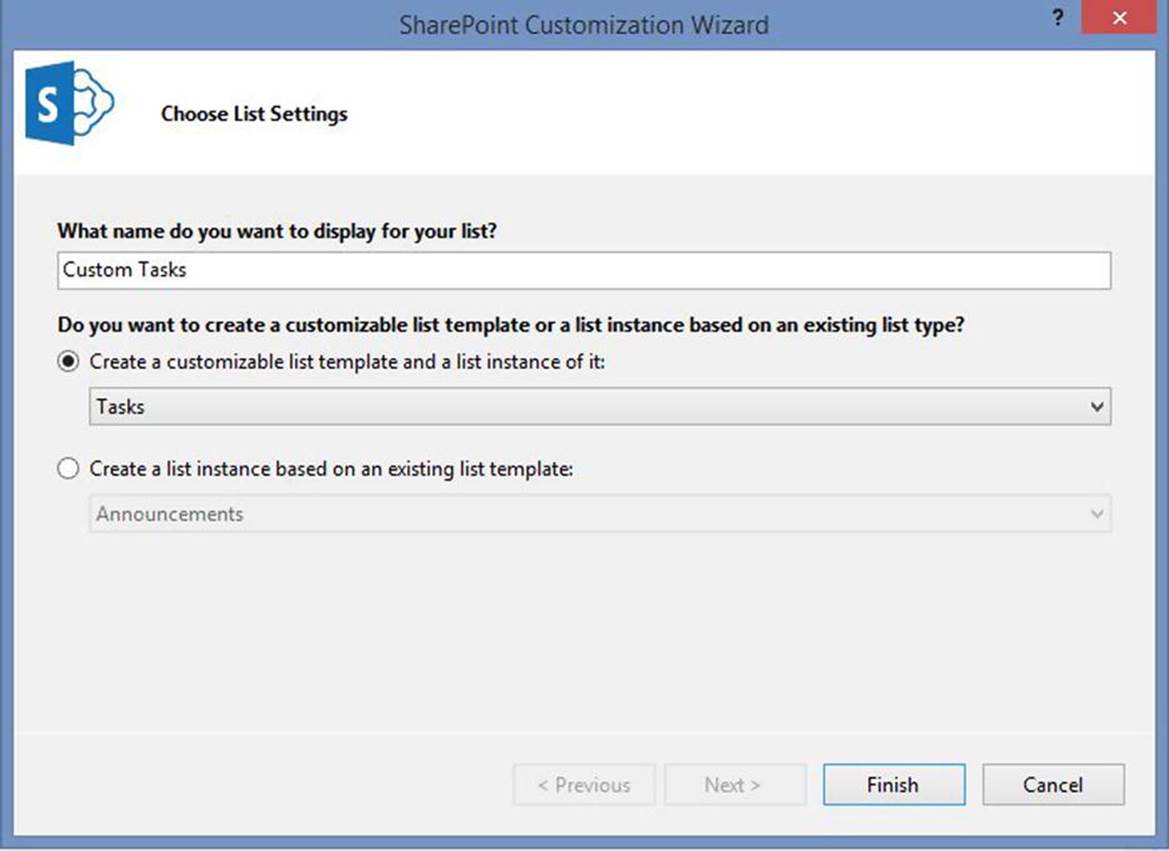
Figure 3-10. Selecting the list to use as our starting point
![]() Tip Once you have created this list (and list template) you can create additional lists using the same template. For example, if you add another list to your project, and select the second option, you’ll see the CustomTaskList in the dropdown list, which you can use to define the new list.
Tip Once you have created this list (and list template) you can create additional lists using the same template. For example, if you add another list to your project, and select the second option, you’ll see the CustomTaskList in the dropdown list, which you can use to define the new list.
Modifying the List Definition
Now you’re ready to define what your new list will contain. You’ll also experience a nice improvement in Visual Studio 2013 in regards to SharePoint development.
If you look at the Solution Explorer you’ll see a CustomTaskList has been added to your project. Within that you’ll also find a CustomTaskListInstance as shown in Figure 3-11.
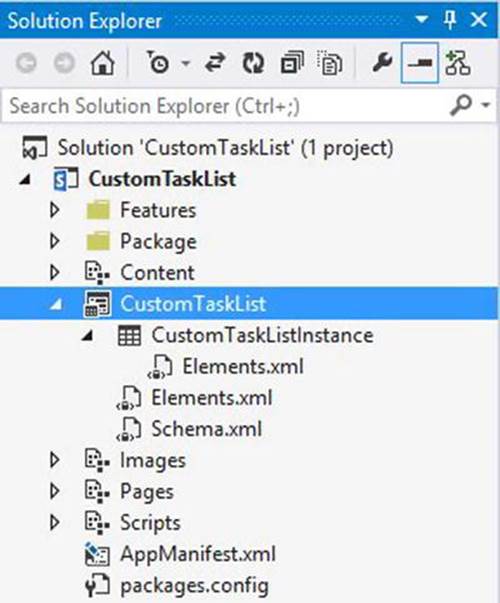
Figure 3-11. The CustomTaskList in the Solution Explorer
This illustrates the fact that you created two different objects: a list template, and a list instance. The Schema.xml file defines all of the details of the list. You can edit this, if you really want to. I suggest that you at least look at it to see what’s in there. It includes the definitions of all the columns in your list. In previous versions of Visual Studio you had to manually edit most of this so this will also give you an appreciation for the new list designer in Visual Studio 2013. You will need to make some manual edits, later in the chapter.
Double-click the Schema.xml file to open it. If the designer is already open, you will get a warning similar to Figure 3-12.
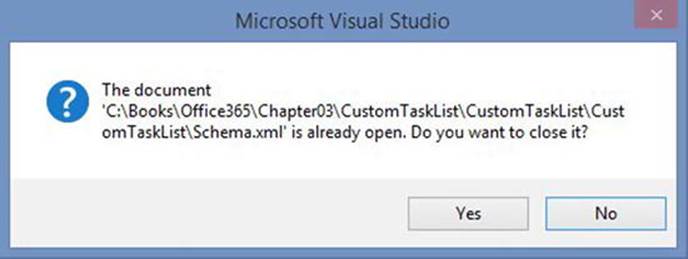
Figure 3-12. Warning that the file is already open
The designer is actually displaying and editing the Schema.xml file, with a much friendlier UI. Visual Studio will not let you open the file as both a text file and with the designer simultaneously, so you’ll need to close the designer. If you choose No, the designer will stay open but the text-file version will not open.
Close the Schema.xml file an open the designer by double-clicking either the CustomTaskList or CustomTaskListInstance elements in the Solution Explorer. While these are two different objects (one a list template, the other an instance of that template), there is one definition (Schema.xml) for both. So opening either, will open the list designer. The list designer has three tabs: Columns, Views, and List. Let’s go through each of these and customize your list.
Adjusting the List Columns
Select the Column tab and you’ll see all of the columns that are on the existing Tasks list.
1. Scroll to the bottom of the column list. Select the Related Items column by clicking the empty grid column to the left of it. A green arrow will then appear in this column and the row will be highlighted. Right-click this row and click the Delete link to remove this column.
2. Using this procedure, remove the Previously Assigned To, Predecessor, and Parent ID columns.
3. The Task Name column is listed several times because there are multiple versions of it. Notice that one of these is defined with a Single Line of Text type but the others are Computed. The computed versions display the same information in a different format, such as with a hyperlink. On the row marked Single Line of Text, select the Required checkbox. This will make this column required.
4. Now you’ll add an existing site column. Click the Type a new or existing column name link on the last row of the grid. All of the existing site columns will appear in a dropdown list. Select the Actual Work column. The Type attribute is automatically set to Numeric because this is an existing site column that was previously defined.
5. Click the Type a new or existing column name link again and enter External Reference for the name. Notice that as you type, the dropdown list is filtered with site columns that match. After entering the name press the Tab key. The Type will default toSingle Line of Text, which will be fine for this project. If you needed a different type, you can select one from the dropdown list.
6. Click the Save button in the ribbon to save these changes. The Columns tab should look like Figure 3-13.
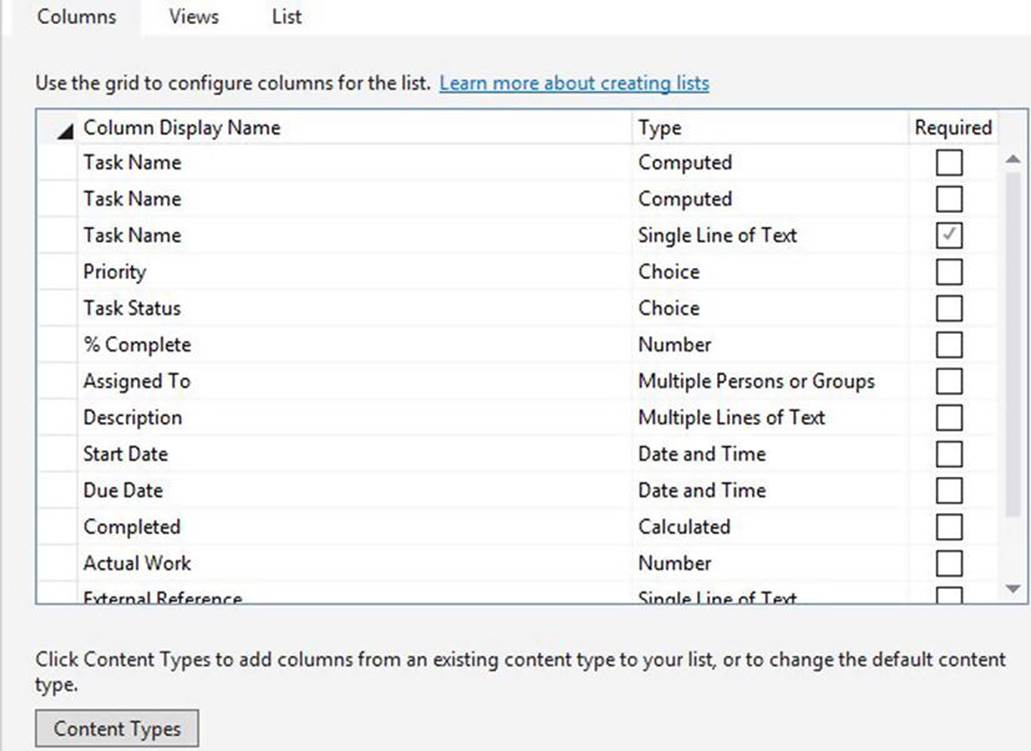
Figure 3-13. The modified list columns
Adding a New View
The Task list that we started with has a lot of views defined. If you go to the Views tab you’ll see them listed there. The All Tasks view is set as the default view and is shown in bold text to identify it as the default. This is the view that will be used when you first go to the list.
As you did with the column list, you can right-click a view and use the Delete link to remove it. You can also adjust the Row Limit value, which indicates how many items will be displayed on a page. You can also select the Read Only check box to prevent items from being modified from that view.
For this project you will create a new view. This view will display tasks that are not yet assigned to anyone.
1. Scroll to the bottom of the view list and click the Click here to add a view link. Enter the name Unassigned Tasks. Press the Tab key and enter 20 for the Row Limit.
2. Notice that there are no selected columns. You’ll add them now. Select the following columns from the Available columns list and click the right-arrow button to move them to the Selected columns list. You can either move them one at a time or hold down the Ctrl key and select multiple columns and move them all at once.
· Assign To
· Priority
· ID
· Task Name (Link Title)
· Due Date
· Description
· Created By
· Created
3. Using the up and down arrows to the right of the Selected columns list, reorder the columns so that the ID, Priority, Task Name, Due Date, Assigned To, and Description columns are shown first, in that order.
4. Save the changes and the view definition should look like Figure 3-14.

Figure 3-14. The new view definition
So now you’ve defined a new view in terms of its contents, what columns are displayed, and in what order. But the point here is that this view should only show unassigned tasks. You will need to define a filter to make this happen. Unfortunately, the list designer does not provide this feature; you will need to modify the Schema.xml file manually to do this.
Open the Schema.xml file (closing the designer if prompted). You’ll probably notice that the file has a lot of blank lines. Also, while some of the elements are properly indented, many are not. If you look for your new view, it will be near the bottom of the file and all on one line, which makes it hard to read. So the list designer edits this file but, while functional, is not formatted well. To resolve many of the formatting issues, from the Edit menu, select the Advanced link and then Format Document.
![]() Note If you go to the Columns tab of the designer and select a column in the list, the Properties window displays all of its properties. There is both a Name and a DisplayName property. The Schema.xml file uses the Name property, while the list designer uses the DisplayNameproperty. This is why there are some discrepancies in the names between the two. For example, the Created By column in the designer is actually the Author field in the Schema.xml. Also, you may have noticed there are a few more columns in the Available columns list in theView tab than were shown in the Columns tab. These extra columns are required columns such as Created and Created By. Since you can’t remove or modify them, they are not shown in the Columns tab.
Note If you go to the Columns tab of the designer and select a column in the list, the Properties window displays all of its properties. There is both a Name and a DisplayName property. The Schema.xml file uses the Name property, while the list designer uses the DisplayNameproperty. This is why there are some discrepancies in the names between the two. For example, the Created By column in the designer is actually the Author field in the Schema.xml. Also, you may have noticed there are a few more columns in the Available columns list in theView tab than were shown in the Columns tab. These extra columns are required columns such as Created and Created By. Since you can’t remove or modify them, they are not shown in the Columns tab.
With a little more manual formatting your view definition will look similar to Listing 3-2.
Listing 3-2. The initial Unassigned Tasks view definition
<View BaseViewID="6"
Name="00ed1e94-ac4d-46b4-914d-1eb83b736f16"
DisplayName="Unassigned Tasks"
Type="HTML"
WebPartZoneID="Main"
SetupPath="pages\viewpage.aspx"
Url="Unassigned Tasks.aspx">
<RowLimit>20</RowLimit>
<ViewFields>
<FieldRef Name="ID" />
<FieldRef Name="Priority" />
<FieldRef Name="LinkTitle" />
<FieldRef Name="DueDate" />
<FieldRef Name="AssignedTo" />
<FieldRef Name="Body" />
<FieldRef Name="Author" />
<FieldRef Name="Created" />
</ViewFields>
<Query />
<Toolbar Type="Standard" />
<XslLink Default="TRUE">main.xsl</XslLink>
<JSLink>clienttemplates.js</JSLink>
</View>
![]() Tip I wouldn’t spend too much time cleaning up the format of this file. As soon as you make any changes with the designer, your formatting changes will be lost. The Format Document command will get your tags on separate lines and properly indented. That is generally sufficient.
Tip I wouldn’t spend too much time cleaning up the format of this file. As soon as you make any changes with the designer, your formatting changes will be lost. The Format Document command will get your tags on separate lines and properly indented. That is generally sufficient.
Notice that there is an empty Query tag; this is where your custom filter will go. Replace the <Query />line with the following code:
<Query>
<Where>
<IsNull>
<FieldRef Name="AssignedTo"></FieldRef>
</IsNull>
</Where>
<OrderBy>
<FieldRef Name="DueDate" Ascending="TRUE" />
</OrderBy>
</Query>
The Query element includes a Where tag and an OrderBy tag. The Where tag uses the IsNull tag and inside that is the AssignedTo column. This query will only return rows where AssignedTo column is null. The OrderBy tag includes the DueDate column, setting theAscending attribute to TRUE. This will order them with the tasks due soonest at the top. Save your changes to the Schema.xml file.
![]() Tip You may be wondering how do I know what query functions are available and what is the syntax for more complex queries. This is defined as part of the Collaborative Application Markup Language (CAML). For a reference of the Query portion of this, go to this article:http://msdn.microsoft.com/en-us/library/office/ms467521(v=office.15).aspx.
Tip You may be wondering how do I know what query functions are available and what is the syntax for more complex queries. This is defined as part of the Collaborative Application Markup Language (CAML). For a reference of the Query portion of this, go to this article:http://msdn.microsoft.com/en-us/library/office/ms467521(v=office.15).aspx.
Modifying the List Properties
Now let’s look at the List tab of the list designer. The first three fields Title, List URL, and Description are pretty self-explanatory. The default values of the first two are typically sufficient and are based on the details you entered when creating the list. The Description should be updated to something more appropriate. The two check boxes may need a little more explanation.
The Display list at Quick Launch adds a link to this list in the quick launch area so users can quickly navigate to this list. Using this link will display the default view, although the user can select a different view once the list is displayed. Users may prefer to add a link to a specific view such as My Tasks. Regardless, if this list is something that most users will need and you want them to find it easily, you should check this box.
If the Hide list from browser check box is selected, the list will not be included in the Site Content page. Assuming that you have also unchecked the Display list at Quick Launch check box, users will not be able to navigate to your list; it is essentially hidden from them. You may want to do this if you are providing some other way of accessing the data in this list, such as through an App Part, or from a custom page.
Leave the default values (Display list at Quick Launch checked and Hide list from browser unchecked) and save the change to the Description field. The List tab should look similar to Figure 3-15.
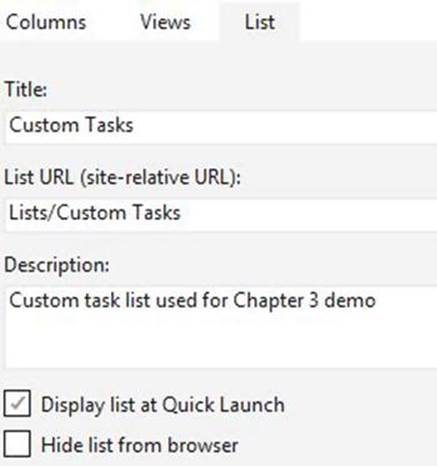
Figure 3-15. Modifying the List tab
Modifying the Default Page
The project template created a Default.aspx page for you with some boilerplate content so that is can be displayed properly in the SharePoint site. It has no real content, however, which is what you’ll need to add. But first we will briefly explain the initial page and how it works with the JavaScript that was created as well.
Exploring the Initial Page
Open the Default.aspx page from the Solution Explorer. At the top there are some Page and Register commands that enable it to work with SharePoint. You should generally leave these as is. The page then includes some standard JavaScript files. It first includes a jQuery library that is in your local Scripts folder. It then references two libraries (sp.runtime.js and sp.js). These are already installed on the SharePoint server and provide the JavaScript Client Object Model functions.
The page then includes the App.css file that is in your Content folder and the App.js file that is in your Scripts folder. You will be modifying these two files later in this chapter to implement a custom UI.
At the bottom of the page there is the following div with the initializing . . . text:
<div>
<p id="message">
<!-- The following content will be replaced with the user name
when you run the app - see App.js -->
initializing...
</p>
</div>
It defines a paragraph tag with a “message” id. Now let’s look at the App.js file to see what it is doing with this. The content of the initial App.js file is shown in Listing 3-3.
Listing 3-3. The initial implementation of App.js
'use strict';
var context = SP.ClientContext.get_current();
var user = context.get_web().get_currentUser();
// This code runs when the DOM is ready and creates a context object
// which is needed to use the SharePoint object model
$(document).ready(function () {
getUserName();
});
// This function prepares, loads, and then executes a SharePoint query
//to get the current users information
function getUserName() {
context.load(user);
context.executeQueryAsync(onGetUserNameSuccess, onGetUserNameFail);
}
// This function is executed if the above call is successful
// It replaces the contents of the 'message' element with the user name
function onGetUserNameSuccess() {
$('#message').text('Hello ' + user.get_title());
}
// This function is executed if the above call fails
function onGetUserNameFail(sender, args) {
alert('Failed to get user name. Error:' + args.get_message());
}
The (document).ready() function specifies that the getUserName() function should be called when the page has been loaded. The getUserName() function executes a query to get the logged in user. Queries are executed asynchronously so when they are invoked, two callback methods are specified; one is called on success, the other on failure. The success function, onGetUserNameSuccess(), uses jQuery to replace the contents of the message tag with a welcome message that includes the user’s name. You will use this querying technique more, later in this chapter.
Adding a List View Web Part
The content for this page will be very simple; you’ll just add a web part onto the page that provides all of the standard SharePoint UI. Visual Studio provides a snippet to make this a snap.
In the Default.aspx page right-click just below the welcome div that we just discussed. In the menu that appears, click the Insert Snippet link, and then select SharePoint and then finally splistview. This will insert the following code to your page:
<WebPartPages:WebPartZone runat="server" FrameType="TitleBarOnly" ID="full"
Title="loc:full">
<WebPartPages:XsltListViewWebPart runat="server"
ListUrl="Lists/List1"
IsIncluded="True"
JsLink="clientTemplate.js"
NoDefaultStyle="TRUE"
PageType="PAGE_NORMALVIEW"
Default="False"
ViewContentTypeId="0x">
</WebPartPages:XsltListViewWebPart>
</WebPartPages:WebPartZone>
This code embeds a standard SharePoint web part on your page that displays a list as well as the normal view and edit forms. You’ll need to change the ListUrl property to point to your list. To get the correct URL, just open the list designer and go to the List tab. For our project this is Lists/Custom Tasks.
There’s one other minor change that you should make to this page. In the second asp:Content tag there is some default text, Page Title. Replace this with Custom Task List.
Testing the App
Your app is now ready to be deployed to your Office 365 site. Just press F5 to build and deploy it. After Visual Studio has built and deployed the app to SharePoint, the list will be displayed using the default view (All Items), which should look like Figure 3-16.
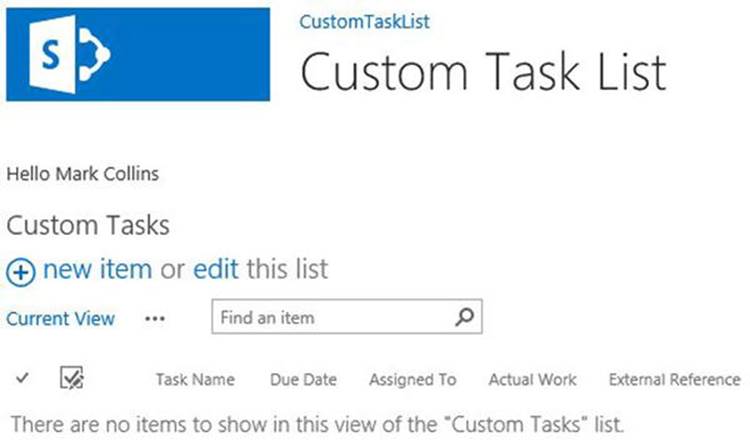
Figure 3-16. The default view of the CustomTaskList
Add a few items to the list but do not assign them yet. Notice that the forms for adding and viewing tasks look like the standard SharePoint forms. This all came for free, just by inserting the splistview snippet.
Now change the view to use the Unassigned Tasks view that you created. You should see the same items since nothing is assigned yet. However, the columns that are included will be different as demonstrated in Figure 3-17.
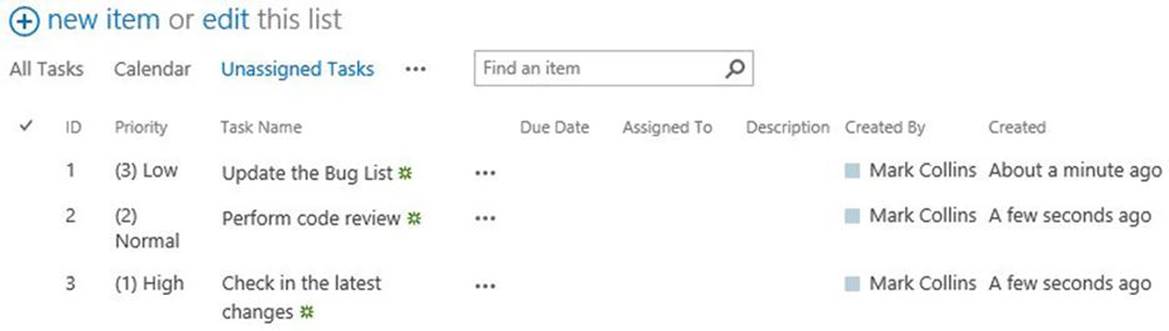
Figure 3-17. The Unassigned Tasks view
Now edit one of these items and assign it to someone by entering a value in the Assigned To column. This task should then be removed from this view.
Creating a Custom UI
So you have created your first SharePoint app. You used the list designer to customize the list columns and defined a new view. You had to write a simple CAML query to implement a filter. Then you made a few minor changes to the web page and voila, hit F5 and you have an app.
This app is identical to a list that you could have created directly in the SharePoint site. But now you have another way of accomplishing the same thing. For the rest of this chapter we’ll show you how you can create a SharePoint list and provide a custom UI using standard web development tools like HTML, CSS, and JavaScript.
Creating a Book List App
For this example, you will create a separate project in Visual Studio and create a simple list that you can use to store book titles. You’ll use the list designer to define the columns and then create a custom page using CSS and JavaScript.
Defining the Book List
You’ll start by defining a Books list that will store the book titles for your custom page. We’ll go through these steps rather quickly as this will be similar to the first project.
1. Open Visual Studio 2013, and from the Start page, click the New Project link. Select the App for SharePoint template and enter ReadingList project name.
2. The template will prompt you for the site URL. Enter the address of your SharePoint site and select the SharePoint-hosted option, just like you did earlier in this chapter. You may be prompted for credentials to the site.
3. From the Solution Explorer, right-click the project and select the Add and then New Item links. In the Add New Item dialog box, the Office/SharePoint folder should already be selected. Select the List item and enter the name Books.
4. In the Choose List Settings dialog box, leave the display name as Books. Select the first option (Create a customizable list template and a list instance of it) just like you did before. This time, however, choose the Default (Custom List) option as shown in Figure 3-18. This will create a blank list that you will add columns to.
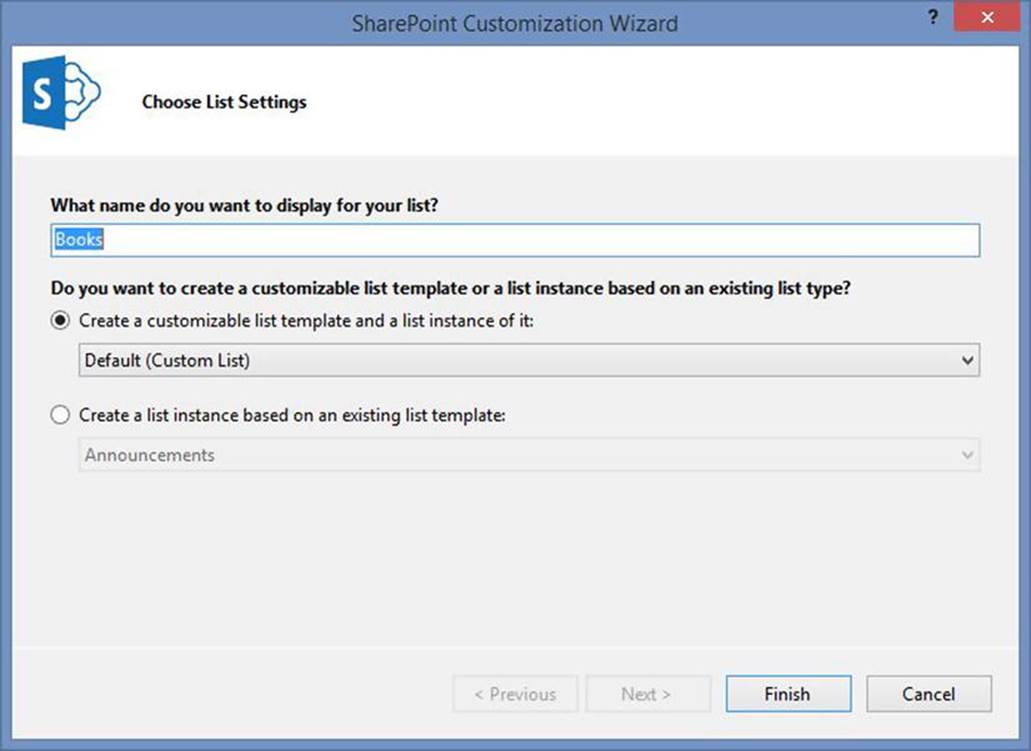
Figure 3-18. Choosing a custom list
5. The list designer should be displayed; if not, double-click the Books list in the Solution Explorer. The Title column is already added as all lists require a Title column. Add the following columns; the grid should look like Figure 3-19.
· URL - Hyperlink or Picture
· Background - Choice
· Order - Number
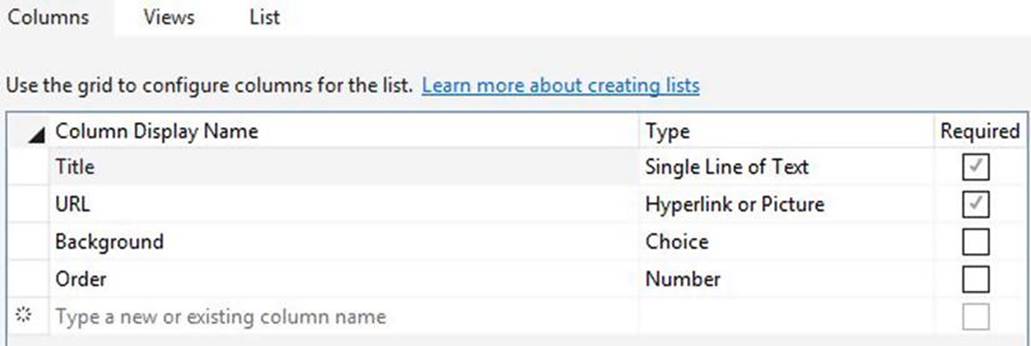
Figure 3-19. Defining the list columns
![]() Caution There is an existing site column called URL. Make sure to select the one that is defined as a HyperLink or Picture. The other columns are Computed types. Background and Order do not already exist as site columns so you’ll need to specify the type.
Caution There is an existing site column called URL. Make sure to select the one that is defined as a HyperLink or Picture. The other columns are Computed types. Background and Order do not already exist as site columns so you’ll need to specify the type.
6. Go to the Views tab and add a new view called Title List. Select the Read Only check box and add the Order, Title (Link Title), and Created columns as shown in Figure 3-20.
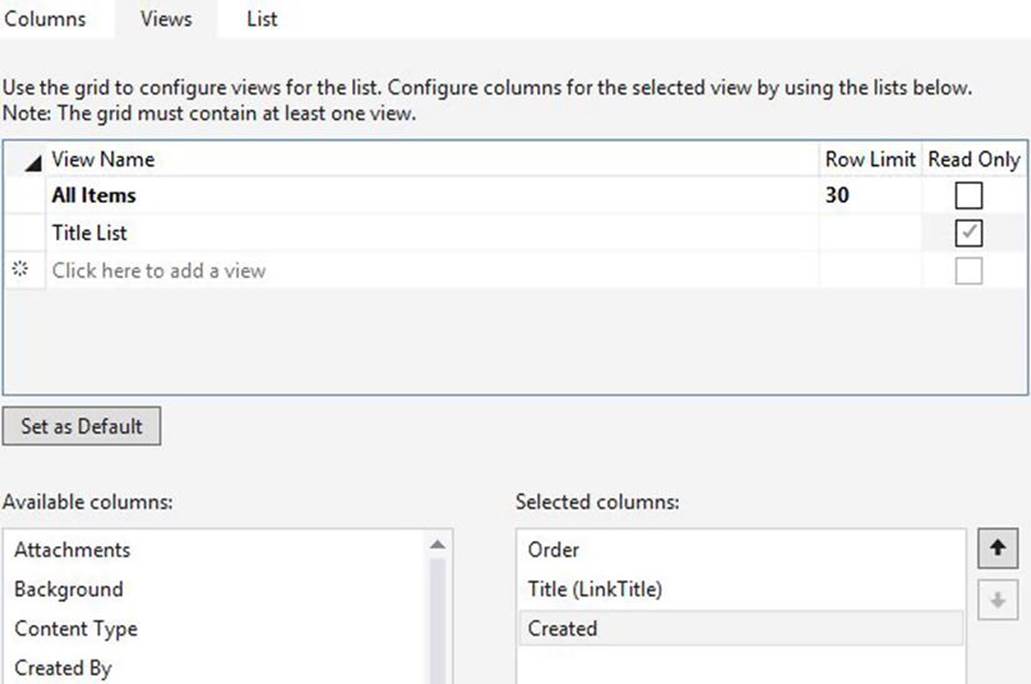
Figure 3-20. Defining the Title List view
7. In the List tab, change the description to My Reading List. Click the Save button in the ribbon to save the list definition.
Defining Choice Values
In the previous project, you had to manually edit the Schema.xml file to enter the CAML query for the view filter. Now you’ll need to edit this file to define the choice options.
You defined the Background column as a Choice type. This type of column is represented on the UI forms as a dropdown with a predefined set of values to choose from. The list designer does not give you the ability to define these values. We’ll show you how to enter these manually.
Make sure you have saved your changes and then open the Schema.xml file, which will close the list designer. As you did before, format the XML first. From the Edit menu, select the Advanced link and then Format Document. This will make the file easier to read.
Search for the text <Fields> in the Schema.xml file. The Fields tag contains the definition of the columns (fields) used in your list. You should see four Field entries for the Title, URL, Background, and Order columns in your list. Within the Field tag for theBackground column, add the following:
<CHOICES>
<CHOICE>White</CHOICE>
<CHOICE>Blue</CHOICE>
<CHOICE>Red</CHOICE>
<CHOICE>Green</CHOICE>
<CHOICE>Orange</CHOICE>
<CHOICE>Yellow</CHOICE>
<CHOICE>Purple</CHOICE>
</CHOICES>
This defines the background colors that are available. Also, inside the Field tag, add the following attribute:
FillInChoice="FALSE"
This specifies that the user can only select from the existing list and not define any new values. The complete Fields tag is shown in Listing 3-4. The actual guid values may be different in your file. If so, use your values not the values in the code listing. The lines that you’ll need to add or modify are shown bolded.
Listing 3-4. The final Fields tag
<Fields>
<Field ID="{fa564e0f-0c70-4ab9-b863-0177e6ddd247}"
Type="Text"
Name="Title"
DisplayName="$Resources:core,Title;"
Required="TRUE"
SourceID="http://schemas.microsoft.com/sharepoint/v3"
StaticName="Title"
MaxLength="255" />
<Field ID="{c29e077d-f466-4d8e-8bbe-72b66c5f205c}"
Name="URL"
SourceID="http://schemas.microsoft.com/sharepoint/v3"
StaticName="URL"
Group="$Resources:core,Base_Columns;"
Type="URL"
DisplayName="$Resources:core,URL;"
Required="TRUE" />
<Field Name="Background"
ID="{ec5bdad4-c9ef-45aa-8650-e6213fb1428d}"
DisplayName="Background"
Type="Choice"
FillInChoice="FALSE">
<CHOICES>
<CHOICE>White</CHOICE>
<CHOICE>Blue</CHOICE>
<CHOICE>Red</CHOICE>
<CHOICE>Green</CHOICE>
<CHOICE>Orange</CHOICE>
<CHOICE>Yellow</CHOICE>
<CHOICE>Purple</CHOICE>
</CHOICES>
</Field>
<Field Name="Order1"
ID="{baf5e8e4-2c81-48b7-8185-f568c6a3d0d9}"
DisplayName="Order"
Type="Number" />
</Fields>
Save the changes to the Schema.xml file.
Populating the Books List
To test the custom page, you’ll need some items in the Books list. You can add these manually after the app has been deployed to SharePoint. However, when deploying updates to the app you may find the list contents are removed and then you’ll need to add them again. To make your life easier, we’ll show you how to pre-populate the list every time the app is deployed.
![]() Note When you press F5 to deploy and debug, Visual Studio must first deploy the changes to the SharePoint site. If only client-side elements have been modified, such as CSS or JavaScript files, the deployment simply replaces the modified files. You’ll notice that these types of deployments are much faster. However, if there are changes to the SharePoint elements, such as lists or views, the whole solution is retracted and then re-deployed. This will also cause you to lose whatever list contents were in the list.
Note When you press F5 to deploy and debug, Visual Studio must first deploy the changes to the SharePoint site. If only client-side elements have been modified, such as CSS or JavaScript files, the deployment simply replaces the modified files. You’ll notice that these types of deployments are much faster. However, if there are changes to the SharePoint elements, such as lists or views, the whole solution is retracted and then re-deployed. This will also cause you to lose whatever list contents were in the list.
As I mentioned earlier, when you create a list like this you are defining both a list template as well as an instance of that template. If you look in the Solution Explorer, the Books element is a list template, while the BooksInstance is the instance of this template. Both of these items have an Elements.xml file.
Open the Elements.xml file from the instance (BooksInstance). Inside this tag, enter the contents shown in Listing 3-5 to pre-populate the list instance with some test data.
Listing 3-5. Adding the Data element
<Data>
<Rows>
<Row>
<Field Name="Title">Beginning WF</Field>
<Field Name="URL">http://www.apress.com/9781430224853</Field>
<Field Name="Background">Green</Field>
<Field Name="Order1">1</Field>
</Row>
<Row>
<Field Name="Title">Office 2010 Workflow</Field>
<Field Name="URL">http://www.apress.com/9781430229049</Field>
<Field Name="Background">Blue</Field>
<Field Name="Order1">2</Field>
</Row>
<Row>
<Field Name="Title">Pro Project Management with SharePoint 2010</Field>
<Field Name="URL">http://www.apress.com/9781430228295</Field>
<Field Name="Background">Orange</Field>
<Field Name="Order1">3</Field>
</Row>
<Row>
<Field Name="Title">Pro Access 2010 Development</Field>
<Field Name="URL">http://www.apress.com/9781430235781</Field>
<Field Name="Background">Yellow</Field>
<Field Name="Order1">4</Field>
</Row>
<Row>
<Field Name="Title">Pro Office 365 Development</Field>
<Field Name="URL">http://www.apress.com/9781430240747</Field>
<Field Name="Background">Red</Field>
<Field Name="Order1">5</Field>
</Row>
<Row>
<Field Name="Title">WinRT Revealed</Field>
<Field Name="URL">http://www.apress.com/9781430245841</Field>
<Field Name="Background">White</Field>
<Field Name="Order1">6</Field>
</Row>
<Row>
<Field Name="Title">HTML5 with Visual Studio 2012</Field>
<Field Name="URL">http://www.apress.com/9781430246381</Field>
<Field Name="Background">Purple</Field>
<Field Name="Order1">7</Field>
</Row>
</Rows>
</Data>
This should be fairly self-explanatory. The Data tag defines data that should be uploaded to the SharePoint site during deployment. This contains a Rows tag, which has a collection of Row elements. Each Row element has a collection of Field tags to define the value of each column.
Deploying the Initial App
Let’s deploy the App as it is currently so you can verify the list is working correctly. You’ll add the custom UI later. Just Press F5 to build and deploy the Books list to your SharePoint site.
Since you’ve not modified the Default.aspx page, there won’t be much content on this page. More specifically, it does not show the list of books or any way to navigate to such a list. The page will look like Figure 3-21.
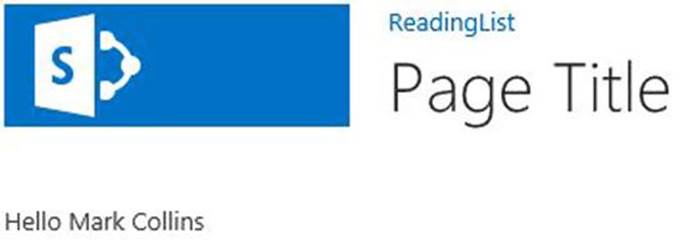
Figure 3-21. The initial Default.aspx page
However, there is a Books list in SharePoint and the standard UI for the defined views is available; you just need to find a way to get to it. If you look at your browser, there is a really long URL for the default page. You might want to paste it into notepad so you can view and edit it.
Start by removing all of the parameters starting with ?SPHostUrl=. With that gone the URL is easier to follow. It will end with something like /ReadingList/Pages/Default.aspx. Replace the Pages/Default.aspx with Lists/Books/AllItems.aspx. This will take you to the standard SharePoint page instead of your custom page. The final URL for our site is:
https://apress365-e2113008fe735a.sharepoint.com/ReadingList/Lists/Books/AllItems.aspx
Yours will be similar but with a different root address. Paste this into a browser to view the contents of the Books list, which should look like Figure 3-22.
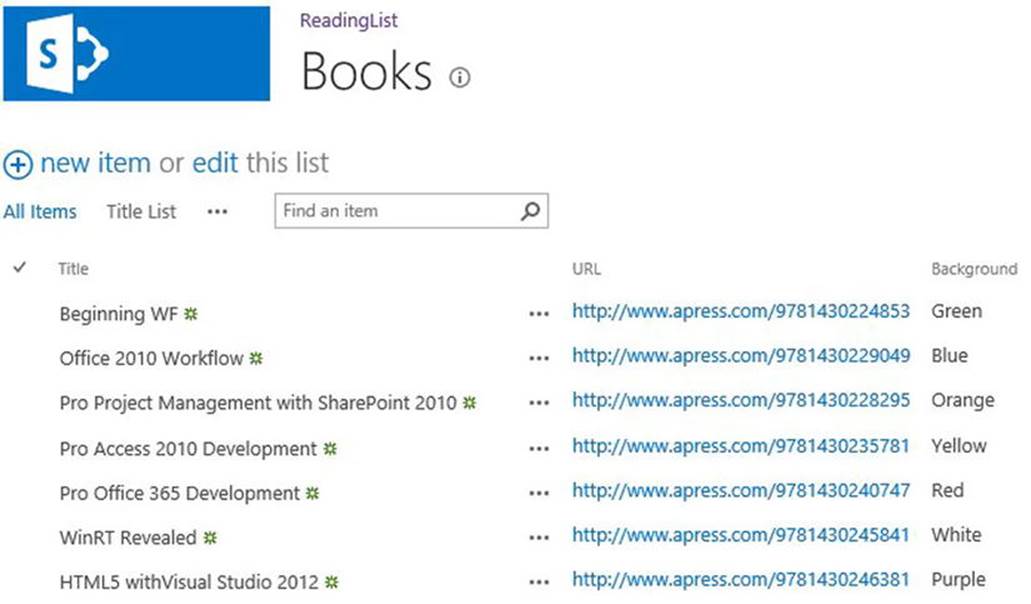
Figure 3-22. The standard SharePoint AllItems page
Notice the Title List view that you defined is also available.
Implementing a Custom Page
With the Books list defined, you’re ready to build the custom UI. You’ll start with the Default.aspx page. You’ll just add a div here and then later use JavaScript to insert contents into it. The other change you will make here is to provide a way to navigate to the standard SharePoint UI. So you’ll create a custom page but also provide a way to use the other views as well.
You’ll then write some JavaScript code that uses both the SharePoint libraries as well as jQuery to create the dynamic content. This code will query data from the Books list and use this to format HTML content. Finally, you’ll modify the App.css file to provide the necessary styling.
Modifying the Default Page
The Default.aspx page should look just like the one you worked with earlier in this chapter. Find the second asp:Content tag and replace the default Page Title text with Reading List.
Then, in the third asp:Content tag, where the message div is, remove this div and replace it with the following:
<a
href="../Lists/Books/AllItems.aspx">Manage Books<img src="../Images/GearIcon.png" />
</a>
<div id="results"></div>
The anchor tag provides a link to the standard views. This will save your users the hassle you just went through to get to these pages. The results div is empty but you’ll fill in content later.
You’ll need a few images that the code will be referencing. We have included them in the download folder for Chapter 3, in the Images subfolder. The files are EditIcon.png, GearIcon.png, and ViewIcon.png. You can use your own images if you prefer. Drag these files into the Images folder in the Solution Explorer. Notice that the Elements.xml file in this folder is automatically updated to include these files.
Writing the JavaScript
Open the App.js file in the Scripts folder. This will be identical to the one you used earlier in this chapter. Replace the entire contents of this file with the code shown in Listing 3-6. We will then walk through this code function by function.
Listing 3-6. The App.js implementation
$(document).ready(function () {
SP.SOD.executeFunc('sp.js', 'SP.ClientContext', retrieveBooks);
});
function retrieveBooks() {
var context = new SP.ClientContext.get_current();
var oList = context.get_web().get_lists().getByTitle('Books');
var camlQuery = new SP.CamlQuery();
camlQuery.set_viewXml('<View><Query><OrderBy><FieldRef Name=\'Order1\' ' +
'Ascending=\'TRUE\' /></OrderBy></Query><ViewFields><FieldRef Name=\'Id\' ' +
'/><FieldRef Name=\'Title\' /><FieldRef Name=\'URL\' '+
'/><FieldRef Name=\'Background\' /><FieldRef Name=\'Order1\' ' +
'/></ViewFields></View>');
this.collListItem = oList.getItems(camlQuery);
context.load(collListItem, 'Include(Id, Title, URL, Background, Order1)');
context.executeQueryAsync(Function.createDelegate(this, this.onQuerySucceeded),
Function.createDelegate(this, this.onQueryFailed));
}
function onQueryFailed(sender, args) {
SP.UI.Notify.addNotification('Request failed. ' + args.get_message() + '\n' +
args.get_stackTrace(), true);
}
function onQuerySucceeded(sender, args) {
var listEnumerator = collListItem.getEnumerator();
var listInfo = "";
while (listEnumerator.moveNext()) {
var oListItem = listEnumerator.get_current();
listInfo +=
"<div id='" + oListItem.get_id() + "' class='Book " +
oListItem.get_item('Background') + "'>" +
"<a href='" + oListItem.get_item('URL').get_url() +
"' target='_blank'>" +
"<div class='BookDescription'>" + oListItem.get_item('Title') +
"</div>" +
"</a>" +
"<div class='EditIcon'>" +
"<a href='#' onclick='ShowDialog(" + oListItem.get_id() +
")'><img src='../Images/EditIcon.png' /></a>" +
"</div>" +
"</div>";
}
$("#results").html(listInfo);
}
function ShowDialog(ID) {
var options = {
url: "../Lists/Books/EditForm.aspx?ID=" + ID,
allowMaximize: true,
title: "Edit Book",
dialogReturnValueCallback: scallback
};
SP.SOD.execute('sp.ui.dialog.js', 'SP.UI.ModalDialog.showModalDialog', options);
return false;
}
function scallback(dialogResult, returnValue) {
if (dialogResult == SP.UI.DialogResult.OK) {
SP.UI.ModalDialog.RefreshPage(SP.UI.DialogResult.OK);
}
}
This may seem like a lot of code but if you break it down, it’s fairly straightforward. As we described earlier, the $(document).ready() command specifies the function to be executed after the page is loaded, in this case it is the retrieveBooks() function.
The retrieveBooks() function gets the current SharePoint context and then uses that to get the Books list. It then executes a CAML query to access the data needed from the list. When formatted as a JavaScript string this may be a little hard to read, especially with the line wraps. Here is the actual query in XML format:
<View>
<Query>
<OrderBy>
<FieldRef Name="Order1" Ascending="TRUE" />
</OrderBy>
</Query>
<ViewFields>
<FieldRef Name="Id" />
<FieldRef Name="Title" />
<FieldRef Name="URL" />
<FieldRef Name="Background" />
<FieldRef Name="Order1" />
</ViewFields>
</View>
This is a pretty simple query that returns all rows sorted by the Order column. The ViewFields tag specifies the columns that should be returned by the query. This query is executed using the executeQueryAsync() method that we showed earlier. This requires two function delegates; one for a successful operation and one for errors. The results of the query will be stored in the collListItem variable.
The onQuerySucceeded() function is called when successful and it does all the interesting work. It gets an enumerator for the results and then iterates through all the items returned. Each iteration through the while loop processes one item from the list. For each book, the code generates HTML content, plugging in data returned from the list. Here is an example of what the HTML looks like (the variable text is shown bolded):
<div id="1" class="Book Yellow">
<a href="http://www.apress.com/9781430246381" target="_blank">
<div class="BookDescription">HTML5 with Visual Studio 2012</div>
</a>
<div class="EditIcon">
<a href="#" onclick="ShowDialog(1)"><img src="../Images/EditIcon.png" /></a>
</div>
</div>
The main div contains an anchor tag that links to the page with information about the book and within that another div that contains the book’s title. There is also another div that contains an icon with an onclick event that calls the ShowDialog() function.
The contents for each book are accumulated in the listInfo variable. When all the books have been processed, the contents of the results div is replaced using the combined generated HTML.
The ShowDialog() function invokes the standard SharePoint EditForm. This allows the user to modify the details of a book from the custom page. When the EditForm is closed, the scallback() function is called. This refreshes the current page to reflect the modified details.
Modifying the CSS
The last step in this process is to define the appropriate styles in the App.css file. Open the App.css file and add the style commands shown in Listing 3-7.
Listing 3-7. The App.css contents
body {
min-width: 520px;
}
.column {
width: 170px;
float: left;
padding-bottom: 100px;
}
.Book {
width:250px;
height:80px;
margin-top:5px;
margin-left:0;
margin-right:10px;
margin-bottom:10px;
cursor:pointer;
padding:5px;
float:left;
text-align:left;
font-family:Segoe UI, sans-serif;
font-size:14px;
background-repeat: no-repeat;
background-position:center;
overflow:hidden;
position:relative;
clear: both;
border-style: solid;
border-width: 2px;
border-color: black;
border-top-left-radius:10px;
border-top-left-radius:10px;
border-top-right-radius:10px;
border-bottom-left-radius:10px;
border-bottom-right-radius:10px;
}
.BookDescription {
color: #000;
font-size: 12pt;
}
.EditIcon {
float:right;
text-align:right;
background-color:black;
}
.Purple {
background-color:#A200FF;
}
.Yellow {
background-color:#efef42;
}
.Orange {
background-color:#F09609;
}
.Blue {
background-color:#1BA1E2;
}
.Red {
background-color:#E51400;
}
.Green {
background-color:#339933;
}
.White{
background-color:#FFFFFF;
}
This is pretty much just basic styling. However, notice the color selectors at the end. The Background column contains a color name such as Purple or Yellow. This is included in the HTML as a class attribute for the main div. The CSS action sets the appropriate background-color property.
Also, the EditIcon selector aligns the icon to the right of the div with a black background (so it will show up well regardless of the main color).
Testing the App
With all the implementation complete, you’re ready to test the app. Press F5 to build and deploy the app. The custom page should look like Figure 3-23.
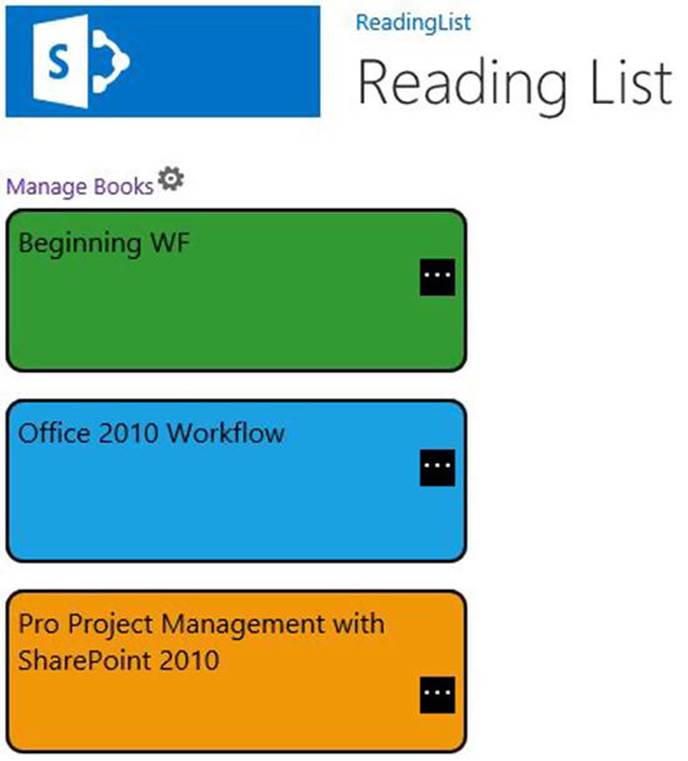
Figure 3-23. The custom Reading List page
If you click on the edit icon, the standard edit form will appear as shown in Figure 3-24.
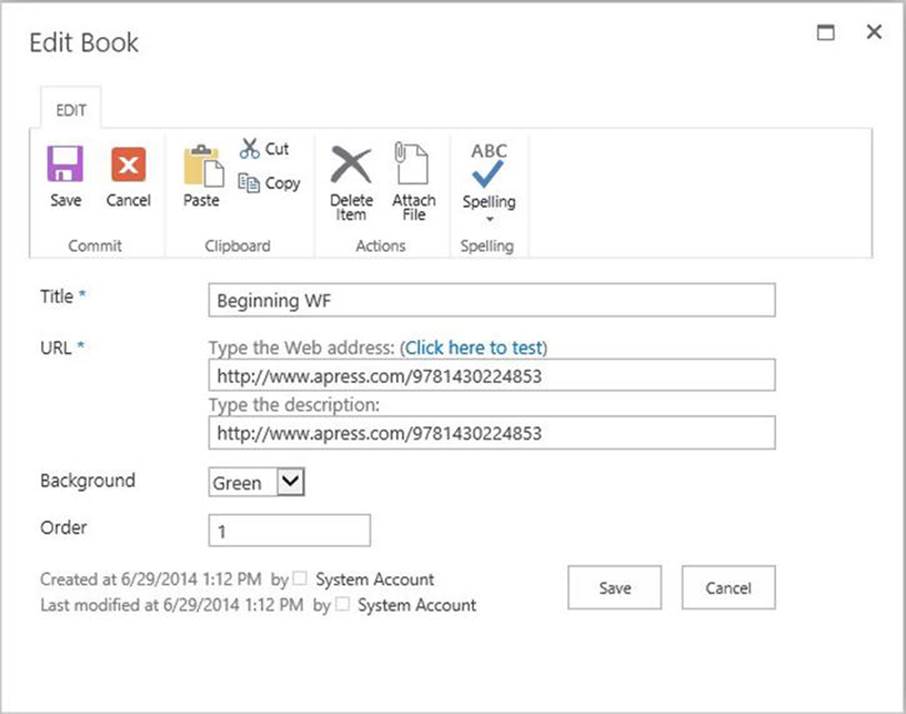
Figure 3-24. The standard EditForm
If you change the background color or the order, the page will be refreshed, reflecting the changes you have made. Also, notice the Manage Books link and icon at the top. If you click this, the All Items view that you looked at earlier will be displayed.
So you have a hybrid solution with a custom UI page combined with some of the standard SharePoint forms and pages. This allows you to create custom pages where needed and leverage the existing UI as well.
Adding a Custom Ribbon
You have the Manage Book link to navigate to the All Items view. Now you’ll remove this and create a custom action in the ribbon instead. This is accomplished with some additional JavaScript code.
Open the App.js file and append the code shown in Listing 3-8.
Listing 3-8. Additional JavaScript code to add a custom ribbon
// Methods for the ribbon
function ModifyRibbon() {
var pm = SP.Ribbon.PageManager.get_instance();
pm.add_ribbonInited(function () {
AddBookTab();
});
var ribbon = null;
try {
ribbon = pm.get_ribbon();
}
catch (e) { }
if (!ribbon) {
if (typeof (_ribbonStartInit) == "function")
_ribbonStartInit(_ribbon.initialTabId, false, null);
}
else {
AddBookTab();
}
}
function AddBookTab() {
var sTitleHtml = "";
var sManageHtml = "";
sTitleHtml += "<a href='../Lists/Books/Title%20List.aspx' >' ";
sTitleHtml += "<img src='../images/ViewIcon.png' /></a><br/>Title List";
sManageHtml += "<a href='../Lists/Books/AllItems.aspx' >";
sManageHtml += "<img src='../images/ViewIcon.png' /></a><br/>Manage Books";
var ribbon = SP.Ribbon.PageManager.get_instance().get_ribbon();
if (ribbon !== null) {
var tab = new CUI.Tab(ribbon, 'Books.Tab', 'Books',
'Use this tab to view and modify the book list',
'Books.Tab.Command', false, '', null);
ribbon.addChildAtIndex(tab, 1);
var group = new CUI.Group(ribbon, 'Books.Tab.Group', 'Views',
'Use this group to view a list of titles',
'Books.Group.Command', null);
tab.addChild(group);
var group = new CUI.Group(ribbon, 'Books.Tab.Group', 'Actions',
'Use this group to add/update/delete books',
'Books.Group.Command', null);
tab.addChild(group);
}
SelectRibbonTab('Books.Tab', true);
$("span:contains('Views')").prev("span").html(sTitleHtml);
$("span:contains('Actions')").prev("span").html(sManageHtml);
SelectRibbonTab('Ribbon.Read', true);
}
The ModifyRibbon() function initializes the ribbon, if it is not already initialized, and calls the AddBookTab() function. The AddBookTab() function is where the custom ribbon tab is generated. It will have two actions, one navigates to the All Items view and the other to theTitle List view that you created. Each action is defined by an HTML block that includes an icon with a link to the appropriate view.
After generating the necessary HTML content, this method then uses the ribbon to create a new tab called Books that contains two groups called Views and Actions. Then the new tab is enabled. Finally, jQuery code is used to insert the generated HTML in the ribbon.
Now you’ll need to modify the $(document).ready() command to also invoke the ModifyRibbon() function. Add the line shown bolded to your App.js file:
$(document).ready(function () {
SP.SOD.executeFunc('sp.js', 'SP.ClientContext', retrieveBooks);
SP.SOD.executeOrDelayUntilScriptLoaded(ModifyRibbon, 'sp.ribbon.js');
});
For the last step, you’ll remove the existing Manage Books link. Open the Default.aspx page and remove the anchor tag from the third asp:Content tag. All that should remain is the empty result div.
With these changes done, you’re ready to test the app. Press F5 to build and deploy the updated app to your SharePoint site. You should now see a Books tab as shown in Figure 3-25.
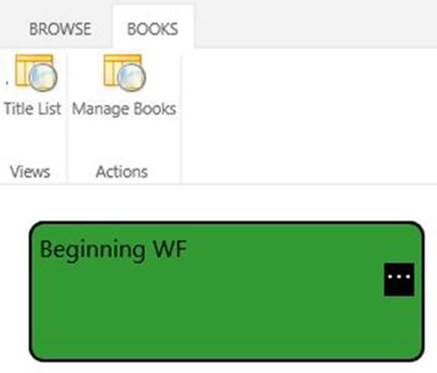
Figure 3-25. The custom Books tab
Click the Title List button, which will navigate to the custom Title List view shown in Figure 3-26.
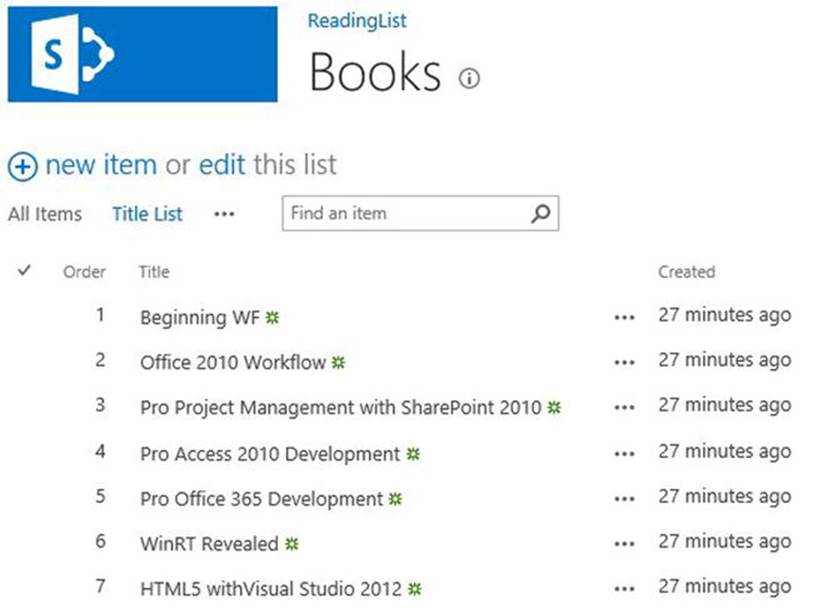
Figure 3-26. The Title List view
To get back to the custom UI page, just click the ReadingList link at the top of the page.
Creating a Custom App Part
For the last feature in this chapter, you’ll create an App Part. An App Part is like a regular web page but with a smaller footprint and can be placed onto an existing page. This allows the users to configure a page by including various App Parts. This works great for a home page or dashboard where you often want visibility into a number of things in one place.
Your reading list contains a collection of books in the order you intend to read them. Your App Part will simply display the one that’s on the top of your list. You’ll add an App Part to your Visual Studio solution using the Client Web Part template. This will create a web page in yourPages folder. You will then modify this file and include a JavaScript file to define your App Part.
![]() Note We explained in Chapter 1 about App Parts and Web Parts. The users will see them as App Parts. However as a developer you will refer to them as Web Parts because that is what Visual Studio calls them. We will call them either App Parts or Web Parts depending on the tools you’re using.
Note We explained in Chapter 1 about App Parts and Web Parts. The users will see them as App Parts. However as a developer you will refer to them as Web Parts because that is what Visual Studio calls them. We will call them either App Parts or Web Parts depending on the tools you’re using.
Adding a Client Web Part
In Visual Studio, from the Solution Explorer, right-click the project and then select the Add and New Item links. In the Add New Item dialog box, select the Client Web Part template and enter the name BookWebPart as shown in Figure 3-27.
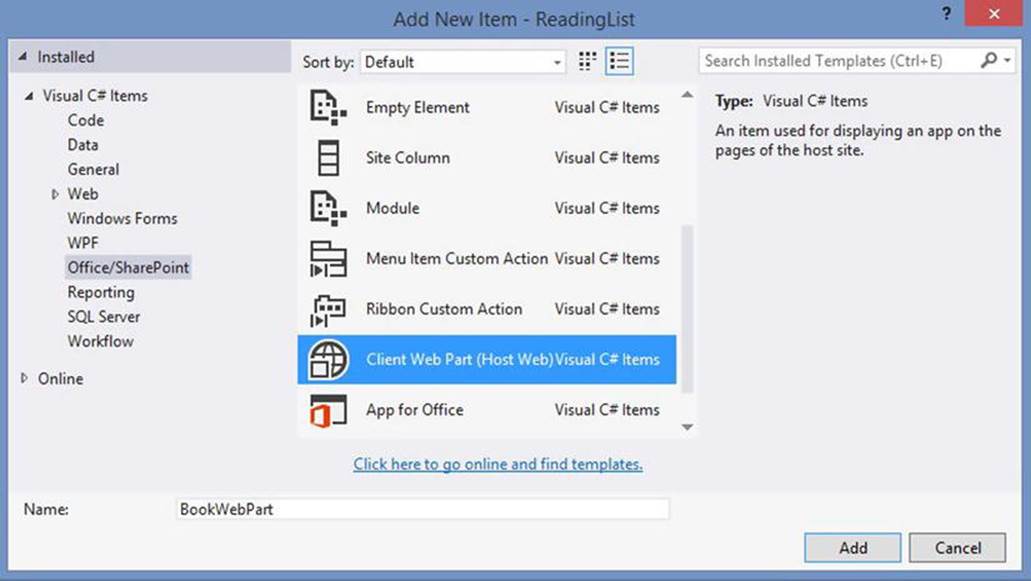
Figure 3-27. Adding a client web part
The template will prompt you for some additional details. Leave all the default values as shown in Figure 3-28.

Figure 3-28. Configuring the web part
![]() Tip When creating a new Web Part, the template gives you the option to base it on an existing page. If you have a page and you want the Web Part to look similar to that page, you can specify the page URL and it will use to define the web part.
Tip When creating a new Web Part, the template gives you the option to base it on an existing page. If you have a page and you want the Web Part to look similar to that page, you can specify the page URL and it will use to define the web part.
Designing the Web Part
The template generated a BookWebPart.aspx file in your Pages folder. You’ll need to include the existing App.css file as well as a new JavaScript file. As with the Default.aspx page, you’ll add an empty div that you’ll later fill in with JavaScript code. The html contents of this file are shown in Listing 3-9, with the additions shown bolded.
Listing 3-9. The BookWebPart.aspx implementation
<html>
<head>
<title></title>
<script type="text/javascript" src="../Scripts/jquery-1.9.1.min.js"></script>
<script type="text/javascript" src="/_layouts/15/MicrosoftAjax.js"></script>
<script type="text/javascript" src="/_layouts/15/sp.runtime.js"></script>
<script type="text/javascript" src="/_layouts/15/sp.js"></script>
<link rel="Stylesheet" type="text/css" href="../Content/App.css" />
<script type="text/javascript" src="../Scripts/WebPart.js"></script>
<script type="text/javascript">
'use strict';
// Set the style of the client web part to be consistent with the host web.
(function () {
var hostUrl = '';
if (document.URL.indexOf('?') != -1) {
var params = document.URL.split('?')[1].split('&');
for (var i = 0; i < params.length; i++) {
var p = decodeURIComponent(params[i]);
if (/^SPHostUrl=/i.test(p)) {
hostUrl = p.split('=')[1];
document.write('<link rel="stylesheet" href="' +
hostUrl + '/_layouts/15/defaultcss.ashx" />');
break;
}
}
}
if (hostUrl == '') {
document.write('<link rel="stylesheet" ' +
'href="/_layouts/15/1033/styles/themable/corev15.css" />');
}
})();
</script>
</head>
<body>
<div id="bookList">Book List</div>
</body>
</html>
Now you’ll need to add a JavaScript file that will contain the code needed to format the Web Part. In the Solution Explorer, right-click the Scripts folder and select the Add and New Item links. In the Add New Item dialog box, go to the Web folder and select the JavaScript File template. Enter WebPart.js for the file name and click the Add button.
Enter the code shown in Listing 3-10 into the WebPart.js file.
Listing 3-10. The WebPart.js implementation
$(document).ready(function () {
var spHostUrl = decodeURIComponent(getQueryStringParameter('SPHostUrl'));
var layoutsRoot = spHostUrl + '/_layouts/15/';
$.getScript(layoutsRoot + "SP.Runtime.js", function () {
$.getScript(layoutsRoot + "SP.js", formatWebPart);
}
);
});
function formatWebPart() {
context = new SP.ClientContext.get_current();
web = context.get_web();
retrieveBooks();
}
function retrieveBooks() {
var context = new SP.ClientContext.get_current();
var oList = context.get_web().get_lists().getByTitle('Books');
var camlQuery = new SP.CamlQuery();
camlQuery.set_viewXml('<View><Query><OrderBy><FieldRef Name=\'Order1\' ' +
'Ascending=\'TRUE\' /></OrderBy></Query><ViewFields><FieldRef Name=\'Id\' ' +
'/><FieldRef Name=\'Title\' /><FieldRef Name=\'URL\' ' +
'/><FieldRef Name=\'Background\' /><FieldRef Name=\'Order1\' ' +
'/></ViewFields></View>');
this.collListItem = oList.getItems(camlQuery);
context.load(this.collListItem, 'Include(Id, Title, URL, Background, Order1)');
context.executeQueryAsync(Function.createDelegate(this, this.onQuerySucceeded),
Function.createDelegate(this, this.onQueryFailed));
}
function onQueryFailed(sender, args) {
SP.UI.Notify.addNotification('Request failed. ' + args.get_message() + '\n' +
args.get_stackTrace(), true);
}
function onQuerySucceeded(sender, args) {
var listEnumerator = collListItem.getEnumerator();
var listInfo = "";
if (listEnumerator.moveNext()) {
var oListItem = listEnumerator.get_current();
listInfo +=
"<div id='" + oListItem.get_id() + "' class='Book " +
oListItem.get_item('Background') + "'>" +
"<a href='" + oListItem.get_item('URL').get_url() +
"' target='_blank'>" +
"<div class='BookDescription'>" + oListItem.get_item('Title') +
"</div>" +
"</a>" +
"</div>";
}
$("#bookList").html(listInfo);
}
function getQueryStringParameter(urlParameterKey) {
var params = document.URL.split('?')[1].split('&');
var strParams = '';
for (var i = 0; i < params.length; i = i + 1) {
var singleParam = params[i].split('=');
if (singleParam[0] == urlParameterKey)
return decodeURIComponent(singleParam[1]);
}
}
This code is very similar to the App.js code that you implemented earlier. The code to query the Books list is identical and the code for generating the HTML is similar except it only processes the first item returned. Also, it does not include the EditIcon button so you can’t edit the current book from this Web Part. There are also some minor differences in the way the context and list are obtained.
Deploying and Configuring the Web Part
Press F5 to build and deploy the app. In addition to the custom UI page, the Web Part will be installed. To access it, however, you’ll need to add it to an existing page.
Go to the Home page of your Team Site. From the PAGE tab of the ribbon, click the Edit button to put the page in edit mode. Then put your cursor at the bottom of the page. Go to the INSERT tab of the ribbon and click the App Part button. You should see your new App Part as shown in Figure 3-29.
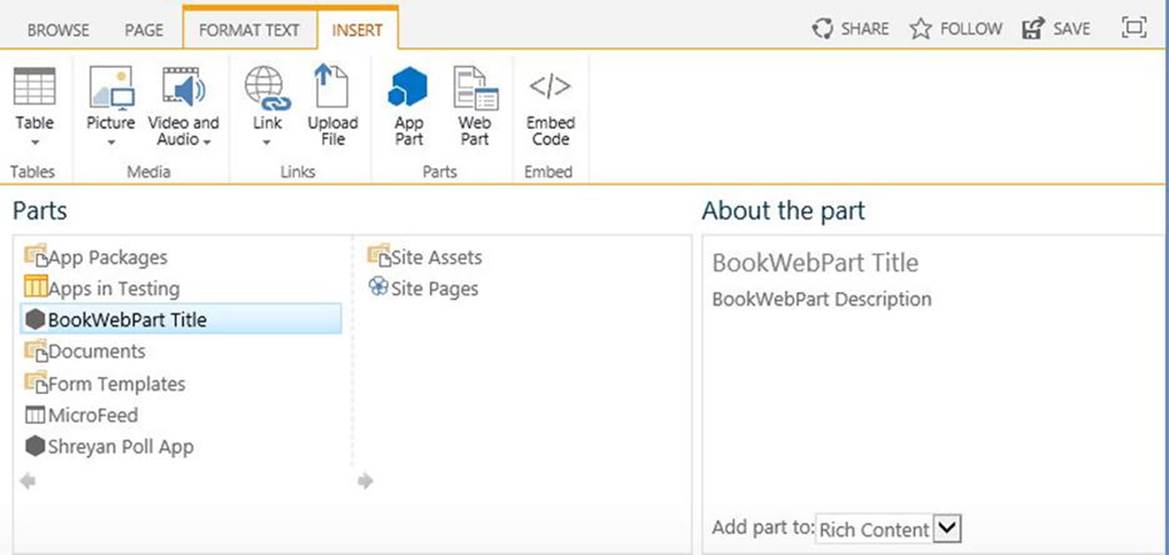
Figure 3-29. Adding the new App Part
Select BookWebPart and then click the Add button. In the App Part properties window, change the Title to Current Book and click the OK button. Click the Save button in the ribbon to save the changes. The modified home page should now look like Figure 3-30.

Figure 3-30. The updated Home page with new App Part
Summary
In this chapter you created two SharePoint apps. This first was a basic list using the standard SharePoint UI. You used the list designer to modify the list columns and to define a new view. You also wrote a CAML query to filter the list. With some fairly simple modifications you were able to quickly provision a functional list.
In the second app, you also created a custom list and modified the Elements.xml file to populate its initial contents. For this list you provided a custom page using JavaScript and CSS. While the implementation was somewhat trivial, you learned how to query data from a SharePoint list and render the contents with custom HTML.
You then implemented a custom ribbon using JavaScript. This is a really great way of providing custom navigation and user functions, within the standard SharePoint UI framework. Finally, you created a simple App Part that exposed some data from your custom list and included this in the Home page.
All materials on the site are licensed Creative Commons Attribution-Sharealike 3.0 Unported CC BY-SA 3.0 & GNU Free Documentation License (GFDL)
If you are the copyright holder of any material contained on our site and intend to remove it, please contact our site administrator for approval.
© 2016-2026 All site design rights belong to S.Y.A.