Pro Office 365 Development, Second Edition (2014)
Chapter 4. Creating Declarative Workflows with Visio and SharePoint Designer
SharePoint is a versatile repository for all sorts of data including document libraries and various lists of data elements. Workflows are a great way to establish a process around that data. For example, when a new request is created, a workflow can be initiated to automate the processing of that request. SharePoint workflows are often referred to as human-centric workflows (or sometimes task-centric) because they are primarily concerned with the tasks that people will perform. When a request is received, for example, some of the typical tasks could be
· Review and approve the request.
· Assign and/or schedule the work.
· Fulfill the request.
· Verify (test) the end result.
· Provide feedback.
The workflow doesn’t actually implement these tasks, people do. The workflow, however, enforces the business rules that determine what tasks are needed, what order they are performed in, under what conditions, and by whom.
The workflow infrastructure has been completely revamped in SharePoint 2013. From a developer’s perspective, the most significant change is that only declarative workflows are supported in 2013. In SharePoint 2010, you could implement a workflow using .NET’s Workflow Foundation, which was sometimes referred to as a “coded” solution since you wrote C# (or VB) code that was compiled into assemblies and executed within SharePoint. This was only supported in on-premise SharePoint servers, however, because of the access level required for them to run.
In SharePoint 2013 both the infrastructure and tools have been enhanced to make declarative workflow a much more viable solution and the coded solution is no longer supported. The good news, for Office 365 developers, is that workflows are fully functional in a cloud-based solution. For backward compatibility, SharePoint 2013 can still run the previous 2010-style workflows. In this chapter, we will be using only the 2013 platform.
Declarative workflows are designed by combining a fixed set of conditions and actions. Conditions allow you to take different actions based on data from various sources. For example, if a request is approved you may want to take different actions than if it was rejected. The available actions provide quite a bit of functionality including:
· Creating or updating a list item.
· Sending an e-mail.
· Checking in a document to a document library.
· Calling an external web service.
In this chapter you’ll implement a workflow to automate the processing of requests using a custom Requests list that you’ll create using SharePoint Designer 2013. You will then use a combination of Visio and SharePoint Designer to define the workflow process. In this chapter, we will show you how to
· Create a custom list using SharePoint Designer 2013.
· Design a workflow in Visio 2013.
· Implement a declarative workflow in SharePoint Designer 2013.
· Use content types and workflow variables to improve the user experience.
Creating the Requests List
Before getting started designing the workflow, you’ll need to implement the Requests lists. You’ll create the Requests list using SharePoint Designer 2013. SharePoint Designer is a desktop application that allows you to view and edit the objects in your SharePoint site such as lists, site columns, and content types. It is also used to define declarative workflows. With the 2013 release, it has been very nicely integrated with Visio 2013 as we will demonstrate later in this chapter.
Installing SharePoint Designer 2013
You can install SharePoint Designer on your client machine from the Office 365 site. Go to your Office 365 settings page. You can get there by clicking the settings icon (the gear-looking button) to the far-right of the menu bar. In the dropdown menu, select the Office 365 settings link. From the settings page select the Software link. From the Software page select the Tools & add-ins link. The page should look similar to Figure 4-1.
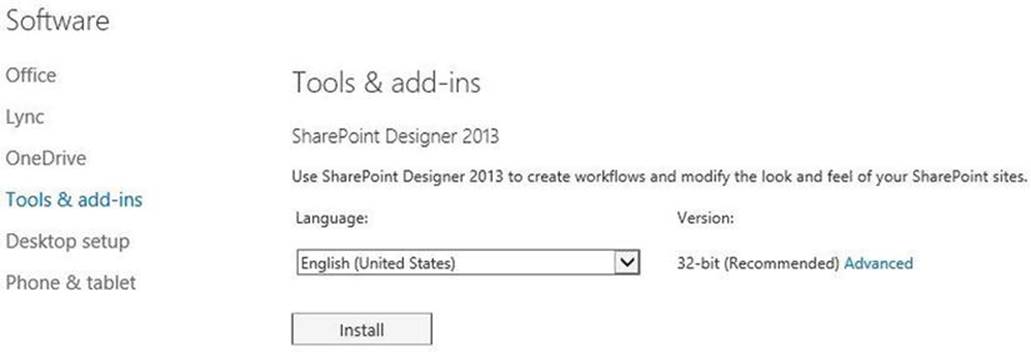
Figure 4-1. Finding the Install option
Click the Install button and follow the instructions to install SharePoint Designer.
![]() Caution You can also install SharePoint Designer 2013 directly from the Microsoft site (http://www.microsoft.com/en-us/download/details.aspx?id=35491). For some reason, however, this version doesn’t seem to work with Office 365 on all machines. If you have any errors opening the SharePoint site, Microsoft recommends installing SharePoint designer using the Office 365 link.
Caution You can also install SharePoint Designer 2013 directly from the Microsoft site (http://www.microsoft.com/en-us/download/details.aspx?id=35491). For some reason, however, this version doesn’t seem to work with Office 365 on all machines. If you have any errors opening the SharePoint site, Microsoft recommends installing SharePoint designer using the Office 365 link.
You should also ensure that your site is configured to allow SharePoint Designer to access it. Go to your Team Site and click the settings icon and select the Site Settings link. In the Site Collection Administration section, you should find the SharePoint Designer Settings link near the end of the list. Click this to view the current settings. Make sure the Enable SharePoint Designer check box is selected as shown in Figure 4-2.
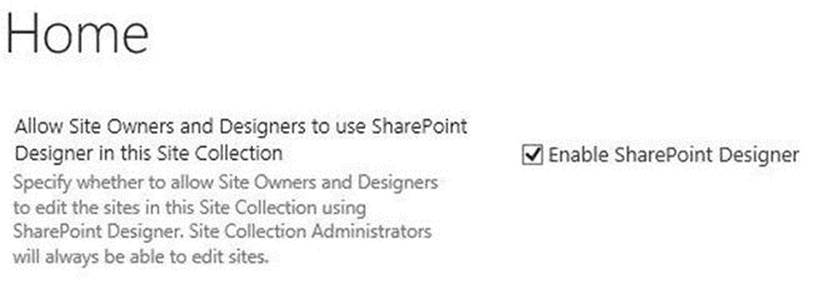
Figure 4-2. Enabling SharePoint Designer
Connecting to your Office 365 Site
Start SharePoint Designer 2013. The Sites tab should be selected. Click the Open Site button and, in the Open Site dialog box, enter the URL of your Team Site. In our case this is https://apress365.sharepoint.com. Click the Open button and, after downloading the information about your site, the contents will look similar to Figure 4-3.
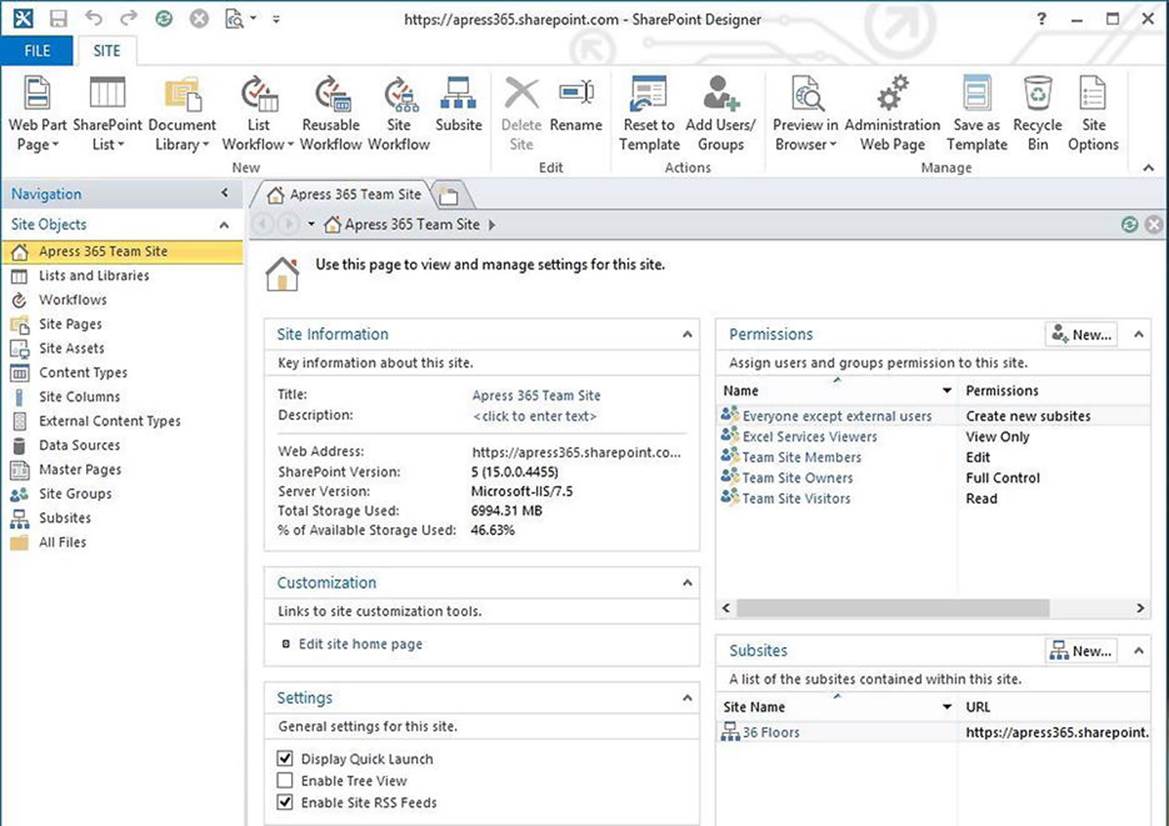
Figure 4-3. The site information displayed in SharePoint Designer 2013
Creating a Custom List
Now you’ll create a new custom list by defining the columns that will be included. This is the same process that you followed using Visual Studio 2013 in the previous chapter, but you’ll use a different tool to complete it.
1. Select Lists and Libraries from the Navigation bar and the details of your existing lists and libraries will be displayed similar to Figure 4-4.
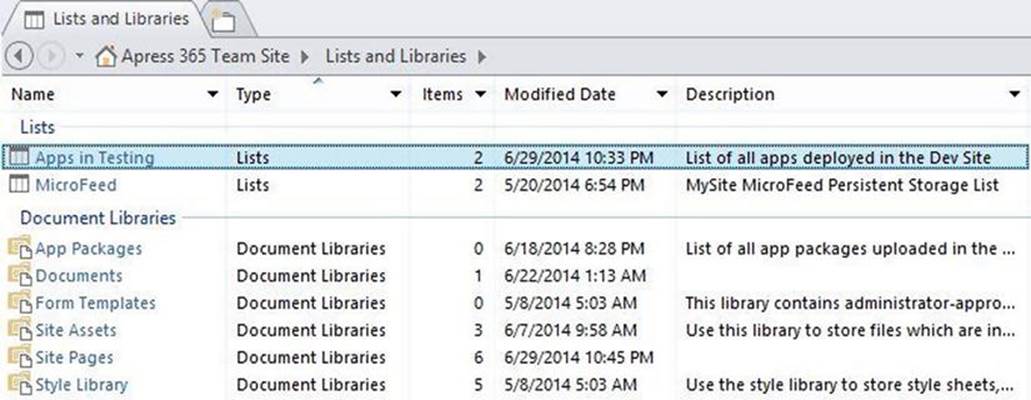
Figure 4-4. Viewing the existing lists and libraries
2. The ribbon contains several options for creating a new list or library. You can use the SharePoint List and Document Library buttons to create a new instance of one of the standard objects such as Tasks, Calendar, and Asset Library. For this project, click the Custom List button to define a list with a custom set of columns. Enter the Name and Description of this list as shown in Figure 4-5.
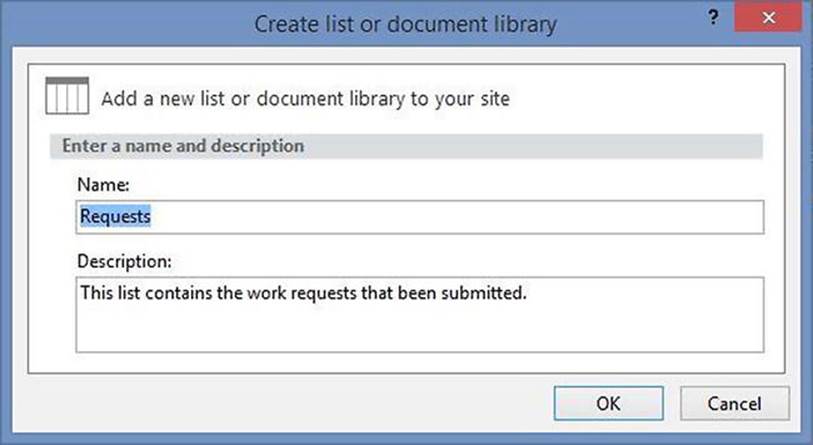
Figure 4-5. Entering the list name and description
3. The List and Libraries tab will now include the new Requests list. Select this list to view its details. In the Customization section, click the Edit list columns link. A Requests tab will be shown listing the existing columns, which, at this point, only contains the Title column as shown in Figure 4-6.
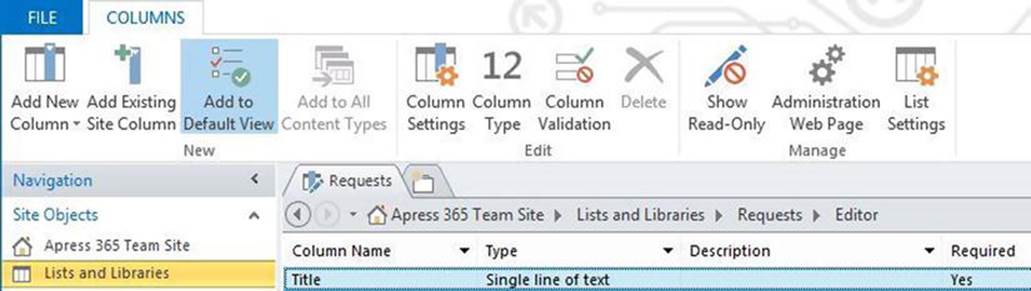
Figure 4-6. Viewing the initial list definition
4. The buttons in the ribbon provide the ability to add new columns and to configure them. The Add New Column button allows you to create a new column that is used only in this list. The Add Existing Site Column button is used to select one or more pre-defined site columns to your list. This is the same concept that we described in the previous chapter when defining columns in Visual Studio. Click the Add Existing Site Column button, which will display the Site Columns Picker dialog box shown inFigure 4-7.
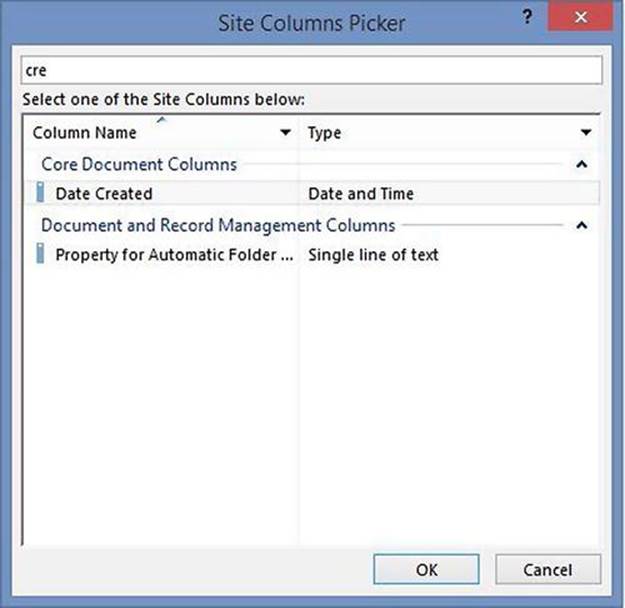
Figure 4-7. Selecting the Date Created site column
5. Notice that as you type in the search box, the list of columns are filtered to show the matching columns. Select the Date Created column and click the OK button.
6. Repeat this process to add the following site columns:
· Due Date
· Comments
· Assigned To
· % Complete
· Date Completed
7. Click the Add New Column button to create a new column. You’ll be prompted to select the type; select Choice. Enter the following values in the Choices list:
· Pending
· Assigned
· InProgress
· Cancelled
· Completed
8. Unselect the Allow blank values? check box to make this a required column and set the default value as Pending, as shown in Figure 4-8. Click the OK button to add the column.
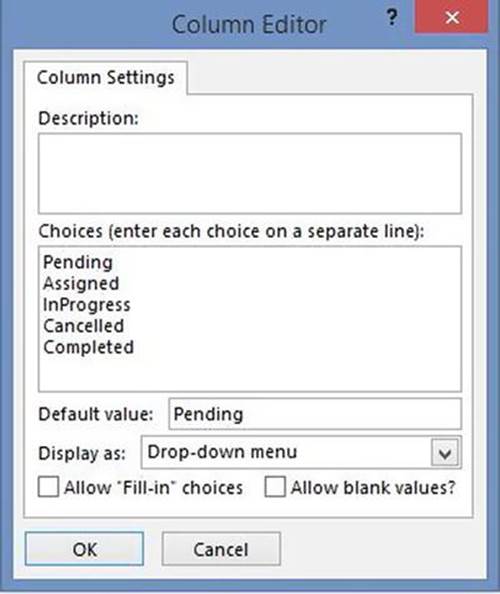
Figure 4-8. Defining the Request Status column
9. The column will be added as NewColumn1; you’ll need to edit the name of this column. Highlight the Column Name cell in the Requests tab and enter Request Status. Click the Save icon in the title bar of the application window. The Requests list should look like Figure 4-9.

Figure 4-9. The completed list definition
10.Now go to your Team Site and you should see the Requests list in your Recent folder. Select this list and click the new item link. The input form should look like Figure 4-10.
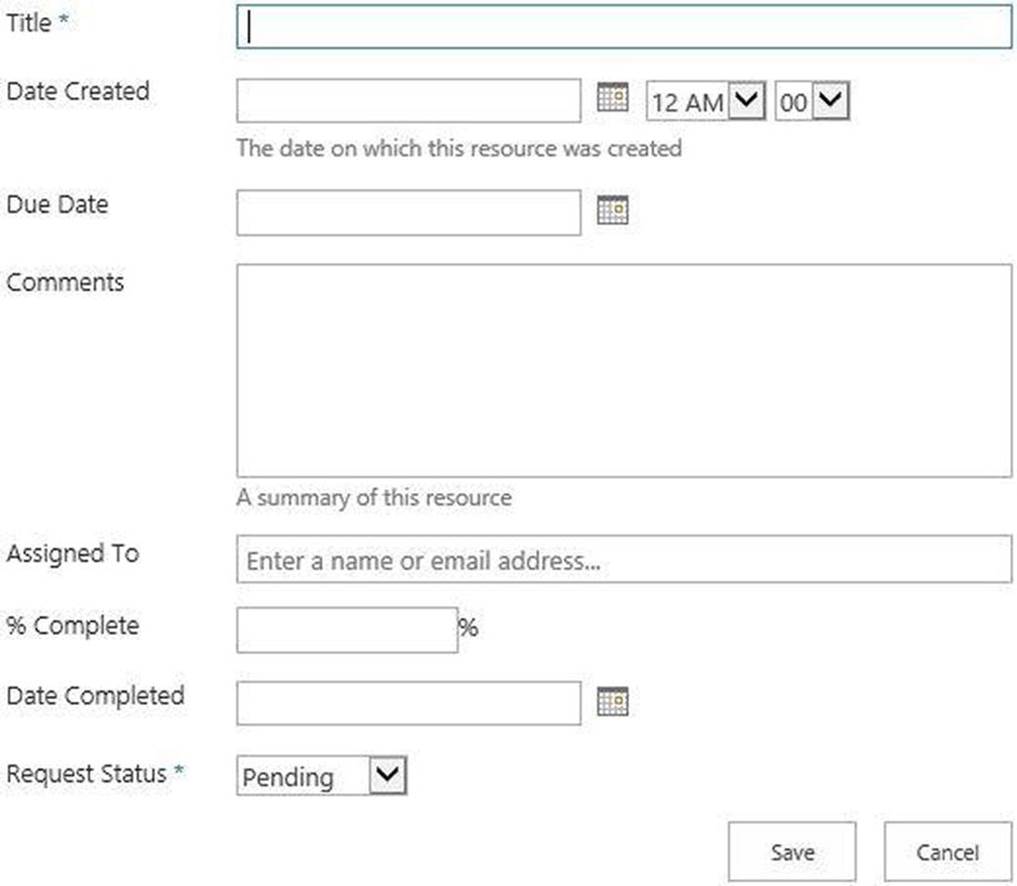
Figure 4-10. Displaying the new form for the Requests list
Using Visio to Define a Workflow
You’ll start the workflow design in Visio 2013. Visio is a great tool for creating diagrams and flowcharts, and with the 2013 release has been very well integrated with SharePoint 2013 workflows. It allows you to begin your workflow design at a high level, creating a flow diagram that describes the workflow process. It provides shapes that correspond with the actions and conditions available in SharePoint Designer. You will later use SharePoint Designer 2013 to add the specific SharePoint instructions onto these same shapes.
![]() Tip You don’t have to use Visio to create a declarative workflow. You can go directly to SharePoint Designer and add actions and conditions to implement the workflow logic using a text-based designer. We’ve included an overview of how to use the text-based workflows designer in Appendix B.
Tip You don’t have to use Visio to create a declarative workflow. You can go directly to SharePoint Designer and add actions and conditions to implement the workflow logic using a text-based designer. We’ve included an overview of how to use the text-based workflows designer in Appendix B.
For more complicated workflows, there are several benefits to using Visio.
· Starting with the big picture is always a good idea.
· A Visio diagram will help you present the workflow design to end users or stakeholders.
· Configuring a workflow using the Visual Designer is more intuitive for end users.
![]() Note You’ll need Visio 2013 Professional to complete the next section of this exercise. You can download a trial version from Microsoft (http://office.microsoft.com/en-us/visio).
Note You’ll need Visio 2013 Professional to complete the next section of this exercise. You can download a trial version from Microsoft (http://office.microsoft.com/en-us/visio).
Designing a Workflow in Visio
Start Visio 2013. In the initial page you’ll need to select a template for your drawing. Unless you have created workflow diagrams before, you probably don’t have a SharePoint workflow option to select. Instead, type SharePoint in the search box and press the Enter key or click the search icon. You’ll probably see an option for either SharePoint 2010 or SharePoint 2013; select the 2013 template. The template details will then be displayed as shown in Figure 4-11. Click the Create button to begin.
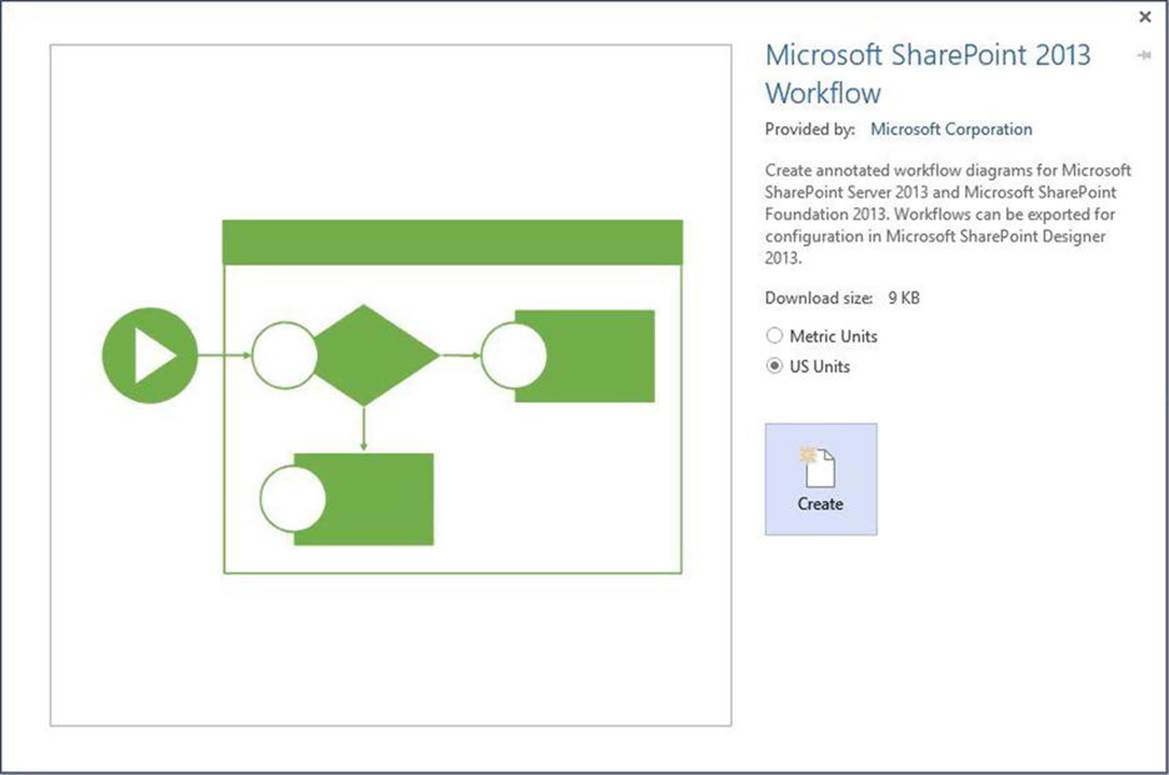
Figure 4-11. Selecting the Microsoft SharePoint 2013 Workflow template
The initial workflow will look like Figure 4-12.
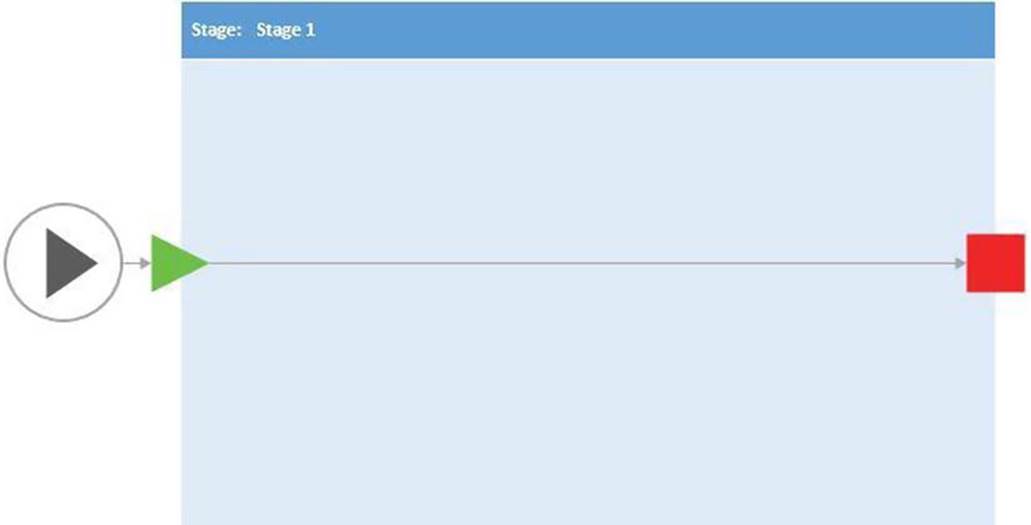
Figure 4-12. The initial workflow diagram with a single stage
The PROCESS tab, shown in Figure 4-13, provides functions specifically for working with SharePoint workflows.

Figure 4-13. The Process tab of the ribbon
The Check Diagram button, for example, will verify your diagram is valid. Since this diagram will later serve as the actual workflow definition, it needs to be correct, logically.
Using Stages
To facilitate very large and complex workflows, Visio allows the process to be divided into stages. From a high level you can view the overall process as a series of stages. Consider a workflow that processes job applicants. You might organize into stages such as:
1. Intake
2. HR Prescreening
3. Position Match
4. Interviews
5. Employment Offer
6. Onboarding
This can be represented in Visio as shown in Figure 4-14. This is using the Stage Outline view, which you can select from the PROCESS tab.

Figure 4-14. Viewing the stage outline
Using Steps
When designing the process for each stage, you can further break down the process into steps. Steps contain a set of actions that are related and are generally executed together. For example, the Intake stage can be comprised of two steps: 1) creating the candidate item in SharePoint and 2) sending an acknowledgement e-mail as illustrated in Figure 4-15.
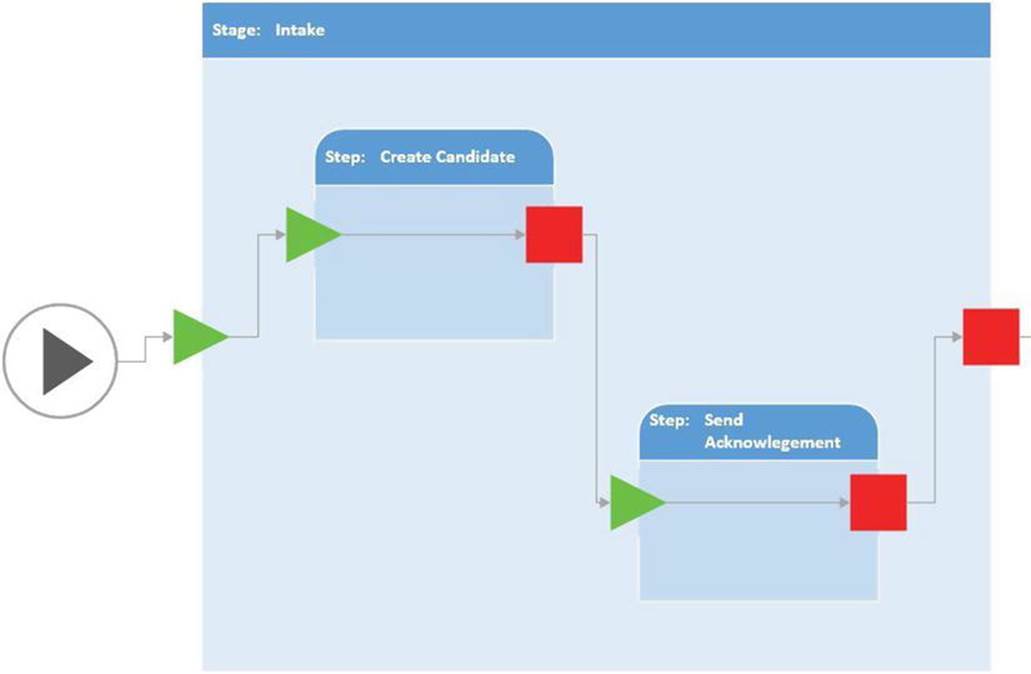
Figure 4-15. The Intake stage with multiple steps
You can also process steps in a loop repeating them as many times as needed. For example, the HR Prescreening stage, shown Figure 4-16, executes the Check qualification step for each guideline that needs to be checked.
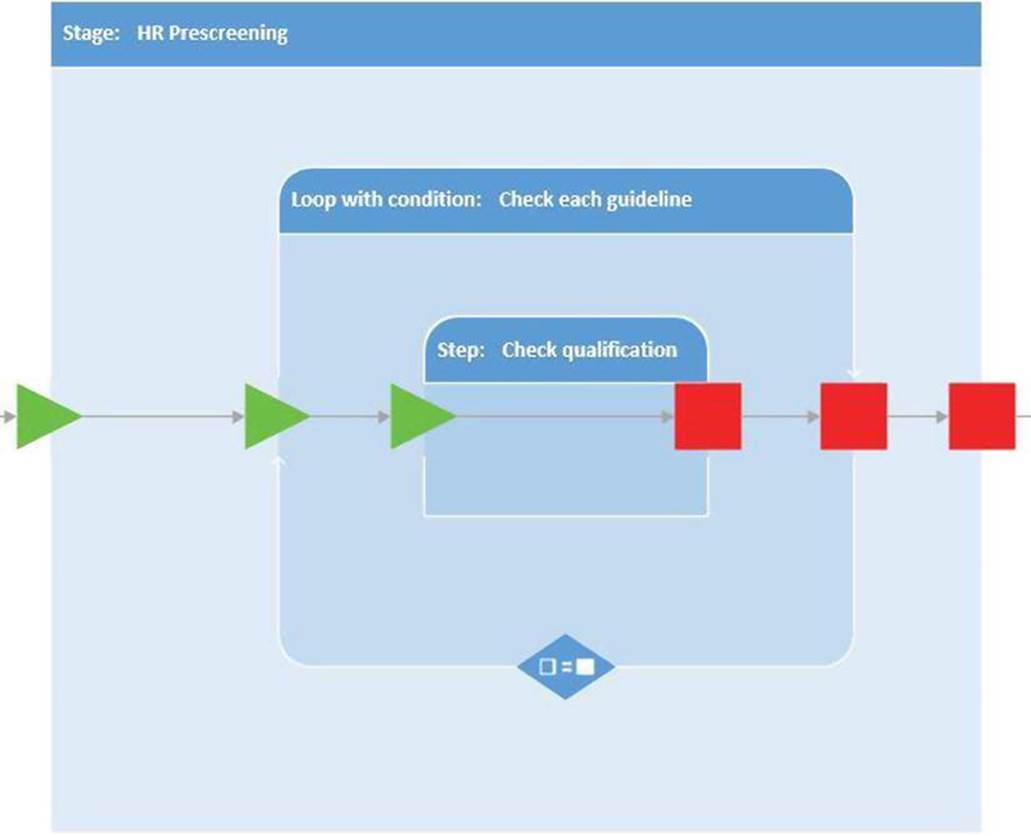
Figure 4-16. Executing the Check qualification step in a loop
Defining Parallel Processing
Some actions in a workflow need to be executed sequentially, that is, one at a time. But there are scenarios where multiple actions, especially long running actions, should be done in parallel. You can define the parallel processing in a workflow diagram using the Start parallel process and End parallel process components as shown in Figure 4-17.
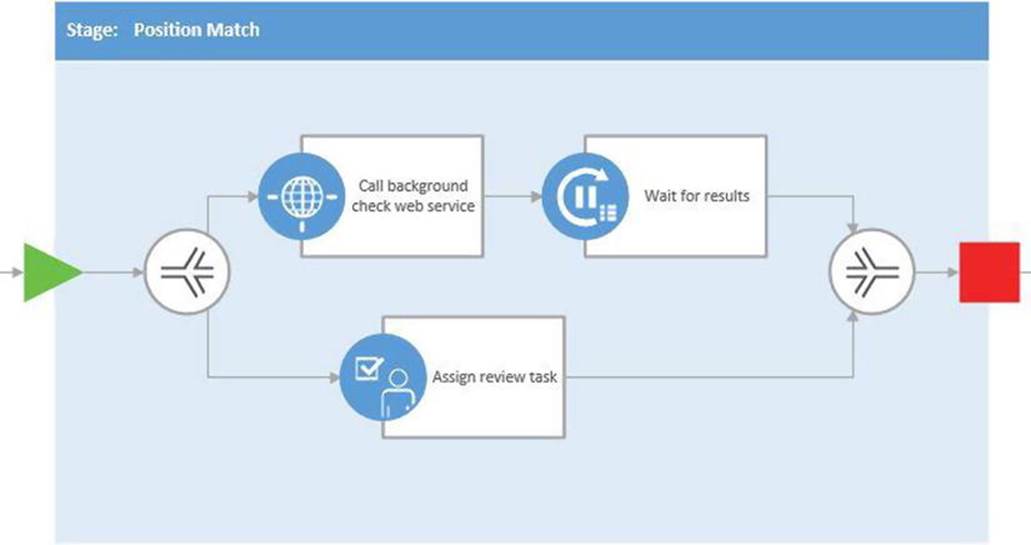
Figure 4-17. Defining parallel processing
In this example, tasks are assigned to the relevant managers to review the candidates while the background check is being done. The background check is initiated through a web service call. The workflow then waits for the list item to be updated. This stage will be complete once both paths have been completed.
Using Actions
Probably the most interesting aspect of a workflow is the actions it will perform. As I mentioned earlier, a declarative workflow can only execute one of the pre-defined actions. We’ve already mentioned some of these such as updating a list item, sending an e-mail, calling a web service, and assigning a task. The complete list of actions is shown in Figure 4-18.
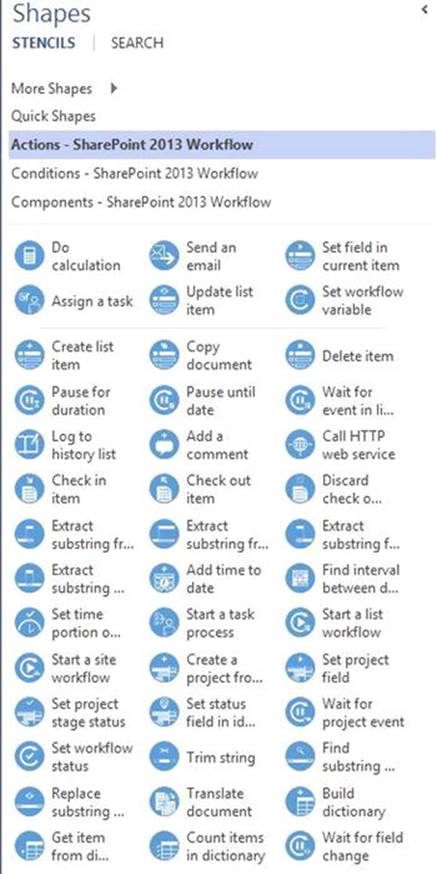
Figure 4-18. The list of actions available in the stencil
Designing the Request Process Workflow
For this project, you’ll create a fairly simple workflow consisting of a single stage. To define the workflow, just drag the appropriate actions and conditions on to the initial stage, double-click each one to change its name, and then use a Connector to link them together. The completed diagram should look like Figure 4-19.
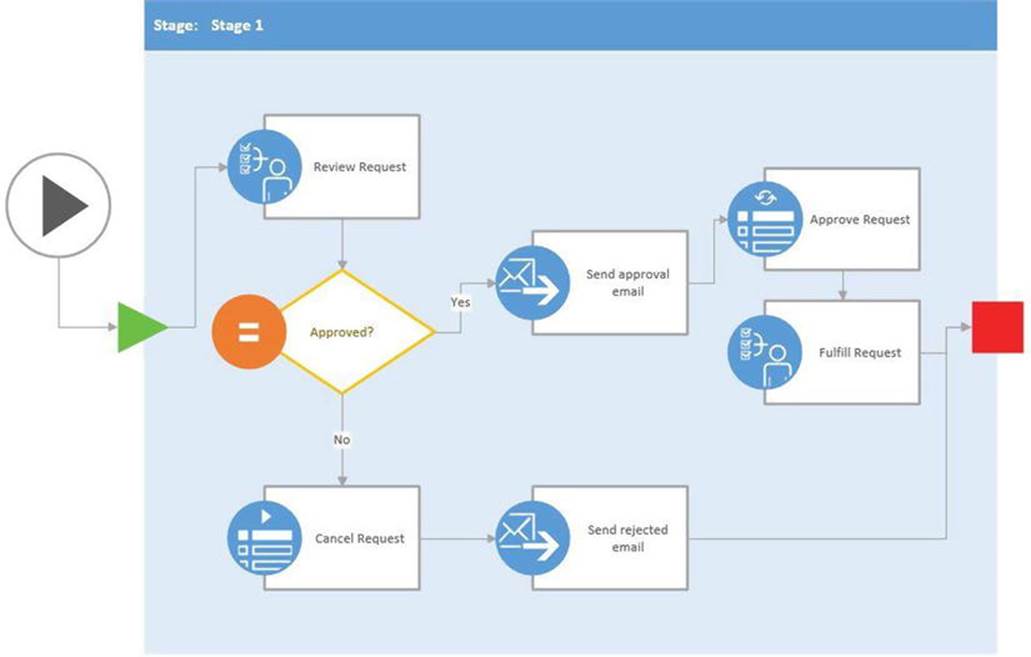
Figure 4-19. The completed workflow diagram
You can find the corresponding object in the stencil by matching up the icon. Some of the icons are very similar so, to avoid any confusion, these are the actions and conditions that you should use:
· Review Request – Start a Task Process
· Approved? – If any value equals value
· Send approval email – Send an e-mail
· Approve Request – Update list item
· Fulfill Request – Start a Task Process
· Cancel Request – Set field in current item
· Send rejected email – Send an e-mail
There are two branches coming from the Approved? condition; one for when the request is approved, the other for when it is not. To indicate, which is which, right-click the connector going to the Send approval email action and select the Yes link. Do the same for the other connector but select the No link. The Yes and No labels will then appear in the diagram.
![]() Tip It is recommended that Yes branches go to the right and No branches go down as was done in this diagram. This allows the SharePoint visualization logic to better format the flow process.
Tip It is recommended that Yes branches go to the right and No branches go down as was done in this diagram. This allows the SharePoint visualization logic to better format the flow process.
When you have finished making the changes, go to the PROCESS tab and click the Check Diagram button. If there are any errors, they will be displayed in the Issues window. Fix any errors that may be reported and then save the diagram.
Configuring the Workflow
Now you’ll go to SharePoint Designer and import this diagram and then configure it for your Requests list. If SharePoint Designer is not still open, start SharePoint Designer and open your Team Site as was described earlier. Select the Workflows item in the Navigator to show the current workflows. This list is probably empty.
In the WORKFLOWS tab of the ribbon, click the Import from Visio button and then select the Import Visio 2013 diagram link. In the file dialog box, select the Visio file that you just created. The Create Workflow dialog, shown in Figure 4-20, will appear. This is where you’ll configure the workflow.
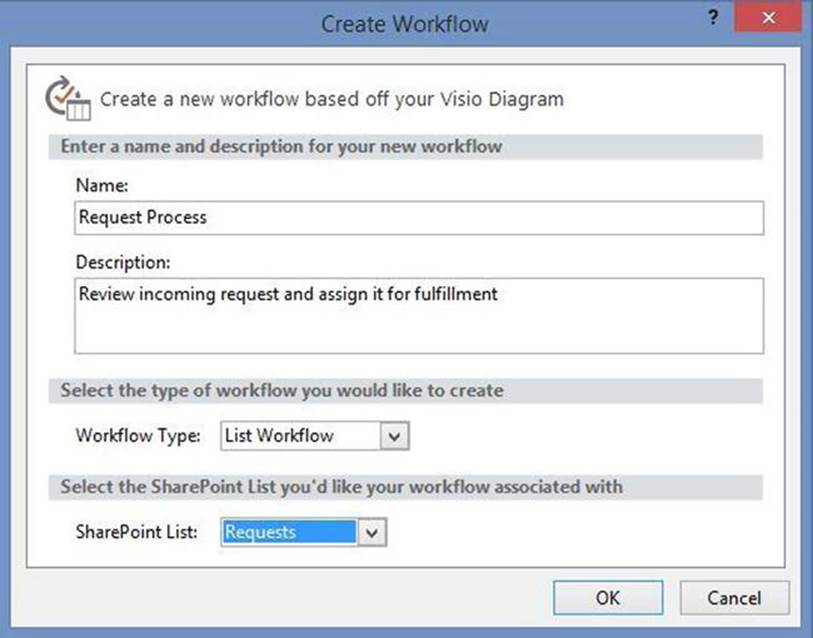
Figure 4-20. Configuring the workflow with the Requests list
Enter Request Process for the name and also add a description. For the Workflow Type, select List Workflow and then select your Requests list. This will configure this workflow to run specifically against the Requests list.
![]() Note Generally a workflow is associated with a specific list or document library. When creating a workflow you can either associate it to a specific list or make it a reusable workflow. When creating a reusable workflow, you defer the list association until later. This workflow can then be reused and associated to multiple lists.
Note Generally a workflow is associated with a specific list or document library. When creating a workflow you can either associate it to a specific list or make it a reusable workflow. When creating a reusable workflow, you defer the list association until later. This workflow can then be reused and associated to multiple lists.
Implementing the Workflow
Now that you have created the workflow structure, you need to specify the details. Each of the shapes in the Visio diagram represents an action or condition and now you need to specify the specific parameters for each of them. We will take you through each of these and show you how to configure it.
The first thing you may have noticed is that it appears that you’re now using Visio again. Actually, you are! This is a Visio control that is hosted inside of SharePoint Designer. The WORKFLOW tab of the ribbon, shown in Figure 4-21 is very specific to the functions of SharePoint Designer. But within the Visual Designer tab, this is actually running Visio.

Figure 4-21. Running Visio inside of SharePoint Designer
If you hover over one of the shapes, a small gear-looking icon will appear on the lower-left corner. This is known as the SharePoint Designer Properties icon and it exposes the properties for this shape that you can configure. Click this icon to see a set of links that you can use to configure the shape as demonstrated in Figure 4-22.
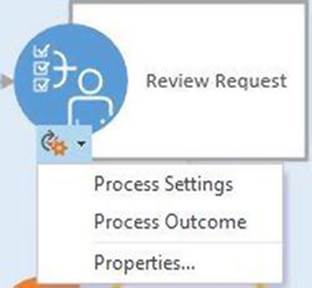
Figure 4-22. Custom links for configuring the shape
![]() Note This icon and the links it exposes are also visible in the Visio application. However, the links are only enabled when running within SharePoint Designer.
Note This icon and the links it exposes are also visible in the Visio application. However, the links are only enabled when running within SharePoint Designer.
The specific links will vary depending on the shape. Generally, the first link will display a dialog to configure all of the properties of the share. The last link, Properties, will display a list of all the properties and their values. Links in between will usually display the same dialog as the first link, or a subset of it.
Configuring the Approval Task
You’ll start with the first action, Review Request, which will generate a task for someone to review and approve the associated request. Click the SharePoint Designer Properties icon and select the Process Settings link. This will display the Start a Task Process dialog box. This includes three collapsible sections: Task Options, Email Options, and Outcome Options. When fully expanded, the dialog box looks like Figure 4-23.
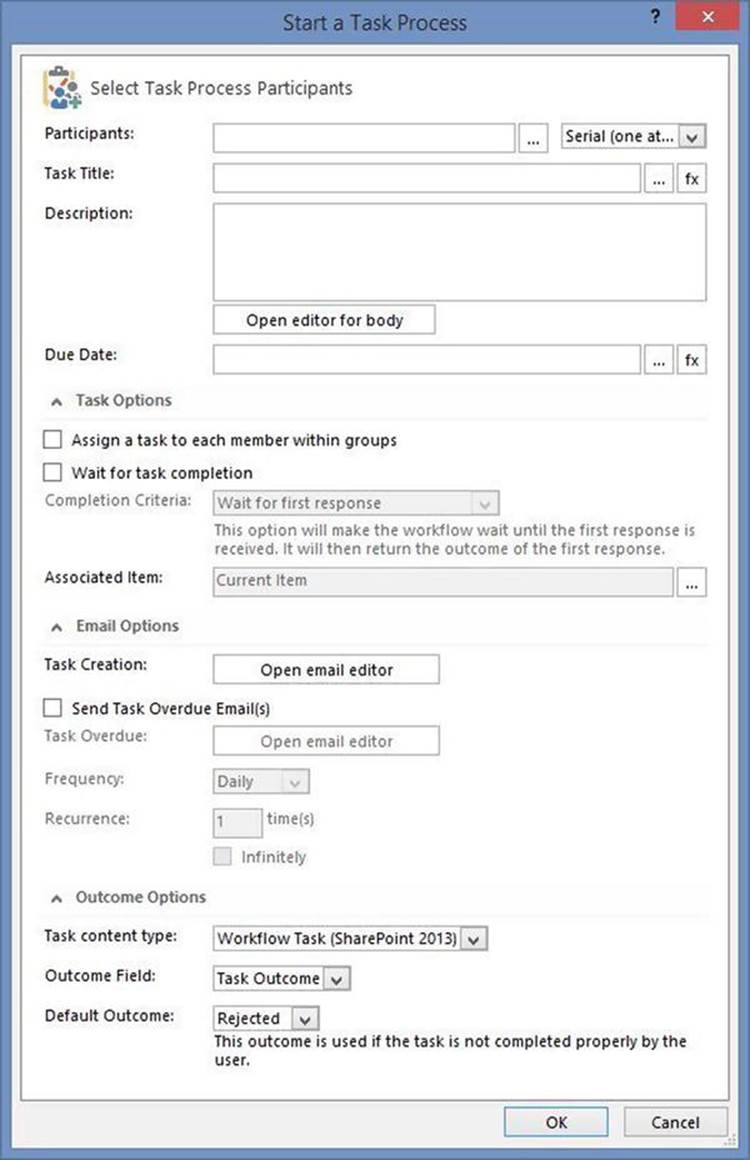
Figure 4-23. The Start a Task Process dialog box
This action starts a task process that we’ll explain in more detail later in this chapter. But essentially, this creates a task that is assigned to one or more people. In this dialog box you’ll configure the details of that task and how the workflow will process it.
1. Click the ellipses next to the Participants field to display the Select Users dialog box. This will list the users and groups that have been added to your Office 365 account. Just select your name from the list and click the Add button. Click the OK button to close the dialog box.
![]() Note For this example I just added myself as the approver. You could set up an Approvers group in SharePoint and then select that group. Anyone in that group would then be able to review the request. You can also assign multiple reviewers.
Note For this example I just added myself as the approver. You could set up an Approvers group in SharePoint and then select that group. Anyone in that group would then be able to review the request. You can also assign multiple reviewers.
2. The dropdown to the right allows you to select either serial or parallel approvals. If you are assigning the task to multiple people (or groups), you can either allow them to review the request simultaneously or one at a time. Since you’re assigning a single person it doesn’t matter which you select.
3. For the Task Title, this should include some information about the request. The reviewer will likely receive tasks to review multiple request and the task title should indicate which request this task is for. Click the ellipses next to the Task Title field to display the String Builder dialog box. Enter Request Approval – and then click the Add or Change Lookup button.
![]() Tip You’ll see the Add or Change Lookup button on a number of dialog boxes in SharePoint Designer. This is where you can retrieve data from a related list item or other data source. It will display the appropriate lookup dialog box, where you can enter the data source and specific field and format. The resulting expression is then embedded within your field value. The fx button, which you’ll also see a lot, does the same thing, except the result replaces the entire field rather than just inserting the expression as part of a larger field definition.
Tip You’ll see the Add or Change Lookup button on a number of dialog boxes in SharePoint Designer. This is where you can retrieve data from a related list item or other data source. It will display the appropriate lookup dialog box, where you can enter the data source and specific field and format. The resulting expression is then embedded within your field value. The fx button, which you’ll also see a lot, does the same thing, except the result replaces the entire field rather than just inserting the expression as part of a larger field definition.
4. In the Lookup for String dialog box, select Current Item as the Data Source and then select the Title column as shown in Figure 4-24. In this context, the Current Item is the Requests item that is being reviewed. This will include its title in the task title. Click the OK button to close the dialog box.
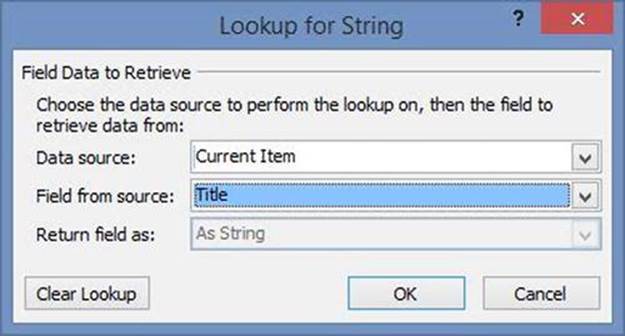
Figure 4-24. Selecting the Title column
![]() Tip The dropdown contains all of the available lists including Calendar, Tasks, and Requests. It also includes a couple of generic references such as Current Item and Association: Task List. Since this workflow is associated with theRequests list, selecting Current Item is equivalent to selecting the Requests list. However, if you were implementing this as a reusable workflow you would need to use Current Item. Then the actual list that is referenced would be defined as whatever list the workflow is associated with.
Tip The dropdown contains all of the available lists including Calendar, Tasks, and Requests. It also includes a couple of generic references such as Current Item and Association: Task List. Since this workflow is associated with theRequests list, selecting Current Item is equivalent to selecting the Requests list. However, if you were implementing this as a reusable workflow you would need to use Current Item. Then the actual list that is referenced would be defined as whatever list the workflow is associated with.
5. The String Builder dialog box will now look like Figure 4-25. Click the OK button to close the dialog box.
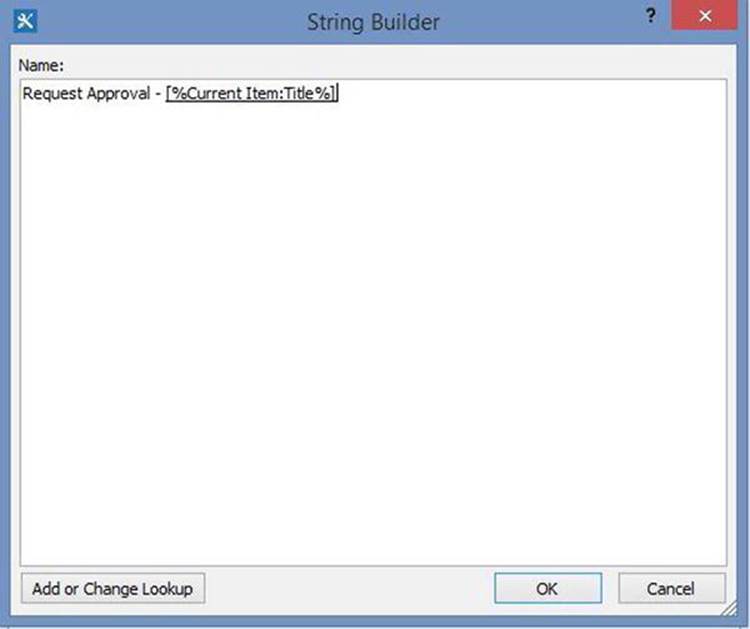
Figure 4-25. The completed String Builder dialog box
6. Expand the Task Options section (if not already expanded). Most of this will not apply since you’re using a single person to perform the approval. The first check box, Assign a task to each member within groups, is used to specify that every member of the group needs to approve the request. In this case, a task is assigned to each person. If unchecked, the task is assigned to the group and any member of the group can work on it and approve the request.
7. The second check box, Wait for task completion, specifies that the workflow should pause until the task is completed, which is the typical scenario for an approval process. However, some tasks can run asynchronously while the workflow process continues. If the workflow must wait for the task, and there are multiple approvals, the Completion Criteria dropdown provides options such as waiting for all approvals, only the first one, or some percentage of approvals to complete.
8. Expand the Email Options section. An e-mail is sent to the user when a task is assigned to them. You can click the Open email editor button to configure the contents of that e-mail. You can also specify if a reminder e-mail should be sent when the task is overdue.
9. Expand the Outcome Options section. We’ll explain task outcomes later in this chapter. Since you are using the standard approval task action, these options cannot be changed. You’ll create a custom outcome later.
10.Click the OK button to close the Start a Task Process dialog box.
So now the workflow has started the approval process. As I said, this will create a task for someone (me) to review the request. In the meantime, the workflow will be idle waiting for the approval process to complete. The rest of the workflow will take the appropriate actions depending on whether the request was approved.
Designing a Condition
Hover over the Approved? shape and click the SharePoint Designer Properties icon. Then select the Value link to display the If any value equals value Properties dialog box. This has three fields to enter, two values and an operator. In this case, you’ll want to see if the outcome from the previous task was approved.
1. Select the first Value field, and then click the lookup (fx) button. This will display the Define Workflow Lookup dialog box. The outcome from the approval task will be stored in a workflow variable. For the Data Source, select Workflow Variables and Parameters. For the Field from source dropdown, select Variable: Outcome as shown in Figure 4-26. Click the OK button to close the dialog box.
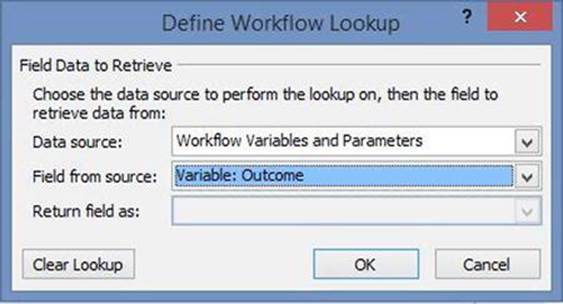
Figure 4-26. Selecting the task outcome variable
2. The Operator should default to equals, which is what you’ll need for this condition.
3. In the second Value field, select Approved from the dropdown list. The completed condition criteria will look like Figure 4-27.
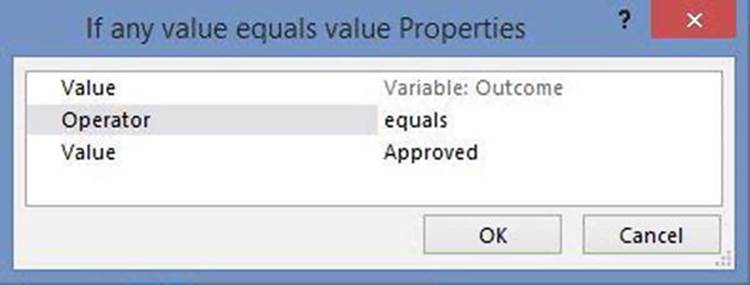
Figure 4-27. The completed condition
![]() Tip You can see from this dropdown list all of the available operations such as begins with, contains, and is empty. This dynamic list is based on the column type of the first value that was selected. If you had selected a numeric column you would see operations such asgreater than and less than.
Tip You can see from this dropdown list all of the available operations such as begins with, contains, and is empty. This dynamic list is based on the column type of the first value that was selected. If you had selected a numeric column you would see operations such asgreater than and less than.
Handling the Rejected Request
If the request was rejected, there are two actions that will be performed by the Workflow:
· Update the Requests item to change its status to Cancelled
· Send an e-mail to the requestor informing them that the request was denied
Cancelling the Request
If the request was not approved you’ll need to update the Requests item to show it was cancelled. To do this, you added a Set Field in Current Item shape in the workflow. To configure this, you simply select the field you want to update and then enter the new value.
Click the SharePoint Designer Properties icon on the Cancel Request shape and then click either the Field or Value link. In the Set Field in Current Item Properties dialog box, select the Request Status column. Since this was defined as aChoice column type, the Value field will be a dropdown listing the allowed options. Select Cancelled as shown in Figure 4-28. Click the OK button to close the dialog box.
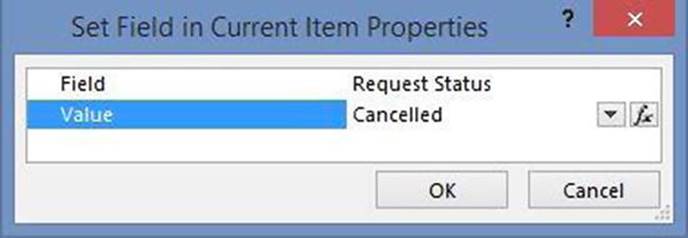
Figure 4-28. Cancelling the request
Sending an E-Mail
Now you’ll need to inform the user that their request was cancelled by sending an e-mail.
1. Click the SharePoint Designer Properties icon on the Send rejected email shape and then click the Email link. This will display the Define E-mail Message dialog box.
2. The e-mail should go to the user who initiated the request. Click the lookup icon to the right of the To field to display the Select Users dialog box. You should find a User who created current item option. Select this and click the Add button as shown in Figure 4-29. Click the OK button to close the dialog box.
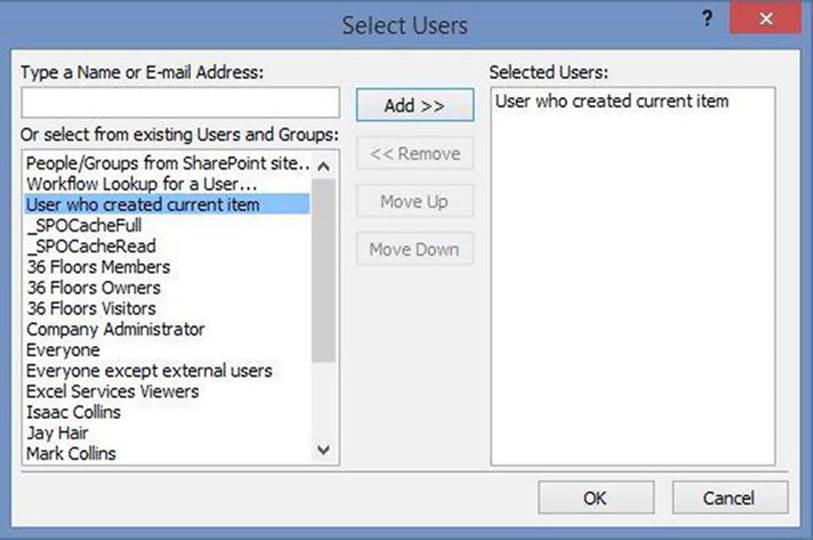
Figure 4-29. Selecting the user who created the request
3. For the Subject field, you’ll want to include the title of the request just like you did with the task initiation e-mail. Click the fx button to display the String Builder dialog box. Enter Request Denied - and then click the Add or Change Lookup button to select the Title field from the Current Item source. When you’re done, close the String Builder dialog box.
4. In the E-mail body add some static text like Your request was denied. The completed dialog box will look like Figure 4-30.
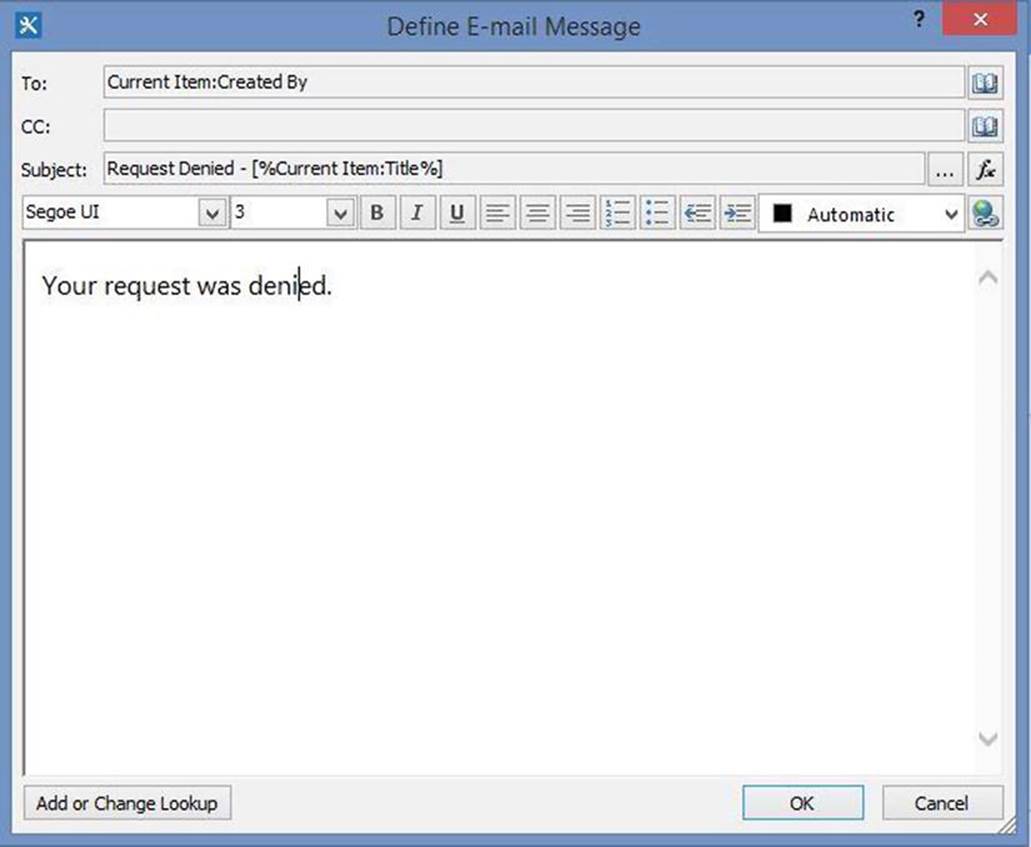
Figure 4-30. The completed e-mail configuration
Handling the Approved Request
If the request was approved, the workflow will need to perform similar actions, specifically it must send an e-mail and update the Requests list item. In addition, it will need to generate a new task to actually fulfill the request.
1. Configure the Send approval e-mail action just like you did for the rejected e-mail. The e-mail subject and body will have different text, obviously, but the process you’ll use to configure it is the same.
2. To update the Requests list, you’ll configure the Approve Request shape. This used a different action called, Update List Item. This action can be used to update other lists, not just the Current Item. It also allows you to update multiple fields in a single action.
3. Click the SharePoint Designer Properties icon on the Approve Request shape and then click the Item link. In the Update List Item Properties dialog box, select the Current Item column. This dialog box displays a grid ofField/Value pairs. Click the Add button and select the Request Status field and then select the Assigned value. Click the Add button again to add another field to be updated. This time, select the % Complete field and enter .10 for the value. This will set the task to be 10% complete. The completed dialog box should look like Figure 4-31. Click the OK button to close the dialog box.

Figure 4-31. Updating a List item
4. The last action that needs to be configured is the actual fulfillment task. Click the SharePoint Designer Properties icon on the Fulfill Request shape and then select the Process Settings link. Configure this just like did for the approval task. Assign the task to yourself and configure the task title and e-mail subject to include the title of the request.
5. Click the Save icon in the Title bar to save all of your changes to the workflow.
Understanding a Task Process
As stated, workflows in SharePoint are normally human-centric. While the workflow performs some actions like sending an e-mail or updating a list item, the tasks that people do form the core of the workflow design. The other actions are used to keep everything organized and manageable. This workflow, for example, can be distilled down to the following:
· Review request.
· If approved, fulfill request.
You have implemented the first task, which is to review and approve (or deny) the request. You then implemented the second task that will fulfill the request.
SharePoint provides a generic task process that you can use for any human task. The approval action that you added to you workflow is called a task process and can contain multiple tasks. It is important to understand the distinction between these terms. A task process refers to an action in the workflow such as approve request. A task refers to a single person performing an action such as reviewing a request.
The distinction is more readily apparent when there is more than one approver. Suppose you require three people to review and approve a request. The task process refers to the entire approval process whereas a task refers to one person reviewing a request. This is illustrated in Figure 4-32.
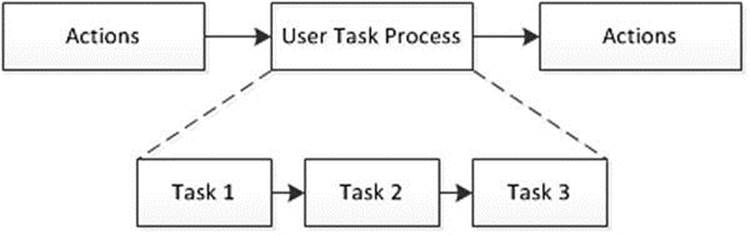
Figure 4-32. User task process with serial execution
SharePoint also allows tasks within a task process to be performed concurrently. With this approach, all three approvers are performing their review simultaneously. This is demonstrated in Figure 4-33.
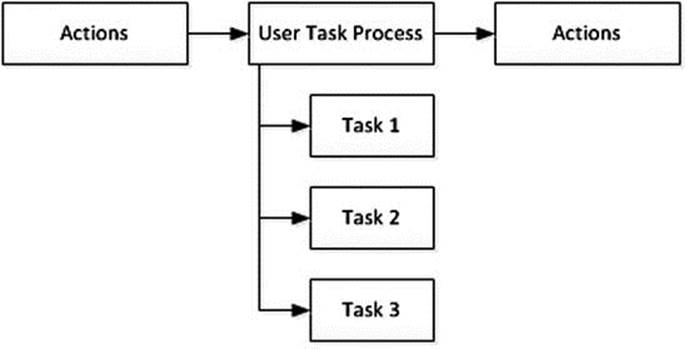
Figure 4-33. User task process with parallel execution
Using the Text-Based Designer
Using the Visual Designer, which is actually a Visio diagram, is convenient for configuring actions and conditions, especially for power users since they can manipulate the visual model of the workflow. However, there is also a Text-Based Designer that you might find useful as well. Prior to SharePoint 2013, this was how all declarative workflows were implemented. Appendix B provides an overview of how to use this designer.
You’ll find a Views button in the WORKFLOW tab of the ribbon. Click the dropdown icon under this button and select the Text-Based Designer link as shown in Figure 4-34.
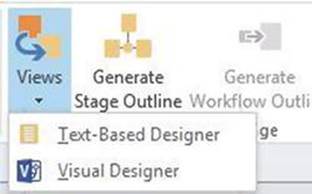
Figure 4-34. Selecting the Text-Based Designer view
The current workflow should now look like Figure 4-35.
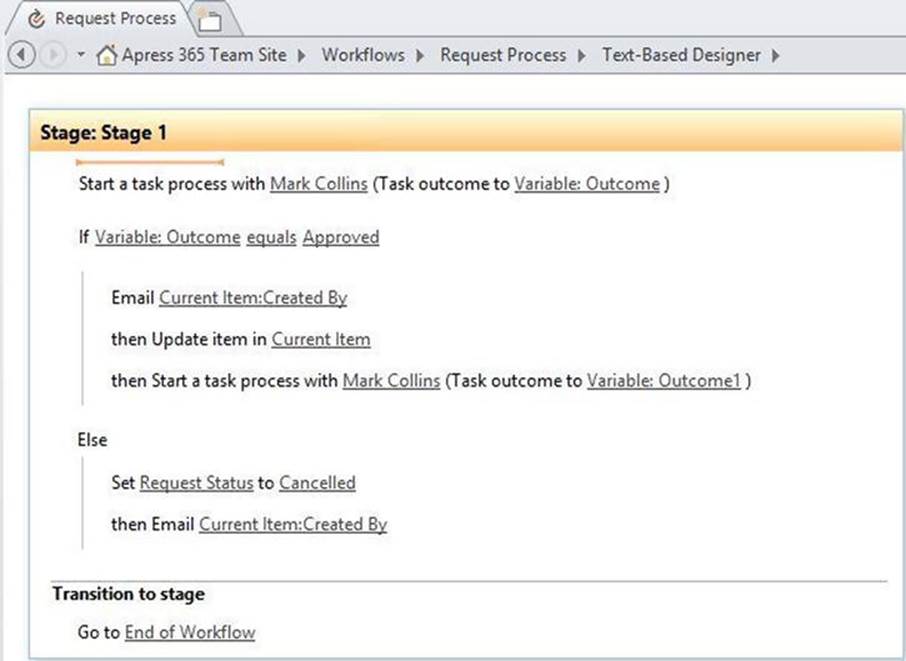
Figure 4-35. The Text-Based Designer
Configuring the Workflow Start Options
There is just one more step to complete before you’re ready to test your workflow. You will configure the workflow to start automatically when a new item is added to the Requests list. As soon as someone submits a new request, a workflow will be started and the appropriate tasks added to the Workflow Tasks list. Go to the Workflow properties page for your workflow.
![]() Tip You’ve probably noticed the breadcrumbs at the top of each SharePoint Designer page. This helps you keep track of where you are and how you navigated there. Your breadcrumbs probably look similar to Figure 4-36. Each of these items is also a link that will take you directly to that object. If you’re currently displaying the Visual Designer page, you can click the Request Process link in the breadcrumbs to go to the Workflow property page.
Tip You’ve probably noticed the breadcrumbs at the top of each SharePoint Designer page. This helps you keep track of where you are and how you navigated there. Your breadcrumbs probably look similar to Figure 4-36. Each of these items is also a link that will take you directly to that object. If you’re currently displaying the Visual Designer page, you can click the Request Process link in the breadcrumbs to go to the Workflow property page.

Figure 4-36. The SharePoint Designer breadcrumbs
In the Start Options section, select the Start workflow automatically when an item is created check box, as shown in Figure 4-37.
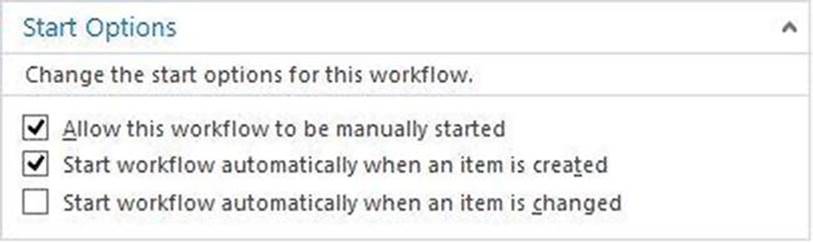
Figure 4-37. The workflow start options
Testing the Initial Workflow
Your workflow is done and ready to be published. Once is has been installed, you’ll create a new request and watch the workflow generate tasks and update the Requests item.
Publishing the Workflow
Before publishing the workflow, it’s a good idea to first check for errors. Click the Edit Workflow link in the Customization section to display the Visual Designer and the Check for Errors button should appear in the ribbon. Click this button and fix any errors that are reported. Once all errors are resolved, click the Publish button to install the workflow. This process can take a few seconds.
Now go to your Team Site and select the Requests list. Select the LIST tab of the ribbon and click the dropdown icon under the Workflow Settings button. Then select the Workflow Setting link as shown in Figure 4-38.
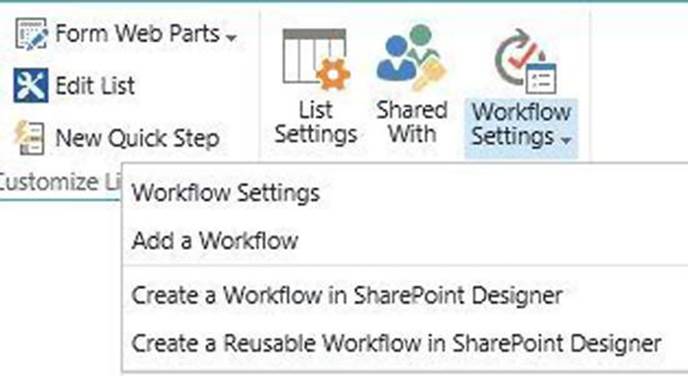
Figure 4-38. Selecting the Workflow Settings link
The Workflow Settings page is shown in Figure 4-39. You can use this page to see if there are any workflows currently in progress.
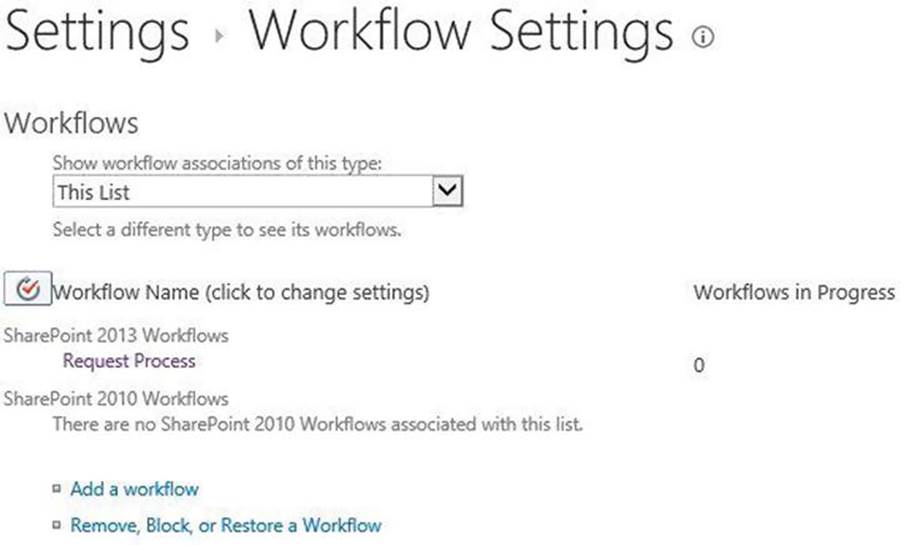
Figure 4-39. Viewing the associated workflows
Processing a Request
Now you’re ready to test the workflow. You’ll add an item to the Requests list and then work the tasks that are generated by the workflow.
1. Go to the SharePoint site and select the Requests list. Click the new item link, which will display the New Item form. Enter a request. The only fields you need to enter are as follows (all the other fields should be left blank or have default values). The New Item form will look like Figure 4-40.
· Title
· Due Date
· Comments
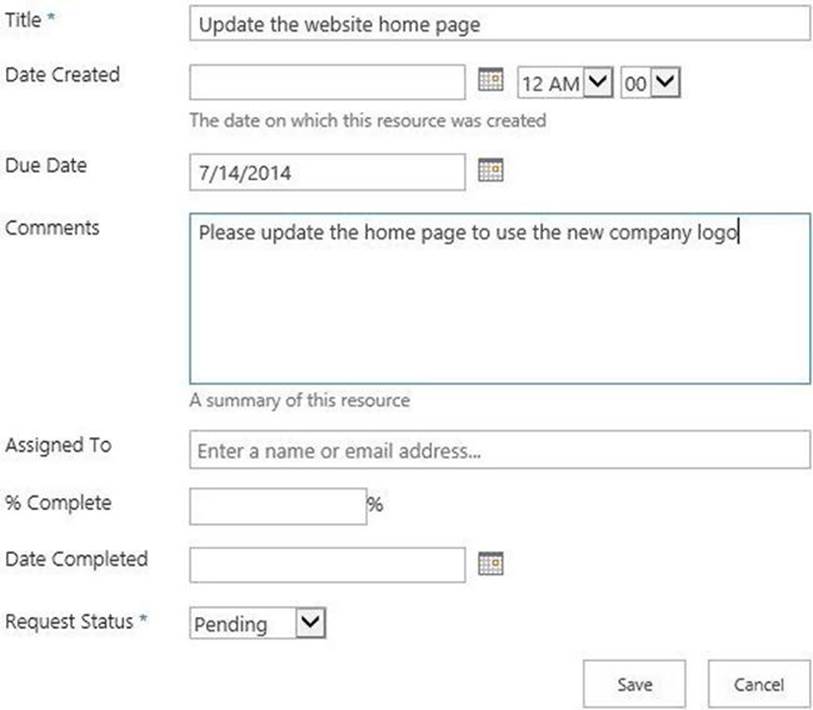
Figure 4-40. The initial New Item form
2. The workflow will start as soon as the request is saved; however, it can take a few seconds before it has generated the first task. It is especially slow the first time it is run. Go to the Workflow Tasks list and you will eventually see a new task created.
3. Edit the new task; the task form should look like Figure 4-41. Click the Approve button to approve the request.
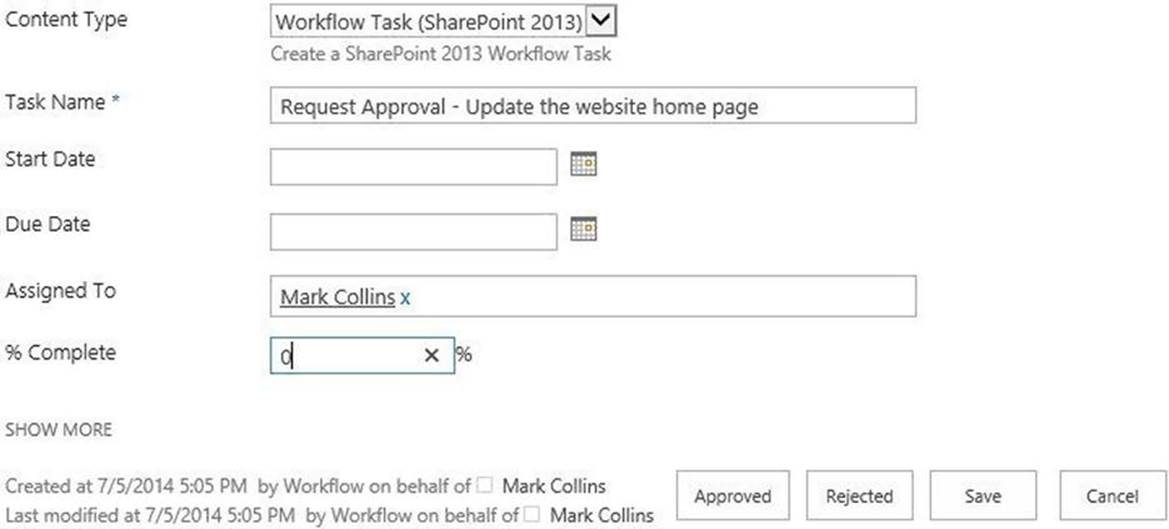
Figure 4-41. The Approval task form
4. Now go to the Requests list. After a few seconds or so, the Request Status will be updated to Assigned, and the % Complete will be set to 10% as demonstrated in Figure 4-42.

Figure 4-42. The updated Requests item
Reviewing the Results
Now let’s look at the artifacts of the workflow process. First, notice in the Requests list that there is a Request Process column. This is the name of the workflow process and this column contains the name of the current stage, Stage 1 in this case. This is also a hyperlink. Click this link to display the details of this workflow instance, which is shown in Figure 4-43.
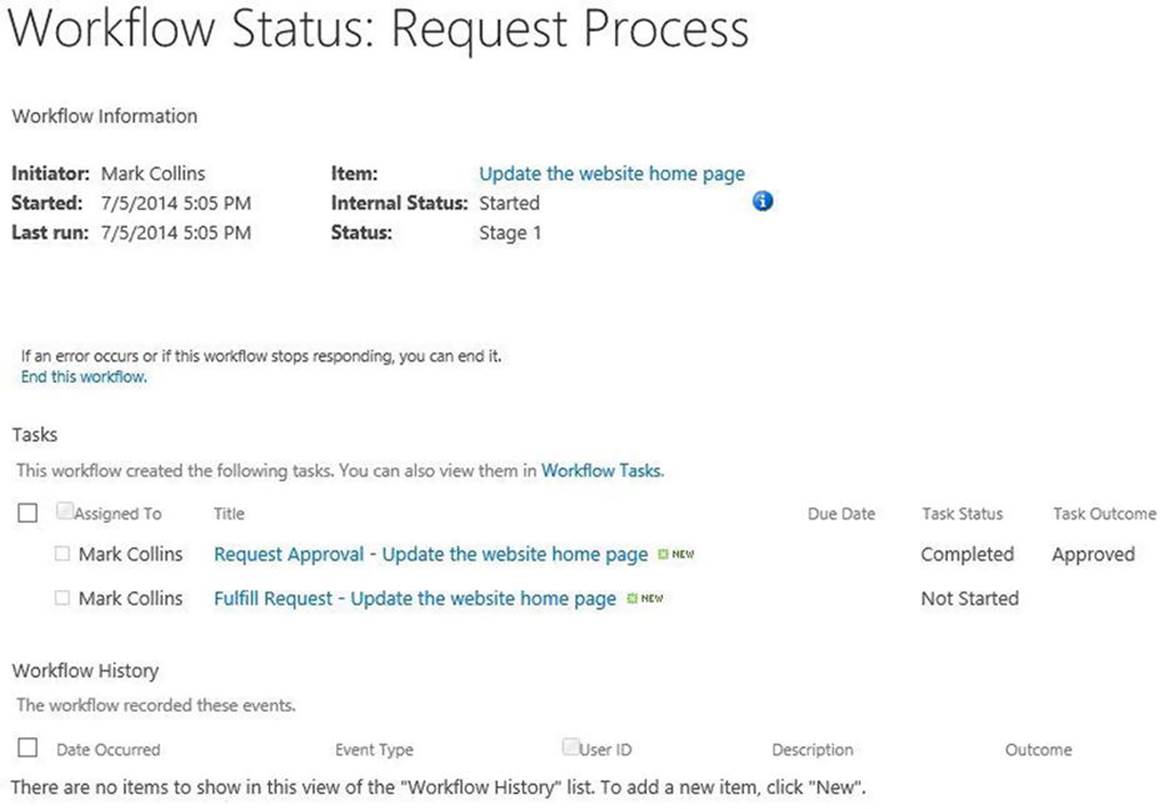
Figure 4-43. The workflow instance details
The Tasks section lists the tasks that have been generated. You can see the approval task was completed with an outcome of Approved. The fulfillment task has been created but not started yet. The Workflow History section shows the history log for this workflow. The workflow logic logs messages to this history log when certain events or errors occur. This log is a helpful feature for debugging workflows.
Check your inbox and you should see the e-mail letting you know that the request has been approved, similar to the one shown in Figure 4-44.
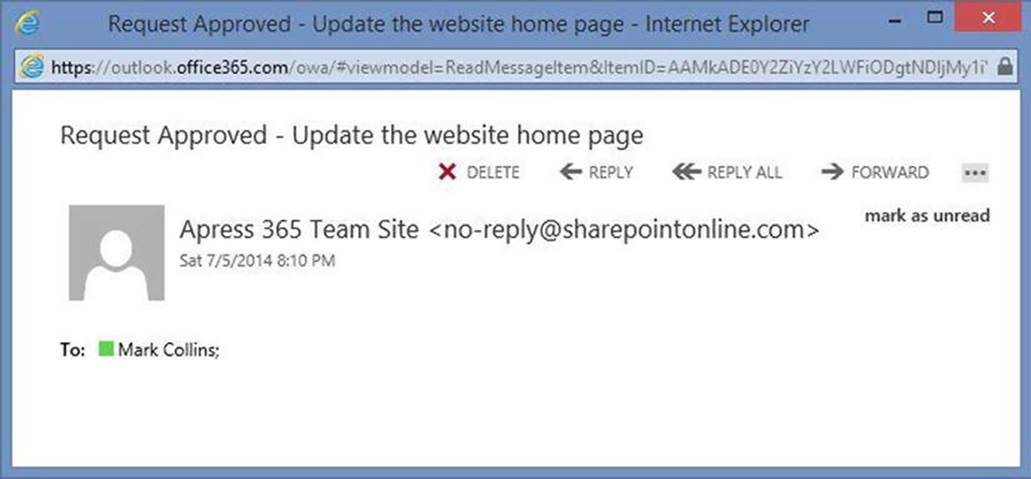
Figure 4-44. The approval e-mail
![]() Note There will be other e-mails in your inbox that the workflow generated. These e-mails are generated by the default implementation of the task and task process events.
Note There will be other e-mails in your inbox that the workflow generated. These e-mails are generated by the default implementation of the task and task process events.
Customizing the Workflow Tasks
You’ve created a simple workflow that creates and assigns tasks, sends e-mails, and moves list items through a defined process. However, there are a couple of enhancements that will make this a lot more useable. First, you may have noticed that there are two types of tasks, approval tasks and fulfillment tasks, in the same Workflow Tasks list. You would really like to perform different actions on these. For example, the Approved and Rejected buttons don’t make a lot of sense on the fulfillment tasks.
The other feature that would be helpful is to use data entered from the approval task to influence the remaining process. For example, the person approving the request may want to decide who to assign the fulfillment request to. Or if the request was rejected, they should be able to enter some comments that are sent to the requestor as part of the rejection e-mail.
In the rest of this chapter, we’ll demonstrate some techniques that you can use to improve the workflow process. First, you’ll define two custom content types, which will enable you to have custom forms and actions for the different task types. Then you’ll use workflow parameters to further enhance the process.
Creating New Content Types
Content types are an integral part of any SharePoint solution. They enable you to put disparate items in a single list and still handle each in a meaningful way. For example, you could have an asset library that contains text files, spreadsheets, pictures, and video clips. When an item is viewed or edited, the library will need to render each of these types differently. This is accomplished by assigning the appropriate content type to each and then configuring the appropriate action based on the content type.
Along the same lines, you’ll define custom content types for the approval and fulfillment tasks. This will allow you to display different forms and support appropriate actions based on the task that is being worked on. You’ll start by creating two new content types that are derived from the standard workflow task, Workflow Task (SharePoint 2013). Then you’ll customize the columns of each content type.
1. Open SharePoint Designer 2013 (if not already opened) and connect to you Team Site. Select Content Types in the Navigator. You’ll notice that there is a fairly long list of content types that have already been defined and they are organized into groups.
2. Click the Content Type button in the ribbon. Enter Request Approval in the name field. For the parent content type, first select the group that the parent is in, List Content Types, and then select the Workflow Task (SharePoint 2013) type. Select the New Group radio button and enter Request for the group name. This will create a new group and put the new content type in it. The dialog box should look like Figure 4-45. Click the OK button to create the new content type.
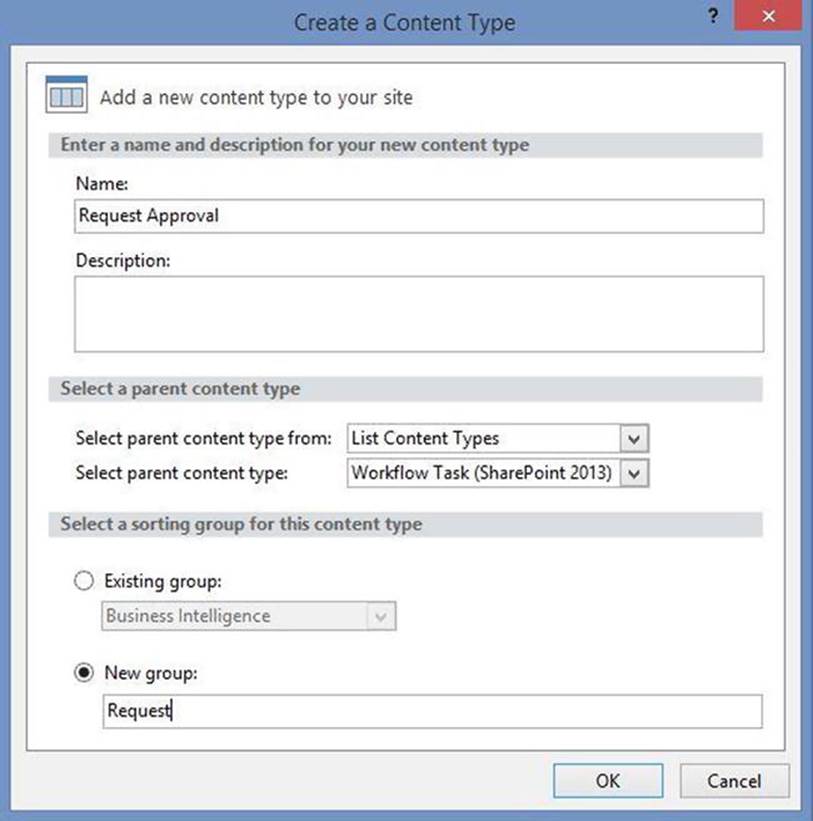
Figure 4-45. Defining the Request Approval content type
3. Click the Content Type button again to define another content type and enter Request Fulfillment for its name. Select the same parent content type, Workflow Task (SharePoint 2013) as the previous one. Then select the Existing Group radio button and select the Request group from the drop down. This group was created when you added the Request Approval content type. The dialog box should look like Figure 4-46. Click the OK button to create the new content type.
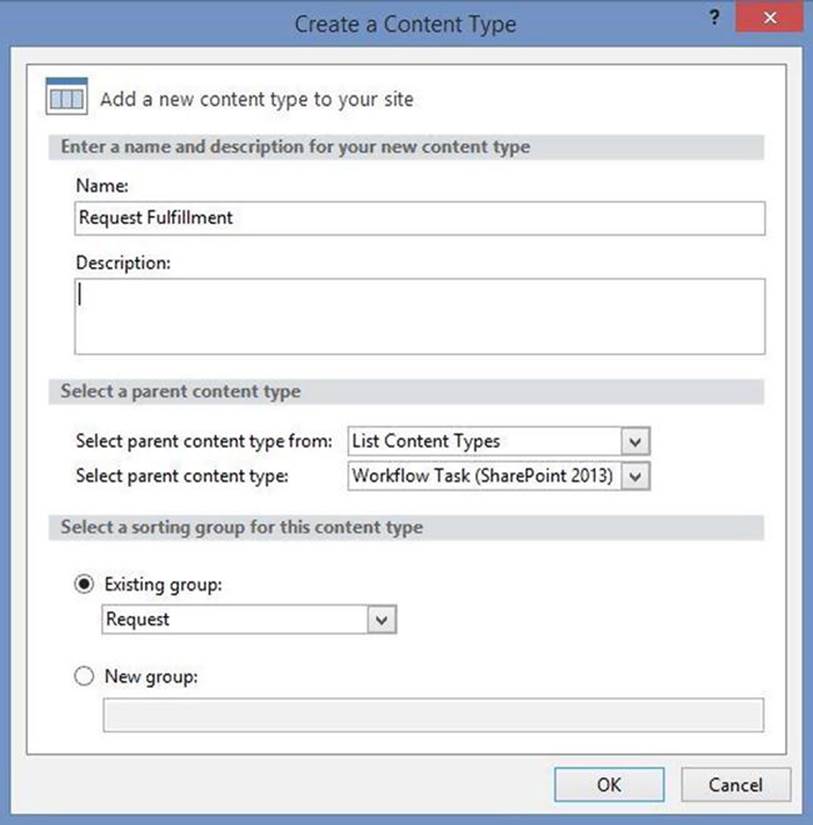
Figure 4-46. Defining the Request Fulfillment content type
4. You should now see the new content types listed in the Request group as shown in Figure 4-47.
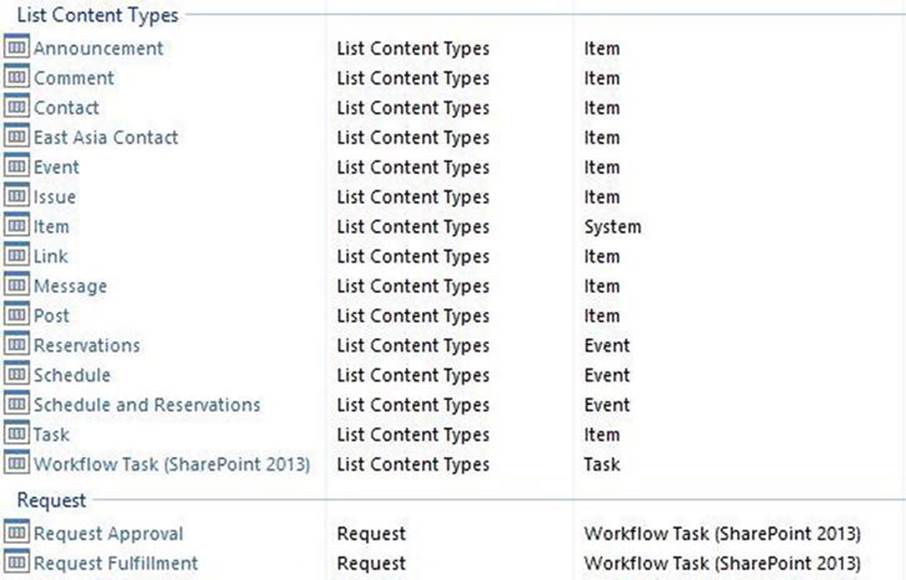
Figure 4-47. Showing the new content types
Now you’ll need to modify each of these content types to customize the columns of each. You’ll add two columns to Request Approval. One will store the user that the approver has chosen to fulfill the request. The other is a comment that will be included in the rejection e-mail. TheRequest Fulfillment will be changed to use a different column to store the task outcome, which will have different options to replace the Approved and Rejected buttons.
Adding New Site Columns
Content types can only contain site columns. The lists that you have created had a combination of both site column and list-specific columns. So you’ll need to first define the new site columns and then later add them to your new content types.
1. Select Site Columns in the Navigator. You’ll notice an even larger list of existing site columns, which are also organized by groups.
![]() Note These group names may be the same as the groups that you saw for the content type, but they are different groups. So, even though you created a Request group for content types, there is no Request group for site columns. You’ll need to create a separate site column group.
Note These group names may be the same as the groups that you saw for the content type, but they are different groups. So, even though you created a Request group for content types, there is no Request group for site columns. You’ll need to create a separate site column group.
2. Click the New Column button in the ribbon. You’ll be prompted for the type before the dialog box appears. Select the Person or Group type.
3. In the Create a Site Column dialog box, enter the name Assign To and a description for this column. Select the New Group radio button and enter Request for the group name. The dialog box should look like Figure 4-48. Click the OK button to create the new site column.
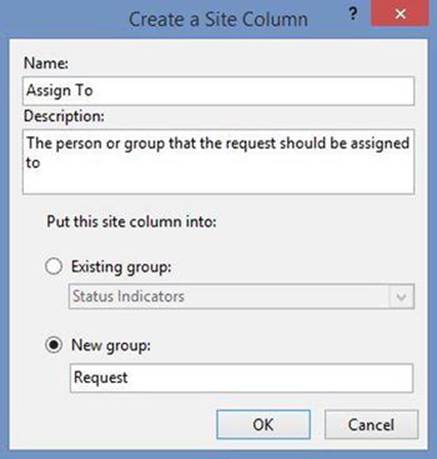
Figure 4-48. Creating the Assign To site column
4. Click the Save icon in the title bar. Unlike content types, new site columns are not saved automatically.
5. Click the New Column button in the ribbon again. When prompted for the type, select Task Outcome.
6. In the Create a Site Column dialog box, enter Request Completed for the name and a description. Select the Existing group radio button and then select the Request group that you just created, as shown in Figure 4-49.
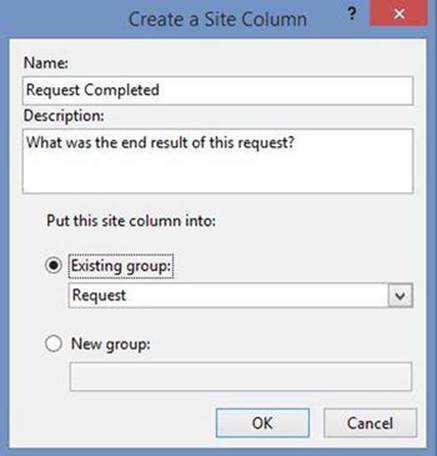
Figure 4-49. Defining the Request Completed site column
7. Because the Task Outcome type defines a set of choices, you’ll be prompted with a Column Editor dialog box. Enter the following values as shown in Figure 4-50. Click the OK button to enter these changes.
· Completed
· On Hold
· Need Info
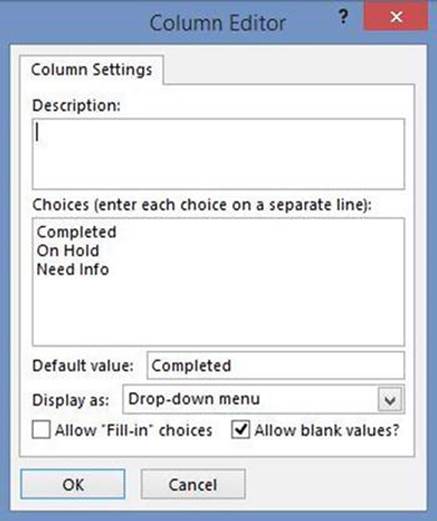
Figure 4-50. The completed dialog box for the Request Completed site column
8. Click the Save button to save all of the changes. You should see the new site columns as demonstrated in Figure 4-51.

Figure 4-51. Listing the new site columns
Customize the Content Types
Now you’re ready to adjust the columns in your custom content types. You’ll add the new columns to the appropriate content type and also remove one of the existing columns.
1. Select Content Types in the navigator and then select the Request Approval content type. Click the Name column to open the content type in its own tab.
2. In the Customization section, click the Edit content type columns link. This will show the existing columns defined for this content type. (You could also click the Edit Columns button in the ribbon).
3. Click the Add Existing Site Column button in the ribbon, which will display the Site Columns Picker dialog box, shown in Figure 4-52. Start typing the column name and the list is automatically filtered to only matching columns. Select the Assign To column and click the OK button.
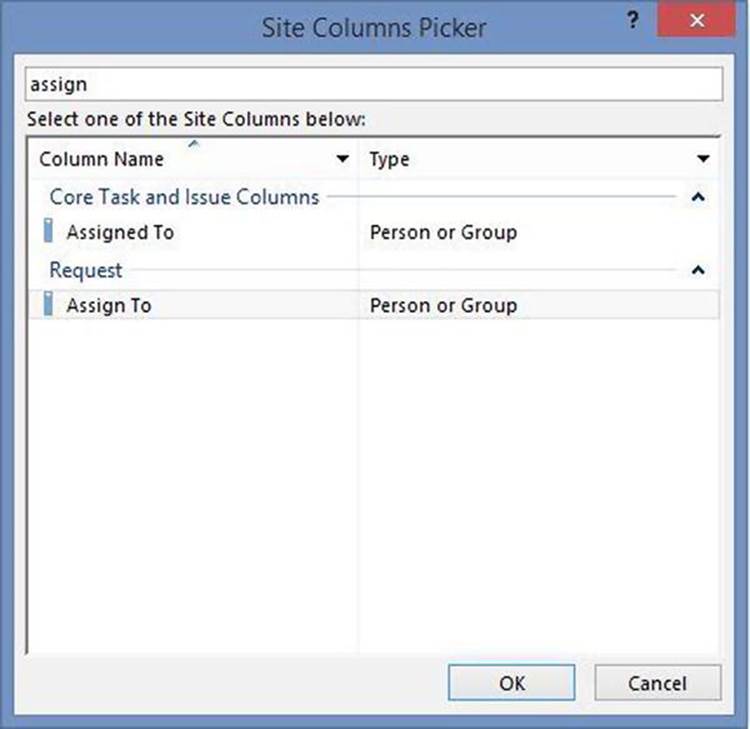
Figure 4-52. The Site Columns Picker dialog box
4. Repeat this step to add the Comments column. The list of columns should look like Figure 4-53.
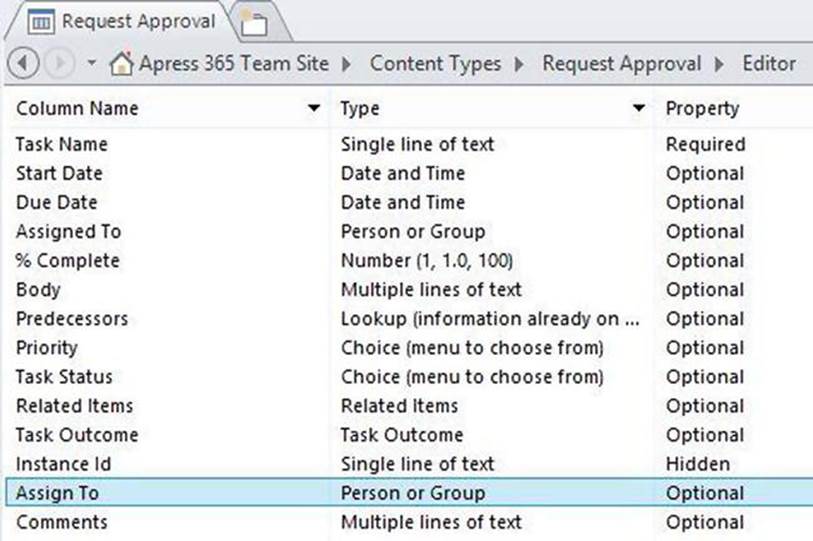
Figure 4-53. The Request Approval columns
5. Click the Save button in the title bar.
6. Open the Request Fulfillment content type and then click the Edit Columns button in the ribbon.
7. Select the Task Outcome column and then click the Delete button in the ribbon.
8. Click the Add Existing Site Column button in the ribbon and select the Request Completed site columns. The list of columns should look like Figure 4-54.
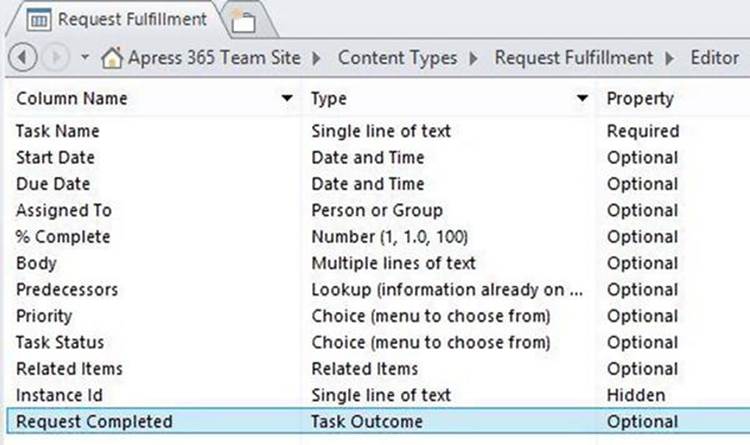
Figure 4-54. The Request Fulfillment columns
9. Click the Save icon in the title bar.
Adding the Content Types to the Workflow Tasks List
Your custom content types are now created and customized with the appropriate set of columns. For a final step, you need to configure the Workflow Tasks list to allow these new content types.
1. Select Lists and Libraries in the navigator and then select the Workflow Tasks list (clicking the Name column to open this list in its own tab).
2. In the Content Types section you’ll see the content types that are currently supported, which should be similar to Figure 4-55.
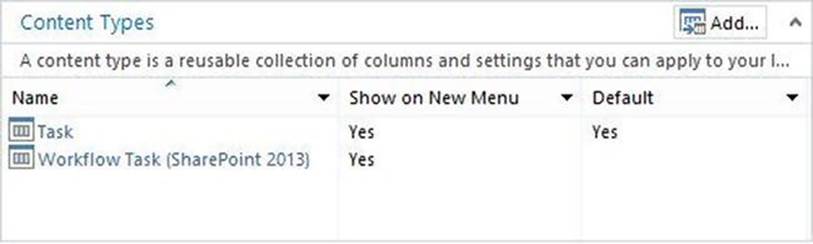
Figure 4-55. The initial list of supported content types
3. Click the Add button and then select the Request Approval content type in the Content Types Picker dialog box. Click the OK button to close the dialog box.
4. Repeat this step to add the Request Fulfillment content type.
5. The Content Types sections should now look like Figure 4-56.
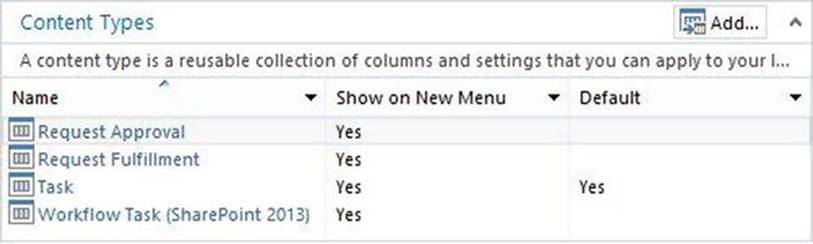
Figure 4-56. The final set of supported content types
Modify the Assign Task Actions
At this point you have new content types defined, but you’ll need to modify the workflow to use the appropriate content type when creating a task. Go back to your Request Process workflow. If you don’t still have this open, you can access it by selecting Workflows in the Navigator and then selecting the Request Process workflow, and finally, clicking the Edit workflow link in the Customization section. If the Text-Based Designer is displayed, you can change to the Visual Designer using the Views button in the ribbon.
1. Hover over the Review Request shape and click the SharePoint Designer Properties icon. Then select the Process Settings link. Expand the Outcome Details section. The standard Workflow Task (SharePoint 2013) content will be configured for this task. The new content types that you created should now be included in this dropdown list. Select the Request Approval content type. A warning will be displayed reminding you that the task list, Workflow Tasks in this case, needs to be configured to support this content type, as demonstrated in Figure 4-57. You took care of this earlier so you can ignore the warning. Click the OK button to close this dialog box.
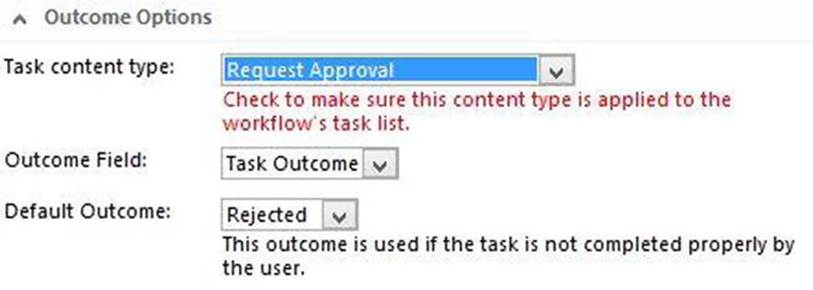
Figure 4-57. Using the new Request Approval content type
2. Now you’ll modify the other task process, Fulfill Request. Click the SharePoint Designer Properties icon and then select the Process Settings link and expand the Outcome Details section. For this task, select the Request Fulfillment content type. In this content type, you replaced the standard Task Outcome column with a custom one. After the content type is selected in this dialog, make sure the Request Completed column is selected as the Outcome Field as shown in Figure 4-58.
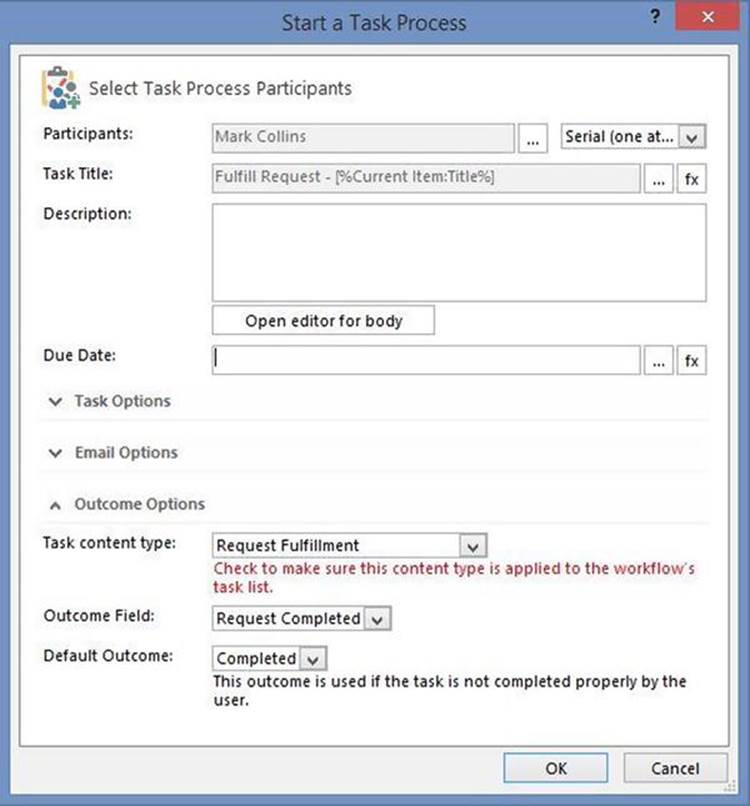
Figure 4-58. Select the Request Fulfillment content type
With these changes in place, you’ll have a different form displayed when you edit a task. Most notably, the Approved and Rejected button will be replaced with more suitable options when working on a fulfillment task. But before we test this out, let’s make a few more enhancements.
Defining Workflow Variables
The workflow process supports variables that persist across activities. This enables you to set a variable in one activity and then later use that in another action or condition. In fact, the Approved? condition used a workflow variable that was set by the preceding action. Now you’ll define some custom variables that you can use to improve the request process.
You added two columns to the Request Approval content type, Assign To and Comments. The person working on the approval task can set these from the task form. These variables will be used later, when assigning the fulfillment task or sending the rejection e-mail.
Click the Local Variables button in the WORKFLOW tab of the ribbon. You’ll see there are two variables, Outcome and Outcome1. These were set by the two Assign Task actions, Review Request, and Fulfill Request. Click the Add button to define a new variable. Enter Assign To for the name and select String as the type as shown in Figure 4-59. Click the OK button to save the variable.
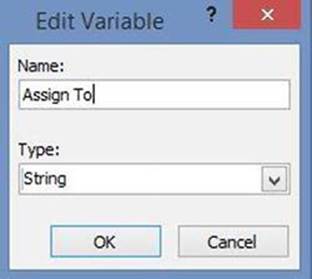
Figure 4-59. Adding the Assign To variable
Repeat this process to add a second variable named Comments with a type String. The final variable list will look like Figure 4-60.
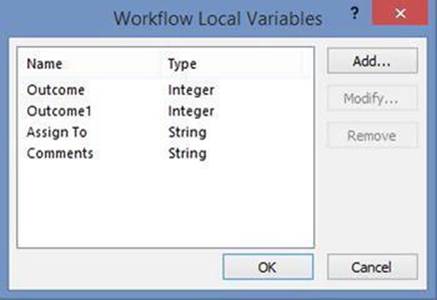
Figure 4-60. The completed variable list
Setting the Workflow Variables
To set these variables, you’ll need to use the Set workflow variable action. You can edit the Visio diagram from within SharePoint Designer. You should have stencils already available to you that include the action and condition shapes. If not, click the SEARCH link in the Stencil window and enter SharePoint.
1. Drag two Set workflow variable shapes onto your diagram. One will be connected to the Yes branch and the other to the No branch. Rename the shape in the Yes branch to Set Assign To variable and the one in the No branch should be named Set Comments variable. You’ll need to re-arrange the shapes a little and add some connectors. The diagram will look similar to Figure 4-61.
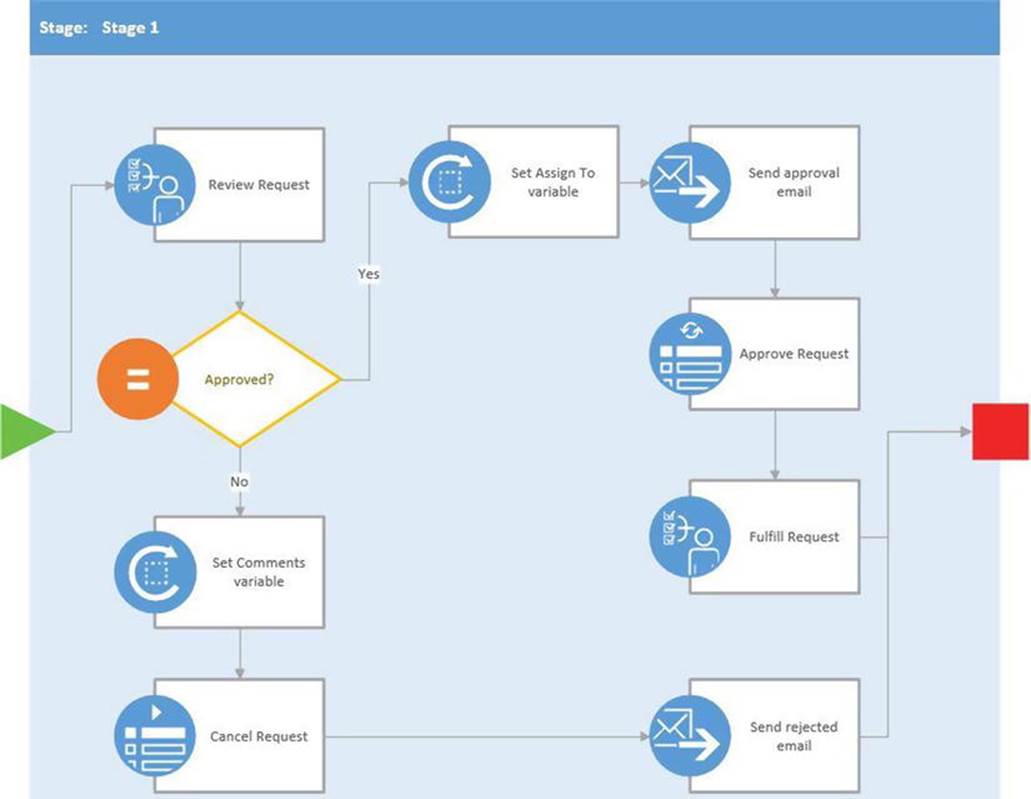
Figure 4-61. Adding new shapes to the diagram
2. Now you’ll configure these actions to set the variables with the appropriate data. Hover over the Set Assign To variable shape and click the SharePoint Designer Properties icon. Select the Variable link to display the Set Workflow Variable Properties dialog box. This has two properties: 1) the variable to be updated and 2) the value to update it with. For the Variable, select the Assign To variable from the drop down. For the Value, click the fx button. This will display theLookup for String dialog box.
3. In the top part of this dialog box you’ll specify the source for the data and then the specific field within that source. For this variable, the data will come from the Assign To column of the Workflow Tasks list. In the Data source dropdown, select theWorkflow Tasks list, then select the Assign To column. Since this column represents a Person or Group, there are multiple ways that this data can be formatted. Select Login Name.
4. Since the source is not from the current item you’ll need to define how the specific item should be selected. This is done in the bottom part of the dialog box. You’ll use the workflow’s Instance Id, which is stored on each task. The Field dropdown lists the columns in the selected source, Workflow Tasks in this case. Select the Instance Id column. Then, in the Value field, click the fx button. Now you’ll specify how the value is obtained. Select Workflow Context for the source and then select Instance ID. The completed dialog box should look like Figure 4-62.
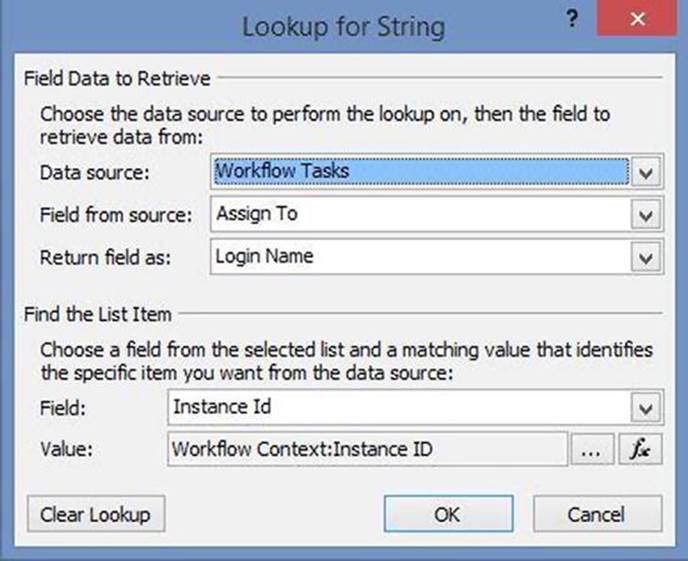
Figure 4-62. Defining the value to update the variable with
5. You’ll now configure the Set Comments variable action using the same approach. Hover over the Set Comments variable shape and click the SharePoint Designer Properties icon. Select the Variable link to display the Set Workflow Variable Properties dialog box. For the Variable, select the Comments variable from the drop down and then click the fx button.
6. Configure the Lookup for String dialog box just like you did for the previous action, except select the Comments field. The completed dialog box should look like Figure 4-63.
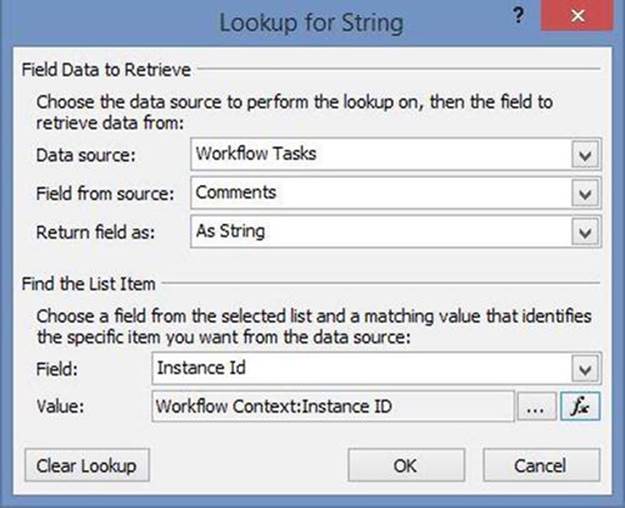
Figure 4-63. Configuring the Set Comments variable action
Enhancing the Workflow Logic
So now you have variables defined and their values have been set. The last step is to use these in your workflow. The Assign To variable will be used when creating the fulfillment task and the Comments variable will be used when sending the rejection e-mail. Let’s start with theAssign To property. First, you’ll modify the Requests item to store the user that will be assigned the fulfillment task.
1. Hover over the Approve Request shape and click the SharePoint Designer Properties icon and select the Items link. You are currently setting the Request Status and % Complete fields. Click the Add button, which will display the Value Assignment dialog box. Select the Assign To field and then, for the value, click the fx button. In the Define Workflow Lookup dialog box, select Workflow Variables and Parameters as the source and then the Assign To variable as the field. Click the OK button to close the Value Assignment dialog box. The completed dialog box will look like Figure 4-64. Click the OK button to save the changes to this action.

Figure 4-64. The completed Update List Item dialog box
2. Next, you’ll adjust the actual task assignment. Hover over the Fulfill Request shape and click the SharePoint Designer Properties icon and select the Process Settings link. This will display the Start a Task Process dialog box. Click the ellipses next to the Participants field. In the Select Users dialog box, select the hard-coded user that is currently being used and click the Remove button. Then select Workflow Lookup for a User and click the Add button.
3. The Lookup for Person or Group dialog box will appear, select the Workflow Variables and Parameters for the source and then select the Assign To variables. Click the OK button to close the dialog box.
4. Then click the OK button again to close the Select Users dialog box. The Start a Task Process dialog box should look similar to Figure 4-65. Click the OK button to close this dialog box.
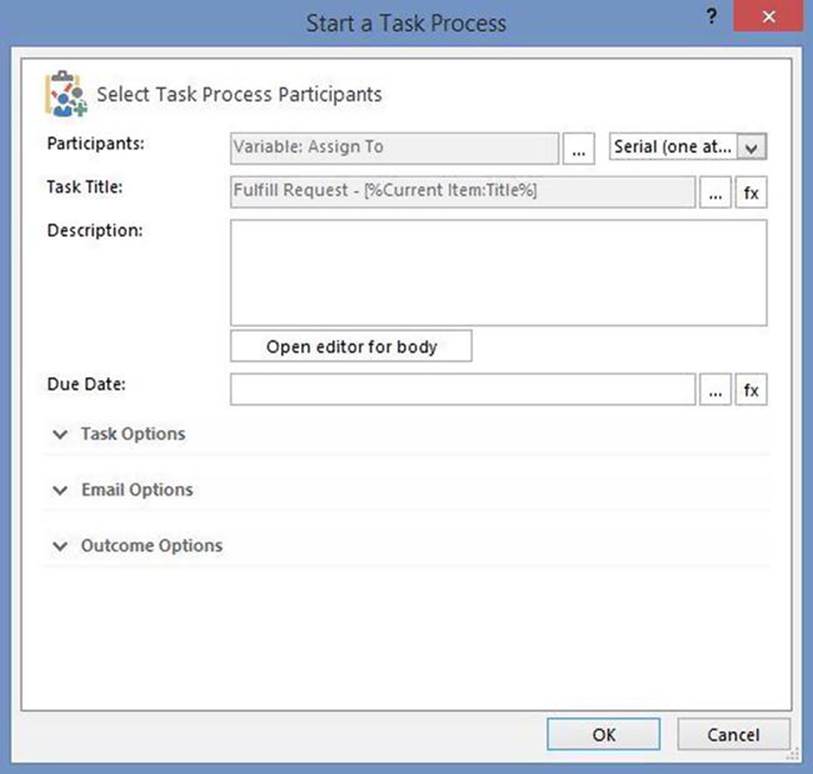
Figure 4-65. The updated Start a Task Process dialog box
5. Hover over the Send rejected email shape and click the SharePoint Designer Properties icon and select the Email link. In the body text enter the following:
[%Variable: Comments%]
6. This will include the approver’s comments in the body of the e-mail. The completed dialog box should look like Figure 4-66. Click the OK button to close the dialog box.
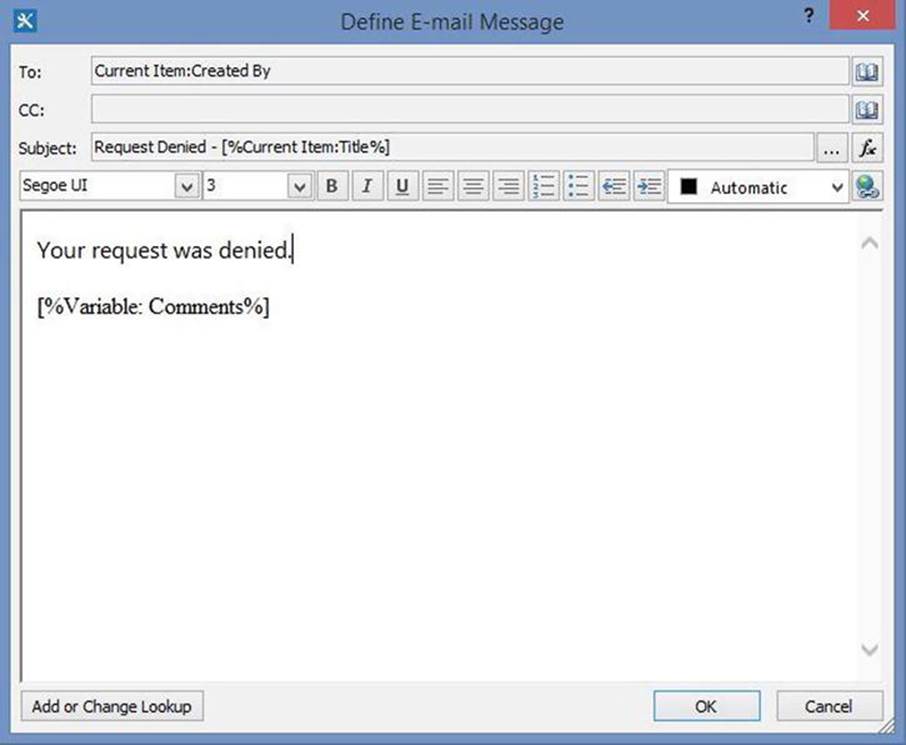
Figure 4-66. Modifying the E-mail contents
![]() Tip You could click the Add or Change Lookup button, which displays the Lookup for String dialog box if you’re not sure of the exact syntax for this.
Tip You could click the Add or Change Lookup button, which displays the Lookup for String dialog box if you’re not sure of the exact syntax for this.
7. With these changes done, you’re ready to test. Click the Save button in the ribbon and then click the Publish button to deploy these changes to your SharePoint site.
Testing the Revised Workflow
Now you’re ready to test these changes.
1. Start by creating a new Requests item as you did earlier.
2. After the approval task is created, edit it and select a different user in the Assign To column and click the Approved button.
3. Go back to the Requests list. You should see the approval task completed and the fulfillment task assigned to the person you selected as demonstrated in Figure 4-67.
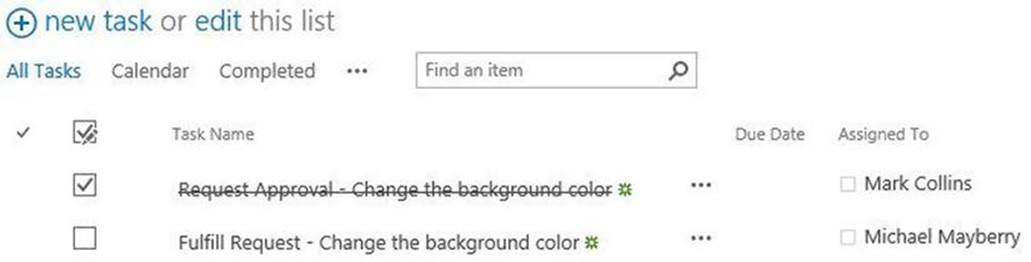
Figure 4-67. The fulfillment task assigned to the selected user
4. Then, go to the Workflow Tasks list and edit the fulfillment task. Notice that the Approved and Rejected buttons have been replaced with Completed, On Hold, and Need Info buttons as shown in Figure 4-68.
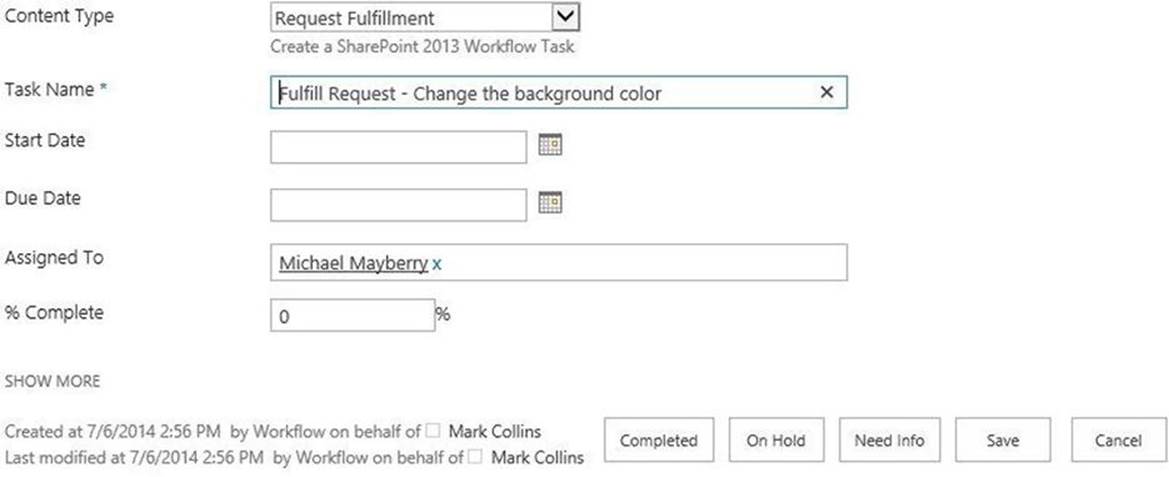
Figure 4-68. The fulfillment task with custom buttons
5. Create another Requests item and edit the approval task when it has been created. This time, enter a comment and click the Rejected button. Then go to your e-mails and find the rejected e-mail, which should look similar to Figure 4-69.
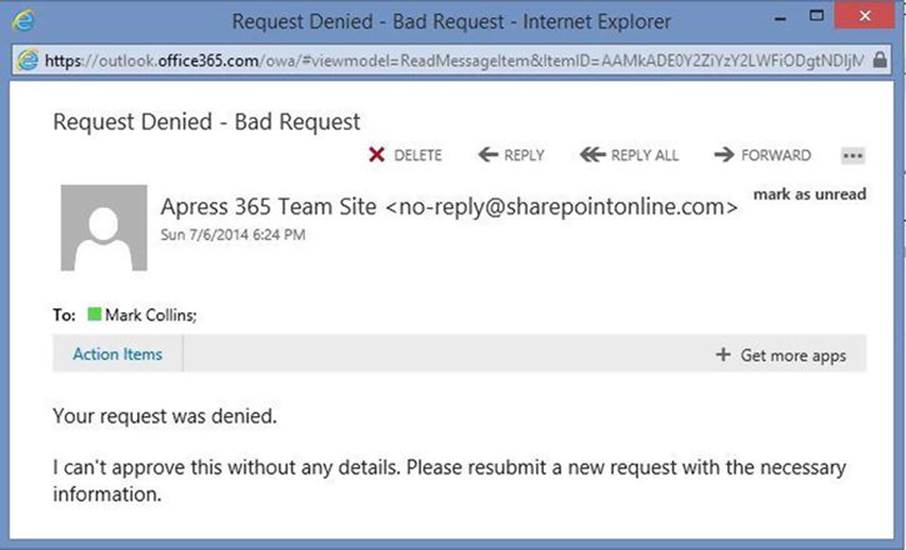
Figure 4-69. The rejection e-mail
Updating the Visio Diagram
In this project you created an initial workflow diagram using Visio 2013. You then opened the same file with SharePoint Designer to implement the specific workflow logic. During the implementation you needed to add a couple of actions to the diagram. For convenience you did this in SharePoint Designer. This is a fairly typical scenario.
Now you want to share this diagram with the users. However, if you open the original diagram in Visio, it does not reflect the recent changes. SharePoint Designer actually imported the diagram into its own internal copy. To get an updated Visio diagram you just need to export it.
From the WORKFLOW tab of the SharePoint Designer ribbon, click the Export to Visio button. This will save the internal copy to a file that can be opened by Visio.
Summary
In this chapter I explained how to implement a declarative workflow to automate the processing of requests. Workflows can be used to automate common processes and make them more efficient and manageable. The workflow presented combines the capability of several tools including:
· SharePoint Designer 2013 to create a list as well as content types and site columns.
· Visio 2013 to provide a visual representation of the workflow.
· SharePoint Designer’s workflow editor to implement the workflow logic.
Hopefully I have given you a sense of what you can do with declarative workflows and how to implement them. In the next chapter, I’ll show you how to build a web database in SharePoint Online using Access 2013.
All materials on the site are licensed Creative Commons Attribution-Sharealike 3.0 Unported CC BY-SA 3.0 & GNU Free Documentation License (GFDL)
If you are the copyright holder of any material contained on our site and intend to remove it, please contact our site administrator for approval.
© 2016-2026 All site design rights belong to S.Y.A.