My Office 2016 (2016)
11. Sending and Receiving Outlook Email
In this chapter, you learn about Outlook email, including setting up an account, sending and receiving mail, and working with incoming messages. Topics include the following:
![]() Configuring Outlook with your email account
Configuring Outlook with your email account
![]() Creating and sending new messages
Creating and sending new messages
![]() Retrieving and reading incoming messages
Retrieving and reading incoming messages
![]() Replying to and forwarding messages
Replying to and forwarding messages
![]() Working with the messages you have received
Working with the messages you have received
Twenty-five years ago, email was more or less unheard of. Today, email is more or less indispensable. That’s a huge shift in such a short time, but it’s not surprising because email is fast, easy, convenient, and nearly universal. Email is the main reason why Outlook may get the most “screen time” of any Office application, because most of us leave it running all day to catch incoming messages as they arrive and to send our own messages at will.
Microsoft Outlook is an outstanding email program, in part because, as you see in this chapter, the basic email tasks of receiving, composing, and sending messages are all quick and easy.
Setting Up Your Email Account
When you launch Outlook for the first time, you are asked to run through a few configuration chores, the most important of which is setting up your email account. To get through these dialog boxes, you need at a minimum your email address and your email account password. This is enough to configure most accounts because Outlook uses Auto Account Setup to glean the rest of the account details automatically.
If this automatic route doesn’t work, or if your email account requires special setup, you need to set up the account manually by entering some or all of the following settings:
• The account type: POP3 (Post Office Protocol 3) or IMAP (Internet Message Access Protocol)
• The domain names of your email provider’s incoming and outgoing mail servers
• Your email account user name (This is often the same as your email address.)
Add an Account Automatically
For many account types, including Hotmail, Outlook.com, and Gmail, Outlook can configure the account automatically given just your email address and password.
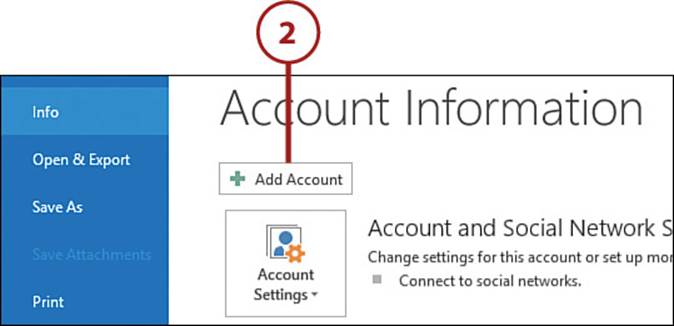
1. Click File. Outlook displays the Account Information screen.
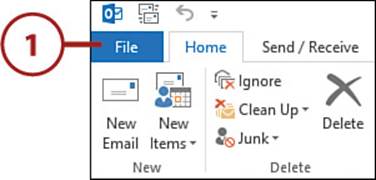
2. Click Add Account. Outlook opens the Auto Account Setup dialog box.
Account Setup at Startup
If you’re starting Outlook for the first time, click Next, select Yes, and then click Next to get to the Auto Account Setup dialog box.
3. Type your name.
4. Type your email address.
5. Type your password twice.
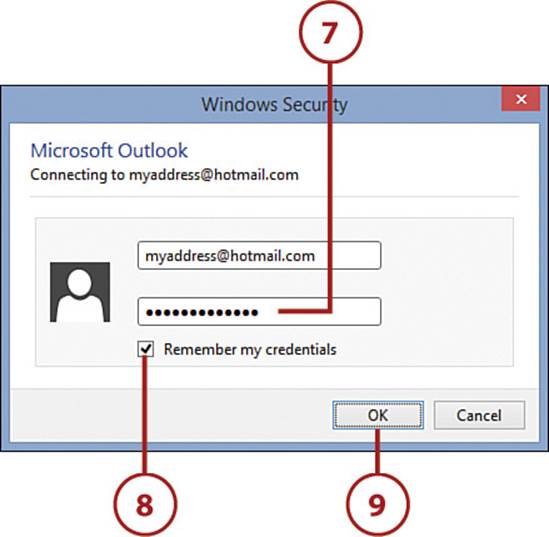
6. Click Next. For most account types, you are asked to confirm that you want to connect to the account.

7. Type your password, if it isn’t filled in for you already.
8. Click to activate the Remember My Credentials check box. For some account types, this reads Save This Password in Your Password List.
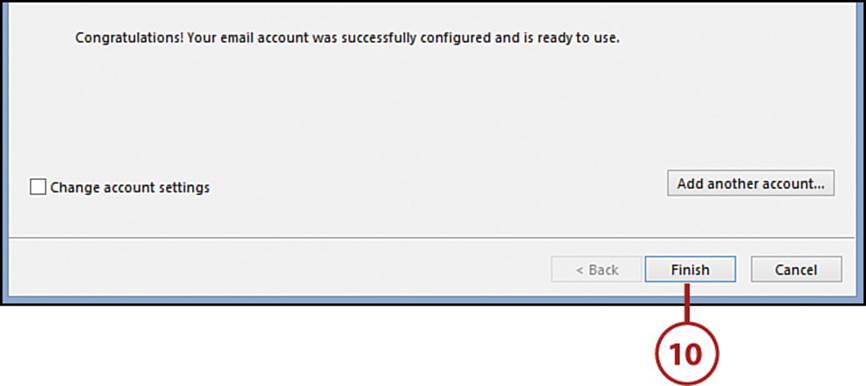
9. Click OK. Outlook connects to your account.
10. Click Finish. Outlook adds the account.
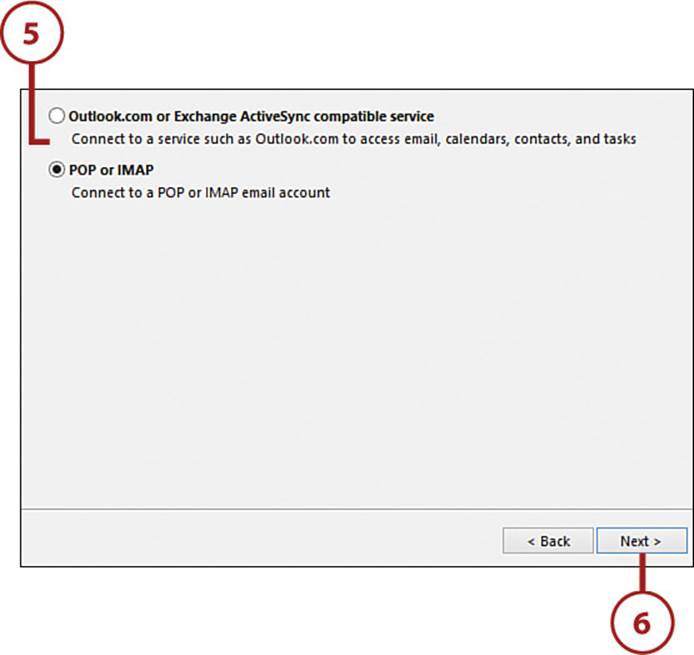
Add an Account Manually
If Outlook fails to set up your account automatically, or if your email account requires a specialized configuration, you need to add the account by hand.
1. Click File. Outlook displays the Account Information screen.
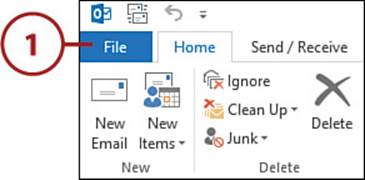
2. Click Add Account. Outlook opens the Auto Account Setup dialog box.
Account Setup at Startup
If you’re starting Outlook for the first time, click Next, select Yes, and then click Next to get to the Auto Account Setup dialog box.
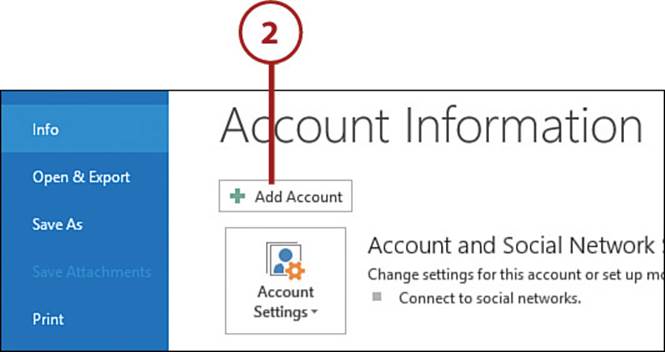
3. Click Manual Setup or Additional Server Types.
4. Click Next.
5. Select the type of account you are setting up.
6. Click Next. For most account types, you are asked to confirm that you want to connect to the account.
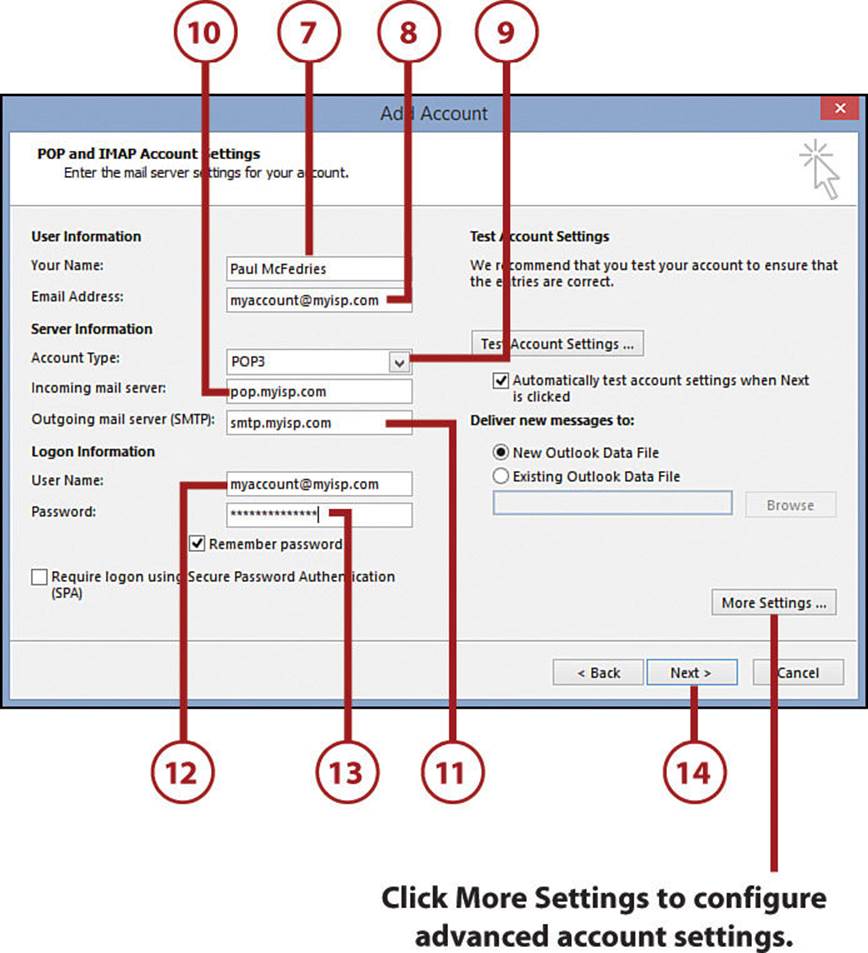
7. Type your name.
8. Type your email address.
9. Select the account type.
10. Type the address of your email provider’s incoming mail server.
11. Type the address of your email provider’s outgoing mail server.
12. Type your account user name.
13. Type your password.
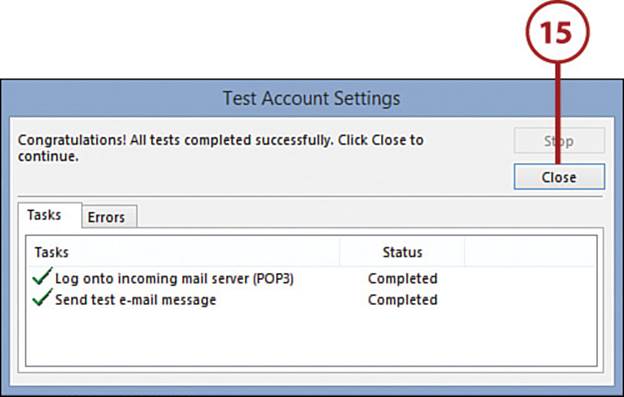
14. Click Next. Outlook tests your account settings.
>>>Go Further: Advanced Account Settings
If you’re adding a POP or IMAP account, click More Settings to open the Internet E-mail Settings dialog box. You can use this dialog box to specify advanced or specialized account settings. For example, if your email provider says that its outgoing email server requires authentication, click the Outgoing Server tab and then click to activate the My Outgoing Server (SMTP) Requires Authentication check box. In most cases, you leave the Use Same Settings as My Incoming Server option selected, but if your provider requires separate authorization, click Log On Using and then enter the credentials you were given for the outgoing server.
If your provider has given you special ports to use, click the Advanced tab and then use the Incoming Server and Outgoing Server text boxes to type the port numbers. Finally, if your provider requires a secure connection to the server, click to activate the This Server Requires an Encrypted Connection (SSL) check box. Click OK to put the new settings into effect.
15. Click Close.
16. Click Finish. Outlook adds the account.

Composing and Sending a New Message
Outlook offers many features and options for sending messages to other people, but you really need to know how to do only three things: send a message to any email address, send a message to someone in your Outlook Contacts list, and attach a file to a message.
Compose a Message
Composing a message in Outlook is not all that different from composing a letter or memo in Word. You just need to add a few extra bits of information, such as your recipient’s email address and a description of your message.
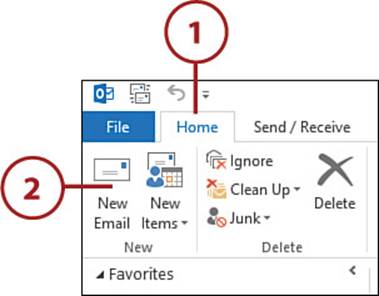
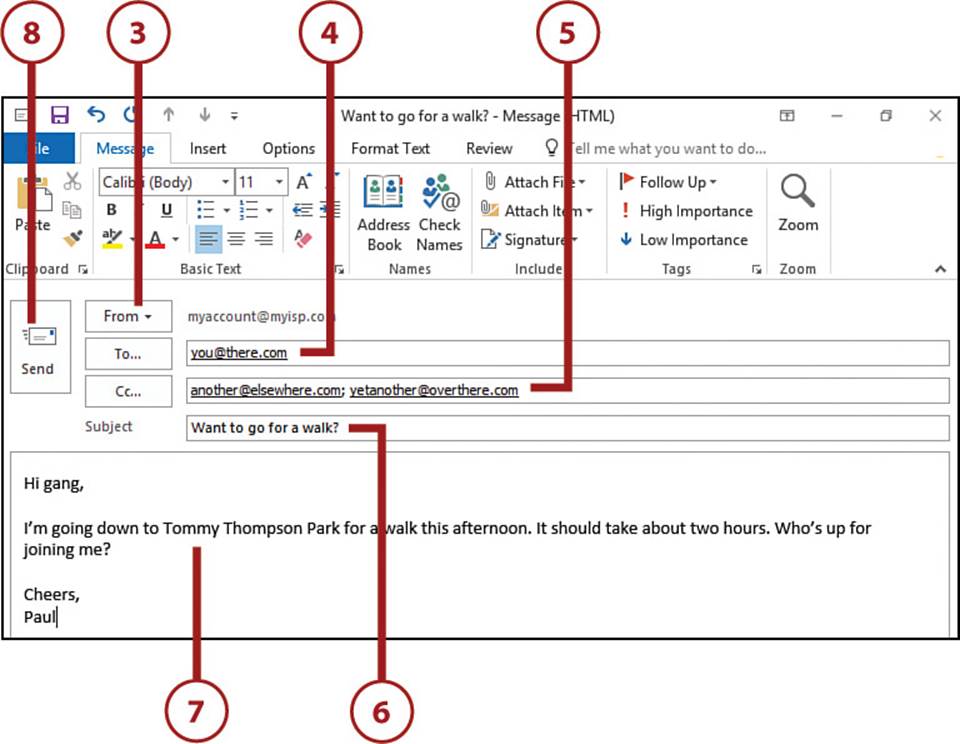
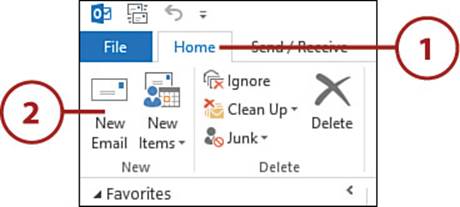
1. Click the Home tab.
2. Click New Email.
Keyboard Shortcut
You can also start a new email message by pressing Ctrl+N.
3. If you have multiple accounts, use the From list to select the account you want to use to send the message.
4. Type the email address of the message recipient. If you want to specify multiple recipients, separate each address with a semicolon (;).
5. If you want to send a copy of the message to someone, use the Cc (courtesy copy) field to type that person’s email address. Again, if you want to specify multiple Cc recipients, separate each address with a semicolon (;).
Blind Courtesy Copy
Each recipient can see the addresses of the main and Cc recipients. If you want someone to receive a copy of the message, but you don’t want everyone else to see that person’s address, send that person a Bcc (blind courtesy copy). To display the Bcc field, click the Options tab and then click Bcc.
6. Type a brief description of your message.
7. Type your message.
8. Click Send. Outlook sends your message to each recipient.
Use the Contacts List to Specify Recipients
When you’re composing a message, you can use Outlook’s Contacts list (see Chapter 13, “Keeping in Touch with Outlook Contacts”) to add recipients without having to type their addresses.
1. Click the Home tab.
2. Click New Email.

Keyboard Shortcut
You can also start a new email message by pressing Ctrl+N.
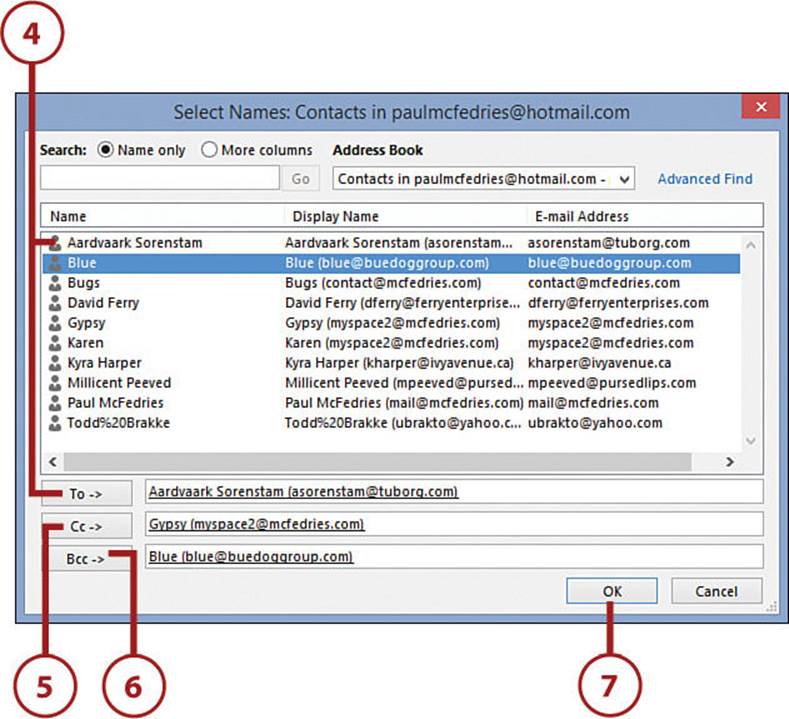
3. Click To. Outlook displays the Select Names dialog box.
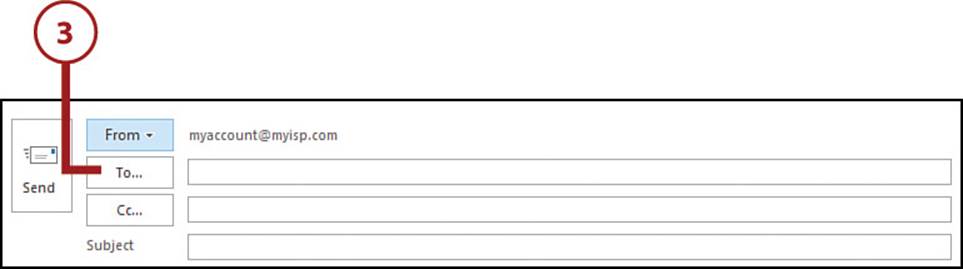
4. Click a contact and then click To. Outlook adds the contact to the message’s To field.
5. If you want to send a courtesy copy of the message to someone, click the contact and then click Cc.
6. If you want to send a blind courtesy copy of the message to someone, click the contact and then click Bcc.
7. Click OK.
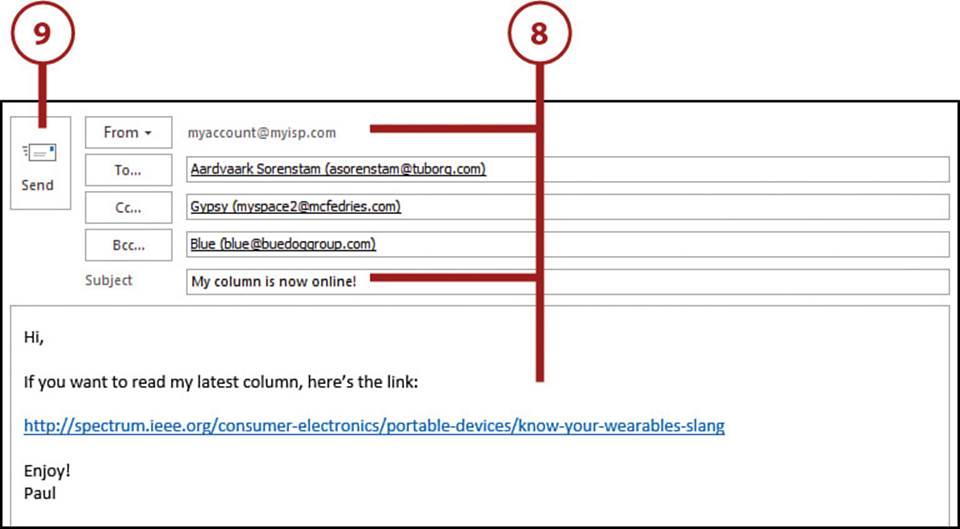
8. Fill in the rest of the message.
9. Click Send. Outlook sends your message to each contact you selected.
Attach a File to a Message
The information you want to send to the recipient might exist in a Word document, Excel spreadsheet, or some other file. In that case, you can attach the file to your message and Outlook sends along a copy of the file when you send the message.
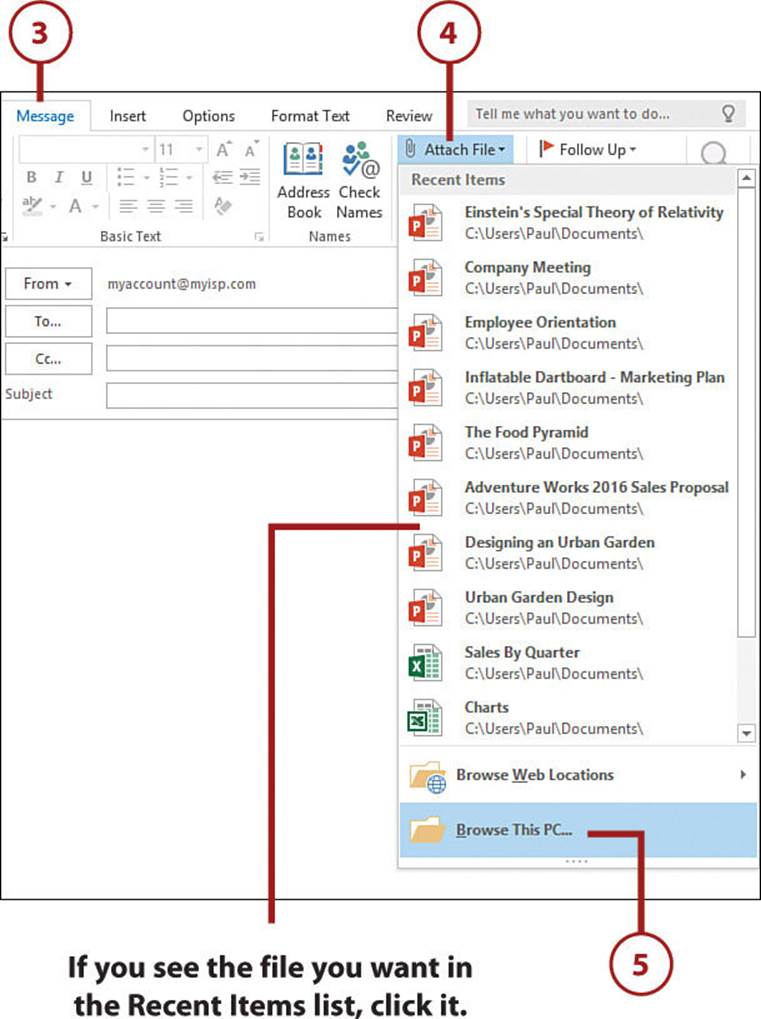
1. Click the Home tab.
2. Click New Email.
3. Click the Message tab.
4. Click Attach File.
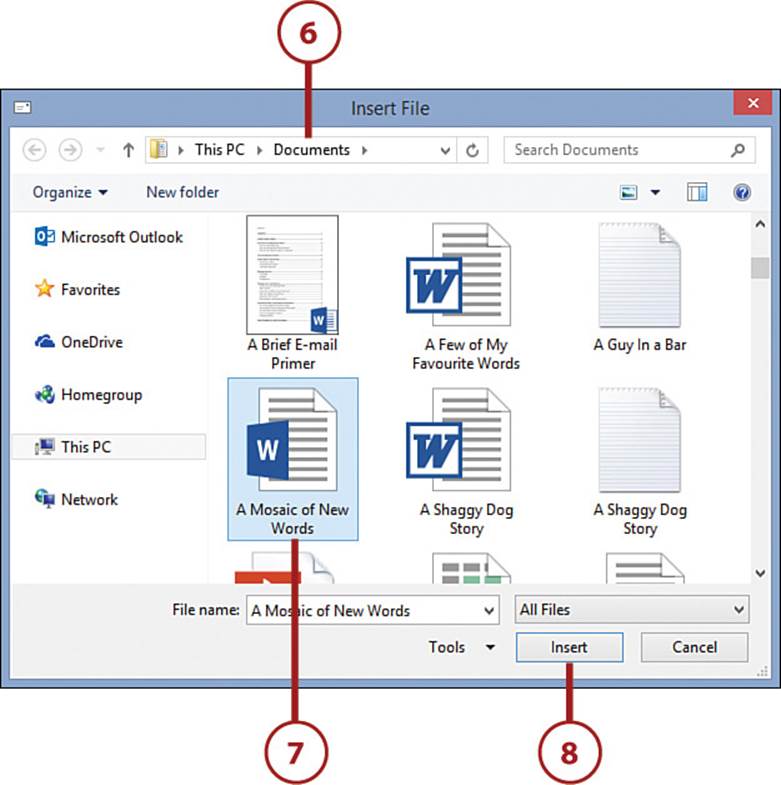
5. Click Browse This PC. Outlook displays the Insert File dialog box.
6. Select the folder that contains the file.
7. Click the file.
8. Click Insert.
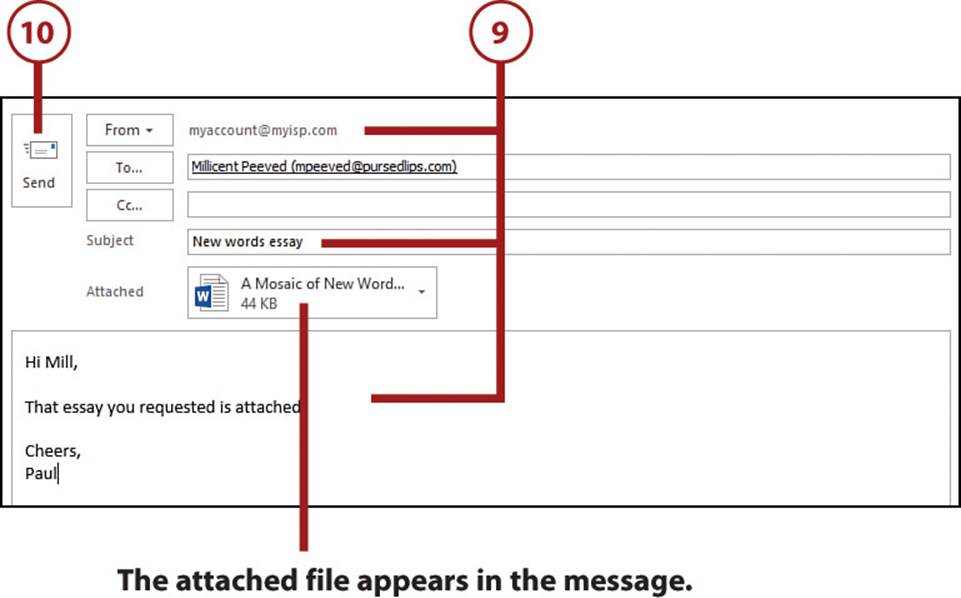
9. Fill in the rest of the message.
10. Click Send. Outlook sends your message to each contact you selected.
Reading and Working with Incoming Mail
You won’t spend all your Outlook time firing off notes to friends and colleagues. Those people will eventually start sending messages back, and you might start getting regular correspondence from mailing lists, administrators, and other members of the email community. This section shows you how to retrieve messages, read them, and use Outlook’s tools for dealing with your messages.
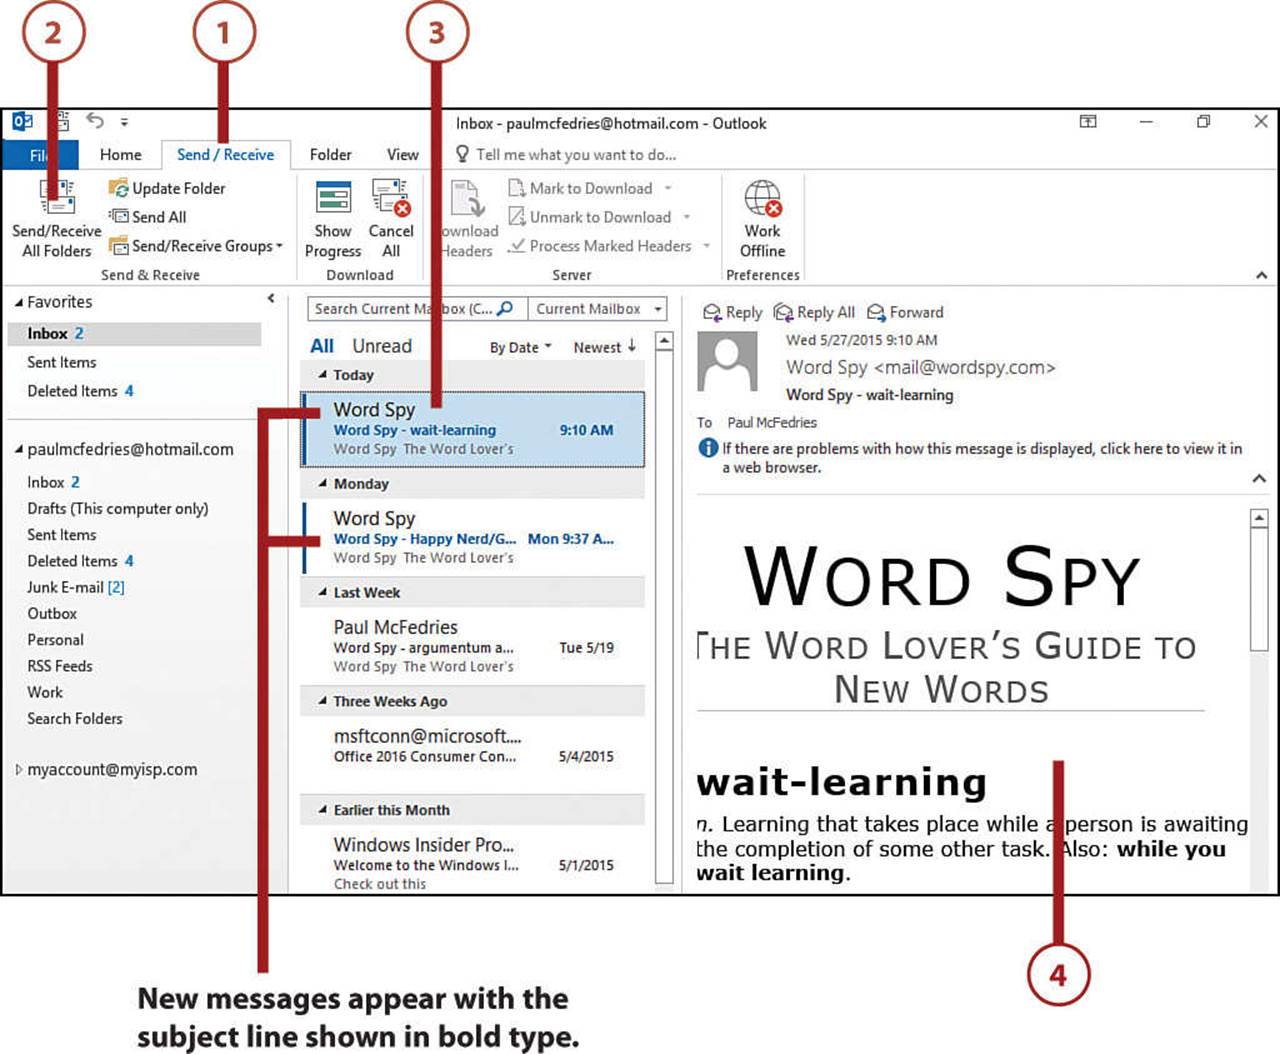
Retrieve and Read Messages
By default, Outlook checks for incoming messages every half hour, but you can retrieve your waiting messages manually at any time.
1. Click the Send/Receive tab.
2. Click Send/Receive All Folders. Outlook retrieves any waiting messages from the server.
3. Click the message you want to read.
4. Read the message in the Preview pane.
Changing the Message Checking Frequency
To change the frequency with which Outlook checks for new messages, click File and then click Options to open the Outlook Options dialog box. Click the Advanced tab and then click Send/Receive. In the Setting for Group “All Accounts” section, use the Schedule an Automatic Send/Receive Every X Minutes spin box to set the interval you prefer.
>>>Go Further: Controlling Message Notifications
Outlook makes sure you know a message has arrived by giving you up to four notifications:
• It plays a brief sound.
• It briefly changes the mouse pointer to a letter icon.
• It displays an envelope icon in the notification area.
• It displays a Desktop Alert, a pop-up message just above the notification area that shows you the sender’s name, the message subject, and the first two lines of the message.
If you think this is overkill, you can turn off one or more of the notifications. Click File, Options to display the Outlook Options dialog box. Click the Mail tab and scroll down to the Message Arrival section. Click to deactivate or activate one or more of the following check boxes:
• Play a Sound
• Briefly Change the Mouse Cursor
• Show an Envelope Icon in the Taskbar
• Display a Desktop Alert
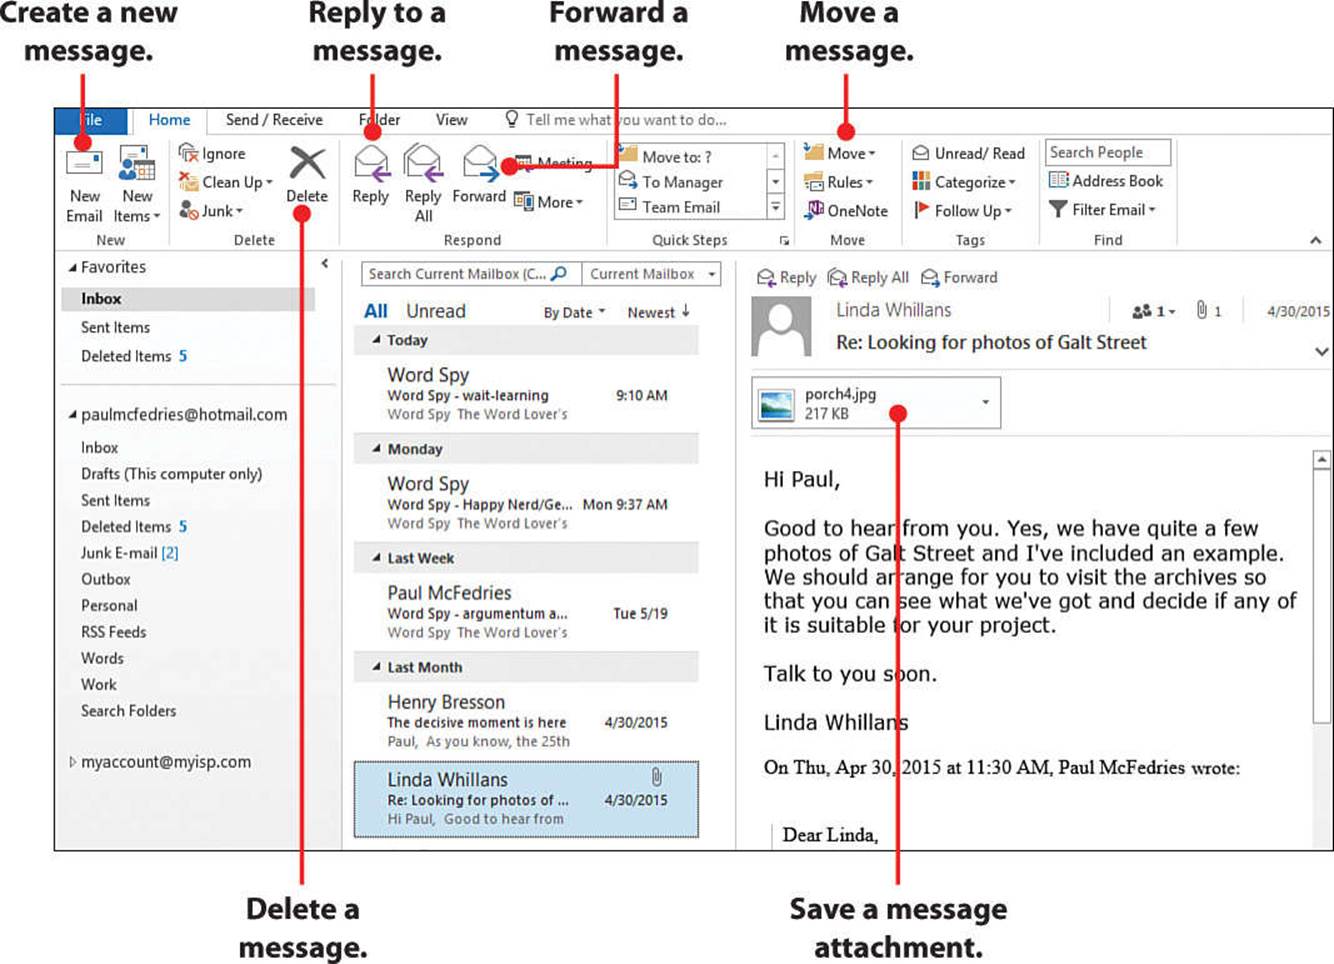
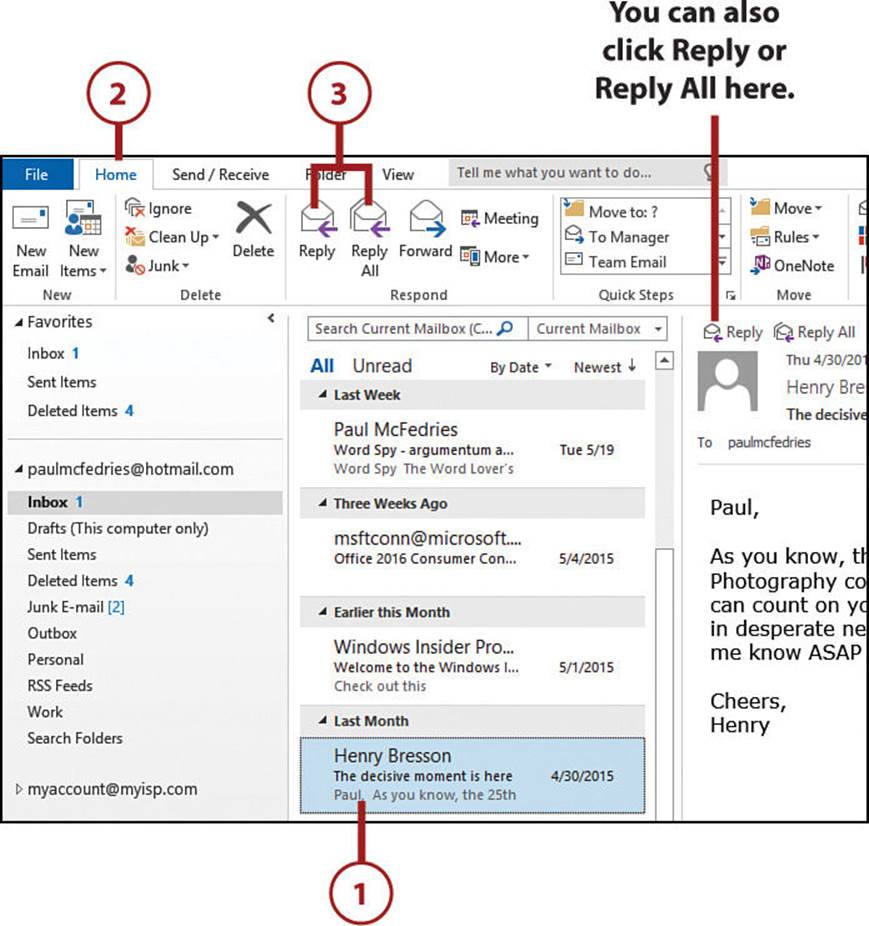
Reply to a Message
If you receive a message asking for information or requiring some other response from you, don’t respond by creating a new message. Instead, use Outlook’s Reply feature, which is faster and easier than crafting a new message.
1. Click the message to which you want to reply.
2. Click the Home tab.
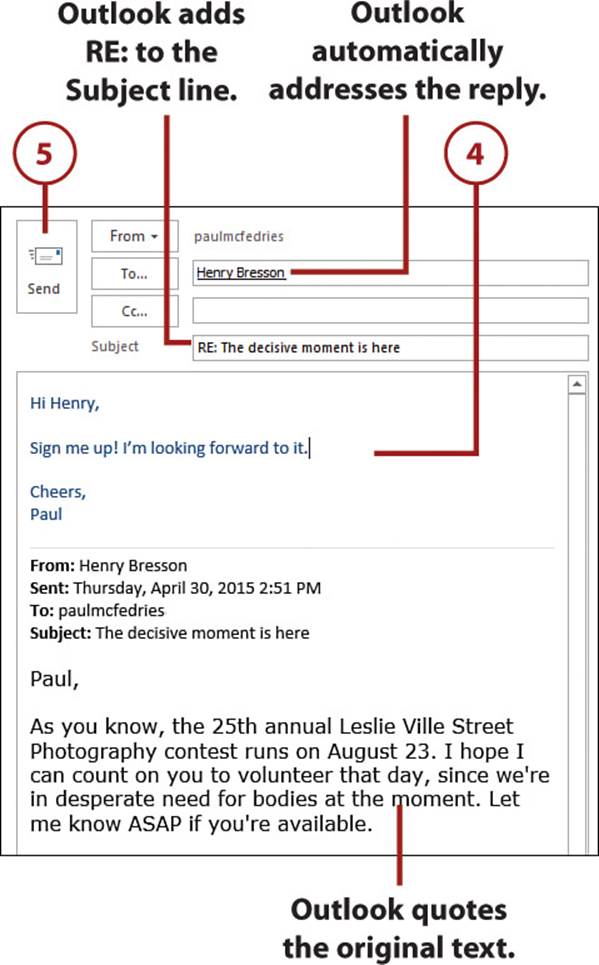
3. Click Reply to send the response only to the person who sent the original message (any names in the Cc line are ignored). To reply not only to the original author, but also to anyone else mentioned in the Cc line, click Reply All instead. Outlook creates the reply.
Keyboard Shortcut
You can also run the Reply command by pressing Ctrl+R. For Reply All, press Ctrl+Shift+R.
4. In the message window, type your reply.
5. Click Send.
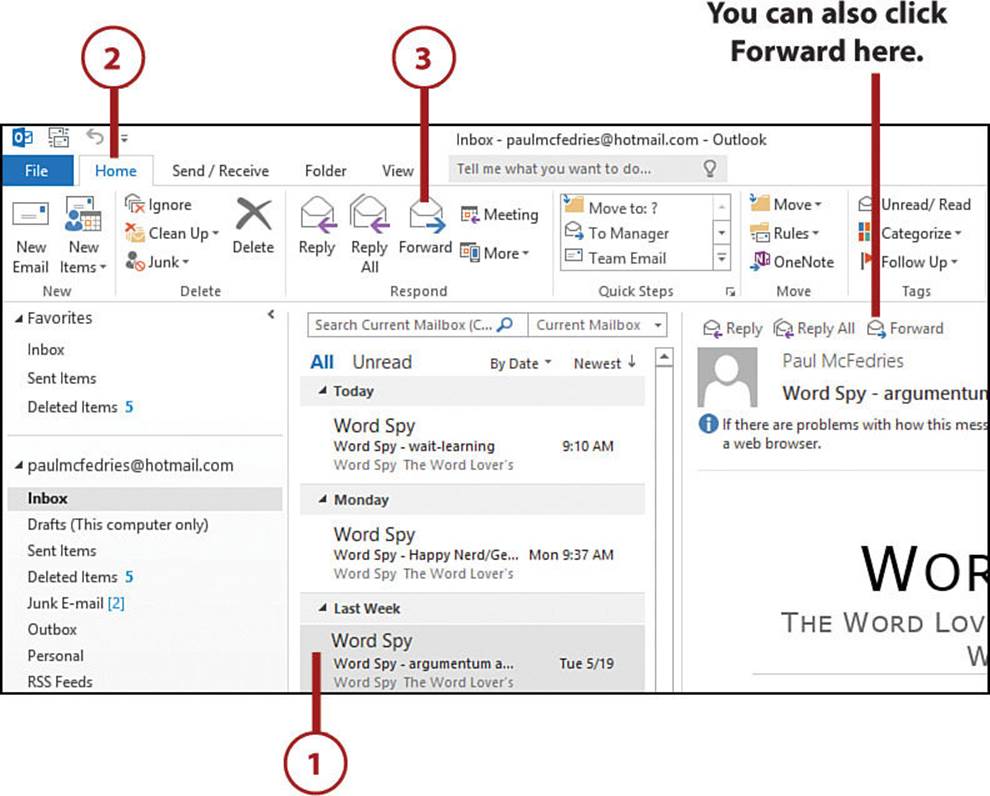
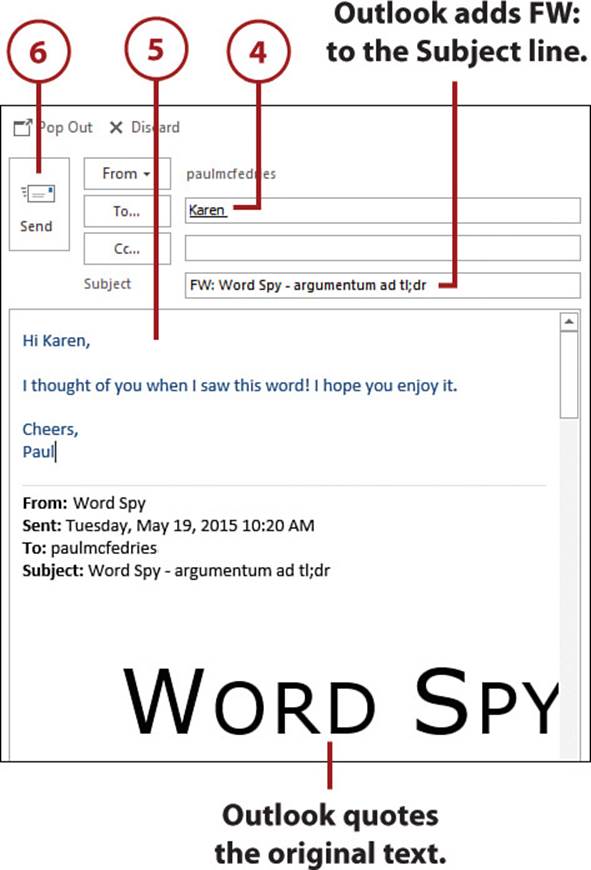
Forward a Message
Instead of replying to a message, you might prefer to forward it to another person. For example, you might receive a message in error, or you might think that a friend or colleague might receive some benefit from reading a message you received.
1. Click the message you want to forward.
2. Click the Home tab.
3. Click Forward. Outlook creates the forward.
Keyboard Shortcut
You can also run the Forward command by pressing Ctrl+F.
4. Specify the recipient of the forward.
5. In the message window, type a brief introduction or explanation of the forward.
6. Click Send.
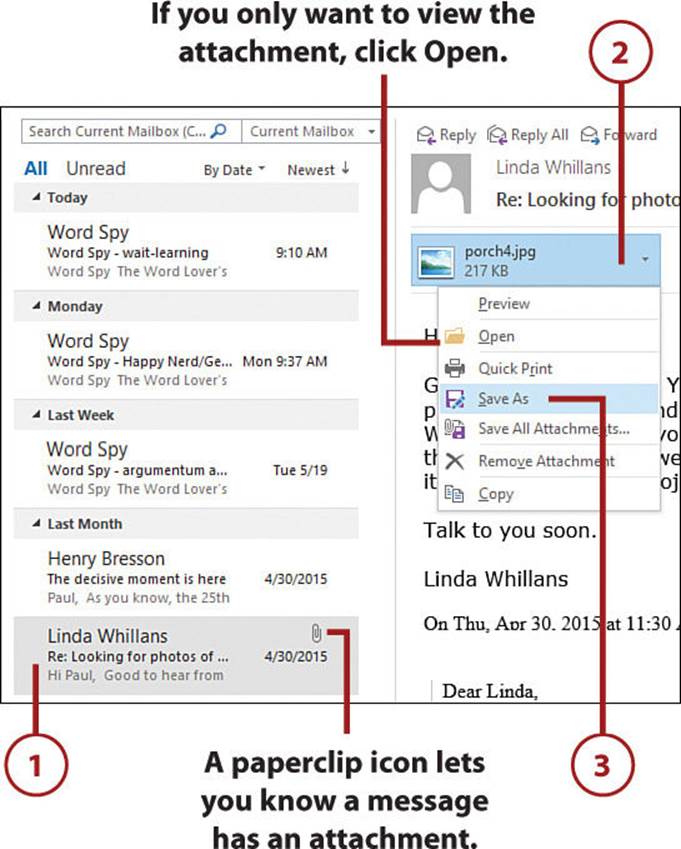
Save an Attachment
If you receive a message with a file attachment, the message list displays a paperclip icon to let you know, and an icon for the file appears in the preview pane. You can then save the attachment to your PC.
1. Click the message that contains the attachment.
2. In the preview pane, click the attachment icon.
3. Click Save As. Outlook displays the Save Attachment dialog box.
It’s Not All Good: Be Careful with Attachments
Many viruses and other malware are transmitted via files attached to email messages. Before you save or even open a file attachment, make sure it comes from someone you trust. Even if you trust the sender, it’s possible the person’s account has been compromised, so if the attachment is unexpected, contact the sender and confirm that she sent you the attachment. In any case, it’s always a good idea to have an antivirus program running on your PC. Here are some good ones to check out:
• Microsoft Security Essentials (http://windows.microsoft.com/en-us/windows/security-essentials-download)
• Norton Internet Security (www.symantec.com)
• McAfee Internet Security Suite (www.mcafee.com)
• Avast! Antivirus (www.avast.com)
• AVG Internet Security (http://free.avg.com/)
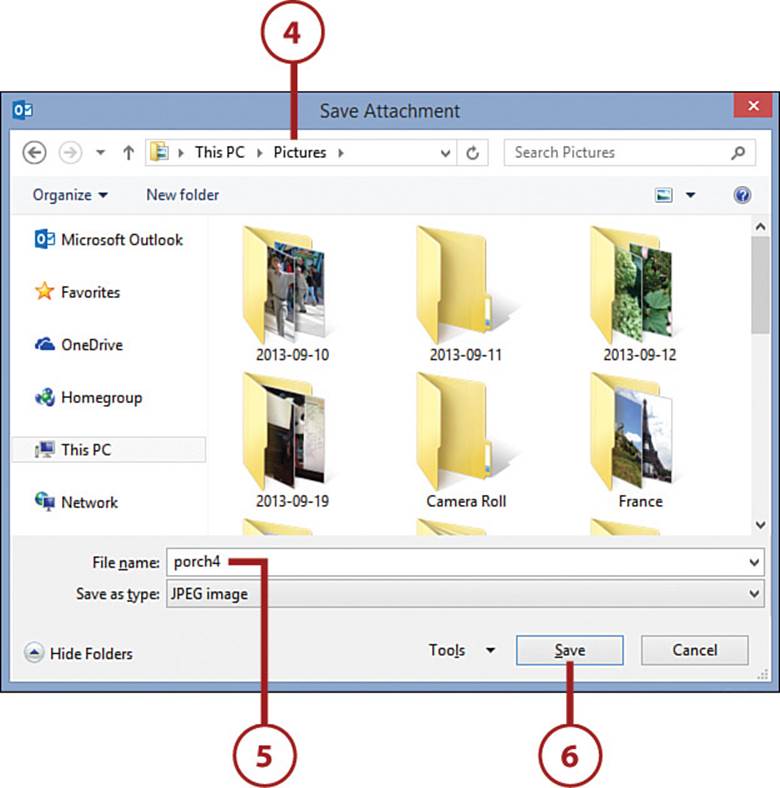
4. Select a location for the file.
5. Type the filename you want to use.
6. Click Save. Outlook saves the file to the location you specified.
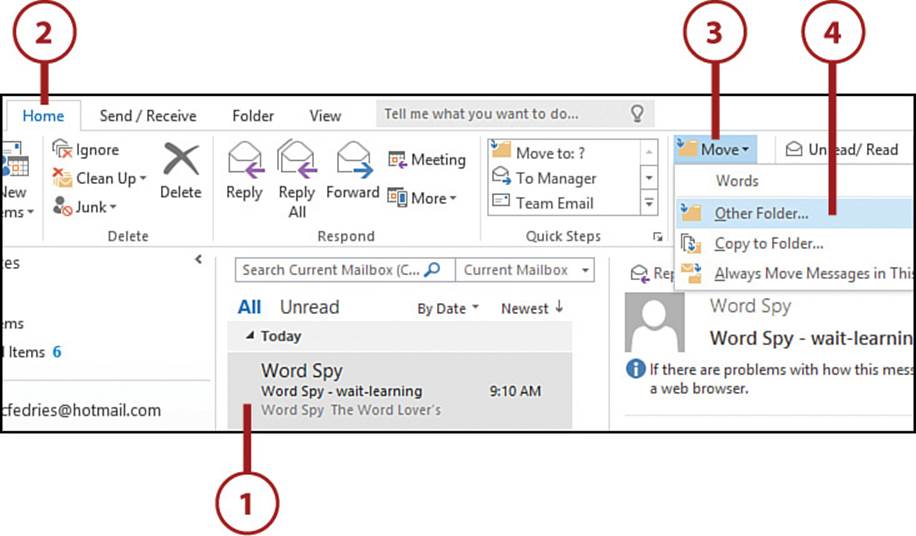
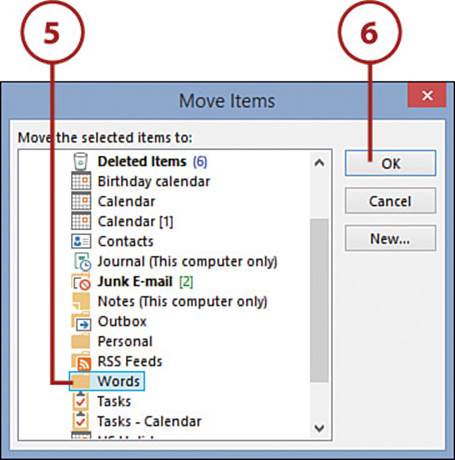
Move a Message
Instead of letting messages pile up in your Inbox folder, you should keep Outlook organized by moving each message to the appropriate folder when you are done with it.
1. Click the message you want to move.
2. Click the Home tab.
3. Click Move.
4. Click Other Folder.
Drag and Drop
An often easier way to move a message is to click and drag the message from the message list and then drop it on the destination folder.
5. Click the destination folder.
6. Click OK. Outlook moves the message to the selected folder.
>>>Go Further: Creating New Folders
Although Outlook comes with a few predefined folders, you will likely want to create your own folders to suit your needs. For example, at work you might want to create a folder for each of your projects or teams, while at home you might need a folder for each of your hobbies or interests. To create a new folder, click the Folder tab and then click New Folder to open the Create New Folder dialog box. Type a name for the new folder and then click the location in which you want Outlook to store the folder. Click OK.
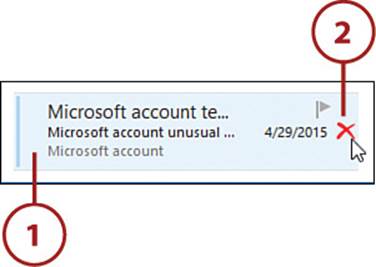
Delete a Message
To prevent your Inbox from become cluttered and difficult to navigate, you should delete any messages you no longer need.
1. Move the mouse pointer over the message you want to delete.
2. Click Delete. Outlook moves the message to the Deleted Items folder.
Keyboard Shortcut
You can also remove a message by clicking it and pressing Ctrl+D.
Recovering a Deleted Message
If you change your mind and decide to keep the message, click the Deleted Items folder, click the message, and then follow the steps in the “Move a Message” section earlier in the chapter to move the message back to the original folder (such as the Inbox). If instead you prefer to permanently remove the message, click the Deleted Items folder, move the mouse pointer over the message, and then click the Delete icon.
It’s Not All Good: Handling Junk Email
Unsolicited commercial messages—also known as junk email or spam—are by far the biggest email annoyance. The good news is that Outlook comes with a Junk E-mail feature that can help you cope. Junk E-mail is a spam filter, which means that it examines each incoming message and applies sophisticated tests to determine whether the message is spam. If the tests determine that the message is probably junk, the email is exiled to the Junk E-mail folder.
Note that filtering spam is always a tradeoff between protection and convenience; that is, the stronger the protection you use, the less convenient the filter becomes because it increases the chance that it will mark legitimate messages as spam. You can set the Junk E-mail protection level to a level that works for you. Click the Home tab, click Junk, and then click Junk E-mail Options. The Junk E-mail Options dialog box appears. In the Options tab, select a setting: Start with Low, and if you find that Outlook misses too many spam messages, switch to the High setting.
All materials on the site are licensed Creative Commons Attribution-Sharealike 3.0 Unported CC BY-SA 3.0 & GNU Free Documentation License (GFDL)
If you are the copyright holder of any material contained on our site and intend to remove it, please contact our site administrator for approval.
© 2016-2026 All site design rights belong to S.Y.A.