My Office 2016 (2016)
12. Scheduling with the Outlook Calendar
In this chapter, you learn about Outlook’s Calendar folder and how to use it to schedule appointments, all-day events, and meetings. Topics include the following:
![]() Navigating Outlook’s Calendar folder
Navigating Outlook’s Calendar folder
![]() Adding appointments
Adding appointments
![]() Setting up recurring appointments
Setting up recurring appointments
![]() Scheduling all-day events
Scheduling all-day events
![]() Sending out meeting requests
Sending out meeting requests
Economists tell us that business productivity, after having been stagnant for several decades, began to rise in the mid-1990s. I am sure there are many reasons behind this improved productivity, but I would venture that at least part of the increase can be attributed to Microsoft Outlook, which debuted in 1997. For one thing, Outlook combined a number of functions—especially email, appointments, and contacts—into a single program. For another, Outlook’s Calendar feature not only made it easy to enter and keep track of appointments and meetings electronically, but it also could be set up to remind us of our appointments and meetings.
Of course, Calendar can only boost your productivity if you know how to use it and that’s what this chapter is designed to show you.
Using the Calendar Folder
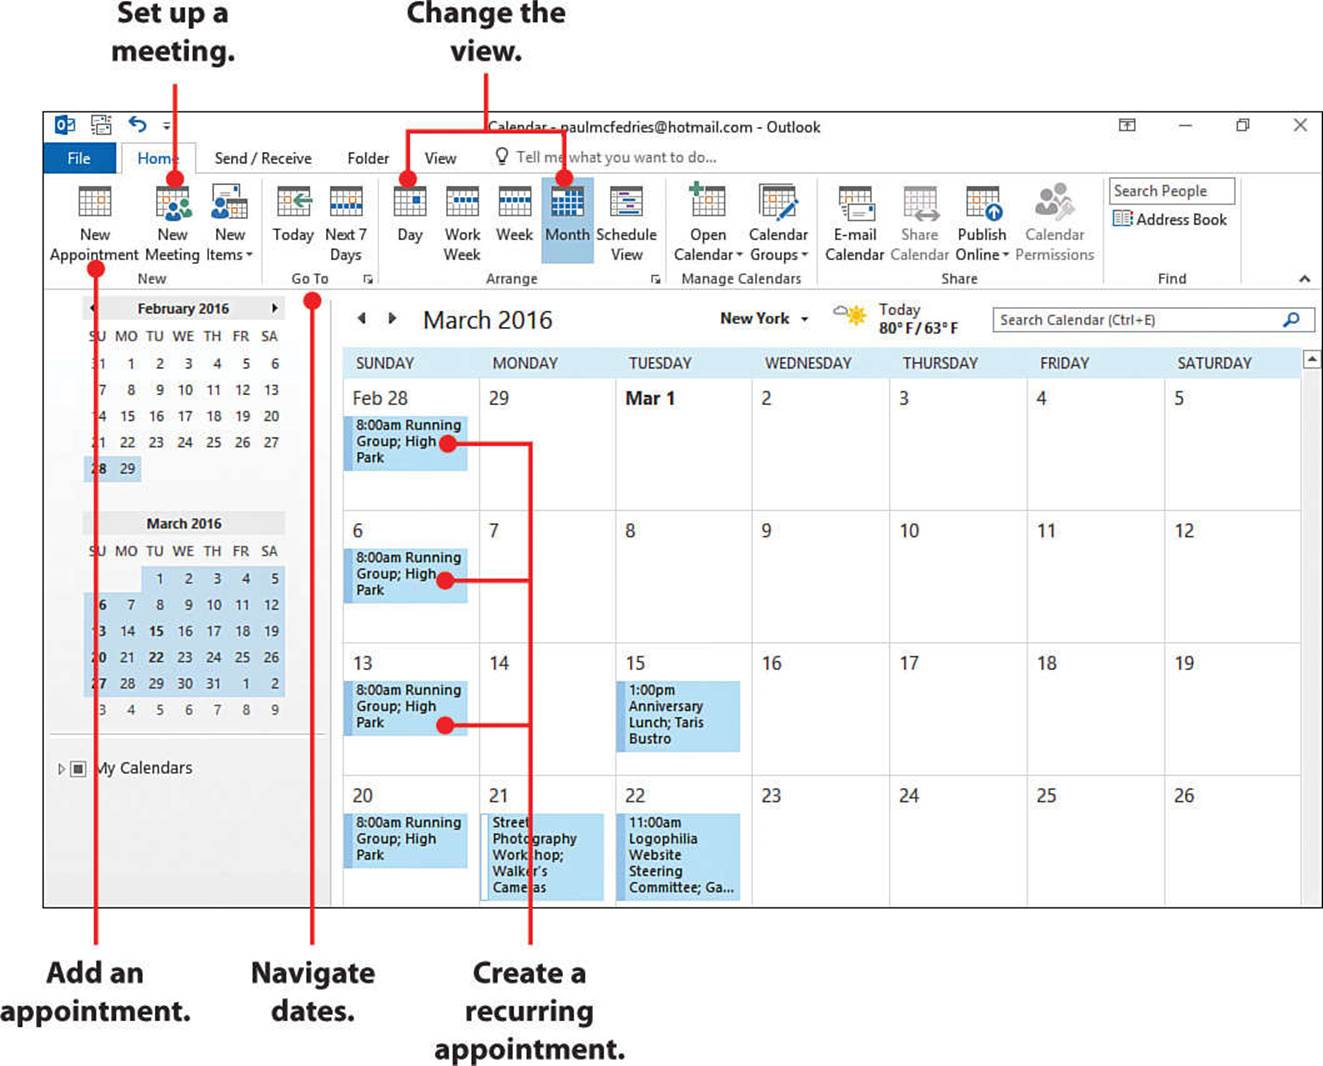
When you display the Calendar folder, Outlook displays a window laid out more or less like a day planner or desk calendar. Here are two items to note right up front:
• Calendar grid—This takes up the bulk of the Calendar window and it shows one month at a time, where each row of the grid is a week. The appointments and meetings you schedule appear in this area.
• Folder pane—This area appears on the left side of the Calendar window and usually shows two months of dates, including the current month, the last few days from the previous month, and possibly the first few days from the next month. You use the Folder pane to change the date shown in the Calendar grid. Dates for which you have already scheduled appointments or meetings are shown in bold type. Note that today’s date always has a blue square around it.
Switch to the Calendar Folder
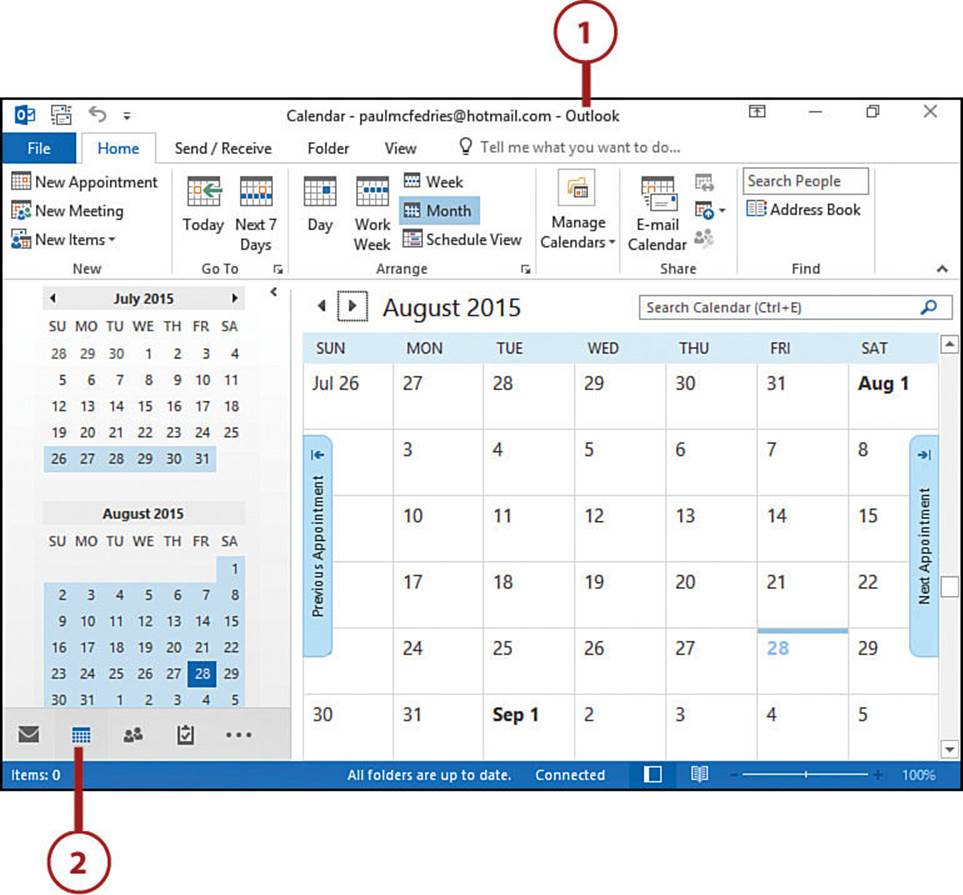
When you launch Outlook, it displays the Inbox folder for your email, so you need to know how to switch to the Calendar folder.
1. Launch Outlook.
2. Click Calendar. Outlook switches to the Calendar folder.
Keyboard Shortcut
You can also switch to the Calendar folder by pressing Ctrl+2. To switch back to the Inbox folder, press Ctrl+1.
>>>Go Further: Displaying the Calendar Folder at Startup
Outlook automatically opens the Inbox folder at startup, but you might find that you spend more time in the Calendar folder. Similarly, you might find that you always switch right away to the Calendar folder to check your upcoming appointments. In either scenario, you might prefer to have Outlook display the Calendar folder automatically at startup instead of the Inbox folder.
To set that up, click File and then click Options to display the Outlook Options dialog box. Click the Advanced tab. Beside the Start Outlook in this Folder box, click Browse to open the Select Folder dialog box. Click the Calendar folder and then click OK to return to the Outlook Options dialog box. Click OK.
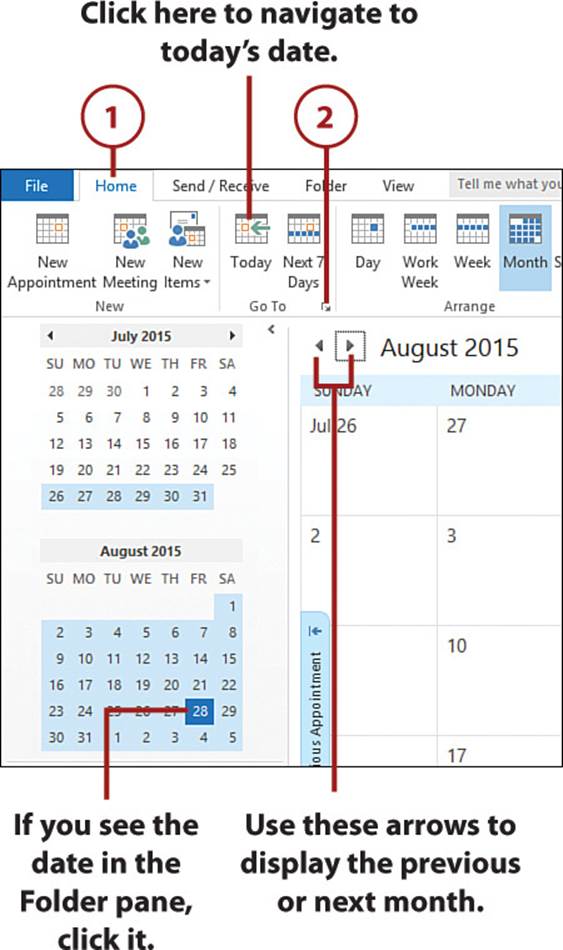
Navigate to a Date
Calendar always opens with today’s date displayed. However, if you want to work with a different day, Outlook makes it easy to navigate to that date.
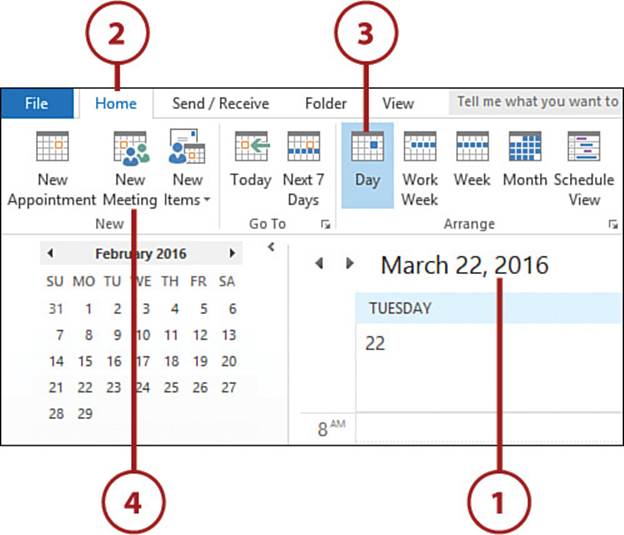
1. Click the Home tab.
2. Click the Go To Date dialog box launcher. Outlook displays the Go To Date dialog box.
Keyboard Shortcut
You can open the Go To Date dialog box from the keyboard by pressing Ctrl+G.
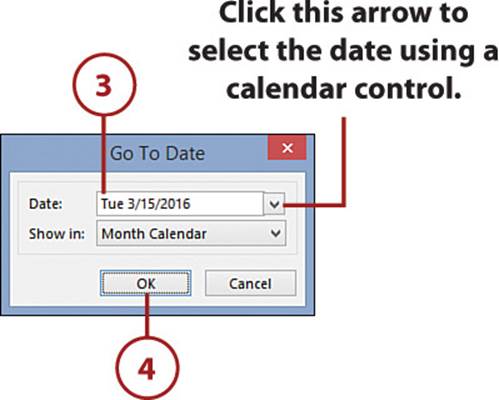
3. Type the date you want.
4. Click OK. Outlook displays the date in the Calendar folder.
Switch the Calendar’s View
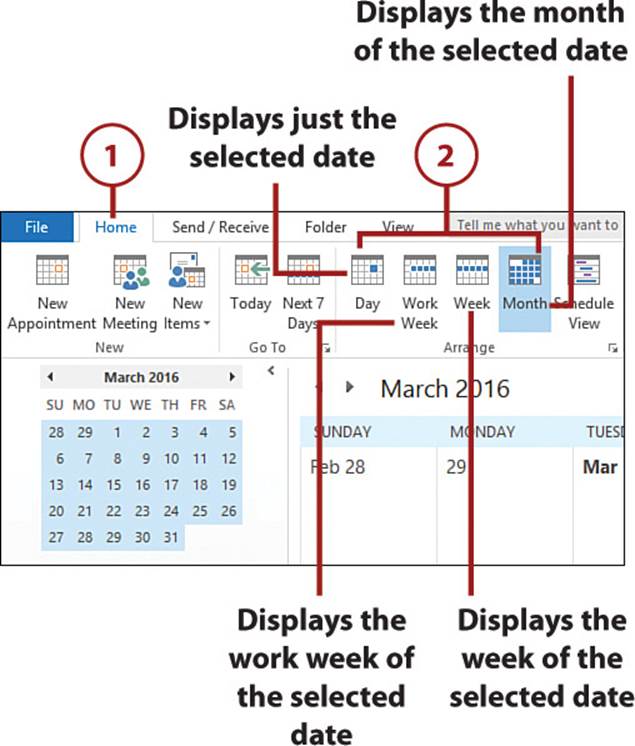
Calendar’s default view is the Month calendar, which shows a single month’s worth of appointments and meetings. However, Calendar is flexible, and you can configure it to show just a single day, a week, or even just the work week.
1. Click the Home tab. The options that follow are also available on the View tab.
2. In the Arrange section, click the view you want to use.
Keyboard Shortcuts
From the keyboard, switch to the Day view by pressing Ctrl+Alt+1; switch to the Work Week view by pressing Ctrl+Alt+2; switch to the Week view by pressing Ctrl+Alt+3; and switch to the Month view by pressing Ctrl+Alt+4.
>>>Go Further: Configuring the Work Week
Outlook assumes the work week consists of the five days from Monday to Friday. If your work week is shorter or uses different days (for example, Tuesday through Saturday, or even any number of nonconsecutive days), you can configure the Work Week view that the Calendar displays. Click File and then click Options to display the Outlook Options dialog box. Click the Calendar tab. In the Work Time section, click to activate the Work Week check boxes for the days you want to include in the Work Week view. Also, use the First Day of Week list to select the day you want Calendar to display at the beginning of the week. Click OK to put the new settings into effect.
Setting Up Appointments
Calendar differentiates between three kinds of items you can schedule:
• Appointments—An appointment is the most general Calendar item. It refers to any activity for which you set aside a block of time. Typical appointments include a lunch date, a trip to the dentist or doctor, or a social engagement. You can also create recurring appointments that are scheduled at regular intervals (such as weekly or monthly).
• All-day events—An all-day event is any activity that consumes one or more entire days. Examples include conferences, trade shows, vacations, and birthdays. In Calendar, events do not occupy blocks of time. Instead, they appear as banners above the affected days. You can also schedule recurring all-day events.
• Meetings—A meeting is a special kind of appointment to which two or more people are invited. Outlook has a Meeting Planner that lets you set up a meeting and send email messages inviting people to the meeting. Outlook can then track the responses so that you know who is coming to the meeting and who isn’t.
The next few sections show you how to create appointments, all-day events, and meetings.
Create a New Appointment
When you create an appointment, you specify the date, the start and end times, and a subject (a short description or title). You can also optionally specify the location and notes related to the appointment.
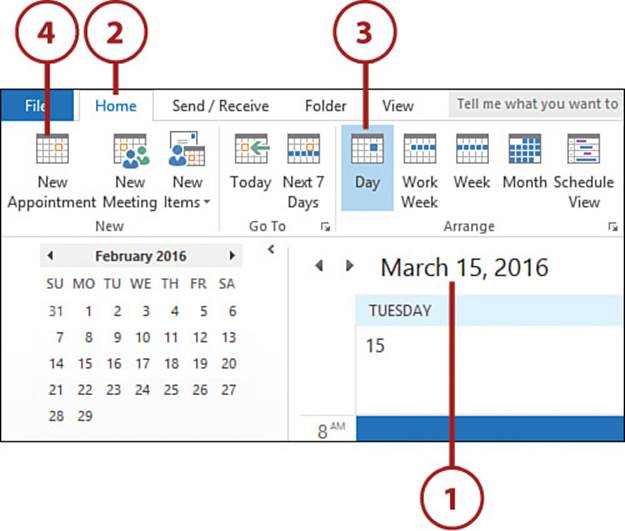
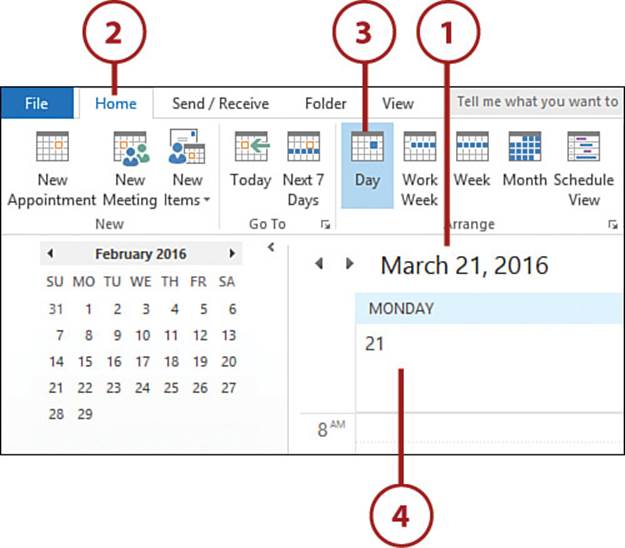
1. Navigate to the day on which the appointment occurs.
2. Click the Home tab.
3. Click Day. If you prefer to see nearby appointments, click Work Week or Week instead.
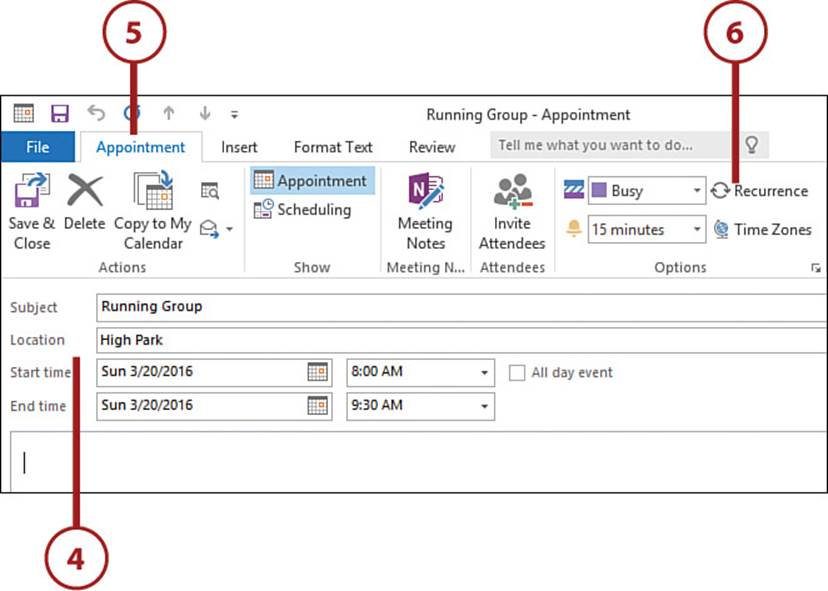
4. Click New Appointment. Outlook displays the Appointment window.
Keyboard Shortcut
You can also run the New Appointment command by pressing Ctrl+N.
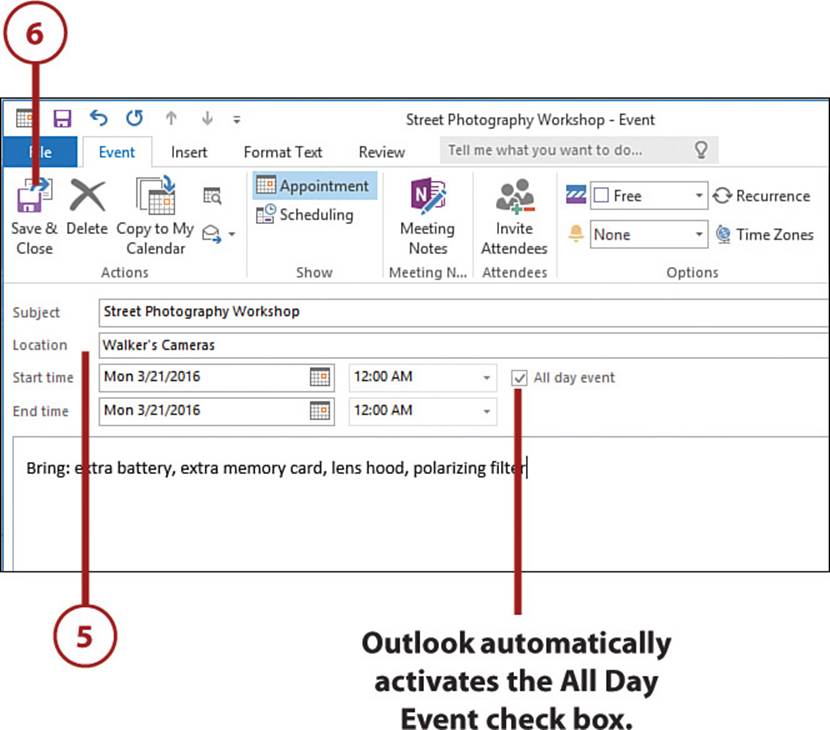
5. Use the Subject text box to type a description of the appointment. This is the text that appears in the Calendar grid.
6. Use the Location text box to type the location (such as a business name, room number, or address) for the appointment.
7. Use the Start Time controls to specify the time that the appointment starts (as well as the date, if needed).
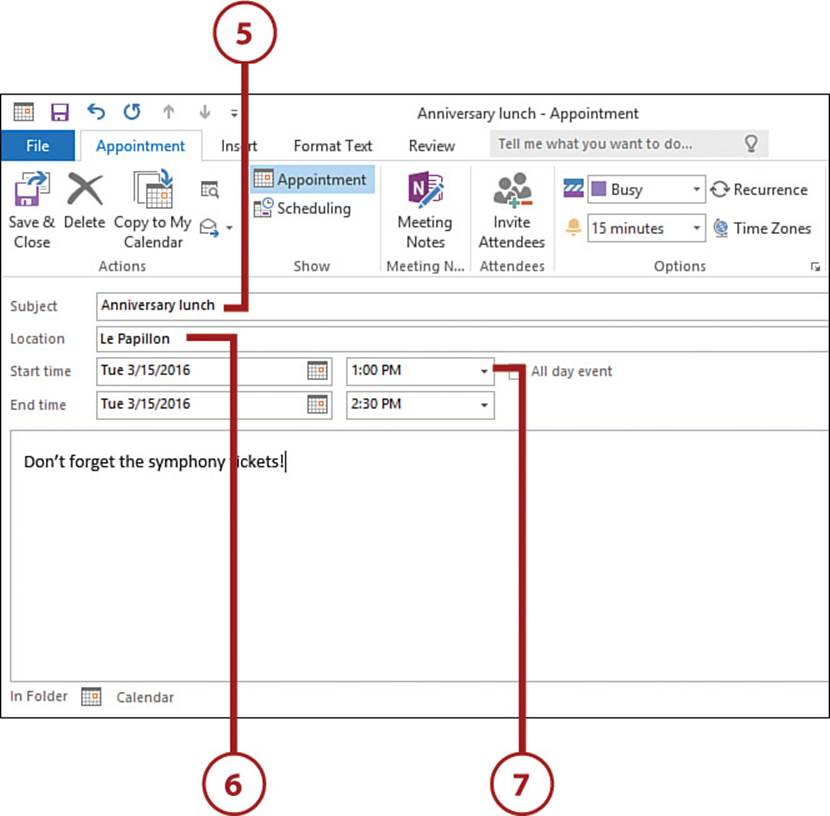
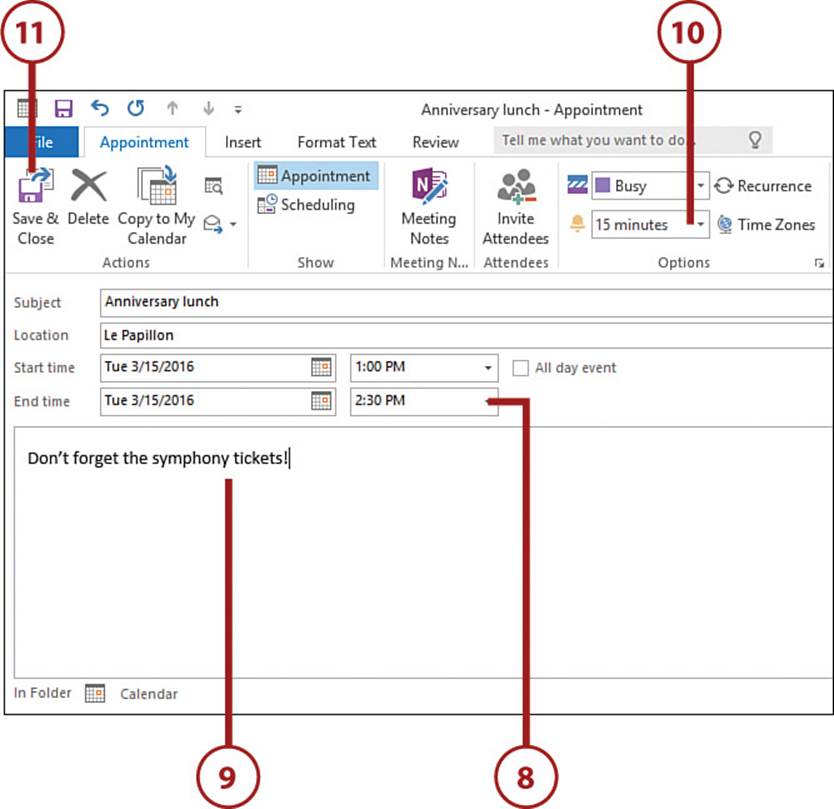
8. Use the End Time controls to specify the time (and possibly the date) the appointment ends.
9. Use the large text box to type notes about the appointment.
10. Use the Reminder list to select the number of minutes, hours, or days before the appointment that you want Outlook to remind you that your appointment is coming up. If you want Outlook to play a sound, click Sound and use the Reminder Sound dialog box to select an audio file to be played.
11. Click Save & Close to add the appointment and return to the Calendar folder.
Shortcut
You can create a basic appointment by switching to Day view, clicking the time of the appointment (or dragging the mouse over the time blocks for an appointment longer than half an hour), typing a subject for the appointment, and then pressing Enter.
Taking Advantage of AutoDate
One of Outlook’s most interesting features is its capability to accept natural-language entries in date and time fields and convert those entries into real dates and times. If today is October 7, for example, typing next week in a date field causes Outlook to enter October 14 as the date. Similarly, you can type noon in a time field, and Outlook “knows” that you mean 12:00.
This useful feature is called AutoDate, and once you understand how it works, you’ll find that it saves you a lot of time in certain situations. I won’t give you a full description of what AutoDate understands, but a few examples should give you an idea of what it can do, and you can experiment from there.
Here are some points to keep in mind when entering dates:
• AutoDate converts yesterday, today, and tomorrow into their date equivalents.
• You can shorten day names to their first three letters: sun, mon, tue, wed, thu, fri, and sat. (Notice, too, that case isn’t important.) You can also shorten month names: jan, feb, mar, apr, may, jun, jul, aug, sep, oct, nov, and dec.
• To specify a date in the current week (by default, Calendar’s weeks run from Sunday through Saturday), use the keyword this (for example, this fri).
• To specify a date from last week or last month, use the keyword last (for example, last aug).
• To specify a date in the next week or month, use the keyword next (for example, next sat).
• If you want to use the first day of a week or month, use the keyword first. For example, first mon in dec gives you the first Monday in December. Similarly, use last to specify the last day of a week or month.
• To get a date that is a particular number of days, weeks, months, or years from some other date, use the keyword from (for example, 6 months from today).
• To get a date that is a particular number of days, weeks, months, or years before some other date, use the keyword before (for example, 2 days before christmas).
• AutoDate recognizes a number of holidays that fall on the same date each year, including the following: Boxing Day, Cinco de Mayo, Christmas Day, Christmas Eve, Halloween, Independence Day, Lincoln’s Birthday, New Year’s Day, New Year’s Eve, St. Patrick’s Day, Valentine’s Day, Veterans Day, and Washington’s Birthday.
• To get a date that is a particular number of days, weeks, months, or years in the past, use the keyword ago (for example, 4 weeks ago).
• AutoDate also accepts spelled-out dates, such as August 23rd and first of January. These aren’t as useful, because they probably take longer to spell out than they do to enter the date in the usual format.
For time fields, keep the following points in mind:
• AutoDate converts noon and midnight into the correct times.
• AutoDate understands military time. So if you type 9, AutoDate converts this to 9:00 AM. However, if you type 21, AutoDate changes it to 9:00 PM.
• Use now to specify the current time.
• You can specify time zones by using the following abbreviations: CST, EST, GMT, MST, and PST.
Create a Recurring Appointment
If you have an appointment that occurs at a regular interval (say, weekly or monthly), Calendar lets you schedule a recurring appointment. For example, if you create a weekly appointment, Calendar fills in that appointment automatically on the same day of the week at the same time for the duration you specify.
1. Navigate to the day on which the appointment occurs.
2. Click the Home tab.
3. Click New Appointment. Outlook displays the Appointment window.

Keyboard Shortcut
You can also run the New Appointment command by pressing Ctrl+N.
4. Fill in the appointment details, as described previously in the “Create a New Appointment” section.
5. Click the Appointment tab.
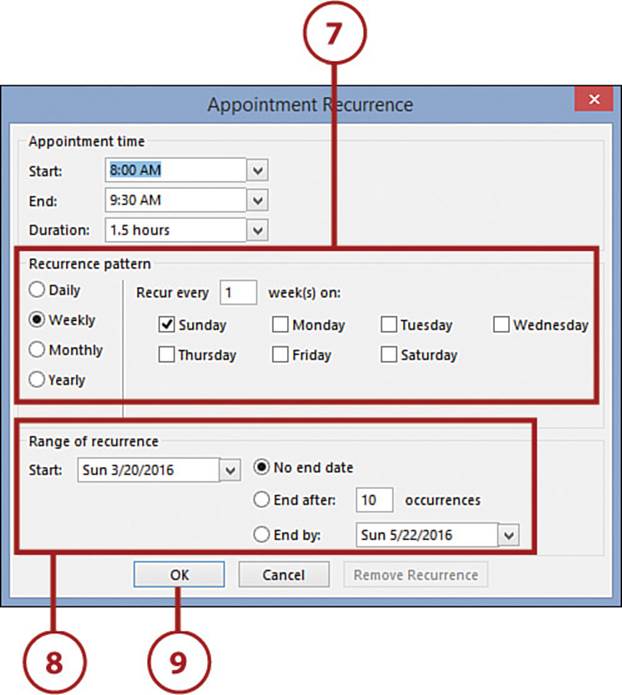
6. Click Recurrence. Outlook opens the Appointment Recurrence dialog box.
7. In the Recurrence Pattern group, click the interval you want to use: Daily, Weekly, Monthly, or Yearly. The options to the right of these buttons change, depending on your selection. The Weekly option, for example, asks you to enter the length of the interval in weeks, as well as the day of the week to use.
8. In the Range of Recurrence group, use the Start box to tell Outlook when the recurring appointment should begin. If you want the appointment scheduled indefinitely, click the No End Date option. Otherwise, click End After and specify the number of appointments to schedule, or click End By and specify the date of the last appointment.
9. Click OK to return to the Appointment window.
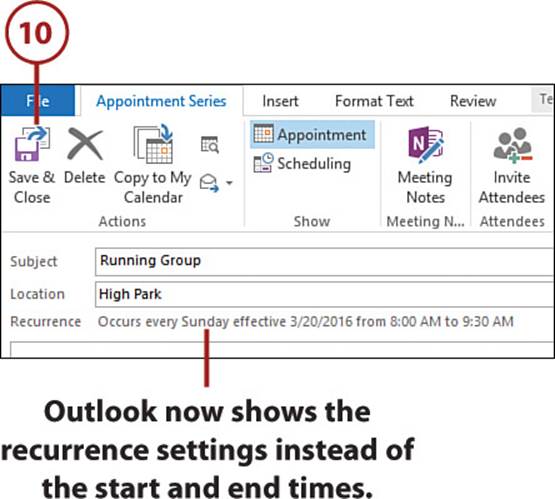
10. Click Save & Close to add the appointment and return to the Calendar folder.
Deleting a Recurring Appointment
When you delete an appointment that is set up to repeat, you can either delete a single instance or the entire series. To delete a single instance of the recurrence, right-click that instance, click Delete, and then click Delete Occurrence. To delete the entire series of recurrences, right-click any instance, click Delete, and then click Delete Series.
Appointments Versus All-Day Events
As I mentioned earlier, an all-day event is an activity that consumes one or more days (or, at least, the working part of those days). Some activities are obvious all-day events: vacations, trade shows, sales meetings, and so on. But what about, say, a training session that lasts from 9:00 to 4:00? Is that an all-day event or just a long appointment? From Outlook’s point of view, there are two main differences between an appointment and an all-day event:
• By default, an appointment is marked as “busy” time, so other people know not to schedule appointments at conflicting times. On the other hand, an all-day event is marked as “free” time.
• Appointments are entered as time blocks in the Calendar, but all-day events are displayed as a banner at the top of the calendar. This means that you can also schedule appointments on days that you have all-day events.
A good example that illustrates these differences is a trade show. Suppose the show lasts an entire day and you’re a sales rep who will be attending the show. You could schedule the show as a day-long appointment. However, what if you also want to visit with customers who are attending the show? In that case, it would make more sense to schedule the show as an all-day event. This leaves the calendar open for you to schedule appointments with your customers.
Schedule an All-Day Event
Scheduling an all-day event is almost identical to scheduling an appointment.
1. Navigate to the day on which the event occurs.
2. Click the Home tab.
3. Click Day.
4. Double-click the banner that appears at the top of the Day calendar. Outlook opens the Event window.
5. Fill in the appointment details, as described previously in the “Create a New Appointment” and “Create a Recurring Appointment” sections.
6. Click Save & Close to add the appointment and return to the Calendar folder.
Understanding Meeting Requests
The appointments and all-day events that you’ve worked with so far haven’t required you to work directly with anyone on your network or on a remote network. Yes, you can email your calendar to other people (by clicking the Home tab’s E-mail Calendar button) or even publish your calendar online (by clicking the Home tab’s Publish Online button) so that others can view your appointments and all-day events. But there might be times when you need to coordinate schedules with other people to arrange a meeting.
The old-fashioned method of doing this involved a phone conversation in which each person consulted his or her day planner to try to find a mutually free time. This is not too bad if just two people are involved, but what if there are a dozen? Or a hundred? You could try sending out email messages, but you’re still looking at a coordination nightmare for a large group of people.
Outlook solves this dilemma by implementing meeting requests, which are special messages that you use to set up small meetings. If you just need to set up a simple meeting that involves only a few people, a meeting request is all you need. A meeting request is an email message that asks the recipients to attend a meeting on a particular day at a particular time. The recipients can then check their schedules (although Outlook does this for them automatically) and either accept or reject the request by clicking buttons included in the message.
Request a Meeting
To set up a meeting with one or more people, you must create and send each potential attendee a meeting request.
1. Navigate to the day on which you want to schedule the meeting.
2. Click the Home tab.
3. Click Day. If you prefer to see nearby appointments, click Work Week or Week instead.
4. Click New Meeting. Outlook displays the Meeting window.
Keyboard Shortcut
You can also run the New Meeting command by pressing Ctrl+Shift+Q.
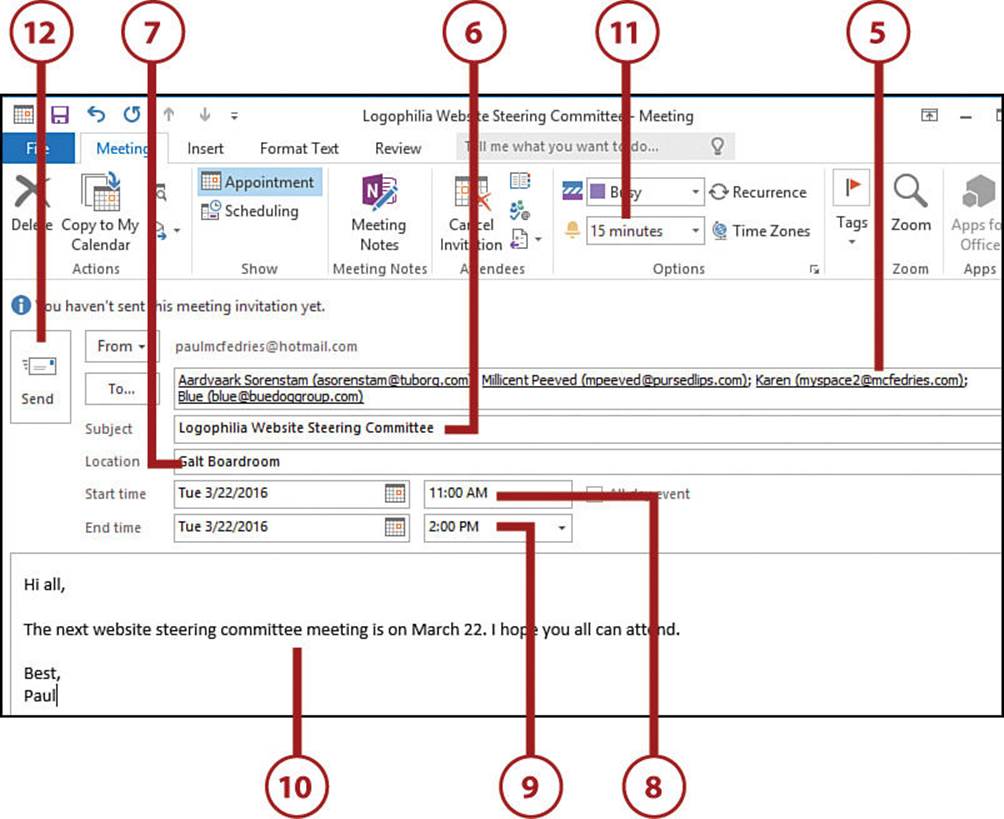
5. Enter the email address of each person you want to invite or select the addresses from your contacts.
Optional Attendees
To specify attendees for whom the meeting is optional, click the To button to display your contacts. Click a contact and then click Optional. You can also add contacts to the Required field. Click OK when you’re done.
6. Use the Subject text box to type a description of the meeting. This is the text that appears in the Calendar grid.
7. Use the Location text box to type the location (such as a business name, room number, or address) for the meeting.
8. Use the Start Time controls to specify the time that the meeting starts (as well as the date, if needed).
9. Use the End Time controls to specify the time (and possibly the date) the meeting ends.
10. Use the large text box to type your invitation text.
11. Use the Reminder list to select the number of minutes, hours, or days before the meeting that you want Outlook to remind you that your meeting is coming up.
12. Click Send to send the meeting requests, add the meeting to your calendar, and return to the Calendar folder.
All materials on the site are licensed Creative Commons Attribution-Sharealike 3.0 Unported CC BY-SA 3.0 & GNU Free Documentation License (GFDL)
If you are the copyright holder of any material contained on our site and intend to remove it, please contact our site administrator for approval.
© 2016-2026 All site design rights belong to S.Y.A.