My Office 2016 (2016)
14. Building a OneNote Notebook
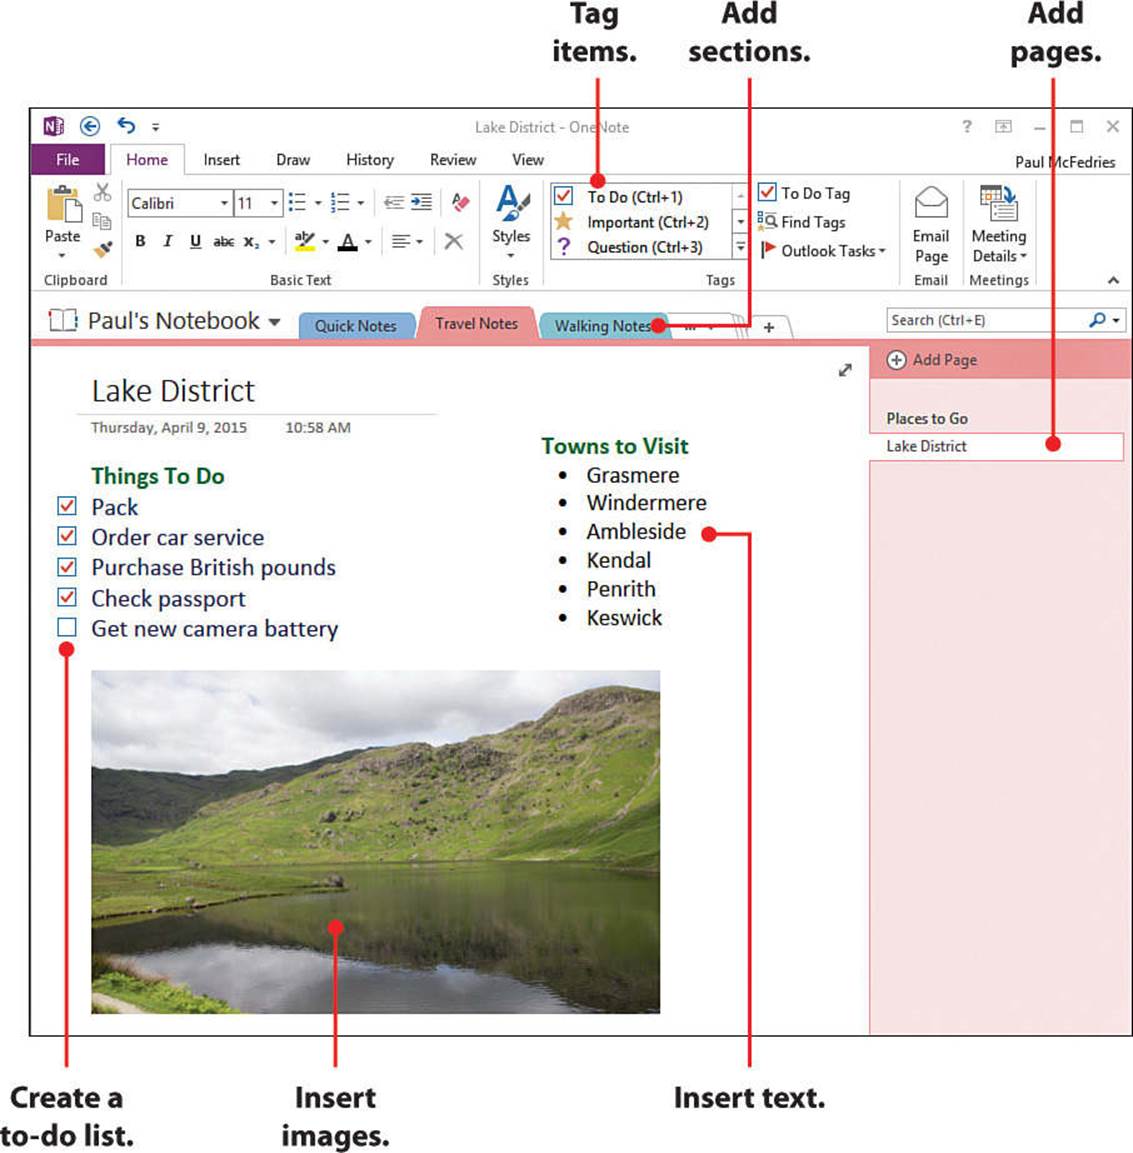
In this chapter, you learn about building a OneNote notebook, working with sections and pages, entering text and lists, and tagging items. Topics include the following:
![]() Building a notebook by adding sections and pages
Building a notebook by adding sections and pages
![]() Color-coding sections and pages
Color-coding sections and pages
![]() Entering text and working with page containers
Entering text and working with page containers
![]() Tagging items on a page
Tagging items on a page
![]() Building a OneNote to-do list
Building a OneNote to-do list
The Office 2016 applications that you’ve learned about so far in the book—Word, Excel, PowerPoint, and Outlook—enable you to enter data in a relatively structured format: Word with its sequential sentences and paragraphs; Excel with its rows, columns, and cells; PowerPoint with its sequential slides and slide placeholders, and Outlook with emails, calendars, and contact lists. However, the data we deal with in our lives isn’t always so structured: thoughts, ideas, inspirations, to-do lists, phone numbers, names of books to read and movies to see, website and email addresses, and on and on.
Many of us keep notebooks handy for jotting down these random bits of data. But we live in an electronic age, so wouldn’t it be great to be able to jot down stray bits of information in a digital format?
I’m happy to report that the answer to that question is, “You can!” The electronic version of your paper notebook is OneNote, which enables you to quickly and easily record just about anything that you would normally scribble on a piece of paper (even doodles, as you see in Chapter 15, “Getting More Out of OneNote”). With OneNote, you can do all that and much more:
• Paste pictures, clip art, and text.
• Insert links to websites.
• Organize data into tables.
• Share your notes with other people.
In this chapter, you learn how to use OneNote to build a notebook and add some basic items such as text and bulleted lists. See Chapter 15 to learn how to augment your notebooks with links, files, digital ink, and more.
Working with Sections
In the real world, a notebook might come with (or you might add) several tabs that divide the notebook into separate sections, each with its own collection of pages. This is the metaphor that OneNote uses. OneNote files are called notebooks. Each notebook consists of a series of sections, and each section consists of one or more pages. You use these pages to enter your free-form notes and other data, such as links and images.
A notebook is a collection of different types of data scraps from a variety of sources. It’s important to impose some kind of order on all those scraps so that the notebook doesn’t devolve into an unruly mess where it takes too long to find what you need.
Within each notebook, the main level of organization is the section, which is represented by a tab in the left pane of the notebook. You use the sections to break down the notebook’s overall topic or theme into smaller subjects. You can create as many sections as you need because there’s no practical limit on the number of sections you can add to a notebook.
OneNote is a hierarchical storage system, with notebooks at the top level, sections at the second level, and pages at the third level. You can fine-tune this hierarchy by taking advantage of OneNote’s color-coding features, which enable you to link similar items visually by applying the same color to those items.
Insert a New Section
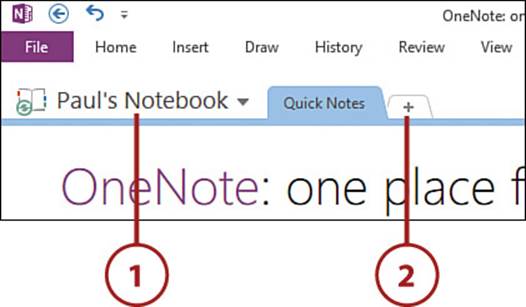
When you create a new notebook using OneNote, the resulting file has a single section that contains a single page. However, you are free to add more sections as needed.
1. Open the notebook you want to work with.
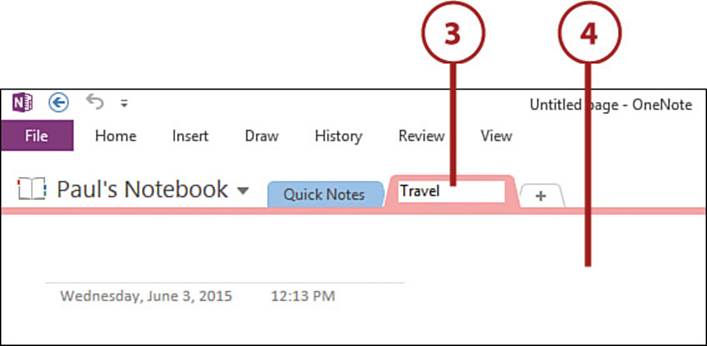
2. Select the Create a New Section icon. OneNote creates the new section and displays the section name in a text box.
Keyboard Shortcut
You can also create a new section by pressing Ctrl+T.
3. Type the section name.
4. Click an empty part of the new section, or press Enter. OneNote closes the text box.
Rename a Section
If you made an error when you originally named a section, or if the section’s current name no longer reflects the section’s content, you can rename the section.
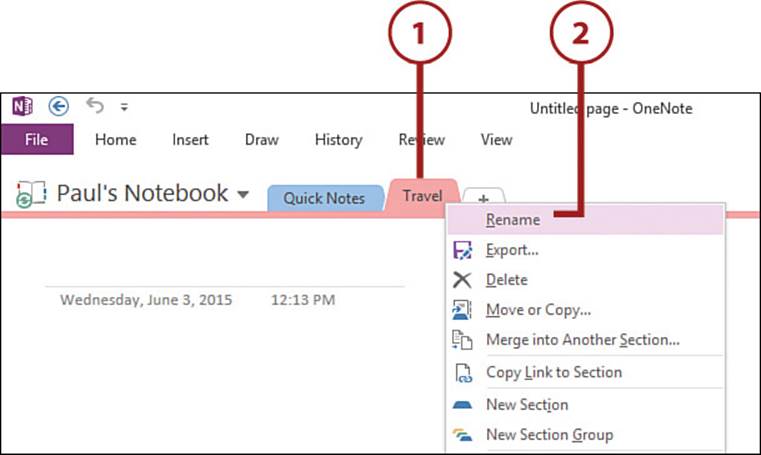
1. Right-click the section tab. OneNote displays a shortcut menu of section-related commands.
2. Click Rename. OneNote opens the section name for editing.
Mouse Shortcut
You can also open the section name for editing by double-clicking the section tab.
3. Type the section name.
4. Click an empty part of the new section, or press Enter. OneNote closes the text box.

Moving a Section
OneNote adds each new section to the right of the existing section tabs. To move a section, click and drag the section’s tab left or right until the section is in the position you want; then release the tab.
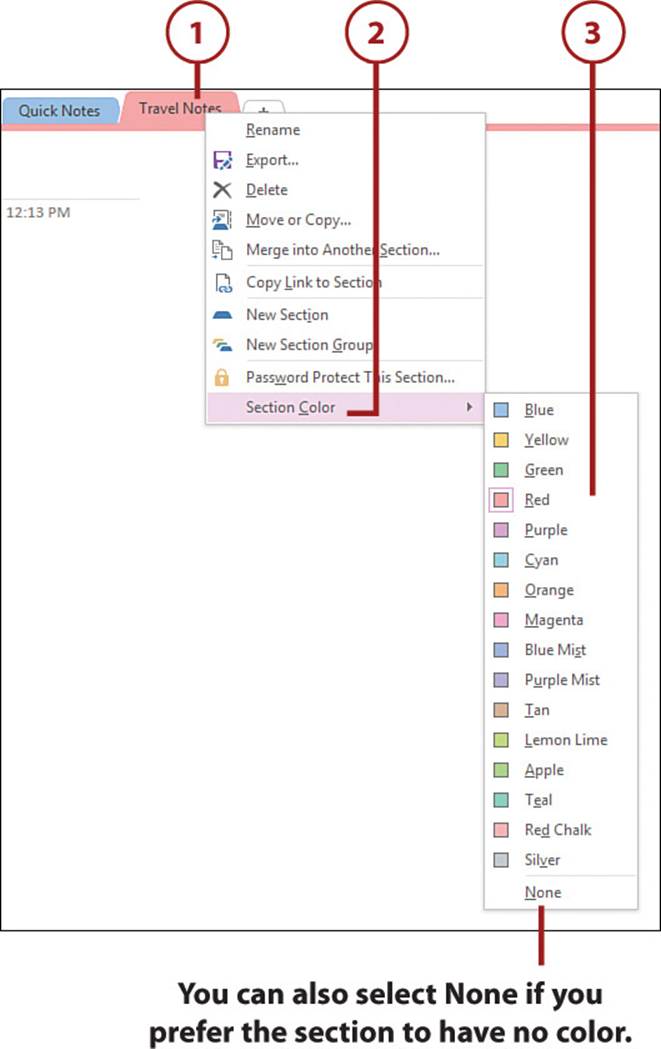
Color-Code a Section
Color-coding a section means that you apply a specified color that appears in the section’s tab (as well as the area surrounding the section when you select the section). So if a notebook contains two or more similar sections similar, you can informally relate them to one another by applying the same color.
1. Right-click the tab of the section you want to color. OneNote displays a shortcut menu of section-related commands.
2. Select Section Color.
3. Select the color you want to apply. OneNote applies the color to the section.
Using Similar Colors Across Notebooks
If you use multiple notebooks, it’s a good idea to apply the same color to the same kinds of pages in each notebook. For example, if all your notebooks have a To-Do List section, it makes navigating the notebooks easier if those sections all use the same color.
Working with Pages
After sections, the second level in the notebook organizational hierarchy is the page, which is more or less a blank slate into which you insert your OneNote data. Each section can have an unlimited number of pages, and the idea is that you use separate pages to break down each section into separate subtopics. Each page appears in the right pane of the notebook window.
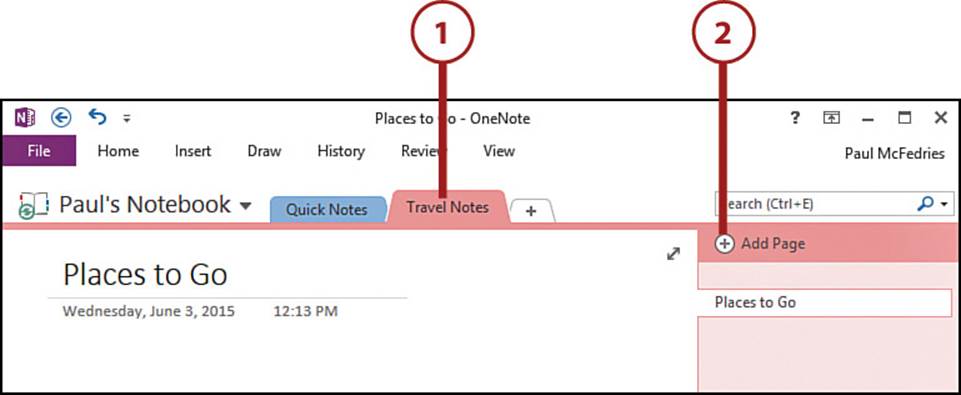
Insert a New Page
Each new section you create comes with a new page, but you can add more pages whenever you need them.
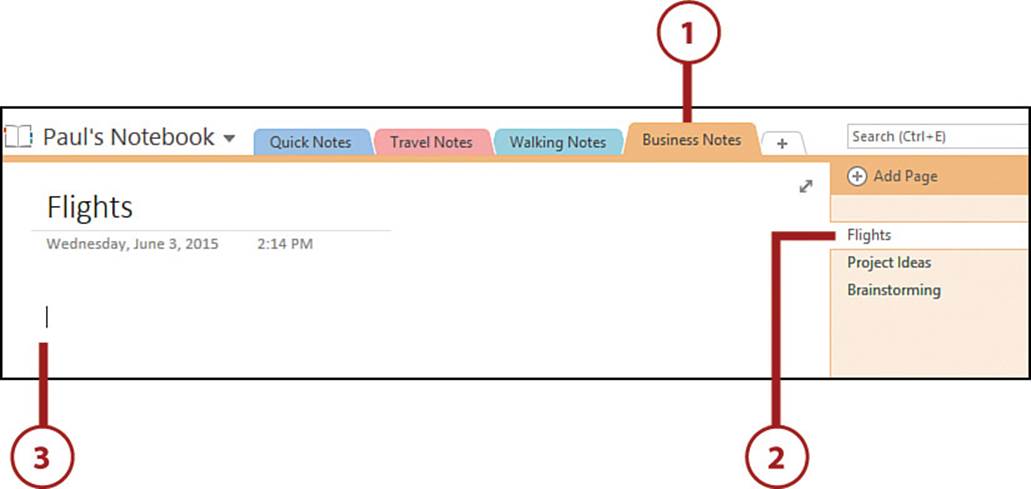
1. Select the section in which you want to insert the new page.
2. Select Add Page. OneNote inserts a new page into the section.
Keyboard Shortcut
You can also add a new page to the current section by pressing Ctrl+N.
3. Type the page title.
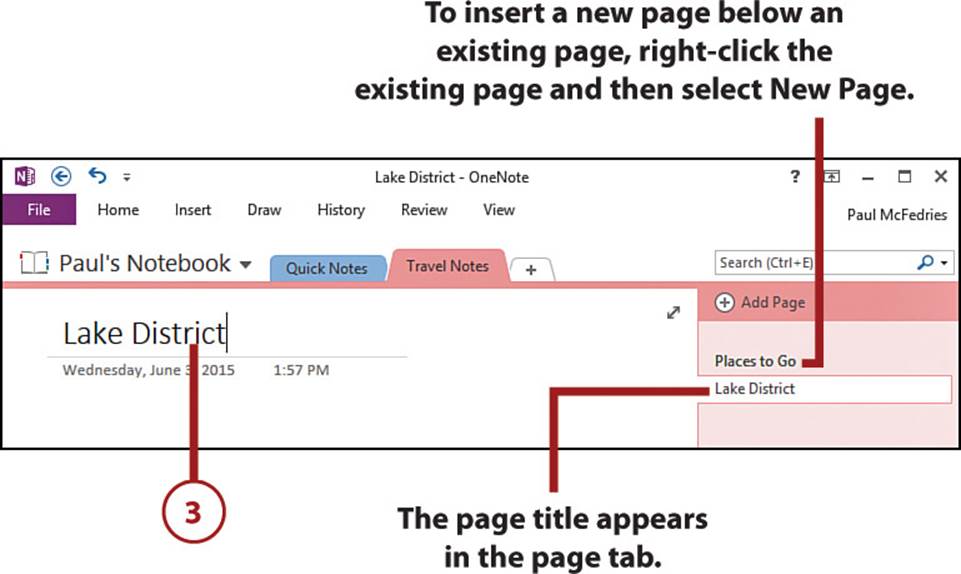
Moving a Page
OneNote adds each new page at the bottom of the existing page tabs. To move a page, click and drag the page’s tab up or down until the page is in the position you want; then release the tab.
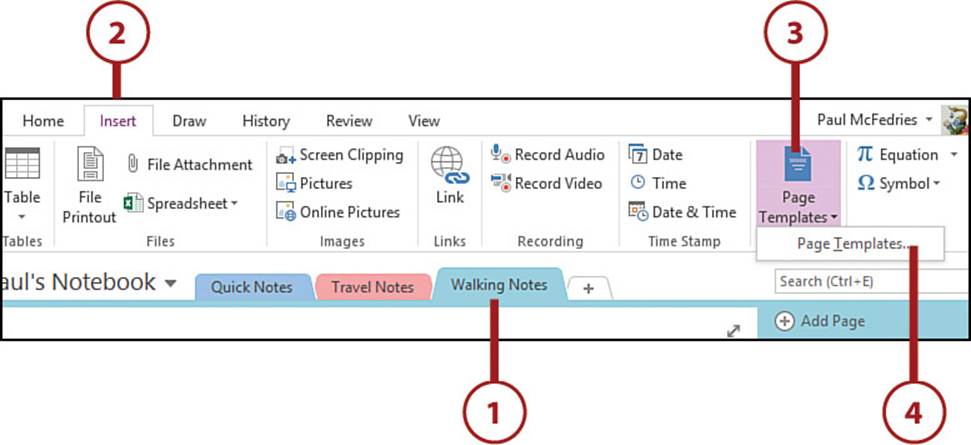
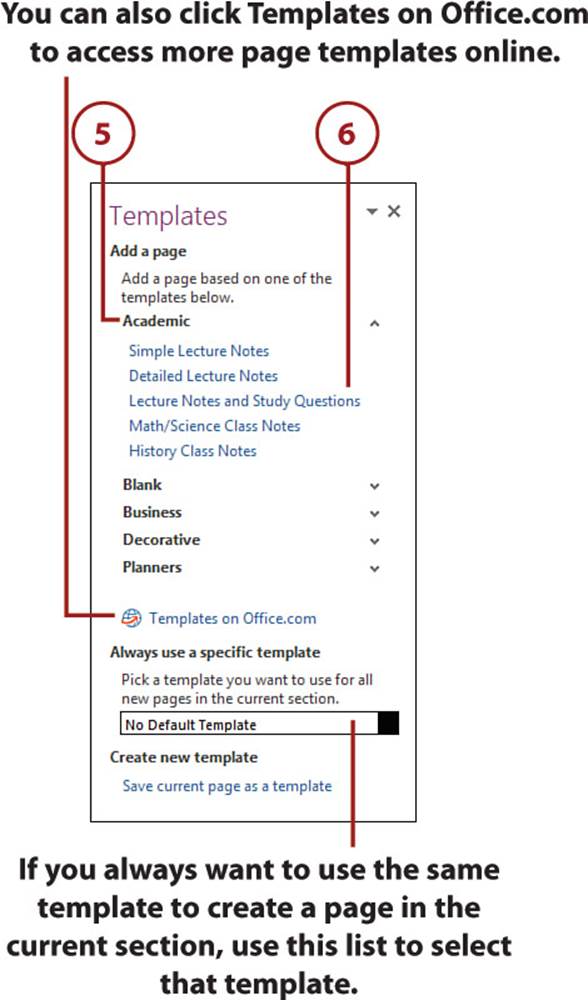
Insert a New Page from a Template
OneNote offers a collection of page templates that enable you to insert a page that comes with preset text and formatting for things like lecture notes, business meetings, and to-do lists.
1. Select the section in which you want to insert the new page.
2. Select the Insert tab.
3. Select Page Templates.
4. Select Page Templates. OneNote displays the Templates task pane.
5. Select a category.
6. Select the page template you want to use.
>>>Go Further: Saving a Page as a Template
If you find yourself using similar text and formatting for many of your pages, you can save yourself some work by saving that text and formatting as a page template that you can apply using the steps in this section. To save the current page as a template, select Insert, Page Templates, Page Templates to open the Templates task pane. At the bottom of the pane, select Save Current Page as a Template to open the Save As Template dialog box. Type a name for the template. If you always want to use this template to create a page in the current section, select the Set as Default Template... check box. Select Save.
Enter Text on a Page
Filling your pages with content is what OneNote is all about, and OneNote makes it easy to insert everything from simple typewritten or handwritten notes, dates and times, image files, screen captures, and even entire files. All OneNote content appears inside a container, which is essentially a box that surrounds the content. After you have some content inside a container, you can move the container around on the page, edit or format the container content, split the content into multiple containers, and more.
Most page content consists of text notes, and OneNote makes it simple to add text to a page:
• For typewritten notes, click where you want the note to appear and then start typing. OneNote immediately places a container around the text. When you’re done, select outside the container.
• To create a bulleted list, click where you want the list to appear and then select Home, Bullets. You can also select Home, Numbering if you prefer a numbered list.
• To add text from a document, open the document, copy the text, return to OneNote, click inside the page where you want the text to appear, and then paste the copied text.
See Chapter 15 to learn how to add more types of content to a page.
Work with Page Containers
When you insert data on a page—whether text, a link, an image, or clip art—the data appears inside a special object called a container. When you have one or more containers on a page, working with the data is almost always straightforward. For example, to edit container text, you select inside the container and change the existing text or add new text. To format the text, you select it and use the buttons in the Ribbon’s Home tab.
Selecting Container Text
To quickly select all the text in a container, double-click the top edge of the container.
You’ll probably spend a significant amount of time in OneNote adjusting containers from one part of a page to another to get the best or most efficient layout for your data. Here are the basic techniques to use:
• Moving a container—Select the container to display its frame. Drag the top edge of the container and drop it on the new position.
• Sizing a container—Select the container to display the selection handles on the corners and sides. Drag a selection handle to get the width you want.
Building a OneNote Table
A typical notebook page, like a typical page in a paper notebook, is a jumble of text, with placeholders scattered around the page. This randomness isn’t necessarily a bad thing because it’s in keeping with OneNote’s inherent informality and (at least on the surface) structure-free format. However, there will be times when you want your notes to have some structure. If it’s a list of items, you can insert a bulleted list into a placeholder (on the Home tab, click Bullets); if it’s an ordered sequence of items, use a numbered list instead (on the Home tab, click Numbering).
However, you might have data that consists of multiple items, each of which has the same set of details. For example, you might want to record a list of upcoming flights, each of which has an airline name, flight number, departure date and time, destination, arrival date and time, seat number, and so on.
For these kinds of data structures, you can insert a table into a container. A table is a rectangular structure with the following characteristics:
• Each item in the list gets its own horizontal rectangle called a row.
• Each set of details in the list gets its own vertical rectangle called a column.
• The rectangle formed by the intersection of a row and a column is called a cell, and you use the table cells to hold the data.
In other words, a OneNote table is similar to an Excel worksheet (and a Word table, which I discussed in Chapter 5, “Working with Page Layout and Design in Word”).
Insert a Table
When you want to construct a table in OneNote, your first step is to create the empty table structure that specifies the number of rows and columns you want in your table. So you need to examine your data and figure out how many items there are (that value will be the number of rows you need in your table), and how many details you want to record for each item (that value will be the number of columns you need in your table). Once you’ve done that, you’re ready to insert the table.
1. Select the section that contains the page you want to work with.
2. Select the page in which you want to insert the table.
3. Select where you want the table to appear.
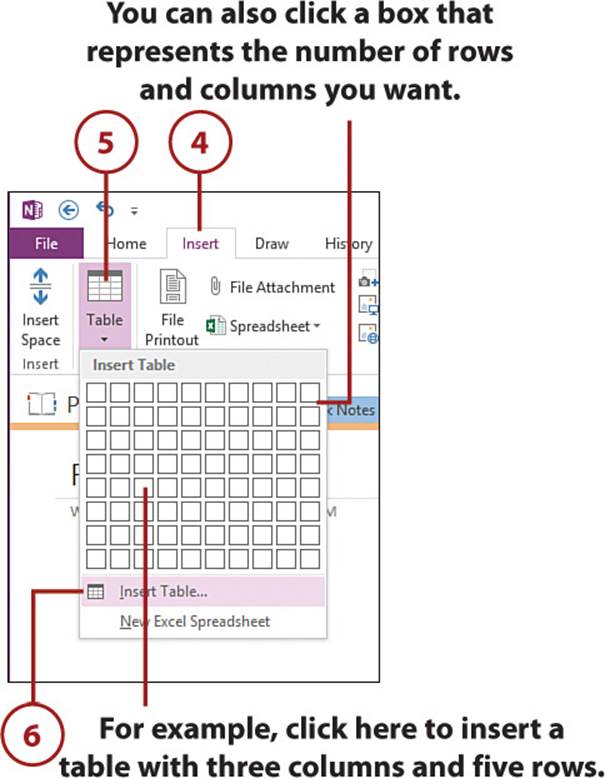
4. Select the Insert tab.
5. Select Table. OneNote displays the Insert Table gallery.
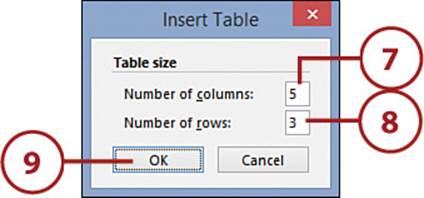
6. Select Insert Table to display the Insert Table dialog box.
7. Specify the number of columns you want in your table.
8. Specify the number of rows you want in the table.
9. Select OK. OneNote inserts the table.
10. Type your text into the table cells.
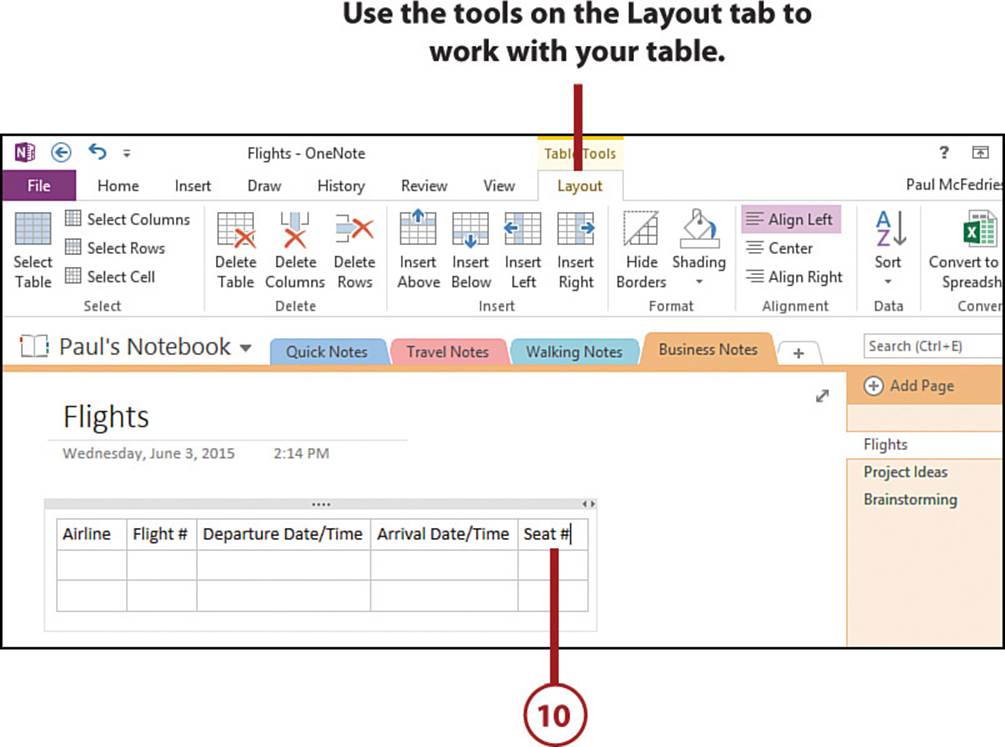
Working with a OneNote Table
A OneNote table is similar to a Word table, so you can use the same techniques to add and delete rows and columns, select table items, and so on. See Chapter 5 for the details.
Working with Tags
OneNote enables you to augment items in a page with small icons called tags. For example, many tags can help you prioritize page data, including the Important, Critical, and Question tags. Similarly, many tags can help you organize your data, including the Project A and Project B tags.
However, probably the most common use of tags is to set up a to-do list. One of the secrets of productivity in a fast-paced, information-overloaded world is organizing the things that require your attention and your effort in a way that minimizes stress and maximizes efficiency. If you have a long list of things to do, the worst way to handle the list is to keep it in your head. If you do this, you’ll not only worry about forgetting something, but you’ll always have each task rumbling around in your brain, so you’ll jump from one to the other rather than concentrating on a single task at a time. Plastering sticky notes all over your monitor isn’t good, either, because all the tasks are still “in your face,” and you won’t be much better off.
The best way to organize a list of pending and current tasks is to have a single place where you record the tasks’ particulars and can augment those particulars as things change and new data becomes available. This place must be one that you check regularly so that there’s never a danger of overlooking a task, and ideally it should be a place where you can prioritize your tasks. This way, you can focus on a single task, knowing that everything you need to do is safely recorded and prioritized. As you’ve probably guessed by now, the place I’m talking about is OneNote, which is ideally suited to recording, organizing, and prioritizing tasks and to-do lists.
Tag an Item
You can apply a tag to a single item, multiple items, or to every item within a container. You can also apply multiple tags to a single item.
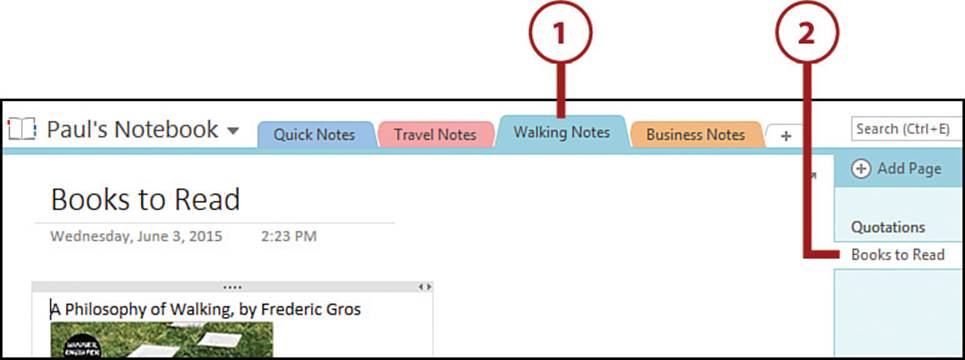
1. Select the section that contains the page you want to work with.
2. Select the page that contains the data you want to tag.
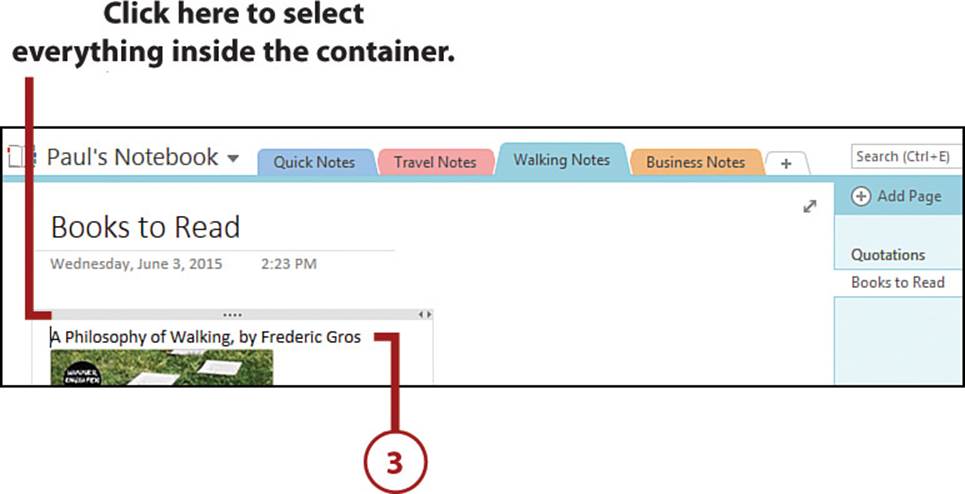
3. If you want to tag a specific paragraph within a text container, select inside that paragraph. If you want to apply the same tag to multiple paragraphs, select those paragraphs. If you want to apply the same tag to every paragraph, click the top edge of the container to select all the text.
4. Select the Home tab.
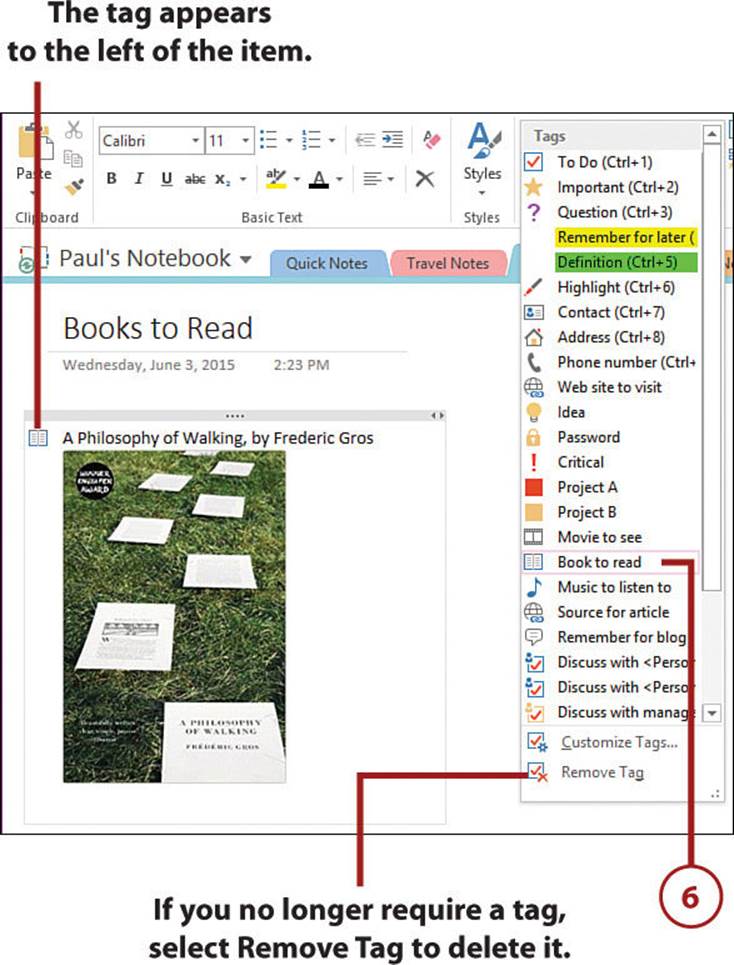
5. Select More in the Tags group. OneNote displays the Tags gallery.

6. Select the tag you want to use. OneNote applies the tag to the data.
>>>Go Further: Creating a Custom Tag
If none of the default OneNote tags is just right for your needs, you can create a custom tag. Open the Tags gallery and select the Customize Tags command. In the Customize Tags dialog box, select New Tag to open the New Tag dialog box. Type a name for your custom tag. Use the Symbol, Font Color, and Highlight Color lists to construct your custom tag, and then click OK.
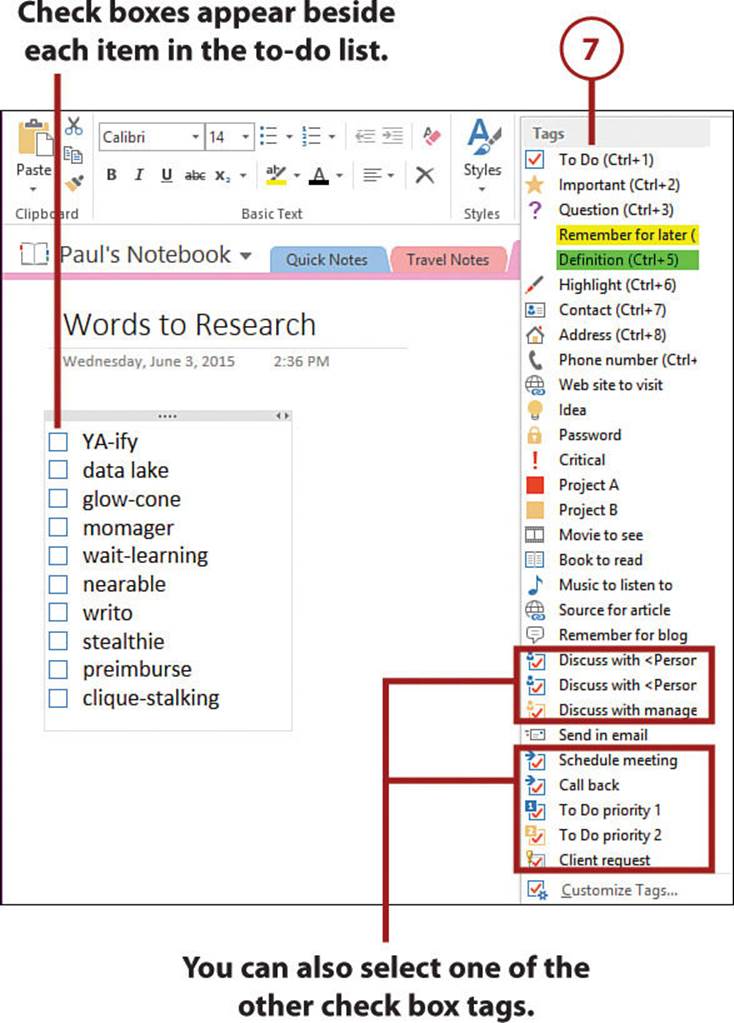
Build Lists
To-do lists are an important part of OneNote, and part of the evidence for that is the large number of check box–like tags it offers. Besides the standard To Do tag, there are eight others:
• Discuss with <Person A>
• Discuss with <Person B>
• Discuss with Manager
• Schedule Meeting
• Call Back
• To Do Priority 1
• To Do Priority 2
• Client Request
Each of these tags gives you a check box augmented with a small icon. When you complete a task, you select the check box to place a red check mark inside, which gives you a strong visual clue about which tasks are done and which are still pending.
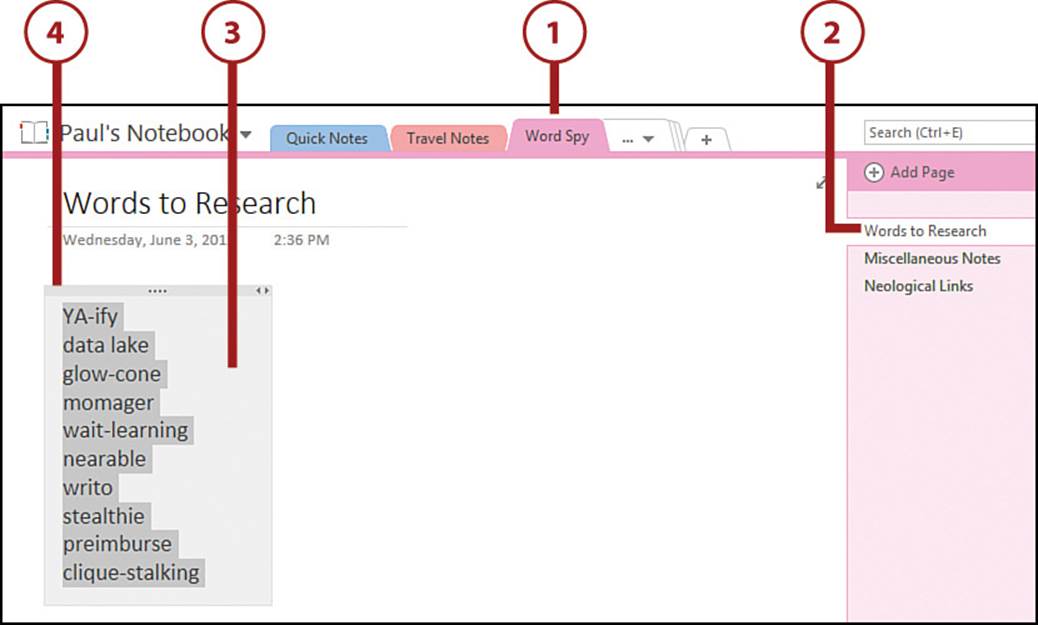
Create a To-Do List
You create a OneNote to-do list by building a list and then tagging it using the To Do tag.
1. Select the section that contains the page you want to work with.
2. Select the page where you want your to-do list to appear.
3. Type each item in your to-do list.
4. Click the top edge of the container to select the entire to-do list.
5. Select the Home tab.
6. Select More in the Tags group. OneNote displays the Tags gallery.
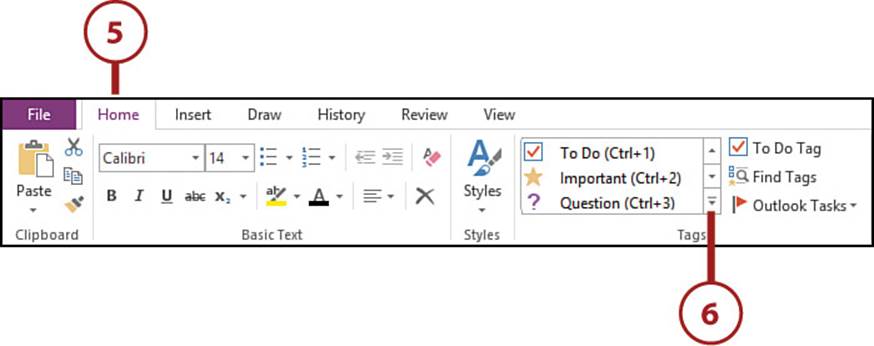
7. Select the To Do tag. OneNote applies the tag to the data.
Keyboard Shortcut
You can also apply the To Do tag by pressing Ctrl+1.
All materials on the site are licensed Creative Commons Attribution-Sharealike 3.0 Unported CC BY-SA 3.0 & GNU Free Documentation License (GFDL)
If you are the copyright holder of any material contained on our site and intend to remove it, please contact our site administrator for approval.
© 2016-2026 All site design rights belong to S.Y.A.