My Office 2016 (2016)
16. Learning Access Basics
In this chapter, you learn about creating Access databases, building tables, querying table data, and creating forms and reports. Topics include the following:
![]() Creating a database
Creating a database
![]() Designing and building tables
Designing and building tables
![]() Entering, sorting, and filtering data
Entering, sorting, and filtering data
![]() Querying your data
Querying your data
![]() Creating data entry forms
Creating data entry forms
![]() Building reports to showcase your data
Building reports to showcase your data
Microsoft Access is a database management system. This means that Access not only stores your information but also supplies you with the means to manage this information—for example, by sorting, searching, extracting, summarizing, and so on.
Access is a large, complex, and often intimidating program. However, much of the program’s complexity comes from its wealth of features aimed solely at database professionals. If you are looking just to enter data, access external data, query and summarize data, and produce useful reports, you will find that a minimum of database theory combined with the right techniques can turn Access into a usable, powerful program. In other words, with the techniques you learn in this chapter, you can extract meaningful and useful information from whatever jumble of data you now have.
Understanding Access Databases
In simplest terms, a database is a collection of data with some sort of underlying organization. In most systems, anything related to the data (such as a data entry screen or a report that summarizes the data) is considered a separate piece of the overall pie. Access, though, is different because its databases consist not only of the basic data but also of related items you use to work with the data.
If you like, you can think of an Access database as a kind of electronic tool shed. In this tool shed you have not only your raw materials (your data) stored in bins and containers of various shapes and sizes, but you also have a number of tools you can use to manipulate these materials, as well as a work area where all this manipulation happens.
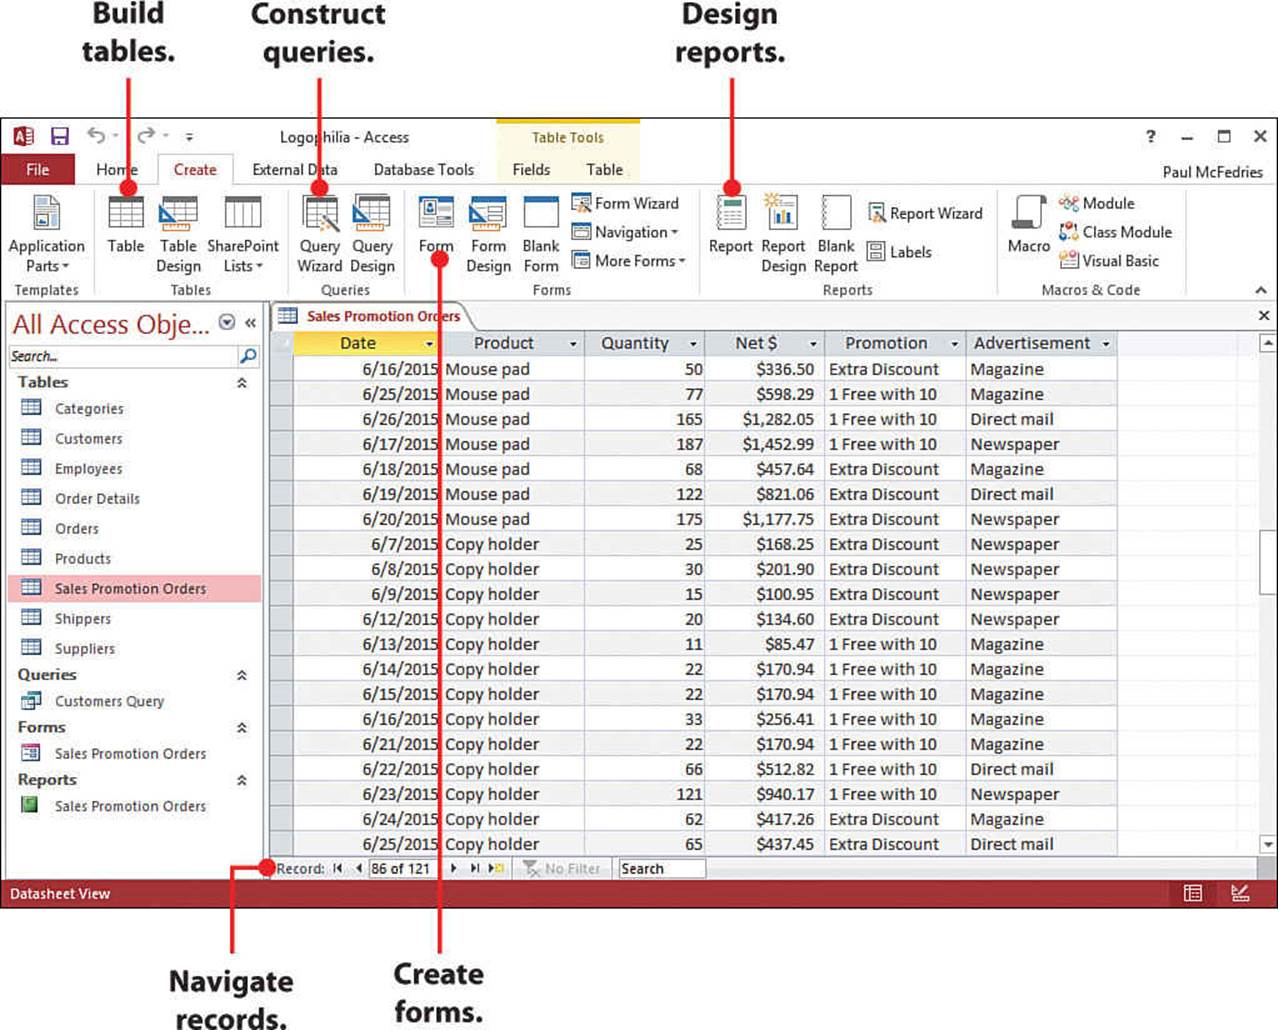
Each Access database can store a number of different types of objects, but in this chapter you learn about four in particular: tables, queries, forms, and reports:
• Tables—In Access databases, you store your information in an object called a table. Tables are rectangular arrangements of rows and columns, where each column represents a field (a specific category of information) and each row represents a record (a single entry in the table).
• Queries—Queries are, literally, questions you ask of your data and they enable you to extract from one or more tables a subset of the data. For example, in a table of customer names and addresses, what if you wanted to see a list of firms located in France? No problem. Just set up the following query: “Which records have ‘France’ in the Country field?”
• Forms—To make entering data easier, you can create Access database objects called forms. Forms provide a “template” that you fill in whenever you enter a record. The form displays a blank box or list for each field in the table. Data entry becomes a simple matter of filling in the appropriate boxes or selecting data from the lists.
• Reports—To make your data more palatable for others to read, you can create a fourth type of database object: a report. Reports let you define how you want your data to appear on the printed page. You can decide which fields to include in the report, where they appear on the page, and which font to use. You can also add your own text and graphics.
Creating a Database
Access comes with a sample database called Northwind, which is great for experimenting and getting to know the program’s features. However, you will eventually need to create and work with your own databases so that you can store, view, and manipulate your own data.
Create a Database
The most direct way to set up a database is to create a blank database container into which you can drop tables, queries, forms, and reports.
1. Click File. If you have just started the program, you can skip to step 3.
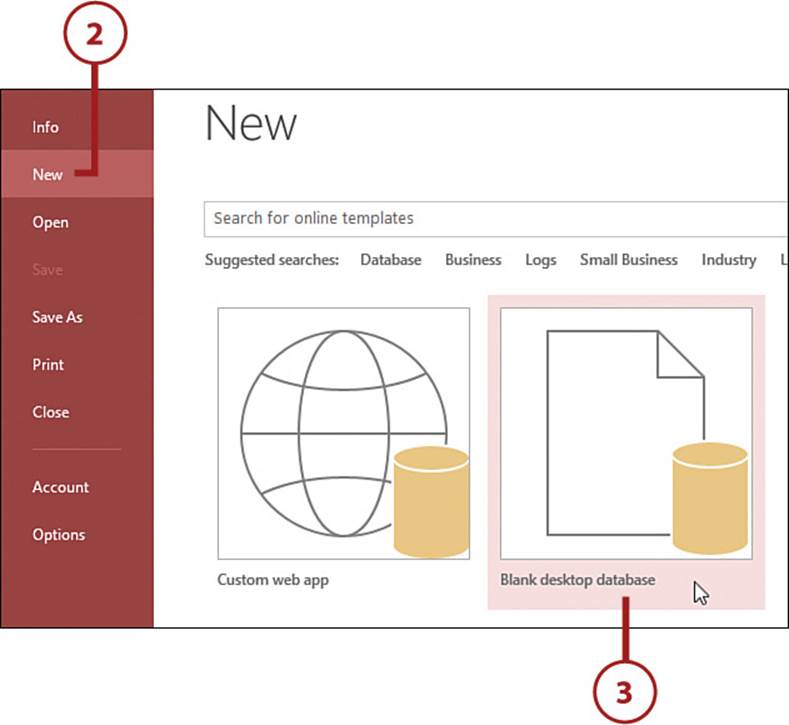
2. Click New.
3. Click Blank Desktop Database. Access prompts you for a name.
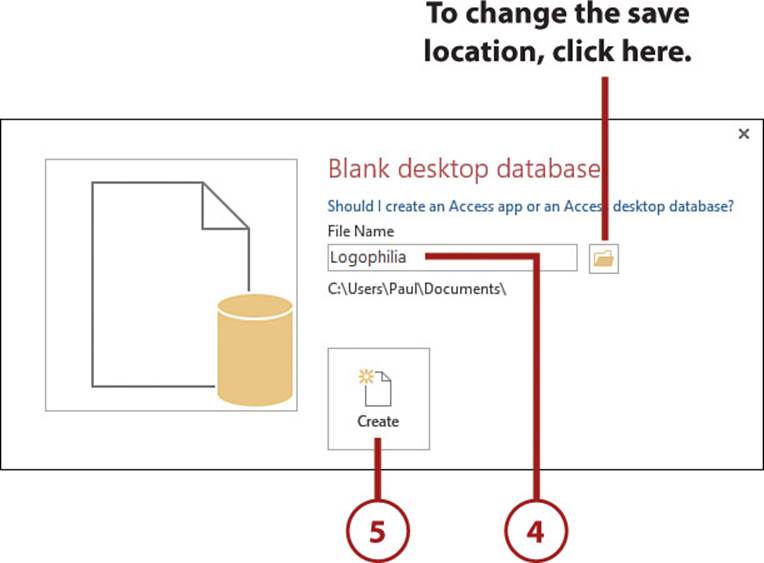
4. Type the name you want to use for your database file.
5. Click Create. Access creates the database file and then displays a new table ready to be built (see “Create a Table,” later in this chapter).
>>>Go Further: Creating a Table from a Template
Instead of a blank database, you may prefer to use a template to create a database that already has a basic structure in place. Access offers two dozen templates that cover common database uses such as asset tracking, contact management, project management, personnel, and inventory. To create a database from a template, follow the steps in this section, except at step 3, click the template you want to use instead of the Blank Desktop Database. If you don’t see a template that does exactly what you need, use the Search for Online Templates text box at the top of the New tab to search the thousands of templates available via the Microsoft Office Online site.
Building and Working with Tables
Tables are the most fundamental of the Access objects because you use them to store your data, and you can’t really do much of anything in Access until you have supplied the program with data. The importance of tables is made manifest by the fact that, when you create a new database, Access automatically creates a new table and displays the table design view. Before you go any further, however, you should take a few minutes to understand how to design a table.
Designing a Table
With your database created, you now need to populate it with one or more tables. Before you create a new table, however, you need to plan your table design. By asking yourself a few questions in advance, you can save yourself the trouble of redesigning your table later. For simple tables, you need to ask yourself four basic questions:
• Does the table belong in the current database?—Each database you create should be set up for a specific purpose. It could be home finances, business transactions, personal assets, or whatever. In any case, once you know the purpose of the database, you can then decide whether the table you want to create fits in with the database theme. For example, if the purpose of the database is to record only information related to your personal finances, it wouldn’t make sense to include a table of recipes in the same database. Similarly, it would be inappropriate to include a table of office baseball pool winners in a database of accounts payable invoices.
• What type of data should I store in the table?—The most important step in creating a table is determining the information you want it to contain. In theory, Access tables can be large, with hundreds of fields. In practice, however, you should minimize the size of your tables. This saves memory and makes managing the data easier. Therefore, you should strive to set up all your tables with only essential information. For example, suppose you want to store your personal assets in a database. You have to decide whether you want all your assets in a single table, or whether it would be better to create separate tables for each type of asset. If you’re only going to be entering basic information—such as the date purchased, a description of each item, and its current value—you can probably get away with a single table.
More detailed data will almost certainly require individual tables for each asset. For example, a table of books might include information on the title, the author, the publisher, and so on. Clearly, such a table wouldn’t work for, say, your collection of jewelry. When you have decided on the tables you want to use, you then need to think about how much data you want to store in each table. In your book collection, for example, would you want to include information on the number of pages, the publishing date, and the number of people the author thanks in the acknowledgments? This might all be crucial information for you, but you need to remember that the more data you store, the longer it takes you to enter each record.
• What fields should I use to store the data?—Now you are almost ready for action. The next thing you need to figure out is the specific fields to include in the table. For the most part, the fields are determined by the data itself. For example, a table of business contacts would certainly include fields for name, address, and phone number. However, should you split the name into two fields—one for the first name and one for the last name? If you think you will need to sort the table by last name, then, yes, you probably should. What about the address? You will probably need individual fields for the city, state, and postal code. There are two general rules to follow when deciding how many fields to include in your tables: First, ask yourself whether you really need the data for a particular field (or whether you might need it in the near future). For example, if you think your table of contact names might someday be used to create form letters, a field to record titles (Ms., Mr., Dr., and so on) would come in handy. When in doubt, err on the side of too many fields rather than too few. Second, always split your data into the smallest fields that make sense. Splitting first and last names is common practice, but creating a separate field for, say, the phone number area code would probably be overkill.
• Which field should I use for the primary key?—When you create a table, you need to decide which field to use as the primary key. The primary key is a field that uses a unique number or character sequence to identify each record in the table. Keys are used constantly in the real world. Your Social Security number is a key that identifies you in government records. Most machines and appliances have unique serial numbers. This book (like most books) has a 10-digit ISBN—International Standard Book Number (which you can see on the back cover). Why are primary keys necessary? Well, for one thing, Access creates an index for the primary key field. You can perform searches on indexed data much more quickly than on regular data, so many Access operations perform faster if a primary key is present. Keys also make it easy to find records in a table, because the key entries are unique (things such as last names and addresses can have multiple spellings, which makes them hard to find). Finally, a primary key is a handy way to avoid data-entry errors. Since the entries in a primary key field must be unique, there is no chance for someone to, say, enter the same account number for two different customers.
You can set things up so that Access sets and maintains the primary key for you, or you can do it yourself. Which one do you choose? If your data contains a number or character sequence that uniquely defines each record, you can set the key yourself. For example, invoices usually have unique numbers that are perfect for a primary key. Other fields that can serve as primary keys are employee IDs, customer account numbers, and purchase order numbers. If your data has no such unique identifier, let Access create a key for you. This means that Access sets up an AutoNumber field (see “Learning About Access Data Types”) that assigns a unique number to each record (the first record is 1, the second 2, and so on).
Finally, don’t worry too much about the design process right now. As you will see, it is easy to make changes down the road by, say, adding and deleting fields, so you are never stuck with a bad design.
Learning About Access Data Types
When building a table you need to assign a data type to each field, which tells Access what kind of data will appear in the field. Access supports a large number of data types, but the following are the ones used most often:
• Short Text—This is a catch-all type you can use for fields that contain any combination of letters, numbers, and symbols (such as parentheses and dashes). These fields usually are short entries (the maximum is 255 characters) such as names, addresses, and phone numbers. For purely numeric fields, however, you should use either the Number or Currency type (discussed in a moment).
• Number—Use this type for fields that contain numbers only. This is particularly true for fields you use for calculations. (Note, though, that fields containing dollar amounts should use the Currency type, described in a moment.)
• Currency—Use this field for dollar values.
• Date & Time—This type is for fields that use only dates and times. Access can handle dates from the year 100 right up to the year 9999.
• Yes/No—Use this type for fields that contain only Yes or No values.
• Long Text—Use this type for longer alphanumeric entries. Long text field entries are usually several sentences or paragraphs long, but they can contain up to 64,000 characters. These types of fields are useful for long text passages or random notes. In a table of customer names, for example, you could use a memo field to record customers’ favorite colors, the names of their spouses and kids, and so on.
• Rich Text—This is the same as Long Text, except that Access allows you to enter character formatting, such as fonts, colors, bold, and italics.
• Hyperlink—This field type is used for addresses of Internet (or intranet) sites or email addresses. When you display the table in Datasheet view, Access configures the addresses as links that you can click.
• AutoNumber—This type creates a numeric entry that Access fills in automatically whenever you add a record. Because this type of field assigns a unique number to each record, it’s ideal for setting up your own primary key.
Create a Table
You create a table by specifying one or more fields that you want to use to store your data, and for each field you assign a name and a data type.
1. Click Create. If you have just created a new database and Access has already created a new table for you, skip to step 3.
2. Click Table. Access creates the new table and displays it in Datasheet view.
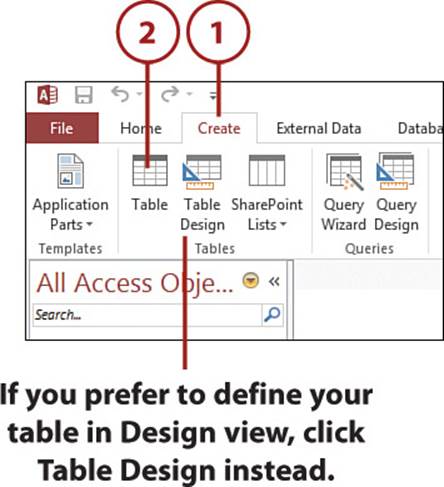
Access Views
For tables, Access has two views: Datasheet and Design. You use Datasheet view to define the table structure, as well as to view, enter, and edit your table data. (Datasheet is the Access term for the row-and-column format that it uses to display table data.) You use Design view for more advanced options regarding the table structure.
3. Select Click to Add. Access displays a list of data types.
4. Click the data type you want to use for the field. Access adds the field.
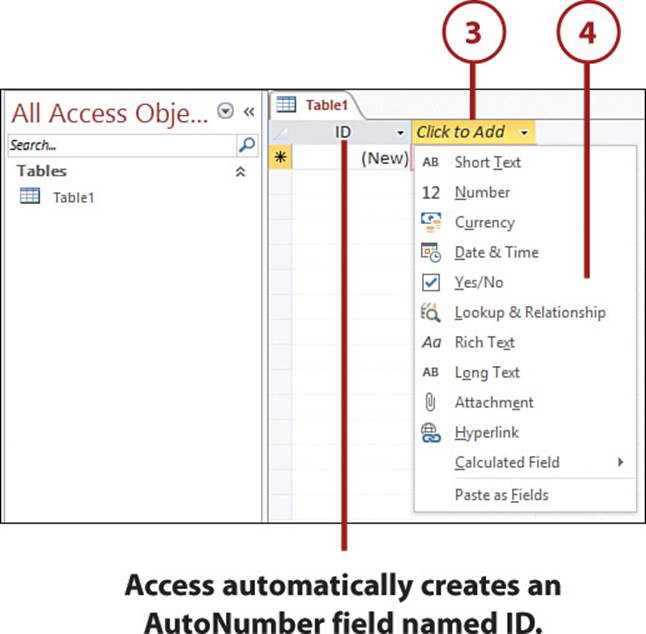
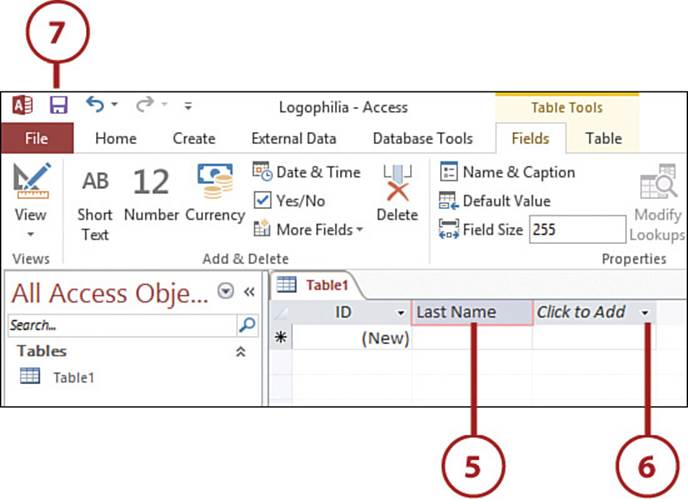
5. Type the field name.
6. Repeat steps 3–5 to define all the fields in your table.
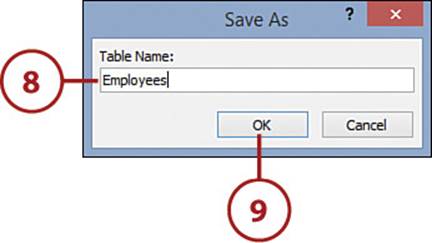
7. Click Save. Access displays the Save As dialog box.
8. Type a name for the table.
9. Click OK.
>>>Go Further: Specifying a Default Field Value
In many cases, you can save yourself (or whoever does your data entry) a ton of time by setting up a field with a default value. A default value means that Access automatically enters the value into the field each time you add a new record to the table. To specify a default value, click anywhere in the field’s column, click the Fields tab, and then click Default Value. In the Expression Builder dialog box that appears, enter the default value in the large text box after the equal sign (=) and then click OK.
Enter Data
Although you can use forms to enter data (described later in this chapter), for most databases it is easier to enter data directly using the table’s datasheet.
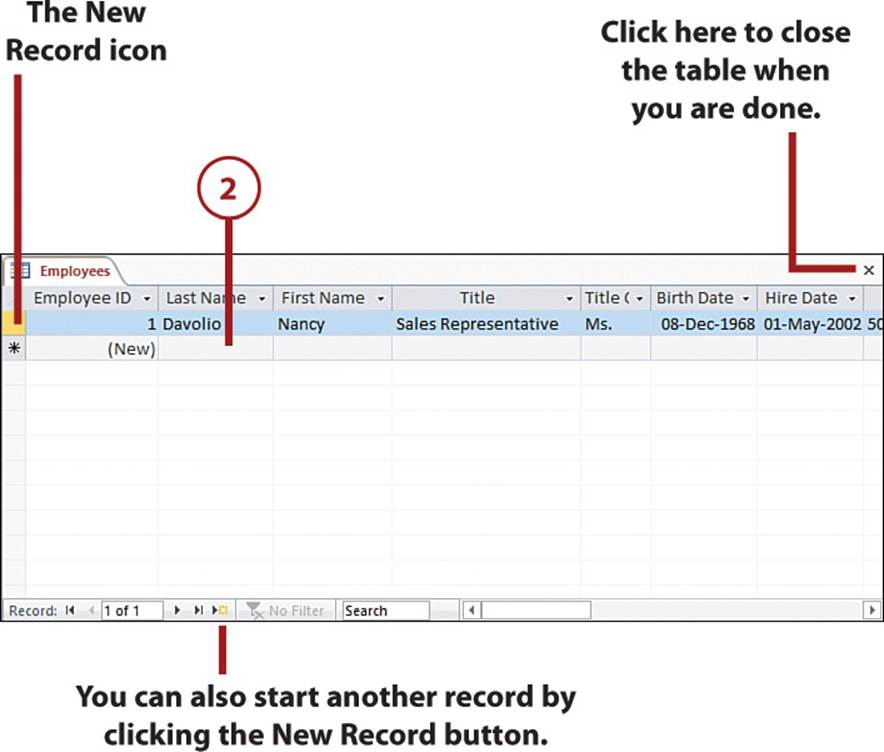
1. Type the data for the current field and then press Tab. Access opens the next field for editing, and you repeat until the record is complete.
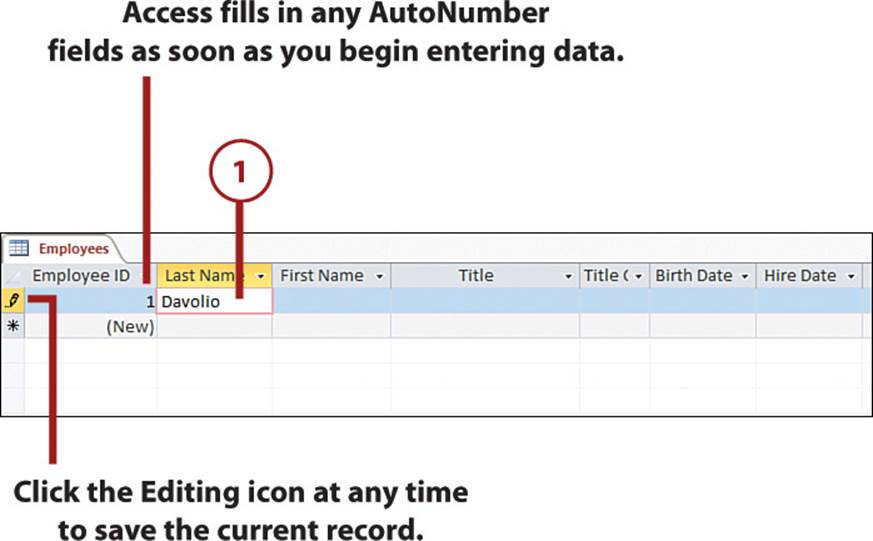
2. Start the next record by clicking anywhere in the bottom row of the table, which is marked with the New Record icon on the left.
Keyboard Shortcuts
If you’re currently inside the last field of the table’s last record, you can also start a new record by pressing Tab. Alternatively, press Ctrl+Shift+= from any field in any record.
>>>Go Further: Entering Data
Entering data in Access is, for the most part, straightforward. You just select a field and start typing. Here are a few notes to keep in mind when entering table data:
• If you see a field that contains (New), this means that the field uses the AutoNumber format, so Access automatically assigns numbers to the field.
• When entering dates, use your locale’s standard date format. In the U.S., for example, use the format mm/dd/yyyy, where mm is the month number (for example, 12 for December), dd is the day, and yyyy is the year.
• When entering times, use the format hh:mm:ss, where hh is the hour, mm is the minutes, and ss is the seconds. You can either use the 24-hour clock (for example, 16:30:05), or you can add a.m. or p.m. (for example, 4:30:05 p.m.).
• You can add today’s date to a field by pressing Ctrl+; (semicolon). To add the current time, press Ctrl+: (colon).
• When entering a number in a Currency field, don’t bother entering a currency symbol (such as $); Access adds it for you automatically.
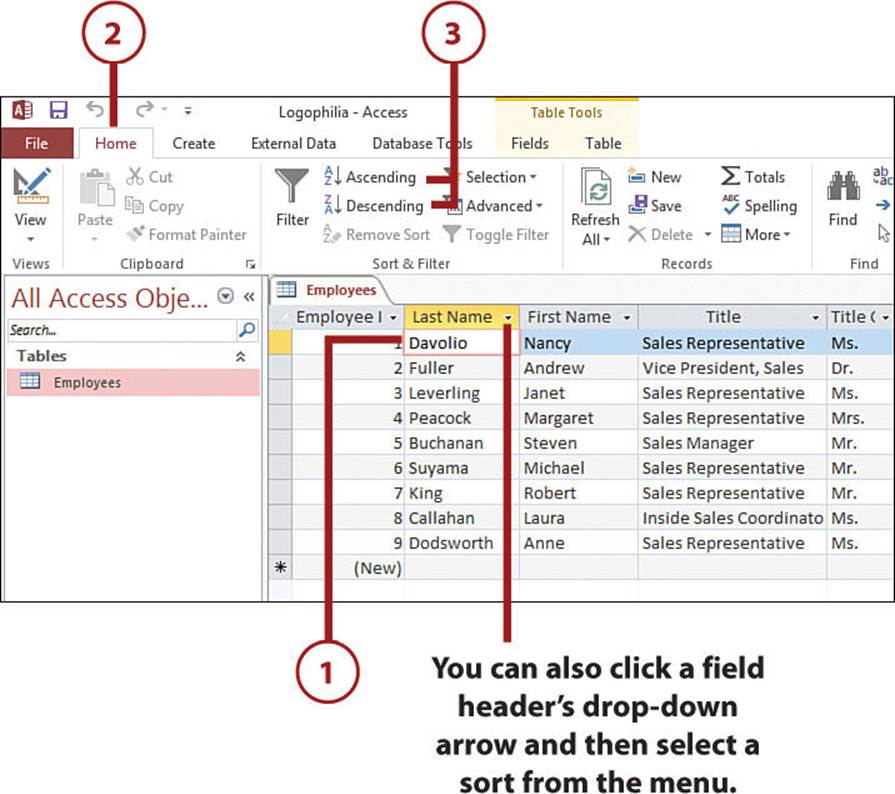
Sort Table Data
One way to make sense out of the data in a large table is to sort the table. Sorting means that you place the records in order (alphabetical, numeric, or date) based on the data in a field.
1. Click anywhere inside the field on which you want to sort the table.
2. Click the Home tab.
3. Click Ascending. If you prefer to sort the data in descending order, click Descending instead.
Ascending Versus Descending
An ascending sort orders the field data from A to Z (for a text field), 0 to 9 (for a numeric field), or earliest to latest (for a date field). A descending sort orders the field data from Z to A (for a text field), 9 to 0 (for a numeric field), or latest to earliest (for a date field).
Filter Table Data
You can make a large table more manageable by filtering the table, which means that Access temporarily hides the records you specify so that you’re left to work with only a subset of the records.
1. Click anywhere inside the field you want to use to filter the table.
2. Click the Home tab.
3. Click Filter. Access displays a list of the unique items in the field.
4. Deactivate the check box for each item you want to temporarily hide.
5. Click OK. Access now only shows the items you selected.
6. To view all the records, repeat steps 1 to 4 and click Select All.
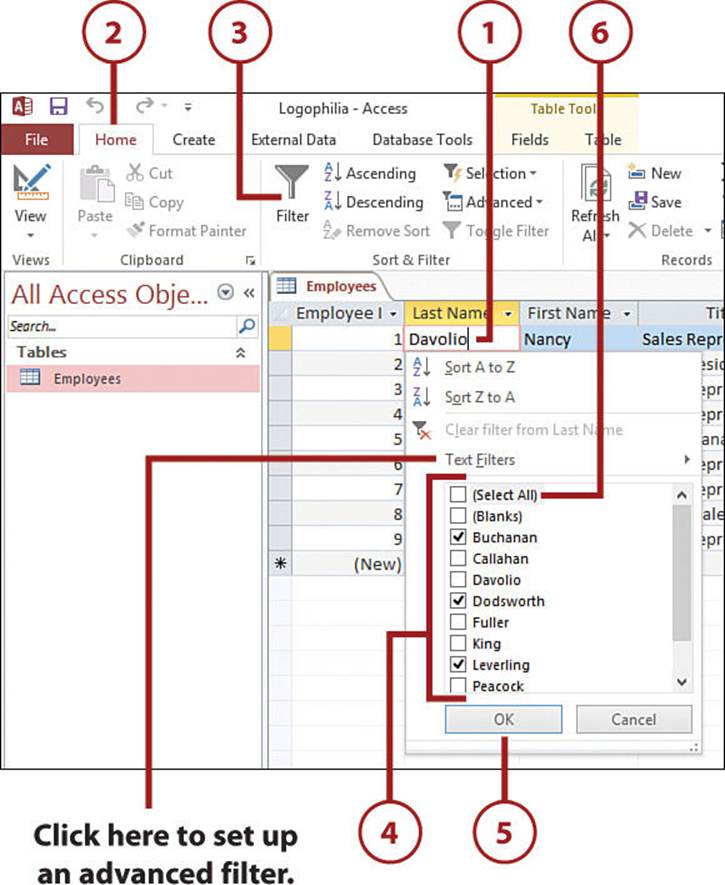
>>>Go Further: Creating Advanced Filters
Rather than filtering out individual field values, you can use advanced filters to filter records based on the value you specify. In the filter dialog box, click Text Filters, select a command such as Begins With, Contains, or Ends With, and then enter a value. For example, if you select Begins With and then enter C, Access filters the table to only show those records where the filtered field begins with the letter C. For numeric fields, you can click Number Filters and then select a command such as Does Not Equal, Less Than, or Greater Than. For a date field, click Date Filters and then select a command such as Before, After, or Last Year.
Querying Access Data
This section gets you up to speed with one of the most powerful concepts in all of Access: queries. Queries are no great mystery, really. Although the name implies that they are a kind of question, thinking of them as requests is more useful. In the simplest case, a query is a request to see a particular subset of your data. For example, showing only those records in a customer table where the country is “Sweden” and the first name is “Sven” would be a fairly simple query to build.
In this respect, queries are fancier versions of the filters you learned about in the previous section. However, unlike a filter, a query isn’t simply a different view of the table data. It’s a separate database object that looks and acts much like a datasheet, and many of the operations you can perform on a datasheet can also be performed on a query’s results.
Design a Simple Query
Access offers the Simple Query Wizard that you can use to create a basic query step-by-step.
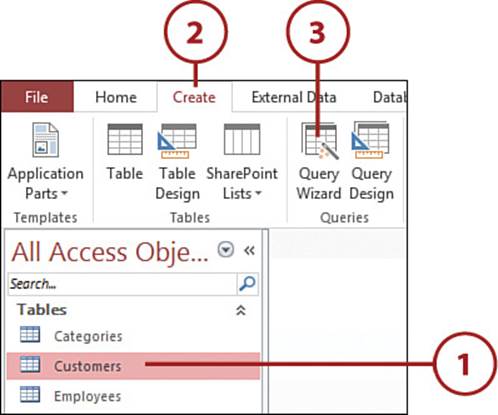
1. Click the table you want to use as the basis for the query.
2. Click the Create tab.
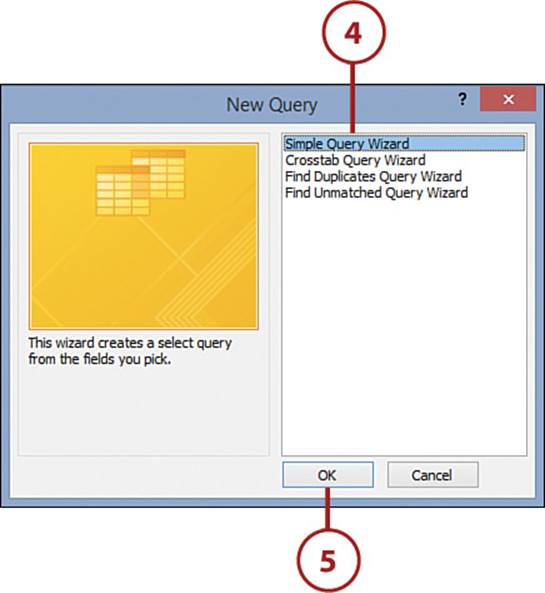
3. Click Query Wizard. Access opens the New Query dialog box.
4. Make sure that Simple Query Wizard is selected.
5. Click OK. Access launches the Simple Query Wizard.
6. For each field you want to include in the query, click the field and then click Add.
7. When you are done, click Next.

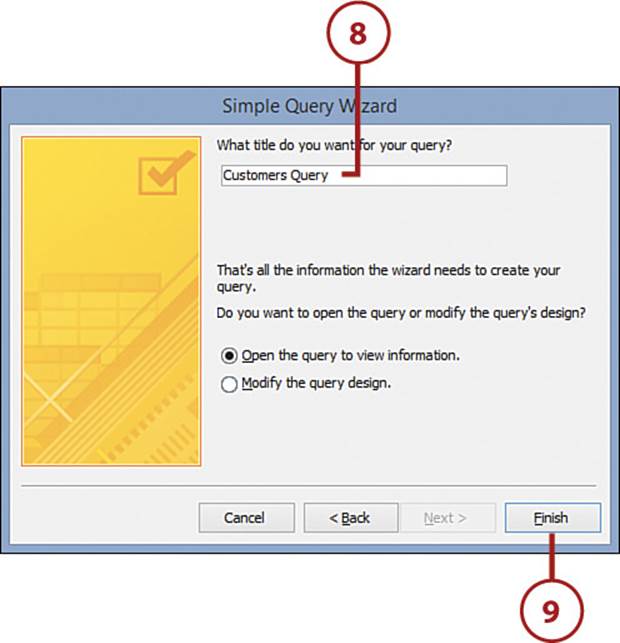
8. Type a name for the query.
9. Click Finish. Access runs the query and displays the results.
Understanding Query Criteria
A query is only as useful and as accurate as the criteria that define it. For this reason, it is crucial to understand query criteria if you want to get the most out of the powerful query capabilities of Access.
A query’s criteria consist of one or more expressions that manipulate the underlying table in some way. For example, if your query includes a Country field, you could specify the string “USA” as the expression. When you apply such an expression to a field for each record in the table, the result contains only those records for which the expression is true. In the example, adding the literal value “USA” to the Country field is equivalent to the following logical formula:
Country = “USA”
Access builds the dynaset by applying this formula to each record in the table and selecting only those records for which it returns True (that is, those records where the value in the Country field is equal to “USA”).
More powerful queries use more complex expressions that combine not only literals, but also operators, table fields, and even built-in functions. Access evaluates the expression on the field in which it was defined and, again, the records where the expression returns a True result are the records that appear in the query dynaset.
Let’s take a more detailed look at the two main components of a query criteria expression: operands and operators.
An operand is a data value that gets manipulated in some way in an expression. The two operand types that you use most often in your criteria expressions are
• Literal—This is a value that you type directly into the expression. Access recognizes four types of literals: text, numbers, dates and times, and a constant (True, False, or Null). When you use a date or a time as a literal in a criteria expression, be sure to surround the value with pound signs (#). For example, #8/23/2016# or #3:15 PM#.
• Field name—Also called an identifier, this is the name of a field from the query’s underlying table, surrounded by square brackets; for example, [Country] or [Company Name].
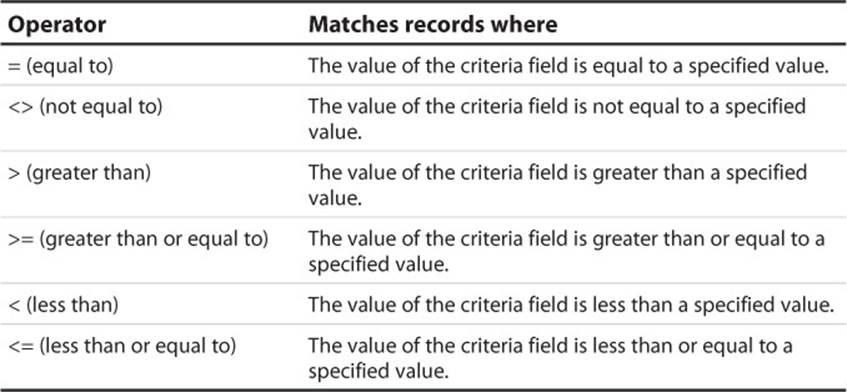
An operator is a special symbol that manipulates one or more operands in some way. The most common operators in query expressions are the comparison operators. You use comparison operators to compare the values in a particular field with a literal value, a function result, the value in another field, or an expression result. Here are the comparison operators used by Access:
For example, suppose your table has a Quantity field and you want to see just those records where the quantity is greater than 100. To do this, you would type the following expression in the Criteria cell for the Quantity field (see “Enter Query Criteria” next):
>100
When you need to build mathematical expressions, use the arithmetic operators:
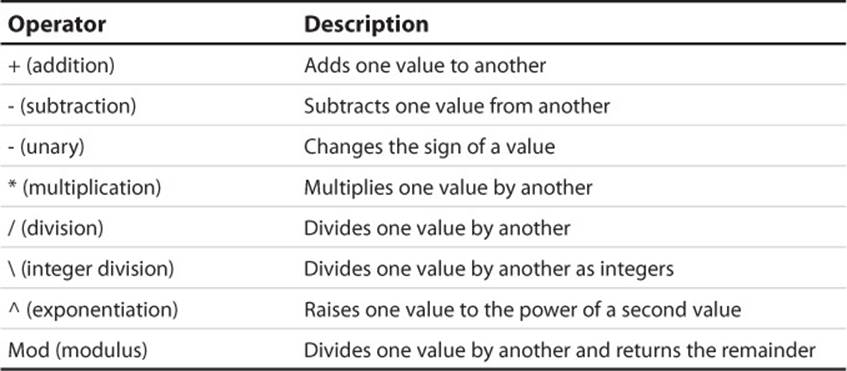
For example, if you want to calculate the extended total for an invoice, you first multiply the quantity ordered by the unit price. If these values are stored in the table using fields named Quantity and UnitPrice, your criteria expression would look like this:
[Quantity]*[UnitPrice]
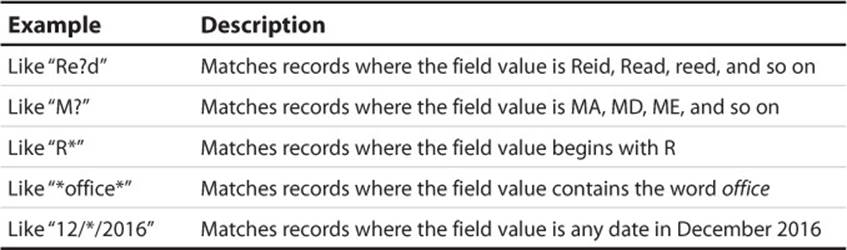
Finally, if you need to allow for multiple spellings in a text field, or if you are not sure how to spell a word you want to use, the wildcard characters can help. The two wildcards are the question mark (?), which substitutes for a single character, and the asterisk (*), which substitutes for a group of characters. You use them in combination with the Like operator, as shown in these examples:
Enter Query Criteria
The last query design step is to specify the criteria that determine the subset of records you want to work with from the table.
1. Double-click the query, if it isn’t open already.
2. Click the Home tab.
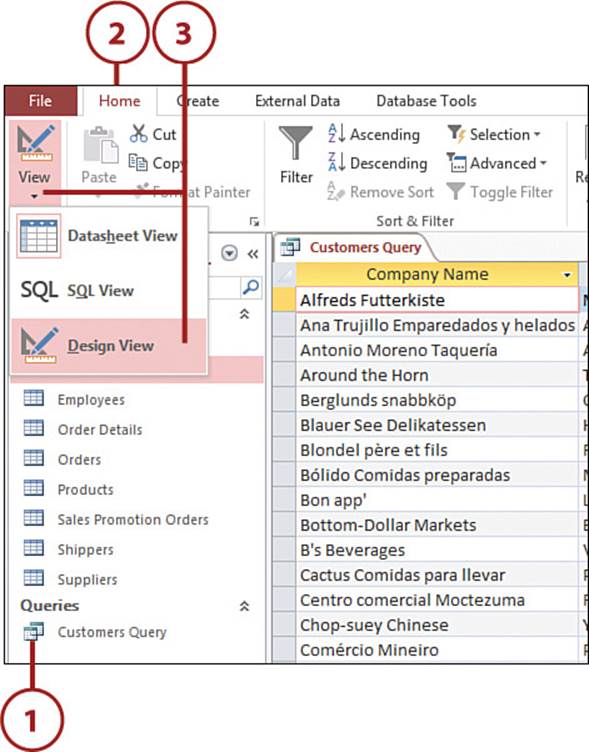
3. Click the bottom half of the View button and then click Design View. Access opens the query in Design view.
4. Click inside the Criteria row in the column that represents the field you want to use in your query expression.
5. Type the expression.
6. Click the Design tab.
7. Click Run. Access applies the criteria and displays the results.
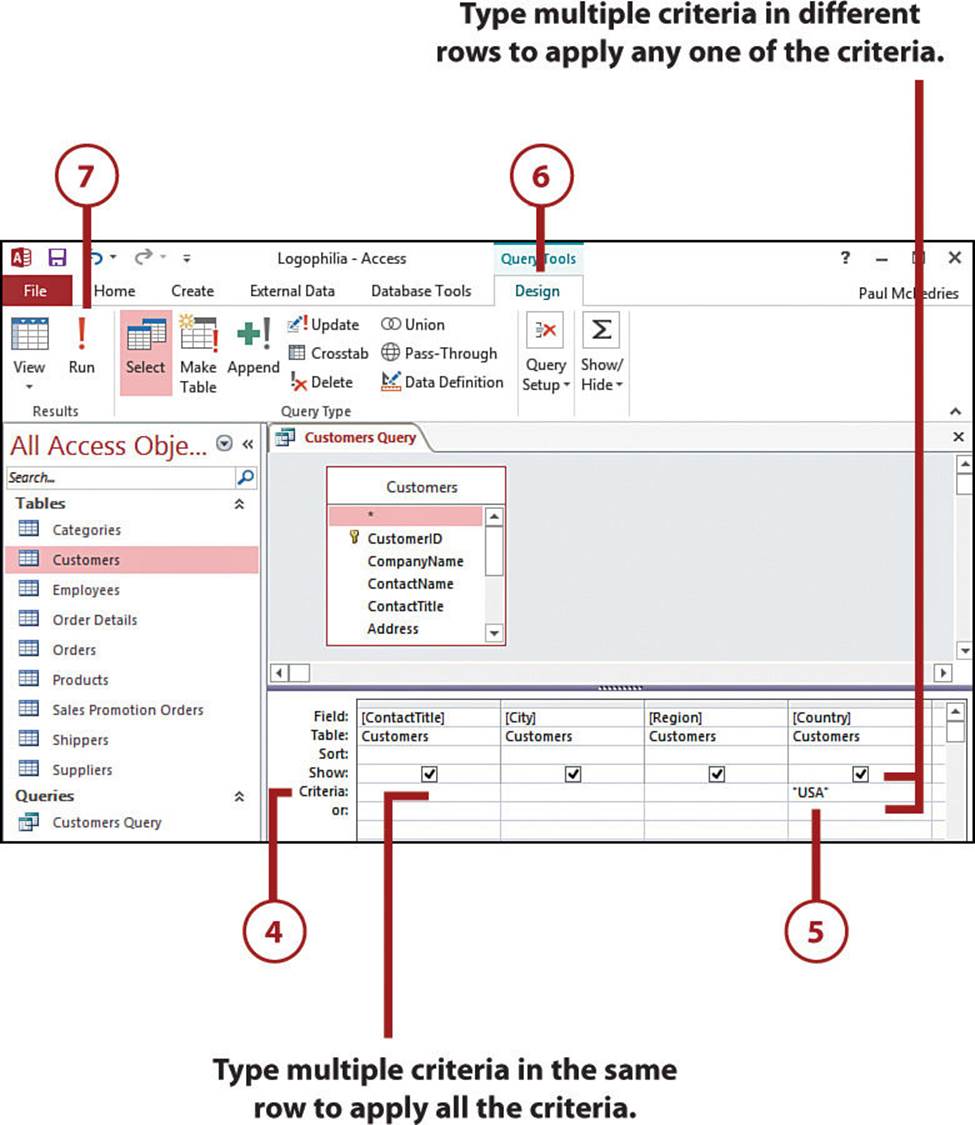
>>>Go Further: Specifying Multiple Criteria
Access allows you to enter more than one criteria expression. How you do this depends on whether you want Access to apply all the criteria you enter or any one of the criteria.
Applying all the criteria means that Access only matches records if they return true for every expression you enter. To apply all the criteria, enter each criteria expression in a single Criteria row. For example, if you enter “USA” in the Country field and Like “S*” in CompanyName field, Access returns all records where the Country field is USA and the CompanyName starts with S.
Applying any one of the criteria means that Access only matches records if they return true for at least one of the expressions you enter. To apply any one of the criteria, enter each criteria expression in a separate Criteria row. For example, if you enter “USA” in the Country field and “Canada” in a separate row of the Country field, Access returns all records where the Country field is either USA or Canada.
Creating Forms
After you use Access for a while, you quickly come to realize that using a datasheet to enter data into a table is not particularly efficient—you usually have to scroll to the right to get to all the fields, which means you cannot see the entire record on the screen—and the no-nonsense row-and-column format of the datasheet is serviceable but not at all attractive.
The datasheet is a reasonable tool if you are only entering one or two records, but if you are entering a dozen records or even a hundred, you need to leave the datasheet behind and use the Access data entry tool of choice: the form. A form is a collection of controls—usually labels and text boxes but also lists, check boxes, and option buttons—each of which represents either a field or the name of a field. As you see in this chapter, forms not only make data entry easier and more efficient, but thanks to Access’s large collection of formatting tools, they can also make data entry more attractive.
Create a Basic Form
By far the easiest way to create a form is to let Access do all the work for you by creating a basic form.
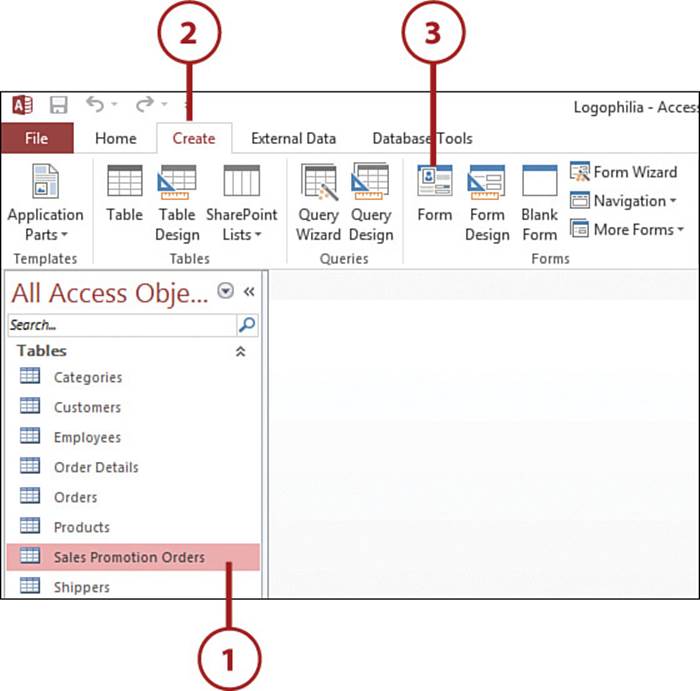
1. Click the table you want to use as the basis of the form.
2. Click the Create tab.
3. Click Form. Access creates and then displays the basic form.
4. Use the controls in the Format, Arrange, and Design tabs to customize the form as needed.
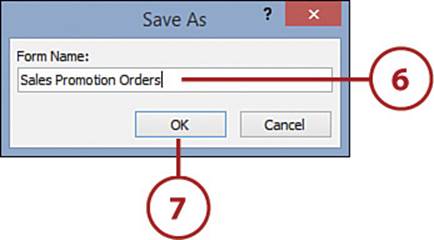
5. Click Save. Access prompts you to name the new form.
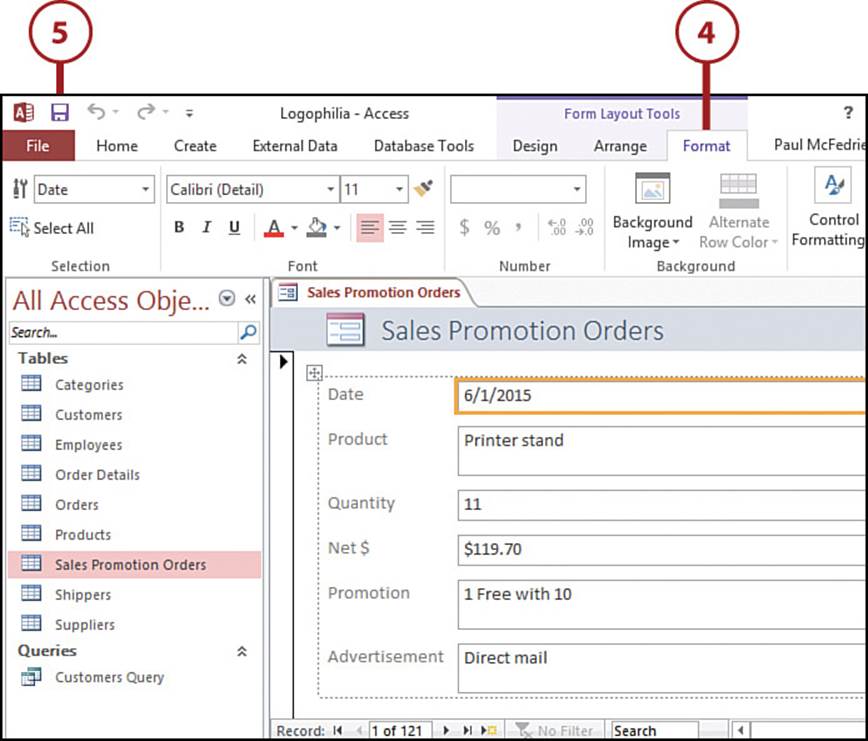
6. Type a name for the form.
7. Click OK.
Switching to Form View
Right now your basic form is open in Layout view, which makes it easy to edit and format the form. When you’re ready to use the form for data entry, you should switch to Form view by clicking the Home tab, clicking the lower half of the View button, and then clicking Form View.
Navigating Form Fields and Records
The basic form shows one record at a time and you can see all the table’s fields onscreen. This feature makes navigating the form fields and records using your mouse easy:
• To navigate to a field, click the field’s control (text box, list box, or whatever).
• To navigate records, use the navigation buttons at the bottom of the form. These are the same navigation buttons that appear at the bottom of a datasheet, so you use the same techniques.
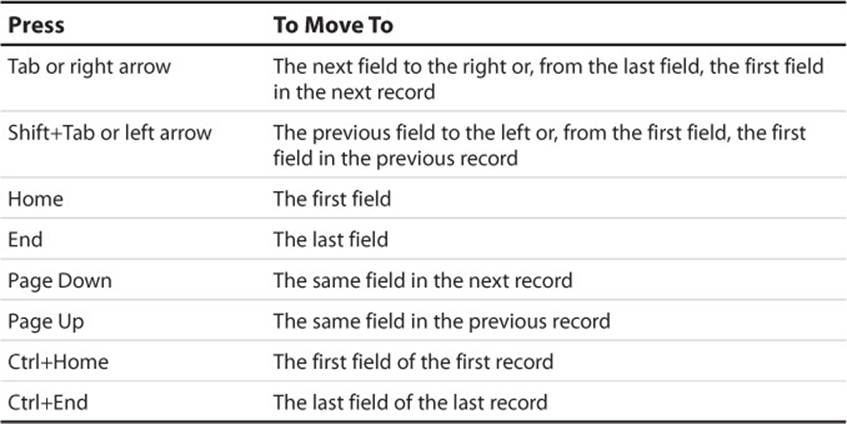
However, when entering data in a form, you’re most often using the keyboard, so navigating the fields and records using keyboard techniques is usually more efficient. Here are three basic techniques you should know:
• When you have finished typing data in a field, press Enter. This action causes the field to accept the data you entered into it and then moves the focus to the next field.
• Press Tab or Shift+Tab to move from field to field.
• When the focus is on the last field in the form, press Tab to move to the next record.
Otherwise, to navigate fields and records in a form you can use the keys outlined here:
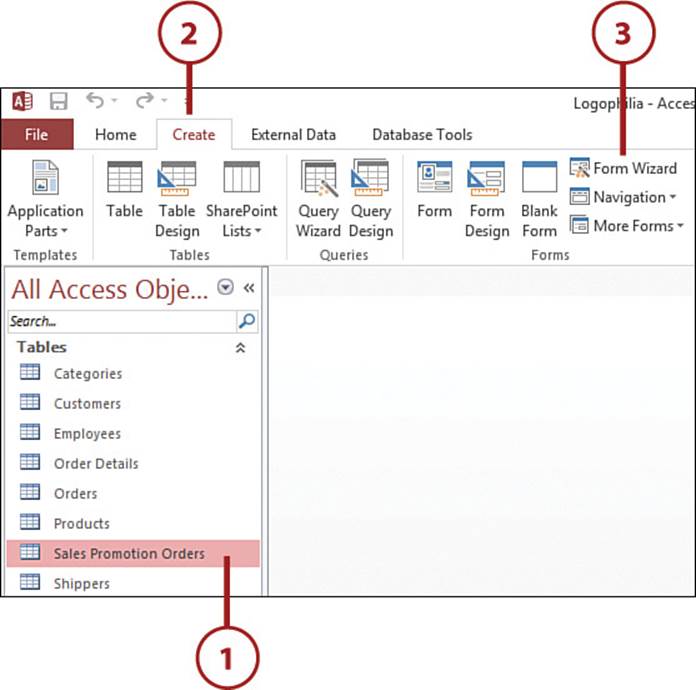
Run the Form Wizard
The basic form should be fine for most of your form needs, but it is likely that in some cases the resulting form will not be exactly what you require. For a bit more control over your forms, use the Form Wizard, which takes you step-by-step through the entire form-creation process.
1. Click the table you want to use as the basis of the form.
2. Click the Create tab.
3. Click Form Wizard. Access launches the Form Wizard.
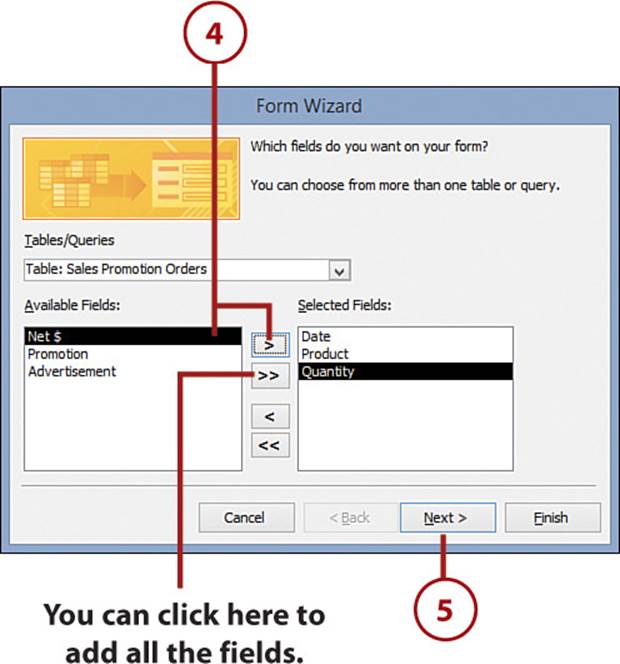
4. For each field you want to include in the form, click the field and then click Add.
5. When you are done, click Next.
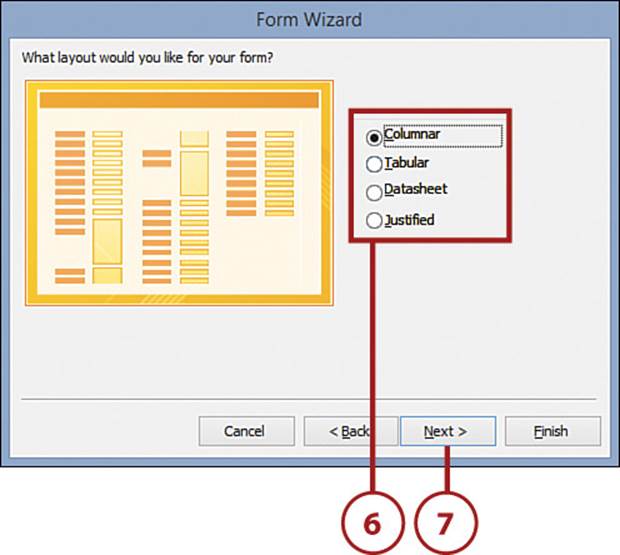
6. Select a layout for the form.
Form Wizard Layouts
In the Columnar layout, the fields are arranged in columns, and only one record is shown at a time (similar to the basic form layout you learned about earlier in this chapter). In the Tabular layout, the fields are arranged in a table, with the field names at the top and the records in rows. In the Datasheet layout, the fields are arranged in a datasheet configuration (like a table or the results of a query). In the Justified layout, the fields are arranged across and down the form with the field names above their respective controls.
7. Click Next.
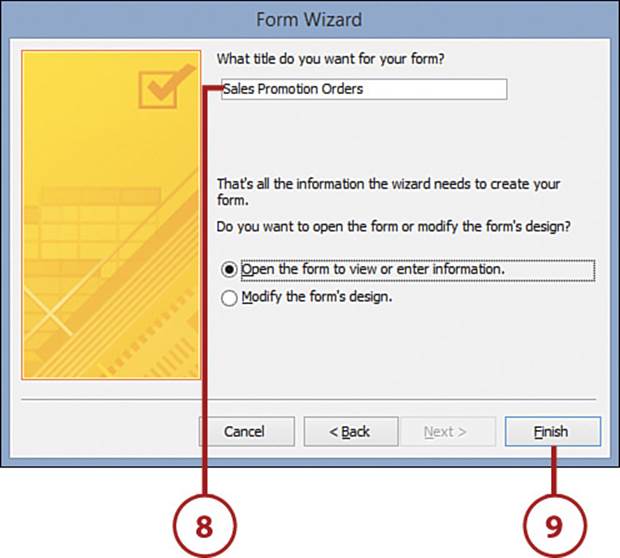
8. Type a name for the form.
9. Click Finish. Access creates the form and displays it.
Creating Reports
The various Access database objects have different purposes. Tables store data; queries analyze data; and forms ease data entry. When it comes time to display your data in its best light, you need to turn to another Access database object: the report. You use reports to organize your table or query data so that it makes sense to other people, and format it so that it is easy to read.
As you see in this section, building a report is not all that different from building a form. This is good news because, as explained earlier in this chapter, Access offers many tools for easing form creation, and that applies to reports as well.
Create a Basic Report
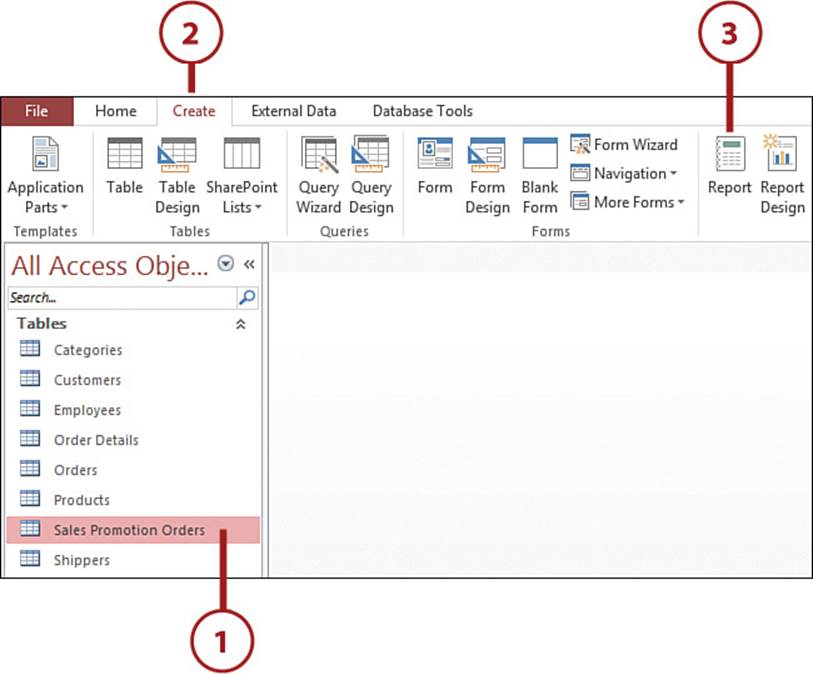
The easiest and fastest way to create a report is to let Access do the work by creating a basic report.
1. Click the table or query you want to use as the basis of the report.
2. Click the Create tab.
3. Click Report. Access creates and then displays the basic report.
4. Use the controls in the Design, Arrange, Format, and Page Setup tabs to customize the report as needed.
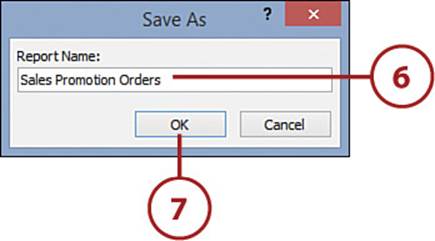
5. Click Save. Access prompts you to name the new report.
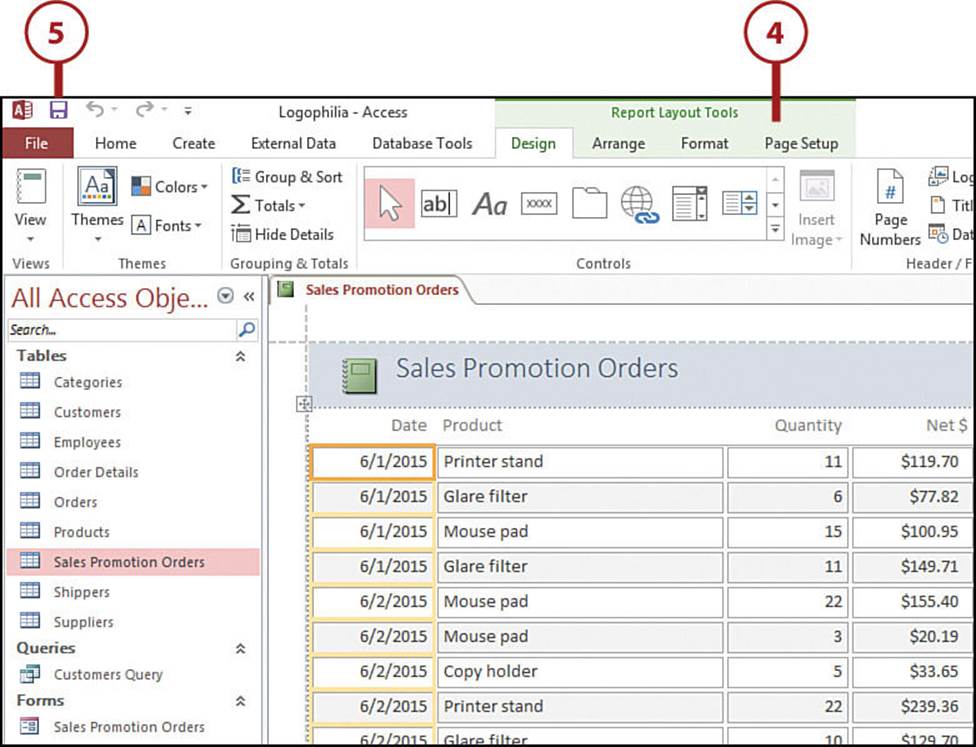
6. Type a name for the report.
7. Click OK.
Switching to Report View
When you first create the basic report, Access opens it in Layout view, which you use to edit and format the report. When you’re ready to view and print the report itself, you should switch to Report view by clicking the Home tab, clicking the lower half of the View button, and then clicking Report View.
Run the Report Wizard
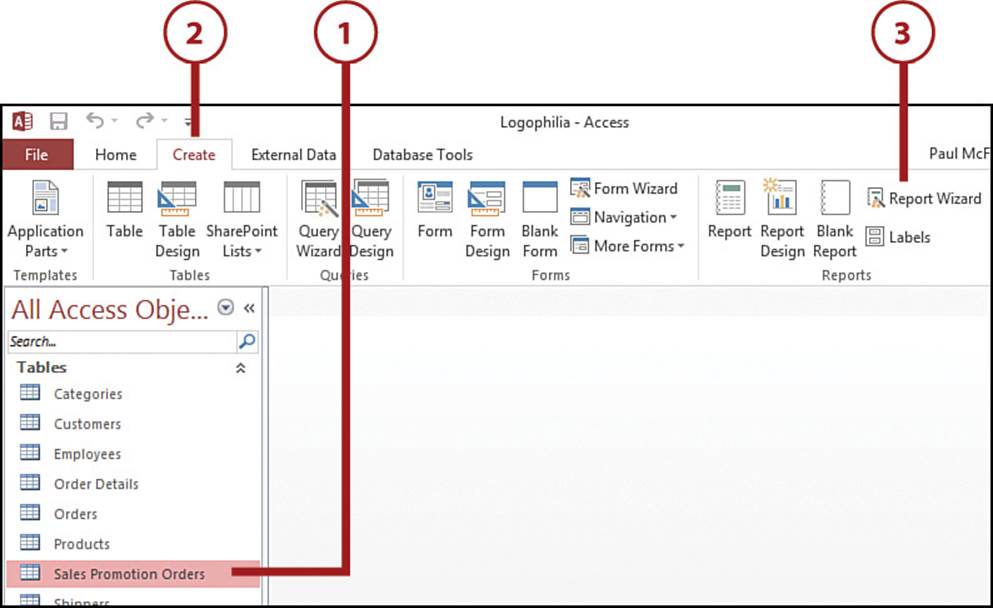
For a bit more control over your reports, use the Report Wizard, which takes you step-by-step through the report-creation process.
1. Click the table you want to use as the basis of the report.
2. Click the Create tab.
3. Click Report Wizard. Access launches the Report Wizard.
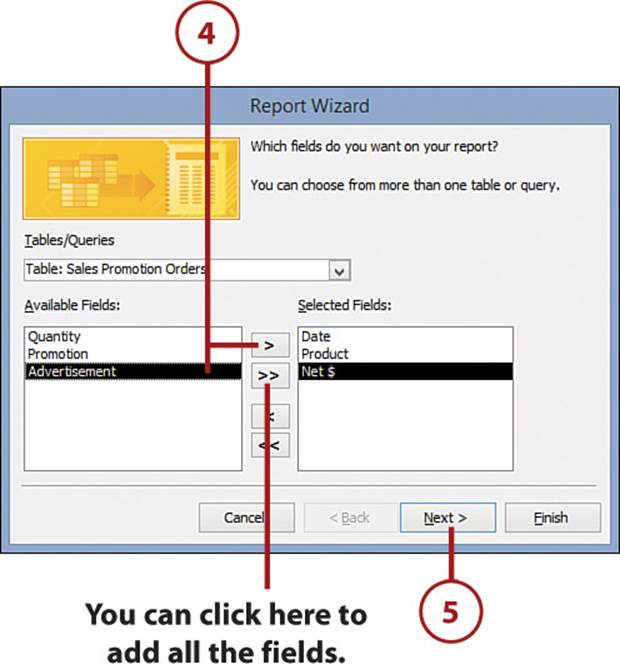
4. For each field you want to include in the report, click the field and then click Add.
5. When you are done, click Next.
6. If you want to group the report based on the values of a field, click the field and then click Add.
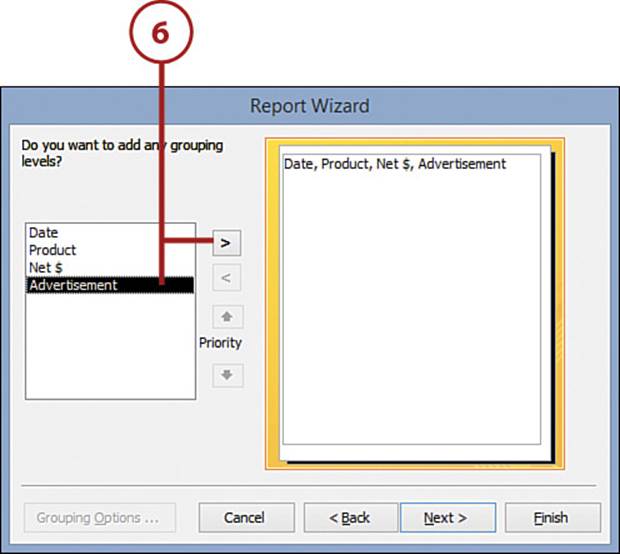
Grouping Levels
A grouping level is a field on which the report records are grouped. In the Sales Promotion Orders table, if you choose Advertisement as the grouping level, the records are grouped according to each unique advertisement item in that field.
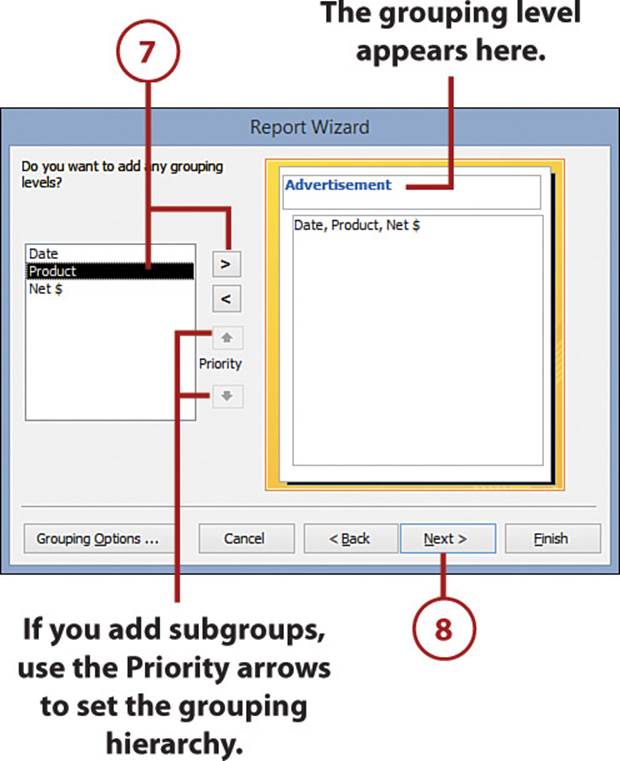
7. If you want to add a subgroup based on the values of a field, click the field and then click Add.
8. Click Next.
>>>Go Further: Creating Custom Grouping Levels
To create a custom grouping level, click the Grouping Options button; then use the Grouping intervals list to click a custom grouping level for each group-level field. For example, a text field enables you to group according to the first letter, first two letters, and so on; similarly, for a date field, you can group by week, month, quarter, and so on.
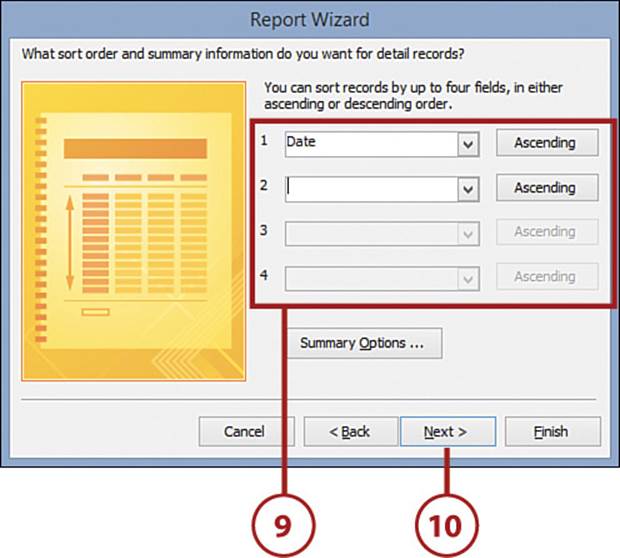
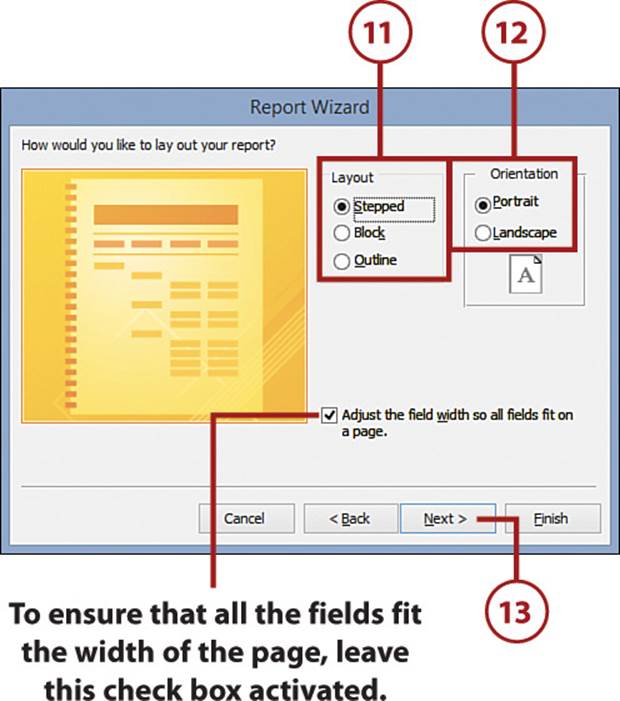
9. Use one or more of the four drop-down lists to choose a sort order for the records. For each field, you can also click the toggle button to choose Ascending or Descending.
10. Click Next.
11. Click the layout you want to use for the report.
12. Click the orientation you want to use for the report.
13. Click Next.
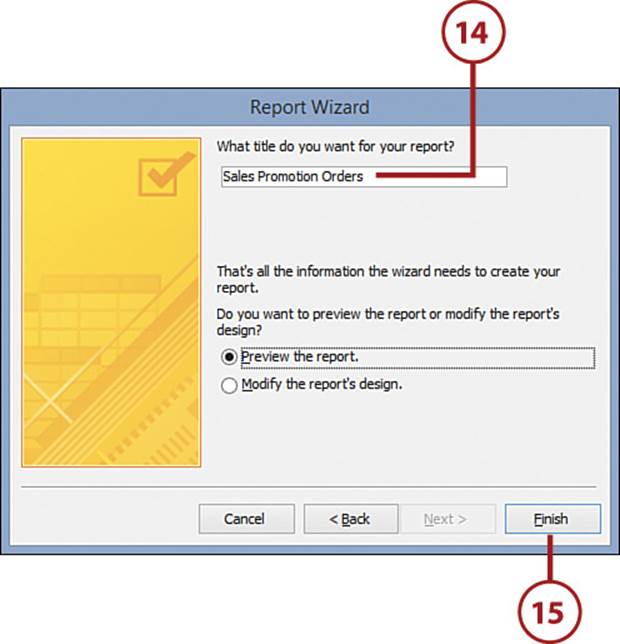
14. Type a name for the report.
15. Click Finish. Access creates the report and displays it.
All materials on the site are licensed Creative Commons Attribution-Sharealike 3.0 Unported CC BY-SA 3.0 & GNU Free Documentation License (GFDL)
If you are the copyright holder of any material contained on our site and intend to remove it, please contact our site administrator for approval.
© 2016-2026 All site design rights belong to S.Y.A.