My Office 2016 (2016)
3. Working with Office 2016 Graphics
In this chapter, you learn various techniques for drawing, inserting, and working with graphic objects, such as lines, photos, and clip art. Topics include the following:
![]() Drawing lines, rectangles, and circles
Drawing lines, rectangles, and circles
![]() Inserting photos, clip art, SmartArt graphics, and WordArt images
Inserting photos, clip art, SmartArt graphics, and WordArt images
![]() Selecting one or more graphic objects
Selecting one or more graphic objects
![]() Sizing, moving, and rotating graphic objects
Sizing, moving, and rotating graphic objects
![]() Applying styles and effects to graphic objects
Applying styles and effects to graphic objects
When most people think about using the Office 2016 applications, they generally think about text—writing sentences and paragraphs in Word, adding formulas and labels in Excel, creating slide titles and bullets in PowerPoint, and so on. It is certainly true that most of the work people do in Office 2016—from papers to purchase orders to presentations—is and should remain text based.
However, if you only think text when you think of Office, you’re missing out on a whole other dimension. All Office 2016 applications have extensive graphics tools that you can take advantage of to improve the clarity of your work or just to add a bit of pizzazz to liven up an otherwise drab document.
Even better, these graphics tools work the same across applications, so once you learn how to use them, you can apply your knowledge to any program. This chapter shows you how to create, edit, and enhance graphics in the Office 2016 applications.
Working with Shapes
A shape is an object such as a line or rectangle that you draw within your document. You can use shapes to point out key features in a document, enclose text, create flowcharts, and enhance the look of a document. In Office 2016, you can use eight shape types:
• Lines—Straight lines, squiggles, free-form polygons, arrows, connectors, and curves
• Basic shapes—Rectangles, triangles, circles, boxes, cylinders, hearts, and many more
• Block arrows—Two-dimensional arrows of various configurations
• Equation shapes—Two-dimensional images for the basic arithmetic symbols, such as plus (+) and equals (=)
• Flowchart—The standard shapes used for creating flowcharts
• Callouts—Boxes and lines for creating callouts to document features
• Stars and banners—Stars, starbursts, scrolls, and more
• Action buttons (PowerPoint only)—Buttons such as forward and backward that represent standard slide show actions
Inserting a Line
You can use lines to point out important document information, to create a free-form drawing, or as part of a more complex graphic, such as a company logo.
1. Click the Insert tab. In OneNote, select the Draw tab instead.
2. Click Shapes and then select the shape you want from the Lines section.
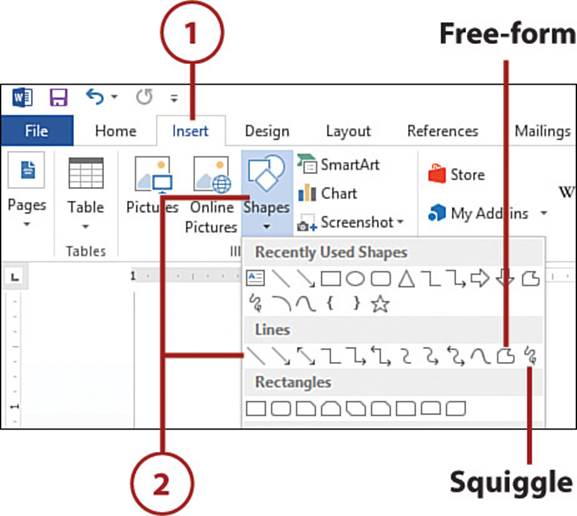
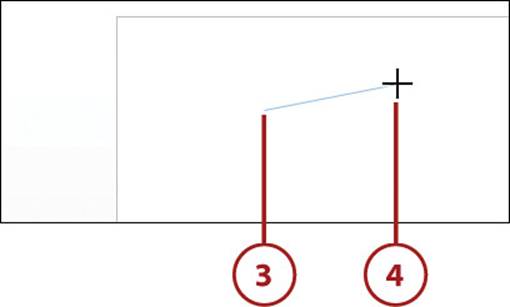
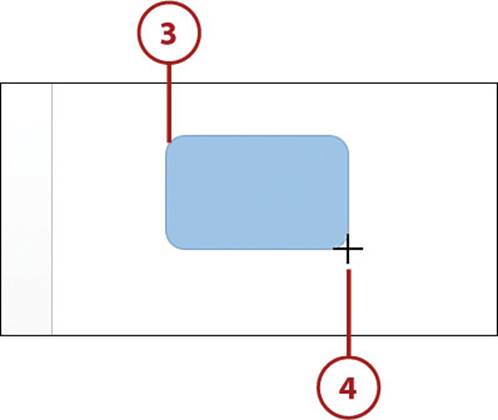
3. Position the crosshair where you want to start drawing the line.
4. Drag to where you want the line to end and then release. If you’re drawing a squiggle, drag in the shape of the line you want.
Taming Your Lines
You can restrict straight lines and arrows to horizontal, vertical, and 45-degree angles by holding down the Shift key while you drag the screen.
>>>Go Further: Drawing a Free-form Polygon
The Lines section of the Shapes gallery includes a Freeform icon that enables you to draw a free-form polygon, which is really just a series of connected lines that create a closed shape. To draw a free-form polygon, follow steps 1 to 4 to create the first side of the shape. Then, click where you want each subsequent side to end. When you’re done, double-click the screen.
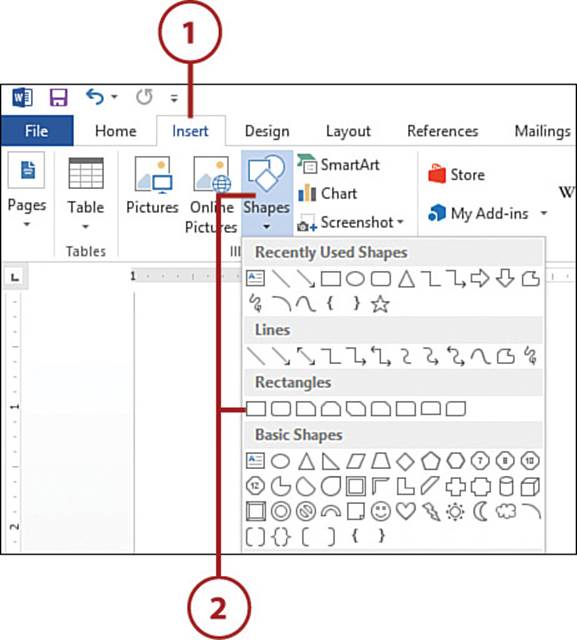
Inserting Any Other Shape
You can use the other shapes either on their own—for example, to point out features with callouts or block arrows or to enhance text with stars or banners—or as part of a more complex graphic.
1. Click the Insert tab. In OneNote, select the Draw tab instead.
2. Click Shapes and then select the shape you want to insert.
3. Position the crosshair where you want to start drawing the shape.
4. Drag until the shape has the size and form you want and then release.
Drawing Squares and Circles
You can make your rectangles square, your ellipses circular, and your angled lines 45 degrees, by holding down the Shift key while you drag the screen.
Inserting Images
Although the shape tools that come with the Office 2016 applications are handy for creating simple graphics effects, your document might require something more ambitious or specific. Office 2016 can help here, too, by offering several types of images that you can insert:
• Picture—You can enhance the visual appeal and strengthen the message of a document by adding a picture to the file. The Office 2016 applications can work with the most popular picture formats, including BMP, JPEG, TIFF, PNG, and GIF. This means that you can insert almost any photo that you have stored on your computer.
• Clip art—This refers to small images or artwork that you can insert into your documents. Office 2016 doesn’t come with its own clip art, but it does give you access to online clip art via the Bing Image Search tool.
• SmartArt—You use these graphics to help present information in a compact, visual format. A SmartArt graphic is a collection of nodes—shapes with some text inside—that enables you to convey information visually. For example, you can use a SmartArt graphic to present a company organization chart, the progression of steps in a workflow, the parts that make up a whole, and much more.
• Text box—The graphics you add to your documents will usually consist of images, but sometimes you need to augment those images with text. For example, you might want to add a title and subtitle or insert a label. To add text to an existing image, you draw a text box and then type your text within that box.
• WordArt—You can add some pizzazz to your documents by inserting a WordArt image, which is a graphic object that contains text stylized with shadows, outlines, reflections, and other predefined effects. WordArt images enable you to apply sophisticated and fun effects to text with just a few clicks. However, some of the more elaborate WordArt effects can make text difficult to read, so make sure that whatever WordArt image you use does not detract from your document message.
Inserting a Picture
If you have a photo or other image on your computer that you think would add just the right touch, you can insert it into your document.
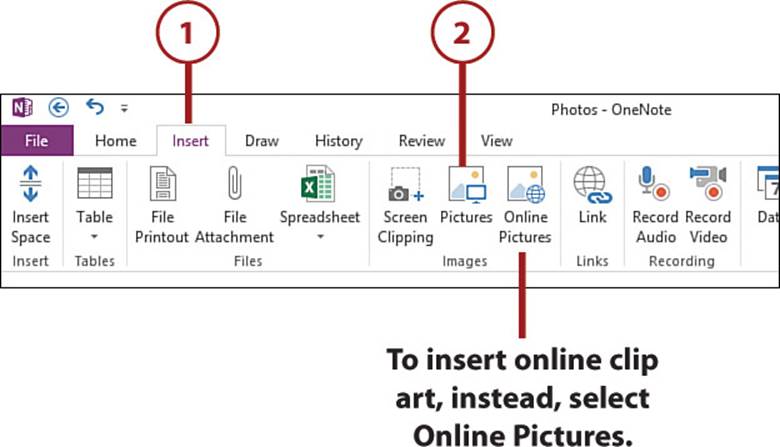
1. Click the Insert tab.
2. Click Pictures to open the Insert Picture dialog box.
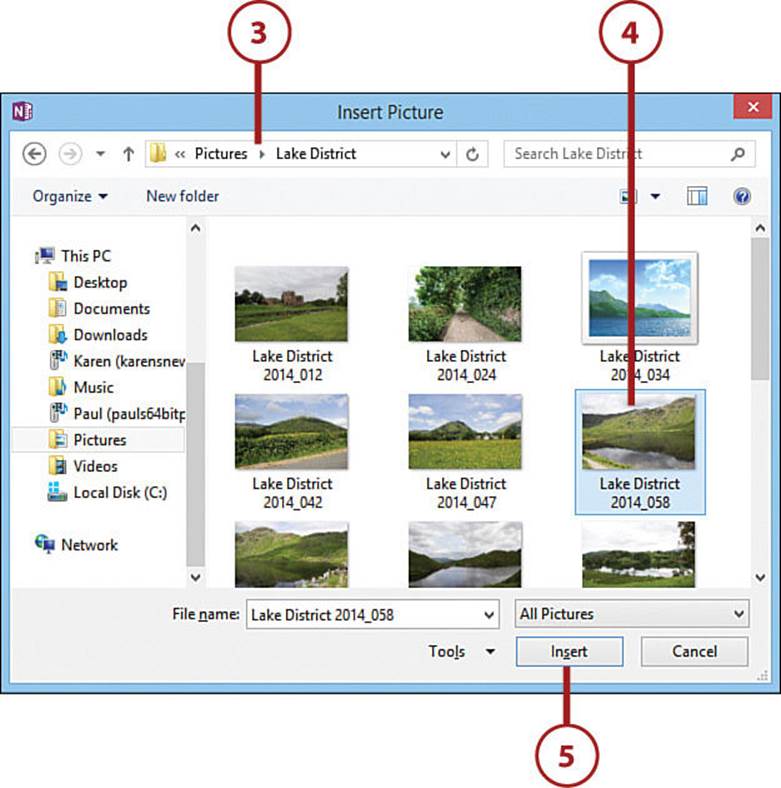
3. Open the folder that contains the picture you want to insert.
4. Click the picture.
5. Click Insert. The Office 2016 application inserts the picture into the document.
>>>Go Further: Linking to the Picture
In Word, Excel, or PowerPoint, you can set up a link between the inserted picture and the original file, so that any changes you make to the original are automatically reflected in the document copy. Follow steps 1 to 4 to select the picture in the Insert Picture dialog box and then open the drop-down menu on the Insert menu.
If you want to keep your document size small, select Link to File to insert the picture as a link to the original file. Use this command when you want edits to the original file to be updated in your document, but you don’t want a copy of the picture in the document. Note, however, that if you send the file to someone (say, via email or over a network), that person will not see the image unless he or she has the same image located in the same folder.
Alternatively, select Insert and Link to insert a copy of the picture into the document and maintain a link to the original file. Use this command when you want edits to the original file to be updated in your document, but you also want a copy within the document just in case the original is deleted.
Understanding SmartArt Graphics
One of the most impressive of the Office 2016 graphics features is support for the SmartArt format, which is based on the XML (Extensible Markup Language) standard. A SmartArt graphic is a collection of nodes—shapes with some text inside—that enable you to convey information visually. You use SmartArt to illustrate concepts in seven main categories:
• List—These are concepts that are sequential or that form a progression or a group. Most of these SmartArt graphics consist of shapes arranged in vertical or horizontal lists.
• Process—These are concepts that progress from one stage to another, where the overall progress has a beginning and an end. In most of these SmartArt graphics, each stage is represented by a shape and accompanying text, and one-way arrows lead you from one shape to the next.
• Cycle—These are concepts that progress from one stage to another in a repeating pattern. In most of these SmartArt graphics, each stage is represented by a shape and accompanying text, and one-way arrows lead you from one shape to the next. The most common structure is a circle, with the last stage leading back to the first stage.
• Hierarchy—These are concepts that either show the relative importance of one thing over another or show how one thing is contained within another. These SmartArt graphics look like organization charts.
• Relationship—These are concepts that show how two or more items are connected to each other. In most of these SmartArt graphics, each item is represented by a shape and accompanying text, and all the shapes either reside within a larger structure, such as a pyramid, or are positioned relative to one another, such as in a Venn diagram.
• Matrix—These are concepts that show the relationship between the entirety of something and its components, organized as quadrants. These SmartArt graphics have one shape that represents the whole and four shapes that represent the component quadrants.
• Pyramid—These are concepts with components that are proportional to each other or interconnected in some way. In most of these SmartArt graphics, the component shapes are arranged in a triangle pattern.
Inserting a SmartArt Graphic
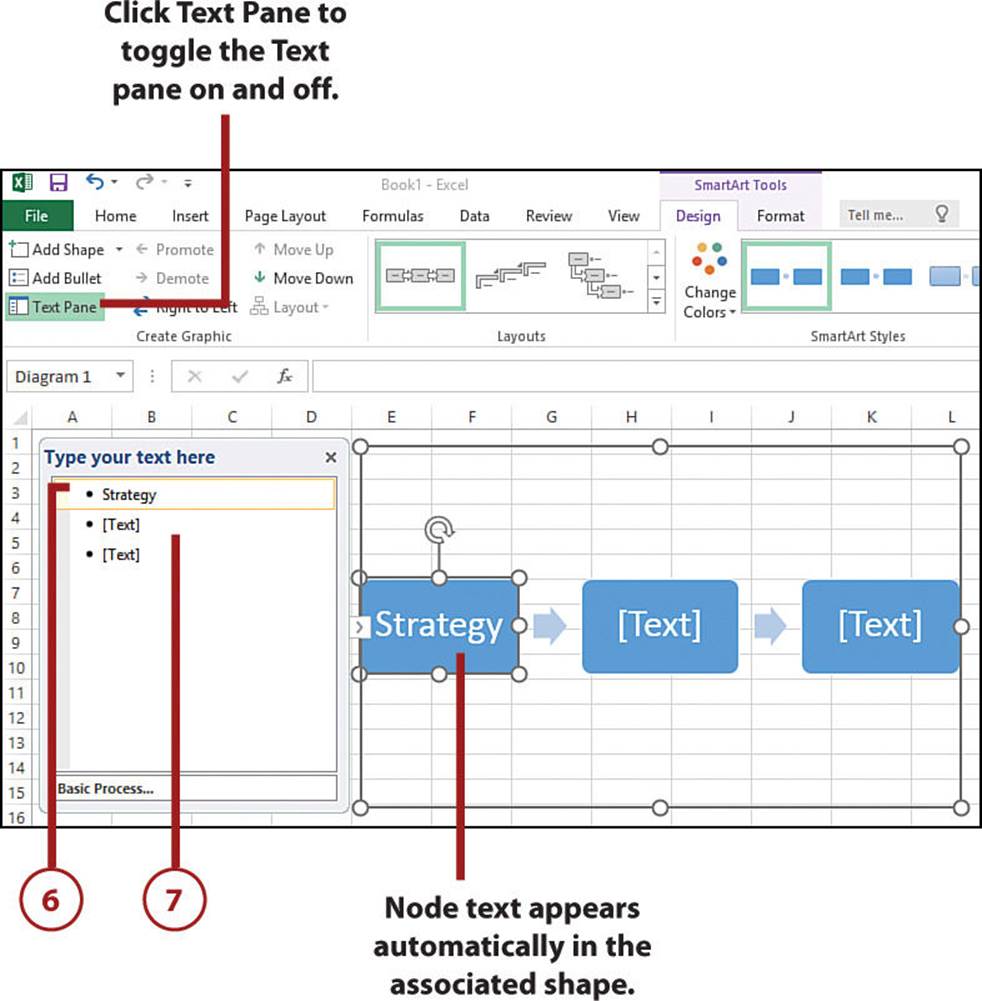
To build a SmartArt graphic, you use the Text pane to add text to each node as well as add and delete nodes.
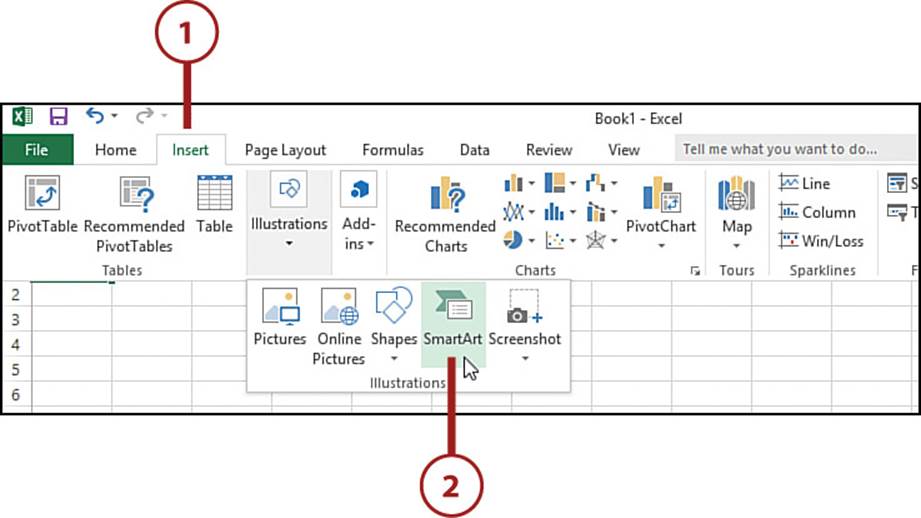
1. Click the Insert tab.
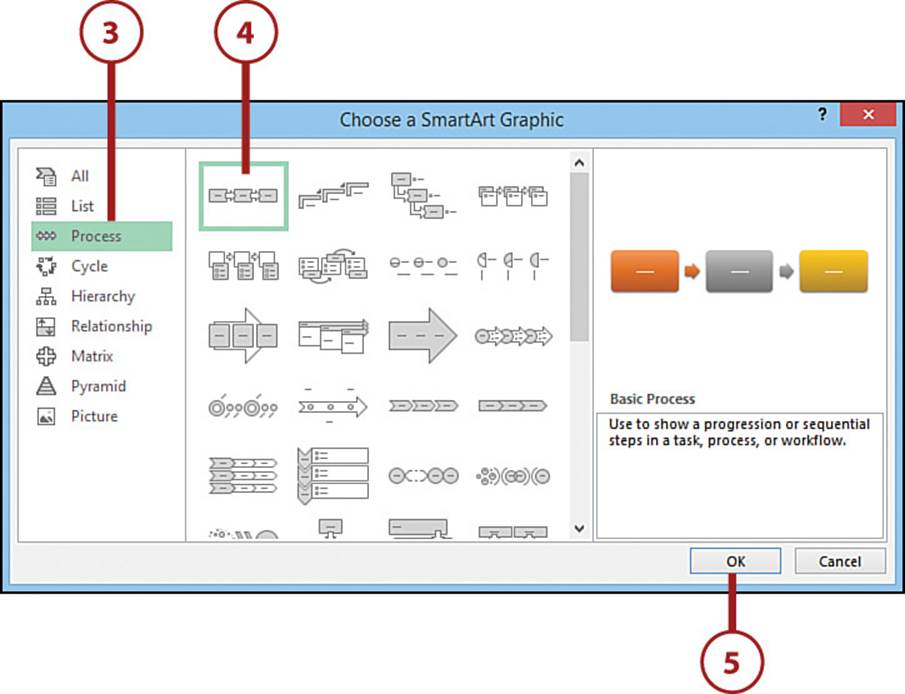
2. Click SmartArt to open the Choose a SmartArt Graphic dialog box.
Locating SmartArt
Depending on the width of your application window, you might need to click Illustrations to see the SmartArt command.
3. Click a SmartArt category.
4. Click the SmartArt style you want to use.
5. Click OK to add the SmartArt graphic to the document.
6. Click a node in the Text pane and then type the text that you want to appear in the node.
7. Repeat step 6 to fill in the other nodes in the SmartArt graphic.
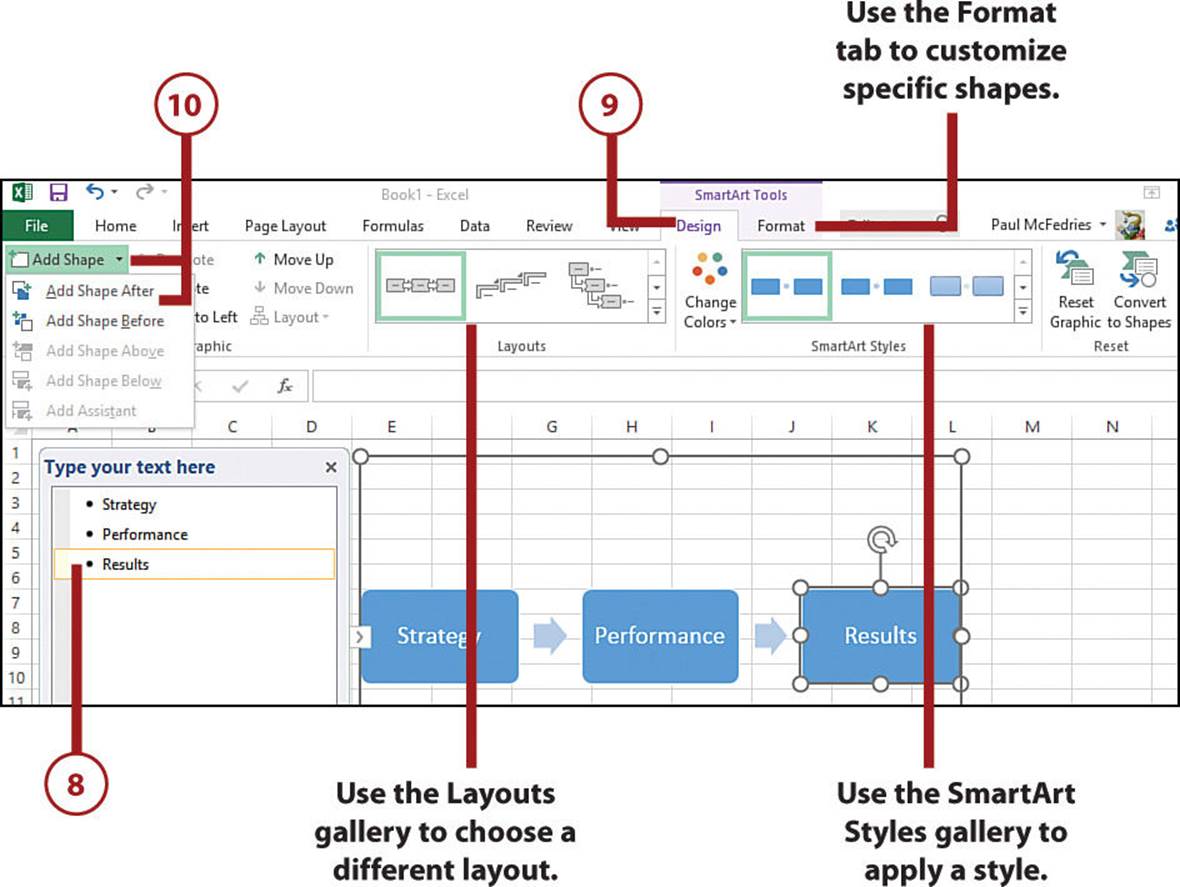
8. To add a node to the SmartArt graphic, select the existing node you want the new node to come before or after.
9. Click the Design tab.
10. Click Add Shape and then select either Add Shape After or Add Shape Before.
Deleting Nodes
To remove a node from the SmartArt graphic, click and hold (or right-click) the node for a few seconds; then select Cut in the shortcut menu that appears.
Inserting WordArt
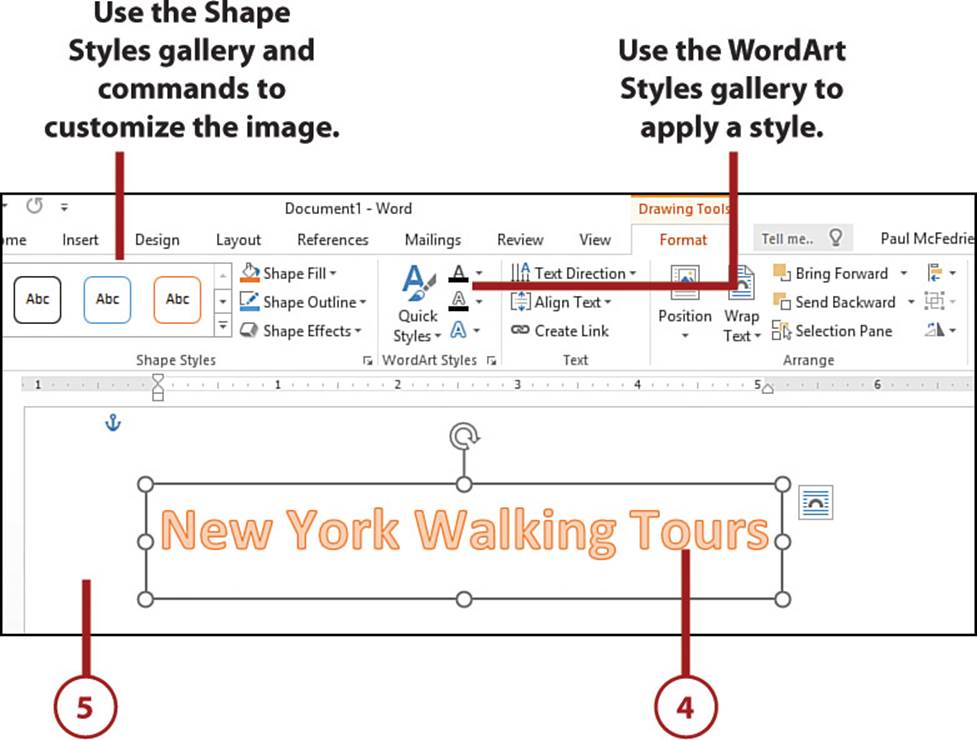
WordArt takes a word or phrase and converts it into a graphic object that applies artistic styles, colors, and shapes to the text. WordArt is therefore useful for newsletter titles, logos, and any time you want text to really stand out from its surroundings.
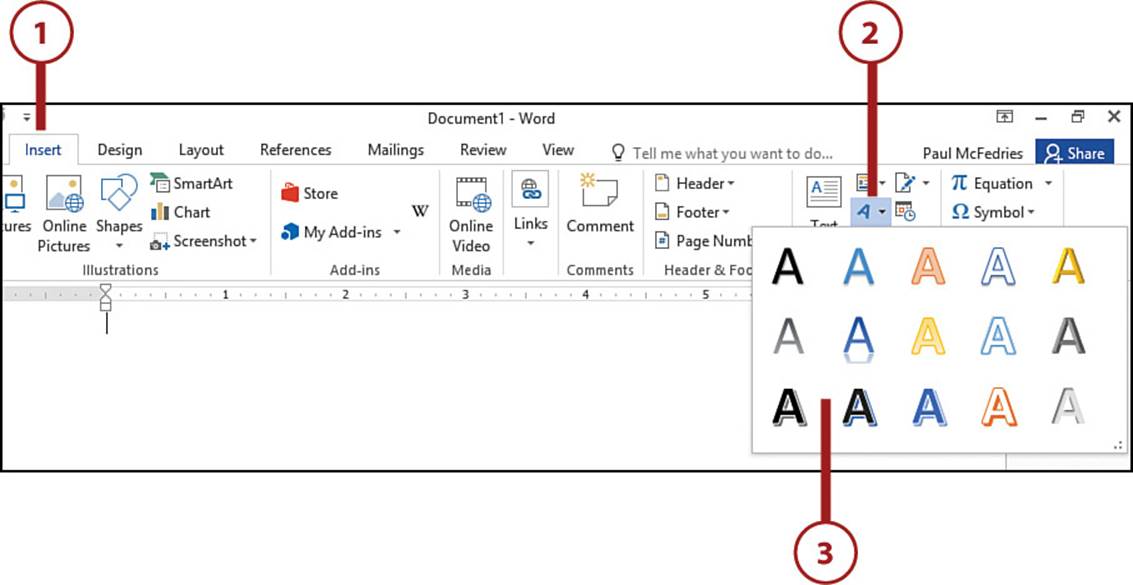
1. Click the Insert tab.
2. Click WordArt to open the WordArt gallery.
3. Click the WordArt style you want to use. The Office 2016 application adds the WordArt image to the document.
4. Type the text that you want to appear in the WordArt image.
5. Click outside the image to set it.
>>>Go Further: Adding a Text Box
The graphics you add to your documents will usually consist of images, but sometimes you need to augment those images with text. For example, you might want to add a title and subtitle or insert a label. If a WordArt image seems like overkill for this, a better alternative is to draw a text box and then type your text within that box.
To add a text box, select Insert, Text Box, use the mouse to drag until the text box has the size and form you want, and then type your text in the box.
Formatting and Editing Graphic Objects
Inserting a line, shape, picture, or other graphic object is usually only half the battle. To complete your work with the graphic, you usually need to spend a bit of time formatting and editing the object to get it just right. This may include some or all of the following: sizing the graphic; rotating it; moving it; grouping or aligning it with other objects; and formatting the object’s fill, lines, and shadow effects. The rest of this chapter provides you with the details of these and other techniques for working with graphic objects.
Selecting Graphic Objects
Every graphic object has an invisible rectangular frame. For a line or rectangle, the frame is the same as the object itself. For all other objects, the frame is a rectangle that completely encloses the shape or image. Before you can format or edit a graphic object, you must select it, which displays selection handles around the frame.
If you just want to work with a single object, you can select it by clicking it. If you need to work with multiple objects, Office 2016 gives you a number of methods, and the one you choose depends on the number of objects and their layout within the document:
• The simplest scenario is when you have just a few objects to select. In this case, hold down the Ctrl key and click each object. If you click an object by accident, keep the Ctrl key held down and click the object again to deselect it.
• To select a few objects, you can “lasso” the objects, as described in the next section.
• To select all the objects in a document, select one and then press Ctrl+A.
Lassoing Graphic Objects
Lassoing graphic objects is done by using the mouse to draw a rectangle around the objects you want to select. Use this technique when the objects you want are located near each other.
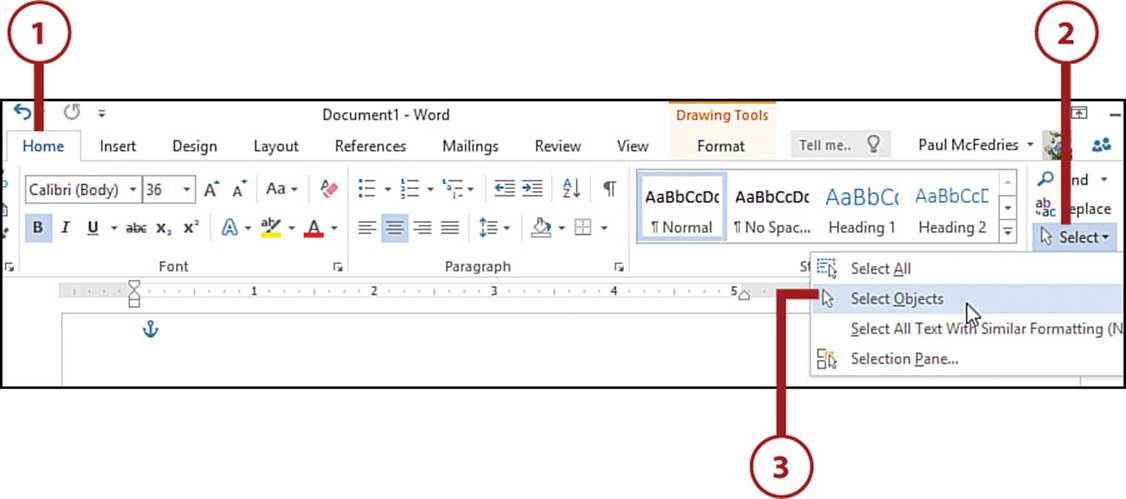
1. Click the Home tab.
2. Click Select.
3. Click Select Objects.
Lassoing Objects in Excel
To lasso objects in Excel, select the Home tab, Find & Select, and then click Select Objects.
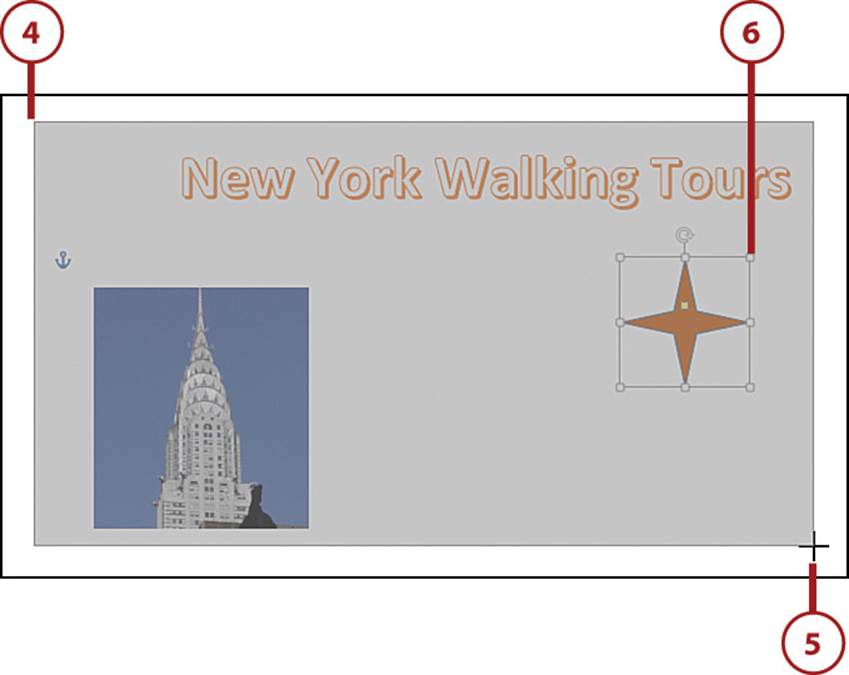
4. Position the mouse pointer at the upper-left corner of the area you want to select.
5. Click and drag to the lower-right corner of the area you want to select. As you drag, the program indicates the selected area with a dashed border.
6. When the selection area completely encloses each object you want to select, release the screen. Excel places selection handles around each object in the selection area.
Sizing a Graphic Object
If a graphic is too large or too small for your needs, or if the object’s shape is not what you want, you can size the image to change its dimensions or its shape. You might want to size a graphic so that it fits within an open document area.
1. Click the graphic you want to size.
2. To adjust the width of the graphic, drag the left or right handle.
3. To adjust the height of the graphic, drag the top or bottom handle.
4. To adjust the width and height at the same time, drag a corner handle.

Sizing Multiple Sides
To size the graphic on two sides at once, hold down Ctrl while you drag any corner handle. Similarly, you can size the left and right sides simultaneously by holding down Ctrl while dragging a side handle; you can size the top and bottom sides simultaneously by holding down Ctrl while dragging the top or bottom handle.
Moving a Graphic Object
To ensure that a graphic is ideally placed within a document, you can move the graphic to a new location. For example, you might want to move a graphic so that it does not cover existing document text.
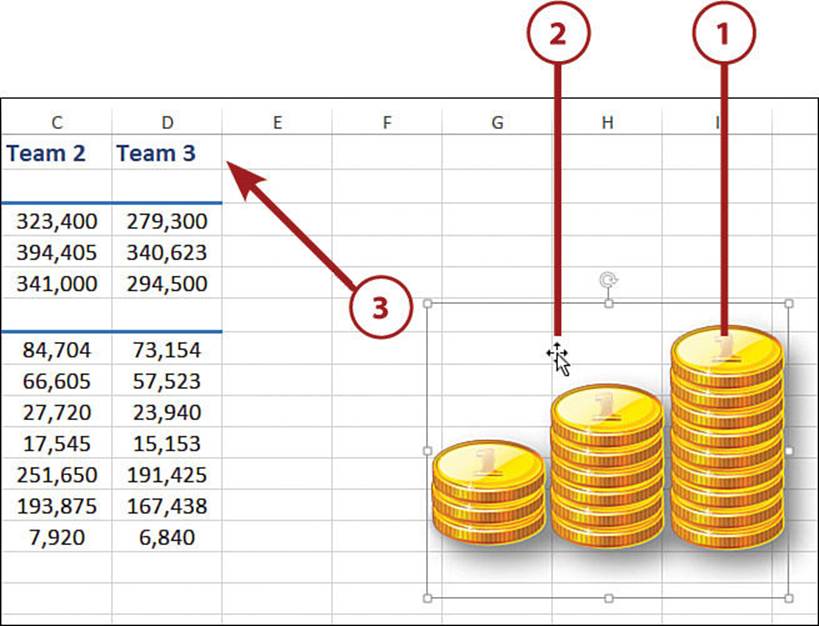
1. Click the graphic you want to move.
2. Place the mouse pointer in the middle of the object. Make sure you don’t place the mouse pointer over any of the object’s sizing handles.
3. Drag the object to the position you want.
Horizontal or Vertical Moves
To move a graphic object only horizontally or vertically, hold down the Shift key while dragging it.
Rotating a Graphic Object
Most graphic objects get inserted into a document without any rotation: Horizontal borders appear horizontal, and vertical borders appear vertical. A nonrotated image is probably what you want most of the time, but for some occasions an image tilted at a jaunty angle is just the right touch for a document. Many objects come with a rotation handle that you can use to rotate the object clockwise or counterclockwise.
1. Click the graphic you want to rotate.
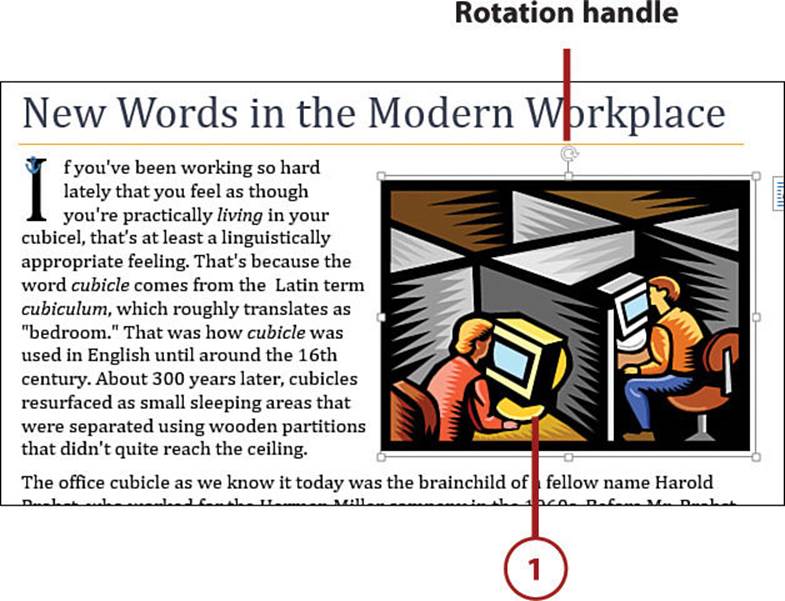
2. Use the mouse pointer to drag the rotation handle. Drag the handle clockwise to rotate the graphic clockwise; drag the handle counterclockwise to rotate the graphic counterclockwise.

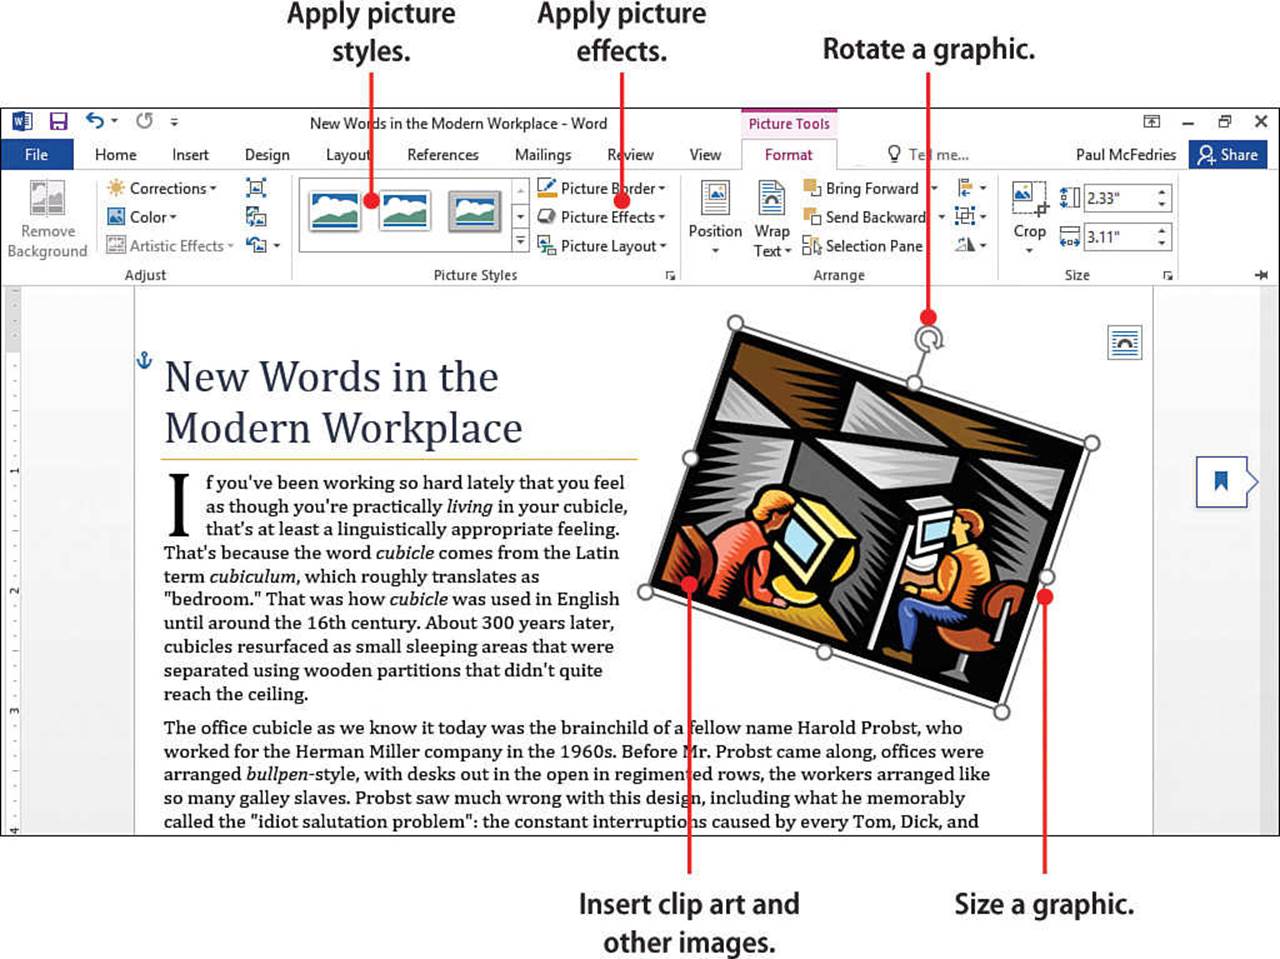
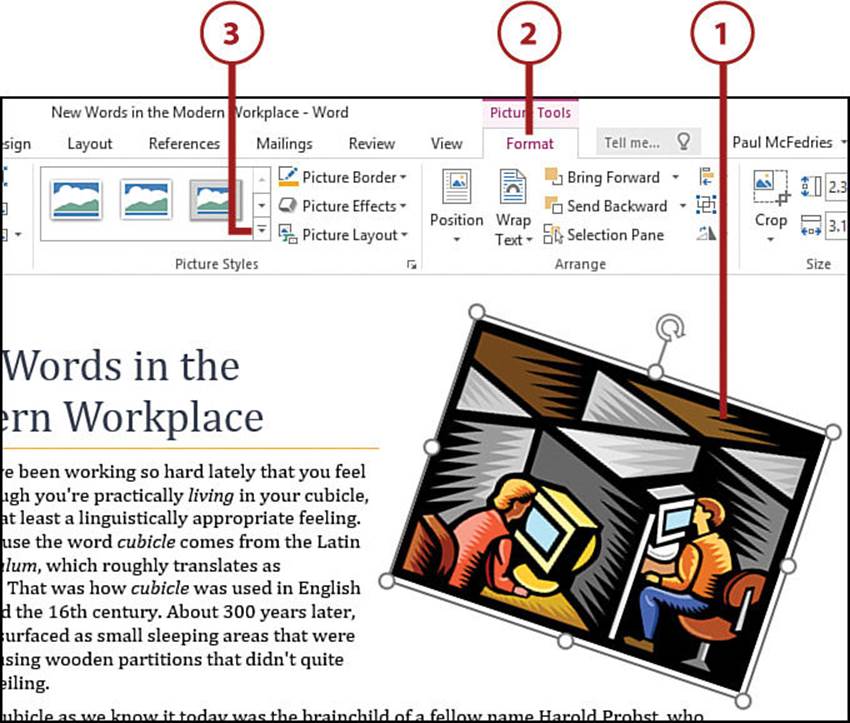
Formatting a Graphic Object
You can enhance your shapes, clip art, photos, WordArt images, and SmartArt graphics by formatting the images. For example, the Office 2016 applications offer more than two dozen picture styles, which are predefined formats that apply various combinations of shadows, reflections, borders, and layouts. Office 2016 also offers a dozen picture effects, which are preset combinations of special effects, such as glows, soft edges, bevels, and 3-D rotations.
1. Click the picture you want to format.
2. Click the Format tab.
3. Click More Picture Styles. The Picture Styles gallery appears.
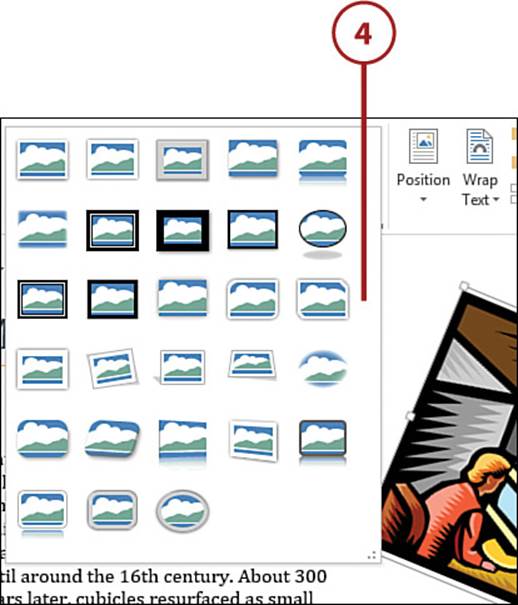
Picture Style Preview
You can get a preview of what the style’s effect will be on your graphic by hovering the mouse pointer over the style.
4. Click the picture style you want to use. The application applies the Quick Style to the picture.
5. Click Picture Effects. If the image is a shape, select Shape Effects instead.
6. Click Preset.
7. Click the effect you want to apply. The application applies the effect to the picture.
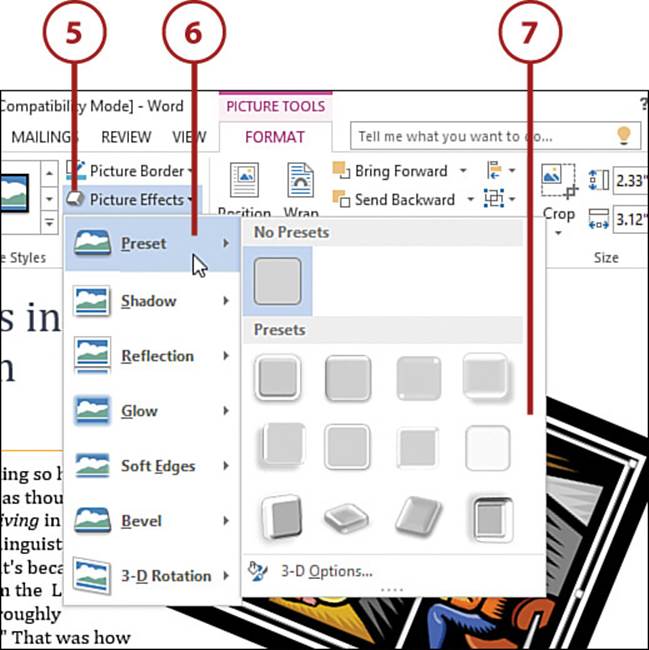
>>>Go Further: More Effects
To gain maximum control over your graphic effects, select the object and then select Picture Effects (or Shape Effects). You can then use the six effect categories—Shadow, Reflection, Glow, Soft Edges, Bevel, and 3-D Rotation—to apply specific effects to the image.
It’s Not All Good: Reverting to the Original
After playing around with a graphic, you might end up with a bit of a mess. If you don’t like the formatting that you’ve applied to a graphic, you can return the picture to its original look and start over. If you haven’t performed any other tasks since applying the formatting, select Undo (or press Ctrl+Z) until the application has removed the formatting. Otherwise, select the Format tab, select Picture Effects (or Shape Effects), select Preset, and then select the icon in the No Presets section. To reverse all the changes made to a picture since you inserted the image, select the picture, select Format, and then select Reset Picture.
All materials on the site are licensed Creative Commons Attribution-Sharealike 3.0 Unported CC BY-SA 3.0 & GNU Free Documentation License (GFDL)
If you are the copyright holder of any material contained on our site and intend to remove it, please contact our site administrator for approval.
© 2016-2026 All site design rights belong to S.Y.A.