My Office 2016 (2016)
4. Working with Text in Word
In this chapter, you learn about working with text in Word, including entering and editing text, inserting symbols and tabs, and checking your work for spelling and grammatical mistakes. Topics include the following:
![]() Entering and editing Word text
Entering and editing Word text
![]() Inserting foreign characters and other symbols
Inserting foreign characters and other symbols
![]() Adding tabs and headings
Adding tabs and headings
![]() Finding and replacing document text
Finding and replacing document text
![]() Checking for spelling and grammar errors
Checking for spelling and grammar errors
All the Office 2016 applications require at least some written input. From worksheet titles and labels in Excel to slide headings and bullets in PowerPoint to page snippets and lists in OneNote, you always end up working with text in one form or another when you work with Office 2016. However, when you have some real writing to do, the Office 2016 tool of choice is, of course, Word and its word processing pedigree. Whether you’re firing off a 3-page memo to the troops or putting together a 300-page book, Word can handle any text task you throw at it.
Word is loaded with useful and powerful features that can help you to not only create beautiful documents, but also create those documents in record time. The next few chapters are designed to introduce you to these features and other techniques for getting the most out of Word. This chapter gets you off to a good start by examining a number of handy and powerful techniques for entering and editing text in Word.
Learning Text Basics
Fritterware refers to software programs that contain so many bells and whistles that you can’t help but fritter away huge amounts of time trying out different options and features. Word is a big, complex program, so it certainly qualifies as fritterware, particularly when it comes to formatting your work. Even so, you still probably spend the bulk of your Word time entering text, which means you can become immediately more productive if you learn a few techniques for making text entry easier and faster. The next few sections help you do just that.
Enter and Edit Text
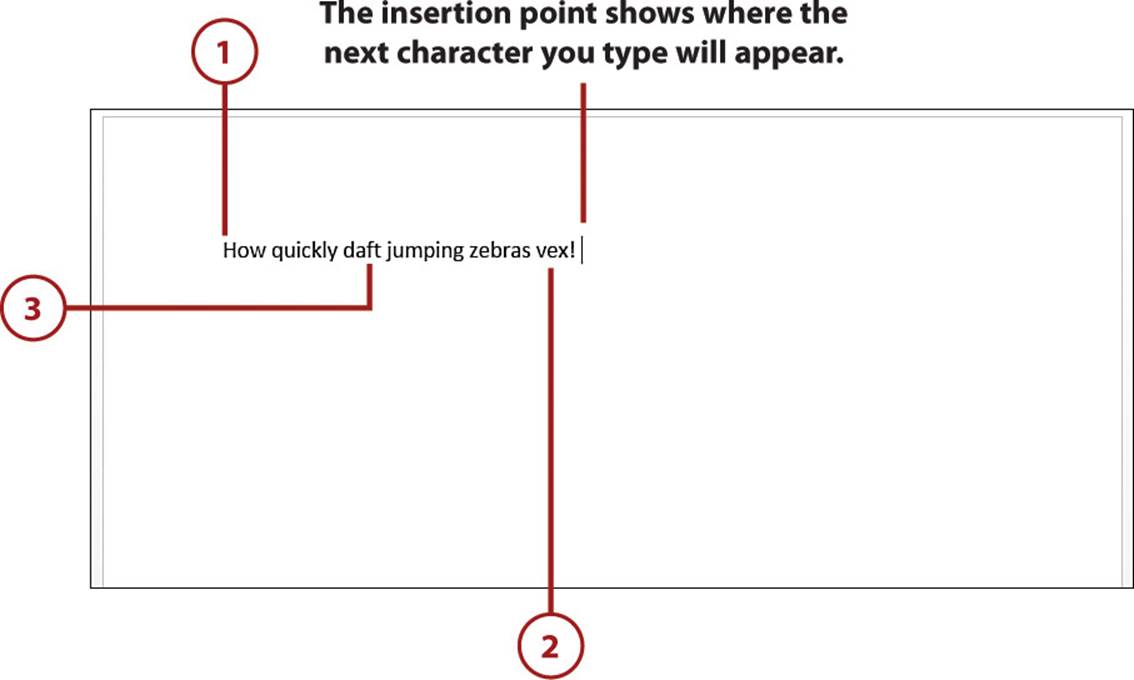
You can use your Windows PC’s keyboard to enter and edit text in Word.
1. Click at the spot where you want to start entering text. If the document already contains text, click at the spot where you want your next typing to appear.
2. Type your text.
3. To edit text, click at the spot where you want to make your changes, or use the arrow keys to position the insertion point. Then either press Backspace to delete the character to the left of the insertion point, or press Delete to delete the character to the right of the insertion point.
>>>Go Further: Using Click and Type
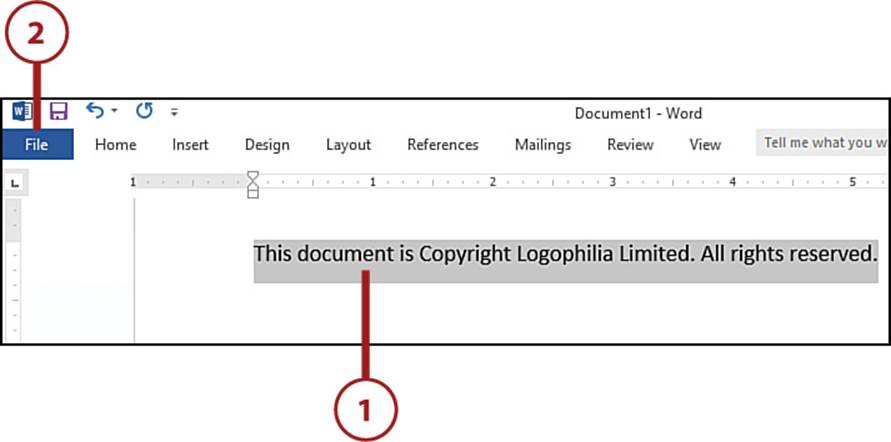
Most text editors or word processing programs only let you enter text starting at the beginning of a new document or immediately after the end of the text in an existing document. However, Word comes with a feature called Click and Type that enables you to starting entering text anywhere within a document. Just double-click where you want to begin and then start typing.
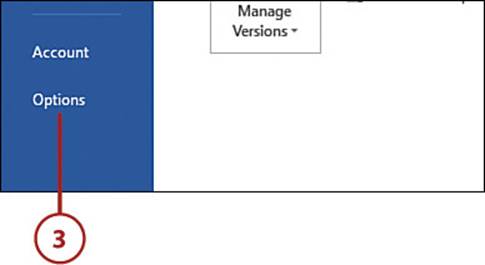
If you find that Click and Type often causes the insertion point to appear in places where you don’t want to start typing, you can turn off this feature. Select File and then select Options to open the Word Options dialog box. Select the Advanced tab and then click to deactivate the Enable Click and Type check box. Select OK to put the new setting into effect.
Enter Text with AutoCorrect
AutoCorrect is a feature that watches what you type and automatically corrects certain mistakes, such as teh (instead of the) and woudl (instead of would). If you disagree with a correction, either press Ctrl+Z to undo it or select the correction and then select Change Back To “text,” where textis the uncorrected version of the text.
However, most of us have phrases, sentences, even multiple paragraphs that we add to our documents regularly. Such frequently used bits of text are called boilerplate, and having to type them constantly can be both tedious and time wasting. To reduce the drudgery of boilerplate, you can set up AutoCorrect to store the boilerplate and then recall it with a few keystrokes.
1. Select the boilerplate text.
2. Select File.
3. Select Options to display the Word Options dialog box.
4. Select Proofing.
5. Select AutoCorrect Options to display the AutoCorrect dialog box.
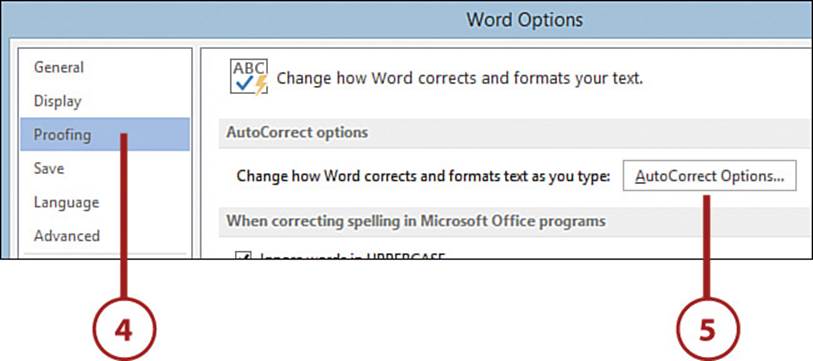
6. Select the AutoCorrect tab.
7. If the boilerplate is formatted and you want to include that formatting each time you insert the boilerplate, select the Formatted Text option; otherwise, select the Plain Text option.
8. In the Replace text box, type a short abbreviation or code.
9. Select Add.
10. Select OK.

Enter AutoCorrect Text
With your AutoCorrect item now defined, you can enter the full text into any Word document by typing the short abbreviation or code and then either pressing Enter or typing any word-ending symbol such as a comma, period, tab, or hyphen.
Insert Symbols
A Word document does not have to consist solely of those letters, numbers, punctuation marks, and other characters that you can see on your keyboard. In fact, hundreds of other symbols are available to you. These include financial symbols such as €, £, and ¥; business symbols such as ®, ™, and ©; mathematical symbols such as ≤, ∞, and ±; and international characters such as Á, ö, and ç.
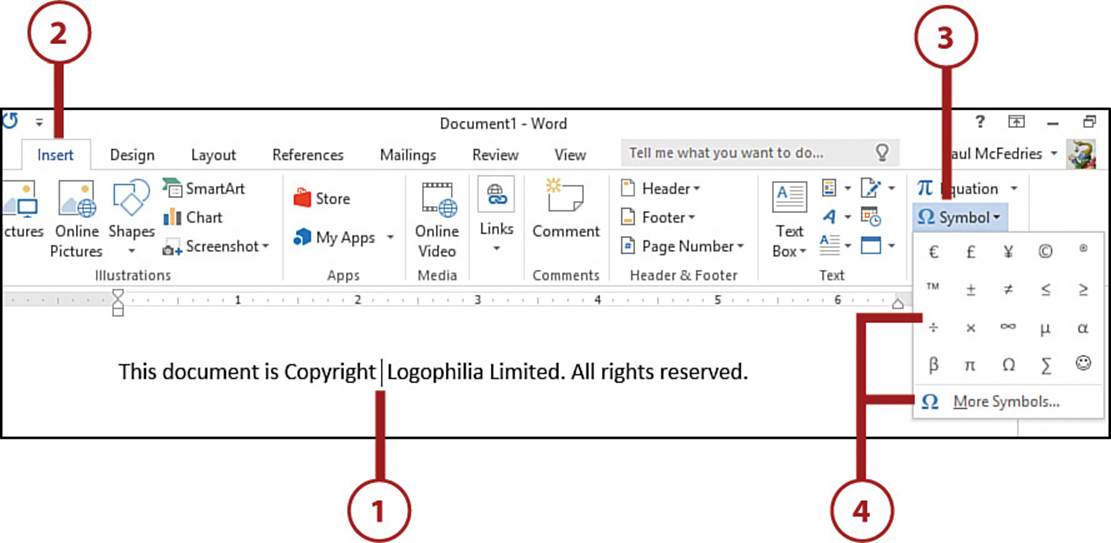
1. Position the insertion point where you want the symbol to appear.
2. Select the Insert tab.
3. Select Symbol.
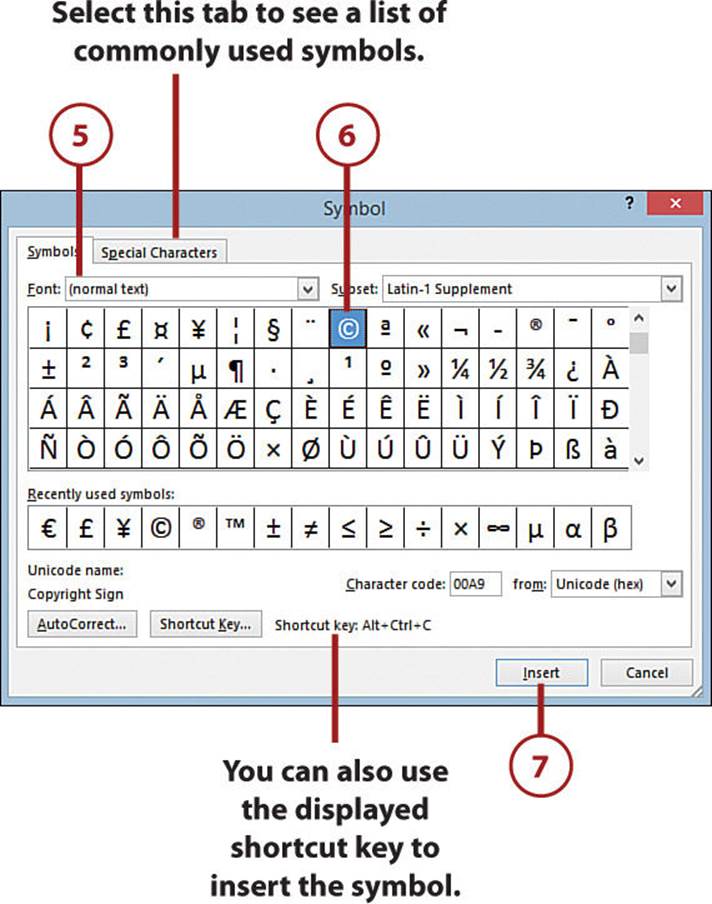
4. If you see the symbol you want to insert, select it. Otherwise, select More Symbols to open the Symbol dialog box.
5. If you want to insert the symbol using a particular font, select the font you want in the Font list.
6. Select the symbol you want to insert.
7. Select Insert. Word inserts the symbol at the insertion point.
Shortcut
You can also double-click the symbol to enter it.
>>>Go Further: Creating an AutoCorrect Entry for a Symbol
As you see in the next section, Word has a few predefined AutoCorrect entries for symbols. If you have other symbols that you use more often, you can insert them via the convenience of AutoCorrect.
In the Symbol dialog box, select the symbol you want to work with and then select AutoCorrect. Word displays the AutoCorrect dialog box and shows the symbol in the With text box. In the Replace text box, type the characters you want to use to trigger the correction and then select Add. Word assigns the AutoCorrect entry to the symbol. Select OK to return to the Symbol dialog box and then select Close.
Insert Symbols Using AutoCorrect
Perhaps the easiest and most efficient way to insert a symbol is via Word’s AutoCorrect feature because you just need to type the two or three original characters and Word converts them to the symbol automatically. The following table lists Word’s predefined AutoCorrect entries for symbols.

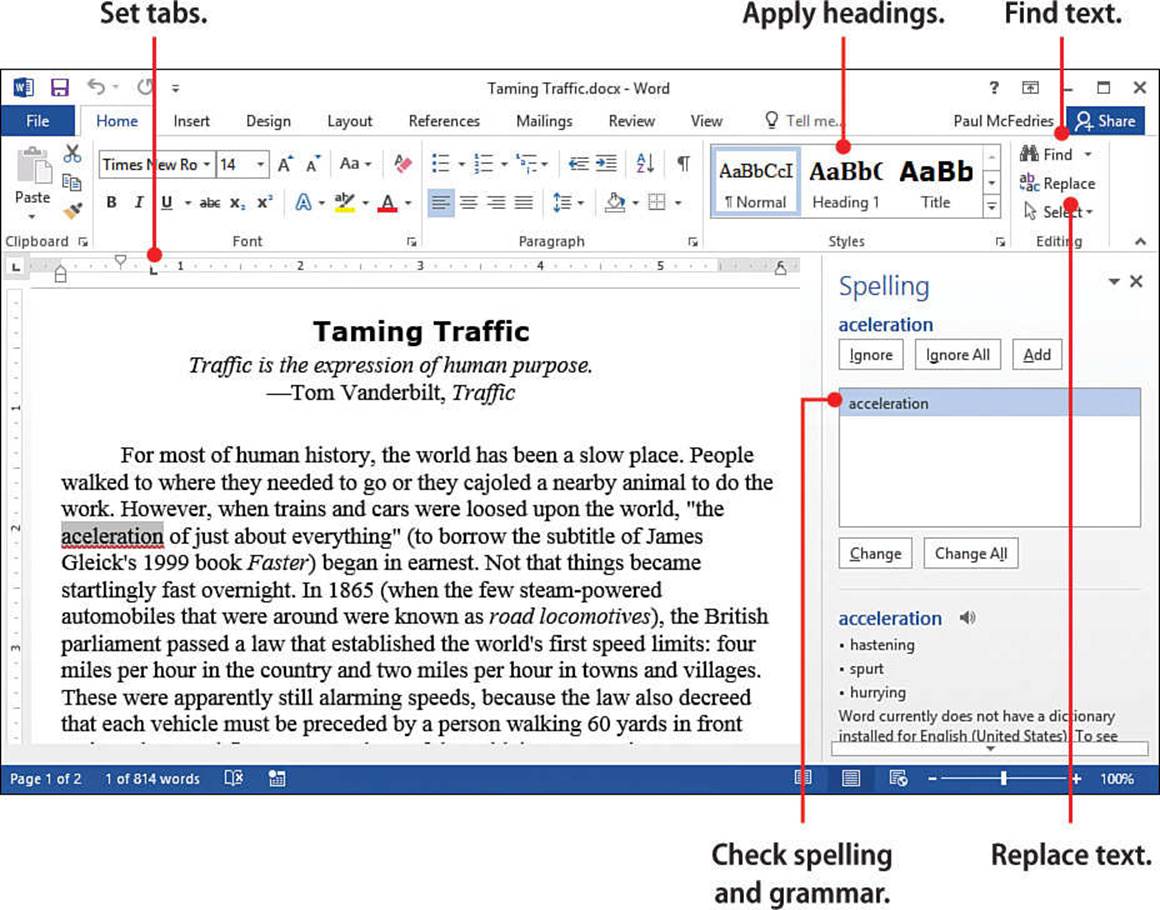
Set Tabs
Documents look much better if they’re properly indented and if their various parts line up nicely. The best way to do this is to use tabs instead of spaces whenever you need to create some room in a line. Why? Well, a single space can take up different amounts of room, depending on the font and size of the characters you’re using. So your document can end up looking pretty ragged if you try to use spaces to indent your text. Tabs, on the other hand, are fastidiously precise: When you press the Tab key, the insertion point moves ahead exactly to the next tab stop, no more, no less.
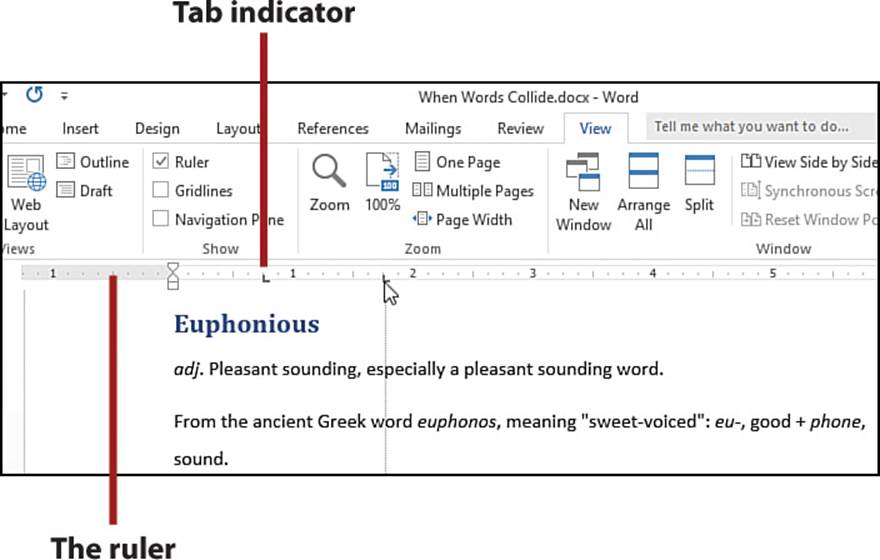
1. Place the insertion point inside the paragraph you want to modify. If your version of Word already displays the ruler, skip to step 4.
2. Select the View tab.
3. Select the Ruler check box to display the ruler.
4. Click the ruler at the position where you want the tab to appear.
5. To move a tab, use a mouse to drag the tab left or right along the ruler.
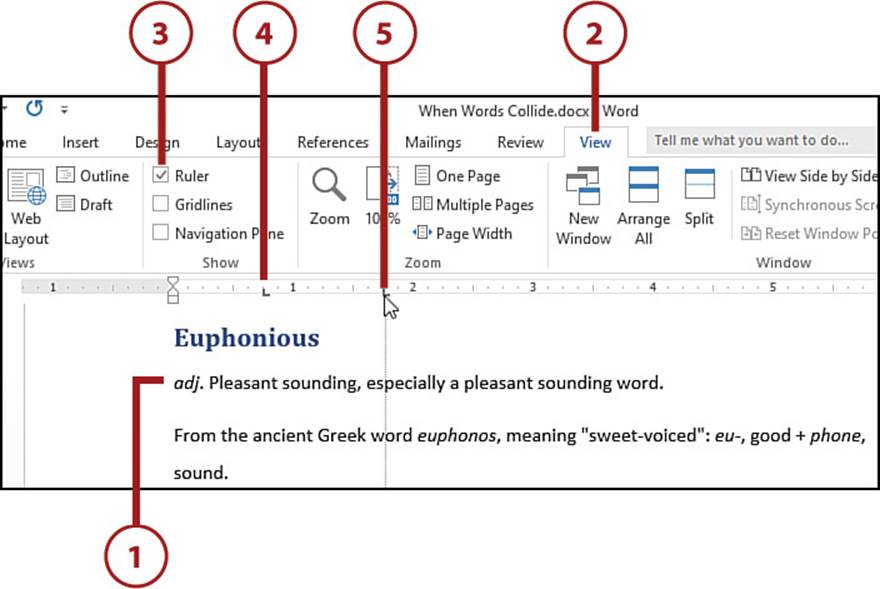
6. To change the tab type, or to modify tabs using a touchscreen, first select the Home tab and then select the Paragraph dialog box launcher.
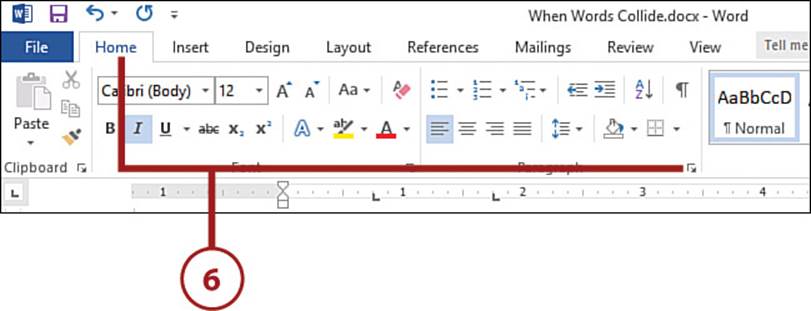
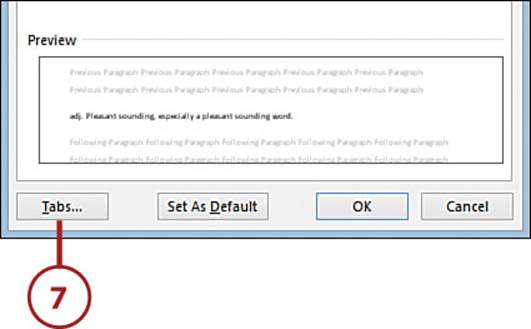
7. Select Tabs to open the Tabs dialog box.
Mouse Shortcut
If you have a mouse or trackpad, a quicker way to get to the Tabs dialog box is to double-click an existing tab.
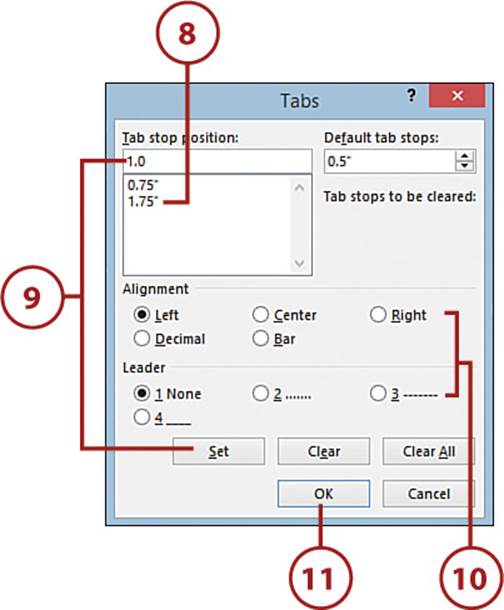
8. To change an existing tab, select it.
9. To create a new tab, type its position in the rule and then select Set.
10. Use the options in the Alignment and Leader groups to set the tab type.
11. Select OK.
>>>Go Further: Word’s Tab Types
Word has a tab to suit your every need. Here’s a summary of the available types:
Left—Text lines up with the tab on the left.
Right—Text lines up with the tab on the right.
Center—Text is centered on the tab.
Decimal—Numbers line up with the tab at their decimal places.
Bar—A vertical line the height of the paragraph is added.
Leader—In this tab type, the tab space for a left, right, center, or decimal tab is filled with a bunch of characters, such as dots.
Enter Headings
Headings are special paragraphs that serve as titles for different sections of a document. You specify headings in Word by applying a heading style, where the Heading 1 style is for the main sections of the document, Heading 2 is for the subsections, Heading 3 is for the sub-subsections, and so on.
1. Place the insertion point anywhere inside the paragraph you want to turn into a heading.
2. Select the Home tab.
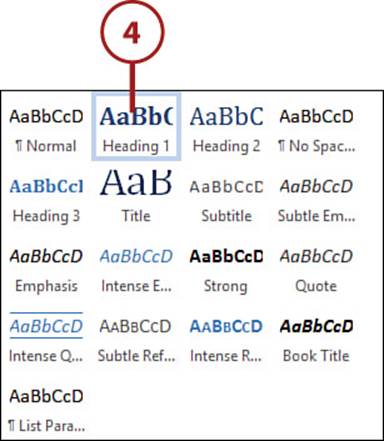
3. Select the More Styles icon to open the Styles gallery.
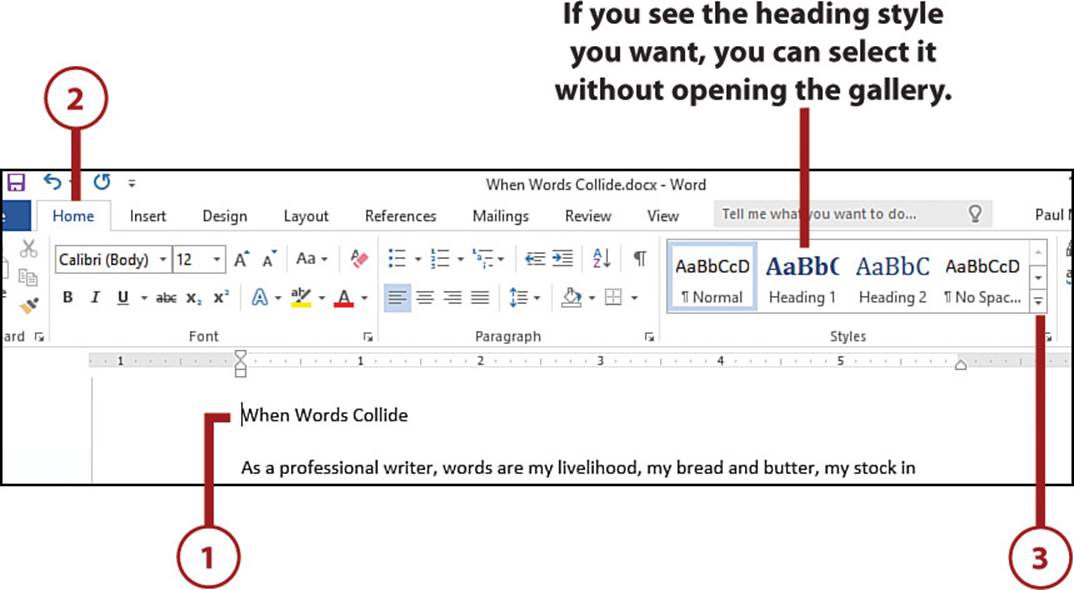
4. Select the heading style you want to apply.
>>>Go Further: Navigating with the Navigation Pane
Another benefit of applying headings is that you can use Word’s Navigation pane to quickly and easily navigate your document. The Navigation pane has a Headings tab that displays a list of the headings in your document. When you select a heading, Word automatically jumps to that part of the file. The Navigation pane also gives you a quick view of your document’s overall structure, so you can often see at a glance whether your document is correctly structured and your headings flow smoothly and logically. To use this feature, select the View tab, select the Navigation Pane check box, and then select Headings in the Navigation pane.
Finding and Replacing Text
We live in a world where the dream of “information at your fingertips” is fast becoming a reality. Search engines such as Google and Bing index online knowledge at a furious clip. And with those search engines at our beck and call full-time, thanks to wireless network connections and portable web surfing devices such as smartphones and tablets, we can call up just about any tidbit of information we need with a minimum of fuss.
This is fine for “googleable” online info, but some of your most useful data probably resides within your own documents. Locating information in a small document is not usually a problem, but when your Word documents grow to tens of pages, locating the text you want becomes a real needle-in-a-haystack exercise. You can make it much easier to locate text in large documents by using Word’s Find feature. Word also comes with a powerful Replace feature that enables you to quickly and easily replace multiple instances of a word or phrase with something else.
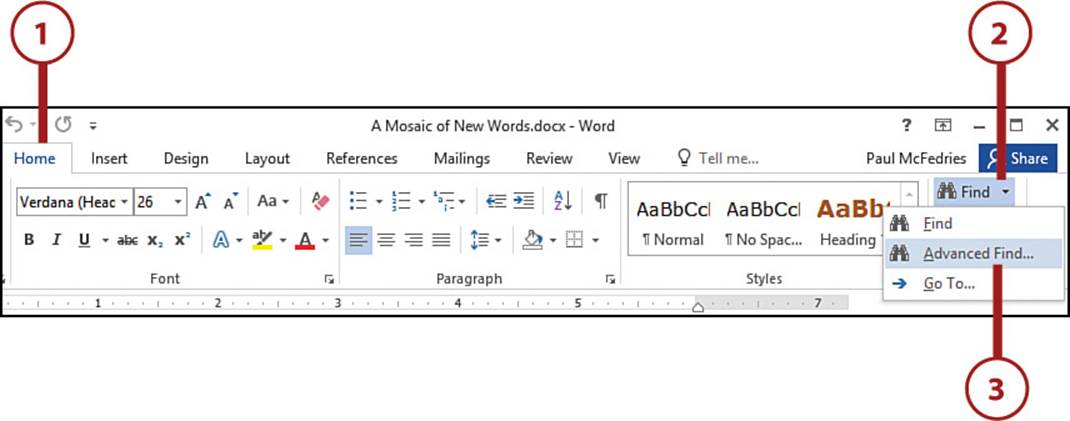
Find Text
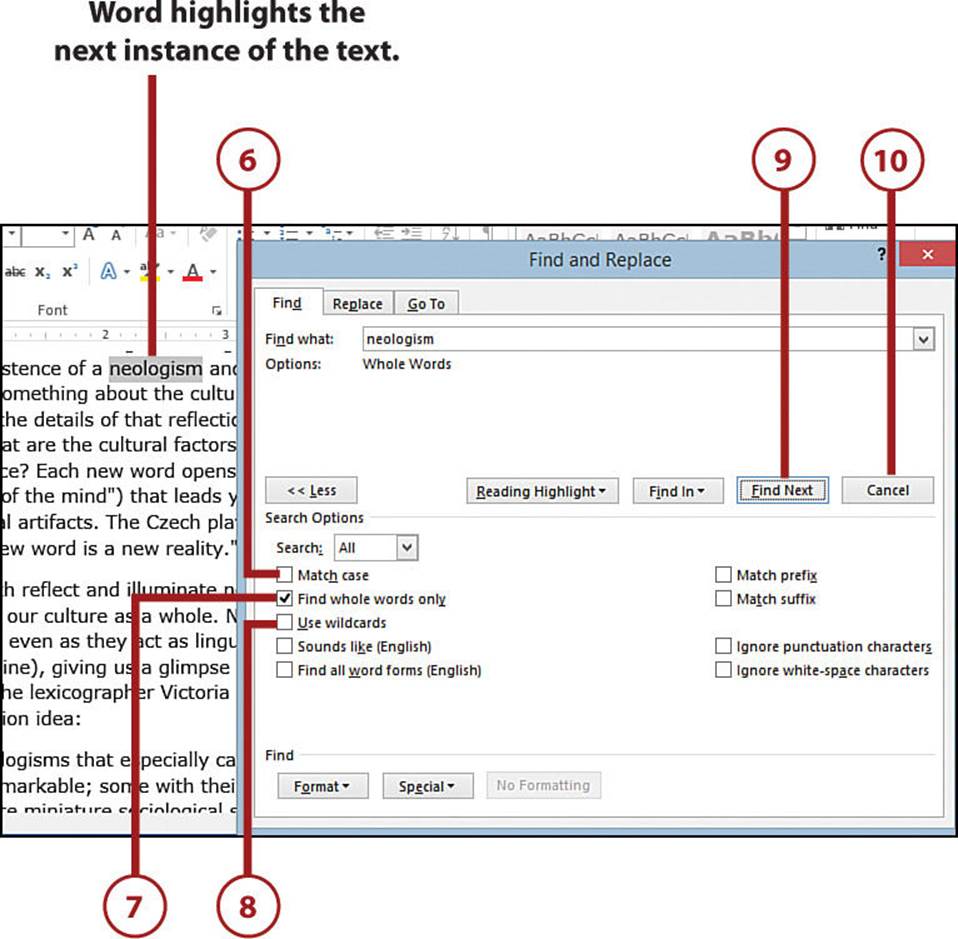
Word’s Find feature not only locates a word or phrase, but also offers options for matching uppercase and lowercase letters, finding whole words only, and more.
1. Select the Home tab.
2. Drop down the Find menu.
3. Select Advanced Find to open the Find and Replace dialog box.
4. In the Find What text box, type the text you’re looking for.
5. To specify search options, select More to expand the dialog box.
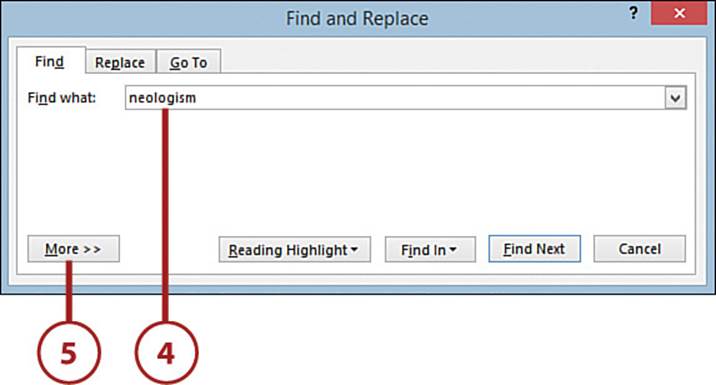
6. Select the Match Case check box to find only those instances that match the uppercase and lowercase letters you specify in the Find What text box. For example, if you type Bob as the search text, Find matches Bob but not bob or BOB.
7. Select the Find Whole Words Only check box to find only those instances of the search text that are entire words, not just partial words. For example, if you type pen as the search text, Find only matches the word pen, not words that contain pen, such as expenses and pencil.
8. Select the Use Wildcards check box to use wildcard characters in your search text. For example, you can use a question mark (?) to match any character (for example, c?t matches cat, cut, and incite, but not colt or cost) and the asterisk (*) to match any number of characters (for example, m*t matches met, meet, and demerit).
9. Select Find Next. Repeat as needed to find the instance of the text that you’re looking for.
10. When you’re done, select Cancel.
Faster Finds
For simple searches where you’re just looking for a bit of text, don’t bother with the Find and Replace dialog box. Instead, select the Home tab’s Find icon to open the Navigation pane. Type your search term in the text box and Word automatically displays a list of the matching terms in the document.
Replace Text
If you have a number of instances of a word or phrase that require the same edit, performing each edit manually is too time consuming. A much better method is to let Word’s Replace feature handle some or all of the edits for you.
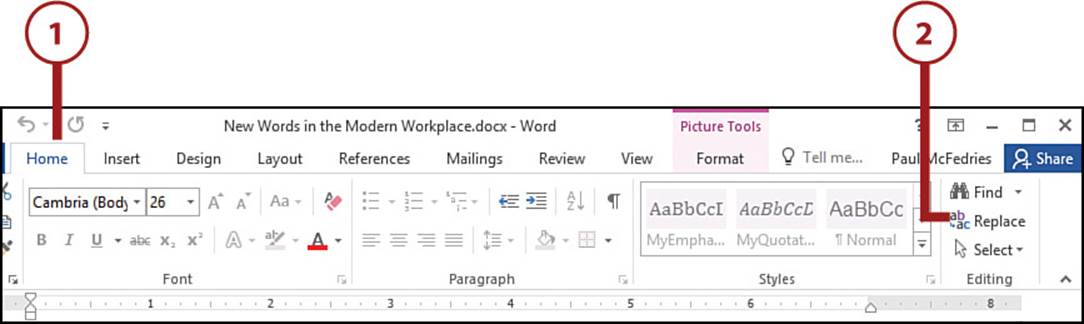
1. Select the Home tab.
2. Select Replace to open the Find and Replace dialog box with the Replace tab displayed.
Keyboard Shortcut
You can also open the Find and Replace dialog box with the Replace tab displayed by pressing Ctrl+H.
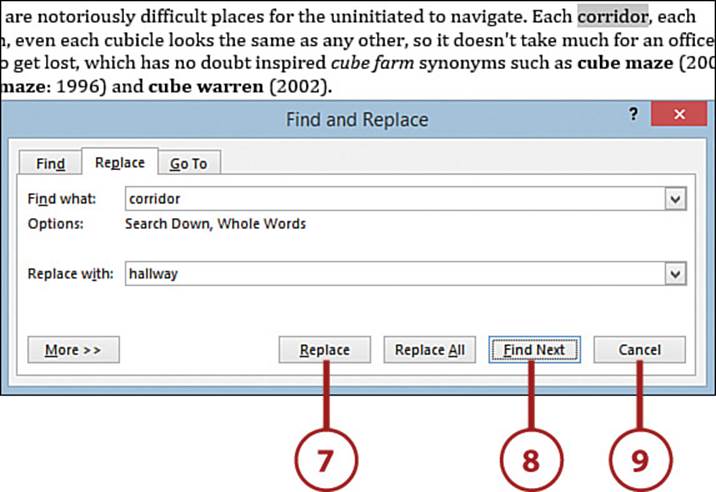
3. Type the text you want to replace in the Find What text box.
4. Type the text you want to use as the replacement in the Replace With text box.
5. If you want to specify search options, you can select More to expand the dialog box. See the previous section “Find Text” for an explanation of the most important search options.
6. Select Find Next. Word highlights the next instance of the Find What text.

7. If you want to replace the highlighted text, select Replace. Word makes the replacement and then highlights the next instance. Keep selecting this button to continue replacing the text. Alternatively, you can select Replace All to replace every instance of the text in the document.
8. If you come across an instance that you don’t want to replace, select Find Next, instead.
9. When you’re done, select Cancel.
>>>Go Further: Replacing Styles
One common Word task is to replace an existing style with another style. For example, if you add a new main heading at the top of the document, you might want to change all the existing Heading 1 styles to Heading 2 styles. The Replace feature makes this easy. In the Find and Replace dialog box, select More to see the extra options. Click inside the Find What text box, select Format, select Style, choose the style you want to replace, and then select OK. Click inside the Replace With text box, select Format, select Style, choose the style you want to use as the replacement, and then select OK. Now run the replacement.
It’s Not All Good: Replace All with Caution
The Replace All command is the quickest and easiest way to make your replacements, but it’s dangerous because you don’t see every replacement that Word makes. This is particularly true if you are using search options such as wildcards. Unless you’re absolutely certain that you want to replace every instance in your document, use the Replace command instead of Replace All.
Proofing Text
The word proofing is short for proofreading, and it refers to inspecting a body of writing for errors or inaccuracies. No matter what kind of writing you do, always proof your work before allowing other people to read it. Why? Because one of the easiest ways to lose face in the working world or to lose marks in the academic world is to hand in a piece of writing that contains spelling or grammar mistakes. No matter how professionally organized and formatted your document appears, a simple spelling error or grammatical gaffe will stick out and take your reader’s mind off your message. However, mistakes do happen, especially if your document is large. To help you catch these errors, Word offers both spell- and grammar-checking features.
As you type in Word, the spell checker operates in the background and examines your text for errors. When you type a word-separating character (that is, you press the spacebar or Enter or type a period, semicolon, comma, or colon), the checker compares the previous word with its internal dictionary; if it can’t find the word in the dictionary, it signals a spelling error by placing a wavy red line under the word.
The grammar checker also operates in the background and scours your text for errors. When you start a new sentence, the grammar checker examines the previous sentence for problems and, if it finds any, it signals a grammatical error by placing a wavy green line under the offending word or phrase.
Handle Spelling and Grammar Errors
You can handle both spelling and grammar errors as you go along, but you can also use the Spelling and Grammar task panes to gain a bit more control over the proofing tools.
1. Select the Review tab.
2. Select Spelling & Grammar. Word displays the Spelling task pane and highlights the first error it finds.
3. Select Change. If you want to correct all instances of the error, select Change All instead.
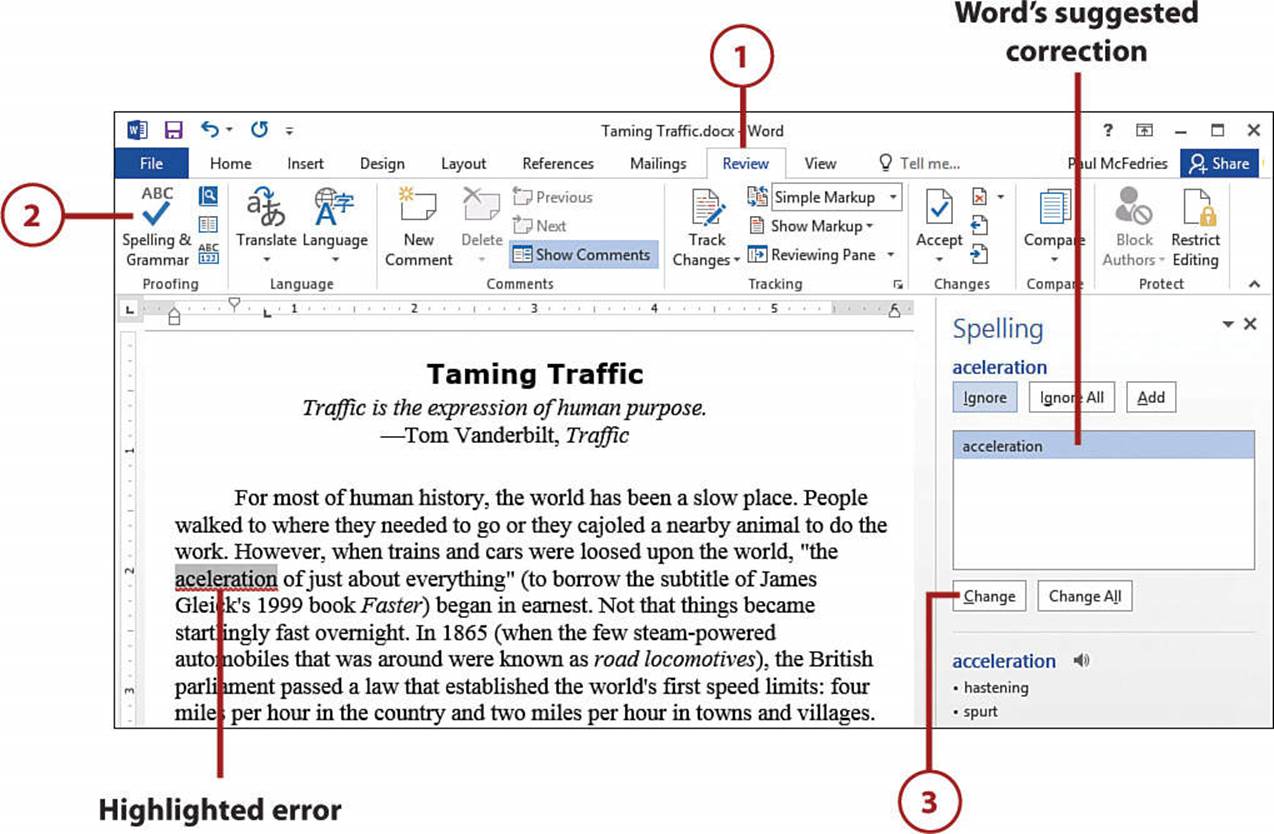
4. If the spell checker highlights a word that you know is correct, select Ignore. If the word appears multiple times in your document, select Ignore All instead.
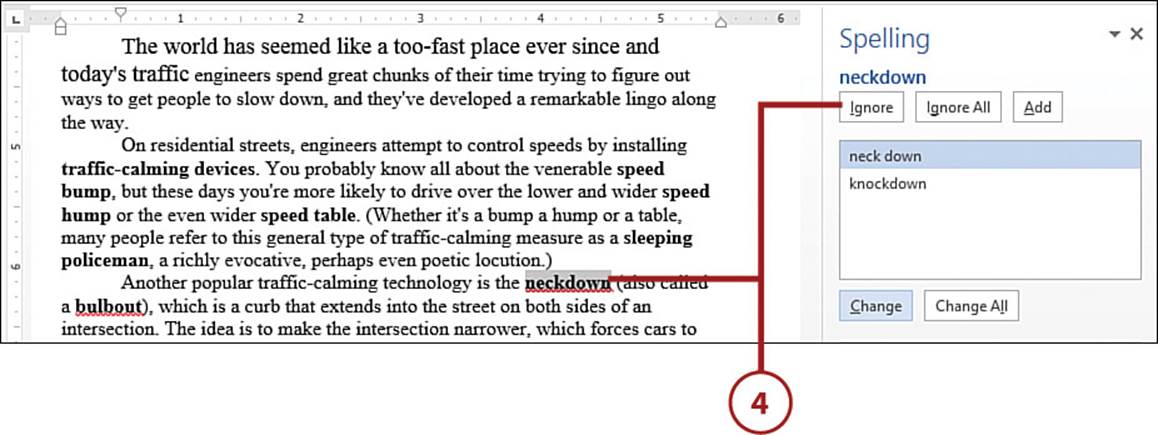
Adding Correct Words to the Dictionary
Words such as proper names and technical terms are flagged by the spell checker because they don’t appear in its dictionary of acceptable words. If the spell checker keeps flagging a correct word that you use frequently, you can add the word to its dictionary and thus avoid it getting flagged again. The next time the spell checker highlights the word, select Add in the Spelling task pane.
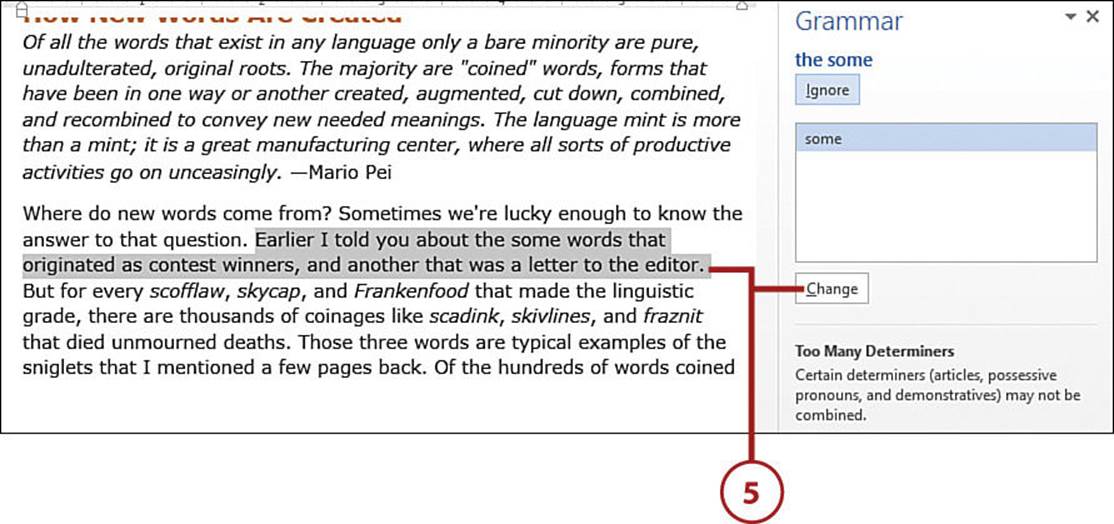
5. If Word flags a grammatical error, you see the Grammar task pane. Select Change to apply the proposed correction. If you believe that your prose is correct, you can select Ignore instead.
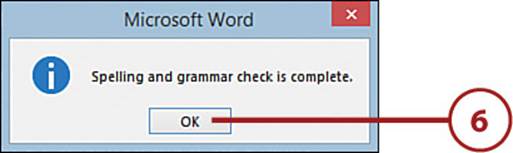
6. When the spelling and grammar check is complete, select OK.
Adding Hyperlinks
A hyperlink is a special section of text that, when clicked, opens a website, and we’re most familiar with them on web pages. Although web-based hyperlinks have been around for a long time now, it still seems slightly radical that you can insert a hyperlink in a Word document. This useful feature lets you create “active” documents that enable the reader to click text to open the linked website in a web browser.
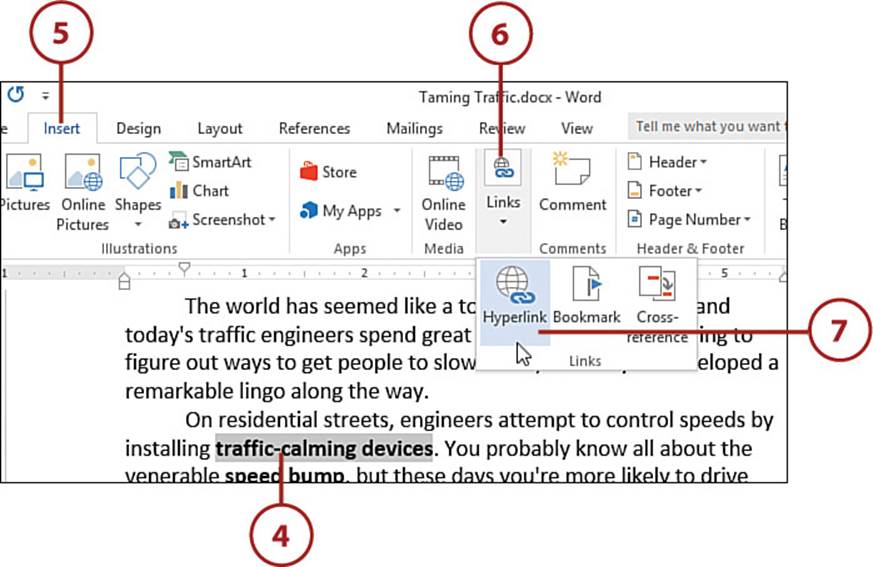
Insert a Hyperlink
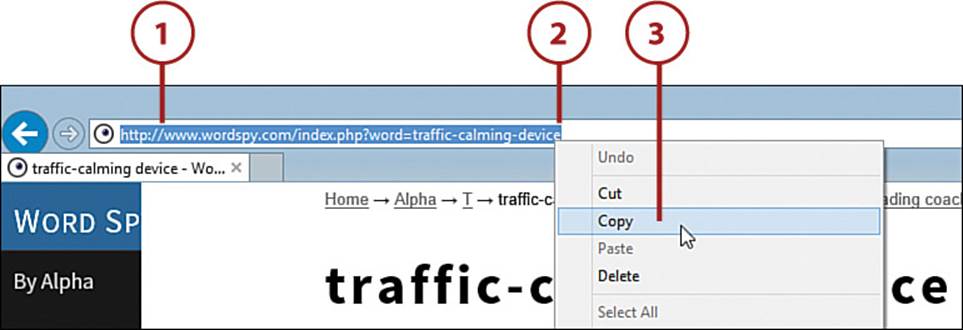
To insert a hyperlink in a Word document, you need to know the web address of the remote site or page. This is most easily accomplished by copying the address from a web browser.
1. In a web browser, use the address box to select the address of the site or page.
2. Right-click the address.
3. Select Copy.
4. In Word, select the text you want to use as the hyperlink.
5. Select the Insert tab.
6. Select Links.
7. Select Hyperlink.
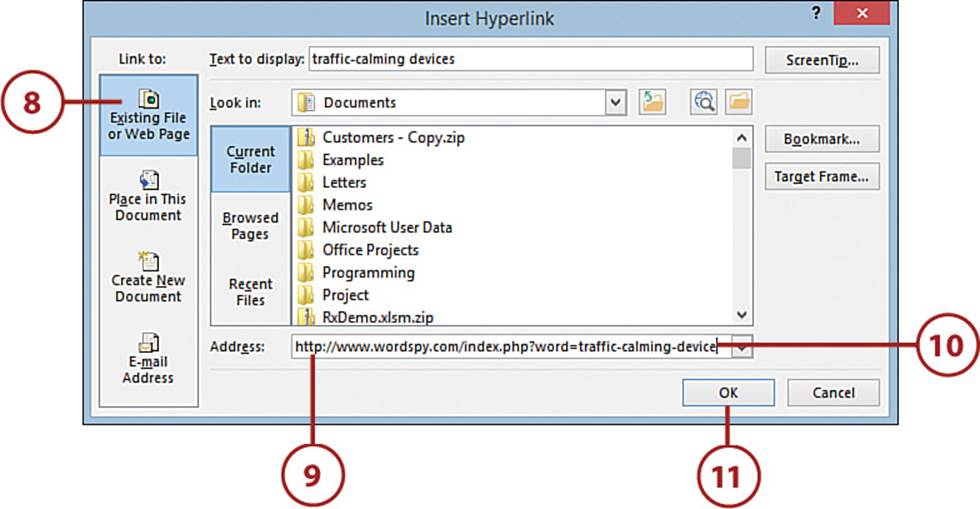
8. Select Existing File or Web Page.
9. Click inside the Address text box.
10. Press Ctrl+V. Word pastes the address.
11. Select OK. Word converts the selected text to a hyperlink.
Removing a Hyperlink
If you no longer require a hyperlink in your Word document, you can remove it. To do this, right-click the hyperlink and then click Remove Hyperlink.
All materials on the site are licensed Creative Commons Attribution-Sharealike 3.0 Unported CC BY-SA 3.0 & GNU Free Documentation License (GFDL)
If you are the copyright holder of any material contained on our site and intend to remove it, please contact our site administrator for approval.
© 2016-2026 All site design rights belong to S.Y.A.