PowerPoint 2016 For Dummies (2016)
Part I
Getting Started with PowerPoint 2016
 Visit www.dummies.com for great Dummies content online.
In this part …
![]() Get a bird’s-eye view of PowerPoint 2016 and what you can do with it.
Get a bird’s-eye view of PowerPoint 2016 and what you can do with it.
![]() Find out how to edit the content on PowerPoint slides, from the text itself to text objects to other types of objects, such as clip art pictures or drawn shapes.
Find out how to edit the content on PowerPoint slides, from the text itself to text objects to other types of objects, such as clip art pictures or drawn shapes.
![]() Understand how to work in Outline View so you can focus on your presentation’s main points and subpoints without worrying about appearance.
Understand how to work in Outline View so you can focus on your presentation’s main points and subpoints without worrying about appearance.
![]() Learn to proof your presentation with PowerPoint and avoid embarrassing mistakes.
Learn to proof your presentation with PowerPoint and avoid embarrassing mistakes.
![]() Discover how to create speaker notes to help you get through your presentation.
Discover how to create speaker notes to help you get through your presentation.
![]() Know how to finish the final preparations by printing copies of your slides, notes, and handouts, as well as how to set up a projector and actually deliver your presentation.
Know how to finish the final preparations by printing copies of your slides, notes, and handouts, as well as how to set up a projector and actually deliver your presentation.
Chapter 4
Proofing Your Presentations
In This Chapter
![]() Checking your spelling
Checking your spelling
![]() Using the Thesaurus
Using the Thesaurus
![]() Capitalizing and punctuating the right way
Capitalizing and punctuating the right way
![]() Using the AutoCorrect feature
Using the AutoCorrect feature
I was voted Worst Speller in the sixth grade. Not that being Worst Speller qualifies me to run for president or anything, but it shows how much I appreciate computer spell checkers. Spelling makes no sense to me. I felt a little better after watching The Story of English on public television. Now at least I know whom to blame for all the peculiarities of English spelling — the Anglos, the Norms (including the guy from Cheers), and the Saxophones.
Fortunately, PowerPoint 2016 has a pretty decent spell checker. In fact, the spell checker in PowerPoint is so smart that it knows that you’ve made a spelling mistake almost before you make it. The spell checker watches over your shoulder as you type and helps you to correct your spelling errors as you work.
Checking Spelling as You Go
Spelling errors in a word-processing document are bad, but at least they’re small. In a PowerPoint presentation, spelling errors are small only until you use a projector to throw your presentation onto a 30-foot screen. Then they get all blown out of proportion. Nothing is more embarrassing than a 3-foot-tall spelling error. And if you’re like me, you probably try to look for mistakes in other people’s presentations just for kicks. Thank goodness for PowerPoint’s on-the-fly spell checker.
The PowerPoint spell checker doesn’t make you wait until you finish your presentation and run a special command to point out your spelling errors. It boldly points out your mistakes right when you make them by underlining any word it doesn’t recognize with a wavy red line, as shown on the word “yars” in the second bullet point in Figure 4-1.
Figure 4-1: PowerPoint usually knows before you do that you’ve misspelled a word.
When you see the telltale wavy red line, you have several options:
· Make the correction: You can retype the word using the correct spelling.
· Let PowerPoint help: You can right-click the word to call up a menu that lists suggested spellings for the word. In most cases, PowerPoint can figure out what you meant to type and suggests the correct spelling. To replace the misspelled word with the correct spelling, just click the correctly spelled word in the menu.
· Ignore the misspelling: Sometimes, you want to misspell a word on purpose (for example, if you run a restaurant named “The Koffee Kup”). More likely, the word is correctly spelled, but PowerPoint just doesn’t know about the word. The right-click menu will help in either case: You can right-click the word in question and then choose either Ignore All to ignore the misspelling or Add to Dictionary to add it to PowerPoint’s spelling dictionary.
 The spell checker can’t tell you when you’ve used the wrong word but spelled it correctly. For example, the second bullet point in Figure 4-1 mentions dime navels instead of dime novels. Cheap literature might be a bad thing, but cheap citrus certainly is not.
Spell Checking After-the-Fact
If you prefer to ignore the constant nagging by PowerPoint about your spelling, you can always check your spelling the old-fashioned way: by running the spell checker after you finish your document. The spell checker works its way through your entire presentation, looking up every word in its massive list of correctly spelled words and bringing any misspelled words to your attention. It performs this task without giggling or snickering. As an added bonus, the spell checker even gives you the opportunity to tell it that you’re right and it’s wrong and that it should discern how to spell words the way you do.
The following steps show you how to check the spelling for an entire presentation:
1. If the presentation that you want to spell check is not already open, open it.
2.  Open the Review tab on the Ribbon and then click the Spelling button found in the Proofing group (shown in the margin).
3. Tap your fingers on your desk.
PowerPoint is searching your presentation for embarrassing spelling errors. Be patient.
4. Don’t be startled if PowerPoint finds a spelling error.
If PowerPoint finds a spelling error in your presentation, it switches to the slide that contains the error, highlights the offensive word, and displays the misspelled word along with a suggested correction, as shown in Figure 4-2.
5. Choose the correct spelling and click the Change button. Alternatively, click Ignore and laugh in PowerPoint’s face.
If you agree that the word is misspelled, scan the list of corrections that PowerPoint offers and select the one that you like. Then click the Change button.
If you like the way that you spelled the word in the first place (maybe it’s an unusual word that isn’t in the PowerPoint spelling dictionary, or maybe you like to spell the way Chaucer did), click the Ignore button. Watch as PowerPoint turns red in the face.
If you want PowerPoint to ignore all occurrences of a particular misspelling within the current presentation, click the Ignore All button. Likewise, if you want PowerPoint to correct all occurrences of a particular misspelling, click the Change All button.
6. Repeat Steps 4 and 5 until PowerPoint gives up.
When you see the following message, you’re finished:
Spell check complete. You’re good to go!
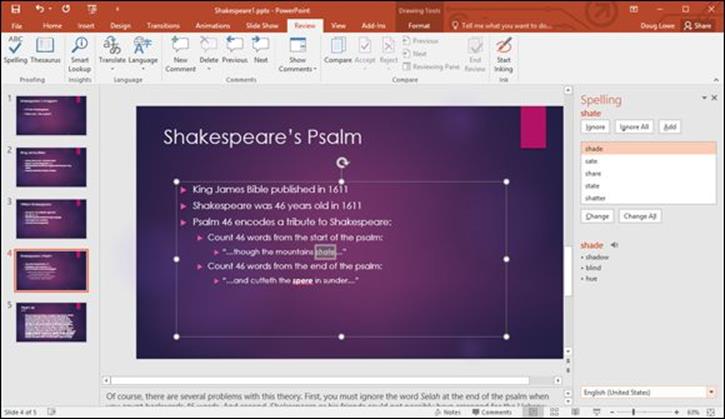
Figure 4-2: The PowerPoint spell checker points out a boo-boo.
PowerPoint always checks spelling in the entire presentation, beginning with the first slide — unless you specify a single word or group of words by highlighting them first. PowerPoint checks the spelling of titles, body text, notes, and text objects added to slides. It doesn’t check the spelling in embedded objects, however, such as charts or graphs.
If you get tired of PowerPoint always complaining about a word that’s not in its standard dictionary, click Add to add the word to the custom dictionary. If you can’t sleep at night until you know more about the custom dictionary, read the following sidebar titled “Don’t make me tell you about the custom dictionary.”
The PowerPoint spell checker is good, but it isn’t perfect. It does a reasonably good job of catching your when you meant you’re or its when you meant it’s. But it can’t catch an error such as “In a few ours we can go home.” Thus, spell checking is no substitute for good, old-fashioned proofreading. Print your presentation, sit down with a cup of cappuccino, and read it.
Don’t make me tell you about the custom dictionary
The PowerPoint spell checker can use more than one spelling dictionary. Besides the standard dictionary, which contains untold thousands of words that were all reviewed for correctness by Noah Webster himself (just kidding), you can have one or more custom dictionaries, which contain words that you have added by clicking the Add button when the spell checker found a spelling error.
Custom dictionaries are shared by other Microsoft programs that use spell checkers — most notably Microsoft Word. So if you add a word to a custom dictionary in Word, the PowerPoint spell checker knows about the word, too.
What if you accidentally add a word to the dictionary? Then you have a serious problem. You have two alternatives. You can petition Noah Webster to have your variant spelling officially added to the English language, or you can edit the Custom.dic file, search through the file until you find the bogus word, and then delete it. The easiest way to edit the Custom.dic file is to click the File tab, and then in Backstage View, click Options, click Proofing, and then click the Custom Dictionaries button. You can then select the Custom.dic file and click Edit Word List to edit its contents.
Using the Thesaurus
PowerPoint includes a built-in thesaurus that can quickly show you synonyms for a word that you’ve typed. Using it is easy:
1. Right-click a word that you’ve typed and choose Synonyms from the menu that appears.
A menu listing synonyms for the word appears. (Sometimes PowerPoint throws an antonym into the list just to be contrary.)
2. Select the word that you want to use to replace your word.
3. PowerPoint replaces the original word with your selection.
 If you choose Thesaurus from the Synonyms menu or click the Thesaurus button in the Ribbon (shown in the margin), the Thesaurus section of the Research task pane appears with the synonyms listed, as shown in Figure 4-3. The Thesaurus lets you look up words to find even more synonyms. For example, if you select falloff from the list of synonyms, you get another set of words. You can keep clicking words to find other synonyms as long as you’d like, until you’re ready to get back to real work.
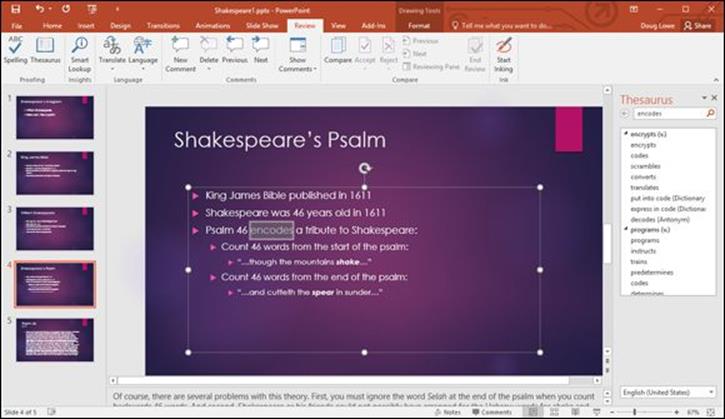
Figure 4-3: The Thesaurus appears in the Research task pane.
Capitalizing Correctly
The PowerPoint Change Case command enables you to capitalize the text in your slides properly. These steps show you how to use it:
1. Select the text that you want to capitalize.
2. ![]() Choose the Home tab on the Ribbon and then click the Change Case button in the Font section (shown in the margin).
Choose the Home tab on the Ribbon and then click the Change Case button in the Font section (shown in the margin).
Doing so reveals a menu of Change Case choices.
3. Study the options for a moment and then click the one that you want.
Here are the case options:
· Sentence case: The first letter of the first word in each sentence is capitalized. Everything else is changed to lowercase.
· lowercase: Everything is changed to lowercase.
· UPPERCASE: Everything is changed to capital letters.
· Capitalize Each Word: The first letter of each word is capitalized.
· tOGGLE cASE: This option turns uppercase into lowercase and turns lowercase into uppercase, for a ransom-note look.
4. Check the results.
Always double-check your text after using the Change Case command to make sure that the result is what you intended. This is especially true when you select Capitalize Each Word. In most cases, you should not capitalize articles (like a and the) and prepositions (like of andfrom). The Capitalize Each Word option capitalizes every word in the title, so you’ll have to manually change articles and prepositions back to lowercase.
Slide titles should almost always use title case. The first level of bullets on a slide can use title case, where all words except articles like a or the and prepositions like for and to are capitalized, or sentence case, where only the first word of each sentence is capitalized. Lower levels usually should use sentence case.
 Avoid uppercase if you can. IT’S HARD TO READ AND LOOKS LIKE YOU’RE SHOUTING.
Using the AutoCorrect Feature
PowerPoint includes an AutoCorrect feature that can automatically correct spelling errors and style errors as you type them. For example, if you accidentally type teh, PowerPoint automatically changes your text to the. And if you forget to capitalize the first word of a sentence, PowerPoint automatically capitalizes it for you. AutoCorrect can even catch certain multi-word mistakes. For example, if you type their are, AutoCorrect will substitute there are.
Any time PowerPoint makes a correction that you don’t like, just press Ctrl+Z to undo the correction. For example, if you really intended to type teh, press Ctrl+Z immediately after PowerPoint corrects it to the.
If you move the insertion pointer back to a word that has been corrected (or if you click the word), a small blue line appears beneath the first letter of the word. Point the mouse at this blue line, and the button with a lightning bolt in it appears. You can then click this button to bring up a menu that enables you to undo the correction that was made, tell PowerPoint to stop making that type of correction, or summon the AutoCorrect options dialog box to adjust your AutoCorrect settings.
To control PowerPoint’s AutoCorrect feature, click the File tab to switch to Backstage View and then click Options. This summons the PowerPoint Options dialog box. Next, choose the Proofing tab on the left side of the PowerPoint Options dialog box, and then click the AutoCorrect Options button to display the dialog box shown in Figure 4-4.
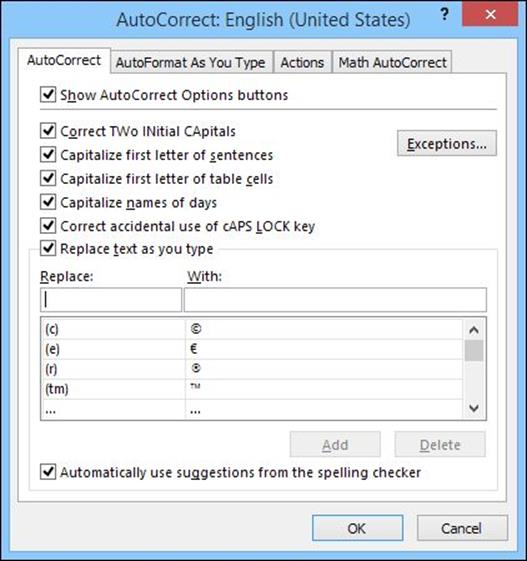
Figure 4-4: The AutoCorrect Options dialog box.
As you can see, the AutoCorrect Options dialog box contains check boxes for a variety of options that govern how AutoCorrect works:
· Show AutoCorrect Options buttons: This option displays the AutoCorrect button beneath words that were changed by the AutoCorrect feature, which allows you to undo the change or tell PowerPoint to stop making that particular type of correction.
· Correct TWo INitial CApitals: Looks for words with two initial capitals and changes the second one to lowercase. For example, if you type BOther, PowerPoint changes it to Bother. However, if you type three or more capitals in a row, PowerPoint assumes that you did it on purpose, so no correction is made.
· Capitalize first letter of sentences: Automatically capitalizes the first word of a new sentence if you forget.
· Capitalize first letter of table cells: Automatically capitalizes the first word in table cells.
· Capitalize names of days: You know, Monday, Tuesday, Wednesday, and so forth.
· Correct accidental use of cAPS LOCK key: This is an especially cool feature. If PowerPoint notices that you’re capitalizing everything backwards, it assumes that you accidentally pressed the Caps Lock key. So it turns off Caps Lock and corrects the words that you capitalized backwards.
· Replace text as you type: This option is the heart of the AutoCorrect feature. It consists of a list of words that are frequently typed wrong, along with the replacement word. For example, teh is replaced by the, and adn is replaced by and. The AutoCorrect list also contains some shortcuts for special symbols. For example, (c) is replaced by the copyright symbol (©), and (tm) is replaced by the trademark symbol (™).
You can add your own words to this list. In the Replace text box, type the word that you want PowerPoint to watch for. In the With text box, type the word that you want PowerPoint to substitute for the first word. Then click Add.
The AutoCorrect feature also includes several formatting options that can automatically apply formats as you type. To set these options, click the AutoFormat As You Type tab. The options shown in Figure 4-5 appear. These options let you control formatting features, such as automatically converting straight quotes to curly quotes, changing fractions such as 1/2 to fraction symbols such as ½, and so on.
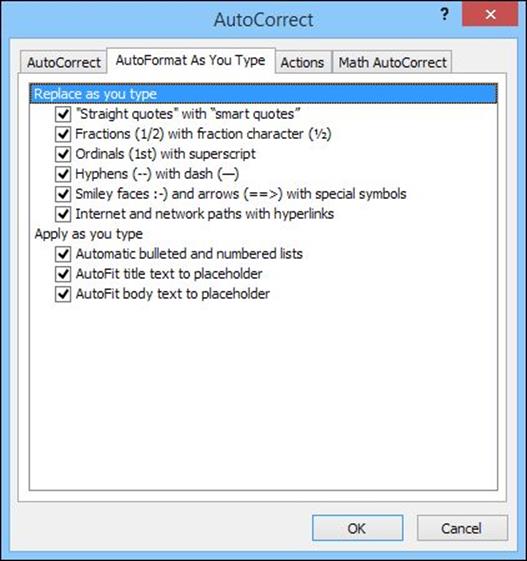
Figure 4-5: The AutoFormat As You Type options.
All materials on the site are licensed Creative Commons Attribution-Sharealike 3.0 Unported CC BY-SA 3.0 & GNU Free Documentation License (GFDL)
If you are the copyright holder of any material contained on our site and intend to remove it, please contact our site administrator for approval.
© 2016-2026 All site design rights belong to S.Y.A.