PowerPoint 2016 For Dummies (2016)
Part I
Getting Started with PowerPoint 2016
 Visit www.dummies.com for great Dummies content online.
In this part …
![]() Get a bird’s-eye view of PowerPoint 2016 and what you can do with it.
Get a bird’s-eye view of PowerPoint 2016 and what you can do with it.
![]() Find out how to edit the content on PowerPoint slides, from the text itself to text objects to other types of objects, such as clip art pictures or drawn shapes.
Find out how to edit the content on PowerPoint slides, from the text itself to text objects to other types of objects, such as clip art pictures or drawn shapes.
![]() Understand how to work in Outline View so you can focus on your presentation’s main points and subpoints without worrying about appearance.
Understand how to work in Outline View so you can focus on your presentation’s main points and subpoints without worrying about appearance.
![]() Learn to proof your presentation with PowerPoint and avoid embarrassing mistakes.
Learn to proof your presentation with PowerPoint and avoid embarrassing mistakes.
![]() Discover how to create speaker notes to help you get through your presentation.
Discover how to create speaker notes to help you get through your presentation.
![]() Know how to finish the final preparations by printing copies of your slides, notes, and handouts, as well as how to set up a projector and actually deliver your presentation.
Know how to finish the final preparations by printing copies of your slides, notes, and handouts, as well as how to set up a projector and actually deliver your presentation.
Chapter 6
Show Time!
In This Chapter
![]() Printing slides
Printing slides
![]() Printing handouts, notes, and outlines
Printing handouts, notes, and outlines
![]() Previewing your output
Previewing your output
![]() Showing your presentation on your computer screen or the big screen
Showing your presentation on your computer screen or the big screen
![]() Wrestling a projector into submission
Wrestling a projector into submission
![]() Working in Presentation View
Working in Presentation View
![]() Showing your presentation online
Showing your presentation online
Overture, curtains, lights. This is it — the night of nights.
No more rehearsing and nursing a part,
We know every part by heart.
Overture, curtains, lights. This is it, you’ll hit the heights.
And oh, what heights we’ll hit,
On with the show, this is it.
The old Bugs Bunny theme song (written by Mack David and Jerry Livingston) strikes a chord when your presentation is all finished and all that remains is to present it to your audience.
This chapter shows you how to finish the final preparations by printing copies of your slides, notes, and handouts. Then the chapter delves into the task of setting up a projector and actually presenting your show.
This is it!
The Quick Way to Print
The Print command. The Printmeister. Big presentation comin’ up. Printin’ some slides. The Printorama. The Mentor of de Printor. Captain Toner of the Good Ship Laseroo.
Don’t worry — when you print a PowerPoint presentation, no one’s waiting to ambush you with annoying one-liners like that guy who used to be on Saturday Night Live. All that awaits you is a handful of boring dialog boxes with boring check boxes. Point-point, click-click, print-print.
The fastest way to print your presentation is to click the Quick Print button, which appears on the Quick Access toolbar. This button does not appear on your Quick Access toolbar by default. To add it, click the down arrow to the right of the Quick Access toolbar and then click the Quick Print button.
Clicking this Quick Print button prints your presentation without further ado, using the current printer settings, which I explain in the remaining sections of this chapter. Usually, this action results in printing a single copy of all the slides in your presentation. But if you have altered the settings on the Print screen in Backstage View during the current PowerPoint session, clicking the Print button uses the altered settings automatically.
You find more information about printing from Backstage View in the next section.
Printing from Backstage View
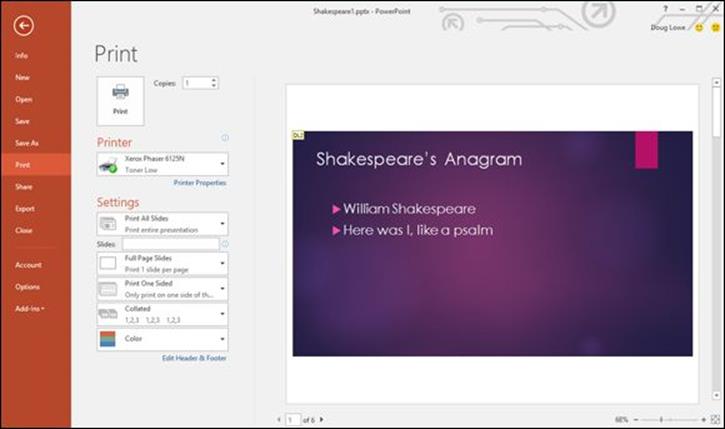
For precise control over how you want your presentation to be printed, you must switch to Backstage View and conjure up the Print screen, shown in Figure 6-1. To summon this screen, choose Office ⇒ Print or press Ctrl+P.
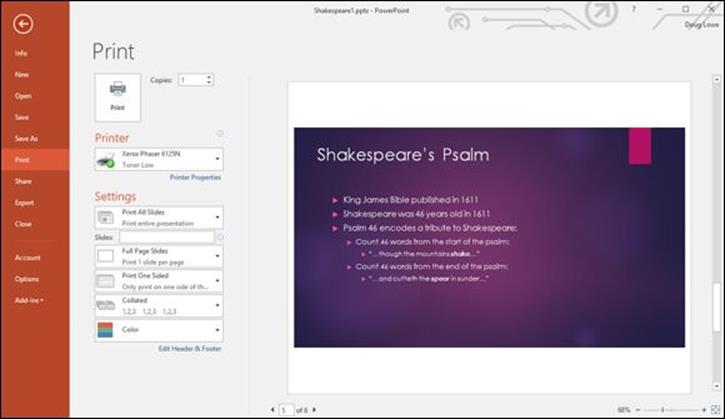
Figure 6-1: Behold the Print screen.
 After you call up the Print screen, click the big Print button (shown in the margin) or press Enter to print all the slides in your presentation. Fiddle around with the settings to print a select group of slides, to print more than one copy, or to print handouts, speaker notes, or an outline. The following sections show you the treasures that lie hidden in this screen.
 Printing can be es-el-oh-double-ewe, so don’t panic if your presentation doesn’t start printing right away. PowerPoint printouts tend to demand a great deal from the printer, so sometimes the printer has to work for a while before it can produce a finished page. Be patient. The Printer Wizard has every intention of granting your request.
Printing more than one copy
The Copies field lets you print more than one copy of your presentation. You can click one of the arrows next to this field to increase or decrease the number of copies, or you can type directly in the field to set the number of copies.
Changing printers
If you’re lucky enough to have two or more printers at your disposal, you can use the Printer list to pick which printer you want to use. Each printer must first be successfully installed in Windows — a topic that’s beyond the reach of this humble book. However, you can find plenty of information about installing printers in the appropriate version of Andy Rathbone’s Windows For Dummies ( Wiley).
Printing part of a document
The Print All Slides drop-down list lets you choose how much (or what part) of your presentation you want to print. When you first access the Print page in Backstage view, the Print All Slides option is selected so that your entire presentation prints. The other options in this drop-down list enable you to tell PowerPoint to print distinct portions of your presentation:
· Print Selection: Prints just the portion of the presentation that you selected before invoking the Print command. First, select the slides that you want to print. Then call up the Print command, select the Selection option, and click OK. (Note that this option is grayed out if nothing is selected when you call up the Print dialog box.)
· Print Current Slide: Prints just the current slide. Before you invoke the Print command, you should move to the slide that you want to print. Then select this option in the Print dialog box and click OK. This option is handy when you make a change to one slide and don’t want to reprint the entire presentation.
· Custom Range: Lets you type specific slide numbers you want to print.
· Custom Shows: If you set up one or more custom slide shows, you can use this option to select the show that you want to print. (See “Using Custom Shows,” later in this chapter.)
But wait, there’s more! Beneath the Print All Slides drop-down list are several other controls:
· Full Page Slides: Lets you indicate how many slides per page you want to print. You can also use this same drop-down list to print Notes Pages or the outline rather than slides.
· Collated: This option tells PowerPoint to print each copy of your presentation one at a time. In other words, if your presentation consists of ten slides and you select three copies and select the Collate check box, PowerPoint first prints all ten slides of the first copy of the presentation, then all ten slides of the second copy, and then all ten slides of the third copy. If you don’t select the Collate check box, PowerPoint prints three copies of the first slide, followed by three copies of the second slide, followed by three copies of the third slide, and so on.
· Color: This drop-down list lets you choose whether to print your slides in color, black and white, or with shades of gray.
Using Print Preview
The Print screen of Backstage view includes a Print Preview feature that lets you see how your pages will appear before actually printing them.
From the Print screen, you can zoom in to examine the preview more closely by clicking anywhere in the preview area. You can also scroll through the pages by using the scroll bar or the navigation arrows beneath the preview area.
Setting Up a Slide Show
The PowerPoint printing features are useful, but PowerPoint is really designed to create slides that are presented directly on a screen rather than printed out. The screen can be your computer’s own monitor, a projector, or an external monitor, such as a giant-screen television. This section and the sections that follow show you how to set up and show a presentation.
In most cases, the default settings for showing a presentation are adequate. However, in some cases, you may need to change the default settings. To do so, first open the presentation that you want to set up and then open the Slide Show tab on the Ribbon and click Set Up Slide Show (found in the Set Up group). This action summons the Set Up Show dialog box, which is shown in Figure 6-2. With this dialog box, you can twiddle with the various options that are available for presenting slide shows.
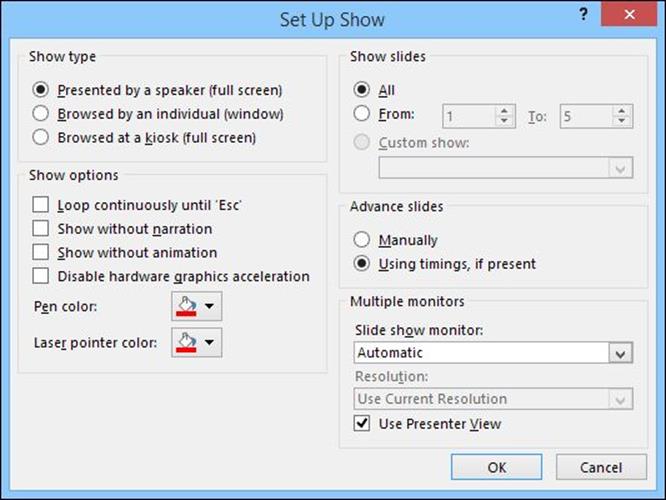
Figure 6-2: The Set Up Show dialog box.
With the options on the Set Up Show dialog box, you can do the following:
· Configure the presentation: You can configure the presentation for one of three basic slide show types: Presented by a Speaker (Full Screen), Browsed by an Individual (Window), or Browsed at a Kiosk (Full Screen).
· Loop through slides: Select the Loop Continuously until ‘Esc’ check box if you want the show to run indefinitely. If you enable this setting, the show jumps back to the first slide after the last slide is shown, and the show continues to repeat until you press Esc.
· Simplify the presentation: Deselect the Show Without Narration and Show Without Animation options if you want to simplify the presentation by not playing narrations that you’ve recorded or animations that you’ve created.
· Disable hardware graphics acceleration: Use this option only if your computer is having trouble properly displaying the graphics, media, or animations in your presentation.
· Select pen and laser pointer color: Select the color to use for the pen or laser pointer. (See the sections “Scribbling on Your Slides” and “Using the Laser Pointer,” later in this chapter, for more information about using the pen and the laser pointer.)
· Select slides: In the Show Slides area, select All to include all slides in the slide show or choose From and supply starting and ending slide numbers if you want to display just some of the slides in the presentation.
· Set up custom shows: Choose Custom Show if you have set up any custom shows within your presentation. (See the section “Using Custom Shows,” later in this chapter, for more information.)
· Choose to change slides manually: In the Advance Slides area, choose Manually to advance from slide to slide by pressing Enter, pressing the spacebar, or clicking. Or, if you want the show to proceed automatically, select the Using Timings, If Present option if it’s available.
· Select a monitor: If your computer has two monitors, select the monitor to use for the slide show by using the drop-down list in the Multiple Monitors area.
Starting a Slide Show
![]() When you want to do a slide show in a one-on-one or small group setting without a projector, beginning the show is just a click away. To start a slide show immediately, click the Slide Show button located (along with the other View buttons) in the lower-right corner of the screen (shown in the margin). PowerPoint fills the entire screen with the first slide of the slide show. To advance to the next slide, click the mouse button or press Enter, the down arrow, Page Down, or the spacebar.
When you want to do a slide show in a one-on-one or small group setting without a projector, beginning the show is just a click away. To start a slide show immediately, click the Slide Show button located (along with the other View buttons) in the lower-right corner of the screen (shown in the margin). PowerPoint fills the entire screen with the first slide of the slide show. To advance to the next slide, click the mouse button or press Enter, the down arrow, Page Down, or the spacebar.
If you’re in a hurry and have a good memory for keyboard shortcuts, just press F5.
You can also start a slide show by opening the Slide Show tab on the Ribbon and clicking one of the following buttons:
·  From Beginning: Starts the slide show from the first slide. Clicking this button is the same as clicking the Slide Show button in the lower-right corner of the screen or pressing F5.
·  From Current Slide: Starts the show from the currently selected slide.
Working in Presenter View
If you have a projector or second monitor connected to your computer, PowerPoint will show the presentation’s slides on the projector or second monitor and switch the primary monitor to Presenter View. Figure 6-3 shows Presenter View in action.
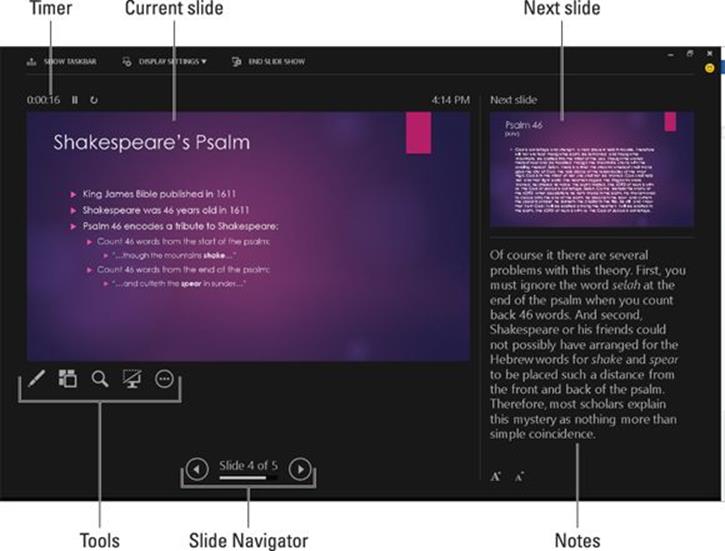
Figure 6-3: Presenter View.
The following paragraphs describe the various features that are available in Presenter View:
· Current slide: The current slide is displayed in the center-left portion of the screen.
· Next slide: The next slide to be displayed is shown at the top right of the screen.
· Notes: Any notes you have created for the current slide are shown at the bottom right of the screen.
· Timer: A timer appears above the current slide to help you keep track of how long your presentation has dragged on.
· Tools: Beneath the current slide are icons representing various tools that let you draw on your slides, magnify the slide to draw the audience’s attention to a particular point, hide the current slide so you can draw the audience’s attention away from the screen and to you, and perform a few other interesting onscreen tricks. These tools are described in the section “Using Presentation Tools,” later in this chapter.
· Slide Navigator: These controls let you advance forward or backward through your slide show.
Setting up a projector
If you’re going to present your show by using a computer projector and a laptop, you need to know how to connect the computer to your laptop as well as how to set up the projector, turn it on, focus it, and so on. Most of these details vary from one projector to the next, so you have to consult the manual that came with the projector or bribe someone to set up the projector for you. The following list provides a few general tips that might help:
· Connecting the projector: Most laptops have an external video port on the back or side, and most projectors have a video input connection. Newer projects and laptops use HDMI connectors, but older projectors or laptops may use other types of connectors, such as DVI or VGA. Note that depending on the type of connector on your laptop and on your projector, you may need a special adapter to match the laptop’s connector to the projector’s connector. At any rate, make sure you have the correct cable and adapter to connect your projector to your laptop.
· Activating the external video port: To use the laptop with a projector, you must first activate the external video port. Some laptops automatically detect a projector when it is connected. On others, you must press a key or combination of keys to activate the external port.
· Selecting the projector’s video input: Most projectors can accept input from more than one source. For example, you might be able to connect a computer and a DVD player to the projector. The projector should have some buttons or perhaps a menu setting that lets you select the input that is used to display the projected image. If you connect your computer to the projector and everything else seems okay but you still don’t get a picture, make sure that the projector is set to the correct input.
· Using the projector’s remote control: If you want to use the projector’s remote control to operate your presentation, you need the appropriate cable to connect the projector to your laptop’s mouse port or USB. The correct cable should come with the projector.
· Using sound: If your presentation has sound, you need to connect your computer’s sound outputs to a set of amplified speakers or, if you’re showing the presentation in a large auditorium, a PA system. The correct cable to connect to a PA system depends on the PA system, but a cable with a mini-stereo plug on one end and a ¼-inch plug on the other will probably do the trick. Note that if you’re using an HDMI connection, the sound output will be supplied to the projector or TV via the HDMI output.
Keyboard and Mouse Tricks for Your Slide Show
During an onscreen slide show, you can use the keyboard and mouse to control your presentation. Tables 6-1 and 6-2 list the keys and clicks that you can use.
Table 6-1 Keyboard Tricks for Your Slide Show
|
To Do This |
Press Any of These Keys |
|
Display next slide |
Enter, spacebar, Page Down, or N |
|
Display preceding slide |
Backspace, Page Up, or P |
|
Display first slide |
1+Enter |
|
Display specific slide |
Slide number+Enter |
|
Toggle screen black |
B or . (period) |
|
Toggle screen white |
W or , (comma) |
|
Show or hide pointer |
A or = (equal sign) |
|
Erase screen doodles |
E |
|
Stop or restart automatic show |
S or + (plus sign) |
|
Display next slide even if hidden |
H |
|
Display specific hidden slide |
Slide number of hidden slide+Enter |
|
Change pen to arrow |
Ctrl+A |
|
Change arrow to pen |
Ctrl+P |
|
End slide show |
Esc, Ctrl+Break (the Break key doubles as the Pause key), or - (minus) |
Table 6-2 Mouse Tricks for Your Slide Show
|
To Do This |
Do This |
|
Display next slide |
Click. |
|
Move through slides |
Roll the wheel on your mouse (if your mouse has a wheel). |
|
Call up menu of actions |
Right-click. |
|
Display first slide |
Hold down both mouse buttons for two seconds. |
|
Use the laser pointer |
Hold down the Ctrl key and then hold the left mouse button and move the mouse. |
|
Doodle |
Press Ctrl+P to change the mouse arrow to a pen and then draw onscreen like John Madden. |
If the cursor is hidden, you can summon it by jiggling the mouse. Then, when the cursor is visible, a faint menu appears in the lower-left corner of the slide. You can use this menu to activate various slide show features.
Using Presentation Tools
Presentation View has several icons that are useful during your presentation, as described in the following sections.
Using the Laser Pointer feature
The Laser Pointer feature displays a bright red dot on the screen, which you can move around by moving the mouse. It’s not quite as good as using a real laser pointer, but if you don’t happen to have one, the PowerPoint laser pointer will do. Figure 6-4 shows the laser pointer in action.
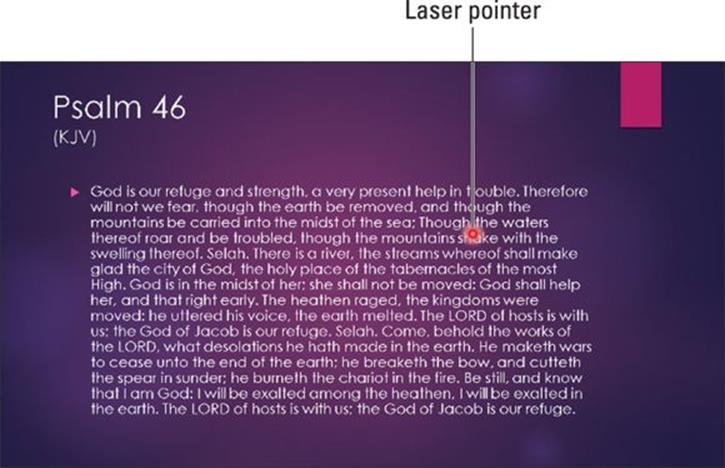
Figure 6-4: Using the laser pointer.
 You can activate the laser pointer in two ways:
· The first is to click the Pen and Laser Pointer button in Presenter View (shown in the margin) and then choose Laser Pointer. Then, use your mouse to move the laser pointer around on the slide.
· The second way to activate the laser pointer is to hold down the Ctrl key, then click and hold the left mouse button and move the mouse. The laser pointer will appear on the screen and move as you move the mouse.
When you release the left mouse button, the laser pointer disappears.
Scribbling on your slides
You can doodle on your slides to draw your audience’s attention to a particular part of the slide. For example, Figure 6-5 shows a slide on which I’ve drawn two circles to indicate the parts of the Psalm 46 that show Shakespeare’s name.

Figure 6-5: Using the pen tool.
To use the pen tool to draw on a slide, click the Pen and Laser Pointer button in Presenter View (shown in the margin) and select the Pen tool. Then, use your mouse to draw on the slide, holding down the left button and dragging the mouse around as best you can to leave your mark.
Here are some additional thoughts worth mentioning:
· Instead of a solid pen, you can also use a transparent highlighter. Just choose the Highlighter tool instead of the Pen tool, then use the mouse to mark on the slide. Note that the Highlighter tool works best on slides that have a light background.
· If you wish, you can change the color of the marks left by the pen tool. Click the Pen and Laser Pointer button, and then choose Ink Color and select the color you’d like to use.
· When you finish your presentation, you are given the option to keep your doodles as annotations in your presentation. Then, you won’t have to redraw the doodles next time.
· On a touchscreen device, you’ll find additional buttons in the bottom-left corner of the presentation to call up the laser pointer, pen, highlighter, and so on.
Rehearsing Your Slide Timings
You can use the PowerPoint Rehearsal feature to rehearse your presentation. The Rehearsal feature lets you know how long your presentation takes, and it can even set slide timings so that the slides automatically advance based on the timings you set during the rehearsal.
To rehearse a slide show, click the Rehearse Timings button in the Set Up section of the Slide Show Ribbon tab. This starts the slide show, with a special Recording dialog box visible, as shown in Figure 6-6.

Figure 6-6: Rehearsing a slide show.
Now rehearse your presentation. Click or use keyboard shortcuts to advance slides. As you rehearse, the Rehearse dialog box keeps track of how long you display each slide and the total length of your presentation.
When you end the presentation, PowerPoint displays a dialog box that gives you the option of applying or ignoring the timings recorded during the rehearsal to the slides in the presentation. If you were satisfied with the slide timings during the rehearsal, click Yes.
If you mess up during a rehearsal, click the Repeat button. Clicking this button restarts the rehearsal from the beginning.
Using Custom Shows
The Custom Shows feature in PowerPoint lets you create several similar slide shows stored in a single presentation file. For example, suppose that you’re asked to give presentations about company benefits to management and non-management staff. You can create a presentation containing slides for all the company benefits and then create a custom show containing only those slides describing benefits that are available to non-management staff. (This custom slide show can leave out slides such as “Executive Washrooms,” “Golf Days,” and “Boondoggles.”) You may then show the complete presentation to management but show the custom show to non-management staff.
A presentation can contain as many custom shows as you want. Each custom show is simply a subset of the complete presentation — comprised of selected slides from the complete presentation.
Creating a custom show
To create a custom show, follow these steps:
1.  On the Slide Show tab on the Ribbon, click Custom Slide Show (located in the Start Slide Show group) and then choose Custom Shows from the menu that appears.
This displays the Custom Shows dialog box.
2. Click the New button.
The Define Custom Show dialog box appears, as shown in Figure 6-7.
3. Type a name for the custom show in the Slide Show Name field.
4. Add the slides that you want to appear in the custom slide show.
All the slides available in the presentation are listed in the list box on the left side of the Define Custom Show dialog box. To add a slide to the custom show, select the slide that you want to add and then click Add. The slide appears in the list box on the right side of the Define Custom Show dialog box.
You don’t have to add slides to the custom show in the same order that the slides appear in the original presentation. Slides for a custom show can appear in any order you want. You can also include a slide from the original presentation more than once in a custom show.
To remove a slide that you’ve added by mistake, deselect the slide that you want to remove in the list box on the right side of the Define Custom Show dialog box, and then click Remove.
You can use the up and down arrows near the right edge of the Define Custom Show dialog box to change the order of the slides in the custom show.
5. Click OK.
You return to the Custom Shows dialog box.
6. Click Close to dismiss the Custom Shows dialog box.
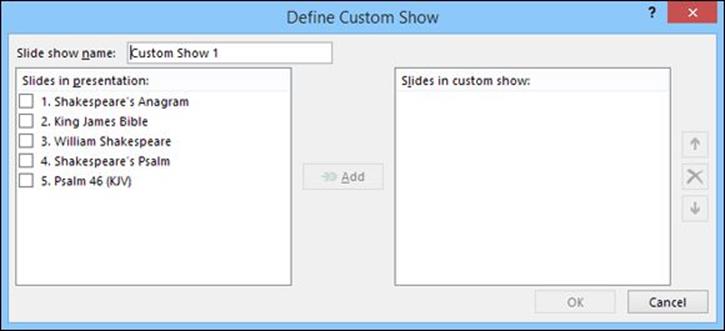
Figure 6-7: Defining a custom show.
Showing a custom show
To show a custom show, first open the presentation that contains the custom show. Then open the Slide Show tab on the Ribbon, click the Custom Slide Show button, then choose Custom Shows from the menu that appears. This displays the Custom Shows dialog box, which lists any custom shows in the presentation. You can then select the custom show you want and start the show by clicking the Show button.
Hiding slides
![]() If you don’t want to go to all the trouble of creating a custom show, but you want to exclude a few slides from a presentation, you don’t have to delete the slides. Instead, you can hide them. To hide a slide, select the slide and then click Hide Slide in the Slide Show Ribbon tab. To unhide a slide, select the slide and click the button again. (You can determine which slides have been hidden by looking at the slide in the Slides tab on the left. If the slide number has a slash through it, the slide is hidden.)
If you don’t want to go to all the trouble of creating a custom show, but you want to exclude a few slides from a presentation, you don’t have to delete the slides. Instead, you can hide them. To hide a slide, select the slide and then click Hide Slide in the Slide Show Ribbon tab. To unhide a slide, select the slide and click the button again. (You can determine which slides have been hidden by looking at the slide in the Slides tab on the left. If the slide number has a slash through it, the slide is hidden.)
Showing Your Presentation Online
PowerPoint 2016 includes a new online presentation feature that makes it ridiculously easy to share your presentation with other people remotely over the Internet. To use it, simply follow these steps:
1.  Click the Present Online button in the Slide Show Ribbon tab (shown in the margin).
Doing this brings up the Present Online dialog box, shown in Figure 6-8.
2. Click Connect.
3. If prompted, enter your Windows Live username and password.
If you don’t have a Windows Live account, sign up for one at http://signup.live.com.
After you are connected, the dialog box shown in Figure 6-9 is shown.
4. To send an email to your meeting participants, click Send in Email. Next, complete the email by adding recipients and any other text you wish to add and send the email.
Your participants can then click the link to open the presentation in their web browsers.
You can also click Copy Link to copy the presentation link to the clipboard. You can then paste the link into an email to distribute to your meeting participants.
5. When everyone is ready to view the presentation, click Start Presentation.
This starts the presentation. Your participants can follow the presentation in their web browsers, as shown in Figure 6-10.
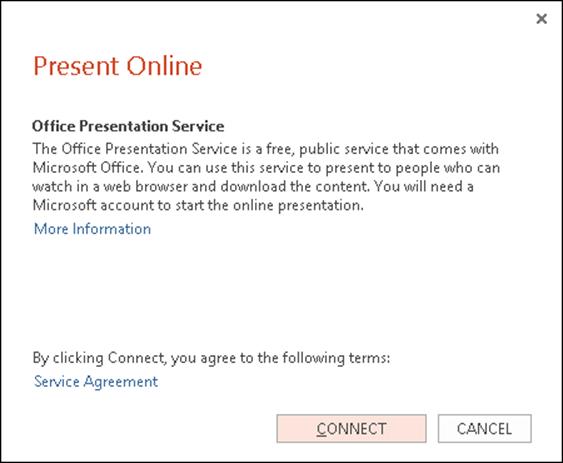
Figure 6-8: Showing a presentation online.
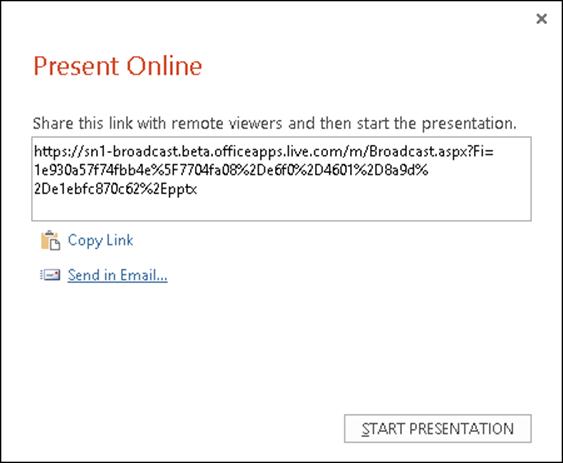
Figure 6-9: Sharing the presentation address.
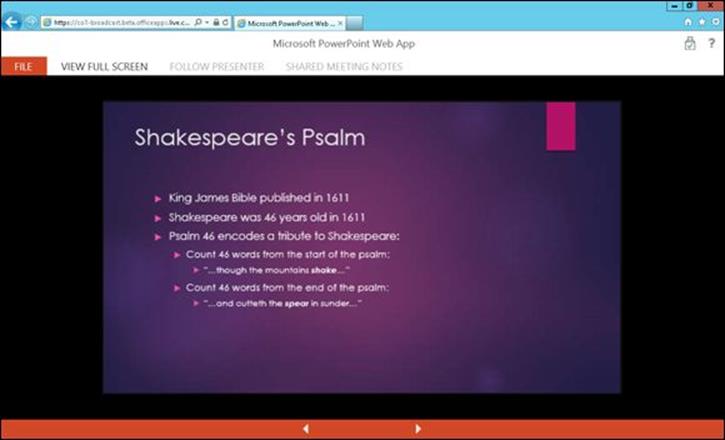
Figure 6-10: Sharing the presentation.
All materials on the site are licensed Creative Commons Attribution-Sharealike 3.0 Unported CC BY-SA 3.0 & GNU Free Documentation License (GFDL)
If you are the copyright holder of any material contained on our site and intend to remove it, please contact our site administrator for approval.
© 2016-2026 All site design rights belong to S.Y.A.