PowerShell in Depth, Second Edition (2015)
Part 2. PowerShell management
Remote control. Background jobs. Regular expressions. HTML and XML. These are just a few of the core technologies accessible within PowerShell that you’ll use to make server and client management easier, more scalable, and more effective than ever before. The chapters in part 2 tackle these technologies individually, diving as deeply as we can, so that you can master their intricacies and subtleties.
Chapter 10. PowerShell Remoting
This chapter covers
· Outlining Remoting technologies and protocols
· Configuring and securing Remoting endpoints
· Exploring Remoting scenarios
· Using implicit Remoting
Remoting was one of the major new technologies introduced in PowerShell v2 and in the broader Windows Management Framework v2 (WMF v2), of which PowerShell is a part. With v4, Microsoft has continued to invest in this important foundational technology. Most Windows machines, client or server, can be used as the local or remote machine—that is, you can create remote connections to them and you can create remote connections from them. The one exception is Windows RT—you can only remote from machines running that version.
Note
There’s very little difference between Remoting in PowerShell v3 and v4. Unless we state otherwise, everything in this chapter applies equally to PowerShell v3 and v4.
Remoting is a complex technology, and we’ll do our best to explore it as thoroughly as possible. But some uses for Remoting are outside the purview of an administrator: Programming custom-constrained runspaces, for example, requires software development skills that are outside the scope of this book.
Note
Everything in this chapter focuses on PowerShell v4 and v3, but the majority of the material also applies to v2. The three versions of the shell can talk to each other via Remoting—that is, a v2 shell can connect to a v3 or v4 shell, and vice versa. PowerShell Remoting between v3 and v4 works seamlessly.
10.1. The many forms of remote control
The first thing we need to clear up is the confusion over the word remote. PowerShell v2 offers two means for connecting to remote computers:
· Cmdlets, which have their own –ComputerName parameter. They use their own proprietary communications protocols, most often DCOM or RPC, and are generally limited to a single task. They don’t use PowerShell Remoting (with a couple of exceptions that we’ll cover later in this chapter).
· Cmdlets that specifically use the Remoting technology: Invoke-Command, anything with the –PSSession noun, and a few others that we’ll cover in this chapter. In this chapter, we’re focusing exclusively on the second group. The nice thing about it is that any cmdlet—whether it has a –ComputerName parameter or not—can be used through Remoting.
Note
PowerShell v3 introduced another type of Remoting: CimSessions. These are analogous to PowerShell Remoting sessions and also work over WSMAN by default. They are covered in detail in chapter 39.
What exactly is Remoting? It’s the ability to send one or more commands over the network to one or more remote computers. The remote computers execute the commands using their own local processing resources (meaning the command must exist and be loaded on the remote computers). The results of the commands—like all PowerShell commands—are objects, and PowerShell serializes them into XML. The XML is transmitted across the network to the originating computer, which deserializes them back into objects and puts them into the pipeline. The serialize/deserialize part of the process is crucial, because it offers a way to get complex data structures into a text form that’s easily transmitted over a network. Don’t overthink the serializing thing, though: It’s not much more complicated than piping the results of a command to Export-CliXML and then usingImport-CliXML to load the results back into the pipeline as objects. It’s almost exactly like that, in fact, with the additional benefit of having Remoting taking care of getting the data across the network.
PowerShell Web Access (PWA—Microsoft uses PSWA but the PowerShell community prefers PWA as an acronym) was introduced in Windows Server 2012 and enhanced in Windows Server 2012 R2. PWA is covered in appendix B. PWA uses PowerShell Remoting “under the hood.” It’s best to consider PWA as a presentation layer superimposed on PowerShell Remoting, which is why we don’t cover it here.
10.2. Remoting overview
Terminology gets a lot of people messed up when it comes to Remoting, so let’s get that out of the way.
· WSMAN is the network protocol used by PowerShell Remoting. It stands for Web Services for Management, and it’s more or less an industry-standard protocol. You can find implementations on platforms other than Windows, although they’re not yet widespread. WSMAN is a flavor of good-old HTTP, the same protocol your web browser uses to fetch web pages from a web server.
· Windows Remote Management, or WinRM, is a Microsoft service that implements the WSMAN protocol and that handles communications and authentication for connections. WinRM is designed to provide communications services for any number of applications; it isn’t exclusive to PowerShell. When WinRM receives traffic, that traffic is tagged for a specific application—such as PowerShell—and WinRM takes care of getting the traffic to that application as well as accepting any replies or results that the application wants to send back.
· Remoting is a term applied to PowerShell’s use of WinRM. Therefore, you can’t do “Remoting” with anything other than PowerShell—although other applications could certainly have their own specific uses for WinRM.
One of the features introduced in PowerShell v3 was a set of Common Information Model (CIM) cmdlets. Over time, they’ll replace the legacy Windows Management Instrumentation (WMI) cmdlets that have been in PowerShell since v1, although for now the WMI and CIM cmdlets live side by side and have a lot of overlapping functionality. Both sets of cmdlets use the same underlying WMI data repository; one of the primary differences between the two sets is in how they communicate over the network. The WMI cmdlets use remote procedure calls (RPCs), whereas the CIM cmdlets use WinRM. The CIM cmdlets aren’t using Remoting—they provide their own utilization of WinRM (more details in chapter 39). We point this out only as an example of how confusing the terminology can be. In the end, you don’t have to worry about it all the time, but when it comes to troubleshooting you’ll definitely need to understand which parts are using what.
Now for a bit more terminology, this time diving into some of the specific implementation details:
· An endpoint is a particular configuration item in WinRM. An endpoint represents a specific application for which WinRM can receive traffic, along with a group of settings that determine how the endpoint behaves. It’s entirely possible for a single application, like PowerShell, to have multiple endpoints set up. Each endpoint might be for a different purpose and might have different security, network settings, and so forth associated with it.
· A listener is another configuration item in WinRM, and it represents the service’s ability to accept incoming network traffic. A listener is configured to have a TCP port number, is configured to accept traffic on one or more IP addresses, and so forth. A listener also is set up to use either HTTP or HTTPS; if you want to be able to use both protocols, then you must have two listeners set up.
10.2.1. Authentication
WinRM has two levels of authentication: machine-level and user-level. User-level authentication involves the delegation of your logon credentials to the remote machine that you’ve connected to. The remote machine can undertake any tasks you’ve specified using your identity, meaning you’ll be able to do whatever you have permission to do and no more. By default, the remote machine can’t delegate your credentials to any other machines—which can lead to a problem called “the second hop” where you attempt, and usually fail, to perform an action on a third machine from within your remote session. We’ll deal with that later in the chapter.
Remoting also supports machine-level authentication. In other words, when you connect to a remote machine, your computer must trust that machine. Trust normally comes through mutual membership in an Active Directory domain, although it can also be manually configured in a number of ways. The practical upshot is that your computer will refuse to connect to any remote machine that it doesn’t know and trust. That can create complications for some environments where the machines aren’t all in the same domain, requiring additional configuration to get Remoting to work.
10.2.2. Firewalls and security
One of the joys of Remoting is that it operates over a single port: 5985 for HTTP and 5986 for HTTPS, by default, although you can reconfigure them if you like. It’s therefore easy to set up firewall exceptions that permit Remoting traffic.
Some organizations, mainly those with very tight network security, may have some trepidation about enabling Remoting and its firewall exceptions. Our only advice is to “get over it.” Remoting is now a foundational, mandatory technology in Windows. Not allowing it would be like not allowing Ethernet. Without Remoting, you’ll find that many of Windows’ administrative tools and features simply don’t work, especially in Windows Server 2012 and later.
Remoting is more secure than what we’ve used in the past for these tasks. It authenticates, by default, using the Kerberos protocol, which never transmits passwords on the network (encrypted or otherwise). Remoting uses a single, customizable port, rather than the thousands required by older protocols like RPCs. WinRM and Remoting have a huge variety of configuration settings that let you control who can use it, how much they can use it, and soon.
10.3. Using Remoting
In the next few sections, we’re going to walk you through the complete process of setting up and using Remoting. This will specifically cover the “easy scenario,” meaning that both your computer and the remote computer are in the same Active Directory domain. After we go over these basics, we’ll dive into all of the other scenarios that you might have to configure.
10.3.1. Enabling Remoting
Remoting needs to be enabled on any machine that will receive connections, which can include computers running either the server or a client version of the Windows operating system. Windows Server 2012, and later versions of the server OS, has Remoting enabled by default though client version of Windows don’t. The easy way to set up Remoting is to run Enable-PSRemoting (you need to be running PowerShell with elevated privileges). You could perform all of the steps manually but we don’t recommend it.
Note
You have to set up PowerShell Remoting on the machine itself. You can’t do it remotely. Having it enabled by default is a good step forward—one less configuration step on new machines.
The Enable-PSRemoting command performs several tasks:
· Starts (or restarts, if it’s already started) the WinRM service.
· Sets the WinRM service to start automatically from now on.
· Creates a WinRM listener for HTTP traffic on port 5985 for all local IP addresses.
· Creates a Windows Firewall exception for the WinRM listener. Note that this will fail on client versions of Windows if any network cards are configured to have a type of “Public,” because the firewall will refuse to create new exceptions on those cards. If this happens, change the network card’s type to something else (like “Work” or “Private,” as appropriate—Windows 8/2012 provides the Set-NetConnectionProfile cmdlet for this task) and run Enable-PSRemoting again. Alternately, if you know you have some Public network cards, add the -SkipNetworkProfileCheck parameter to Enable-PSRemoting. Doing so will successfully create a Firewall exception that allows incoming Remoting traffic only from the computer’s local subnet.
The command will also set up one or more of these endpoints:
· Microsoft.PowerShell
· Microsoft.PowerShell32
· Microsoft.ServerManager (for Server Manager)
· Microsoft.Windows.ServerManagerWorkflows (for Server Manager workflows)
· Microsoft.PowerShell.Workflow (for PowerShell workflow)
You’ll be prompted several times as the command runs; be sure to reply “Y” for “Yes” so that each step can complete properly. You can avoid the prompts by using the –Force parameter.
Discovering WSMAN endpoints
You can find the endpoints that exist on your system through the WSMAN provider. The configuration information is exposed through a PowerShell drive—WSMAN:
PS C:\> dir WSMan:\localhost\Plugin
WSManConfig: Microsoft.WSMan.Management\WSMan::localhost\Plugin
Type Keys Name
---- ---- ----
Container {Name=Event Forwarding Plugin} Event Forwarding Plugin
Container {Name=microsoft.powershell} microsoft.powershell
Container {Name=microsoft.powershell... microsoft.powershell.workflow
Container {Name=microsoft.powershell32} microsoft.powershell32
Container {Name=WMI Provider} WMI Provider
This example is taken from a Windows 8.1 64-bit machine. You’ll notice what appears to be two endpoints that we haven’t mentioned:
· Event Forwarding Plugin
· WMI Provider
Windows servers have another apparent endpoint that we haven’t mentioned: SEL Plugin.
The simple reason we haven’t mentioned them is that they aren’t Remoting endpoints as such. Their purpose is to provide WSMAN connectivity for other activities. Event forwarding and WMI are self-explanatory whereas SEL is for hardware management.
The WSMAN configurations that are purely for Remoting can be discovered by using Get-PSSessionConfiguration:
PS C:\> Get-PSSessionConfiguration | format-table Name, PSVersion -auto
Name PSVersion
---- ---------
microsoft.powershell 4.0
microsoft.powershell.workflow 4.0
microsoft.powershell32 4.0
Table 10.1 illustrates some example endpoint configurations. On a 32-bit machine, the endpoint is referred to as PowerShell rather than PowerShell32.
Table 10.1. Example endpoint configurations. The table reports the “out-of-the-box” configuration. Any machine originally running PowerShell v3 that has been upgraded to PowerShell v4 will show the PowerShell version as 4.
|
PowerShell version |
PowerShell 32-bit |
PowerShell 64-bit |
Server Manager |
Server Manager workflow |
PowerShell workflow |
|
|
Windows Server 2008 R2 |
2 |
Y |
Y |
Y |
||
|
Windows 7 64-bit |
2 |
Y |
Y |
Y |
||
|
Windows 8 32-bit client |
3 |
Y |
Y |
|||
|
Windows 8.1 64-bit client |
4 |
Y |
Y |
Y |
||
|
Windows Server 2012 |
3 |
Y |
Y |
Y |
Y |
|
|
Windows Server 2012 R2 |
4 |
Y |
Y |
Y |
Y |
|
|
Windows 7 client 32-bit stand-alone |
2 |
Y |
In an enterprise you’ll probably use Group Policy to configure Remoting. That approach has slightly a different outcome compared to using Enable-PSRemoting, as shown in table 10.2.
Table 10.2. The outcome when enabling Remoting through different mechanisms
|
Enable-PSRemoting |
Group Policy |
Manually step-by-step |
|
|
Set WinRM to autostart and start the service |
Yes |
Yes |
Yes; use Set-Service and Start-Service. |
|
Configure HTTP listener |
Yes |
You can configure autoregistration of listeners, but you can’t create custom listeners. |
Yes; use the Winrm command-line utility and WSMan: drive in PowerShell |
|
Configure HTTPS listener |
No |
No |
Yes; use the winrm command-line utility and WSMan: drive in PowerShell |
|
Configure endpoints/session configurations |
Yes |
No |
Yes; use PSSession-Configuration cmdlets |
|
Configure Windows Firewall exception |
Yes, but not on a Public network |
Yes, but not on a Public network |
Yes, but not on a Public network |
10.3.2. 1-to-1 Remoting
The most straightforward way to use Remoting is called 1-to-1 Remoting, in which you essentially bring up an interactive PowerShell prompt on a remote computer. It’s pretty simple, once Remoting is enabled on the remote machine:
PS C:\> Enter-PSsession -ComputerName Win8
[Win8]: PS C:\Users\Administrator\Documents>
Note
If you want to experiment with this, just use localhost as the computer name, once you’ve enabled Remoting on your computer. You’ll be “remotely controlling” your local machine, but you’ll get the full Remoting experience.
Notice how the PowerShell prompt changes to include the name of the computer you’re now connected to. From here, it’s almost exactly as if you were physically standing in front of that computer, and you can run any command that the remote machine contains. Keep these important caveats in mind:
· By default, when the PowerShell prompt contains any computer name (even localhost), you can’t execute any other commands that initiate a Remoting connection. Doing so would create a “second hop,” which won’t work by default.
· You can’t run any commands that start a graphical application. If you do so, the shell may appear to freeze; press Ctrl-C to end the process and regain control.
· You can’t run any command program that has its own “shell” like nslookup or netsh—though you can run them as commands rather than interactively.
· You can only run scripts on the remote machine if its execution policy permits you to do so (we discuss that in chapter 17).
· You aren’t connected to an interactive desktop session; your connection will be audited as a “network logon,” much as if you were connecting to a file share on the remote machine. As a result of the connection type, Windows won’t execute profile scripts, although you’ll be connected to your profile home folder on the remote machine.
· Nothing you do will be visible by any other user who’s connected to the same machine, even if they’re interactively logged onto its desktop console. You can’t run some application and have it “pop up” in front of the logged-on user.
· You must specify the computer’s name as it appears in Active Directory or in your local Trusted Hosts list; you can’t use IP addresses or DNS CNAME aliases unless they’ve been added to your Trusted Hosts list.
When you’ve finished with the remote machine, run Exit-PSSession. This will return you to your local prompt, close the connection to the remote machine, and free up resources on the remote machine. This will also happen automatically if you just close the PowerShell window.
[Win8]: PS C:\Users\Administrator\Documents> Exit-PSSession
PS C:\>
The way we’ve used Enter-PSSession will always connect to the remote machine’s default PowerShell endpoint. On a 64-bit operating system, that’ll be the 64-bit version of PowerShell. Later, we’ll show you how to connect to other endpoints (remembering that Enable-PSRemotingwill create multiple endpoints).
10.3.3. 1-to-many Remoting
One-to-many Remoting, also known as fan-out Remoting, is a powerful technique that highlights the value of Remoting. You transmit a command (or a series of commands) to multiple remote computers. They each execute the command, serialize the results into XML, and send the results back to you. Your copy of PowerShell deserializes the XML into objects and puts them in the pipeline. For example, suppose you want to get a list of all processes whose names start with the letter “s,” from two different computers:
PS C:\> Invoke-Command -ScriptBlock { Get-Process -name s* } -ComputerName
![]() localhost,win8
localhost,win8
Handles NPM(K) PM(K) WS(K) VM(M) CPU(s) Id ProcessN PSCompu
ame terName
------- ------ ----- ----- ----- ------ -- -------- -------
217 11 3200 7080 33 1.23 496 services win8
50 3 304 980 5 0.13 248 smss win8
315 16 2880 8372 46 0.03 12 spoolsv win8
472 36 8908 11540 60 0.31 348 svchost win8
306 12 2088 7428 36 0.19 600 svchost win8
295 15 2372 5384 29 0.61 636 svchost win8
380 15 17368 19428 55 0.56 728 svchost win8
1080 41 12740 25456 120 2.19 764 svchost win8
347 19 3892 8812 93 0.03 788 svchost win8
614 52 13820 18220 1129 2.28 924 svchost win8
45 4 508 2320 13 0.02 1248 svchost win8
211 18 9228 8408 1118 0.05 1296 svchost win8
71 6 804 3540 28 0.00 1728 svchost win8
2090 0 120 292 3 10.59 4 System win8
217 11 3200 7080 33 1.23 496 services loca...
50 3 304 980 5 0.13 248 smss loca...
315 16 2880 8372 46 0.03 12 spoolsv loca...
469 36 8856 11524 59 0.31 348 svchost loca...
306 12 2088 7428 36 0.19 600 svchost loca...
295 15 2372 5384 29 0.61 636 svchost loca...
380 15 17368 19428 55 0.56 728 svchost loca...
1080 41 12740 25456 120 2.19 764 svchost loca...
347 19 3892 8812 93 0.03 788 svchost loca...
607 49 13756 18132 1129 2.28 924 svchost loca...
45 4 508 2320 13 0.02 1248 svchost loca...
211 18 9228 8408 1118 0.05 1296 svchost loca...
71 6 804 3540 28 0.00 1728 svchost loca...
2089 0 120 292 3 10.59 4 System loca...
The command is Invoke-Command. Its –ScriptBlock parameter accepts the commands (use semicolons to separate multiple commands) you want transmitted to the remote machines; the –ComputerName parameter specifies the machine names. Alternatively, for longer commands a script block object could be created:
$sb = {Get-Process -Name s*}
Invoke-Command -ComputerName localhost,win8 -ScriptBlock $sb
As with Enter-PSSession, you must specify the computer’s name as it appears in Active Directory or in your local Trusted Hosts list; you can’t use IP addresses or DNS CNAME aliases unless they’ve been added to your Trusted Hosts list.
Notice anything interesting about the output? It contains an extra column named PSComputerName, which contains the name of the computer each result row came from. This is a handy way to separate, sort, group, and otherwise organize your results. This property is always added to the incoming results by PowerShell; if you’d rather not see the property in the output, add the –HideComputerName parameter to Invoke-Command. The property will still exist (and can be used for sorting and so forth), but it won’t be displayed in the output by default.
As with Enter-PSSession, Invoke-Command will use the default PowerShell endpoint on the remote machine—which in the case of a 64-bit OS will be the 64-bit shell. We’ll cover how to connect to a different endpoint later in this chapter.
By default, Invoke-Command will talk to only 32 computers at once. Doing so requires it to maintain a PowerShell instance in memory for each remote machine it’s talking to; 32 is a number Microsoft came up with that seems to work well in a variety of situations. If you specify more than 32 computers, the extra ones will just queue up, and Invoke-Command will start working with them as the first 32 begin to complete. You can change the level of parallelism by using the command’s –ThrottleLimit parameter, keeping in mind that higher numbers place a greater load on your computer but no extra load on the remote machines.
10.3.4. Remoting caveats
The data sent from a remote machine to your computer has to be packaged in a way that makes it easy to transmit over the network. Serialization and deserialization, which we’ve already mentioned, make it possible—but with some loss of functionality. For example, consider the type of object produced by Get-Service:
PS C:\> Get-Service | Get-Member
TypeName: System.ServiceProcess.ServiceController
Name MemberType Definition
---- ---------- ----------
Name AliasProperty Name = ServiceName
RequiredServices AliasProperty RequiredServices = ServicesDepe...
Disposed Event System.EventHandler Disposed(Sy...
Close Method System.Void Close(
Continue Method System.Void Continue()
CreateObjRef Method System.Runtime.Remoting.ObjRef ...
Dispose Method System.Void Dispose()
Equals Method bool Equals(System.Object obj)
ExecuteCommand Method System.Void ExecuteCommand(int ...
GetHashCode Method int GetHashCode()
GetLifetimeService Method System.Object GetLifetimeService()
GetType Method type GetType()
InitializeLifetimeService Method System.Object InitializeLifetim...
Pause Method System.Void Pause()
Refresh Method System.Void Refresh()
Start Method System.Void Start(), System.Voi...
Stop Method System.Void Stop()
WaitForStatus Method System.Void WaitForStatus(Syste...
CanPauseAndContinue Property bool CanPauseAndContinue {get;}
CanShutdown Property bool CanShutdown {get;}
CanStop Property bool CanStop {get;}
Container Property System.ComponentModel.IContaine...
DependentServices Property System.ServiceProcess.ServiceCo...
DisplayName Property string DisplayName {get;set;}
MachineName Property string MachineName {get;set;}
ServiceHandle Property System.Runtime.InteropServices....
ServiceName Property string ServiceName {get;set;}
ServicesDependedOn Property System.ServiceProcess.ServiceCo...
ServiceType Property System.ServiceProcess.ServiceTy...
Site Property System.ComponentModel.ISite Sit...
Status Property System.ServiceProcess.ServiceCo...
ToString ScriptMethod System.Object ToString();
As you can see, these objects’ members include several methods, which let you stop the service, pause it, and so on. Now consider that exact same kind of object retrieved, via Remoting, from a remote machine:
PS C:\> Invoke-Command -ComputerName win8 -ScriptBlock { Get-Service } |
![]() Get-Member
Get-Member
TypeName: Deserialized.System.ServiceProcess.ServiceController
Name MemberType Definition
---- ---------- ----------
ToString Method string ToString(), string ToString(str...
Name NoteProperty System.String Name=AeLookupSvc
PSComputerName NoteProperty System.String PSComputerName=win8
PSShowComputerName NoteProperty System.Boolean PSShowComputerName=True
RequiredServices NoteProperty Deserialized.System.ServiceProcess.Ser...
RunspaceId NoteProperty System.Guid RunspaceId=00e784f7-6c27-4...
CanPauseAndContinue Property System.Boolean {get;set;}
CanShutdown Property System.Boolean {get;set;}
CanStop Property System.Boolean {get;set;}
Container Property {get;set;}
DependentServices Property Deserialized.System.ServiceProcess.Ser...
DisplayName Property System.String {get;set;}
MachineName Property System.String {get;set;}
ServiceHandle Property System.String {get;set;}
ServiceName Property System.String {get;set;}
ServicesDependedOn Property Deserialized.System.ServiceProcess.Ser...
ServiceType Property System.String {get;set;}
Site Property {get;set;}
Status Property System.String {get;set;}
The methods (except for the universal ToString() method) are gone. That’s because you’re looking at a deserialized version of the object (it says so right in the TypeName at the top of the output), and the methods are stripped off. Essentially, you’re getting a read-only, static version of the object.
This isn’t necessarily a downside; serialization and the removal of methods doesn’t occur until the remote commands finish executing and their output is being packaged for transmission. The objects are still “live” objects when they’re on the remote computer, so you have to start them, stop them, pause them, or whatever on the remote machine. In other words, any “actions” you want to take must be part of the command you send to the remote machine for execution.
10.3.5. Remoting options
Both Invoke-Command and Enter-PSSession offer a few basic options for customizing their behavior.
Alternate credentials
By default, PowerShell delegates whatever credential you used to open the shell on your computer. That may not always be what you want, so you can specify an alternate username by using the –Credential parameter. You’ll be prompted for the account’s password, and that account will be used to connect to the remote machine (or machines) and run whatever commands you supply.
Note
In chapter 17, on PowerShell security, we discuss the –Credential parameter in more detail and offer other ways in which it can be used.
Alternate port number
PowerShell defaults to using port 5985 for Remoting; you can change that when you set up WinRM listeners. You can also change your computer to use a different port when it initiates connections, which makes sense if you’ve changed the port your servers are listening to.
You’ll find the port being listened to (the port on which traffic will be accepted) by examining your WSMan drive in PowerShell. Here’s an example. (Note that your computer’s listener ID will be different than the Listener_1084132640 shown here, but you can find your ID by getting a directory listing of WSMan:\localhost\Listener.)
PS WSMan:\localhost\Listener\Listener_1084132640> ls
WSManConfig:
Microsoft.WSMan.Management\WSMan::localhost\Listener\Listener_1084132640
Type Name SourceOfValue Value
---- ---- ------------- -----
System.String Address *
System.String Transport HTTP
System.String Port 5985
System.String Hostname
System.String Enabled true
System.String URLPrefix wsman
System.String CertificateThumbprint
System.String ListeningOn_1638538265 10.211.55.6
System.String ListeningOn_1770022257 127.0.0.1
System.String ListeningOn_1414502903 ::1
System.String ListeningOn_766473143 2001:0:4...
System.String ListeningOn_86955851 fdb2:2c2...
System.String ListeningOn_1728280878 fe80::5e...
System.String ListeningOn_96092800 fe80::98...
System.String ListeningOn_2037253461 fe80::c7...
Keep in mind that to work with the WSMAN PSDrive, you must be in an elevated PowerShell session. To change the port (using port 1000 as an example), type this:
PS C:\> Set-Item WSMan:\localhost\listener\*\port 1000
Now let’s look at the client-side configuration, which tells your computer which port the server will be listening to:
PS WSMan:\localhost\Client\DefaultPorts> dir
WSManConfig:
Microsoft.WSMan.Management\WSMan::localhost\Client\DefaultPorts
Type Name SourceOfValue Value
---- ---- ------------- -----
System.String HTTP 5985
System.String HTTPS 5986
If you’ve set all of your servers to port 1000 (for example), then it makes sense to also reconfigure your clients so that they use that port by default:
PS C:\> Set-Item WSMan:\localhost\client\DefaultPorts\HTTP 1000
Alternately, both Invoke-Command and Enter-PSSession have a –Port parameter, which can be used to specify a port other than the one listed in the DefaultPorts configuration. That’s useful if you have to use an alternate port for just one or two servers in your environment and don’t want to change the client’s defaults.
Tip
If you want to change default ports for your enterprise, we suggest you use Group Policy to push out these settings.
The default ports should only be changed if you have a good reason. If you do change the ports, make sure that your change is documented and applied across your enterprise (including firewalls) to avoid unnecessary troubleshooting efforts if Remoting connections fail.
Using SSL
If a server is configured with an HTTPS endpoint (which isn’t the case after running Enable-PSRemoting; you have to set that up manually, which we’ll get to later), then specify the –UseSSL parameter of Invoke-Command or Enter-PSSession to use the HTTPS port. That’s port 5986 by default.
Sending a script instead of a command
Our example of Invoke-Command showed how to send just one command, or even a few commands separated by semicolons. For example, to run a command that’s located in a module, you first need to load the module:
PS C:\> Invoke-Command –ScriptBlock { Import-Module ActiveDirectory;
![]() Get-ADUser –filter * } –ComputerName WINDC1
Get-ADUser –filter * } –ComputerName WINDC1
PowerShell v3 and v4 autoloads modules by default, though you won’t see them using Get-Module –ListAvailable until you’ve used them. Forcing the module to load is required for PowerShell v2 and does no harm in v3 or later. In a mixed environment, it’s essential. The module has to be available on the remote machine. Invoke-Command can also send an entire script file, if you prefer. The file path and name are provided to the –FilePath parameter, which you’d use in place of –ScriptBlock. PowerShell will read the contents of the file from the local machine and transmit them over the network—the remote machines don’t need direct access to the file itself.
10.4. PSSessions
So far, your use of Remoting has been ad hoc. You’ve allowed PowerShell to create the connection, it’s run your commands, and then it closes the connection. Without realizing it, you’ve been creating a temporary PowerShell session, or PSSession. A PSSession represents the connection between your computer and a remote one. Some overhead is involved in setting up a connection and then closing it down, and if you plan to connect to the same computer several times within a period of time, you may want to create a persistent connection to avoid that overhead.
Persistent connections have another advantage: They represent a running copy of PowerShell on a remote machine. Using the ad hoc Remoting that we’ve shown you so far, every single command you send runs in a new, fresh copy of the shell. With a persistent connection, you could continue to send commands to the same copy of PowerShell, and the results of those commands—such as importing modules—would remain in effect until you closed the connection.
10.4.1. Creating a persistent session
The New-PSSession command sets up one or more new sessions. You might want to assign these session objects to a variable so that you can easily refer to them in the future:
PS C:\> $win8 = New-PSsession -ComputerName win8
PS C:\> $domaincontrollers = New-PSsession -ComputerName win8,windc1
Here, you’ve created a variable, $win8, that contains a single session object, and a variable, $domaincontrollers, that contains two session objects.
Note
New-PSSession offers the same options for using alternate credentials, using SSL, and using port numbers as Enter-PSSession and Invoke-Command.
10.4.2. Using a session
Both Invoke-Command and Enter-PSSession can use an already-open session object. Provide the object (or objects) to the commands’ –Session parameter, instead of using the –ComputerName parameter. For example, to initiate a 1-to-1 connection to a computer, use this:
PS C:\> Enter-PSSession -Session $win8
[win8]: PS C:\Users\Administrator\Documents>
Be careful to pass only a single session to Enter-PSSession; if you give it multiple objects, the command can’t function properly. Invoke-Command, though, can accept multiple sessions:
PS C:\> Invoke-Command -Session $domaincontrollers -ScriptBlock {
![]() get-eventlog -LogName security -Newest 50 }
get-eventlog -LogName security -Newest 50 }
As we mentioned, it’s a lot easier to work with sessions if you keep them in a variable. That isn’t mandatory, though, because you can use Get-PSSession to retrieve sessions. For example, if you have an open session to a computer named WINDC1, you can retrieve the session and connect to it like this:
PS C:\> Enter-PSSession –Session (Get-PSSession –computername WINDC1)
The parenthetical Get-PSSession runs first, returning its session object to the –Session parameter of Enter-PSSession. If you have multiple sessions open to the same computer, the command will fail.
10.4.3. Managing sessions
Session objects will remain open and available for quite some time by default; you can configure a shorter idle timeout if you want. You can display a list of all sessions, and their status, by running Get-PSSession with no parameters:
PS C:\> Get-PSSession
Id Name ComputerName State ConfigurationName Ava
ila
bil
ity
-- ---- ------------ ----- ----------------- ---
6 Session6 win8 Opened Microsoft.PowerShell ble
7 Session7 win8 Opened Microsoft.PowerShell ble
Note that the output includes both the state (Opened, in this case) and availability (Available, although our output here is a bit truncated). You can also see the name of the endpoint that the session is connected to—Microsoft.PowerShell in both instances in this example. One reason you might maintain multiple connections to a single remote machine is to connect to different endpoints—perhaps, for example, you might want a connection to both a 64-bit and a 32-bit PowerShell session.
When you’ve finished with a session, you can close it to free up resources. For example, to close all open sessions, use this:
PS C:\> Get-PSSession | Remove-PSSession
Get-PSSession is quite flexible. It provides parameters that let you retrieve just a subset of available sessions without having to get them all and then filter them through Where-Object:
· -ComputerName retrieves all sessions for the specified computer name.
· -ApplicationName retrieves all sessions for the specified application.
· -ConfigurationName retrieves all sessions connected to the specified endpoint, such as Microsoft.PowerShell.
10.4.4. Disconnecting and reconnecting sessions
PowerShell v3 introduced the ability to disconnect a session and then later reconnect it. A disconnected session is still running on the remote machine, meaning you can potentially start a long-running process, disconnect, and then reconnect later to check your results. You can even receive the results from a disconnected session without having to explicitly reconnect.
Note that the disconnection isn’t necessarily automatic. If you just close your shell window, or if your computer crashes, PowerShell won’t automatically put the remote session into a disconnected state. Instead, it’ll shut the session down. Disconnecting is something you have to explicitly do, although PowerShell can automatically put a session into a disconnected state after a long timeout period or a network outage. The neat thing is that you can start a session from one computer, disconnect it, and then reconnect to that session from another computer. For example, to start a session and then disconnect it, use this:
PS C:\> New-PSSession -ComputerName win8
Id Name ComputerName State ConfigurationName Ava
ila
bil
ity
-- ---- ------------ ----- ----------------- ---
16 Session16 win8 Opened Microsoft.PowerShell ble
Availability value when the session is open is - Available
PS C:\> Get-PSSession -ComputerName win8 | Disconnect-PSSession
Id Name ComputerName State ConfigurationName Ava
ila
bil
ity
-- ---- ------------ ----- ----------------- ---
16 Session16 win8 Disconnected Microsoft.PowerShell one
Availability value when the session is disconnected is – None.
Now you can shut down your shell window, move to an entirely different computer, and reconnect the session from there. To do so, run Connect-PSSession and specify the computer name on which the session is running (you can also specify an application name and configuration name using the appropriate parameters):
PS C:\> Connect-PSSession -ComputerName win8
Id Name ComputerName State ConfigurationName Ava
ila
bil
ity
-- ---- ------------ ----- ----------------- ---
16 Session16 win8 Opened Microsoft.PowerShell ble
Here’s an important thing to note: You can reconnect to someone else’s session. For example, it’s possible for Bob to “grab” a session that was originally opened by, and disconnected by, Jane. You need to be an administrator to seize someone else’s session as long as you have the credentials.
Invoke-Command can be used in its ad hoc mode—when you specify a computer name rather than a session—and told to create a disconnected session. The command will start up a session, send the command you specify, and then leave the session disconnected and still running that command. You can reconnect later or receive the results from the session. Here’s an example:
PS C:\> Invoke-Command -ComputerName win8 -ScriptBlock { get-eventlog
![]() -LogName security -Newest 1000 } –Disconnected
-LogName security -Newest 1000 } –Disconnected
Id Name ComputerName State ConfigurationName Ava
ila
bil
ity
-- ---- ------------ ----- ----------------- ---
13 Session12 win8 Disconnected http://schemas.mi... one
PS C:\> Receive-PSSession -Session (Get-PSSession -ComputerName win8)
Index Time EntryType Source InstanceID Me PS
ss Co
ag mp
e ut
er
Na
me
----- ---- --------- ------ ---------- -- --
299 Mar 14 16:24 SuccessA... Microsoft-Windows... 4616 Th wi
298 Mar 14 15:23 SuccessA... Microsoft-Windows... 4616 Th wi
297 Mar 14 14:22 SuccessA... Microsoft-Windows... 4616 Th wi
296 Mar 14 13:21 SuccessA... Microsoft-Windows... 4616 Th wi
Here, you can see that we invoked the command and asked it to create a disconnected session. The –Disconnected parameter we used is an alias for –InDisconnectedSession. Normally, when you specify a computer name the session will start, run the command, and then send you the results and close. In this case, you anticipate the command taking a few moments to complete, so you leave the session running and disconnected. Receive-PSSession is used to retrieve the results. The session is still running and disconnected, but if you want to run further commands in it, you can easily reconnect it to do so:
PS C:\> Get-PSSession -ComputerName win8 | Connect-PSSession
Id Name ComputerName State ConfigurationName Ava
ila
bil
ity
-- ---- ------------ ----- ----------------- ---
13 Session12 win8 Opened http://schemas.mi... ble
PS C:\> invoke-command -ScriptBlock { get-service } -Session (Get-PSSession
![]() -ComputerName win8)
-ComputerName win8)
Status Name DisplayName PSCompu
terName
------ ---- ----------- -------
Stopped AeLookupSvc Application Experience win8
Stopped ALG Application Layer Gateway Service win8
Stopped AllUserInstallA... Windows All-User Install Agent win8
Stopped AppIDSvc Application Identity win8
Stopped Appinfo Application Information win8
Stopped AppMgmt Application Management win8
10.5. Advanced session techniques
There’s a lot more you can do with sessions. Keep in mind that Remoting always involves a session—even if it’s one that’s created, used, and closed automatically. Therefore, most of the options we’ll discuss in the next two sections apply both to the –PSSession cmdlets as well asInvoke-Command, because all of them involve the use of Remoting sessions.
10.5.1. Session parameters
Several common parameters are used by the Remoting cmdlets:
· -Authentication specifies an authentication mechanism. Kerberos is the default; you can also specify Basic, CredSSP, Digest, Negotiate, and Negotiate-WithImplicitCredential. CredSSP is a common alternative that offers a solution to the “second hop” problem, which we’ll discuss later. Note that the protocol you specify must be enabled in WinRM before it can be used, and only Kerberos is enabled by default. You can see the authentication protocols configured on the client by using this:
dir wsman:\localhost\client\auth
The remote authentication configuration can be viewed like this:
Connect-WSMan -ComputerName server02
dir wsman:server02\service\auth
-SessionOption specifies a Session Options object, which wraps up a number of advanced configuration settings. We’ll discuss those next.
· -AllowRedirection allows your Remoting session to be redirected from the computer you originally specified and handled by another remote machine instead. It’s unusual to use this on an internal network, but it’s common when you’re connecting to a cloud infrastructure. Microsoft Office 365 is an excellent example: You’ll often connect PowerShell to a generic computer name and then be redirected to the specific server that handles your organization’s data.
· -ApplicationName connects a session to the specified application name, such as http://localhost:5985/WSMAN. The application name is always a URI starting with http:// or https://.
· -ConfigurationName connects a session to the specified configuration or endpoint. This can either be a name, like Microsoft.PowerShell, or a full URI, such as http://schemas.microsoft.com/powershell.
· -ConnectionURI specifies the connection endpoint—this is more or less an alternate way of specifying a computer name, port number, and application name in one easy step. These look something like http://SERVER2:5985/PowerShell, including the transport (http or https), the computer name, the port, and the application name.
When creating a new session with either Invoke-Command or New-PSSession, you can specify a friendly name for the session. Just use –SessionName with Invoke-Command, or use –Name with New-PSSession. Once you’ve done so, it’s a bit easier to retrieve the session again: Just use Get-PSSession and the –Name parameter to specify the friendly name of the desired session.
10.5.2. Session options
On most of the Remoting-related commands you’ll notice a –SessionOption parameter, which accepts a Session Options object. This object consolidates a number of advanced parameters that can be used to set up a new session. Typically, you’ll create the options object using New-PSSessionOption, export the session to an XML file (or store it in a variable), and then reimport it (or specify the variable) to utilize the options. New-PSSessionOption supports a number of parameters, and you can read all about them in its help file.
For example, suppose you occasionally want to open a new session with no compression or encryption. Here’s how you could create a reusable options object and then use it to open a new session:
PS C:\> New-PSSessionOption -NoCompression
![]() -NoEncryption | Export-Clixml NoCompNoEncOption.xml
-NoEncryption | Export-Clixml NoCompNoEncOption.xml
PS C:\> New-PSSession -ComputerName win8
![]() -SessionOption (Import-Clixml .\NoCompNoEncOption.xml)
-SessionOption (Import-Clixml .\NoCompNoEncOption.xml)
Note
This particular set of session options won’t work by default, because the default client profile doesn’t permit unencrypted traffic. We modified our test computer to permit unencrypted traffic to help ease troubleshooting and experimentation in our lab.
New-PSSessionOption has a whole slew of parameters; none of them are mandatory. Specify the ones you want, and omit the ones you don’t care about, when creating a new session options object.
10.6. Creating a custom endpoint
The New-PSSessionConfigurationFile cmdlet makes it easy to set up new endpoints. You’re not technically creating anything related to a PSSession, despite what the cmdlet name implies; you’re creating a new Remoting configuration, also known as an endpoint, that will run Windows PowerShell. The command uses a number of parameters, most of which are optional. We’ll let you read the command’s help for full details and stick with the most important parameters. The first, -Path, is mandatory and specifies the path and filename of the session configuration file that you want to create. You must give the file the “.pssc” filename extension.
Everything else is optional. Some of the parameters, such as –AliasDefinitions, accept a hash table (we cover those in chapter 16). This parameter, for example, defines a set of aliases that’ll be available to anyone who connects to this new endpoint. You’d specify something like –AliasDefinitions @{Name='hlp';definition='Get-Help'; options='ReadOnly'} to define an alias named hlp that runs the Get-Help cmdlet and that isn’t modifiable by anyone using the endpoint (ReadOnly).
Here’s an example:
PS C:\> New-PSSessionConfigurationFile -Path Restricted.pssc
![]() -LanguageMode Restricted -VisibleProviders FileSystem
-LanguageMode Restricted -VisibleProviders FileSystem
![]() -ExecutionPolicy Restricted -PowerShellVersion 3.0
-ExecutionPolicy Restricted -PowerShellVersion 3.0
This code creates a new configuration file that specifies:
· The endpoint will be in Restricted Language mode. Users will be able to run cmdlets and functions, but they may not create script blocks or variables and may not use other scripting language features. Only basic comparison operators will be available (all of this is documented in the command’s help for the -LanguageMode parameter).
· The endpoint will be PowerShell 3.0. If you omit this parameter the newest available version of Windows PowerShell is used. Valid values are 2.0 and 3.0 even in PowerShell v4 and later. We recommend using the newest available version.
· Only the FileSystem PSProvider will be available; other forms of storage won’t be connected as drives.
· Script execution won’t be permitted, meaning that only cmdlets will be available to run.
Next, you ask the shell to use that configuration file to create the new endpoint, registering it with WinRM:
PS C:\> Register-PSSessionConfiguration -Path .\Restricted.pssc -Force
![]() -Name MyEndpoint
-Name MyEndpoint
WSManConfig: Microsoft.WSMan.Management\WSMan::localhost\Plugin
Type Keys Name
---- ---- ----
Container {Name=MyEndpoint} MyEndpoint
You define the name MyEndpoint for this new endpoint, so to create a session that connects to it, you go to another computer and use New-PSSession:
PS C:\> $sess = New-PSSession -ComputerName win8
![]() -ConfigurationName MyEndpoInt
-ConfigurationName MyEndpoInt
Now you can use that session object with Enter-PSSession or Invoke-Command, as you learned earlier in this chapter.
There are other commands used for unregistering a configuration, disabling and enabling them (while leaving them registered), and so forth:
PS C:\> Get-Command -Noun pssessionconfiguration*
Capability Name
---------- ----
Cmdlet Disable-PSSessionConfiguration
Cmdlet Enable-PSSessionConfiguration
Cmdlet Get-PSSessionConfiguration
Cmdlet New-PSSessionConfigurationFile
Cmdlet Register-PSSessionConfiguration
Cmdlet Set-PSSessionConfiguration
Cmdlet Test-PSSessionConfigurationFile
Cmdlet Unregister-PSSessionConfiguration
When you create a custom session configuration file, as you’ve seen, you can set its language mode. The language mode determines what elements of the PowerShell scripting language are available in the endpoint, and the language mode can be a bit of a loophole. With the Full language mode, you get the entire scripting language, including script blocks. A script block is any executable hunk of PowerShell code contained within curly brackets {}. They’re the loophole. Any time you allow the use of script blocks, they can run any legal command, even if your endpoint used-VisibleCmdlets or -VisibleFunctions or another parameter to limit the commands in the endpoint.
In other words, if you register an endpoint that uses -VisibleCmdlets to expose Get-ChildItem but you create the endpoint’s session configuration file to have the full language mode, then any script blocks inside the endpoint can use any command. Someone could run:
PS C:\> & { Import-Module ActiveDirectory; Get-ADUser -filter * |
![]() Remove-ADObject }
Remove-ADObject }
Eek! This can be especially dangerous if you configured the endpoint to use a RunAs credential to run commands under elevated privileges. It’s also somewhat easy to let this happen by mistake, because you set the language mode when you create the new session configuration file (New-PSSessionConfigurationFile), not when you register the session (Register-PSSessionConfiguration). So if you’re using a session configuration file created by someone else, pop it open and confirm its language mode before you use it!
You can avoid this problem by setting the language mode to NoLanguage, which shuts off script blocks and the rest of the scripting language. Or, go for RestrictedLanguage, which blocks script blocks while still allowing some basic operators if you want users of the endpoint to be able to do basic filtering and comparisons.
Understand that this isn’t a bug—the behavior we’re describing here is by design. But it can be a problem if you don’t know about it and understand what it’s doing.
Note
Much thanks to fellow MVP Aleksandar Nikolic for helping us understand the logic of this loophole!
10.6.1. Custom endpoints for delegated administration
One of the coolest things you can do with a custom endpoint is called delegated administration. You set up the endpoint so that it runs all commands under a predefined user account’s authority, rather than using the permissions of the user who connected to the endpoint. This is especially useful for PowerShell Web Access.
To start, you create a custom endpoint, just as we showed you earlier. When creating the new session configuration file, you restrict the endpoint. So, when you’re running New-PSSessionConfigurationFile, you’ll generally do something like this:
· Use –ExecutionPolicy to define a Restricted execution policy if you don’t want people running scripts in the endpoint.
· Use –ModulesToImport to specify one or more modules to load into the session.
· Use –FunctionDefinitions to define custom functions that will appear within the session.
· Potentially use –LanguageMode to turn off PowerShell’s scripting language; this is useful if you want people to run only a limited set of commands.
· Use –SessionType to set the session type to RestrictedRemoteServer. This turns off most of the core PowerShell commands, including the ability to import any modules or extensions that aren’t part of the session configuration file.
· Use –VisibleCmdlets to specify which commands you want visible within the session. You have to make sure their module is imported, but this lets you expose less than 100 percent of the commands in a module. Use –VisibleFunctions to do the same thing for imported functions, and use –VisibleProviders to make specific PSProviders available.
Register the new session configuration using Register-PSSessionConfiguration. When you do so, use the –RunAsCredential parameter to specify the username that all commands within the session will run as. You’ll be prompted for the password. You might also want to consider these parameters:
· -AccessMode lets you specify that the endpoint can only be used by local users (“Local”) or by local and remote (“Remote”).
· -SecurityDescriptorSddl lets you specify, in the Security Descriptor Definition Language (SDDL), who can use the endpoint. Users must have, at a minimum, “Execute(Invoke)” in order to be able to use the session. We find SDDL to be complex, so you could specify the –ShowSecurityDescriptorUI parameter, which lets you set the endpoint permissions in a GUI dialog box. See, GUIs are still useful for some things!
In the end, you’ve created an endpoint that (a) only certain people can connect to, and that (b) will run commands under an entirely different set of credentials. Delegated administration! The people using the endpoint don’t need permission to run the commands you’ve allowed within it!
10.7. Connecting to non-default endpoints
To connect to an endpoint other than the default PowerShell endpoint, you need to know the endpoint name, also called its configuration name. You can run Get-PSSessionConfiguration to see all of the endpoints configured on the local machine:
PS C:\> Get-PSSessionConfiguration
Name : microsoft.powershell
PSVersion : 4.0
StartupScript :
RunAsUser :
Permission : BUILTIN\Administrators AccessAllowed,
BUILTIN\Remote Management Users AccessAllowed
Name : microsoft.powershell.workflow
PSVersion : 4.0
StartupScript :
RunAsUser :
Permission : BUILTIN\Administrators AccessAllowed,
BUILTIN\Remote Management Users AccessAllowed
Name : microsoft.powershell32
PSVersion : 4.0
StartupScript :
RunAsUser :
Permission : BUILTIN\Administrators AccessAllowed,
BUILTIN\Remote Management Users AccessAllowed
This output shows you the configuration name, which you provide to the New-PSSession –ConfigurationName parameter when creating a new session:
PS C:\> New-PSSession -ComputerName win8
![]() -ConfigurationName 'microsoft.powershell32'
-ConfigurationName 'microsoft.powershell32'
Id Name ComputerName State ConfigurationName Ava
ila
bil
ity
-- ---- ------------ ----- ----------------- ---
19 Session19 win8 Opened microsoft.powersh... ble
You’ll also find a –ConfigurationName parameter on Invoke-Command and Enter-PSSession, which enables those cmdlets to connect to an alternate endpoint without creating a persistent session object first.
Get-PSSessionConfiguration only works on the local machine. If you need to discover the endpoints on a remote machine, you can do one of two things. Your first option is to create a session to the remote machine and use Get-PSSessionConfiguration:
PS C:\> Enter-PSSession -ComputerName dc02
[dc02]: PS C:\Users\Richard\Documents> Get-PSSessionConfiguration
Alternatively, you could use Connect-WSMan like this:
PS C:\> Connect-WSMan -ComputerName w12standard
PS C:\> dir wsman:\w12standard\plugin
Both methods work and give the required results as long as Remoting is enabled on the remote system.
10.8. Enabling the “second hop”
We’ve mentioned this “second hop” thing a number of times. It’s essentially a built-in, default limitation on how far your credentials can be delegated. Here’s the scenario:
· You’re using a computer named CLIENT. You open PowerShell, making sure that the shell is run as Administrator. You can run whatever commands you like.
· You use Enter-PSSession to remote to a machine named SERVER1. Your credentials are delegated via Kerberos, and you can run whatever commands you like.
· While still remoted into SERVER1, you use Invoke-Command to send a command, via Remoting, to SERVER2. Your credentials can’t delegate across this “second hop,” and so the command fails.
There are two workarounds to solve this problem. The first is easy: Specify a –Credential parameter any time you’re launching a new Remoting connection across the second and subsequent hops. In our example scenario, while running Invoke-Command on SERVER1 to connect to SERVER2, provide an explicit credential. That way, your credential doesn’t need to be delegated, and you avoid the problem.
Note
If you’re a domain administrator and the local machine (CLIENT in this example) is a domain controller, some elements of the delegation to enable “second hop” processing are available by default. We don’t recommend using domain controllers as administration workstations!
The second technique requires that you enable, and then use, the CredSSP authentication protocol on all machines involved in the chain of Remoting, starting with your computer (CLIENT in our example scenario) and including every machine that you’ll remote to. Enabling CredSSP is most easily done through Group Policy, where you can configure it for entire groups of computers at once. You can, though, enable it on a per-machine basis using the WSMan: drive in PowerShell:
PS WSMan:\localhost\Service\Auth> dir
WSManConfig: Microsoft.WSMan.Management\WSMan::localhost\Service\Auth
Type Name SourceOfValue Value
---- ---- ------------- -----
System.String Basic false
System.String Kerberos true
System.String Negotiate true
System.String Certificate false
System.String CredSSP false
System.String CbtHardeningLevel Relaxed
PS WSMan:\localhost\Service\Auth> set-item ./credssp $true
PS WSMan:\localhost\Service\Auth> dir
WSManConfig: Microsoft.WSMan.Management\WSMan::localhost\Service\Auth
Type Name SourceOfValue Value
---- ---- ------------- -----
System.String Basic false
System.String Kerberos true
System.String Negotiate true
System.String Certificate false
System.String CredSSP true
System.String CbtHardeningLevel Relaxed
Here, we’ve shown the protocol before and after enabling it in WSMan:\localhost\ Service\Auth. Once it’s enabled, specify –Authentication CredSSP when using Invoke-Command, Enter-PSSession, or New-PSSession to use the protocol. An alternative, and possibly simpler, technique is to use the Enable-WSManCredSSP cmdlet on the relevant machines.
On the client machine, run:
Enable-WSManCredSSP -Role Client -DelegateComputer SERVER1
We recommend that you only enable CredSSP when required rather than as a permanent configuration.
On the remote machine, run:
Enable-WSManCredSSP -Role Server
10.9. Setting up WinRM listeners
Enable-PSRemoting creates a single WinRM listener that listens on all enabled IP addresses on the system. You can discover the existing listeners by using this:
PS C:\> Get-WSManInstance winrm/config/Listener -Enumerate
cfg : http://schemas.microsoft.com/wbem/wsman/1/config/
listener
xsi : http://www.w3.org/2001/XMLSchema-instance
lang : en-US
Address : *
Transport : HTTP
Port : 5985
Hostname :
Enabled : true
URLPrefix : wsman
CertificateThumbprint :
ListeningOn : {10.10.54.165, 127.0.0.1, 192.168.2.165, ::1...}
And the IP addresses that are being listened on are discovered like this:
Get-WSManInstance winrm/config/Listener -Enumerate |
select -ExpandProperty ListeningOn
Alternatively, you can use the WSMAN provider:
PS C:\> dir wsman:\localhost\listener
WSManConfig: Microsoft.WSMan.Management\WSMan::localhost\Listener
Type Keys Name
---- ---- ----
Container {Address=*, Transport=HTTP} Listener_809701527
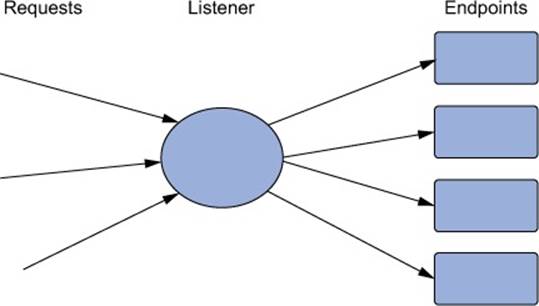
Keep in mind that a single WinRM listener can service any number of endpoints and applications, as shown in figure 10.1; you only need to set up a new listener if the default one (which uses HTTP on port 5985) isn’t what you want to use. It’s easier to change the default listener to use different settings if you don’t want to use its default settings at all. But if you want both that listener and an alternate one, then you need to create that alternate one.
Figure 10.1. A single listener servicing multiple endpoints
Why might you want to create a new listener? The most probable answers are that you want to restrict the IP addresses, or ports, that are used for listening or you want to create a listener for secured traffic using HTTPS rather than HTTP. A combination of these conditions would allow only connections over HTTPS to a specific IP address and port. That approach is useful in an environment requiring secure transport and access—for example, to a server in the DMZ where you need to be able to connect over the management network but not from the internet-facing address.
10.9.1. Creating an HTTP listener
You can create a new listener by using the New-WSManInstance cmdlet:
PS C:\> New-WSManInstance winrm/config/Listener
![]() -SelectorSet @{Transport='HTTP'; Address="IP:10.10.54.165"}
-SelectorSet @{Transport='HTTP'; Address="IP:10.10.54.165"}
![]() -ValueSet @{Port=8888}
-ValueSet @{Port=8888}
The address, port, and transport protocol are specified, but notice that they’re in two separate groups. That’s because New-WSManInstance uses –SelectorSet to identify the individual instance (see the Keys column in the following code) and –ValueSet to define property values. You can see the new listener like this:
PS C:\> dir wsman:\localhost\listener | Format-Table -AutoSize
WSManConfig: Microsoft.WSMan.Management\WSMan::localhost\Listener
Type Keys Name
---- ---- ----
Container {Address=*, Transport=HTTP} Listener_809701527
Container {Address=IP:10.10.54.165, Transport=HTTP} Listener_886604375
10.9.2. Adding an HTTPS listener
Adding a listener for HTTPS is similar, but you need to go through a few steps first:
1. Create a certificate request. You can’t do that in PowerShell and need to either ask your Certificate Services administrators for help or use the tools provided by your certificate provider.
2. Request the certificate using the request you’ve just created.
3. Download the certificate.
4. Install the certificate into the computer certificate store.
5. Find the new certificate in the PowerShell cert: drive and get its thumbprint.
You can now create the listener:
New-WSManInstance winrm/config/Listener
![]() -SelectorSet @{Transport='HTTPS'; Address="IP:10.10.54.165"}
-SelectorSet @{Transport='HTTPS'; Address="IP:10.10.54.165"}
![]() -ValueSet @{Hostname="<servername>";CertificateThumbprint="XXXXXXXX"}
-ValueSet @{Hostname="<servername>";CertificateThumbprint="XXXXXXXX"}
where Hostname matches the server name in your SSL certificate.
You can remove a listener using Remove-WSManInstance:
PS C:\> Get-WSManInstance winrm/config/Listener
![]() -SelectorSet @{Transport='HTTP'; Address="IP:10.10.54.165"} |
-SelectorSet @{Transport='HTTP'; Address="IP:10.10.54.165"} |
Remove-WSManInstance
Or use
Remove-WSManInstance winrm/config/Listener
![]() -SelectorSet @{Transport='HTTP'; Address="IP:10.10.54.165"}
-SelectorSet @{Transport='HTTP'; Address="IP:10.10.54.165"}
You remove the default listener like this:
Remove-WSManInstance winrm/config/Listener
![]() -SelectorSet @{Transport="HTTP"; Address="*"}
-SelectorSet @{Transport="HTTP"; Address="*"}
We recommend restarting the WinRM service after you modify the listeners.
There are two modifications you can make to a connection, whether using Invoke-Command, Enter-PSSession, or some other Remoting command that relates to HTTPS listeners. These are created as part of a session option object.
· -SkipCACheck causes WinRM to not worry about whether or not the SSL certificate was issued by a trusted CA. But untrusted CAs may in fact be untrustworthy! A poor CA might issue a certificate to a bogus computer, leading you to believe you’re connecting to the right machine when in fact you’re connecting to an imposter. Using this parameter is risky, so do so with caution.
· -SkipCNCheck causes WinRM to not worry about whether or not the SSL certificate on the remote machine was actually issued for that machine. Again, this is a great way to find yourself connected to an imposter. Half the point of SSL is mutual authentication, and this parameter disables that half.
10.10. Other configuration scenarios
So far in this chapter, we’ve tried to focus on the easy and common Remoting configuration scenarios, but we know there are other scenarios you’ll have to confront. In the next few sections, we’ll cover some of these “outside the lines” cases. There are certainly others, and you’ll find most of those documented in PowerShell’s about_remote_troubleshooting help file, which we heartily recommend that you become familiar with. That file also explains how to configure many of the Remoting configuration settings, set up firewall exceptions, and perform other tasks via Group Policy—which is a lot easier than configuring individual machines one at a time.
10.10.1. Cross-domain Remoting
Remoting doesn’t work across Active Directory domains by default. If your computer is in DOMAINA, and you need to remote into a machine that belongs to DOMAINB, you’ll have to do a bit of work first. You’ll still need to ensure that your user account has permissions to do whatever it is you’re attempting in DOMAINB—the configuration setting we’re showing you only enables the Remoting connectivity. This is a Registry setting, so be careful when making this change:
PS C:\> New-ItemProperty -Name LocalAccountTokenFilterPolicy -Path
![]() HKLM:\SOFTWARE\Microsoft\Windows\CurrentVersion\Policies\System
HKLM:\SOFTWARE\Microsoft\Windows\CurrentVersion\Policies\System
![]() -PropertyType DWord -Value 1
-PropertyType DWord -Value 1
This code will enable all members of a machine’s Administrators group, regardless of the domain they’re in, to use Remoting on the machine. So, in our example, you’d make this change on the machine in DOMAINB—the destination machine of the Remoting connection.
10.10.2. Quotas
The great thing about Remoting is that it exists and solves a number of administration problems. The bad thing (and there’s always one of those) is that too much Remoting can damage your system health. Imagine the scenario where you’ve implemented a server to support a new business-critical application. The application is being rolled out across the enterprise and the number of users is growing rapidly. At a certain loading you realize that the application is breaking down and consuming more resources than it should. You need to restrict the amount of resources devoted to PowerShell Remoting. How? You set quotas.
If you look in the WSMAN provider, you’ll see a number of possible quota sessions:
PS C:\> dir wsman:\localhost | select Name, Value
Name Value
---- -----
MaxEnvelopeSizekb 500
MaxTimeoutms 60000
MaxBatchItems 32000
MaxProviderRequests 4294967295
PS C:\> dir wsman:\localhost\service | select Name, value
Name Value
---- -----
MaxConcurrentOperations 4294967295
MaxConcurrentOperationsPerUser 1500
EnumerationTimeoutms 240000
MaxConnections 300
MaxPacketRetrievalTimeSeconds 120
We haven’t come across a situation where the defaults needed to be changed, but just in case you should ever need to make a change, this is how you do it:
Set-Item wsman:\localhost\MaxEnvelopeSizeKB -value 200
This code sets a global value for the size of the envelope (message) to 200 KB. Quotas can be set on individual session configurations:
Set-PSSessionConfiguration -name microsoft.powershell
![]() -MaximumReceivedObjectSizeMB 11 -Force
-MaximumReceivedObjectSizeMB 11 -Force
This increases the maximum object size for the microsoft.powershell endpoint. Other quota values can be found in a number of areas of the listener and endpoint configurations:
dir wsman:\localhost\plugin\microsoft.powershell\quotas
dir wsman:\localhost\plugin\microsoft.powershell\InitializationParameters
10.10.3. Configuring on a remote machine
You may run into instances where you need to modify the WinRM configuration on a remote computer. WinRM needs to be up and running on that system, and you can use the Connect-WSMan cmdlet to create the connection:
PS WSMan:\> Connect-WSMan -ComputerName win8
PS WSMan:\> dir
WSManConfig:
ComputerName Type
------------ ----
localhost Container
win8 Container
As you can see here, the new computer shows up alongside localhost in your WSMan: drive, enabling you to access the machine’s WinRM configuration. You might also want to use the Test-WSMan cmdlet to verify everything:
PS C:\> Test-WSMan -comp quark -Authentication default
wsmid : http://schemas.dmtf.org/wbem/wsman/identity/1/
wsmanidentity.xsd
ProtocolVersion : http://schemas.dmtf.org/wbem/wsman/1/wsman.xsd
ProductVendor : Microsoft Corporation
ProductVersion : OS: 6.2.8250 SP: 0.0 Stack: 3.0
In addition to validating that Remoting is working, you can see the WinRM stack version (the OS and SP values will only be visible if the -Authentication default parameter is used). In this example, Quark is running PowerShell 3.0 and therefore WSMAN 3.0 is shown in the Stackproperty.
Note
WSMAN version 3.0 is used in PowerShell v3 and v4.
For the most part you shouldn’t run into any issues Remoting from a PowerShell 4.0, or 3.0, machine to one running PowerShell 2.0, but this is a handy tool for double-checking version information. You’ll need this when we discuss CIM sessions in chapter 39.
10.10.4. Key WinRM configuration settings
All of these settings are located in your WSMan: drive; we’ll cover the ones of most common interest but you can explore the drive to discover others. Many of these can also be configured via Group Policy—look for the “Windows Remote Management” section of the Group Policy object, under the Computer Configuration container.
· \Shell\IdleTimeout—The number of milliseconds a Remoting session can sit idle before being disconnected
· \Shell\MaxConcurrentUsers—The maximum number of Remoting sessions any number of users can have to a machine
· \Shell\MaxShellRunTime—The maximum time any Remoting session can be open, in milliseconds
· \Shell\MaxProcessesPerShell—The maximum number of processes any Remoting session can run
· \Shell\MaxMemoryPerShellMB—The maximum amount of memory any Remoting session can utilize
· \Shell\MaxShellsPerUser—The maximum number of Remoting sessions any one user can open to the machine
To change one of these settings manually, use the Set-Item cmdlet:
PS C:\> Set-Item WSMAN:\Localhost\Shell\IdleTimeout -Value 3600000
Warning
The updated configuration might affect the operation of the plug-ins having a per-plug-in quota value greater than 3600000. Verify the configuration of all the registered plug-ins and change the per-plug-in quota values for the affected plug-ins.
Some WSMAN settings can be configured at a global and individual plug-in level (a plug-in is another way of looking at a session configuration). This is especially true when the plug-in needs to use the capability of the shell. If you run this code
Get-Item -Path wsman:\localhost\shell\IdleTimeout
Get-ChildItem wsman:\localhost\plugin |
foreach {
Get-Item "wsman:\localhost\plugin\$($_.Name)\quotas\IdleTimeoutms"
}
you’ll get back something like this:
WSManConfig: Microsoft.WSMan.Management\WSMan::localhost\Shell
Type Name SourceOfValue Value
---- ---- ------------- -----
System.String IdleTimeout 7200000
WSManConfig:
Microsoft.WSMan.Management\WSMan::localhost\Plugin\microsoft.powershell
\Quotas
Type Name SourceOfValue Value
---- ---- ------------- -----
System.String IdleTimeoutms 7200000
WSManConfig: Microsoft.WSMan.Management\WSMan::localhost\Plugin\microsoft .powershell.
workflow\Quotas
Type Name SourceOfValue Value
---- ---- ------------- -----
System.String IdleTimeoutms 7200000
As the error message on the Set-Item call explains, if you change the timeout setting at the shell level it will conflict with the setting at the plug-in level. The plug-in needs to be modified to match the shell. As with quotas, the default settings work very well and we don’t know any reason for changing them in normal operating conditions.
10.10.5. Adding a machine to your Trusted Hosts list
Remoting doesn’t like to connect to machines that it doesn’t trust. You might think you’re connecting to a remote machine named SERVER1, but if an attacker could somehow spoof DNS or perform some other trickery, they could hijack your session and have you connect to the attacker’s machine instead. They could then capture all manner of useful information from you. Remoting’s concept of trust prevents that from happening. By default, Remoting trusts only machines that are in the same Active Directory domain as your computer, enabling it to use Kerberos authentication to confirm the identity of the remote machine. That’s why, by default, you can’t remote to a machine using an IP address or hostname alias: Remoting can’t use those to look up the machine’s identity in Active Directory.
You can modify this behavior by manually adding machine names, IP addresses, and other identifiers to a persistent, static Trusted Hosts list that’s maintained by WinRM. WinRM—and thus Remoting—will always trust machines on that list, although it doesn’t actually authenticate them. You’re opening yourself up to potential hijacking attempts—although it’s rare for those to occur on an internal network.
You modify the list by using the WSMan: drive, as shown here:
PS WSMan:\localhost\Client> dir
WSManConfig: Microsoft.WSMan.Management\WSMan::localhost\Client
Type Name SourceOfValue Value
---- ---- ------------- -----
System.String NetworkDelayms 5000
System.String URLPrefix wsman
System.String AllowUnencrypted false
Container Auth
Container DefaultPorts
System.String TrustedHosts
PS WSMan:\localhost\Client> Set-Item .\TrustedHosts *
WinRM Security Configuration.
This command modifies the TrustedHosts list for the WinRM client. The
computers in the TrustedHosts list might not be authenticated. The client
might send credential information to these computers. Are you sure that
you want to modify this list?
[Y] Yes [N] No [S] Suspend [?] Help (default is "Y"): y
PS WSMan:\localhost\Client>
We’ve added * to TrustedHosts, essentially meaning we’ll be able to use Remoting with any computer. We don’t necessarily recommend that as a best practice, but it’s useful in a lab environment where you just want stuff to work. In a production environment, we generally prefer to see a managed list of trusted hosts rather than the * wildcard. For example, *.company.pri would trust all hosts in the company.pri domain. Read the about_remote_troubleshooting PowerShell help file for a lot more detail and examples.
10.10.6. Using Group Policy to configure Remoting
This is a reminder that in a production environment the best way to configure Remoting is to use Group Policy. Full details on configuring Remoting via Group Policy can be found in the help file about_remote_troubleshooting.
We strongly recommend that you fully understand the settings by configuring manually in a lab before applying a Group Policy to your enterprise.
10.11. Implicit Remoting
Implicit Remoting is an incredibly cool trick and one that you’ll get more and more use out of in the future. The basic idea is this: Rather than installing every possible PowerShell module on your computer, you leave the modules installed out on servers. You can then “import” the modules into your current PowerShell session, making it look like the commands in the modules all live locally. In reality, your computer will contain “shortcuts” to the commands, and the commands will execute out on the servers you got them from. The results—and even the commands’ help—will be brought to your computer via Remoting.
Here’s an example where you’ll import the ServerManager module from a remote server:
PS C:\> $sess = New-PSSession -ComputerName win8
PS C:\> Invoke-Command -Session $sess -ScriptBlock { Import-Module
![]() servermanager }
servermanager }
PS C:\> Import-PSSession -Session $sess -Module ServerManager -Prefix RemSess
ModuleType Name ExportedCommands
---------- ---- ----------------
Script tmp_1hn0kr5w.keb {Get-WindowsFeature, Ins...
Here’s what you did:
1. You opened a session to the remote machine, saving the session object in a variable for easy use later.
2. You invoked a command against that session, asking it to load the desired module into memory.
3. You imported that session, grabbing only the commands in the ServerManager module. To make these commands easy to distinguish, you added the prefix “RemSess” to the noun of all imported commands. The prefix is optional but is recommended especially if you’re importing to a Windows 8, Windows Server 2012, or later system with the greatly increased number of cmdlets.
You can quickly check to see which commands you brought over:
PS> Get-Command -Noun RemSess*
CommandType Name
----------- ----
Alias Add-RemSessWindowsFeature
Alias Remove-RemSessWindowsFeature
Function Disable-RemSessServerManagerStandardUserRemoting
Function Enable-RemSessServerManagerStandardUserRemoting
Function Get-RemSessWindowsFeature
Function Install-RemSessWindowsFeature
Function Uninstall-RemSessWindowsFeature
Note
The module name column has been removed to enable the display to fit the page width.
You can now run these commands, just as if they were locally installed, and can even access their help (provided the server has had Update-Help run so that it has a copy of the help locally). The only caveat is the one that applies to all results in Remoting: The results of your commands won’t have any methods attached to them, because the results will have been through the serialization/deserialization process.
These “imported” commands will exist as long as your session to the remote machine is open and available. Once it’s closed, the commands will vanish. If you want to make these commands always available to you, save the remote session information to a module using the Export-PSSession cmdlet.
There are a few ways you might want to use this. First, take your current session and export everything to a module:
PS C:\> Export-PSSession -Session $q -OutputModule QuarkAll
The session $q is to the computer named Quark. This command will create a module called QuarkAll under $home\Documents\WindowsPowerShell\Modules:
PS C:\> Get-Module -ListAvailable QuarkAll
ModuleType Name ExportedCommands
---------- ---- ----------------
Manifest QuarkAll {}
Later, you can import this module as you would with implicit Remoting. Because the imported cmdlet names may conflict, add a prefix:
PS C:\> Import-Module QuarkAll -Prefix Q
The first time you try to run one of the commands, PowerShell dynamically creates the necessary session and establishes a remote connection:
PS C:\> Get-Qsmbshare
Creating a new session for implicit Remoting of "Get-SmbShare" command...
If you check sessions, you should see a new one created for this module:
PS C:\> Get-PSSession | select *
State : Opened
ComputerName : quark
ConfigurationName : Microsoft.PowerShell
InstanceId : 662484ed-d350-4b76-a146-865a8d43f603
Id : 2
Name : Session for implicit Remoting module at
C:\Users\Jeff\Documents\WindowsPowerShell\Modules\
QuarkAll\QuarkAll.psm1
Availability : Available
ApplicationPrivateData : {PSVersionTable}
Runspace : System.Management.Automation.RemoteRunspace
If you remove the module, the session is also automatically removed.
You can also create a limited module by only exporting the commands you want. First, create a session:
PS C:\> $q=New-PSSession Quark
Then, create a new module exporting only the Get cmdlets:
PS C:\> Export-PSSession -Session $q -OutputModule QuarkGet –CommandName
![]() Get* [CA] -CommandType cmdlet
Get* [CA] -CommandType cmdlet
When you import the module, the only commands you can run remotely on Quark are the Get cmdlets:
PS C:\> Import-Module QuarkGet -Prefix Q
PS C:\> Get-Command -module QuarkGet
CommandType Name Definition
----------- ---- ----------
Function Get-QAppLockerFileInformation ...
Function Get-QAppLockerPolicy ...
Function Get-QAppxProvisionedPackage ...
Function Get-QAutoEnrollmentPolicy ...
Function Get-QBitsTransfer ...
...
One thing we should point out is that when you export a session, any commands with names that might conflict on your local computer are skipped unless you use the -AllowClobber parameter. In the examples with Quark, you’re connecting from a computer running PowerShell 2.0 to one running PowerShell 4.0, or 3.0, and thus are able to use the cmdlets of the later versions of PowerShell just as if they were installed locally:
PS C:\> get-qciminstance win32_operatingsystem | Select
![]() CSName,BuildNumber,Version
CSName,BuildNumber,Version
Creating a new session for implicit Remoting of "Get-CimInstance" command...
CSName BuildNumber Version
------ ----------- -------
QUARK 8250 6.2.8250
Implicit Remoting is an incredibly powerful technique—and a necessity for working with remote Exchange servers—that lets you take advantage of modules, snap-ins, and tools that you may not have installed locally. If you find yourself needing these tools often, take the time to export a session to a module; then you’ll be ready for anything.
10.12. Standard troubleshooting methodology
Troubleshooting can be difficult, especially with Remoting because there are so many layers in which something can go wrong. We strongly recommend that you read, learn, and inwardly digest the help file about_Remote_Troubleshooting. It contains a lot of useful information that will improve your knowledge of Remoting and enable you to troubleshoot problems. When you have to diagnose problems with Remoting, we recommend that you follow these four steps:
1. Test Remoting with its default configuration. If you’ve tinkered with it, undo your changes and start from scratch.
2. Start by attempting to connect from the initiating machine to the target machine by using something other than Remoting but that’s still security-sensitive. For example, use Windows Explorer to open the remote machine’s C$ shared folder. If that doesn’t work, you have broader security issues. Make a note of whether you need to provide alternate credentials—if you do, Remoting will need them as well.
3. Install a Telnet client on the initiating machine (a simple command-line client, like the Windows native one, will do). Attempt to connect to the HTTP WinRM listener by running telnet machine_name:5985. You should get a blank screen, and Ctrl-C will end the session. If this doesn’t work, there’s a basic connectivity problem (such as a blocked port) you need to resolve.
4. Use Test-WSMan, using an alternate credential if necessary. Make sure that you’re using the machine’s real name as it appears in Active Directory or that you’ve taken one of the other approaches (TrustedHosts plus a credential, or SSL plus a credential). If that doesn’t work, you have a problem in the WSMAN configuration.
Walking through these four steps, in this order, can help you pinpoint at least the general cause of most problems.
10.13. Summary
Remoting was the most eagerly awaited feature in PowerShell v2. It moved PowerShell’s capabilities up by several levels. You can gain remote access to systems through a number of cmdlets that have a –ComputerName parameter or through the WSMAN-based Remoting technology.
Once you’ve mastered the material in this chapter, you’ll be able to administer all the machines in your environment from the comfort of your own workstation.
All materials on the site are licensed Creative Commons Attribution-Sharealike 3.0 Unported CC BY-SA 3.0 & GNU Free Documentation License (GFDL)
If you are the copyright holder of any material contained on our site and intend to remove it, please contact our site administrator for approval.
© 2016-2026 All site design rights belong to S.Y.A.