PowerShell in Depth, Second Edition (2015)
Part 2. PowerShell management
Chapter 11. Background jobs and scheduling
This chapter covers
· Creating jobs
· Retrieving job results
· Managing the job queue
· Using scheduled jobs
In PowerShell, jobs are one of the many extension points provided to the shell for you to build on. Jobs allow you to run tasks asynchronously—you get the prompt back to continue working while PowerShell runs the job in the background. PowerShell v4 (beginning in v3) defines four broad but distinct types of jobs: those based on the Remoting architecture covered in the previous chapter (also known as background jobs)—though they don’t use PowerShell Remoting directly—those based on WMI and CIM, and those based on a new “scheduled job” architecture.
Note
The CIM cmdlets themselves don’t have an –AsJob parameter you have to use Start-Job or Invoke-Command to wrap the command as a job. If you create a CDXML module using the cmdlet-over-objects technology (see chapter 39) you’ll automatically get an –AsJob parameter added to your cmdlets.
PowerShell workflows can also be run as jobs, as you’ll learn in chapter 23. Each of these jobs works slightly differently, but all of them represent the same essential thing: a unit of work that’s run in the background.
11.1. Remoting-based jobs
You have two ways to start jobs that use the Remoting architecture: Start-Job and Invoke-Command. Start-Job is designed to start a job that runs entirely on your local computer and technically doesn’t use the Remoting subsystem to function because it doesn’t use remote machines.Invoke-Command starts a job that’s tracked on your local machine but that sends commands to remote computers for execution there. Invoke-Command is a great way to coordinate running a command on a bunch of remote computers.
Note
If you use Invoke-Command locally and use the -Computername or -AsJob parameter, PowerShell will use Remoting to the local computer, so it must be enabled.
11.1.1. Starting jobs
To start a local job use the Start-Job cmdlet and specify a script block:
PS C:\> Start-Job -ScriptBlock { Get-Eventlog -LogName security }
Id Name PSJobTypeName State HasMoreData Location Command
-- ---- ------------- ----- ----------- -------- -------
6 Job6 BackgroundJob Running True localhost get-eventlog -LogNa...
Note
Depending on the width of your PowerShell console, when you use the job cmdlets you might get a truncated view and some columns might not appear at all. We’ve tried to accommodate all columns in the confines of the printed page so you can get an idea of what to expect and look for.
The command’s immediate result is a job object. Job IDs are numbered sequentially, starting with 1 for the first job you run when opening a new shell instance, although it’s possible depending on your configuration that job numbers might start at 2 or higher. PowerShell v2 tended to start the job IDs at 1 whereas PowerShell v3 and later start at 2. Job names are also created sequentially based on the parent job name (which we’ll explain in minute), such as Job1, although you can specify a custom name when starting a new job by using the –Name parameter of Start-Job.
Tip
Use the –Name parameter if you’re working with a lot of jobs simultaneously—it makes keeping track of them easier.
Here are a few other parameters you should keep in mind:
· Use –FilePath instead of –ScriptBlock to specify the name of a script to run—the script is on the local machine. You can add –ArgumentList to specify a list of parameter values to be fed to that script.
· -Credential and –Authentication can be used to specify alternative credentials or an authentication mechanism for the job to run under.
· -InitializationScript is a script block that runs before the job starts. You might use this, for example, to first import a required module.
· -PSVersion can be either 2.0 or 3.0—the default is 3.0 even in later versions of PowerShell—and it specifies the version of PowerShell you want the job run under. It’s mainly useful on machines that have PowerShell v2 and v3/v4 installed side by side.
· -RunAs32 runs the script in the 32-bit version of PowerShell. You’ll need this if you’re using a snap-in or module that only exists in a 32-bit flavor and you’re on a 64-bit machine.
· -DefinitionName starts the job using a predefined job definition, which enables you to start custom job types. You can also use –DefinitionPath to start the job at the specified path. We’ll use these in a bit for scheduled jobs.
Jobs run in a background PowerShell process, so the more jobs you have running at once, the more copies of PowerShell you’ll have running at once in memory.
You can also start jobs using Invoke-Command. Run Invoke-Command as usual, adding the –AsJob parameter (and use the –JobName parameter if you want to give the job a nicer name than PowerShell will make up by default). Because Invoke-Command is specifically designed to send commands to remote computers, it’s a good way to have all of that running in the background, for example:
PS C:\> Invoke-Command -ScriptBlock { Get-Service } -ComputerName win8,
![]() localhost -AsJob -JobName ServiceCheck
localhost -AsJob -JobName ServiceCheck
Id Name PSJobTypeName State HasMoreData Location Command
-- ---- ------------- ----- ----------- -------- -------
12 ServiceCheck RemoteJob Running True win8,local... get-se...
11.1.2. Checking job status
Run Get-Job to display a list of running jobs and to check their status, for example:
PS C:\> Get-Job
Id Name PSJobTypeName State HasMoreData Location Command
-- ---- ------------- ----- ----------- -------- -------
6 Job6 BackgroundJob Completed True localhost get-event...
12 ServiceCheck RemoteJob Completed True win8,l... get-servi...
When a job is targeting multiple computers, the status shown here will be the worst-case scenario from all computers involved. In other words, if one computer failed, you’ll see “Failed” as the status, even if every other computer succeeded. To drill down for more detail, you’ll need to work with those child jobs directly.
11.1.3. Working with child jobs
Every job consists of a top-level parent job and at least one child job. Jobs that target multiple computers will have one child job per targeted computer. To examine the child jobs, you’ll need the ID or name of the top-level job. For example:
PS C:\> Get-Job
Id Name PSJobTypeName State HasMoreData Location Command
-- ---- ------------- ----- ----------- -------- -------
6 Job6 BackgroundJob Completed True localhost get-event...
12 ServiceCheck RemoteJob Completed True win8,l... get-servi...
PowerShell v3 added parameters to make it easier to work with child jobs. It’s easy to see all the jobs at once by using –IncludeChildJob:
PS C:\> Get-Job -Name ServiceCheck –IncludeChildJob
Id Name PSJobTypeName State HasMoreData Location Command
-- ---- ------------- ----- ----------- -------- -------
12 ServiceCheck RemoteJob Completed True win8,l... get-servi...
13 Job13 RemoteJob Completed True win8 get-servi...
14 Job14 RemoteJob Completed True localhost get-servi...
This code demonstrates how you’d find the name of a job and its children. This also works with the job ID.
Note
Depending on your PowerShell installation, when you look at help for Get-Job you might not see the –IncludeChildJob parameter but rather -ShowChildJob. This appears to be a documentation bug. The correct parameter is –IncludeChildJob. PowerShell v4 documentation has the correct parameter name.
These job objects have more information than can be contained in a table; to see everything, use this:
PS C:\> Get-Job -id 13 | select *
State : Completed
StatusMessage :
HasMoreData : True
Location : serenity
Runspace : System.Management.Automation.RemoteRunspace
Command : get-service
JobStateInfo : Completed
Finished : System.Threading.ManualResetEvent
InstanceId : e6761f14-4ea4-488f-84e6-0e08f396b969
Id : 13
Name : Job13
ChildJobs : {}
PSBeginTime : 9/26/2012 12:58:06 PM
PSEndTime : 9/26/2012 12:58:06 PM
PSJobTypeName :
Output : {AeLookupSvc, ALG, AllUserInstallAgent, AppIDSvc...}
Error : {}
Progress : {}
Verbose : {}
Debug : {}
Warning : {}
Notice that the job object provides access to the Error, Progress, Verbose, Debug, and Warning streams (or pipelines) from the copy of PowerShell that ran the job. There’s also data that indicates when the job started and when it ended if you need to track how long these things take to complete. Here’s a handy one-liner you can use:
Get-Job -State Completed |
select Name, Location, *time, @{Name="RunTime";
Expression={$_.PSEndTime - $_.PSBeginTime}}
11.1.4. Waiting for a job
If you launch a job from within a script, you may want to have your script pause, or wait, until the job completes:
PS C:\> Wait-Job -id 13
Using other parameters of Wait-Job, you can also wait until all active jobs reach a given state. Finally, you can also specify a timeout, which will end the waiting period once the time has expired regardless of the job status. Nothing will happen to the jobs but you’ll get your prompt back.
11.1.5. Stopping jobs
It’s not impossible for a job to hang or otherwise fail. When that happens, you can stop it immediately. Any results that the job has already produced will be retained:
PS C:\> Stop-Job -Name ServiceCheck
It’s also possible to stop all jobs that are in a particular status, such as stopping all running jobs:
PS C:\> Stop-Job –state 'Running'
Review the help for Stop-Job for more details.
11.1.6. Getting job results
PowerShell temporarily caches the results of jobs, enabling you to retrieve them whenever you’re ready. There’s a trick: By default, whatever results you receive are removed from the cache when they’re given to you. You can, for example, retrieve the results of a job that’s still running. You’ll get whatever results are currently available, and new ones will continue to pile up.
To get the results of a job, specify it by name, ID, or other identifier. If you get the results from a parent job, you’ll automatically get all of its child job results:
PS C:\> Receive-Job -Name ServiceCheck
Status Name DisplayName PSCompu
terName
------ ---- ----------- -------
Stopped AeLookupSvc Application Experience win8
Stopped ALG Application Layer Gateway Service win8
Stopped AllUserInstallA... Windows All-User Install Agent win8
Stopped AppIDSvc Application Identity win8
Stopped Appinfo Application Information win8
Stopped AppMgmt Application Management win8
Stopped AudioEndpointBu... Windows Audio Endpoint Builder win8
Stopped Audiosrv Windows Audio win8
Running BFE Base Filtering Engine win8
Running BITS Background Intelligent Transfer Ser... win8
Running BrokerInfrastru... Broker Infrastructure win8
Jobs started with Invoke-Command will contain the PSComputerName property by default, showing you which result came from which computer. WMI job result objects also have a PSComputerName property that fills a similar purpose (you can use the WMI system property __SERVERif you prefer).
You can also direct PowerShell to deliver a copy of the results, keeping the original results in memory so that you can retrieve them again:
PS C:\> Receive-Job -id 13 –Keep
Index Time EntryType Source InstanceID Messa
ge
----- ---- --------- ------ ---------- -----
2494 Jun 10 10:11 SuccessA... Microsoft-Windows... 4616 Th...
2493 Jun 10 09:10 SuccessA... Microsoft-Windows... 4616 Th...
2492 Jun 10 08:09 SuccessA... Microsoft-Windows... 4616 Th...
2491 Jun 10 07:08 SuccessA... Microsoft-Windows... 4616 Th...
You can retrieve results from the job queue as often as you want as long as you use -Keep. The first time you don’t, though, the results will be flushed from the queue.
The Receive-Job command has some interesting parameters:
· -ComputerName gets the results from all jobs run against the specified computers. Use this instead of –ID or –Name.
· -Session gets the results from all jobs run through a specified Remoting session. You specify the full session object as the value for this parameter.
· -AutoRemoveJob deletes the job object after getting the results from it.
· -Wait tells the shell to start receiving job results but to not display the command prompt again until all results have been received. In conjunction with this, you can specify –WriteEvents to display notices about changes in the job status while you’re waiting for the results to finish. You can’t use this with –Keep and you must use –Wait.
· –WriteJobInResults precedes the job results output with a copy of the job object itself. You can’t use this with –Keep and you must use –Wait.
11.1.7. Removing jobs
Unless you have Receive-Job autoremove them, job objects linger until you close the shell or manually remove them:
PS C:\> Get-Job -id 13 | Remove-Job
Or you can just remove everything that’s completed:
PS C:\> Remove-Job -State Completed
Other parameters of Remove-Job let you specify the jobs to remove in other ways, including by name, a hash table filter, the command that was run, and so forth.
11.1.8. Investigating failed jobs
Job objects have a Reason property that’ll indicate why a job failed. For example, let’s start a job that’ll fail and see what happens:
PS C:\> Get-Job
PS C:\> Start-Job -ScriptBlock { Get-Eventlog -LogName Nothing }
Id Name PSJobTypeName State HasMoreData Locat
ion
-- ---- ------------- ----- ----------- -----
17 Job17 BackgroundJob Running True lo...
Eventually, we check the job and its children and see that it failed:
PS C:\> Get-Job –IncludeChildJob
Id Name PSJobTypeName State HasMoreData Locat
ion
-- ---- ------------- ----- ----------- -----
17 Job17 BackgroundJob Failed False lo...
18 Job18 Failed False lo...
You could also filter and get only failed child jobs like this:
PS C:\> Get-Job -ChildJobState Failed
The value for –ChildJobState is any job state such as running, stopped, or completed. The job object has a JobStateInfo property, which is an object. Let’s look at the failed child job:
PS C:\> Get-Job 18 | select -ExpandProperty JobStateInfo
State Reason
----- ------
Failed System.Management.Automation.Remo...
Because this is also an object, you need to expand this as well to get to the root of the problem:
PS C:\> Get-Job 18 | select -ExpandProperty JobStateInfo |
![]() select -ExpandProperty Reason
select -ExpandProperty Reason
The event log 'Nothing' on computer '.' does not exist.
That’s pretty much what we expected.
You can read more about jobs, and job troubleshooting, in the about_jobs and about_Job_Details help files.
Tip
Even if you see that a job has failed, you might still want to try to receive results. It’s possible your job may have partially completed before failing, and depending on your situation, some results may be better than nothing.
11.2. WMI jobs
WMI jobs work pretty much like the Remoting-based jobs we’ve discussed. You start them using Get-WmiObject, adding its –AsJob parameter. Invoke-WmiMethod, Remove-WmiObject, and Set-WmiInstance also have an –AsJob parameter. Apart from adding the –AsJobparameter, you use these cmdlets the same as you would otherwise.
Note
Test-Connection, Stop-Computer, and Restart-Computer all have an –AsJob parameter. They should be considered part of this group because they use WMI “under the hood” to perform their functions.
There’s one difference in these commands’ normal operation: When run as a background job, computers are contacted in parallel rather than sequentially as is normally the case. The cmdlets support a –ThrottleLimit parameter to increase or decrease the parallelism from its default of 32 concurrent connections. WMI jobs continue to communicate over remote procedure calls (RPCs) and don’t use or require PowerShell Remoting. For example:
PS C:\> Get-WmiObject -Class Win32_Service -ComputerName win8 –AsJob
Id Name PSJobTypeName State HasMoreData Locat
ion
-- ---- ------------- ----- ----------- -----
25 Job25 WmiJob Running True win8
Note
The CIM cmdlets, such as Get-CimInstance, don’t support an -AsJob parameter. Because these cmdlets rely on WinRM by default (the same technology as PowerShell Remoting), you send the CIM command to the remote computers via Invoke-Command.
The job object is created locally with a child job for each remote computer. WMI jobs use the same cmdlets to retrieve job status, get job results, and so forth—everything from the first portion of this chapter applies.
11.3. Scheduled jobs
PowerShell v3 introduced a new job definition for scheduled jobs. Unlike the jobs discussed previously in this chapter, these scheduled jobs do have a lifespan outside the PowerShell console window. Once scheduled, they continue to exist and operate even if you close the shell. Several commands deal specifically with these jobs:
PS C:\> Get-Command -Noun ScheduledJob*
CommandType Name ModuleName
---------- ---- -------
Cmdlet Disable-ScheduledJob PSScheduledJob
Cmdlet Enable-ScheduledJob PSScheduledJob
Cmdlet Get-ScheduledJob PSScheduledJob
Cmdlet Get-ScheduledJobOption PSScheduledJob
Cmdlet New-ScheduledJobOption PSScheduledJob
Cmdlet Register-ScheduledJob PSScheduledJob
Cmdlet Set-ScheduledJob PSScheduledJob
Cmdlet Set-ScheduledJobOption PSScheduledJob
Cmdlet Unregister-ScheduledJob PSScheduledJob
These cmdlet names reveal three kinds of objects you’ll work with: scheduled jobs themselves (which you can enable, disable, get, register, modify, and unregister), scheduled job triggers (which determine when a job runs), and scheduled job options (which you can get, create, and change).
11.3.1. Scheduled jobs overview
Scheduled jobs are a kind of hybrid entity introduced with PowerShell v3.
Note
The terminology between scheduled jobs and scheduled tasks can be very confusing—we recommend you spend a few moments working out the differences. A scheduled task runs a command (or script) on a trigger activated by the Windows Task Scheduler. A scheduled job runs a PowerShell job on a trigger activated by the Windows Task Scheduler. As an additional source of confusion, the module for scheduled jobs (PSScheduledJob) is available in PowerShell v3 and v4 when installed on older versions of Windows but the module for scheduled tasks (ScheduledTasks) isn’t available on those legacy systems.
There’s the scheduled job itself, which is registered with Windows Task Scheduler and can be managed from Task Scheduler. That scheduled job may have one or more options associated with it, and it’ll have triggers that determine when the scheduled job runs. When a scheduled job does run, a normal PowerShell job object is created to contain the results. So, if a scheduled job runs 10 times, you’ll have 10 job objects to play with. Those “result” job objects work identically to the ones we’ve already covered in this chapter; you can use Receive-Job to extract their results,Remove-Job to delete them, and so on.
Note
You’ll find quite a bit of in-shell documentation on scheduled jobs. Run Help about_scheduled* for a list of topics.
11.3.2. Creating a scheduled job
To create a scheduled job, start by—at a minimum—creating a trigger. This is what tells the job when to run. That might be something simple, like “every day at 3 a.m.,” or something more complex; review the help for New-JobTrigger to see your options. For example:
$trigger = New-JobTrigger –Daily –At '3 am'
Here, you’re saving the trigger into a variable, $trigger, to make it easy to refer to later. You may also want to create a job options object. Doing so isn’t mandatory, but reading the help for New-ScheduledJobOption lets you see what your options are. Here’s a quick example:
$options = New-ScheduledJobOption –HideInTaskScheduler -RequireNetwork
This option, which you’ve also saved into a variable, will make the job invisible in Task Scheduler and will make the job fail if the network isn’t available at the time the job runs. With the options and trigger created, you can register a new scheduled job. Note the verb on this one is Register, because it’s creating something external to PowerShell:
Register-ScheduledJob –Name DailyRestart –ScriptBlock { Get-Process ;
Restart-Computer -force } –Trigger $trigger –ScheduledJobOption $options
You’ve created a new scheduled job that will get a list of running processes and then restart the local computer, each day at 3 a.m., provided the network is available at the time. Note that you didn’t need to export the process list to anything—it’ll be stored for you. For longer sets of commands, put them into a script file and use the –FilePath parameter to point to the script (on the local machine), rather than trying to jam everything into the script block.
When you create a scheduled job, PowerShell creates a folder for it on the disk of the computer where the job exists. This folder goes in your user profile directory by default, in \AppData\Local\Microsoft\Windows\PowerShell\ScheduledJobs, with a subfolder for each job name. For the earlier example, that would be \DailyRestart. This folder contains the scheduled job’s XML definition file and an \Output folder. The \Output folder is further broken down with a subfolder for each time the job has executed—folder names are a timestamp. Within those timestamp folders you’ll find the job’s output in an XML file, along with the job’s status. You have little need to work with any of these folders or files directly, because the job management commands handle them for you.
Like many PowerShell commands, Register-ScheduledJob (and Set-ScheduledJob) has a –Credential parameter, which specifies an alternate username for the job to run as.
A new feature introduced in v4 is the option to run the job immediately upon creating it. In v3 if you wanted to create a scheduled job and run it you had to jump through some hoops. Now you can simply use the –RunNow parameter.
In this example, we’ve created a scheduled job to run once a month on Sunday:
$trigger = New-JobTrigger -At 12:00 -WeeksInterval 4 -DaysOfWeek Sunday
![]() -Weekly
-Weekly
$action = { Get-Process | Export-Clixml -Path c:\work\WeeklyProcs.xml }
Register-ScheduledJob -Name "Weekly Process Snapshot" -ScriptBlock
![]() $action -Trigger $trigger –RunNow
$action -Trigger $trigger –RunNow
But we also wanted it to run right immediately. Mission accomplished.
You can view the properties of a scheduled job:
PS C:\> Get-Scheduledjob "Weekly Process Snapshot"
Id Name JobTriggers Command Enabled
-- ---- ----------- ------- -------
1 Weekly Proce... 1 get-process | ... True
If you don’t give a job name, you’ll see all of the existing jobs.
11.3.3. Managing scheduled jobs
A number of cmdlets are available for managing scheduled jobs. Note that these apply only to the scheduled entity; they don’t work with the results of jobs that have already run. First up are commands that deal with triggers:
· Add-JobTrigger—Adds a new trigger to an existing scheduled job
· Disable-JobTrigger—Turns off a scheduled job’s triggers but doesn’t delete them
· Enable-JobTrigger—Enables a previously disabled scheduled job trigger
· Get-JobTrigger—Gets the triggers of scheduled jobs
· New-JobTrigger—Creates a new job trigger
· Remove-JobTrigger—Removes a job trigger from the scheduled job
· Set-JobTrigger—Reconfigures a trigger on a scheduled job
Next are commands that deal with scheduled job options:
· Get-ScheduledJobOption—Gets the options for a scheduled job
· New-ScheduledJobOption—Creates a new option set
· Set-ScheduledJobOption—Reconfigures a scheduled job’s options
Finally, these commands work with scheduled job entries:
· Disable-ScheduledJob—Disables, but doesn’t delete, a scheduled job
· Enable-ScheduledJob—Reenables a previously disabled scheduled job
· Get-ScheduledJob—Gets the scheduled jobs on a computer
· Register-ScheduledJob—Creates and registers a new scheduled job
· Set-ScheduledJob—Reconfigures an existing scheduled job
· Unregister-ScheduledJob—Removes a scheduled job entry
It’s possible to run a scheduled job on demand:
PS C:\> Start-Job –DefinitionName DailyRestart
Just give the scheduled job’s name (which is its definition name), and the job will begin immediately. Even though you can see the scheduled job in the Task Scheduler, we recommend using PowerShell to manually run it.
11.3.4. Working with scheduled job results
Once a scheduled job has run, you can run Get-Job to see a list of available jobs. Each result job will have the same name as the scheduled job that ran it; in many cases, you’ll need to use ID numbers to retrieve the specific results. For example, after setting up your job and letting it run for a few days, you have this:
PS C:\> Get-Job -Name DailyRestart
Id Name State HasMoreData Location
-- ---- ----- ----------- --------
45 DailyRestart Completed True localhost
46 DailyRestart Completed True localhost
47 DailyRestart Completed True localhost
48 DailyRestart Completed True localhost
49 DailyRestart Completed True localhost
50 DailyRestart Completed True localhost
51 DailyRestart Completed True localhost
If you don’t see anything, don’t forget to import the PSScheduledJob module first. You can now use Receive-Job –id 45 to get the first set of results, and so forth. All of the rules we covered earlier in this chapter for working with jobs still apply, and you’ll need to take care to remove the jobs you’re finished with, to free up memory and disk space.
Note
In the case of jobs created by a scheduled job, the results will remain on disk after being received, even if you don’t specify the –Keep parameter of Receive-Job. Be sure to use Remove-Job to delete job results you’re finished with so that you can free up disk space. You can also run something like Remove-Job –Name DailyRestart to remove all results associated with a given job name.
Worried about job results taking up too much space? You can control how many results are kept. A scheduled job has an ExecutionHistoryLength property, which determines how many saved results are retained on disk. As new results are created, older ones are deleted to make room. The default value is 32; use the –MaxResultCount parameter of Set-ScheduledJob or Register-ScheduledJob to modify this value for an existing or a newly scheduled job, respectively.
Tip
Use the –ClearExecutionHistory parameter of Set-ScheduledJob to completely delete a scheduled job’s existing execution history and results.
11.3.5. Removing scheduled jobs
Because PowerShell scheduled jobs are stored in the Task Scheduler, you might be tempted to simply delete the job there. Don’t. When you want to remove a scheduled job, first make sure you’ve saved any results. Then use the Unregister-ScheduledJob cmdlet:
PS C:\> Unregister-ScheduledJob -Name "Weekly Process Snapshot"
You can also pipe Get-ScheduledJob to Unregister-ScheduledJob to remove multiple jobs at once. When you use this approach, PowerShell will clean up job results and files written to disk. If you use the Task Scheduler, you’ll be left with orphan files and Get-ScheduledJobwill give you bad results.
Note
If you look at help for Unregister-ScheduledJob, you’ll see a WhatIf parameter. In PowerShell v3 if you use it, you’ll think the cmdlet behaved as you’d expect when using –Whatif, but it doesn’t. The job will be removed, so be careful. This has been corrected in PowerShell v4.
11.4. Job processes
The preceding sections have described the three different types of jobs available within PowerShell:
· Remoting-based jobs
· WMI-based jobs
· Scheduled jobs
We provided a few hints as to where these jobs actually run. It’s now time for us to summarize how and where jobs run because it’s different for each of the job types. This will give you an indication of what’s happening on your system when you run PowerShell jobs.
11.4.1. Jobs created with Start-Job
These jobs run as child processes of your interactive PowerShell process. Each background job creates a new instance of powershell.exe as a child to your interactive session.
Note
That’s why you lose all of the running jobs when you close your session—because the child processes are automatically closed when you close the interactive parent session.
The child instances of powershell.exe are hidden, though they can be viewed by using a process monitoring tool. They’re temporary sessions that are closed when the job is finished. Figure 11.1 illustrates this point. Open a PowerShell session and run Get-Process filtering on processes whose names begin with the letter “p.” Figure 11.1 shows a single PowerShell instance with an ID of 1436.
Figure 11.1. Illustrating the creation of a child PowerShell session when a job is run
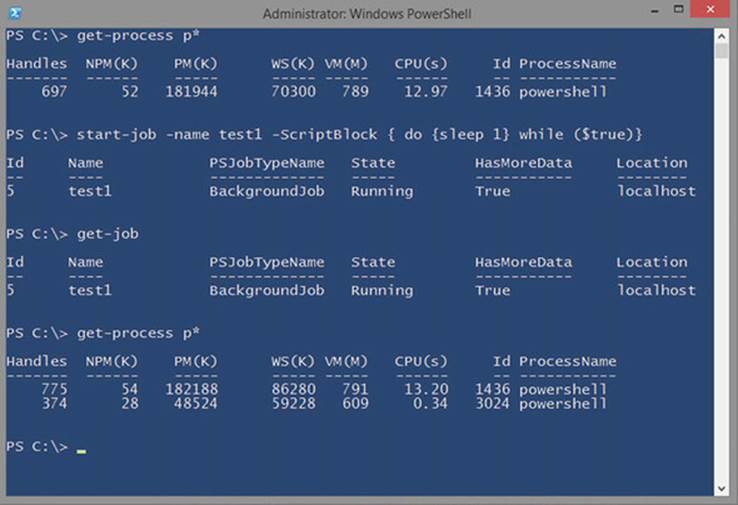
A job is then started that’ll continue running until it’s forcibly stopped. This is achieved by a script block with an infinite loop:
do {sleep 1} while ($true)
PowerShell won’t exit the loop because the condition is always true! Running Get-Process again shows that two PowerShell sessions now exist. The following WMI call shows that the new process (ID 3024) is a child of process 1436, your original PowerShell session:
PS> Get-WmiObject –Class Win32_Process -Filter "ProcessId = 3024" |
![]() Format-table ProcessName, Processid, ParentProcessId –auto
Format-table ProcessName, Processid, ParentProcessId –auto
ProcessName Processid ParentProcessId
----------- --------- ---------------
powershell.exe 3024 1436
11.4.2. Jobs created with Invoke-Command
When a job is started using the –AsJob parameter of Invoke-Command, it runs under WSMAN in a wsmprovhost.exe process, as illustrated in figure 11.2.
Figure 11.2. Illustrating the processes involved when running a job through Invoke-Command
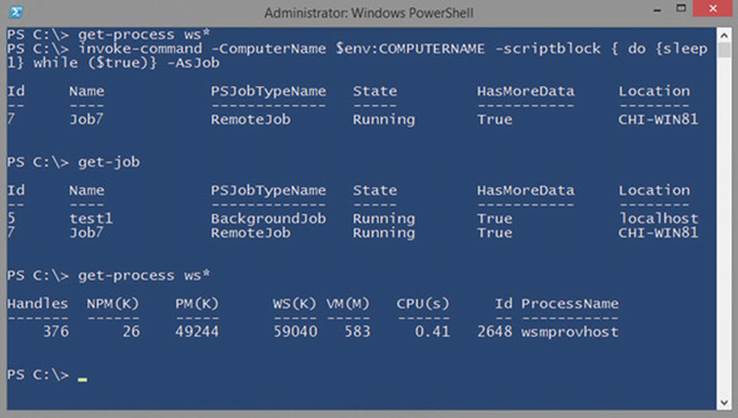
No processes called wsmprovhost are running prior to the starting of the job. Once the job starts, you can see that a wsmprovhost.exe process exists. Running jobs in this manner may result in a performance boost.
When the –AsJob parameter is used to start jobs on remote machines, one child job is created per remote system. If you use Start-Job inside an Invoke-Command, one job object (parent and child jobs) is created per remote system.
11.4.3. Jobs created through the WMI cmdlets
WMI-based jobs run in a completely different process. Figure 11.3 shows this in the unsecapp.exe process.
Figure 11.3. Illustrating the process used to run a WMI-based job
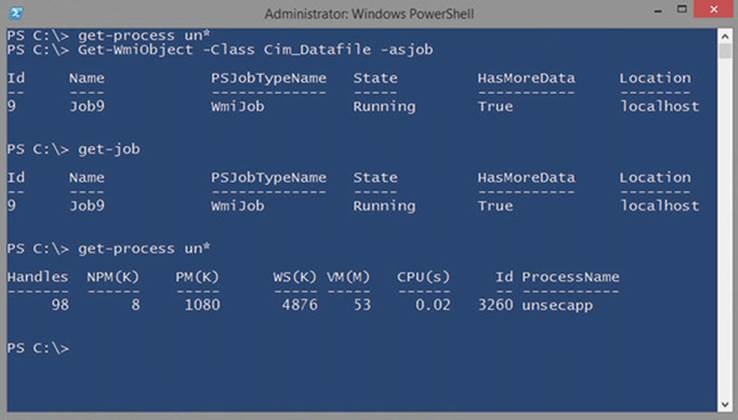
The unsecapp.exe application is part of the WMI installation and can be found in the C:\Windows\System32\wbem folder.
11.4.4. Jobs created through the scheduler
PowerShell jobs that are created as a scheduled task run in their own instance of PowerShell when the job is started. This runspace is automatically closed when the job completes.
11.5. Summary
Jobs are a good way to move long-running processes to the background to allow you to continue using the shell for other tasks. Remember, you may encounter many different kinds of jobs. Microsoft or even third parties may introduce job types that we haven’t discussed in this chapter, and they may work entirely differently from the ones we’ve shown you.
All materials on the site are licensed Creative Commons Attribution-Sharealike 3.0 Unported CC BY-SA 3.0 & GNU Free Documentation License (GFDL)
If you are the copyright holder of any material contained on our site and intend to remove it, please contact our site administrator for approval.
© 2016-2026 All site design rights belong to S.Y.A.