PowerShell in Depth, Second Edition (2015)
Part 1. PowerShell fundamentals
Chapter 2. PowerShell hosts
This chapter covers
· The purpose of PowerShell hosts
· The PowerShell console and ISE hosts
· The differences between 64-bit and 32-bit hosts
· PowerShell transcripts
PowerShell can be confusing to use because it behaves differently in different situations. Here’s an example from PowerShell v2: When you run the Read-Host command in the PowerShell.exe console, it behaves differently than if you run that same command in the PowerShell Integrated Scripting Editor (ISE). The reason you encounter these differences has to do with the fact that you don’t interact directly with PowerShell. Instead, you give commands to the PowerShell engine by means of a host. It’s up to the host to determine how to interact with the PowerShell engine.
Note
The difference in the response of Read-Host between the console and the ISE has been eliminated in PowerShell v3 and later.
The PowerShell engine is a set of .NET Framework classes stored in a DLL file. You can’t interact with it directly. Instead, the application you interact with loads the engine. For example, if you’ve ever used the Exchange Server 2007 (or later) graphical management console (called the Exchange Management Console, or EMC), then you’ve used a PowerShell host. The EMC lets you interact by clicking icons, filling in dialog boxes, and so forth, but it’s PowerShell that performs the actions it takes. You never “see” the shell, but it’s hiding under the GUI. That’s why it can show you the PowerShell commands for the actions it has performed. Exchange also provides a console-based shell that exposes the underlying PowerShell engine together with the Exchange cmdlets.
When we talk about “using PowerShell,” we’re most often talking about using it through a host that looks more like a command-line shell. Microsoft provides two different hosts for that purpose: the console and the ISE. Third-party vendors can also produce host applications, and many popular PowerShell editors—PrimalScript, Power-GUI, PowerShell Plus, PowerSE, and so forth—all host the PowerShell engine. You can write your own .NET programs to run PowerShell scripts or even call the underlying classes directly. How you interact with the shell and what your results look like will depend on the host you’re using. Results might look and work one way in the Microsoft-supplied console, but they might look and work differently in a third-party application—or in some cases may not work at all. Conversely, some things that have worked in a third-party host don’t work in the Microsoft hosts.
Tip
Remember that if things work in one host but not in another, it’s mostly likely due to the differences in the hosts rather than it being a PowerShell error. If you have an error in a third-party host that you can’t resolve, make sure you test it in the Microsoft PowerShell console as a lowest common denominator.
For this book, we’ll assume you’re using one of the two Microsoft-supplied hosts, which we’ll describe in this chapter.
2.1. 32-bit vs. 64-bit, and administrator vs. not
The way you access the shortcuts for Microsoft’s PowerShell host applications depends on the version of the operating system and the install options you’ve chosen. The first thing you need to be aware of is that PowerShell v4 isn’t available on all versions of Windows. It’s installed as part of the base build on
· Windows 8.1 x86 and x64
· Windows Server 2012 R2 x64
The Windows Management Framework (WMF) download (PowerShell v4, WinRM v3 [the version of WinRM hasn’t changed between PowerShell v3 and v4], and the new WMI API) is available for
· Windows 7 SP1 (or above) x86 and x64
· Windows Embedded Standard 7
· Windows Server 2008 R2 SP1 (or above) x64
· Windows Server 2012
The WMF download is available from www.microsoft.com/en-us/download/details.aspx?id=40855. Check the version you need for your system in the download instructions. You’ll notice that PowerShell v4 isn’t available for Windows 8. This is deliberate because it’s included in the free Windows 8.1 upgrade.
Note
If you’re using Windows XP, Windows Vista, Windows Server 2008, or any flavor of Windows Server 2003, you can’t install PowerShell v4. Check appendix C for further information on the differences between the PowerShell versions.
Application incompatibilities
Don’t install WMF 4.0 on a system running any of the following:
· System Center 2012 Configuration Manager (but you can install SP1 to remove the incompatibility)
· Microsoft Exchange Server 2013
· Microsoft Exchange Server 2010
· Microsoft Exchange Server 2007
· Microsoft SharePoint Server 2013
· Microsoft SharePoint Server 2010
· Windows Small Business Server 2011 Standard
These restrictions also apply to WMF 3.0 (PowerShell 3.0), but they may be changed with the issue of Service Packs for these applications. Please check the application documentation to see if there are any changes.
You’ll need to install Microsoft .NET Framework 4.5 (use the full offline installer from http://msdn.microsoft.com/en-us/library/5a4x27ek(v=vs.110).aspx) before installing WMF 4.0. The 4.5 version of the framework is preinstalled on Windows 8.1 and Windows Server 2012 R2.
Microsoft, and other vendors, have produced tablet devices with Windows RT installed. These devices, such as the Microsoft Surface, do have PowerShell installed, but the instance of PowerShell is constrained in that you can’t access some features. Which features are unavailable depends on whether the device is running Windows 8 or Windows 8.1 RT, but here are some examples:
· You can’t remote into the device.
· You can’t run workflows.
· You can’t use Desired State Configuration.
In addition, the ISE isn’t available on Surface devices.
Note
The Microsoft Surface Pro devices run a full version of PowerShell, including the ISE.
In the Windows 8/2012 family of products, the way you access applications has changed. You use the Start screen instead of the Start menu. If you’re on the Windows Desktop, press the Win button to access the Start screen or click the Start button in Windows 8.1/2012 R2. Scroll to the right to find the PowerShell icon. Alternatively, press Win-Q to access the application search menu.
On earlier versions of Windows you’ll find shortcuts to Microsoft’s host applications on your computer’s Start menu. If you’re on a Server Core (Windows Server 2008 R2 or later) system that doesn’t have a Start menu, run powershell to start the console host. You’ll need to install PowerShell because it isn’t part of the default Windows Server 2008 R2 server core install. The shortcuts can usually be found under Accessories > Windows PowerShell.
Note
PowerShell and the old command prompt use the same underlying console technology, which means you can type Powershell in a command prompt or cmd in a PowerShell console and “switch” to the other shell. Typing exit will revert back to the starting shell.
On a 32-bit system (on any Windows version), you’ll find shortcuts for PowerShell—what we refer to as “the console”—and for the PowerShell ISE. Obviously, these shortcuts both point to 32-bit versions of PowerShell. But on a 64-bit system you’ll find four shortcuts:
· Windows PowerShell—the 64-bit console
· Windows PowerShell ISE—also 64-bit
· Windows PowerShell (x86)—the 32-bit console
· Windows PowerShell ISE (x86)—also 32-bit
It’s important to run the proper version, either 32-bit or 64-bit. PowerShell itself behaves the same either way, but when you’re ready to load extensions you can only load ones built on the same architecture. The 64-bit shell can only load 64-bit extensions. If you have a 32-bit extension, you’ll have to load it from the 32-bit shell. Once you launch, the window title bar will also display “(x86)” for the 32-bit versions, which means you can always see which one you’re using.
Tip
We recommend that you pin PowerShell to your taskbar. Doing so makes access much quicker. Right-clicking the icon on the taskbar provides access to the PowerShell console and the ISE in addition to providing links to run as Administrator for both hosts.
On computers that have User Account Control (UAC) enabled, you’ll need to be a bit careful. If your PowerShell window title bar doesn’t say “Administrator,” you’re not running PowerShell with Administrator authority.
Warning
Watch the top-left corner of the host as it starts. It will say “Administrator: Windows PowerShell” or “Administrator: Windows PowerShell ISE” during at least some of the startup period. Some of us, like Richard, modify the title bar to display the path to the current working directory so the title bar won’t show “Administrator” once the profile has finished executing.
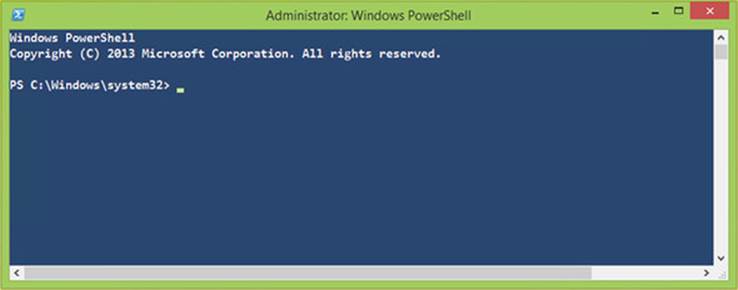
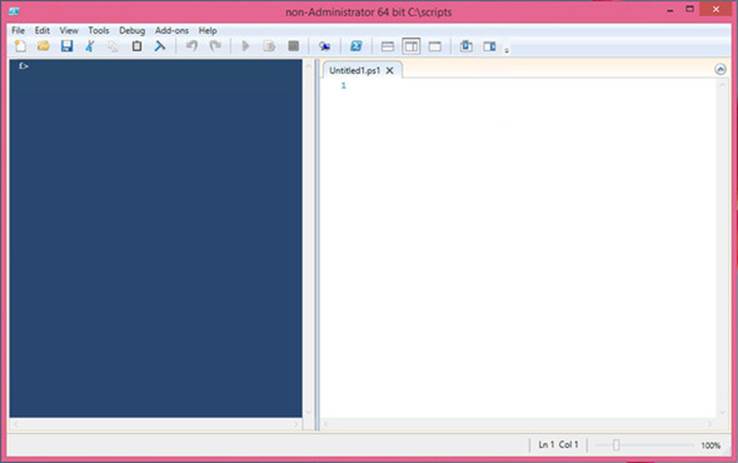
If you’re not running as an Administrator, some tasks may fail with an “Access Denied” error. For example, you can only access some WMI classes when you’re using PowerShell with the elevated privileges supplied by running as Administrator. If your title bar doesn’t say “Administrator” and you need to be an Administrator to do what you’re doing, close the shell. Reopen it by right-clicking one of the Start menu shortcuts and selecting Run as Administrator from the context menu. That’ll get you a window title bar like the one shown in figure 2.1, which is what you want. In Windows 8, either right-click the taskbar shortcut or right-click the title on the Start screen to access the Run as Administrator option.
Figure 2.1. An elevated PowerShell session from Windows 8.1. Notice the Administrator label in the caption.
It’s always worth taking a moment to verify whether your session is elevated before continuing with your work. One way you can do this is to modify your profile so that the console top border indicates whether PowerShell is elevated (in addition to specifying whether it’s x86 or x64 and the current folder). You can then set a smaller prompt so that you have more of the console to type in. By default the current path is shown at the prompt, as you can see in figure 2.1. The function you need to add to your profile appears in listing 2.1.
Listing 2.1. Prompt function for PowerShell profile
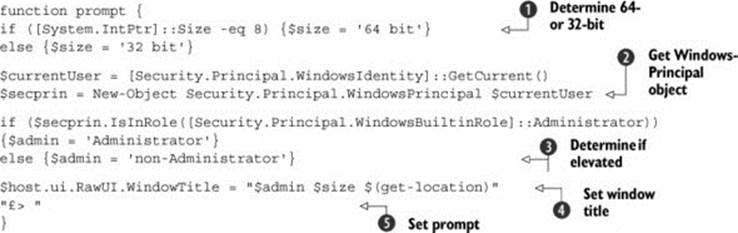
The function in listing 2.1 specifies whether you’re running the 32- or 64-bit version of PowerShell ![]() . The current user is retrieved and used to create a Security.Principal .WindowsPrincipal object
. The current user is retrieved and used to create a Security.Principal .WindowsPrincipal object ![]() . That object is then used to determine whether the user is running PowerShell as Administrator—that is, with elevated privileges
. That object is then used to determine whether the user is running PowerShell as Administrator—that is, with elevated privileges ![]() . The window title is set using the information gathered earlier
. The window title is set using the information gathered earlier ![]() , and then the prompt is set
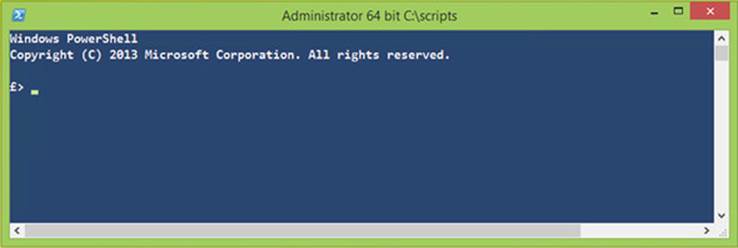
, and then the prompt is set ![]() . Any string you want can be used as the prompt. The results of including listing 2.1 in your profile are shown in figure 2.2. The ISE will also run this function at startup.
. Any string you want can be used as the prompt. The results of including listing 2.1 in your profile are shown in figure 2.2. The ISE will also run this function at startup.
Figure 2.2. The Windows PowerShell console from Windows 8.1 after running the function in listing 2.1 in your profile.
The PowerShell console is the simpler of the two available hosts, which is why we’ll consider it before ISE.
2.2. The console
Most people’s first impression of PowerShell is the Microsoft-supplied console, shown in figure 2.2 in the previous section. This console is built around an older piece of console software that’s built into Windows—the same one used for the old Cmd.exe shell. Although PowerShell’s programmers tweaked the console’s initial appearance—it has a blue background rather than black, for example—it’s still the same piece of software that’s been more or less unchanged since the early 1990s. As a result, it has a few limitations. For example, it can’t properly display double-byte character set (DBCS) languages, making it difficult to use with Asian languages that require a larger character set. The console also has primitive copy-and-paste functionality, along with fairly simplistic editing capabilities.
You may wonder then, why use the console? If you’ve ever used a command-line shell before, even one in a Unix or Linux environment, the console looks and feels familiar. That’s the main reason. If you’re using Server Core, then the console is your only choice, because the ISE won’t run on Server Core.
Note
“Server Core” is a term that originated in Windows Server 2008. In Windows Server 2012 and later, Server Core is the default server installation that doesn’t have the Server Graphical Shell feature installed. PowerShell wasn’t available on the Windows Server 2008 version of Server Core, but it’s available in Windows Server 2008 R2 and later.
Within the console, you can use a few tricks to make it a bit easier to work with:
· Pressing the up and down arrows on your keyboard will cycle through the command history buffer, enabling you to recall previous commands, edit them, and run them again.
· Pressing F7 will display the command history buffer in a pop-up window. Use the up and down arrow keys to select a previous command, and then either press Enter to rerun the command or press the right arrow key to display the command for editing.
· Use your mouse to highlight blocks of text by left-clicking and dragging. Then, press Enter to copy that block of text to the Windows clipboard. Quick Edit Mode must be enabled in the console’s properties for this to work.
· Right-click to paste the Windows clipboard contents into the console.
· Use the Tab key to complete the PowerShell cmdlet, function, and parameter names. In PowerShell v4, variable names and .NET classes can also be completed in this way.
You can also do a few things to make the console more comfortable for yourself. Click the control box, which is at the top-left corner of the console window, and select Properties. You’ll want to make a few adjustments in this dialog box:
· On the Options tab, you can increase the command history buffer. A bigger buffer takes more memory but preserves more of the commands you’ve run, allowing you to recall them and run them again more easily.
· On the Colors tab, choose text and background colors you’re comfortable reading.
· On the Font tab, select a font face and size you like. This is important: You want to be sure you can easily distinguish between the single quote and backtick characters, between parentheses and curly brackets, and between single and double quotes. Distinguishing these characters isn’t always easy to do using the default font. The backtick and single quote confusion is particularly annoying. The Consolas font is a good choice. Consider changing the text color to pure white (RGB 255:255:255) for better readability.
Note
On a U.S. or U.K. keyboard, the backtick character is located on the upper-left key, under the Esc key. It shares space with the tilde (~) character. It’s also referred to as a “grave accent mark.” On other keyboards, you may find it in a different location.
· On the Layout tab, make sure both Width settings are the same. The bottom one controls the physical window size, whereas the top one controls the logical width of the window. When they’re both the same, you won’t have a horizontal scrollbar. If the upper “screen buffer” width is larger than the “window size,” you’ll have a horizontal scrollbar. That means viewing much of PowerShell’s output will require horizontal scrolling, which can become cumbersome and annoying to work with.
As you’re customizing your console window, take a moment to make sure it can display all the characters from the character set with which you work. If any characters aren’t displaying properly, you may want to switch to the PowerShell ISE instead. Its ability to use TrueType fonts and to display DBCS languages makes it a real advantage.
2.3. The PowerShell ISE
The PowerShell Integrated Scripting Environment, or ISE (usually pronounced “aye ess eee,” not “ice”), was created to offer a better script-editing experience than Windows Notepad, as well as provide a console experience that supports the use of DBCS languages and TrueType fonts. In general, the ISE works similarly to the console host, with a few exceptions:
· The ISE can maintain several PowerShell runspaces in a single window by placing each onto a separate tab. Each runspace is an instance of PowerShell, much like opening multiple console windows.
· The ISE can have multiple PowerShell scripts open simultaneously. Each is available through a separate tab.
· The ISE displays graphical dialog boxes for many prompts and messages, rather than displaying them on a command line as text.
· The ISE doesn’t support transcripts, which we’ll describe later in this chapter (this changes in PowerShell v5).
· You can change the font, starting size, and color schemes by selecting Tools from the menu and then selecting the appropriate options. To adjust the text display size, use the slider at the bottom right of the ISE window.
Note
Some server operating systems don’t have the ISE installed by default. If you need it, and it isn’t present, you can install it using Server Manager like any other Windows feature. You can also use PowerShell to install ISE on servers. The command syntax is Add-WindowsFeature -Name PowerShell-ISE. The ISE may be installed but not exposed through the Start screen, in which case you need to pin it to the Start screen and/or taskbar.
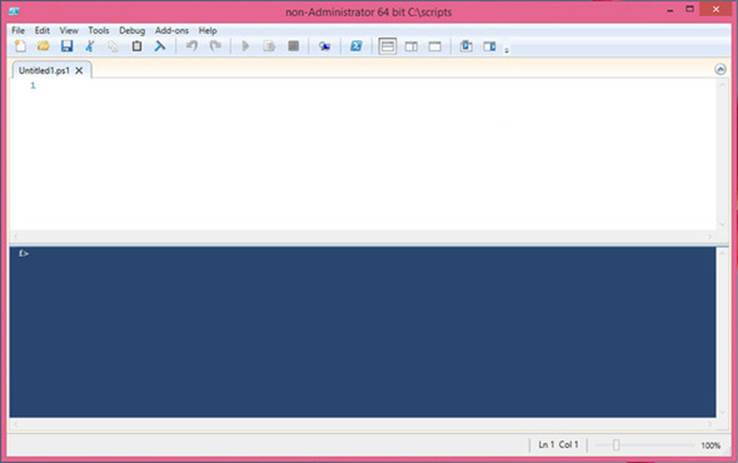
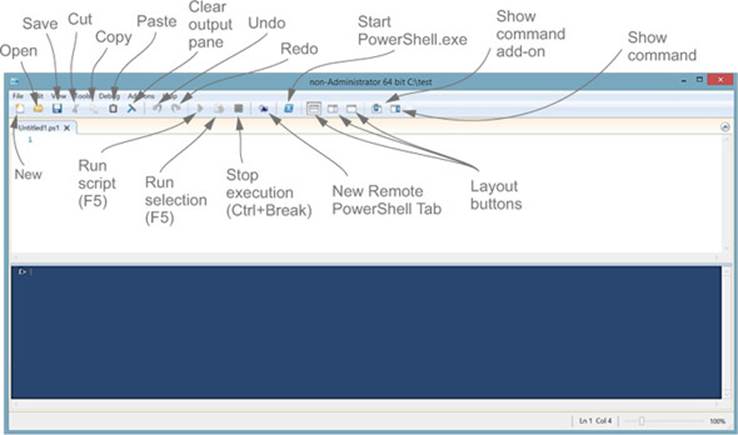
The ISE supports two basic layouts, which are controlled by the three buttons on its toolbar. The default layout, shown in figure 2.3, uses two vertically stacked panes.
Figure 2.3. The default ISE layout uses two vertically stacked panes together with the Command Addon pane (which we’ve removed here). The title shows that ISE is being run in a nonelevated manner—using the function in listing 2.1 as part of our profile.
The top pane is the script editor, and the bottom pane is where you can interactively type commands and receive output. In PowerShell v3, the interactive and output panes were combined to effectively duplicate the PowerShell console. This configuration is maintained in PowerShell v4.
Clicking the second layout button in the toolbar gives you the layout shown in figure 2.4, where the script editor takes up one side and the console takes up the other.
Figure 2.4. The split view gives you more room to edit a script.
Finally, the last button switches to a full-screen editor, which is useful if you’re working on a long script. In some views, you’ll notice that the script pane has a little blue arrow in the top-right corner. This can be used to hide or expose the script pane.
The other toolbar buttons, labeled in figure 2.5, provide access to the majority of the ISE’s functions (the button layout is identical in PowerShell v3 and v4). You’ll also find additional options on the menu. The File, Edit, and View menus are self-explanatory, and we’ll discuss the Debug menu when we come to the topic of debugging in chapter 31.
Figure 2.5. Getting to know the ISE toolbar can save you time when performing common tasks.
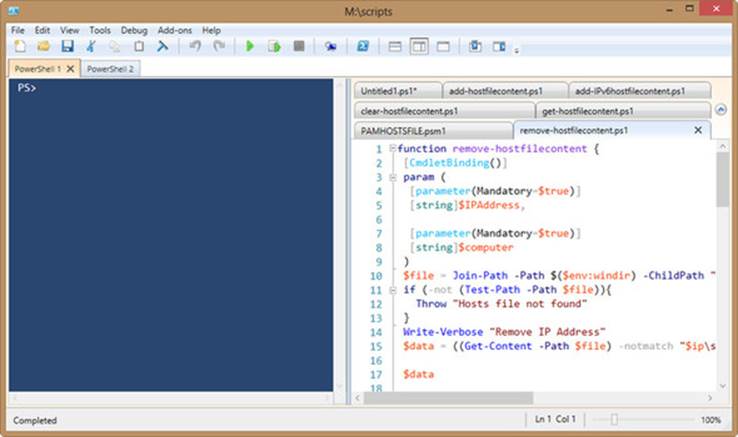
Let’s try something: In the ISE, select New PowerShell Tab from the File menu. (You’ll also see a New Remote PowerShell Tab option. We’ll discuss that in chapter 10 on Remoting.) What pops up is a whole new instance of PowerShell, called a runspace, which we mentioned earlier. Each tab has its own set of script file tabs, with each file tab representing a single script file. Each PowerShell tab also has its own output area and command-line pane. Each PowerShell tab is truly separate: If you load an extension into one, for example, it’s only available in that one. To load an extension into every open PowerShell tab, you have to manually load it into each one, one at a time. Figure 2.6 shows what the ISE looks like with two PowerShell tabs open and with several script files opened within one PowerShell tab.
Figure 2.6. The ISE supports multiple PowerShell tabs, as well as multiple script files within each tab.
A lot of folks tend to think of the ISE as “just a script editor,” but it’s designed to be a complete, usable replacement for the PowerShell console host. The ISE offers better copy-and-paste capabilities (using the standard Ctrl-C, Ctrl-X, and Ctrl-V shortcut keys), better color-coding for PowerShell syntax, and more. Even if you hide the script editor pane and only use the ISE as an interactive command line, you’ll often have a better PowerShell experience than you would with the console. The ISE even supports the up/down arrow keys for recalling previous commands and lets you edit those commands by putting your cursor anywhere on the line and typing away.
The ISE is also extensible. Information on some of the available extensions, sample code, and guidance on writing your own extensions to the ISE can be found at http://social.technet.microsoft.com/wiki/contents/articles/2969.windows-powershell-ise-add-on-tools.aspx.
2.4. Command history buffer vs. PowerShell’s history
The console application maintains its own command history buffer, which contains a list of the commands you’ve run. It holds the 50 most recent commands by default, and we explained earlier how you can adjust that number. When you’re using the up and down arrow keys, or pressing F7 in the console, you’re accessing this buffer.
PowerShell maintains its own independent list of the commands you’ve run, and you can view that list by running the Get-History command. By default this buffer maintains the last 4,096 commands. We’re not going to dive into a lot of detail on PowerShell’s history at this point, although we’ll work it into the discussion in upcoming chapters as needed. For now, you should be aware of the two different histories, being maintained in two different ways. Also be aware that a number of cmdlets are available for viewing and working with the PowerShell history (Get-Help *history).
2.5. Transcripts
The PowerShell console—but not the ISE currently—supports the Start-Transcript and Stop-Transcript commands. When you start a transcript, every PowerShell command you run, along with its output and errors, will be saved to a text file. Legacy commands such as ping andipconfig will have the command recorded only in the transcript file, not the output. When you close the shell or stop the transcript, the shell stops recording your actions. If you run Start-Transcript without any parameters, it creates a file in your Documents folder that includes a timestamp. Or you can specify your own filename:
PS C:\> Start-Transcript c:\work\Monday.txt
You’ll find transcripts useful when you’re experimenting with the shell, because they enable you to keep a log of everything you’ve tried. You can then review the file in Notepad or another text editor, copy out the parts you want, and save them for future use. If necessary, you can append to an existing transcript file. This can be handy when you’re working with PowerShell features that can exist between PowerShell sessions, such as workflows. Use the –append parameter:
PS C:\> Start-Transcript c:\work\mytranscript.txt -append
Non-Microsoft hosts often don’t support transcripts. If you try to start a transcript in a host that doesn’t support it (such as the ISE), you’ll get an error message that clearly explains what’s wrong. It’s not your fault; the authors of that host didn’t do the work necessary to make transcripts possible.
2.6. Summary
You can use Windows PowerShell within a variety of host applications, and the ones you’ll probably use most commonly are the Microsoft-supplied console and ISE hosts. The ISE offers a richer experience, but it lacks support for a small number of features such as transcripts. On 64-bit systems, Microsoft supplies 32-bit and 64-bit versions of both hosts, although on server operating systems you may have to take extra steps to install them. You should spend a little time familiarizing yourself with these hosts’ user interfaces, as well as some time customizing them to suit your needs.
All materials on the site are licensed Creative Commons Attribution-Sharealike 3.0 Unported CC BY-SA 3.0 & GNU Free Documentation License (GFDL)
If you are the copyright holder of any material contained on our site and intend to remove it, please contact our site administrator for approval.
© 2016-2026 All site design rights belong to S.Y.A.