PowerShell in Depth, Second Edition (2015)
Part 3. PowerShell scripting and automation
Chapter 24. Advanced syntax for scripts and functions
This chapter covers
· Using advanced parameters
· Aliasing parameters
· Validating parameter input
· Using parameter sets
· Using common parameters
This is the chapter we’ve been waiting to get to. In it, we’re going to take almost everything from the prior chapters—writing scripts and functions, creating objects as output, using scope, and more—to the next level. In our minds, the advanced syntax we’ll cover in this chapter is something every script or function should eventually use. You’ll get an amazing amount of additional functionality and capability almost entirely for free, simply by giving PowerShell a few extra keywords here and there.
The type of script and function you’re going to build in this chapter is called an advanced script or advanced function, although many folks like to refer to them as script cmdlets, which was their first name during the PowerShell v2 beta process. As the name implies, you’ll be able to build something that looks, smells, feels, and tastes almost exactly like a real, native PowerShell cmdlet—and you won’t need a copy of Visual Studio to do it!
24.1. Starting point
To begin with, everything we’ll show you in this chapter will work fine in either a script or a function. But it’s most common to see these techniques used in a function, because you can stack multiple functions into a single file to create a library of reusable tools—a PowerShell script module, as you’ll see in the next chapter. With that in mind, we’ll demonstrate these advanced techniques in functions. Just keep in mind that, if you wanted, you could do all of the same syntax tricks in a plain script.
Tip
After a while the collection of scripts that you build up becomes unmanageable. Creating functions and loading them as modules makes your code management a bit easier. You can also add and remove functionality from your PowerShell session as you need it. In PowerShell v3 and v4, modules are autoloaded when you start a PowerShell session—which is another great reason to go that route.
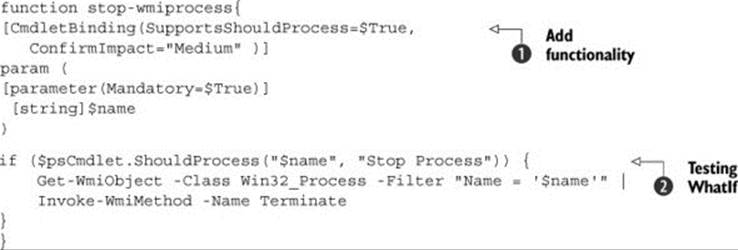
Our first listing shows your starting point: a plain function that runs a couple of commands and outputs a single, consolidated object. You’ll notice that we’ve used an ordered hash table for the properties; we discussed ordered hash tables in chapter 16 if you need a refresher. You’ll be building on this code as we go.
Listing 24.1. Your starting point for advanced function syntax
function Get-SystemInfo {
$os = Get-WmiObject –Class Win32_OperatingSystem –ComputerName localhost
$cs = Get-WmiObject –Class Win32_ComputerSystem –ComputerName localhost
$props = [ordered]@{
OSVersion = $os.version
Model = $cs.model
Manufacturer = $cs.manufacturer
ComputerName = $os.PSComputerName
OSArchitecture = $os.osarchitecture
}
$obj = New-Object –TypeName PSObject –Property $props
Write-Output $obj
}
With that basic starting point in mind, let’s tackle parameters first.
24.2. Advanced parameters
We’ve already shown you how to build a Param() block to define input parameters. You’ll use that same technique, but you’ll add just a bit more framework to it in the next listing. You can read more about this technique in the shell’s about_Functions_ Advanced_Parameters help topic, but we’ll walk you through the general approach.
Listing 24.2. Adding parameters
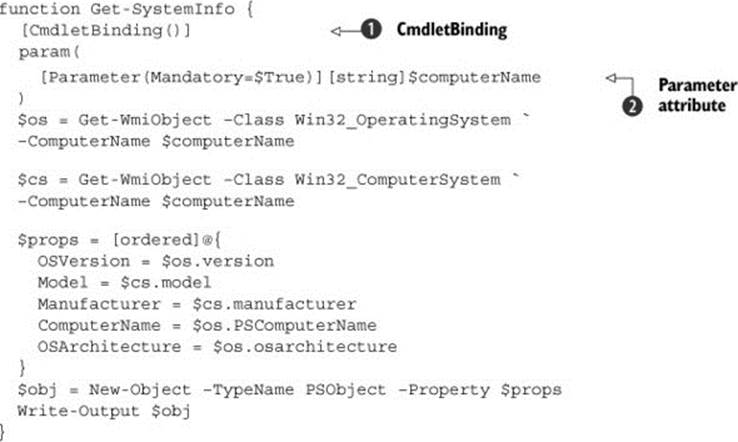
In listing 24.2, you precede the Param() block with a [CmdletBinding()] decorator ![]() ; see the about_Functions_CmdletBindingAttribute help topic. That activates a certain feature set, such as the –Verbose and –Debug parameters you’re going to rely on for the remainder of this chapter. Now, although PowerShell will detect your use of some of those features and allow them even without [CmdletBinding()], other features require it, and as a best practice you should include it in all your scripts or functions that use any of the techniques we’re presenting in this chapter. One feature the [CmdletBinding()] decorator enables is the [Parameter()] decorator
; see the about_Functions_CmdletBindingAttribute help topic. That activates a certain feature set, such as the –Verbose and –Debug parameters you’re going to rely on for the remainder of this chapter. Now, although PowerShell will detect your use of some of those features and allow them even without [CmdletBinding()], other features require it, and as a best practice you should include it in all your scripts or functions that use any of the techniques we’re presenting in this chapter. One feature the [CmdletBinding()] decorator enables is the [Parameter()] decorator ![]() , and you can see that listing 24.2 includes a Mandatory=$True attribute within that. The Mandatory attribute forces PowerShell to prompt you for a value for any parameter marked as such.
, and you can see that listing 24.2 includes a Mandatory=$True attribute within that. The Mandatory attribute forces PowerShell to prompt you for a value for any parameter marked as such.
Note
In PowerShell v3 and v4, you don’t have to type Mandatory=$True. You can just use Mandatory. We prefer the full syntax because it’s much clearer to new PowerShell users.
The parameter list is still comma-separated, meaning that if you had a second parameter you’d need to put a comma after $computerName. After that comma you could put another [Parameter()] decorator for the second parameter. It might end up looking something like this:
[CmdletBinding()]
Param(
[Parameter()][string]$one,
[Parameter()][int]$two,
[Parameter()]$three
)
Whenever possible, you should specify a data type for your parameters, as you’ve done with $computerName. Doing so provides another level of error checking for free; for instance, if you define the parameter as an integer and input a string, you’ll get an error. This simple function takes two integers as parameters and multiplies them together:
function test-typecheck {
param (
[int]$a,
[int]$b
)
$a * $b
}
If you supply two integers, everything works:
PS C:\> test-typecheck -a 4 -b 5
20
But if you put in the wrong sort of data, you’ll get an error:
PS C:\> test-typecheck -a 4 -b "blue"
test-typecheck : Cannot process argument transformation
on parameter 'b'. Cannot convert value "blue" to type
"System.Int32". Error: "Input string was not in a correct format."
At line:1 char:24
+ test-typecheck -a 4 -b "blue"
+ ~~~~~~
+ CategoryInfo : InvalidData: (:)
[test-typecheck],
ParameterBindingArgumentTransformationException
+ FullyQualifiedErrorId : ParameterArgumentTransformationError,
test-typecheck
Defining a type for the parameter input data won’t protect you from entering incorrect values as long as they’re the right type. It also doesn’t mean PowerShell can implicitly convert your input to the required type, but defining a type is a useful test for no real effort.
Tip
If you don’t know the type to use, put an example through Get-Member and the full type name will be displayed.
Your parameter names should also, whenever appropriate, be consistent with the parameter names used by native PowerShell commands—$computerName rather than $host, for example, or $FilePath rather than something like $filespec. Again, this isn’t compulsory, but it makes your functions blend seamlessly into the PowerShell ecosystem.
Within the [Parameter()] decorator, you specify a number of attributes that tell PowerShell more about each parameter. In many cases, these attributes tell PowerShell to do extra work on your behalf, which is nice. Here’s a list:
· Mandatory=$True—Indicates that the parameter isn’t optional and must be specified. If someone runs your function and doesn’t supply this parameter, PowerShell will prompt for it—with no extra coding on your part needed to make that happen. If you make a parameter mandatory, any default values you code will be ignored.
· ValueFromPipeline=$True—Enables the parameter to accept pipeline input of the same type (in other words, ByValue). You must specify a data type, such as [string], so that PowerShell knows what input types to attach. You can have only one parameter accept pipeline input for a given type. So, if you specify ValueFromPipeline for one [string] parameter, you can’t do so for a second [string] parameter. You could have a parameter of another type, such as [int], that could accept input by type.
· ValueFromPipelineByPropertyName=$True—Enables By-Property-Name pipeline input for the parameter. So, if the parameter is named $computerName, it’ll grab the values from the ComputerName property of whatever objects are piped in. If piped-in objects don’t have a ComputerName property (in this example), the parameter would be left empty.
· Position=x—Tells PowerShell that this parameter can accept values positionally. In other words, rather than providing the parameter name, a user has to provide the necessary values in the indicated order. You should specify only one parameter per position. For example, only one parameter will be at position 0, one will be at position 1, and so on. Parameters that don’t have a position number specified can be used only if the user provides the parameter name.
There are other attributes you can specify, such as HelpMessage, which are described in PowerShell’s help file, but you’ll use the preceding ones most often. Next, you’re going to modify your parameter to accept input from the pipeline both ByValue and ByPropertyName. Listing 24.3shows the modification; also notice that we’ve hit Enter a few times to break up the lines and make them more readable. This is perfectly legal, and it’s how many people routinely format this kind of parameter. Also notice that we’re changing the data type from [string] to [string[]], indicating that it can accept multiple values when used as a parameter rather than on the pipeline.
Listing 24.3. Adding information to the parameter
function Get-SystemInfo {
[CmdletBinding()]
param(
[Parameter(Mandatory=$True,
ValueFromPipeline=$True,
ValueFromPipelineByPropertyName=$True)]
[string[]]$computerName
)
$os = Get-WmiObject –Class Win32_OperatingSystem `
-ComputerName $computerName
$cs = Get-WmiObject –Class Win32_ComputerSystem `
-ComputerName $computerName
$props = [ordered]@{
OSVersion = $os.version
Model = $cs.model
Manufacturer = $cs.manufacturer
ComputerName = $os.PSComputerName
OSArchitecture = $os.osarchitecture
}
$obj = New-Object –TypeName PSObject –Property $props
Write-Output $obj
}
At this point, your function is technically broken. You’ve rigged it to accept pipeline input, but you haven’t modified it to handle that input properly. You have two situations to deal with: one where input comes in via the parameter and another where input comes in via the pipeline. For example, the function could be run in any of several ways. Here’s one:
Get-Content names.txt | Get-SystemInfo
With the preceding example, you’re reading in strings (one computer name per line is assumed in names.txt) and piping them to Get-SystemInfo.
Get-ADComputer –Filter * |
Select-Object @{n='ComputerName';e={$_.Name}} |
Get-SystemInfo
In this code, objects are being given a ComputerName property with values from the original Name property and are then being piped into the Get-SystemInfo function. Both of the preceding examples are using pipeline input; the next two use parameter input:
Get-SystemInfo –computerName SERVER2
Obviously, the preceding just passes in a single computer name.
Get-SystemInfo –computerName (Get-Content names.txt)
The previous code passes in one or more names. PowerShell executes the function somewhat differently in each situation. The next listing shows the modifications you need to make and walks you through the execution sequence for either of the pipeline input examples.
Listing 24.4. AdvancedFunction.ps1: pipeline input sequence
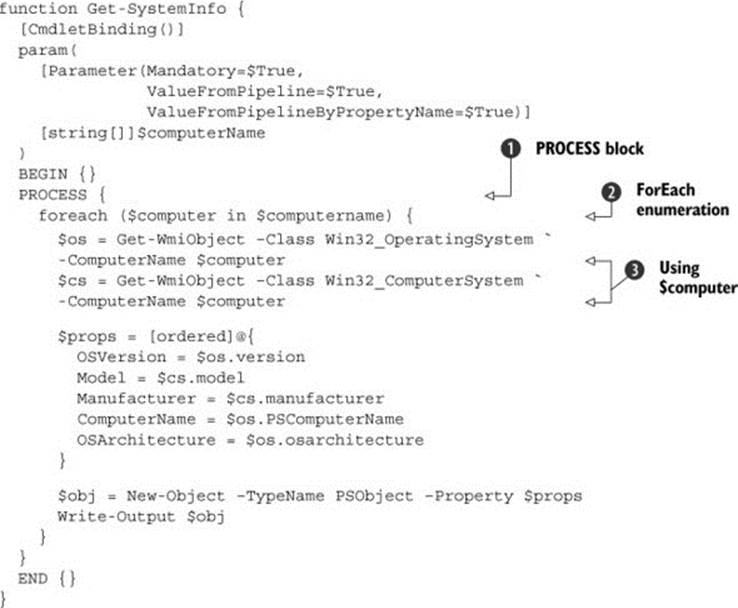
When the function is called with pipeline input, PowerShell first looks for and executes a BEGIN block. Yours is empty, so it moves on to the PROCESS block ![]() . This is executed one time for each object that was piped in, and a single piped-in object at a time is placed in the$computerName parameter. You’re using a ForEach block
. This is executed one time for each object that was piped in, and a single piped-in object at a time is placed in the$computerName parameter. You’re using a ForEach block ![]() to enumerate the contents of $computerName, which is technically redundant because it’ll only ever contain one object. But ForEach is capable of enumerating one thing, so your computer name goes into the $computervariable
to enumerate the contents of $computerName, which is technically redundant because it’ll only ever contain one object. But ForEach is capable of enumerating one thing, so your computer name goes into the $computervariable ![]() , which is what you use for the remainder of the script.
, which is what you use for the remainder of the script.
The procedure is somewhat different when the –computerName parameter is used instead of pipeline input. In that case, the entire value or set of values given to –computerName is placed into the $computerName variable. BEGIN, PROCESS, and END are still executed, but only one time apiece. That means your ForEach loop isn’t redundant—you need it to enumerate whatever was passed to $computerName. By using both a PROCESS block and the ForEach loop, you’ve enabled both parameter input and pipeline input for your function:
PS C:\> get-systeminfo "serenity","quark"
ComputerName : SERENITY
Manufacturer : TOSHIBA
OSVersion : 6.1.7601
OSArchitecture : 64-bit
Model : Qosmio X505
ComputerName : QUARK
Manufacturer : LENOVO
OSVersion : 6.1.7601
OSArchitecture : 32-bit
Model : S10-3
"serenity","quark" | get-systeminfo
ComputerName : SERENITY
Manufacturer : TOSHIBA
OSVersion : 6.1.7601
OSArchitecture : 64-bit
Model : Qosmio X505
ComputerName : QUARK
Manufacturer : LENOVO
OSVersion : 6.1.7601
OSArchitecture : 32-bit
Model : S10-3
See? It works both ways.
24.3. Variations on parameter inputs
You can run into quite a lot of variations, and different ways of handling them, when you combine parameter and pipeline input.
First, specifying a parameter always manually overrides pipeline input to it. In the following example, assume that names.txt contains 10 names:
Get-Content names.txt | Get-SystemInfo –computername localhost
Your function will run only once, against localhost. PowerShell won’t combine the pipeline and parameter input; it’ll simply disregard the pipeline input in favor of the parameter input.
In instances where you have pipeline- and non-pipeline-enabled parameters, you can have both pipeline and parameter input. For example, here’s an incomplete function to illustrate:
function Do-Something {
[CmdletBinding()]
Param(
[Parameter(ValueFromPipeline=$True}][string[]]$one,
[Parameter(Mandatory=$True)][string]$two
)
PROCESS {
ForEach ($thing in $one) {
Write-Host $thing
}
}
}
There’s no useful code within this function; we’re just showing how it’d work. Assuming you ran it like this:
Do-Something –one a,b,c –two something
the PROCESS block would execute only once. The ForEach loop would execute three times, because $one contains three objects, so $thing would contain a on the first iteration, then b, then c. $two would contain something throughout the entire function. Now assume you ran the same function like this:
'a','b','c' | Do-Something –two wow
The piped-in strings would be bound to $one because it accepts pipeline input ByValue for the type String. The PROCESS block would execute three times because three objects were piped in. The first time PROCESS executes, $one will contain a, and after that it’d contain b and then c. Each of those times, the ForEach block would execute once, basically transferring the current contents of $one into the variable $thing. The $two parameter would contain wow for the entire time.
It’s also important to note that when a parameter receives input from the pipeline, that variable won’t exist within the function’s BEGIN block. That’s because PowerShell doesn’t internally create and populate the parameter variable until it reaches the PROCESS block, at which point the variable will contain only a single piped-in object at a time.
24.4. Parameter aliases
Sometimes, the consistent name you choose for a parameter might not be the one you prefer to use most often. Some folks might prefer –host instead of –computerName, for example. PowerShell enables you to create an alias for parameters, as shown in this listing.
Listing 24.5. Specifying parameter aliases
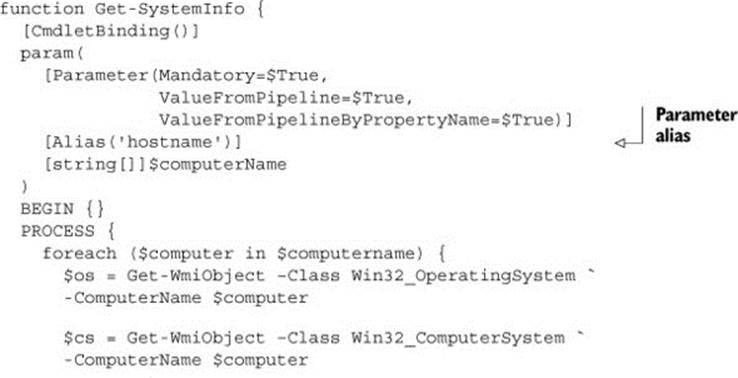
Listing 24.5 used –hostname, because PowerShell’s normal rules of parameter name truncation will allow –host to work as well. Note that aliases can’t be used for pipeline ByPropertyName; you couldn’t pipe in an object that had a hostname property and expect this parameter to grab that property’s values. ByPropertyName works only with the parameter’s actual name, which in this example is still computerName.
Tip
Notice that the alias is defined in a separate decorator. A common mistake is to try to define the alias in the parameter decorator.
Defining an alias doesn’t create a different variable name, either; you’ll never have $hostname within the script. Instead, it directs any value input to –hostname into the defined $computerName parameter variable:
PS C:\> get-systeminfo -hostname localhost | Select osversion
OSVersion
---------
6.1.7601
PS C:\> get-systeminfo -host localhost | Select osversion
OSVersion
---------
6.1.7601
24.5. Parameter validation
PowerShell can do a certain amount of data checking for you, automatically rejecting improper parameter input before any of your code even runs. This data checking is defined through an additional set of parameter decorators. The following listing shows an example, which defines the$computerName parameter to accept only between 1 and 5 values, with each value being 5 to 20 characters in length.
Listing 24.6. Adding parameter validation
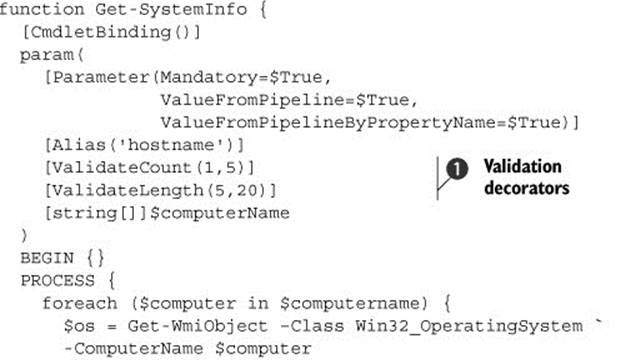
Note that you can tack on as many of these validation elements as you like, but each one goes in as a separate decorator ![]() . They’re usually typed on separate lines immediately preceding the variable, although it’s also legal just to string the whole thing together on a single line (which is harder to read).
. They’re usually typed on separate lines immediately preceding the variable, although it’s also legal just to string the whole thing together on a single line (which is harder to read).
Tip
Making your code easier to read may seem trivial, but when you come back to it next year because it needs updating you’ll be much happier because you spent the time making it readable. Well-formatted code will also make your life easier if you have to ask for help on the forums. People are much more inclined to help if they can read the code easily.
You can specify several other validations. For example, you might want to run a small validation script:
function Get-SystemInfo {
[CmdletBinding()]
param(
[Parameter(Mandatory=$True,
ValueFromPipeline=$True,
ValueFromPipelineByPropertyName=$True)]
[Alias('hostname')]
[ValidateScript({Test-Connection -Computername $_ -Count 1 -Quiet})]
[string[]]$computerName
)
In the ValidateScript decorator, you can define a script block. The code should return True or False. Use $_ to indicate the parameter value. In this example, you have a short script block that’s calling the Test-Connection cmdlet using the –Quiet parameter. If this fails, the script block will return False, validation will fail, and PowerShell will throw an exception.
Another common validation is to test for a predefined value. Let’s say you were writing a function to query an event log but you wanted to make sure the person running the command entered the right log name. You could do something like this:
function get-log {
Param (
[ValidateSet("Security","System","Application")]
[string]$Logname
)
Get-EventLog -LogName $Logname
}
If anything other than a value in the set is specified, PowerShell will complain. It’ll also tell the user the members of the set:
PS C:\> get-log -Logname Ssytem
get-log : Cannot validate argument on parameter 'Logname'.
The argument "Ssytem" does not belong to the set "Security,System,Application"
specified by the ValidateSet attribute. Supply an argument
that is in the set and then try the command again.
At line:1 char:18
+ get-log -Logname Ssytem
+ ~~~~~~
+ CategoryInfo :
InvalidData: (:) [get-log],
ParameterBindingValidationException
+ FullyQualifiedErrorId :
ParameterArgumentValidationError,get-log
The last validation test is a pattern test using a regular expression pattern:
Param (
[ValidatePattern("\w+\\\w+")]
[string]$Username
)
In this example you want to validate that any value for –Username be in the format domain\username. This tests only whether the credential looks right, not that it’s valid.
There are a few other validation decorators you can use. You’ve seen how to validate against a set of values—it’s also possible to validate against a range of values. As an example, consider the Win32_LogicalDisk class. It has a DriveType property that can take values from 0 (Unknown) to 6 (RAM disk). You’ll probably be most interested in the range 1–5, which covers local and network disks together with CDs.
function get-disk {
param (
[Parameter(Mandatory=$True)]
[ValidateRange(1,5)]
[uint32]$drivetype,
[string]$computername="$env:COMPUTERNAME"
)
Get-WmiObject -Class Win32_LogicalDisk `
-Filter "DriveType = $drivetype" `
-ComputerName $computername |
select DeviceID,
@{N="PercentFree"; E={[math]::Round((($_.FreeSpace / $_.Size) * 100), 2)}}
}
The function can be used like this:
get-disk -drivetype 3 | Format-Table -AutoSize
DeviceID PercentFree
-------- -----------
C: 69.69
If you supply a value for $drivetype that’s outside of the range 1–5, an error will be thrown and you’ll be told you’re below the minimum or above the maximum value. The default value you’ve put on the $computername variable supplies the name of the local machine. A few cmdlets won’t accept “.” or localhost as values for computer names. Using the environment variable steps around that problem.
Calculations involving disk or file sizes often result in a lot of decimal places being shown. You don’t always need that level of precision, so rounding to two decimal places is usually enough. One way to achieve that is to use the System.Math class’s Round method, as shown in the preceding code.
Variables can be set to null or, in the case of strings, to being empty. These situations can cause an error because, for example, you can’t have a computer with a name of $null! Two validation decorators exist to catch this problem:
· [ValidateNotNull()]
· [ValidateNotNullOrEmpty()]
We tend to use [ValidateNotNullorEmpty()] because it covers both situations. Use [ValidateNotNull()] if you just want to test for a null value:
function get-disk {
[CmdletBinding()]
param (
[Parameter(Mandatory=$True)]
[ValidateRange(1,5)]
[uint32]$drivetype,
[ValidateNotNullorEmpty()]
[string]$computername
)
Get-WmiObject -Class Win32_LogicalDisk `
-Filter "DriveType = $drivetype" `
-ComputerName $computername |
select DeviceID,
@{N="PercentFree"; E={[math]::Round((($_.FreeSpace / $_.Size) * 100), 2)}}
}
The function can be tested like this:
$comp = $null
get-disk -drivetype 3 -computername $comp -Debug | Format-Table -AutoSize
$comp = ""
get-disk -drivetype 3 -computername $comp -Debug | Format-Table -AutoSize
You’ve seen that parameters marked as mandatory will prompt for a value if you don’t supply one. There’s a way to override that behavior using parameter decorators. You have three options:
· [AllowNull()]
· [AllowEmptyString()]
· [AllowEmptyCollection()]
The following function demonstrates how these parameter decorators can be used:
function get-disk {
[CmdletBinding()]
param (
[Parameter(Mandatory=$True)]
[ValidateRange(1,5)]
[uint32]$drivetype,
[Parameter(Mandatory=$True)]
[AllowNull()]
[AllowEmptyString()]
[string]$computername
)
if ($computername -eq $null -or $computername -eq ""){
$computername="$env:COMPUTERNAME"
}
Write-Debug $computername
Get-WmiObject -Class Win32_LogicalDisk -Filter "DriveType = $drivetype"
-ComputerName $computername |
select DeviceID,
@{N="PercentFree"; E={[math]::Round((($_.FreeSpace / $_.Size) * 100), 2)}}
}
In this example you’ve kept the validation on drive type and made the $computername parameter mandatory. The two decorators allow a null value or an empty string to be passed into the function as the computer name. This can sometimes occur if you’re using those values to initialize a string. You can test the code like this:
$comp = $null
get-disk -drivetype 3 -computername $comp -Debug | Format-Table -AutoSize
$comp = ""
get-disk -drivetype 3 -computername $comp -Debug | Format-Table -AutoSize
You did force the local computer name to be selected if the $computername variable is null or an empty string. Either of these cases would cause Get-WmiObject to fail.
Note that PowerShell runs all of the validations you specify; if any one of them fails, your function will quit immediately with a descriptive error message:
PS C:\> get-systeminfo sys
Get-SystemInfo : Cannot validate argument on parameter 'computerName'. The
number of characters (3) in the argument is too small. Specify an
argument whose length is greater than or equal to "5" and then try the
command again.
At line:1 char:15
+ get-systeminfo <<<< sys
+ CategoryInfo : InvalidData: (:)
[Get-SystemInfo], ParameterBindingValidationException
+ FullyQualifiedErrorId : ParameterArgumentValidationError,Get-SystemInfo
No further validations will be performed once an error has occurred. Even with all of these validation options, you might still need to add more tests or error handling to accommodate potentially bad values.
Note
Jeff posted a number of articles on these validation techniques on his blog. He then turned the articles into a collection of About help topics and packaged them in a PowerShell module. You can visit http://jdhitsolutions.com/blog/2012/05/introducing-the-scriptinghelp-powershell-module/ to learn more.
24.6. Parameter sets
Many PowerShell commands support multiple parameter sets. Look at the help for Get-WmiObject, for example, and you’ll see a good example of multiple parameter sets. The important thing to remember is that once you start creating parameter sets, each parameterset must have a parameter that’s a member of no other parameterset; otherwise PowerShell can’t unambiguously resolve the parameterset to use. A parameter that isn’t explicitly in any parametersets is counted as being in all of them. When users run your function, they can only use the parameters from a given set (or any belongs to all sets parameters) at a time. For example, here’s the parameter declaration portion of a function:
Function Get-Stuff {
[CmdletBinding()]
Param(
[Parameter(ParameterSetName='Fred')][string]$one,
[Parameter(ParameterSetName='Fred')][string]$two,
[Parameter(ParameterSetName='Wilma')][string]$buckle,
[Parameter(ParameterSetName='Wilma')][string]$my,
[Parameter(ParameterSetName='Wilma')][string]$shoe,
[Parameter(ParameterSetName='Dino')][string]$bag,
[Parameter(ParameterSetName='Dino')][string]$sack,
[Parameter()][string]$peach,
[Parameter()][string]$apple
)
}
The actual parameter set names are completely made up and for the most part are invisible to users of the function. They exist only as grouping identifiers. Any of the following would be legal ways to run this function:
· Get-Stuff –one 'see' –two 'here' –peach 'certainly'
· Get-Stuff –buckle 'brass' –shoe 'leather' –apple 'mcintosh'
· Get-Stuff –bag 'leather' –sack 'paper'
These are legal because no single command uses parameters that are from multiple sets, except one of the two doesn’t belong to any set parameters, which can be used anywhere. The following would all be illegal:
· Get-Stuff –my 'belong' –bag 'leather'
· Get-Stuff –one 'here' –two 'there' –buckle 'copper'
· Get-Stuff –apple 'yes' –peach 'yes'
Those are illegal because they combine parameters from different named parameter sets. The third one may seem odd to be illegal, but because the two parameters are members of all three parametersets, PowerShell doesn’t know which one you want to use. In addition, you can’t define a parameter more than once. For example, you couldn’t create a second parameter named $one and assign it to the Wilma parameter set; you’ve already defined $one and can’t create a second instance of it. Doing so will result in an error. But you can make a parameter a member of multipleparametersets:
[Parameter(ParameterSetName='Fred')]
[Parameter(ParameterSetName='Wilma')]
[string]$house
And the function would be called as
Get-Stuff –one 'see' -house 'his'
Get-Stuff –my 'see' -house 'hers'
There may be situations where you want to specify a default parameter set name. To accomplish this, make a small adjustment to the cmdletbinding attribute:
[CmdletBinding(DefaultParameterSetName="Wilma")]
If you’ve provided some default parameter values for the Fred set, this simplifies things for the admin running the script. You can see your parameter sets by using Get-Help:
PS C:\> help get-stuff
Get-Stuff [-buckle <String>] [-my <String>] [-shoe <String>]
[-peach <String>] [-apple <String>] [-Verbose] [-Debug]
[-ErrorAction <ActionPreference>] [-WarningAction <ActionPreference>]
[-ErrorVariable <String>] [-WarningVariable <String>]
[-OutVariable <String>] [-OutBuffer <Int32>]
Get-Stuff [-one <String>] [-two <String>] [-peach <String>]
[-apple <String>] [-Verbose] [-Debug] [-ErrorAction <ActionPreference>]
[-WarningAction <ActionPreference>] [-ErrorVariable <String>]
[-WarningVariable <String>] [-OutVariable <String>] [-OutBuffer <Int32>]
Get-Stuff [-bag <String>] [-sack <String>] [-peach <String>]
[-apple <String>] [-Verbose] [-Debug] [-ErrorAction <ActionPreference>]
[-WarningAction <ActionPreference>] [-ErrorVariable <String>]
[-WarningVariable <String>] [-OutVariable <String>] [-OutBuffer <Int32>]
The output is limited because you haven’t added any comment-based help, but you can see there are three ways to run Get-Stuff. Also notice that the first syntax example corresponds with the default parameter set.
24.7. WhatIf and Confirm parameters
PowerShell supplies a huge amount of power to the administrator, and with great power comes the opportunity to make great mistakes. Look at this snippet:
Get-Service s* | Stop-Service
Would you run that on your server? Do you know what it could do? We guess that the answer to both questions is no, but it’s easy to discover the answer to the second question. You can use
Get-Service s* | Stop-Service –WhatIf
The result will be a lot of messages of the form
What if: Performing operation "Stop-Service" on Target
"Security Accounts Manager (SamSs)".
All well-written cmdlets that have the potential to modify your system should have a –WhatIf parameter. They should also have a –Confirm parameter so you can prompt for confirmation before performing the action:
Get-Service s* | Stop-Service -Confirm
Confirm
Are you sure you want to perform this action?
Performing operation "Stop-Service" on Target "Security Accounts Manager
(SamSs)".
[Y] Yes [A] Yes to All [N] No [L] No to All [S] Suspend [?] Help
(default is "Y"): L
Would you like to be able to add that functionality to your functions? Well, that’s just what we’re going to show you in this section.
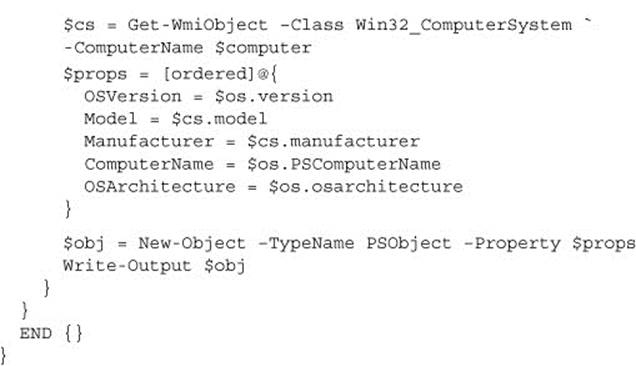
The key to adding –WhatIf and –Confirm parameters to your functions is the [CmdletBinding()] decorator. All you have to do is add SupportsShouldProcess= $True and ConfirmImpact="Medium" in the parentheses and do a bit of clever stuff in the body of the function, as demonstrated in listing 24.7. We’ll use WMI as an example and show you how to add the –Confirm and –Whatif parameters to the Win32_Process class—remember that methods on WMI classes just perform their actions; you normally don’t get the opportunity to test what they’ll do or prompt for confirmation to proceed. Invoke-WmiMethod does have –Confirm and –Whatif parameters, but it involves more work on your part if you try to use them in the function.
Listing 24.7. Adding WhatIf and Confirm parameters
The [CmdletBinding()] decorator has SupportsShouldProcess=$True and Confirm-Impact="Medium" added ![]() . The first one adds the parameters, and the second works with the $ConfirmPreference setting to determine if confirmation is automatically triggered. If theConfirmImpact setting is the same or higher than the setting in the $ConfirmPreference variable, then confirmation is automatically requested.
. The first one adds the parameters, and the second works with the $ConfirmPreference setting to determine if confirmation is automatically triggered. If theConfirmImpact setting is the same or higher than the setting in the $ConfirmPreference variable, then confirmation is automatically requested.
$psCmdlet represents the cmdlet or advanced function that’s being run. You use its ShouldProcess() method ![]() to control the parameter’s action. If either –Whatif or –Confirm is used, the method kicks in and uses the message Stop Process to tell you what it’s doing to the object$name, as can be seen in these examples:
to control the parameter’s action. If either –Whatif or –Confirm is used, the method kicks in and uses the message Stop Process to tell you what it’s doing to the object$name, as can be seen in these examples:
PS C:\> stop-wmiprocess -name notepad.exe -WhatIf
What if: Performing operation "Stop Process" on Target "notepad.exe".
PS C:\> stop-wmiprocess -name notepad.exe -Confirm
Confirm
Are you sure you want to perform this action?
Performing operation "Stop Process" on Target "notepad.exe".
[Y] Yes [A] Yes to All [N] No [L] No to All [S] Suspend [?] Help
(default is "Y"): n
If the parameters aren’t used, the WMI cmdlets are called and notepad.exe is terminated. This is a huge amount of functionality for little effort, and the advanced function toolbox isn’t empty yet.
24.8. Verbose output
This final trick is one we like to use a lot. You can technically use it in any script or function, but it works especially smoothly in combination with the [CmdletBinding()] directive.
Here’s the situation: Administrators often write long, complex scripts, and they get a bit nervous about whether they’re working properly. Nobody likes to run a command and have it just sit there. So, to give themselves some assurances that things are going well—and to make any eventual troubleshooting a bit easier—they’ll add what we call progress information. The next listing shows what this often looks like.
Listing 24.8. Adding progress information to a function
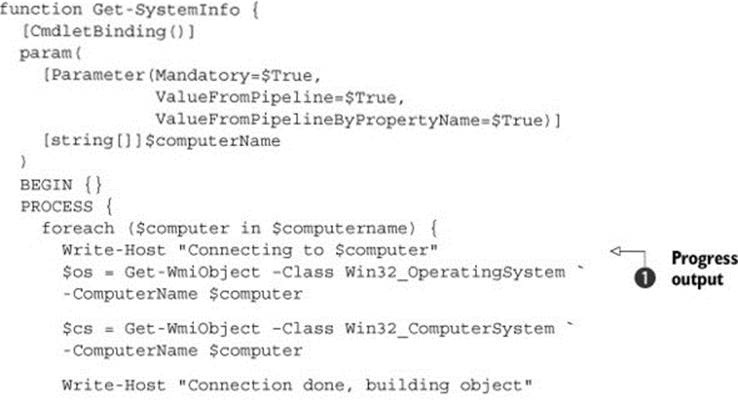
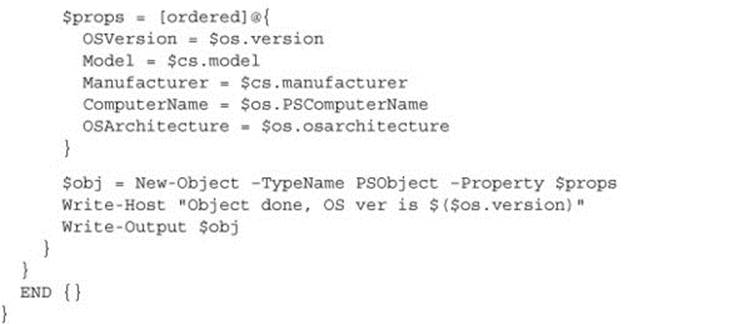
The example in listing 24.8 uses Write-Host to create the progress output ![]() . When run, it looks something like this:
. When run, it looks something like this:
PS C:\> C:\CustomObjects.ps1
Connecting to localhost
Connection done, building object
Object done, OS ver is 6.1.7601
ComputerName : localhost
Manufacturer : VMware, Inc.
OSVersion : 6.1.7601
OSArchitecture : 64-bit
Model : VMware Virtual Platform
That’s all well and good, but we hate it (well, some of us more than others). It breaks one of our primary rules: to avoid using Write-Host. Our main problem with it is that it messes up the script’s normal output and there’s no way to shut it off, short of going back through the script, one line at a time, and either removing or commenting out the Write-Host commands. Fortunately, there’s a much better way, and it’s easy to use. The following listing shows the right way to create this kind of progress output, which PowerShell would refer to as verbose output.
Listing 24.9. The right way to show verbose output
function Get-SystemInfo {
[CmdletBinding()]
param(
[Parameter(Mandatory=$True,
ValueFromPipeline=$True,
ValueFromPipelineByPropertyName=$True)]
[string[]]$computerName
)
BEGIN {}
PROCESS {
foreach ($computer in $computername) {
Write-Verbose "Connecting to $computer"
$os = Get-WmiObject –class Win32_OperatingSystem `
-ComputerName $computer
$cs = Get-WmiObject –class Win32_ComputerSystem `
-ComputerName $computer
Write-Verbose "Connection done, building object"
$props = [ordered]@{
OSVersion = $os.version
Model = $cs.model
Manufacturer = $cs.manufacturer
ComputerName = $os.PSComputerName
OSArchitecture = $os.osarchitecture
}
$obj = New-Object –TypeName PSObject –Property $props
Write-Verbose "Object done, OS ver is $($os.version)"
Write-Output $obj
}
}
END {}
}
All listing 24.9 does is replace Write-Host with Write-Verbose. Run the script again, this time with a couple of computer names, and you get this:
PS C:\> Get-SystemInfo -computerName localhost,WIN-KNBA0R0TM23
ComputerName : localhost
Manufacturer : VMware, Inc.
OSVersion : 6.1.7601
OSArchitecture : 64-bit
Model : VMware Virtual Platform
ComputerName : WIN-KNBA0R0TM23
Manufacturer : VMware, Inc.
OSVersion : 6.1.7601
OSArchitecture : 64-bit
Model : VMware Virtual Platform
Hey, wait! Where’s the output? It’s suppressed, which means your script output looks nice, clean, and uninterrupted. If you need that progress information, you just have to turn it on by adding the –Verbose switch to your command. The [CmdletBinding()] element adds the –Verboseswitch to your function automatically; you don’t have to code it. You just have to use Write-Verbose, and the switch will turn that output on:
PS C:\> Get-SystemInfo -computerName localhost,WIN-KNBA0R0TM23 -Verbose
VERBOSE: Connecting to localhost
VERBOSE: Connection done, building object
VERBOSE: Object done, OS ver is 6.1.7601
ComputerName : localhost
Manufacturer : VMware, Inc.
OSVersion : 6.1.7601
OSArchitecture : 64-bit
Model : VMware Virtual Platform
VERBOSE: Connecting to WIN-KNBA0R0TM23
VERBOSE: Connection done, building object
VERBOSE: Object done, OS ver is 6.1.7601
ComputerName : WIN-KNBA0R0TM23
Manufacturer : VMware, Inc.
OSVersion : 6.1.7601
OSArchitecture : 64-bit
Model : VMware Virtual Platform
In the shell, that verbose output is even given an alternate color, making it easy to visually distinguish from the primary script output. Finished looking at it? Just run the function again without the –Verbose switch, and the output is suppressed again. As an additional bonus, the strings in theWrite-Verbose calls can be used as comments to document your code.
24.9. Summary
We’ve covered a lot of ground, and these are all practical, useful tricks for you to use. As we said at the outset of this chapter, the extra work that PowerShell does on your behalf in terms of validation, along with the ability to make your scripts and functions look and work more like real PowerShell cmdlets, is worth the minor additional effort in using these syntactic techniques. We think every script or function should strive to implement these features—and as we’ve shown you, there’s not much extra work involved in doing so.
All materials on the site are licensed Creative Commons Attribution-Sharealike 3.0 Unported CC BY-SA 3.0 & GNU Free Documentation License (GFDL)
If you are the copyright holder of any material contained on our site and intend to remove it, please contact our site administrator for approval.
© 2016-2026 All site design rights belong to S.Y.A.