PowerShell in Depth, Second Edition (2015)
Part 3. PowerShell scripting and automation
Chapter 25. Script modules and manifest modules
This chapter covers
· Turning a PowerShell script into a module
· Exporting module members
· Using a module manifest
· Working with dynamic modules
In previous chapters, we’ve shown you how to build a script—or, more likely, a function—that works much like a native PowerShell cmdlet. In this chapter, we’re going to show you how to package multiple functions together into a distributable form that can be loaded into, and unloaded from, the shell. You’ve almost certainly used these modules before, perhaps loading the ActiveDirectory module. The only difference in what you’ll build now is that you’ll work entirely in PowerShell’s scripting language, whereas many of the modules you’ve used to this point will have been written in Visual Studio. PowerShell v3 introduced the ability to create CDXML modules—a WMI class wrapped in XML. These are covered in chapter 39. The module manifest techniques shown later in this chapter can also be applied to CDXML modules.
Note
We covered modules more extensively in chapter 5. If you need a refresher on how to load or unload modules, please refer back to that chapter.
25.1. Making a script module
Listing 25.1 shows a complete script that contains a single function. This is a repeat of a function that you built in an earlier chapter; you’ll use it as a starting point. Remember that you can easily add as many functions to this script as you want to—we’re sticking with a single function to keep things easy to read.
Listing 25.1. MyModule.ps1
function Get-DiskInfo {
[CmdletBinding()]
param(
[Parameter(Mandatory=$True,
ValueFromPipeline=$True,
ValueFromPipelineByPropertyName=$True)]
[string[]]$computerName,
[Parameter(Mandatory=$True)]
[ValidateRange(10,90)]
[int]$threshold
)
BEGIN {}
PROCESS {
foreach ($computer in $computername) {
$params = @{computername=$computer
filter="drivetype=3"
class="win32_logicaldisk"}
$disks = Get-WmiObject @params
foreach ($disk in $disks) {
$danger = $False
if ($disk.freespace / $disk.size * 100 -le $threshold) {
$danger = $True
}
$props = @{ComputerName=$computer
Size=$disk.size / 1GB -as [int]
Free = $disk.freespace / 1GB -as [int]
Danger=$danger}
$obj = New-Object –TypeName PSObject –Property $props
$obj
}
}
}
END {}
}
To run the function in listing 25.1, all you have to do is dot-source the script file. It’d be easier to import a module, and making this script into a script module is incredibly easy: Just change the .ps1 filename extension to .psm1. That’s it.
To make this behave more like a regular PowerShell module, you should put it into one of the folders that PowerShell automatically searches when you list or load modules. Those places are defined in the system-wide PSModulePath environment variable:
PS C:\> $env:psmodulepath
C:\Users\Richard\Documents\WindowsPowerShell\Modules;C:\Program Files\WindowsPo
werShell\Modules;C:\windows\system32\WindowsPowerShell\v1.0\Modules\
To make the display a bit easier to identify all the paths, use the –split operator:
PS C:\> $env:psmodulepath -split ";"
C:\Users\Richard\Documents\WindowsPowerShell\Modules
C:\Program Files\WindowsPowerShell\Modules
C:\windows\system32\WindowsPowerShell\v1.0\Modules\
Note
It should probably go without saying—but we’ll say it anyway: Your modules should go in the Documents location, not in the System32 location. System32 is generally reserved for modules distributed by Microsoft. Windows security will also make it more difficult to change modules in the System32 location. The Program Files location is used for modules you need for configurations managed in Desired State Configuration, as explained in chapter 41.
Depending on what other applications you’ve installed, your path may be different. What we’re showing here is the default. Keep in mind that this environment variable is accessible from within PowerShell, but it’s defined globally in Windows (%PSMODULEPATH%). You could add more locations to this variable by appending a semicolon and the additional path. It’s also possible to prepend another location. If you’re creating a lot of modules, it’s probably better to prepend because your development area will be scanned for the module first. It’s perfectly legal to list a Universal Naming Convention (UNC) path here also so that you can use a file server to store your modules. Because a UNC might be interpreted as an internet location, you might need to sign your modules or modify your execution policy to allow them to run. You can also put a line like this in your profile to make the extra locations a permanent addition to your PowerShell environment:
$env:PSModulePath = "C:\Scripts\Modules;" + $env:PSModulePath
Warning
The location and naming conventions for modules are what trips up almost everyone at first. Read the following instructions carefully.
Within one of the paths listed in PSModulePath, you must create a folder for your module. The folder name will become the module name, and it should contain only letters and numbers. Avoid spaces, punctuation, and so on. Save your script module within that folder, giving it the exact same filename as the folder, plus the .psm1 filename extension.
For example, if you’ve decided to name your module MyModule, then you might save it as \My Documents\WindowsPowerShell\Modules\MyModule\MyModule.psm1. It’s very, very important that the folder name—MyModule—and the filename—MyModule .psm1—match exactly. Otherwise, PowerShell won’t be able to find the module.
Warning
The latest versions of Windows use a Documents library, which consists of two locations: a Shared Documents folder and a My Documents folder. PSModulePath only refers to the My Documents location. If you’re creating the necessary folders by using Windows File Explorer, make sure you’re in My Documents and not Shared Documents.
That’s all you have to do. With the module file saved in the correct location, you can run Import-Module MyModule (assuming you stuck with MyModule as the module name and used that name for the folder and filename) to load the module; Remove-Module MyModule will unload it. Of course, you don’t have to keep your module in one of the locations listed in PSModulePath; you can store it anywhere. If you store it elsewhere, provide the path and filename to Import-Module, such as Import-Module C:\Mine\MyModule.psm1.
Note
The command autodiscovery feature in PowerShell v3 and v4 will work only if you store your module in one of the locations listed in PSModulePath.
It may be beneficial to keep the module in another location during development, especially if you’re running later versions of PowerShell and leave the autodiscovery function switched on.
A .psm1 file can contain a number of item types:
· Functions, as discussed earlier
· Other calls to Import-Module
· Dot-sourced PowerShell scripts to run PowerShell scripts (usually in the same folder) that each contain one or more functions
One file or many files?
You can create your module with a single PSM1 file. The advantages of doing this are that you have everything in one place and you can unload the functions when you’re finished with working with the module.
The alternative is to have a number of scripts that contain your functions and dot-source them in the PSM1 file. Each script would have a line like this in the PSM1 file:
. $psScriptRoot\FileFunctions.ps1
$psScriptRoot is a PowerShell automatic variable that contains the directory from which a script is being run.
The advantage of this approach, especially if you have a large amount of code, is that it becomes easier to maintain. The disadvantage is that the functions don’t unload when you call Remove-Module.
Which should you use? As always, it’s your call depending on your preferences and how you want to work.
Tip
In PowerShell v2, $psScriptRoot was only available in PSM1 files. In PowerShell v3 and v4, you can use it in all scripts.
25.2. Exporting module members
When you import, or load, a script module into memory, PowerShell runs the PSM1 file within the global scope. That means any functions defined within the module become visible to the entire shell. You can import a module and then get a directory listing of PowerShell’s Function: drive to see the module’s functions, or you can use Get-Command. That’s often the exact behavior you’ll want; sometimes, though, you might want certain things within the module to remain hidden, or private.
For example, take a look at listing 25.2. Here, you’re adding a small utility function. This function does something useful, but you don’t want anyone to see or use it. You plan to use it from within some of the module’s other functions, but you haven’t taken the time to make it fit for public consumption. It has a nonstandard name, it defines its parameters in the simplest possible manner, and so on. Alternatively, it may be a function that’s used only in the middle of a process and it doesn’t make sense for it to be accessed outside of that context.
Listing 25.2. MyModule.psm1, revised
function utilPingWMI {
param([string]$computername)
Test-Connection -ComputerName $computername -Count 1 -Quiet
}
function Get-DiskInfo {
[CmdletBinding()]
param(
[Parameter(Mandatory=$True,
ValueFromPipeline=$True,
ValueFromPipelineByPropertyName=$True)]
[string[]]$computerName,
[Parameter(Mandatory=$True)]
[ValidateRange(10,90)]
[int]$threshold
)
BEGIN {}
PROCESS {
foreach ($computer in $computername) {
$params = @{computername=$computer
filter="drivetype=3"
class="win32_logicaldisk"}
if (utilPingWMI $computer ){
$disks = Get-WmiObject @params
foreach ($disk in $disks) {
$danger = $False
if ($disk.freespace / $disk.size * 100 -le $threshold) {
$danger = $True
}
$props = @{ComputerName=$computer
Size=$disk.size / 1GB -as [int]
Free = $disk.freespace / 1GB -as [int]
Danger=$danger}
$obj = New-Object –TypeName PSObject –Property $props
$obj
}
}
else {
write-Warning "Could not contact $computer"
}
}
}
END {}
}
By default, when users load that module into the shell, the utilPingWMI function will be visible in the Function: drive and they’ll be able to call the function themselves. That’s not what you want, so you’ll make use of a cmdlet called Export-ModuleMember. This cmdlet tells the shell exactly which pieces of your module you want made visible to the public; everything else will remain private.
This sometimes confuses folks, so here are the rules to remember:
· If you don’t use Export-ModuleMember at all, all functions in your script module become publicly visible. This includes functions, aliases, and any variables you define in the script. Variables and aliases aren’t made visible.
· If you use Export-ModuleMember, only the things you explicitly export, or make public, will be publicly visible. Everything else will be private. Private means that non-exported elements can be seen by anything in the module’s PSM1 file but not by anything external to that file.
This sometimes confusing behavior was designed by Microsoft as an ease-of-use feature. The idea is that, if you do nothing, the module will do something. If you want to get more sophisticated and start hiding stuff, the shell will shift modes and expose only what you tell it to.
We mentioned aliases and variables in the rules, and you can be pretty clever in how you use those. Our next listing shows a new MyModule.psm1, which has several public and private elements.
Listing 25.3. MyModule.psm1, using Export-ModuleMember
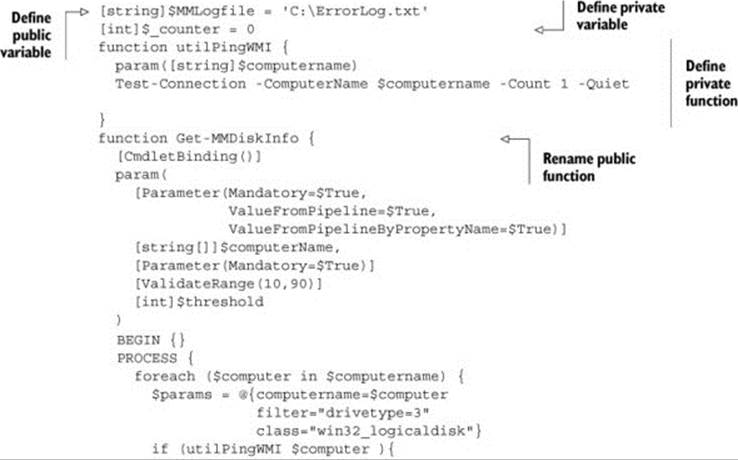
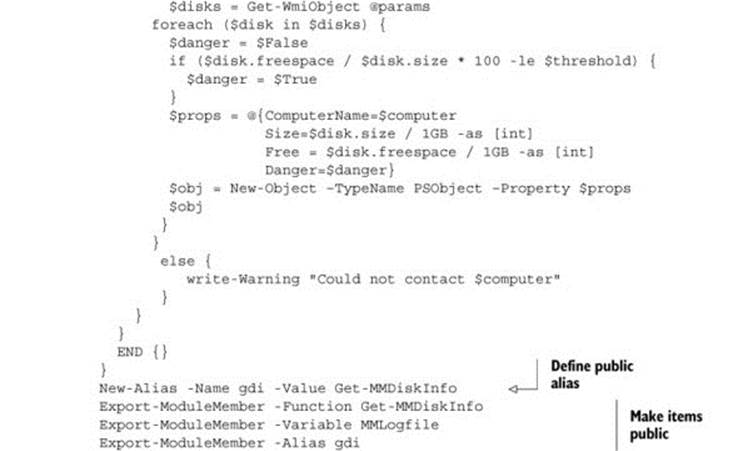
Let’s cover a few specifics about what you’re doing in listing 25.3:
· You defined two variables, one of which you’ll make public. You’re using the prefix MM for public items, which will help ensure that they don’t conflict with something that another module is making public or that’s already built into the shell.
· In keeping with the nonconflict theory, you’re renaming your function to Get-MMDiskInfo. In PowerShell v3 and v4, you can also use the –Prefix parameter to dynamically set the prefix at time of import into the shell, meaning you don’t need to modify your code. If you use the –Prefix parameter in PowerShell v4, the ExportedCommands property of the module shows the commands in the module with the prefix applied. When you run commands using the ModuleName\CommandName syntax, you must use the prefix.
· PowerShell doesn’t know what will be public or private until the very end, when you start issuing Export-ModuleMember commands. That’s where everything you export officially becomes public and everything else remains private. Remember that remaining private isn’t the default; it only becomes the default once you start using Export-ModuleMember to explicitly make things public.
· The alias you created and exported, gdi, will enable someone who loads your module to run gdi in order to run the Get-MMDiskInfo function. That alias will vanish if they remove your module from the shell’s memory.
· You give the private variable a name that starts with an underscore, $_counter, as a visual reminder to yourself that the variable isn’t public. That variable can safely be used within any of the functions that your PSM1 file contains, but it won’t be visible anywhere else.
With a clever plan, you can create complex modules that contain internal functions and variables and that expose just your intended aliases, functions, and variables to the public.
25.3. Making a module manifest
One of the downsides of a script module is that you’re limited to a single PSM1 file. There might well be instances where you need to work with a greater number of files, and that’s where a module manifest comes into play. A manifest is essentially a text file that uses special formatting to tell PowerShell what files are included in your module—an inventory of sorts. Module manifests have the same name as your module; if your module folder is MyModule, then the manifest file must be named MyModule.psd1.
When PowerShell loads a module by name—such as when you run Import-Module MyModule—it looks for a PSD1 file first. If it doesn’t find one, it’ll then look for a DLL file and then a PSM1 file. So normally, if you want to provide a manifest, saving one with the proper filename is enough to get PowerShell to use it.
You can create a new manifest by using the New-ModuleManifest cmdlet. It has several parameters that we’ll need to cover, so let’s start with the ones that are mandatory. There are two things you should keep in mind when using these:
· Parameters we identify as skippable can be given an empty string for their value, and the resulting manifest will function properly. You still have to specify the parameter or the cmdlet will prompt you for it, but you don’t have to provide a value other than an empty string.
· Parameters we identify as multivalued can accept a comma-separated list of values.
Here are the parameters you must specify when running the cmdlet:
· Author—The module’s author. Skippable.
· CompanyName—The name of the company that produces the module. Skippable.
· Copyright—A copyright notice for the module. Skippable.
· Description—A textual description of the module. Skippable.
· FileList—A list of files contained within the module, intended for informational purposes only. Multivalued.
· FormatsToProcess—A list of .format.ps1xml files that provide formatting instructions for the module. Skippable and multivalued.
· ModuleToProcess—The primary module, usually a PSM1 file with a script module, that should be loaded first.
· Path—The path and filename of the final manifest file, which must be given a .psd1 filename extension.
· RequiredAssemblies—A list of .NET Framework assemblies that the module needs to run. Skippable and multivalued.
· TypesToProcess—A list of PS1XML files that provide type extension instructions for the module. Skippable and multivalued.
Note
Two of these parameters, -TypesToProcess and –FormatsToProcess, will make more sense after we’ve covered custom format views and custom type extensions in upcoming chapters.
There are also a few optional parameters you may find useful. Three of these control what’s made public from the module:
· AliasesToExport
· FunctionsToExport
· VariablesToExport
These all default to *, which means the elements exported by the module will in fact be exported and made public. These don’t override your use of Export-ModuleMember within the PSM1 file; rather, they overlay it. In order for a function, variable, or alias to be public, it must meet both of these criteria:
· It must be exported by using Export-ModuleMember or be contained in a module that doesn’t use Export-ModuleMember at all.
· It must be listed on the appropriate Module manifest parameter, or the parameter must not be specified, or the parameter must be specified with a value of * (which is the default).
These parameters all support wildcards; -AliasesToExport b* would export all aliases starting with the letter “b” that had also been exported within the PSM1 file.
Here are a few more optional parameters you may find useful:
· ModuleList—This is an information-only list of modules contained within the module.
· ModuleVersion—This defaults to 1.0 and is for informational purposes only.
· NestedModules—This is a multivalued list of additional modules that must be loaded into memory in order for the root module to work. You can use it instead of adding Import-Module commands at the top of your PSM1 file.
· ScriptsToProcess—This is a multivalued list of PS1 files that should be run when the module is loaded.
· DefaultCommandPrefix—New in PowerShell v4, this parameter specifies a prefix that’s prepended to the nouns of all functions in the module. The Exported-Commands property of the module will use the prefix. If you use the module qualified syntax,ModuleName\CommandName, the command names must include the prefix.
It’s a lot of information to provide, but the cmdlet lets you create complex, multifile modules that can be loaded in a single step.
25.4. Creating dynamic modules
Before we leave the world of modules and script blocks, let’s look at an interesting way of creating dynamic modules using the New-Module cmdlet. A dynamic module is a collection of code that exists in memory only; nothing is written to disk. Frankly, this is something most IT pros won’t need very often, but it offers some intriguing possibilities.
One possibility is to use a dynamic module to copy a function from one computer to another without writing anything to disk. There are a few moving pieces, so we’ll go through this process step by step.
Say on your machine you have a few functions loaded into the shell that you want to execute on a remote machine. You begin by creating a string that contains the function code, separated by a semicolon to indicate a new command:
$command=""
$command="Function Get-Mac { $((get-command get-mac).Definition)} ;"
$command+="Function Get-Uptime { $((get-command get-uptime).Definition)}"
The variable $command now contains two functions separated by a semicolon. Next, you push these functions to a remote machine. You’re going to use a session so you can run several commands. It’s possible to do everything with one command using Invoke-Command, but you want to make this easier to follow:
$sess=New-PSSession -ComputerName Quark
With the session in place you’ll create a dynamic module on the remote computer:
invoke-command {
Param ($commandText)
$sb=[scriptblock]::Create($commandText)
$mod=New-Module -scriptblock $sb
$mod | import-module} -session $sess -argumentlist $command
The script block you’re invoking accepts a parameter, $commandText. You’ll create a script block from it using the Create() method of the [scriptblock] type accelerator. This new script block is then used by New-Module to create a dynamic module. It isn’t necessary, but you’ll explicitly import the module so you can see it, if you want, with Get-Module. The end result, though, is that the functions from $command are now loaded in memory on the remote computer and you can execute them:
invoke-command {get-uptime} -session $sess
When the session ends, the dynamic module ends and nothing ever touches the filesystem. You can take this concept even further and copy a script-based module from the local machine to a dynamic module on a remote machine, as shown in the following listing.
Listing 25.4. Copying a module to a remote computer
$module="FileSystem"
Import-Module $module
Get-Command -Module $module -CommandType Function |
ForEach -begin { $commands=""} -Process {
$commands+="Function $($_.Name) { $($_.Definition) } ;"
} -end { $commands+="Export-ModuleMember -function *" }
#create a dynamic module on the remote machine
invoke-command {
Param ($commandText)
$sb=[scriptblock]::Create($commandText)
$mod=New-Module -scriptblock $sb
$mod | import-module
} -session $sess -argumentList $commands
The code in listing 25.4 is similar to what you did earlier with the exception of piping the module functions to ForEach-Object to build the command string.
The other interesting use of New-Module is to create a custom object. There are easier ways to create custom objects, but in the interest of completeness we felt we should at least offer a quick glimpse at this technique.
First, define a script block with a number of functions. These will become the custom object’s methods so you don’t need to adhere to typical naming conventions; it’s probably better if you don’t.
$sb={
Function GetBootTime {
$os=get-wmiobject win32_operatingsystem
$os.ConvertToDateTime($os.LastBootUpTime)
}
Function GetCDrive {
get-wmiobject win32_logicaldisk -filter "deviceid='c:'"
}
Function ClearTemp {
Param($path=$env:temp)
Write-Host "Checking $path" -foreground Cyan
dir -path $path -recurse | Where {$_.LastWriteTime -ge (GetBootTime)} |
Remove-item -Recurse
}
}
Next, create a dynamic module, but this time create a custom object:
PS C:\> $co=new-module -ScriptBlock $sb -AsCustomObject
PS C:\> $co | get-member
TypeName: System.Management.Automation.PSCustomObject
Name MemberType Definition
---- ---------- ----------
Equals Method bool Equals(System.Object obj)
GetHashCode Method int GetHashCode()
GetType Method type GetType()
ToString Method string ToString()
ClearTemp ScriptMethod System.Object ClearTemp();
GetBootTime ScriptMethod System.Object GetBootTime();
GetCDrive ScriptMethod System.Object GetCDrive();
The module functions become methods that you can execute like any other method:
PS C:\> $co.GetCDrive()
DeviceID : C:
DriveType : 3
ProviderName :
FreeSpace : 124712972288
Size : 201504845824
VolumeName :
Using a dynamic module like this is a terrific way of creating an object that can do something without much effort. Again, this isn’t something we think most people will need on a regular basis, but it might come in handy for those special situations or when you feel like showing off your PowerShell ninja skills.
25.5. Summary
Modules are a powerful and convenient way to distribute sets of related functionality. If you build a module manifest, your modules can even consist of multiple files, including type extensions and custom formatting views, which we’ll be covering in chapters 26 and 27.
All materials on the site are licensed Creative Commons Attribution-Sharealike 3.0 Unported CC BY-SA 3.0 & GNU Free Documentation License (GFDL)
If you are the copyright holder of any material contained on our site and intend to remove it, please contact our site administrator for approval.
© 2016-2026 All site design rights belong to S.Y.A.