PowerShell in Depth, Second Edition (2015)
Part 4. Advanced PowerShell
Chapter 39. WMI and CIM
This chapter covers
· Introducing WMI
· Understanding the WMI and CIM cmdlets
· Working with CIM sessions and CDXML
Including a chapter on Windows Management Instrumentation (WMI) and the Common Information Model (CIM) in an advanced PowerShell book may seem to be an odd move, but in reality PowerShell and WMI are closely linked—we’ve written much on using WMI with PowerShell, two powerful technologies that combine to give a huge amount of functionality. PowerShell makes this combination even more powerful because 60% of the new PowerShell cmdlets delivered in the Windows 8/Windows Server 2012 family of products are produced from WMI classes as “cmdlets over objects,” which we’ll cover near the end of the chapter.
The chapter starts with an overview of WMI and explains the relationship between WMI and CIM. PowerShell cmdlets have been available to work with WMI since PowerShell v1. We provide an overview of those cmdlets that focuses on the issues and intricacies of using them rather than detailed explanations.
The bulk of this chapter is taken up with a detailed examination of the PowerShell CIM cmdlets, which were introduced with PowerShell v3. These are analogous to the WMI cmdlets but extend the range of functionality. Closely related to the CIM cmdlets are CIM sessions, which are similar to the PowerShell Remoting session and provide an easy way to remove the dependence on the Distributed Component Object Model (DCOM) for accessing WMI on remote systems.
PowerShell v3 introduced technology to wrap WMI classes in XML. You save the file with a .cdxml extension and you can use it as a PowerShell module. This technology provides huge gains in terms of ease of use. As we stated earlier, much of the new PowerShell functionality introduced in Windows Server 2012 is delivered through using these “cmdlets over objects.” As we mentioned, the chapter closes by examining how this technology can be accessed. We offer an example to help the explanation.
Before we get to the new stuff, let’s spend a little time recapping the fundamentals by considering just exactly what WMI is.
39.1. What is WMI?
Before we discuss using WMI with PowerShell, we must define WMI. And where does CIM come into the picture?
WMI is Microsoft’s implementation of the Common Information Model (CIM), which is an industry standard produced by the Distributed Management Task Force (DMTF). According to www.dmtf.org/standards/cim, “CIM provides a common definition of management information for systems, networks, applications and services, and allows for vendor extensions” (our emphasis). WMI was introduced back in the days of Windows NT 4. WMI is what allows you to manage Windows-based systems.
If you try this code:
PS C:\> Get-WmiObject -List *OperatingSystem | select Name
you’ll see the following returned:
Name
----
CIM_OperatingSystem
Win32_OperatingSystem
Win32_SystemOperatingSystem
Ignore the last entry—it’s a WMI link class between the operating system and the computer system. The important classes are CIM_OperatingSystem and Win32_Operating-System. The first is the base class that represents an operating system as defined by the DMTF, and the second is Microsoft’s implementation of that class in WMI.
If you try this:
PS C:\> Compare-Object -ReferenceObject (Get-WmiObject CIM_OperatingSystem)
![]() -DifferenceObject (Get-WmiObject Win32_OperatingSystem)
-DifferenceObject (Get-WmiObject Win32_OperatingSystem)
you’ll discover that there’s no apparent difference between the classes. If you dig a little further:
PS C:\> Get-WmiObject CIM_OperatingSystem | get-member |
![]() Select TypeName -unique
Select TypeName -unique
TypeName
--------
System.Management.ManagementObject#root\cimv2\Win32_OperatingSystem
PS C:\> Get-WmiObject win32_Operatingsystem | get-member |
![]() Select TypeName -unique
Select TypeName -unique
TypeName
--------
System.Management.ManagementObject#root\cimv2\Win32_OperatingSystem
you’ll find that the WMI and CIM classes are effectively identical. Why have both? The answer is so that the CIM information can be accessed from non-Windows implementations of CIM.
Starting with PowerShell v3, Microsoft began moving back toward the DTMF standards and introducing a new API for accessing WMI—which is why there are WMI cmdlets and CIM cmdlets. We’d expect any future development to be concentrated on the CIM cmdlets rather than the WMI cmdlets. Because the WMIcmdlets have been around the longest, we’ll start with a quick look at how to use them.
39.2. WMI cmdlets
Now that you know what WMI is, let’s look at how you can use PowerShell to work with WMI. The WMI cmdlets in PowerShell v3 and v4 are identical to those in PowerShell v2, so this discussion applies to all versions. We’ll concentrate on some areas that might cause you problems rather than provide a full detailed description.
The most important point to know is that working with WMI in Windows is COM-based. This means that to access remote machines you need the DCOM service running on the remote system and you need to configure any firewalls to allow DCOM, WMI, and Remote Management access. You can accomplish this by using Group Policy, the GUI, netsh, or the PowerShell cmdlets in the NetSecurity module if you’re using Windows 8/Windows Server 2012 or later.
Once that’s complete, you can use WMI with PowerShell. The WMI cmdlets are as follows:
PS C:\> Get-Command *WMI* -CommandType cmdlet | select Name
Name
----
Get-WmiObject
Invoke-WmiMethod
Register-WmiEvent
Remove-WmiObject
Set-WmiInstance
Four of them work directly with WMI objects, whereas the fifth (Register-WmiEvent) works with events. The cmdlets all have a –ComputerName parameter so they can work with remote machines (remember that’s via DCOM). Let’s see some examples of these cmdlets in action.
39.2.1. Get-WmiObject
Get-WmiObjectdoes exactly what it says: it gets WMI objects. This is probably the WMI cmdlet you’ll use the most (it was the only WMI cmdlet in PowerShell v1 and the only way to interact with remote systems in PowerShell v1). You’ve seen examples of it at work throughout the book, so we’ll just provide a quick recap:
PS C:\> Get-WmiObject -Class Win32_ComputerSystem
Domain : WORKGROUP
Manufacturer : Microsoft Corporation
Model : Surface Pro 2
Name : RSSURFACEPRO2
PrimaryOwnerName : Richard
TotalPhysicalMemory : 8506142720
You could also write a query as you might have done in VBScript:
PS C:\> Get-WmiObject -Query "SELECT * FROM Win32_ComputerSystem"
The query is written in WMI Query Language (WQL), which is a subset of SQL. A detailed description of WQL is available at http://msdn.microsoft.com/en-us/library/windows/desktop/aa394552(v=vs.85).aspx. You may see comments regarding speed differences depending on whether you use a query. In reality, our tests show little difference between the two approaches, though using the query involves more typing. But where you can see performance gains is with filtering.
For example, if you use WMI to look at logical disks:
PS C:\> Get-WmiObject -Class Win32_LogicalDisk
you’ll get data returned for your hard drives as well as CD/DVD drives. The way to differentiate between the two types of disk is to use the value of the DriveType property. A value of 3 indicates a hard disk and 5 indicates it’s a CD/DVD.
Note
Many WMI properties are numeric values that need to be interpreted. The WMI documentation on MSDN—we recommend starting at http://msdn.microsoft.com/en-us/library/aa394572(v=vs.85).aspx—is the best source for this information.
You can restrict or filter the results in a number of ways. The most obvious to PowerShell novices would be to use Where-Object:
PS C:\> Get-WmiObject -Class Win32_LogicalDisk | where DriveType -eq 3
DeviceID : C:
DriveType : 3
ProviderName :
FreeSpace : 181799030784
Size : 248951861248
VolumeName : Windows
We actively discourage this approach because it means retrieving all the data and then performing the filter action. This isn’t too bad on the local machine, but it’s a bad idea when pulling data back from multiple machines across the network. The better approach is to let Get-WMIObject do the filtering for you on the remote machine. Luckily, WQL can help. You might use a query:
PS C:\> Get-WmiObject -Query "SELECT * FROM Win32_LogicalDisk WHERE
![]() DriveType = 3"
DriveType = 3"
If you’re using a string value in your filter, then put the value in single quotes:
PS C:\> Get-WmiObject -Query
![]() "SELECT * FROM Win32_LogicalDisk WHERE DeviceId = 'C:'"
"SELECT * FROM Win32_LogicalDisk WHERE DeviceId = 'C:'"
This approach works and is perfectly acceptable, but our preferred technique will save you some typing:
PS C:\> Get-WmiObject -Class Win32_LogicalDisk -Filter "DriveType = 3"
The –Filter parameter takes the WHERE clause from the WQL query (everything after the WHERE keyword) and delivers the same results. When you apply filtering, either with a query or the parameter, it’s done on the source machine. So if you query a remote machine for processes that meet some criteria, the processing happens remotely, not on your machine, which makes PowerShell much more efficient. One thing to be careful of when using filters is that the operators are the legacy operators, not the new PowerShell operators.
Get-WmiObject also has an interesting set of parameters, as you’ll discover when you read the help file. A few of them leap out and require a bit of explanation or commentary, as shown in table 39.1.
Table 39.1. Important Get-WmiObject parameter descriptions
|
Parameter |
Comments |
|
ComputerName |
Enables access to WMI classes on remote machines. Uses DCOM as connectivity protocol. DCOM must be running on remote machine and firewalls must be configured to allow DCOM transactions. |
|
AsJob |
The WMI processing runs as a job. The *-Job cmdlets have to be used to access the data. |
|
ThrottleLimit |
Use with the AsJob parameter to control the number of simultaneous actions. |
|
EnableAllPrivileges |
Ensures that all of your user privileges are enabled. Use this parameter in addition to running PowerShell with elevated privileges. |
|
Amended |
Enables access to some extra information such as a class description that’s normally too expensive to retrieve. |
|
Authentication |
This is the DCOM authentication level. Use a value of 6 (packet privacy) when accessing remotely through providers such as IIS or Clustering that require it. Not required for accessing data on a local machine. |
|
DirectRead |
Indicates whether direct access to the WMI provider is requested for the specified class without any regard to its base class or to its derived classes; restricts output to just the class asked for. Very rarely used; usually doesn’t make any difference. |
|
Impersonation |
Default value is impersonate, which allows objects to use the credentials of the caller. Nothing more is usually required. |
For most of your WMI work, you probably won’t need to use most of the parameters in table 39.1 and can instead stick with their defaults.
As you can see, retrieving WMI objects is straightforward. But sometimes you may need to remove WMI objects once you’ve found them.
39.2.2. Remove-WmiObject
The Remove-WmiObject cmdlet has to be used with care. If you remove the WMI object for a critical service, your system will become unstable and probably crash. This cmdlet can be used like this:
PS C:\> $p = Get-WmiObject -Class Win32_Process -Filter "Name='calc.exe'"
PS C:\> Remove-WmiObject -InputObject $p
Or you could take this approach:
PS C:\> Get-WmiObject -Class Win32_Process -Filter "Name='calc.exe'" |
![]() Remove-WmiObject
Remove-WmiObject
Both techniques work. We recommend the second approach for two reasons. First, you can use the Get-WmiObject call to double-check that you’re deleting the correct object and save yourself from those embarrassing “oops” moments. Second, it’s a bit less typing, which will increase your productivity over the long run.
Note
In the previous examples, terminating the calc.exe process would also remove the WMI object. From our experience, you shouldn’t need to remove WMI objects directly from the CIM repository that often. Remove-WmiObject should be for those special cases. The cmdlet also supports -WhatIf and -Confirm.
Occasionally you may need to modify a WMI object rather than deleting it.
39.2.3. Set-WmiInstance
Set-WmiInstance is used to modify one or more properties on a WMI object. As an example, let’s look at changing the label on a disk volume. Say your test system doesn’t have a label for its C: drive.
PS C:\> Get-WmiObject -Class Win32_Volume -Filter "Name = 'C:\\'" |
![]() Format-table Name, Label –autosize
Format-table Name, Label –autosize
Name Label
---- -----
C:\
The use of \\ always catches people new to PowerShell and WMI. It’s required because WMI uses \ as an escape character and needs the second \ to escape it so that it’s used as a literal character. Performing the change is simply a matter of piping the Win32_Volume object into Set-WmiInstance:
PS C:\> Get-WmiObject -Class Win32_Volume -Filter "Name = 'C:\\'" |
![]() Set-WmiInstance -Arguments @{Label="WmiTest"}
Set-WmiInstance -Arguments @{Label="WmiTest"}
Note
You’ll need to run PowerShell with elevated privileges to make this change. And yes, for a local system you could’ve used the Label command.
You can rerun the test to observe the change:
PS C:\> Get-WmiObject -Class Win32_Volume -Filter "Name = 'C:\\'" |
![]() Format-table Name, Label –autosize
Format-table Name, Label –autosize
Name Label
---- -----
C:\ WmiTest
You’ll find that many, if not most, of the properties on WMI classes are read-only (check the class documentation on MSDN if in doubt), so don’t expect to spend a lot of time modifying property values. You can’t change the size of the disk this way!
Tip
Piping the results of a WMI query into Get-Member will show that many properties are labeled get and set, which you may take to mean they can be overwritten. Don’t believe it; check the documentation.
Many WMI classes provide methods for performing administrative tasks. A number of PowerShell cmdlets, like Stop-Computer, are based on these methods. If you can find a cmdlet that accomplishes what you need, use it. Otherwise, you need to turn your attention elsewhere.
39.2.4. Invoke-WmiMethod
In PowerShell v1 you only had the Get-WmiObject cmdlet. This meant that if you wanted to utilize a WMI method, you had to create a variable for the object and then call the method:
PS C:\> $proc = Get-WmiObject -Class Win32_Process -Filter
![]() "Name='calc.exe'"
"Name='calc.exe'"
PS C:\> $proc.Terminate()
__GENUS : 2
__CLASS : __PARAMETERS
__SUPERCLASS :
__DYNASTY : __PARAMETERS
__RELPATH :
__PROPERTY_COUNT : 1
__DERIVATION : {}
__SERVER :
__NAMESPACE :
__PATH :
ReturnValue : 0
PSComputerName :
Note
When you’re working with WMI methods, a return code of 0 indicates success. Any other result indicates that the method call has failed.
This approach still works even in PowerShell v4, but you have a better way of doing things:
PS C:\> proc = Get-WmiObject -Class Win32_Process -Filter
![]() "Name='calc.exe'"
"Name='calc.exe'"
PS C:\> Invoke-WmiMethod -InputObject $proc -Name Terminate
An even better way is to pipe the results of your search into Invoke-WmiMethod:
PS C:\> Get-WmiObject -Class Win32_Process -Filter "Name='calc.exe'" |
![]() Invoke-WmiMethod -Name Terminate
Invoke-WmiMethod -Name Terminate
You can also work with methods that take parameters:
PS C:\> Invoke-WmiMethod -Class Win32_Process -Name Create `
-ArgumentList 'calc.exe', 'c:\scripts'
The method arguments are provided as an array to the cmdlet. There’s an issue regarding the use of arguments with Invoke-WmiMethod that comes up quite regularly. As an example, consider formatting a disk:
PS C:\> $vol = Get-WmiObject -Class Win32_Volume -Filter "DriveLetter='H:'"
PS C:\> $vol.Format("FAT", $true, 4096, "", $false)
The arguments correspond to the filesystem to use, whether to perform a quick format, the cluster size to use, the volume label, and whether compression is enabled. The logical assumption would be that you could change the code to this:
PS C:\> Get-WmiObject -Class Win32_Volume -Filter "DriveLetter='H:'" |
![]() Invoke-WmiMethod -Name Format -ArgumentList "FAT", $true, 4096, "",
Invoke-WmiMethod -Name Format -ArgumentList "FAT", $true, 4096, "",
![]() $false
$false
Unfortunately it doesn’t work and you get the following error message:
Invoke-WmiMethod : Input string was not in a correct format.
If you modify the order of the arguments, it’ll work:
PS C:\> Get-WmiObject -Class Win32_Volume -Filter "DriveLetter='H:'" |
![]() Invoke-WmiMethod -Name Format -ArgumentList 4096, $false, "FAT", "",
Invoke-WmiMethod -Name Format -ArgumentList 4096, $false, "FAT", "",
![]() $true
$true
The differences between the documented order of arguments and the order expected by Invoke-WmiMethod are illustrated in table 39.2.
Table 39.2. Order of arguments as documented and as expected by Invoke-WmiMethod
|
Using method as documentation |
Using Invoke-WmiMethod |
|
FileSystem |
ClusterSize |
|
QuickFormat |
EnableCompression |
|
ClusterSize |
FileSystem |
|
Label |
Label |
|
EnableCompression |
QuickFormat |
The argument list as documented can be derived using this:
(Get-WmiObject -Class Win32_Volume -Filter "DriveLetter='H:'").Format
This code will show the order required by Invoke-WmiMethod:
([wmiclass]"Win32_Volume").GetMethodParameters('Format')
The [wmiclass] type accelerator instructs PowerShell to treat “Win32_Volume” as a WMI class object. The object has a method called GetMethodParameters that we’re invoking to get the parameters for the Format method.
The easy way to remember parameter order is that method parameters for Invoke-WmiMethod are in alphabetical order. Don’t ask us why; we suspect it’s a .NET thing.
Note
The new Get-CimClass cmdlet also gives the correct order for Invoke-WmiMethod. Use (Get-CimClass-ClassNameWin32_Volume).CimClass-Methods['Format'].Parameters. We recommend using Invoke-CimMethod in PowerShell v3 and v4 because the argument names and values are required, which removes issues regarding their order.
Another issue arises when you’re dealing with arguments that take arrays of values. This works:
PS C:\> $nic = Get-WmiObject -Class Win32_NetworkAdapterConfiguration
![]() -Filter "Index=7"
-Filter "Index=7"
PS C:\> $nic.SetDNSServerSearchOrder("10.10.54.201")
Using Invoke-WmiMethod failed. After discussions with fellow PowerShell MVP Bartek Bielawski and a bit more digging, we found that for multiple DNS servers this would work:
PS C:\> $dnsserver = "10.10.54.201", "10.10.54.98"
PS C:\> Get-WmiObject -Class Win32_NetworkAdapterConfiguration -Filter
![]() "Index=7" | Invoke-WmiMethod -Name SetDNSServerSearchOrder
"Index=7" | Invoke-WmiMethod -Name SetDNSServerSearchOrder
![]() -ArgumentList (,$dnsserver)
-ArgumentList (,$dnsserver)
It’s necessary to create an array as the input argument (,$variable)—it’s a unary array, that is, a one-element array. If you want to use just a single DNS server, then you need to use the unary array trick twice: once when you create the variable and again when you use Invoke-WmiMethod. Messy, but it works:
PS C:\> $dnsserver = (,"10.10.54.201")
PS C:\> Get-WmiObject -Class Win32_NetworkAdapterConfiguration -Filter
![]() "Index=7" | Invoke-WmiMethod -Name SetDNSServerSearchOrder
"Index=7" | Invoke-WmiMethod -Name SetDNSServerSearchOrder
![]() -ArgumentList (, $dnsserver)
-ArgumentList (, $dnsserver)
To jump ahead slightly (we’ll cover the CIM cmdlets in greater detail later in the chapter), if you want to use the CIM cmdlets, it’s easy if you have multiple DNS servers:
PS C:\> $dnsserver = "10.10.54.201", "10.10.54.98"
PS C:\> Get-CimInstance -ClassName Win32_NetworkAdapterConfiguration
![]() -Filter "Index=7" | Invoke-CimMethod -MethodName
-Filter "Index=7" | Invoke-CimMethod -MethodName
![]() SetDNSServerSearchOrder -Arguments @{DNSServerSearchOrder =
SetDNSServerSearchOrder -Arguments @{DNSServerSearchOrder =
![]() $dnsserver}
$dnsserver}
If you just have a single one, you need to create a unary array on the Arguments parameter:
PS C:\> $dnsserver = "10.10.54.201"
PS C:\> Get-CimInstance -ClassName Win32_NetworkAdapterConfiguratio
![]() -Filter "Index=7" | Invoke-CimMethod -MethodName
-Filter "Index=7" | Invoke-CimMethod -MethodName
![]() SetDNSServerSearchOrder -Arguments @{DNSServerSearchOrder =
SetDNSServerSearchOrder -Arguments @{DNSServerSearchOrder =
![]() (,$dnsserver)}
(,$dnsserver)}
This isn’t satisfactory because you have to adopt different techniques depending on the number of DNS servers you need to put into the property. This is not a PowerShell issue; it’s a WMI issue because the IP address that you saw last time also takes an array and it was happy with a single value. Hopefully, this isn’t something that will come up too often, but be aware of these options when working with WMI methods.
Tip
We recommend using the networking cmdlets in Windows 8 and later to modify the DNS server search order.
Last but not least in our consideration of the WMI cmdlets is how you work with events.
39.2.5. Register-WmiEvent
WMI has a rich, event-driven environment that you can access through the PowerShell eventing engine. Using Get-WmiObject-List*Event* will generate a long list of classes, most of which are related to events. Three classes of note are as follows:
· __InstanceCreationEvent
· __InstanceModificationEvent
· __InstanceDeletionEvent
Using these classes involves creating a WQL query and registering the event:
PS C:\> $q = "SELECT * FROM __InstanceModificationEvent WHERE
![]() TargetInstance ISA 'Win32_LocalTime'"
TargetInstance ISA 'Win32_LocalTime'"
PS C:\> Register-WmiEvent -Query $q
The results are obtained using the PowerShell event cmdlets:
PS C:\> Get-Event | select TimeGenerated
TimeGenerated
-------------
05/02/2014 15:52:18
05/02/2014 15:52:19
05/02/2014 15:52:20
05/02/2014 15:52:21
05/02/2014 15:52:22
05/02/2014 15:52:23
05/02/2014 15:52:24
05/02/2014 15:52:25
05/02/2014 15:52:26
05/02/2014 15:52:27
05/02/2014 15:52:28
A new event is generated every second as the system time changes. The results are from a machine configured for UK date format. As always, you should remove registrations and events when you’ve finished processing:
PS C:\> Unregister-Event *
PS C:\> Get-Event | Remove-Event
The WMI cmdlets provide a huge amount of functionality. They were joined in PowerShell v3 by the CIM cmdlets, which provide alternative routes to that same functionality but also expand what you can achieve in PowerShell when you’re working with WMI.
Note
PowerShell includes several WMI type accelerators such as [wmi] and [wmisearcher]. These are intended to provide shortcuts to WMI objects—in other words, to save some typing. The type accelerators assume you have solid WMI knowledge and thus are a bit more complicated to use. We typically don’t use them because Get-WmiObject is so easy to use and flexible. Frankly, we’re not sure they offer a lot of value, which is why we aren’t covering them in this chapter. There’s not much more we could add than what’s already documented in About_WMI_cmdlets.
39.3. CIM cmdlets
As we stated in the introduction, WMI is the Microsoft implementation of CIM. In the PowerShell v3 wave of products (including Windows 8 and Windows Server 2012), a new API was introduced for accessing CIM (WMI). This API replaces the COM-based API that we grew to know and love in PowerShell v1 and v2.
Note
In the rest of this chapter, we’ll use WMI and CIM interchangeably unless we’re discussing the new API or cmdlets. They’re the same thing.
The new API generated the need for a new set of cmdlets. As you’ve seen, the WMI cmdlets of PowerShell v2 are still available and, more important, still as valid.
Tip
If you have a lot of scripts using the WMI cmdlets, don’t rush to modify them to use the CIM cmdlets. They’ll still work in PowerShell v3 and v4. Consider modifying them when you have to make major changes.
The CIM cmdlets mirror the WMI cmdlets, as you can see in table 39.3. One important point to note is that the CIM cmdlets can be used to work with legacy existing WMI classes and the new classes Microsoft introduced with Windows 8/Server 2012 and later. The WMI cmdlets will work with the new classes, but they aren’t as flexible when working with remote machines.
Table 39.3. Comparing WMI and CIM cmdlets
|
WMI cmdlet |
CIM cmdlet |
|
Get-CimClass |
|
|
New-CimInstance |
|
|
Get-WmiObject |
Get-CimInstance |
|
Get-CimAssociatedInstance |
|
|
Set-WmiInstance |
Set-CimInstance |
|
Invoke-WmiMethod |
Invoke-CimMethod |
|
Remove-WmiObject |
Remove-CimInstance |
|
Register-WmiEvent |
Register-CimIndicationEvent |
The use of Get-,Set-, and Remove-CimInstance is directly comparable to the corresponding WMI cmdlets. Get-CimAssociatedInstance is a new and improved way to work with WMI class associations. There’s an invoke cmdlet for CIM methods that’s similar to Invoke-WmiMethod. You can also work with CIM events through Register-CimIndicationEvent.
A couple of cmdlets don’t have corresponding WMI equivalents. Get-CimClass is a discovery tool that opens the CIM classes in a way that’s much easier to use. New-CimInstance can be used to create new instances of CIM classes but only under certain circumstances. In most cases you’re better served by using the class’s Create method via Invoke-CimMethod. We won’t say anything else about New-CimInstance.
The other big difference is the way that the CIM cmdlets access remote systems. You’ll recall the WMI cmdlets use DCOM for remote connectivity. When you use the CIM cmdlets, the default method of connecting to remote machines is Web Services-Management (WSMAN). This is exactly the same protocol that PowerShell Remoting uses. You need to have the remoting service (WinRM) running and configured on the remote machine. You don’t have to enable the full remoting capability (by running Enable-PSRemoting), but remember it’s enabled by default on the latest versions of Windows servers.
Note
You can use the WSMAN cmdlets to retrieve WMI data from remote machines. The syntax of these cmdlets is difficult, and we recommend using them only as a last resort. If you want to learn more about the WSMAN cmdlets, check out chapter 17 of PowerShell and WMI (Manning, 2012). The CIM cmdlets combine the firewall-friendly nature of the WSMAN cmdlets with the syntax simplicity of the WMI cmdlets. Best of both worlds.
The CIM cmdlets don’t use PowerShell Remoting but they can use CIM sessions, which are analogous to remote PowerShell sessions (which we describe in the next section). You can still use DCOM in a CIM session, but it’s a fallback for accessing legacy systems that don’t have PowerShell v3 or v4 installed. The remote connectivity options are listed in table 39.4.
Table 39.4. Connectivity options when using CIM cmdlets
|
Scenario |
Protocol |
|
Local machine—computername parameter not used |
DCOM |
|
Local machine—computername parameter used |
WSMAN |
|
Remote machine—computername parameter used |
WSMAN |
|
Remote machine—CIM session with default options |
WSMAN |
|
Remote machine—CIM session with DCOM protocol specified |
DCOM |
One big difference is the type of objects returned by the two groups of cmdlets. Try running this code:
PS C:\> Get-WmiObject -Class Win32_ComputerSystem | Get-Member
TypeName: System.Management.ManagementObject#root\cimv2\
![]() Win32_ComputerSystem
Win32_ComputerSystem
Name MemberType Definition
---- ---------- ----------
PSComputerName AliasProperty PSComputerName = __SERVER
JoinDomainOrWorkgroup Method System.Management...
Rename Method System.Management...
SetPowerState Method System.Management...
UnjoinDomainOrWorkgroup Method System.Management...
AdminPasswordStatus Property uint16 AdminPasswordStatus
AutomaticManagedPagefile Property boolAutomaticManagedPagefile
...
Now compare those results to this:
PS C:\> Get-CimInstance -ClassName Win32_ComputerSystem | Get-Member
TypeName: Microsoft.Management.Infrastructure.CimInstance#
![]() root/cimv2/Win32_ComputerSystem
root/cimv2/Win32_ComputerSystem
Name MemberType Definition
---- ---------- ----------
Clone Method System.ObjectICloneable.Clone()
Dispose Method void Dispose()
Equals Method boolEquals(System.Objectobj)
GetCimSessionComputerName Method string GetCimSessionComputerName()
GetCimSessionInstanceId Method guidGetCimSessionInstanceId()
GetHashCode Method intGetHashCode()
GetObjectData Method void GetObjectData...
GetType Method type GetType()
ToString Method string ToString()
AdminPasswordStatus Property uint16 AdminPasswordStatus {get;}
AutomaticManagedPagefile Property boolAutomaticManagedPagefile
AutomaticResetBootOption Property boolAutomaticResetBootOption
...
The first point to note is that the object type changes. Get-WmiObject returns a System .Management.ManagementObject type object, but the object returned from Get-CimInstance is from the Microsoft.Management.Infrastructure.CimInstance class. This is part of the new API for working with CIM we mentioned earlier.
The other big difference is that the WMI cmdlet returns a set of methods that are part of the WMI class:
· JoinDomainOrWorkgroup
· Rename
· SetPowerState
· UnjoinDomainOrWorkgroup
A variable can be created to reference the object and the methods called on that object, such as:
PS C:\> $comp = Get-WmiObject -Class Win32_ComputerSystem
PS C:\> $comp.Rename("Newname", "password", "username")
This approach will not work with the CIM cmdlets because the objects that are returned are inert; they don’t give access to the WMI class methods. If you need to use the methods, you have to use Invoke-CimMethod as described later in the chapter.
An apparent, but important, difference is that the WMI cmdlets use –Class but the CIM cmdlets use –ClassName. However, the CIM cmdlets will accept –Class as an abbreviated parameter name so this shouldn’t be too difficult to use.
The only way to learn about the CIM cmdlets is to use them, so let’s start by looking at how you discover information on the CIM classes.
39.3.1. Get-CimClass
This cmdlet alone makes the move to the CIM API worthwhile. It opens up WMI classes to discovery in a simple way. Here’s the default information returned by the cmdlet:
PS C:\> Get-CimClass -Class Win32_ComputerSystem
NameSpace: ROOT/cimv2
CimClassName CimClassMethods CimClassProperties
------------ --------------- ------------------
Win32_ComputerSystem {SetPowerState, R... {Caption,Description...}
You can dig into the detailed information:
PS C:\> $class = Get-CimClass -Class Win32_ComputerSystem
PS C:\> $class.CimClassMethods
Name ReturnType Parameters Qualifiers
---- ---------- ---------- ----------
SetPowerState UInt32 {PowerState... {}
Rename UInt32 {Name... {Implemented, ValueMap}
JoinDomainOrWorkgroup UInt32 {AccountOU... {Implemented, ValueMap}
UnjoinDomainOrWorkgroup UInt32 {FUnjoinOptions...{Implemented, ValueMap}
PS C:\> $class.CimClassProperties
Name : Caption
Value :
CimType : String
Flags : Property, ReadOnly, NullValue
Qualifiers : {MaxLen, read}
ReferenceClassName :
...
Probably the most useful part is when you drill down into the methods and get to understand the parameters:
PS C:\> $class.CimClassMethods["Rename"].Parameters
Name CimType Qualifiers
---- ------- ----------
Name String {ID, In}
Password String {ID, In}
UserName String {ID, In}
You get the parameter name and, more important, the type of data the method expects for that parameter. This information can be difficult to obtain using the WMI cmdlets, and most people resort to the documentation.
If you need them, you can access the system properties for the class by using $class.CimSystemProperties.
Unfortunately, there’s one gap in the information provided by Get-CimClass: You can’t get to the amended properties. Some properties are buried deep in the WMI database and involve relatively expensive processing to reach. The most common reason for accessing these properties is to read the class description. With the WMI cmdlets, you’d do this:
PS C:\> (Get-WmiObject -List Win32_ComputerSystem -Amended).Qualifiers |
![]() where Name -eq "Description" | select -ExpandProperty Value
where Name -eq "Description" | select -ExpandProperty Value
The Win32_ComputerSystem class represents a computer system operating
in a Win32 environment.
There’s no equivalent mechanism using the CIM cmdlets to retrieve this information.
Now that you’ve seen how to discover information about the CIM classes, how do you retrieve information about the instances of those classes?
39.3.2. Get-CimInstance
If we’d asked you to tell us how to access a WMI class in PowerShell v2, you’d have told us to use Get-WmiObject. Table 39.3 shows that the equivalent CIM cmdlet is Get-CIMInstance, which is used exactly as you’d expect:
PS C:\> Get-CimInstance -ClassName Win32_ComputerSystem
Name PrimaryOwnerName Domain TotalPhysicalMemory Model
---- ---------------- ------ ------------------- -----
RSSURFACEPRO2 Richard WORKGROUP 8506142720 Surface Pro 2
The Manufacturer property has been removed to fit the page size. One thing to be aware of is that the default formatting has changed for many standard classes. The information is still there; it’s just formatted slightly differently.
The techniques you used with Get-WmiObject still work. You can use the –Filter parameter:
PS C:\> Get-CimInstance -ClassName Win32_Process -Filter "Name =
![]() 'powershell.exe'"
'powershell.exe'"
ProcessId Name HandleCount WorkingSetSize VirtualSize
--------- ---- ----------- -------------- -----------
4060 powershell.exe 700 124346368 310177792
Alternatively, you can use a query:
PS C:\> Get-CimInstance -Query "SELECT * FROM Win32_Process WHERE Name =
![]() 'powershell.exe'"
'powershell.exe'"
ProcessId Name HandleCount WorkingSetSize VirtualSize
--------- ---- ----------- -------------- -----------
4060 powershell.exe 732 124186624 310177792
If you want to access a machine by name, local or remote:
PS C:\> Get-CimInstance -Query "SELECT * FROM Win32_Process WHERE Name =
![]() 'powershell.exe'" -ComputerName RSLAPTOP01
'powershell.exe'" -ComputerName RSLAPTOP01
ProcessId Name HandleCount PSComputerName
--------- ---- ----------- --------------
4060 powershell.exe 802 RSLAPTOP01
WorkingSetSize and VirtualSize properties were removed from the display for the sake of brevity.
You can even use –ResourceURI in a manner similar to the WSMAN cmdlets if you wish. We don’t recommend that approach; the syntax is more convoluted.
One great thing about the CIM cmdlets is that the data can be refreshed. Follow through this example on your machine to see what we mean. First, create an object representing the PowerShell process running on your machine. You can then display KernelModeTime, which is a measure of the time that the CPU spends on PowerShell:
PS C:\> $p = Get-CimInstance -ClassName Win32_Process -Filter "Name =
![]() 'powershell.exe'"
'powershell.exe'"
PS C:\> $p | format-table Name, KernelModeTime -AutoSize
Name KernelModeTime
---- --------------
powershell.exe 31356201
If you pipe that object through Get-CimInstance, the values are refreshed:
PS C:\> $p | Get-CimInstance |
![]() format-table Name, KernelModeTime –AutoSize
format-table Name, KernelModeTime –AutoSize
Name KernelModeTime
---- --------------
powershell.exe 31824204
Note that the original object, $p, remains the same; it’s just the data you’re displaying that gets refreshed. There’s no comparable way of doing this with the WMI cmdlets.
WMI classes may be associated with other classes. A typical example is the association between the Win32_NetworkAdapter and the Win32_Network-Adapter-Configuration classes. The first holds hardware information on your network card, and the second holds the TCP/IP configuration data. You’ll often need to retrieve information on the configuration based on the adapter. For example, you can find the wireless adapter using the WMI cmdlets:
PS C:\> $nic = Get-WmiObject -ClassName Win32_NetworkAdapter -Filter
![]() "NetEnabled = $true AND NetConnectionID LIKE '%Wireless%'"
"NetEnabled = $true AND NetConnectionID LIKE '%Wireless%'"
Now you need to find its TCP/IP address, which is stored on the Win32_Network-AdapterConfiguration class:
PS C:\> Get-WmiObject -Query "ASSOCIATORS OF
![]() {Win32_NetworkAdapter.DeviceID=$($nic.DeviceID)}
{Win32_NetworkAdapter.DeviceID=$($nic.DeviceID)}
![]() WHERE ResultClass = Win32_NetworkAdapterConfiguration
WHERE ResultClass = Win32_NetworkAdapterConfiguration
"
DHCPEnabled : True
IPAddress : {192.168.1.2, fe80::6d95:b824:6a72:a0a9}
DefaultIPGateway : {192.168.1.1}
DNSDomain : tiscali.co.uk
ServiceName : athr
Description : Atheros AR5007 802.11b/g WiFi Adapter
Index : 11
You can do the same thing with the CIM cmdlets but in a slightly different way:
PS C:\> $nic = Get-CimInstance -ClassName Win32_NetworkAdapter
![]() -Filter "NetEnabled = $true AND NetConnectionID LIKE '%Wireless%'"
-Filter "NetEnabled = $true AND NetConnectionID LIKE '%Wireless%'"
PS C:\> Get-CimAssociatedInstance -CimInstance $nic -ResultClassName
![]() Win32_NetworkAdapterConfiguration | select IPAddress
Win32_NetworkAdapterConfiguration | select IPAddress
IPAddress
---------
{192.168.1.2, fe80::6d95:b824:6a72:a0a9}
Using the CIM cmdlets is cleaner and simpler. Anything that removes the need to remember the query syntax for WMI associations has to be a bonus.
Sometimes you find CIM instances on your systems that you don’t want or no longer need. You can use the CIM cmdlets to remove those instances.
39.3.3. Remove-CimInstance
Every system you touch has a number of processes running that consume resources. Sometimes other admins may leave processes running that they shouldn’t have—we know you wouldn’t do that. There are a couple of ways to remove those processes.
The simplest method of using Remove-CimInstance, and the one we recommend, is to use Get-CimInstance first and pipe the results into Remove-CimInstance:
PS C:\> Get-CimInstance -ClassName Win32_Process -Filter "Name =
![]() 'calc.exe'" | Remove-CimInstance
'calc.exe'" | Remove-CimInstance
This approach has the advantage of allowing you to correctly identify the instance you want to remove before performing the deletion. The alternative approach is to perform a query and remove the results:
PS C:\> Remove-CimInstance -Query "SELECT * FROM Win32_Process WHERE Name =
![]() 'calc.exe'"
'calc.exe'"
If you look at the help for Remove-Ciminstance, you’ll see that a –WhatIf parameter is available:
PS C:\> Remove-CimInstance -Query "SELECT * FROM Win32_Process WHERE Name =
![]() 'calc.exe'" -WhatIf
'calc.exe'" -WhatIf
What if: Performing operation "Remove-CimInstance" on Target
"Win32_Process: calc.exe (Handle = "3600")".
This parameter depends on the underlying functionality within the WMI provider. If the provider supports –WhatIf, then the parameter works properly. In the case of the provider not supporting –WhatIf, either you’ll get an error or the parameter is ignored and the cmdlet does its job. We haven’t seen any documentation describing which providers support –WhatIf and which don’t, so your mileage may vary.
Sometimes you don’t want to remove a CIM instance; you just want to modify it.
39.3.4. Set-CimInstance
Modifying the value of a CIM instance isn’t a task that comes up every day, but you need to be able to do it when required. There’s a cmdlet for this called Set-CimInstance. A simple example is to look at the label on the disk volume holding the C: drive:
PS C:\> Get-CimInstance -ClassName Win32_Volume -Filter "Name = 'C:\\'" |
Format-table Name, Label –autosize
Name Label
---- -----
C:\
As with the WMI version of this example from earlier in the chapter, the \ needs to be escaped. Changing the label is just a matter of piping the results into Set-CimInstance:
PS C:\> Get-CimInstance -ClassName Win32_Volume -Filter "Name = 'C:\\'" |
![]() Set-CimInstance -Property @{Label="CimTest"}
Set-CimInstance -Property @{Label="CimTest"}
The result can be tested:
PS C:\> Get-CimInstance -ClassName Win32_Volume -Filter "Name = 'C:\\'" |
![]() Format-table Name, Label –autosize
Format-table Name, Label –autosize
Name Label
---- -----
C:\ CimTest
A more common scenario is working with the methods on the WMI classes to perform changes. Whereas you used Invoke-WMIMethod earlier in the chapter, the corresponding CIM cmdlet is Invoke-CimMethod.
39.3.5. Invoke-CimMethod
CIM provides a huge repository of information that you can tap into to discover what’s happening on your systems. It also provides the opportunity to manage those systems through the methods on the CIM classes. You saw earlier that there are a few issues with using Invoke-WmiMethod. Those issues don’t exist when you use Invoke-CimMethod.
As we explained, you can use Get-CimClass to discover the parameter information you need about a method. Let’s create a process:
PS C:\> $class = Get-CimClass -ClassName Win32_Process
PS C:\> $class.CimClassMethods["Create"].Parameters
Name CimType Qualifiers
---- ------- ----------
CommandLine String {ID, In, MappingStrings}
CurrentDirectory String {ID, In, MappingStrings}
ProcessStartupInformation Instance {EmbeddedInstance, ID, In,...
ProcessId UInt32 {ID, MappingStrings, Out}
You need to provide a command-line command to start the process and a directory. The parameters are supplied as a hash table using the parameter name you’ve discovered and the value. The hash table can be built separately or as part of the cmdlet call; we prefer to do it separately because it makes the code more readable. You can then invoke the method as shown here:
PS C:\> $params = @{CommandLine = "calc.exe"; CurrentDirectory =
![]() "c:\scripts"}
"c:\scripts"}
PS C:\> Invoke-CimMethod -ClassName Win32_Process -MethodName Create
![]() -Arguments $params
-Arguments $params
ProcessId ReturnValue PSComputerName
--------- ----------- --------------
2040 0
As with calling any WMI method, a return code of 0 means success. Anything else is a failure. Some methods, such as the Terminate method of Win32_Process, don’t have any arguments. In these cases, you have a couple of options. Option one is to get the instance and pipe it intoInvoke-CimMethod:
PS C:\> Get-CimInstance -Class Win32_Process -Filter "Name = 'calc.exe'" |
![]() Invoke-CimMethod -MethodName terminate
Invoke-CimMethod -MethodName terminate
Alternatively, you can create a variable for the instance and use that instance as follows:
PS C:\> $inst = Get-CimInstance -Class Win32_Process -Filter "Name =
![]() 'calc.exe'"
'calc.exe'"
PS C:\> Invoke-CimMethod -InputObject $inst -MethodName Terminate
39.3.6. Register-CimIndicationEvent
Windows is an event-driven operating system. PowerShell provides a good way of working with the event engine. WMI provides events. You can put all of that together to work with WMI events. If you’ve worked with WMI events using Register-WmiEvent you’ll notice a few differences. A number of CIM classes deal with events in general:
PS C:\> Get-CimClassCIM_Inst* | Select –expand CimClassname
CIM_InstIndication
CIM_InstCreation
CIM_InstModification
CIM_InstDeletion
CIM_InstalledSoftwareElement
CIM_InstalledOS
You may also find classes that deal with explicit events, such as Win32_VolumeChange-Event, Win32_ComputerShutdownEvent, or RegistryKeyChangeEvent. The first thing you should do when working with events is register the event you need:
PS C:\> $q = "SELECT * FROM CIM_InstModification WHERE TargetInstance ISA
![]() 'Win32_LocalTime'"
'Win32_LocalTime'"
PS C:\> Register-CimIndicationEvent -Query $q
In this case you’ll get an event every second as the system time changes. You can see the results by using PowerShell’s Get-Event cmdlet:
PS C:\> Get-Event | select TimeGenerated
When you’ve finished with the event, you should unregister it and tidy up by clearing out the event queue:
PS C:\> Unregister-Event *
PS C:\> Get-Event | Remove-Event
The CIM cmdlets provide an alternative and, in many cases, a better way of working with WMI. We’ve mentioned several times that the CIM cmdlets can use the PowerShell remoting protocols to access remote systems. It’s time we had a look at how that works.
39.4. CIM sessions
As shown in table 39.4, the CIM cmdlets use WSMAN to access remote systems by default, either through the –ComputerName parameter or by using a CIMsession using the –CimSession parameter. These options are exactly analogous to PowerShell Remoting. Use the –ComputerName parameter when you want to access the remote machine only once, and use a CIMsession when you want to perform a number of actions on the remote system.
Connecting to a remote machine using the –ComputerName parameter is exactly the same as for any other cmdlet with this capability:
PS C:\> Get-CimInstance -ClassName Win32_OperatingSystem -ComputerName
![]() webr201 | Select PSComputerName, LastBootUpTime
webr201 | Select PSComputerName, LastBootUpTime
A CimSession is created and used like this:
PS C:\> $sw = New-CimSession -ComputerName webr201
PS C:\> Get-CimInstance -ClassName Win32_OperatingSystem -CimSession $sw |
![]() Select PSComputerName,LastBootUpTime
Select PSComputerName,LastBootUpTime
This creates a CimSession using WSMAN. How can you tell?
PS C:\> $sw
Id : 1
Name : CimSession1
InstanceId : 2e1cf2b0-96e5-4fdd-90e9-f18948846500
ComputerName : webr201
Protocol : WSMAN
Look at the session information and it’ll tell you the protocol. This is great, but you can only use WSMAN with a CimSession against PowerShell v3 or v4. Look at the WSMAN information for the webr201 system used in the earlier example:
PS C:\> Test-WSMan -ComputerName webr201
wsmid : http://schemas.dmtf.org/wbem/wsman/identity/1/
wsmanidentity.xsd
ProtocolVersion : http://schemas.dmtf.org/wbem/wsman/1/wsman.xsd
ProductVendor : Microsoft Corporation
ProductVersion : OS: 0.0.0 SP: 0.0 Stack: 3.0
This is version 3 of WSMAN that’s installed with PowerShell v3 and v4. Look at a system running PowerShell v2:
PS C:\> Test-WSMan -ComputerName server02
wsmid : http://schemas.dmtf.org/wbem/wsman/identity/1/
wsmanidentity.xsd
ProtocolVersion : http://schemas.dmtf.org/wbem/wsman/1/wsman.xsd
ProductVendor : Microsoft Corporation
ProductVersion : OS: 0.0.0 SP: 0.0 Stack: 2.0
If you try to use a CIM session over WSMAN to a system running WSMAN version 2.0, it will fail. What’s the answer? Drop back to DCOM:
PS C:\> $o = New-CimSessionOption -Protocol DCOM
PS C:\> $sd = New-CimSession -ComputerName server02 -SessionOption $o
PS C:\> Get-CimInstance -ClassName Win32_OperatingSystem -CimSession $sd |
![]() Select PSComputerName,LastBootUpTime
Select PSComputerName,LastBootUpTime
The only difference is that a session option to use the DCOM protocol has been used. If you create a session using the DCOM protocol, you automatically get packet privacy enabled. This provides remote access to WMI providers such as IIS or clustering that demand the packet privacy level of encryption.
Note
If you use a WSMAN-based CIM session, you don’t need to worry about packet privacy; you aren’t using DCOM, so it’s not an issue.
Other CIMSession options include UICulture, skipping of certificate checks, password authentication mechanisms, proxy types, and WMI impersonation (or packet privacy–level encryption), although you should be able to use most default settings. The complete help file for this cmdlet is a recommended read, and there’s no reason for us to rehash it here.
One of the good things about CIM sessions is that they can be combined. You can achieve this by explicitly specifying the sessions you want to use:
PS C:\> Get-CimInstance -ClassName Win32_OperatingSystem -CimSession $sw,
![]() $sd | Select PSComputerName, LastBootUpTime
$sd | Select PSComputerName, LastBootUpTime
The end result is getting Win32_OperatingSystem information from multiple CIM sessions. Alternatively, this can be done implicitly by piping all of the available CIM sessions to Get-CimInstance:
PS C:\> Get-CimSession | Get-CimInstance -ClassName Win32_OperatingSystem |
![]() Select PSComputerName,LastBootUpTime
Select PSComputerName,LastBootUpTime
Our favorite thing regarding CIM sessions is that if you use WSMAN (which was revised for PowerShell v3; PowerShell v4 uses the same versions of WSMAN) the session can survive a reboot of the remote machine, as illustrated in figure 39.1.
Figure 39.1. Reconnecting a WSMAN-based CIM session

You’re given a warning that you have up to four minutes to reconnect after you attempt to reconnect to the remote machine. If you’re restarting a system that runs Microsoft Exchange or another application that takes a long time to restart, your session may time out. In that case you’ll need to re-create it.
The CIM cmdlets and CIM sessions come as “out-of-the-box” technology. Microsoft’s long-term strategy is to use CIM in place of the WMI technologies you’re familiar with. So we encourage you to take the time to begin learning and using these new cmdlets.
One last piece of CIM-related functionality that we want to cover enables you to create your own cmdlets from CIM classes.
39.5. “Cmdlets over objects”
This topic may be stretching the envelope a bit for a lot of IT pros, but it’s a powerful way to deliver easy-to-use CIM-based functionality. It’s also critical to understand because 60% of the PowerShell functionality in both Windows Server 2012 and Windows Server 2012 R2 is delivered using this technique. The basis of the technique is that you take a CIM class, wrap some XML around the properties and methods, save it as a CDXML file, and publish it as a PowerShell module.
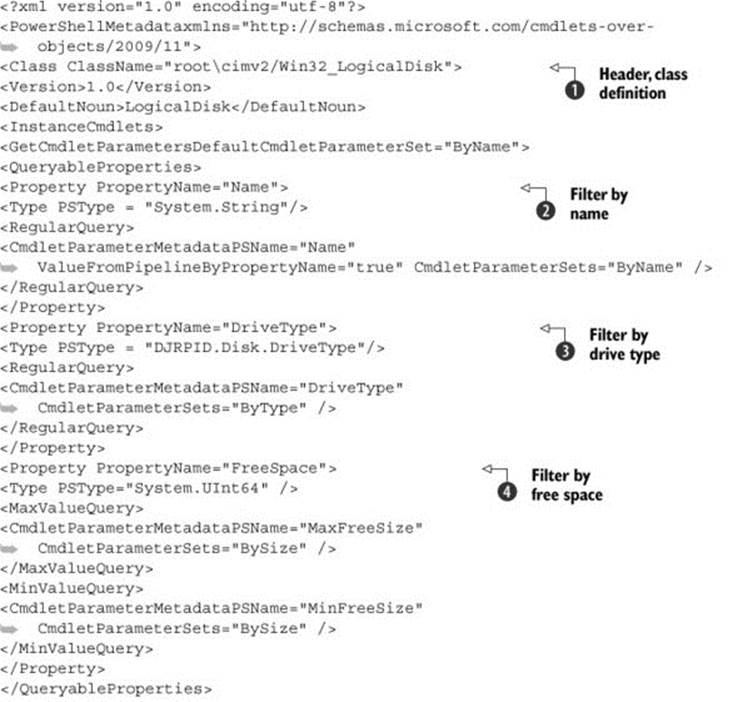
That’s right; we did say XML. An example is shown in listing 39.1, which takes the Win32_LogicalDisk class and creates two cmdlets for your module. The first cmdlet enables you to filter by disk type, using words instead of the integer codes WMI expects, and the second invokes theChkdsk method.
Listing 39.1. Cmdlet over object code
This listing should be saved with a CDXML extension. The filename will eventually be used as the module name, so plan accordingly. If you want PowerShell to be able to easily find it, then create an appropriately named subfolder in your module path. We’ll show you how to import this later.
For now let’s look at this file, which appears a lot more complicated than it actually is. The listing starts with some header lines ![]() . Here you provide the CIM class you’ll be using—in this case, Win32_LogicalDisk. The namespace is expected as part of the class information. The version can be provided by any scheme you use in your organization. The last part of this area supplies the default noun. This is what will be used by the Get cmdlet you’ll create. Our recommendation is to relate the noun to the class. Use the full class name or the part after the Win32_. We’ve usedLogicalDisk, which is descriptive, informative, and singular.
. Here you provide the CIM class you’ll be using—in this case, Win32_LogicalDisk. The namespace is expected as part of the class information. The version can be provided by any scheme you use in your organization. The last part of this area supplies the default noun. This is what will be used by the Get cmdlet you’ll create. Our recommendation is to relate the noun to the class. Use the full class name or the part after the Win32_. We’ve usedLogicalDisk, which is descriptive, informative, and singular.
The next sections of the list provide the search properties used with your new Get-LogicalDisk cmdlet. For example, if you just use the cmdlet name, all logical disks are returned:
PS C:\> Get-LogicalDisk | format-table DeviceId, DriveType, Size, FreeSpace
![]() –autosize
–autosize
DeviceId DriveType Size FreeSpace
-------- --------- ---- ---------
C: 3 249951154176 163819159552
E: 5
F: 5
Your cmdlet has three defined search properties. The first uses the name ![]() of the logical disk—that is, the drive letter:
of the logical disk—that is, the drive letter:
PS C:\> Get-LogicalDisk -Name c: | format-table DeviceId, DriveType, Size,
![]() FreeSpace –autosize
FreeSpace –autosize
DeviceId DriveType Size FreeSpace
-------- --------- ---- ---------
C: 3 249951154176 163819200512
The second parameter allows you to search by disk type ![]() . You can do so using the WMI integer code:
. You can do so using the WMI integer code:
PS C:\> Get-LogicalDisk -DriveType 3 | Format-table DeviceId, DriveType,
![]() Size, FreeSpace –autosize
Size, FreeSpace –autosize
DeviceId DriveType Size FreeSpace
-------- --------- ---- ---------
C: 3 249951154176 163819659264
Better still, you can use a descriptive term to indicate the type of disk you require:
PS C:\> Get-LogicalDisk -DriveTypeHardDisk | format-table DeviceId,
![]() DriveType, Size, FreeSpace –autosize
DriveType, Size, FreeSpace –autosize
DeviceId DriveType Size FreeSpace
-------- --------- ---- ---------
C: 3 249951154176 163819659264
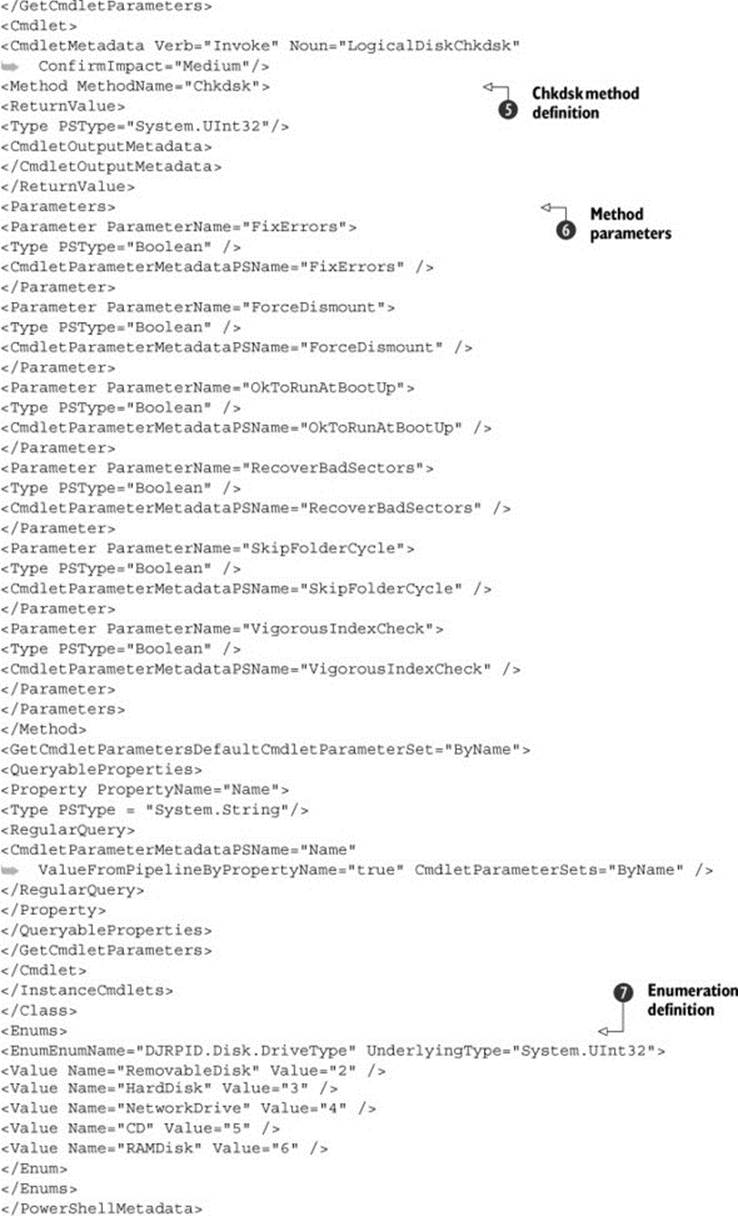
The translation between the numerical value and the descriptive term is managed by the DJRPID.Disk.DriveType enumeration, which is provided at the end of the list ![]() in the enums section.
in the enums section.
Searching on the amount of free space available on the disk is managed slightly differently ![]() . Two parameters are supplied: one for a search based on the maximum amount of free space available and the other on the minimum amount of free space required. Their use needs a little bit of thinking about:
. Two parameters are supplied: one for a search based on the maximum amount of free space available and the other on the minimum amount of free space required. Their use needs a little bit of thinking about:
PS C:\> Get-LogicalDisk -MinFreeSize 150GB | format-table DeviceId,
![]() DriveType, Size, FreeSpace –autosize
DriveType, Size, FreeSpace –autosize
DeviceId DriveType Size FreeSpace
-------- --------- ---- ---------
C: 3 249951154176 163817295872
PS C:\> Get-LogicalDisk -MinFreeSize 200GB | format-table DeviceId,
![]() DriveType, Size, FreeSpace -autosize
DriveType, Size, FreeSpace -autosize
A disk has to have at least the requested amount of free space available for it to be returned when the –MinFreeSpace parameter is used. The opposite is true when using the –MaxFreeSpace parameter:
PS C:\> Get-LogicalDisk -MaxFreeSize 150GB | format-table DeviceId,
![]() DriveType, Size, FreeSpace -autosize
DriveType, Size, FreeSpace -autosize
PS C:\> Get-LogicalDisk -MaxFreeSize 200GB | format-table DeviceId,
![]() DriveType, Size, FreeSpace –autosize
DriveType, Size, FreeSpace –autosize
DeviceId DriveType Size FreeSpace
-------- --------- ---- ---------
C: 3 249951154176 163817295872
The disk has to have less than the value supplied to the –MaxFreeSpace parameter for it to be returned.
Each method on the CIM class can be used to create another cmdlet ![]() . A name can be supplied for the noun that’ll be applied to the cmdlet. It doesn’t have to match the method name, but we recommend incorporating the method name as done in this example. The parameters of theChkdsk method can be found using Get-CimClass:
. A name can be supplied for the noun that’ll be applied to the cmdlet. It doesn’t have to match the method name, but we recommend incorporating the method name as done in this example. The parameters of theChkdsk method can be found using Get-CimClass:
PS C:\> (Get-CimClass -ClassName
![]() Win32_LogicalDisk).CimClassMethods["ChkDsk"].Parameters
Win32_LogicalDisk).CimClassMethods["ChkDsk"].Parameters
Name CimType Qualifiers
---- ------- ----------
FixErrors Boolean {ID, in}
ForceDismount Boolean {ID, in}
OkToRunAtBootUp Boolean {ID, in}
RecoverBadSectors Boolean {ID, in}
SkipFolderCycle Boolean {ID, in}
VigorousIndexCheck Boolean {ID, in}
The parameters are coded individually ![]() with the cmdlet name for the parameter, the data type, and the parameter name as defined in the class supplied.
with the cmdlet name for the parameter, the data type, and the parameter name as defined in the class supplied.
To use the CDXML file, import it as a module as you would any other PowerShell module. The same module rules apply. To make it easier, save the file as Logicaldisk.cdxml in a folder called LogicalDisk under your Modules folder:
PS C:\> Import-Module Logicaldisk
PS C:\> get-command -Module Logicaldisk
CommandType Name ModuleName
----------- ---- ----------
Function Get-LogicalDiskLogicaldisk
Function Invoke-LogicalDiskChkdskLogicaldisk
Or you can specify the full path of the file:
PS C:\> import-module c:\devwork\logicaldisk.cdxml
Using CDXML should be regarded as an advanced technique, and we recognize that not everyone will want to code XML in this manner. You can find more CDXML examples in chapters 18 and 19 of PowerShell and WMI or on Richard’s blog athttp://richardspowershellblog.wordpress.com/. Finally, a PowerShell community project is in the process of starting to provide a number of modules for the common legacy WMI classes, so don’t feel you need to reinvent the wheel.
39.6. Summary
Knowing how to use WMI and CIM with PowerShell is a critical skill for IT pros. Most management tasks you’ll need to undertake will use WMI and CIM. Using the WMI cmdlets will continue to work for all versions of PowerShell. So if you have WMI-based management scripts in place, don’t feel you need to rewrite them. Because Microsoft’s long-term strategy for remote management centers around CIM, it’s to your benefit to begin using these cmdlets now. You can use CIM with systems running PowerShell v2—just remember that you’ll need to use DCOM for yourCIMSessions to these machines.
All materials on the site are licensed Creative Commons Attribution-Sharealike 3.0 Unported CC BY-SA 3.0 & GNU Free Documentation License (GFDL)
If you are the copyright holder of any material contained on our site and intend to remove it, please contact our site administrator for approval.
© 2016-2026 All site design rights belong to S.Y.A.