PowerShell in Depth, Second Edition (2015)
Part 1. PowerShell fundamentals
Chapter 8. The PowerShell pipeline
This chapter covers
· Using PowerShell’s pipeline mechanism
· Working with parameter binding
· Troubleshooting the pipeline
Okay, we’ll admit it: We’re big PowerShell fans. You probably could have guessed that, but you might not know exactly why. It’s the pipeline. Although not everyone realizes it, PowerShell is incredibly different from other command-line shells in any other operating system, or even in older versions of Windows, and that difference is due primarily to the pipeline. It’s easy to use PowerShell without knowing much about the pipeline, but mastering PowerShell requires you to master the pipeline. That’s what this chapter will help you do.
8.1. How the pipeline works
We started using the pipeline almost from the very start of this book, and the previous chapter made heavy use of it. Heck, you’ve used it yourself if you’ve ever run a command like Dir | More, or Get-Service | Out-File, or Get-Process | Sort | Select, or any other combination of commands. That vertical bar, |, is the pipe character, and it indicates that you’re using PowerShell’s pipeline.
8.1.1. The old way of piping
In pretty much every other operating system shell we’re aware of, including Windows’ old Cmd.exe shell, you can pipe stuff from command to command. It’s worth understanding how older shells do it so that you can better appreciate what PowerShell’s up to.
In those older shells, utilities—such as Ping, Ipconfig, Tracert, NSlookup, and so forth—are generally written to a specific set of rules, which require them to implement three interfaces:
· StdIn
· StdOut
· StdErr
When you run a command, it outputs text to StdOut. If you just run a single command, the shell captures whatever comes out of StdOut and displays it on the screen. Thus, when you run Ipconfig, you see output on the screen. Input is given to the command via StdIn. So, when you run an interactive utility like NSlookup, the shell takes whatever you type and jams it into the utility’s StdIn so that you can interact with the utility. StdErr is where errors are written.
Run a command like Dir | More in an older shell and you’re basically telling the shell to “connect the StdOut of the first command to StdIn of the second command.” Figure 8.1 shows how this arrangement works.
Figure 8.1. Piping in old shells just connects StdOut to StdIn.
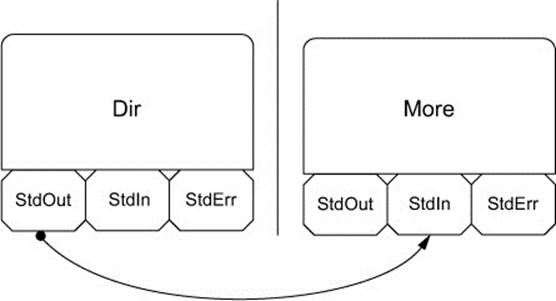
The output sent from command to command is always text. That’s why Unix and Linux administrators tend to have strong string-manipulation skills and really strong regular expression skills—because they’re working with text in their shell, they need those skills to get by.
8.1.2. The PowerShell way of piping
PowerShell works completely differently. For one, its cmdlets don’t implement StdOut, StdIn, or StdErr the way old-school commands do (although PowerShell knows how to interact with those standard interfaces, because it has to do so in order to run older commands like Ping andIpconfig; we’ll cover those at the end of this chapter).
Instead, when two PowerShell commands are connected to each other, the first command places its output, in the form of objects, into the pipeline. The pipeline is something that the shell itself maintains as a way of getting objects from one command to another. In a way, the pipeline is a bit like StdOut; it’s the one place that all PowerShell commands must send their output.
Note
Technically, PowerShell has several pipelines: one for output (which is like StdOut), one for errors (similar to StdErr), one for warnings, one for verbose command messages, and one for debugging information. Right now, we’re just concerned with the output pipeline.
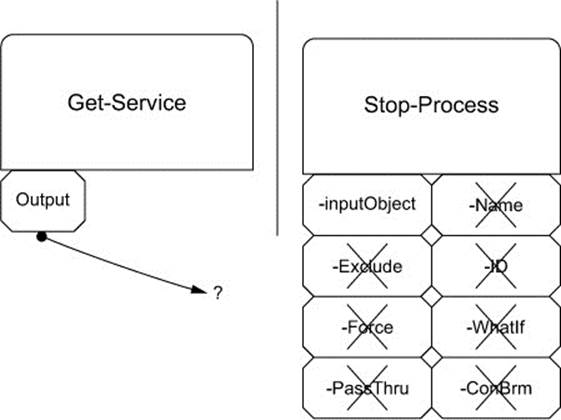
The real PowerShell difference happens with the next command in the pipeline: There’s no StdIn for the shell to use. There’s no single way for whatever’s in the pipeline to be handed off to the next command. Instead, PowerShell has to attach the objects in the pipeline to one of the next command’s parameters. For example, let’s say you were to run Get-Service | Stop-Service (don’t actually do so—it’ll crash your machine). As shown in figure 8.2, PowerShell has to decide which parameter of Stop-Service will receive the objects that Get-Service put into the pipeline.
Figure 8.2. PowerShell has to decide which parameter of the second command will receive the output from the first command.
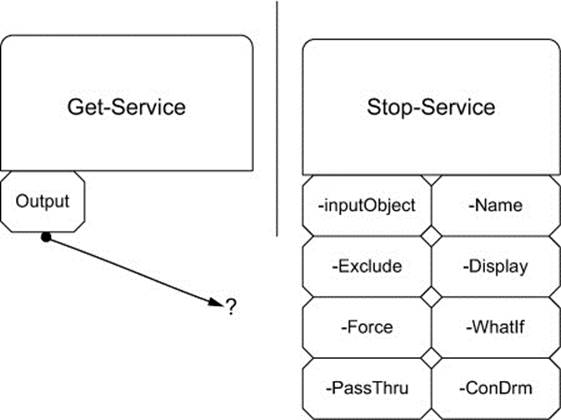
This decision-making process is called pipeline parameter binding, and PowerShell has two techniques it can use: ByValue and ByPropertyName. Both of these techniques rely on the programmer who created the cmdlet having hooked it up to participate in this process.
8.2. Parameter binding ByValue
With this technique, PowerShell figures out which parameters of the cmdlet are capable of accepting pipeline input via the ByValue technique. This capability, as we mentioned, is built into the cmdlet when it’s created by a programmer. The programmer decides which parameters will support ByValue, and that information is documented in the cmdlet’s help file. For example, if you run Help Stop-Service –Full, you can scroll down to the help for each individual parameter. Here’s what two of them look like:
-Include <string[]>
Stops only the specified services. The value of this parameter
qualifies the Name parameter. Enter a name element or pattern,
such as "s*". Wildcards are permitted.
Required? false
Position? named
Default value
Accept pipeline input? false
Accept wildcard characters? false
-InputObject <ServiceController[]>
Specifies ServiceController objects representing the services to be
stopped. Enter a variable that contains the objects, or type a
command or expression that gets the objects.
Required? true
Position? 1
Default value
Accept pipeline input? true (ByValue)
Accept wildcard characters? False
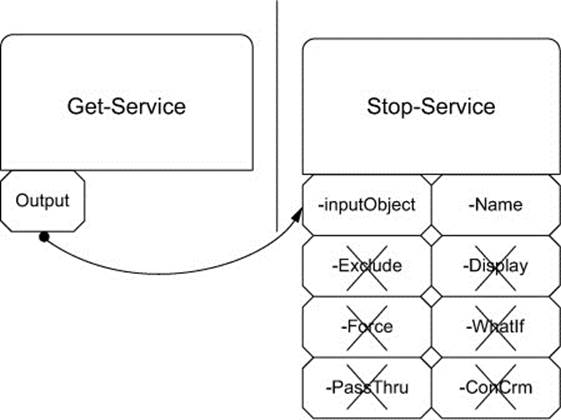
The –Include parameter doesn’t support pipeline input at all—it says so right in the help. The –InputObject parameter does accept pipeline input, and it does so using the ByValue technique, which is what PowerShell is attempting. PowerShell reads through all of the available parameters and figures out which ones support ByValue. The result is shown in figure 8.3.
Figure 8.3. PowerShell eliminates parameters that don’t support ByValue pipeline input.

Each parameter can accept only a certain kind of input, which is also documented in the help. The –Name parameter accepts objects of the type String, whereas the -InputObject parameter accepts objects of the type ServiceController. PowerShell looks at the objects in the pipeline to see what type they are. You can do the same thing by using the Get-Member cmdlet:
PS C:\> Get-Service | Get-Member
TypeName: System.ServiceProcess.ServiceController
Name MemberType Definition
---- ---------- ----------
Name AliasProperty Name = ServiceName
RequiredServices AliasProperty RequiredServices = ServicesDepen...
Disposed Event System.EventHandler Disposed(Sys...
The first line of output says it all: Get-Service produces objects of the type System .ServiceProcess.ServiceController. As a shortcut, you usually just look at the last part of the name, which is ServiceController. That’s the exact type of object that -InputObject will accept ByValue, and so, as shown in figure 8.4, PowerShell sends the objects in the pipeline to the –InputObject parameter. The help file for Stop-Service says that the –InputObject parameter
Figure 8.4. The output of Get-Service will be attached to the –InputObject parameter of Stop-Service.
Specifies ServiceController objects representing the services to be Stopped
So whatever service objects are in the pipeline—which is all of them—will be stopped.
PowerShell always does ByValue parameter binding first; it will only go on to the next technique, ByPropertyName, if there was no parameter capable of accepting the type of object that’s in the pipeline by using the ByValue technique. You’ll also see that only one parameter per cmdlet can use ByValue. If the cmdlet had two parameters that supported ByValue, PowerShell would have no way of knowing what input gets hooked into each parameter.
Note
PowerShell recognizes the object type “Object” as a generic type. If you look at the help for cmdlets such as Sort-Object and Select-Object, you’ll see that they too have an –InputObject parameter, which accepts pipeline input ByValue and which accepts the generic type “Object.” In other words, any kind of object can be given to –InputObject, and that’s why all of the examples in the previous chapter worked. Parameters that accept the type “Object” are kind of “universal recipients,” capable of accepting anything that comes along the pipeline.
8.3. Pipeline binding ByPropertyName
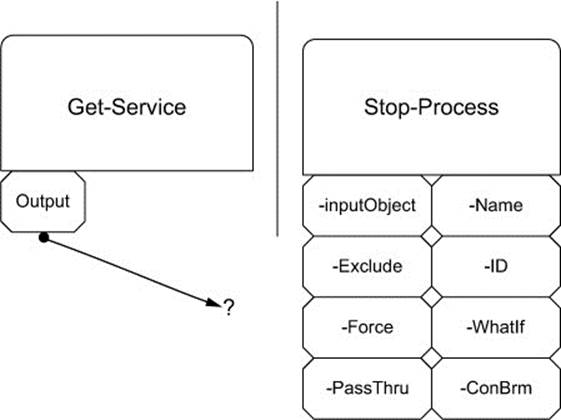
If PowerShell can’t make ByValue binding work, it’ll shift to Plan B, which is ByPropertyName. Let’s change our example just a bit. Take a look at figure 8.5 to see what you’ll try next (again, don’t actually run this command just yet because it might crash your machine).
Figure 8.5. PowerShell needs to figure out which parameter of Stop-Process will receive the output of Get-Service.
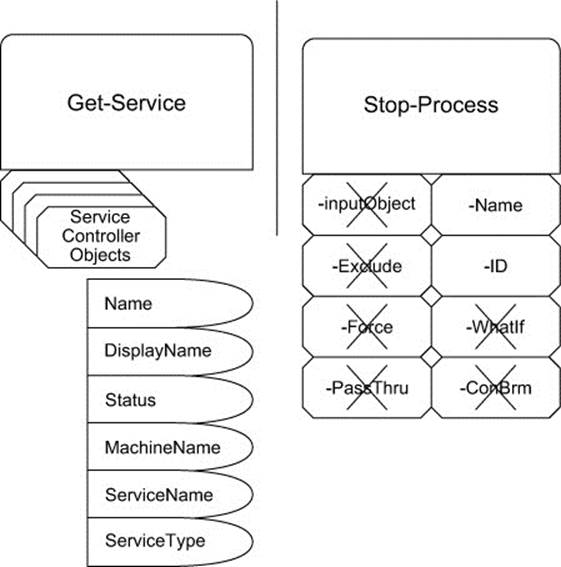
You might not think it makes any sense to run Get-Service | Stop-Process, but PowerShell is going to give it a try anyway. First, the shell will look to see which parameters accept pipeline input ByValue, and figure 8.6 shows what it comes up with.
Figure 8.6. Finding the parameters that accept pipeline input ByValue
That’s right, Stop-Process has only one parameter that accepts pipeline input ByValue, and it’s –InputObject. Unfortunately, the help file says that this parameter accepts objects of the type Process. That isn’t what you have in the pipeline, and you can’t turn a ServiceControllerinto a Process so ByValue will fail. On to Plan B!
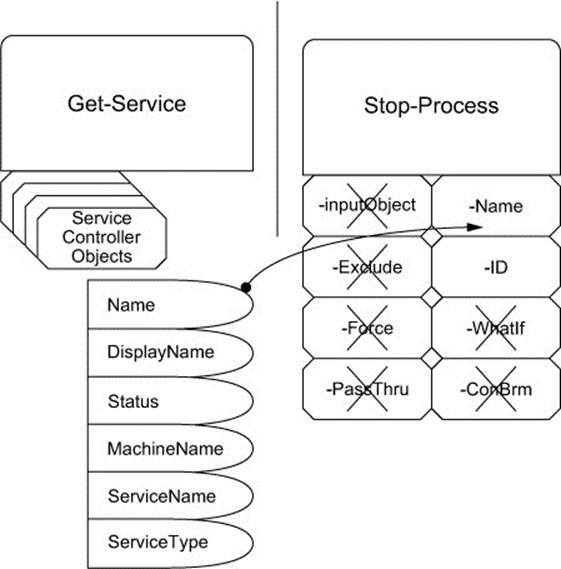
Now the shell looks to see which parameters accept pipeline input ByPropertyName. It also does the internal equivalent of running Get-Member again, to see what properties the objects in the pipeline have. Figure 8.7 shows this step.
Figure 8.7. PowerShell starts trying ByPropertyName binding by listing the properties of the objects in the pipeline.
PropertyName is simple: The values from every property of every object in the pipeline will be sent to any parameters that have the same name. In this case, only two Stop-Process parameters work with ByPropertyName: -Name and –ID. The objects in the pipeline don’t have an IDproperty, so the –ID parameter gets nothing. The objects in the pipeline have a Name property, so that property’s values get attached to the –Name parameter, simply because the property name matched the parameter name!
Figure 8.8 shows how PowerShell connects the two commands, and you can run this with the –WhatIf switch to see what would’ve happened.
Figure 8.8. ByPropertyName binding matches property names to parameter names.
PS C:\> Get-Service | Stop-Process –whatif
Stop-Process : Cannot find a process with the name "Dhcp". Verify the
process name and call the cmdlet again.
At line:1 char:27
+ Get-Service | Stop-Process <<<< -whatif
+ CategoryInfo : ObjectNotFound: (Dhcp:String) [Stop-Process]
, ProcessCommandException
+ FullyQualifiedErrorId : NoProcessFoundForGivenName,Microsoft.PowerSh
ell.Commands.StopProcessCommand
What if: Performing operation "Stop-Process" on Target "dns (1324)".
Stop-Process : Cannot find a process with the name "Dnscache". Verify the
process name and call the cmdlet again.
At line:1 char:27
+ Get-Service | Stop-Process <<<< -whatif
+ CategoryInfo : ObjectNotFound: (Dnscache:String) [Stop-Proc
ess], ProcessCommandException
+ FullyQualifiedErrorId : NoProcessFoundForGivenName,Microsoft.PowerSh
ell.Commands.StopProcessCommand
We’ve truncated most of the output to save space, but you can see what’s happening: Service names rarely match their executable names. For example, the DHCP service doesn’t run as Dhcp.exe; it runs in Svchost.exe (service host). So Stop-Process fails to stop that one. But the DNSservice does run as Dns.exe, meaning its service name and process name match, so Stop-Process would’ve tried to stop it. We boldfaced that in the output, so you can see it more easily.
The point of this example was to illustrate how ByPropertyName works, but you probably want to see an example of it working properly, right? No problem. Start by creating a CSV file named Users.csv. You can do this in Notepad, and you’ll put this into the file:
samAccountName,Name,Department,City,Title
DonJ,DonJ,IT,Las Vegas,CTO
JefferyH,JefferyH,IT,Syracuse,Director
RichardS,RichardS,IT,London,Writer
GregS,GregS,Custodial,Denver,Janitor
Now, you’ll use Import-CSV to have the shell read this file. Specifically, you’re going to pipe it to Get-Member to see what type of objects the Import-CSV command produces:
PS C:\> import-csv .\users.csv | Get-Member
TypeName: System.Management.Automation.PSCustomObject
Name MemberType Definition
---- ---------- ----------
Equals Method bool Equals(System.Object obj)
GetHashCode Method int GetHashCode()
GetType Method type GetType()
ToString Method string ToString()
City NoteProperty System.String City=Las Vegas
Department NoteProperty System.String Department=IT
Name NoteProperty System.String Name=DonJ
samAccountName NoteProperty System.String samAccountName=DonJ
Title NoteProperty System.String Title=CTO
Okay, we know some interesting facts that we’ll refer back to in a moment. The command produces objects of the type PSCustomObject, and the objects have properties that correspond to your CSV file columns: City, Department, Name, samAccountName, and Title.
Take a look at the help for the New-ADUser cmdlet (if you don’t have this installed on your computer, you can read the help online at http://technet.microsoft.com/en-us/library/ee617253.aspx). You’ll notice that none of its parameters support pipeline binding ByValue (if you’re viewing the help online, just use your browser’s Find function to search for “ByValue” on the page). That means PowerShell’s Plan A, ByValue binding, fails. New-ADUser simply doesn’t support it.
On to Plan B! You’ll notice that lots of the command’s parameters support pipeline input ByPropertyName, including the –City, -Department, -Name, -samAccountName, and –Title parameters. Goodness, those names sound familiar...because they’re the exact names that you used as column headers in your CSV file! That means you could create four new users (that’s how many objects your CSV file produces) simply by running this (although you shouldn’t run it just yet):
PS C:\> Import-CSV users.csv | New-ADUser
Think about that for a long moment. What a powerful technique! Because the first command produced objects whose properties correspond to parameters of the second cmdlet, you can accomplish a time-consuming task with just a couple of commands in a single pipeline. Wow! Problem is, this isn’t a realistic example. That CSV file, in a real organization, will probably originate with Personnel or Human Resources—and they’re never going to get the format right. They’ll see “samAccountName” and think, “There’s nobody named ‘Sam’ here, so that can’t be right.” More likely, you’ll get something like this from them:
UserName,Department,City,Title
DonJ,IT,Las Vegas,CTO
JefferyH,IT,Syracuse,Director
RichardS,IT,London,Writer
GregS,Custodial,Denver,Janitor
That won’t work. For one, it lacks the Name column, which is a mandatory parameter of New-ADUser. It also lacks the samAccountName column, and user objects need to have that property. You could just edit the CSV file every time you got one—but that sounds like a lot of work. Why not have PowerShell do it? In the previous chapter, we showed you a custom property-creation trick with Select-Object, and that trick will serve you well right now:
PS C:\> import-csv .\users.csv | select-object *,
>> @{name="samAccountName";expression={$_.UserName}},
>> @{name="name";expression={$_.UserName}}
>>
UserName : DonJ
Department : IT
City : Las Vegas
Title : CTO
samAccountName : DonJ
name : DonJ
UserName : JefferyH
Department : IT
City : Syracuse
Title : Director
samAccountName : JefferyH
name : JefferyH
UserName : RichardS
Department : IT
City : London
Title : Writer
samAccountName : RichardS
name : RichardS
UserName : GregS
Department : Custodial
City : Denver
Title : Janitor
samAccountName : GregS
name : GregS
Cool! You told Select-Object to grab all of the properties from the input objects (that’s what * does in the property list), and then you also created two brand-new properties named samAccountName and Name. Those were populated with the contents of the old UserName property. We left UserName in the output to demonstrate a point: Because that property doesn’t map to any parameters of New-ADUser, it’ll just get ignored. Now you can create those users! You’ll add the –passThru switch so that the resulting user objects are displayed as output:
PS C:\> import-csv .\users.csv | select-object *,
>> @{name='samAccountName';expression={$_.UserName}},
>> @{name='name';expression={$_.UserName}} |
>> New-ADUser -passThru
>>
DistinguishedName : CN=DonJ,CN=Users,DC=company,DC=pri
Enabled : False
GivenName :
Name : DonJ
ObjectClass : user
ObjectGUID : 1c6d89b1-a70b-471e-8a11-797b4569f7a1
SamAccountName : DonJ
SID : S-1-5-21-29812541-3325070801-1520984716-1104
Surname :
UserPrincipalName :
DistinguishedName : CN=JefferyH,CN=Users,DC=company,DC=pri
Enabled : False
GivenName :
Name : JefferyH
ObjectClass : user
ObjectGUID : 577569a3-4e2b-4145-944f-868a591be6fc
SamAccountName : JefferyH
SID : S-1-5-21-29812541-3325070801-1520984716-1105
Surname :
UserPrincipalName :
DistinguishedName : CN=RichardS,CN=Users,DC=company,DC=pri
Enabled : False
GivenName :
Name : RichardS
ObjectClass : user
ObjectGUID : 2863a36b-6ee2-4ea8-8058-64e8f536f863
SamAccountName : RichardS
SID : S-1-5-21-29812541-3325070801-1520984716-1106
Surname :
UserPrincipalName :
DistinguishedName : CN=GregS,CN=Users,DC=company,DC=pri
Enabled : False
GivenName :
Name : GregS
ObjectClass : user
ObjectGUID : 18e2ad39-a4bf-4ccb-bfaa-b35ddd15121a
SamAccountName : GregS
SID : S-1-5-21-29812541-3325070801-1520984716-1107
Surname :
UserPrincipalName :
Awesome! Of course, you could add more columns to the CSV file to fill in more attributes, and we expect you’d do that in a real organization. And there’s no reason you can’t use other parameters with New-ADUser. For example, you might want to specify the parent container for all of the new accounts:
PS C:\> import-csv .\users.csv | select-object *,
>> @{name='samAccountName';expression={$_.UserName}},
>> @{name='name';expression={$_.UserName}} |
>> New-ADUser –path "ou=employees,dc=company,dc=pri" -passThru
The –passThru switch
Most of the time in PowerShell, cmdlets that do something—those with verbs like New, Stop, Set, and so forth—don’t produce any output. They’ll display errors if something goes wrong, but generally speaking it’s the Get cmdlets that produce output.
Many so-called action cmdlets have a –passThru switch. This tells the cmdlet, “When you get done doing whatever it is you do, place the objects you acted on into the pipeline.” This can enable some pretty powerful one-liner commands: Imagine piping the output of New-ADUser (which is one or more new user objects) to another cmdlet that sets their password...and another cmdlet that enables their account...and another cmdlet that adds them to a group...and so on, and so on, and so on. It becomes even more powerful if you have the Exchange tools installed on your workstation because you can continue the pipeline into Enable-Mailbox and create their mailbox as well!
You won’t find this switch on every cmdlet, but it’s worth looking at cmdlets’ help files to see if it exists (you can also type Get-Command -ParameterName Passthru to get a list of cmdlets supporting the –Passthru parameter) and to think about how you might use it. Remember, if nothing is written to the pipeline, you can’t pipe into the next command in your expression. This ability to pipe objects between cmdlets is a compelling feature of Windows PowerShell.
8.4. Troubleshooting parameter binding
It’s extremely common to try to connect commands together and to become disappointed when they don’t connect in quite the way you’d hoped. There are two steps to troubleshooting those problems: carefully considering the process itself, which we’ve described in this chapter, and getting PowerShell to tell you what it’s doing.
As a quick reference, figure 8.9 is a flowchart of the entire process, including both ByValue and ByPropertyName phases.
Figure 8.9. The complete parameter binding process
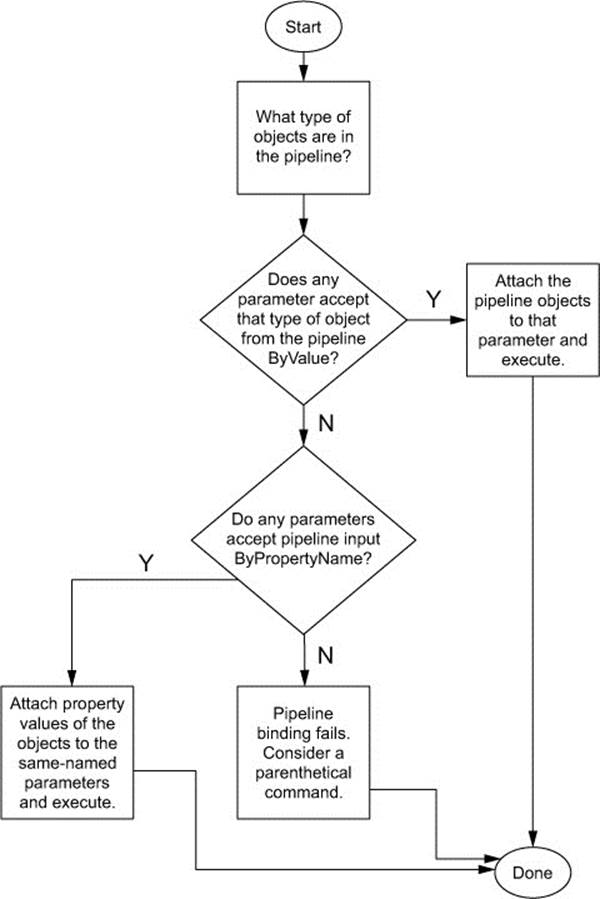
PowerShell’s Trace-Command cmdlet can help you see what PowerShell’s doing with parameter binding.
Caution
When you trace a command, the command you specify actually executes. Be careful not to trace any command that you don’t want to run! You can use the –whatIf switch (if supported) on the final command of your command line to prevent it from doing anything.
The output of Trace-Command can be complicated, so we’ll help you break it down by walking through it one chunk at a time. First, run the command. You’re going to trace the command that you ran earlier to create the new users in Active Directory:
PS C:\> trace-command -pshost -name parameterbinding -Expression {
>> import-csv .\users.csv | select-object *,
>> @{name="samAccountName";expression={$_.UserName}},
>> @{name="name";expression={$_.UserName}} |
>> New-ADUser -whatif
>> }
>>
The first chunk of output is for your Import-CSV command. Here you’ll see it bind the argument .\users.csv to the –Path parameter. It did so positionally because you didn’t actually type the –Path parameter name. The –Path parameter accepts an array of strings, but you provided only one, so PowerShell internally creates an array and adds your one item to it. You can also see PowerShell checking to make sure all mandatory parameters were provided (they were). Each of these steps is outlined in the trace:
DEBUG: ParameterBinding Information: 0 : BIND NAMED cmd line args
[Import-Csv]
DEBUG: ParameterBinding Information: 0 : BIND POSITIONAL cmd line args
[Import-Csv]
DEBUG: ParameterBinding Information: 0 : BIND arg [.\users.csv] to
parameter [Path]
DEBUG: ParameterBinding Information: 0 : Binding collection
parameter Path: argument type [String], parameter type [System.String[]],
collection type Array, element type [System.String], no coerceElementType
DEBUG: ParameterBinding Information: 0 : Creating array with
element type [System.String] and 1 elements
DEBUG: ParameterBinding Information: 0 : Argument type String is
not IList, treating this as scalar
DEBUG: ParameterBinding Information: 0 : Adding scalar element of
type String to array position 0
DEBUG: ParameterBinding Information: 0 : BIND arg [System.String[]]
to param [Path] SUCCESSFUL
DEBUG: ParameterBinding Information: 0 : MANDATORY PARAMETER CHECK on
cmdlet [Import-Csv]
Next up is your Select-Object command. There were no named parameters on this one, but there was a positional parameter where you specified your property list. Again, a check for mandatory parameters (there aren’t any) is run:
DEBUG: ParameterBinding Information: 0 : BIND NAMED cmd line args
[Select-Object]
DEBUG: ParameterBinding Information: 0 : BIND POSITIONAL cmd line args
[Select-Object]
DEBUG: ParameterBinding Information: 0 : BIND arg [System.Object[]] to
parameter [Property]
DEBUG: ParameterBinding Information: 0 : BIND arg [System.Object[]]
to param [Property] SUCCESSFUL
DEBUG: ParameterBinding Information: 0 : MANDATORY PARAMETER CHECK on
cmdlet [Select-Object]
In the next chunk, you can see PowerShell working with the New-ADUser parameters. Now, keep in mind that at this point the shell is just worrying about the obvious parameters—the ones you specified by typing parameter names or values. It hasn’t gotten to pipeline input yet, because it hasn’t run any of these commands. You’re still in a sort of “pre-flight” mode. You can see the –WhatIf parameter being bound, along with the standard mandatory parameter check:
DEBUG: ParameterBinding Information: 0 : BIND NAMED cmd line args
[New-ADUser]
DEBUG: ParameterBinding Information: 0 : BIND arg [True] to parameter
[WhatIf]
DEBUG: ParameterBinding Information: 0 : COERCE arg to
[System.Management.Automation.SwitchParameter]
DEBUG: ParameterBinding Information: 0 : Parameter and arg
types the same, no coercion is needed.
DEBUG: ParameterBinding Information: 0 : BIND arg [True] to param
[WhatIf] SUCCESSFUL
DEBUG: ParameterBinding Information: 0 : BIND POSITIONAL cmd line args
[New-ADUser]
DEBUG: ParameterBinding Information: 0 : BIND cmd line args to DYNAMIC
parameters.
DEBUG: ParameterBinding Information: 0 : DYNAMIC parameter object:
[Microsoft.ActiveDirectory.Management.Commands.NewADUserParameterSet]
DEBUG: ParameterBinding Information: 0 : MANDATORY PARAMETER CHECK on
cmdlet [New-ADUser]
Now the fun begins. PowerShell begins executing your commands. There are three of them total, so you’ll see three statements in the output:
DEBUG: ParameterBinding Information: 0 : CALLING BeginProcessing
DEBUG: ParameterBinding Information: 0 : CALLING BeginProcessing
DEBUG: ParameterBinding Information: 0 : CALLING BeginProcessing
At this point, Import-CSV starts to run and produces its first object. That object goes into the pipeline. If you remember what you put into that CSV file, this should be the user information for DonJ. In the trace, you can see PowerShell attempting to bind this object to the Select-Objectcmdlet. It sees that the object is of the type PSCustom-Object, and it successfully binds the object to the –InputObject parameter. You can see a breakdown of the object’s contents, including the UserName, Department, City, and Title properties. PowerShell also does another check to make sure all mandatory parameters have been specified:
DEBUG: ParameterBinding Information: 0 : BIND PIPELINE object to
parameters: [Select-Object]
DEBUG: ParameterBinding Information: 0 : PIPELINE object TYPE =
[System.Management.Automation.PSCustomObject]
DEBUG: ParameterBinding Information: 0 : RESTORING pipeline parameter's
original values
DEBUG: ParameterBinding Information: 0 : Parameter [InputObject]
PIPELINE INPUT ValueFromPipeline NO COERCION
DEBUG: ParameterBinding Information: 0 : BIND arg [@{UserName=DonJ;
Department=IT; City=Las Vegas; Title=CTO}] to parameter [InputObject]
DEBUG: ParameterBinding Information: 0 : BIND arg [@{UserName=DonJ;
Department=IT; City=Las Vegas; Title=CTO}] to param [InputObject]
SUCCESSFUL
DEBUG: ParameterBinding Information: 0 : MANDATORY PARAMETER CHECK on
cmdlet [Select-Object]
Now Select-Object does its magic and produces its output—just one object, because you’re doing this one object at a time. PowerShell now needs to bind that to New-ADUser:
DEBUG: ParameterBinding Information: 0 : BIND PIPELINE object to
parameters: [New-ADUser]
DEBUG: ParameterBinding Information: 0 : PIPELINE object TYPE =
[Selected.System.Management.Automation.PSCustomObject]
DEBUG: ParameterBinding Information: 0 : RESTORING pipeline parameter's
original values
Now you’re going to see PowerShell start binding ByPropertyName. It does this for every single parameter of New-ADUser, so there’s quite a bit of output in this part of the trace. For this example, you’re just going to include the first handful of properties. Notice the two we’ve highlighted in bold? That’s your Name property being bound to –Name and your City property being bound to –City. The –Name parameter has an internal validation programmed into it, which ensures that the parameter doesn’t receive a null or empty value. Because you’ve provided the value DonJ, the validation passes and PowerShell continues:
DEBUG: ParameterBinding Information: 0 : Parameter [Name] PIPELINE
INPUT ValueFromPipelineByPropertyName NO COERCION
DEBUG: ParameterBinding Information: 0 : BIND arg [DonJ] to parameter
[Name]
DEBUG: ParameterBinding Information: 0 : Executing VALIDATION
metadata: [System.Management.Automation.ValidateNotNullOrEmptyAttribute]
DEBUG: ParameterBinding Information: 0 : BIND arg [DonJ] to param
[Name] SUCCESSFUL
DEBUG: ParameterBinding Information: 0 : Parameter [DisplayName]
PIPELINE INPUT ValueFromPipelineByPropertyName NO COERCION
DEBUG: ParameterBinding Information: 0 : Parameter [Description]
PIPELINE INPUT ValueFromPipelineByPropertyName NO COERCION
DEBUG: ParameterBinding Information: 0 : Parameter
[AccountExpirationDate] PIPELINE INPUT ValueFromPipelineByPropertyName NO
COERCION
DEBUG: ParameterBinding Information: 0 : Parameter
[AccountNotDelegated] PIPELINE INPUT ValueFromPipelineByPropertyName NO
COERCION
DEBUG: ParameterBinding Information: 0 : Parameter [AccountPassword]
PIPELINE INPUT ValueFromPipelineByPropertyName NO COERCION
DEBUG: ParameterBinding Information: 0 : Parameter
[AllowReversiblePasswordEncryption] PIPELINE INPUT
ValueFromPipelineByPropertyName NO COERCION
DEBUG: ParameterBinding Information: 0 : Parameter
[CannotChangePassword] PIPELINE INPUT ValueFromPipelineByPropertyName NO
COERCION
DEBUG: ParameterBinding Information: 0 : Parameter [Certificates]
PIPELINE INPUT ValueFromPipelineByPropertyName NO COERCION
DEBUG: ParameterBinding Information: 0 : Parameter
[ChangePasswordAtLogon] PIPELINE INPUT ValueFromPipelineByPropertyName NO
COERCION
DEBUG: ParameterBinding Information: 0 : Parameter [City] PIPELINE
INPUT ValueFromPipelineByPropertyName NO COERCION
DEBUG: ParameterBinding Information: 0 : BIND arg [Las Vegas] to
parameter [City]
DEBUG: ParameterBinding Information: 0 : BIND arg [Las Vegas] to
param [City] SUCCESSFUL
DEBUG: ParameterBinding Information: 0 : Parameter [Company] PIPELINE
INPUT ValueFromPipelineByPropertyName NO COERCION
DEBUG: ParameterBinding Information: 0 : Parameter [Country] PIPELINE
INPUT ValueFromPipelineByPropertyName NO COERCION
This goes on for quite a while because there are so many parameters. Eventually, PowerShell runs a final check to make sure all mandatory parameters have been given a value, and it executes the command. You can see the “what if” output indicating what New-ADUser would’ve done:
DEBUG: ParameterBinding Information: 0 : MANDATORY PARAMETER CHECK on
cmdlet [New-ADUser]
What if: Performing operation "New" on Target "CN=DonJ,CN=Users,DC=company,D
C=pri".
It’s important to understand that PowerShell executes all the cmdlets in the pipeline more or less simultaneously. In other words, there are objects streaming through the pipeline one at a time, in parallel. You’ve just seen the first object, the DonJ user, travel through the pipeline. This entire process repeats for the other three objects created by Import-CSV.
The point of this exercise is to see what PowerShell is actually doing. If you’re having difficulty getting a particular command line to work, this is a useful technique to see if PowerShell is doing what you thought it would do.
8.5. When parameter binding lets you down
Sometimes, cmdlets just aren’t rigged up the way you want them to be. Consider this example:
Get-ADComputer –filter * |
Select-Object @{name='computername';expression={$_.Name}} |
Get-WmiObject –class Win32_OperatingSystem
Here’s what we think this is going to do:
1. The first command will produce a bunch of Active Directory computer objects, which we know have a Name property.
2. The second command will produce a PSCustomObject that has a ComputerName property. This property will contain the contents of the computer object’s original Name property.
3. The third command has a –computerName parameter. We’re expecting those PSCustomObject objects to bind ByPropertyName, thus specifying the computer names we want to query information from.
A wonderful plan. Sadly, the –ComputerName parameter of Get-WmiObject doesn’t accept pipeline input. It just never got rigged up for that functionality. (We’re basing this example on v3 of PowerShell; it might work in a later version if Microsoft recodes the parameter to accept pipeline input, but it’s unlikely given that Microsoft’s development effort is concentrated on the CIM cmdlets rather than the older WMI cmdlets. The differences between the two sets of cmdlets are explained in chapter 39.) If we’d looked at help for this parameter, we’d have seen that it doesn’t take pipeline input:
PS C:\> Get-Help Get-WmiObject -Parameter computername | select pipelineInput
pipelineInput
-------------
false
In these situations, a parenthetical command can usually take the place of pipelining objects:
Get-WmiObject –class Win32_OperatingSystem –computerName (
Get-ADComputer –filter * | Select-Object –expand Name
)
This revised command is simply expanding the computers’ Name property into plain strings, which is what the parameter expects. Parenthetical commands are powerful this way, because they don’t rely on parameters being designed to accept pipeline input. When pipeline input won’t do what you need, a parenthetical command often will. Alternatively, fall back on using Foreach-Object to work with one or more commands, or even a complete pipeline of commands, for each object passing along the pipeline.
8.6. Nested pipelines
The pipeline is viewed as a sequential process: A | B | C | D. Sometimes you may need to reuse the values from B in later parts of the pipeline. This can be difficult to achieve and usually involves nested pipelines and using variables to store data.
Imagine you need to print out the multiplication tables for the values 1 to 10. You could do something like this:
1..10 |
Foreach-Object -Process {
$value = $psitem
1..10 | ForEach-Object -Process { "$value * $($_) = " + ($value * $_)}
}
Put the values 1 through 10 onto the pipeline. In the Process block of ForEach-Object, the current pipeline object ($psitem - introduced in PowerShell v3 as an alternative to using $_) is put into the variable $value. A second pipeline has the values 1 to 10 placed in it and each is multiplied by $value with the results written to screen. The output would look like this:
1 * 1 = 1
1 * 2 = 2
1 * 3 = 3
...
10 * 9 = 90
10 * 10 = 100
PowerShell v4 introduced a new common parameter, PipelineVariable, that’s designed for these cases. The parameter has an alias of PV. You can discover this example in the help file about_CommonParameters:
1..10 |
Foreach-Object -PipelineVariable Left -Process { $_ } |
Foreach-Object -PV Right -Process { 1..10 } |
Foreach-Object -Process { "$Left * $Right = " + ($Left * $Right) }
Using the range operator, integers 1 through 10 are placed on the pipeline. In the first Foreach-Object call, the values are put into the $Left variable. The pipeline progresses to the second Foreach-Object, where for each object on the pipeline the values 1 through 10 are added to the$Right variable.
In the third Foreach-Object, the value of $Left is multiplied by the corresponding value of $Right to produce output similar to the previous version of the code.
Note
Each value of $Left is multiplied by every value in $Right.
As a more practical example, consider the need to create a folder hierarchy. You need 10 folders called ServerN, where N is a value 1 through 10. Each of those folders will have 10 subfolders, called Log1 to Log10. You can generate the folder structure like this:
$folders = 1..10 |
ForEach-Object -PipelineVariable TLfolder -Process {"Server$_"} |
ForEach-Object -PipelineVariable ChildFolder -Process {1..10 | foreach {"Log$_"}} |
ForEach-Object -Process {"$TLfolder\$childFolder"}
New-Item -Path C:\ -Name "Logs" -ItemType Directory
foreach ($folder in $folders){
New-Item -Path C:\Logs -ItemType Directory -Name $folder
}
The folder names are generated by putting the values 1 to 10 onto the pipeline. The value is appended to “Server” and saved in the TLfolder variable. The pipeline progresses, and in the second Foreach-Object, the values 1 to 10 are appended to “Logs” and saved to thePipelineVariable ChildFolder. The final Foreach-Object combines the contents of the two pipeline variables to produce the full folder name. New-Item is used to create a folder in the root of C:, and then foreach is used to iterate over the folder names to create the folder.
8.7. The pipeline with external commands
So if this pipeline binding stuff all relies on objects, what happens if you try to use external command-line utilities in PowerShell?
Simple: When a command-line utility, such as Ipconfig, is run in PowerShell, PowerShell captures its StdOut, which will contain text. Each line of text is brought into PowerShell as a String object. This usually works well, as long as you know what to expect. You’ll often pipe those String objects to a command like Select-String, which lets you search the strings for specific patterns.
Similarly, if you try to pipe objects to an external command-line utility, PowerShell will convert those objects to text (much as it does when creating an onscreen display for you to look at) and send that text to the external command’s StdIn. This rarely works well, except in cases where the external command doesn’t care about what the strings actually say. The More command—famous from the Dir | More example—is a command that works well with this technique. It doesn’t care what the strings say—it just displays them one page at a time and pauses until you press Enter to continue.
8.8. Summary
In this chapter, we’ve revealed one of the most important inner workings in PowerShell. If your head is still spinning a bit, don’t worry—it’s taken us years to grasp and use the pipeline effectively. It’s something you should practice, and if you get stuck ask someone for help. Online forums like PowerShell.org, PowerShell.com, Scripting-Answers.com, and so on are all good places to ask questions, especially for tricky pipeline-binding problems.