QuickBooks 2016 All-in-One For Dummies (2016)
Book VII
Care and Maintenance
 See www.dummies.com/extras/quickbooks2016aio for more on good accounting controls.
Contents at a Glance
1. Chapter 1: Administering QuickBooks
1. Keeping Your Data Confidential
2. Using QuickBooks in a Multi-User Environment
3. Using Audit Trails
4. Enabling Simultaneous Multi-User Access
5. Maintaining Good Accounting Controls
2. Chapter 2: Protecting Your Data
1. Backing Up the QuickBooks Data File
2. Restoring a QuickBooks Data File
3. Condensing the QuickBooks Company Files
3. Chapter 3: Troubleshooting
1. Using the QuickBooks Help File and This Book
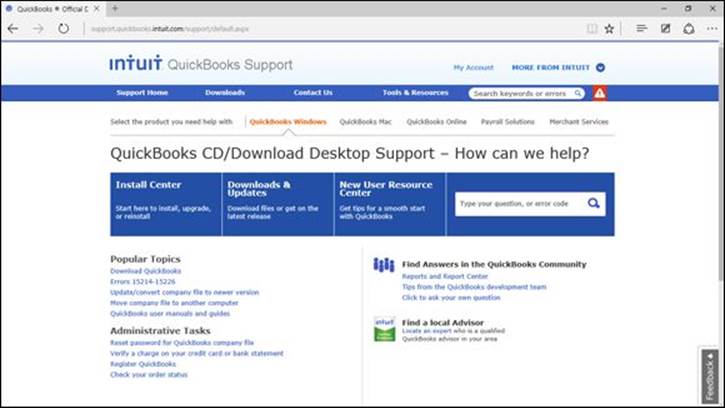
2. Browsing Intuit’s Product-Support Website
3. Checking Another Vendor’sProduct-Support Website
4. Tapping into Intuit’s Onlineand Expert Communities
5. Trying an Internet Newsgroup
6. When All Else Fails …
Chapter 2
Protecting Your Data
In This Chapter
· Making a backup of the QuickBooks data file
· Restoring the QuickBooks data file from a backup
· Archiving and condensing QuickBooks data
In this chapter, I tell you how to protect your QuickBooks data. Principally, protecting your data requires that you back up the data. If you back up your data, you have a second copy available in case the original data file goes bad or becomes corrupted.
Because archiving and data file compression are related to backing up and restoring QuickBooks data files, I also talk about archiving in this chapter. When you archive QuickBooks data files, you create a permanent record of the data files. You also have the option of condensing the current working data file.
Backing Up the QuickBooks Data File
A critically important task that either you or some co-worker needs to complete is a backup of the QuickBooks data file. I respectfully suggest that few items stored on your computer’s hard drive deserve as much caretaking as the QuickBooks data file does. Quite literally, the QuickBooks data file describes your business’s financial affairs. You absolutely don’t want to lose the data file. Losing the data file, for example, might mean that you don’t know how much money you have, you don’t know whether you’re making or losing money, and you won’t be able to easily or accurately prepare your annual tax returns.
Backing-up basics
Fortunately, backing up the QuickBooks data file is rather straightforward. You need to complete only nine steps:
1. Choose the File ⇒ Create Copy command.
QuickBooks displays the first Save Copy or Backup dialog box (see Figure 2-1), which provides three options: the option to save a backup copy of your QuickBooks file, the option to create a portable company file, and the option to create an accountant’s copy.
2. You want to save a backup copy, so click the Backup Copy option button; then click Next to continue.
 You can create either a full backup file or a portable company file when you copy the QuickBooks file. A portable company file is smaller than a backup file, so it’s more convenient to move around. For example, you can more easily e-mail a portable company file. The rub with portable company files is this: QuickBooks must work hard to scrunch the portable company file to a small size. QuickBooks also has to do more work to unscrunch the file later on when you want to work with it.
After you click Next, the second Save Copy or Backup dialog box, shown in Figure 2-2, appears.
You can go directly to the Save Copy or Backup dialog box shown in Figure 2-2 by choosing the File ⇒ Create Backup command.
3. Indicate whether you want to save your QuickBooks backup file on your company’s computer or to QuickBooks’s offsite data center.
Click Local Backup to indicate that you want to store the backup copy of your file on your computer’s hard disk or some removable storage device, such as a flash drive.
4. Click the Options button to choose a backup location.
QuickBooks displays the Backup Options dialog box, as shown in Figure 2-3.
5. Specify to which folder or disk location the company file should be backed up.
You just enter a pathname directly in the box that tells where to save your backup copies.
If you don’t know how to enter a pathname, click the Browse button. When QuickBooks displays the Browse for Folder dialog box, use its folder list to select the disk or folder you want to use for QuickBooks backups.
6. (Optional) Select your backup options.
You can also use the Backup Options dialog box to specify when QuickBooks should remind you to back up and how QuickBooks should back up:
· Adding time stamps: To add the date and time of the backup operation to the backup file’s name, select the Add the Date and Time of the Backup to the File Name check box.
· Limiting backup copies: To tell QuickBooks to get rid of old backup copies, select the Limit the Number of Backup Copies in This Folder to X check box and then specify how many backup copies you want to keep by using the adjoining text box.
· Setting backup reminders: Select the Remind Me to Back Up When I Close My Company File Every X Times check box and the adjoining text box to specify that you want to be reminded to back up the QuickBooks file when you close QuickBooks. Your interval options include every time, every other time, every third time, and so forth.
· Enabling data verification: Use the verification buttons to tell QuickBooks that it should check for data integrity when it backs up your data. Select the Complete Verification radio button for QuickBooks’s best and most comprehensive verification. Alternatively, if you’re someone who doesn’t have time for the extra few seconds of double-checking that data verification takes, sure, select the Quicker Verification radio button. Better yet, throw caution completely to the wind — caution is for babies anyway — and select the No Verification radio button.
7. Click OK when you finish specifying the backup location and options and then click Next.
QuickBooks displays a dialog box (see Figure 2-4) that asks when you want to back up.
8. Specify when you want to back up.
Typically, you want to back up when you choose the Save Copy or Backup command. In this case, when QuickBooks displays the Save Copy or Backup dialog box that asks the “when” question, click the Save It Now button. You can, however, also tell QuickBooks to regularly schedule backups of the QuickBooks data file according to some clever scheme by — when QuickBooks asks the “when” question — clicking the Save It Now and Schedule Future Backups buttons or by clicking the Only Schedule Future Backups button. If you tell QuickBooks that you want to schedule backups, QuickBooks displays a couple of dialog boxes that you use to create the new backup schedule by naming the schedule and by setting the days and times when backups should be scheduled.
9. Click Finish to close the Save Copy or Backup dialog box.
After you’ve specified how the backup operation should work, click Finish. QuickBooks backs up (or creates a copy of) the current QuickBooks company file and stores that new file copy at the backup location.
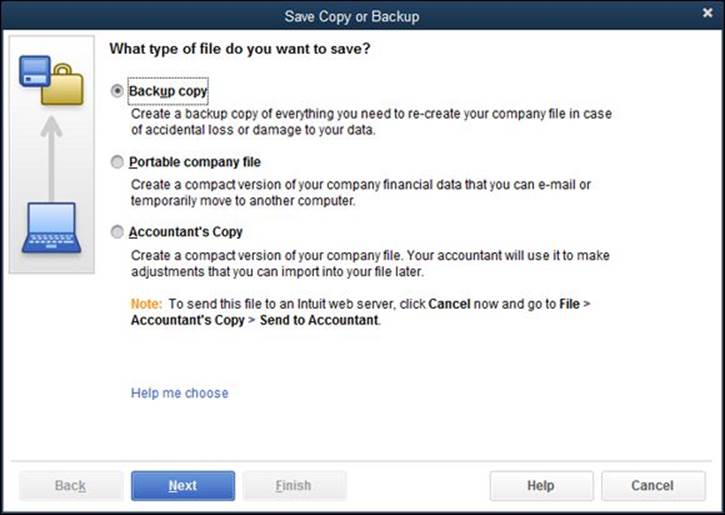
Figure 2-1: The first Save Copy or Backup dialog box.
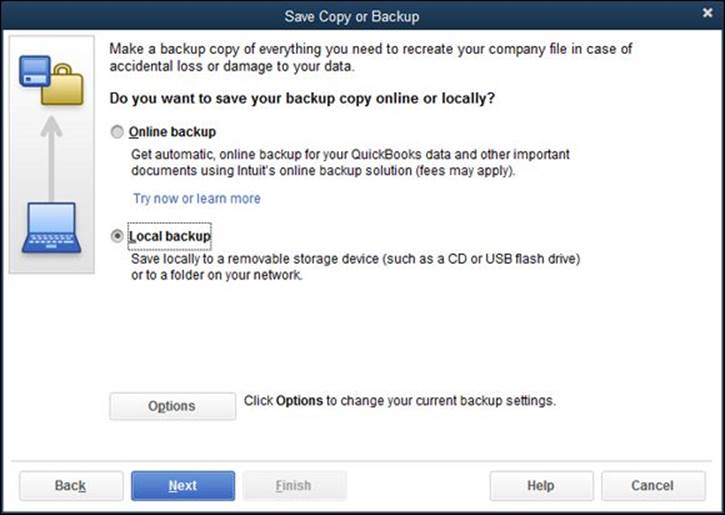
Figure 2-2: The Save Copy or Backup dialog box.
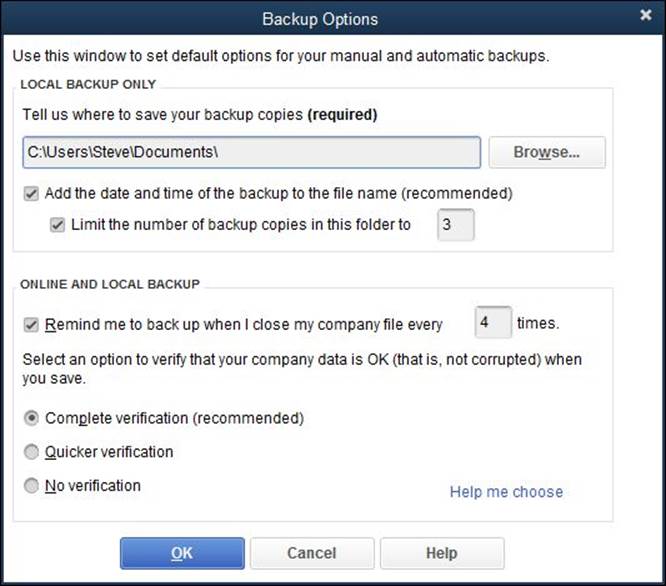
Figure 2-3: The Backup Options dialog box.
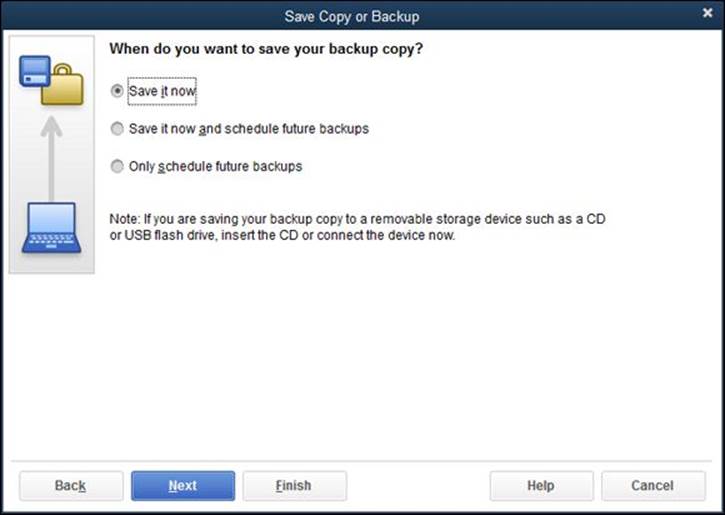
Figure 2-4: The Save Copy or Backup dialog box that asks when you want to back up.
What about online backup?
If you’re observant, you may have noticed that the Save Copy or Backup dialog box shown in Figure 2-2, earlier in this chapter, includes an Online Backup option button. If you want to find out more about backing up the QuickBooks company data file online — which means using Intuit’s computer network rather than your computer or some removable disk to store the backup — you can select the Online Backup radio button.
For what it’s worth, I strongly recommend that you consider using the online backup method, for two reasons:
· Reasonable cost: Online backup is extremely reasonable, with prices that run (at this writing) from free (if you signed up for the annual support or Enterprise support plan) to $25 a month. You can find yourself paying the higher figure if you back up all your computer’s files, which actually seems to be the best value!
· Less effort: Online backup can make the task of backing up less difficult and more regular as long as you have a reliable Internet connection. You don’t need to remember to back up and then remember to take the backup disk home.
Two final quick points: Yes, I use the online QuickBooks backup option myself (and to back up all my important files). No, Intuit doesn’t pay me some sort of secret commission to tout the product.
 You can store back-up files in a folder that syncs with a cloud-based back-up, like Dropbox, Google Drive, or Microsoft’s OneDrive. Each of these offers a free set-and-forget cloud-based back-up if you use the free storage space offered by any of them. It’s definitely an option for users on a budget or with limited resources.
Some backup tactics
Backing up is mostly just a matter of common sense. That being said, however, let me give you some ideas about how, when, and maybe why you should back up:
· Make it easy. I already mention this in my recommendation concerning the online backup option, but the point deserves mention again. The most important thing you can do regarding QuickBooks data file backup is this: Make backing up easy. This probably means considering the online option, but if you do go local, you want to have a high-density, removable storage device that you can use with the computer you use to run QuickBooks. I use a stick-of-gum-size USB flash drive. Choose what device works best for you, but you definitely want some similarly easy-to-employ storage device. In this case, easy means that backing up is more likely to occur.
· Back up regularly. I recommend that you back up every time you enter transactions in the QuickBooks data file. Obviously, if backing up represents a lot of work, you won’t want to do it. But if you have an easy way to back up and a convenient storage device to back up to, you can — and should — back up regularly. Daily backups aren’t too often.
· Store a backup copy of the QuickBooks data file offsite. One final important point worth mentioning: Many of the events that may destroy or corrupt your data file are specific to your computer, such as a hard drive failure, a virus, a user accident, and so forth. Some of the events that may corrupt or destroy your QuickBooks data file, however, are location specific. Fire, flood, or theft can cause you to lose the QuickBooks data file and its backup. For this reason, you want to store a copy of the backup offsite. At the end of the week, for example, you may want to pop the flash drive in your shirt pocket or purse and take it home. Make sure that if something corrupts or destroys the QuickBooks data file, that same something also doesn’t destroy the backup QuickBooks data file.
Restoring a QuickBooks Data File
If you find that the working copy of the QuickBooks data file becomes corrupted or gets destroyed, you need to restore the QuickBooks data file so that you can begin using QuickBooks again. Restoring the QuickBooks data file is easy if you’ve recently backed it up (see the preceding section).
 If you haven’t recently (or ever) backed up the QuickBooks data file, you’ll have to restore the QuickBooks data file, which means starting over from scratch. This means, for example, that you rerun QuickBooks Installation and Setup and re-enter all the old data. In short, restoring without a backup copy of the QuickBooks data file means that you start over at square one.
To restore the QuickBooks data file from the backup copy of the file, put the backup disc into the drive or plug in the flash drive and then follow these steps:
1. Launch QuickBooks, and choose the File ⇒ Open or Restore Company command.
QuickBooks displays the Open or Restore Company dialog box, as shown in Figure 2-5.
2. Indicate what type of file you want to restore.
You can use the Open or Restore Company dialog box to open a regular QuickBooks data file, to restore a backup copy of the regular QuickBooks file or a portable version of the file, and to convert an accountant’s copy transfer file. If you want to restore a backup copy, predictably, you click the radio button labeled Restore a Backup Copy.
3. Click Next.
QuickBooks displays another version of the Open or Restore Company dialog box, as shown in Figure 2-6.
4. Tell QuickBooks whether the backup copy is stored at your company or at QuickBooks’s offsite data center.
To do this, you just click the radio button that labels your backup copy file’s location.
5. Click Next.
QuickBooks displays the Open Backup Copy dialog box, as shown in Figure 2-7.
6. Identify the backup file that you’ll use for the restoration.
Use the Open Backup Copy dialog box to specify the location of and then the specific backup file that you’ll use for the restoration. You can use the Look In drop-down list to identify the disk and folder storing the backup file. After you identify the location of the backup file, double-click the file.
7. Click Next.
QuickBooks displays yet another version of the Open or Restore Company dialog box, which simply tells you that QuickBooks is about to ask you where you want to store the newly restored file. (Er, that QuickBooks needs to tell you it’s about to ask a question seems a little strange, but let’s not get bogged down with that… .)
When you restore the company data file by using the backup copy, you destroy the current working version of the file. In other words, QuickBooks takes the backup copy and copies it over the to-be-restored company data file. Therefore, before you restore company data files, make sure that you’re using the right backup copy and that you’re overwriting the corrupted, to-be-restored company file.
If you’re uncomfortable deleting or overwriting the old (possibly corrupted) QuickBooks data file, you can use a new filename for the restored file. You do this as part of Step 9.
8. Click Next.
QuickBooks displays the Save Company File As dialog box, as shown in Figure 2-8.
9. Tell QuickBooks where it should restore the backup copy and then click Save.
Use the Save Company File As dialog box to pick a location for the backed up file. You’ll probably pick the same location as the existing file. If you do this and also use the same name for the QuickBooks file, QuickBooks displays a message asking you to confirm that you want to overwrite the existing file. You click Yes. After you click Yes, QuickBooks displays another message box titled Delete Entire File. Confirm that you want to delete the existing (and presumably corrupt) company data file by typing the word yes in the message box. Then click OK. QuickBooks uses the backup copy to overwrite the to-be-restored company file. Again, however, note that you can also choose to use a new filename for the restored file.
You’re now free of the rather persistent dialog boxes. Whew.
Note: If you restore your QuickBooks data file using a newer version of QuickBooks than the version you use to create the backup copy, QuickBooks displays a dialog box that asks if you’re okay with the fact that the company file will be updated for the new version. You need in this case to check a box that says, “Hey man, I understand my company file will be updated to the new version.”
10. Enter any transactions that took place since your last backup.
If you entered transactions after you last backed up the QuickBooks company file, you now re-enter those transactions into QuickBooks. For example, if you last backed up QuickBooks on Friday of last week, you need to enter any transactions that you’ve created since last Friday.
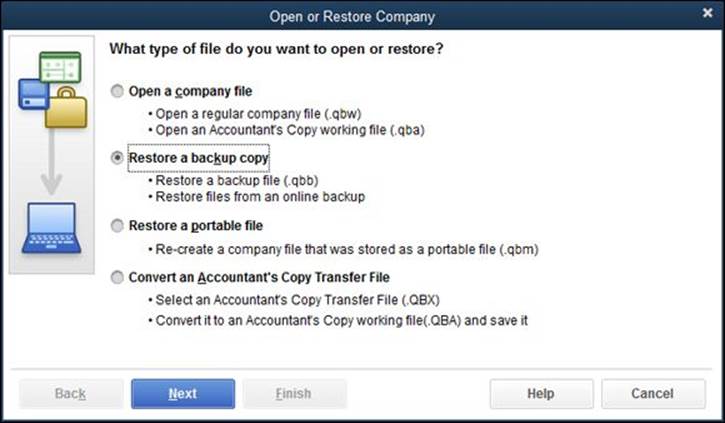
Figure 2-5: The Open or Restore Company dialog box.
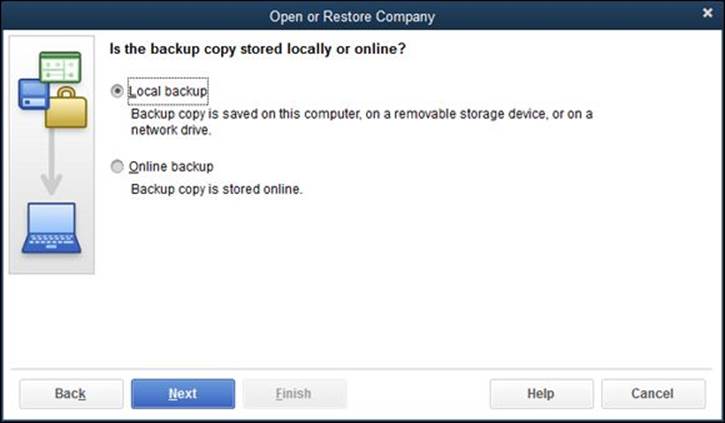
Figure 2-6: The Open or Restore Company dialog box that asks where you’ve backed up.
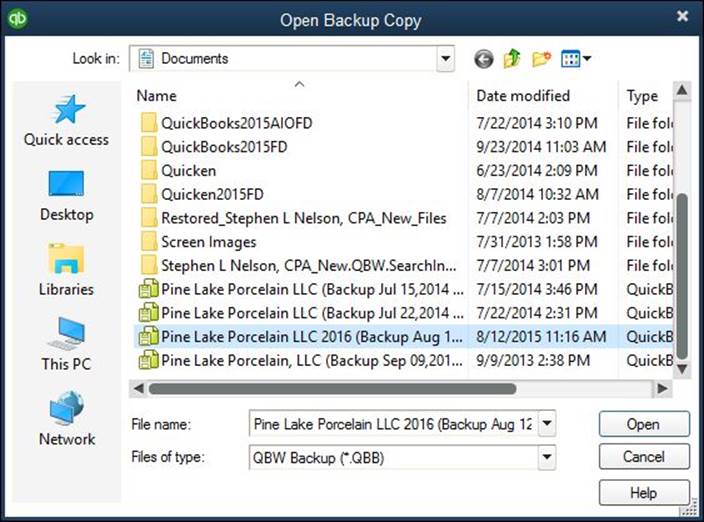
Figure 2-7: The Open Backup Copy dialog box.

Figure 2-8: The Save Company File As dialog box.
Condensing the QuickBooks Company Files
The QuickBooks file condense process does two things:
· The QuickBooks Condense command creates a permanent copy of the QuickBooks data file. (This copy is called an archival copy of the file.) An archival copy of the company file amounts to a snapshot of the company file as it exists at a particular point in time. If somebody later has a question — perhaps your accountant, or a federal or state auditor — you can use the archival copy of the data file to show what the company file looked like at a particular point in time.
· The file condense process makes the data file smaller by summarizing many old closed, detailed transactions that use big monster journal entries.
Because this condensing and archiving can be a little bit confusing, let me quickly summarize exactly what happens when you condense the QuickBooks company file. Here’s what QuickBooks typically does during the process:
· Saves an archive copy of your company files: When you condense the QuickBooks company file, QuickBooks saves an archival copy of that file.
· Removes old closed transactions: As part of the condense process, QuickBooks gives you the opportunity to remove old, closed transactions from the current, working version of the QuickBooks company file. Remember that archiving creates an archival copy of the QuickBooks company file. You still have the working version of the QuickBooks company file, however, and it’s this current, working version of the QuickBooks company file that gets cleaned up, or condensed, by the removal of old, closed transactions.
Closed transactions are transactions that QuickBooks no longer needs to track in detail. For example, an old customer invoice — after it’s been paid — is a closed transaction. An old check written to some vendor — after it’s cleared the bank — is a closed transaction.
· Summarizes old, closed transactions: Because the old, closed transactions are removed from the QuickBooks data file, condensing typically creates summary monthly journal entries for the old, closed transactions and places these summary transactions in the current, working version of the QuickBooks data file. These summary monthly journal entries allow you to continue to prepare monthly financial statements. For example, even though archiving removes all the old, closed transactions from, for example, January 2011, you can still produce financial statements for January 2011 in 2016. To produce monthly financial statements for January 2011, QuickBooks uses the summary monthly journal entries.
· Clears the audit trail: As I mention in Book VII, Chapter 1, QuickBooks maintains an audit trail showing who has entered what transactions. One almost-hidden effect of the cleanup of the QuickBooks data files concerns the audit trail. If you clean up a company file and indicate that the company file should be condensed, QuickBooks clears the audit trail before the “removed closed transactions on or before” date. In other words, for the period of time in which QuickBooks removes old, closed transactions, it also removes the audit trail of those transactions.
The condense file process typically means creating a copy of the QuickBooks data file that you save and put away someplace and then creating a scaled-down version of the working company file. The command that you use to condense the QuickBooks company file, however, also allows you to create almost-empty company files. Most people never need to use this option. I can think of only one category of QuickBooks users who may want to create almost-empty company files: CPAs and consultants (who want to reuse a company file for another business unit or client) may want to use this command to create company data files that have many of the lists set up already. I don’t go into any further detail on creating an almost-empty company file by using the archiving command, but you should know that it’s there.
Cleanup basics
After you understand what archiving is all about, the process is quite straightforward. To condense the QuickBooks company file, follow these steps:
1. Choose the File ⇒ Utilities ⇒ Condense Data command.
QuickBooks displays the first Condense Data dialog box, as shown in Figure 2-9.
2. Select the Transactions Before a Specific Date radio button.
This option tells QuickBooks that you want to do two things: create an archival copy of the QuickBooks data file, and skinny down the working company file so that it isn’t so big. QuickBooks reduces the size of the working version of the company data file by removing old, closed transactions if you choose in Step 3 to remove transactions.
3. Specify the Remove Transactions Before date.
To specify the date before which closed transactions should be removed, enter the date in the date box. If you want to condense the file by removing transactions on or before December 31, 2015, for example, enter 1/1/2016 in the date box. Note, however, that you don’t need to feel compulsive about removing a bunch of closed transactions. You remove closed transactions only if your QuickBooks company file is getting too big. You can easily work with a QuickBooks company file that’s 25MB, 50MB, or even 100MB (megabytes).
Although typically, you condense a QuickBooks file by removing old, closed transactions, the Condense command also creates files without transactions and files with only a specified data range of transactions. To create a file that holds lists and preferences but no transactions, click the All Transactions radio button. By the way, you might use the All Transactions option to build a nearly empty file you could reuse (such as for training). To create a QuickBooks file that holds a specified range of transactions, click the Transactions Outside of Range radio button and then enter the dates that bookend the range using the Before and After boxes.
4. Click Next when you finish specifying which transactions QuickBooks should remove.
QuickBooks displays the second Condense Data dialog box, as shown in Figure 2-10.
5. Specify how transactions should be summarized.
If you will summarize historical transactions, QuickBooks uses a second Condense Data dialog box to ask how it would summarize historical data: with a single summary journal entry, with monthly summary journal entries, or no summary at all. Select the radio button that corresponds to the summarization approach you want. (Usually, you would probably use the second option listed — that of having QuickBooks create monthly summary journal entries — so you can still generate meaningful monthly reports.
6. Click Next when you finish specifying how QuickBooks should summarize transactions.
QuickBooks displays the third Condense Data dialog box, as shown in Figure 2-11.
7. Specify how inventory transactions should be condensed, and click Next.
If your QuickBooks file includes inventory transactions, QuickBooks recommends that you remove old inventory transactions. When QuickBooks displays the third Condense Data dialog box, you can tell QuickBooks to do just this by selecting the Summarize Inventory Transactions option button. (If you don’t want to remove old transactions, select the Keep Inventory Transactions Details button.)
When you click Next, you continue to the fourth Condense Data dialog box (not shown), which asks which transactions should considered closed.
8. Specify which transactions should be removed, and click Next.
QuickBooks asks for a bit more information about exactly what constitutes a closed or old transaction that should be removed. You select check boxes to indicate whether transactions before the removal date should be removed even if they’re uncleared, marked To Be Printed, flagged as To Be Sent, and so on.
When you click Next, you move on to the fifth Condense Data dialog box (see Figure 2-12).
9. Specify any list cleanup that should occur, and click Next.
Use the fifth Condense Data dialog box to tell QuickBooks that in addition to removing old closed transactions, it should clean up some of the lists. You can select check boxes on the Condense Data dialog box that tell QuickBooks to remove unused accounts, unused customers, unused vendors, and so forth. By cleaning up your list through the removal of unused list items, you not only reduce the size of the company file, but also make it easier for people to work with the list.
When you click Next, QuickBooks displays the sixth page of the Condense Data dialog box, as shown in Figure 2-13.
10. Confirm your condensing and archiving operation.
After you describe how you want QuickBooks to archive and condense the company file, QuickBooks displays the sixth Condense Data dialog box, as shown in Figure 2-13. The dialog box tells you that the archival process begins with QuickBooks making a copy of the data file and that the condensation operation may take several minutes or even several hours to complete.
11. Click Begin Condense.
QuickBooks begins the process of condensing the data file.
12. Back up the data file when prompted.
At the very beginning of the condense process, QuickBooks prompts you to back up the QuickBooks company file. Backing up the QuickBooks company file as part of a condense operation works the same as backing up the QuickBooks company file at any other time. If you have questions about how to back up the QuickBooks company file, refer to the earlier section “Backing-up basics.”
After you back up the QuickBooks company file, QuickBooks saves an archive copy of the company file and then cleans up the working version of the company file by using your instructions. Again, as noted in the earlier steps, the cleanup process may take only a few minutes, or it may take several hours if your file is very large.
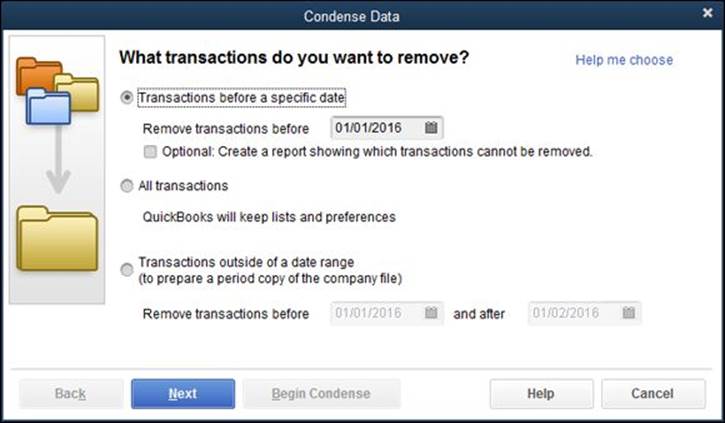
Figure 2-9: The first Condense Data dialog box.

Figure 2-10: The second Condense Data dialog box.
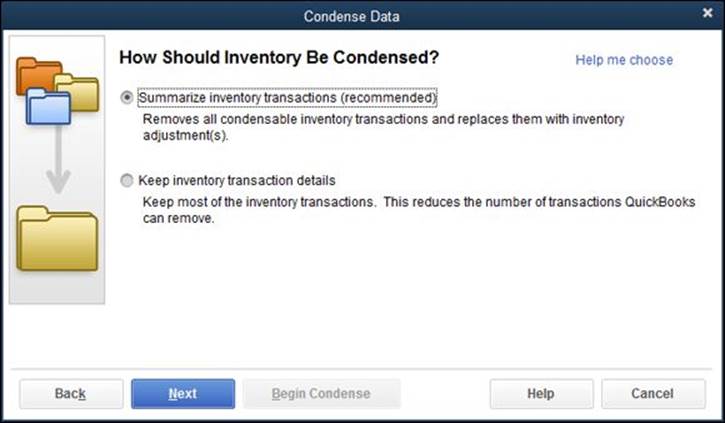
Figure 2-11: The third Condense Data dialog box.
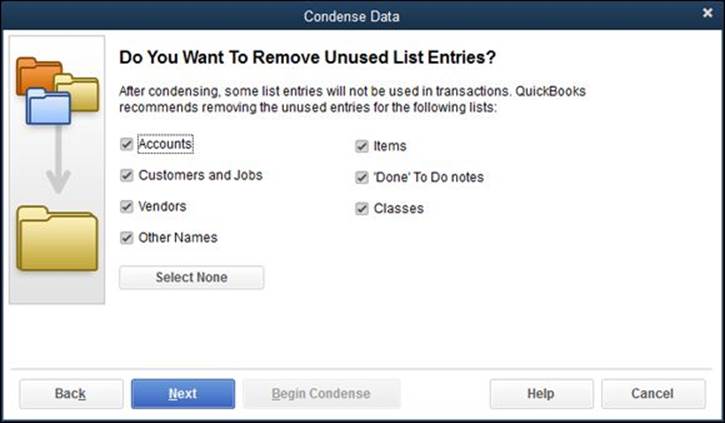
Figure 2-12: The fifth Condense Data dialog box.
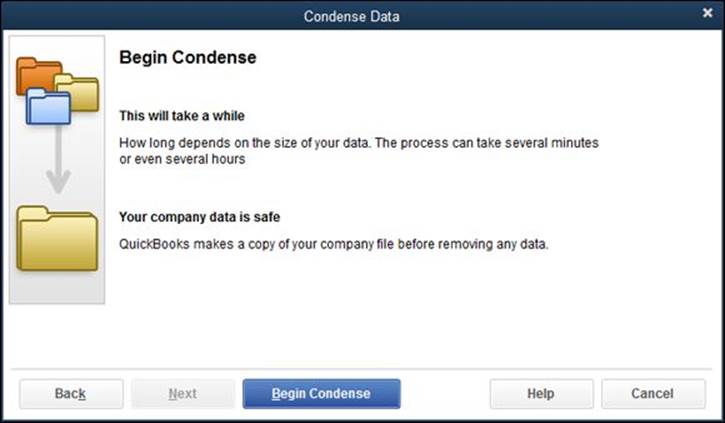
Figure 2-13: The sixth Condense Data dialog box.
Some cleanup and archiving strategies
Deciding when and how you want to clean up or archive your QuickBooks company file is mostly a matter of common sense. Your first consideration should be whether you need to condense the company file at all. If QuickBooks still runs at a reasonable speed, if you don’t find yourself going crazy because of many unused items in lists, or if the data file hasn’t grown monstrously large (larger than 100MB or so), you may not need to condense. In many cases, you achieve no benefit by cleaning up. And by not cleaning up, you still have complete, detailed financial records at your fingertips.
My technical editor wants me to point something out here: He notes that running a cleanup operation doesn’t necessarily reduce the size of the QuickBooks data file. He says, therefore, that if you really must have a smaller data file, you should first run a cleanup operation and then save and restore a portable QuickBooks data file.
Here’s another common-sense notion about cleaning up and archiving the QuickBooks company files: You should create an archival copy of the QuickBooks data file. In fact, I recommend that you create an archival copy of the QuickBooks data file at the end of the year, after you or your CPA make any final adjustments to the year. It’s a great idea to create an archival copy of the QuickBooks data file that’s used to prepare your tax return and any financial statements, because you can always later explain some number on a return or financial statement by looking at the archival copy of the data file.
Throughout this book — and most recently in Book VII, Chapter 1, which discusses administering QuickBooks — I mention that one of the problems with using QuickBooks is that people can intentionally or inadvertently change old transactions. This means that someone can, unfortunately, change transactions in a QuickBooks data file in a previous year. When that change occurs, someone who looks at the QuickBooks data file later may not be able to explain a number on a tax return or a financial statement. For example, if someone goes back and changes a transaction in a previous year, and that transaction is used to calculate total revenues for the year, you can no longer use the QuickBooks data to explain numbers on your tax return and your financial statements for total revenue. That makes sense, right?
Fortunately, by having an archival copy of the QuickBooks data file — the QuickBooks data file that supplied numbers to your tax return and the financial statements — you can always see which QuickBooks transactions support a particular tax return number or financial statement number. If you’re still confused about this point — and it is a little bit tricky — ask your tax advisor or your CPA about the problem. He can explain to you the danger of having a change in QuickBooks data that has been used to prepare a return or a financial statement after that return has been prepared, or after those financial statements have been published and distributed.
All materials on the site are licensed Creative Commons Attribution-Sharealike 3.0 Unported CC BY-SA 3.0 & GNU Free Documentation License (GFDL)
If you are the copyright holder of any material contained on our site and intend to remove it, please contact our site administrator for approval.
© 2016-2026 All site design rights belong to S.Y.A.