Scenario-Focused Engineering (2014)
Part II: The Fast Feedback Cycle
Chapter 8. Building prototypes and coding
You’ve done the work to brainstorm a bunch of promising ideas. And you’ve narrowed those down to a few that you believe have the greatest potential for success. In this stage of the Fast Feedback Cycle, you turn those ideas into something concrete that a customer can see, use, feel, and experience—and then you test it to see whether you’re on the right track. Until you actually try out an idea on real people, you won’t know whether it will work or how good an idea it really is.
The key in this stage is to build out a few of your ideas as quickly and efficiently as you possibly can. This stage completes one trip around the Fast Feedback Cycle and gets you ready to start the next iterative cycle. The first step in that cycle is to show your customers what you’ve built and to get feedback, launching you into a continuous cycle of learning and improvement.
Experimentation: Make data-driven decisions
Here’s a secret the professors probably didn’t tell you in engineering school: failure is okay. As a matter of fact, failure is more than okay when you’re doing it with a purpose, to learn. Learning what doesn’t work is just as valuable as knowing what does work, especially in dealing with the complex, nuanced customer needs you are likely trying to satisfy. When you experiment as a scientist does, failure has a much different and more positive meaning; it is expected and desirable. At the beginning of a project, your understanding of the deep customer need is incomplete, so you have to experiment and learn, try and fail, and then try again in order to land on an optimal solution that solves your customer’s needs. Your ideas may look great on paper, but will they work for real-life customers in the real world? In other words, you need to take an experimental approach to building software and use customer feedback to drive decisions every step of the way.
After all, wouldn’t it be better to learn early on that customers don’t really like what you’re building, or only kind of like it (but still prefer your competitor’s product), or that even though they love what you’re building, they aren’t willing to pay for it? Wouldn’t it be nice to know this before you sink a lot of time and energy into creating your solution? And wouldn’t it be nice to figure out which of your assumptions are wrong so that you can modify your approach as quickly as possible and still have the time, money, and energy to try again? Rather than investing weeks or months getting an idea coded and ready to ship, spend a few hours or days building a rapid prototype and then test it with customers to be sure that you’re on the right track.
![]() Mindshift
Mindshift
Expect to iterate. When you first present a concept, a prototype, or a build to a set of customers, don’t think of it as the ultimate test of your design prowess and not be satisfied with anything less than a perfect outcome. Rather, think of every customer test as a learning opportunity that you enter into with a childlike curiosity, and expect to encounter rough spots and situations that you haven’t noticed or realized before. What parts do your customers like? Which parts aren’t really working yet? Are they using it the way you thought or does something different happen? Will they pay for it? Today? Would they like it better if you changed something? What are they telling you? By expecting imperfection, you leave room in your thinking to hear and learn from your customers’ reactions.
By the same token, you should schedule your project knowing you will modify your plans as you learn. Building a project schedule that assumes your first design will work perfectly is a recipe for disaster. Have you ever worked on a project that shipped exactly what the first specification defined? Iteration will happen whether you like it or not. The point is whether you’ll put yourself “behind schedule” and feel bad about it, or whether you’ve planned for iteration and left yourself some time to be nimble and respond to feedback.
Our advice: learn from experience. Don’t be arrogant. Your first ideas probably won’t work perfectly on the first go-around, so don’t overinvest in production code or detailed prototypes until you have gotten some confirmation from customers that you’re on the right track. Go into the process assuming that your plan is partially great and partially terrible—you just don’t know which part is which yet. Make plans for feedback and iteration to figure this out.
Experimentation is fundamentally about gathering real, unbiased data to guide your decisions; it’s about enabling data-driven decision making. Instead of relying on your own personal opinions and judgments about which alternative solutions will work the best, are most desirable, or have the best ease of use, get actual customer feedback into that feedback loop as much as possible. After all, you are not the target customer. You’ve already done a lot of customer research and observation, and you’ve used empathy for the customer to make well-informed decisions about the problem you want to solve and how to solve it. But this is just the beginning. For the remainder of your project you will use experimentation to continually gather feedback about how your target customers are responding to your work in progress, and you’ll use that feedback to inform your decision making.
The best approach is to “fail fast.” That is, if your idea is destined to fail, you want to learn that as quickly and efficiently as possible so that you can start on a better path right away. What you do not want to do is postpone failure, waiting until the product is complete, when you have already invested so much, before you realize that it won’t work. Instead, test concepts and prototypes with customers as early as possible—even if you show only rough drawings or barely functional prototypes—to get directional feedback that lets you know what’s working and what isn’t.
Experimentation with rapid prototypes
The way that you get constant feedback and learning is by continually trying different ideas, seeing which ones work the best, and using that feedback to inform your next iteration. Sometimes you can do this easily by writing production code and testing with live users by running A/B tests or other real-time experiments. Often, however, it’s much faster and more efficient to build out new ideas with lighter-weight approaches, such as paper prototypes, mockups, wireframes, implementation spikes, or other rapid prototyping approaches. You can even use a skit. (Really, you ask, a skit? Yeah, it sounds crazy, but you can prototype workflows and complicated processes by acting out the parts in a skit.) These rapid prototypes can help you determine much more quickly whether your ideas are on the right track for users, for the technology, and even for the business model. Customer feedback on your prototypes also gives you insights into both what customers find easy or confusing and why customers behave the way they do, which helps you refine your solution’s usefulness and desirability as you iterate.
SFE in action: Getting early feedback changed direction
Bishara Kharoufeh, Principal Engineering Manager, Microsoft Dynamics
Several years ago, when we began thinking about the future goals for the Microsoft Dynamics product line, we knew we wanted to recognize the inflection point that was occurring in our industry toward cloud computing. Thinking about the possibilities of embracing the cloud immediately led many on the team to assume that we were going to write a mobile version of Dynamics for a smartphone. The team felt that creating a mobile version of Dynamics was an important business shift, but at the time we didn’t know exactly what parts of the suite should be mobile, how to do it, or what the customers really wanted out of a mobile solution from us.
We did some initial research and identified a particular pain point about how long it takes to create a project that crosses organizational boundaries: getting a contract signed, setting it up, and getting work started even though the customer, account manager, and project manager are in different organizations. We wrote a short scenario for this customer problem and gave it the title “Prakash initiates a cross-organization project.” The team did some focused brainstorming around this particular experience and came up with a promising set of both UI and technical solution ideas. One potential solution was to send the project manager (PM) a notification that the contract was signed and for the PM to then set up the project directly from his or her mobile device, no matter where the PM was at the time.
We quickly built a paper prototype based on the best of the current ideas. We were pretty excited by some of the ideas in this prototype and were ready to take it to some customers. In fact, we built three different prototypes for the customers to see—there was no shortage of brilliant ideas coming from the engineering team. The team was super excited to get validation that its ideas rocked and wanted to get on with fleshing out the real solution in code.
But we received some unexpected feedback. As we walked the customers through the flow of the paper prototype and asked them what they thought, the customers universally responded: “Setting up a new project is too complicated to deal with on a small screen, with all these fields and actions I need to take. Really, I just need to know when the contract is signed. A text message would be perfect for that. Then I’ll know that it’s time for me to go set up the project, and I can get on it right away.”
We were fortunate that we received this very early feedback. Had we acted on the instincts and passion of the team, we would have headed down a path where we would have spent many months (or years) coding a complex mobile app, only to discover way too late that a much simpler and more delightful solution for our customer already existed: sending a simple text message.
Prototypes come in many flavors
You’ve likely built prototypes before. But there are a lot of misconceptions about prototyping, especially among software engineers. The term is often understood by software developers to mean a bunch of code that actually works, at least partially, to demonstrate some part of the platform, architecture, user experience, or other functional aspect of a software project. While developing working code prototypes can be very useful in some situations, writing and debugging code enough for it to actually function, even if only minimally, is a relatively labor-intensive job. This is especially true compared with some of the fastest rapid-prototyping techniques, which let you build a viable prototype in less than an hour.
![]() Vocab
Vocab
A prototype is a model of a concept, process, technology, or experience that is built for the purpose of learning whether the proposed solution is viable and meets the project’s goals.
When we talk about prototyping in this book, we’ve broadened our scope to include many different types of prototypes, both code and noncode prototypes. We think of a prototype as anything you build that enables you to test an idea in real time and space with the intent of learning so that you can further refine your idea in subsequent iterations. Of particular note are rapid prototypes that can often be produced much more quickly and earlier in a product cycle, either with no code or within a simplified coding environment. Here are a few examples of different kinds of rapid prototypes:
![]() A paper prototype, consisting of sketches of a user interface drawn on sheets of paper, a stack of sticky notes, or even cocktail napkins. An example is shown in Figure 8-1. Each page shows what users would see at each step as they go through a particular experience.
A paper prototype, consisting of sketches of a user interface drawn on sheets of paper, a stack of sticky notes, or even cocktail napkins. An example is shown in Figure 8-1. Each page shows what users would see at each step as they go through a particular experience.
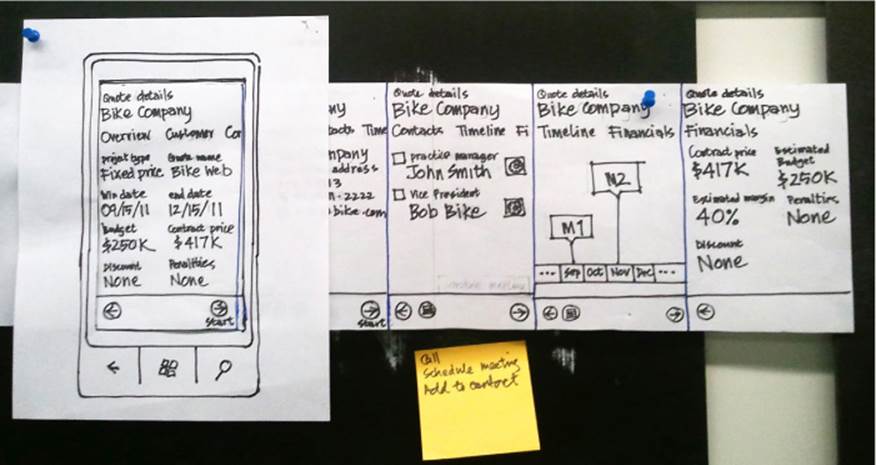
FIGURE 8-1 A simple paper prototype made with a sliding panel that changes the interface on the outlined mobile device as the customer interacts with it.
![]() Grayscale or wireframe drawings of a user interface produced with Microsoft PowerPoint, Microsoft Visio, Balsamiq, or a host of other simple prototyping tools. An example is shown in Figure 8-2.
Grayscale or wireframe drawings of a user interface produced with Microsoft PowerPoint, Microsoft Visio, Balsamiq, or a host of other simple prototyping tools. An example is shown in Figure 8-2.
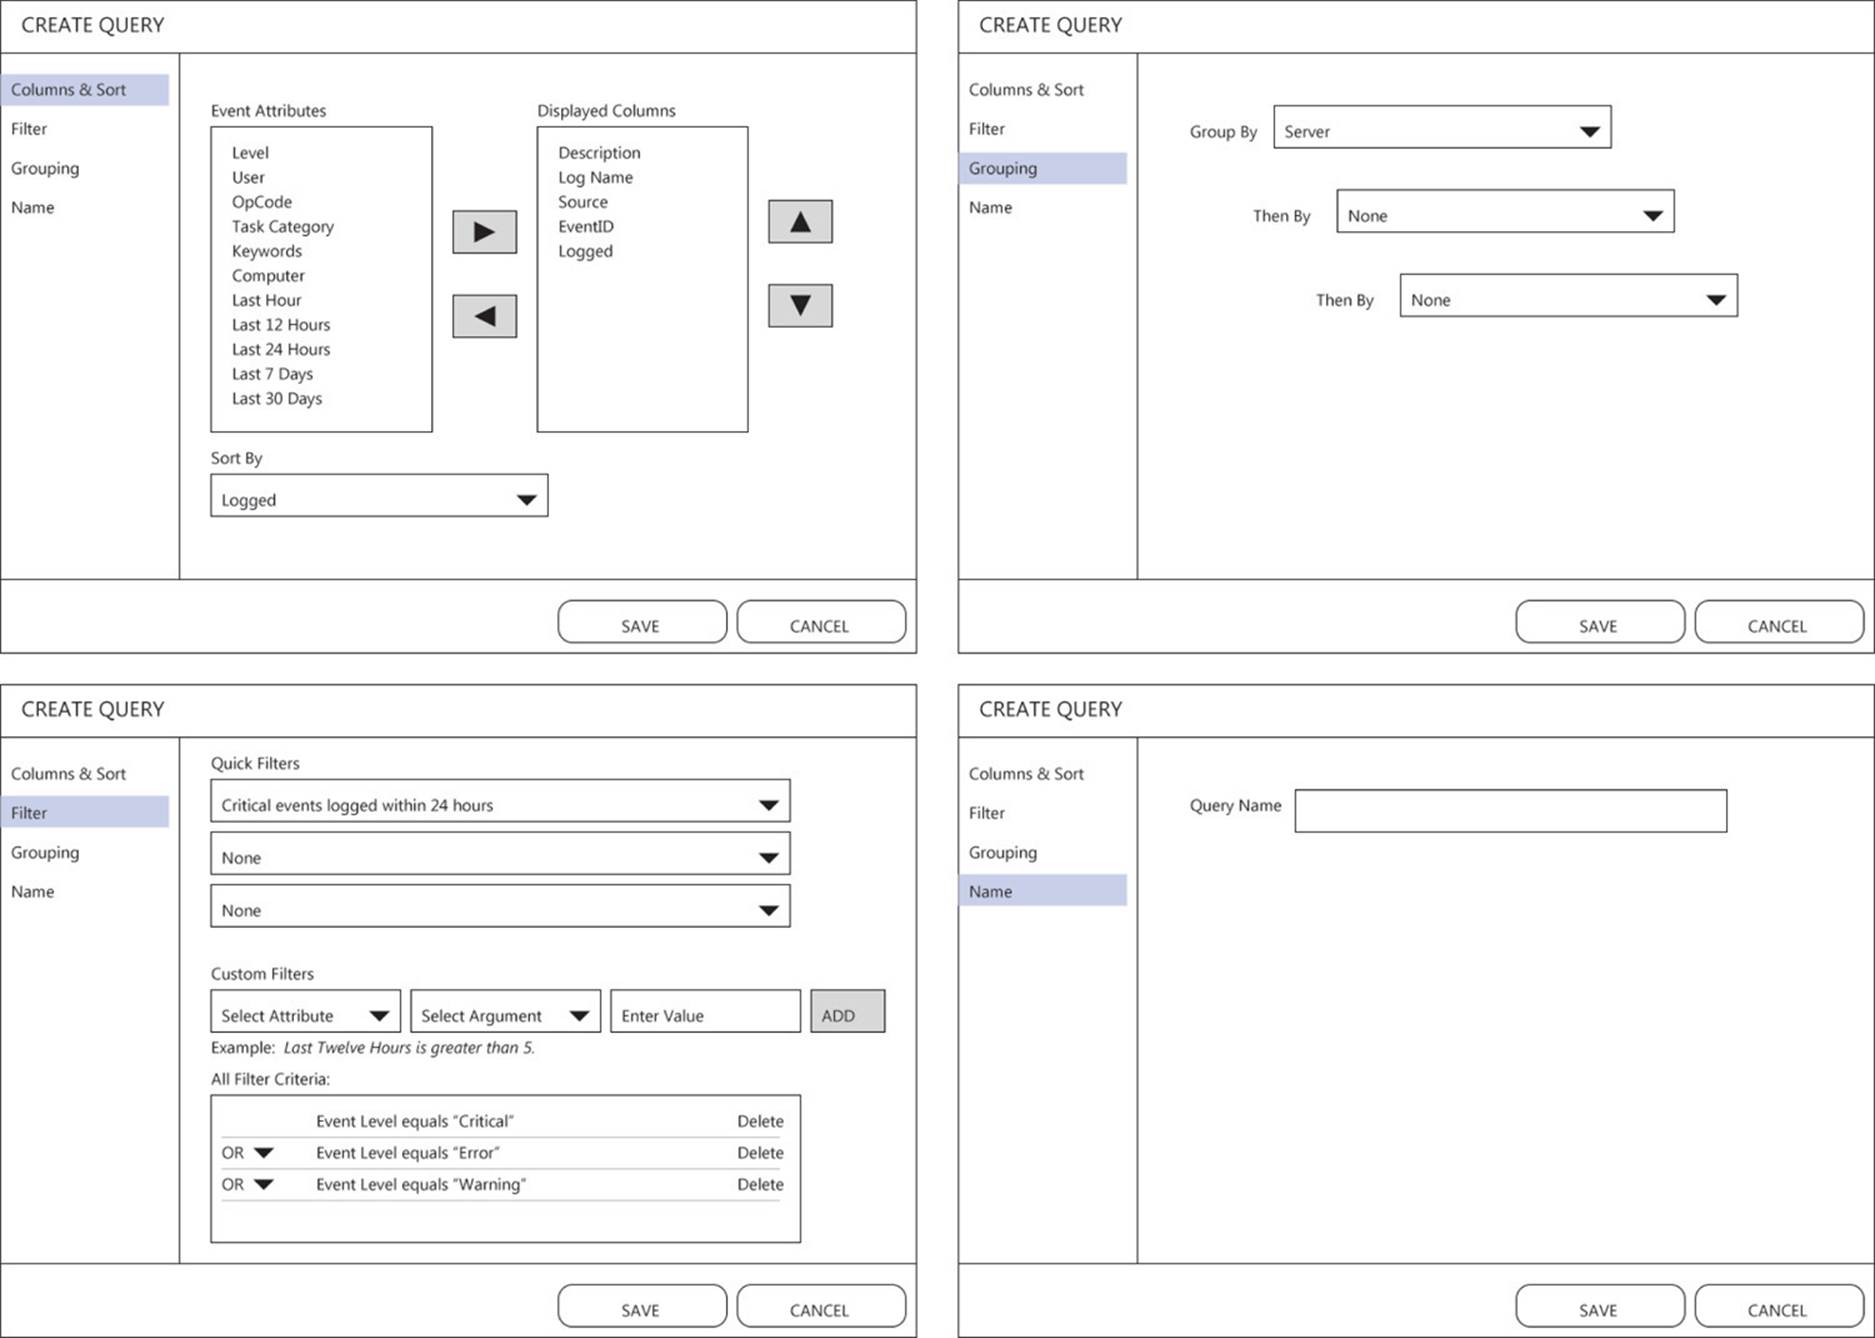
FIGURE 8-2 A wireframe prototype made with PowerPoint provides a quick way to mock up a user interface that can be tested with customers.
![]() A “Wizard of Oz” trial in which a customer interacts with a “computer” that is really just a person sitting behind a curtain who mimics what a voice- or text-based system might do.
A “Wizard of Oz” trial in which a customer interacts with a “computer” that is really just a person sitting behind a curtain who mimics what a voice- or text-based system might do.
![]() A sequence of screens built in SketchFlow (part of Blend for Visual Studio), perhaps with a bit of code embedded in a single control to mimic some crucial functionality of the proposed app.
A sequence of screens built in SketchFlow (part of Blend for Visual Studio), perhaps with a bit of code embedded in a single control to mimic some crucial functionality of the proposed app.
![]() A written page listing the methods and call signatures for a potential API that has not yet been implemented. A developer-customer could attempt to write code against this API (but not compile it).
A written page listing the methods and call signatures for a potential API that has not yet been implemented. A developer-customer could attempt to write code against this API (but not compile it).
![]() A mockup created in Adobe Photoshop, Illustrator, or Flash that looks pixel-perfect but is actually just a set of pictures that show a canned example of a user interface, perhaps with a few buttons or hot spots wired up to click through the pictures.
A mockup created in Adobe Photoshop, Illustrator, or Flash that looks pixel-perfect but is actually just a set of pictures that show a canned example of a user interface, perhaps with a few buttons or hot spots wired up to click through the pictures.
![]() A simple HTML, Visual Basic, C#, or Ruby on Rails app that mimics the functionality and behavior of a solution that will eventually be built on a different platform.
A simple HTML, Visual Basic, C#, or Ruby on Rails app that mimics the functionality and behavior of a solution that will eventually be built on a different platform.
Alberto Savoia, former director of engineering (and self-proclaimed “innovation agitator”) at Google, has called these kinds of earlier, precode prototypes pretotypes to help underline the importance and value of prototyping before building functional prototypes or writing production code.1 More commonly, approaches like these are referred to as rapid prototypes. Whether you call them pretotypes or rapid prototypes, the goal is the same: low-cost ways of making sure that you are solving a real problem and that your solution is the right one. Or, as Savoia would say, “Are you building the right ‘It’?”
In this book we recognize the value of many different types of prototypes, including rougher, early ones as well as more-detailed prototypes, in code and noncode formats.2 Each type serves a different function at different iterations of the Fast Feedback Cycle throughout a project. The trick is to pick the right tool for the job. Exactly what you build, and what tool set you use, depends on what questions you have and what level of feedback you’re looking for, and these will naturally change as you progress from your first trips around the Fast Feedback Cycle into subsequent iterations. Sometimes writing code is the best and most efficient way to get the customer feedback you need to make progress. But we hope that after you read this chapter, you’ll find more efficient ways to reach your goal of enabling data-driven decisions using customer feedback with a minimum of sunk cost and risk.
![]() Mindshift
Mindshift
Why not just start coding? In the early stages of a project, you might feel that the most efficient path forward is to get busy and start writing code. Why waste time with a prototype first, especially because anything that isn’t code is going to be throw-away work? This way of thinking ends up being penny-wise but pound-foolish. You may make what feels like quick progress at first, but experienced developers know that almost always—after running into system constraints, integration issues, and customer complaints—you end up regretting your first idea, and then you have to throw it away or substantially change it. It can be particularly painful to hobble along, sometimes for years, with a suboptimal design that is the source of untold problems in legacy support, ongoing scalability or performance problems, or limitations in what end-to-end experiences the architecture can support without a major rewrite. We’ve seen countless teams genuinely believe that their first solution idea is flawless and inspired on paper, and yet, in its first user test, that same idea raises major issues that no one on the team anticipated.
Build multiple prototypes in parallel
In the first couple of iterations of the Fast Feedback Cycle, you should build out not one concept but several different potential solutions to test with customers. Building multiple prototypes in parallel is a good practice for three main reasons.
The first reason to build multiple prototypes is to allow the team to explore diverse approaches in enough detail that the relative strengths and weaknesses of each approach become more apparent. As you start thinking through how the solution will work in a bit more detail than in the quick brainstorming sketches you made in the previous stage, you’ll see possibilities that weren’t obvious before, and ideas that seemed great at first may now look pale in comparison with better alternatives.
Second, when you explore several sufficiently different approaches in detail, you have another chance to blend ideas. As we discussed in Chapter 7, “Brainstorming alternatives,” the path to the solution that best optimizes your goals is often not choosing just one of your prototyped alternatives over the others but combining aspects of several prototypes to create a blend or a new approach that you had not considered initially.
The third reason to build multiple prototypes is that customers give better feedback and comment more on the relative merits of different approaches when they can compare and contrast a small number of options.3 When you show customers a single approach, they too can quickly develop tunnel vision and have trouble imagining any other possible solution. They might have trouble giving feedback other than, “Looks all right to me.” However, if you show some alternatives, those same customers can become quite chatty and will be much more opinionated about what parts they find useful, which places are confusing or straightforward, and, importantly, what aspects tickle their fancy. All of this data provides important clues for what you might need to change and where you should focus to create that emotionally desirable experience you’re ultimately striving for.
Also, writing code for one approach is expensive enough, but writing code for multiple approaches, even if it’s throw-away code, is almost always too costly in the earliest stages of a project. A noncode approach is usually a more lightweight, efficient way to produce multiple prototypes in the first few iterations, where your primary goal is to validate that you are solving the right problem, one that customers care about and that will support your business model. Showing a few different solutions that highlight different aspects of your customers’ situation and needs is one way to stimulate feedback on which parts of the problem are indeed the most important to address.
A group of computer scientists, designers, and education researchers at Stanford University put the value of creating multiple prototypes to the test. They conducted a study to compare the efficacy of iterating on one prototype in a serial fashion with iterating on multiple prototypes in parallel. They had 33 web designers create online advertisements for a new website. Each designer created five prototypes before settling on a final design. Some of the subjects received feedback after showing one prototype, before generating the next one—serial prototyping. Other subjects created three prototypes and received feedback on all three before going on to create one more prototype, receiving feedback on it, refining that prototype, getting feedback again, and settling on a final design—parallel prototyping. The researchers found that every measure—from independent experts’ review of the resulting advertisements, to actual click-through rates, to the length of time visitors spent on the website—was higher for the ads produced through the parallel prototyping approach.4
Rough prototypes stimulate more valuable feedback
It might seem a bit crazy for us to suggest that you can get better customer feedback from a rough prototype than from a detailed, picture-perfect one. However, in practice, when you present something that looks like a finished product, that encourages customers to give you feedback on the details: things like the color scheme, the specific words on a page, or the icons you used. A prototype that looks finished lures the customer away from engaging with the more structural issues and concepts you are working through in your first couple of iterations.
Even if it is trivially easy for you to mock up a pixel-perfect prototype using something like HTML, you have to ask yourself whether you really want that type of feedback right now. Do you want feedback on the words you used, the color scheme, what your logo looks like, or the way you laid out graphics? Probably not yet. Instead, you should be more concerned about confirming whether the basic idea makes sense, whether the experience’s flow and sequence feel smooth and natural, and whether you’ve even addressed a problem that customers want solved.
![]() Mindshift
Mindshift
Get used to showing work early. It will feel uncomfortable at first to show customers half-baked work. Engineers can have trouble sharing their early ideas with teammates, never mind with external customers, often out of fear and insecurity that their ideas will be criticized. But if you want to be efficient and avoid wasting work, you need to get used to it. Remember that getting feedback is not about you, it’s about the idea and whether that particular idea works for this particular situation. Likely, you will have to try a bunch of approaches before you hit on one that works, so go in with the expectation that not every idea will pan out. Show your ideas to customers before you are comfortable or have even worked out all the mechanics yourself, and remember to keep it simple and focused. Do not wait until your solution is working or until it is beta quality—that is much too late. The sooner you get feedback, and the less you are experiencing tunnel vision about how it should work, the easier it is for you to adapt to feedback and meaningfully shift your approach to something that your customers will really love.
Furthermore, it’s natural for customers to not want to hurt your feelings. When you show them a prototype that looks finished, reviewers may be quite reluctant to tell you that they don’t find your solution very useful, that the whole concept doesn’t make sense to them, or that they would have reordered the experience a wholly different way. Subconsciously, they might assume that you are already committed to this approach because it looks so finished, so they will give you feedback on little things they think you may actually be able to change at this stage of product development.
However, if you show a prototype that looks obviously rough, and especially if you present alternatives, that opens the door for a much richer and more open conversation and makes it much easier for customers to tell you what they honestly think. A prototype that is obviously unfinished makes for a natural two-way conversation about how your solution could or should work. A more polished prototype, on the other hand, subliminally challenges the customer simply to spot the flaws.
In fact, several sophisticated prototyping tools intentionally use fonts that look like handwritten text and lines that look hand-drawn to help customers feel comfortable about giving honest feedback on prototypes that still don’t look “done.”
SFE in action: A “sketchy” toolkit made us more efficient
Lisa Mueller, Senior User Experience Lead, Microsoft Dynamics
When our team began to explore ideas and designs for a new version of Microsoft Dynamics, the UX team wanted to help the engineers explore solution ideas as efficiently as possible. Our idea was to create a toolkit that the program managers (PMs) would use to mock up roughideas that we could show to customers and get early feedback. We ended up building a PowerPoint toolkit that provided individual UI components, experience patterns, photos, and links to supporting documents (things like text guidelines and persona information). This customized toolkit had extensive functionality for building detailed wireframes and UI mockups with a ton of high-fidelity patterns and detailed data that were easy to access and manipulate.
After a few months of using the toolkit we discovered that the mockups coming from the PMs were taking more time to produce than we (or the schedule) had expected. Turns out that the PMs were spending way too much time thinking about and iterating on UI details. We found the PMs “pixel pushing” in preparation for the upcoming scenario reviews with the leadership team.
As we were still in the early stages of the project, we wanted to help teams create rough drafts of their solution ideas. The current toolkit led them down the path of working on too much detail. Once we realized this, we updated the toolkit to be more “sketchy.” This sketchy toolkit contained the same basic patterns and components as before, but this time it offered a more limited set of rough-looking components and used the Buxton Sketch font, which looks more like handwriting. The idea behind providing rough-looking UI components in the toolkit was to discourage the PMs from spending a lot of time working on details, and to encourage them to get the big ideas across quickly, with just enough (rough) fidelity that we could test it with customers. As UX professionals, we were well aware of the dynamic with customers where they tend to give feedback at a level of fidelity similar to what you show them. Give them high-level fidelity, and they’ll assume the decisions are already made on an almost-finished product. Give them low fidelity, and they assume the team still has time for feedback.
Once we “sketchified” the toolkit, the PMs were able to more quickly create rough prototypes and mockups that we could show to customers to get early, high-level feedback. We still needed higher-fidelity tools for later stages, like redlines, but for early mockups, this “sketchy” toolkit was exactly what we needed to get customer feedback on ideas faster.
Prototyping: More than just a feedback tool
This book is focused on using the Fast Feedback Cycle to get iteration to work for you so that you build things your customers will love. In this context, the primary purpose of prototyping is to build out ideas in order to get rapid customer feedback to fuel that cycle, particularly in the first several iterations. But prototyping has other notable benefits that can be very helpful to your project as well.
Thinking it through
Prototyping allows you to try out ideas in physical space, in real time, with real people, and sometimes even in real situations—but in a very fast way. Building a prototype is a great way to think through a problem and consider the real-world interactions and constraints that need to be negotiated to create a functional, understandable solution. Rather than learning by thinking, this is learning by doing. And for an engineer, prototyping is an extremely productive way to make quick progress and find the bugs in your own thinking. Whether you are working out the technical details, the implementation of the business plan, or the customer experience, moving out of the abstract and starting to actually put pieces together helps you work through the constraints and see whether your solution is viable.
Communication
A good prototype can be an effective communication tool. It can elicit a visceral response about the direction you are taking and how you are approaching the key problems you are taking on. You can use a prototype to communicate to the team, to customers, to partners, to management, and to any other stakeholders you may have on the project. A prototype also helps unify the team on the direction and key decisions for a project, and it does more than describe what you are doing; it allows someone to experience what you intend to build. Unlike a written specification or a long list of requirements, a prototype is difficult to misinterpret. To this end, even a storyboard or series of rough sketches can be enough to align a team and partners on the direction you are taking. Indeed, a rough prototype can serve these needs quite effectively.
For similar reasons, including mockups, screenshots, and other prototypes in specifications is very useful, and they may become a primary tool for spec writing. Prototypes on their own are usually insufficient for completely replacing specs, however, because even fairly detailed prototypes do not usually include all of the error conditions and other edge cases that will ultimately need to be handled by the software. We’ll discuss this in more detail in Chapter 11, “The way you work.”
Soliciting support
If a picture is worth a thousand words, a prototype is worth . . . we don’t know, a lot more than that.
Prototypes are often used to get buy-in from managers or investors who control the resources you need to complete a project. Whether you are pitching a product idea to an investor, trying to win a lucrative contract, or getting a green light from management, a good prototype can be pivotal to convincing others that your ideas are good ones and that they are achievable.
When you use a prototype to sell your ideas, you want to show two things. Be sure that people see the “aha moments,” where you demonstrate that you’ve solved a deep technical, business, or customer need. You should also show any customer data and feedback you’ve collected that communicates what target customers think about your prototype or what customer insights initially inspired the idea. It’s really easy to get caught up in the whiz-bang flash of a good prototype or demo. Keep it grounded and real by backing up your hopes with actual customer feedback.
Technical exploration
There are clear benefits of using prototypes to investigate technical and architectural problems and to refine approaches before you write production code. But you can go a step further and explore technical areas not just for the sake of discovering creative solutions to technical problems, but also to get a deep understanding of the breadth and depth of the technical challenges ahead. You can use prototyping techniques such as spiking to better understand the resources that are needed to complete the project, as well as to get an early handle on the performance, scalability, and other key characteristics of various implementation approaches that may in turn have material impact on the resulting end-to-end customer experience. We’ll discuss this in more detail later in this chapter.
What makes a good prototype?
In the iterative process, a prototype is the stimulus for an experiment. Just as with the scientific method, you have a hypothesis, some idea that you want to test. You use a prototype to test the hypothesis and get answers to related questions, either about the problem you’ve identified or the solution you’re proposing. It’s natural that in the very beginning, the questions you have will be quite broad: Is your approach appealing to customers? Are you solving a real need? Is the form factor appropriate? As you iterate, the questions become more and more detailed and specific: Is the user interaction intuitive? Is the color scheme appealing? Does the application meet specific performance benchmarks?
Regardless of where you are in the Fast Feedback Cycle, a good prototype has some common characteristics:
![]() Rapid Don’t spend a lot of time building the prototype. Be as efficient as possible. Your goal is to learn exactly what you set out to learn and no more, as quickly as possible. Don’t waste your time on unnecessary details or on areas you’re not questioning. A good prototype uses the least amount of work required to answer a specific question.
Rapid Don’t spend a lot of time building the prototype. Be as efficient as possible. Your goal is to learn exactly what you set out to learn and no more, as quickly as possible. Don’t waste your time on unnecessary details or on areas you’re not questioning. A good prototype uses the least amount of work required to answer a specific question.
![]() Disposable By definition a prototype is meant to be thrown away.5 Remember that the point of prototyping is not to build a beautiful, elegant prototype; the point is to experiment, to get customer input, and to get data to inform your decision making with a minimum of effort. Often this means building something inherently disposable because taking the time to make it real doesn’t make sense, especially in your first iterations through the Fast Feedback Cycle.
Disposable By definition a prototype is meant to be thrown away.5 Remember that the point of prototyping is not to build a beautiful, elegant prototype; the point is to experiment, to get customer input, and to get data to inform your decision making with a minimum of effort. Often this means building something inherently disposable because taking the time to make it real doesn’t make sense, especially in your first iterations through the Fast Feedback Cycle.
![]() Focused Concentrate the prototype on what you don’t know, on what you want to learn, on whatever you aren’t sure about. Generally, you would not attempt to prototype the whole system, just a portion of the experience or the technology that you have the most questions about or that seems the riskiest.
Focused Concentrate the prototype on what you don’t know, on what you want to learn, on whatever you aren’t sure about. Generally, you would not attempt to prototype the whole system, just a portion of the experience or the technology that you have the most questions about or that seems the riskiest.
![]() Mindshift
Mindshift
A good prototype looks like a patchwork quilt. The implication of building rapid, disposable, focused prototypes is that your prototypes, especially early ones, will most likely not be visually or architecturally beautiful. They will look more like a patchwork quilt, a mix of formats, styles, and materials, possibly forged from a variety of different tools, that quickly stitches together just enough of the ideas to make sense. A prototype is a rough approximation for the purpose of getting feedback, nothing more. Nor will your prototypes feel complete. They will usually zoom in on a few aspects or threads of the solution, not the entire system. They will probably completely ignore error conditions and edge cases. The perfectionist in you may rebel at the idea of producing work that looks so blatantly unfinished, but this is usually the right tradeoff because for now you are focused on speed, on getting feedback so that you can correct your course to maximize efficiency and minimize wasted effort.
Lean Startup offers another term for what makes a good prototype: minimum viable product, often abbreviated MVP. Agile development also has names for this idea: minimum marketable feature (MMF) or minimum marketable product (MMP). Whatever you call it, the underlying idea of an MVP, MMF, or MMP is the same—what is the smallest thing you can put together most quickly that is sufficient for learning whether customers find it valuable. Sometimes an MVP will be a mockup or prototype, but it can also be a live, functional service with an absolute minimum feature set, intended to prove whether actual customer demand is strong enough to make pursuing that direction any further worthwhile. One clever idea proposed by Eric Ries is to create a faked-up homepage for an offering that hasn’t been built yet, just to see how many people click the Buy button. He also suggests that an MVP could be a concierge service that manually provides a new service to a handful of customers but could be scaled out to serve a larger number of people if the feedback is positive. Some good arguments can be made to suggest that the Apple iPhone was originally built as an MVP, with only enough features to test whether this new paradigm for a smartphone with a touchscreen instead of a keypad was actually workable and valuable for customers.6
SFE in action: But we don’t have time for a prototype!
Mike Pietraszak, Adjunct Instructor, DigiPen Institute of Technology
I teach a game design and production class to freshmen at DigiPen Institute of Technology. The students, many of whom have never written code, work in teams of three over 10 weeks to design and build their own game using C++. Students start the semester overflowing with feature and gameplay ideas (“Let’s have zombie aliens! With missiles for eyeballs! And laser swords! And . . .”). But the whole point of a game is “fun,” not features. Games that are feature-rich but also tedious or frustrating are not successful. So how do you “make fun”? You get feedback.
Department chair Doug Schilling and computer science instructor Elie Abi-Chahine came up with a great way to introduce fast feedback cycles to students. During a lab session in the first few weeks of the semester, the three-person teams are given a game engine and are instructed to code a working game prototype in 45 minutes (!!!)—including placeholder art (sound is optional). When time is up, students demo their game to the rest of the class, which provides verbal feedback. Many teams are unable to produce a complete “game,” but no team has ever wound up without anything to demo.
Completing a feedback iteration in less than one hour is powerful. Students quickly learn a lot about what others find fun in their games—and it’s often not even remotely what they expected. Placeholder art and sound—or even coding errors—that embarrass a game’s creatorsoften wind up being features that players love most. One military-strategy game substituted a jaguar roar for an explosion sound as a placeholder. People loved it! The positive feedback was so enthusiastic that the jaguar stayed in the final game, becoming its unexpected mascot.
Creating a time box for students forced severe scoping. The scoped prototypes, even though they had few features, were able to be coded very quickly and stimulated valuable customer feedback. After students have this initial experience, the value of customer feedback becomes clear. In addition to receiving feedback every three weeks during milestone reviews, many teams seek out more frequent, informal feedback from friends throughout the semester.
Go from low fidelity to high fidelity
Generally speaking, you should focus your first few iterations of the Fast Feedback Cycle on big-picture ideas and gradually work your way toward details as plans solidify. This usually means starting with lower-fidelity approaches, such as paper prototypes, and working your way up to higher-fidelity prototypes, such as detailed wireframes or coded prototypes, until you’re sure enough of your approach that it’s time to shift to writing production code.
![]() Vocab
Vocab
Low-fidelity, or lo-fi, prototyping shows just enough detail to communicate big ideas or concepts and get directional feedback. Lo-fi prototyping is characterized by very rapid iterations using low-tech tools (paper, whiteboard, sticky notes).
High-fidelity, or hi-fi, prototyping shows lots of details with the intent of testing some portion of a more complete, more polished solution. Hi-fi prototypes are characterized by having some level of implemented functionality or a lot of visual detail, especially animations, sounds, and other design elements that are important to an interface. These prototypes are usually created by using more sophisticated tools and programming languages.
Many people think about lo-fi and hi-fi prototypes as a binary decision—you create one or the other. In reality, a broad spectrum spans very lo-fi prototypes (such as a paper prototype drawn using fat markers) to very hi-fi prototypes (a code prototype that mimics a fully functional application). Many of the most broadly useful prototypes fall somewhere in between, and in practice you will use a variety of prototyping techniques along this spectrum.
The choice of tools is not a binary decision either. A single tool can support a range of lo-fi and hi-fi prototypes along the spectrum. For example, depending on how much work you put into it, a PowerPoint prototype can be very rough or extremely detailed, with a branching click-through sequence. The tool you use doesn’t completely define the fidelity of your prototype. The questions you want to test should define the level of detail your prototype implements. Many tools, while they have a sweet spot, also have the ability to span different levels of fidelity.
Where do I focus my experiments?
So where do you begin? Especially at the start of a project, with so many ideas and hypotheses, how do you know where to turn your attention first? Do you test the end-to-end experience, the underlying technology, or the business model itself?
In general, you should prioritize by deciding which areas represent the most risk. Is there risk in your business model or do you already have evidence that customers will pay for what you are building? Is the deeper risk about your technology? Can you actually build your solution and make it scale? Or is the risk centered on the end-to-end customer experience? Will customers use it and love it? Quite possibly your biggest risk will be finding the right combination of these—can you build the technology that creates an experience that will delight customers and that they’re willing to buy? You will likely have questions about and experiment in all three domains—the business model, the technical architecture and implementation, and the end-to-end customer experience. And the good news is that you can usually do these experiments in parallel.
The focus of your experiments will change depending on where you are in your project. You should let your highest-priority questions and concerns guide you. The answers to some questions will greatly affect the next round of design decisions, and these questions must be answered before you can move on. Early in a project, in your first round of testing rough prototypes with customers, your mindset shouldn’t be so much on refining specific design ideas for your solution but on verifying your understanding of your customers’ needs. As we’ve said before, the most meaningful result from the first round of prototyping and user testing may be the realization that the problem you are attempting to solve isn’t really that important or that one seemingly minor aspect of your proposed solution is much more valuable to your customer than you realized.
Next, you need to make some informed decisions about the basic shape of the solution you envision, which gives rise to a different set of questions to explore and also impacts (and is impacted by) decisions about which technologies to use. At the end, your questions are much more detail-oriented, aimed at fine-tuning specific aspects of your solution to get it just right.
We break up a project into three major phases: the needs phase, which encompasses the early iterations of a project; the solution tradeoffs phase, which is the main work of the middle of the project; and the details phase at the endgame of a project. The following sections offer some sample questions that you might ask in each of these major phases and give you an idea of how your focus will shift over time. You will have business questions, technology questions, and user-experience questions that can be answered through testing noncode prototypes at first and then, when you are ready, with production code. Often you can answer several types of questions at one time. It is ideal to iterate not just on the user experience, but on your business and technology plans in parallel. Depending on the scope of your project, you might rocket from early stages to the endgame in just a few weeks, or, for larger projects, you might spend weeks or even months iterating to answer each set of questions.
The needs phase
Early in a new project, during the first couple of iterations, you are probably working with noncode prototypes or very rough code prototypes and are testing concepts and developing your initial ideas. You haven’t figured out the details yet, nor are you trying to. Rather, your focus is on making sure that you’re in the right neighborhood for solving a problem the customer cares about, in a way that you can monetize and with technology that is feasible to build. If you remember the mountain peaks we described in Chapter 7, you’re looking for the foothills of a solution that appears to lead to a global maximum.
These are the sorts of questions you should explore with your first prototypes:
![]() Experience Does the basic idea make sense to customers? Do they find it valuable and useful? Does some aspect of it excite them, does it validate that you’re on the path to achieving deep desirability? Does your framing of the problem accurately describe its most important aspects to your customers?
Experience Does the basic idea make sense to customers? Do they find it valuable and useful? Does some aspect of it excite them, does it validate that you’re on the path to achieving deep desirability? Does your framing of the problem accurately describe its most important aspects to your customers?
![]() Business Would customers be willing to pay for this functionality directly, or engage with advertisements, or do whatever you plan for monetizing the solution? Will each part of the ecosystem find enough value to play its part to make the approach successful? Can you secure contracts with key partners?
Business Would customers be willing to pay for this functionality directly, or engage with advertisements, or do whatever you plan for monetizing the solution? Will each part of the ecosystem find enough value to play its part to make the approach successful? Can you secure contracts with key partners?
![]() Technology Is this rough plan feasible to build within a reasonable amount of time? What resources will this take to complete? Are there technology boundaries that limit what you can achieve in the user experience? What are the hardest technical challenges you will need to overcome?
Technology Is this rough plan feasible to build within a reasonable amount of time? What resources will this take to complete? Are there technology boundaries that limit what you can achieve in the user experience? What are the hardest technical challenges you will need to overcome?
The solution-tradeoffs phase
After the early stages of a project, once you have narrowed in on the right path for the customer experience, business, and technology, you need to work through all the interactions. At this point you focus on getting the high-level flow right and on ensuring that the solution matches the users’ expectations and mental model. Most of the time people think of testing customer interactions with the system in an end-to-end manner. Don’t forget that your solution likely has other interactions as well, such as how the different technical components interact and how the partner ecosystem functions. Be sure that those interactions are meeting your goals as well. You may also start working through the visual and aesthetic design of your interface at this point, but be sure that your basic solution approach is working for customers first before you start working on refining visuals or optimizing performance. If you haven’t already started writing code, you definitely will during this phase.
This phase is where you do the activities that most engineers associate with design and development work, and they are vitally important, but it’s a mistake to start a project with these activities and inadvertently skip the needs phase. Be sure you have answered the questions above before moving into detailed design work—lest you end up spending a lot of time solving the wrong problem or on a dead-end solution path.
Here are the kinds of questions you might ask midgame:
![]() Experience Is the end-to-end experience compelling? Can users navigate the flow of the experience? Is it usable? Do users understand where to click, how to interact with the UI, what steps to take to complete their goal? Is the API platform easy to use for developers? Do the target customers find the experience desirable?
Experience Is the end-to-end experience compelling? Can users navigate the flow of the experience? Is it usable? Do users understand where to click, how to interact with the UI, what steps to take to complete their goal? Is the API platform easy to use for developers? Do the target customers find the experience desirable?
![]() Business Is the solution meaningfully differentiated from your competition? Are there lighthouse moments that will enable strong marketing messages? Does the detailed business model meet the needs of all partners? Are you getting the carryover you expected from your chosen target customer into adjacent segments?
Business Is the solution meaningfully differentiated from your competition? Are there lighthouse moments that will enable strong marketing messages? Does the detailed business model meet the needs of all partners? Are you getting the carryover you expected from your chosen target customer into adjacent segments?
![]() Technology Is the technical solution scalable, performant, and secure enough to support the delightful end-to-end experience you are striving for? Have you solved the hardest algorithms and do they work as well as they need to?
Technology Is the technical solution scalable, performant, and secure enough to support the delightful end-to-end experience you are striving for? Have you solved the hardest algorithms and do they work as well as they need to?
The details phase
During the project’s endgame, your solution is now refined enough for you to focus on the small details, fine-tuning various aspects of the solution so that it is polished and has high quality. Here are the kinds of questions you should be asking now:
![]() Experience Have you achieved deep desirability? Is the user experience smooth, fast, and fluid? When someone is using the product, do they get tripped up anywhere? Are there annoyances you can fix? Are there places you can further optimize for the most common user tasks and situations? Is the end result visually beautiful in your customers’ eyes?
Experience Have you achieved deep desirability? Is the user experience smooth, fast, and fluid? When someone is using the product, do they get tripped up anywhere? Are there annoyances you can fix? Are there places you can further optimize for the most common user tasks and situations? Is the end result visually beautiful in your customers’ eyes?
![]() Business Exactly how much should you charge for a monthly subscription? Are there tweaks you can make in the user experience that make a customer more likely to go through with a purchase? Would an incentive help? Are your partners fully aligned and ready to launch?
Business Exactly how much should you charge for a monthly subscription? Are there tweaks you can make in the user experience that make a customer more likely to go through with a purchase? Would an incentive help? Are your partners fully aligned and ready to launch?
![]() Technology Are there ways to optimize the performance or scalability or to improve maintainability or operability?
Technology Are there ways to optimize the performance or scalability or to improve maintainability or operability?
I don’t have a GUI, why prototype?
Don’t be fooled into thinking that prototyping is always about visual experiences and user interfaces. It’s easiest to imagine what a prototype might look like in those domains because they are inherently visual. However, prototyping can be just as useful when you are responsible for deeply technical work that may have no user interface at all, such as building architectural or platform components, an API, or a new compiler. You might think of DLLs, APIs, and compilers as not having a user interface. Of course, they actually do, but they just aren’t graphical interfaces.
Technical component design can also benefit from the ideas entailed in the Fast Feedback Cycle—know your customer (who is probably a developer, and may even be a teammate); articulate the end-to-end scenario you’re trying to solve; explore ideas and visualize multiple approaches; try out several potential approaches in a lightweight, rapid way; get feedback from your customer on your ideas before you commit to a plan; keep iterating. As we discussed in the last chapter, many seasoned software architects intuitively do many of these things already.
More importantly, don’t forget that most, if not all, deep technical work does meaningfully affect how your customers experience your solution. The engineering team should be very much aware of this value and how and when it plays out for the user, business, or ecosystem. If the system relies on transactions with a remote back-end database, for instance, that inherent latency can easily impact the user experience, making the system seem slow to respond. An algorithm that optimizes for minimum memory footprint rather than performance might have a similar affect. However, if the planned user experience requires lengthy customer input at that stage, it may not matter, and optimizing for memory footprint and not latency may well be the best tradeoff—but this should be an intentional decision and not a lucky near miss. Or if your cloud system does not support in-place deployments (and rollbacks, if needed), frequent maintenance outages will inevitably impact the customer experience, as well as your business relationship with partners. Is this the right tradeoff, or should you invest in improving your operations system? Good architecture and technical design is needed not just for the technology to work from an engineering and operations perspective, but also for the end-to-end user experience to be smooth, and ultimately to support your business plan.
Consider the following story about a team that built a compelling user experience and wrote a ton of complicated code in doing so, but only exposed two words to their end users, who were actually fellow software developers.
SFE in action: Prototyping parallel computing
Ed Essey, Senior Program Manager, Microsoft Developer Division
Parallel computing techniques have historically been very challenging for most developers. Our research showed that even the 5 percent of developers who were comfortable writing programs using parallel constructs still considered parallel computing to be a time-consuming, error-prone programming paradigm fraught with subtle perils. As a senior program manager in the Parallel Computing Platform, I was part of a group tasked with creating the programming experiences that would enable developers to more easily access the power of parallelism and concurrency on Microsoft’s platforms.
My team sought to make an easy, error-free programming model that could leverage the parallel capabilities of the multicore CPUs that were rapidly becoming status quo in the PC industry. Our goal was to provide a model with which developers no longer needed to create any threads, tasks, locks, semaphores, monitors, critical sections, or anything like that in their own code. This would all happen under the covers. We thought this would be a total win for developers, and that they would love it. With the key technical decisions made, we were ready to build and test the first prototype of our framework, called PLINQ.
In our very first prototype, we just wanted to test the PLINQ engine—did it work and would people use it? We didn’t yet have a design for a programming model to access the functionality, but we released an early code prototype of the PLINQ engine to a small set of our best and most skilled customers to try out. We received a ton of positive feedback; customers loved it and told us that PLINQ was exciting and powerful. Word got out in the developer community, and PLINQ quickly received a lot of attention. Now we needed to figure out exactly how it was going to be exposed to the developer.
We wanted to enable a programming model as simple as this:
var query = from num in nums.AsParallel()
where someExpensiveOperation(num) == true
select num;
“Just add AsParallel” became a rallying cry for the team. It summed up the value proposition we created and became a mantra that the team would use to guide our decisions.
But sticking to this simple mantra meant that we had to do a lot of work. It opened up questions like “Do we parallelize if the left data source is marked AsParallel? The right data source? Both? Or is AsParallel about the query instead of the data?” These were complex design questions, and it was really the iterations with customers that helped us hone the answers. Eventually, we were able to take care of all the complicated stuff regarding parallelizing algorithms and primitives. We would partition, merge, divide and conquer, handle locality, handle thread scheduling—all of that. We could handle various types of hardware and manage resources across various loads on the system. The developer no longer had to worry about any of that tedious and demanding code.
But the next set of customer feedback surfaced a problem. It was now possible to achieve 4 times, 16 times, or greater speedups with just a simple function call, but there was a catch. That simple function call also made it possible to introduce the most insidious of all code defects: race conditions, deadlocks, and other intermittent run-time errors. At this point, we learned that we had a new target customer, a group far outside the 5 percent who had traditionally used parallelism, and they were now stumbling into a world of hurt. We had big decisions to make in terms of our user scenarios, the amount of safety we would provide, and so on.
We tried several different approaches. For one prototype we focused on our original audience of skilled developers by adding more imperative steps to the declarative model, making it harder to turn on PLINQ unless the developer knew it would be safe to parallelize. We backed off from the “Just add AsParallel” vision and tested it with a small, close circle of advanced developers. Customers were not happy, and the backlash was strong.
We then proposed a number of alternative designs, and eventually widened our brainstorming and prototyping with others outside our team. This larger group quickly grokked our situation, and being untainted by the deep knowledge we had of our users, came up with a very elegant solution. Their idea returned to the “Just add AsParallel” plan, but also included a safety check. Under the covers the code would analyze the safety of the query first and only parallelize if it was absolutely safe to do so; otherwise, it would run the sequential version. This was a deep mental shift for us parallel-computing folks—to optimize for absolute safety instead of trying to run as parallel as much of the time as possible.
This new approach tested really well with users and could be seamlessly extended in future releases to add in new common query shapes we learned about through user feedback and telemetry that we could guarantee to be safe to parallelize. By the end of the project, we had solved many mainline scenarios for our customers in a very simple and delightful way, by adding only one visible function call that was guaranteed to be safe, and would seamlessly improve code performance. The final design looked like this:
var query = Parallel.Foreach(nums, num => someExpensiveOperation(num))
After we shipped this last iteration, we rarely received unsolicited user feedback on PLINQ again. This was worrisome, until we analyzed our telemetry and marketing data. The data showed that this was the most common form of parallelism in the market, and that users understood it without the need for support. There are many wrong turns we might have made, but the ultimate success of this model came about through constant prototyping and iteration with our customers and partners.
When to transition from prototypes to production code
A question that comes up a lot is how do you know when you’ve done enough prototyping and it’s time to start writing production code? Closely related is the question of whether you should really always throw away your prototype code, or can you successfully iterate your prototype into production-quality code?
While the predominant view of prototyping is that you build with the intention of throwing the prototype away, it doesn’t always need to be that way. However, there are some important tradeoffs to be aware of. Planning to throw away a prototype does allow you to write code a lot faster, without having to worry about long-term architectural implications, performance, scale, operability, security, localization, or any of the long list of requirements that need to be satisfied for production-quality code. So there are definitely potential efficiency benefits to intentionally writing throw-away prototype code, especially if you are still exploring several different approaches in an early iteration.
However, sometimes it makes sense to begin a project with the intent of iterating on production code from the very beginning. Perhaps the technical architecture is already defined and unchangeable (a platform you inherited or purchased), or the changes you intend to make are so surgical that it’s just as easy to code them in production as not. Regardless of how much time you spend prototyping, at some point you have to make the decision to transition to writing production code. How do you decide when is the right time to make that transition? Here are the key factors to consider in this decision.
Where are you in the project?
How much have you learned about your target customers and their reactions to your plans and early designs? Early on you will have broad-based questions, and you’ll want to get them answered quickly. At the early stages of a project, you usually stick to noncode prototypes; however, perhaps you have a solution that really needs code to explore it, even at the high level. Either way, the idea is to use the fastest techniques possible for getting your broad questions answered, and when writing code, faster almost always means throw away—focus on the rough idea of the concept you want to test, not on the quality of the prototype.
As a general rule, however, after you have experimented with several prototypes, your solution is converging, and your big questions about the business, technology, and end-to-end experience have been answered, that’s the time to start serious development and begin iterating on production code. Once production coding begins, you will still iterate and get regular feedback from customers, so the Fast Feedback Cycle keeps going, but you will be feeding changes directly into your production code.
As the project progresses, new problems and issues may arise that you haven’t anticipated. At times throughout the project, it may make sense for you to answer some questions by forking off small prototyping efforts (using throw-away code), trying out a few approaches and getting feedback before adding a production-code task to the backlog. Prototyping work tends to happen on a sliding scale, where noncode prototypes and throw-away code are heavily weighted toward the beginning of the project, and smaller, tactical prototypes, or “investigations” with possible production code, are more heavily weighted toward the end.
What is the nature of the problem you are trying to solve?
Is the biggest challenge in your project fundamentally about designing an architecture or algorithm that will be the basis of your solution? Or do you need to investigate the relative merits of different components, platforms, or tool sets before choosing a technology approach to move forward with? Is it critical to work with a live customer data set (such as an email inbox or an actual stockpile of digital photos) to get valid customer feedback on your approach? Is the nature of the interaction so complex that customers really need to have it functioning for it to make sense? Does the interface rely heavily on animations or a particularly novel user interface? Those are all cases where you will probably want to start prototyping with code, and perhaps even write production code, earlier than usual, possibly within your first few iterations of the Fast Feedback Cycle.
However, when your project is more focused on designing a flow through a multistep process, and you’re not quite sure which order of the steps will be optimal, you probably want to stick to noncode prototypes. Or perhaps you are working through the business implications of a particular end-to-end solution. For instance, you want to know whether a customer can smoothly make a purchase, whether a customer notices (but is not aggravated by) your advertising, or whether a customer is compelled to pay for your service to begin with. Perhaps this experience will flow across not just your software but through a partner’s software as well. These are situations in which you will likely get tremendous value from using noncode prototyping approaches to quickly iterate multiple ideas. These rapid prototypes let you assess whether customers find your approach useful, usable, and desirable, and whether your proposed business model is going to work, before you take on the expense of code and integrating with a partner’s system.
Of course, rarely are projects so straightforward that this is an either/or decision. Most likely you will have portions of your project that you can prototype productively without code, very rapidly and with extremely tight iterations. Other parts of your project may require that you use code sooner, with that work happening in parallel with your other efforts. Again, let the nature of the question you are trying to answer drive the approach you take.
Which skills or tools are your team members most comfortable with?
How comfortable or fluent a team is with a particular language or set of tools can also be a factor in deciding which prototyping tools to use. It would be a mistake for us to blindly tell a team what tools or prototyping methods to use because we think they are faster. If the goal is to get feedback quickly, individuals and teams should pick the tools that they’re skilled with and that are well suited to their project in order to get feedback most efficiently. Paper prototyping may be faster, or using a high-level wireframe tool may be faster, or coding in an object-oriented language may be faster . . . or not. It depends on the skills of the team as well as the nature of the problems the team is trying to solve.
Think of an experienced designer who is fluent and practiced in HTML. It may be faster for that person to prototype a webpage by writing HTML than by using some web mockup tool. As long as the details don’t get in the way, why not use the same platform from the get-go to iterate with customers and the rest of the development team?
However, you need to consider the skill set of both the people building the prototype and whoever on the team is asked to help iterate the prototype. The reason is that allowing everyone to edit the prototype directly is an extremely effective way to collaborate and get feedback from peers. In this way, team members can demonstrate their thoughts and any alternative ideas they have. If the prototype is built using a highly technical tool by a single whiz on the team, you may lose an avenue for team collaboration because no one else can contribute to, extend, or edit that prototype.
This is one of the arguments for using rapid, noncode prototyping approaches as long as you can, because they often create a more accessible playing field on which the larger team can collaborate, including marketing, planning, and management personnel. Many teams have told us that using PowerPoint to create early-stage wireframe prototypes has been transformative because it is a tool that is rich enough to satisfy expert designers but simple enough that everyone on the team can meaningfully participate in the hands-on prototyping process by creating and editing the same prototypes that the designers produced.
Most teams have relatively little background in using noncode prototyping approaches, so the initial startup cost can make them hesitant to use these approaches the first time. Although you do need to invest in learning techniques and tools to productively use paper prototyping, PowerPoint, and other lightweight prototyping tools, we’ve found that most of them are easy to learn and well worth the investment. More importantly, the efficiency gains are tremendous—once you can produce credible, testable prototypes in hours, rather than in days, weeks, or longer.
Throw away code or production?
In both cases, dangers lurk. The danger in prototyping with production code is that you might lose sight of the original goal of the prototype, which is to quickly answer a question to inform your decision making. If you write production code, it’s highly likely that you will overengineer the prototype and end up writing a lot more code than you need to get the feedback you desire. It’s a balance. Perhaps it’s worth taking more time so that you have good enough code for reuse. But what if the feedback is negative? What if customers reject the ideas in your prototype? What if your prototype proves that this approach is impractical from an engineering perspective? All that extra time making sure the code is reusable has been wasted.
Perhaps more importantly, when you put time and energy into the craft of quality coding, tunnel vision is close by. The more time you spend caring about the code you write, the more difficult it will be to hear customer feedback or feedback from your fellow developers that your solution is junk.7 There is a danger that you will go deeper and deeper into the tunnel emotionally, and it will be harder and harder for you to throw out your expensive investment and look for a better solution.
On the other hand, let’s say you decide to quickly write lots of throw-away code and test different ideas with customers. You do this a bunch of times with rapid iterations, and your throw-away prototype looks better and better and is getting fantastic feedback from customers. Now you demo your awesome, somewhat-functional, throw-away prototype to management and they say . . . drum roll please . . .
“We love it! Customers love it! You are an amazing team! Now ship it in production immediately, full steam ahead!”
Yikes! What do you do? Thus, the danger of building great-looking, working prototypes with throw-away code. Everybody falls in love with it, including you, and you want to get it out to customers as soon as you can. With a bad case of group amnesia setting in, you forget about the shortcuts you’ve taken in the implementation, everything from security and memory footprint to operability and long-term maintainability. You risk taking on a huge coding debt for the next version, if you are lucky enough that the solution survives that long.
![]() Tip
Tip
If you choose to write throw-away code or build noncode prototypes, be sure they don’t look finished so that casual observers don’t get the wrong impression about how close you are to shipping. One way to do this is to use fonts that mimic a person’s handwriting. Also, consider using hand-drawn sketches instead of dropping in actual UI controls or graphics. Show line-drawing wireframes rather than pixel-perfect renditions of a user interface. You might also add a watermark in the background that specifically says “PROTOTYPE” or “DRAFT.” Many prototyping tools use these techniques by default for exactly this reason.
Remember that the point of prototyping, regardless of your intention for the future of the codebase, is to learn something—to answer a question that moves your project forward with the minimum amount of sunk cost. You need to find a balance between noncode prototypes, prototyping with throw-away code, and writing production code that makes the most sense for your team and project.
Building code in slices
When time comes to build production code, it’s critical to sequence the work appropriately to get the most out of the Fast Feedback Cycle. The order in which you do your coding and integration will have a significant effect on how well you can continue to validate your work in progress with customers. This affects how quickly you will detect mistakes and, hence, how efficient your overall process is in minimizing wasted effort.
Most pieces of software can be represented by some sort of block diagram, stacked in abstraction layers from the lowest primitives and platforms to the presentation layer, something like the following illustration. It can be tempting to look at a block diagram like this and decide to write the code one component at a time. It can be even more tempting to assign individual developers on the team to “own” each component.
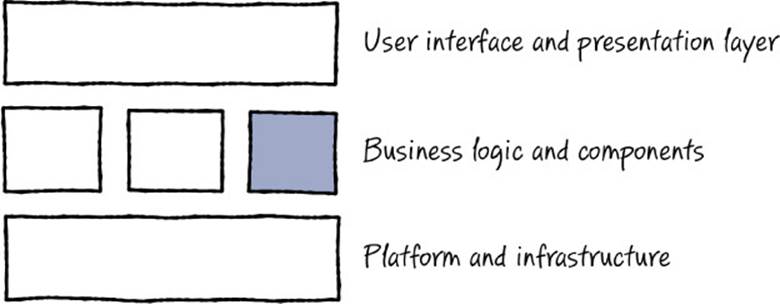
However, this creates a problem. Implementing all the components to a certain level of completeness so that you can see the end-to-end system work can take a lot of time. You carry a lot of risk that your approach (user experience, business, or architectural) has some sort of mistake, which you will not discover until quite late in the project when you first attempt to integrate.
This kind of late integration is well known to be problematic for engineering quality, and engineering teams commonly use continuous integration approaches to try to avoid these problems. It turns out that a late integration approach is bad for user experience quality, too.
Instead, you want to sequence your work and continually integrate so that you see the end-to-end performance characteristics of your code from the start, which allows you to detect architectural problems and integration issues early. Similarly, you want to continue to get customer feedback on a regular basis so that you can verify that you are still squarely solving the right problem, that your solution works for them, and that your monetization plan is on track. Ideally, you should get customer feedback on your work in progress at every iteration of the Fast Feedback Cycle. If you are an Agile team, the end of each sprint is a natural time to do this.
Being able to test with customers throughout coding has profound implications on how you sequence your development work. If you want to test a work in progress with customers, you have to build things in such a way that you will have something to show that makes sense to them. You need to sequence the implementation work so that you have some reasonable increment of working code to show customers—not an internal component or some unintegrated platforms, but functionality that works from a customer’s point of view. To accomplish this, an Agile approach known as “slicing” is a particularly useful construct to think about as you sequence and assign development work.
![]() Vocab
Vocab
Slicing is implementing a single, vertical path through a multilayered system so that you can test the resulting end-to-end experience with a customer right away.
Instead of building one component at a time, sequence your development work so that you build slices through your multilayered stack vertically to create a complete path through an end-to-end experience.8 Your slice may not touch every component, but it needs to make it all the way to the top layer so that it is exposed to the end user. The approach is illustrated in Figure 8-3.
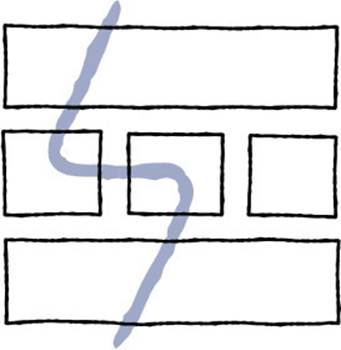
FIGURE 8-3 Building a single slice through a layered architecture.
As you build each slice, test with customers to ensure that what you are building is still resonating and is on track to meet their needs. The first few slices may require stubbing out a particular component temporarily, or faking up a database or server call with dummy data. The first few slices may also be quite simplistic in functionality, such as creating and naming a shopping list but not yet allowing any items to be added to it. Even trivially basic functionality like this is worth testing with customers. It is remarkable how just seeing something semifunctional can trigger customers to mention a requirement or an expectation that had not occurred to them before, or help you realize that this implementation approach is not going to work because of a fundamental limitation of screen size, form factor, or another basic constraint you may have taken for granted.
Over time, as you build more slices and widen existing ones by adding more-complete functionality, error handling, and so on, you naturally fill out the full functionality of each component yet still always have your system in a state where virtually all of the code can be demonstrated and tested with customers early and often. Sequencing your implementation work in this manner not only allows you to get constant customer feedback but also tends to flesh out any architectural issues much sooner because of the earlier integration of components. All of this helps you reduce risk, since you can be continuously verifying your latest work with your customers. We will discuss how slices grow to become complete experiences across multiple iterations in Chapter 11.
Build stage: Tools and techniques
All sorts of tools and techniques are available for developing concepts to get good customer feedback. You can use anything from the extra napkin you’re served on an airplane to writing thousands of lines of compiled code. In this section we present a handful of our favorite tools and techniques for building prototypes. Remember that this is just a short, static list. Many other tools and techniques are available that are not listed here, and new ones are showing up all of the time. And, of course, not all of those we discuss will make sense for every kind of problem; use this list as a reference, and pick the approach that is most suited to your particular situation.
Paper prototyping
A paper prototype is exactly what it sounds like—a prototype that’s built by drawing a user interface on paper. By using various colors and kinds of paper, clear transparencies, sticky notes, pens, markers, scissors, and tape, it’s fairly easy to mock up complete interactions, where a user can make selections and see how the software responds just by shuffling some paper around. Paper prototyping can be extremely efficient and effective for early iterations through the Fast Feedback Cycle, especially for getting feedback on user interface approaches. An example is shown inFigure 8-4.
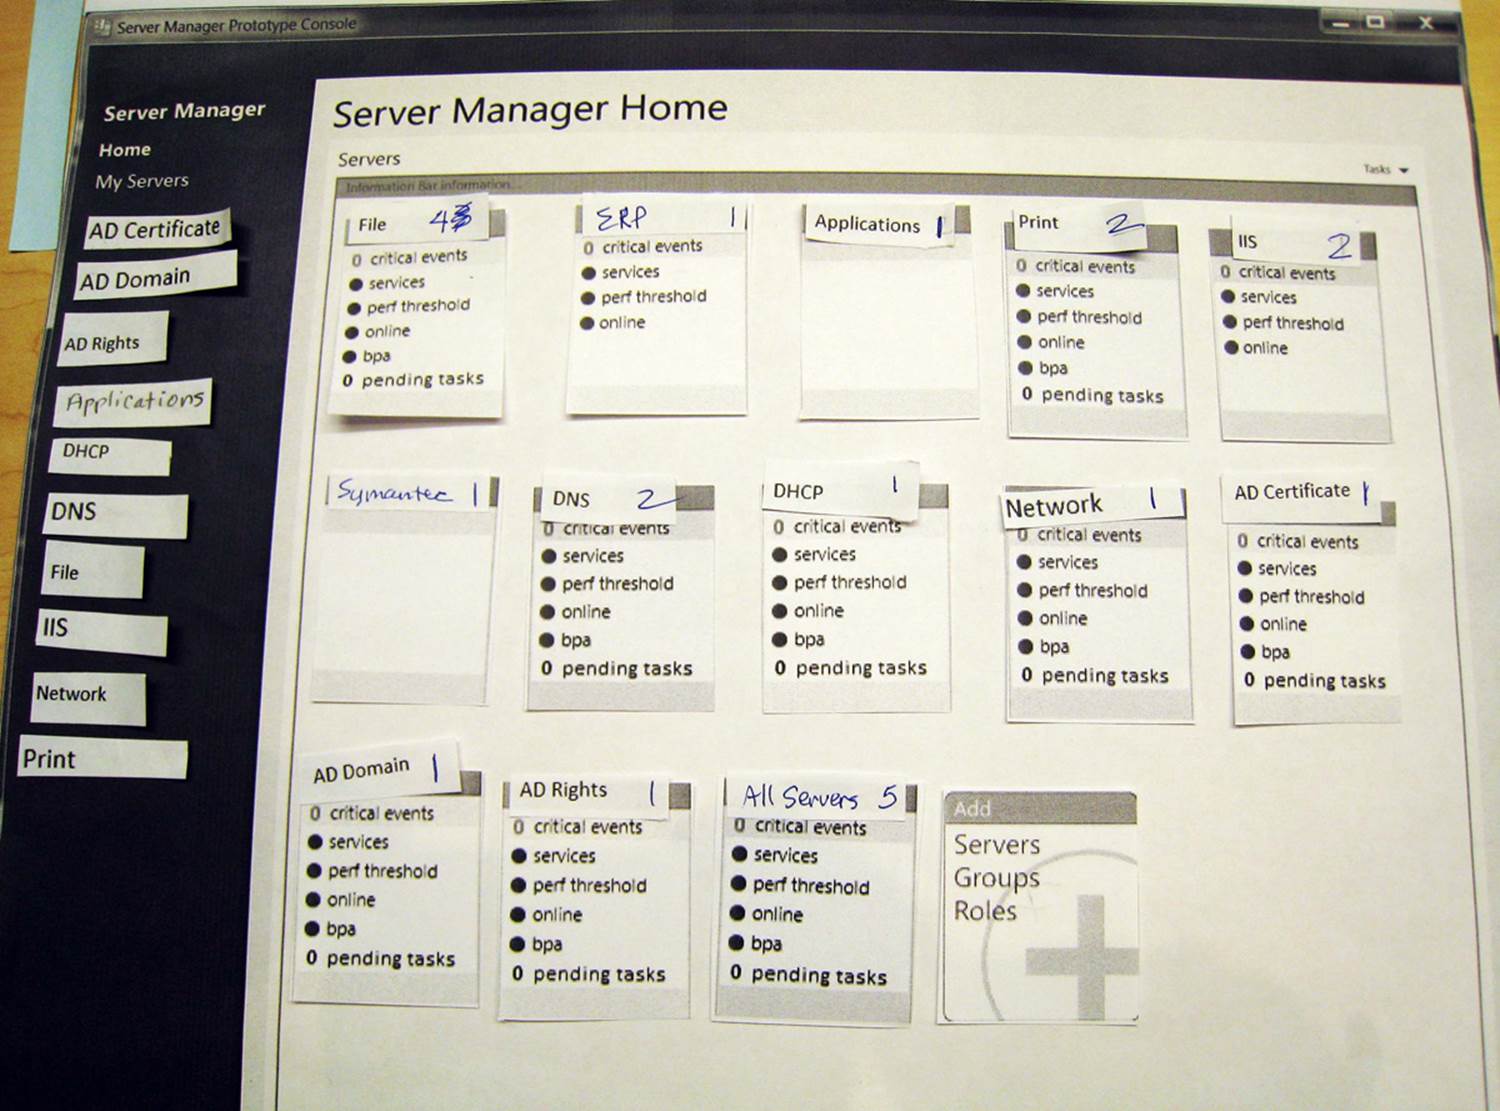
FIGURE 8-4 An example of a paper prototype built to test out early ideas for Windows Server 8.
Don’t underestimate the power of using very simple, low-tech tools like this for getting your ideas and concepts into a form that you can share with customers. You might even be able to change a prototype on the fly as a customer’s feedback sparks new ideas.
We’ll dig into paper prototyping in more detail in the deep dive section at the end of this chapter.
Software for rapid prototyping
If you’re ready to include more detail than you can easily do on paper, or you need to show basic animations or transitions or simply need to share your prototype electronically (rather than in person), consider using a software tool. Various software programs can be used to create prototypes—some that were intended specifically for prototyping and others that just happen to work well for that purpose.
More engineers are recognizing the power of getting early customer feedback every day. It’s not surprising then that the marketplace is reacting, and we are beginning to see more and more prototyping tools and support offered to software developers. Here is a list of our favorites tools, which we’ve seen many teams use quite productively. Plenty of other tools are out there as well.
Microsoft PowerPoint
Most people think of Microsoft PowerPoint as a tool for creating slides and slide shows. However, in the past few years PowerPoint has gained popularity as a tool for creating wireframe mockups of user interfaces; it’s our favorite software tool for this purpose. Search the web, and you will find many downloadable templates containing common elements that you can use to create wireframes for different form factors, including webpages and mobile devices. Microsoft Visual Studio 2012 comes with a particularly rich PowerPoint “storyboarding” add-in that provides a ribbon and a complete library of common controls to use in your PowerPoint prototypes.
The basic idea is to copy and paste common controls from a template or library and then arrange them to mimic a proposed user experience. For instance, copy the blank mobile phone template, and then paste in several buttons and check boxes; add some headings and some text, and voilà, you have something that looks just like a settings screen on a mobile device. Or create a full-screen application like this early iteration of Windows Server 8 shown in Figure 8-5. Notice the Storyboarding tab in the ribbon and the Storyboard Shapes panel on the right, which provides an extensive library of elements and icons as well as starter backgrounds for the Windows desktop, Windows applications, and Windows Phone apps.
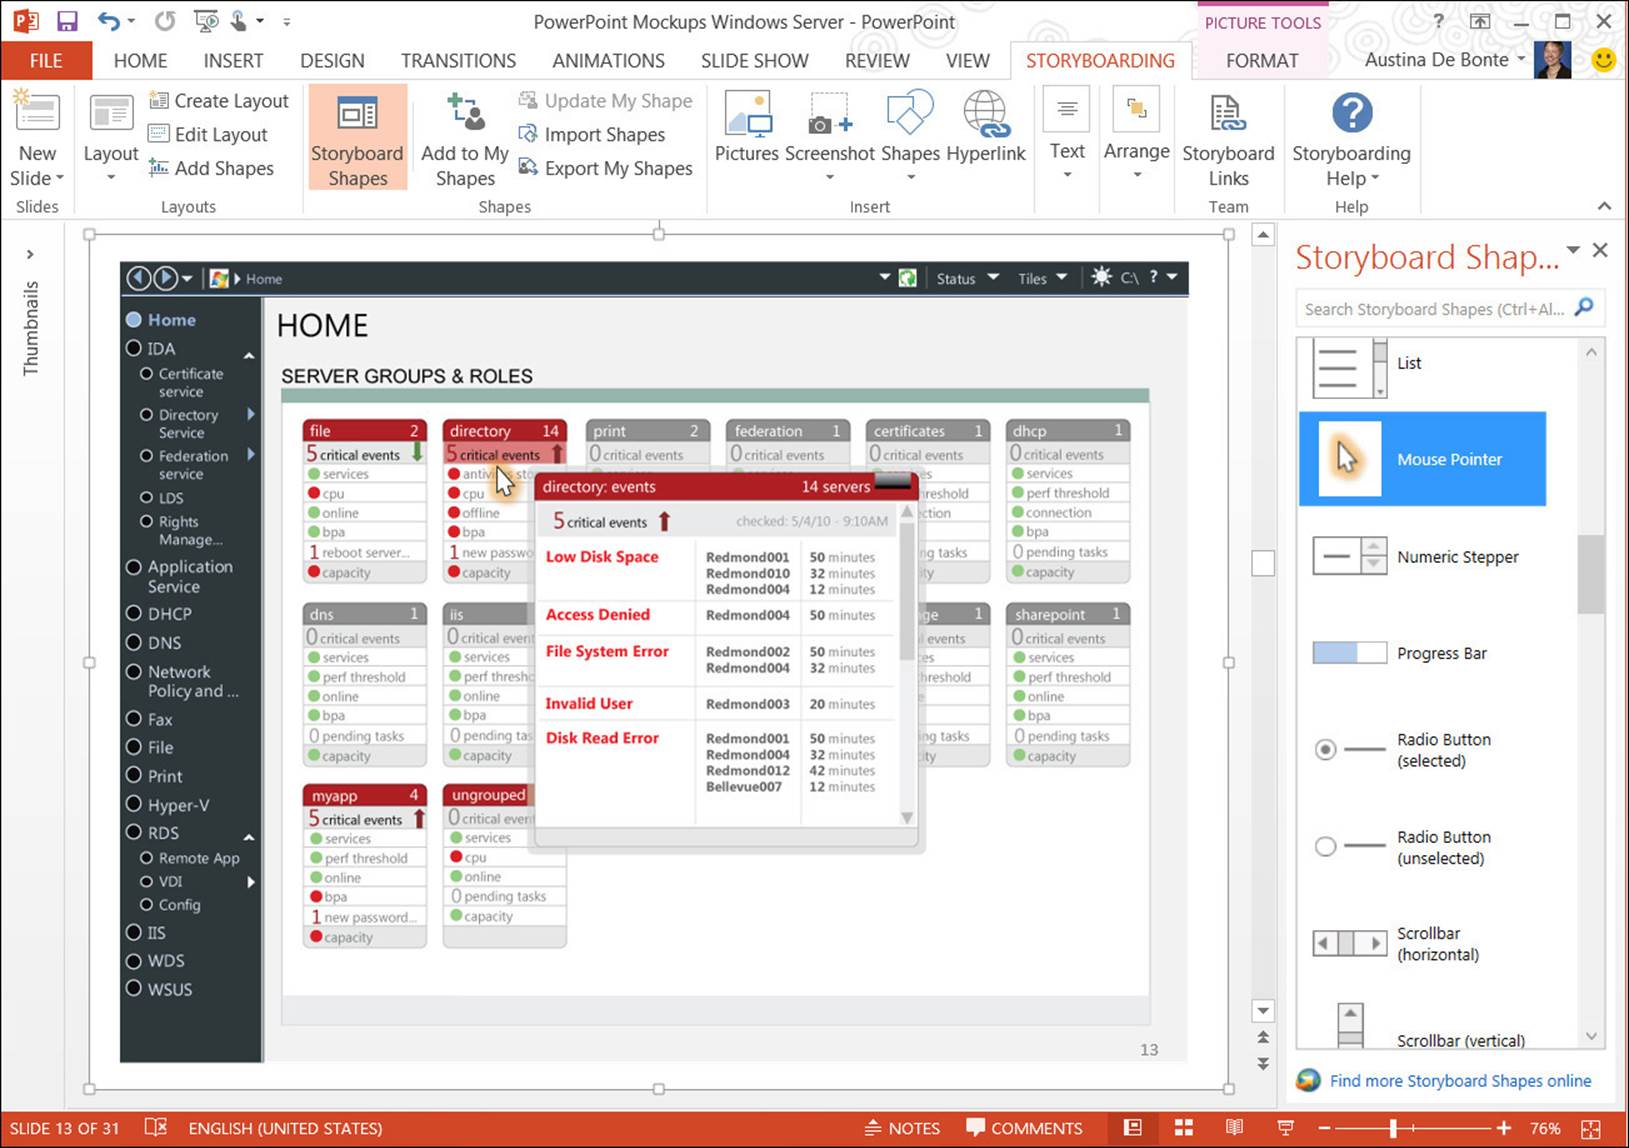
FIGURE 8-5 A detailed prototype of the proposed Windows Server 8 dashboard, built in PowerPoint.
None of the common controls in a PowerPoint prototype actually work functionally, but visually they are close enough to get the idea across. However, PowerPoint also has the ability to turn any element into a clickable hot spot, which makes it possible to simulate simple user interactions by hyperlinking multiple slides. For example, you can make the Close button on a pop-up dialog return you to an earlier slide (thereby “closing” the dialog). To do this, right-click the Close button element and select Hyperlink. In the dialog that appears, shown in Figure 8-6, select Place In This Document, and choose which slide to link to.
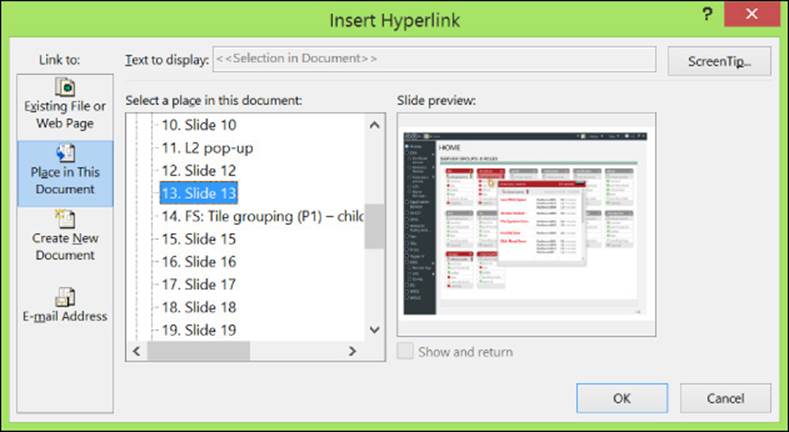
FIGURE 8-6 The Insert Hyperlink dialog box in PowerPoint allows you to create hot spots that link slides to create a click-through prototype.
Once you have linked all your slides together to mock up the interface transitions you are interested in, switch to Slide Show view for a live session in which customers can click items on the screen to explore the prototype. For more complex interactions, PowerPoint also has a full macro scripting language and debugger.
Microsoft Visio
Visio has been around for a long time. It was introduced in the mid-1990s as a diagramming and flow-chart tool. It became very popular for architectural design, with its strong support for UML (unified modeling language) and code generation.
Visio has also become a popular tool for prototyping application user interfaces. Despite the influx of new, innovative prototyping tools in the market, Visio remains one of the most widespread prototyping tools within the design community.9 Visio has a built-in library of common controls, cursors, dialogs, and other primitives that you can use to mock up your application’s interface. You can create simple click-through prototypes by hyperlinking the shapes. For more complex interactions, you can use the Visual Basic programming language that is embedded as part of Visio.
Microsoft Blend for Visual Studio with SketchFlow
SketchFlow is a visual drag-and-drop tool for creating interactive prototypes. It’s housed within the larger Microsoft Blend developer suite and is now part of the Visual Studio 2012 developer tools (in update 2).
Like PowerPoint and Visio, SketchFlow provides a set of reusable common controls that can be used to create many common types of user-interface layouts. However, the controls in SketchFlow are automatically backed by live code and provide basic functionality as soon as you drag them into place. Because SketchFlow resides within Microsoft Blend for Visual Studio, the full programming power of the Windows Presentation Framework (WPF) is available as well, enabling you to create arbitrarily complex prototypes with animation, motion, transitions, data sources, and application logic. (See Figure 8-7.) This means that you can populate a list box with actual data (such as the snowboard boot you want customers to purchase), and remove the item from the list when the user clicks Remove.
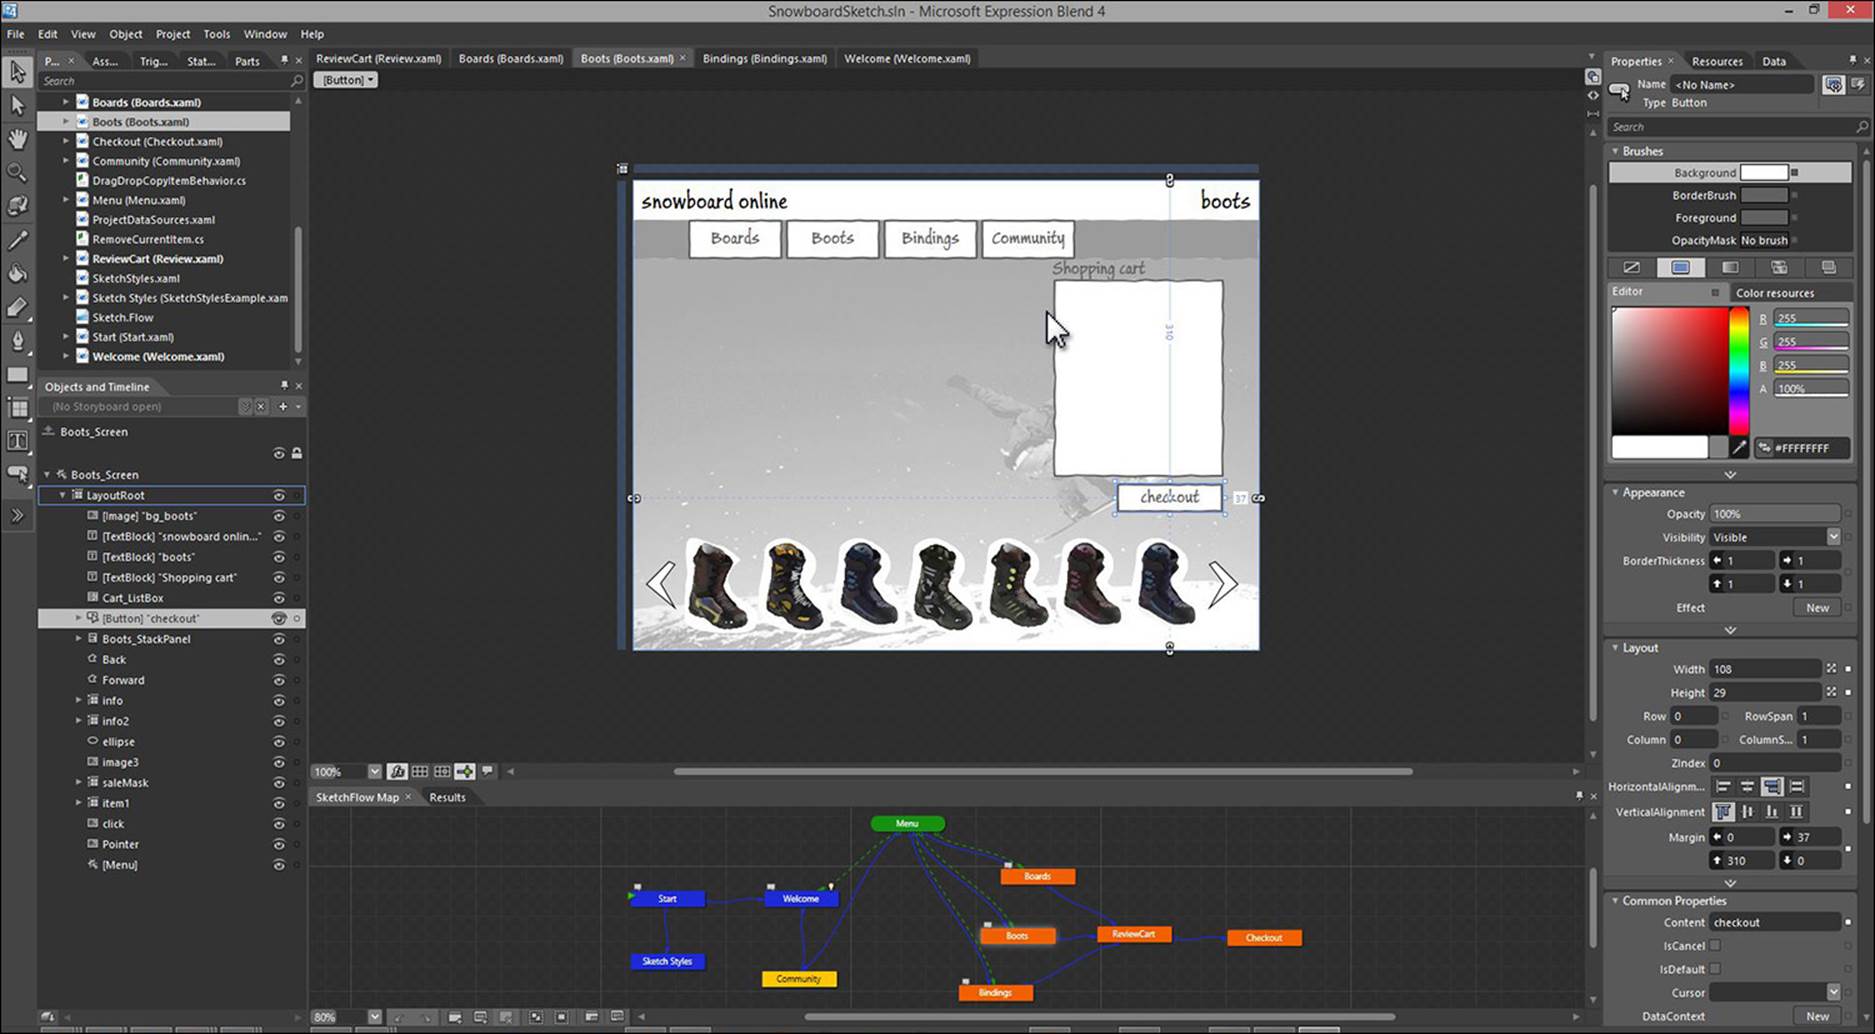
FIGURE 8-7 Interactive prototype in Microsoft SketchFlow of an online shopping app.
One of the nice features of SketchFlow is its use of wiggly lines throughout its wire-framing tool set to help convey that what you’ve created is a prototype and not a finished implementation. Also notice the handwritten font the app uses, Buxton Sketch, which further underscores that impression.10 While learning SketchFlow is not quite as easy as learning PowerPoint or Visio, SketchFlow is dramatically more powerful. Notably, we know teams that have started a project by building lower-fidelity prototypes in SketchFlow; gradually added functionality and detail into that prototype; swapped in production-quality fonts, controls, and graphics; and continued to build production code in the same environment. Especially if you are writing production code for the Windows Presentation Framework, SketchFlow is worth checking out for prototyping.
![]() Mindshift
Mindshift
Meet the devigner. The popularity of using languages such as HTML, CSS, XAML, and WPF has created an opportunity for design teams and engineering teams to work more closely together than ever before. Some design teams are gaining the technical proficiency to mock up proposed UI designs and to be responsible for some of the final production code as well, particularly when a tool set such as Microsoft Blend for Visual Studio helps separate the code from the presentation-layer markup.
People with both the design and tech skills to do this are sometimes called devigners, a combination of developer and designer. This arrangement gives devigners the flexibility to implement design details exactly as they envision them, without the potential for misinterpretation by the development team. Of course, with this responsibility comes many of the same issues development teams have faced over the years. How do you handle fixing and tracking bugs? In early iterations, do you prototype with final product quality or build it to throw away? In later iterations, how much time and energy do you spend to get that last few percentage points of perfection? When hiring a devigner, what skills are required? How are devigners rewarded and compensated with respect to their developer counterparts?
Balsamiq mockups
This tool allows you to build lo-fi wireframes that look and feel like sketches on a whiteboard or on paper, with a charmingly hand-drawn aesthetic—except these sketches are on a computer and provide linking and other quick functionality that allow you to create click-through prototypes with ease. Find it at www.balsamiq.com.
POP (prototyping on paper)
POP is an app for mobile devices that uses your phone’s camera to snap a picture of a user interface you draw on paper and then allows you to link the pictures through hot spots. Very quickly you have an interactive, lo-fi, click-through prototype running on your mobile phone or tablet. You can find it on https://popapp.in/. It is currently available for iPhone, Android, and Windows 8.
Time will tell if this tool becomes popular, but we like it for its simplicity and for the idea of merging two ideas (paper and interactive-wireframe mockups) in a new way. (What a brilliant example of innovating through combining existing ideas, too).
![]() Mindshift
Mindshift
The downside of pixel-perfect visual prototypes. Many designers have spent years learning the ins and outs of tools such as Adobe Photoshop or Adobe Illustrator in order to draw user interfaces whose looks are indistinguishable from the real thing. You can even link UI elements together with active hot spots that trigger changes in a picture (often implemented by hiding and showing layers), which imitates a user clicking through some part of the experience. These pixel-perfect visual prototypes are beautiful to look at, and can show exactly what an interface should look like in minute detail. They can be used to work out some detailed visual elements, such as animated transitions, or to excite a team about a new visual motif for its solution. Exciting visuals can sometimes be just the thing you need to sell an idea to an investor or a partner.
However, these pixel-perfect prototypes are very time-consuming to produce, even for an expert, and require a particular skill set that takes some time to master. Unfortunately, leaders can become very excited about these kinds of prototypes and may not realize how much work goes into making them. This points to a major downside of these types of prototypes—if only a few people on the team know how to make them, and iterating them is difficult and time-consuming, it makes it a lot harder for the larger team to meaningfully collaborate, edit, and consider alternatives as part of the Fast Feedback Cycle. This tends to lock in ideas and cause the team to be less responsive to feedback.
For your first few iterations, you almost always want a lower-fidelity approach so that you can explore a few alternatives more quickly. For later iterations, sometimes there’s a good reason to build a pixel-perfect visual prototype. But our experience is that you often don’t need to bother building a pixel-perfect prototype at all. Once you have explored some ideas in low-fidelity ways and narrowed in on an approach that seems to work, most teams find it more productive to move to code at that point. However, if you need a detailed, pixel-perfect prototype, you’re better off having a professional do it than trying to learn these tools yourself.
Three-dimensional prototypes
If you are seeking to build a device or other three-dimensional object, you can use cardboard, woodblocks, foam, clay, fiberglass, or other physical objects to approximate the size and shape of the object you are imagining. You might also use a 3-D printer to mock up a physical object. By carrying a device-shaped woodblock in your pocket for a few days, you get a feel for whether an extra millimeter of thickness really matters. There’s a famous story about a bunch of designers from IDEO who were consulting with a group of surgeons about a new surgical tool the designers envisioned that would solve a specific problem the surgeons were running into. Rather than trying to draw or describe the idea, the designers grabbed a whiteboard marker and taped it to a black film canister and a clothespin to physically demonstrate how the tool might look.11
Prototyping with skits
If the solution you are trying to prototype is a service, process, or workflow of some sort—a situation that includes a sequence of steps that multiple people need to do across a period of time—sometimes a skit can be a useful prototyping tool. Perhaps you are designing a system for getting three departments in a media business to approve a new article before it is published. Or perhaps you’re imagining a retail kiosk where a customer can plug in her cell phone to create a custom-printed mug, wait for it to be made, and pay for the finished item at a cashier. Or maybe you’re designing a bug-tracking solution that helps developers and testers collaborate to find and fix bugs. Perhaps you are thinking through how customer service calls will work for your new online service. Any of these sorts of problem spaces are conducive to using a skit as your prototyping tool.
Of course, you can also draw flow charts and process diagrams to think through how a process would work. But the benefit of a skit is that by physically walking through a process, you get a more visceral sense of whether that workflow is smooth and feels natural and comfortable to the people involved, especially if there are different actors with different perspectives. By acting out the process, you see more clearly what information is needed at each step and can identify where redundancy or confusion occurs. You might also notice spots with bigger lags in time or processing or where the process might be optimized by reordering the steps or perhaps omitting a step entirely.
Here’s how to do it. Recruit team members to play different roles in the skit or to represent the different steps of your workflow. Use a piece of paper or another token to carry “information” from one step to the next. Build some simple props or UI mockups to model what the customer would see at each step. Place each step in a different location so that customers need to walk from place to place to accomplish their task. But as with any type of prototype, don’t try just one skit. Try reordering the steps or making other changes, and then run through the skit again to see how that affects the end-to-end experience.
Prototyping an idea with skits is a great technique for enabling the team to think through its ideas in real time and space, but it can be even more productive when you bring in a customer to take part in the skit to make sure that the process is smooth and understandable from the customer’s perspective as well.
Prototyping an API
Changing an API after developers have begun to code against it is perhaps one of the most disruptive things you can ever do to those customers. And those customers are your fellow software developers. Have a heart and prototype the end-to-end usage of your API and get feedback before you commit the resources to writing any code and releasing the API to the world. When you think about it, an API is probably the easiest thing in the world to prototype. Do you have Notepad installed on your computer? Here are a couple of techniques you can use to rapidly prototype an API.
Gather around the whiteboard
When you are ready to work out the details of an API, gathering a few team members around a whiteboard can be very productive. You can even invite a few customers who would use the API you’re designing. Write out what the class structure would look like, what the methods would be called, what arguments they would take. Draw sketches of how different classes relate to one another, and which functionality appears where. Consider different alternatives and discuss the pros and cons of each choice.
![]() Mindshift
Mindshift
Don’t let elegance win out over customer needs. Just as with any other customer scenario, you need to keep developers’ needs, desires, and preferences in mind when you’re designing an API for them to use. When prototyping an API, take a minute to remind everyone about the customer scenario. What are customers trying to accomplish? What role does this API play in the larger system? This may be a single scenario (my customer needs to perform analytical data analysis on large data sets), or it may be a laundry list of smaller scenarios (print to a file, sort lists, etc.). Try to adopt that customer’s point of view as you work, and don’t ever forget that the beautiful class design you’re creating is in service to your customer, who is trying to solve a problem or complete a task. All too often, we’ve seen the elegance of the class design take center stage over the customers’ needs, and the result is an API that is elegant on paper but awkward to use in practice.
Write the documentation
An easy but very effective way to prototype an API is to start writing the documentation for it. You can use a simple text editor or word processor to write up the essentials of your API—the object hierarchy, classes, methods, arguments, and so on. Along with that, you can also write some sample code against that API and see how the methods you defined feel in actual use. Ideally, your sample code would demonstrate how your API might be used for the specific customer scenarios you’ve identified.
This prototyping approach is lightweight enough that it’s quite reasonable to write up a few alternative APIs that you can show to customers, ask them to compare the alternatives and comment on the differences, and then adjust and perhaps merge the best ideas based on their feedback.
SFE in action: Using demo.txt
Jeffrey Snover, Distinguished Engineer, Microsoft Windows Server
The PowerShell team uses SFE techniques for command-line interfaces and APIs and considers it critical to our success. Before we used SFE, we had a few experiences where we had developed something that made sense in a functional specification but then failed when we used the feature to accomplish a task. It was too complicated or was missing steps or information. We adopted a technique we called “demo.txt,” which required people to simply write down what the user experience of a feature would be. This technique transformed our development, and the payback was immediate and profound.
A developer or program manager would produce a demo.txt for a feature area. The form of the document was a PowerShell-session transcript file. It had a number of sections. Each section declares what the user is trying to accomplish and then shows what commands a user typed and what the command results were. For example, here’s the sequence of commands that a customer would type to schedule a new job to happen at 3:00 a.m.
# Register the scheduled job (Every day at 3am, wake up the computer)
$trigger = New-JobTrigger -Daily -At 3am
$options = New-ScheduledJobOption -WakeToRun
Register-ScheduledJob -Name SyncAndBuild -Trigger $trigger -ScheduledJobOption $options
-ScriptBlock { cd $enlistmentLocation; sdx sync; .tools\build.cmd }
After writing the document, we would all get in a room and walk through the experience. Writing the demo.txt file forced the author to get out of his head and put himself in the customer’s shoes. That alone improved the design, but it was the peer review that had the largest impact. The most frequent phrases used in those meetings were “Wait, what?” and “How would I . . .?” and “Why do I have to. . .?” and “What happens when . . .?” and “This is going to rock!” Having lots of people walk through the experience fleshed out the different assumptions, mindsets, and approaches and forced us to make sure that we were designing a coherent, complete, and cogent experience. It was a turning point in the project.
The success of the early demo.txt approach for command-line interfaces led us to adopt a similar approach for APIs, where the developer would write sample programs showing how someone would use a proposed API.
It needs to be stressed that thinking through the experience for an API or a command-line interface has to be done before any code is written. We didn’t always do that, and we learned our lesson. For a while, we allowed someone to write the feature and then do a review of the demo.txt afterward. The problem is that once someone writes the code, any feedback means changing the code that already works. People were fine changing things that were really broken, but they resisted making big changes just to improve the user experience. We switched pretty quickly based on that learning and insisted that the review take place prior to any coding so that we could change anything and everything in order to deliver an optimal customer experience.
We did all this years before SFE training was available, so we made it up ourselves and learned from our mistakes. Here are some of the key things we learned in applying these techniques to APIs and command-line interfaces:
1. Start by declaring a target customer persona and skill level.
2. Have individual scenarios for how customers will use the feature area.
a. Declare what they are trying to accomplish and then show what they need to do.
b. Stack rank these scenarios by frequency of usage.
c. Make sure that the things that people do the most require the least effort.
3. Have scenarios for errors and stack rank them by probability.
a. To paraphrase Dostoyevsky, “Errors, like the poor, will be with us always.” The cloud means networks; networks mean failures.
b. The error experience is when customers need our help the most and is a great opportunity to delight them.
4. Design your nouns and group your verbs.
a. Nouns define the conceptual model for your feature. Once someone understands your nouns, he or she should understand your feature. If that isn’t true, chances are that your design needs work.
b. Pick the verbs to perform on those nouns from a well-defined set of verbs grouped by activity (e.g., Data, Life Cycle, Diagnostic, Communications, Security, Common, and Other).
5. Write the actual code that your users would write.
6. Do a peer review of the scenarios and the code the user would write to accomplish them.
a. Pay particular attention to the flow of things that a user has to type and whether the output of one command contains the information necessary for the next step. For PowerShell, we look to ensure that one command can be piped to another to accomplish a task.
b. If you can review it with actual target customers, do so.
7. Adopt an 80/20 approach to complexity.
a. Provide a simple command to deal with 80 percent of the user scenarios and provide an -OPTIONS parameter that takes an object created by another command, which can be as complex as needed to deal with all the corner scenarios.
b. If your high-frequency command can’t be explained with a crayon, consider refactoring it.
The cookbook approach
A clever variant of writing the documentation is the cookbook approach, which is featured in a series of books from O’Reilly Media. The idea is to not just write the documentation for a new API, but to also create a cookbook that shows the new API being used in various ways. With this technique, you create a cookbook that is a collection of recipes (or useful tasks) that demonstrate how the API would be used.
Each recipe contains three ingredients:
![]() Problem A description of the problem being solved.
Problem A description of the problem being solved.
![]() Solution A code example showing how to solve that problem.
Solution A code example showing how to solve that problem.
![]() Discussion Any relevant notes or comments about using the API to solve that problem.
Discussion Any relevant notes or comments about using the API to solve that problem.
Prototyping an API with a cookbook provides several benefits. A cookbook serves as a mechanism for both thinking through how a particular API design would play out in actual use and for getting feedback on your design. Because the cookbook shows the API in various usage scenarios, it’s easier for customers to evaluate on paper. Once coding of the API begins, keep the cookbook up to date, and you’ll be able to use it to test any proposed additions or changes prior to coding the new features.
As you test various proposed cookbooks, you will also learn about new tasks customers want to perform or discover that some of the problems you anticipated as being common aren’t so common. You’ll add, delete, and merge new recipes until your cookbook contains a set of recipes optimized for your customers’ needs. A cookbook can also be a good tool for comparing different APIs. What does a cookbook of similar recipes look like for your competitor platforms or for other APIs in your system?
Finally, by keeping the cookbook’s recipes current as you develop the API, at release time you’ll have a valuable set of documentation and sample code ready-made for your broad set of customers.
Open book, close book
Once you start narrowing in on one or two API designs, you can use a technique we call “open book, close book” to test the design a bit more rigorously with some customers. Have them use the new API, take away the documentation (“close the book”), and then see what parts of the API they remember. This is a fancy way of doing usability testing for APIs that gives you even more information about how customers internalize your proposed API. Here’s how you do it.
Start by writing some code examples that show how to perform the tasks of your API that you want to test with customers. Try to make the examples look just as they would in a development tool, with syntax coloring and other adornments. You can use a text editor, word processor, PowerPoint, whatever—just write out an example of what the actual code should look like. You’ll also need some basic documentation for the API or perhaps even a cookbook if you have one already. The documentation doesn’t have to be complete, just a quick reference with an object hierarchy, header file, and some brief descriptions of the essential classes and methods you want to test.
Invite some customers to review and analyze your API. It’s helpful to have them review the API two at a time—the conversation between the two customers will be extremely helpful because it forces them to vocalize what they are thinking. Ask the first pair into a room, and without giving them any documentation, show them the first code example. Ask them to read the code and tell you what it does. Your job is to listen to them react and encourage them to talk out loud. With a pair of reviewers, one of them is usually more knowledgeable than the other. It’s typical for that person to begin to “teach” the other one how the code example works. Listen very carefully to that conversation because it may provide you with some useful customer insights. After all, that expert customer has not seen the documentation or even the class object model. She’s seen only the snippet of sample code you have provided, and she will project all sorts of ideas onto your API that she believes to be true.
After the pair has analyzed and discussed the code example, give them the documentation along with any code examples they have evaluated so far (paper printouts are fine). You then give them an open-book test and ask them to code a few things using your API. Observe them working and notice how well they do or don’t do. Take note of how they use the documentation, where they went for more help, and what was intuitive and not intuitive to them. If the documentation is light (which is okay, this should be a quick prototype), the facilitator can play the role of the virtual online help system for anything you forgot to write down.
Once they finish with the open-book coding, close the book. Remove the code examples and any documentation. Ask them to code the same set of tasks or a similar set, but this time as a closed-book test. Again, watch them work and notice what they do, this time as they attempt to use this new API from memory.
When concepts in your API map to the customers’ mental model, the customer will remember the API and will be able to recode those sections. But when the customer forgets something, they will code up a mix of what they remember, along with what makes sense to them. They will fill in the gaps with something they made up. It’s important to pay attention to the things they make up because quite often the made-up parts will be an improvement on your original idea and provide a window into what makes the most sense from your customer’s point of view.
Prototyping with code
Writing code is usually the most expensive way to build an idea to test with customers. Because using code is much more resource intensive than other prototyping techniques, if you are going to build a functional prototype using code, be sure you are doing so for a good reason. The classic criteria for building a functional prototype is simple—do it when you want to get feedback on something that can’t be mocked up adequately using less expensive alternatives. Here are some of the common situations where teams have found writing code to be the best way to test out their ideas.
An easy, surgical change
If the idea you want to try is small and easy to code in a few hours or less, by all means just write the code. This usually is the case for minor adjustments to an existing service, for aesthetic tweaks, or for other minor changes to the interface. While you can test code with customers by using all of the usual approaches, these types of changes are often the sort of thing you want to use an A/B test with to see whether a new idea might improve the use of a feature or your ability to monetize your live service. A/B testing allows you to test two variants of your code to see which works better for the system, for the business, or for the customer experience. For instance, you might try two different layouts of your “buy a subscription” page to see which one converts more visitors into buyers.
A/B testing
A/B testing isn’t just for quick-and-easy code changes. If getting live usage data is important for knowing whether an idea will truly work, there is no substitute for A/B testing. This is often the case for aspects of your software that affect monetization or the usage patterns of specific features or services. While the code you write for an A/B test might not need to be fully and completely production quality, it needs to be awfully close if you are going to make it available on your live service without jeopardizing service quality and operability, so there are some additional costs to consider. We’ll discuss A/B testing in more detail in Chapter 9, “Observing customers: Getting feedback.”
Complex interactions
As you iterate through the Fast Feedback Cycle, you will come to the point where your questions become much more specific. At that point you already know what problems you are solving and how you are approaching them. And you may already have begun writing production code toward those goals. But now you are trying out something new that involves a very specific set of interrelated and complex interactions that would be unwieldy to mock up using a high-level tool set.
A simple example is a situation where the exact method of user input, either mouse or touch, makes a big difference in the experience. A solution that tries to perfect the experience of dragging two windows to dock them together would be difficult to prototype adequately without writing code. Dialing in the exact touch motion to initiate a swipe is another example. For these kinds of complex interface interactions, customers can’t give you valid feedback from a paper prototype, so you need functional code for customers to try.
Animation
Sometimes, the details matter. And when it comes to animation, the details are usually important. You might experiment to see whether any higher-level tools can get the job done more quickly, but many times with animation you have to write code, especially if you need to factor in any server latency to the animation’s feel and performance. Do a quick Internet search for “animation prototyping,” and you’ll find some options for quickly prototyping animation (most of them require some level of scripting).
Personal data
Sometimes, to get good feedback, it’s best when customers can try out your solution using their own data (email, photos, songs, etc.), perhaps even in their own environment. For example, you are working on a photo app and wonder about how a particular sorting or tagging scheme will work. In this case, you may get better data if users try out your ideas with their own photos of their kids, dogs, and vacation spots, rather than with a pile of stock photos that they don’t recognize and don’t care about.
The test drive
At times, you can’t get real, deep, informative feedback unless customers have the ability to use your solution in their own environment, with their own data, and over a few days, weeks, or even months. Getting longitudinal feedback like this requires the most complete, fully functional, and highest-fidelity code—you can’t expect customers to use something in their daily lives that isn’t substantially complete. It goes without saying that you should do a significant amount of iteration with lower-fidelity methods to fine-tune your ideas before you get to this point. Often this kind of test drive is less of a prototype and more a prerelease version of the code, sometimes called a preview, alpha, or beta.
One example is in the development of Microsoft Kinect. The best way for that team to see how customers used the Kinect games and interface in a realistic family environment was to find a way for a handful of homes to use the system and to observe that usage over a period of time. By doing this, the Kinect team was able to discover all sorts of valuable insights, such as how the system worked with home furniture and layout (was proximity a problem?), what happened when friends came over who had never seen or heard of Kinect before (could they figure it out?), or how the family reacted to the system after its newness wore off (did they still use it and, if so, was the usage different?).
Similarly, many development teams work with enterprise partners to deploy prerelease code in their environments in order to get real-world feedback that helps fine-tune the final release. The systems found in larger corporations are almost always very complex. And while many enterprise systems have a lot of basics in common, the actual systems vary greatly in the number and type of legacy systems, code, and data that they integrate. Legacy integration and data can make it difficult, impossible, or prohibitively expensive to replicate different types of enterprise systems or topologies in a lab setting, so this kind of real-world testing is essential.
Technical investigations
As a developer, you probably already do a reasonable amount of code prototyping in the course of your regular work. Some development teams call these “investigations.” If there are a couple of technical approaches to solving a problem, a developer might play around with the code, trying out each approach to see which one works the best. Sometimes this happens when you’re working on a particularly difficult bug, where there is no clear, easy fix. An investigation is just another way to do a quick round of code prototyping with the intent to answer a question about which is the best technical solution for the given problem.
Auditioning components
“Buy, borrow, or build?” is a common question that teams ask (or should ask) frequently. Can I purchase a component that solves my needs, can I use an open source component, or do I need to build it myself?
When beginning a project, you may have choices to make as to which API, which components, which libraries, and even which programming language you will use. To answer these questions, teams need to write code that exercises the key component interactions and all of the architectural layers so that they can make well-informed decisions about which option offers the flexibility, ease of use, and maintainability that’s needed. In Agile development, this practice is one application of the technique called spiking.
![]() Vocab
Vocab
A spike is an experiment that cuts through the technical and architectural layers of a solution with the intent of learning about technical characteristics and tradeoffs rather than assessing the end-to-end experience. Spikes are done with the intention and expectation that any resulting code will be thrown away.
Spikes are often quite divergent, where different developers go off and try something and then get back together in a day or two to compare notes and decide upon an approach. It’s common to use spiking as a technique to inform buy, borrow, or build decisions on specific components to be used in a solution. Spikes are also used to answer questions such as which language or API best suits the problem domain, which data structures are optimal, what the basic performance characteristics of a particular implementation might be, or whether to put certain code on the client or the server.
Testing the -ilities
Most projects have specific goals and metrics for the system related to performance, scalability, security, reliability, maintainability, operability, accessibility, localizability, and the like. If you have several architectural approaches you’re considering that may impact these “-ilities,” you may find value in writing code to test a few approaches to see which solution works best for optimizing these factors.
Deep dive: Paper prototyping
Paper prototyping is well suited for detailing user interface ideas and making modifications early in the design phase. You can use this technique for testing ideas with customers as well as for thinking through your own ideas. Sometimes, ideas that look good in your mind’s eye end up not working so well in real life. Paper prototyping is an easy way to explore many alternatives over a short period of time.
Paper prototyping tends to work best when the UI is composed of elements and controls that people are familiar with, because customers already have reasonably accurate expectations about how these elements work. You can create a paper prototype that uses these common elements and then test to see how the user interacts with your system. However, with new types of interactions and metaphors (think about swiping a touchscreen or how a user interacts with a product like Microsoft’s Kinect), paper prototyping probably isn’t a very accurate way of judging how customers will interact. To represent and test new UI metaphors, you probably need a higher-fidelity prototype.
Paper prototyping is also a good tool for including lots of team members and for building bridges between them. You can use rapidly made paper prototypes to set expectations and to get everyone on the same page with regard to direction, proposed plans, and what you’ve learned about your customers. Paper prototypes also lend themselves to having more team members play around with them, mocking up new, creative, and potentially innovative ideas regardless of the team members’ skill sets or expertise.
You can create remarkably detailed and complex user interfaces using only paper and other basic office supplies. For instance, consider Figure 8-8 and Figure 8-9, which show a prototype built by a group of design students from Sao Paulo State University.
All materials on the site are licensed Creative Commons Attribution-Sharealike 3.0 Unported CC BY-SA 3.0 & GNU Free Documentation License (GFDL)
If you are the copyright holder of any material contained on our site and intend to remove it, please contact our site administrator for approval.
© 2016-2026 All site design rights belong to S.Y.A.