Exam Ref 70-411 Administering Windows Server 2012 R2 (2014)
Chapter 1. Deploy, manage, and maintain servers
Installing servers implies a unitary operation, but deploying servers is something you do often, not just once in a while. You have to install servers reliably and repeatedly, without major user intervention. After the server is deployed, you have to keep it up to date with the latest security, critical, and important updates while minimizing the amount of intervention required. And you have to be able to monitor the server to ensure that it is running efficiently and without major failure events.
This chapter discusses the deployment of Windows Server 2012 R2 by using Windows Deployment Services (WDS) to automate the deployment of standard or custom images to servers. It also discusses implementing Windows Server Update Services (WSUS) to automate and customize patch management on the network. Finally, the chapter covers monitoring servers with Windows Performance Monitor (perfmon) and Windows Event Viewer.
Important: Have you read page xvii?
It contains valuable information regarding the skills you need to pass the exam.
A major change in Windows Server 2012 R2 is the nearly complete coverage of all server tasks with Windows PowerShell. This is a significant change over earlier versions of Windows Server, and this chapter covers Windows PowerShell ways to deploy, update, and monitor Windows Server.
Objectives in this chapter:
![]() Objective 1.1: Deploy and manage server images
Objective 1.1: Deploy and manage server images
![]() Objective 1.2: Implement patch management
Objective 1.2: Implement patch management
![]() Objective 1.3: Monitor servers
Objective 1.3: Monitor servers
 Exam Tip
Exams are written to a very demanding specification, and exam question writers must not only justify their correct answers but their wrong answers as well. If you’re unsure of the correct answer to a simple multiple choice question, start by eliminating any answer that you know to be wrong. If there is more than one answer that appears to be correct, it’s likely that you missed an important clue in the description of the question. Go back and carefully read the question to see if there’s a clue you overlooked.
Objective 1.1: Deploy and manage server images
Automating the deployment of servers has become an important part of what information technology professionals (IT Pros) are expected to do, and this exam description recognizes it with an objective focused on deployment and image management. The key role that Windows Server 2012 R2 uses to manage and deploy server images is Windows Deployment Service (WDS). The new WDS features in Windows Server 2012 and Windows Server 2012 R2 are likely to be the primary focus of the exam questions, especially because WDS in Windows Server 2012 R2 introduces full support for Windows PowerShell, with 33 cmdlets to manage WDS.
This objective covers how to:
![]() Install the Windows Deployment Services role
Install the Windows Deployment Services role
![]() Configure and manage boot, install, and discover images
Configure and manage boot, install, and discover images
![]() Update images with security updates, hotfixes, and drivers
Update images with security updates, hotfixes, and drivers
![]() Install features for offline images
Install features for offline images
![]() Configure driver groups and packages
Configure driver groups and packages
Installing the Windows Deployment Services role
Before you can use WDS, you have to install the Windows Deployment Services role on a server. That server can be in an Active Directory Domain Services (AD DS) domain or it can be a stand-alone server. The minimum prerequisites for installing WDS are these:
![]() AD DS An AD DS server is required if WDS is integrated into Active Directory. The deployment server can be either a member server or a domain controller. WDS imposes no minimum AD DS domain or forest versions, and a standalone WDS doesn’t require AD DS.
AD DS An AD DS server is required if WDS is integrated into Active Directory. The deployment server can be either a member server or a domain controller. WDS imposes no minimum AD DS domain or forest versions, and a standalone WDS doesn’t require AD DS.
![]() DHCP An active DHCP server on the network is required to support Preboot eXecution Environment (PXE).
DHCP An active DHCP server on the network is required to support Preboot eXecution Environment (PXE).
![]() DNS A working and reachable Domain Name Service (DNS) server is required.
DNS A working and reachable Domain Name Service (DNS) server is required.
![]() NTFS The image store must reside on an NTFS volume.
NTFS The image store must reside on an NTFS volume.
![]() Credentials You must be a member of the Local Administrators group on the server to install the Windows Deployment Services role.
Credentials You must be a member of the Local Administrators group on the server to install the Windows Deployment Services role.
The Windows Deployment Services role can be installed and managed only on a server running the GUI Windows Server installation. WDS is not supported on Windows Server Core installations.
Installing WDS by using Server Manager
Windows Server Manager is the GUI way to install and configure the Windows Deployment Services role on a server, whether running stand-alone or integrated with Active Directory. Use the Add Roles And Features Wizard to install the Windows Deployment Services role. You’ll use the Role-based Or Feature-based option. Server Manager can be used to insert roles and features into virtual hard disks or to manage multiple servers from a single console, as shown in Figure 1-1.
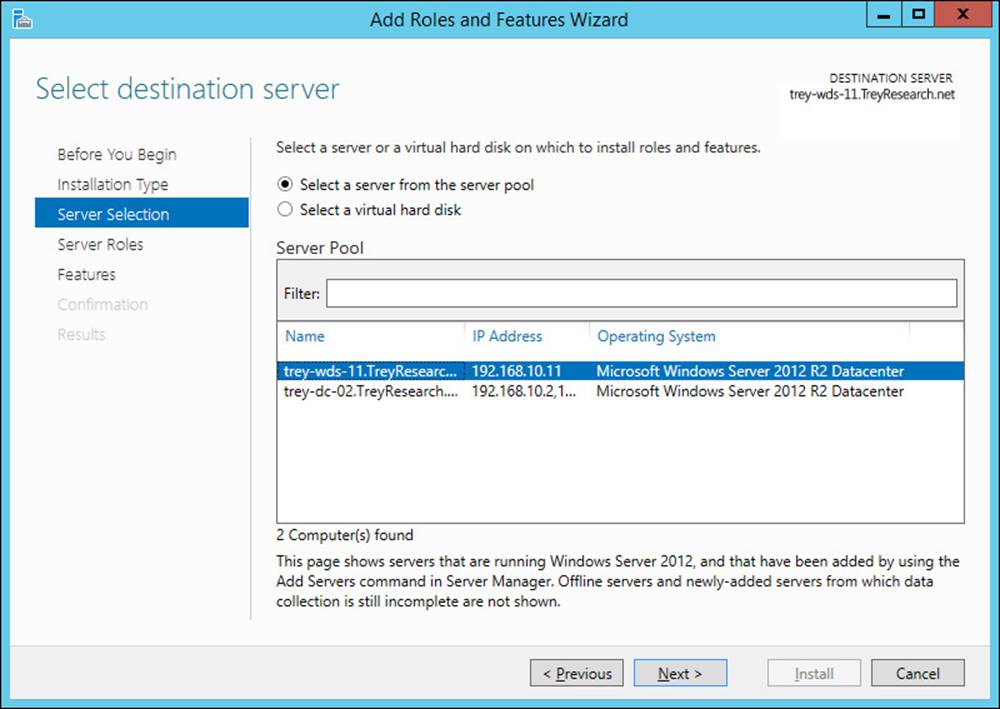
FIGURE 1-1 The Select Destination Server page of the Add Roles And Features Wizard
When you install the Windows Deployment Services role using Server Manager, it automatically prompts you to install the necessary management tools. WDS can be deployed with the combined Deployment Server role service and Transport Server role service, as shown in Figure 1-2, or (less commonly) with the Transport Server role service only.
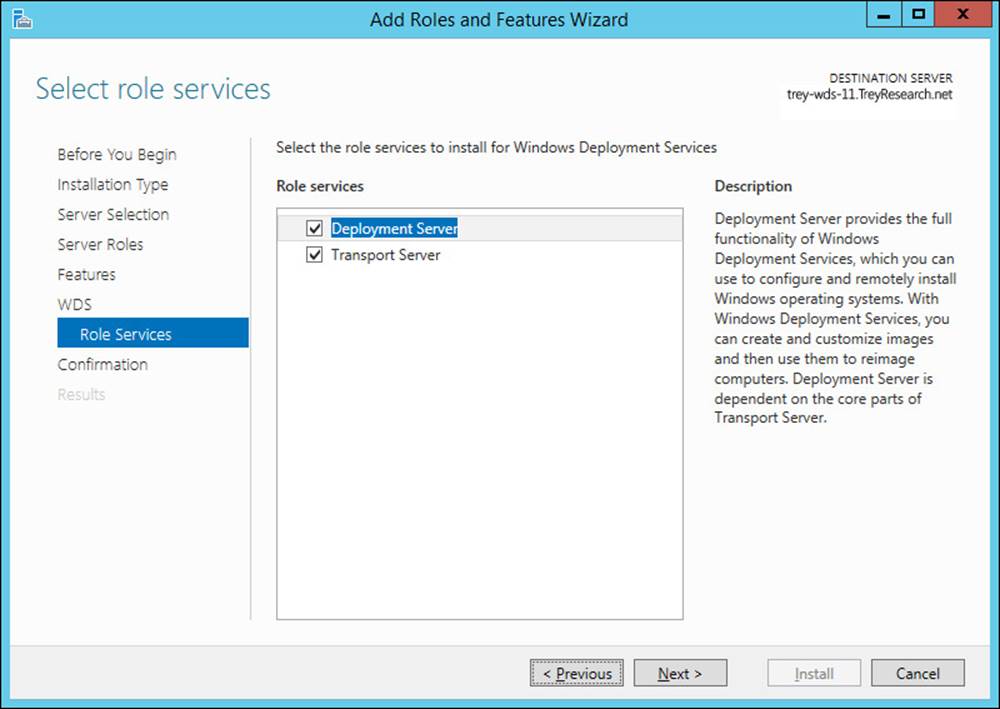
FIGURE 1-2 The Select Role Services page of the Add Roles And Features Wizard
Exam Tip
Installing only the Transport Server role service of WDS installs the core networking parts of WDS, including the PXE server. All configuration and management of the images and their deployment require custom scripts and the use of WDSUtil.exe. You can’t use Windows PowerShell or the GUI to configure the Transport Server.
Installing WDS by using Windows PowerShell
An important change in Windows Server 2012 R2 is the new Windows PowerShell WDS module, which provides virtually 100 percent Windows PowerShell coverage. Existing command-line tools are deprecated, and all tasks can be performed with Windows PowerShell.
Exam Tip
Exam question writers have a difficult and demanding task to create questions and answers that are clear and unambiguous, but also challenging and that test the breadth of the objective domain for the exam. It is relatively easier to write command-line questions with compelling distractors (incorrect answer choices). Given the now complete Windows PowerShell coverage in Windows Server 2012 R2, you should expect many Windows PowerShell questions in this exam, so prepare accordingly.
Use the Install-WindowsFeature cmdlet to install the Windows Deployment Services role on a server. The Install-WindowsFeature cmdlet accepts parameters of –Name for the feature name, -ComputerName for the name (or IP address) of the target server or –Vhd for the name of the virtual hard disk, and a –Credential parameter that enables you to provide credentials as a <PSCredential> object. Additionally, you can specify flags of –IncludeAllSubFeature and –IncludeManagementTools. By default, the Install-WindowsFeature cmdlet installs only the specific feature or role specified; it does not install any subfeatures or management tools for the feature.
To install the Windows Deployment Services role, including the management tools on the trey-wds-11 server, open an elevated Windows PowerShell window and use the following Windows PowerShell command:
Install-WindowsFeature –Name WDS –ComputerName "trey-wds-11" -IncludeManagementTools
Note: Using and elevated Windows PowerShell prompt
Many management tasks require administrative privileges. You can either pass in a PSCredential object, created by using the Get-Credential cmdlet, or open an elevated Windows PowerShell window with the following command (which prompts you for credentials and then opens up a new elevated Windows PowerShell window):
Start-Process PowerShell.exe -Verb RunAs
Exam Tip
Windows PowerShell commands that require elevation typically support a -Credential parameter. Exam answers that leave this parameter off typically fail. If the answer includes a -Credential parameter as a string in the form “DOMAIN\User”, it will also fail because the parameter expects a PSCredential object. Use the Get-Credential cmdlet to generate a PSCredential object.
Configuring WDS
Before you can actually use WDS, you have to configure some basic information from Server Manager or directly in the Wdsmgmt.msc console. You have to make several configuration decisions, including the following:
![]() AD DS integrated or stand-alone server
AD DS integrated or stand-alone server
![]() Location of the Remote Installation folder
Location of the Remote Installation folder
![]() Initial PXE server settings
Initial PXE server settings
The AD DS integrated option is available only in an AD DS domain environment. The location for the remote installation folder should be on an NTFS-formatted volume with sufficient free space to hold several images, applications, and driver packages. It is not usually installed on the system volume; it is installed on its own dedicated volume.
Initial PXE settings control which client computers are allowed to download images. You can set this to none, only prestaged clients, or any PXE client that requests an image.
After the initial configuration is complete, you can choose to continue to install the initial images to the server, as shown in Figure 1-3.
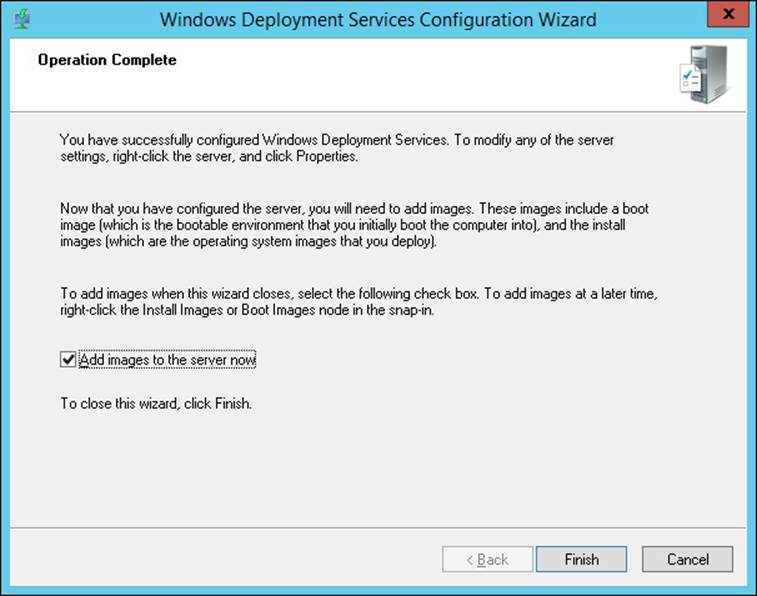
FIGURE 1-3 The Operation Complete page of the Windows Deployment Services Configuration Wizard
Configuring and managing boot, install, and discover images
There are four types of images used by WDS: boot images, install images, capture images, and discover images. The minimum requirements to boot to the WDS server and deploy an image to a client computer are a boot image and an install image.
Boot images
Boot images are Windows PE images that reside in the \Sources folder on the Windows installation media as \Sources\Boot.wim. The Boot.wim file includes both Windows PE and the WDS client.
Install images
Install images are the actual operating system images that are deployed to the client computer. You can use the default image in the \Sources folder of the installation media (\Sources\Install.wim), or you can create a custom image by using a capture image or other tool.
Capture images
Capture images are used to create a custom install image from an existing template computer. You must prepare the template computer with Sysprep and then boot by using the capture image. You have to have sufficient spare disk space on the template computer to save the captured image to a local volume.
Discover images
Discover images are used by WDS client computers that don’t support PXE boot. You use the Boot.wim file from the Windows installation media, and you also need the tools in the Windows Assessment and Deployment Kit (Windows ADK) for Windows 8.1, which is available athttp://www.microsoft.com/en-us/download/details.aspx?id=39982.
Managing images in the WDS image store
You can copy, disable, enable, import, export, remove, and set the properties of images within a WDS image store by using either the GUI or the Windows PowerShell WDS module.
Exam Tip
The Import-WDS* cmdlets lend themselves well to exam questions. The unqualified candidate will likely choose the Copy or Set verb, rather than Import.
Use the Add Image Wizard in the Windows Deployment Services console or the Import-WDS* cmdlets in Windows PowerShell to add images to the WDS image store. WDS organizes install images into an image group to enable them to share common file resources and security. You must create at least one image group.
To add an install image to the WDS image store, use the following Windows PowerShell command:
Import-WdsInstallImage -Path "<WIM or VHD Location>" -ImageGroup "<GroupName>"
The command for adding a WDS boot image is essentially the same, but without the -ImageGroup parameter:
Import-WdsBootImage -Path "<WIM or VHD Location>"
Both cmdlets support a wealth of additional parameters, allowing you to set various properties of the images. Use the Get-Help cmdlet with the -Full parameter to get complete details on a particular Windows PowerShell cmdlet.
Exam Tip
To copy an image from one image group to another, use the Export-WdsInstallImage and Import-WdsInstallImage cmdlets. The Copy-WdsInstallImage cmdlet allows you to copy an image only within the same image group.
Updating images with security updates, hotfixes, and drivers
You can use a capture image to create an updated install image that includes current hotfixes and updates, or you can use the Deployment Image Servicing and Management (DISM) platform commands and the Windows PowerShell Dism module to mount an offline image and update it directly.
You can directly modify an offline image (.wim) or virtual hard disk (.vhd or .vhdx) with the Dism cmdlets. To modify an image or virtual hard disk by inserting an update into it, follow these steps:
1. Set the image to read-write by clearing any read-only attributes with attrib -r.
2. Mount the image on an empty mount point using the Mount-WindowsImage cmdlet.
3. Extract the contents of the update (.msu file) using WinRAR or another third-party tool.
4. Inject the .cab file into the mounted image by using the Add-WindowsPackage cmdlet.
5. Commit the changes and unmount the install image by using the Save-WindowsImage and Dismount-WindowsImage cmdlets.
Installing or removing features in offline images
You can add or remove Windows features in an existing image or virtual hard disk by using the Enable-WindowsOptionalFeature cmdlet or the Disable-WindowsOptionalFeature cmdlet, respectively. You can modify the currently running image with the -online parameter, or modify an offline image or virtual hard disk by mounting it and modifying the mounted image. To modify an offline image or virtual hard disk, follow these steps:
1. Set the image to read-write by clearing any read-only attributes with attrib -r.
2. Mount the image on an empty mount point using the Mount-WindowsImage cmdlet.
3. Modify the image with the Enable-WindowsOptionalFeature cmdlet or the Disable-WindowsOptionalFeature cmdlet, as appropriate.
4. Commit the changes and unmount the install image by using the Save-WindowsImage and Dismount-WindowsImage cmdlets.
Capturing a new template image
For many changes, it’s easiest to modify an existing image by updating an offline image or virtual hard disk. When more substantial changes are required, however, or when there is a change in the underlying hardware or core software suite, it is often easier to create a new template computer and then capture an image from it. To do this, follow these steps:
1. Create a capture image in the Windows Deployment Services console by right-clicking a boot image and selecting Create Capture Image to start the Create Capture Image Wizard, as shown in Figure 1-4.
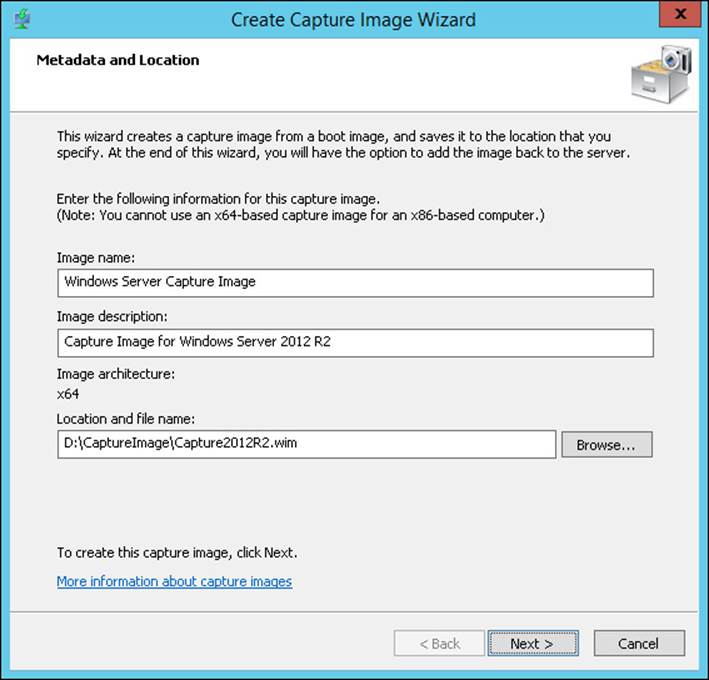
FIGURE 1-4 The Create Capture Image Wizard
2. Add the capture image to the WDS image store.
3. Deploy Windows to the computer that will act as the source for the template image. This computer’s hardware should be as similar to the intended target computers that the captured image will support as is practical.
4. Install roles and features that will be part of the template.
Note: Supported roles for Sysprep on Windows Server
Not all roles that can be enabled on Windows Server are supported as a template image. All Active Directory roles, for example, are not supported. To see a list of roles that are supported by Sysprep, see http://technet.microsoft.com/en-us/library/hh824835.aspx.
5. Install any additional software that you want to be part of the template.
6. Apply all updates and hotfixes that you want to be part of the template. Add all drivers that the template needs.
7. Disable or remove any packages that should not be deployed on target computers.
8. Run Sysprep on the template computer using the following command from the %windir%\system32\sysprep directory:
Sysprep /oobe /generalize /reboot
9. Restart the computer and boot from the network.
10. Select the capture boot image you created and follow the steps of the Windows Deployment Services Image Capture Wizard to save the image.
Note: Saving images locally
Ensure that you have sufficient room on the template computer to save a local copy of the image you are capturing. You can automatically upload the image to your WDS server as well, but you must always save a copy on a locally mounted drive. It can be a Server Message Block (SMB) share from a network computer, as long as the share has an assigned drive letter.
Configuring driver groups and packages
WDS enables you to add hardware-specific drivers to your deployment images and to allow images to request a specific set of images from the available driver store. You can create driver groups to host and organize collections of drivers. The initial configuration of WDS creates a default driver group called “DriverGroup1”. You can use the Windows Deployment Services console to add or remove driver groups, rename or duplicate driver groups, and modify the properties of driver groups.
In addition to the Windows Deployment Services console, you can use the Windows PowerShell *-WdsDriverPackage cmdlets to manage your drivers and driver packages. The cmdlets available include these:
![]() Add-WdsDriverPackage Adds a driver package from the WDS driver store into a driver group or injects it directly into a boot image.
Add-WdsDriverPackage Adds a driver package from the WDS driver store into a driver group or injects it directly into a boot image.
![]() Disable-WdsDriverPackage Makes a driver package in the WDS driver store unavailable to clients without removing it from the driver store.
Disable-WdsDriverPackage Makes a driver package in the WDS driver store unavailable to clients without removing it from the driver store.
![]() Enable-WdsDriverPackage Makes a driver package in the WDS driver store available to clients. Packages are enabled by default when added to the WDS driver store.
Enable-WdsDriverPackage Makes a driver package in the WDS driver store available to clients. Packages are enabled by default when added to the WDS driver store.
![]() Get-WdsDriverPackage Gets the properties of all the driver packages in the WDS driver store, or the properties of a specific package if you specify the name or ID (GUID) of the package.
Get-WdsDriverPackage Gets the properties of all the driver packages in the WDS driver store, or the properties of a specific package if you specify the name or ID (GUID) of the package.
![]() Import-WdsDriverPackage Imports a driver package into the WDS driver store and optionally adds it to a driver group.
Import-WdsDriverPackage Imports a driver package into the WDS driver store and optionally adds it to a driver group.
![]() Remove-WdsDriverPackage Removes a driver package from a WDS driver group, or removes it from all driver groups and deletes it completely from the driver store.
Remove-WdsDriverPackage Removes a driver package from a WDS driver group, or removes it from all driver groups and deletes it completely from the driver store.
The WDS Windows PowerShell cmdlets do not allow you to create or directly manage the properties of driver groups. You can manipulate the contents of driver groups, but not create new driver groups.
You can inject drivers into an existing image or virtual hard disk by using the Add-WdsDriverPackage cmdlet. After you add a driver package to an existing image, WDS can’t remove the driver package. You would have to re-create the image without the driver installed.
 Thought experiment: Upgrading hardware
In this thought experiment, apply what you’ve learned about this objective. You can find answers to these questions in the “Answers” section at the end of this chapter.
You are the network administrator for TreyResearch.net. Your current server hardware specification is no longer available, and the company has chosen a new vendor and has upgraded hardware from that new vendor. The current custom WDS images that support the older hardware contain all the required software, but fail to boot with the new hardware.
In discussions with management about future directions, it is revealed that in the near- to mid-term, the new servers will be rolled out to support all the Finance, Accounting, and Human Resources users who use thin clients to connect to Remote Desktop Session Host servers that will be replaced. At the same time, a new version of a key line of business applications used by these departments is to be rolled out with the new hardware.
1. You have to come up with an immediate solution for the new hardware to support the new users coming on board this week. What’s the best way to support the new hardware?
2. What should you do to support the move to new software and hardware for the Finance, Accounting, and Human Resources departments?
Objective summary
![]() The Windows Deployment Services role can be installed only on a full (GUI) installation of Windows Server. It isn’t supported on a Windows Server Core installation.
The Windows Deployment Services role can be installed only on a full (GUI) installation of Windows Server. It isn’t supported on a Windows Server Core installation.
![]() Before installing and configuring the Windows Deployment Services role, ensure that your network infrastructure is in place and reachable. DNS and DHCP are required for WDS, as is AD DS if you are using an Active Directory integrated WDS deployment.
Before installing and configuring the Windows Deployment Services role, ensure that your network infrastructure is in place and reachable. DNS and DHCP are required for WDS, as is AD DS if you are using an Active Directory integrated WDS deployment.
![]() When you install the Windows Deployment Services role with the Install-WindowsFeature cmdlet, use the -IncludeManagementTools parameter.
When you install the Windows Deployment Services role with the Install-WindowsFeature cmdlet, use the -IncludeManagementTools parameter.
![]() Initial configuration of the Windows Deployment Services role is required after installation and includes setting the location of the WDS image store. The image store must reside on an NTFS volume and is typically installed on a volume other than the system volume.
Initial configuration of the Windows Deployment Services role is required after installation and includes setting the location of the WDS image store. The image store must reside on an NTFS volume and is typically installed on a volume other than the system volume.
![]() There are four different types of images used by the WDS server: boot, install, capture, and discover images.
There are four different types of images used by the WDS server: boot, install, capture, and discover images.
![]() Capture images are used to capture a custom install image from a template computer. Discover images are used to deploy by using physical media rather than PXE boot.
Capture images are used to capture a custom install image from a template computer. Discover images are used to deploy by using physical media rather than PXE boot.
![]() Use the Dism module of Windows PowerShell to update images. You have to mount an offline image on the local file system in read-write mode and use the Add-WindowsPackage or Enable-WindowsOptionalFeature cmdlets to update the mounted image.
Use the Dism module of Windows PowerShell to update images. You have to mount an offline image on the local file system in read-write mode and use the Add-WindowsPackage or Enable-WindowsOptionalFeature cmdlets to update the mounted image.
![]() Before you can use the updated image, you have to commit the changes and unmount the image.
Before you can use the updated image, you have to commit the changes and unmount the image.
![]() You must use the Windows Deployment Service console to create WDS driver groups or change the properties of existing driver groups.
You must use the Windows Deployment Service console to create WDS driver groups or change the properties of existing driver groups.
![]() You can use the WDS cmdlets to manage drivers and driver packages in existing WDS driver groups.
You can use the WDS cmdlets to manage drivers and driver packages in existing WDS driver groups.
Objective review
Answer the following questions to test your knowledge of the information in this objective. You can find the answers to these questions and explanations of why each answer choice is correct or incorrect in the “Answers” section at the end of the chapter.
1. Which of the following are required to install the Windows Deployment Services role on Windows Server 2012 R2? (Choose all that apply.)
A. An active DHCP server
B. A working and reachable DNS server
C. A local volume with a Resilient File System (ReFS)
D. An AD DS server
2. Which types of images are required to create a custom image from a template computer? (Choose all that apply.)
A. Boot images
B. Install images
C. Capture images
D. Discover images
3. Which Windows PowerShell cmdlet is used to update an offline boot file with a new driver?
A. Import-WdsBootImage
B. Import-WdsDriverPackage
C. Set-WdsBootImage
D. Add-WdsDriverPackage
Objective 1.2: Implement patch management
Centralizing your patch management is an important server function and one that can’t be entirely managed with Windows PowerShell. You need a combination of tools to fully manage your network’s updates.
Windows Server Update Services (WSUS) is the primary technology for deploying updates.
This objective covers how to:
![]() Install and configure the Windows Server Update Services role
Install and configure the Windows Server Update Services role
![]() Configure Group Policy Objects (GPOs) for updates
Configure Group Policy Objects (GPOs) for updates
![]() Configure WSUS groups
Configure WSUS groups
![]() Configure WSUS synchronization
Configure WSUS synchronization
![]() Configure client-side targeting
Configure client-side targeting
![]() Manage patch management in mixed environments
Manage patch management in mixed environments
Install and configure the Windows Server Update Services role
You can install and configure the Windows Server Update Services role and its supporting services by using Server Manager, the command line, or a mixture of the two. If you choose the command line, use a combination of Windows PowerShell and the Wsusutil.exe utility for configuration. The Windows Server Update Services role is supported on a Windows Server Core installation.
Installing and configuring by using GUI
Windows Server Manager is the GUI way to install and configure the Windows Server Update Services role on a server. Use the Add Roles And Features Wizard with the role-based or feature-based option to install the Windows Server Update Services role. Server Manager can be used to insert roles and features into virtual hard disks or to manage multiple servers from a single console.
When you install the Windows Server Update Services role using Server Manager, it automatically prompts you to install the necessary management tools and the other features and roles that are required (see Figure 1-5).
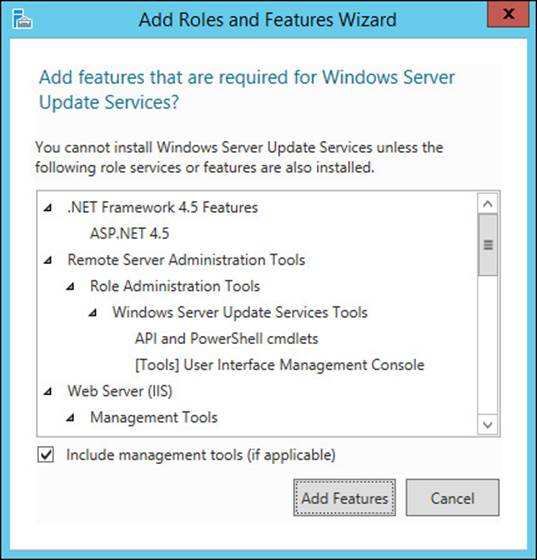
FIGURE 1-5 The Add Features That Are Required For Windows Server Update Services page
The WSUS installation defaults to using the Windows Internal Database (WID) as the WSUS repository. Alternately, you can choose to use SQL Server as the repository by selecting Database instead of WID Database on the Select Role Services page of the Add Roles And Features Wizard. You can’t install both on the same server, however. If you intend to have only a single WSUS server at a site, the default is generally a good choice. But if you need a shared database across multiple WSUS servers, need SQL query access to the database, or already have a SQL Server infrastructure in place, choose SQL Server instead.
The WSUS content can be stored on Windows Update, keeping the disk footprint smaller, or it can be stored on a locally accessible volume or share for reduced wide area network (WAN) utilization and faster access. The default is to use a locally accessible location. This location must be an NTFS-formatted volume and needs to have at least 6 GB of free disk space (and a good deal more for most networks.)
When the installation of the Windows Server Update Services role is complete, you’ll see the WSUS node in Server Manager. If you click the Configuration Required For Windows Server Update Services yellow bar in the Servers pane (see Figure 1-6), the configuration will complete with the settings you made during the Add Roles And Features Wizard.
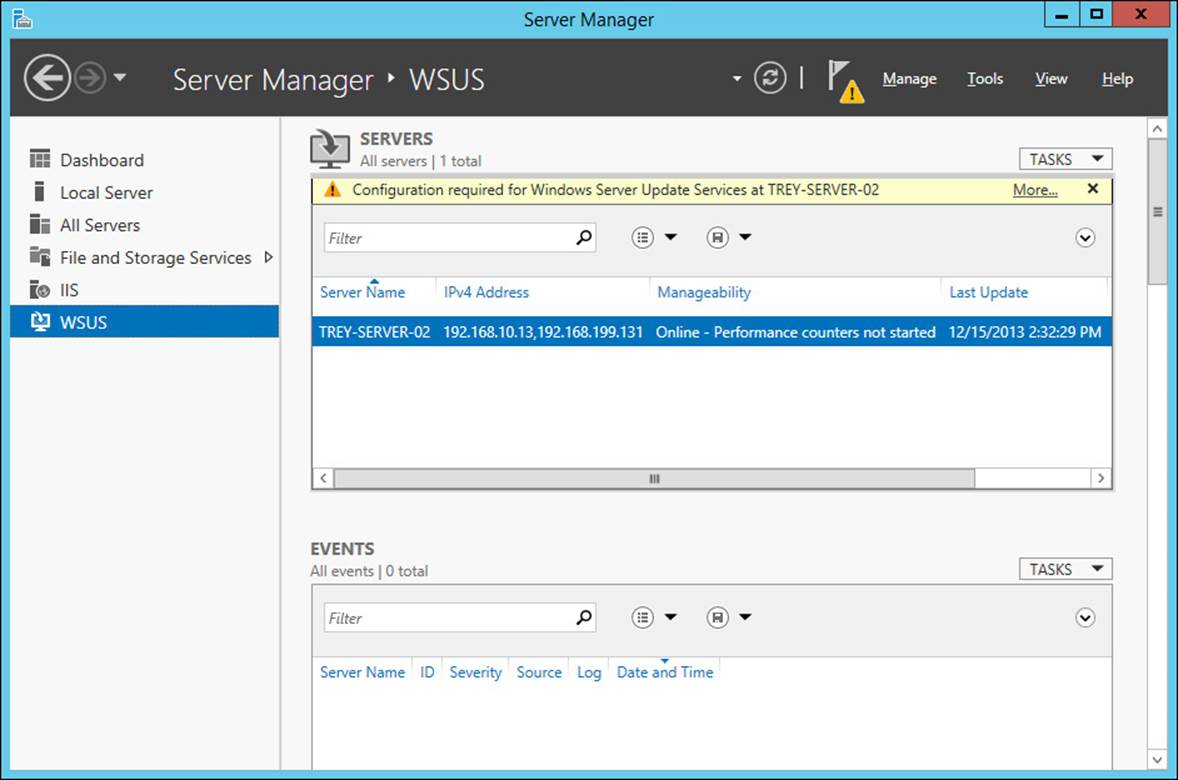
FIGURE 1-6 The WSUS pane of Server Manager
Installing and configuring by using the command line
You can install WSUS by using Windows PowerShell. The basic command is this:
Install-WindowsFeature -Name UpdateServices -IncludeManagementTools
This command installs WSUS in the default configuration and uses the WID database. To install WSUS to use a SQL Server database, use this command:
Install-WindowsFeature -Name UpdateServices,UpdateServices-DB -IncludeManagementTools
 Exam Tip
The expected command line to install the Windows Server Update Services role would include an -IncludeAllSubFeatures parameter, but this will fail. You can’t install both the WID database and a SQL Server database for WSUS. It is an easily overlooked conflict that can cause you to choose an incorrect answer to an exam question.
Windows PowerShell can’t be used for all WSUS configuration and management; you have to rely on the Wsusutil.exe utility for at least some of the command-line configuration.
Postinstallation configuration
Installing the Windows Server Update Services role and supporting services and features is only the first step of creating a working WSUS server. You’ll have to do some postinstallation tasks as well, which you can do from within Server Manager or by using the command line.
To configure WSUS to use the WID database and a content directory of D:\WSUS, use the following commands from an elevated prompt:
cd "C:\Program Files\Update Services\Tools"
.\wsusutil postinstall content_dir=D:\WSUS
To configure WSUS to use a SQL Server instance on the local server with the update files stored on D:\WSUS, use these commands:
cd "C:\Program Files\Update Services\Tools"
.\wsusutil postinstall SQL_INSTANCE_NAME=localhost content_dir=D:\WSUS
Exam Tip
A potential exam question scenario might be the following: You install the Windows Server Update Services role with a SQL database. However, after successfully completing the command, you notice that the database wasn’t created. What should you do next? The answer: Run wsusutil.exe and point to the SQL server and instance.
To configure the location from which WSUS synchronizes updates, use the Set-WsusServerSynchronization cmdlet. To configure the local WSUS server to sync with Microsoft Update, use this command:
Set-WsusServerSynchronization -SyncFromMU
You can also configure WSUS to sync with an upstream WSUS server. You can specify the server name, port number, whether to use SSL, and whether the WSUS server is a replica. To configure the local WSUS server to sync with an upstream server, SRV2, over port 8530, use this command:
Set-WsusServerSynchronization -UssServerName SRV2 -PortNumber 8530
You can use the WSUS cmdlets to manage remote WSUS servers. Use the Get-WsusServer cmdlet to generate an IUpdateServer object and then pass the object to Set-WsusServerSynchronization on the command line:
Get-WsusServer -Name SRV2 -PortNumber 8530 | Set-WsusServerSynchronization -SyncFromMU
You can use Windows PowerShell to manage which updates are approved or denied, and which classifications and products are synchronized. To approve a single update, use this command:
Get-WsusUpdate -UpdateID <GUID> | `
Approve-WsusUpdate -Action Install -TargetGroupName "All Computers"
Use the following commands to get all the security updates that are needed and that have either failed or have not been approved, and then set them to be installed on the “Servers” group:
Get-WsusUpdate -Classification Security -Status FailedorNeeded | `
Approve-WsusUpdate -Action Install -TargetGroupName "Servers"
More Info: Command-line references
For more information on the WSUS cmdlets in Windows Server 2012 R2, see http://technet.microsoft.com/en-us/library/hh826166.aspx. For help using Wsusutil.exe, type Wsusutil.exe /?.
Configuring Group Policy Objects for updates
You can configure Group Policy Objects (GPOs) to enforce organizational standards for applying Windows Updates by using the Group Policy Management Editor, as shown in Figure 1-7.
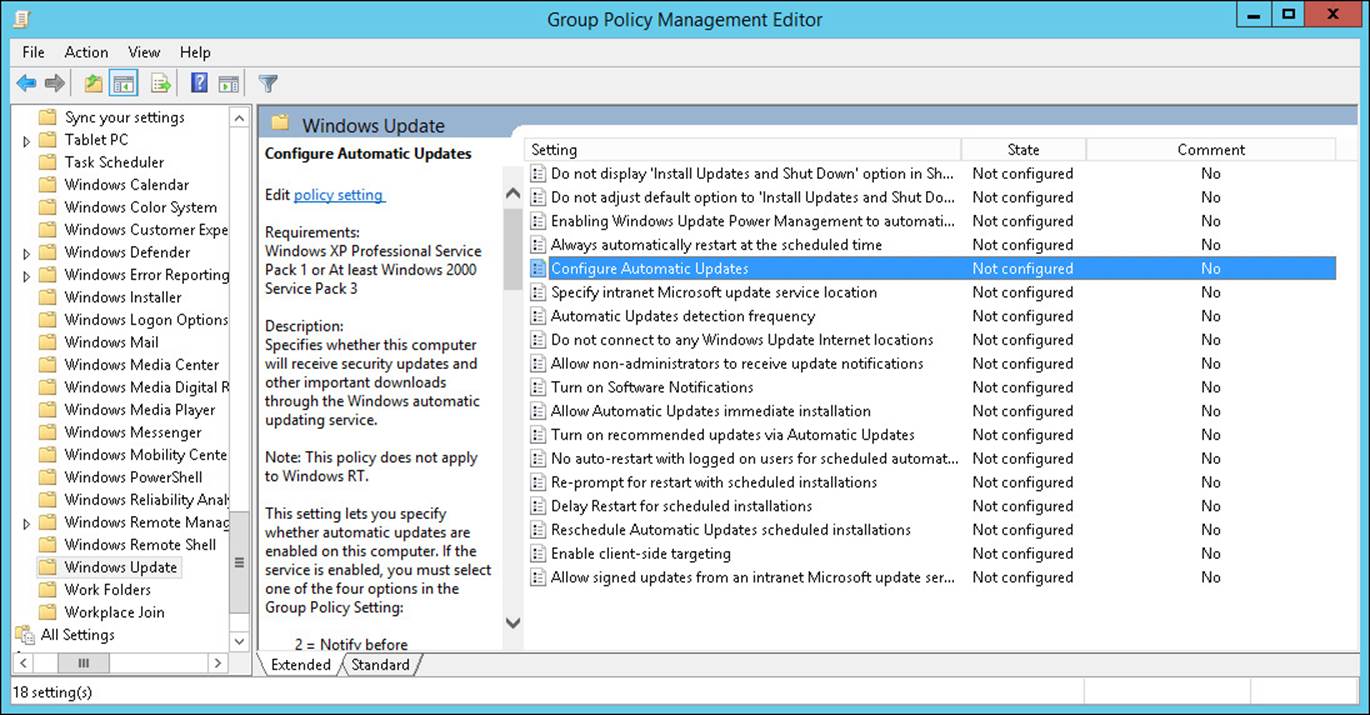
FIGURE 1-7 The Group Policy Management Editor
By using the WSUS GPO settings, you can enforce the location that domain-joined client computers use for updates, which updates are installed automatically, whether updates that require a reboot enforce that reboot, and so on. The available WSUS settings are shown in Table 1-1.
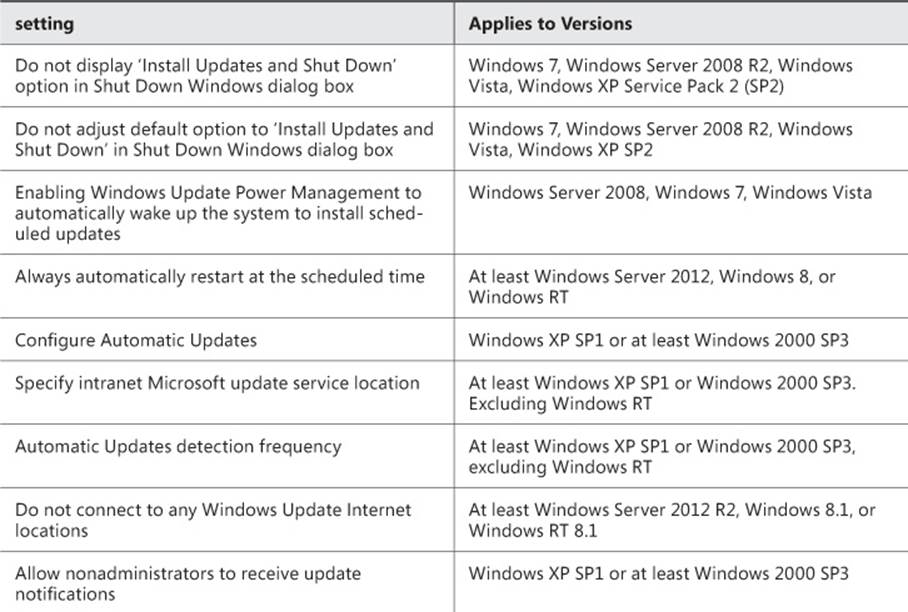
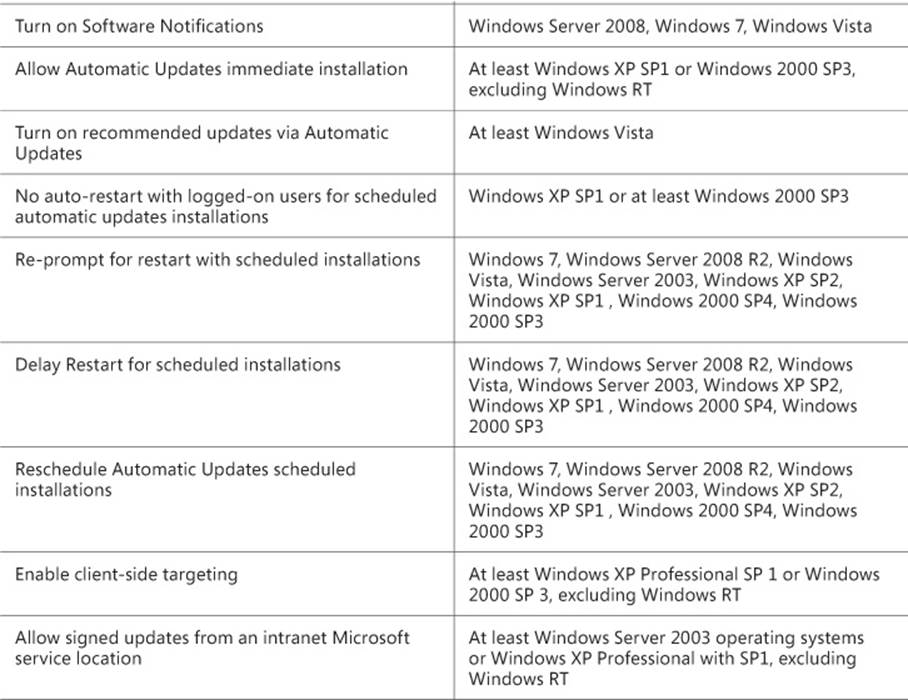
TABLE 1-1 WSUS GPO settings
Exam Tip
Exam question writers love to write questions about GPOs because it’s easy to write compelling distractors (incorrect answer choices) for them. The interaction of GPOs with each other and the specific Windows versions that the GPOs apply to are areas to focus on.
Configuring WSUS groups
After the initial configuration of WSUS is complete, you can create WSUS groups to control which update policies are applied to which computers. You need to create the groups in the Windows Server Update Services console by selecting All Computers in the left pane and then clicking Add Computer Group in the Actions pane (see Figure 1-8).
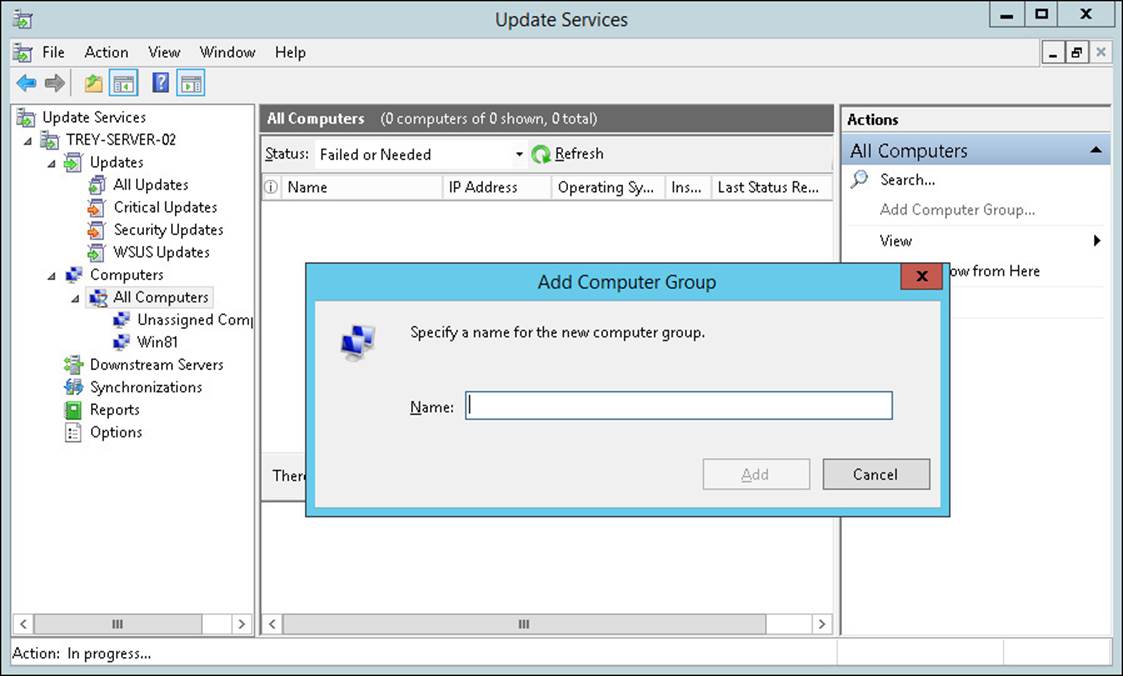
FIGURE 1-8 The Add Computer Group dialog box
You can add computers to an existing group in the Update Services console or by using the Add-WsusComputer cmdlet.
Configuring client-side targeting
The typical WSUS server uses server-side targeting with computers assigned to WSUS groups on the server. New computers are automatically assigned to the Unassigned Computers group until they are assigned to a group. This process works for small to mid-sized organizations, but it doesn’t scale well in larger organizations. You can configure WSUS to use Group Policy to assign computers to WSUS groups by enabling client-side targeting.
Enable client-side targeting by selecting Computers in the Options section of the Windows Server Update Services console and selecting Use Group Policy Or Registry Settings On Computers, as shown in Figure 1-9.

FIGURE 1-9 The Computers dialog box in the Update Services console
If you have already assigned computers to WSUS groups, this choice will clear those selections. After the GPO has configured the client computers to assign them to a group, the WSUS computer groups will be repopulated based on the GPO settings. You can also manually set it in the registry for any non-domain-joined computers for which you want to manage the updates for by setting the values for the following registry keys in the HKEY_LOCAL_MACHINE\Software\Policies\Microsoft\Windows\CurrentVersionWindowsUpdate subkey:
![]() ElevateNonAdmins If 1, non-administrators can approve or disapprove updates. If 0, only administrators can approve or disapprove updates.
ElevateNonAdmins If 1, non-administrators can approve or disapprove updates. If 0, only administrators can approve or disapprove updates.
![]() TargetGroup Name of the WSUS computer group to use if client-side targeting is enabled.
TargetGroup Name of the WSUS computer group to use if client-side targeting is enabled.
![]() TargetGroupEnabled If 1, client-side targeting is enabled; if 0, it isn’t.
TargetGroupEnabled If 1, client-side targeting is enabled; if 0, it isn’t.
![]() WUServer URL of the WSUS server used by Automatic Updates.
WUServer URL of the WSUS server used by Automatic Updates.
![]() WUStatusServer URL of the WSUS server to which to send reporting information. Both WUServer and WUStatusServer must be set to the same value.
WUStatusServer URL of the WSUS server to which to send reporting information. Both WUServer and WUStatusServer must be set to the same value.
To configure Group Policy to work with client-side targeting, you need to edit the GPOs for your domain. You can create an overall GPO that you link at the domain level that turns Automatic Updates on; then sets the location of the WSUS server and additional GPOs that assign computers to specific WSUS groups based on their organizational unit (OU) or other criteria. To enable Automatic Updates and set the location of the WSUS server, you have to edit two policy settings:
![]() Configure Automatic Updates
Configure Automatic Updates
![]() Specify Intranet Microsoft Update Service Location
Specify Intranet Microsoft Update Service Location
The Configure Automatic Updates setting can be set to notify, download and notify, automatically download and install, or allow local administrators to control the setting. The Specify Intranet Microsoft Update Service Location setting requires you to specify the server name and port for detecting updates and the update statistics server (see Figure 1-10).
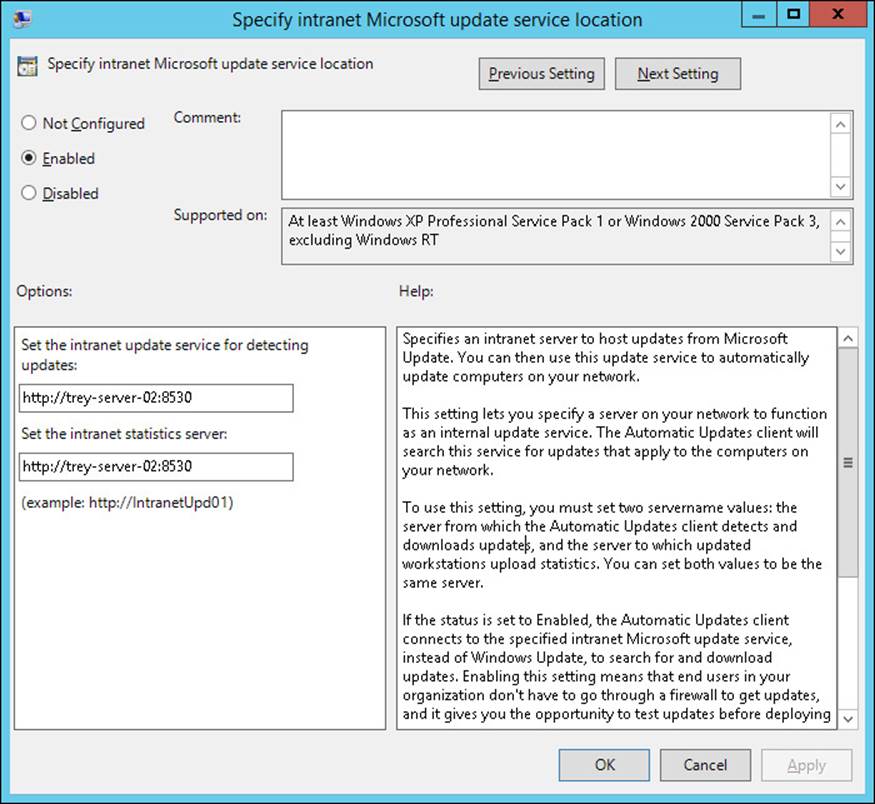
FIGURE 1-10 The Specify Intranet Microsoft Update Service Location Group Policy edit dialog box
To specify the specific WSUS groups that are used, edit the Enable Client-Side Targeting setting.
After the GPOs have propagated and clients have connected to check for updates, the groups in the Windows Server Update Services console will repopulate and show the computers that are assigned to the WSUS groups by Group Policy.
 Thought experiment: Setting up new deployments and patching services
In this thought experiment, apply what you’ve learned about this objective. You can find answers to these questions in the “Answers” section at the end of this chapter.
You are the network administrator for TreyResearch.net. Trey Research has added a new building and is hiring, and you’ve been tasked to set up new deployment and patching services in the new building, which will be on a separate subdomain and subnet. Updates will be synchronized to the existing company WSUS server.
Company policy dictates a minimum number of physical servers and a minimum security and patching footprint for servers on the network, with no unnecessary roles or features installed.
With these requirements, answer the following questions:
1. Can you install your patching and deployment servers to the same physical server while minimizing the security footprint?
2. What is the minimum number of physical servers required?
3. What virtualized servers can you group together while meeting the requirements?
Objective summary
![]() The Windows Server Update Services role can be installed on both a Windows Server full installation and a Windows Server Core installation.
The Windows Server Update Services role can be installed on both a Windows Server full installation and a Windows Server Core installation.
![]() WSUS supports either the WID or a SQL Server database, but you have to make a choice at install time.
WSUS supports either the WID or a SQL Server database, but you have to make a choice at install time.
![]() The installation of the Windows Deployment Services role can’t use the -InstallAllSubFeatures parameter to the Install-WindowsFeature cmdlet because both databases can’t be installed at the same time.
The installation of the Windows Deployment Services role can’t use the -InstallAllSubFeatures parameter to the Install-WindowsFeature cmdlet because both databases can’t be installed at the same time.
![]() The postinstallation tasks normally handled by the Server Manager Add Roles And Features Wizard can be done on the command line by using a combination of the wsusutil.exe utility and Windows PowerShell.
The postinstallation tasks normally handled by the Server Manager Add Roles And Features Wizard can be done on the command line by using a combination of the wsusutil.exe utility and Windows PowerShell.
![]() Managing remote WSUS servers using Windows PowerShell uses the Get-WsusServer cmdlet to generate an IUpdateServer object.
Managing remote WSUS servers using Windows PowerShell uses the Get-WsusServer cmdlet to generate an IUpdateServer object.
![]() You can use the Group Policy Management console (gpmc.msc) and Group Policy Management Editor (gpedit.msc) to create and edit GPOs that control how WSUS is used in your organization.
You can use the Group Policy Management console (gpmc.msc) and Group Policy Management Editor (gpedit.msc) to create and edit GPOs that control how WSUS is used in your organization.
![]() Use WSUS groups to aggregate subsets of client computers that need to have the same set of updates applied. WSUS groups can be created only in the Windows Server Update Services console (wsus.msc).
Use WSUS groups to aggregate subsets of client computers that need to have the same set of updates applied. WSUS groups can be created only in the Windows Server Update Services console (wsus.msc).
![]() The default installation of WSUS is configured to use server-side control of what computers are in which WSUS groups. This default requires that each computer be explicitly assigned to a specific WSUS group. You can change WSUS to use client-side targeting, which sets WSUS to have client computers assign themselves to a WSUS group based on GPO settings or individual registry entries.
The default installation of WSUS is configured to use server-side control of what computers are in which WSUS groups. This default requires that each computer be explicitly assigned to a specific WSUS group. You can change WSUS to use client-side targeting, which sets WSUS to have client computers assign themselves to a WSUS group based on GPO settings or individual registry entries.
Objective review
Answer the following questions to test your knowledge of the information in this objective. You can find the answers to these questions and explanations of why each answer choice is correct or incorrect in the “Answers” section at the end of the chapter.
1. What is the Windows PowerShell command to install the Windows Server Update Services role and supporting features for use with the WID database?
A. Install-WindowsFeature -Name UpdateServices -IncludeAllSubFeatures
B. Install-WindowsFeature -Name UpdateServices -IncludeAllSubFeatures -IncludeManagementTools
C. Install-WindowsFeature -Name UpdateServices -IncludeManagementTools
D. Install-WindowsFeature -Name UpdateServices,UpdateServices-DB -IncludeManagementTools
2. What are the required GPOs to assign computers to WSUS groups? (Choose all that apply.)
A. Configure Automatic Updates
B. Specify intranet Microsoft update service location
C. Turn on recommended updates via Automatic Updates
D. Enable client-side targeting
3. What are the required postinstallation commands to configure WSUS to connect to a SQL Server database? (Choose all that apply.)
A. wsusutil postinstall content_dir=D:\WSUS
B. wsusutil postinstall SQL_INSTANCE_NAME=localhost content_dir=D:\WSUS
C. Set-WsusServerSynchronization -SyncFromMU
D. Invoke-WsusServerCleanup
Objective 1.3: Monitor servers
An important part of managing and maintaining servers is to monitor of faults, alerts, and events; and performance and bottlenecks.
This objective covers how to:
![]() Configure Data Collector Sets (DCSs)
Configure Data Collector Sets (DCSs)
![]() Configure alerts
Configure alerts
![]() Schedule performance monitoring
Schedule performance monitoring
![]() Monitor real-time performance
Monitor real-time performance
![]() Monitor virtual machines (VMs)
Monitor virtual machines (VMs)
![]() Monitor events
Monitor events
![]() Configure event subscriptions
Configure event subscriptions
![]() Configure network monitoring
Configure network monitoring
Configuring Data Collector Sets
A Data Collector Set (DCS) is the foundation of building performance monitoring and reporting that fits your environment and needs. A DCS organizes multiple data points from Windows Performance Monitor into a single collection.
You can create a DCS from an active Windows Performance Monitor view, from a template, manually by adding a custom combination of data logs, or by configuring performance counter alerts to monitor performance counters.
Creating DCS from Performance Monitor
To create a DCS from a Windows Performance Monitor view, first create the view by adding the counters to the Performance Monitor that you want to include in the DCS. Right-click Performance Monitor; then select New, Data Collection Set (see Figure 1-11).
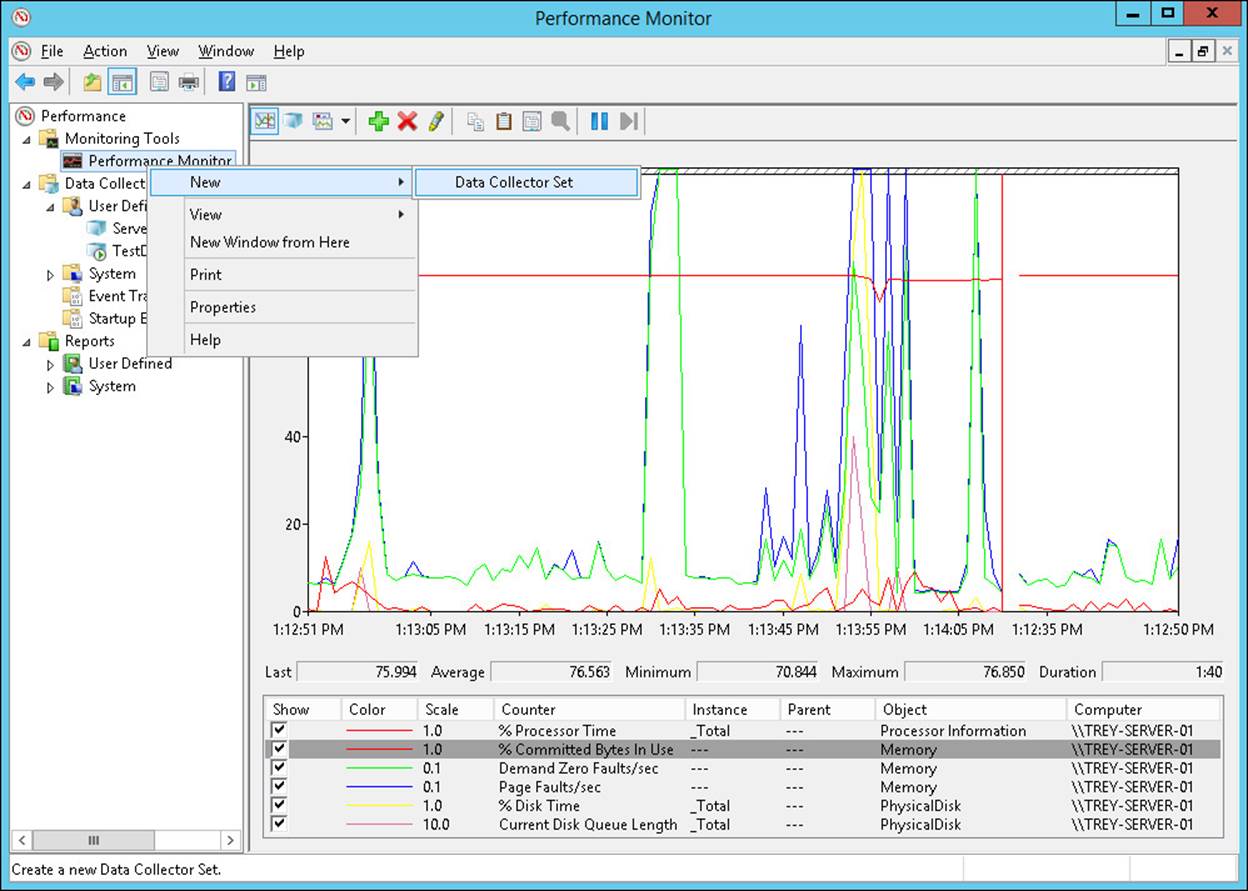
FIGURE 1-11 Creating a DCS from an existing Performance Monitor
New DCS are displayed in the User Defined section of the Performance Monitor console. You can modify the properties of the DCS to add a schedule, change storage details, configure start and restart conditions, and add tasks to run when the DCS stops.
Creating a DCS from a template
You can create a DCS from a template. There are four default templates, or you can browse to open additional templates if you have them. The four default templates are these:
![]() Basic Creates an empty DCS to which you can add counters.
Basic Creates an empty DCS to which you can add counters.
![]() System Diagnostics Generates a report on hardware resources, response times, and processes. Includes configuration data and suggestions for ways to improve performance
System Diagnostics Generates a report on hardware resources, response times, and processes. Includes configuration data and suggestions for ways to improve performance
![]() System Performance Generates a report on hardware resources, response times, and processes.
System Performance Generates a report on hardware resources, response times, and processes.
![]() WDAC Diagnostics Provides detailed debug information for Windows Data Access Components (DACs).
WDAC Diagnostics Provides detailed debug information for Windows Data Access Components (DACs).
After you create the DCS, you can modify its properties as described previously. You can save any user-defined DCS as a template to use as the basis for future DCS creation.
Creating a DCS manually
Rather than start from a DCS template, you can create the DCS manually. When you create a DCS manually, you can choose from two types of data to include the following:
![]() Data logs, which include a combination of the following:
Data logs, which include a combination of the following:
![]() Performance counters, which include any set of performance counters
Performance counters, which include any set of performance counters
![]() Event trace data, which includes any set of system or application events
Event trace data, which includes any set of system or application events
![]() System configuration information, which includes the value and changes to specified registry keys
System configuration information, which includes the value and changes to specified registry keys
![]() Performance counter alerts, which enable you to configure actions to take based on a threshold value of a performance counter
Performance counter alerts, which enable you to configure actions to take based on a threshold value of a performance counter
Configuring alerts
Performance counter alerts enable you to trigger actions and events based on the value of a performance counter. You specify the counter or counters to add to the DCS, whether your threshold value is a floor or ceiling threshold, and the limit for that threshold. You can also change where the DCS stores data, what action to take when the threshold is reached, and under which account the DCS runs.
To configure alerts, create a new manual DCS by using the steps described in the “Create a DCS Manually” section, and then use these steps:
1. In the Create new Data Collector Set Wizard, on the What Type Of Data Do You Want To Include page, select Performance Counter Alert.
2. Click Next and then click Add to add one or more Performance counters. On the Add performance counter dialog, shown in Figure 1-12, select one or more counters to add and then click the Add button to move them to the Added Counters field. Click OK when you’ve finished adding counters.
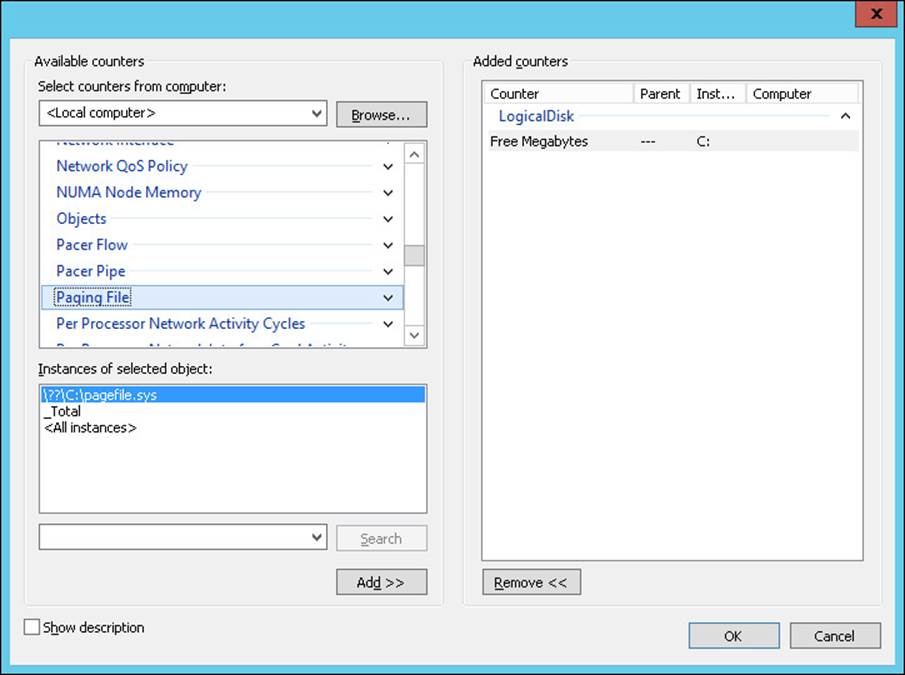
FIGURE 1-12 Adding counters
3. On the Which Performance Counters Would You Like To Monitor page, select a counter that you’ve added and in the Alert When box, select Above or Below from the drop-down list.
4. Enter the limit for the counter.
5. Repeat steps 4 and 5 for each counter you’ve added.
6. Click Next, and specify the account which the DCS should run, and then select Open Properties For This Data Collector Set.
7. Click Finish to open the properties for the DCS.
8. In the Properties for the DCS, set a schedule as described in “Scheduling performance monitoring" and set any additional properties needed.
Scheduling performance monitoring
Beginning in Windows Server 2012, you can determine when a DCS runs, so you can schedule regular performance monitoring. To schedule a DCS to run as a scheduled job, you have to configure the DCS.
The DCS can be set as a scheduled task during initial creation or after it is created by right-clicking on the DCS and selecting Properties to open the Properties dialog box for the DCS. Click the Schedule tab and click Add to add a schedule to the DCS, as shown in Figure 1-13.
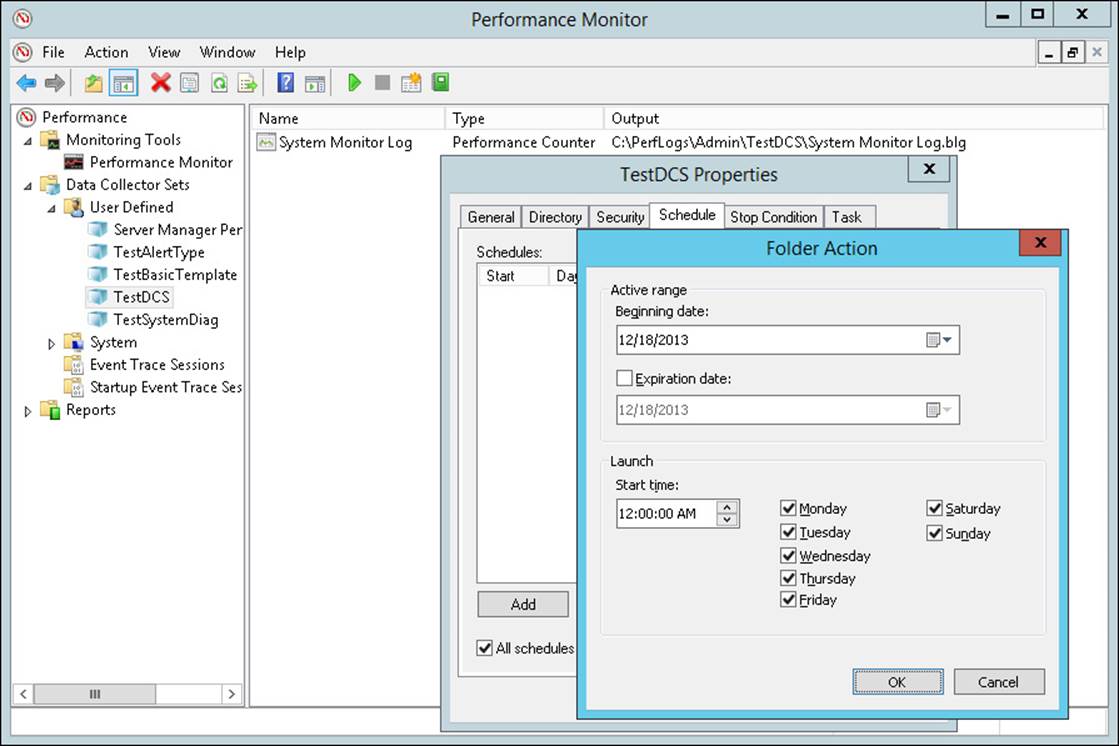
FIGURE 1-13 The Folder Action dialog box of the DCS Properties dialog box in Performance Monitor
Note: Managing permissions and rights required
To allow a scheduled DCS to run, it must be scheduled to run as a user with Log On As A Batch User rights. Members of the Performance Log Users and Administrators groups have this permission, or it can be assigned directly to a specified account by using a GPO.
Monitoring real-time performance
You can monitor real-time performance by using the Resource Monitor view of the Windows Performance Monitor. Start the Resource Monitor by using the shortcut in Administrative Tools by clicking the link in the Overview Of Performance Monitor pane of Windows Performance Monitor. You can also type perfmon /res from a command shell.
The Resource Monitor provides detailed real–time process monitoring, CPU usage, memory, logical and physical disk, and network usage. You can end a problem process or the entire tree of a problem process. You can also suspend a process (and resume previously suspended processes). When a process appears to be a problem, you can analyze the wait chain for the process to see whether it is a problem and what it is waiting for, as shown in Figure 1-14.
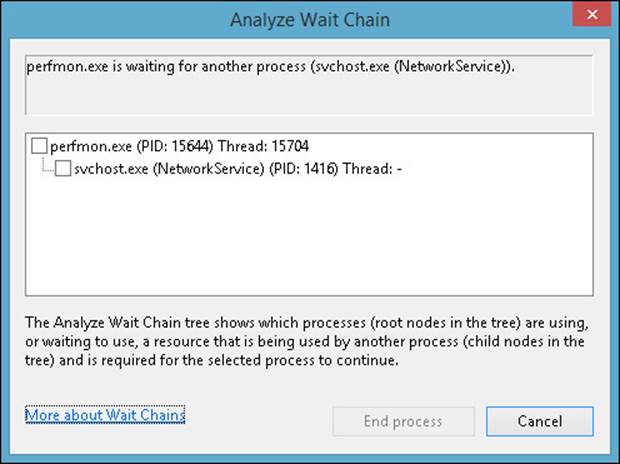
FIGURE 1-14 The Analyze Wait Chain dialog box
Monitoring virtual machines
All Hyper-V hosts include virtual machine (VM) resource pools that align with the resources that the host provides to guest VMs. These resource pools include processor, Ethernet, memory, and Virtual Hard Disk (VHD). By monitoring these resource pools, you can also monitor the aggregate usage of the resource by the guest VMs. You can also create new resource pools that measure a subset of a resource, such as the VHDs on a specific volume. To get a list of the resource pools, use the Get-VMResourcePool cmdlet. The default output on a Hyper-V host that hasn’t had any configuration done is the following:
Name ResourcePoolType ParentName ResourceMeteringEnabled
---- ---------------- ---------- -----------------------
Primordial FibreChannelConnection False
Primordial FibreChannelPort False
Primordial VFD False
Primordial ISO False
Primordial VHD False
Primordial Memory False
Primordial Ethernet False
Primordial Processor False
The predefined resource pools are named Primordial to indicate that they represent the resources of the entire host machine. To enable a pool, use the Enable-VMResourcePool cmdlet. To enable resource metering on all available pools, use this command:
Enable-VMResourceMetering *
The preceding command enables all resource pools on the host that have a resource to enable. On my host, it yielded the following:
Name ResourcePoolType ParentName ResourceMeteringEnabled
---- ---------------- ---------- -----------------------
Primordial FibreChannelConnection False
Primordial VFD False
Primordial ISO False
Primordial VHD True
Primordial Ethernet True
Primordial Memory True
Primordial FibreChannelPort False
Primordial Processor True
The pools that still show False were not enabled because there are no resources associated with them.
Creating new VM resource pools
You can create new VM resource pools that monitor subsets of the primordial pool. For example, to create a new resource pool to monitor the resources used by the VHDs on the E drive, create a new VM resource pool with the following command:
New-VMResourcePool "E-Drive" VHD -Paths "E:\"
Name ResourcePoolType ParentName ResourceMeteringEnabled
---- ---------------- ---------- -----------------------
E Drive Pool VHD {Primordial} False
Monitoring resource usage by VMs
You can use VM resource pools to monitor the resource usage of specific VMs. To enable resource metering on the VM trey-dc-02, use the following command:
Enable-VMResourceMetering -VMName trey-dc-02
To see the resource usage of trey-dc-02, use this command:
Measure-VM -VMName trey-dc-02
VMName AvgCPU AvgRAM MaxRAM MinRAM TotalDisk Network Network
(MHz) (M) (M) (M) (M) Inbound(M) Outbound(M)
--------------- ------- ----- ------ ------ --------- ---------- -----------
trey-dc-02 20 1358 1358 1358 130048 7 2
Because Measure-VM supports lists of VMs, you can quickly get the resource usage of all the VMs running on the local machine:
Get-VM | Measure-VM
VMName AvgCPU AvgRAM MaxRAM MinRAM TotalDisk Network Network
(MHz) (M) (M) (M) (M) Inbound(M) Outbound(M)
--------------- ------- ----- ------ ------ --------- ---------- -----------
charlie-monster 0 0 0 0 0 0 0
trey-dc-02 20 1382 1420 1342 130048 79 16
trey-server-01 102 1010 1044 972 334848 16 5
trey-Server-02 45 5803 5838 5682 260096 4 3
trey-wds-11 16 1688 1744 1638 348862 14 73
vm-ts-05 73 1287 1401 1248 130048 113 14
Win7-DRM 0 0 0 0 0 0 0
This is useful, but the VM cmdlets also support remoting, so you can easily get the status of a remote machine as well:
Enable-VMResourceMetering * -ComputerName hp350-srv8-7
Get-VM -ComputerName hp350-srv8-7 | Measure-VM
VMName AvgCPU AvgRAM MaxRAM MinRAM TotalDisk Network Network
(MHz) (M) (M) (M) (M) Inbound(M) Outbound(M)
--------------- ------- ----- ------ ------ --------- ---------- -----------
HP350-TS-05 20 2703 2703 2703 539648 2 2
srv2 290 16384 16384 16384 614401 3 3
Monitoring events
Event monitoring has not materially changed in Windows Server 2012 or Windows Server 2012 R2 over the behavior and tools available in Windows Server 2008—with the exception of a limited number of Windows PowerShell cmdlets. The exam questions will likely focus on that one area that is new while retaining some legacy questions such as how to create a custom event view.
Creating custom views
You can create custom Event Viewer views by opening the Event Viewer console (eventvwr.msc) and clicking Create Custom View in the Actions pane. Specify the time period for the view in the Logged drop-down list, and set the Event Level to View. Continue configuring what you want to see in the custom view. As shown in Figure 1-15, you can track by log or by source, and specify Event IDs, task categories, keywords, and the user and computer that generated the event.

FIGURE 1-15 The Create Custom View dialog box of the Event Viewer console
Using Windows PowerShell to monitor events
You can use Windows PowerShell to monitor events. A quick way to get a list of all available event–related Windows PowerShell cmdlets, organized to make it easier to find what you need, is to use this command:
Get-Command *event*,*counter* | sort noun,verb | Format-Table -auto Verb,Noun,Module
This command gives you a list of all the Windows PowerShell cmdlets on the current computer that have “event” or “counter” in their name, sorted by noun.
Some of the common Windows PowerShell cmdlets used for server monitoring are shown in Table 1-2.
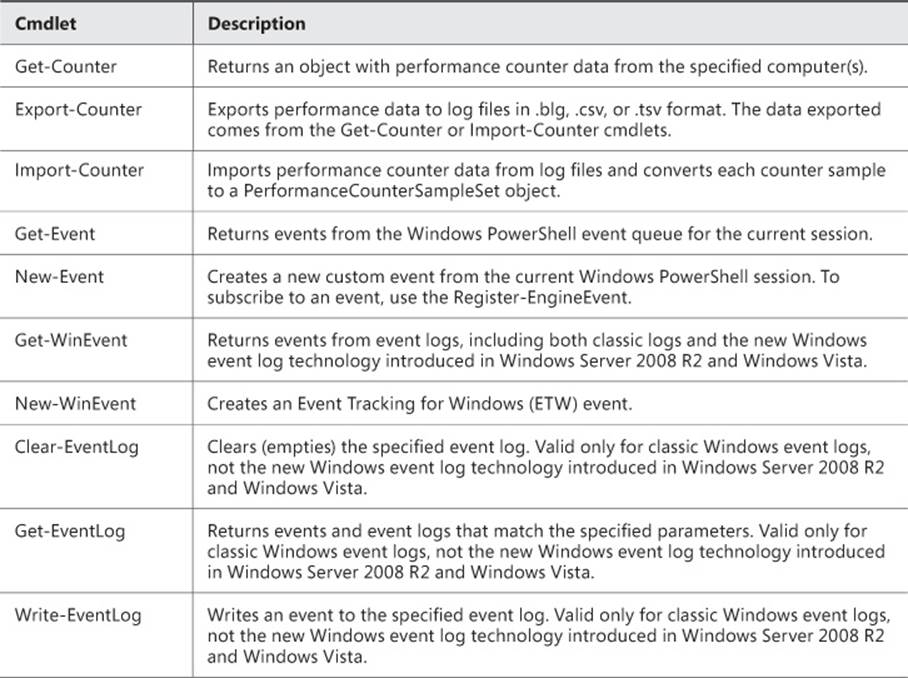
TABLE 1-2 Popular Windows PowerShell cmdlets for server monitoring
Using event subscriptions
Event Viewer allows you to connect to a remote computer, but only one at a time. This limitation can make it difficult to collect events that span multiple computers, and it is positively tedious to try to capture the event health of your entire network. However, beginning in Windows Server 2008, you can create subscriptions to enable multiple computers to forward events from multiple logs to a single computer for evaluation.
When you create an event subscription, you specify exactly which events are forwarded and in which log they are stored locally. When you have the subscription events in a local log, you can view and process them in the same way you would a local event.
Configuring for event subscriptions
Before you can use event subscriptions, both the event sender (forwarder) and event receiver (collector) have to be configured to support the subscription. On each source (forwarding) computer, you have to enable and configure Windows Remote Management (WinRM) with this command:
WinRM quickconfig
You have to run the same WinRM command on the collector computer if you need to configure event delivery optimization. In addition, you have to run the wecutil qc command on the collector computer from an elevated prompt.
Finally, add the collector computer’s account to the local Administrators group on each of the source computers. This is sufficient configuration on domain-joined computers that are all part of the same (or a trusted) domain. Additional configuration is required for workgroup computers:
![]() Only pull subscriptions are supported.
Only pull subscriptions are supported.
![]() A Windows Firewall exception is required.
A Windows Firewall exception is required.
![]() A local administrative account must be added to the Event Log Readers group on each source computer.
A local administrative account must be added to the Event Log Readers group on each source computer.
![]() Each source computer must be a trusted host for WinRM on the collector computer:
Each source computer must be a trusted host for WinRM on the collector computer:
WinRM set winrm/config/client @{TrustedHosts="<source1>,<source2>,..."}
Creating a new event subscription
After you configure the source and collector computers to support event subscriptions, you can create a new subscription in Event Viewer by following these steps:
1. Select Subscriptions in the left pane and click Create Subscription in the Actions pane.
2. Configure the subscription properties, including name, destination log, and source computers.
3. Select the events to collect, as shown in Figure 1-16. Click OK.
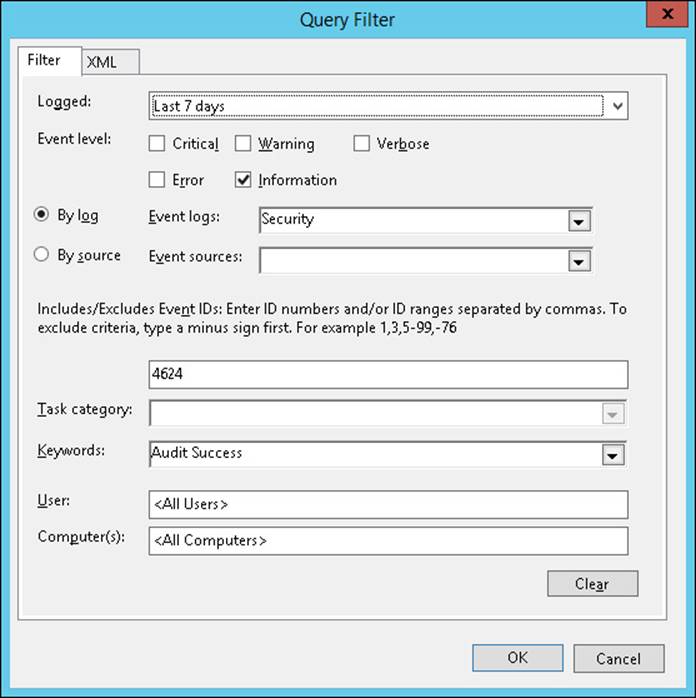
FIGURE 1-16 The Query Filter dialog box of Event Viewer
4. To optimize event delivery, click the Advanced button. You can configure event delivery optimization to the following:
![]() Normal Uses pull delivery mode and batches 5 items at a time with a timeout of 15 minutes
Normal Uses pull delivery mode and batches 5 items at a time with a timeout of 15 minutes
![]() Minimize Bandwidth Uses push delivery with a batch timeout of six hours and a heartbeat interval of six hours
Minimize Bandwidth Uses push delivery with a batch timeout of six hours and a heartbeat interval of six hours
![]() Minimize Latency Uses push delivery mode with a batch timeout of 30 seconds
Minimize Latency Uses push delivery mode with a batch timeout of 30 seconds
Configuring network monitoring
Windows Server 2012 R2 provides a new module of Windows PowerShell cmdlets to enable network packet capturing. The NetEventPacketCapture module includes the cmdlets shown in Table 1-3.
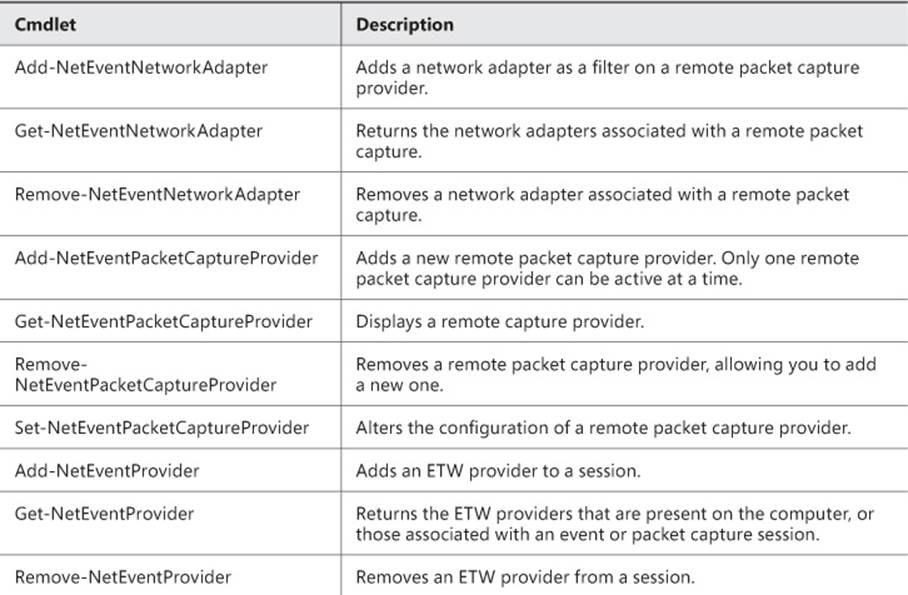
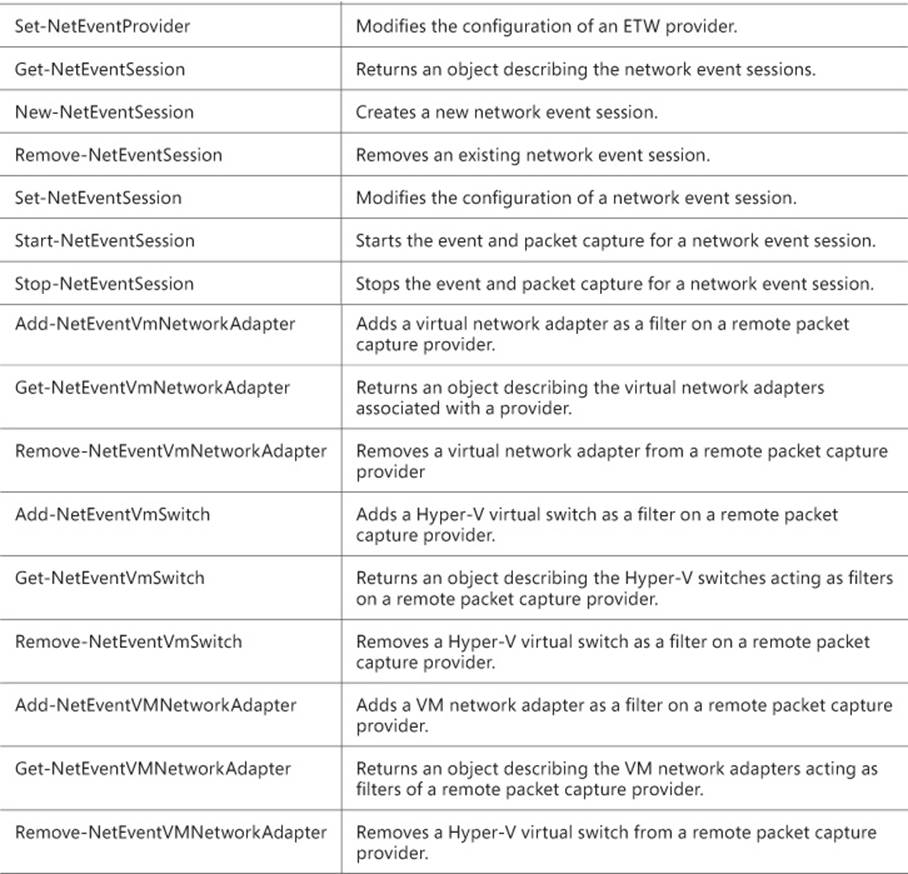
TABLE 1-3 NetEventPacketCapture cmdlets
 Thought experiment: Monitoring events remotely
In this thought experiment, apply what you’ve learned about this objective. You can find answers to these questions in the “Answers” section at the end of this chapter.
You are the network administrator for TreyResearch.net, and you have a mix of servers, some running Windows Server Core and some running full Windows Server installations. You have to manage these servers remotely.
1. How can you review individual System event logs across all the computers, limiting the events to the last 40 events per computer?
2. How can you clear the Applications event log on all the computers?
3. How can you get current performance counter data from individual servers?
4. How can you get an aggregate report of performance data from the servers?
Objective summary
![]() A data collector set (DCS) enables you to aggregate multiple event and performance data sources and types into a single view of the data to improve analysis.
A data collector set (DCS) enables you to aggregate multiple event and performance data sources and types into a single view of the data to improve analysis.
![]() DCS can be built directly from the Performance Monitor view in the console, allowing you to interactively build the data set you want and then save the view as a DCS.
DCS can be built directly from the Performance Monitor view in the console, allowing you to interactively build the data set you want and then save the view as a DCS.
![]() You can build a DCS from a preconfigured template that already has the basic data you’re looking for; then modify that data set and save it back out as a template for later reuse.
You can build a DCS from a preconfigured template that already has the basic data you’re looking for; then modify that data set and save it back out as a template for later reuse.
![]() You can also build a DCS manually, choosing the type and mix of data that the DCS will include. Data can be data logs, such as performance counters, event trace data, and system configuration information. Or it can be performance counter alerts, allowing you to take actions based on the value of a performance counter.
You can also build a DCS manually, choosing the type and mix of data that the DCS will include. Data can be data logs, such as performance counters, event trace data, and system configuration information. Or it can be performance counter alerts, allowing you to take actions based on the value of a performance counter.
![]() You can schedule a DCS to run at a specific time or at regular intervals to allow you to monitor and react to changes in server performance.
You can schedule a DCS to run at a specific time or at regular intervals to allow you to monitor and react to changes in server performance.
![]() You monitor real-time performance with the Resource Monitor. You can open up the Resource Monitor from the command line with perfmon /res, but this allows you to see only the local computer. If you open up perfmon.mmc (or choose Performance Monitor from the Server Manager Tools menu), you can connect to another computer first and then open the Resource Monitor on the remote computer.
You monitor real-time performance with the Resource Monitor. You can open up the Resource Monitor from the command line with perfmon /res, but this allows you to see only the local computer. If you open up perfmon.mmc (or choose Performance Monitor from the Server Manager Tools menu), you can connect to another computer first and then open the Resource Monitor on the remote computer.
![]() Hyper-V VM hosts include VM resource pools that provide resources to the guest VMs. You can monitor these resources with the VMResourcePool and VMResourceMetering cmdlets.
Hyper-V VM hosts include VM resource pools that provide resources to the guest VMs. You can monitor these resources with the VMResourcePool and VMResourceMetering cmdlets.
![]() Event Viewer lets you see all the events on your local computer or a remote computer, but it can be difficult to identify the source of a problem if there are too many other events hiding the ones you’re looking for. By creating custom views, you can focus in on a subset of events. To identify events across multiple servers, use Event Subscriptions to get events from remote computers.
Event Viewer lets you see all the events on your local computer or a remote computer, but it can be difficult to identify the source of a problem if there are too many other events hiding the ones you’re looking for. By creating custom views, you can focus in on a subset of events. To identify events across multiple servers, use Event Subscriptions to get events from remote computers.
Objective review
Answer the following questions to test your knowledge of the information in this objective. You can find the answers to these questions and explanations of why each answer choice is correct or incorrect in the “Answers” section at the end of the chapter.
1. How can you monitor real-time performance on a remote computer?
A. Run Resource Monitor from the Administrative Tools folder.
B. Run the command perfmon /res from an elevated prompt.
C. Run Performance Monitor and connect to the remote computer. Then right-click Monitoring Tools and select Resource Monitor from the Action menu.
D. Open a remote desktop session on the remote computer and then run Resource Monitor from the Administrative Tools folder.
E. Create a PSSession to the remote computer with New-PSSession; then enter the session with Enter-PSSession. Run the command perfmon /res in the remote PSSession.
2. What Windows PowerShell commands can you use to measure the Hyper-V VHD resource usage of the VM trey-wms-11? (Choose all that apply.)
A. Enable-VMResourceMonitoring -VmName trey-wms-11
B. Enable-VMResourceMetering -VmName trey-wms-11
C. Measure-VM -VMName *
D. (Measure-VM -VMName trey-wms-11).HardDiskMetrics
E. Measure-VM -ComputerName trey-wms-11 -VHD
F. (Measure-VM -VmName trey-wms-11).Totaldisk
Answers
This section contains the solutions to the thought experiments and answers to the lesson review questions in this chapter.
Objective 1.1: Thought experiment
1. Inject the vendor–provided driver package that supports the new hardware into the existing boot image using Import-WdsDriverPackage and Add-WdsDriverPackage.
2. Create a new WDS group for the Finance, Accounting, and Human Resources department servers. Using the updated boot image created in answer #1, build a template server with the new software. After full testing of the new hardware and software together, sysprep the template server and create a capture image in the Windows Deployment Services console. You can use that image to create a new template image. Add the new hardware Media Access Control (MAC) addresses to the Active Directory Prestaged Devices folder in the Windows Deployment Services console, specifying the appropriate OU for the computer accounts.
Objective 1.1: Review
1. Correct answers: A, B
A. Correct: An active DHCP server is required to provide an IP address for the PXE boot process.
B. Correct: A working and reachable DNS server is required to allow the PXE server and PXE client to find each other.
C. Incorrect: ReFS is not supported for the WDS image store. Only NTFS is required.
D. Incorrect: WDS can be installed in stand-alone mode, which doesn’t require Active Directory.
2. Correct answer: C
A. Incorrect: A boot image is used by a PXE boot. In this scenario, you boot from the local hard disk.
B. Incorrect: An install image is used to install a new version of Windows on a target computer. In this scenario, you boot from a running instance of Windows to capture the image for use on other computers.
C. Correct: A capture image is used to capture the image of a working computer.
D. Incorrect: A discover image is used when booting to a USB or DVD, not for capturing.
3. Correct answer: D
A. Incorrect: This command adds a boot image to a WDS image store.
B. Incorrect: This command adds a driver package to a WDS driver store.
C. Incorrect: This command changes the properties of a WDS boot image.
D. Correct: This command can be used to insert a driver package into an offline, locally mounted boot image.
Objective 1.2: Thought experiment
1. Yes, but only if you use VMs running on Hyper-V. Because WDS isn’t supported on a Windows Server Core installation, you have to install WSUS on a full GUI install if they are on the same server
2. One, but by using only VMs. You need at least two virtualized Windows servers (preferably three): two running a core installation and one running a GUI installation, to provide separation of roles while minimizing the security and patching footprint. The physical server can also be a Windows Server 2012 R2 core installation with only the Hyper-V role installed.
3. You can install the infrastructure roles—DNS, DHCP and AD DS—on a single virtualized server with Windows Server 2012 R2 core installation while putting the Windows Deployment Services role on a separate Windows Server 2012 R2 full installation. It is technically possible to add the Windows Server Update Services role onto the infrastructure server, but it’s a better practice to keep the patching separate from the AD DS server.
Objective 1.2: Review
1. Correct answer: C
A. Incorrect: The -InstallAllSubFeatures parameter tries to install both the WID and SQL database, which isn’t supported. No Management Tools are installed.
B. Incorrect: The -InstallAllSubFeatures parameter tries to install both the WID and SQL database, which isn’t supported.
C. Correct: Installs the UpdateServices role with the default WID database along with the required Management Tools.
D. Incorrect: Installs the SQL Server database, not the WID database.
2. Correct answers: A, D
A. Correct: Automatic Updates must be configured before the client can connect to the WSUS server to register and be placed in a WSUS group.
B. Incorrect: Client computers can connect directly to Microsoft Update to actually download updates but still register and be placed in a WSUS group.
C. Incorrect: Recommended updates has nothing to do with assigning computers to groups.
D. Correct: This GPO enables client-side targeting and specifies the WSUS group in which the client should be placed.
3. Correct answers: B, C
A. Incorrect: This command sets the content directory for the WID database.
B. Correct: This command sets the content directory to a local SQL Server database and the content directory.
C. Correct: This command sets the WSUS Server Synchronization to download and sync updates from Microsoft Update. A synchronization source has to be set before WSUS can download updates.
D. Incorrect: This command cleans up outdated or replaced updates on a working WSUS server. It doesn’t do postinstallation cleanup.
Objective 1.3: Thought experiment
1. Create a simple Windows PowerShell script to poll the System event log on the servers:
PollServers.PS1
# Script to poll servers for recent System Event Log activity
$Servers = @("Trey-DC-02","Trey-wds-11","Trey-Server-01","Trey-Server-02")
ForEach ($srv in $Servers ) {
Echo "System Event Log for Server $srv`:"
Echo "------------------------------------"
Get-EventLog -ComputerName $srv -LogName System -Newest 40
Echo " "
}
Note that although I show this as a script, you can easily run the commands interactively from Windows PowerShell.
2. Foreach ($srv in $servers){ Clear-EventLog -LogName Application -ComputerName $srv }
3. Get-Counter -ComputerName <computername>
4. Create a DCS that contains the performance data you want to collect; then schedule the DCS to run at appropriate intervals on each server, forwarding the result to the server on which you’re collecting the data. After each run, set a task to clear the counters.
Objective 1.3: Review
1. Correct answer: D
A. Incorrect: This allows you to monitor real-time performance with Resource Monitor, but you can’t connect to a remote computer from inside the Resource Monitor.
B. Incorrect: This allows you to monitor real-time performance with Resource Monitor, but you can’t connect to a remote computer from inside the Resource Monitor.
C. Incorrect: Even though you’re connecting to a remote computer for data collection, this still opens a local instance of Resource Monitor.
D. Correct: This opens a remote session and the version of Resource Monitor will be running on the remote computer.
E. Incorrect: Remote PSSessions can’t interact with graphical applications to send the display back to your local computer.
2. Correct answers: B, F
A. Incorrect: This is not a valid command.
B. Correct: This is the command to start resource monitoring of a the specific Hyper-V VM.
C. Incorrect: This gives you resource data on all VMs. Yes, it will include the disk usage for trey-wms-11, but mixed in with everything else, so you can’t easily act on it.
D. Incorrect: This gives you disk performance metrics for the virtual disk, but not the amount of disk space used.
E. Incorrect: This uses the -ComputerName parameter, rather than the VMName. ComputerName is used for the Hyper-V host name, not the virtual machine guest name.
F. Correct: This gives you just the hard disk usage of the VHD for trey-wms-11.