Exam Ref 70-413 Designing and Implementing a Server Infrastructure, Second Edition (2014)
Chapter 1. Plan and deploy a server infrastructure
The first step or phase in the process of any major project is planning. Building a comprehensive plan takes time and input from all parties with a vested interest in the project. Planning for a new server deployment requires knowledge of the existing environment and a good understanding of the overall IT goals and objectives. After you have the information you need, it is just a matter of putting the right pieces into place. With Windows Server 2012 R2, you can deploy both physical and virtual servers. System Center 2012 R2 Virtual Machine Manager (VMM) is the tool for deploying and managing all pieces of a virtualization infrastructure. File and storage services must also have a part in the overall plan to ensure that adequate resources are available and that new capabilities in Windows Server 2012 R2, such as storage tiering, are evaluated for possible incorporation.
Important: Have you read page xiv?
It contains valuable information regarding the skills you need to pass the exam.
Objectives in this chapter:
![]() Objective 1.1: Design and plan for an automated server installation strategy
Objective 1.1: Design and plan for an automated server installation strategy
![]() Objective 1.2: Implement a server deployment infrastructure
Objective 1.2: Implement a server deployment infrastructure
![]() Objective 1.3: Plan and implement server upgrade and migration
Objective 1.3: Plan and implement server upgrade and migration
![]() Objective 1.4: Plan and deploy Virtual Machine Manager services
Objective 1.4: Plan and deploy Virtual Machine Manager services
![]() Objective 1.5: Plan and implement file and storage services
Objective 1.5: Plan and implement file and storage services
Objective 1.1: Design and plan for an automated server installation strategy
Automation is a vital part of keeping any IT infrastructure running smoothly. Microsoft provides a variety of tools to help the IT administrator automate almost every task required to get the job done. Specific tools for deploying server images include the Deployment Image Servicing and Management (DISM) utility, the Windows Assessment and Deployment Kit (ADK) and Windows Deployment Services (WDS).
Building the right deployment strategy depends a great deal on the number of systems to be deployed and their location. Installing a full blown deployment infrastructure would not be appropriate for small organizations with a limited number of servers. All automated deployment strategies require the use of a baseline image containing the necessary drivers for the target hardware or, in the case of virtual images, a base operating system image. Understanding how to create these baseline images will be important to the success of any deployment.
Other key parts of a server deployment strategy include the use of staging servers and proper network configuration to support the transfer of everything necessary to get a system up and running regardless of location.
This objective covers how to:
![]() Understand design considerations for deployment images
Understand design considerations for deployment images
![]() Design a server implementation using Windows Assessment and Deployment Kit (ADK)
Design a server implementation using Windows Assessment and Deployment Kit (ADK)
![]() Design a virtual server deployment
Design a virtual server deployment
![]() Plan for deploying servers to Microsoft Azure IaaS
Plan for deploying servers to Microsoft Azure IaaS
![]() Plan for deploying servers using App Controller and Windows PowerShell
Plan for deploying servers using App Controller and Windows PowerShell
![]() Plan for multicast deployment
Plan for multicast deployment
![]() Plan for Windows Deployment Services (WDS)
Plan for Windows Deployment Services (WDS)
Understanding design considerations for deployment images
Before you get started with building images, it’s important to understand the most common scenarios for deploying them, including deciding whether to use thin or thick images, deciding how much automation to use (zero touch, light touch, and so on), how many images you need for a given scenario, and the best way to design the deployment infrastructure based on a given scenario. You can then move on to actually building images to meet the specific scenarios necessary for your implementation.
One of the key aspects of crafting a plan for an automated server deployment capability is to build a baseline or reference image to use as a part of the installation process. Bare metal deployments require one baseline image from which to boot and one for the actual installation. In this sense, a bare metal machine has no operating system installed or has its existing operating system totally replaced. For virtual deployment scenarios, it is possible to create a baseline virtual machine without going through the entire installation process because the underlying hardware doesn’t change. Other pieces of the deployment puzzle include automated answer files and a networking infrastructure that supports Preboot eXecution Environment (PXE).
Figure 1-1 shows the process of designing a Windows image as outlined in the help file that accompanies the Windows Assessment and Deployment Kit (ADK). Physical images require more planning and a good understanding of the target environment. Any non-standard driver requirements need to be identified first to ensure a successful deployment.
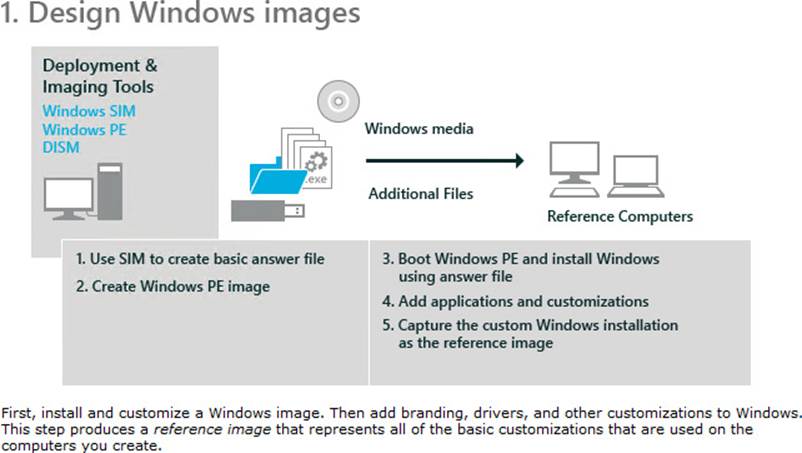
FIGURE 1-1 The help file from the Windows ADK Quick Start guide
Creating images
Several steps are required when creating images for use in operating system deployment. A typical deployment scenario uses two types of images: boot and install. Boot images typically use Windows PE to initialize the hardware prior to installing an operating system. Install images contain everything necessary to install the operating system.
One of the primary tools used to create and manipulate images is Deployment Image Servicing and Management (DISM). DISM comes with every version of Windows since Windows 7 and Windows Server 2008. Use DISM to perform the following tasks:
![]() Capture an image and save it as a WIM file
Capture an image and save it as a WIM file
![]() List all images within a WIM, VHD, or VHDX file
List all images within a WIM, VHD, or VHDX file
![]() Manage several images in a single WIM file by appending, removing, or enumerating the images
Manage several images in a single WIM file by appending, removing, or enumerating the images
![]() Prepare a Windows PE image
Prepare a Windows PE image
![]() List information about a Windows PE image
List information about a Windows PE image
![]() Mount a Windows image
Mount a Windows image
![]() List specific information about an image mounted from a WIM, VHD, or VHDX file, including where it is mounted, the mount status, and the index of each image in a WIM file
List specific information about an image mounted from a WIM, VHD, or VHDX file, including where it is mounted, the mount status, and the index of each image in a WIM file
![]() List all drivers in an image or information about a specific driver
List all drivers in an image or information about a specific driver
![]() Add out-of-box or boot-critical drivers to support new hardware
Add out-of-box or boot-critical drivers to support new hardware
![]() Add operating-system updates such as hotfixes and Windows features
Add operating-system updates such as hotfixes and Windows features
![]() Add or remove a language pack and configure international settings
Add or remove a language pack and configure international settings
![]() List all international settings and languages in an image
List all international settings and languages in an image
![]() Troubleshoot imaging problems using the integrated status and logging
Troubleshoot imaging problems using the integrated status and logging
![]() Manage multiple image versions
Manage multiple image versions
![]() List all features in a package or specific information about a Windows feature
List all features in a package or specific information about a Windows feature
![]() Check the applicability of a Windows Installer MSP file
Check the applicability of a Windows Installer MSP file
![]() Update multiple Windows editions by updating a single image
Update multiple Windows editions by updating a single image
![]() Upgrade to a later edition of Windows
Upgrade to a later edition of Windows
![]() List all the Windows editions to which an image can be upgraded
List all the Windows editions to which an image can be upgraded
![]() Apply settings using an Unattend.xml answer file
Apply settings using an Unattend.xml answer file
![]() Split a large WIM file into several smaller files to fit on selected media
Split a large WIM file into several smaller files to fit on selected media
Windows PE is a small operating system used as the basis of a boot image to install, deploy, and repair Windows. Tools for building Windows PE–based images come as part of the Windows ADK and should be downloaded and installed on a system running Windows 8, Windows 8.1, Windows Server 2012, or Windows Server 2012 R2. A boot.wim file uses Windows PE as the operating system and typically includes a setup executable and a WDS client.
The basic version of boot.wim can be found on either a Windows installation DVD or inside an ISO file of the Windows installation media. (You find boot.wim in the sources folder of either source.) This base boot.wim file can be used to create customized boot images for use by WDS. These customized boot images can be created using either the capture or discover method. A capture image is typically taken after the operating system and all roles, features, and applications have been installed.
The System Preparation (Sysprep) tool must be run on the target system prior to booting with the capture image. Sysprep converts a generalized system into a specialized state and back again. The resulting image can be deployed to any computer. Using Sysprep on an installed physical or virtual machine removes any information such as a security identifier (SID), making it possible to use a customized installation as a base image for other systems. Using the capture image on a physical system works particularly well when you have many installations to accomplish on the same type of hardware.
It is possible to convert WIM files directly to a virtual hard disk (VHD) with Windows PowerShell using a free tool. The latest version of this tool as of this writing is 6.3 and is available for download from the Microsoft Script Center site (http://technet.microsoft.com/en-us/scriptcenter/bb410849.aspx) under the name Convert-WindowsImage.ps1. Microsoft Consulting Services currently maintains the script, providing updates and bug fixes when necessary. Use the following command to launch a UI option and complete steps 1 through 4 in the dialog box to configure the VHD.
.\Convert-WindowsImage.ps1 -ShowUI
After you choose a source file in step 1, step 2 gives you the option to select from a list of versions (refer to Figure 1-2) for the stock-keeping unit (SKU) or type of image you want to create. Options include Windows Server 2012 R2 Standard with GUI or Core and Windows Server 2012 R2 Datacenter with GUI or Core. In step 3, you also have the option to choose to create a VHD or VHDX file. At the time of this writing, you must select VHD if you plan to push the virtual machine (VM) to Azure. With step 4, you apply your selections and create the VHD.
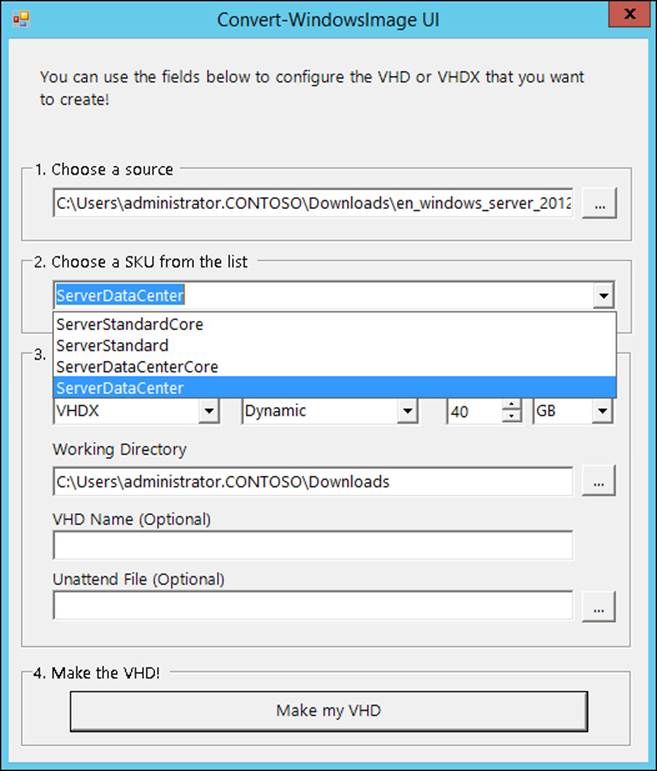
FIGURE 1-2 The Convert-WindowsImage PowerShell script
Microsoft Deployment Toolkit
Another free tool for automating the deployment process is the Microsoft Deployment Toolkit (MDT). MDT works in conjunction with the Windows ADK and requires it to be installed for some operations. Figure 1-3 shows an image from the MDT help file that describes the deployment process quite well. The MDT help file has a wealth of information about each of the steps outlined in the diagram.
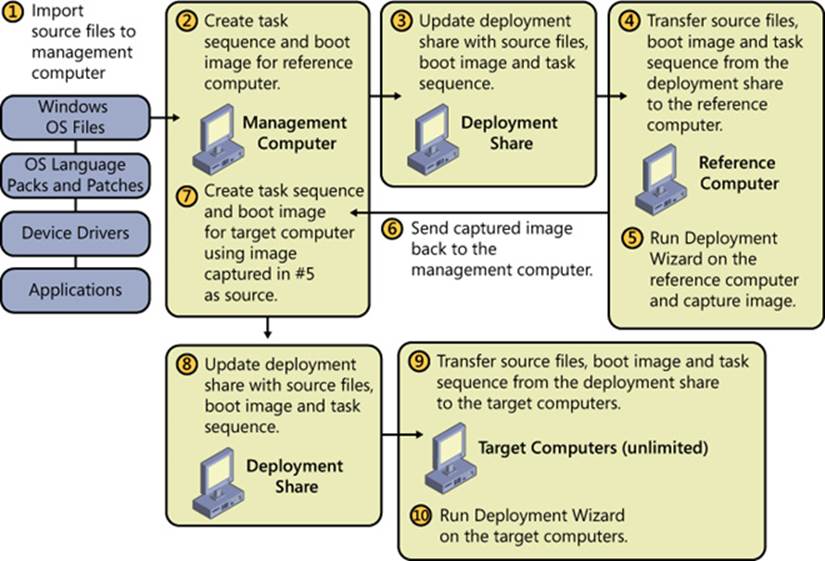
FIGURE 1-3 The ten steps to prepare for deployment
After the MDT is installed, you have access to the Deployment Workbench application with a list of capabilities and features. Figure 1-4 shows what the basic Deployment Workbench application looks like. If you look closely, you see a download operation in progress for the Windows Automated Installation Kit (x64). The Deployment Workbench requires a number of additional tools that must be installed in order to perform certain tasks. For convenience the Deployment Workbench makes it possible to download and install these additional pieces directly from the main Components window.
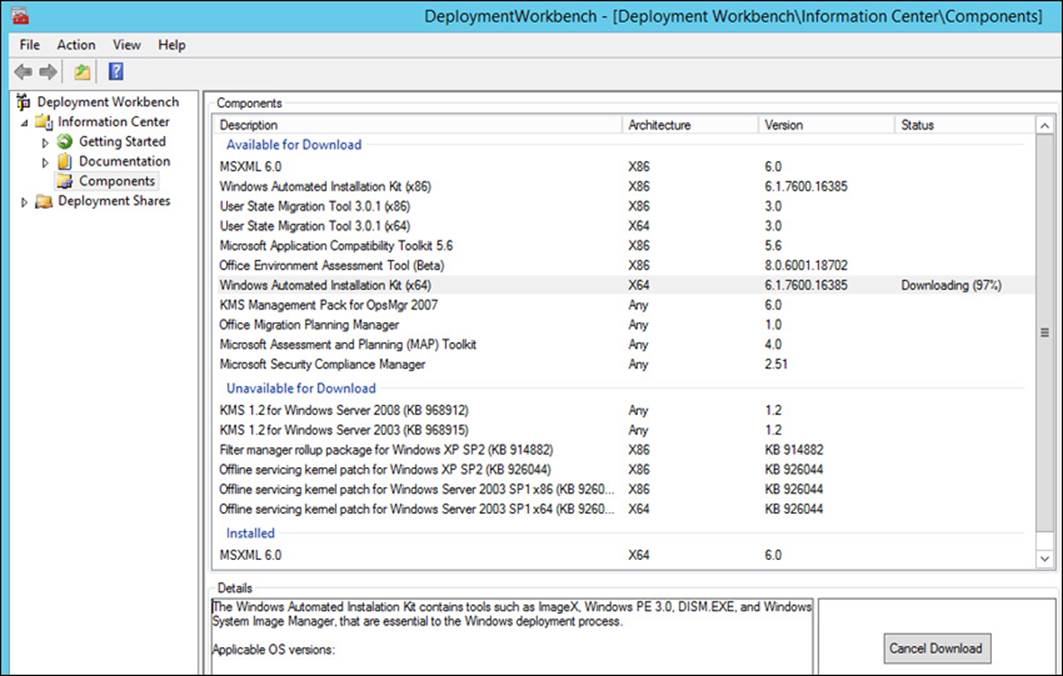
FIGURE 1-4 The Deployment Workbench
The Windows Automated Installation Kit (WAIK), which is required for performing some operations, can be downloaded and installed from the Deployment Workbench. Many of the role migrations require a deployment share to use for moving files between source and target systems. The Deployment Workbench configures a new share with appropriate permissions for you by using a wizard to prompt for all required information.
To launch the New Deployment Share Wizard, right-click Deployment in the console tree and choose New Deployment Share. Individual pages prompt for a path, file share, and descriptive name. The Options page (see Figure 1-5) allows you to configure default options for processes such as entering a product key and prompting for a local Administrator password. Click Next to see a Summary page and then a Progress page as a new share is created and all files are copied to the share.
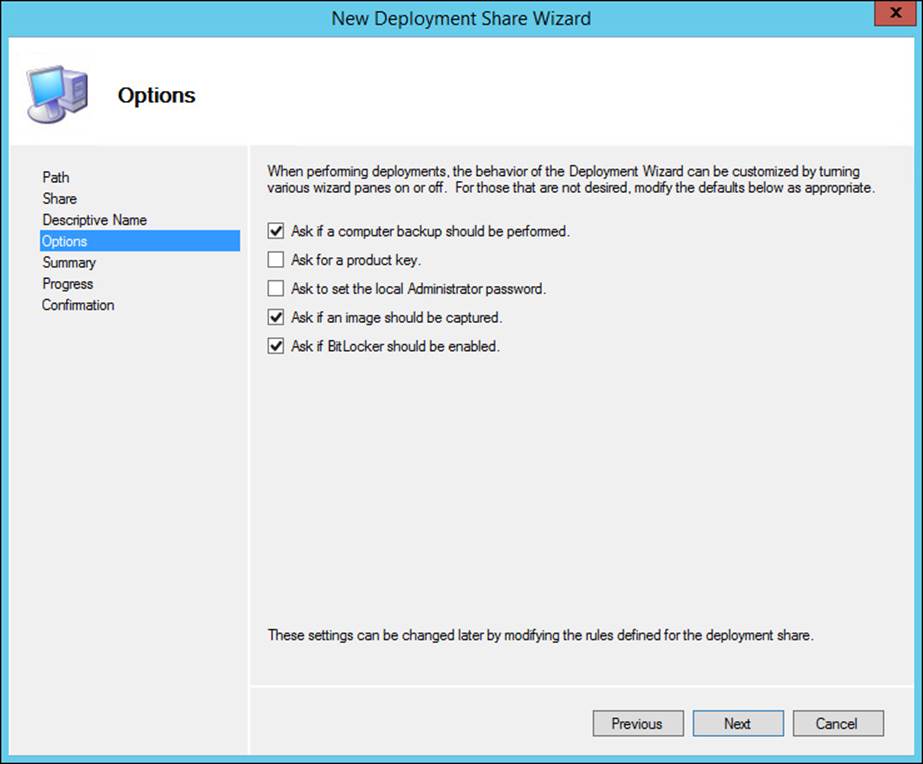
FIGURE 1-5 The Options page of the New Deployment Share Wizard
After the wizard completes, you should see a number of directories and files listed in the DeploymentShare, as shown in Figure 1-6.

FIGURE 1-6 The DeploymentShare directory
The last thing you might want to do is import an operating system image for use in later steps. Figure 1-7 shows the initial page of the Import Operating System Wizard. You can see the available options are a full set of source files, a custom image, or a WDS image.
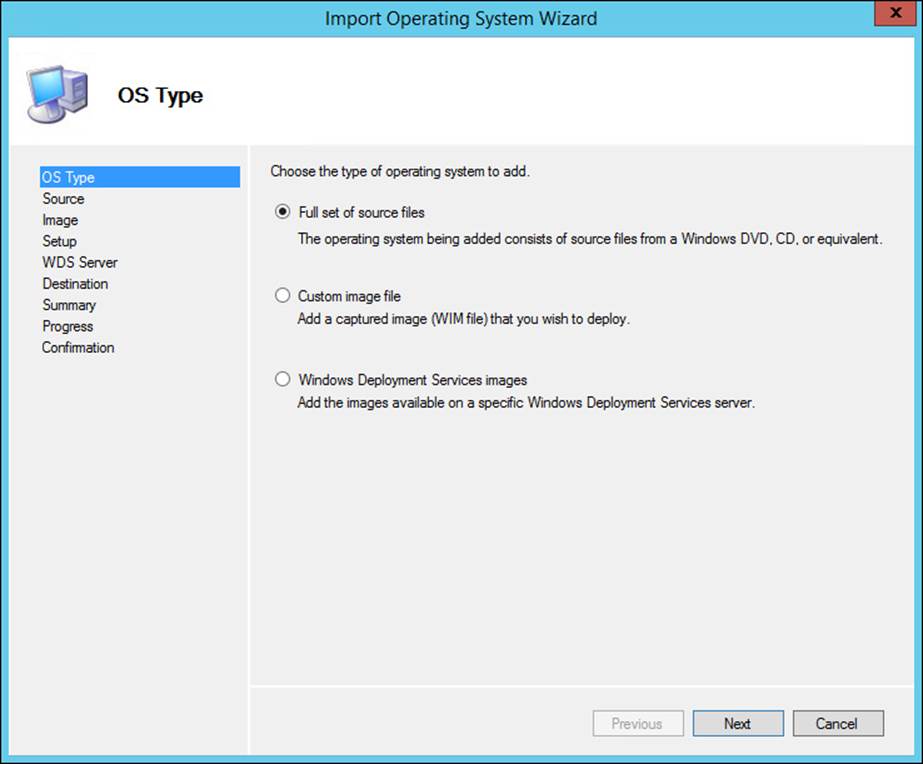
FIGURE 1-7 The Import Operating System Wizard
This wizard steps you through the process of importing an existing operating system from either a physical DVD or a mounted ISO file.
Using the Windows Assessment and Deployment Kit
The latest Microsoft release of the Windows ADK was published in October of 2013 and includes a number of useful tools. The tools of most interest for the purposes of this book include the Deployment Tools and Windows PE. You can use the assessment tool to look for any potential issues with hardware and drivers.
More Info: Windows PE
For more detailed information on Windows PE, visit http://technet.microsoft.com/en-us/library/hh825110.aspx. For a complete technical reference on all the Windows Deployment Tools, see http://technet.microsoft.com/en-us/library/hh825039.aspx.
Understanding how to use the different tools in the Windows ADK is an important part of a successful deployment and crucial for passing the certification exam.
 Exam Tip
The Windows ADK is used to create customized images and knowledge of it is a skill you must demonstrate for the test. Specifically, you should know how to use the Windows System Image Manager (SIM) to create answer files and Windows PE images.
The process of installing a Windows operating system involves answering a series of questions that would typically be answered in an interactive fashion. Creating an answer file provides a way to respond to the questions in an automated fashion for an unattended installation.
Windows SIM is a free tool from Microsoft that simplifies the process of creating an answer file. To use Windows SIM, you need an image file (WIM). It also requires a catalog file that will be created if not found. After the initial steps have completed, you should see a dialog box similar to the one in Figure 1-8.
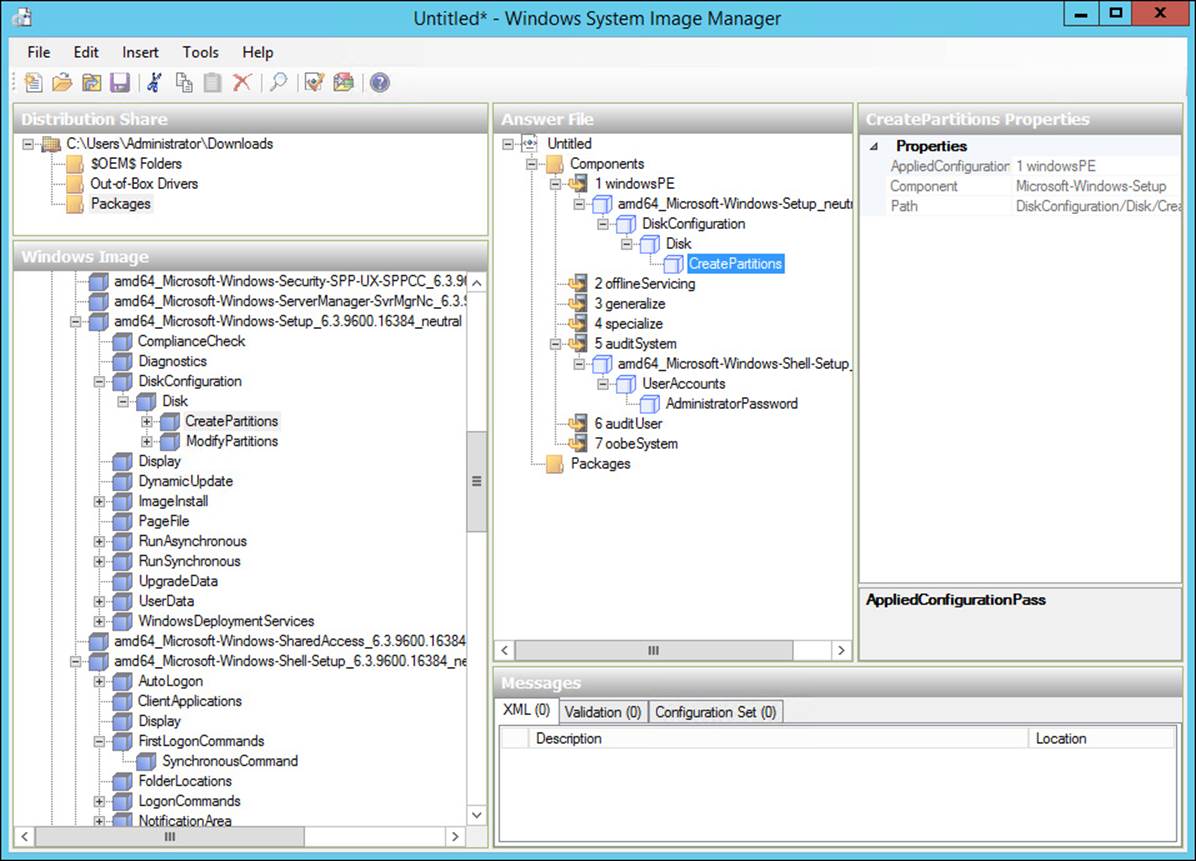
FIGURE 1-8 The Windows SIM tool
Note that the output of the Windows SIM tool is an XML file. If you use an answer file to specify information such as passwords, they will be stored in the clear unless you do something to obfuscate them. The latest version of Windows SIM has Hide Sensitive Data selected by default on the Tools menu.
Creating a new answer file consists of picking specific components from the Windows image you want to customize. Figure 1-8 shows two customizations added at this point in the process: one for creating a partition and the second to specify an Administrator password. Other possibilities include adding drivers that might not be in the standard distribution or adding custom logon instructions. After the customization is complete, choose File and then Save to save the XML file and validate the answers in the process. Any errors are displayed in the Validation tab.
Planning for deploying servers to Microsoft Azure IaaS
Microsoft Azure represents an ideal target for moving specific workloads up to the cloud. Infrastructure as a Service (IaaS) is a cloud computing service model in which a service provider owns and maintains hardware and equipment that you can use, usually paying on a per-use basis.
The two primary Microsoft services available on Azure as of this writing include Microsoft Active Directory and SQL Database. VMs make it possible to deploy any workload in addition to these services. A custom application can be deployed to Azure as a VM instance connecting to a SQL Server database and using Azure Active Directory for all authentication. This use case represents Azure taking advantage of the capability to scale individual VMs to meet demand as necessary.
Azure provides a number of preconfigured Windows Server images in the Image Gallery available for use as part of your deployment. You can also upload your own images as long as they are in the VHD format. Creating a new VM from the gallery uses the Azure management portal New function (see Figure 1-9). Sign in to the management portal, click on the New tab and then choose Compute, Virtual Machine, and then From Gallery to start the wizard.
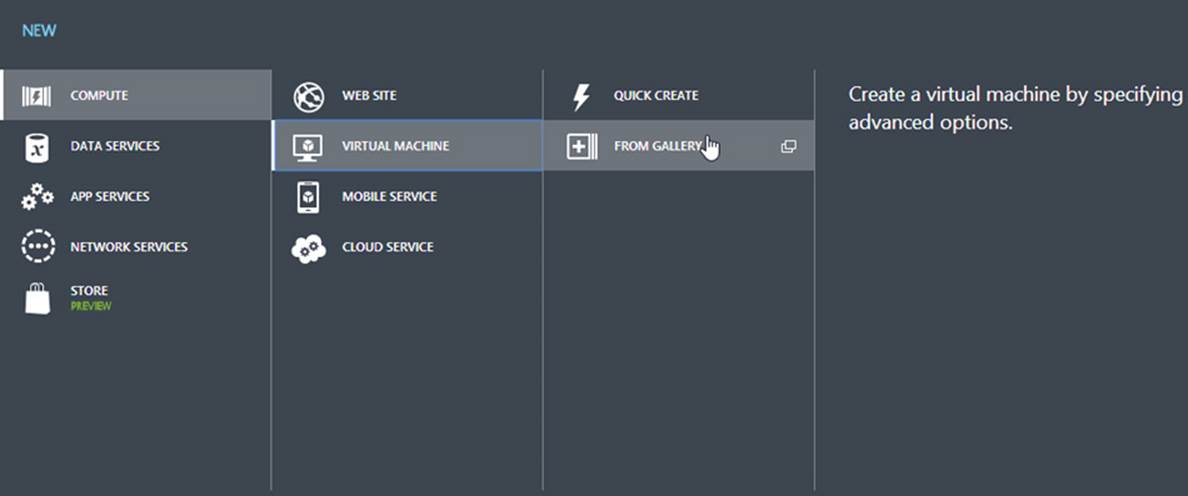
FIGURE 1-9 Creating a new VM
An Azure virtual network includes the capability to create a private network resident exclusively within Azure or connected to an on-premises network using a site-to-site virtual private network (VPN). A new network on Azure can be created by using either the management portal or with Microsoft Azure PowerShell. In the management portal, click the New tab, choose Networks, Virtual Network, and then Custom Create to start the configuration wizard. Figure 1-10 shows the Virtual Network Details page for creating a new virtual network.
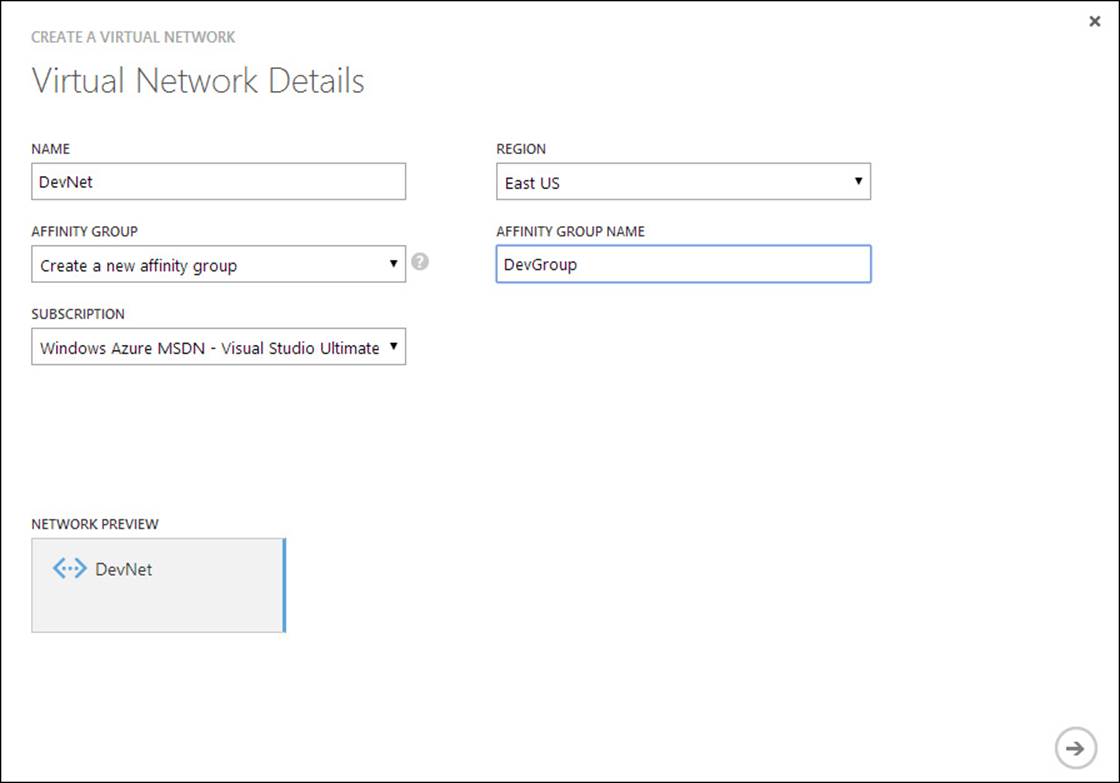
FIGURE 1-10 Create A Virtual Network page
Two additional pages let you specify a custom Domain Name System (DNS) provider and finally the range of IP addresses for the network. After a network is defined, you can provision VMs connected exclusively to that network. Another Azure configuration point concerns selecting a specific datacenter or region for VMs and websites. Azure has a construct called an affinity group that provides a mechanism to group services together and restrict them to a specific geographical location. Performance can be improved by locating workloads in the same datacenter or near the greatest number of users. An affinity group can be set by using either the management portal or Windows PowerShell. Figure 1-11 shows the management portal and the Settings page.
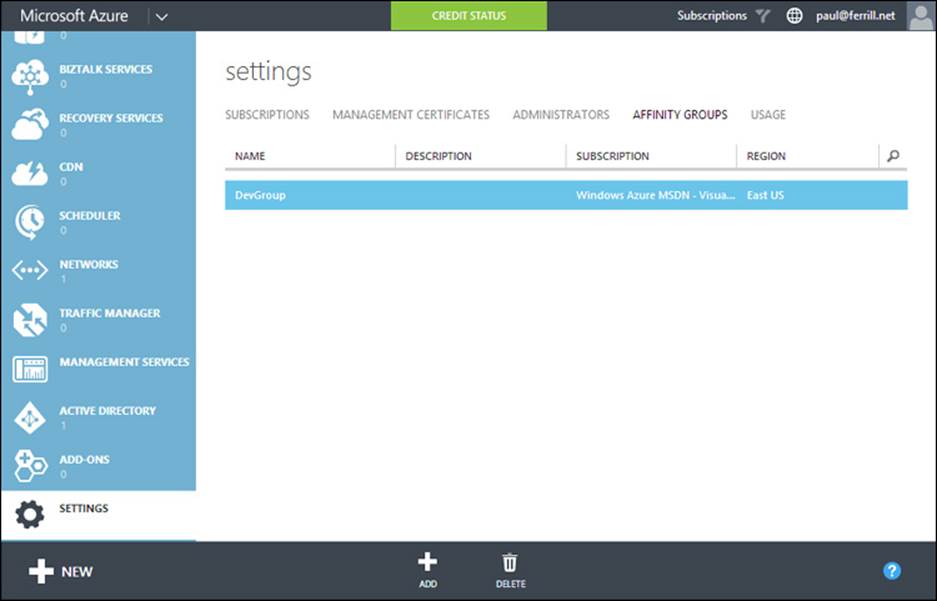
FIGURE 1-11 The Settings page for Affinity Groups
The Settings page includes the Affinity Groups item for creating new named groupings. A number of networking issues should be addressed during the deployment planning stages. These issues include the need for a site-to-site VPN connection and IP address issues to include name resolution. Azure networking includes support for any private address ranges to include 10.0.0.0/8, 172.16.0.0/12, and 192.168.0.0/16.
Choosing where to source your DNS servers depends on your overall network topology. For a hybrid on-premises and off-premises solution, you want to provide redundancy on both sides of the firewall. The Azure UI provides a convenient way to configure the main information such as the DNS server name and address and the IP address space. Figure 1-12 shows an example of this page.
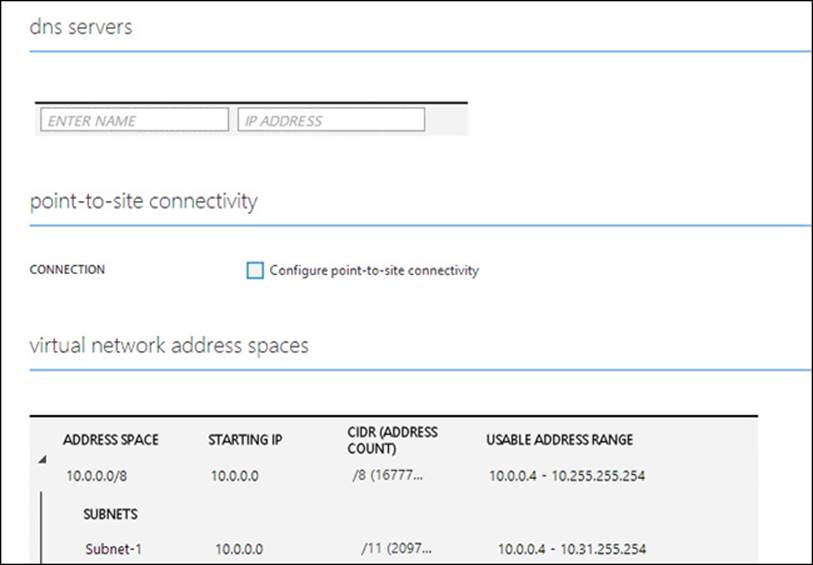
FIGURE 1-12 The Azure network Settings page
Planning for deploying servers using System Center App Controller and Windows PowerShell
With System Center 2012, Microsoft introduced App Controller, which is a tool to help configure, deploy, and manage VMs on-premises or in the cloud. App Controller provides a number of automation capabilities for deployment not found in any other Microsoft product. If you plan to use this tool, you need a number of supporting pieces, not the least of which is Microsoft System Center 2012 R2 VMM. You also need an Azure account to establish a connection between App Controller and the cloud.
App Controller is meant to be used by application or service owners as well as system administrators, so it depends on a VMM administrator to configure networks or create the various profiles used to create new VM instances. Figure 1-13 shows the web-based interface that is available after the App Controller installation is finished.
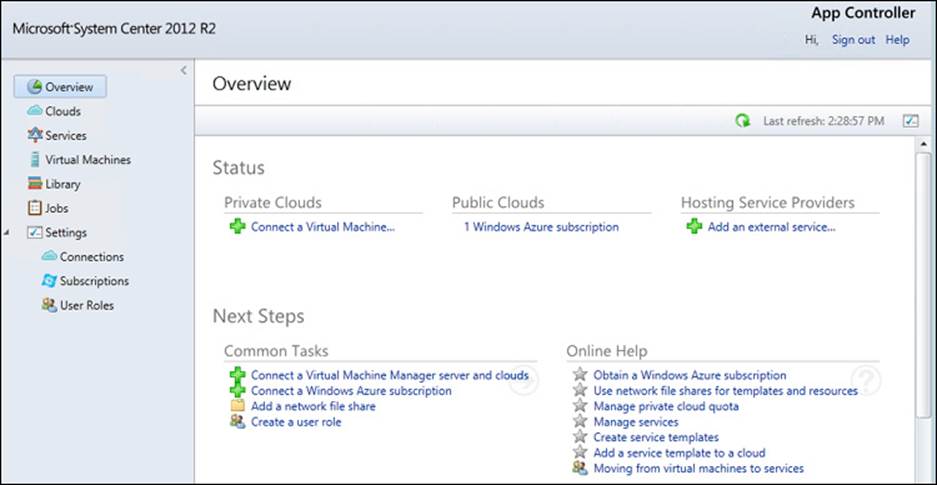
FIGURE 1-13 The Overview page in the App Controller user interface
If you don’t have a private cloud defined in VMM, you have to do that before you proceed. App Controller is the link between a private and public cloud and deals with entities only at the cloud level.
Azure first steps
The best way to learn about any subject is to practice as much as possible. Microsoft makes that easy with trial Azure subscriptions. A link on the Azure website lets anyone sign up for a one-month trial. Azure uses certificates to secure the connection between a specific subscription and a management platform such as System Center. A certificate for Internet Information Services (IIS) should be created during the installation of App Controller and is visible from the IIS Manager Server Certificates page (see Figure 1-14).
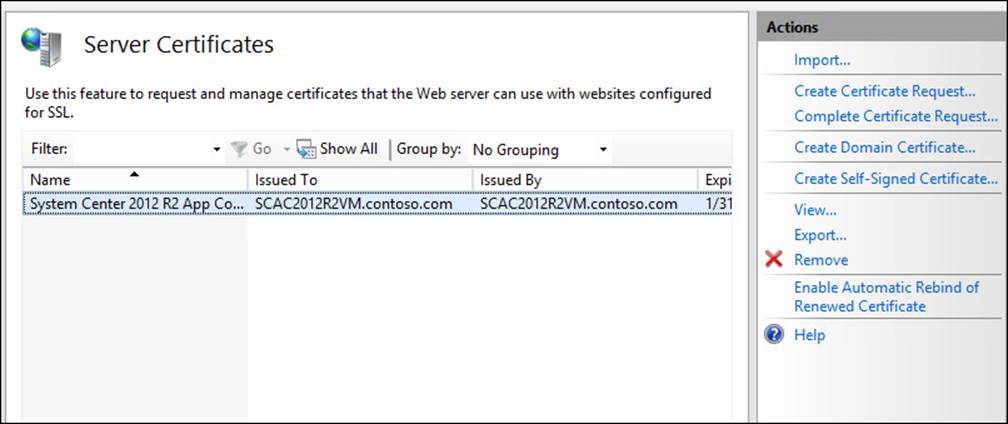
FIGURE 1-14 The IIS Manager is used to create self-signed certificates
You need to export this certificate in two different formats to connect App Controller to an Azure subscription. This step requires launching the Microsoft Management Console (MMC) and loading the certificates snap-in. To launch MMC, type MMC at a command prompt or in the Run dialog box (launch using Windows+R). From MMC, add the Certificates snap-in with either Control+M or the Add/Remove snap-in from the File menu. Make sure to choose Computer Account when prompted to choose which certificate store to manage.
To export the key, select the System Center App Controller certificate from the Personal store and then choose More Actions, All Tasks, Export to launch the Certificate Export Wizard as shown in Figure 1-15. For the local certificate, you must choose to export the private key and provide a password, which creates a PFX file to be used in App Controller. Launch the Certificate Export Wizard a second time to create the second file without the private key. This action creates a CER file that must be uploaded to Azure.
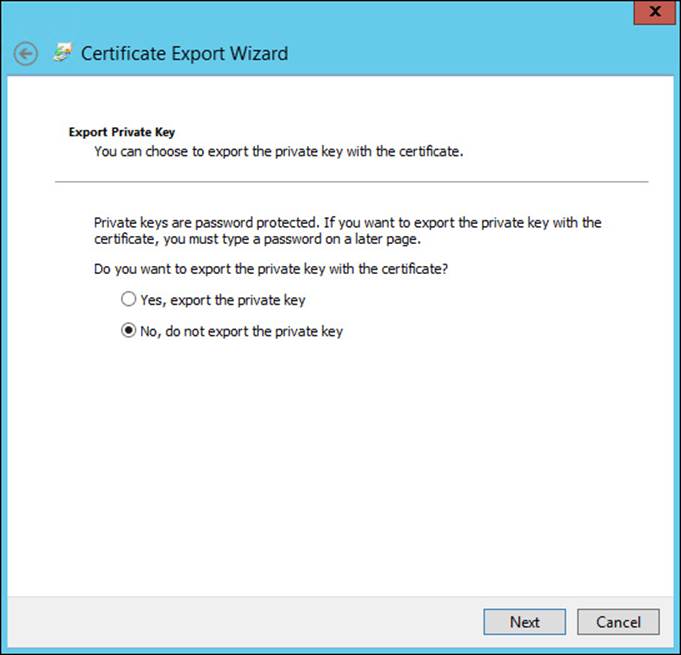
FIGURE 1-15 The Certificate Export Wizard is used to export keys
The Azure management console includes a Settings section with a Management Certificates page that has a button labeled Upload. Clicking this button prompts you to browse for the CER file previously exported. When the upload process completes, you should see the new certificate listed along with a subscription ID. This number is needed in the next step, in which you add the subscription to App Controller.
From the System Center App Controller UI, click Add Azure Subscription to connect to your Azure account using the PFX file previously generated. Figure 1-16 shows the dialog box with the text boxes completed.
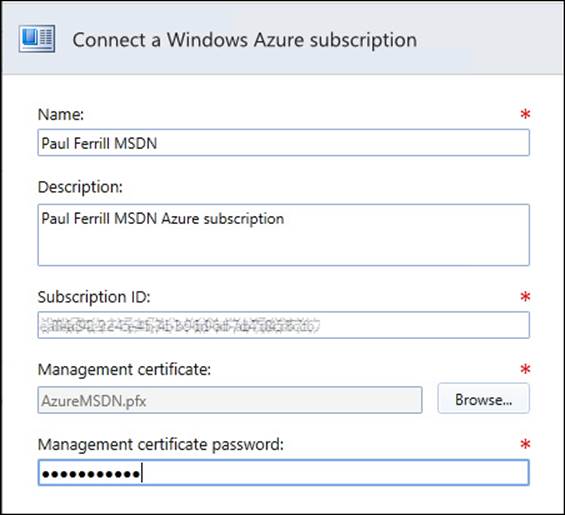
FIGURE 1-16 Connecting to an Azure subscription using a subscription ID
When this connection is established, you have full access to all VMs and virtual disks associated with the account.
Microsoft Azure PowerShell
Microsoft offers a PowerShell module specifically for working with Azure on the Azure website (http://www.windowsazure.com/en-us/downloads/). When installed, this module provides a number of new cmdlets for managing VM instances on Azure. Installation requires the Microsoft Web Platform Installer that can be downloaded from the Azure website. Launching this link displays a dialog box that has a link near the bottom that displays a list of everything to be installed (see Figure 1-17).
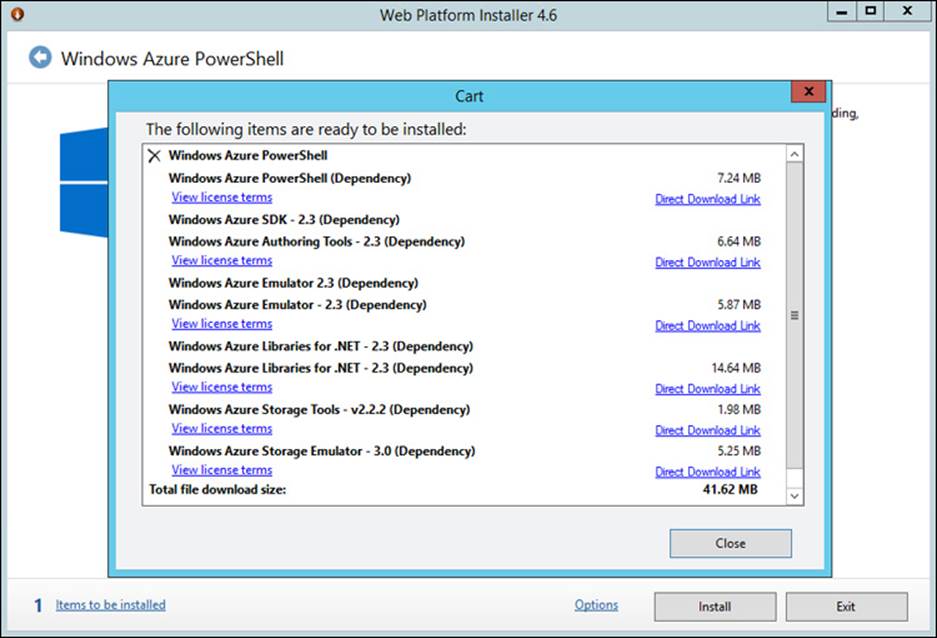
FIGURE 1-17 The Web Platform Installer
Clicking Install launches the installation process that begins downloading the necessary items. After the download completes, each item is installed. Upon completion, the Azure PowerShell cmdlets are available from either the PowerShell command line or the PowerShell Integrated Scripting Environment (ISE).
A total of 29 cmdlets specific to App Controller make it possible to completely automate the process of creating, copying, and moving VMs and virtual disks between a local or on-premises system and Azure. You need to connect to your Azure subscription prior to actually deploying any files. Two PowerShell commands help facilitate the establishment of credentials:
Get-AzurePublishSettingsFile
Import-AzurePublishSettingsFile
The first command opens a webpage and allows you to retrieve the .publishsettings file. After this file is retrieved, use the Import-AzurePublishSettingsFile cmdlet to import the credentials into your local environment.
Azure command-line interface
A final option for deploying servers is the Azure command-line interface, which is different from the PowerShell option and includes downloadable installers for Windows, Mac, and Linux (see Figure 1-18). The Azure command-line interface is a cross-platform tool written in JavaScript and uses Node.js, which provides a consistent set of commands across the three client operating systems. With this tool, you can manage all aspects of your Azure account to include creating and copying VMs. It is also possible to take advantage of underlying operating system commands that you’re familiar with to further automate the process.
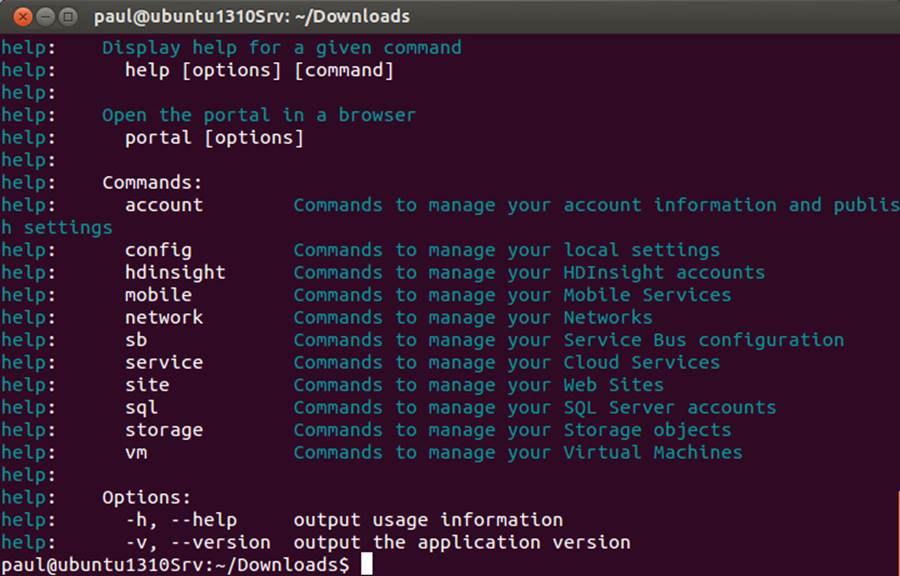
FIGURE 1-18 The Azure command-line interface
Planning for multicast deployment
WDS uses either multicast or unicast protocol as a part of the process of deploying a new server instance. The difference between multicast and unicast is implied in the name: multicast is sent to multiple computers; unicast is sent to a specific computer. All configurations of multicast deployments use the WDS MMC snap-in that should have been installed along with the WDS role. Multicast transmissions are configured using the WDS management console. Figure 1-19 shows the Create Multicast Transmission Wizard.
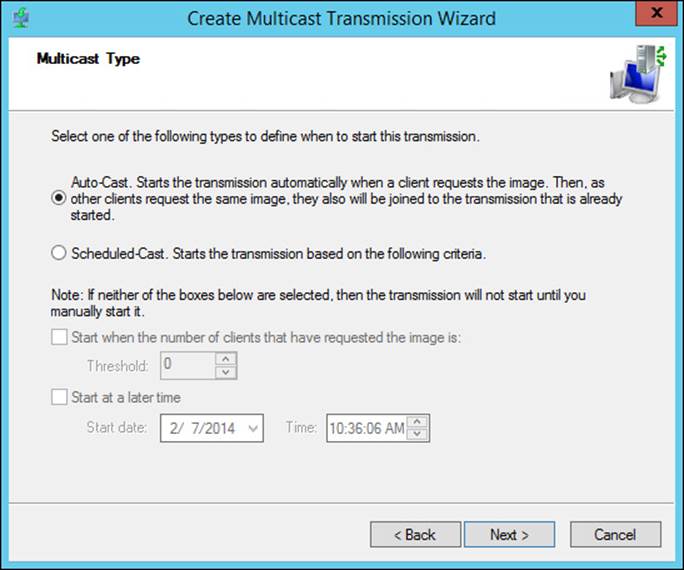
FIGURE 1-19 Providing a Multicast Type in the Create Multicast Transmission Wizard
Choosing Auto-Cast configures the WDS server to monitor boot requests and automatically use multicast when additional clients request the same image.
Planning for Windows Deployment Services
WDS is the primary tool for enabling the distribution and deployment of Windows operating systems over the network. WDS makes it possible to fully automate the installation process of a new Windows-based machine over the network with no human intervention required. It supports deployment of the latest versions of the Windows operating system as well as legacy versions back to Windows 7 and Windows Server 2003.
To use WDS requires the Windows Deployment Services role to be installed by using either Server Manager or PowerShell. Two role services are installed along with WDS by default: Deployment Server and Transport Server. Both of these role services require a working DHCP server and DNS somewhere on the network, plus an NTFS volume to store installation images.
A Transport Server is required for environments without Active Directory Domain Services (AD DS), DNS, or DHCP. For Transport Server–only installs, you must use a public share with no authentication required to store the boot and install images. Both from an authentication and a practical perspective, WDS works best in an Active Directory–enabled environment. Another AD DS advantage comes in the capability to use prestaged clients to speed up and secure deployment.
Note: Deployment and Transport Role Configuration
You must configure the Deployment and Transport roles at the time of installation. If you need to change the location for the image store or the type of server (Standalone or Active Directory Integrated), you have to remove and reinstall the role.
WDS uses a file system directory to store all boot and install images, PXE boot files, and management tools. Requirements for this directory include the following:
![]() Must reside on an NTFS partition
Must reside on an NTFS partition
![]() Must not be the system partition
Must not be the system partition
![]() Must have enough room to contain all images
Must have enough room to contain all images
Figure 1-20 shows the WDS console and the menu presented when you right-click a boot image. A capture boot image is created from an existing boot image and contains the tools necessary to create an install image from a physical or VM. After the image is created, you can boot any system connected to the same network as the WDS server from that image and then proceed with the capture process.
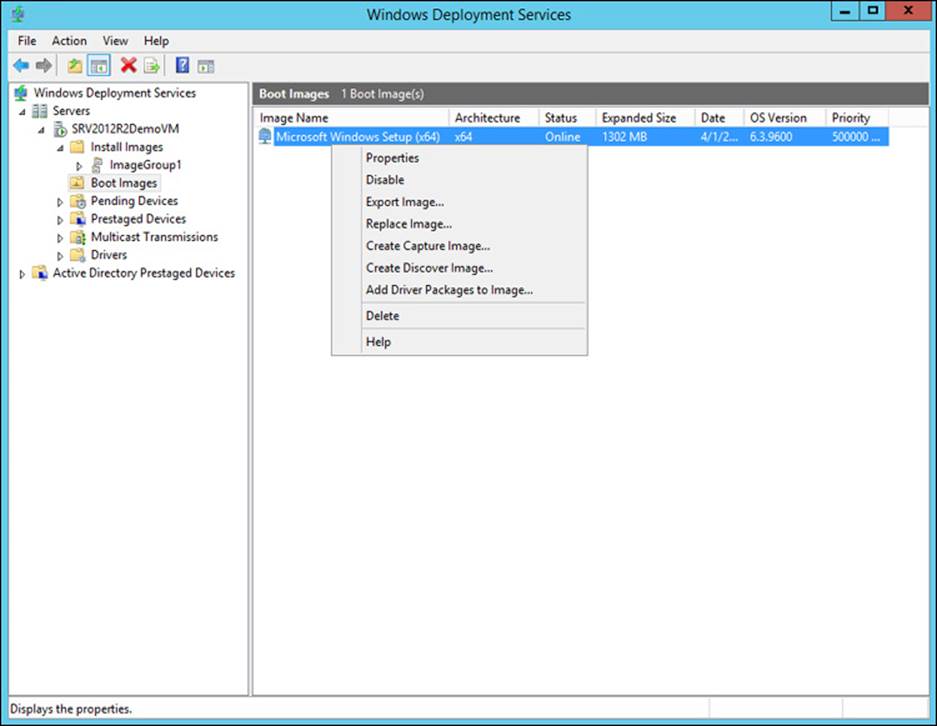
FIGURE 1-20 The WDS console displaying a menu of options for boot images
Creating a baseline virtual image is not difficult if you have the right files. With an ISO file of the Windows Server 2012 R2 media, create a new VM using Hyper-V Manager with appropriate memory and processor settings. Site-specific configuration information must be entered when the installation process completes. The final result is a VHD file that can be used to create new VMs directly or can be exported for use by using the import function.
More Info: Windows Deployment Services (WDS)
For more detailed information on the deployment process and WDS, visit http://technet.microsoft.com/en-us/library/hh831764.aspx.
![]() Thought experiment: Prepare a boot and install image
Thought experiment: Prepare a boot and install image
In this thought experiment, apply what you’ve learned about this objective. You can find answers to these questions in the “Answers” section at the end of this chapter.
Before you undertake a server deployment, you must prepare several images to use as a part of the process.
1. Describe the steps required to build a boot image for a Windows Server 2012 R2 rollout to a single site.
2. Describe the steps needed to create an install image for a large number of Dell servers with similar configurations.
3. Describe the steps required to establish a connection with Azure.
Objective summary
![]() Designing an automated deployment strategy requires the use of several Microsoft-provided tools to include the Windows ADK and WDS.
Designing an automated deployment strategy requires the use of several Microsoft-provided tools to include the Windows ADK and WDS.
![]() Use the Windows ADK and related tools such as DISM to build custom images for deployment.
Use the Windows ADK and related tools such as DISM to build custom images for deployment.
![]() Boot and install images are required for bare metal deployment.
Boot and install images are required for bare metal deployment.
![]() Azure provides a new target for the deployment of VMs, and the process is fully integrated into System Center and Windows PowerShell.
Azure provides a new target for the deployment of VMs, and the process is fully integrated into System Center and Windows PowerShell.
![]() Understanding network requirements for distributed deployment is important for a successful design.
Understanding network requirements for distributed deployment is important for a successful design.
Objective review
Answer the following questions to test your knowledge of the information in this objective. You can find the answers to these questions and explanations of why each answer choice is correct or incorrect in the “Answers” section at the end of this chapter.
1. Several recommended methods for creating images are available to use for deployment. Which of the following would be suitable solutions? (Choose all that apply.)
A. Installation images are available on the Windows Server 2012 installation media.
B. Images can be downloaded from the Microsoft Download Center.
C. Images can be captured using the WDS tools.
D. Images can be extracted from a running VM.
2. The Windows SIM is used for what purpose?
A. To create an image for installing an operating system to a new system
B. To build an answer file for use in an automated operating system installation
C. To modify an existing system image to add customized drivers and software
D. For installing a system image on a new computer
3. What tools come with WDS? (Choose all that apply.)
A. Windows PE
B. Windows SIM
C. Windows Deployment Toolkit
D. Windows Migration Toolkit
Objective 1.2: Implement a server deployment infrastructure
When you have a plan in place that meets the requirements of your organization, you should be ready to take the next step and start the implementation. It is important to stick to the plan. If you do encounter issues along the way, you should revisit the original plan and make adjustments as necessary. This iterative process helps to ensure that you accurately document the process and identify any deviations discovered during execution.
This objective covers how to:
![]() Configure multicast deployment
Configure multicast deployment
![]() Configure multisite topology and distribution points
Configure multisite topology and distribution points
![]() Configure a multiserver topology
Configure a multiserver topology
![]() Configure autonomous and replica WDS servers
Configure autonomous and replica WDS servers
Configuring multisite topology and transport servers
Deployment over a distributed, multisite network requires a phased approach to implement because some pieces must be up and running before others are. Configuration of multisite deployments includes additional pieces to handle the file replication. For Windows Server 2012 R2, the primary tool for replicating files is the Distributed File System (DFS).
The name of the DFS service used in the context of server deployment is DFS Replication, or DFSR. Windows Server 2012 R2 adds a number of updates and new features to DFSR to keep up with requirements from other tools such as WDS, including initial cloning capability and improvements in both performance and scalability. For large distribution directories, it can take time and bandwidth to accomplish the initial synchronization.
One way to improve the initial setup and configuration of DFSR is to prestage files (this is especially true for large files such as deployment images or ISO files). Some types of external media must be used to accomplish a preseed such as a USB disk device. An initial copy of the directory to be replicated is made on an external device and then used at the target site to populate the replica directory. All changes after that point occur by using differencing technology and bits transfer.
Prestaging of clients involves assigning them to use either a local server or the nearest WDS server to obtain the installation images. The WDS management console provides a wizard to complete the process of configuring a prestaged device. To launch this wizard, right-click Active Directory Prestaged Devices in the left pane and choose Add Device, as shown in Figure 1-21.
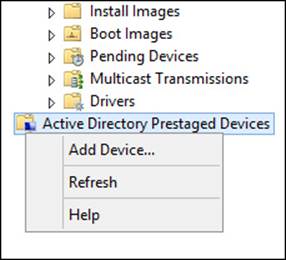
FIGURE 1-21 Adding a prestaged client from Active Directory
The first dialog box in the wizard prompts for Name, Device ID, Device Group, and OU (see Figure 1-22). For the Device ID, enter either a GUID, UUID, or Mac address so that the WDS server can identify the client when it queries for a deployment server.
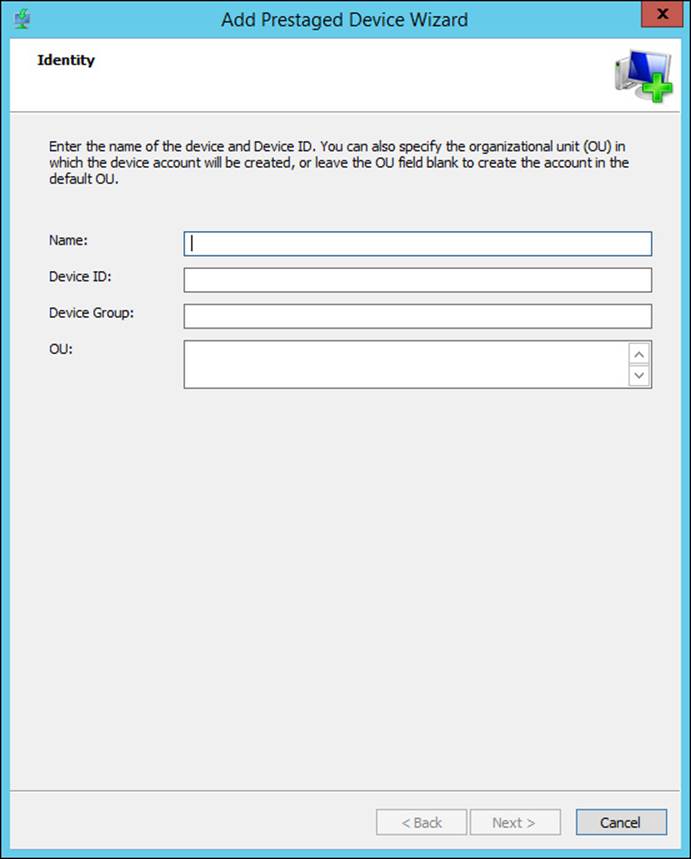
FIGURE 1-22 The Add Prestaged Device Wizard requires a unique identifier for each device
This dialog box requires you to have previously added a computer object in Active Directory and that the information you need to complete the dialog box is available. A Mac address can be used instead of a system GUID.
Configuring a multiserver topology
All configuration for WDS happens using the WDS management console. For large installations, it makes sense to use a redundant server topology to increase efficiency and provide additional reliability. A multiserver scenario can also use prestaged clients (as discussed in the previous section).
Keep in mind that WDS is not cluster-aware, so each server effectively operates independently to service specific clients. Management of all servers happens with the WDS console or with any of the 33 new cmdlets in Windows PowerShell.
WDS requires a number of configuration steps before it is ready to actually deploy anything. This process involves using the WDS MMC snap-in to configure the server for either AD DS integrated or stand-alone mode. You must also configure whether and how each server responds to client requests.
For servers configured with both Deployment and Transport Server roles, you can add images as part of running the configuration wizard. This launches an additional wizard and requires access to distribution media.
If you haven’t previously configured WDS, you must accomplish this task before moving on. To start the configuration process, right-click the server in the left pane of the MMC console, as shown in Figure 1-23.
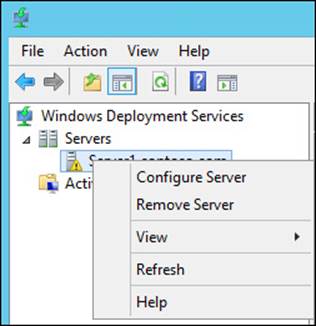
FIGURE 1-23 The Windows Deployment Services Configure Server command
This launches the configuration wizard and takes you through a number of steps including one point where you must choose either Active Directory Integrated or Standalone. You must also designate a directory in which to store the distribution images.
![]() Install Options Choose Integrated with Active Directory or Standalone server.
Install Options Choose Integrated with Active Directory or Standalone server.
![]() Remote Installation Folder Location Specify the path to the remote installation folder. It defaults to C:\RemoteInstall.
Remote Installation Folder Location Specify the path to the remote installation folder. It defaults to C:\RemoteInstall.
![]() Proxy DHCP Server There are two check boxes available. Your choice depends on whether DHCP is running on the WDS server or if a non-Microsoft DHCP server is on the network:
Proxy DHCP Server There are two check boxes available. Your choice depends on whether DHCP is running on the WDS server or if a non-Microsoft DHCP server is on the network:
![]() Do Not Listen On DHCP And DHCPv6 Ports
Do Not Listen On DHCP And DHCPv6 Ports
![]() Configure DHCP Options For Proxy DHCP
Configure DHCP Options For Proxy DHCP
![]() PXE Server Initial Settings There are three options:
PXE Server Initial Settings There are three options:
![]() Do Not Respond To Any Client Computers (Default)
Do Not Respond To Any Client Computers (Default)
![]() Respond Only To Known Client Computers
Respond Only To Known Client Computers
![]() Respond To All Client Computers (Known And Unknown). This option includes an option that allows you to require administrator approval for unknown computers.
Respond To All Client Computers (Known And Unknown). This option includes an option that allows you to require administrator approval for unknown computers.
If you choose the system disk, you’ll see a message like the one shown in Figure 1-24.
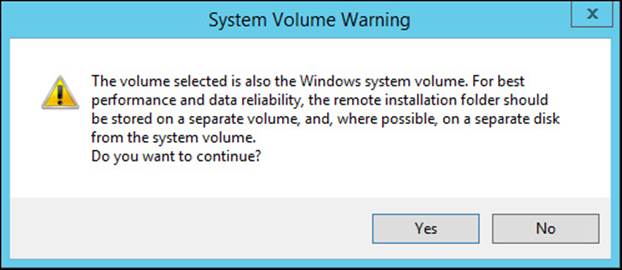
FIGURE 1-24 System Volume Warning message
The next page asks what types of clients you want to service. Options here include None, Only Known, or Any Client with a request. If you plan to use prestaged clients, you should choose known clients. After this question has been answered, the wizard proceeds to initialize the WDS server.
 Exam Tip
WDSUTIL is a command-line utility that allows you to script everything you would normally do using the WDS console. For the exam, you should know what this tool can do and how to use it.
Most of the settings in WDS can be modified using the Properties page available by right-clicking the server name in the WDS MMC snap-in. The most important thing is to ensure that settings match between different servers.
Deploying servers to Azure IaaS
Azure provides a number of different methods for deploying servers. The simplest method is to pick an instance from the VM gallery and then customize it to meet your needs. Figure 1-25 shows some of the options available in the gallery.

FIGURE 1-25 The management portal with the Windows Server 2012 R2 Datacenter image selected
Note: Azure Supports VHD Files Only
At the time of this writing, Azure supports only VHD files for VMs.
Another option is to upload a VHD file containing a server image to Azure. This image must have been properly prepared before to include running Sysprep to generalize the image. When it is accomplished, you can use Windows PowerShell to actually upload the image to Azure.
Deploying servers to public and private cloud by using App Controller and Windows PowerShell
Using either App Controller or Windows PowerShell is the easiest part of the entire deployment process. All that is left after the image preparation step is to deploy to either a target host machine or to Azure. You must connect App Controller to an Azure account and a local VMM instance to move VMs between the two.
After you have a local App Controller instance connected to an Azure account, you can drag between the two. Both services use the concept of a cloud to which you deploy things such as a VM. Using App Controller, the IT administrator decides whether the VM resides in the private cloud (on-premises) or in the public Azure cloud.
The Azure service offers a number of baseline platform images ready for deployment into the cloud. To retrieve an image named BaselineImage to a local cloud with PowerShell, use the following:
Get-AzureVMImage | Select "BaselineImage"
And to copy an image to the cloud and provision it, use these commands:
$image = "BaselineImage"
$newvm = New-AzureVMConfig -Name "TestVM" -InstanceSize "Small" -Image $image
$pwd = "P@ssW0rd"
$un = "pferrill"
$vm1 | Add-AzureProvisioningConfig -Windows -AdminUserName $un -Password $pwd
$vm1 | New-AzureVM -ServiceName "clcTestSvc1" -Location "East US"
![]() Thought experiment: Microsoft Azure PowerShell scripting
Thought experiment: Microsoft Azure PowerShell scripting
In this thought experiment, apply what you’ve learned about this objective. You can find answers to these questions in the “Answers” section at the end of this chapter.
Automation is the key to implementing a smooth-running server deployment strategy, and Windows PowerShell is the best tool for the job.
Building a proof-of-concept automated deployment script requires good planning and programming practices.
1. List several reasons for using Microsoft Azure PowerShell instead of other tools.
2. How can you find out what PowerShell cmdlets apply to Azure without using a search engine?
3. List the steps required to actually deploy a VM to Azure using only PowerShell commands.
Microsoft Azure PowerShell is a powerful tool, and it benefits you to learn how to use it in the long run. Microsoft has a wide range of resources if you want to learn more.
Objective summary
![]() After you have a plan of attack for implementation, you have to execute the plan.
After you have a plan of attack for implementation, you have to execute the plan.
![]() Although a multisite topology might seem difficult to configure, it takes only a few steps.
Although a multisite topology might seem difficult to configure, it takes only a few steps.
![]() Azure provides the perfect target for deploying servers to the cloud.
Azure provides the perfect target for deploying servers to the cloud.
![]() App Controller is a part of the Microsoft System Center family and provides a friendly UI for managing both public and private cloud assets.
App Controller is a part of the Microsoft System Center family and provides a friendly UI for managing both public and private cloud assets.
![]() Using Windows PowerShell with the Azure cmdlets is another way to manage public and private cloud assets.
Using Windows PowerShell with the Azure cmdlets is another way to manage public and private cloud assets.
Objective review
Answer the following questions to test your knowledge of the information in this objective. You can find the answers to these questions and explanations of why each answer choice is correct or incorrect in the “Answers” section at the end of this chapter.
1. What is the purpose of prestaging client images? (Choose all that apply.)
A. To provide images on a local network in a multisite topology to speed up the process
B. To make custom prepared images available to any client
C. To control the deployment process
D. To prevent overuse of a wide area network (WAN) with image traffic
2. What tool should you use to create a multicast server to handle large numbers of deployment images?
A. Server Manager in Windows Server 2012 R2
B. Network control tool in Control Panel
C. WDS MMC snap-in
D. Windows PowerShell
3. What are methods for deploying a VM to Azure? (Choose all that apply.)
A. Use System Center App Controller to move an existing private cloud VM to Azure.
B. Use Microsoft Azure PowerShell to copy a local VM up to the cloud.
C. Use the Azure command line from a Linux machine to copy VMs to and from the cloud.
D. Use a command window and the xcopy command.
Objective 1.3: Plan and implement server upgrade and migration
One of the most common tasks facing any system administrator with the introduction of a new version of an operating system is to migrate specific roles or upgrade from an older version. The steps required to perform a migration vary depending on what operating system is running on the system to be migrated.
This objective covers how to:
![]() Plan for role migration
Plan for role migration
![]() Migrate server roles
Migrate server roles
![]() Migrate servers across domains and forests
Migrate servers across domains and forests
![]() Design a server consolidation strategy
Design a server consolidation strategy
![]() Plan for capacity and resource optimization
Plan for capacity and resource optimization
Planning for role migration
The first step in any significant migration effort is to come up with a plan. In the case of a server operating system migration, many factors must be taken into consideration before you think about the actual migrations. This is especially important if the migration includes server consolidation because application architecture must be evaluated to ensure no interruption to operations.
If you don’t have a good understanding of your infrastructure and the applications running in your production environment, you should use some type of inventory tool to create a complete map. The Windows Server Migration Tools (WSMT) provide a comprehensive set of PowerShell-based tools to help facilitate the job of migrating server roles, features, and operating system settings along with data and shares from Windows Server 2003, Windows Server 2008, and Windows Server 2008 R2 to Windows Server 2012.
To install the WSMT using PowerShell, type the following in a PowerShell window with elevated privileges:
Install-WindowsFeature Migration –ComputerName <computer_name>
When this operation completes, you have access to new cmdlets that make migrating the different roles much easier.
More Info: Windows Server Migration Tools (WSMT)
For more detailed information on the WSMT, visit http://technet.microsoft.com/en-us/library/jj134202.aspx.
The first tool you should run is the Get-SmigServerFeature cmdlet to list the features the target server has installed. Figure 1-26 shows the output of this command.
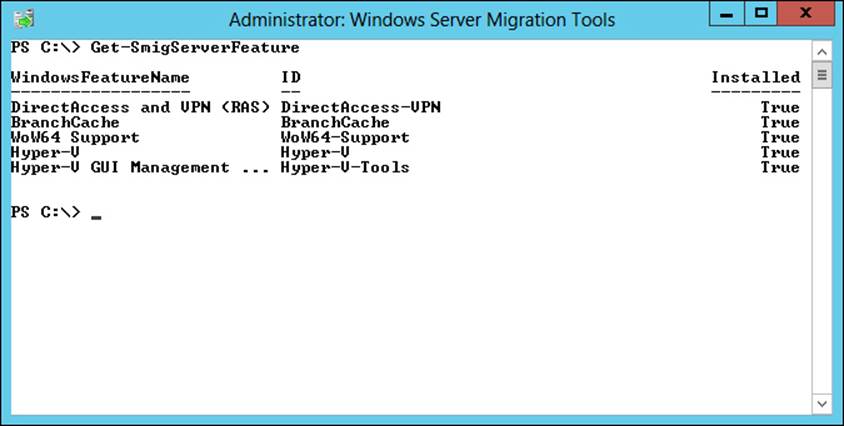
FIGURE 1-26 The PowerShell window showing results of running the Get-SmigServerFeature cmdlet
After you have a list of roles needing migration, gather the information necessary to accomplish the process, including the following:
![]() Source and destination server names and IP addresses
Source and destination server names and IP addresses
![]() Specific hardware requirements such as number of network ports or amount of available memory
Specific hardware requirements such as number of network ports or amount of available memory
![]() Location of a file share accessible by both source and destination machines for storing migration files
Location of a file share accessible by both source and destination machines for storing migration files
There are several steps to populate the deployment share prior to actually starting the migration. The actual files depend on what operating system the source machine currently runs. To create these files, use the smigdeploy.exe tool. The easiest way to create these files is to first change the directory to the location of the tool, which is C:\Windows\System32\ServerMigrationTools by default. Then type the following:
SmigDeploy.exe /package /architecture X86 /os WS08 /path <deployshare>
This code creates the necessary files needed to migrate from a system running a 32-bit version of Windows Server 2008. To accomplish the same task for a system running a 64-bit version of Windows Server 2008 R2, type this:
SmigDeploy.exe /package /architecture amd64 /os WS08R2 /path <deployshare>
With this step accomplished, you must register the migration tools on the source system by typing SMIGDEPLOY.EXE in the folder in which the migration files were created. You then see an item on the Start menu for the WSMT, as shown in Figure 1-27.
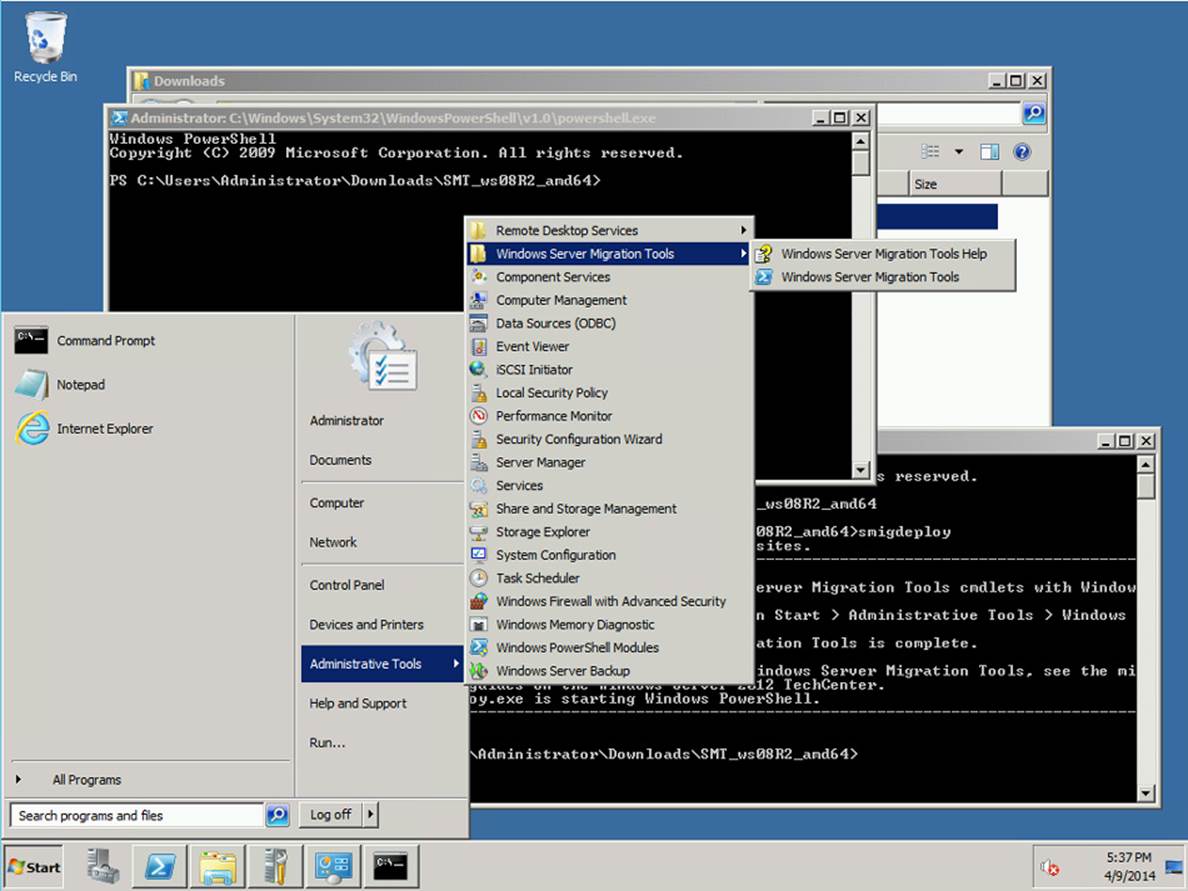
FIGURE 1-27 The Windows Server 2008 R2 Start menu showing Windows Server Migration Tools
Migrating server roles
The actual migration process can happen in a number of different ways, depending on the criticality of the specific role. If a server is functioning in a role that needs to continue uninterrupted, perform a live migration if possible. If the role is running on a VM, the live migration process is relatively painless.
Microsoft provides guidance for migrating specific roles, including AD DS and DNS, DHCP, file and print services, and IIS.
DHCP migration
Migrating a DHCP server can be a tricky process unless you follow the Microsoft-prescribed procedure. The process requires the installation of the WSMT on both the source and destination servers. You should also ensure that the destination server has the same number of (or more) network adapters as the source server.
Two Windows PowerShell cmdlets, Export-SmigServerSetting and Import-SmigServerSetting, accomplish the key step of moving the DHCP server settings from one machine to the other. You might consider using the WSMT to move your IP configuration to ensure that those settingsmove from one machine to the next. The command to export the IP configuration on the source machine in PowerShell is the following:
Export-SmigServerSetting -IPConfig -Path <SharedFolderPath> -Verbose
This code should be run from a PowerShell session from the Start menu by launching the WSMT as an administrator. The steps to accomplish the migration are as follows:
1. Install the DHCP role on the target server.
2. Stop the DHCP Server service on the source server using the command Stop-Service DHCPserver.
3. Use the Migration Tool cmdlet Export-SmigServerSetting to collect data on the source server.
4. Delete the DHCP authorization on the source server with the following command:
Netsh DHCP delete server <FQDN of source server> <IP address of source server>
5. Run the Import-SmigServerSetting cmdlet on the destination server as follows:
Import-SmigServerSetting –featureID DHCP –User All –Group –Ipconfig <All | Global
| NIC> -SourcePhysicalAddress <IP address of source server> -TargetPhysicalAddress
–Force –path <path to file>
6. Start the DHCP service on the target server:
Start-Service DHCPServer
7. Authorize the target server (command is case sensitive) with the following command:
netsh DHCP add server <FQDN of target server> <IP address of target server>
Hyper-V migration
Many benefits come with migrating your Hyper-V platform to Windows Server 2012 R2, especially if it is running on anything older than Windows Server 2012. Hyper-V 3.0 has many features that make it significantly more capable than previous versions. New features in Windows Server 2012 R2 Hyper-V should make the effort required to migrate worthwhile.
Although the actual migration is relatively simple, you should accomplish a number of steps on the source system prior to starting the migration, including deleting any snapshots taken of running VMs because they are not supported for migration. You’ll also want to set the MAC address option in the settings of each VM to “Static” prior to migration to prevent any reconfiguration after the process completes.
Printer migration
Migrating printers from one server operating system to another is a relatively straightforward process, but must be done with care, especially in a production environment. The actual progress can be accomplished from the Windows Server 2012 R2 Server Manager Print Management tool, which should be available from the Tools menu. If not, you have to install the Print Services role on the target server. Figure 1-28 shows a portion of the Print Management screen.
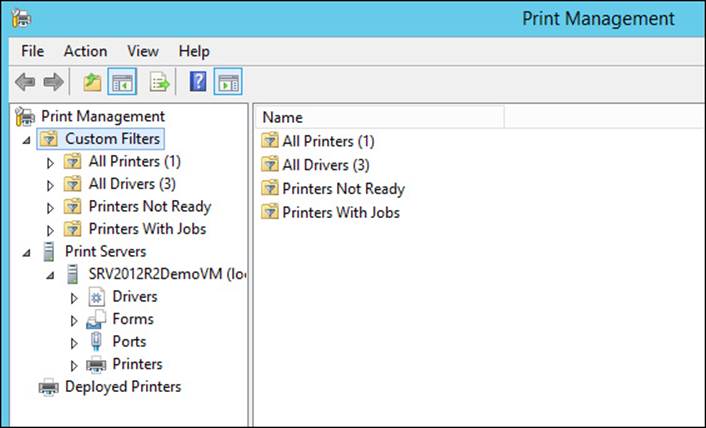
FIGURE 1-28 The Windows Print Management screen
Migrating servers across domains and forests
The biggest challenge of cross-domain migration has to do with credentials and trust. Microsoft provides the Active Directory Migration Tool (ADMT) to simplify the process of migrating objects across domains and forests. The two types supported are interforest and intraforest migration. An interforest migration occurs between forests, and an intraforest migration occurs between domains within the same forest.
Prior to either migration, you must establish a trust relationship between the two domains. Possibilities here include a one-way or two-way transitive trust.
Exam Tip
Make sure that you understand the different trusts required for different migration scenarios for the exam. For a scenario in which objects are migrated from a source domain to a target domain, the source domain must trust the target domain. In the scenario in which users are migrated and will access resources in the source domain, a two-way trust is required.
Designing a server consolidation strategy
Microsoft Hyper-V 3.0 has changed the approach to server consolidation, especially for IT shops heavily invested in Microsoft technologies that include System Center. Workloads that traditionally demanded a physical machine, such as an Active Directory domain controller, can now be virtualized and made redundant by using Hyper-V 3.0. Virtualization and Hyper-V represent a key piece of a server consolidation strategy.
To optimize this strategy, it is important to have a general understanding of your network and how the existing pieces fit together. It is also important to know the types of workloads and the level of service required for each one; it drives the target virtualization system from a hardware and redundancy perspective. Windows Server 2012 R2 has built-in clustering features for building out a highly available (HA) system with full redundancy.
Planning for capacity and resource optimization
The Microsoft Assessment and Planning (MAP) Toolkit for Windows Server 2012 R2, shown in Figure 1-29, includes an inventory tool to help assess your current environment and produce a comprehensive report. Version 9.0 of the tool is available from the Microsoft Download Center and includes sample reports, a Getting Started Guide, and a training kit.
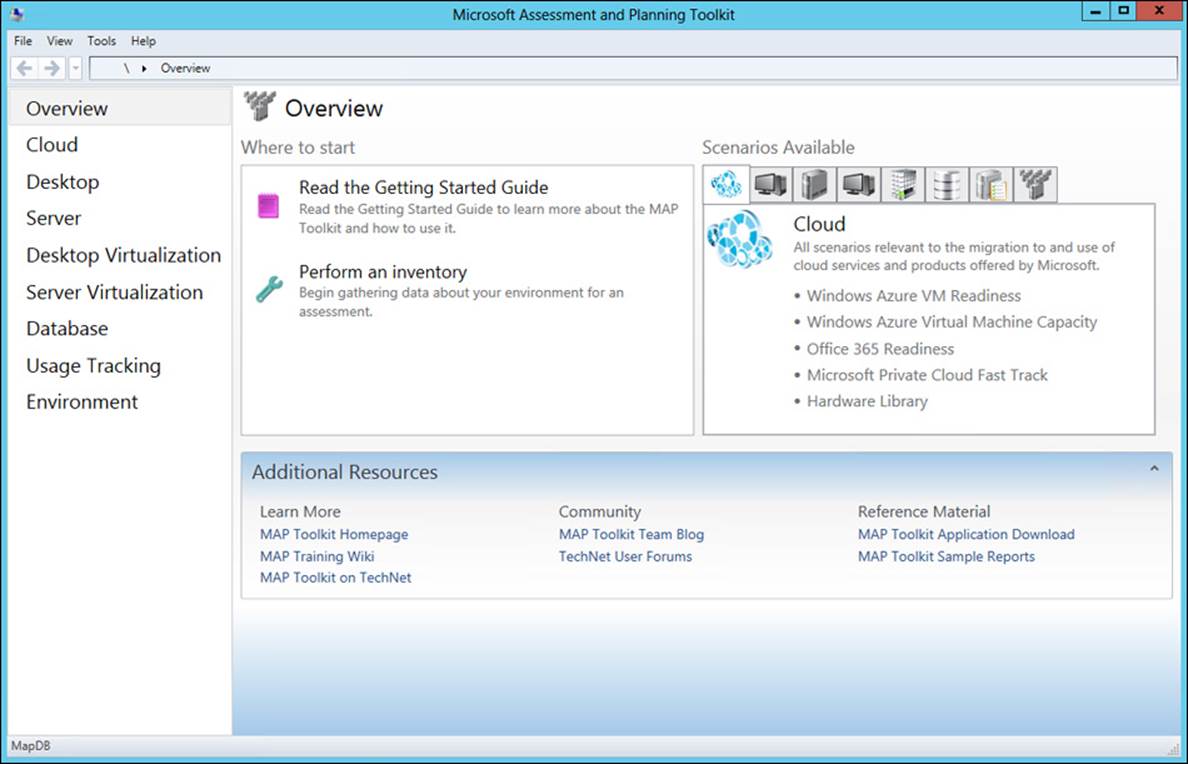
FIGURE 1-29 The Overview page of the Microsoft Assessment and Planning Toolkit
The MAP Toolkit requires the .NET Framework 3.5 run time, which is not installed by default. If you have the Windows Server 2012 R2 ISO file mounted on the X drive, you can use the following command to install it:
Dism /online /enable-feature /featurename:NetFx3 /All /Source:X:\sources\sxs
/LimitAccess
The source path for the .NET Framework 3.5 run time shown in the previous DISM line, X:\sources\sxs, must point to a valid location for the .NET Framework 3.5 installation files.
![]() Thought experiment: Server migration best practices
Thought experiment: Server migration best practices
In this thought experiment, apply what you’ve learned about this objective. You can find answers to these questions in the “Answers” section at the end of this chapter.
Migrating physical servers to a new operating system is a relatively common occurrence. Although it might not occur weekly or monthly, it eventually has to be done. Knowing the right tools to use and how to use them helps IT administrators complete the process successfully.
1. List several roles that migrate easily.
2. What tool should you use to assess an existing system to identify migration candidates?
3. List the steps required to migrate a file server from Windows Server 2008 R2 to Windows Server 2012 R2.
Objective summary
![]() Migrating existing systems to a new operating system is a skill every IT administrator should have because Microsoft delivers new releases of Windows Server on a regular basis.
Migrating existing systems to a new operating system is a skill every IT administrator should have because Microsoft delivers new releases of Windows Server on a regular basis.
![]() The migration of specific roles provides a good way to break down a larger migration process into manageable steps.
The migration of specific roles provides a good way to break down a larger migration process into manageable steps.
![]() Understanding options such as Microsoft Hyper-V for the consolidation of physical servers can help save operating costs.
Understanding options such as Microsoft Hyper-V for the consolidation of physical servers can help save operating costs.
![]() Microsoft provides a wide variety of tools to assist the migration of different roles and workloads to Windows Server 2012 R2.
Microsoft provides a wide variety of tools to assist the migration of different roles and workloads to Windows Server 2012 R2.
![]() It is important to put a good migration plan together before starting the process to identify all the steps necessary and ensure success.
It is important to put a good migration plan together before starting the process to identify all the steps necessary and ensure success.
Objective review
Answer the following questions to test your knowledge of the information in this objective. You can find the answers to these questions and explanations of why each answer choice is correct or incorrect in the “Answers” section at the end of this chapter.
1. What roles are good candidates for migration to a new operating system? (Choose all that apply.)
A. Active Directory domain controllers
B. Routing and Remote Access Services (RRAS)
C. VPN server
D. Isolated test server
2. What tools should be used for a server role migration?
A. WSMT
B. Windows SIM
C. DISM
D. PowerShell
3. What tools does the MAP Toolkit provide? (Choose all that apply.)
A. DISM
B. Capacity planning tool
C. PowerShell cmdlets
D. An inventory and reporting tool
Objective 1.4: Plan and deploy Virtual Machine Manager services
With the inclusion of Hyper-V 3.0 in Windows Server 2012, Microsoft provides a production-ready virtualization platform. Improvements in Windows Server 2012 R2 to the storage subsystem have only enhanced the platform and its readiness to support any virtualized workload.
System Center 2012 R2 Virtual Machine Manager (VMM) is the primary management tool for any enterprise-level virtualization deployment. In some cases, it might be cost effective in terms of administration costs for a smaller organization with a significant number of VMs to manage. Either way, a good understanding of VMM is a skill every IT administrator should possess.
This objective covers how to:
![]() Design Virtual Machine Manager service templates
Design Virtual Machine Manager service templates
![]() Define operating system profiles
Define operating system profiles
![]() Configure hardware and capability profiles
Configure hardware and capability profiles
![]() Manage services
Manage services
![]() Configure image and template libraries
Configure image and template libraries
![]() Manage logical networks
Manage logical networks
Designing Virtual Machine Manager service templates
VMM is intended to simplify the task of managing large numbers of supporting services. Most modern enterprise applications use a tiered design approach with different services, such as a database, assigned to a specific tier. VMM builds on this approach to enable the creation of service templates to include everything necessary to bring a tier or service online.
You should create a Run As account if you haven’t done so. This account is required in a number of different management functions. A Run As account is an alias for a domain administrator account that is used by VMM when performing system management tasks. From the Settings workspace of the VMM management console application, click the Create Run As Account icon to launch the Create Run As Account wizard.
Service templates can include networking, storage, and compute resources configured in a specific way. VMM includes a Service Template Designer for creating these services to be used later when configuring new applications. It comes with a total of four default templates for blank, one-tier, two-tier, and three-tier services. Figure 1-30 shows what the template looks like with the two-tier basic template.
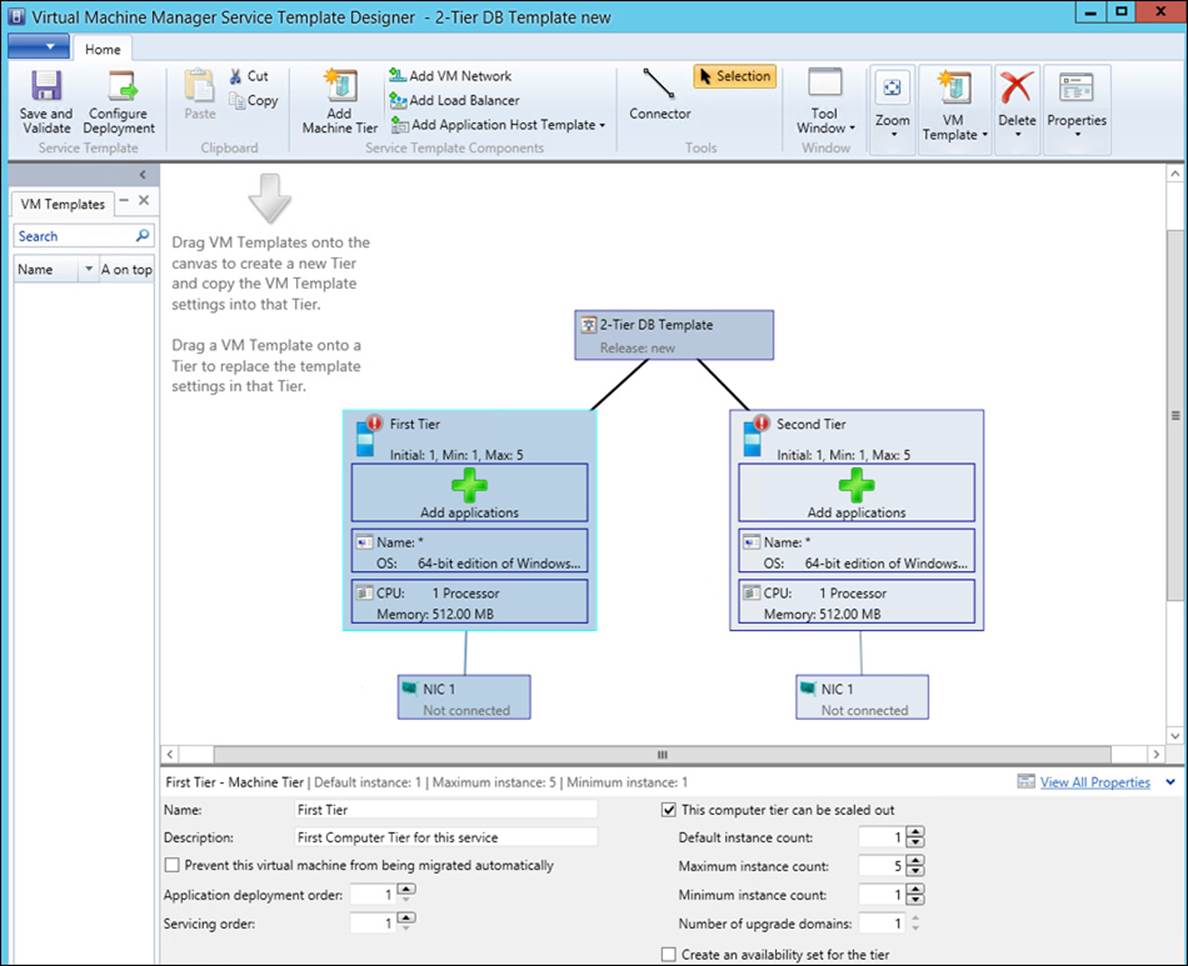
FIGURE 1-30 The Virtual Machine Manager Service Template Designer
A VM template is a generic description of the specific details required to function in a particular role. At a minimum, the VM template consists of an operating system profile, a hardware profile, and virtual disks. A new VM template can be constructed from an existing baseline template, from a VHD stored in the library, or from an existing VM deployed on the same host.
Exam Tip
Watch for exam questions that include situations calling for minimizing administrative overhead. For VMM, service templates might be your answer because they allow you to manage multiple entities at the same time as one single entity.
Defining operating system profiles
One of the most common tasks related to creating a new VM is operating system installation. VMM enables the creation of a Guest OS Profile containing basic information such as a product key, the default administrator password, and information to join the operating system to a domain.
Figure 1-31 shows the New Guest OS Profile dialog box for entering the domain join information. This dialog box can save an IT administrator both time and energy for every new VM needing to join a domain. You can also configure additional settings by using a previously created answer file to further automate the installation process. A provision to execute commands upon first logon gives you a way to accomplish anything not covered in the basic installation process.
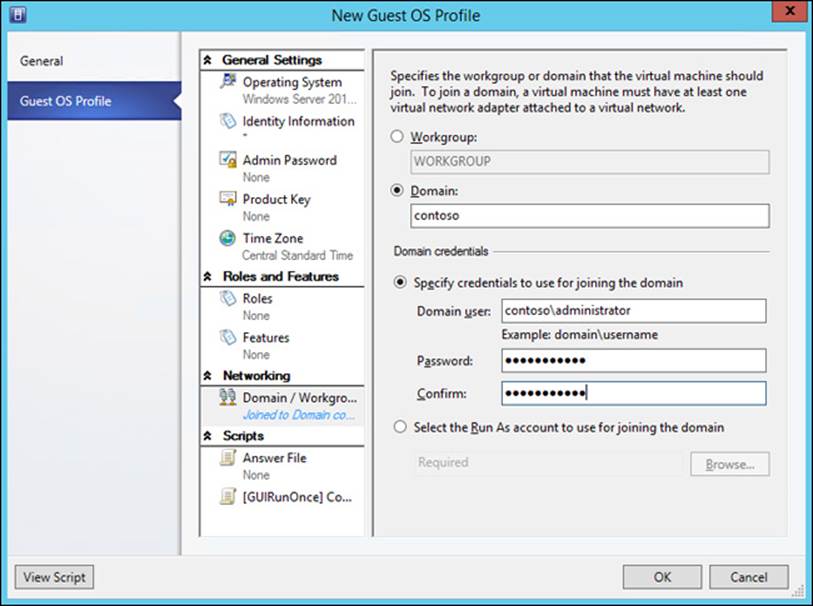
FIGURE 1-31 The New Guest OS Profile Wizard
Configuring hardware and capability profiles
Capability profiles allow an administrator to define the limits of a particular virtualization platform such as ESX, Hyper-V, or XenServer. Configurable items include the number of processors, amount of memory, number of virtual hard drives, and number of network adapters. A capability profile can also be used to set the minimum number of vCPUs or amount of memory to ensure good performance.
Figure 1-32 shows the Create Capability Profile Wizard, which you can launch from the Create icon with the Library workspace selected. A capability profile makes it possible to place limits on memory and number of processors, for example, to improve the compatibility across different hardware platforms.
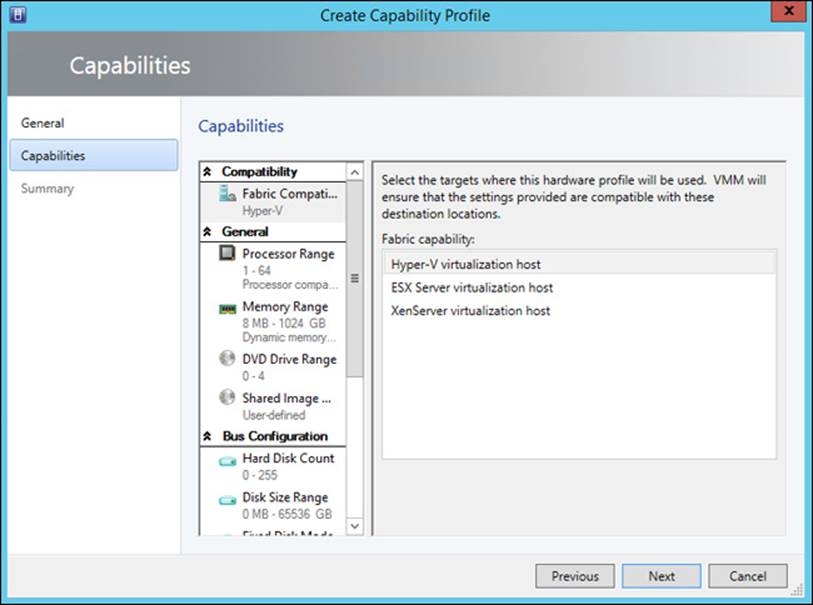
FIGURE 1-32 The Create Capability Profile Capabilities Wizard
Figure 1-33 shows the New Hardware Profile Wizard, which enables you to set specific hardware defaults.
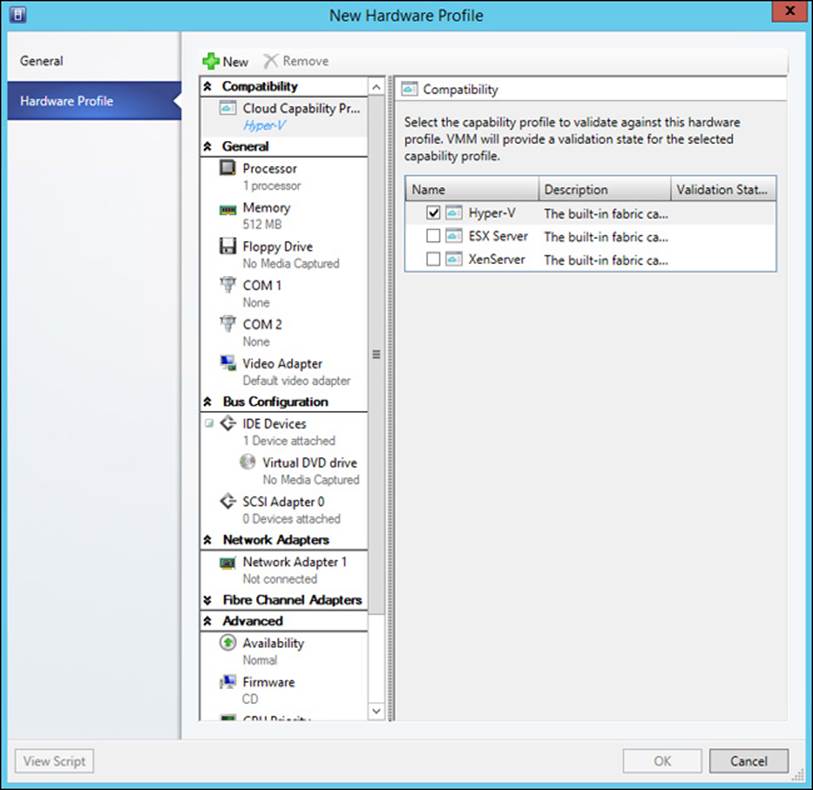
FIGURE 1-33 The New Hardware Profile Wizard
The New Physical Computer Profile Wizard defines specific details needed when deploying new physical hosts with VMM in an environment. Before you launch this wizard, you should have several components properly configured, including at least one logical switch and an operating system image for deployment. Figure 1-34 shows this Hardware Configuration page.
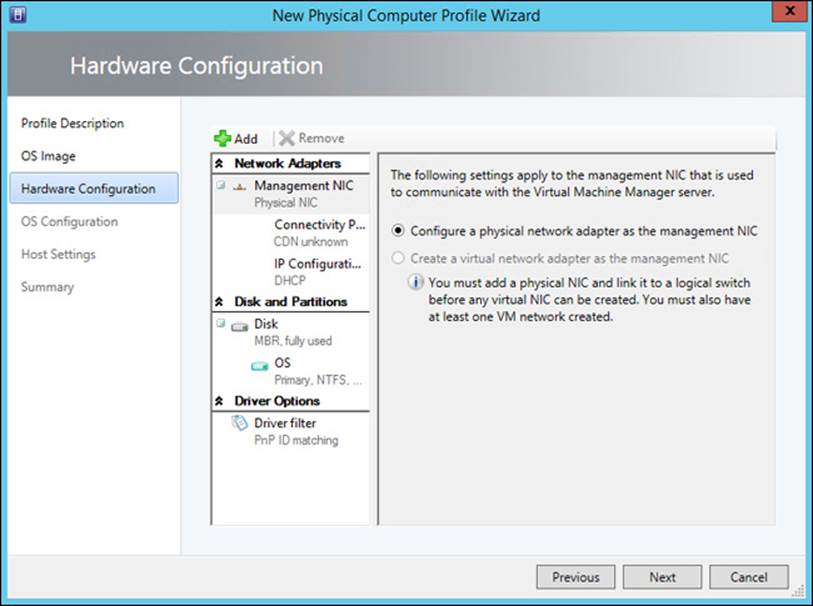
FIGURE 1-34 The New Physical Computer Profile Wizard
Managing services
After a service has been deployed, you can make changes in two ways:
![]() Update an existing VM to modify its settings
Update an existing VM to modify its settings
![]() Deploy a new VM containing all necessary updates
Deploy a new VM containing all necessary updates
When done with care, in-place changes of an existing VM reduce the risk of service interruption. Deploy a new VM only when the number or scope of changes makes it necessary (for example, a major service pack release with many updates).
Configuring image and template libraries
VMM can store a variety of resources in libraries, including file-based resources such as VHD, ISO, PS1, SQL, ZIP, and other necessary files. Options for configuring the storage location of these files include a typical share on a server and a share on a cluster-shared volume (CSV). The CSV option provides a resilient resource shared throughout the cluster for any host to use.
Templates and profiles are stored in the VMM SQL database unless redirected. For large installations, this database can grow to a significant size. You should keep the SQL database on a system with adequate space to meet the needs of your VMM deployment. (Microsoft provides sizing guidance on the TechNet site.)
Managing logical networks
VMM uses the word “fabric” to group together Infrastructure, Networking, and Storage resources. Grouped under each of these three titles are specific pieces organized according to common functionality. This structure makes managing the different resources a little more intuitive as you search for a specific item needing attention. Managing a logical network involves a number of different pieces and properties, such as virtual local area networks (VLANs) and IP addresses.
One piece of a logical network is a logical switch, which provides consistent configuration information to control virtual switches across hosts in a datacenter. Single-root I/O virtualization (SR-IOV) is a technology that brings significant performance improvements to virtualized networks that can match physical networks. Not all network adapters support SR-IOV, so you have to check your hardware before attempting to enable this capability. Enabling SR-IOV support for a logical switch must occur when the logical switch is created (and it can’t be changed).
Every network uses IP addresses for communicating between nodes. DHCP is the most common method of assigning an IP address for a new node on the network. VMM provides the capability to define a pool of IP addresses to be used for a specific network site. With the Create IP Pool Wizard, you can create a new IP Pool.
You can reserve an individual address or a range of IP addresses for other uses if necessary, including any virtual IP addresses you might need for load balancing purposes. IP Pools must be associated with a logical network at the time of creation and can’t be changed without deleting the entire logical network and starting over.
![]() Thought experiment: Automating with VMM and PowerShell
Thought experiment: Automating with VMM and PowerShell
In this thought experiment, apply what you’ve learned about this objective. You can find answers to these questions in the “Answers” section at the end of this chapter.
System Center VMM has a large number of moving parts and provides the IT administrator control over a wide range of components. Understanding which tool to use and when to use it is a key skill for any IT administrator in today’s virtualized IT environment.
1. What is the make up of a cloud?
2. Why should you create service templates?
3. What steps should you take to deploy a VM in a VMM environment using Windows PowerShell?
Knowing how Windows PowerShell and VMM work together and when to use PowerShell can help automate the management process.
Objective summary
![]() System Center VMM is a powerful tool with many facets.
System Center VMM is a powerful tool with many facets.
![]() Profiles and templates provide the basis for rapidly deploying and configuring new VMs and their associated services.
Profiles and templates provide the basis for rapidly deploying and configuring new VMs and their associated services.
![]() After you learn the basics of building templates and creating new VMs, you can move on to automation.
After you learn the basics of building templates and creating new VMs, you can move on to automation.
![]() You can use PowerShell in conjunction with System Center VMM to customize a wide range of functions.
You can use PowerShell in conjunction with System Center VMM to customize a wide range of functions.
![]() System Center VMM can manage every aspect of your virtualization implementation to include other vendors’ products.
System Center VMM can manage every aspect of your virtualization implementation to include other vendors’ products.
Objective review
Answer the following questions to test your knowledge of the information in this objective. You can find the answers to these questions and explanations of why each answer choice is correct or incorrect in the “Answers” section at the end of this chapter.
1. Creating a VM template requires what resources? (Choose all that apply.)
A. A Windows system image
B. A preconfigured VM
C. At least one Hyper-V host on which to run the VM
D. Full installation of Microsoft SQL Server
2. Operating system profiles allow you to specify what parts of an installation?
A. Administrator name and password
B. Boot partition size
C. Custom drivers
D. System components such as number of virtual CPUs and amount of memory
3. What networking components can be configured when managing logical networks using VMM? (Choose all that apply.)
A. Switch Ports
B. VLANs
C. IP address blocks
D. MAC addresses
Objective 1.5: Plan and implement file and storage services
Windows Server 2012 R2 brings even more improvements and innovation in the area of storage. The inclusion of storage tiering capabilities brings Windows Server 2012 R2 into parity with many expensive dedicated storage systems. Understanding how to take advantage of these new features will be important for any system administrator.
This objective covers how to:
![]() Incorporate planning considerations, including iSCSI SANs, Fibre Channel SANs, Virtual Fibre Channel, storage pools, Storage Spaces, and data deduplication
Incorporate planning considerations, including iSCSI SANs, Fibre Channel SANs, Virtual Fibre Channel, storage pools, Storage Spaces, and data deduplication
![]() Configure the iSCSI Target Server
Configure the iSCSI Target Server
![]() Configure the iSCSI Naming Services (iSNS)
Configure the iSCSI Naming Services (iSNS)
![]() Configure the Network File System (NFS)
Configure the Network File System (NFS)
![]() Install Device Specific Modules (DSMs)
Install Device Specific Modules (DSMs)
Incorporating planning considerations
Well-defined requirements must drive all design, planning, and implementation efforts to ensure that the system is built to meet specified needs. Storage is often quantified in terms of size and speed, but you can also include availability or reliability because they determine how much and the type of redundancy required. Another common requirement source comes from specific workloads. A good understanding of the required types of I/O can help determine the best way to allocate capital funds against traditional and solid-state disks.
Windows Server 2012 R2 includes many storage-related capabilities that should be considered when evaluating any new storage requirements. Many features that were previously available only from high-end storage vendors now come in the box. Offloaded Data Transfer (ODX) is one of these new features with a potential for significant impact on overall performance. The biggest requirement for using ODX is a storage system that provides the appropriate support. Many of the famous and some smaller storage vendors have announced support for ODX, which requires that the system initiating the transfer be running Windows 8, Windows 8.1, or Windows Server 2012 or 2012 R2.
Figure 1-35 shows a typical Hyper-V configuration with a scale-out file server hosting all file shares for use by any host. They are replicated across multiple file servers and use shared storage on the back end. Redundancy is provided through the use of Storage Spaces.
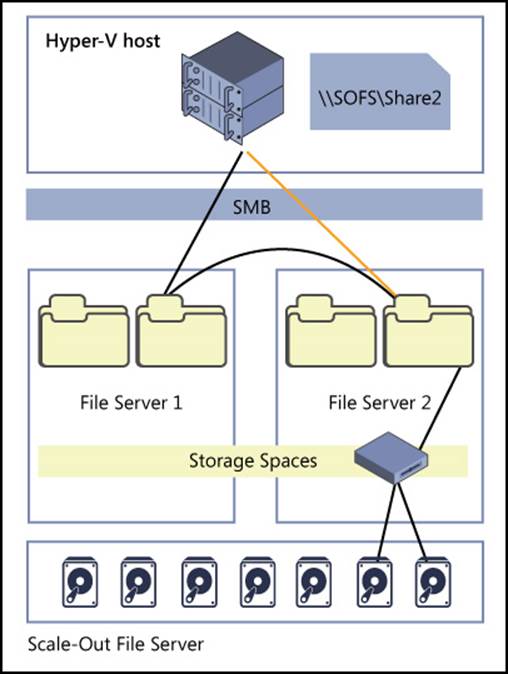
FIGURE 1-35 The scale-out file server configuration
From a Hyper-V perspective, your storage system must support ODX at the logical unit number (LUN) level if you use block storage. Another possibility is to use a Server Message Block (SMB) file share on another system backed by an ODX–capable storage array. A major enhancement delivered with Windows Server 2012 is the inclusion of the SMB 3.0 protocol. This newest version of the basic network file protocol for Windows adds a number of new capabilities specifically targeted for high availability and reliability. High availability file storage can now be built on top of Windows Server 2012 with a CSV. One common implementation for a CSV is to build a scale-out file server based on multiple physical Windows Server machines and shared serial attached SCSI (SAS) storage.
iSCSI and Fibre Channel SANs
The SCSI has been one of the primary disk interface standards for many years. RFC 3720 defines the Internet SCSI, mapping the SCSI architecture and commands onto TCP/IP. To connect to remote disks over a storage area network (SAN), you use the same basic SCSI command structure—but over a network transport. The two most common transports in use today are Ethernet and Fibre Channel. Many traditional SAN architectures used a totally separate network for all storage traffic, typically using Fibre Channel host bus adapters (HBAs), cabling, and switches.
Hyper-V for Windows Server 2012 introduced a new virtual Fibre Channel SAN feature. To use this feature, the host machine must have one or more Fibre Channel HBAs with updated drivers supporting the virtual Fibre Channel. This feature enables workload virtualization with a dependency on Fibre Channel storage.
Figure 1-36 shows the Hyper-V Virtual SAN Manager interface. Clicking the Create button launches a wizard to create a new virtual Fibre Channel SAN directly connected to an HBA and available for use by any VM on the host. The virtual SAN appears to the VM as a dedicated, locally attached device just as if the system were running on physical hardware.
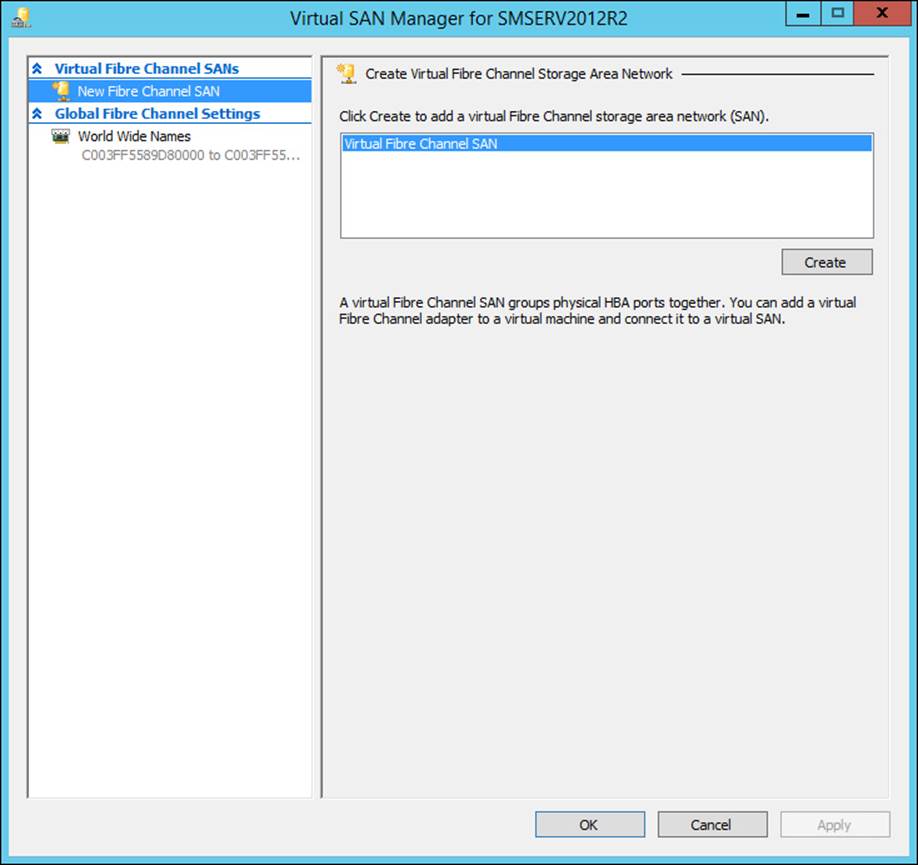
FIGURE 1-36 The Virtual SAN Manager
Storage pools
Microsoft defines a storage pool as “a collection of physical disks that enable you to aggregate disks, expand capacity in a flexible manner, and delegate administration.” Windows Server 2012 R2 adds a number of new features to storage pools, including the concept of storage tiers, write-back cache, dual parity, and parity space support for failover clusters. A new rebuild feature uses free space in the storage pool to significantly reduce the amount of time required to repair a storage space after a physical disk failure.
Microsoft uses the term “primordial storage pool” to define all available unallocated physical disks recognized by the operating system. A new named storage pool is then created from this list of available physical disks. Figure 1-37 shows the properties page for a storage pool named TieredPool1. This pool includes both hard disk drives (HDDs) and solid-state disks (SSDs), which allow tiering to be enabled.
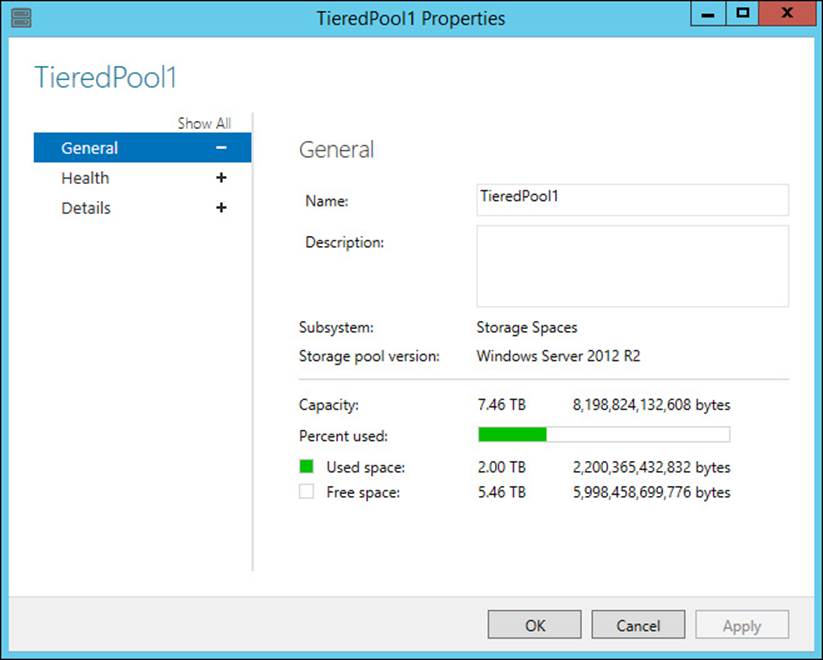
FIGURE 1-37 A storage pool property page
To see the disks in the storage pool named TieredPool1, use the following PowerShell command:
Get-StoragePool -FriendlyName TieredPool1 | Get-PhysicalDisk | FT FriendlyName, Size,
MediaType
FriendlyName Size MediaType
------------ ------------- ---------
PhysicalDisk1 3999956729856 HDD
PhysicalDisk2 3999956729856 HDD
PhysicalDisk3 198910672896 SSD
New Windows PowerShell cmdlets for managing storage tiers include Get-StorageTier, Get-StorageTierSupportedSize, New-StorageTier, Remove-StorageTier, Resize-StorageTier, and Set-StorageTier.
Storage Spaces
Storage Spaces is a storage subsystem where you can group disks into one or more storage pools. A storage space is a virtual disk created from free space in a storage pool with attributes including resiliency levels, for example. Microsoft introduced Storage Spaces with Windows 8 and Windows Server 2012. Storage spaces resemble hardware redundant arrays of independent disks (RAID) and use some of the same language, such as mirroring, parity, and striping.
Planning a new storage deployment with Windows Server 2012 R2 requires answers to several questions:
![]() How much storage is needed?
How much storage is needed?
![]() What level of redundancy is required?
What level of redundancy is required?
![]() What levels of performance in terms of input/output per second (IOPS) and throughput should the storage system provide?
What levels of performance in terms of input/output per second (IOPS) and throughput should the storage system provide?
![]() Does the storage system need to provide a clustered system?
Does the storage system need to provide a clustered system?
After you have answers to these questions, you need to match them with the types of Storage Spaces and understand how they are created (including the new tiered storage capability in Windows Server 2012). A tiered space uses both traditional HDDs and SSDs to provide the best type of storage for each workload. A background process observes the Storage Space to determine which disk blocks have the highest usage and attempts to move them to the faster SSD tier. This process runs at predetermined intervals and uses as much or as little of the available SSD space as needed. Figure 1-38 shows how a tiered storage system works in terms of data moving between tiers.

FIGURE 1-38 How a tiered storage system works
Each Storage Space can be configured to have as little or as much redundancy as required. Windows Server 2012 R2 provides for two-way and three-way mirroring for data redundancy (you need a minimum of five physical disks to establish a three-way mirror).
Thin provisioning is the concept of allocating a small fraction of the total capacity of a virtual disk and then growing the allocation as needed. You can initialize a disk with a large capacity but with only a percentage of that capacity physically available. Using this approach helps to minimize a disk-resizing problem if demand outgrows capacity.
Data deduplication
Reducing the amount of duplicated data can have a significant effect on the amount of storage required. Many high-end storage systems have a deduplication feature as a standard part of the operating system. Windows Server 2012 brings this feature into the base operating system as an optionally enabled capability.
Microsoft recommends a number of steps to take when considering and planning for data deduplication:
1. Identify target deployments.
2. Identify specific volumes and the file contents.
3. Run the deduplication evaluation tool to determine savings.
4. Plan the rollout, scalability, and deduplication policies.
Data deduplication must be installed by using either the Add Roles and Features Wizard or Windows PowerShell. Using the wizard, select Server Roles and then select Data Deduplication as shown in Figure 1-39.

FIGURE 1-39 The Data Deduplication role
After the Data Deduplication role is installed, you have access to the deduplication evaluation tool (DDPEval.exe). The Server Manager File And Storage Services Volumes tab is where you go to enable deduplication on a specific volume. Right-clicking the volume displays a menu of options, including Configure Data Deduplication. Selecting this option displays a dialog box like the one shown in Figure 1-40.
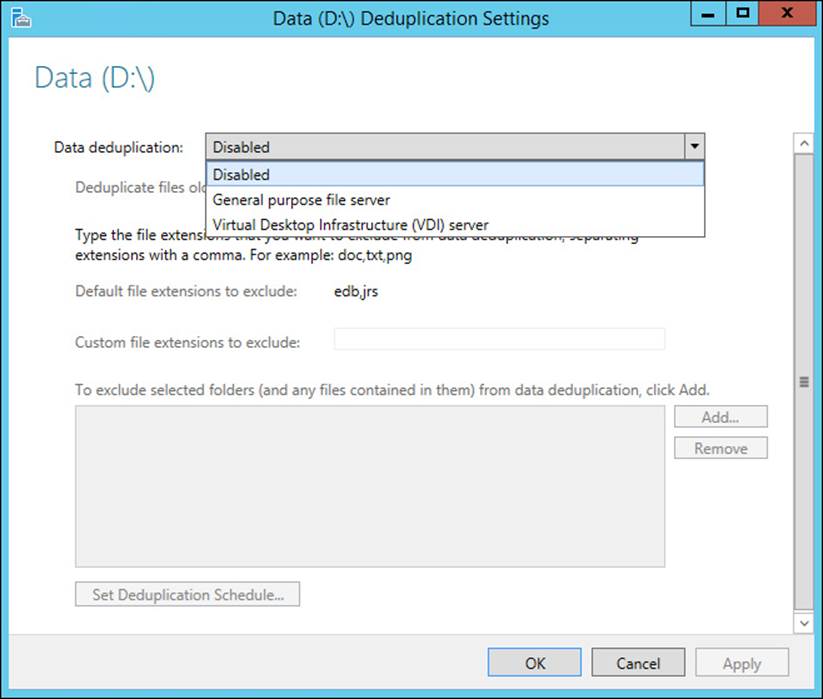
FIGURE 1-40 The Data Deduplication Settings page
This page provides all the configurable options for a deduplicated volume. At present, the two deduplication types are General Purpose File Server and Virtual Desktop Infrastructure (VDI) Server. Other configuration options include file extensions to exclude and folders to exclude.
Storage management
Managing storage resources can be both a difficult and a tedious task. Windows Server 2012 R2 includes a number of SMI-S–compliant storage management features available through Windows PowerShell as well as external management platforms such as System Center VMM. Figure 1-41 shows the different possibilities for managing storage using storage management application programming interfaces (APIs) provided by Windows Server 2012 R2.

FIGURE 1-41 A storage management summary
Configuring the iSCSI Target Server
Windows Server 2012 R2 includes a number of new and improved iSCSI Target Server features and functionality. New in this release is the capability to use VHDX files as the persistence layer behind an iSCSI LUN, bringing with it increased capacity and use of both dynamic and differencing disks.
As with most other Windows Server roles, the iSCSI Target Server role can be installed either through Server Manager or by using the following Windows PowerShell command:
Add-WindowsFeature fs-iscsitarget-server
iSCSI disks are intended to use one-to-one mappings with a target host device. Traditionally, a large storage vendor provided an expensive SAN that offered block-based storage. In block-based storage, a small chunk, or block, of the total storage system is allocated and dedicated to a specific LUN. Physical SCSI disks use LUNs on a host machine to uniquely identify each disk to a controller.
In Windows Server 2012 R2, each iSCSI LUN connects to a VHD as the source. Figure 1-42 shows the New iSCSI Virtual Disk Wizard, which is used to create a new iSCSI Target disk.
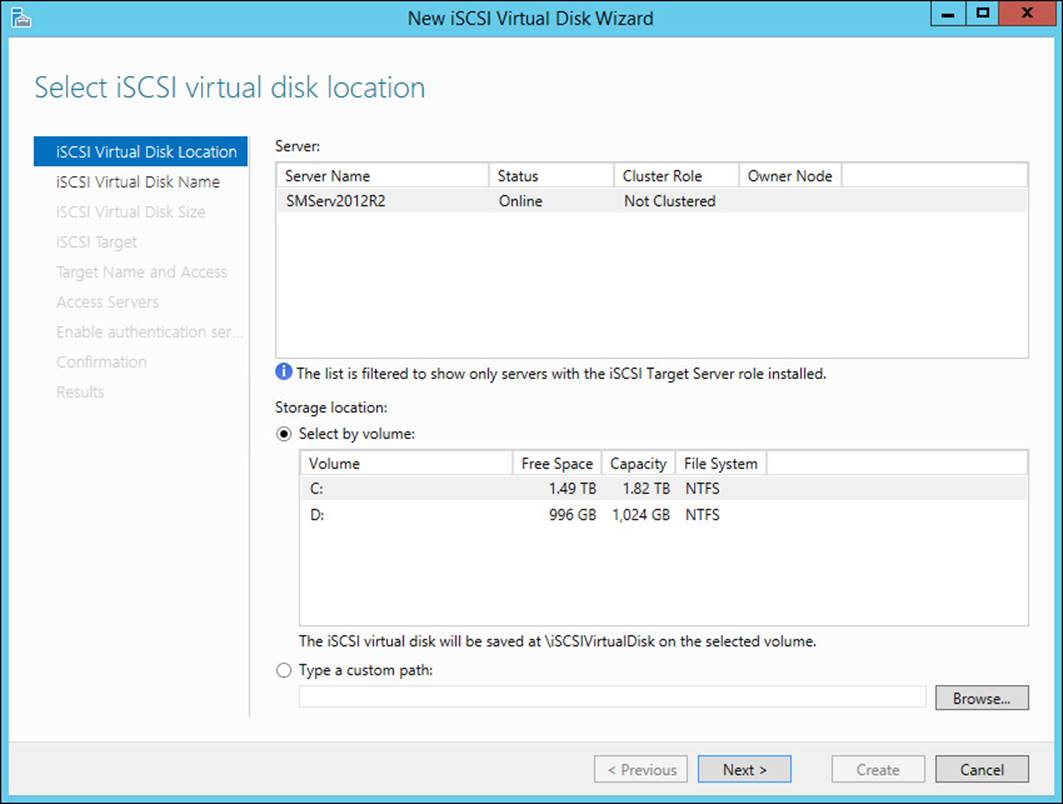
FIGURE 1-42 The New iSCSI Virtual Disk Wizard
You must identify the access server so that initiators can find the target. Options here include IQN, DNS Name, IP Address, or MAC Address. The iSCSI Qualified Name (IQN) is a required part of defining an iSCSI Target and is autogenerated for you by the wizard.
Configuring iSCSI Naming Services (iSNS)
In large networks, the presence of large numbers of iSCSI LUNs can make it difficult for a client to connect to the right target. To help solve this problem, Microsoft provides iSCSI Naming Services (iSNS). It installs as a feature using the Server Manager Add Roles And Features Wizard.Figure 1-43 shows the iSNS Server Properties page with the Discovery Domains tab selected, which is where you can create a new domain with individual iSCSI nodes for easier client access and management. An iSCSI node can be an initiator, target, or management node.

FIGURE 1-43 The iSNS Server Properties page is used to configure iSNS
You can use PowerShell to do the installation as follows:
Add-WindowsFeature iSNS
Configuring the Network File System (NFS)
Although the Network File System isn’t commonly used in organizations that use the Windows operating system exclusively, it is frequently used in UNIX and VMware installations. For ease of management, it makes sense to provide NFS services from your Windows Server 2012 R2environment if required. NFS is another role-based installation available either through Server Manager or Windows PowerShell. The PowerShell command to install NFS is this:
Add-WindowsFeature fs-NFS-Service
Figure 1-44 shows the Microsoft Management Console–based management screen for NFS services. One of the key requirements for configuring and managing NFS has to do with mapping users between Active Directory and (potentially) a Linux or UNIX equivalent by using the identity mapping feature of NFS services.
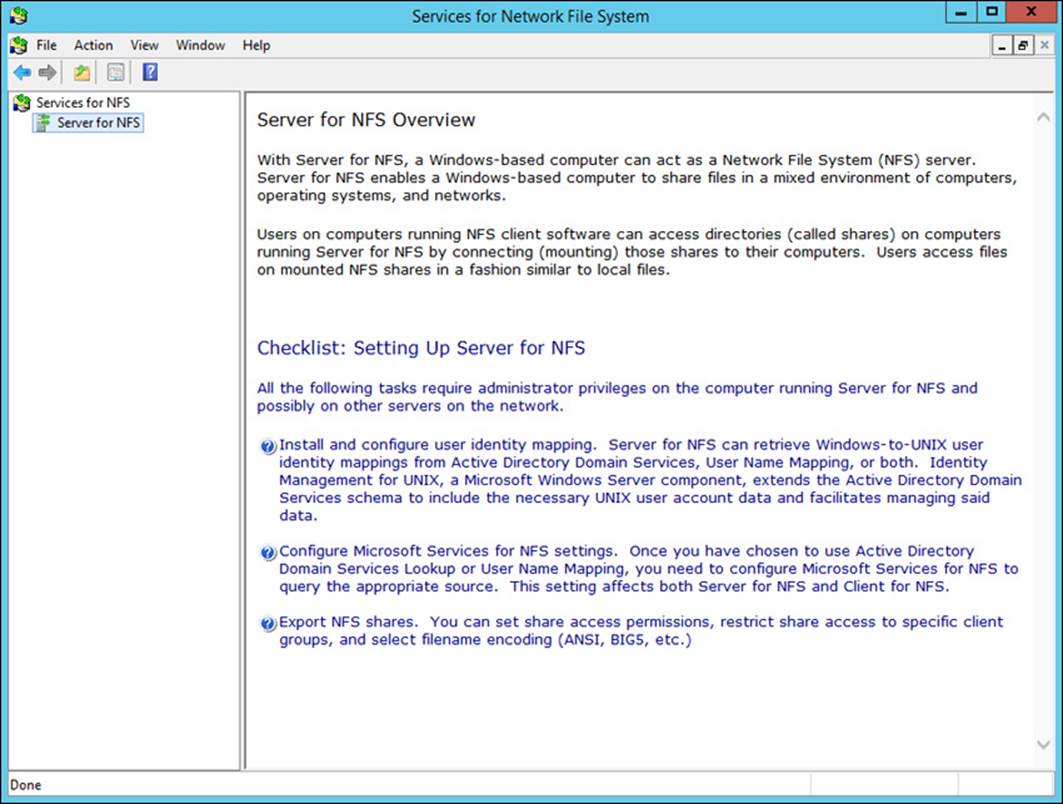
FIGURE 1-44 The Server For NFS Overview page
After the NFS services role is installed, you can create a new NFS share from Server Manager using the New Share Wizard as shown in Figure 1-45.
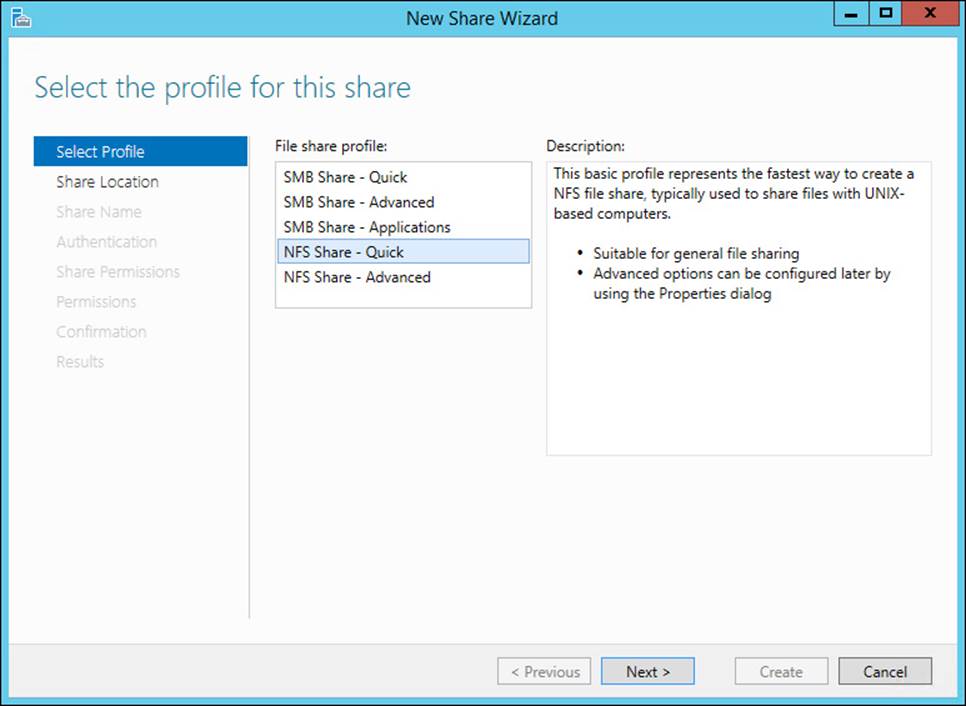
FIGURE 1-45 The New Share Wizard creating an NFS share
Authentication options include different levels of Kerberos authentication (see Figure 1-46) or no server authentication for a public NFS share.
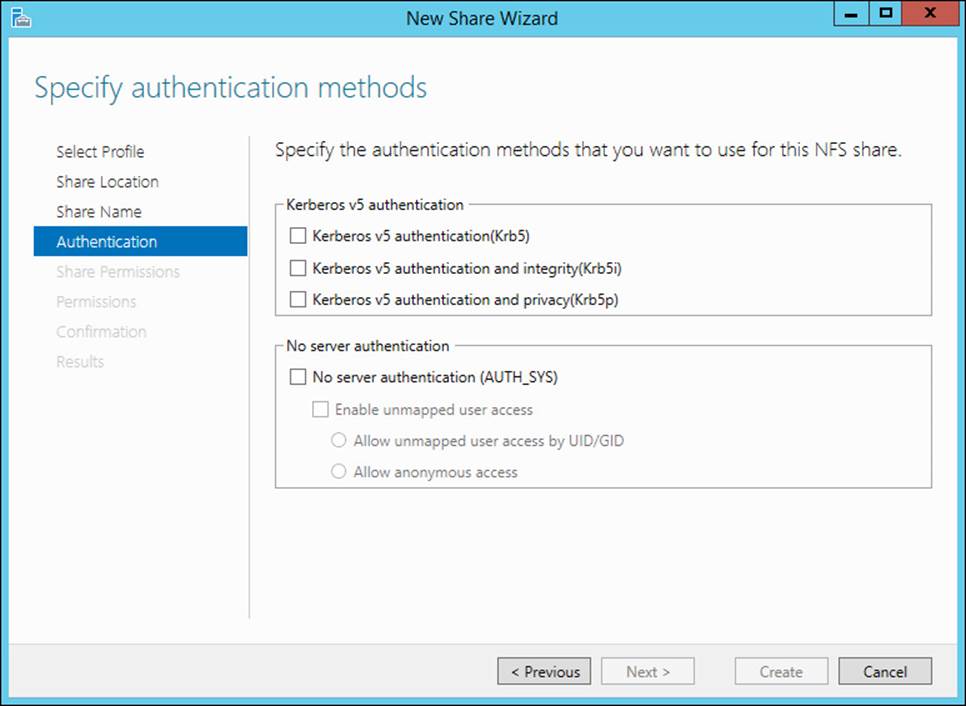
FIGURE 1-46 The New Share Wizard authentication page
Exam Tip
For the exam, be aware of multiple uses of NFS to include interoperability with Linux and UNIX. One common use case is using highly available file services under Windows Server or Windows Sever 2012 R2 with NFS to host VMs for third-party hypervisors such as VMware ESXi. This use case is new to Windows Server 2012, which includes a wide array of improvements to the NFS code.
![]() Thought experiment: Building a cluster
Thought experiment: Building a cluster
In this thought experiment, apply what you’ve learned about this objective. You can find answers to these questions in the “Answers” section at the end of this chapter.
Clusters have become the default method for providing high availability and high reliability of Microsoft services. Consider the following tasks related to establishing a clustered file server:
1. List the hardware required to build out a minimal cluster system.
2. List the steps necessary to create a cluster and provide a clustered file system to the network.
3. List the advantages of using an SMB 3.0 file transport.
Clustering has become much more important to mainstream IT with the advent of Windows Server 2012. Understanding how to build a cluster from a hardware and software perspective is a key skill to have.
Objective summary
![]() Windows Server 2012 R2 includes a number of new storage features, including storage tiering, flashback read cache, and new management capabilities.
Windows Server 2012 R2 includes a number of new storage features, including storage tiering, flashback read cache, and new management capabilities.
![]() Storage Spaces replace traditional hardware–based RAID drives.
Storage Spaces replace traditional hardware–based RAID drives.
![]() Data deduplication can deliver significant space savings and performance improvements.
Data deduplication can deliver significant space savings and performance improvements.
![]() Windows Server 2012 R2 is an excellent iSCSI and NFS host.
Windows Server 2012 R2 is an excellent iSCSI and NFS host.
![]() A good understanding of the new SMB 3.0 protocol and the requirements to take full advantage of its built-in resiliency should be a priority for any IT administrator.
A good understanding of the new SMB 3.0 protocol and the requirements to take full advantage of its built-in resiliency should be a priority for any IT administrator.
![]() Knowing which storage vendors offer ODX support should greatly influence any new purchases of storage equipment.
Knowing which storage vendors offer ODX support should greatly influence any new purchases of storage equipment.
Objective review
Answer the following questions to test your knowledge of the information in this objective. You can find the answers to these questions and explanations of why each answer choice is correct or incorrect in the “Answers” section at the end of this chapter.
1. Which tools are required to configure an iSCSI Target? (Choose all that apply.)
A. Server Manager
B. MMC and the appropriate snap-in
C. Windows PowerShell
D. DISM
2. Which security options are available for NFS volumes? (Choose all that apply.)
A. Kerberos
B. Active Directory
C. Clear text
D. SHA1 hash
3. What is used as the system resource behind an iSCSI LUN?
A. Direct Attached Disk
B. Storage Spaces
C. ReFS volumes
D. Virtual Disks
Answers
This section contains the solutions to the thought experiments and answers to the objective review questions in this chapter.
Objective 1.1: Thought experiment
1. Building a boot image for a site with different hardware requires a generic boot image with support for common devices. In this case, you could use the boot.wim file for the appropriate version of Windows Server 2012 R2.
2. With a specific hardware target. it’s possible to customize the boot image and add any drivers that would normally not be available in the standard install image. To do this, have a copy of the drivers and then use DISM to insert them into the image used for deployment.
3. You can connect to Azure using Windows PowerShell by executing the following two commands:
Get-AzurePublishSettingsFile
Import-AzurePublishSettingsFile
Objective 1.1: Review
1. Correct answers: A, C
A. Correct: Installation images are available on the Windows Server 2012 installation media.
B. Incorrect: Although you can download distribution media from the Microsoft Developer Network (MSDN), they are not generally available from the Microsoft Download Center.
C. Correct: Images can be captured using the WDS tools.
D. Incorrect: It is not possible to capture an image from a running VM.
2. Correct answer: B
A. Incorrect: Images for installing an operating system to a new system are either extracted from the distribution media or captured from an existing machine.
B. Correct: Windows SIM is used to build an answer file for use in an automated operating system installation.
C. Incorrect: DISM is used to modify an existing system image to add customized drivers and software.
D. Incorrect: In the context of this chapter, you would use WDS to install a system image on a new computer.
3. Correct answers: A, B
A. Correct: Windows PE is part of WDS.
B. Correct: Windows SIM is part of WDS.
C. Incorrect: The Windows Deployment Toolkit is a separate download.
D. Incorrect: The Windows Migration Toolkit is a separate download.
Objective 1.2: Thought experiment
1. Microsoft Azure PowerShell provides the cmdlets necessary to fully automate deploying and managing VMs on the Azure platform. Using PowerShell makes it possible to create a library of scripts that can accomplish repetitive tasks consistently.
2. PowerShell has a built-in help cmdlet, Get-Help, which displays the documentation embedded in each cmdlet. You can also use the command Get-Command along with a filter to show all Azure–related cmdlets.
3. Deploying a VM can be accomplished with just a few PowerShell commands. They require the use of three commands:
![]() New-AzureVMConfig -Name “TestVM” -InstanceSize “Small” -Image $image
New-AzureVMConfig -Name “TestVM” -InstanceSize “Small” -Image $image
![]() Add-AzureProvisioningConfig -Windows -AdminUserName $un -Password $pwd
Add-AzureProvisioningConfig -Windows -AdminUserName $un -Password $pwd
![]() New-AzureVM -ServiceName “clcTestSvc1” -Location “East US”
New-AzureVM -ServiceName “clcTestSvc1” -Location “East US”
Objective 1.2: Review
1. Correct answers: A, B, C, D
A. Correct: Having local images available in a geographically diverse network speeds up the process.
B. Correct: It is possible to prestage custom images for remote installation.
C. Correct: Using prestaged images gives a greater measure of control over the deployment process.
D. Correct: Using a local image reduces the bandwidth required over a WAN.
2. Correct answers: C, D
A. Incorrect: Server Manager is not the proper tool.
B. Incorrect: Although the network control tool allows you to change settings about adapters, it is not appropriate here.
C. Correct: All GUI management of WDS happens using the MMC snap-in.
D. Correct: PowerShell is a powerful tool and offers a second choice to MMC with the addition of the new cmdlets in this release.
3. Correct answers: A, B, C
A. Correct: System Center App Controller is a viable way to deploy a VM to the cloud.
B. Correct: Microsoft Azure PowerShell is another viable method of deploying a VM to the cloud.
C. Correct: Linux support is provided through the Azure command-line tool.
D. Incorrect: Xcopy is not a viable method for deploying a VM to the cloud.
Objective 1.3: Thought experiment
1. Microsoft lists a number of roles that migrate easily, but Hyper-V is probably the most obvious. New benefits with the Windows Server 2012 R2 version of Hyper-V make it a prime candidate, and the migration process is relatively painless. Other roles include remote access, network policy services, and typical file and print roles.
2. The Windows ADK provides the reports needed to determine what roles and services can be migrated either to a newer operating system or up to the cloud.
3. Migrating a file server with named shares would require creating duplicate shares on the target system and then copying files between the systems. Finally, the old server would be disconnected and any default share mappings reset to point to the new system.
Objective 1.3: Review
1. Correct answers: B, C
A. Incorrect: A new Active Directory domain controller is typically brought up and configured, and then the old domain controller is decommissioned.
B. Correct: Routing and Remote Access Services (RRAS) have been upgraded with Windows Server 2012 R2 and offer new capabilities not found in previous versions.
C. Correct: A VPN server is now part of RRAS and would also be a good candidate for migration.
D. Incorrect: Although an isolated test server could be easily upgraded, it typically isn’t a candidate for migration.
2. Correct answer: A
A. Correct: The WSMT offers the best solution for migration.
B. Incorrect: The Windows SIM is used for deploying new systems but not migration.
C. Incorrect: DISM is another tool used primarily in the installation process.
D. Incorrect: PowerShell is a powerful tool, but not the right choice here.
3. Correct answers: B, D
A. Incorrect: DISM is not part of the MAP Toolkit.
B. Correct: The MAP Toolkit includes a capacity planning tool.
C. Incorrect: PowerShell cmdlets are not part of the MAP Toolkit.
D. Correct: The MAP Toolkit includes an inventory and reporting tool.
Objective 1.4: Thought experiment
1. At the lowest level, a cloud is made up of VMs connected together and to the outside world by virtual networks and some type of storage. Microsoft uses the term “Fabric” to describe the “plumbing” required to make a cloud functional.
2. Service templates make deploying new services much simpler. Specifically, they are designed to create identical applications or services based on the same template. The key is consistency and simplification of the overall process.
3. Deploying a VM in a VMM environment can take advantage of the PowerShell cmdlets installed with VMM. You can see these cmdlets by clicking the View Script button provided by the VMM console. For example, the NewVmFromVmConfig cmdlet creates a new VM using a previously defined configuration template.
Objective 1.4: Review
1. Correct answer: B
A. Incorrect: A Windows system image is not required for creating a new VM.
B. Correct: Using a previously configured VM is a valid option.
C. Incorrect: Although you need a Hyper-V host on which to run a VM, it is not required for creating a new VM.
D. Incorrect: Although SQL Server is used behind the scenes in VMM, it is not required for creating a new VM.
2. Correct answer: A
A. Correct: Default administrator name and password are part of a Guest OS profile.
B. Incorrect: Boot partition size is not part of a Guest OS profile.
C. Incorrect: Custom drivers can be added using DISM, but not in a Guest OS profile.
D. Incorrect: System components are configured in hardware profiles.
3. Correct answers: A, B, C, D
A. Correct: Switch ports can be configured when managing logical networks.
B. Correct: VLANs can be configured when managing logical networks.
C. Correct: IP address blocks are a key piece of logical networks and can be configured.
D. Correct: It is possible to create custom MAC address pools from VMM.
Objective 1.5: Thought experiment
1. Creating a cluster requires a minimum of two independent nodes plus storage available to both nodes.
2. Creating a clustered file share requires a minimum of two nodes with shared “just a bunch of disks” (JBOD)–based storage. The cluster wizard takes you through the steps required to actually create the cluster and add storage.
3. SMB 3.0 provides the underlying protocol for highly available storage and includes new features and services to provide timely failover. They require all client and server machines to be running Windows Server 2012 or 2012 R2, or Windows 8 or 8.1.
Objective 1.5: Review
1. Correct answers: A, B, C
A. Correct: Server Manager provides multiple management points for creating and managing iSCSI Targets.
B. Correct: MMC is a valid tool for making changes to the iSCSI Target Server.
C. Correct: Windows PowerShell includes iSCSI cmdlets for creating and managing the service.
D. Incorrect: DISM is not used for iSCSI Target management.
2. Correct answers: A, B
A. Correct: Kerberos is the primary method.
B. Correct: Connections can be made between Active Directory credentials and equivalents.
C. Incorrect: Clear text is not an option.
D. Incorrect: SHA1 is not used for this case.
3. Correct answer: D
A. Incorrect: Direct Attached Disks can be used to store the virtual disks but are not directly assignable as an iSCSI Target LUN.
B. Incorrect: Although the virtual disk can reside on a Storage Spaces volume, it is not the direct source of an iSCSI Target LUN.
C. Incorrect: ReFS volumes are not recommended for iSCSI virtual disks.
D. Correct: A virtual disk is the resource behind an iSCSI LUN.
All materials on the site are licensed Creative Commons Attribution-Sharealike 3.0 Unported CC BY-SA 3.0 & GNU Free Documentation License (GFDL)
If you are the copyright holder of any material contained on our site and intend to remove it, please contact our site administrator for approval.
© 2016-2026 All site design rights belong to S.Y.A.