Windows Server 2012 R2 Pocket Consultant: Storage, Security, & Networking (2014)
Chapter 3. Data sharing and redundancy
§ Using and enabling file sharing
§ Configuring standard file sharing
§ Managing share permissions
§ Managing existing shares
§ Configuring NFS sharing
§ Using shadow copies
§ Connecting to network drives
§ Configuring synced sharing
The Server Message Block (SMB) protocol is the primary file sharing protocol used by computers running Windows. When folders are shared over a network, an SMB client reads and writes to files and requests services from computers hosting SMB-shared folders. With SMB, Windows Server 2012 R2 supports standard file sharing and public folder sharing. Standard file sharing makes it possible for remote users to access network resources such as files, folders, and drives. When you share a folder or a drive, you make all its files and subfolders available to a specified set of users. Because you don’t need to move files from their current location, standard file sharing is also referred to as in-place file sharing.
You can enable standard file sharing on disks formatted with FAT, FAT32, exFAT, NTFS, or Resilient File System (ReFS). One set of permissions apply to disks formatted with exFAT, FAT, or FAT32. These permissions are called share permissions. Two sets of permissions apply to disks formatted with NTFS or ReFS: NTFS permissions (also referred to as access permissions) and share permissions. Having two sets of permissions allows you to determine precisely who has access to shared files and the level of access assigned. With either NTFS permissions or share permissions, you do not need to move the files you are sharing.
With public folder sharing, you share files by just copying or moving files to the computer’s Public folder. Public files are available to anyone who logs on to a computer locally regardless of whether that person has a standard user account or an administrator user account on the computer. You can also grant network access to the Public folder; however, if you do this, there are no access restrictions. The Public folder and its contents are open to everyone who can access the computer over the local network.
Using and enabling file sharing
The sharing settings on a computer determine the way files can be shared. The two file sharing models that Windows Server 2012 R2 supports have the following differences:
§ Standard (in-place) file sharing. Allows remote users to access files, folders, and drives over the network. When you share a folder or a drive, you make all its files and subfolders available to a specified set of users. Share permissions and access permissions together enable you to control who has access to shared files and the level of access assigned. You do not need to move the files you are sharing.
§ Public folder sharing. Allows local users and (optionally) remote users to access any files placed in the computer’s %SystemDrive%\Users\Public folder. Access permissions on the Public folder determine which users and groups have access to publicly shared files in addition to the level of access those users and groups have. When you copy or move files to the Public folder, access permissions are changed to match those of the Public folder. Some additional permissions are added as well. When a computer is part of a workgroup, you can add password protection to the Public folder. Separate password protection isn’t needed in a domain because only domain users can access Public folder data.
With standard file sharing, local users don’t have automatic access to any data stored on a computer. You control local access to files and folders by using the security settings on the local disk. With public folder sharing, on the other hand, files copied or moved to the Public folder are available to anyone who logs on locally. You can grant network access to the Public folder as well; however, doing so makes the Public folder and its contents open to everyone who can access the computer over the network.
Windows Server 2012 R2 adds new layers of security through compound identities, claims-based access controls, and central access policies. With both Windows 8.1 and Windows Server 2012 R2, you can assign claims-based access controls to file and folder resources on NTFS and ReFS volumes. With Windows Server 2012 R2, users are granted access to file and folder resources, either directly with access permissions and share permissions or indirectly with claims-based access controls and central access policies.
SMB 3.0 makes it possible to encrypt data being transferred over the network. You can enable SMB encryption for shares configured on NTFS and ReFS volumes. SMB encryption works only when the computer requesting data from an SMB-based share (either a standard file share or a DFS share) and the server supplying the data support SMB 3.0. Both Windows 8.1 and Windows Server 2012 R2 support SMB 3.0. (They have an SMB 3.0 client.)
Public folder sharing is designed to enable users to share files and folders from a single location. With public folder sharing, you copy or move files you want to share to a computer’s %SystemDrive%\Users\Public folder. You can access public folders in File Explorer by double-tapping or double-clicking the system drive, and then accessing the Users\Public folder.
The Public folder has several subfolders you can use to help organize public files:
§ Public Desktop. Used for shared desktop items. Any files and program shortcuts placed in the Public Desktop folder appear on the desktop of all users who log on to the computer (and to all network users if network access has been granted to the Public folder).
§ Public Documents, Public Music, Public Pictures, Public Videos. Used for shared document and media files. All files placed in one of these subfolders are available to all users who log on to the computer (and to all network users if network access has been granted to the Public folder).
§ Public Downloads. Used for shared downloads. Any downloads placed in the Public Downloads subfolder are available to all users who log on to the computer (and to all network users if network access has been granted to the Public folder).
NOTE
By default, the Public Desktop folder is hidden from view. If hidden items aren’t being displayed in File Explorer, tap or click View, and then select Hidden Items.
By default, anyone with a user account and password on a computer can access that computer’s Public folder. When you copy or move files to the Public folder, access permissions are changed to match that of the Public folder, and some additional permissions are added as well.
You can change the default Public folder sharing configuration in two key ways:
§ Allow users logged on to the computer to view and manage public files but restrict network users from accessing public files. When you configure this option, the implicit groups Interactive, Batch, and Service are granted special permissions on public files and public folders.
§ Allow users with network access to view and manage public files. This allows network users to open, change, create, and delete public files. When you configure this option, the implicit group Everyone is granted Full Control permission to public files and public folders.
Windows Server 2012 R2 can use either or both sharing models at any time. However, standard file sharing offers more security and better protection than public folder sharing, and increasing security is essential to protecting your organization’s data. With standard file sharing, share permissions are used only when a user attempts to access a file or folder from a different computer on the network. Access permissions are always used, whether the user is logged on to the console or is using a remote system to access a file or folder over the network. When data is accessed remotely, first the share permissions are applied, and then the access permissions are applied.
As shown in Figure 3-1, you can configure the basic file sharing settings for a server by using Advanced Sharing Settings in Network And Sharing Center. Separate options are provided for network discovery, file and printer sharing, and public folder sharing.
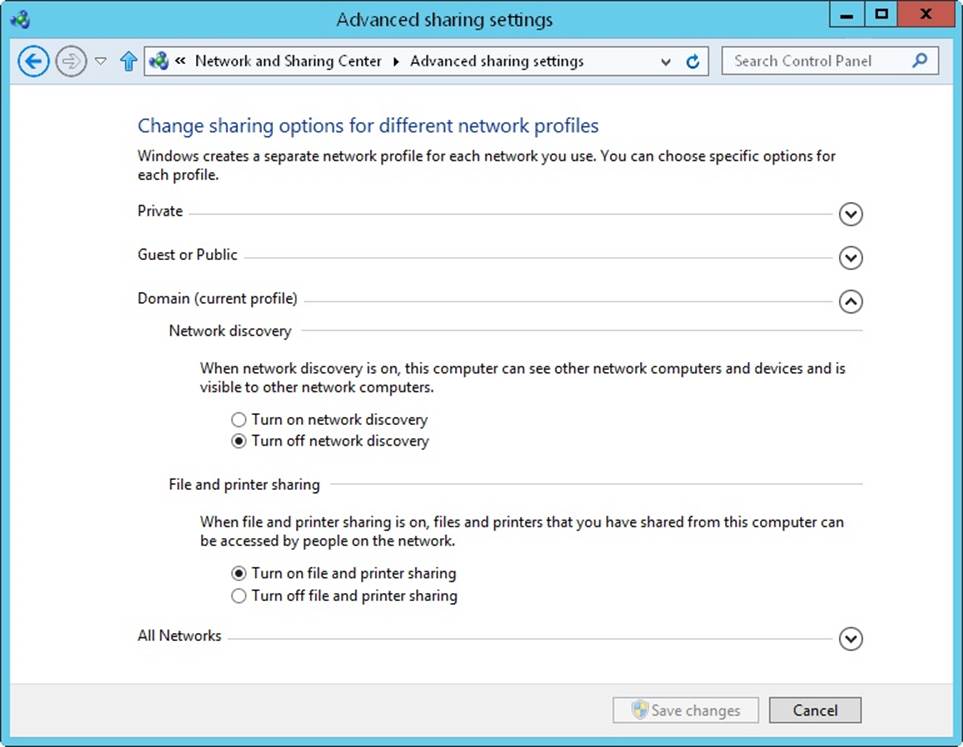
Figure 3-1. Network And Sharing Center shows the current sharing configuration.
You can manage a computer’s sharing configuration by following these steps:
1. In Control Panel, tap or click View Network Status And Tasks under the Network And Internet heading to open Network And Sharing Center.
2. In Network And Sharing Center, tap or click Change Advanced Sharing Settings in the left pane. Select the network profile for the network on which you want to enable file and printer sharing. Typically, this will be the Domain profile.
3. Standard file and printer sharing controls network access to shared resources. To configure standard file sharing, do one of the following:
o Select Turn On File And Printer Sharing to enable file sharing.
o Select Turn Off File And Printer Sharing to disable file sharing.
4. Public folder sharing controls access to a computer’s Public folder. To configure public folder sharing, expand the All Networks panel by tapping or clicking the related expand button. On the Public Folder Sharing panel, choose one of the following options:
o Turn On Sharing So Anyone With Network Access Can Read And Write Files In The Public Folders. Enables public folder sharing by granting access to the Public folder and all public data to anyone who can access the computer over the network. Windows Firewall settings might prevent external access.
o Turn Off Public Folder Sharing. Disables public folder sharing, preventing local network access to the Public folder. Anyone who logs on locally to your computer can still access the Public folder and its files.
5. Tap or click Save Changes.
Configuring standard file sharing
You use shares to control access for remote users. Permissions on shared folders have no effect on users who log on locally to a server or to a workstation that has shared folders.
Understanding SMB changes
SMB is the primary file sharing protocol used by Windows operating systems. As Windows itself has changed over the years, so has SMB. To allow for version and feature changes, SMB was designed to enable clients and servers to negotiate and then use the highest version supported by both the client attempting to connect an SMB share and the server hosting the share.
The current version of SMB is version 3.02, which is supported by Windows 8.1 and Windows Server 2012 R2. Thus, when a Windows 8.1 computer connects to an SMB share hosted on a server running Windows Server 2012 R2, SMB 3.02 is the version used for the SMB session.
The earliest implementation of SMB was called CIFS, which was introduced with Windows NT 4.0, followed by SMB 1.0, which was used by all versions of Windows from Windows 2000 to Windows Server 2003 R2. Beginning with Windows 8.1 and Windows Server 2012 R2, support for CIFS and SMB 1.0 is an optional feature that must be enabled. Because CIFS and SMB 1.0 are outdated, perform poorly, and are less secure than their predecessors, SMB 1.0/CIFS File Sharing Support should not be enabled unless required. That said, if a computer running Windows 8.1 needs to connect to a server running a legacy Windows operating system, the computer must have the SMB 1.0/CIFS File Sharing Support feature enabled. In addition, if a computer running a legacy Windows operating system needs to connect to a server running Windows Server 2012 R2, the server must have the SMB 1.0/CIFS File Sharing Support feature enabled.
Table 3-1 provides a summary of the current versions of SMB, the associated versions of Windows, and the major features introduced. You can enter Get-Smb-Connection at an elevated, administrator Windows PowerShell prompt to determine the version of SMB a client has negotiated with a file server. In the command output, the version is listed in the Dialect column, as shown in the following sample output:
ServerName ShareName UserName Credential Dialect NumOpens
---------- --------- -------- ---------- ------- --------
Server36 IPC$ CPANDL\williams CPANDL\williams 3.02 0
Server36 PrimaryData CPANDL\williams CPANDL\williams 3.02 14
Table 3-1. Overview of current SMB versions
|
SMB Version |
Windows Version |
Features |
|
SMB 2.0 |
Windows Vista SP1, Windows Server 2008 |
Increasing scalability and security, asynchronous operations, larger reads/writes, request compounding |
|
SMB 2.1 |
Windows 7, Windows Server 2008 R2 |
Large MTU support, BranchCache support |
|
SMB 3.0 |
Windows 8, Windows Server 2012 |
Enhancements for server clusters, BranchCache v2 support, SMB over RDMA, improved security |
|
SMB 3.02 |
Windows 8.1, Windows Server 2012 R2 |
Improved performance for SMB over RDMA, additional scale-out options, Hyper-V live migration support |
IMPORTANT
SMB 3.0 and SMB 3.02 brought many enhancements for performance, especially when you use clustered file servers. A key enhancement that doesn’t rely on a special configuration is end-to-end encryption of SMB data, which eliminates the need to use Internet Protocol security (IPsec), specialized hardware, or wide area network (WAN) accelerators to protect data from eavesdropping. SMB encryption can be enabled on a per-share basis.
Viewing existing shares
You can use both Computer Management and Server Manager to work with shares. You also can view current shares on a computer by entering net share at a command prompt or by entering get-smbshare at a Windows PowerShell prompt.
TIP
The get-smbshare cmdlet is only one of many cmdlets associated with the smbshare module. To get a list of other cmdlets available for working with SMB shares, enter get-command –module smbshare at a Windows PowerShell prompt.
NOTE
Computer Management, net share, and get-smbshare display information about SMB-based shares, including standard SMB folder shares, hidden SMB folder shares (those ending with the $ suffix), and SMB folders shared by using Distributed File System (DFS). Server Manager displays information about standard SMB folder shares, SMB folders shared by using DFS, and folders shared by using Network File System (NFS). Server Manager does not display information about hidden SMB folder shares.
In Computer Management, you can view the shared folders on a local or remote computer by following these steps:
1. You’re connected to the local computer by default. If you want to connect to a remote computer, press and hold or right-click the Computer Management node and then tap or click Connect To Another Computer. Choose Another Computer, type the name or IP address of the computer you want to connect to, and then tap or click OK.
2. In the console tree, expand System Tools, expand Shared Folders, and then select Shares. The current shares on the system are displayed, as shown in Figure 3-2.
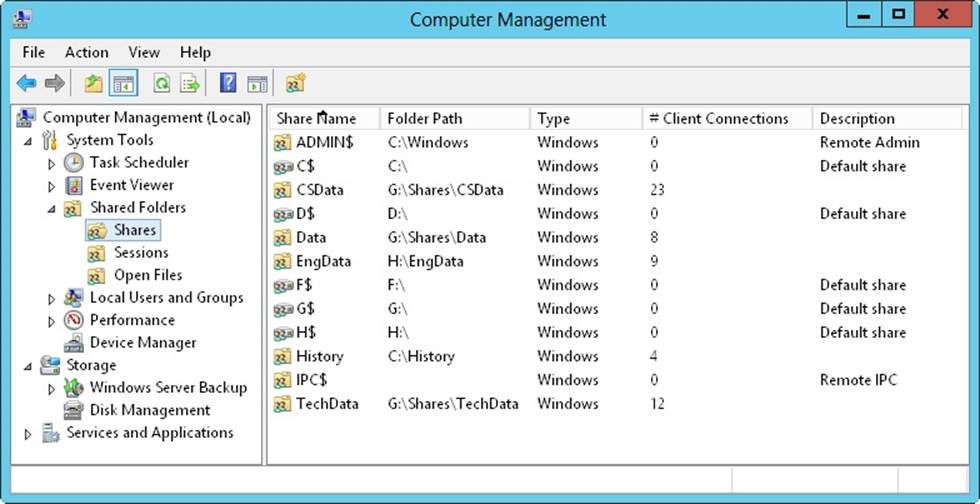
Figure 3-2. Available shares are listed in the Shared Folders node.
3. The columns for the Shares node provide the following information:
o Share Name. Name of the shared folder.
o Folder Path. Complete path to the folder on the local system.
o Type. What kind of computers can use the share. This typically shows as Windows because SMB shares are for Windows-based computers.
o # Client Connections. Number of clients currently accessing the share.
o Description. Description of the share.
In Server Manager, you can view the shared folders on a local or remote computer by following these steps:
1. Select the File And Storage Services node, and then select the related Shares subnode.
2. As Figure 3-3 shows, the Shares subnode provides information about shares on each file server that has been added for management. The columns for the Shares subnode provide the following information:
o Share. Name of the shared folder.
o Local Path. Complete path to the folder on the local system.
o Protocol. What protocol the share uses, either SMB or NFS.
o Cluster Role. If the server sharing the folder is part of a cluster, the cluster role is shown here. Otherwise, the cluster role is listed as None.
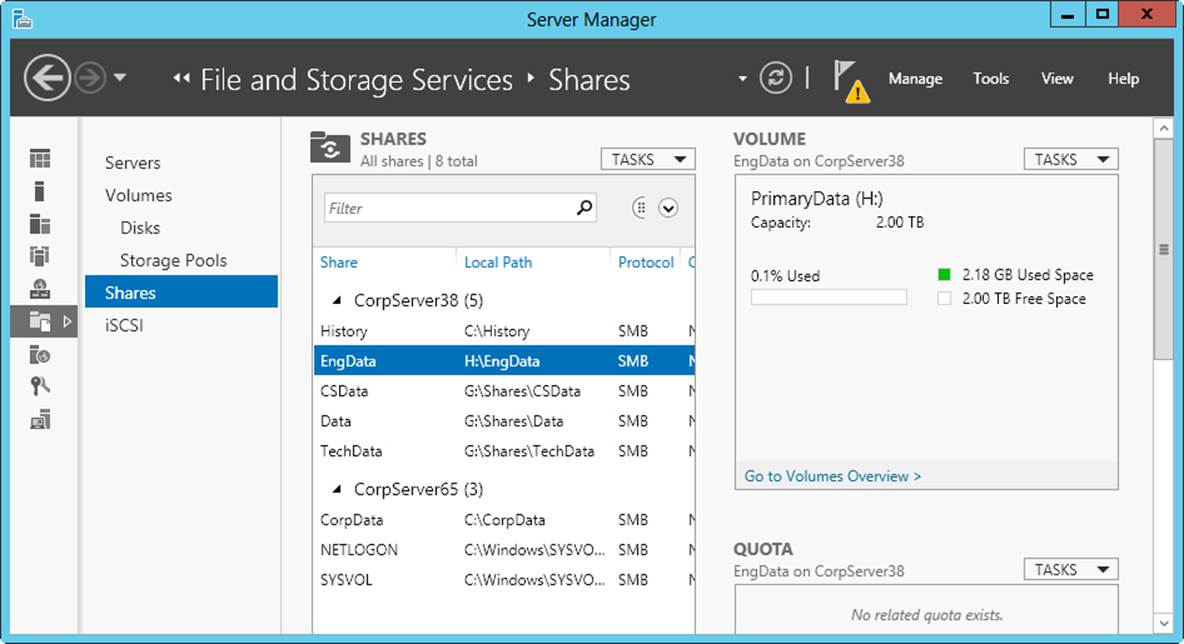
Figure 3-3. Tap or click Shares in the main pane (on the left) to view the available shares.
3. When you tap or click a share in the Shares pane, information about the related volume is displayed in the Volume pane.
REAL WORLD
NFS is the file sharing protocol used by UNIX-based systems, which includes computers running Apple OS X. As discussed in Configuring NFS sharing later in this chapter, you can enable support for NFS by installing the Server For NFS role service as part of the file server configuration.
Creating shared folders in Computer Management
Windows Server 2012 R2 provides several ways to share folders. You can share local folders by using File Explorer, and you can share local and remote folders by using Computer Management or Server Manager.
When you create a share with Computer Management, you can configure its share permissions and offline settings. When you create a share with Server Manager, you can provision all aspects of sharing, including NTFS permissions, encrypted data access, offline settings for caching, and share permissions. Typically, you create shares on NTFS volumes because NTFS offers the most robust solution.
In Computer Management, you share a folder by following these steps:
1. If necessary, connect to a remote computer. In the console tree, expand System Tools, expand Shared Folders, and then select Shares. The current shares on the system are displayed.
2. Press and hold or right-click Shares, and then tap or click New Share. This starts the Create A Shared Folder Wizard. Tap or click Next.
3. In the Folder Path text box, enter the local file path to the folder you want to share. The file path must be exact, such as C:\EntData\Documents. If you don’t know the full path, tap or click Browse, use the Browse For Folder dialog box to find the folder you want to share, and then tap or click OK. Tap or click Next.
TIP
If the file path you specified doesn’t exist, the wizard can create it for you. Tap or click Yes when prompted to create the necessary folder or folders.
4. In the Share Name text box, enter a name for the share, as shown in Figure 3-4. This is the name of the folder to which users will connect. Share names must be unique for each system.
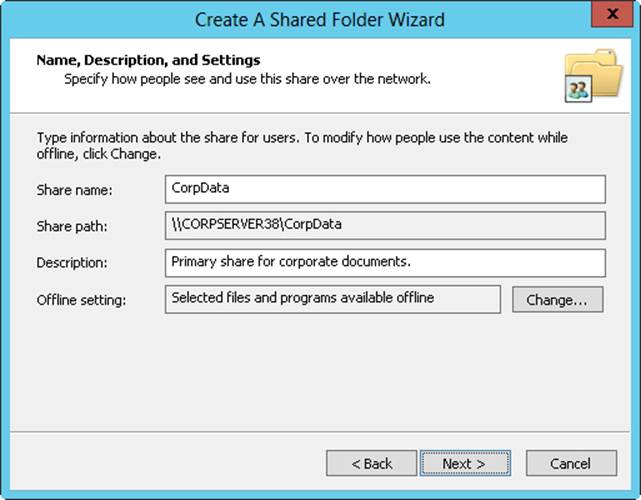
Figure 3-4. Use the Create A Shared Folder Wizard to configure the essential share properties, including name, description, and offline resource usage.
TIP
If you want to hide a share from users (which means that they won’t be able to view the shared resource when they try to browse to it in File Explorer or at the command line), enter a dollar sign ($) as the last character of the shared resource name. For example, you could create a share called PrivEngData$, which would be hidden from File Explorer, NET VIEW, and other similar utilities. Users can still connect to the share and access its data if they’ve been granted access permission and they know the share’s name. Note that the $ must be typed as part of the share name when mapping to the shared resource.
5. If you want to, enter a description of the share in the Description text box. When you view shares on a particular computer, the description is displayed in Computer Management.
6. By default, the share is configured so that only files and programs that users specify are available for offline use. Typically, this is the option you want to use because this option also enables users to take advantage of the new Always Offline feature. If you want to use different offline file settings, tap or click Change, select the appropriate options in the Offline Settings dialog box, and then tap or click OK. The offline availability settings available include the following:
o Only The Files And Programs That Users Specify Are Available Offline. Select this option if you want client computers to cache only the files and programs that users specify for offline use. Optionally, if the BranchCache For Network Files role service is installed on the file server, select Enable BranchCache to enable computers in a branch office to cache files that are downloaded from the shared folder, and then securely share the files to other computers in the branch office.
o No Files Or Programs From The Shared Folder Are Available Offline Select this option if you don’t want cached copies of the files and programs in the share to be available on client computers for offline use.
o All Files And Programs That Users Open From The Shared Folder Are Automatically Available Offline. Select this option if you want client computers to automatically cache all files and programs that users open from the share. Optionally, select Optimize For Performance to run cached program files from the local cache instead of the shared folder on the server.
7. Tap or click Next, and then set basic permissions for the share. You’ll find helpful pointers in Managing share permissions later in the chapter. The available options are as follows:
o All Users Have Read-Only Access. Gives users access to view files and read data. They can’t create, modify, or delete files and folders.
o Administrators Have Full Access; Other Users Have Read-Only Access Gives administrators complete control over the share. Full access allows administrators to create, modify, and delete files and folders. On an NTFS volume or partition, it also gives administrators the right to change permissions and to take ownership of files and folders. Other users can view files and read data; however, they can’t create, modify, or delete files and folders.
o Administrators Have Full Access; Other Users Have No Access. Gives administrators complete control over the share, but prevents other users from accessing the share.
o Customize Permissions. Allows you to configure access for specific users and groups, which is usually the best technique to use. Setting share permissions is discussed fully in Managing share permissions.
8. When you tap or click Finish, the wizard creates the share and displays a status report, which should state “Sharing Was Successful.” If an error is displayed instead, note the error and take corrective action as appropriate before repeating this procedure to create the share. Tap or click Finish.
Individual folders can have multiple shares. Each share can have a different name and a different set of access permissions. To create additional shares on an existing share, just follow the preceding steps for creating a share with these changes:
§ In step 4, when you name the share, make sure that you use a different name.
§ In step 5, when you add a description for the share, use a description that explains what the share is used for and how it’s different from the other shares for the same folder.
Creating shared folders in Server Manager
In Server Manager, you share a folder by following these steps:
1. The Shares subnode of the File And Storage Services node shows existing shares for file servers that have been added for management. In the Shares pane, tap or click Tasks, and then tap or click New Share to start the New Share Wizard.
2. Choose one of the available file share profiles, and then tap or click Next. The New Share Wizard has the following file share profiles:
o SMB Share—Quick. A basic profile for creating SMB file shares that allows you to configure the settings and permissions of the shares.
o SMB Share—Advanced. An advanced profile for creating SMB file shares that allows you to configure the settings, permissions, management properties, and NTFS quota profile (if applicable) of the shares.
o SMB Share—Applications. A custom profile for creating SMB file shares with settings appropriate for Hyper-V, certain databases, and other server applications. It’s essentially the same as the quick profile, but it doesn’t allow you to enable access-based enumeration or offline caching.
NOTE
If you are using the Server For NFS role service, options are available for creating NFS shares as well.
REAL WORLD
SMB 3.0 includes enhancements for server-based applications. These enhancements improve performance for small random reads and writes, which are common with server-based applications, such as Microsoft SQL Server OLTP. With SMB 3.0, packets use large Maximum Transmission Units (MTUs) as well, which enhance performance for large, sequential data transfers, such as those used for deploying and copying virtual hard disks (VHDs) over the network, database backup and restore over the network, and SQL Server data warehouse transactions over the network.
3. On the Select The Server And Path For This Share page, select the server and volume on which you want the share to be created. Only file servers you’ve added for management are available. When you are ready to continue, tap or click Next.
By default, Server Manager creates the file share as a new folder in the \Shares directory on the selected volume. To override this, choose the Type A Custom Path option, and then either enter the share path, such as C:\Data, or click Browse to use the Select Folder dialog box to select the share path.
4. On the Specify Share Name page, enter a name for the share, as shown in Figure 3-5. This is the name of the folder to which users will connect. Share names must be unique for each system.
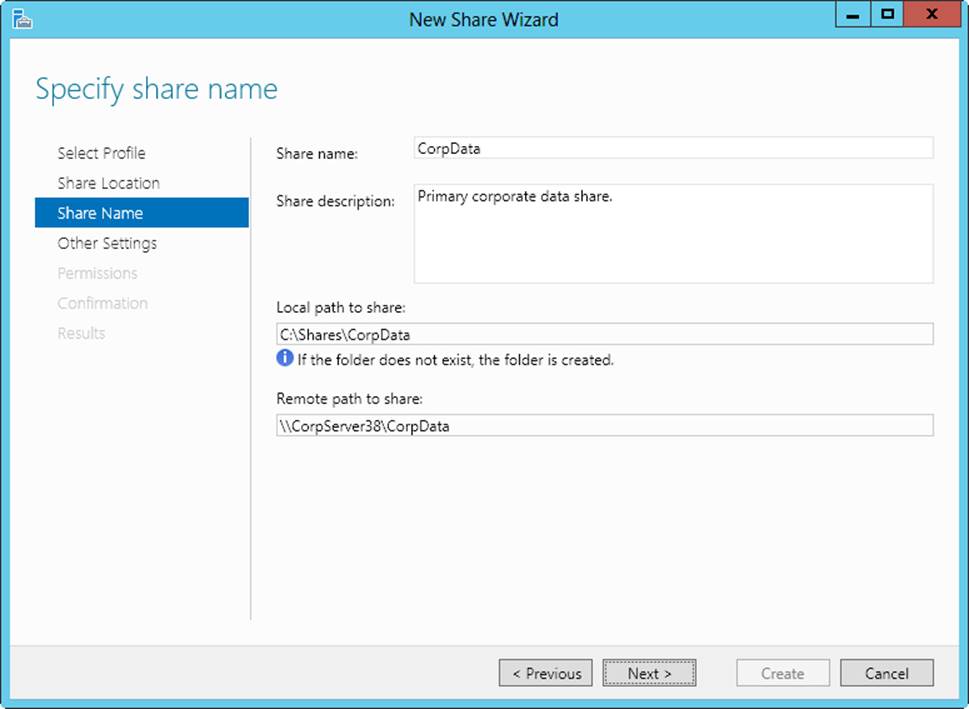
Figure 3-5. Set the name and description for the share.
5. If you want to, enter a description of the share in the Description text box. When you view shares on a particular computer, the description is displayed in Computer Management.
6. Note the local and remote paths to the share. These paths are set based on the share location and share name you specified. When you are ready to continue, tap or click Next.
7. On the Configure Share Settings page, use the following options to configure the way the share is used:
o Enable Access-Based Enumeration. Configures permissions so that when users browse the folder, only files and folders a user has been granted at least Read access to are displayed. If a user doesn’t have at least Read (or equivalent) permission for a file or folder within the shared folder, that file or folder is hidden from view. (This option is dimmed if you are creating an SMB share optimized for applications.)
o Allow Caching Of Share. Configures the share to cache only the files and programs that users specify for offline use. Although you can later edit the share properties and change the offline files’ availability settings, you typically want to select this option because it allows users to take advantage of the new Always Offline feature. Optionally, if the BranchCache For Network Files role service is installed on the file server, select Enable BranchCache to enable computers in a branch office to cache files that are downloaded from the shared folder and then securely share the files to other computers in the branch office. (This option is dimmed if you are creating an SMB share optimized for applications.)
o Encrypt Data Access. Configures the share to use SMB encryption, which protects file data from eavesdropping while being transferred over the network. This option is useful on untrusted networks.
8. On the Specify Permissions To Control Access page, the default permissions assigned to the share are listed. By default, the special group Everyone is granted the Full Control share permission and the underlying folder permissions are as listed. To change share, folder, or both permissions, tap or click Customize Permissions, and then use the Advanced Security Settings dialog box to configure the required permissions. Setting share permissions is discussed fully in Managing share permissions later in this chapter. Setting folder permissions is discussed fully in Understanding file and folder permissions in Chapter 4.
NOTE
If the share will be used for Hyper-V, you might need to enable constrained delegation for remote management of the Hyper-V host.
9. If you are using the advanced profile, optionally set the folder management properties, and then tap or click Next. These properties specify the purpose of the folder and the type of data stored in it so that data management policies, such as classification rules, can then use these properties.
10.If you are using the advanced profile, optionally apply a quota based on a template to the folder, and then tap or click Next. You can select only quota templates that have already been created. For more information, see Managing disk quota templates in Chapter 4.
11.On the Confirm Selections page, review your selections. When you tap or click Create, the wizard creates the share, configures it, and sets permissions. The status should state, “The share was successfully created.” If an error is displayed instead, note the error and take corrective action as appropriate before repeating this procedure to create the share. Tap or click Close.
Changing shared folder settings
When you create a share, you can configure many basic and advanced settings, including those for access-based enumeration, encrypted data access, offline settings for caching, and management properties. In Server Manager, you can modify these settings by following these steps:
1. The Shares subnode of the File And Storage Services node shows existing shares for file servers that have been added for management. Press and hold or right-click the share with which you want to work, and then tap or click Properties.
2. In the Properties dialog box, shown in Figure 3-6, you have several options panels that can be accessed by using controls in the left pane. You can expand the panels one by one or tap or click Show All to expand all the panels at the same time.
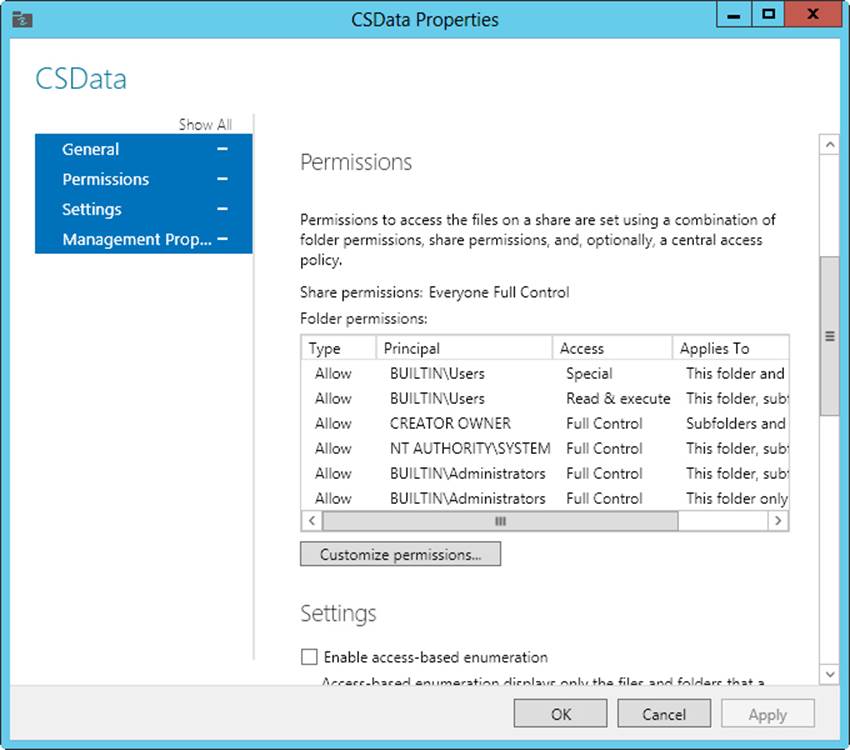
Figure 3-6. Modify share settings by using the options provided.
3. Use the options provided to modify the settings as necessary, and then tap or click OK. The options available are the same whether you use the basic, advanced, or applications profile to create the shared folder.
TIP
If you’re creating a share for general use and general access, you can publish the shared resource in Active Directory. Publishing the resource in Active Directory makes finding the share easier for users; however, this option is not available in Server Manager. To publish a share in Active Directory, press and hold or right-click the share in Computer Management, and then tap or click Properties. On the Publish tab, select the Publish This Share In Active Directory check box, add an optional description and owner information, and then tap or click OK.
Managing share permissions
Share permissions set the maximum allowable actions available within a shared folder. By default, when you create a share, everyone with access to the network has Read access to the share’s contents. This is an important security change—in previous editions of Windows Server, the default permission was Full Control.
With NTFS and ReFS volumes, you can use file and folder permissions and ownership, in addition to share permissions, to further constrain actions within the share. With FAT volumes, share permissions control only access.
Understanding the various share permissions
From the most restrictive to the least restrictive, the share permissions available are as follows:
§ No Access. No permissions are granted for the share.
§ Read. Users can do the following:
§ View file and subfolder names
§ Access the subfolders in the share
§ Read file data and attributes
§ Run program files
§ Change. Users have Read permission and the ability to do the following:
§ Create files and subfolders
§ Modify files
§ Change attributes on files and subfolders
§ Delete files and subfolders
§ Full Control. Users have Read and Change permissions, in addition to the following capabilities on NTFS volumes:
§ Change file and folder permissions
§ Take ownership of files and folders
You can assign share permissions to users and groups. You can even assign permissions to implicit groups. For details on implicit groups, see Chapter 9, “Creating user and group accounts” In Windows Server 2012 R2 Pocket Consultant: Essentials & Configuration.
Viewing and configuring share permissions
You can view and configure share permissions in Computer Management or Server Manager. To view and configure share permissions in Computer Management, follow these steps:
1. In Computer Management, connect to the computer on which the share is created. In the console tree, expand System Tools, expand Shared Folders, and then select Shares.
2. Press and hold or right-click the share with which you want to work, and then tap or click Properties.
3. In the Properties dialog box, tap or click the Share Permissions tab, shown in Figure 3-7. You can now view the users and groups that have access to the share and the type of access they have.
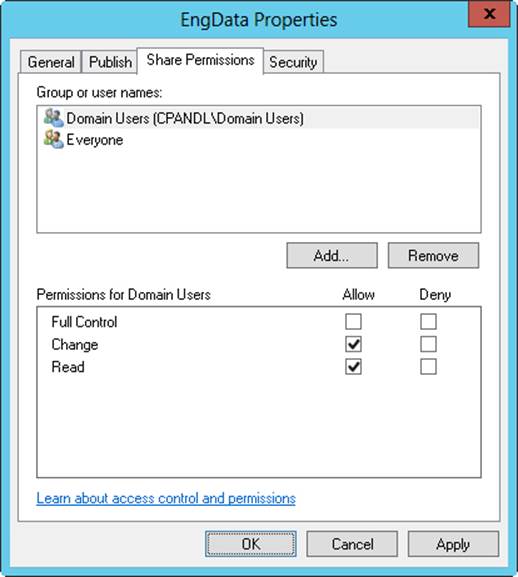
Figure 3-7. The Share Permissions tab shows which users and groups have access to the share and what type of access they have.
4. Users or groups that already have access to the share are listed in the Group Or User Names list. You can remove permissions for these users and groups by selecting the user or group you want to remove, and then tapping or clicking Remove. You can change permissions for these users and groups by doing the following:
a. Select the user or group you want to change.
b. Allow or deny access permissions in the Permissions list box.
5. To add permissions for another user or group, tap or click Add. This opens the Select Users, Computers, Service Accounts, Or Groups dialog box, shown in Figure 3-8.
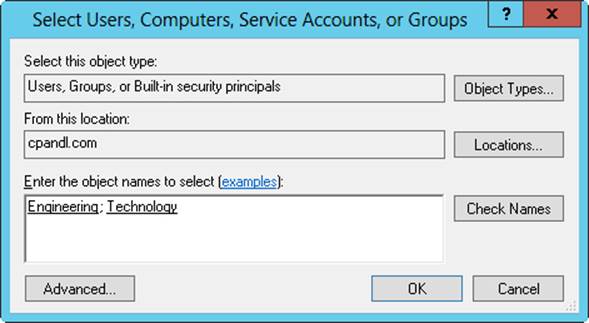
Figure 3-8. Add users and groups to the share.
6. Enter the name of a user, computer, or group in the current domain, and then tap or click Check Names. This produces one of the following results:
o If a single match is found, the dialog box is automatically updated and the entry is underlined.
o If no matches are found, you either entered an incorrect name part or you’re working with an incorrect location. Modify the name and try again, or tap or click Locations to select a new location.
o If multiple matches are found, select the name or names you want to use, and then tap or click OK. To assign permissions to other users, computers, or groups, enter a semicolon (;) and then repeat this step.
NOTE
The Locations button enables you to access account names in other domains. Tap or click Locations to find a list of the current domains, trusted domains, and other resources you can access. Because of the transitive trusts in Windows Server, you can usually access all the domains in the domain tree or forest.
7. Tap or click OK. The users and groups are added to the Group Or User Names list for the share.
8. Configure access permissions for each user, computer, and group by selecting an account name and then allowing or denying access permissions. Keep in mind that you’re setting the maximum allowable permissions for a particular account.
9. Tap or click OK. To assign additional security permissions for NTFS, see File and folder permissions in Chapter 4.
IMPORTANT
Keep in mind that you can select the opposite permission to override an inherited permission. Note also that Deny typically overrides Allow, so if you explicitly deny permission to a user or group for a child folder or file, this permission should be denied to that user or group of users.
To view and configure share permissions in Server Manager, follow these steps:
1. The Shares subnode of the File And Storage Services node shows existing shares for file servers that have been added for management.
2. Press and hold or right-click the share with which you want to work, and then tap or click Properties.
3. In the Properties dialog box, tap or click the Permissions in the left pane. You can now view the users and groups that have access to the share and the type of access they have.
4. To change share, folder, or both permissions, tap or click Customize Permissions. Next, select the Share tab in the Advanced Security Settings dialog box, as shown in Figure 3-9.
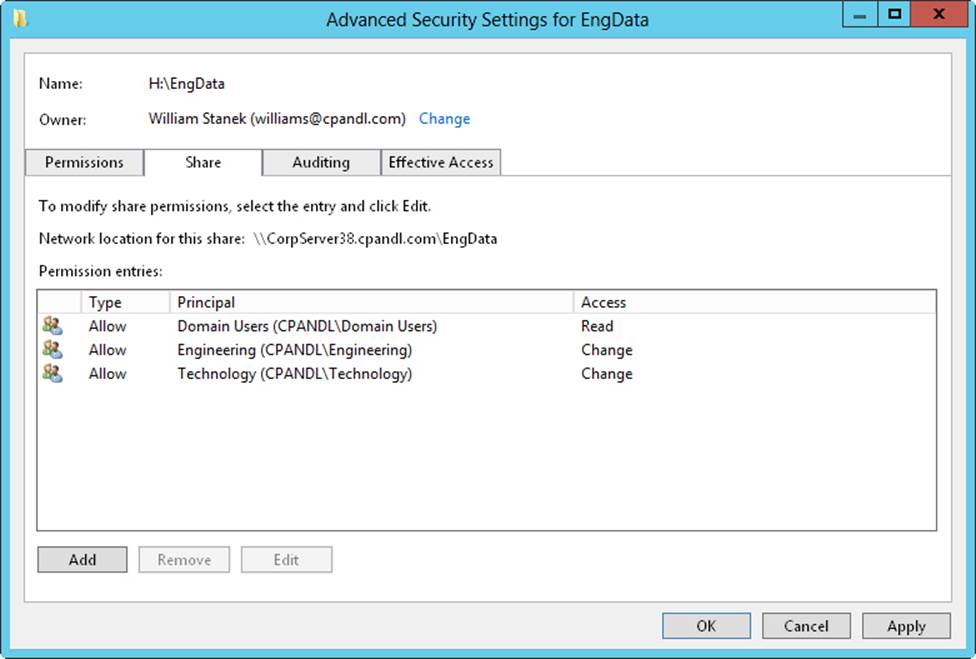
Figure 3-9. The Share tab shows which users and groups have access to the share and what type of access they have.
5. Users or groups that already have access to the share are listed in the Permission Entries list. You can remove permissions for these users and groups by selecting the user or group you want to remove, and then tapping or clicking Remove. You can change permissions for these users and groups by doing the following:
a. Select the user or group you want to change, and then select Edit.
b. Allow or deny access permissions in the Permission Entries list, and then tap or click OK.
6. To add permissions for another user or group, tap or click Add. This opens the Permission Entry dialog box, shown in Figure 3-10.
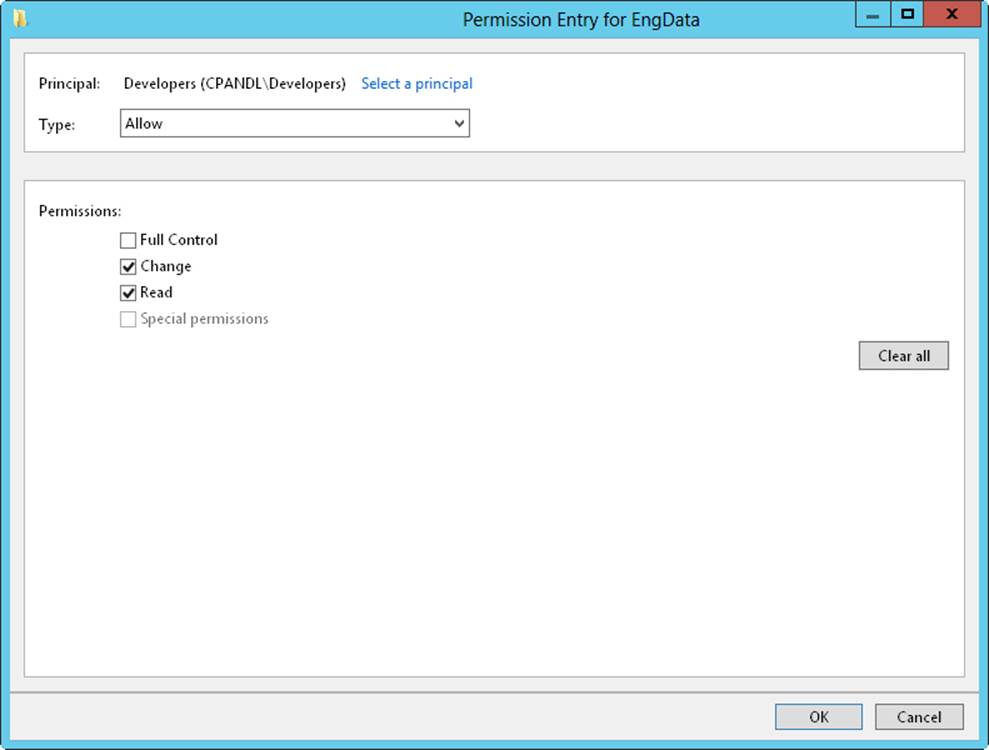
Figure 3-10. Add permission entries for a particular user or group.
7. Tap or click Select A Principal to display the Select User, Computer, Service Account Or Group dialog box. Enter the name of a user or a group account. Be sure to reference the user account name rather than the user’s full name. Only one name can be entered at a time.
8. Tap or click Check Names. If a single match is found for each entry, the dialog box is automatically updated, and the entry is underlined. Otherwise, you’ll get an additional dialog box. If no matches are found, you either entered the name incorrectly or you’re working with an incorrect location. Modify the name in the Name Not Found dialog box and try again, or tap or click Locations to select a new location. When multiple matches are found, in the Multiple Names Found dialog box, select the name you want to use, and then tap or click OK.
9. Tap or click OK. The user and group is added as the Principal, and the Permission Entry dialog box is updated to show this.
10.Use the Type list to specify whether you are configuring allowed or denied permissions, and then select the permissions you want to allow or deny.
11.Tap or click OK to return to the Advanced Security Settings dialog box. To assign additional security permissions for NTFS, see File and folder permissions in Chapter 4.
Managing existing shares
As an administrator, you often have to manage shared folders. This section covers the common administrative tasks of managing shares.
Understanding special shares
When you install Windows Server, the operating system creates special shares automatically. These shares are known as administrative shares and hidden shares, and they are designed to help make system administration easier. You can’t set access permissions on automatically created special shares; Windows Server assigns access permissions. You can create your own hidden shares by adding the $ symbol as the last character of the share name.
You can delete special shares temporarily if you’re certain the shares aren’t needed; however, the shares are re-created automatically the next time the operating system starts. To permanently disable the administrative shares, change the following registry values to 0 (zero):
§ HKEY_LOCAL_MACHINE\SYSTEM\CurrentControlSet\Services\lanmanserver \parameters\AutoShareServer
§ HKEY_LOCAL_MACHINE\SYSTEM\CurrentControlSet\Services\lanmanserver \parameters\AutoShareWks
Which special shares are available depends on your system configuration. Table 3-2 lists special shares you might find and how they’re used.
Table 3-2. Special shares used by Windows Server 2012 R2
|
Share Name |
Description |
Usage |
|
ADMIN$ |
A share used during remote administration of a system. It provides access to the operating system %SystemRoot%. |
On workstations and servers, administrators and backup operators can access these shares. On domain controllers, server operators also have access. |
|
FAX$ |
Supports network faxes. |
Used by fax clients when sending faxes. |
|
IPC$ |
Supports named pipes during remote interprocess communications (IPC) access. |
Used by programs when performing remote administration and when viewing shared resources. |
|
NETLOGON |
Supports the Net Logon service. |
Used by the Net Logon service when processing domain logon requests. Everyone has Read access. |
|
PRINT$ |
Supports shared printer resources by providing access to printer drivers. |
Used by shared printers. Everyone has Read access. Administrators, server operators, and printer operators have Full Control. |
|
SYSVOL |
Supports Active Directory. |
Used to store data and objects for Active Directory. |
|
Driveletter$ |
A share that allows administrators to connect to a drive’s root folder. These shares are shown as C$, D$, E$, and so on. |
On workstations and servers, administrators and backup operators can access these shares. On domain controllers, server operators also have access. |
Connecting to special shares
Most special shares end with the $ symbol. Although these shares aren’t displayed in File Explorer, administrators and certain operators can connect to them (except for NETLOGON and SYSVOL). If your current logon account has appropriate permissions, you can connect directly to a special share or any standard share by typing the UNC path for the share in File Explorer’s address box. The basic syntax is:
\\ServerName\ShareName
ServerName is the DNS name or IP address of the server and ShareName is the name of the share. In the following example, you connect to the D$ share on CorpServer25:
\\CorpServer25\D$
If you always want the drive to be listed as a network location in This PC or need to specify credentials, you can connect to a special share by following these steps:
1. When you open File Explorer, the This PC node should be opened by default. If you have an open Explorer window and This PC is not the selected node, select the leftmost option button in the address list, and then select This PC.
2. Next, tap or click the Map Network Drive button on the Computer panel, and then tap or click Map Network Drive. This displays the Map Network Drive dialog box, shown in Figure 3-11.
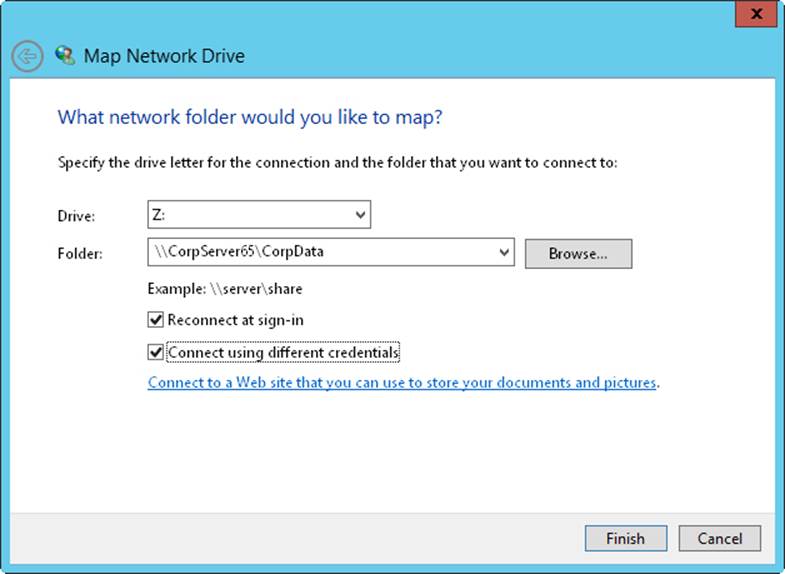
Figure 3-11. Connect to special shares by mapping them with the Map Network Drive dialog box.
3. In the Drive list, select a free drive letter. This drive letter is used to access the special share.
4. In the Folder text box, enter the Universal Naming Convention (UNC) path to the share. For example, to access the C$ share on a server called Twiddle, you would use the path \\TWIDDLE\C$.
5. The Reconnect At Sign-In check box is selected automatically to ensure that the network drive is connected each time you log on. If you need to access the share only during the current logon session, clear this check box.
6. If you need to connect to the share using different user credentials, select the Connect Using Different Credentials check box.
7. Tap or click Finish. If you are connecting using different credentials, enter the user name and password when prompted. Enter the user name in Domain \Username format, such as Cpandl\Williams. Before tapping or clicking OK, select Remember My Credentials if you want the credentials to be saved. Otherwise, you’ll need to provide credentials in the future.
After you connect to a special share, you can access it as you would any other drive. Because special shares are protected, you don’t have to worry about ordinary users accessing these shares. The first time you connect to the share, you might be prompted for a user name and password. If you are prompted, provide that information.
Viewing user and computer sessions
You can use Computer Management to track all connections to shared resources on a Windows Server 2012 R2 system. Whenever a user or computer connects to a shared resource, Windows Server 2012 R2 lists a connection in the Sessions node.
To view connections to shared resources, enter net session at an elevated command prompt or Get-SMBSession at an elevated Windows PowerShell prompt. You also can follow these steps:
1. In Computer Management, connect to the computer on which you created the shared resource.
2. In the console tree, expand System Tools, expand Shared Folders, and then select Sessions. You can now view connections to shares for users and computers.
The columns for the Sessions node provide the following important information about user and computer connections:
§ User. The names of users or computers connected to shared resources. Computer names are shown with a $ suffix to differentiate them from users.
§ Computer. The name of the computer being used.
§ Type. The type of network connection being used.
§ # Open Files The number of files with which the user is actively working. For more detailed information, access the Open Files node.
§ Connected Time. The time that has elapsed since the connection was established.
§ Idle Time. The time that has elapsed since the connection was last used.
§ Guest. Whether the user is logged on as a guest.
As shown in the following example, the output of Get-SMBSession provides the session ID, client computer name, client user name and the number of open files for each session:
SessionId ClientComputerName ClientUserName NumOpens
--------- ------------------ -------------- --------
601295421497 10.0.0.60 CPANDL\williams 2
Managing sessions and shares
Managing sessions and shares is a common administrative task. Before you shut down a server or an application running on a server, you might want to disconnect users from shared resources. You might also need to disconnect users when you plan to change access permissions or delete a share entirely. Another reason to disconnect users is to break locks on files. You disconnect users from shared resources by ending the related user sessions.
Ending Individual Sessions
To disconnect individual users from shared resources, enter net session \\computername /delete at an elevated command prompt or Close-SMBSession at –Computer Name computername an elevated Windows PowerShell prompt. In both instances, computername is the DNS name or IP address of computer from which the session originates.
You also can disconnect users by following these steps:
1. In Computer Management, connect to the computer on which you created the share.
2. In the console tree, expand System Tools, expand Shared Folders, and then select Sessions.
3. Press and hold or right-click the user sessions you want to end, and then tap or click Close Session.
4. Tap or click Yes to confirm the action.
Ending All Sessions
To disconnect all users from shared resources, follow these steps:
1. In Computer Management, connect to the computer on which you created the share.
2. In the console tree, expand System Tools, expand Shared Folders, and then press and hold or right-click Sessions.
3. Tap or click Disconnect All Sessions, and then tap or click Yes to confirm the action.
NOTE
Keep in mind that you’re disconnecting users from shared resources, not from the domain. You can use only logon hours and Group Policy to force users to log off after they’ve logged on to the domain. Thus, disconnecting users doesn’t log them off the network. It just disconnects them from the shared resource.
To disconnect individual users from shared resources, enter net session \\computername /delete at an elevated command prompt or Close-SMBSession at –ComputerName computername an elevated Windows PowerShell prompt. In both instances, computername is the DNS name or IP address of computer from which the session originates.
You also can use Windows PowerShell to disconnect all users from a shared resource. The key here is to ensure you only close the sessions you want to close. Consider the following example:
ForEach-Object ($Session in (Get-SMBSession)) {
Close-SMBSession –force}
This example uses a ForEach loop to get all active SMB sessions and then close each SMB session in turn. Thus, if you enter this example at an elevated Windows PowerShell prompt, you will disconnect all users from all shared resources.
To close all connections only for a specific share, you must create a ForEach loop that only examines the connections for that share, such as:
ForEach-Object ($Session in (Get-SMBShare CorpData |
Get-SMBSession)) {Close-SMBSession –force}
This example uses a ForEach loop to get all active SMB sessions for the CorpData share and then close each of those sessions in turn. Thus, if you enter this example at an elevated Windows PowerShell prompt, you only disconnect users from the CorpData share.
Managing open resources
Any time users connect to shares, the individual file and object resources they are working with are displayed in the Open Files node. The Open Files node might show the files the user has open but isn’t currently editing.
You can access the Open Files node by following these steps:
1. In Computer Management, connect to the computer on which you created the share.
2. In the console tree, expand System Tools, expand Shared Folders, and then select Open Files. This displays the Open Files node, which provides the following information about resource usage:
o Open File. The file or folder path to the open file on the local system. The path might also be a named pipe, such as \PIPE\spools, which is used for printer spooling.
o Accessed By. The name of the user accessing the file.
o Type. The type of network connection being used.
o # Locks. The number of locks on the resource.
o Open Mode. The access mode used when the resource was opened, such as read, write, or write+read.
You also can use Get-SMBOpenFile to list open files. As shown in the following example, Get-SMBOpenFile provides the file ID, session ID, path, share relative path, client computer name, and client user name for each open file:
FileId SessionId Path ShareRelativePath ClientComputerName ClientUserN
------ --------- ---- ----------------- ------------------ ------------
601295424973 601295421497 C:\PrimaryData\ 10.0.0.60 CPANDL\williams
601295425045 601295421577 C:\Windows\SYSVOL cpan... 10.0.0.60 CPANDL\
CORPPC29$
Closing an Open File
To close an open file on a computer’s shares, follow these steps:
1. In Computer Management, connect to the computer with which you want to work.
2. In the console tree, expand System Tools, expand Shared Folders, and then select Open Files.
3. Press and hold or right-click the open file you want to close, and then tap or click Close Open File.
4. Tap or click Yes to confirm the action.
You also can use Close-SMBOpenFile to close open files. When you close a file, you use the –FileID parameter to specify the identifier for the file to close, such as:
Close-SMBOpenFile –FileID 601295424973
Add the –Force parameter to force close the file if needed. However, if the file has been modified by a user, any changes to the file could be lost.
Closing All Open Files
To close all open files on a computer’s shares, follow these steps:
1. In Computer Management, connect to the computer on which the share is created.
2. In the console tree, expand System Tools, expand Shared Folders, and then press and hold or right-click Open Files.
3. Tap or click Disconnect All Open Files, and then tap or click Yes to confirm the action.
You also can use Windows PowerShell to close all open files on a computer’s share. The key here is to ensure that you only close the files you want to close. Consider the following example:
ForEach-Object ($Session in (Get-SMBOpenFile)) {
Close-SMBOpenFile –force}
This example uses a ForEach loop to get all open SMB files, and then close each SMB file in turn. Thus, if you enter this example at an elevated Windows PowerShell prompt, you will close all open files for all shared resources.
To close open files on a specific share, you must create a ForEach loop that only examines the open files for that share, such as:
ForEach-Object ($Session in (Get-SMBShare CorpData |
Get-SMBOpenFile)) {Close-SMBOpenFile –force}
This example uses a ForEach loop to get all open SMB files for the CorpData share and then close each of those files in turn. Thus, if you enter this example at an elevated Windows PowerShell prompt, you only close open files for the CorpData share.
Stopping file and folder sharing
To stop sharing a folder, follow these steps:
1. Do one of the following:
o In Server Manager, select the share you want to manage on the Shares subnode of the File And Storage Services node.
o In Computer Management, connect to the computer on which you created the share, and then access the Shares node.
2. Press and hold or right-click the share you want to remove, tap or click Stop Sharing, and then tap or click Yes to confirm the action.
CAUTION
You should never delete a folder containing shares without first stopping the shares. If you fail to stop the shares, Windows Server 2012 R2 attempts to reestablish the shares the next time the computer is started, and the resulting error is logged in the system event log.
Configuring NFS sharing
As discussed in Chapter 1, you can install Server For NFS as a role service on a file server. Server For NFS provides a file sharing solution for enterprises with mixed Windows, OS X, and UNIX environments, allowing users to transfer files between Windows Server 2012 R2, OS X, and UNIX operating systems by using the NFS protocol.
You can configure NFS sharing for local folders on NTFS volumes by using File Explorer. You can also configure NFS sharing of local and remote folders on NTFS volumes by using Server Manager. In File Explorer, follow these steps to enable and configure NFS sharing:
1. Press and hold or right-click the share you want to manage, and then tap or click Properties to display a Properties dialog box for the share.
2. On the NFS Sharing tab, tap or click Manage NFS Sharing.
3. In the NFS Advanced Sharing dialog box, select the Share This Folder check box, as shown in Figure 3-12.
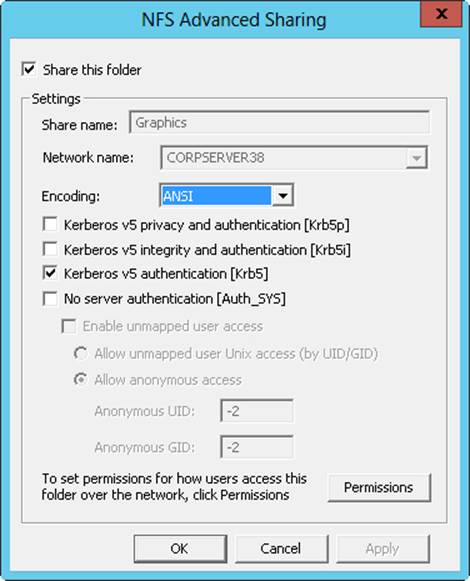
Figure 3-12. You can use NFS sharing to share resources between Windows and UNIX computers.
4. In the Share Name text box, enter a name for the share. This is the name of the folder to which UNIX users will connect. NFS share names must be unique for each system and can be the same as those used for standard file sharing.
5. ANSI is the default encoding for text associated with directory listings and file names. If your UNIX computers use a different default encoding, you can choose that encoding in the Encoding list.
6. UNIX computers use Kerberos v5 authentication by default. Typically, you want to allow Kerberos integrity and authentication in addition to standard Kerberos authentication. Select the check boxes for the authentication mechanisms you want to use. Clear the check boxes for those you don’t want to use.
7. The share can be configured so that no server authentication is required. If you want to require server authentication, select the No Server Authentication check box, and then choose additional options as appropriate. Unmapped user access can be allowed and enabled. If you want to allow anonymous access to the NFS share, select the Allow Anonymous Access option, and then enter the anonymous user UID and anonymous group GID.
8. For UNIX computers, you configure access primarily based on the computer names (also referred to as host names). By default, no UNIX computers have access to the NFS share. If you want to grant read-only or read/write permissions, tap or click Permissions, set the permissions you want to use in the NFS Share Permissions dialog box, and then tap or click OK. You can configure no access, read-only access, or read/write access by client computer name and client computer groups.
9. Tap or click OK twice to close the open dialog boxes and save your settings.
In File Explorer, you can disable NFS sharing by following these steps:
1. Press and hold or right-click the share you want to manage, and then tap or click Properties. This displays a Properties dialog box for the share.
2. On the NFS Sharing tab, tap or click Manage NFS Sharing.
3. In the NFS Advanced Sharing dialog box, clear the Share This Folder check box, and then tap or click OK twice.
With Server Manager, you can configure NFS permissions as part of the initial share configuration when you are provisioning a share. On the Shares subnode of the File And Storage Services node, you can create an NFS share by following these steps:
1. In the Shares pane, tap or click Tasks, and then tap or click New Share to start the New Share Wizard. Choose NFS Share—Quick or NFS Share—Advanced as the share profile, and then tap or click Next.
2. Specify the share name and location as you would for an SMB share.
3. On the Specify Authentication Methods page, configure Kerberos v5 Authentication and No Server Authentication. The options provided are similar to those discussed previously in this section.
4. On the Specify Share Permissions page, configure access for UNIX hosts. Hosts can be set for no access, read-only access, or read/write access to the share.
5. On the Specify Permissions To Control Access, optionally set NTFS permissions for the share.
6. On the Confirm Selections page, review your selections. When you tap or click Create, the wizard creates the share, configures it, and sets permissions. The status should state, “The share was successfully created.” If an error is displayed instead, note the error and take corrective action. However, because typical errors relate to configuring host access, you probably won’t need to repeat this procedure to create the share. Instead, you might need to modify only the share permissions. Tap or click Close.
Using shadow copies
Any time your organization uses shared folders, you should consider creating shadow copies of these shared folders as well. Shadow copies are point-in-time backups of data files that users can access directly in shared folders. These point-in-time backups can save you and the other administrators in your organization a lot of work, especially if you routinely have to retrieve lost, overwritten, or corrupted data files from backups. The usual procedure for retrieving shadow copies is to use the Previous Versions or Shadow Copy client. Windows Server 2012 R2 includes a feature enhancement that enables you to revert an entire (nonsystem) volume to a previous shadow copy state.
Understanding shadow copies
You can create shadow copies only on NTFS volumes. You use the Shadow Copy feature to create automatic backups of the files in shared folders on a per-volume basis. For example, on a file server that has three NTFS volumes, each containing shared folders, you need to configure this feature for each volume separately.
If you enable this feature in its default configuration, shadow copies are created twice each weekday (Monday–Friday) at 7:00 A.M. and 12:00 P.M. You need at least 100 megabytes (MB) of free space to create the first shadow copy on a volume. The total disk space used beyond this depends on the amount of data in the volume’s shared folders. You can restrict the total amount of disk space used by Shadow Copy by setting the allowable maximum size of the point-in-time backups.
You configure and view current Shadow Copy settings on the Shadow Copies tab of the disk’s Properties dialog box. In File Explorer or Computer Management, press and hold or right-click the icon for the disk with which you want to work, tap or click Properties, and then tap or click the Shadow Copies tab. The Select A Volume panel shows the following:
§ Volume. The volume label of NTFS volumes on the selected disk drive
§ Next Run Time. The status of Shadow Copy as Disabled, or the next time a shadow copy of the volume will be created
§ Shares. The number of shared folders on the volume
§ Used. The amount of disk space used by Shadow Copy
Individual shadow copies of the currently selected volume are listed in the Shadow Copies Of Selected Volume panel by date and time.
Creating shadow copies
To create a shadow copy on an NTFS volume with shared folders, follow these steps:
1. Open Computer Management. If necessary, connect to a remote computer.
2. In the console tree, expand Storage, and then select Disk Management. The volumes configured on the selected computer are displayed in the details pane.
3. Press and hold or right-click Disk Management, point to All Tasks, and then tap or click Configure Shadow Copies.
4. On the Shadow Copies tab, select the volume with which you want to work in the Select A Volume list.
5. Tap or click Settings to configure the maximum size of all shadow copies for this volume and to change the default schedule. Tap or click OK.
6. After you configure the volume for shadow copying, tap or click Enable if necessary. When prompted to confirm this action, tap or click Yes. Enabling shadow copying creates the first shadow copy and sets the schedule for later shadow copies.
NOTE
If you create a run schedule when configuring the Shadow Copy settings, shadow copying is enabled automatically for the volume when you tap or click OK to close the Settings dialog box. However, the first shadow copy won’t be created until the next scheduled run time. If you want to create a shadow copy of the volume now, select the volume and then tap or click Create Now.
Restoring a shadow copy
Users working on client computers access shadow copies of individual shared folders by using the Previous Versions or Shadow Copy client. The best way to access shadow copies on a client computer is to follow these steps:
1. In File Explorer, press and hold or right-click the share for which you want to access previous file versions, tap or click Properties, and then tap or click the Previous Versions tab.
2. On the Previous Versions tab, select the folder version with which you want to work. Each folder has a date and time stamp. Tap or click the button corresponding to the action you want to perform:
o Tap or click Open to open the shadow copy in File Explorer.
o Tap or click Copy to display the Copy Items dialog box, which lets you copy the snapshot image of the folder to the location you specify.
o Tap or click Restore to roll back the shared folder to its state at the time of the snapshot image you selected.
Reverting an entire volume to a previous shadow copy
Windows Server 2012 R2 features a shadow copy enhancement that enables you to revert an entire volume to the state it was in when a particular shadow copy was created. Because volumes containing operating system files can’t be reverted, the volume you want to revert must not be a system volume. The same goes for volumes on a cluster shared disk.
To revert an entire volume to a previous state, follow these steps:
1. Open Computer Management. If necessary, connect to a remote computer.
2. In the console tree, expand Storage. Press and hold or right-click Disk Management, point to All Tasks, and then tap or click Configure Shadow Copies.
3. On the Shadow Copies tab, select the volume with which you want to work in the Select A Volume list.
4. Individual shadow copies of the currently selected volume are listed by date and time in the Shadow Copies Of Selected Volume panel. Select the shadow copy with the date and time stamp to which you want to revert, and then tap or click Revert.
5. To confirm this action, select the Check Here If You Want To Revert This Volume check box, and then tap or click Revert Now. Tap or click OK to close the Shadow Copies dialog box.
Deleting shadow copies
Each point-in-time backup is maintained separately. You can delete individual shadow copies of a volume as necessary, and this recovers the disk space used by the shadow copies.
To delete a shadow copy, follow these steps:
1. Open Computer Management. If necessary, connect to a remote computer.
2. In the console tree, expand Storage. Press and hold or right-click Disk Management, point to All Tasks, and then tap or click Configure Shadow Copies.
3. On the Shadow Copies tab, select the volume with which you want to work in the Select A Volume list.
4. Individual shadow copies of the currently selected volume are listed by date and time in the Shadow Copies Of Selected Volume panel. Select the shadow copy you want to delete, and then tap or click Delete Now. Tap or click Yes to confirm the action.
Disabling shadow copies
If you no longer want to maintain shadow copies of a volume, you can disable the Shadow Copy feature. Disabling this feature turns off the scheduling of automated point-in-time backups and removes any existing shadow copies.
To disable shadow copies of a volume, follow these steps:
1. Open Computer Management. If necessary, connect to a remote computer.
2. In the console tree, expand Storage. Press and hold or right-click Disk Management, point to All Tasks, and then tap or click Configure Shadow Copies.
3. On the Shadow Copies tab, select the volume with which you want to work in the Select A Volume list, and then tap or click Disable.
4. When prompted, confirm the action by tapping or clicking Yes. Tap or click OK to close the Shadow Copies dialog box.
Connecting to network drives
Users can connect to a network drive and to shared resources available on the network. This connection is shown as a network drive that users can access like any other drive on their systems.
NOTE
When users connect to network drives, they’re subject not only to the permissions set for the shared resources, but also to Windows Server 2012 R2 file and folder permissions. Differences in these permission sets are usually the reason users might not be able to access a particular file or subfolder within the network drive.
Mapping a network drive
In Windows Server 2012 R2, you connect to a network drive by mapping to it using NET USE and New-PsDrive. The syntax for NET USE is the following:
net use DeviceName \\ComputerName\ShareName
DeviceName specifies the drive letter or an asterisk (*) to use the next available drive letter, and \\ComputerName\ShareName is the UNC path to the share, such as either of the following:
net use g: \\ROMEO\DOCS
or
net use * \\ROMEO\DOCS
NOTE
To ensure that the mapped drive is available each time the user logs on, make the mapping persistent by adding the /Persistent:Yes option.
The syntax for New-PsDrive is:
New-PsDrive –Name DriveLetter –Root \\ServerName\ShareName
-PsProvider FileSystem
DriveLetter is the drive letter to use and ServerName is the DNS name or IP address of the server hosting the share and ShareName is the name of the share, such as:
New-PsDrive –Name g –Root \\CorpServer21\CorpData
-PsProvider FileSystem
NOTE
To ensure that the mapped drive is available each time the user logs on, add the –Persist parameter.
If the client computer is running Windows 8.1, you can map network drives by completing the following steps:
1. When you open File Explorer, the This PC node should be opened by default. If you have an open Explorer window and This PC is not the selected node, select the leftmost option button in the address list, and then select This PC.
2. Next, tap or click the Map Network Drive button in the Computer panel, and then tap or click Map Network Drive.
3. Use the Drive list to select a free drive letter to use, and then tap or click the Browse button to the right of the Folder list. In the Browse For Folder dialog box, expand the network folders until you can select the name of the workgroup or the domain with which you want to work.
4. When you expand the name of a computer in a workgroup or a domain, you’ll get a list of shared folders. Select the shared folder with which you want to work, and then tap or click OK.
5. Select Reconnect At Logon if you want Windows to connect to the shared folder automatically at the start of each session.
6. Tap or click Finish. If the currently logged-on user doesn’t have appropriate access permissions for the share, select Connect Using Different Credentials, and then tap or click Finish. After you tap or click Finish, you can enter the user name and password of the account with which you want to connect to the shared folder. Enter the user name in Domain\UserName format, such as Cpandl\Williams. Before tapping or clicking OK, select Remember My Credentials if you want the credentials to be saved. Otherwise, you’ll need to provide credentials in the future.
Disconnecting a network drive
In Windows Server 2012 R2, you disconnect a network drive using NET USE and Remove-PsDrive. The syntax for NET USE is:
net use DeviceName /delete
DeviceName specifies the network drive to remove, such as:
net use g: /delete
The syntax for Remove-PsDrive is:
Remove-PsDrive –Name DriveLetter
DriveLetter is the network drive to remove, such as:
Remove-PsDrive –Name g
NOTE
If the network drive has open connections, you can force remove the network drive using –Force parameter.
In File Explorer, you can disconnect a network drive by following these steps:
1. When you open File Explorer, the This PC node should be opened by default. If you have an open Explorer window and This PC is not the selected node, select the leftmost option button in the address list, and then select This PC.
2. Under Network Location, press and hold or right-click the network drive icon, and then tap or click Disconnect.
Configuring synced sharing
Although the standard approach to sharing files requires a computer that is joined and connected to a domain, synced sharing does not. With sync shares, users can use an Internet or corporate network connection to sync data to their devices from folders located on enterprise servers. You implement synced sharing by using Work Folders.
Work Folders is a feature that you can add to servers running Windows Server 2012 R2 or later. Work Folders use a client-server architecture. A Work Folders client is natively integrated into Windows 8.1, and clients for Windows 7, Apple iPad, and other devices are becoming available as well.
Getting started with Work Folders
You deploy Work Folders in the enterprise by performing these procedures:
1. Add the Work Folders role to servers that you want to host sync shares.
2. Use Group Policy to enable discovery of Work Folders.
3. Create sync shares on your sync servers and optionally, enable SMB access to sync shares.
4. Configure clients to access Work Folders.
NOTE
Group Policy is discussed in detailed in Chapter 6. For detailed information about configuring Group Policy to enable discovery of Work Folders, see Automatically configuring Work Folders, in Chapter 6.
Work Folders use a remote web gateway configured as part of the IIS hostable web core. When users access a sync share via a URL provided by an administrator and configured in Group Policy, a user folder is created as a subfolder of the sync share and this subfolder is where the user’s data is stored. The folder naming format for the user-specific folder is set when you create a sync share. The folder can be named by using only the user alias portion of the user’s logon name or the full logon name in alias@domain format. The format you choose primarily depends on the level of compatibility required. Using the full logon name eliminates potential conflicts when users from different domains have identical user aliases, but this format is not compatible with redirected folders.
To maintain compatibility with redirected folders, you should configure sync folders to use aliases. However, in enterprises with multiple domains, the drawback to this approach is that there could be conflicts between identical user aliases in different domains. Although the automatically configured permissions for a user folder would prevent amyh from the cpandl.com domain from accessing a user folder created for amyh from the pocket-consultant.com domain, the conflict would cause problems. If there was an existing folder for amyh from the cpandl.com domain, the server would not be able to create a user folder for amyh from the pocket-consultant.com.
With Work Folders, you have several important options during initial setup. You can encrypt files in Work Folders on client devices and ensure that the screens on client devices lock automatically and require an access password. Encryption is implemented by using the Encrypting File System (EFS). EFS encrypts files with an enterprise encryption key rather than an encryption key generated by the client device. The enterprise encryption key is specific to the enterprise ID of the user (which by default is the primary SMTP address of the user). Having an enterprise encryption key that is separate from a client’s standard encryption key is important to ensure that encrypted personal files and encrypted work files are managed separately.
When files are encrypted, administrators can use a selective wipe to remove enterprise files from a client device. The selective wipe removes the enterprise encryption key and thus renders the work files unreadable. Selective wipe does not affect any encrypted personal files. As the work files remain encrypted, there’s no need to actually delete the work files from the client device. That said, you could run Disk Optimizer on the drive where the work files were stored. During optimization, Disk Optimizer should then overwrite the sectors where the work files were stored. Selective wipe only works when you’ve enabled the encryption option on Work Folders.
Although encryption is one way to protect enterprise data, another way is to configure client devices to lock screens and require a password for access. The exact policy enforced requires:
§ A minimum password length of 6 characters
§ A maximum password retry of 10
§ A screen that automatically locks in 15 minutes or less
If you enforce the use of automatic lock screens and passwords, any device that doesn’t support these requirements is prevented from connecting to the Work Folder.
By default, sync shares are not available in the same way as standard file shares. Because of this, users can only access sync shares by using the Work Folders client. If you want to make sync shares available to users as standard file shares, you must enable SMB access. After you enable SMB access, users can access files stored in Work Folders by using syncing and by mapping network drives.
When a user makes changes to files in Work Folders, the changes might not be immediately apparent to others using the same Work Folders. For example, if a user deletes a file from a Work Folder by using SMB, other users accessing the Work Folder might still see the file as available. This inconsistency can occur because by default clients only poll the sync server every 10 minutes for SMB changes.
A sync server also uses a Work Folders client to check periodically for changes users have made using SMB; the default polling interval is 5 minutes. When the server identifies changes, the server relays the changes the next time a client syncs. Following this, you can determine that it could take up to 15 minutes for a change made using SMB to fully propagate.
REAL WORLD
To minimize support issues related to Work Folders, you’ll want to let users know how the technology works. Specifically, you’ll want to let users know changes might not be immediately apparent, and they’ll need to be patient when waiting for changes to propagate.
You can specify how frequently the server checks for changes made locally on the server or through SMB by using the –MinimumChangeDetectionMins parameter of the Set-SyncServerSetting cmdlet. However, as the server must check the change information for each file stored in the sync share, you need to be careful that you don’t configure a server to try to detect changes too frequently. A server that checks for changes too frequently can become overloaded. Remember, change detection uses more resources as the number of files stored in the sync share increases.
If you deploy roles and features that require a full version of the Web (IIS) role, you might find that these roles and features or the Work Folders feature itself don’t work together. A conflict can occur because the full version of the Web (IIS) role has a Default Web Site that uses port 80 for HTTP communications and port 443 for secure HTTP communications. For example, running Windows Essentials Experience and Work Folders together on the same server requires a special configuration. Typically, you need to change the ports used by Windows Essentials Experience so that they don’t conflict with the ports used by Work Folders.
To enable detailed logging of Work Folders, you can enable and configure the Audit Object Access policy setting for a Group Policy Object (GPO) processed by the server. You’ll find this setting in the Administrative Templates for Computer Configuration under Windows Settings\Security Settings\Local Policies Audit Policies. After you enable Audit Object Access, add an audit entry for the specific folders you want to audit. In File Explorer, press and hold or right-click a folder you want to audit, and then select Properties. In the Properties dialog box, on the Security tab, select Advanced. In the Advanced Security Settings dialog box, use the options on the Auditing tab to configure auditing.
Creating sync shares and enabling SMB access
You create a sync share to identify a local folder on a sync server that will be synchronized and accessible to domain users via the Work Folders client. As sync shares are mapped to local paths on sync servers, I recommend that you create any folders that you want to use before creating sync shares. This will make it easier to select the exact folders with which you want to work. For details on adding the Work Folders role and configure Work Folders in Group Policy, see Automatically configuring Work Folders in Chapter 6.
To create a sync share, complete the following steps:
1. In Server Manager, select File And Storage Services, and then select Work Folders. On the Work Folders panel, select Tasks, and then select New Sync Share to open the New Sync Share Wizard. If the Before You Begin page is displayed, tap or click Next.
2. On the Select The Server And Path page, shown in Figure 3-13, select the server with which you want to work. Keep in mind that only servers that have the Work Folders role installed are available for selection.
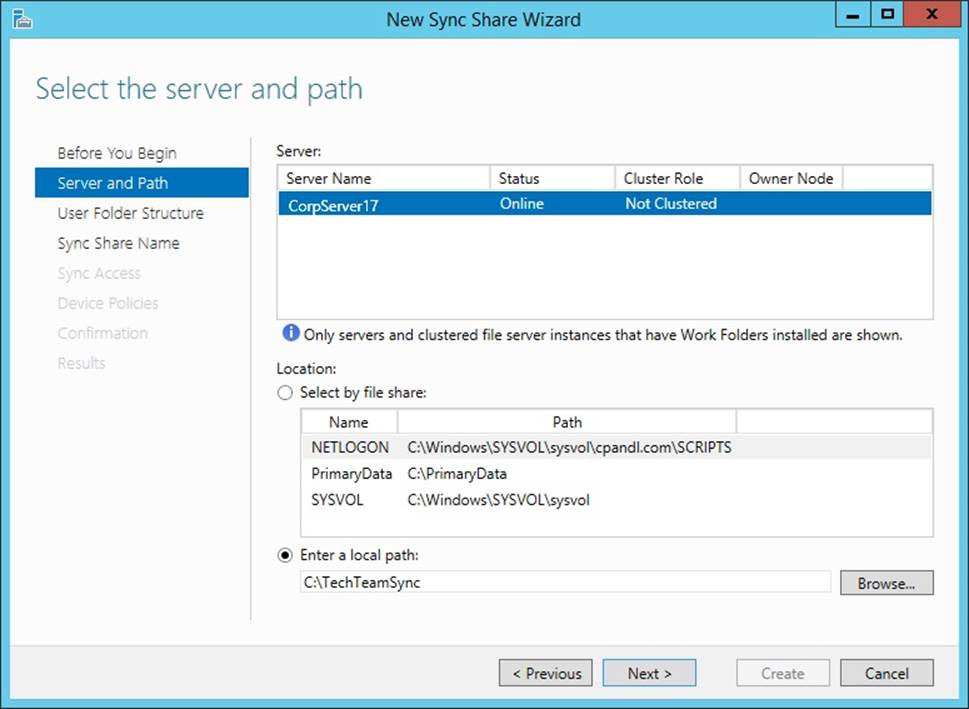
Figure 3-13. Specify the server and folder to use.
3. When configuring sync shares, you have several options. You can:
o Add syncing to an existing file share by choosing the Select By File Share option, and then selecting the file share that should also be synced.
o Add syncing to an existing local folder by choosing Enter A Local Path, selecting Browse, and then using the Select Folder dialog box to locate and chose the folder to sync.
o Add syncing to a new local folder by choosing Enter A Local Path, and then entering the path to use.
4. When you are ready to continue, tap or click Next. If you specified a new folder location, you are prompted to confirm whether you want to create this folder. Select OK to create the folder and continue.
5. On the Specify The Structure For User Folders page, choose a folder naming format for the subfolders where user data is stored. To use only the user alias portion of the user’s logon name for naming user folders, choose User Alias. To use the full logon name for naming user folders, choose User alias@domain.
6. By default, all folders and files stored under the user folder are synced automatically. If you’d prefer that only a specific folder is synced, select the Sync Only The Following Folder check box, and then enter the name of the folder, such as Documents. Tap or click Next to continue
7. On the Enter The Sync Share Name page, enter a share name and description before tapping or clicking Next to continue.
8. On the Grant Sync Access To Groups page, shown in Figure 3-14, use the options provided to specify the users and groups that should be able to access the sync share. To add a user or group, tap or click Add, and then use the Select User Or Group dialog box to specify the user or group that should have access to the sync share.
SECURITY ALERT
Any users and groups you specify will be granted permissions on the base folder that allows the users and groups to create folders and access files in their folders. Specifically, Creator/Owner is granted Full Control on subfolders and files only. The users and groups are granted List Folder/Read Data, Create Folders/Append Data, Traverse Folder/Execute File, Read/Write attributes on the base folder. Local System is granted Full Control of the base folder, subfolders, and files. Administrator is granted Read permission on the base folder.
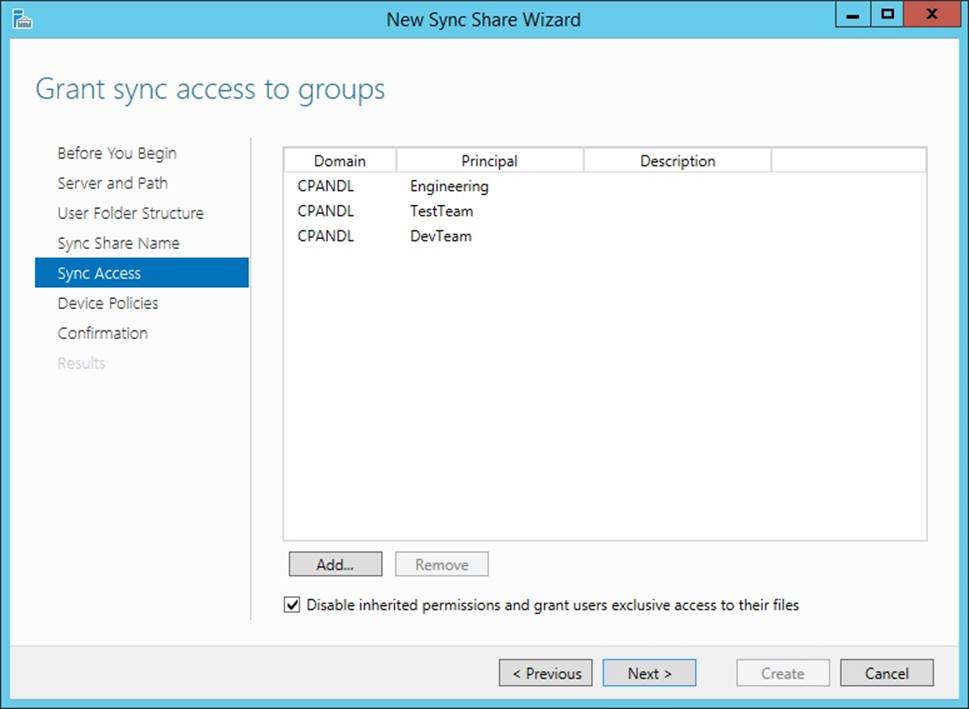
Figure 3-14. Specify the users and groups that should have access to the sync share.
9. By default, inherited permissions are disabled and users have exclusive access to their user folders. Because of this, only the user who stores a file has access to this file on the share. If the base folder for the share has permissions that you want to be applied to user folders, such as those that would grant administrators access to user folders, clear the Disable Inherited Permissions check box. When you are ready to continue, tap or click Next.
10.On the Specify Device Policies page, you have two options. You can select Encrypt Work Folders to encrypt files in Work Folders on client devices. You can select Automatically Lock Screen And Require A Password to ensure that the screens on client devices lock automatically and require a password for access.
11.Tap or click Next to continue, and then confirm your selections. Select Create to create the sync share. If the wizard is unable to create the sync share, you’ll get an error and will need to note the error and take appropriate corrective action. A common error you might get occurs when the server hosts both Work Folders (which use the hostable web core) and the full Web (IIS) role. Before you can crate sync shares, you’ll need to modify the ports used so they do not conflict or install Work Folders on a server that doesn’t have the full Web (IIS) role.
12.If you did not select an existing file share during set up and want to enable the sync share for SMB access, open File Explorer. In File Explorer, press and hold or right-click the folder, select Share With, and then select Specific People. Finally, configure file sharing as discussed earlier in this chapter.
Accessing Work Folders on clients
Users with a domain user account can access Work Folders from a client device over the Internet or over the corporate network. You can configure Work Folder Access for a user by completing the following steps:
1. In Control Panel, tap or click System And Security, and then select Work Folders. On the Manage Work Folders page, tap or click Set Up Work Folders.
2. On the Enter Your Work Email Address page, enter the user email address, such as amyh@cpandl.com, and then tap or click Next. If the client device is joined to the domain, you will not be prompted for the user’s credentials. Otherwise, you are prompted for the user’s credentials. After the user enters her credentials, you can select Remember My Credentials to store the user’s credentials for future use, and then tap or click OK to continue.
3. On the Introducing Work Folders page, note where the work files for the user will be stored. By default, work files are stored in a user profile subfolder called Work Folders. For example, the work files for Amyh would be stored under %SystemDrive%\Users\Amyh\WorkFolders. To store work files in another location, tap or click Change and then use the options provided to specify a new save location for work files. When you are ready to continue, tap or click Next.
4. On the Security Policies page, review the security policies that will be applied, and then have the user select the I Accept These Policies On My PC check box. You will not be able to continue if you do not select this check box.
5. Select Set Up Work Folders to create Work Folders on the client device.
After you configure Work Folders for initial use on a client device, the user can access Work Folders in File Explorer. When a user opens File Explorer, the This PC node should be opened by default. If so, the user just needs to double-tap or double-click Work Folders to view work files. If a user has an open Explorer window and This PC is not the selected node, she just needs to tap or click the leftmost option button in the address list, and then tap or click This PC.
As the user works with files, the changes the user makes trigger sync actions with the server. If the user doesn’t change any files locally for an extended period of time, the client connects to the server every 10 minutes to determine whether there are changes to sync.
All materials on the site are licensed Creative Commons Attribution-Sharealike 3.0 Unported CC BY-SA 3.0 & GNU Free Documentation License (GFDL)
If you are the copyright holder of any material contained on our site and intend to remove it, please contact our site administrator for approval.
© 2016-2026 All site design rights belong to S.Y.A.