Windows Server 2012 R2 Pocket Consultant: Storage, Security, & Networking (2014)
Chapter 5. Enhancing computer security
§ Using security templates
§ Using the Security Configuration Wizard
Sound security practices and settings are essential to successful system administration. Two key methods to configure security settings are to use security templates and security policies. Both of these features manage system settings that you would otherwise manage through Group Policy.
Using security templates
Security templates provide a centralized way to manage security-related settings for workstations and servers. You use security templates to apply customized sets of Group Policy definitions to specific computers. These policy definitions generally affect the following policies:
§ Account policies. Control security for passwords, account lockout, and Kerberos security
§ Local policies. Control security for auditing, user rights assignment, and other security options
§ Event log policies. Control security for event logging
§ Restricted groups policies. Control security for local group membership administration
§ System services policies. Control security and startup mode for local services
§ File system policies. Control security for file and folder paths in the local file system
§ Registry policies. Control the permissions on security-related registry keys
NOTE
Security templates are available in all Windows Server installations and can be imported into any Group Policy object (GPO). Security templates apply only to the Computer Configuration area of Group Policy. They do not apply to the User Configuration area. In Group Policy, you’ll find applicable settings under Computer Configuration\Windows Settings\Security Settings. Some security settings are not included, such as those that apply to wireless networks, public keys, software restrictions, and IP security.
Working with security templates is a multipart process that involves the following steps:
1. Use the Security Templates snap-in to create a new template, or select an existing template that you want to modify.
2. Use the Security Templates snap-in to make necessary changes to the template settings, and then save the changes.
3. Use the Security Configuration And Analysis snap-in to analyze the differences between the template with which you are working and the current computer security settings.
4. Revise the template as necessary after you review the differences between the template settings and the current computer settings.
5. Use the Security Configuration And Analysis snap-in to apply the template and overwrite existing security settings.
When you first start working with security templates, you should determine whether you can use an existing template as a starting point. Other administrators might have created templates, or your organization might have baseline templates that should be used. You can also create a new template to use as your starting point, as shown in Figure 5-1.
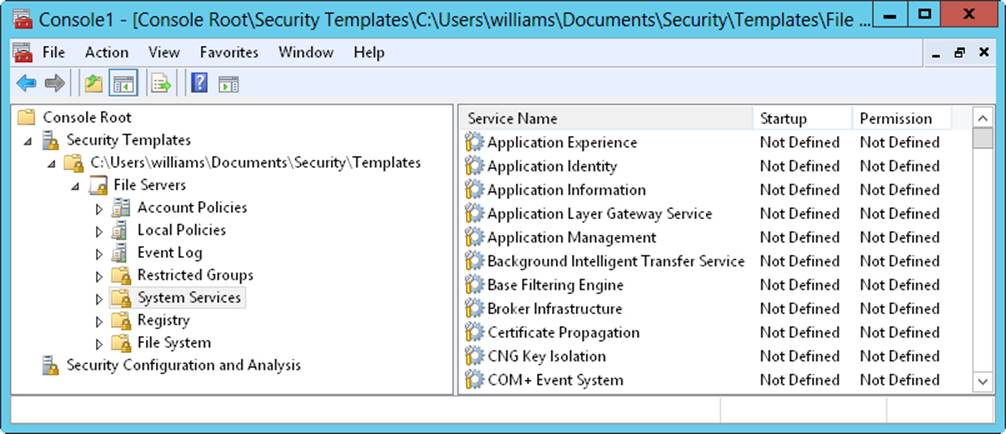
Figure 5-1. View and create security templates with the Security Templates snap-in.
TIP
If you select a template that you want to use as a starting point, you should go through each setting that the template applies and evaluate how the setting affects your environment. If a setting doesn’t make sense, you should modify it appropriately or delete it.
You should use the Security Configuration And Analysis snap-in to apply templates rather than the Security Templates snap-in. You can also use the Security Configuration And Analysis snap-in to compare the settings in a template to the current settings on a computer. The results of the analysis highlight areas in which the current settings don’t match those in the template. This is useful to determine whether security settings have changed over time.
Using the Security Templates and Security Configuration And Analysis snap-ins
You can open the security snap-ins by following these steps:
1. Start the Microsoft Management Console (MMC) by pressing the Windows key, entering mmc.exe, and then pressing Enter.
2. In the Microsoft Management Console, tap or click File, and then tap or click Add/Remove Snap-In.
3. In the Add Or Remove Snap-Ins dialog box, tap or click Security Templates, and then tap or click Add.
4. Tap or click Security Configuration And Analysis, and then tap or click Add. Tap or click OK.
By default, the Security Templates snap-in looks for security templates in the %SystemDrive%\Users\%UserName%\Documents\Security\Templates folder. You can add other search paths for templates by following these steps:
1. With the Security Templates snap-in selected in the MMC, choose New Template Search Path from the Action menu.
2. In the Browse For Folder dialog box, select the template location to add, such as %SystemRoot%\Security\Templates\Policies. Tap or click OK.
Now that you’ve located the template search path with which you want to work, you can select a template and expand the related notes to review its settings.
You can create a template by following these steps:
1. In the Security Templates snap-in, either press and hold or right-click the search path where the template should be created, and then tap or click New Template.
2. Enter a name and description for the template in the text boxes provided.
3. Tap or click OK to create the template. The template will not have settings configured, so you need to modify the settings carefully before the template is ready for use.
4. After you modify the template, save the changes by pressing and holding or right-clicking the template in the Security Templates snap-in and selecting Save. Alternatively, you can select Save As to assign a different name to the modified template.
Reviewing and changing template settings
The sections that follow discuss how to work with template settings. As you’ll learn, you manage each type of template setting in a slightly different way.
Changing settings for account, local, and event log policies
Account policy settings control security for passwords, account lockout, and Kerberos security. Local policy settings control security for auditing, user rights assignment, and other security options. Event log policy settings control security for event logging. For detailed information on account policy, local policy settings, and configuring event logging, see Chapter 9, “Creating User and Group Accounts” and Chapter 3, “Monitoring Services, Processes, and Events” in Windows Server 2012 R2 Pocket Consultant: Essentials & Configuration.
With account, local, and event log policies, you can change template settings by following these steps:
1. In the Security Templates snap-in, expand the Account Policies or Local Policies node as necessary, and then select a related subnode, such as Password Policy or Account Lockout Policy.
2. In the right pane, policy settings are listed alphabetically. The value in the Computer Setting column shows the current setting. If the template changes the setting so that it is no longer defined, the value is listed as Not Defined.
3. Double-tap or double-click a setting to display its Properties dialog box, as shown in Figure 5-2. To determine the purpose of the setting, tap or click the Explain tab. To define and apply the policy setting, select the Define This Policy Setting In The Template check box. To clear this policy and not apply it, clear this check box.
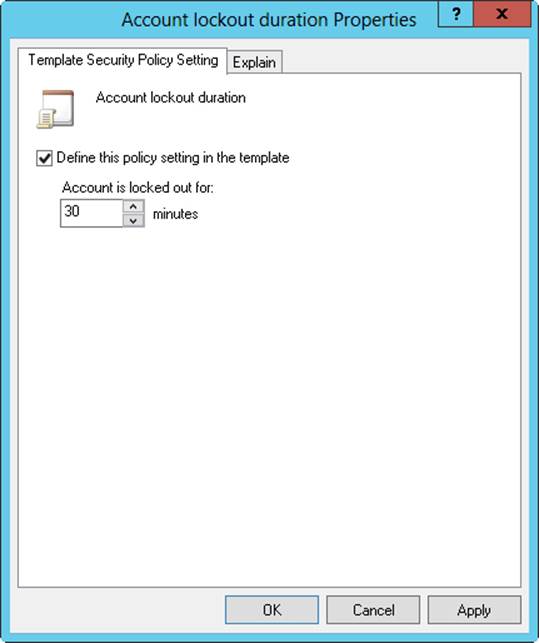
Figure 5-2. Change template settings for account and local policies in the Security Templates snap-in.
4. If you enable the policy setting, specify how the policy setting is to be used by configuring any additional options.
5. Tap or click OK to save your changes. You might get the Suggested Value Changes dialog box, shown in Figure 5-3. This dialog box informs you of other values that are changed to suggested values based on your setting change. For example, when you change the Account Lockout Threshold setting, Windows might also change the Account Lockout Duration and Reset Account Lockout Counter After settings, as shown in the figure.
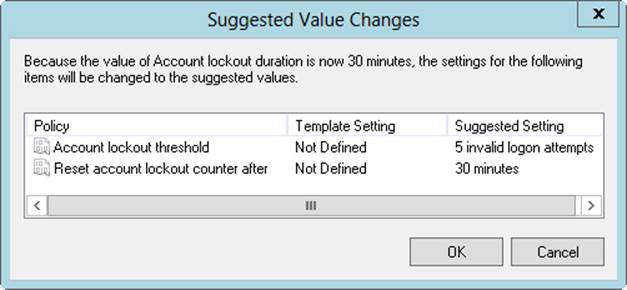
Figure 5-3. Review the suggested value changes.
Configuring restricted groups
Restricted groups policy settings control the list of members of groups and the groups to which the configured group belongs. You can restrict a group by following these steps:
1. In the Security Templates snap-in, select the Restricted Groups node. In the right pane, any currently restricted groups are listed by name. Members of the group are listed as well, and so are groups of which the restricted group is a member.
2. You can add a restricted group by pressing and holding or right-clicking the Restricted Groups node in the left pane, and then tapping or clicking Add Group. In the Add Group dialog box, tap or click Browse.
3. In the Select Groups dialog box, enter the name of a group you want to restrict, and then tap or click Check Names. If multiple matches are found, select the account you want to use, and then tap or click OK. If no matches are found, update the name you entered and try searching again. Repeat this step as necessary, and then tap or click OK.
4. In the Properties dialog box, shown in Figure 5-4, you can use the Add Members option to add members to the group. Tap or click Add Members, and then specify the members of the group. If the group should not have any members, remove all members by tapping or clicking Remove. Any members who are not specified in the policy setting for the restricted group are removed when the security template is applied.
5. In the Properties dialog box, tap or click Add Groups to specify the groups to which this group belongs. If you specify membership in groups, the groups to which this group belongs are listed exactly as you’ve applied them (if the groups are valid in the applicable workgroup or domain). If you do not specify membership in groups, the groups to which this group belongs are not modified when the template is applied.
6. Tap or click OK to save your settings.

Figure 5-4. Configure membership for the selected group.
You can remove a restriction on a group by following these steps:
1. In the Security Templates snap-in, select the Restricted Groups node. In the right pane, any currently restricted groups are listed by name. Members of the group are listed along with the groups of which the restricted group is a member.
2. Press and hold or right-click the group that should not be restricted, and then tap or click Delete. When prompted to confirm the action, tap or click Yes.
Enabling, disabling, and configuring system services
Policy settings for system services control the general security and startup mode for local services. You can enable, disable, and configure system services by following these steps:
1. In the Security Templates snap-in, select the System Services node. In the right pane, all currently installed services on the computer with which you are working are listed by name, startup setting, and permission configuration. Keep the following in mind when working with system services:
o If the template does not change the startup configuration of the service, the value for the Startup column is listed as Not Defined. Otherwise, the startup configuration is listed as one of the following values: Automatic, Manual, or Disabled.
o If the template does not change the security configuration of the service, the value for the Permission column is listed as Not Defined. Otherwise, the security configuration is listed as Configured.
2. Double-tap or double-click the entry for a system service to display its Properties dialog box, shown in Figure 5-5. To define and apply the policy setting, select the Define This Policy Setting In The Template check box. To clear this policy and not apply it, clear this check box.
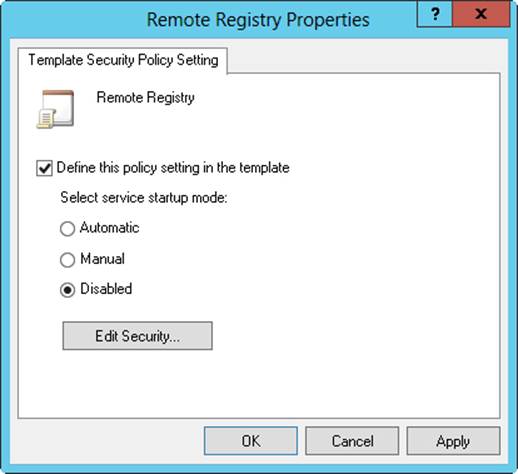
Figure 5-5. Change template settings for system services.
3. If you enable the policy setting, specify the service startup mode by selecting Automatic, Manual, or Disabled. Keep the following in mind:
o Automatic ensures that the service starts automatically when the operating system starts. Choose this setting for essential services that you know are secure and that you want to be sure are run if they are installed on the computer to which the template is being applied.
o Manual prevents the service from starting automatically and allows the service only to be started manually, either by a user, application, or other service. Choose this setting when you want to restrict unnecessary or unused services or when you want to restrict services that you know are not entirely secure.
o Disabled prevents the service from starting automatically or manually. Choose this setting only with unnecessary or unused services that you want to prevent from running.
4. If you know the security configuration that the service should use, tap or click Edit Security, and then set the service permissions in the Security For dialog box. You can set permissions to allow specific users and groups to start, stop, and pause the service on the computer.
5. Tap or click OK.
Configuring security settings for registry and file system paths
Policy settings for the file system control security for file and folder paths in the local file system. Policy settings for the registry control the values of security-related registry keys. You can view or change security settings for currently defined registry and file system paths by following these steps:
1. In the Security Templates snap-in, select the Registry node or the File System node, depending on which type of file path with which you want work. In the right pane, all currently secured paths are listed.
2. Double-tap or double-click a registry or file path to view its current settings, as shown in Figure 5-6.
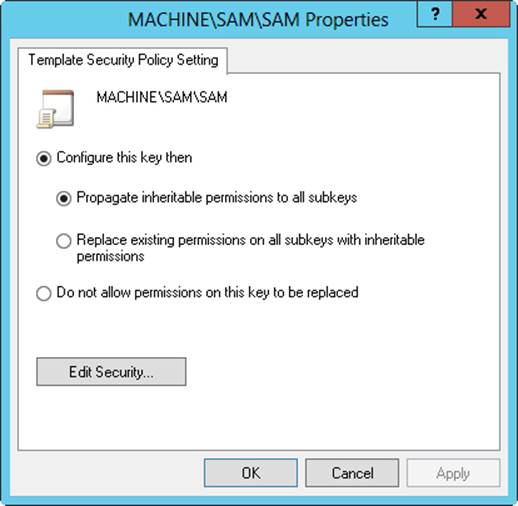
Figure 5-6. Change template settings for paths and keys.
3. To ensure that permissions on the path or key are not replaced, select Do Not Allow Permissions On This Key To Be Replaced, and then tap or click OK. Skip the remaining steps in this procedure.
4. To configure the path or key and replace permissions, select Configure This Key Then, and then choose one of the following options:
o Propagate Inheritable Permissions To All Subkeys. Choose this option to apply all inheritable permissions to this registry or file path and to all registry and file paths below this path. Existing permissions are replaced only if they conflict with a security permission set for this path.
o Replace Existing Permissions On All Subkeys With Inheritable Permissions. Choose this option to replace all existing permissions on this registry or file path and on all registry and file paths below this path. Any existing permissions are removed, and only the current permissions remain.
5. Tap or click Edit Security. In the Security For dialog box, configure security permissions for users and groups. You have the same options for permissions, auditing, and ownership as you do for files and folders used with NTFS. See Chapter 3 for details on permissions, auditing, and ownership.
6. Tap or click OK twice to save the settings.
You can define security settings for registry paths by following these steps:
1. In the Security Templates snap-in, select and then press and hold or right-click the Registry node, and then tap or click Add Key to display the Select Registry Key dialog box, shown in Figure 5-7.
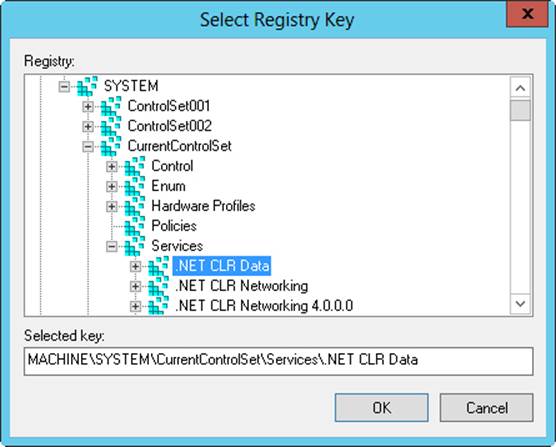
Figure 5-7. Select the registry path or value to secure.
2. In the Select Registry Key dialog box, select the registry path or value with which you want to work, and then tap or click OK. Entries under CLASSES_ROOT are for HKEY_CLASSES_ROOT. Entries under MACHINE are for HKEY_LOCAL_MACHINE. Entries under USERS are for HKEY_USERS.
3. In the Security For dialog box, configure security permissions for users and groups. You have the same options for permissions, auditing, and ownership as you do for files and folders used with NTFS. See Chapter 3 for details on permissions, auditing, and ownership.
4. Tap or click OK. The Add Object dialog box is displayed. To ensure that permissions on the path or key are not replaced, select Do Not Allow Permissions On This Key To Be Replaced, and then tap or click OK. Skip the remaining steps in this procedure.
5. To configure the path or key and replace permissions, select Configure This Key Then, and then do one of the following:
o Choose Propagate Inheritable Permissions To All Subkeys to apply all inheritable permissions to this registry path and all registry paths below this path. Existing permissions are replaced only if they conflict with a security permission set for this path.
o Choose Replace Existing Permissions On All Subkeys With Inheritable Permissions to replace all existing permissions on this registry path and on all registry paths below this path. Any existing permissions are removed, and only the current permissions remain.
6. Tap or click OK.
You can define security settings for file paths by following these steps:
1. In the Security Templates snap-in, select and then press and hold or right-click the File System node, and then tap or click Add File to display the Add A File Or Folder dialog box, shown in Figure 5-8.
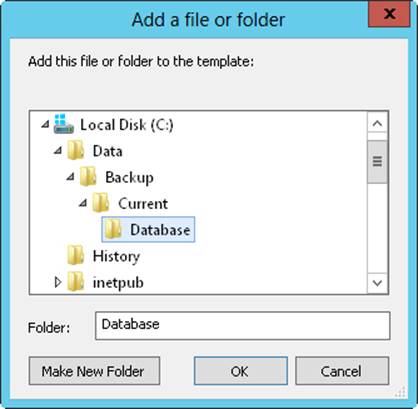
Figure 5-8. Select the file or folder path to secure.
2. In the Add A File Or Folder dialog box, select the file or folder path or value with which you want to work, and then tap or click OK.
3. In the Database Security For dialog box, configure security permissions for users and groups. You have the same options for permissions, auditing, and ownership as you do for files and folders used with NTFS. See Chapter 12 for details on permissions, auditing, and ownership.
4. Tap or click OK. The Add Object dialog box is displayed. To ensure that permissions on the path are not replaced, select Do Not Allow Permissions On This File Or Folder To Be Replaced, and then tap or click OK. Skip the remaining steps in this procedure.
5. To configure the path and replace permissions, select Configure This Path Then, and then do one of the following:
o Choose Propagate Inheritable Permissions To All Subfolders to apply all inheritable permissions to this file path and all file paths below this path. Existing permissions are replaced only if they conflict with a security permission set for this path.
o Choose Replace Existing Permissions On All Subfolders With Inheritable Permissions to replace all existing permissions on this file path and on all file paths below this path. Any existing permissions are removed, and only the current permissions remain.
6. Tap or click OK.
Analyzing, reviewing, and applying security templates
As stated previously, you use the Security Configuration And Analysis snap-in to apply templates and to compare the settings in a template to the current settings on a computer. Applying a template ensures that a computer conforms to a specific security configuration. Comparing settings can help you identify any discrepancies between what is implemented currently and what is defined in a security template. This can also be useful to determine whether security settings have changed over time.
REAL WORLD
The key drawback to using the Security Configuration And Analysis snap-in is that you cannot configure multiple computers at once. You can configure security only on the computer on which you are running the snap-in. If you want to use this tool to deploy security configurations, you must log on to and run the tool on each computer. Although this technique works for standalone computers, it is not the optimal approach in a domain. In a domain setting, you’ll want to import the security template settings into a Group Policy object (GPO), and then deploy the security configuration to multiple computers. For more information, see Deploying security templates to multiple computers later in this chapter.
The Security Configuration And Analysis snap-in uses a working database to store template security settings, and then applies the settings from this database. For analysis and comparisons, the template settings are listed as the effective database settings and the current computer settings are listed as the effective computer settings. Keep in mind that if you are actively editing a template in the Security Templates snap-in, you need to save the template so that the changes can be analyzed and used.
After you create a template or determine that you want to use an existing template, you can analyze and then configure the template by following these steps:
1. Open the Security Configuration And Analysis snap-in.
2. Press and hold or right-click the Security Configuration And Analysis node, and then tap or click Open Database to display the Open Database dialog box.
3. By default, the Open Database dialog box’s search path is set to %SystemDrive%\Users\%UserName%\Documents\Security\Database. As necessary, select options in the Open Database dialog box to navigate to a new location in which to save the database. In the File Name text box, enter a descriptive name for the database, such as Current Config Comparison, and then tap or click Open. The security database is created in the Security Database Files format with the .sdb file extension.
4. The Import Template dialog box is displayed with the default search path set to %SystemDrive%\Users\%UserName%\Documents\Security\Templates. As necessary, select options in the Import Template dialog box to navigate to a new template location. Select the security template you want to use, and then tap or click Open. Security template files end with the .inf file extension.
5. Press and hold or right-click the Security Configuration And Analysis node, and then tap or click Analyze Computer Now. When prompted to set the error log path, enter a new path or tap or click OK to use the default path.
6. Wait for the snap-in to complete the analysis of the template. If an error occurs during the analysis, you can view the error log by pressing and holding or right-clicking the Security Configuration And Analysis node and choosing View Log File.
When you are working with the Security Configuration And Analysis snap-in, you can review the differences between the template settings and the current computer settings. As Figure 5-9 shows, the template settings stored in the analysis database are listed in the Database Setting column, and the current computer settings are listed in the Computer Setting column. If a setting has not been analyzed, it is listed as Not Defined.
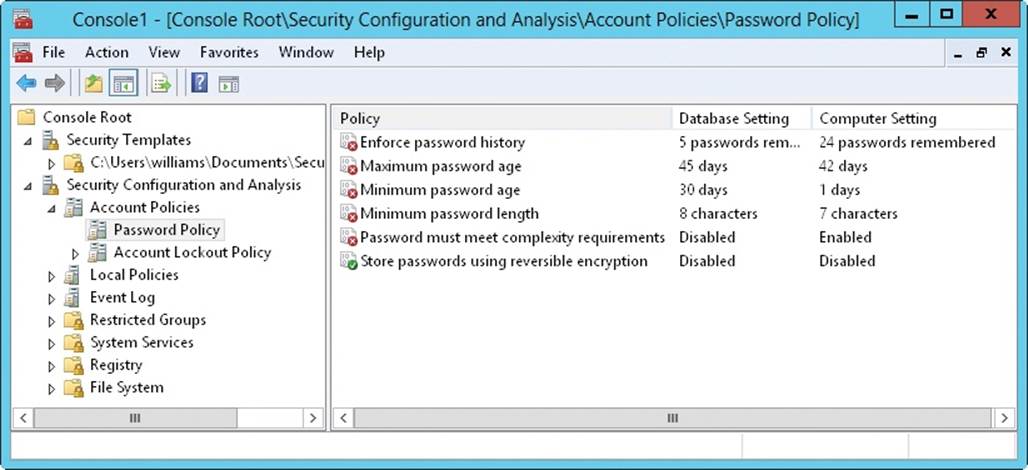
Figure 5-9. Review the differences between the template settings and the current computer settings.
You can make changes to a setting stored in the database by following these steps:
1. In the Security Configuration And Analysis snap-in, double-tap or double-click the setting with which you want to work.
2. In the Properties dialog box, shown in Figure 5-10, note the current computer setting. If information about the purpose of the setting is available, you can view this information by tapping or clicking the Explain tab.
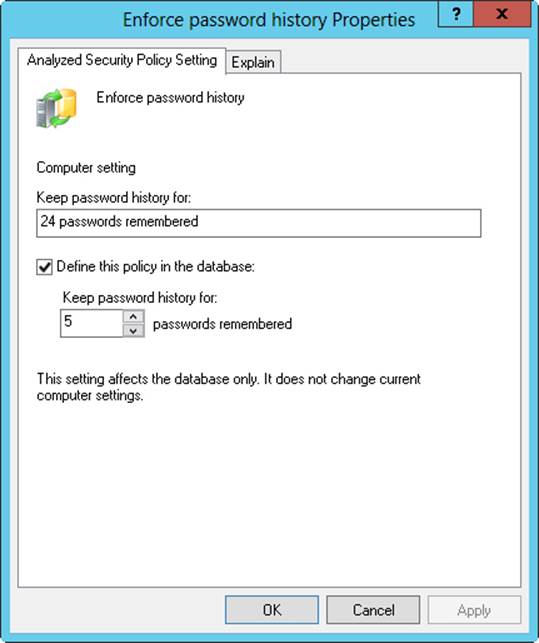
Figure 5-10. Change a policy setting in the database before applying the template.
3. To define and apply the policy setting, select the Define This Policy In The Database check box. To clear this policy and not apply it, clear this check box.
4. If you enable the policy setting, specify how the policy setting is to be used by configuring any additional options.
5. Repeat this process as necessary. To save your database changes to the template, press and hold or right-click the Security Configuration And Analysis node, and then tap or click Save.
You can also use the Secedit command-line utility to analyze, review, and apply security templates. The basic technique is as follows:
1. Open an elevated administrator prompt.
2. Use Secedit /Import to import a security template into a working database.
3. Use Secedit /Analyze to compare the template settings to a computer’s current settings.
4. Use Secedit /Configure to apply the template settings.
Whether you are working with the graphical wizard or the command-line utility, you might want to create a rollback template before applying any settings. A rollback template is a reverse template that allows you to remove most settings applied with a template. The only settings that cannot be removed are those for access control lists on file system and registry paths.
At an elevated administrator prompt, you can create a rollback template by using the Secedit command-line utility. Enter the following:
secedit /generaterollback /db DatabaseName /cfg TemplateName
/rbk RollBackName /log LogName
DatabaseName is the name of a new database that will be used to perform the rollback, TemplateName is the name of an existing security template for which you are creating a rollback template, RollBackName sets the name of a new security template in which the reverse settings should be stored, and LogName sets the name of an optional file for tracking the status of the rollback process.
In the following example, you create a rollback template for the “File Servers” template:
secedit /generaterollback /db rollback.db /cfg "file servers.inf"
/rbk fs-orig.inf /log rollback.log
When you’re ready to apply the template, press and hold or right-click the Security Configuration And Analysis node, and then tap or click Configure Computer Now. When prompted to set the error log path, tap or click OK because the default path should be sufficient. To view the configuration error log, press and hold or right-click the Security Configuration And Analysis node, and then tap or click View Log File. Note any problems, and take action as necessary.
If you created a rollback template prior to applying a security template, you can restore the computer’s security settings to its previous state. To apply a rollback template, follow these steps:
1. In the Security Configuration And Analysis snap-in, press and hold or right-click the Security Configuration And Analysis node, and then tap or click Import Template.
2. In the Import Template dialog box, select the rollback template.
3. Select the Clear This Database Before Importing check box, and then tap or click Open.
4. Press and hold or right-click the Security Configuration And Analysis node, and then tap or click Configure Computer Now. Tap or click OK.
The only settings that cannot be restored are for access control lists on file system and registry paths. After the permissions on file system and registry paths have been applied, you cannot reverse the process automatically and must instead manually reverse the changes one at a time.
Deploying security templates to multiple computers
Rather than applying security templates to one computer at a time, you can deploy your security configurations to multiple computers through Group Policy. To do this, you need to import the security template into a GPO processed by the computers to which the template settings should apply. Then, when policy is refreshed, all computers within the scope of the GPO receive the security configuration.
Security templates apply only to the Computer Configuration portion of Group Policy. Before you deploy security configurations in this way, you should take a close look at the domain and organizational unit (OU) structure of your organization and make changes as necessary to ensure that the security configuration is applied only to relevant types of computers. Essentially, this means that you need to create OUs for the different types of computers in your organization, and then move the computer accounts for these computers into the appropriate OUs. Afterward, you need to create and link a GPO for each of the computer OUs. For example, you could create the following computer OUs:
§ Domain Controllers. An OU for your organization’s domain controllers. This OU is created automatically in a domain.
§ High-Security Member Servers. An OU for servers that require higher than usual security configurations.
§ Member Servers. An OU for servers that require standard server security configurations.
§ Laptop and Mobile Devices. An OU for laptops and mobile devices, which are inherently less secure and might require enhanced security configurations.
§ High-Security User Workstations. An OU for workstations that require higher than usual security configurations.
§ User Workstations. An OU for workstations that require standard workstation security configurations.
§ Remote Access Computers. An OU for computers that remotely access the organization’s network.
§ Restricted Computers. An OU for computers that require restrictive security configurations, such as computers that are used in labs or kiosks.
REAL WORLD
You need to be extra careful when you deploy security templates through GPOs. If you haven’t done this before, practice in a test environment first, and be sure to also practice recovering computers to their original security settings. If you create a GPO and link the GPO to the appropriate level in the Active Directory structure, you can recover the computers to their original state by removing the link to the GPO. This is why it’s extremely important to create and link a new GPO rather than use an existing GPO.
To deploy a security template to a computer GPO, follow these steps:
1. After you configure a security template and have tested it to ensure that it is appropriate, open the GPO you previously created and linked to the appropriate level of your Active Directory structure. In the Group Policy Management editor, open Computer Configuration\Windows Settings\Security Settings.
2. Press and hold or right-click Security Settings, and then tap or click Import Policy.
3. In the Import Policy From dialog box, select the security template to import, and then tap or click Open. Security templates end with the .inf file extension.
4. Check the configuration state of the security settings to verify that the settings were imported as expected, and then close the policy editor. Repeat this process for each security template and computer GPO you’ve configured. In the default configuration of Group Policy, it will take 90 to 120 minutes for the settings to be pushed out to computers in the organization.
Using the Security Configuration Wizard
The Security Configuration Wizard can help you create and apply a comprehensive security policy. A security policy is an XML file you can use to configure services, network security, registry values, and audit policies. Because security policies are role-based and feature-based, you generally need to create a separate policy for each of your standard server configurations. For example, if your organization uses domain controllers, file servers, and print servers, you might want to create a separate policy for each of these server types. If your organization has mail servers, database servers, and combined file/print servers in addition to domain controllers, you should create separate policies tailored to these server types.
You can use the Security Configuration Wizard to do the following:
§ Create a security policy
§ Edit a security policy
§ Apply a security policy
§ Roll back the last-applied security policy
Security policies can incorporate one or more security templates. Much like you can with security templates, you can apply a security policy to the currently logged-on computer by using the Security Configuration Wizard. Through Group Policy, you can also apply a security policy to multiple computers. By default, security policies created with the Security Configuration Wizard are saved in the %SystemRoot% \security\msscw\Policies folder.
The command-line counterpart to the graphical wizard is the Scwcmd (Scwcmd.exe) utility. At an elevated administrator prompt, you can use Scwcmd Analyze to determine whether a computer is in compliance with a security policy and Scwcmd Configure to apply a security policy.
Creating security policies
The Security Configuration Wizard allows you to configure policies only for roles and features that are installed on a computer when you run the wizard. The precise step-by-step process for creating security policies depends on the server roles and features available on the computer that is currently logged on. That said, the general configuration sections presented in the wizard are the same regardless of the computer configuration.
The Security Configuration Wizard has the following configuration sections:
§ Role-Based Service Configuration. Configures the startup mode of system services based on a server’s installed roles, installed features, installed options, and required services.
§ Network Security. Configures inbound and outbound security rules for Windows Firewall With Advanced Security based on installed roles and installed options.
§ Registry Settings. Configures protocols used to communicate with other computers based on installed roles and installed options.
§ Audit Policy. Configures auditing on the selected server based on your preferences.
§ Save Security Policy. Allows you to save and view the security policy. You can also include one or more security templates.
With the fact that the step-by-step process can vary in mind, you can create a security policy by following these steps:
1. Start the Security Configuration Wizard in Server Manager by tapping or clicking Tools, Security Configuration Wizard. On the Welcome page of the wizard, tap or click Next.
2. On the Configuration Action page, review the actions you can perform. (See Figure 5-11.) Create A New Security Policy is selected by default. Tap or click Next.
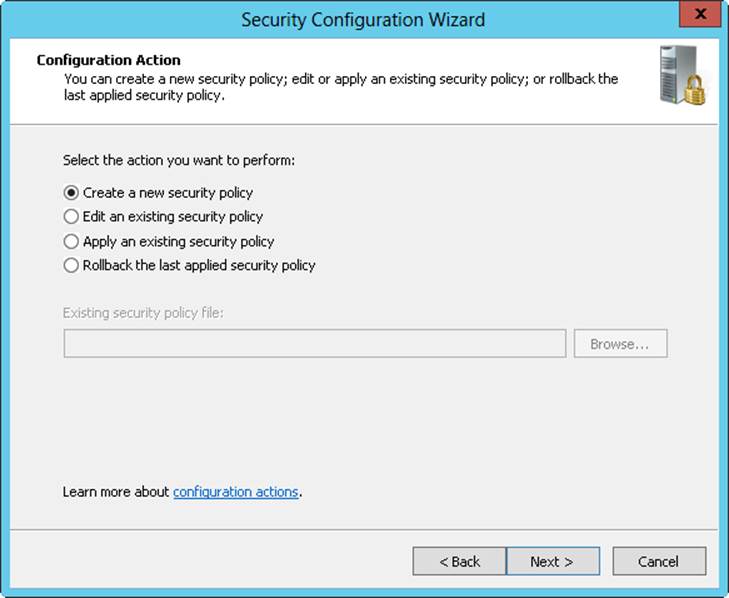
Figure 5-11. Review the actions you can perform.
3. On the Select Server page, select the server you want to use as a baseline for this security policy. The baseline server is the server on which the roles, features, and options with which you want to work are installed. The computer that is logged on is selected by default. To choose a different computer, tap or click Browse. In the Select Computer dialog box, enter the name of the computer, and then tap or click Check Names. Select the computer account you want to use, and then tap or click OK.
4. When you tap or click Next, the wizard collects the security configuration and stores it in a security configuration database. On the Processing Security Configuration Database page, tap or click View Configuration Database to view the settings in the database. After you review the settings in the SCW Viewer, return to the wizard and tap or click Next to continue.
5. Each configuration section has an introductory page. The first introductory page is the one for Role-Based Service Configuration. Tap or click Next.
6. The Select Server Roles page, shown in Figure 5-12, lists the installed server roles. Select each role that should be enabled. Clear the check box for each role that should be disabled. Selecting a role enables services, inbound ports, and settings required for that role. Clearing a role disables services, inbound ports, and settings required for that role, provided that they aren’t required by an enabled role. Tap or click Next.
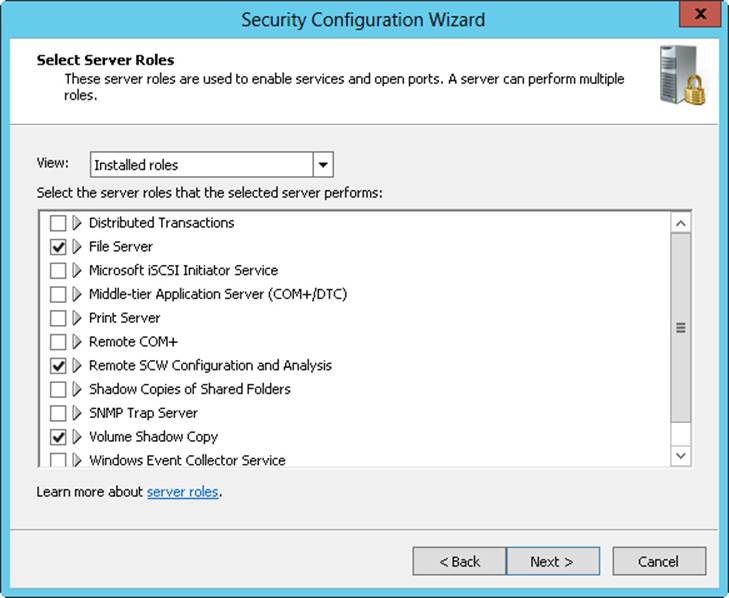
Figure 5-12. Select the server roles to enable.
7. On the Select Client Features page, you’ll find the installed client features used to enable services. Select each feature that should be enabled, and clear each feature that should be disabled. Selecting a feature enables services required for that feature. Clearing a feature disables services required for that feature, if they aren’t required by an enabled feature. Tap or click Next.
8. On the Select Administration And Other Options page, you’ll see the installed options used to enable services and open ports. Select each option that should be enabled, and clear each option that should be disabled. Selecting an option enables services required for that option. Clearing an option disables services required for that option, if they aren’t required by an enabled option. Tap or click Next.
9. On the Select Additional Services page, you’ll find a list of additional services found on the selected server while processing the security configuration database. Select each service that should be enabled, and clear each service that should be disabled. Selecting a service enables services required for that service. Clearing a service disables services required for that service, if they aren’t required by an enabled service. Tap or click Next.
10.On the Handling Unspecified Services page, indicate how unspecified services should be handled. Unspecified services are services that are not installed on the selected server and are not listed in the security configuration database. By default, the startup mode of unspecified services is not changed. To disable unspecified services instead, select Disable The Service. Tap or click Next.
11.On the Confirm Service Changes page, review the services that will be changed on the selected server if the security policy is applied. Note the current startup mode and the startup mode that will be applied by the policy. Tap or click Next.
12.On the introductory page for Network Security, tap or click Next. On the Network Security Rules page, you’ll find a list of firewall rules needed for the roles, features, and options you previously selected. You can add, edit, or remove inbound and outbound rules by using the options provided. Tap or click Next when you are ready to continue.
13.On the introductory page for Registry Settings, tap or click Next. On the Require SMB Security Signatures page, review the server message block (SMB) security signature options. By default, minimum operating system requirements and digital signing are used, and you won’t want to change these settings. Tap or click Next.
14.For domain controllers and servers with LDAP, on the Require LDAP Signing page, you can set minimum operating system requirements for all directory-enabled computers that access Active Directory Domain Services.
15.On the Outbound Authentication Methods page, choose the methods that the selected server uses to authenticate with remote computers. Your choices set the outbound LAN Manager authentication level that will be used. If the computer communicates only with domain computers, select Domain Accounts, but do not select the other options. This will ensure that the computer uses the highest level of outbound LAN Manager authentication. If the computer communicates with both domain and workgroup computers, select Domain Accounts and Local Accounts On The Remote Computers. In most cases, you won’t want to select the file-sharing option because this will result in a substantially lowered authentication level. Tap or click Next.
16.The outbound authentication methods you choose determine what additional Registry Settings pages are displayed. Keep the following in mind:
o If you don’t select any outbound authentication methods, the outbound LAN Manager authentication level is set as Send NTLMv2 Response Only, and an additional page is displayed to enable you to set the inbound authentication method. On the Inbound Authentication Using Domain Accounts page, choose the types of computers from which the selected server will accept connections. Your choices set the inbound LAN Manager authentication level that will be used. If the computer communicates only with Windows XP Professional or later computers, clear both options to ensure that the computer uses the highest level of inbound LAN Manager authentication. If the computer communicates with older PCs, accept the default selections. Tap or click Next.
o If you select domain accounts, local accounts, or both, you’ll have additional related pages that enable you to set the LAN Manager authentication level used when making outbound connections. You’ll also be able to specify that you want to synchronize clocks with this server’s clock. Inbound authentication is set as Accept All.
o If you allow file sharing passwords for early releases of Windows, the outbound LAN Manager authentication level is set as Send LM & NTLM Only and the inbound authentication level is set as Accept All. Because of this, when you tap or click Next, the Registry Settings Summary page is displayed.
17.On the Registry Settings Summary page, review the values that will be changed on the selected server if the security policy is applied. Note the current value and the value that will be applied by the policy. Tap or click Next.
18.On the introductory page for Audit Policy, tap or click Next. On the System Audit Policy page, configure the level of auditing you want. To disable auditing, select Do Not Audit. To enable auditing for successful events, select Audit Successful Activities. To enable auditing for all events, select Audit Successful And Unsuccessful Activities. Tap or click Next.
19.On the Audit Policy Summary page, review the settings that will be changed on the selected server if the security policy is applied. Note the current setting and the setting that will be applied by the policy. Tap or click Next.
20.On the introductory page for Save Security Policy, tap or click Next. On the Security Policy File Name page, you can configure options for saving the security policy and adding one or more security templates to the policy. To view the security policy in the SCW Viewer, tap or click View Security Policy. When you have finished viewing the policy, return to the wizard.
21.To add security templates to the policy, tap or click Include Security Templates. In the Include Security Templates dialog box, tap or click Add. In the Open dialog box, select a security template to include in the security policy. If you add more than one security template, you can prioritize them in case any security configuration conflicts occur between them. Settings from templates higher in the list have priority. Select a template, and then tap or click the Up and Down buttons to prioritize the templates. Tap or click OK.
22.By default, the security policy is saved in the %SystemRoot%\Security\Msscw \Policies folder. Tap or click Browse. In the Save As dialog box, select a different save location for the policy if necessary. After you enter a name for the security policy, tap or click Save. The default or selected folder path and file name are then listed in the Security Policy File Name text box.
23.Tap or click Next. On the Apply Security Policy page, you can choose to apply the policy now or later. Tap or click Next, and then tap or click Finish.
Editing security policies
You can use the Security Configuration Wizard to edit a security policy by following these steps:
1. Start the Security Configuration Wizard in Server Manager by tapping or clicking Tools, Security Configuration Wizard. When the wizard starts, tap or click Next.
2. On the Configuration Action page, select Edit An Existing Security Policy, and then tap or click Browse. In the Open dialog box, select the security policy with which you want to work, and then tap or click Open. Security policies end with the .xml extension. Tap or click Next.
3. Follow steps 3–23 of the procedure in the section Creating security policies to edit the configuration of the security policy.
Applying security policies
You can use the Security Configuration Wizard to apply a security policy by following these steps:
1. Start the Security Configuration Wizard in Server Manager by tapping or clicking Tools, Security Configuration Wizard. When the wizard starts, tap or click Next.
2. On the Configuration Action page, select Apply An Existing Security Policy, and then tap or click Browse. In the Open dialog box, select the security policy with which you want to work and then tap or click Open. Security policies end with the .xml extension. Tap or click Next.
3. On the Select Server page, select the server to which you want to apply the security policy. The computer that is logged on is selected by default. To choose a different computer, tap or click Browse. In the Select Computer dialog box, enter the name of the computer, and then tap or click Check Names. Select the computer account you want to use, and then tap or click OK.
4. Tap or click Next. On the Apply Security Policy page, tap or click View Security Policy to view the security policy in the SCW Viewer. When you have finished viewing the policy, return to the wizard.
5. Tap or click Next to apply the policy to the selected server. When the wizard finishes applying the policy, tap or click Next, and then tap or click Finish.
Rolling back the last applied security policy
You can use the Security Configuration Wizard to roll back the last security policy you applied by following these steps:
1. Start the Security Configuration Wizard inn Server Manager by tapping or clicking Tools, Security Configuration Wizard. When the wizard starts, tap or click Next.
2. On the Configuration Action page, select Rollback The Last Applied Security Policy, and then tap or click Next.
3. On the Select Server page, select the server on which you want to roll back the last security policy you applied. The computer that is logged on is selected by default. To choose a different computer, tap or click Browse. In the Select Computer dialog box, enter the name of the computer, and then tap or click Check Names. Select the computer account you want to use, and then tap or click OK.
4. Tap or click Next. On the Rollback Security Configuration page, tap or click View Rollback File to view the details of the last applied security policy in the SCW Viewer. When you finish viewing the policy, return to the wizard.
5. Tap or click Next to roll back the policy to the selected server. When the wizard finishes the rollback process, tap or click Next, and then tap or click Finish.
Deploying a security policy to multiple computers
In an organization with many computers, you probably won’t want to apply a security policy to each computer separately. As discussed in Deploying security templates to multiple computers earlier in this chapter, you might want to apply a security policy through Group Policy, and you might want to create computer OUs for this purpose.
After you’ve created the necessary OUs, you can use the Scwcmd utility’s transform command to create a GPO that includes the settings in the security policy (and any security templates attached to the policy). You then deploy the settings to computers by linking the new GPO to the appropriate OU or OUs. By default, security policies created with the Security Configuration Wizard are saved in the %SystemRoot%\security\msscw\Policies folder.
Use the following syntax to transform a security policy:
scwcmd transform /p:FullFilePathToSecurityPolicy /g:GPOName
FullFilePathToSecurityPolicy is the full file path to the security policy’s .xml file, and GPOName is the display name for the new GPO. Consider the following example:
scwcmd transform /p:"c:\users\wrs\documents\fspolicy.xml"
/g: "FileServer GPO"
When you create the GPO, you can link the GPO by following these steps:
1. In the Group Policy Management Console (GPMC), select the OU with which you want to work. In the right pane, the Linked Group Policy Objects tab shows the GPOs that are currently linked to the selected OU (if any).
2. Press and hold or right-click the OU to which you want to link the previously created GPO, and then select Link An Existing GPO. In the Select GPO dialog box, select the GPO to which you want to link, and then tap or click OK.
When Group Policy is refreshed for computers in the applicable OU, the policy settings in the GPO are applied.
Because you created a new GPO and linked the GPO to the appropriate level in the Active Directory structure, you can restore the computers to their original state by removing the link to the GPO. To remove a link to a GPO, follow these steps:
1. In the GPMC, select and then expand the OU with which you want to work. In the right pane, the Linked Group Policy Objects tab shows the GPOs that are currently linked to the selected OU.
2. Press and hold or right-click the GPO. On the shortcut menu, the Link Enabled option should have a check mark to show it is enabled. Clear this option to remove the link.
All materials on the site are licensed Creative Commons Attribution-Sharealike 3.0 Unported CC BY-SA 3.0 & GNU Free Documentation License (GFDL)
If you are the copyright holder of any material contained on our site and intend to remove it, please contact our site administrator for approval.
© 2016-2026 All site design rights belong to S.Y.A.