Windows Server 2012 R2 Pocket Consultant: Storage, Security, & Networking (2014)
Chapter 6. Managing users and computers with Group Policy
§ Centrally managing special folders
§ User and computer script management
§ Deploying software through Group Policy
§ Automatically configuring Work Folders
§ Automatically enrolling computer and user certificates
§ Managing Automatic Updates in Group Policy
You can use Group Policy to manage users and computers in many different ways. In the sections that follow, I’ll describe some specific management areas, including the following:
§ Folder redirection
§ Computer and user scripts
§ Software deployment
§ Work Folders options
§ Computer and user certificate enrollment
§ Automatic update settings
Centrally managing special folders
You can centrally manage special folders used by Windows Server through folder redirection. You do this by redirecting special folders to a central network location instead of using multiple default locations on each computer. For Windows Vista and later releases of Windows, the special folders you can manage are AppData (Roaming), Desktop, Start Menu, Documents, Pictures, Music, Videos, Favorites, Contacts, Downloads, Links, Searches, and Saved Games.
Note that even though current releases of Windows store personal folders in slightly different ways, you manage the folders in the same way within Group Policy.
You have two general options for redirection. You can redirect a special folder to the same network location for all users, or you can designate locations based on user membership in security groups. In either case, you should make sure that the network location you plan to use is available as a network share. See Chapter 4, for details on sharing data on a network.
By default, users can redirect folders no matter which computer they’re using within the domain. Windows 8.1 and Windows Server 2012 R2 enable you to modify this behavior by specifying from which computers a user can access roaming profiles and redirected folders. You do this by designating certain computers as primary computers, and then configuring domain policy to restrict the downloading of profiles, redirected folders, or both to primary computers. For more information, see Chapter 10, “Managing existing user and group accounts” in Windows Server 2012 R2: Essentials & Configuration.
Redirecting a special folder to a single location
You can redirect a special folder to a single location by following these steps:
1. In the Group Policy Management Console (GPMC), press and hold or right-click the Group Policy object (GPO) for the site, domain, or organizational unit with which you want to work, and then tap or click Edit to open the policy editor for the GPO.
NOTE
If you’d rather create a new GPO, press and hold or right-click the site, domain or organizational unit and then select Create A GPO... And Link It Here. In the New GPO dialog box, enter a name for the GPO, and then select OK.
2. In the policy editor, expand the following nodes: User Configuration, Policies, Windows Settings, and Folder Redirection.
3. Under Folder Redirection, press and hold or right-click the special folder with which you want to work, such as AppData(Roaming), and then tap or click Properties to open a Properties dialog box similar to the one shown in Figure 6-1.
4. In the Setting list on the Target tab, choose Basic—Redirect Everyone’s Folder To The Same Location.
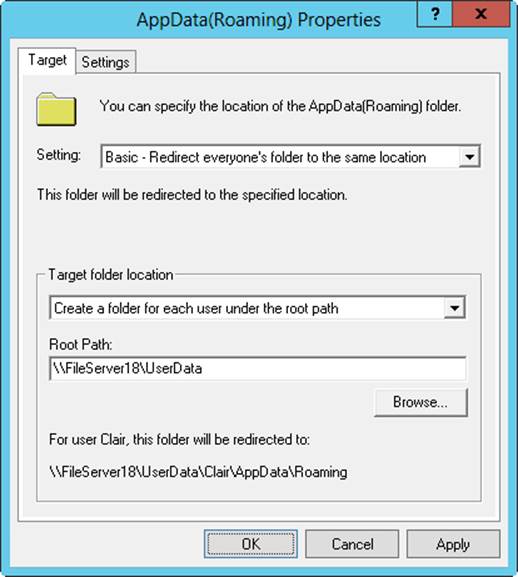
Figure 6-1. Set options for redirection by using a special folder’s Properties dialog box.
5. Under Target Folder Location, you have several options depending on the folder with which you’re working, and those options include the following:
o Redirect To The User’s Home Directory. If you select this option, the folder is redirected to a subdirectory within the user’s home directory. You set the location of the user’s home directory with the %HomeDrive% and %HomePath% environment variables.
o Create A Folder For Each User Under The Root Path. If you select this option, a folder is created for each user at the location you enter in the Root Path text box. The folder name is the user account name as specified by %UserName%. Thus, if you enter the root path value \\Zeta\UserDocuments, the folder for Williams will be located at \\Zeta \UserDocuments\Williams.
o Redirect To The Following Location. If you select this option, the folder is redirected to the location you enter in the Root Path text box. Here, you typically want to use an environment variable to customize the folder location for each user. For example, you could use the root path value \\Zeta\UserData\%UserName%\docs.
o Redirect To The Local Userprofile Location. If you select this option, the folder is redirected to a subdirectory within the user profile directory. You set the location of the user profile with the %UserProfile% variable.
IMPORTANT
When specifying the root path, be sure to specify the UNC path for the server and not a local path. The basic syntax for a UNC path is \\ServerName \ShareName, such as \\CorpServer38\CorpData.
6. Tap or click the Settings tab, configure the following additional options, and then tap or click OK to complete the process:
o Grant The User Exclusive Rights To. Gives users full rights to access their data in the special folder.
o Move The Contents Of FolderName To The New Location Moves the data in the special folders from the individual systems on the network to the central folder or folders.
o Also Apply Redirection Policy To. Applies the redirection policy to previous releases of Windows as well.
Redirecting a special folder based on group membership
You can redirect a special folder based on group membership by following these steps:
1. In the GPMC, press and hold or right-click the GPO for the site, domain, or organizational unit with which you want to work, and then tap or click Edit to open the policy editor for the GPO.
2. In the policy editor, expand the following nodes: User Configuration, Policies, Windows Settings, and Folder Redirection.
3. Under Folder Redirection, press and hold or right-click the special folder with which you want to work, such as AppData(Roaming), and then tap or click Properties.
4. In the Setting list on the Target tab, choose Advanced – Specify Locations For Various User Groups. As shown in Figure 6-2, a Security Group Membership panel is added to the Properties dialog box.
5. Tap or click Add to open the Specify Group And Location dialog box. Or select a group entry, and then tap or click Edit to modify its settings.
6. In the Security Group Membership text box, enter the name of the security group for which you want to configure redirection, or tap or click Browse to find a security group to add.

Figure 6-2. Configure advanced redirection by using the Security Group Membership panel.
7. As with basic redirection, the options available depend on the folder with which you’re working and include the following:
o Redirect To The User’s Home Directory. If you select this option, the folder is redirected to a subdirectory within the user’s home directory. You set the location of the user’s home directory with the %HomeDrive% and %HomePath% environment variables.
o Create A Folder For Each User Under The Root Path. If you select this option, a folder is created for each user at the location you enter in the Root Path text box. The folder name is the user account name as specified by %UserName%. Thus, if you enter the root path value \\Zeta\UserDocuments, the folder for Williams will be located at \\Zeta\UserDocuments\Williams.
o Redirect To The Following Location. If you select this option, the folder is redirected to the location you enter in the Root Path text box. Here, you typically want to use an environment variable to customize the folder location for each user. For example, you could use the root path value \\Zeta\UserData\%UserName%\docs.
o Redirect To The Local Userprofile Location. If you select this option, the folder is redirected to a subdirectory within the user profile directory. You set the location of the user profile with the %UserProfile% variable.
8. Tap or click OK. Repeat steps 5–7 for other groups you want to configure.
9. When you’re done creating group entries, tap or click the Settings tab, configure the following additional options, and then tap or click OK to complete the process:
o Grant The User Exclusive Rights To. Gives users full rights to access their data in the special folder.
o Move The Contents Of FolderName To The New Location Moves the data in the special folders from the individual systems on the network to the central folder or folders.
o Also Apply Redirection Policy To. Applies the redirection policy to early releases of Windows as well.
Removing redirection
Sometimes you might want to remove redirection from a particular special folder. You remove redirection by following these steps:
1. In the GPMC, press and hold or right-click the GPO for the site, domain, or organizational unit with which you want to work, and then tap or click Edit to open the policy editor for the GPO.
2. In the policy editor, expand the following nodes: User Configuration, Policies, Windows Settings, and Folder Redirection.
3. Under Folder Redirection, press and hold or right-click the special folder with which you want to work, and then tap or click Properties.
4. Tap or click the Settings tab, and then make sure that an appropriate Policy Removal option is selected. The following two options are available:
o Leave The Folder In The New Location When Policy Is Removed When you select this option, the folder and its contents remain at the redirected location and current users are still permitted to access the folder and its contents at this location.
o Redirect The Folder Back To The Local Userprofile Location When Policy Is Removed. When you select this option, the folder and its contents are copied back to the original location; however, the contents aren’t deleted from the previous location.
5. If you changed the Policy Removal option, tap or click Apply, and then tap or click the Target tab. Otherwise, just tap or click the Target tab.
6. To remove all redirection definitions for the special folder, choose Not Configured in the Setting list.
7. To remove redirection for a particular security group, select the security group in the Security Group Membership panel, and then tap or click Remove. Tap or click OK.
User and computer script management
You can configure four types of scripts with Windows Server:
§ Computer Startup. Executed during startup
§ Computer Shutdown. Executed prior to shutdown
§ User Logon. Executed when a user logs on
§ User Logoff. Executed when a user logs off
Windows supports scripts written as command-shell batch scripts ending with the .bat or .cmd extension or scripts that use the Windows Script Host (WSH). WSH is a feature of Windows Server that enables you to use scripts written in a scripting language, such as VBScript, without needing to insert the script into a webpage. To provide a multipurpose scripting environment, WSH relies on scripting engines. A scripting engine is the component that defines the core syntax and structure of a particular scripting language. Windows Server ships with scripting engines for VBScript and JScript. Other scripting engines are also available.
Beginning with Windows 7 and Windows Server 2008 R2, current Windows operating systems also support Windows PowerShell scripts. When Windows PowerShell is installed on computers that process a particular GPO, you can use Windows PowerShell scripts in much the same way as you use other scripts. You have the option of running Windows PowerShell scripts before or after other types of scripts.
Assigning computer startup and shutdown scripts
Computer startup and shutdown scripts are assigned as part of a GPO; as a result, all computers that are members of the site, domain, or organizational unit—or all three—execute scripts automatically when they’re started or shut down.
To assign a computer startup or shutdown script, follow these steps:
1. In File Explorer, open the folder containing the script or scripts you want to use.
2. In the GPMC, press and hold or right-click the GPO for the site, domain, or organizational unit with which you want to work, and then tap or click Edit to open the policy editor for the GPO.
3. In the Computer Configuration\Policies node, double-tap or double-click the Windows Settings folder, and then tap or click Scripts.
4. To work with startup scripts, press and hold or right-click Startup, and then tap or click Properties. To work with shutdown scripts, press and hold or right-click Shutdown and select Properties to open a dialog box similar to the one shown in Figure 6-3.
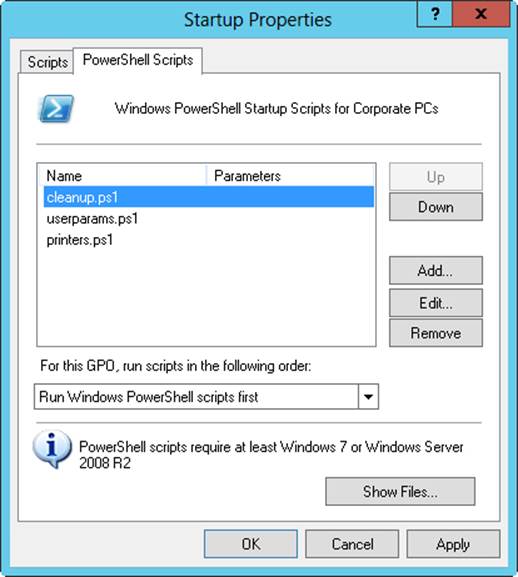
Figure 6-3. Add, edit, and remove computer startup scripts by using the Startup Properties dialog box.
5. On the Scripts tab, you can manage command-shell batch scripts ending with the .bat or .cmd extension and scripts that use the Windows Script Host. On the PowerShell Scripts tab, you can manage Windows PowerShell scripts. When working with either tab, tap or click Show Files.
6. Copy the files in the open File Explorer window, and then paste them into the window that opened when you clicked Show Files.
7. Tap or click Add to open the Add A Script dialog box and assign a script. In the Script Name text box, enter the name of the script you copied to the Machine\Scripts\Startup or the Machine\Scripts\Shutdown folder for the related policy. In the Script Parameters text box, enter any parameters to pass to the script. Repeat this step to add other scripts.
8. During startup or shutdown, scripts are executed in the order in which they’re listed in the Properties dialog box. On the Scripts tab, use the Up and Down buttons to reorder scripts as necessary. Do the same on the PowerShell Scripts tab. On the PowerShell Scripts tab, you can also use the selection list to specify whether Windows PowerShell scripts should run before or after other types of scripts.
9. If you want to edit the script name or parameters later, select the script in the Script For list, and then tap or click Edit. To delete a script, select the script in the Script For list, and tap or click Remove.
10.To save your changes, tap or click OK.
Assigning user logon and logoff scripts
You can assign user scripts in one of the three following ways:
§ You can assign logon and logoff scripts as part of a GPO; and as a result, all users who are members of the site, domain, or organizational unit—or all three—execute scripts automatically when they log on or log off.
§ You can also assign logon scripts individually through the Active Directory Users And Computers console, which enables you to assign a separate logon script to each user or group.
§ You can also assign individual logon scripts as scheduled tasks by using the Scheduled Task Wizard.
To assign a logon or logoff script in a GPO, follow these steps:
1. In File Explorer, open the folder containing the script or scripts you want to use.
2. In the GPMC, press and hold or right-click the GPO for the site, domain, or organizational unit with which you want to work, and then tap or click Edit to open the policy editor for the GPO.
3. Double-tap or double-click the Windows Settings folder in the User Configuration\Policies node, and then tap or click Scripts.
4. To work with logon scripts, press and hold or right-click Logon, and then tap or click Properties. To work with logoff scripts, press and hold or right-click Logoff, and then tap or click Properties. This opens a dialog box similar to the one shown in Figure 6-4.
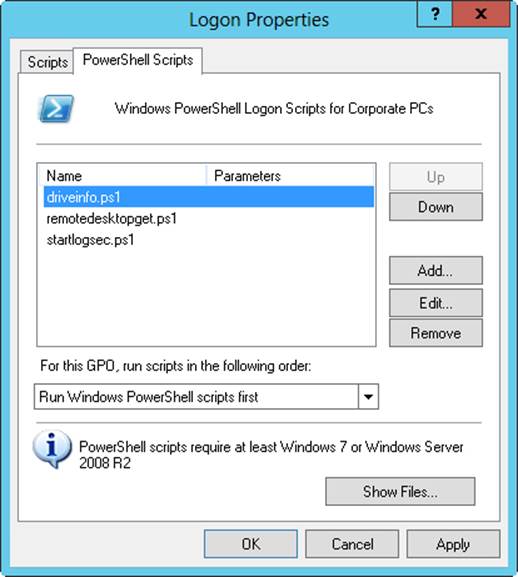
Figure 6-4. Add, edit, and remove user logon scripts by using the Logon Properties dialog box.
5. On the Scripts tab, you can manage command-shell batch scripts ending with the .bat or .cmd extension and scripts that use the Windows Script Host. On the PowerShell Scripts tab, you can manage Windows PowerShell scripts. When working with either tab, tap or click Show Files.
6. Copy the files in the open File Explorer window, and then paste them into the window that opened when you clicked Show Files.
7. Tap or click Add to open the Add A Script dialog box and assign a script. In the Script Name text box, enter the name of the script you copied to the User\Scripts\Logon or the User\Scripts\Logoff folder for the related policy. In the Script Parameter text box, enter any parameters to pass to the script. Repeat this step to add other scripts.
8. During logon or logoff, scripts are executed in the order in which they’re listed in the Properties dialog box. On the Scripts tab, use the Up and Down buttons to reorder scripts as necessary. Do the same on the PowerShell Scripts tab, on which you can also use the selection list to specify whether Windows PowerShell scripts should run before or after other types of scripts.
9. If you want to edit the script name or parameters later, select the script in the Script For list, and then tap or click Edit. To delete a script, select the script in the Script For list, and then tap or click Remove.
10.To save your changes, tap or click OK.
Deploying software through Group Policy
Group Policy includes basic functionality, called Software Installation policy, for deploying software. Although Software Installation policy is not designed to replace enterprise solutions such as System Center 2012 R2, you can use it to automate the deployment and maintenance of software in just about any size organization if your computers are running the Windows operating system.
Getting to know Software Installation policy
In Group Policy, you can deploy software on a per-computer or per-user basis. Per-computer applications are available to all users of a computer and configured under Computer Configuration\Policies\Software Settings\Software Installation. Per-user applications are available to individual users and configured under User Configuration\Policies\Software Settings\Software Installation.
You deploy software in three key ways:
§ Computer assignment. Assigns the software to client computers so that it is installed when the computer starts. This technique requires no user intervention, but it does require a restart to install the software. Installed software is then available to all users on the computer.
§ User assignment. Assigns the software to users so that it is installed when a user logs on. This technique requires no user intervention, but it does require the user to log on to install or advertise the software. The software is associated with the user only and not the computer.
§ User publishing. Publishes the software so that users can install it manually through Programs And Features. This technique requires the user to explicitly install software or activate installation. The software is associated with the user only.
When you use user assignment or user publishing, you can advertise the software so that a computer can install the software when it is first used. With advertisements, the software can be installed automatically in the following situations:
§ When a user accesses a document that requires the software
§ When a user opens a shortcut to the application
§ When another application requires a component of the software
When you configure Software Installation policy, you should generally not use existing GPOs. Instead, you should create GPOs that configure software installation, and then link those GPOs to the appropriate containers in Group Policy. When you use this approach, it’s much easier to redeploy software and apply updates.
After you create a GPO for your software deployment, you should set up a distribution point. A distribution point is a shared folder that is available to the computers and users to which you are deploying software. With basic applications, you prepare the distribution point by copying the installer package file and all required application files to the share and configuring permissions so that these files can be accessed. With other applications, you may need to prepare the distribution point by performing an administrative installation to the share. The advantage of an administrative installation is that the software can be updated and redeployed through Software Installation policy.
You can update applications deployed through Software Installation policy by using an update or service pack or by deploying a new version of the application. Each task is performed in a slightly different way.
Deploying software throughout your organization
Software Installation policy uses either Windows Installer Packages (.msi) or ZAW Down-Level Application Packages (.zap). When you use computer assignment, user assignment, or user publishing, you can deploy software by using Windows Installer Packages. When you use user publishing, you can deploy software by using either Windows Installer Packages or ZAW Down-Level Application Packages. With either technique, you must set file permissions on the installer package so that the appropriate computer and user accounts have read access.
Because Software Installation policy is applied only during foreground processing of policy settings, per-computer application deployments are processed at startup and per-user application deployments are processed at logon. You can customize installation by using transform (.mst) files. Transform files modify the installation process according to the settings you defined for specific computers and users.
You can deploy software by following these steps:
1. In the GPMC, press and hold or right-click the GPO you want to use for the deployment, and then tap or click Edit.
2. In the policy editor, open Computer Configuration\Policies\Software Settings \Software Installation or User Configuration\Policies\Software Settings \Software Installation as appropriate for the type of software deployment.
3. Press and hold or right-click Software Installation. On the shortcut menu, tap or click New, and then tap or click Package.
4. In the Open dialog box, go to the network share where your package is located, tap or click the package to select it, and then tap or click Open.
NOTE
Windows Installer Packages (.msi) is selected by default in the Files Of Type list. If you are performing a user publishing deployment, you can also choose ZAW Down-Level Application Packages (.zap) as the file type.
5. In the Deploy Software dialog box, shown in Figure 6-5, select one of the following deployment methods, and then tap or click OK:
o Published. To publish the application without modifications
o Assigned. To assign the application without modifications
o Advanced. To deploy the application by using advanced configuration options
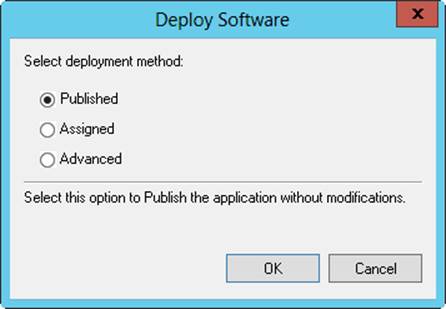
Figure 6-5. Select the deployment method.
Configuring software deployment options
You can view and set general options for a software package by following these steps:
1. In the GPMC, press and hold or right-click the GPO you want to use for the deployment, and then tap or click Edit.
2. In the policy editor, access Computer Configuration\Policies\Software Settings \Software Installation or User Configuration\Policies\Software Settings \Software Installation as appropriate for the type of software deployment.
3. Double-tap or double-click the Software Installation package. In the Properties dialog box, review or modify software deployment options.
4. On the Deployment tab, shown in Figure 6-6, you can change the deployment type and configure the following deployment and installation options:
o Auto-Install This Application By File Extension Activation. Advertises any file extensions associated with this package for install-on-first-use deployment. This option is selected by default.
o Uninstall This Application When It Falls Out Of The Scope Of Management. Removes the application if it no longer applies to the user.
o Do Not Display This Package In The Add/Remove Programs Control Panel. Prevents the application from appearing in Add/Remove Programs, which prevents a user from uninstalling an application.
o Install This Application At Logon. Configures full installation—rather than advertisement—of an application when the user logs on. This option cannot be set when you publish a package for users.
o Installation User Interface Options. Controls how the installation is performed. With the default setting, Maximum, the user gets all setup screens and messages during installation. With the Basic option, the user gets only error and completion messages during installation.

Figure 6-6. Review and modify the deployment options as necessary.
5. Tap or click OK.
Updating deployed software
When an application uses a Windows Installer package, you can apply an update or service pack to a deployed application by following these steps:
1. After you obtain an .msi file or .msp (security update) file containing the update or service pack to be applied, copy the .msi or .msp file and any new installation files to the folder containing the original .msi file. Overwrite any duplicate files as necessary.
2. In the GPMC, press and hold or right-click the GPO you want to use for the deployment, and then tap or click Edit.
3. In the policy editor, access Computer Configuration\Policies\Software Settings \Software Installation or User Configuration\Policies\Software Settings \Software Installation as appropriate for the type of software deployment.
4. Press and hold or right-click the package with which you want to work. On the shortcut menu, tap or click All Tasks, and then tap or click Redeploy Application.
5. When prompted to confirm the action, tap or click Yes. The application is then redeployed to all users and computers as appropriate for the GPO with which you are working.
When an application uses an Installer package that is not Windows-based, you can update a deployed application or apply a service pack by following these steps:
1. In the GPMC, press and hold or right-click the GPO you want to use for the deployment, and then tap or click Edit.
2. In the policy editor, access Computer Configuration\Policies\Software Settings \Software Installation or User Configuration\Policies\Software Settings \Software Installation as appropriate for the type of software deployment.
3. Press and hold or right-click the package. On the shortcut menu, tap or click All Tasks, and then tap or click Remove. Tap or click OK to accept the default option of immediate removal.
4. Copy the new .zap file and all related files to a network share, and redeploy the application.
Upgrading deployed software
You can upgrade a previously deployed application to a new version by following these steps:
1. Obtain a Windows Installer file for the new software version, and copy it along with all required files to a network share. Alternatively, you can perform an administrative installation to the network share.
2. In the GPMC, press and hold or right-click the GPO you want to use for the deployment, and then tap or click Edit.
3. In the policy editor, access Computer Configuration\Policies\Software Settings \Software Installation or User Configuration\Policies\Software Settings \Software Installation as appropriate for the type of software deployment.
4. Press and hold or right-click Software Installation. On the shortcut menu, tap or click New, and then tap or click Package. Create an assigned or published application by using the Windows Installer file for the new software version.
5. Press and hold or right-click the upgrade package, and then tap or click Properties. On the Upgrades tab, tap or click Add. In the Add Upgrade Package dialog box, do one of the following:
o If the original application and the upgrade are in the current GPO, select Current Group Policy Object, and then select the previously deployed application in the Package To Upgrade list.
o If the original application and the upgrade are in different GPOs, select A Specific GPO, tap or click Browse, and then select the GPO from the Browse For A Group Policy Object dialog box. Select the previously deployed application in the Package To Upgrade list.
6. Choose an upgrade option. If you want to replace the application with the new version, select Uninstall The Existing Package, Then Install The Upgrade Package. If you want to perform an in-place upgrade over the existing installation, select Package Can Upgrade Over The Existing Package.
7. Tap or click OK to close the Add Upgrade Package dialog box. If you want to make this a required upgrade, select the Required Upgrade For Existing Packages check box, and then tap or click OK to close the upgrade package’s Properties dialog box.
Automatically configuring Work Folders
Computers that are members of a workplace can access internal network resources, such as internal websites and business applications. Work Folders enable users to synchronize their corporate data to their devices and vice versa. Those devices can be joined to the corporate domain or a workplace. Devices access Work Folders via a remote web gateway running on Microsoft Internet Information Services (IIS).
To deploy Work Folders, you add the File And Storage Services \ Work Folders role to a file server, and then configure Work Folders by using Server Manager. Afterward, you can use policy settings to control related options, such as the server to which users can connect remotely and access Work Folders. You control the connection server in one of two ways:
§ By specifying the exact URL of a file server hosting the Work Folders for the user, such as https://server29.cpandl.com
§ By specifying the URL used within your organization for Work Folders discovery, such as https://workfolders.cpandl.com
REAL WORLD
Clients use secure encrypted communications to connect to work folders as long as the file servers hosting the Work Folders have valid SSL certificates. When a device initiates an SSL connection, the server sends the certificate to the client. The client evaluates the certificate and continues only if the certificate is valid and can be trusted. If you configure a connection to an exact URL, the client can connect directly to the specified sever and synchronize data in Work Folders. The server’s certificate must have a Common Name (CN) or a Subject Alternative Name (SAN) that matches the host header in the request. For example, if the client makes a request to https://server18.cpandl.com, the CN or SAN must be server18.cpandl.com.
In Group Policy, you specify the URL used within your organization for Work Folders discovery by using the Specify Work Folders Settings policy found under Administrative Templates policies for User Configuration\Windows Components \Work Folders. Any server configured with Work Folders acts as a discovery server by default. If you configure a discovery URL, a client connects to one of several servers, and the email address of the user is used to discover which specific server hosts the Work Folders for the client. The client is then connected to this server. Each discovery server will need to have a certificate with multiple Subject Alternative Names, which includes the server name and the discovery name. For example, if a client makes a request to https://workfolders.cpandl.com and connects to FileServer11.cpandl.com, the server’s certificate must have a CN or SAN of fileserver11.cpandl.com and a SAN of workfolders.cpandl.com.
If you want to configure Work Folders in Group Policy, use the following technique:
1. Access Group Policy for the system, site, domain, or OU with which you want to work. Next, access the Work Folders node by using the Administrative Templates policies for User Configuration under Windows Components \Work Folders.
2. Double-tap or double-click Specify Work Folders Settings, and then select Enabled.
3. In the World Folders URL text box, enter the URL of the file server that hosts the Work Folders for the user or the URL used within your organization for Work Folders discovery.
4. If you want to prevent users from changing settings when setting up Work Folders, select Force Automatic Setup.
5. Tap or click OK.
Automatically enrolling computer and user certificates
A server designated as a certificate authority (CA) is responsible for issuing digital certificates and managing certificate revocation lists (CRLs). Servers running Windows Server can be configured as certificate authorities by installing Active Directory Certificate Services. Computers and users can use certificates for authentication and encryption.
In an enterprise configuration, enterprise CAs are used for automatic enrollment. This means authorized users and computers can request a certificate, and the certificate authority can automatically process the certificate request so that the users and computers can immediately install the certificate.
Group Policy controls the way automatic enrollment works. When you install enterprise CAs, automatic enrollment policies for users and computers are enabled automatically. The policy for computer certificate enrollment is Certificate Services Client—Auto-Enrollment Settings under Computer Configuration\Policies\Windows Settings\Security Settings\Public Key Policies. The policy for user certificate enrollment is Certificate Services Client—Auto-Enrollment under User Configuration\Policies\Windows Settings\Security Settings\Public Key Policies.
You can configure automatic enrollment by following these steps:
1. In the GPMC, press and hold or right-click the GPO with which you want to work, and then tap or click Edit.
2. In the policy editor, access User Configuration\Policies\Windows Settings \Security Settings\Public Key Policies or Computer Configuration\Policies \Windows Settings\Security Settings\Public Key Policies as appropriate for the type of policy you want to review.
3. Double-tap or double-click Certificate Services Client—Auto-Enrollment. To disable automatic enrollment, select Disabled from the Configuration Model list, tap or click OK, and then skip the remaining steps in this procedure. To enable automatic enrollment, select Enabled from the Configuration Model list.
4. To automatically renew expired certificates, update pending certificates, and remove revoked certificates, select the related check box.
5. To ensure that the latest version of certificate templates are requested and used, select the Update Certificates That Use Certificate Templates check box.
6. To notify users when a certificate is about to expire, specify when notifications are sent using the box provided. By default, notifications are sent when 10 percent of the certificate lifetime remains.
7. Tap or click OK to save your settings.
Managing Automatic Updates in Group Policy
Automatic Updates help you keep the operating system up to date. Although you can configure Automatic Updates on a per-computer basis, you’ll typically want to configure this feature for all users and computers that process a GPO—this is a much more efficient management technique.
Note that by default, Windows 8.1 and Windows Server 2012 R2 use Windows Update to download Windows Components in addition to binaries for roles, role services, and features. If the Windows diagnostics framework detects that a Windows component needs to be repaired, Windows uses Windows Update to download the component. If an administrator is trying to install a role, role service, or feature and the payload is missing, Windows uses Windows Update to download the related binaries.
Configuring Automatic Updates
When you manage Automatic Updates through Group Policy, you can set the update configuration to any of the following options:
§ Auto Download And Schedule The Install. Updates are automatically downloaded and installed according to a schedule you specify. When updates have been downloaded, the operating system notifies the user so that she can review the updates that are scheduled to be installed. The user can install the updates at that time or wait for the scheduled installation time.
§ Auto Download And Notify For Install. The operating system retrieves all updates as they become available, and then prompts the user when they’re ready to be installed. The user can then accept or reject the updates. Accepted updates are installed. Rejected updates aren’t installed but remain on the system, where they can be installed at a later date.
§ Notify For Download And Notify For Install. The operating system notifies the user before retrieving any updates. If a user elects to download the updates, the user still has the opportunity to accept or reject them. Accepted updates are installed. Rejected updates aren’t installed but remain on the system, where they can be installed at a later date.
§ Allow Local Admin To Choose Setting. Allows the local administrator to configure Automatic Updates on a per-computer basis. Note that if you use any other setting, local users and administrators are unable to change settings for Automatic Updates.
You can configure Automatic Updates in Group Policy by following these steps:
1. In the GPMC, press and hold or right-click the GPO with which you want to work, and then tap or click Edit.
2. In the policy editor, access Computer Configuration\Policies\Administrative Templates\Windows Components\Windows Update.
3. Double-tap or double-click Configure Automatic Updates. In the Properties dialog box, you can now enable or disable Group Policy management of Automatic Updates. To enable management of Automatic Updates, select Enabled. To disable management of Automatic Updates, select Disabled, tap or click OK, and then skip the remaining steps.
4. Choose an update configuration from the options in the Configure Automatic Updating list. On Windows 8 and later as well as Windows Server 2012 and later, updates can be automatically installed during the scheduled maintenance window by selecting the Install During Automatic Maintenance check box.
5. If you select Auto Download And Schedule The Install, you can schedule the installation day and time by using the lists provided. Tap or click OK to save your settings.
By default, Windows Update runs daily at 2:00 A.M. as part of other automatic maintenance. With desktop operating systems running Windows 8 or later, Windows Update uses the computer’s power management features to wake the computer from hibernation or sleep at the scheduled update time, and then install updates. Generally, this wake-up-and-install process will occur whether the computer is on battery or AC power.
If a restart is required to finalize updates applied as part of automatic maintenance and there is an active user session, Windows caches the credentials of the user currently logged on to the console, and then restarts the computer automatically. After the restart, Windows uses the cached credentials to sign in as this user. Next, Windows restarts applications that were running previously, and then locks the session using the Secure Desktop. If BitLocker is enabled, the entire process is protected by BitLocker encryption as well.
The maintenance process does not need a user to be logged on. The maintenance process runs whether a user is logged on or not. If no user is logged on when scheduled maintenance begins and a restart is required, Windows restarts the computer without caching credentials or storing information about running applications. When Windows restarts, Windows does not log on as any user.
Because Windows automatically wakes computers to perform automatic maintenance and updates, you’ll also want to carefully consider the power options that are applied. Unless a power plan is configured to turn off the display and put the computer to sleep, the computer may remain powered on for many hours after automatic maintenance and updates.
Optimizing Automatic Updates
Generally, most automatic updates are installed only when a computer is shut down and restarted. Some automatic updates can be installed immediately without interrupting system services or requiring system restart. To ensure that some updates can be installed immediately, follow these steps:
1. In the GPMC, press and hold or right-click the GPO with which you want to work, and then tap or click Edit.
2. In the policy editor, access Computer Configuration\Policies\Administrative Templates\Windows Components\Windows Update.
3. Double-tap or double-click Allow Automatic Updates Immediate Installation. In the Properties dialog box, select Enabled, and then tap or click OK.
By default, only users with local administrator privileges receive notifications about updates. You can enable any user logged on to a computer to receive update notifications by following these steps:
1. In the GPMC, press and hold or right-click the GPO with which you want to work, and then tap or click Edit.
2. In the policy editor, access Computer Configuration\Policies\Administrative Templates\Windows Components\Windows Update.
3. Double-tap or double-click Allow Non-Administrators To Receive Update Notifications. In the Properties dialog box, select Enabled, and then tap or click OK.
Another useful policy is Remove Access To Use All Windows Update Features. This policy prohibits access to all Windows Update features. If enabled, all Automatic Updates features are removed and can’t be configured. This includes the Automatic Updates tab in the System utility and driver updates from the Windows Update website in Device Manager. This policy is located in User Configuration \Policies\Administrative Templates\Windows Components\Windows Update.
Using intranet update service locations
On networks with hundreds or thousands of computers, the Automatic Updates process can use a considerable amount of network bandwidth, and having all the computers check for updates and install them over the Internet doesn’t make sense. Instead, consider using the Specify Intranet Microsoft Update Service Location policy, which tells individual computers to check a designated internal server for updates.
The designated update server must run Windows Server Update Services (WSUS), be configured as a web server running IIS, and be able to handle the additional workload, which might be considerable on a large network during peak usage times. Additionally, the update server must have access to the external network on port 80. The use of a firewall or proxy server on this port shouldn’t present any problems.
The update process also tracks configuration information and statistics for each computer. This information is necessary for the update process to work properly, and it can be stored on a separate statistics server (an internal server running IIS) or on the update server itself.
To specify an internal update server, follow these steps:
1. After you install and configure an update server, open the GPO with which you want to work for editing. In the policy editor, access Computer Configuration\Policies\Administrative Templates\Windows Components\Windows Update.
2. Double-tap or double-click Specify Intranet Microsoft Update Service Location. In the Properties dialog box, select Enabled.
3. In the Set The Intranet Update Service For Detecting Updates text box, enter the URL of the update server. In most cases, this is http://servername, such as http://CorpUpdateServer01.
4. Enter the URL of the statistics server in the Set The Intranet Statistics Server text box. This doesn’t have to be a separate server; you can specify the update server in this text box.
NOTE
If you want a single server to handle both updates and statistics, enter the same URL in both boxes. Otherwise, if you want a different server for updates and statistics, enter the URL for each server in the appropriate box.
5. Tap or click OK. After the applicable GPO is refreshed, systems running appropriate versions of Windows will look to the update server for updates. You’ll want to monitor the update and statistics servers closely for several days or weeks to ensure that everything is working properly. Directories and files will be created on the update and statistics servers.
All materials on the site are licensed Creative Commons Attribution-Sharealike 3.0 Unported CC BY-SA 3.0 & GNU Free Documentation License (GFDL)
If you are the copyright holder of any material contained on our site and intend to remove it, please contact our site administrator for approval.
© 2016-2026 All site design rights belong to S.Y.A.