Windows Server 2012 R2 Pocket Consultant: Storage, Security, & Networking (2014)
Chapter 7. Managing TCP/IP networking
§ Navigating networking in Windows Server 2012 R2
§ Managing networking in Windows 8.1 and Windows Server 2012 R2
§ Installing TCP/IP networking
§ Configuring TCP/IP networking
§ Managing network connections
As an administrator, you enable networked computers to communicate by using the basic networking protocols built into Windows Server 2012 R2. The key protocol you use is TCP/IP, which is a suite of protocols and services used for communicating over a network and is the primary protocol used for internetwork communications. Compared to configuring other networking protocols, configuring TCP/IP communications is fairly complicated, but TCP/IP is the most versatile protocol available.
NOTE
Group Policy settings can affect your ability to install and manage TCP/IP networking. The key policies you should examine are in User Configuration \Administrative Templates\Network\Network Connections and Computer Configuration\Administrative Templates\System\Group Policy. Group Policy is discussed in Chapter 6.
Navigating networking in Windows Server 2012 R2
Windows Server 2012 R2 has an extensive set of networking tools:
§ Network Explorer. Provides a central console for browsing computers and devices on the network
§ Network And Sharing Center. Provides a central console for viewing and managing a computer’s networking and sharing configuration
§ Network Diagnostics. Provides automated diagnostics to help diagnose and resolve networking problems
Before I describe how these networking tools are used, let’s first look at the following Windows Server 2012 R2 features on which these tools rely:
§ Network Discovery. Controls the ability to view other computers and devices
§ Network Awareness. Reports changes in network connectivity and configuration
REAL WORLD
Computers running Windows Vista with SP1 or later, in addition to later releases of Windows, support extensions to network awareness. These extensions enable a computer connected to one or more networks via two or more interfaces (regardless of whether they are wired or wireless) to select the route with the best performance for a particular data transfer. As part of selecting the best route, Windows chooses the best interface (either wired or wireless) for the transfer. This mechanism improves the selection of wireless over wired networks when both interfaces are present.
Network discovery settings for the computer with which you are working determine the computers and devices you can browse or view in Windows Server 2012 R2 networking tools. Discovery settings work in conjunction with a computer’s Windows Firewall settings to block or allow the following:
§ Discovery of network computers and devices
§ Discovery of your computer by others
Network discovery settings are meant to provide the appropriate level of security for each of the various categories of networks to which a computer can connect. The three categories of networks are defined as follows:
§ Domain network. Designates a network in which computers are connected to the corporate domain to which they are joined
§ Private network. Designates a network in which computers are configured as members of a homegroup or workgroup and are not connected directly to the public Internet
§ Public network. Designates a network in a public place, such as a coffee shop or an airport, rather than an internal network
Because a computer saves settings separately for each category of network, different block and allow settings can be used for each network category. When you connect a computer’s network adapter to a network for the first time, Windows sets the network category based on the configuration of the computer. Based on the network category, Windows Server 2012 R2 automatically configures settings that turn discovery on or off. The On (Enabled) state means
§ The computer can discover other computers and devices on the network.
§ Other computers on the network can discover the computer.
The Off (Disabled) state means
§ The computer cannot discover other computers and devices on the network.
§ Other computers on the network cannot discover the computer.
Typically, you will find that a network adapter is set as public before you join a computer to the domain. Network Explorer, shown in Figure 7-1, displays a list of discovered computers and devices on the network. To access Network Explorer, tap or click File Explorer on the Start screen. In File Explorer, tap or click the location path selection button, and then tap or click Network.
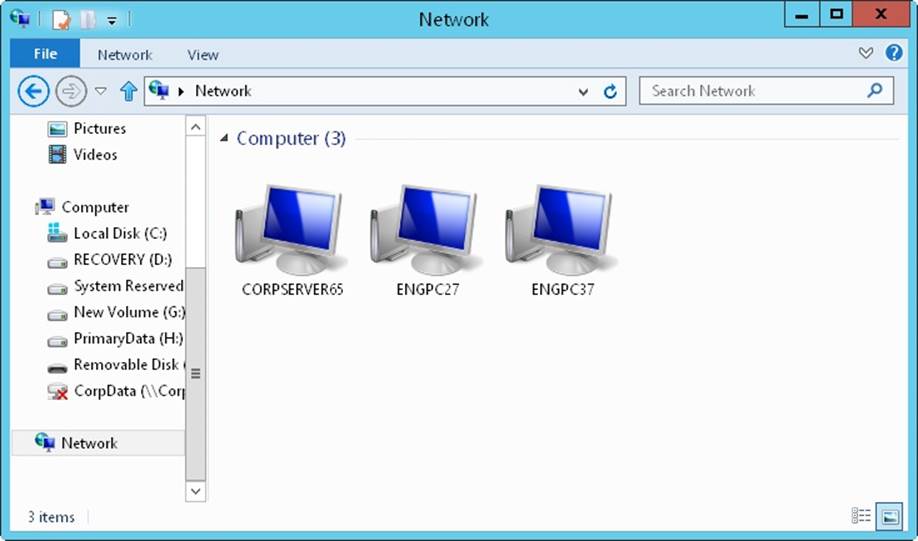
Figure 7-1. Use Network Explorer to browse network resources.
The computers and devices listed in Network Explorer depend on the network discovery settings of the computer, the operating system, and whether the computer is a member of a domain. If discovery is blocked and a server running Windows Server 2012 R2 is not a member of a domain, you’ll get a warning message about this. When you tap or click the warning message and then select Turn On Network Discovery And File Sharing, you enable network discovery, file sharing, and printer sharing. In addition, related Windows Firewall ports open.
Network And Sharing Center, shown in Figure 7-2, provides the current network status, in addition to an overview of the current network configuration. In Control Panel, you can access Network And Sharing Center by tapping or clicking View Network Status And Tasks under the Network And Internet heading.
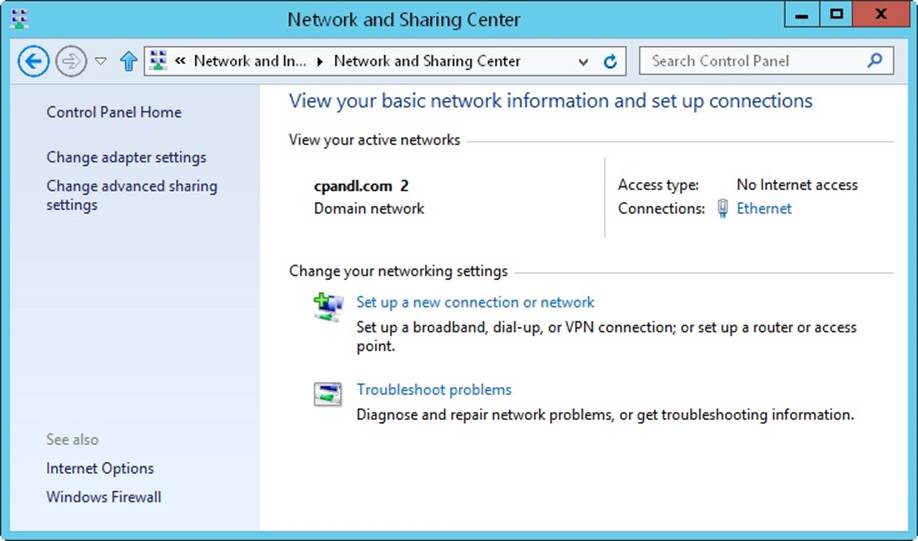
Figure 7-2. View and manage network settings with Network And Sharing Center.
Network And Sharing Center provides an overview of the network. The value below the network name shows the category of the current network as Domain Network, Private Network, or Public Network. The Access Type box specifies whether and how the computer is connected to its current network. Values for this option are No Network Access, No Internet Access, or Internet. If you tap or click the name of a network connection, you can display the related status dialog box.
Tapping or clicking Change Adapter Settings displays the Network Connections page, which you can use to manage network connections. Tapping or clicking Change Advanced Sharing Settings provides options for configuring the computer’s sharing and discovery settings for each network profile. To manage a profile, expand the profile’s view panel by tapping or clicking the Expand button (showing a down arrow), tap or click the setting with which you want to work, and then tap or click Save Changes. To turn on or off network discovery, tap or click Turn On Network Discovery or Turn Off Network Discovery as appropriate, and then tap or click Save Changes.
From Network And Sharing Center, you can attempt to diagnose a networking problem. To do this, tap or click Troubleshoot Problems, and then tap or click a troubleshooter to run, such as Incoming Connections or Network Adapter, and then follow the prompts. Windows Network Diagnostics then attempts to identify the network problem and provide a possible solution.
NOTE
To quickly access Network Connections without opening Network And Sharing Center, enter ncpa.cpl in the Everywhere search box. Alternatively, enter ncpa.cpl at a command prompt or a Windows PowerShell prompt.
Managing networking in Windows 8.1 and Windows Server 2012 R2
In Group Policy, you’ll find network management policies for both wired networks (IEEE 802.3) and wireless networks (IEEE 802.11) are located in the Administrative Templates for Computer Configuration under Windows Settings\Security Settings. Only one wired policy and one wireless policy can be created and applied at a time. This means you can establish both a wired policy and a wireless policy for computers running Windows Vista and later releases of Windows. You also can create a wireless policy for computers running Windows XP.
If you press and hold or right-click the Wired Network (IEEE 802.3) node, you can create a policy for Windows Vista and later releases that specifies whether the Wire AutoConfig service is used to configure and connect these clients to 802.3 wired Ethernet networks. For Windows 7 and later releases of Windows, you have options for preventing the sharing of user credentials and for specifying whether to prohibit computers from making autoconnection attempts to the network for a specified amount of time.
If you press and hold or right-click the Wireless Network (IEEE 802.11) node, you can create separate policies for Windows XP computers and computers running later releases that enable WLAN autoconfiguration, define the specific networks that can be used, and set network permissions. For Windows 7 and later releases of Windows, you have options for preventing the sharing of user credentials, for specifying whether to prohibit computers from making autoconnection attempts to the network for a specified amount of time, and for preventing the use of hosted networks.
Windows Vista SP1 or later and later releases of Windows support several wired and wireless enhancements. These enhancements enable users to change their password when connecting to a wired or wireless network (as opposed to using the Winlogon change password feature), to correct a wrong password entered during sign on, and to reset an expired password—all as part of the network logon process.
Network security enhancements include the following:
§ Secure Socket Tunneling Protocol (SSTP)
§ Secure Remote Access (SRA)
§ CryptoAPI Version 2 (CAPI2)
§ Online Certificate Status Protocol (OCSP) extensions
§ Port preservation for Teredo
§ Remote Desktop Protocol (RDP) file signing
Secure Socket Tunneling Protocol allows data transmission at the data link layer over an HTTPS connection. Secure Remote Access enables secure access to remote networks over HTTPS. Together these technologies enable users to securely access a private network by using an Internet connection. Secure Socket Tunneling Protocol and Secure Remote Access represent improvements over the Point-to-Point Tunneling Protocol (PPTP) and Layer Two Tunneling Protocol/Internet Protocol Security (L2TP/IPsec) protocols because they use the standard TCP/IP ports for secure web traffic, and this allows them to traverse most firewalls in addition to Network Address Translation (NAT) and web proxies.
Secure Socket Tunneling Protocol uses HTTP over Secure Sockets Layer (SSL), which is also known as Transport Layer Security (TLS). HTTP over SSL (which uses TCP port 443) is commonly used for protected communications with websites. Whenever users connect to a web address that begins with https://, they are using HTTP over SSL. Using HTTP over SSL solves many of the virtual private network (VPN) protocol connectivity problems. Because SSTP supports both IPv4 and IPv6, users can establish secure tunnels using either IP technology. Essentially, you get VPN technology that works everywhere, which should mean that you receive far fewer support calls.
CAPI2 extends support for public key infrastructure (PKI) and X.509 certificates and implements additional functionality for certificate path validation, certificate stores, and signature verification. One of the steps during certificate path validation is revocation checking, which involves verifying the certificate status to ensure that it has not been revoked by its issuer; this is where Online Certificate Status Protocol comes into the picture.
OCSP is used to check the revocation status of certificates. CAPI2 also supports independent OCSP signer chains and specifying additional OCSP download locations on a per-issuer basis. Independent OCSP signer chains modify the original OCSP implementation so that it can work with OCSP responses that are signed by trusted OCSP signers that are separate from the issuer of the certificate being validated. Additional OCSP download locations make it possible to specify OCSP download locations for issuing CA certificates as URLs that are added as a property to the CA certificate.
To ensure IPv4/IPv6 coexistence, Windows enables applications to use IPv6 on an IPv4 network, and it also supports related technologies such as port preservation for Teredo, which is a User Datagram Protocol (UDP)–based tunneling technology that can traverse NATs. This feature enables Teredo communications between “port preserving” symmetric NATs and other types of NATs. A NAT is port preserving if it chooses to use the same external port number as the internal port number.
Current releases of Windows Server support TCP Chimney offloading. This feature enables the networking subsystem to offload the processing of a TCP/IP connection from a server’s processors to its network adapters, as long as the network adapters support TCP/IP offload processing. Both TCP/IPv4 connections and TCP/IPv6 connections can be offloaded. By default, TCP connections are offloaded on 10–gigabits per second (Gbps) network adapters but are not offloaded on 1-Gbps network adapters. To modify the related settings, you can use Netsh.
Network Diagnostic Framework (NDF) simplifies network troubleshooting by automating many common troubleshooting steps and solutions. When you run Windows Network Diagnostics, each diagnostic session generates a report with diagnostics results, and you can view this information in Action Center by tapping or clicking the Troubleshooting link, and then tapping or clicking View History. On the Troubleshooting History page, each diagnostic session is listed by type and date run. To get detailed information, select the session you want to review, and then tap or click View Details.
The diagnostic information shown in Action Center comes from an Event Trace Log (ETL) file created as part of diagnostics. If you press and hold or right-click a diagnostic session and then select Open File Location, you can view the files generated as part of diagnostics for the selected diagnostic session.
You can use the Netsh Trace context to perform comprehensive tracing in addition to network packet capturing and filtering. You perform traces by using predefined or custom scenarios and providers. Tracing scenarios are collections of providers. Providers are the actual components in the network protocol stack that you want to work with, such as TCP/IP, Windows Filtering Platform and Firewall, Wireless LAN Services, Winsock, or NDIS. Typically, you use Network Monitor (Netmon) to analyze trace data. If you collect trace data on a computer where Netmon isn’t installed, you can just copy the trace file to a computer where Netmon is installed so that you can analyze the data.
Windows Vista with SP1 or later and later releases of Windows use an RDP 6.1 or later compatible client. Here, RDP files can be digitally signed to prevent users from opening or running potentially dangerous RDP files from unknown sources. Administrators can sign RDP files by using a signing tool provided by Microsoft. Three related settings can be configured through Group Policy or through the registry. These settings include a comma-separated list of certificate hashes that are trusted by the administrator (known as the trusted publishers list), an option to enable users to decide to accept untrusted publishers (enabled by default), and an option to enable users to accept unsigned files (enabled by default).
Windows 8.1 and Windows Server 2012 R2 have a number of enhancements in their built-in DNS clients that improve name resolution on IPv4 and IPv6 networks. With adaptive query timeout, the DNS client adapts the timeout interval based on the time required for previous queries. Thus, instead of waiting 1000 milliseconds (ms) before timing out a query, the timeout is adjusted based on past performance for the network, resulting in timeouts between 25 ms and 1000 ms.
The DNS client for Windows 8.1 and Windows Server 2012 R2 also supports query coalescing, parallel queries, and persistent caching. With query coalescing, the DNS client combines multiple DNS queries for the same name. This results in only one query and optimizes performance. With parallel queries, the DNS client issues IPv4 and IPv6 queries for A and AAAA records in parallel when both IP interfaces are enabled, which streamlines the query process and improves performance. Link-local multicast name resolution (LLMNR) and NETBIOS queries are also issued in parallel for IPv4 and IPv6. With a persistent cache, the DNS client maintains the DNS cache across changes that occur on the same network. For example, the DNS client now persists the cache after address change notifications and when the computer is resuming from the sleep or standby state.
Installing TCP/IP networking
To install networking on a computer, you must install TCP/IP networking and a network adapter. Windows Server 2012 R2 uses TCP/IP as the default wide area network (WAN) protocol. Typically, you install networking during Windows Server 2012 R2 setup. You can also install TCP/IP networking through network connection properties.
To install TCP/IP after installing Windows Server 2012 R2, log on to the computer by using an account with administrator privileges, and then follow these steps:
1. In Control Panel, access Network And Sharing Center by tapping or clicking View Network Status And Tasks under the Network And Internet heading.
2. In Network And Sharing Center, tap or click Change Adapter Settings.
3. In Network Connections, press and hold or right-click the connection with which you want to work, and then tap or click Properties. This displays a Properties dialog box for the connection, shown in Figure 7-3.
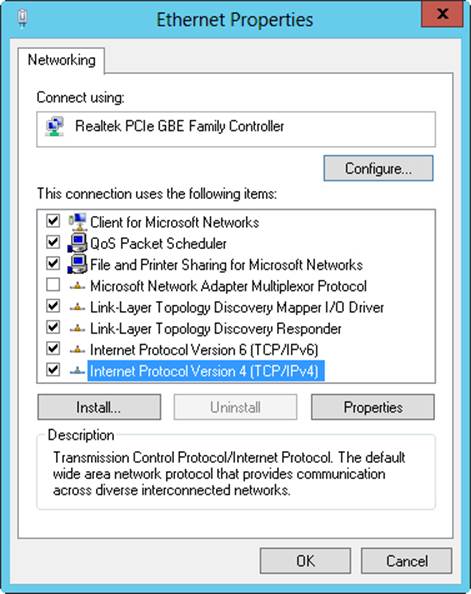
Figure 7-3. Install and configure TCP/IP protocols.
4. If Internet Protocol Version 6 (TCP/IPv6), Internet Protocol Version 4 (TCP/IPv4), or both aren’t shown in the list of installed components, you need to install them. Tap or click Install. Tap or click Protocol, and then tap or click Add. In the Select Network Protocol dialog box, select the protocol to install, and then tap or click OK. If you are installing both TCP/IPv6 and TCP/IPv4, repeat this procedure for each protocol.
5. In the Properties dialog box for the network connection, be sure that Internet Protocol Version 6 (TCP/IPv6), Internet Protocol Version 4 (TCP/IPv4), or both are selected, and then tap or click OK.
6. As necessary, follow the instructions in the next section for configuring network connections for the computer.
Configuring TCP/IP networking
A network connection is created automatically if a computer has a network adapter and is connected to a network. If a computer has multiple network adapters and is connected to a network, one network connection is created for each adapter. If no network connection is available, you should connect the computer to the network or create a different type of connection.
Computers use IP addresses to communicate over TCP/IP. Windows Server 2012 R2 provides the following ways to configure IP addresses:
§ Manually. IP addresses that are assigned manually are called static IP addresses. Static IP addresses are fixed and don’t change unless you change them. You usually assign static IP addresses to Windows servers, and when you do this, you need to configure additional information to help the server navigate the network.
§ Dynamically. A DHCP server (if one is installed on the network) assigns dynamic IP addresses at startup, and the addresses might change over time. Dynamic IP addressing is the default configuration.
§ Alternate addresses (IPv4 only). When a computer is configured to use DHCPv4 and no DHCPv4 server is available, Windows Server 2012 R2 assigns an alternate private IP address automatically. By default, the alternate IPv4 address is in the range 169.254.0.1 to 169.254.255.254 with a subnet mask of 255.255.0.0. You can also specify a user-configured alternate IPv4 address, which is particularly useful for laptop users.
Configuring static IP addresses
When you assign a static IP address, you need to tell the computer the IP address you want to use, the subnet mask for this IP address, and, if necessary, the default gateway to use for internetwork communications. An IP address is a numeric identifier for a computer. IP addressing schemes vary according to how your network is configured, but they’re typically assigned based on a particular network segment.
IPv6 addresses and IPv4 addresses are very different. With IPv6, the first 64 bits represent the network ID and the remaining 64 bits represent the network interface. With IPv4, a variable number of the initial bits represent the network ID and the rest of the bits represent the host ID. For example, if you’re working with IPv4 and a computer on the network segment 10.0.10.0 with a subnet mask of 255.255.255.0, the first three octets (8-bit groups) represent the network ID, and the address range you have available for computer hosts is 10.0.10.1 to 10.0.10.254. In this range, the address 10.0.10.255 is reserved for network broadcasts.
If you’re on a private network that is indirectly connected to the Internet, you should use private IPv4 addresses. Table 7-1 summarizes private network IPv4 addresses.
Table 7-1. Private IPv4 network addressing
|
Private Network ID |
Subnet Mask |
Network Address Range |
|
10.0.0.0 |
255.0.0.0 |
10.0.0.0–10.255.255.255 |
|
172.16.0.0 |
255.240.0.0 |
172.16.0.0–172.31.255.255 |
|
192.168.0.0 |
255.255.0.0 |
192.168.0.0–192.168.255.255 |
All other IPv4 network addresses are public and must be leased or purchased. If the network is connected directly to the Internet and you’ve obtained a range of IPv4 addresses from your Internet service provider, you can use the IPv4 addresses you’ve been assigned.
Using the ping command to check an address
Before you assign a static IP address, you should make sure that the address isn’t already in use or reserved for use with DHCP. With the ping command, you can check whether an address is in use. Open a command prompt and enter ping, followed by the IP address you want to check.
To test the IPv4 address 10.0.10.12, you would use the following command:
ping 10.0.10.12
To test the IPv6 address FEC0::02BC:FF:BECB:FE4F:961D, you would use the following command:
ping FEC0::02BC:FF:BECB:FE4F:961D
If you receive a successful reply from the ping test, the IP address is in use and you should try another one. If the request times out for all four ping attempts, the IP address isn’t active on the network at this time and probably isn’t in use; however, a firewall could be blocking your ping request. Your company’s network administrator would also be able to confirm whether an IP address is in use.
Configuring a static IPv4 or IPv6 address
One LAN connection is available for each network adapter installed. These connections are created automatically. To configure static IP addresses for a particular connection, follow these steps:
1. In Network And Sharing Center, tap or click Change Adapter Settings. In Network Connections, press and hold or right-click the connection with which you want to work, and then tap or click Properties.
2. Double-tap or double-click Internet Protocol Version 6 (TCP/IPv6) or Internet Protocol Version 4 (TCP/IPv4) as appropriate for the type of IP address you are configuring.
3. For an IPv6 address, do the following:
o Tap or click Use The Following IPv6 Address, and then enter the IPv6 address in the IPv6 Address text box. The IPv6 address you assign to the computer must not be in use anywhere else on the network.
o The Subnet Prefix Length option ensures that the computer communicates over the network properly. Windows Server 2012 R2 should insert a default value for the subnet prefix into the Subnet Prefix Length text box. If the network doesn’t use variable-length subnetting, the default value should suffice, but if it does use variable-length subnets, you need to change this value as appropriate for your network.
4. For an IPv4 address, do the following:
o Tap or click Use The Following IP Address, and then enter the IPv4 address in the IP Address text box. The IPv4 address you assign to the computer must not be in use anywhere else on the network.
o The Subnet Mask option ensures that the computer communicates over the network properly. Windows Server 2012 R2 should insert a default value for the subnet mask into the Subnet Mask text box. If the network doesn’t use variable-length subnetting, the default value should suffice, but if it does use variable-length subnets, you need to change this value as appropriate for your network.
5. If the computer needs to access other TCP/IP networks, the Internet, or other subnets, you must specify a default gateway. Enter the IP address of the network’s default router in the Default Gateway text box.
6. Domain Name System (DNS) is needed for domain name resolution. Enter a preferred address and an alternate DNS server address in the text boxes provided.
7. When you have finished, tap or click OK twice. Repeat this process for other network adapters and IP protocols you want to configure.
8. With IPv4 addressing, configure WINS as necessary.
Configuring dynamic IP addresses and alternate IP addressing
Although most servers have static IP addresses, you can configure servers to use dynamic addressing, alternate IP addressing, or both. You configure dynamic and alternate addressing by following these steps:
1. In Network And Sharing Center, tap or click Change Adapter Settings. In Network Connections, one LAN connection is shown for each network adapter installed. These connections are created automatically. If you don’t find a LAN connection for an installed adapter, check the driver for the adapter. It might be installed incorrectly. Press and hold or right-click the connection with which you want to work, and then tap or click Properties.
2. Double-tap or double-click Internet Protocol Version 6 (TCP/IPv6) or Internet Protocol Version 4 (TCP/IPv4) as appropriate for the type of IP address you are configuring.
3. Select Obtain An IPv6 Address Automatically or Obtain An IP Address Automatically as appropriate for the type of IP address you are configuring. You can select Obtain DNS Server Address Automatically, or you can select Use The Following DNS Server Addresses, and then enter a preferred and alternate DNS server address in the text boxes provided.
4. When you use dynamic IPv4 addressing, you can configure an automatic alternate address or manually configure the alternate address. To use an automatic configuration, on the Alternate Configuration tab, select Automatic Private IP Address. Tap or click OK, tap or click Close, and then skip the remaining step.
5. To use a manual configuration, on the Alternate Configuration tab, select User Configured, and then enter the IP address you want to use in the IP Address text box. The IP address you assign to the computer should be a private IP address, as shown earlier in Table 7-1, and it must not be in use anywhere else when the settings are applied. Complete the alternate configuration by entering a subnet mask, default gateway, DNS server, and Windows Internet Name Service (WINS) settings. When you have finished, tap or click OK, and then tap or click Close.
Configuring multiple gateways
To provide fault tolerance in case of a router outage, you can choose to configure Windows Server 2012 R2 computers so that they use multiple default gateways. When you assign multiple gateways, Windows Server 2012 R2 uses the gateway metric to determine which gateway is used and at what time. The gateway metric indicates the routing cost of using a gateway. The gateway with the lowest routing cost, or metric, is used first. If the computer can’t communicate with this gateway, Windows Server 2012 R2 tries to use the gateway with the next lowest metric.
The best way to configure multiple gateways depends on the configuration of your network. If your organization’s computers use DHCP, you probably want to configure the additional gateways through settings on the DHCP server. If computers use static IP addresses or you want to set gateways specifically, assign them by following these steps:
1. In Network And Sharing Center, tap or click Change Adapter Settings. In Network Connections, press and hold or right-click the connection with which you want to work, and then tap or click Properties.
2. Double-tap or double-click Internet Protocol Version 6 (TCP/IPv6) or Internet Protocol Version 4 (TCP/IPv4) as appropriate for the type of IP address you are configuring.
3. Tap or click Advanced to open the Advanced TCP/IP Settings dialog box, shown in Figure 7-4.
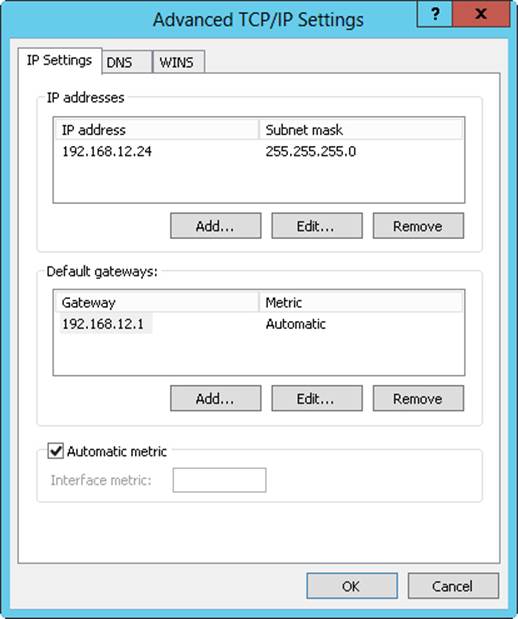
Figure 7-4. Configure multiple IP addresses and gateways in the Advanced TCP/IP Settings dialog box.
4. The Default Gateways panel shows the current gateways that have been manually configured (if any). You can enter additional default gateways as necessary.
a. Tap or click Add, and then enter the gateway address in the Gateway text box.
b. By default, Windows Server 2012 R2 automatically assigns a metric to the gateway. You can also assign the metric yourself. To do this, clear the Automatic Metric check box, enter a metric in the text box provided, and then tap or click Add.
c. Repeat steps a through b for each gateway you want to add.
5. Tap or click OK, and then tap or click Close.
Configuring networking for Hyper-V
After you install Hyper-V and create an external virtual network, your server uses a virtual network adapter to connect to the physical network. When you work with the Network Connections page, you will find the original network adapter and a new virtual network adapter. The original network adapter will have nothing bound to it except the Microsoft Virtual Network Switch Protocol, and the virtual network adapter will have all the standard protocols and services bound to it. The virtual network adapter that appears under Network Connections will have the same name as the virtual network switch with which it is associated.
NOTE
As part of the Hyper-V configuration, you can create an internal virtual network, which enables communications only between the server and hosted virtual machines. This configuration exposes a virtual network adapter to the parent server without the need to have a physical network adapter associated with it and isolates the virtual machine from the Internet and the rest of the LAN. Hyper-V binds the virtual network service to a physical network adapter only when an external virtual network is created. An external virtual network is required for communications on the LAN and the Internet.
Following this, when you install Hyper-V on a server and enable external virtual networking, you’ll find that virtual network switching is being used. As shown in Figure 7-5, the server has a network connection with the Hyper-V Extensible Virtual Switch protocol enabled and all other networking components not enabled in the dialog box on the left and an entry for a virtual connection with the key networking components enabled and the Hyper-V Extensible Virtual Switch Protocol disabled in the dialog box on the right. This is the configuration you want to use to ensure proper communications for the server and any hosted virtual machines that use networking. If this configuration is changed, virtual machines won’t be able to connect to the external network.
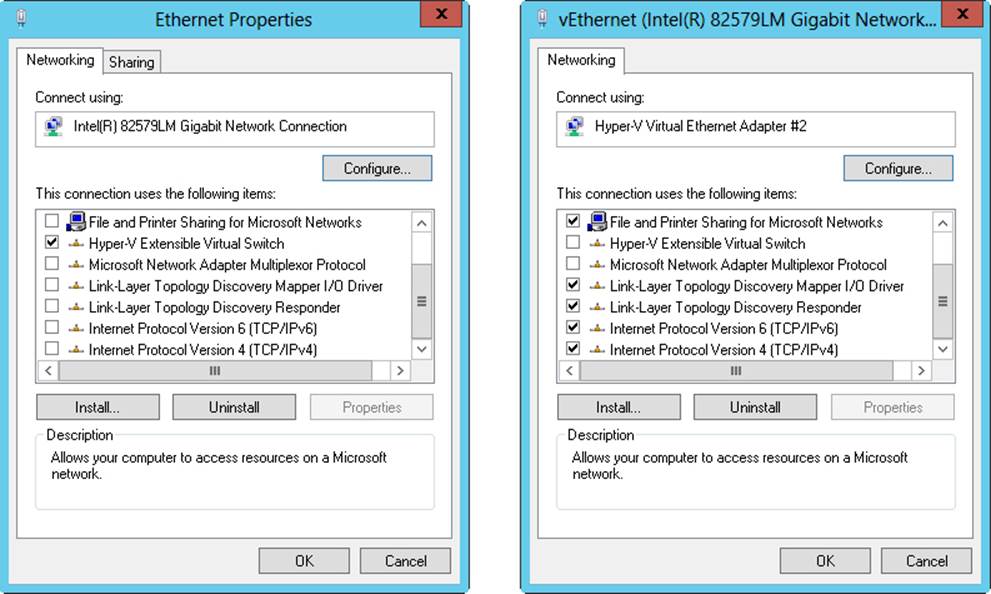
Figure 7-5. Use switched virtual networking to ensure communications with hosted virtual machines.
Managing network connections
Network connections make it possible for computers to access resources on the network and the Internet. One network connection is created automatically for each network adapter installed on a computer. This section examines techniques you can use to manage these connections.
Checking the status, speed, and activity for network connections
To check the status of a network connection, follow these steps:
1. In Network And Sharing Center, tap or click Change Adapter Settings. In Network Connections, press and hold or right-click the connection with which you want to work, and then tap or click Status to display the Status dialog box for the network connection.
2. If the connection is disabled or the media is unplugged, you won’t be able to access the Status dialog box. Enable the connection or connect the network cable to resolve the problem, and then try to display the Status dialog box again.
Enabling and disabling network connections
Network connections are created and connected automatically. If you want to disable a connection so that it cannot be used, follow these steps:
1. In Network And Sharing Center, tap or click Change Adapter Settings. In Network Connections, press and hold or right-click the connection, and then tap or click Disable to deactivate the connection and disable it.
2. If you want to enable the connection later, press and hold or right-click the connection in Network Connections, and then tap or click Enable.
If you want to disconnect from a network, follow these steps:
1. In Network And Sharing Center, tap or click Change Adapter Settings. In Network Connections, press and hold or right-click the connection and then tap or click Disconnect. Typically, only remote access connections have a Disconnect option.
2. If you want to activate the connection later, press and hold or right-click the connection in Network Connections, and then tap or click Connect.
Renaming network connections
Windows Server 2012 R2 initially assigns default names to network connections. In Network Connections, you can rename a connection at any time by pressing and holding or right-clicking the connection, tapping or clicking Rename, and then entering a new name. If a computer has multiple network connections, a descriptive name can help you and others better understand the uses of a particular connection.
All materials on the site are licensed Creative Commons Attribution-Sharealike 3.0 Unported CC BY-SA 3.0 & GNU Free Documentation License (GFDL)
If you are the copyright holder of any material contained on our site and intend to remove it, please contact our site administrator for approval.
© 2016-2026 All site design rights belong to S.Y.A.