MCSA: Windows Server 2012 R2 Installation and Configuration (2015)
Chapter 5
Administer Active Directory
THE FOLLOWING 70-410 EXAM OBJECTIVES ARE COVERED IN THIS CHAPTER:
1. ![]() Create and manage Active Directory users and computers
Create and manage Active Directory users and computers
§ Automate the creation of Active Directory accounts
§ Create, copy, configure, and delete users and computers
§ Configure templates
§ Perform bulk Active Directory operations
§ Configure user rights
§ Offline domain join
§ Manage inactive and disabled accounts
2. ![]() Create and manage Active Directory groups and organizational units (OUs)
Create and manage Active Directory groups and organizational units (OUs)
§ Configure group nesting
§ Convert groups including security, distribution, universal, domain local, and domain global
§ Manage group membership using Group Policy
§ Enumerate group membership
§ Delegate the creation and management of Active Directory objects
§ Manage default Active Directory containers
§ Create, copy, configure, and delete groups and OUs
In previous chapters, you learned how to install Domain Name System (DNS) and Active Directory, but you still haven’t been introduced to the lower-level objects that exist in Active Directory.
In this chapter, you will look at the structure of the various components within a domain. You’ll see how an organization’s business structure can be mirrored within Active Directory through the use of organizational units for ease of use and to create a seamless look and feel. Because the concepts related to organizational units are quite simple, some system administrators may underestimate their importance and not plan to use them accordingly. Make no mistake: one of the fundamental components of a successful Active Directory installation is the proper design and deployment of organizational units.
You’ll also see in this chapter the actual steps you need to take to create common Active Directory objects and then learn how to configure and manage them. Finally, you’ll look at ways to publish resources and methods for creating user accounts automatically.
An Overview of OUs
An organizational unit (OU) is a logical group of Active Directory objects, just as the name implies. OUs serve as containers within which Active Directory objects can be created, but they do not form part of the DNS namespace. They are used solely to create organization within a domain.
OUs can contain the following types of Active Directory objects:
§ Users
§ Groups
§ Computers
§ Shared Folder objects
§ Contacts
§ Printers
§ InetOrgPerson objects
§ Microsoft Message Queuing (MSMQ) Queue aliases
§ Other OUs
Perhaps the most useful feature of OUs is that they can contain other OU objects. As a result, system administrators can hierarchically group resources and objects according to business practices. The OU structure is extremely flexible and, as you will see later in this chapter, can easily be rearranged to reflect business reorganizations.
Another advantage of OUs is that each can have its own set of policies. Administrators can create individual and unique Group Policy objects (GPOs) for each OU. GPOs are rules or policies that can apply to all of the objects within the OU. GPOs are discussed in detail in Chapter 6 “Manage GPOs.”
Each type of object has its own purpose within the organization of Active Directory domains. Later in this chapter, you’ll look at the specifics of User, Computer, Group, and Shared Folder objects. For now, let’s focus on the purpose and benefits of using OUs.
The Purpose of OUs
OUs are mainly used to organize the objects within Active Directory. Before you dive into the details of OUs, however, you must understand how OUs, users, and groups interact. Most important, you should understand that OUs are simply containers that you can use to group various objects logically. They are not, however, groups in the classical sense. That is, they are not used for assigning security permissions. Another way of stating this is that the user accounts, computer accounts, and group accounts that are contained in OUs are considered security principals while the OUs themselves are not.
OUs do not take the place of standard user and group permissions. A good general practice is to assign users to groups and then place the groups within OUs. This enhances the benefits of setting security permissions and of using the OU hierarchy for making settings. Figure 5.1 illustrates this concept.
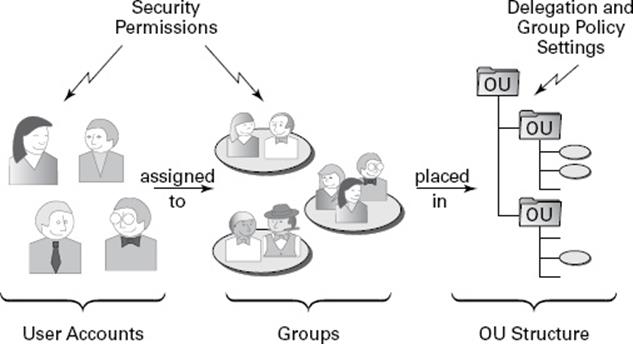
FIGURE 5.1 Relationships of users, groups, and OUs
An OU contains objects only from within the domain in which it resides. As you’ll see in the section “Delegating Administrative Control” later in this chapter, the OU is the finest level of granularity used for group policies and other administrative settings.
Benefits of OUs
There are many benefits to using OUs throughout your network environment.
§ OUs are the smallest unit to which you can assign directory permissions.
§ You can easily change the OU structure, and it is more flexible than the domain structure.
§ The OU structure can support many different levels of hierarchy.
§ Child objects can inherit OU settings.
§ You can set Group Policy settings on OUs.
§ You can easily delegate the administration of OUs and the objects within them to the appropriate users and groups.
Now that you have a good idea of why you should use OUs, take a look at some general practices you can use to plan the OU structure.
Planning the OU Structure
One of the key benefits of Active Directory is the way in which it can bring organization to complex network environments. Before you can begin to implement OUs in various configurations, you must plan a structure that is compatible with business and technical needs. In this section, you’ll learn about several factors that you should consider when planning for the structure of OUs.
Logical Grouping of Resources
The fundamental purpose of using OUs is to group resources (which exist within Active Directory) hierarchically. Fortunately, hierarchical groups are quite intuitive and widely used in most businesses. For example, a typical manufacturing business might divide its various operations into different departments as follows:
§ Sales
§ Marketing
§ Engineering
§ Research and Development
§ Support
§ Information Technology (IT)
Each of these departments usually has its own goals and mission. To make the business competitive, individuals within each of the departments are assigned to various roles. The following role types might be used:
§ Managers
§ Clerical staff
§ Technical staff
§ Planners
Each of these roles usually entails specific job responsibilities. For example, managers should provide direction to general staff members. Note that the very nature of these roles suggests that employees may fill many different positions. That is, one employee might be a manager in one department and a member of the technical staff in another. In the modern workplace, such situations are quite common.
All of this information helps you plan how to use OUs. First the structure of OUs within a given network environment should map well to the business’s needs, including the political and logical structure of the organization as well as its technical needs. Figure 5.2shows how a business organization might be mapped to the OU structure within an Active Directory domain.
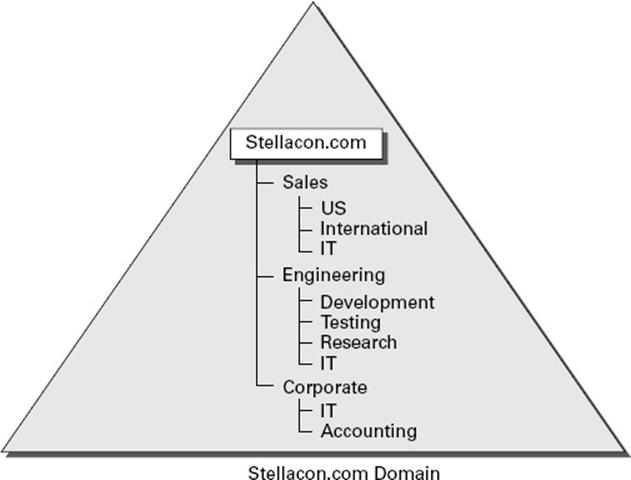
FIGURE 5.2 Mapping a business organization to an OU structure
When naming OUs for your organization, you should keep several considerations and limitations in mind:
Keep the Names and Descriptions Simple The purpose of OUs is to make administering and using resources simple. Therefore, it’s always a good idea to keep the names of your objects simple and descriptive. Sometimes, finding a balance between these two goals can be a challenge. For example, although a printer name like “The LaserJet located near Bob’s cube” might seem descriptive, it is certainly difficult to type. Also, imagine the naming changes that you might have to make if Bob moves (or leaves the company)!
Pay Attention to Limitations The maximum length for the name of an OU is 64 characters. In most cases, this should adequately describe the OU. Remember, the name of an OU does not have to describe the object uniquely because the OU is generally referenced only as part of the overall hierarchy. For example, you can choose to create an OU named “IT” within two different parent OUs. Even though the OUs have the same name, users and administrators are able to distinguish between them based on their complete pathname.
Pay Attention to the Hierarchical Consistency The fundamental basis of an OU structure is its position in a hierarchy. From a design standpoint, this means you cannot have two OUs with the same name at the same level. However, you can have OUs with the same name at different levels. For example, you could create an OU named “Corporate” within the North America OU and another one within the South America OU. This is because the fully qualified domain name includes information about the hierarchy. When an administrator tries to access resources in a Corporate OU, they must specify which Corporate OU they mean.
For example, if you create a North America OU, the Canada OU should logically fit under it. If you decide that you want to separate the North America and Canada OUs into completely different containers, then you might want to use other, more appropriate names. For example, you could change North America to “U.S.” Users and administrators depend on the hierarchy of OUs within the domain, so make sure that it remains logically consistent.
Based on these considerations, you should have a good idea of how best to organize the OU structure for your domain.
Understanding OU Inheritance
When you rearrange OUs within the structure of Active Directory, you can change several settings. When they are moving and reorganizing OUs, system administrators must pay careful attention to automatic and unforeseen changes in security permissions and other configuration options. By default, OUs inherit the permissions of their new parent container when they are moved.
By using the built-in tools provided with Windows Server 2012 R2 and Active Directory, you can move or copy OUs only within the same domain. You cannot use the Active Directory Users and Computers tool to move OUs between domains. To do this, use theActive Directory Migration Tool (ADMT). This is one of the many Active Directory support tools.
Delegating Administrative Control
I already mentioned that OUs are the smallest component within a domain to which administrative permissions and group policies can be assigned by administrators. Now you’ll take a look specifically at how administrative control is set on OUs.
![]()
Delegation occurs when a higher security authority assigns permissions to a lesser security authority. As a real-world example, assume that you are the director of IT for a large organization. Instead of doing all of the work yourself, you would probably assign roles and responsibilities to other individuals. For example, if you worked within a multidomain environment, you might make one system administrator responsible for all operations within the Sales domain and another responsible for the Engineering domain. Similarly, you could assign the permissions for managing all printers and print queue objects within your organization to one individual user while allowing another individual user to manage all security permissions for users and groups. In this way, you can distribute the various roles and responsibilities of the IT staff throughout the organization.
Businesses generally have a division of labor that handles all of the tasks involved in keeping the company’s networks humming. Network operating systems (NOSs), however, often make it difficult to assign just the right permissions; in other words, they do not support very granular permission assignments. Sometimes, fine granularity is necessary to ensure that only the right permissions are assigned. A good general rule of thumb is to provide users and administrators with the minimum permissions they require to do their jobs. This way, you can ensure that accidental, malicious, and otherwise unwanted changes do not occur.
 You can use auditing to log events to the Security log in the Event Viewer. This is a way to ensure that if accidental, malicious, and otherwise unwanted changes do occur, they are logged and traceable.
In the world of Active Directory, you delegate to define responsibilities for OU administrators. As a system administrator, you will occasionally be tasked with having to delegate responsibility to others—you can’t do it all, although sometimes administrators believe that they can. You understand the old IT logic of doing all of the tasks yourself for job security, but this can actually make you look worse.
 You can delegate control only at the OU level and not at the object level within the OU.
If you do find yourself in a role where you need to delegate, remember that Windows Server 2012 R2 was designed to offer you the ability to do so. In its simplest definition, delegation allows a higher administrative authority to grant specific administrative rights for containers and subtrees to individuals and groups. What this essentially does is to eliminate the need for domain administrators with sweeping authority over large segments of the user population. You can break up this control over branches within your tree, within each OU you create.
To understand delegation and rights, you should first understand the concept of access control entries (ACEs). ACEs grant specific administrative rights on objects in a container to a user or group. A container’s access control list (ACL) is used to store ACEs.
When you are considering implementing delegation, keep these two concerns in mind:
Parent-Child Relationships The OU hierarchy you create will be important when you consider the maintainability of security permissions. OUs can exist in a parent-child relationship, which means that permissions and group policies set on OUs higher up in the hierarchy (parents) can interact with objects in lower-level OUs (children). When it comes to delegating permissions, this is extremely important. You can allow child containers to inherit the permissions set on parent containers automatically. For example, if the North America division of your organization contains 12 other OUs, you could delegate permissions to all of them at once (saving time and reducing the likelihood of human error) by placing security permissions on the North America division. This feature can greatly ease administration, especially in larger organizations, but it is also a reminder of the importance of properly planning the OU structure within a domain.
Inheritance Settings Now that you’ve seen how you can use parent-child relationships for administration, you should consider inheritance, the process in which child objects take on the permissions of a parent container. When you set permissions on a parent container, all of the child objects are configured to inherit the same permissions. You can override this behavior, however, if business rules do not lend themselves well to inheritance.
Applying Group Policies
One of the strengths of the Windows operating system is that it offers users a great deal of power and flexibility. From installing new software to adding device drivers, users can make many changes to their workstation configurations. However, this level of flexibility is also a potential problem. For instance, inexperienced users might inadvertently change settings, causing problems that can require many hours to fix.
In many cases (and especially in business environments), users require only a subset of the complete functionality the operating system provides. In the past, however, the difficulty associated with implementing and managing security and policy settings has led to lax security policies. Some of the reasons for this are technical—it can be tedious and difficult to implement and manage security restrictions. Other problems have been political—users and management might feel that they should have full permissions on their local machines, despite the potential problems this might cause.
That’s where the idea of group policies comes in. Simply defined, group policies are collections of rules that you can apply to objects within Active Directory. Specifically, Group Policy settings are assigned at the site, domain, and OU levels, and they can apply to user accounts and computer accounts. For example, a system administrator can use group policies to configure the following settings:
§ Restricting users from installing new programs
§ Disallowing the use of the Control Panel
§ Limiting choices for display and Desktop settings
Creating OUs
Now that you have looked at several different ways in which OUs can be used to bring organization to the objects within Active Directory, it’s time to look at how you can create and manage them.
Through the use of the Active Directory Users and Computers administrative tool, also called the MMC (Microsoft Management Console), you can quickly and easily add, move, and change OUs. This graphical tool makes it easy to visualize and create the various levels of hierarchy an organization requires.
Figure 5.3 shows a geographically based OU structure that a multinational company might use. Note that the organization is based in North America and that it has a corporate office located there. In general, the other offices are much smaller than the corporate office located in North America.
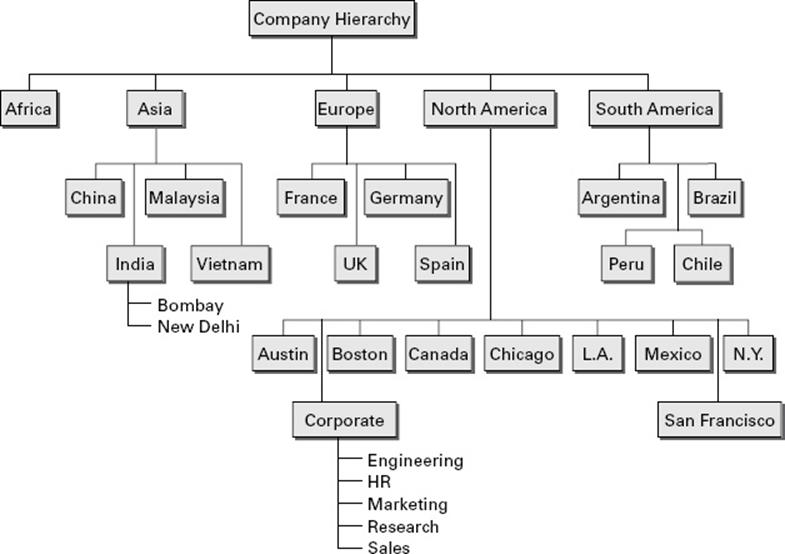
FIGURE 5.3 A geographically based OU structure
It’s important to note that this OU structure could have been designed in several different ways. For example, I could have chosen to group all of the offices located in the United States within an OU named “U.S.” However, because of the large size of these offices, I chose to place these objects at the same level as the Canada and Mexico OUs. This prevents an unnecessarily deep OU hierarchy while still logically grouping the offices.
One nice feature when creating an OU is the ability to protect the OU from being accidentally deleted. When you create an OU, you can check the Protect Container From Accidental Deletion check box. This check box protects against an administrator deleting the OU. To delete the OU, you must go into the advanced view of the OU and uncheck the box.
Exercise 5.1 walks you through the process of creating several OUs for a multinational business. You’ll be using this OU structure in later exercises within this chapter.
To perform the exercises included in this chapter, you must have administrative access to a Windows Server 2012 R2 domain controller.
![]() EXERCISE 5.1: Creating an OU Structure
EXERCISE 5.1: Creating an OU Structure
1. Click the Windows key on the keyboard and choose Administrative Tools.
2. Open the Active Directory Users and Computers administrative tool.
3. Right-click the name of the local domain and choose New ![]() Organizational Unit. You will see the dialog box shown here. Notice that this box shows you the current context within which the OU will be created. In this case, you’re creating a top-level OU, so the full path is simply the name of the domain.
Organizational Unit. You will see the dialog box shown here. Notice that this box shows you the current context within which the OU will be created. In this case, you’re creating a top-level OU, so the full path is simply the name of the domain.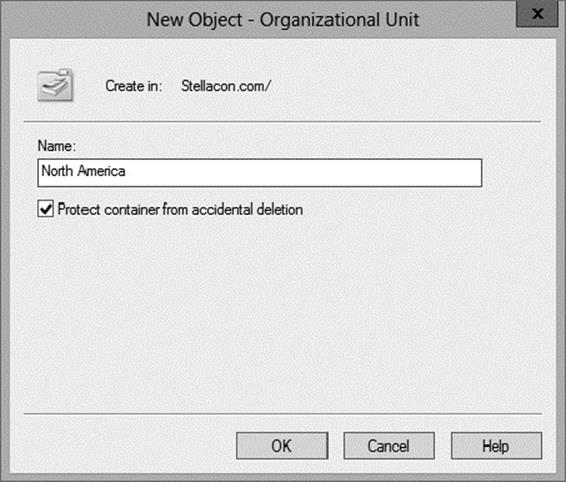
4. Type North America for the name of the first OU. Uncheck the box Protect Container From Accidental Deletion and click OK to create this object.
5. Create the following top-level OUs by right-clicking the name of the domain and choosing New ![]() Organizational Unit. Also make sure to uncheck Protect Container From Accidental Deletion for all OUs in these exercises because you’ll be deleting some of these OUs in later ones.
Organizational Unit. Also make sure to uncheck Protect Container From Accidental Deletion for all OUs in these exercises because you’ll be deleting some of these OUs in later ones.
1. Africa
2. Asia
3. Europe
4. South America
Note that the order in which you create the OUs is not important. In this exercise, you are simply using a method that emphasizes the hierarchical relationship.
6. Create the following second-level OUs within the North America OU by right-clicking the North America OU and selecting New ![]() Organizational Unit:
Organizational Unit:
1. Austin
2. Boston
3. Canada
4. Chicago
5. Corporate
6. Los Angeles
7. Mexico
8. New York
9. San Francisco
7. Create the following OUs under the Asia OU:
1. China
2. India
3. Malaysia
4. Vietnam
8. Create the following OUs under the Europe OU:
1. France
2. Germany
3. Spain
4. UK
9. Create the following OUs under the South America OU:
1. Argentina
2. Brazil
3. Chile
4. Peru
10.Create the following third-level OUs under the India OU by right-clicking India within the Asia OU and selecting New ![]() Organizational Unit:
Organizational Unit:
1. Bombay
2. New Delhi
11.Within the North America Corporate OU, create the following OUs:
1. Engineering
2. HR
3. Marketing
4. Research
5. Sales
12.When you have completed creating the OUs, you should have a structure that looks similar to the one in the left pane shown here.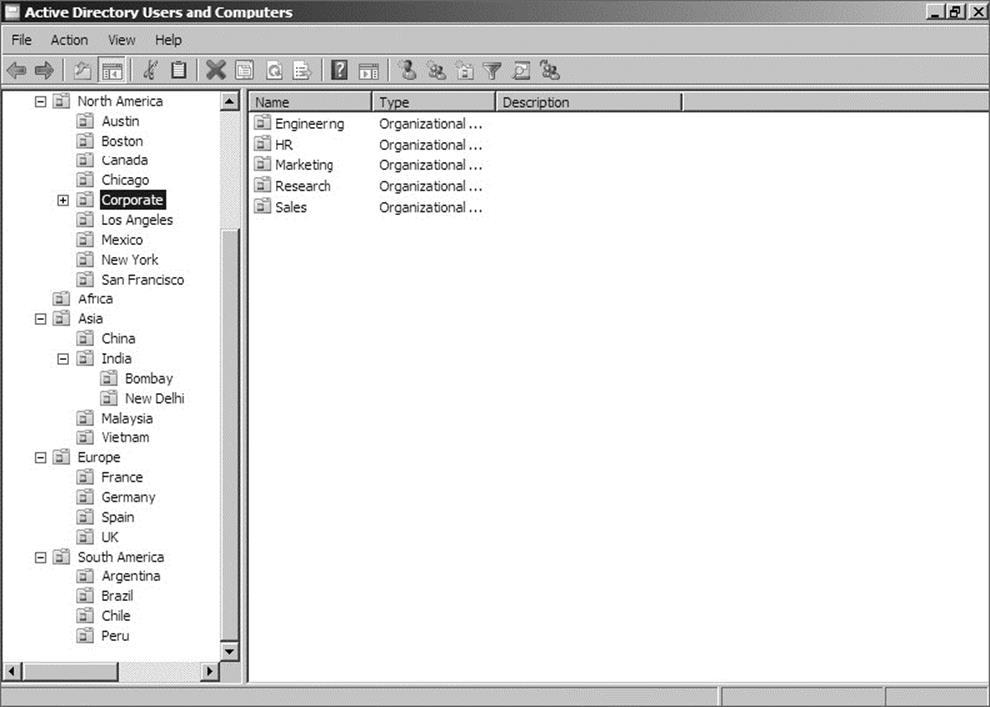
Managing OUs
Managing network environments would still be challenging, even if things rarely changed. However, in the real world, business units, departments, and employee roles change frequently. As business and technical needs change, so should the structure of Active Directory.
Fortunately, changing the structure of OUs within a domain is a relatively simple process. In the following sections, you’ll look at ways to delegate control of OUs and make other changes.
Moving, Deleting, and Renaming OUs
The process of moving, deleting, and renaming OUs is a simple one. Exercise 5.2 shows how you can easily modify and reorganize OUs to reflect changes in the business organization. The specific scenario covered in this exercise includes the following changes:
§ The Research and Engineering departments have been combined to form a department known as Research and Development (RD).
§ The Sales department has been moved from the Corporate headquarters office to the New York office.
§ The Marketing department has been moved from the Corporate headquarters office to the Chicago office.
This exercise assumes you have already completed the steps in Exercise 5.1.
EXERCISE 5.2: Modifying OU Structure
1. Click the Windows key on the keyboard and choose Administrative Tools.
2. Open the Active Directory Users and Computers administrative tool.
3. Right-click the Engineering OU (located within North America ![]() Corporate) and click Delete. When you are prompted for confirmation, click Yes. Note that if this OU contained objects, they would have all been automatically deleted as well.
Corporate) and click Delete. When you are prompted for confirmation, click Yes. Note that if this OU contained objects, they would have all been automatically deleted as well.
4. Right-click the Research OU and select Rename. Type RD to change the name of the OU and press Enter.
5. Right-click the Sales OU and select Move. In the Move dialog box, expand the North America branch and click the New York OU. Click OK to move the OU.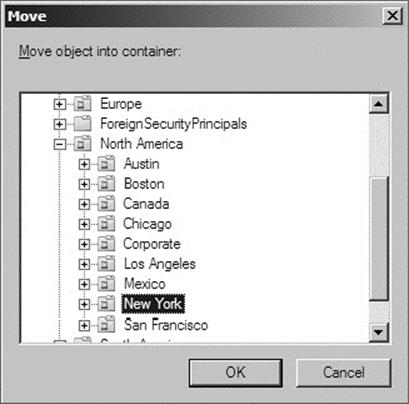
6. You will use an alternate method to move the Marketing OU. Drag the Marketing OU and drop it onto the Chicago OU.
7. When you have finished, you should see an OU structure similar to the one shown here. Close the Active Directory Users and Computers administrative tool.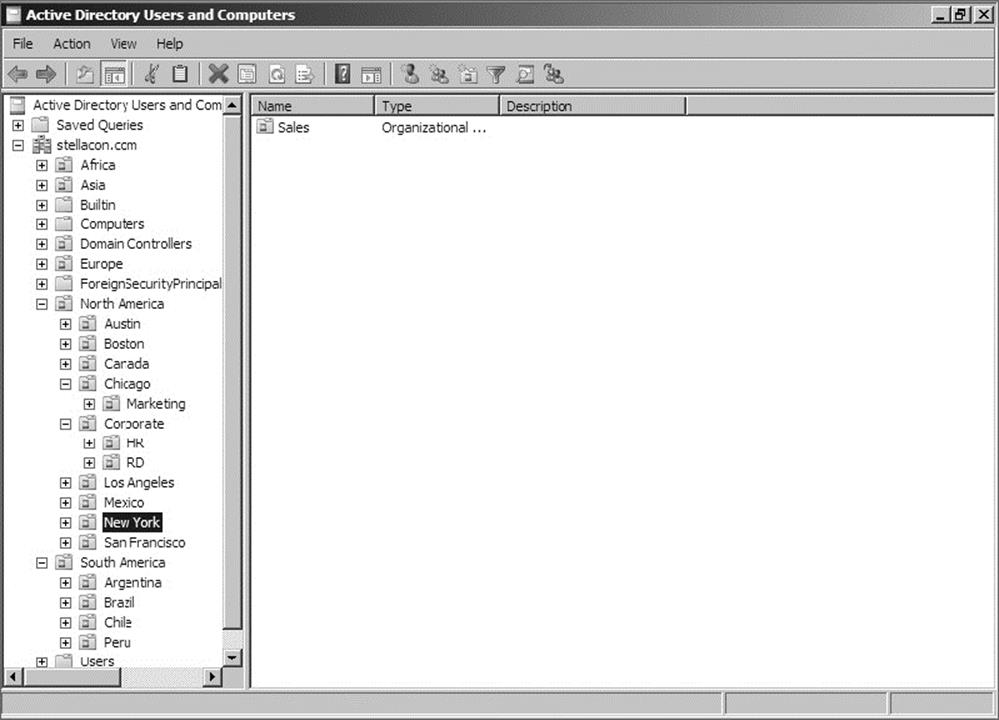
Administering Properties of OUs
Although OUs are primarily created for organizational purposes within the Active Directory environment, they have several settings that you can modify. To modify the properties of an OU using the Active Directory Users and Computers administrative tool, right-click the name of any OU and select Properties. When you do, the OU Properties dialog box appears. In the example shown in Figure 5.4, you’ll see the options on the General tab.
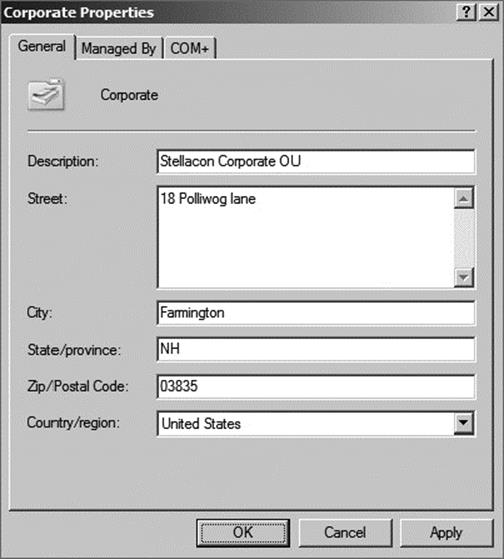
FIGURE 5.4 The General tab of the OU’s Properties dialog box
In any organization, it helps to know who is responsible for managing an OU. You can set this information on the Managed By tab (see Figure 5.5). The information specified on this tab is convenient because it is automatically pulled from the contact information on a user record. You should consider always having a contact for each OU within your organization so that other system administrators know whom to contact if they need to make any changes.
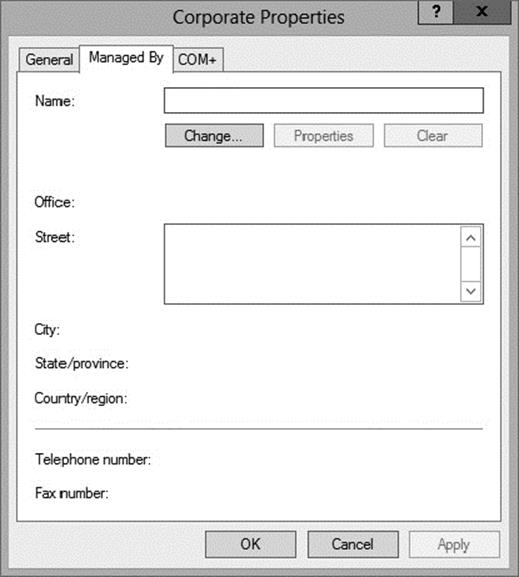
FIGURE 5.5 The Managed By tab of the OU’s Properties dialog box
Delegating Control of OUs
In simple environments, one or a few system administrators may be responsible for managing all of the settings within Active Directory. For example, a single system administrator could manage all users within all OUs in the environment. In larger organizations, however, roles and responsibilities may be divided among many different individuals. A typical situation is one in which a system administrator is responsible for objects within only a few OUs in an Active Directory domain. Alternatively, one system administrator might manage User and Group objects while another is responsible for managing file and print services.
Fortunately, using the Active Directory Users and Computers tool, you can quickly and easily ensure that specific users receive only the permissions they need. In Exercise 5.3, you will use the Delegation of Control Wizard to assign permissions to individuals. To complete these steps successfully, first you must have created the objects in the previous exercises of this chapter.
EXERCISE 5.3: Using the Delegation of Control Wizard
1. Click the Windows key on the keyboard and choose Administrative Tools.
2. Open the Active Directory Users and Computers administrative tool.
3. Right-click the Corporate OU within the North America OU and select Delegate Control. This starts the Delegation of Control Wizard. Click Next to begin configuring security settings.
4. In the Users Or Groups page, click the Add button. In the Enter The Object Names To Select field, enter Account Operators and click the Check Names button. Click OK. Click Next to continue.
5. In the Tasks To Delegate page, select Delegate The Following Common Tasks and place a check mark next to the following items:
1. Create, Delete, And Manage User Accounts
2. Reset User Passwords And Force Password Change At Next Logon
3. Read All User Information
4. Create, Delete, And Manage Groups
5. Modify The Membership Of A Group
6. Click Next to continue.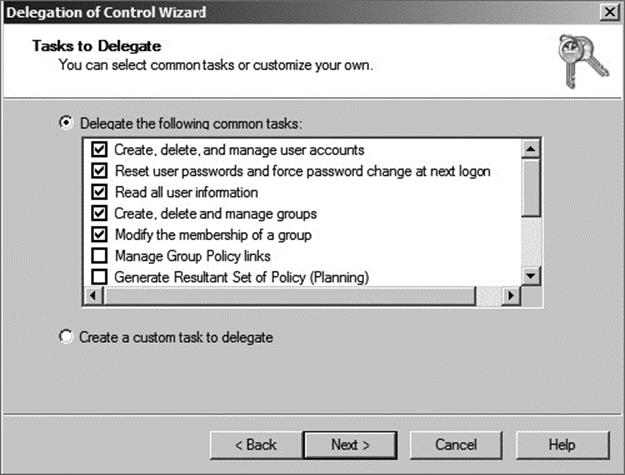
7. The Completing The Delegation Of Control Wizard page then provides a summary of the operations you have selected. To implement the changes, click Finish.
Although the common tasks available through the wizard are sufficient for many delegation operations, you may have cases in which you want more control. For example, you might want to give a particular system administrator permissions to modify only Computer objects. Exercise 5.4 uses the Delegation of Control Wizard to assign more granular permissions. To complete these steps successfully, you must have completed the previous exercises in this chapter.
EXERCISE 5.4: Delegating Custom Tasks
1. Click the Windows key on the keyboard and choose Administrative Tools.
2. Open the Active Directory Users and Computers administrative tool.
3. Right-click the Corporate OU within the North America OU and select Delegate Control. This starts the Delegation of Control Wizard. Click Next to begin making security settings.
4. In the Users Or Groups page, click the Add button. In the Enter The Object Names To Select field, enter Server Operators and click the Check Names button. Click OK and then click Next to continue.
5. In the Tasks To Delegate page, select the Create A Custom Task To Delegate radio button and click Next to continue.
6. In the Active Directory Object Type page, choose Only The Following Objects In The Folder and place a check mark next to the following items. (You will have to scroll down to see them all.)
1. User Objects
2. Computer Objects
3. Contact Objects
4. Group Objects
5. Organizational Unit Objects
6. Printer Objects
7. Click Next to continue.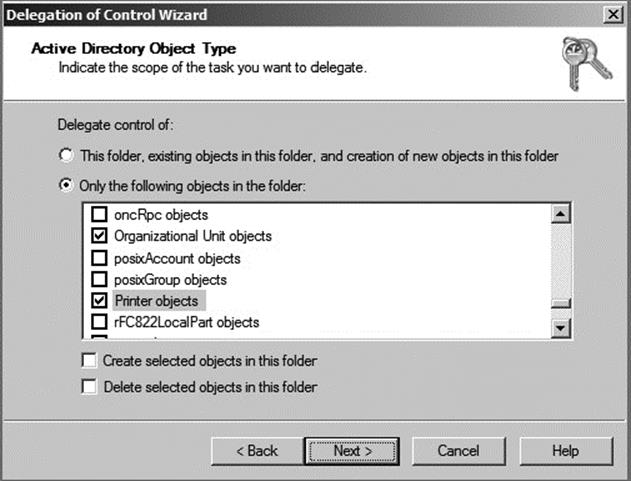
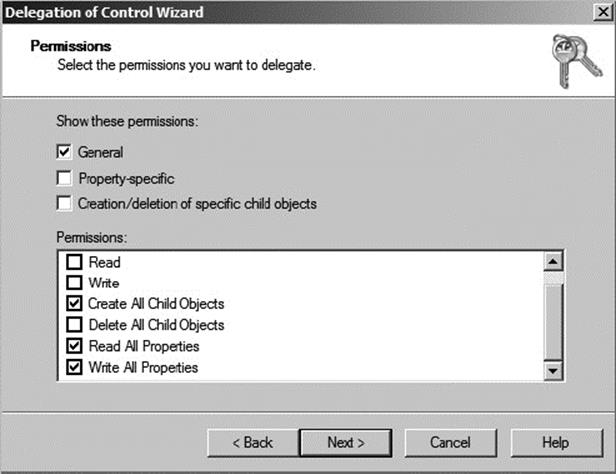
8. In the Permissions page, place a check mark next to the General option and make sure the other options are not checked. Note that if the various objects within your Active Directory schema had property-specific settings, you would see those options here. Place a check mark next to the following items:
1. Create All Child Objects
2. Read All Properties
3. Write All Properties
This gives the members of the Server Operators group the ability to create new objects within the Corporate OU and the permissions to read and write all properties for these objects.
9. Click Next to continue.
10.The Completing The Delegation Of Control Wizard page provides a summary of the operations you have selected. To implement the changes, click Finish.
![]()
Delegation: Who’s Responsible for What?
You’re the IT director for a large, multinational organization. You’ve been with the company for quite a while, that is, since the environment had only a handful of offices and a few network and system administrators. Times have changed, however. Now system administrators must coordinate the efforts of hundreds of IT staffers in 14 countries.
For years now, a debate has been raging among IT administrators on the question of when to create a new child domain and when to make it just an OU. For example, let’s say you have a remote office in Concord, New Hampshire. Do you give the remote office its own domain (as a child domain), or do you just make the Concord office an OU? Well, it really depends on who you want to manage the resources in Concord. Do you want to create domains or OUs based on location?
Fortunately, through the proper use of OUs and delegation, you are given a lot of flexibility in determining how to handle the administration. You can structure the administration in several ways. First, if you choose to create OUs based on a geographic business structure, you could delegate control of these OUs based on the job functions of various system administrators. For example, you could use one user account to administer the Concord OU. Within the Concord OU, this system administrator could delegate control of resources represented by the Printers and Scanners OUs.
Alternatively, the OU structure may create a functional representation of the business. For example, the Engineering OU might contain other OUs that are based on office locations such as New York and Paris. A system administrator of the Engineering domain could delegate permissions based on geography or job functions to the lower OUs. Regardless of whether you build a departmental, functional, or geographical OU model, keep in mind that each model excludes other models. This is one of the most important decisions you need to make. When you are making this decision or modifying previous decisions, your overriding concern is how it will affect the management and administration of the network. The good news is that, because Active Directory has so many features, the model you choose can be based on specific business requirements rather than imposed by architectural constraints.
Troubleshooting OUs
In general, you will find using OUs to be a relatively straightforward and painless process. With adequate planning, you’ll be able to implement an intuitive and useful structure for OU objects.
The most common problems with OU configuration are related to the OU structure. When troubleshooting OUs, pay careful attention to the following factors:
Inheritance By default, Group Policy and other settings are transferred automatically from parent OUs to child OUs and objects. Even if a specific OU is not given a set of permissions, objects within that OU might still get them from parent objects.
Delegation of Administration If you allow the wrong user accounts or groups to perform specific tasks on OUs, you might be violating your company’s security policy. Be sure to verify the delegations you have made at each OU level.
Organizational Issues Sometimes, business practices do not easily map to the structure of Active Directory. A few misplaced OUs, user accounts, computer accounts, or groups can make administration difficult or inaccurate. In many cases, it might be beneficial to rearrange the OU structure to accommodate any changes in the business organization. In others, it might make more sense to change business processes.
If you regularly consider each of these issues when troubleshooting problems with OUs, you will be much less likely to make errors in the Active Directory configuration.
Creating and Managing Active Directory Objects
Now that you are familiar with the task of creating OUs, you should find creating and managing other Active Directory objects quite simple. The following sections will examine the details.
Overview of Active Directory Objects
When you install and configure a domain controller, Active Directory sets up an organizational structure for you, and you can create and manage several types of objects.
Active Directory Organization
When you are looking at your Active Directory structure, you will see objects that look like folders in Windows Explorer. These objects are containers, or organizational units (OUs). The difference is that an OU is a container to which you can link a GPO. Normal containers cannot have a GPO linked to them. That’s what makes an OU a special container.
By default, after you install and configure a domain controller, you will see the following organizational sections within the Active Directory Users and Computers tool (they look like folders):
Built-In The Built-In container includes all of the standard groups that are installed by default when you promote a domain controller. You can use these groups to administer the servers in your environment. Examples include the Administrators group, Backup Operators group, and Print Operators group.
Computers By default, the Computers container contains a list of the workstations in your domain. From here, you can manage all of the computers in your domain.
Domain Controllers The Domain Controllers OU includes a list of all the domain controllers for the domain.
Foreign Security Principals Foreign security principals containers are any objects to which security can be assigned and that are not part of the current domain. Security principals are Active Directory objects to which permissions can be applied, and they can be used to manage permissions in Active Directory.
Managed Service Accounts The Managed Service Accounts container is a new Windows Server 2012 R2 container. Service accounts are accounts created to run specific services such as Exchange and SQL Server. Having a Managed Service Accounts container allows you to control the service accounts better and thus allows for better service account security.
Users The Users container includes all the security accounts that are part of the domain. When you first install the domain controller, there will be several groups in this container. For example, the Domain Admins group and the administrator account are created in this container.
You want to be sure to protect the administrator account. You should rename the admin account and make sure the password is complex. Protected admin accounts can make your network safer. Every hacker knows that there is an administrator account on the server by default. Be sure to make your network safer by protecting the admin account.
Active Directory Objects
You can create and manage several different types of Active Directory objects. The following are specific object types:
Computer Computer objects represent workstations that are part of the Active Directory domain. All computers within a domain share the same security database, including user and group information. Computer objects are useful for managing security permissions and enforcing Group Policy restrictions.
Contact Contact objects are usually used in OUs to specify the main administrative contact. Contacts are not security principals like users. They are used to specify information about individuals outside the organization.
Group Group objects are logical collections of users primarily for assigning security permissions to resources. When managing users, you should place them into groups and then assign permissions to the group. This allows for flexible management without the need to set permissions for individual users.
InetOrgPerson The InetOrgPerson object is an Active Directory object that defines attributes of users in Lightweight Directory Access Protocol (LDAP) and X.500 directories.
MSIMaging-PSPs MSIMaging-PSPs is a container for all Enterprise Scan Post Scan Process objects.
MSMQ Queue Alias An MSMQ Queue Alias object is an Active Directory object for the MSMQ-Custom-Recipient class type. The Microsoft Message Queuing (MSMQ) Queue Alias object associates an Active Directory path and a user-defined alias with a public, private, or direct single-element format name. This allows a queue alias to be used to reference a queue that might not be listed in Active Directory Domain Services (AD DS).
Organizational Unit An OU object is created to build a hierarchy within the Active Directory domain. It is the smallest unit that can be used to create administrative groupings, and it can be used to assign group policies. Generally, the OU structure within a domain reflects a company’s business organization.
Printer Printer objects map to printers.
Shared Folder Shared Folder objects map to server shares. They are used to organize the various file resources that may be available on file/print servers. Often, Shared Folder objects are used to give logical names to specific file collections. For example, systemadministrators might create separate shared folders for common applications, user data, and shared public files.
User A User object is the fundamental security principal on which Active Directory is based. User accounts contain information about individuals as well as password and other permission information.
Creating Objects Using the Active Directory Users and Computers Tool
Exercise 5.5 walks you through the steps necessary to create various objects within an Active Directory domain. In this exercise, you create some basic Active Directory objects. To complete this exercise, you must have access to at least one Active Directory domain controller, and you should have also completed the previous exercises in this chapter.
EXERCISE 5.5: Creating Active Directory Objects
1. Click the Windows key on the keyboard and choose Administrative Tools.
2. Open the Active Directory Users and Computers tool.
3. Expand the current domain to list the objects currently contained within it. For this exercise, you will use the second- and third-level OUs contained within the North America top-level OU, as shown here.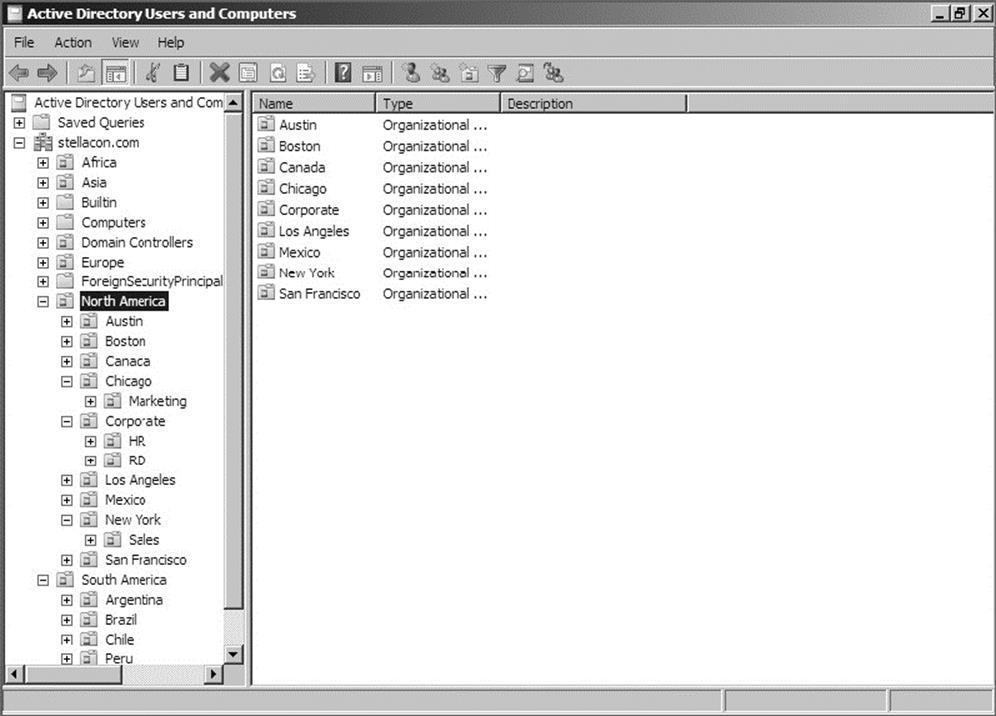
4. Right-click the Corporate OU and select New ![]() User. Fill in the following information:
User. Fill in the following information:
1. First Name: Maria
2. Initial: D
3. Last Name: President
4. Full Name: (leave as default)
5. User Logon Name: mdpresident (leave default domain)
6. Click Next to continue.
5. Enter P@ssw0rd for the password for this user and then confirm it. Note that you can also make changes to password settings here. Click Next.
6. You will see a summary of the user information. Click Finish to create the new user.
7. Click the RD container and create another user in that container with the following information:
1. First Name: John
2. Initial: Q
3. Last Name: Adams
4. Full Name: (leave as default)
5. User Logon Name: jqadams (leave default domain)
Click Next to continue.
8. Assign the password P@ssw0rd. Click Next and then click Finish to create the user.
9. Right-click the RD OU and select New ![]() Contact. Use the following information to fill in the properties of the Contact object:
Contact. Use the following information to fill in the properties of the Contact object:
1. First Name: Jane
2. Initials: R
3. Last Name: Admin
4. Display Name: jradmin
Click OK to create the new Contact object.
10.Right-click the RD OU and select New ![]() Shared Folder. Enter Software for the name and \\server1\applications for the network path (also known as the Universal Naming Convention [UNC] path). Note that you can create the object even though this resource (the physical server) does not exist. Click OK to create the Shared Folder object.
Shared Folder. Enter Software for the name and \\server1\applications for the network path (also known as the Universal Naming Convention [UNC] path). Note that you can create the object even though this resource (the physical server) does not exist. Click OK to create the Shared Folder object.
11.Right-click the HR OU and select New ![]() Group. Type All Users for the group name. Do not change the value in the Group Name (Pre–Windows 2000) field. For Group Scope, select Global, and for Group Type, select Security. To create the group, click OK.
Group. Type All Users for the group name. Do not change the value in the Group Name (Pre–Windows 2000) field. For Group Scope, select Global, and for Group Type, select Security. To create the group, click OK.
12.Right-click the Sales OU and select New ![]() Computer. Type Workstation1 for the name of the computer. Notice that the pre–Windows 2000 name is automatically populated and that, by default, the members of the Domain Admins group are the only ones who can add this computer to the domain. Place a check mark in the Assign This Computer Account As A Pre-Windows 2000 Computer box and then click OK to create the Computer object.
Computer. Type Workstation1 for the name of the computer. Notice that the pre–Windows 2000 name is automatically populated and that, by default, the members of the Domain Admins group are the only ones who can add this computer to the domain. Place a check mark in the Assign This Computer Account As A Pre-Windows 2000 Computer box and then click OK to create the Computer object.
13.Close the Active Directory Users and Computers tool.
Configuring the User Principal Name
When you log into a domain, your logon name looks like an email address (for example, wpanek@willpanek.com). This is called your user principal name (UPN). A UPN is the username followed by the @ sign and the domain name. At the time that the user account is created, the UPN suffix is generated by default. The UPN is created as userName@DomainName, but an administrator can alter or change the default UPN. If your forest has multiple domains and you need to change the UPN to a different domain, you have that ability. To change the UPN suffix, in Active Directory Users and Computers, choose a user and go into their properties. Choose the Attribute Editor tab. Scroll down to the userPrincipalName attribute and make your changes. These changes then get replicated to the global catalog.
If your organization has multiple forests set up by a trust, you can’t change the UPN to a domain in the other forest. Global catalogs are used to log on users. Because UPNs get replicated to the local forest global catalog servers, you cannot log onto other forests using the UPN.
Using Templates
Now you are going to dive into user templates. User templates allow an Active Directory administrator to create a default account (for example, template_sales) and use that account to create all of the other users who match it (all the salespeople).
If you are creating multiple accounts, this can save you a lot of time and resources. For example, if you need to add 35 new salespeople to your company, you’ll create one template for sales and use a copy of that template for all of the other new accounts. This saves you the trouble of filling out many of the same fields over and over again. When you copy a template, some of the information does not get copied over. This is because it is user-specific information. Here are some of the fields that do not get copied over from a template:
§ Name
§ Logon Name
§ Password
§ Phone Numbers
§ Description
§ Office
§ Web Page
Many of the important fields such as Member Of (groups to which the user belongs), Profile Path, Department, and Company all get copied over. There is one important item that needs to be done when creating a template: the template account needs to be disabled after creation. You do not want anyone using this account to access your network. In Exercise 5.6, you will create a Sales template to use for your Sales department.
EXERCISE 5.6: Creating a User Template
1. Click the Windows key on the keyboard and choose Administrative Tools.
2. Open the Active Directory Users and Computers snap-in.
3. Expand the current domain to list the objects contained within it. For this exercise, you will use the Sales OU. Right-click the Sales OU and choose New ![]() User.
User.
4. Use the following properties:
1. First Name: Sales
2. Last Name: Template
3. Username: sales_template
4. Password: P@ssw0rd
5. Click Next and then click Finish.
6. In the right window, double-click the Sales Template user to open the properties.
7. On the General tab, complete the following items:
1. Description: Template Account
2. Office: Corporate
3. Telephone: 999-999-9999
4. Email: Salet@abc.com
5. Web: www.abc.com
8. Click the Profile tab. In the Profile Path field, type \\ServerA\%username%.
9. On the Members Of tab, click the Add button. At the Enter The Object Name To Select box, type Administrator and click the Check Names button. (Normally you would not add salespeople to the Administrators group, but you are doing so just for this exercise.) Click OK.
10.Click the Account tab. Scroll down in the Account Options box and check the Account Is Disabled check box.
11.Click OK in the user’s Properties window to go back to the Sales OU.
12.Right-click the Sales Template account and choose Copy.
13.Enter the following information:
1. First Name: Jenny
2. Last Name: Sales
3. Username: jsales
4. Password: P@ssw0rd
Uncheck the Account Is disabled check box.
14.In the right window, double-click the Jenny Sales user to open the properties.
15.Take a look at the Members Of tab, the General tab, and the Profile tab, and you will see that some of the fields are prefilled (including the Administrators group).
16.Close Jenny Sales Properties and exit Active Directory Users and Computers.
Importing Objects from a File
In Exercise 5.5, you created an account using the Active Directory Users and Computers tool. But what if you need to bulk import accounts? There are two main applications for doing bulk imports of accounts: the ldifde.exe utility and the csvde.exe utility. Both utilities import accounts from files.
The ldifde utility imports from line-delimited files. This utility allows an administrator to export and import data, thus allowing batch operations such as Add, Modify, and Delete to be performed in Active Directory. Windows Server 2012 R2 includes ldifde.exe to help support batch operations.
The csvde.exe utility performs the same export functions as ldifde.exe, but csvde.exe uses a comma-separated value file format. The csvde.exe utility does not allow administrators to modify or delete objects. It only supports adding objects to Active Directory.
Active Directory Migration Tool
Another tool that administrators have used in the past is Active Directory Migration Tool (ADMT). ADMT allows an administrator to migrate users, groups, and computers from a previous version of the server to a current version of the server.
Administrators also used the ADMT to migrate users, groups, and computers between Active Directory domains in different forests (interforest migration) and between Active Directory domains in the same forest (intraforest migration).
At the time this book was written, Microsoft had not yet released a new version of ADMT that is supported by Windows Server 2012 R2. The reason I even mention it in this book is because Microsoft may be releasing a version of it soon, and I wanted you to understand what it can do. Continue to check the Microsoft website to see whether a new version has been released.
Offline Domain Join of a Computer
Offline domain join gives administrators the ability to preprovision computer accounts in the domain to prepare operating systems for deployments. At startup, computers can then join the domain without the need to contact a domain controller. This helps reduce the time it takes to deploy computers in a datacenter.
Let’s say your datacenter needs to have multiple virtual machines deployed. This is where offline domain join can be useful. Upon initial startup after the operating system is installed, offline domain join allows the virtual machines to join the domain automatically. No additional steps or restart are needed.
The following are some of the benefits of using offline domain join:
§ There is no additional network traffic for Active Directory state changes.
§ There is no additional network traffic for computer state changes to the domain controller.
§ Changes for both the Active Directory state and the computer state can be completed at a different times.
Managing Object Properties
Once you’ve created the necessary Active Directory objects, you’ll probably need to make changes to their default properties. In addition to the settings you made when you were creating Active Directory objects, you can configure several more properties. You can also access object properties by right-clicking any object and selecting Properties from the pop-up menu.
Each object type contains a unique set of properties.
User Object Properties The following list describes some of the properties of a User object:
General General account information about this user
Address Physical location information about this user
Account User logon name and other account restrictions, such as workstation restrictions and logon hours
Profile Information about the user’s roaming profile settings
Telephones Telephone contact information for the user
Organization The user’s title, department, and company information
Member Of Group membership information for the user
Dial-In Remote Access Service (RAS) permissions for the user
Environment Logon and other network settings for the user
Sessions Session limits, including maximum session time and idle session settings
Remote Control Remote control options for this user’s session
Remote Desktop Services Profile Information about the user’s profile for use with Remote Desktop Services
Personal Virtual Desktop Allows you to assign a user a specific virtual machine to use as a personal virtual desktop
COM+ Specifies a COM+ partition set for the user
Computer Object Properties
Computer objects have different properties than User objects. Computer objects refer to the systems that clients are operating to be part of a domain. The following list describes some Computer object properties:
General Information about the name of the computer, the role of the computer, and its description
(You can enable an option to allow the Local System account of this machine to request services from other servers. This is useful if the machine is a trusted and secure computer.)
Operating System The name, version, and service pack information for the operating system running on the computer
Member Of Active Directory groups of which this Computer object is a member
Delegation Allows you to set services that work on behalf of another user
Location A description of the computer’s physical location
Managed By Information about the User or Contact object that is responsible for managing this computer
Dial-In Sets dial-in options for the computer
Setting Properties for Active Directory Objects
Now that you have seen the various properties that can be set for the Active Directory objects, let’s complete an exercise on how to configure some of these properties. Exercise 5.7 walks you through how to set various properties for Active Directory objects. To complete the steps in this exercise, first you must have completed Exercise 5.5.
Although it may seem a bit tedious, it’s always a good idea to enter as much information as you know about Active Directory objects when you create them. Although the name Printer1 may be meaningful to you, users will appreciate the additional information, such as location, when they are searching for objects.
EXERCISE 5.7: Managing Object Properties
1. Click the Windows key on the keyboard and choose Administrative Tools.
2. Open the Active Directory Users and Computers tool.
3. Expand the name of the domain and select the RD container. Right-click the John Q. Adams user account and select Properties.
4. Here you will see the various Properties tabs for the User account. Make some configuration changes based on your personal preferences. Click OK to continue.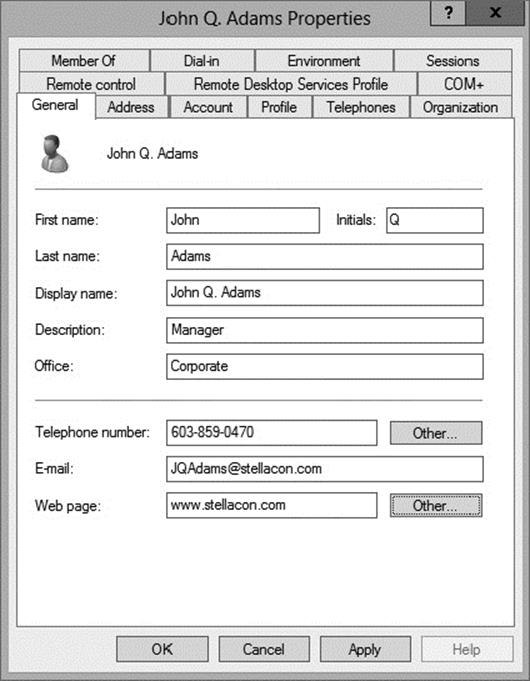
5. Select the HR OU. Right-click the All Users group and click Properties. In the All Users Properties dialog box, you will be able to modify the membership of the group.
Click the Members tab and then click Add. Add the Maria D. President and John Q. Admin user accounts to the group. Click OK to save the settings and then OK to accept the group modifications.
6. Select the Sales OU. Right-click the Workstation1 Computer object. Notice that you can choose to disable the account or reset it (to allow another computer to join the domain under that same name). From the context menu, choose Properties. You’ll see the properties for the Computer object.
Examine the various options and make changes based on your personal preference. After you have examined the available options, click OK to continue.
7. Select the Corporate OU. Right-click the Maria D. President user account and choose Reset Password. You will be prompted to enter a new password, and then you’ll be asked to confirm it. Note that you can also force the user to change this password upon the next logon, and you can also unlock the user’s account from here. For this exercise, do not enter a new password; just click Cancel.
8. Close the Active Directory Users and Computers tool.
By now, you have probably noticed that Active Directory objects have a lot of common options. For example, Group and Computer objects both have a Managed By tab.
Windows Server 2012 R2 allows you to manage many User objects at once. For instance, you can select several User objects by holding down the Shift or Ctrl key while selecting. You can then right-click any one of the selected objects and select Properties to display the properties that are available for multiple users. Notice that not every user property is available because some properties are unique to each user. You can configure the Description field for multiple object selections that include both users and nonusers, such as computers and groups.
An important thing to think about when it comes to accounts is the difference between disabling an account and deleting an account. When you delete an account, the security ID (SID) gets deleted. Even if you later create an account with the same username, it will have a different SID number, and therefore it will be a different account. It is sometimes better to disable an account and place it into a nonactive OU called Disabled. This way, if you ever need to reaccess the account, you can do so.
Another object management task is the process of deprovisioning. Deprovisioning is the management of Active Directory objects in the container. When you remove an object from an Active Directory container, the deprovisioning process removes the object and synchronizes the container to stay current.
Understanding Groups
Now that you know how to create user accounts, it’s time to learn how to create group accounts. As an instructor, I am always amazed when students (who work in the IT field) have no idea why they should use groups. This is something every organization should be using.
To illustrate their usefulness, let’s say you have a Sales department user by the name of wpanek. Your organization has 100 resources shared on the network for users to access. Because wpanek is part of the Sales department, he has access to 50 of the resources. The Marketing department uses the other 50. If the organization is not using groups and wpanek moves from Sales to Marketing, how many changes do you have to make? The answer is 100. You have to move him out of the 50 resources he currently can use and place his account into the 50 new resources that he now needs.
Now let’s say that you use groups. The Sales group has access to 50 resources, and the Marketing group has access to the other 50. If wpanek moves from Sales to Marketing, you need to make only two changes. You just have to take wpanek out of the Sales group and place him in the Marketing group. Once this is done, wpanek can access everything he needs to do his job.
Group Properties
Now that you understand why you should use groups, let’s go over setting up groups and their properties. When you are creating groups, it helps to understand some of the options that you need to use.
Group Type You can choose from two group types: security groups and distribution groups.
1. Security Groups These groups can have rights and permissions placed on them. For example, if you want to give a certain group of users access to a particular printer, but you want to control what they are allowed to do with this printer, you’d create a security group and then apply certain rights and permissions to this group.
2. Security groups can also receive emails. If someone sent an email to the group, all users within that group would receive it (as long as they have a mail system that allows for mail-enabled groups, like Exchange).
3. Distribution Groups These groups are used for email only (as long as they have a mail system that allows for mail-enabled groups, like Exchange). You cannot place permissions and rights for objects on this group type.
Group Scope When it comes to group scopes, you have three choices.
1. Domain Local Groups Domain local groups are groups that remain in the domain in which they were created. You use these groups to grant permissions within a single domain. For example, if you create a domain local group named HPLaser, you cannot use that group in any other domain, and it has to reside in the domain in which you created it.
2. Global Group Global groups can contain other groups and accounts from the domain in which the group is created. In addition, you can give them permissions in any domain in the forest.
3. Universal Groups Universal groups can include other groups and accounts from any domain in the domain tree or forest. You can give universal groups permissions in any domain in the domain tree or forest.
Creating Group Strategies
When you are creating a group strategy, think of this acronym that Microsoft likes to use in the exam: AGDLP (or AGLP). This acronym stands for a series of actions you should perform. Here is how it expands:
A Accounts (Create your user accounts.)
G Global groups (Put user accounts into global groups.)
DL Domain local groups (Put global groups into domain local groups.)
P Permissions (Assign permissions such as Deny or Apply on the domain local group.)
Another acronym that stands for a strategy you can use is AGUDLP (or AULP). Here is how it expands:
A Accounts (Create your user accounts.)
G Global groups (Put user accounts into global groups.)
U Universal groups (Put the global groups into universal groups.)
DL Domain local groups (Put universal groups into domain local groups.)
P Permissions (Place permissions on the local group.)
Creating a Group
To create a new group, open the Active Directory Users and Computers snap-in. Click the OU where the group is going to reside. Right-click and choose New and then Group. After you create the group, just click the Members tab and choose Add. Add the users you want to reside in that group, and that’s all there is to it.
Filtering and Advanced Active Directory Features
The Active Directory Users and Computers tool has a couple of other features that come in quite handy when you are managing many objects. You can access the Filter Options dialog box by clicking the View menu in the MMC and choosing Filter Options. You’ll see a dialog box similar to the one shown in Figure 5.6. Here you can choose to filter objects by their specific types within the display. For example, if you are an administrator who works primarily with user accounts and groups, you can select those specific items by placing check marks in the list. In addition, you can create more complex filters by choosing Create Custom. Doing so provides you with an interface that looks similar to that of the Find command.
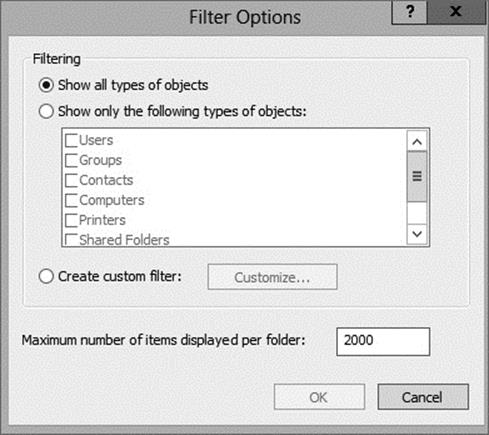
FIGURE 5.6 The Filter Options dialog box
Another option in the Active Directory Users and Computers tool is to view advanced options. You can enable the advanced options by choosing Advanced Features in the View menu. This adds some top-level folders to the list under the name of the domain. Let’s take a look at a couple of the new top-level folders.
The System folder (shown in Figure 5.7) provides additional features that you can configure to work with Active Directory. You can configure settings for the Distributed File System (DFS), IP Security (IPSec) policies, the File Replication Service (FRS), and more. In addition to the System folder, you’ll see the LostAndFound folder. This folder contains any files that may not have been replicated properly between domain controllers. You should check this folder periodically for any files so that you can decide whether you need to move them or copy them to other locations.
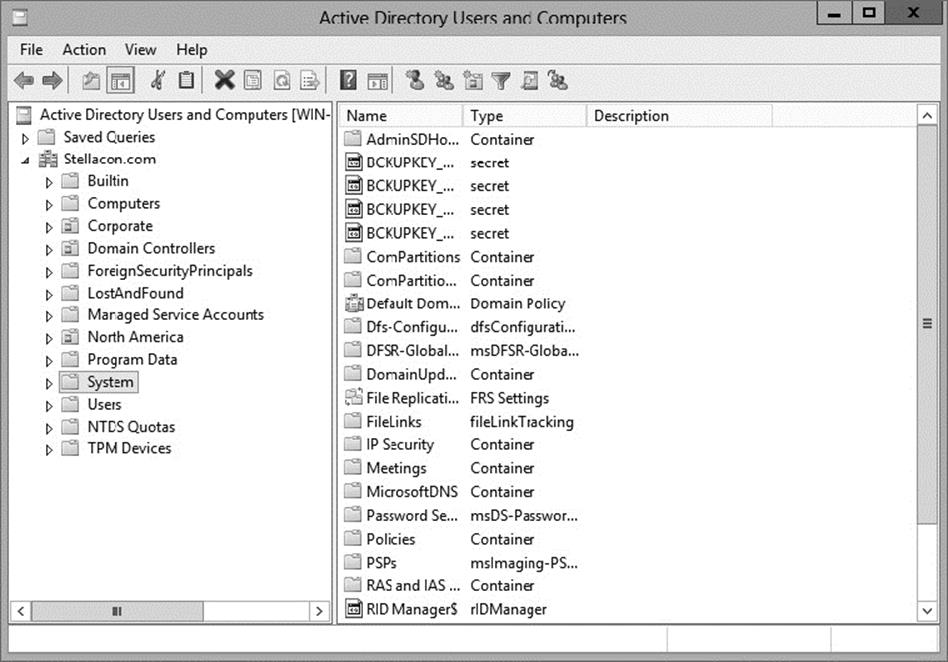
FIGURE 5.7 Advanced Features in the System folder of the Active Directory Users and Computers tool
As you can see, managing Active Directory objects is generally a simple task. The Active Directory Users and Computers tool allows you to configure several objects. Let’s move on to look at one more common administration function: moving objects.
Moving, Renaming, and Deleting Active Directory Objects
One of the extremely useful features of the Active Directory Users and Computers tool is its ability to move users and resources easily.
Exercise 5.8 walks you through the process of moving Active Directory objects. In this exercise, you will make several changes to the organization of Active Directory objects. To complete this exercise, first you must have completed Exercise 5.5.
EXERCISE 5.8: Moving Active Directory Objects
1. Click the Windows key on the keyboard and choose Administrative Tools.
2. Open the Active Directory Users and Computers tool and expand the name of the domain.
3. Select the Sales OU (under the New York OU), right-click Workstation1, and select Move. A dialog box appears. Select the RD OU and click OK to move the Computer object to that container.
4. Click the RD OU and verify that Workstation1 was moved.
5. Close the Active Directory Users and Computers tool.
In addition to moving objects within Active Directory, you can easily rename them by right-clicking an object and selecting Rename. Note that this option does not apply to all objects. You can remove objects from Active Directory by right-clicking them and choosing Delete.
 Deleting an Active Directory object is an irreversible action. When an object is destroyed, any security permissions or other settings made for that object are removed as well. Because each object within Active Directory contains its own security identifier (SID), simply re-creating an object with the same name does not place any permissions on it. Before you delete an Active Directory object, be sure that you will never need it again. Windows Server 2012 R2 has an Active Directory Recycle Bin to allow an administrator to retrieve a deleted object, but in case the Recycle Bin gets cleared, it’s better to be safe than sorry. Also, the AD Recycle Bin is disabled by default, so it will be unavailable unless you turn that feature on. So, what is the moral of this story? Don’t delete AD objects unless you are absolutely sure you want them gone.
Windows Server 2012 R2 has a check box called Protect Container From Accidental Deletion for all OUs. If this check box is checked, to delete or move an OU, you must go into the Active Directory Users and Computers advanced options. Once you are in the advanced options, you can uncheck the box to move or delete the OU.
Resetting an Existing Computer Account
Every computer on the domain establishes a discrete channel of communication with the domain controller at logon time. The domain controller stores a randomly selected password (different from the user password) for authentication across the channel. The password is updated every 30 days.
Sometimes the computer’s password and the domain controller’s password don’t match, and communication between the two machines fails. Without the ability to reset the computer account, you wouldn’t be able to connect the machine to the domain. Fortunately, you can use the Active Directory Users and Computers tool to reestablish the connection.
Exercise 5.9 shows you how to reset an existing computer account. You should have completed the previous exercises in this chapter before you begin this exercise.
EXERCISE 5.9: Resetting an Existing Computer Account
1. Click the Windows key on the keyboard and choose Administrative Tools.
2. Open the Active Directory Users and Computers tool and expand the name of the domain.
3. Click the RD OU and then right-click the Workstation1 computer account.
4. Select Reset Account from the context menu. Click Yes to confirm your selection. Click OK at the success prompt.
5. When you reset the account, you break the connection between the computer and the domain. So, after performing this exercise, reconnect the computer to the domain if you want it to continue working on the network.
Throughout this book, I have tried to show you the PowerShell way of doing a task shown previously using an MMC snap-in. Well, this is going to be no different.
This example shows you how to reset the secure connection between the local computer and the domain to which it is joined using a PowerShell command. In this example, the domain controller that performs the operation is specified as StellaDC1.Stellacon.com. To execute this PowerShell command, you must run this command on the local computer:
Test-ComputerSecureChannel -Repair -Server StellaDC1.Stellacon.com
Publishing Active Directory Objects
One of the main goals of Active Directory is to make resources easy to find. Two of the most commonly used resources in a networked environment are server file shares and printers. These are so common, in fact, that most organizations have dedicated file and print servers. When it comes to managing these types of resources, Active Directory makes it easy to determine which files and printers are available to users.
With that being said, take a look at how Active Directory manages to publish shared folders and printers.
Making Active Directory Objects Available to Users
An important aspect of managing Active Directory objects is that a system administrator can control which objects users can see. The act of making an Active Directory object available is known as publishing. The two main types of publishable objects are Printer objects and Shared Folder objects.
The general process for creating server shares and shared printers has remained unchanged from previous versions of Windows: you create the various objects (a printer or a file system folder) and then enable them for sharing. To make these resources available via Active Directory, however, there’s an additional step: you must publish the resources. Once an object has been published in Active Directory, clients will be able to use it.
When you publish objects in Active Directory, you should know the server name and share name of the resource. When system administrators use Active Directory objects, they can change the resource to which the object points, without having to reconfigure or even notify clients. For example, if you move a share from one server to another, all you need to do is to update the Shared Folder object’s properties to point to the new location. Active Directory clients still refer to the resource with the same path and name that they used before.
Publishing Printers
Printers can be published easily within Active Directory. This makes them available to users in your domain.
Exercise 5.10 walks you through the steps you need to take to share and publish a Printer object by having you create and share a printer. To complete the printer installation, you need access to the Windows Server 2012 R2 installation media (via the hard disk, a network share, or the CD-ROM drive).
![]() EXERCISE 5.10: Creating and Publishing a Printer
EXERCISE 5.10: Creating and Publishing a Printer
1. Click the Windows key on the keyboard and choose Control Panel.
2. Click Devices And Printers ![]() Add A Printer. This starts the Add Printer Wizard. Then click the Next button.
Add A Printer. This starts the Add Printer Wizard. Then click the Next button.
3. In the Choose A Local Or Network Printer page, select Add A Local Printer. This should automatically take you to the next page. If it does not, click Next.
4. On the Choose A Printer Port page, select Use An Existing Port. From the drop-down list beside that option, make sure LPT1: (Printer Port) is selected. Click Next.
5. On the Install The Printer Driver page, select Generic for the manufacturer. For the printer, highlight Generic/Text Only. Click Next.
6. On the Type A Printer Name page, type Text Printer. Uncheck the Set As The Default Printer box and then click Next.
7. The Installing Printer screen appears. After the system is finished, the Printer Sharing page appears. Make sure the box labeled “Share this printer so that others on your network can find and use it” is selected, and accept the default share name of Text Printer.
8. In the Location section, type Building 203, and in the Comment section, add the following comment: This is a text-only Printer. Click Next.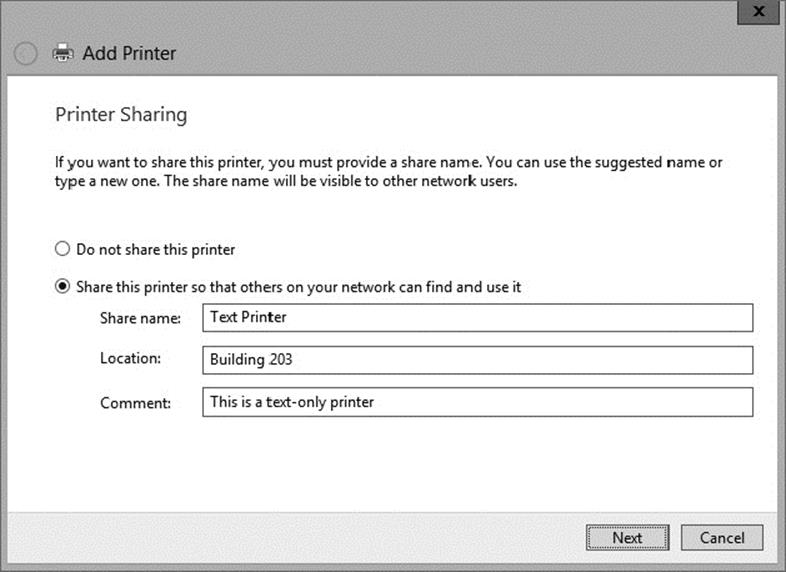
9. On the You’ve Successfully Added Text Printer page, click Finish.
10.Next you need to verify that the printer will be listed in Active Directory. Right-click the Text Printer icon and select Printer Properties.
11.Select the Sharing tab and make sure that the List In The Directory box is checked. Note that you can also add additional printer drivers for other operating systems using this tab. Click OK to accept the settings.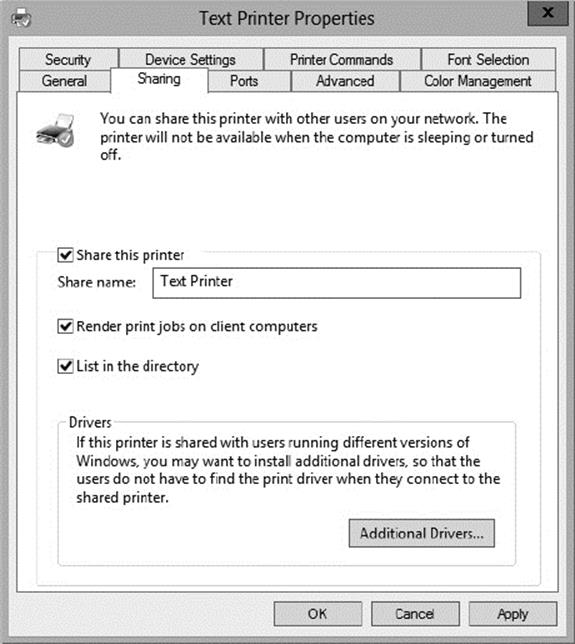
Note that when you create and share a printer this way, an Active Directory Printer object is not displayed within the Active Directory Users and Computers tool. The printer is actually associated with the Computer object to which it is connected.
Publishing Shared Folders
Now that you’ve created and published a printer, you’ll see how the same thing can be done to shared folders.
Exercise 5.11 walks through the steps required to create a folder, share it, and then publish it in Active Directory. This exercise assumes you are using the C: partition; however, you may want to change this based on your server configuration. This exercise assumes you have completed Exercise 5.5.
EXERCISE 5.11: Creating and Publishing a Shared Folder
1. Create a new folder in the root directory of your C: partition and name it Test Share. To do this, click the File Explorer link on the toolbar.
2. Right-click the Test Share folder. Choose Share With ![]() Specific People.
Specific People.
3. In the File Sharing dialog box, enter the names of users with whom you want to share this folder. In the upper box, enter Everyone and then click Add. Note that Everyone appears in the lower box. Click in the Permission Level column next to Everyone and choose Read/Write from the pop-up menu. Then click Share.
4. You’ll see a message that your folder has been shared. Click Done.
5. Click the Windows key on the keyboard and choose Administrative Tools.
6. Open the Active Directory Users and Computers tool. Expand the current domain and right-click the RD OU. Select New ![]() Shared Folder.
Shared Folder.
7. In the New Object - Shared Folder dialog box, type Shared Folder Test for the name of the folder. Then type the UNC path to the share (for example, \\server1\Test Share). Click OK to create the share.
Once you have created and published the Shared Folder object, clients can use the My Network Places icon to find it. The Shared Folder object will be organized based on the OU in which you created it. When you use publication, you can see how this makes it easy to manage shared folders.
Querying Active Directory
So far you’ve created several Active Directory resources. One of the main benefits of having all of your resource information in Active Directory is that you can easily find what you’re looking for using the Find dialog box. Recall that I recommended that you always enter as much information as possible when creating Active Directory objects. This is where that extra effort begins to pay off.
Exercise 5.12 walks you through the steps to find specific objects in Active Directory. To complete this exercise, you must have completed Exercise 5.5.
EXERCISE 5.12: Finding Objects in Active Directory
1. Click the Windows key on the keyboard and choose Administrative Tools.
2. Open the Active Directory Users and Computers tool.
3. Right-click the name of the domain and select Find.
4. In the Find Users, Contacts, And Groups dialog box, select Users, Contacts, And Groups from the Find drop-down list. For the In setting, choose Entire Directory. This searches the entire Active Directory environment for the criteria you enter.
Note that if this is a production domain and there are many objects, searching the whole directory may be a time-consuming and network-intensive operation.
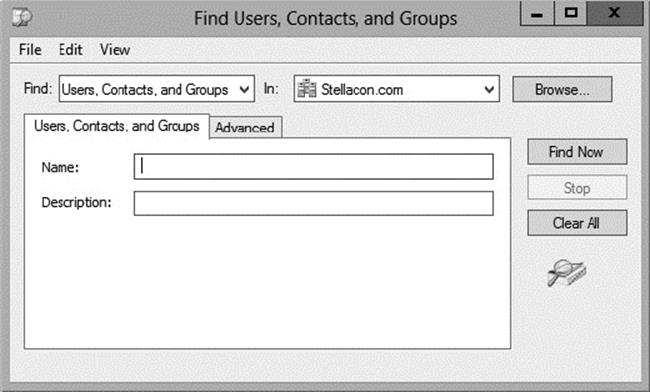
5. In the Name field, type admin and then click Find Now to obtain the results of the search.
6. Now that you have found several results, you can narrow down the list. Click the Advanced tab of the Find Users, Contacts, And Groups dialog box.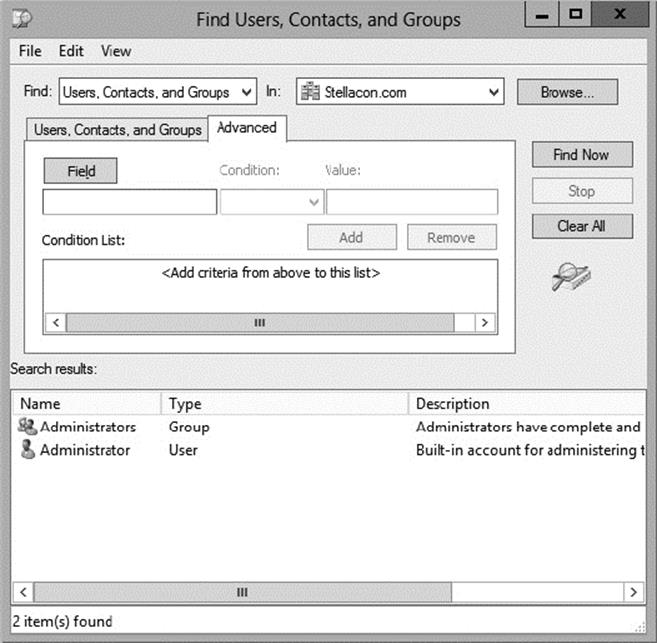
In the Field drop-down list, select User ![]() Last Name. For Condition, select Starts With, and for Value, type admin. Click Add to add this condition to the search criteria. Click Find Now. Now only the users that have the last name Admin are shown.
Last Name. For Condition, select Starts With, and for Value, type admin. Click Add to add this condition to the search criteria. Click Find Now. Now only the users that have the last name Admin are shown.
7. When you have finished searching, close the Find Users, Contacts, And Groups dialog box and exit the Active Directory Users and Computers tool.
Using the many options available in the Find dialog box, you can usually narrow down the objects for which you are searching quickly and efficiently. Users and system administrators alike find this tool useful in environments of any size. Now that you have seen how to create objects in Active Directory, let’s take a look at a new Windows Server 2012 R2 feature called Active Directory Administrative Center.
Using the Active Directory Administrative Center
Windows Server 2012 R2 has a feature called the Active Directory Administrative Center (see Figure 5.8). This feature allows you to manage many Active Directory tasks from one central location (see Figure 5.9).
FIGURE 5.8 Active Directory Administrative Center
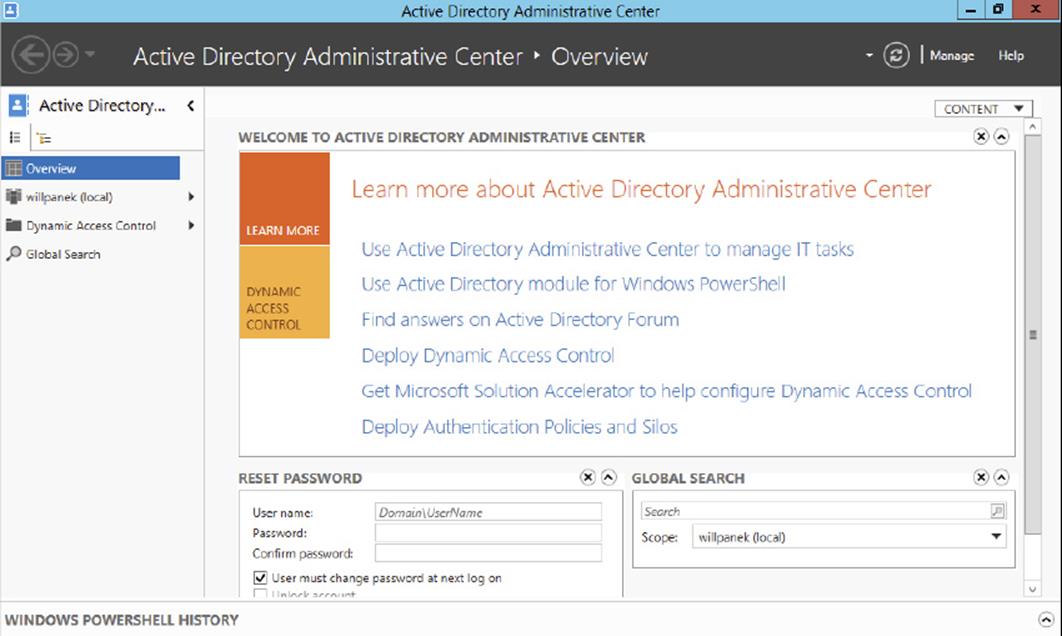
FIGURE 5.9 Administrative Center Overview screen
Using the Active Directory Administrative Center, here are some of the tasks that an administrator can perform:
§ Reset passwords
§ Create new objects
§ Delete objects
§ Move objects
§ Perform global searches
§ Configure properties for Active Directory objects
In Windows Server 2012 R2, the Active Directory Administrative Center is just another tool in your Active Directory tool belt. It does not matter which way you create your Active Directory objects as long as you have a good understanding of how to create them.
Using the Command Prompt for Active Directory Configuration
Many IT administrators like to use command-line commands to configure and maintain their Active Directory environment. One advantage of using command-line commands is the ability to do multiple changes at once using batch files.
Another advantage of knowing how to manipulate Active Directory using the command prompt is working with Windows Server 2012 R2 Server Core. Server Core is an installation of Windows Server 2012 R2 that has no GUI windows. One of the ways to configure Server Core is to use commands in the command prompt window.
Table 5.1 shows you many of the command prompt commands and explains how each command affects Active Directory.
TABLE 5.1 Command prompt commands
|
Command |
Explanation |
|
Csvde |
This command allows you to import and export data from Active Directory. The data gets stored in a comma-separated value (CSV) format. |
|
Dcdiag |
This troubleshooting command checks the state of your domain controllers in your forest and sends back a report of any problems. |
|
Djoin |
This command allows a computer account to join a domain, and it runs an offline domain join when a computer restarts. |
|
Dsacls |
This command allows you to see and change permissions in the access control list for objects in Active Directory Domain Services (AD DS). |
|
Dsadd |
This command allows you to add an object to the AD DS directory. |
|
Dsamain |
This command shows the Active Directory data stored in either a snapshot or a backup as if it were in a Lightweight Directory Access Protocol (LDAP) server. |
|
Dsdbutil |
This command provides database utilities for Active Directory Lightweight Directory Services (AD LDS). |
|
Dsget |
This command shows the properties of an object in the AD DS directory. |
|
Dsmgmt |
This command gives an administrator management utilities for AD LDS. |
|
Dsmod |
This command allows you to modify an AD DS object. |
|
Dsmove |
This command allows you to move an object in an Active Directory domain from its current OU to a new OU within the same forest. |
|
Dsquery |
This command allows you to query AD DS. |
|
Dsrm |
This command removes an object from the AD DS directory. |
|
Ldifde |
This command allows you to import and export data from Active Directory. The data is stored as LDAP Data Interchange Format (LDIF). |
|
Ntdsutil |
This is one of the most important commands for Active Directory. It allows you to do maintenance on the Active Directory database. |
|
Repadmin |
This command allows administrators to diagnose Active Directory replication problems between domain controllers. |
Summary
This chapter covered the fundamentals of administering Active Directory. The most important part of administering Active Directory is learning about how to work with OUs. Therefore, you should be aware of the purpose of OUs; that is, they help you to organize and manage the directory. For instance, think of administrative control. If you wanted to delegate rights to another administrator (such as a sales manager), you could delegate that authority to that user within the Sales OU. As the system administrator, you would retain the rights to the castle.
You also looked at how to design an OU structure from an example. The example showed you how to design a proper OU layout. You can also create, organize, and reorganize OUs if need be.
In addition, you took a look at groups and group strategies. There are different types of groups (domain local, global, and universal groups), and you should know when each group is available and when to use each group.
Finally, this chapter covered how to use the Active Directory Users and Computers tool to manage Active Directory objects. If you’re responsible for day-to-day system administration, there’s a good chance that you are already familiar with this tool; if not, you should be after reading this chapter. Using this tool, you learned how to work with Active Directory objects such as User, Computer, and Group objects. You also learned how to import users by doing a bulk import, and you studied the two different file types that work for bulk imports. Bulk imports allow you to import multiple users without the need to add one user at a time.
Exam Essentials
Understand the purpose of OUs. OUs are used to create a hierarchical, logical organization for objects within an Active Directory domain.
Know the types of objects that can reside within OUs. OUs can contain Active Directory User, Computer, Shared Folder, and other objects.
Understand how to use the Delegation of Control Wizard. The Delegation of Control Wizard is used to assign specific permissions at the level of OUs.
Understand the concept of inheritance. By default, child OUs inherit permissions and Group Policy assignments set for parent OUs. However, these settings can be overridden for more granular control of security.
Know groups and group strategies. You can use three groups in Native mode: domain local, global, and universal. Understand the group strategies and when they apply.
Understand how Active Directory objects work. Active Directory objects represent some piece of information about components within a domain. The objects themselves have attributes that describe details about them.
Understand how Active Directory objects can be organized. By using the Active Directory Users and Computers tool, you can create, move, rename, and delete various objects.
Understand how to import bulk users. You can import multiple accounts by doing a bulk import. Bulk imports use files to import the data into Active Directory. Know the two utilities (ldifde.exe and csvde.exe) you need to perform the bulk imports and how to use them.
Learn how resources can be published. A design goal for Active Directory was to make network resources easier for users to find. With that in mind, you should understand how using published printers and shared folders can simplify network resource management.
Review Questions
1. You are the administrator of an organization with a single Active Directory domain. A user who left the company returns after 16 weeks. The user tries to log onto their old computer and receives an error stating that authentication has failed. The user’s account has been enabled. You need to ensure that the user is able to log onto the domain using that computer. What do you do?
A. Reset the computer account in Active Directory. Disjoin the computer from the domain and then rejoin the computer to the domain.
B. Run the ADadd command to rejoin the computer account.
C. Run the MMC utility on the user’s computer, and add the Domain Computers snap-in.
D. Re-create the user account and reconnect the user account to the computer account.
2. You are the administrator of an organization with a single Active Directory domain. One of your senior executives tries to log onto a machine and receives the error “This user account has expired. Ask your administrator to reactivate your account.” You need to make sure that this doesn’t happen again to this user. What do you do?
A. Configure the domain policy to disable account lockouts.
B. Configure the password policy to extend the maximum password age to 0.
C. Modify the user’s properties to set the Account Never Expires setting.
D. Modify the user’s properties to extend the maximum password age to 0.
3. You need to create a new user account using the command prompt. Which command would you use?
A. dsmodify
B. dscreate
C. dsnew
D. dsadd
4. Maria is a user who belongs to the Sales distribution global group. She is not able to access the laser printer that is shared on the network. The Sales global group has full access to the laser printer. How do you fix the problem?
A. Change the group type to a security group.
B. Add the Sales global group to the Administrators group.
C. Add the Sales global group to the Printer Operators group.
D. Change the Sales group to a local group.
5. You are a domain administrator for a large domain. Recently, you have been asked to make changes to some of the permissions related to OUs within the domain. To restrict security for the Texas OU further, you remove some permissions at that level. Later, a junior system administrator mentions that she is no longer able to make changes to objects within the Austin OU (which is located within the Texas OU). Assuming that no other changes have been made to Active Directory permissions, which of the following characteristics of OUs might have caused the change in permissions?
A. Inheritance
B. Group Policy
C. Delegation
D. Object properties
6. Isabel, a system administrator, created a new Active Directory domain in an environment that already contains two trees. During the promotion of the domain controller, she chose to create a new Active Directory forest. Isabel is a member of the Enterprise Administrators group and has full permissions over all domains. During the organization’s migration to Active Directory, many updates were made to the information stored within the domains. Recently, users and other system administrators have complained about not being able to find specific Active Directory objects in one or more domains (although the objects exist in others). To investigate the problem, Isabel wants to check for any objects that have not been properly replicated among domain controllers. If possible, she would like to restore these objects to their proper place within the relevant Active Directory domains.
Which two of the following actions should she perform to be able to view the relevant information? (Choose two.)
A. Change Active Directory permissions to allow object information to be viewed in all domains.
B. Select the Advanced Features item in the View menu.
C. Promote a member server in each domain to a domain controller.
D. Rebuild all domain controllers from the latest backups.
E. Examine the contents of the LostAndFound folder using the Active Directory Users and Computers tool.
7. You are a consultant hired to evaluate an organization’s Active Directory domain. The domain contains more than 200,000 objects and hundreds of OUs. You begin examining the objects within the domain, but you find that the loading of the contents of specific OUs takes a long time. Furthermore, the list of objects can be large. You want to do the following:
§ Use the built-in Active Directory administrative tools and avoid the use of third-party tools or utilities.
§ Limit the list of objects within an OU to only the type of objects that you’re examining (for example, only Computer objects).
§ Prevent any changes to the Active Directory domain or any of the objects within it.
Which one of the following actions meets these requirements?
D. Use the Filter option in the Active Directory Users and Computers tool to restrict the display of objects.
E. Use the Delegation of Control Wizard to give yourself permissions over only a certain type of object.
F. Implement a new naming convention for objects within an OU and then sort the results using this new naming convention.
G. Use the Active Directory Domains and Trusts tool to view information from only selected domain controllers.
H. Edit the domain Group Policy settings to allow yourself to view only the objects of interest.
8. You are the administrator for a small organization with four servers. You have one file server named Paniva that runs Windows Server 2012 R2. You have a junior administrator who needs to do backups on this server. You need to ensure that the junior admin can use Windows Server Backup to create a complete backup of Paniva. What should you configure to allow the junior admin to do the backups?
. The local groups by using Computer Management
A. A task by using Authorization Manager
B. The User Rights Assignment by using the Local Group Policy Editor
C. The Role Assignment by using Authorization Manager
9. Miguel is a junior-level system administrator, and he has basic knowledge about working with Active Directory. As his supervisor, you have asked Miguel to make several security-related changes to OUs within the company’s Active Directory domain. You instruct Miguel to use the basic functionality provided in the Delegation of Control Wizard. Which of the following operations are represented as common tasks within the Delegation of Control Wizard? (Choose all that apply.)
. Reset passwords on user accounts.
A. Manage Group Policy links.
B. Modify the membership of a group.
C. Create, delete, and manage groups.
10. You are the primary system administrator for a large Active Directory domain. Recently, you have hired another system administrator upon whom you intend to offload some of your responsibilities. This system administrator will be responsible for handling help desk calls and for basic user account management. You want to allow the new employee to have permissions to reset passwords for all users within a specific OU. However, for security reasons, it’s important that the user not be able to make permissions changes for objects within other OUs in the domain. Which of the following is the best way to do this?
. Create a special administration account within the OU and grant it full permissions for all objects within Active Directory.
A. Move the user’s login account into the OU that the new employee is to administer.
B. Move the user’s login account to an OU that contains the OU (that is, the parent OU of the one that the new employee is to administer).
C. Use the Delegation of Control Wizard to assign the necessary permissions on the OU that the new employee is to administer.
All materials on the site are licensed Creative Commons Attribution-Sharealike 3.0 Unported CC BY-SA 3.0 & GNU Free Documentation License (GFDL)
If you are the copyright holder of any material contained on our site and intend to remove it, please contact our site administrator for approval.
© 2016-2026 All site design rights belong to S.Y.A.