Training Guide Administering Windows Server 2012 R2 (2014)
Chapter 1. Deploying and updating Windows Server 2012 R2
Deploying and servicing Windows Server 2012 and Windows Server 2012 R2 is a routine task that you will perform in your career as a systems administrator. Deploying the operating system is something you generally do once per server, especially now that it’s easier to restore a system image from backup, than it is to deploy from scratch. Servicing includes keeping your deployment images and your deployed services up to date. In your job role, you’re likely to spend a lot more time on these tasks than you will on deployment. In this chapter, you’ll learn about configuring and servicing Windows Server 2012 and Windows Server 2012 R2 images, about the tools included with Windows Server that enable you to automate its deployment, and about the technologies that are available to automate the process of keeping deployed servers up to date with hotfixes and software updates.
Lessons in this chapter:
![]() Lesson 1: Configuring and servicing Windows Server images
Lesson 1: Configuring and servicing Windows Server images
![]() Lesson 2: Automatically deploying Windows Server images
Lesson 2: Automatically deploying Windows Server images
![]() Lesson 3: Servicing and updating deployed servers
Lesson 3: Servicing and updating deployed servers
Before you begin
To complete the practice exercises in this chapter, you must set up the lab of virtual machines, as described in the Introduction. You should take a checkpoint (formerly known as a snapshot) of each virtual machine prior to performing the practice exercises. You can revert the virtual machines to their original state once you have completed the exercises.
Lesson 1: Configuring and servicing Windows Server images
Although you can install Windows Server 2012 from the installation media, most organizations that deploy the server operating system use custom images. By using custom images, systems administrators can deploy operating systems so that they require a minimum of post-installation configuration. In this lesson, you will learn about Windows images, the steps that you can take to configure these images, and the processes involved in servicing those images.
After this lesson, you will be able to:
![]() Understand Windows images.
Understand Windows images.
![]() Configure Windows images.
Configure Windows images.
![]() Service Windows images.
Service Windows images.
Estimated lesson time: 45 minutes
Understanding Windows images
In earlier versions of the Windows Server operating system, such as Windows NT 4.0 and Windows Server 2003, all of the files needed to install the operating system were located in a special i386 directory on the installation media. With Windows images, the entire operating system—as well as associated drivers, updates, and applications—is stored within a single file, known as an image file. During installation, this image is applied to the target volume. Windows images use the Windows Imaging (WIM) file format and have the following benefits:
![]() Multiple deployment methods You can use a variety of ways to deploy Windows images. You can deploy .wim files using a traditional DVD-ROM, from a bootable USB drive, from a network share, or through specialized deployment technologies such as Windows Deployment Services (WDS) or Microsoft System Center 2012 Configuration Manager.
Multiple deployment methods You can use a variety of ways to deploy Windows images. You can deploy .wim files using a traditional DVD-ROM, from a bootable USB drive, from a network share, or through specialized deployment technologies such as Windows Deployment Services (WDS) or Microsoft System Center 2012 Configuration Manager.
![]() Editable You can mount an image and edit it, enabling, disabling, or removing operating system roles and features as necessary.
Editable You can mount an image and edit it, enabling, disabling, or removing operating system roles and features as necessary.
![]() Updatable You can update an image without having to perform an operating system image capture. In previous versions of Windows, you had to perform a deployment, apply updates, and then capture a new image. If you wanted to update that image, you’d have to start from scratch.
Updatable You can update an image without having to perform an operating system image capture. In previous versions of Windows, you had to perform a deployment, apply updates, and then capture a new image. If you wanted to update that image, you’d have to start from scratch.
The Windows Server 2012 installation media contain two .wim files in the Sources directory: Boot.wim and Install.wim. Boot.wim is used by the installation media to load the preinstallation environment that you use to deploy Windows Server 2012. Install.wim stores one or more operating system images. For example, as Figure 1-1 shows, the Install.wim file available with the evaluation version of Windows Server 2012 contains four different editions of Windows Server 2012.
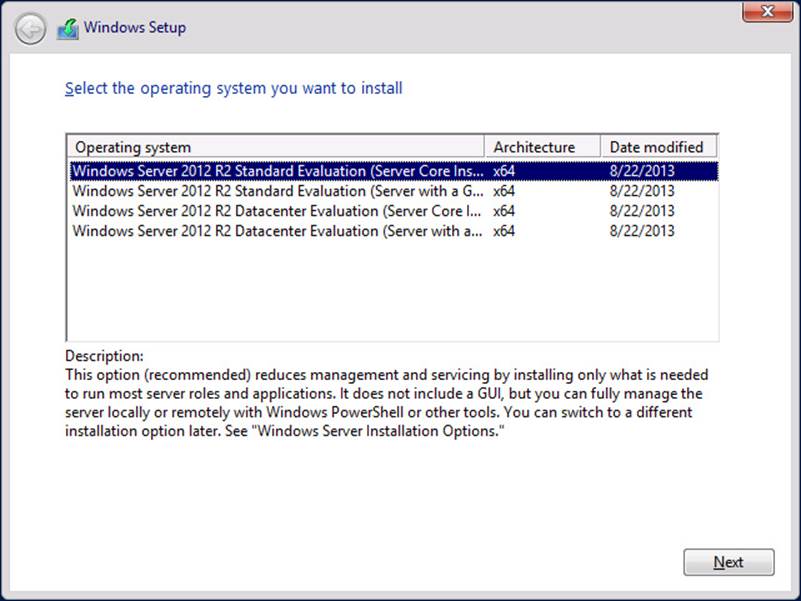
FIGURE 1-1 Operating systems included in the evaluation Install.wim file
More Info: Windows Server 2012 R2
This book uses the evaluation version that you can download from the Microsoft website at http://technet.microsoft.com/en-US/evalcenter/dn205286.aspx.
More Info: Windows Imaging (WIM) file format
To learn more about the Windows Imaging (WIM) file format, consult the following Microsoft white paper at http://www.microsoft.com/en-us/download/details.aspx?id=13096.
Configuring Windows images
Although you can deploy Windows Server 2012 and Windows Server 2012 R2 straight off the installation media, in enterprise environments you will want to make modifications to the image. The Deployment Image Servicing and Management (DISM) tool is a command-line tool that you can use to manage images in an offline state. The advantage of performing offline modifications to images is that you don’t need to install an operating system and then perform a capture to make changes.

You can use Dism.exe to perform the following tasks:
![]() Enable or disable roles and features
Enable or disable roles and features
![]() List roles and features
List roles and features
![]() Add, remove, and list software updates
Add, remove, and list software updates
![]() Add, remove, and list software drivers
Add, remove, and list software drivers
![]() Add, remove, and list software packages in .appx format to a Windows image
Add, remove, and list software packages in .appx format to a Windows image
For example, you can take the Install.wim file from the Windows Server installation media and use Dism.exe to mount that image, add new drivers and recent software updates to that image, and save those changes—all without having to perform a Windows Server 2012 deployment. The advantage is that when you do use this updated image for deployment, the drivers and updates that you added are already applied to the image. You don’t have to install them as part of your post-installation configuration routine.
Real World: Finding drivers
Rather than searching vendor websites in vain, you can use the Microsoft Update Catalog (http://catalog.update.microsoft.com) to find and download driver files that you can add to WIM images. This site stores all of the certified hardware drivers, software updates, and hotfixes published by Microsoft. Once you download drivers and software updates, you can add them to your existing installation images by using Dism.exe.
Servicing Windows images
As a systems administrator responsible for deploying Windows Server, you need to ensure that your deployment images are kept up to date. The latest software updates must be applied to the image, and any new device drivers for commonly used server hardware should be included.
The main goals of an image servicing strategy are the following:
![]() Ensure that the latest software updates and hotfixes are applied to the image before the image is deployed to new servers.
Ensure that the latest software updates and hotfixes are applied to the image before the image is deployed to new servers.
![]() Ensure that the latest drivers are applied to the image before the image is deployed to new servers.
Ensure that the latest drivers are applied to the image before the image is deployed to new servers.
If you don’t take these steps, you’ll have to wait until after you’ve deployed the operating system before you can apply updates and drivers, which consumes a significant amount of time. If your images are up to date, you won’t have to pause between deploying Windows Server, and waiting for it to contact Microsoft Update or the local Windows Server Update Services (WSUS) server before you can move on to the next step (for example, deploying a server application such as Microsoft Exchange 2013, Microsoft SharePoint 2013, or Microsoft SQL Server 2012).
Real World: Locating update files
Instead of searching through TechNet to locate specific update files, the Microsoft Update Catalog (http://catalog.update.microsoft.com) contains all of the software update and hotfix files published by Microsoft. You can inject these updates into an operating system image by using Dism.exe.
Using Dism.exe to service images
The Dism.exe command-line utility is included with the Windows Server 2012 operating system. You can use the Dism.exe utility to service the current operating system in an online state or perform offline servicing of a Windows image. This lesson is concerned with performing maintenance of installation images, so it covers only that aspect of Dism.exe functionality.
Servicing images with Dism.exe involves performing the following general steps:
1. Mount the image so that it can be modified.
2. Service the image.
3. Commit or discard the changes made to the image.
Mounting images
By mounting an image, you can make changes to that image. When you mount an image, you link it to a folder. You can use File Explorer, Windows PowerShell, or Cmd.exe to navigate the structure of this folder and interact with it as you would any other folder located on the file system. Once the image is mounted, you can also use Dism.exe to perform servicing tasks, such as adding and removing drivers and updates.
A single WIM file can contain multiple operating system images. Each operating system image is assigned an index number, which you need to know before you can use Dism.exe to mount the image. You locate this using the /Get-wiminfo switch. For example, if you have an image named Install.wim located in the C:\Images folder, you can use the following command to get a list of the operating system images it contains.
Dism.exe /get-wiminfo /wimfile:c:\images\install.wim
Figure 1-2 shows the result of this command and lists the images contained in Windows Server 2012. The Standard Edition of Windows Server 2012 R2 is assigned index identity 2, the Server Core version of the Standard Edition is listed as index identity 1, the Server Core version of the Datacenter Edition is assigned index identity 3, and the version of the Datacenter Edition that installs the GUI components is assigned index identity 4.
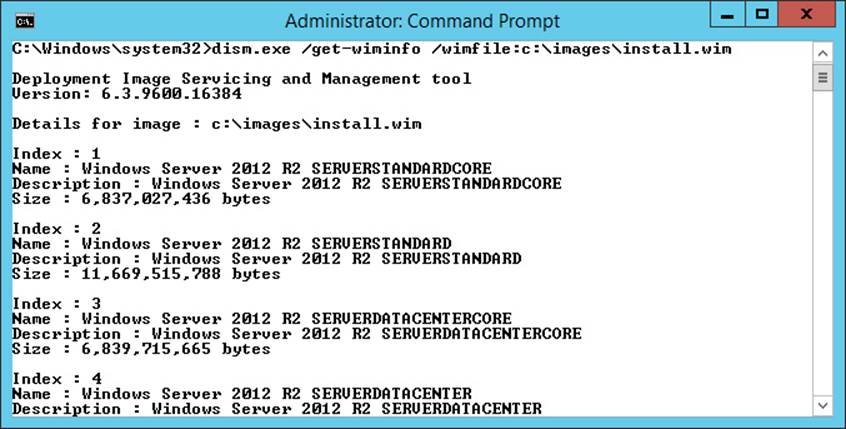
FIGURE 1-2 List of images in a .wim file
Once you have determined which operating system image you want to service, use the /Mount-image switch with the Dism.exe command to mount that image. For example, to mount the Standard Edition of Windows Server 2012 R2 from the Install.wim file that is available with the Evaluation Edition in the C:\Mount folder, issue this command.
Dism.exe /mount-image /imagefile:c:\images\install.wim /index:2 /mountdir:c:\mount
Adding drivers and updates to images
Once you have mounted an image, you can start to service that image. When servicing images used to deploy Windows Server, the most common tasks are adding device drivers and software updates to the image. You can use the /Add-Driver switch with the Dism.exe command to add a driver to a mounted image. When using the switch by itself, you need to specify the location of the driver’s .inf file. Rather than adding a driver at a time, you can use the /Recurse option to have all drivers located in a folder and its subfolders added to an image. For example, to add all of the drivers located in and under the C:\Drivers folder to the image mounted in the C:\Mount folder, use the following command.
Dism.exe /image:c:\mount /Add-Driver /driver:c:\drivers\ /recurse
You can use the /Get-Driver option to list all drivers that have been added to the image and the /Remove-Driver option to remove a driver from an image. You can remove only the drivers that you or someone else has added to an image. You can’t remove any of the drivers that were present on the image when it was published by Microsoft. You might choose to remove an existing driver if the driver you added in the past has since been updated.
More Info: Adding drivers to images
You can learn more about adding drivers to images by consulting the following TechNet article at http://technet.microsoft.com/en-us/library/hh824971.aspx.
You can use Dism.exe with the /Add-Package switch to add packages that contain updates or packages in .cab or .msu format. Software updates are available from the Microsoft Update Catalog website in .msu format. For example, if you download an update from the Microsoft Update Catalog website named Security Update For Windows Server 2012 R2 (KB2893294) to the C:\Updates folder on a computer, and you mounted a WIM image of the Windows Server 2012 R2 operating system in the C:\Mount folder, you could apply the update to the image by using this command.
Dism.exe /image:c:\mount /Add-Package /PackagePath:"c:\updates\Security Update for
Windows Server 2012 R2 (KB2893294)"
Real World: Driverstore folder
You can download drivers from the Microsoft Update Catalog website. You can also use the C:\Windows\system32\driverstore directory from another deployment of Windows Server 2012, Windows Server 2012 R2, Windows 8, or Windows 8.1 on the x64 platform. Copy this folder to a USB drive and store it separately because it contains all of the drivers that have been downloaded for the current hardware.
The updates in this folder in .msu format are then applied to the mounted image, as shown in Figure 1-3. You can use the /Get-Package option to list the updates and packages that were already added to the image.
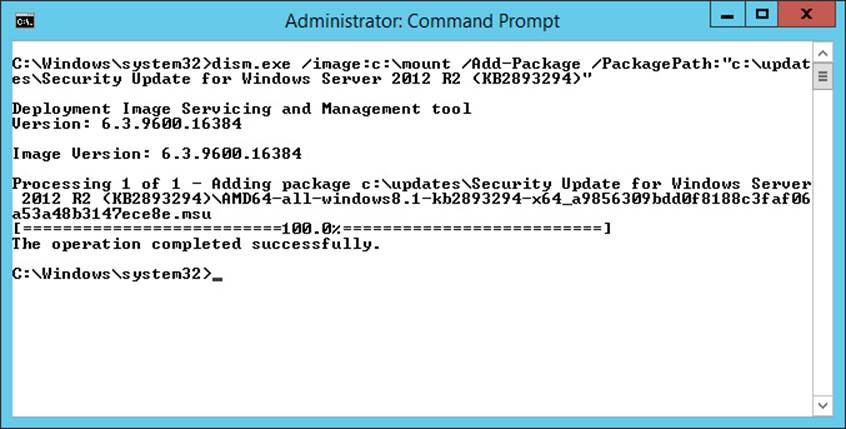
FIGURE 1-3 Adding updates to the image
![]() Quick check
Quick check
![]() Which switch do you use with Dism.exe to add updates to a mounted image?
Which switch do you use with Dism.exe to add updates to a mounted image?
Quick check answer
![]() You use the /Add-Package switch with Dism.exe to add updates to a mounted image.
You use the /Add-Package switch with Dism.exe to add updates to a mounted image.
Adding features and app packages
You can determine which features are available in a mounted operating system image by using the /Get-Features switch. For example, to learn which features are available on the image mounted in the C:\Mount folder, use this command.
Dism.exe /image:c:\mount /Get-Features
You can enable or disable a specific feature using the /Enable-Feature switch. For example, to enable the NetFx3ServerFeatures feature, which enables the .NET Framework 3.5 server features in an image, use this command.
Dism.exe /image:c:\mount /Enable-Feature /all /FeatureName:NetFx3ServerFeatures
Some features on the Windows Server image are in a state in which they are listed as having their payload removed, which means that the installation files for that feature are not included on the image. If you install a feature that had its payload removed when the operating system was deployed, the operating system can download the files from the Microsoft update servers on the Internet. You can also specify the location of the installation files. The installation files for the features that have had their payload removed in Windows Server are located in the \Sources\sxs folder of the volume in which the installation media is located.
You can add these payload-removed features to an image by using Dism.exe and specifying the source directory. For example, to modify an image mounted in the C:\Mount folder so that the Microsoft .NET Framework 3.5 features are installed and available, issue this command when the installation media is located on volume D.
Dism.exe /image:c:\mount /Enable-Feature /all /FeatureName:NetFx3 /Source:d:\sources\sxs
Note: Installing .NET Framework 3.5 features
Before you can install the .NET Framework 3.5 features, you must first add the .NET Framework 3.5 server features (NetFx3ServerFeatures) payload.
You can add, remove, and list provisioned app packages to an install image. App packages are located in .appx files and are used with computers running the Windows 8, Windows 8.1, Windows Server 2012, and Windows Server 2012 R2 operating systems. When you add a provisioned app package to an install image, the application will be installed for all users. You use the /Add-ProvisionedAppxPackage, /Get-ProvisionedAppxPackage, and /Remove-ProvisionedAppxPackage switches with the Dism.exe command to accomplish these goals.
Real World: .NET Framework 3.5
A lot of current software needs the .NET Framework 3.5 components. Rather than searching for the installation media, adding the payload files is one of the things that I first change when customizing Install.wim.
Committing an image

When you finish servicing an image, you can save your changes using the /Unmount-Wim switch with the /Commit option. You can discard changes using the /Discard option. For example, to make changes and then commit the image mounted in the C:\Mount folder, use this command.
Dism.exe /Unmount-Wim /MountDir:c:\mount /commit
Once you have committed the changes, the .wim file that you originally mounted is updated with these modifications. You can then import this .wim file into WDS, or use it with bootable USB installation media to deploy Windows Server 2012 or Windows Server 2012 R2 with these updates already applied.
Build and capture
The build and capture process is commonly used with client operating systems and less commonly with server operating systems. When you perform a build and capture, you deploy an operating system; provision that operating system with updates, applications, and drivers; and then capture that operating system for deployment. Build and capture is used less often with server operating systems because they rarely require the same sort of application deployment that is required for client operating systems.
If your deployment strategy does involve the deployment and capture of Windows Server 2012 and Windows Server 2012 R2, you need to remember that you’ll need to generalize the image prior to capture, removing any configuration information that is specific to the installation. You can perform this task using the Sysprep.exe utility. Sysprep.exe is included with Windows Server 2012 and Windows Server 2012 R2, and has the dialog box shown in Figure 1-4. When you use Sysprep.exe to prepare the image, you can configure the image to return to the system Out-of-Box Experience (OOBE). This is the same experience you get when Windows Server boots for the first time, though in this case all of the updates, applications, and drivers included on the captured image will be included on the newly deployed image.
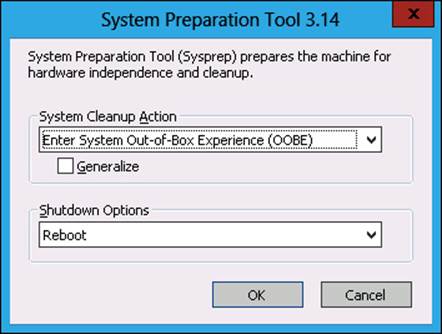
FIGURE 1-4 Sysprep dialog box
With previous versions of the Windows Server operating system, you would use a utility known as ImageX.exe to capture and apply images. To perform these tasks, you would boot a prepared server into a special Windows Preinstallation Environment (Windows PE) that included these tools. You would then use the ImageX.exe tool to capture the prepared operating system in .wim format, saving it on a separate volume or on a network share. This image capture and deployment functionality is now present in the Dism.exe command-line utility. You can use Dism.exe with the /Capture-Image switch to capture an image and the /Apply-Image switch to write an existing image to a volume.
Another capture option is to build a virtual machine, run Sysprep.exe to prepare the installation, shut down, and then import the .vhd or .vhdx file into WDS. WDS in Windows Server 2012 R2 supports importing and managing images in .vhd or .vhdx format using the console. Images in this format can be deployed from WDS to “bare metal” or to virtual machines in the same way that images in .wim format are.
More Info: Capture and apply images
To learn more about capturing and applying images using Dism.exe, consult the following TechNet article at http://technet.microsoft.com/en-us/library/hh825258.aspx.
Lesson summary
![]() Install.wim, located in the \Sources folder of the Windows Server 2012 installation media, stores the Windows Server 2012 operating system images.
Install.wim, located in the \Sources folder of the Windows Server 2012 installation media, stores the Windows Server 2012 operating system images.
![]() You can use Dism.exe to add and remove drivers and software updates from installation images.
You can use Dism.exe to add and remove drivers and software updates from installation images.
![]() You must mount an installation image before you can modify it.
You must mount an installation image before you can modify it.
![]() You must commit your changes when dismounting an installation image to have those changes saved.
You must commit your changes when dismounting an installation image to have those changes saved.
![]() Use Sysprep.exe to prepare an image for capture.
Use Sysprep.exe to prepare an image for capture.
Lesson review
Answer the following questions to test your knowledge of the information in this lesson. You can find the answers to these questions and explanations of why each answer choice is correct or incorrect in the “Answers” section at the end of this chapter.
1. You want to configure an existing Windows Server 2012 deployment image with several recently released software updates that are in .msu format without performing a build and capture. Which of the following commands can you use to accomplish this goal? (Choose all that apply.)
A. ImageX.exe
B. Dism.exe
C. Sysprep.exe
D. Diskpart.exe
2. Which of the following switches do you use with the Dism.exe utility if you want to add software updates in .msu format to a mounted image? (Choose all that apply.)
A. /Add-Driver
B. /Enable-Feature
C. /Add-Package
D. /Add-ProvisionedAppxPackage
3. Which of the following steps must you take before you can modify an existing offline installation image?
A. Commit the image.
B. Capture the image.
C. Mount the image.
D. Discard the image.
Lesson 2: Automatically deploying Windows Server images
Deploying a server operating system requires that the systems administrator answer a few brief questions, but those questions are spaced out across the operating system deployment process. An administrator who can automate this process doesn’t need to spend time shepherding the server operating system deployment, but instead can go on to perform unrelated tasks. Automating operating system deployment also has the benefit of ensuring that configuration steps are performed in a consistent manner. Automating the process minimizes the chance that a careless mistake will result in the operating system deployment process needing to be restarted from the beginning. In this lesson, you learn about WDS, understand different image types used with automated operating system deployment technologies, and learn how to create answer files so that operating system deployment can be deployed without requiring direct administrator attention.
After this lesson, you will be able to:
![]() Create answer files.
Create answer files.
![]() Manage Windows Deployment Services (WDS).
Manage Windows Deployment Services (WDS).
![]() Deploy the discover, boot, and install images.
Deploy the discover, boot, and install images.
Estimated lesson time: 45 minutes
Automating installation
When performing an operating system installation, you spend far more time watching process bars than you do inputting configuration information. If you automate server operating system deployment, you can minimize the amount of time you have to spend watching the operating system install. Automating the process also minimizes the chance of configuration mistakes that might occur when bored administrators get distracted during the deployment process.
There are two different ways to automate server operating system deployment:
![]() Answer files You can start an operating system deployment and provide an answer file. The installation process uses the answer file to answer all necessary questions. A complex answer file can perform post–installation configuration tasks. The drawback of answer files is that they take time to configure properly. Once you get them working, though, they’ll save you many hours.
Answer files You can start an operating system deployment and provide an answer file. The installation process uses the answer file to answer all necessary questions. A complex answer file can perform post–installation configuration tasks. The drawback of answer files is that they take time to configure properly. Once you get them working, though, they’ll save you many hours.
![]() Centralized deployment Rather than installing operating systems from a DVD or USB stick, you can use centralized deployment to perform simultaneous installations of the same operating system on multiple computers. Centralized deployment can even be used with answer files.
Centralized deployment Rather than installing operating systems from a DVD or USB stick, you can use centralized deployment to perform simultaneous installations of the same operating system on multiple computers. Centralized deployment can even be used with answer files.
When considering your operating system deployment strategy, remember what you learned about image servicing in Lesson 1. Keeping your deployment images up to date means that when you automatically deploy Windows Server, the deployed operating system will have the latest software updates and drivers.
Configuring answer files
With answer files, you can automate the process of deploying Windows Server. Instead of having to manually select specific installation options and perform post–installation configuration actions such as joining a newly deployed server to an AD DS domain, you can automate the process with answer files. During setup, the Windows Server looks for a file on local and attached media named Autounattend.xml. If this file is present, Windows Server automatically uses the settings contained in the file to configure the new server deployment.
As its name suggests, Autounattend.xml uses the XML file format. Although it is certainly possible for you to manually edit this XML file using a text editor such as Notepad, this process is complicated, and you are likely to make errors that cause the file to not work. The Windows System Image Manager (known as Windows SIM) is a GUI-based tool that you can use to create an answer file. When using the tool, you must specify the image for which you want to create an answer file. Windows SIM then creates a catalog file for all the options that you can configure. After you configure all the settings that you want automated during installation and post-installation configuration, you can have the tool output an answer file using correct XML syntax. Windows SIM is included with the Windows Assessment and Deployment Kit (Windows ADK), which you can download from the Microsoft website.
To create an answer file using Windows SIM, perform the following steps:
1. Download and install Windows ADK from the Microsoft website using the installation defaults.
2. Copy the file \Sources\install.wim from the Windows Server installation media to a temporary directory on the computer on which you have installed Windows ADK.
3. Open Windows SIM from the Start screen.
4. On the Windows SIM interface, click File, and then click Select Windows Image. Open the file Install.wim.
5. Select an operating system image on the install image for which you wish to create an answer file.
6. When prompted to create a catalog file, click Yes.
7. Click File, and click New Answer File.
8. Use Windows SIM to select each component that you want to configure. Figure 1-5 shows how you can configure installation to join the Contoso.com domain.
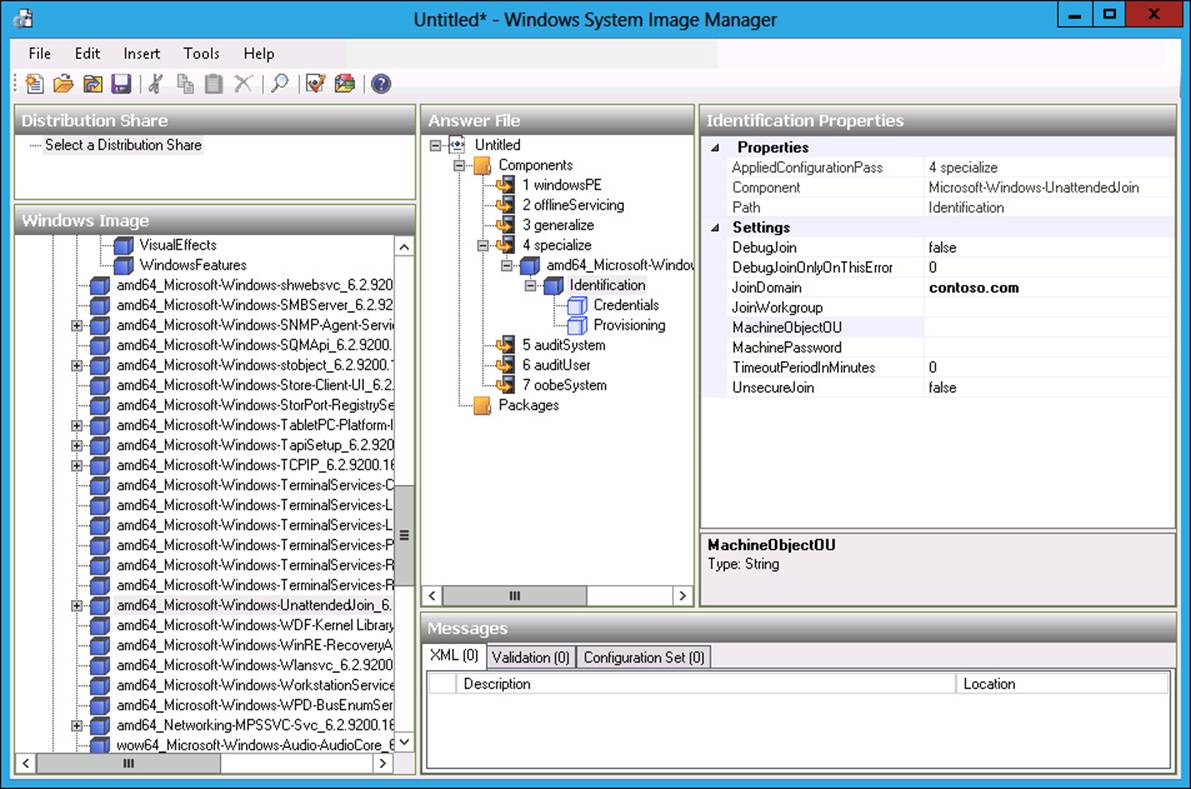
FIGURE 1-5 Configuring an answer file
More Info: Windows SIM
You can learn more about Windows SIM by visiting the following TechNet website at http://technet.microsoft.com/en-us/library/hh824929.aspx.
Windows Deployment Services
WDS is a server role that you can deploy on computers running Windows Server. WDS enables you to deploy operating systems, including but not limited to Windows 8, Windows 8.1, Windows Server 2012, and Windows Server 2012 R2, to computers over the network. WDS sends these operating systems across the network using multicast transmissions, which means that multiple computers receive the same operating system image while minimizing the use of network bandwidth. When you use multicast transmissions, the same amount of traffic crosses the network independently of whether you are deploying Windows Server to 1 computer or 50.
Deploying Windows Server through WDS involves performing the following steps:
1. An operating system deployment transmission is prepared on the WDS server.
2. The media access control (MAC) addresses of Pre-boot Execution Environment (PXE)–compliant network adapters are made available to the WDS server.
3. The computers that are targets of the transmission boot using their PXE–compliant network adapters.
4. These computers locate the WDS server and begin the operating system setup process. If the WDS server has been provisioned with an answer file, as shown in Figure 1-6, the setup completes automatically. If the WDS server has not been provisioned with an answer file, an administrator must enter setup configuration information.
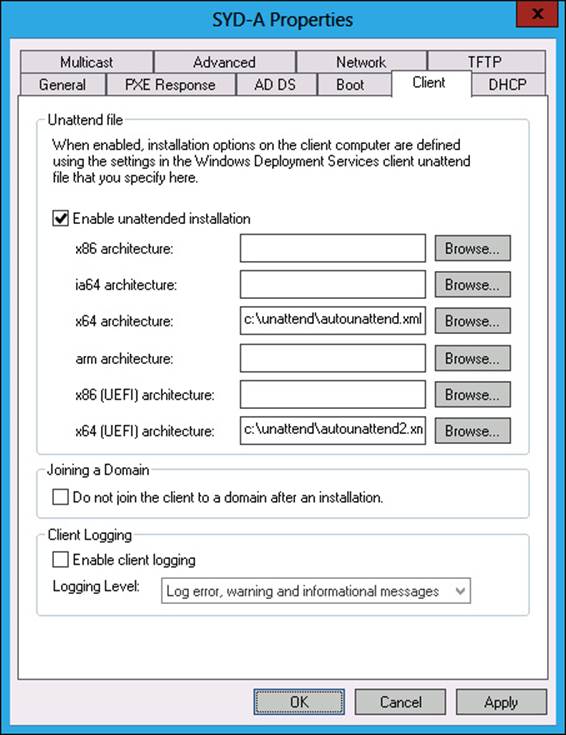
FIGURE 1-6 Configuring unattended files
Real World: Multiple WDS servers
Each WDS server can have only one unattended installation file for each processor architecture. Because unattended installation files differ between server and client, you will either need to swap unattended files when you are switching between client and server, or have multiple WDS servers. In environments in which you frequently perform operating system deployment, consider using System Center 2012 R2 Configuration Manager because it makes the process of configuring automatic operating system deployment for multiple operating system types and roles easier. You can also deploy server operating systems using System Center 2012 R2 Virtual Machine Manager.
WDS requirements
WDS clients need a PXE–compliant network adapter, which is rarely a problem because almost all modern network adapters are PXE–compliant. You can also use WDS to deploy Windows Server 2012 or Windows Server 2012 R2 to virtual machines running under Hyper-V. The trick to doing this is to use a legacy rather than a synthetic network adapter when creating the virtual machine as a Generation 1 virtual machine. This isn’t necessary when using Generation 2 virtual machines, as the Generation 2 virtual machine network adapters support PXE booting.
If you have a computer that does not have a PXE–compliant network adapter, you can configure a special type of boot image known as a discover image. A discover image boots an environment, loading special drivers to enable the network adapter to interact with the WDS server. You create the boot image by adding the appropriate network adapter drivers associated with the computer that can’t PXE boot to the Boot.wim file from the Windows Server installation media.
WDS has the following requirements:
![]() A Windows Server DNS server must be present on the local area network (LAN). This is implied by the domain membership.
A Windows Server DNS server must be present on the local area network (LAN). This is implied by the domain membership.
![]() An authorized Dynamic Host Configuration Protocol (DHCP) server must be present on the network. You can host WDS and DHCP on the same computer as long as you configure the options shown in Figure 1-7.
An authorized Dynamic Host Configuration Protocol (DHCP) server must be present on the network. You can host WDS and DHCP on the same computer as long as you configure the options shown in Figure 1-7.
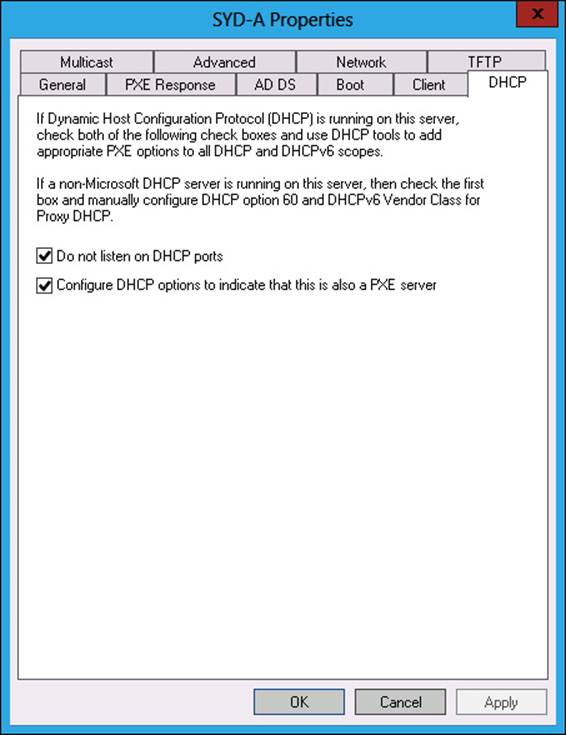
FIGURE 1-7 WDS and DHCP colocation settings
With Windows Server, you can deploy WDS on a server that is not a member of an AD DS domain. This is a feature new to Windows Server 2012. You can’t deploy WDS on a server running Windows Server 2008 or Windows Server 2008 R2 unless that server is a member of an AD DS domain.
If you install WDS from the Add Roles And Features Wizard, you can configure these settings automatically. Although the WDS server does not require a static IP address, it is good practice to ensure that infrastructure roles such as WDS always use a consistent network address. You can install WDS on computers running the Server Core version of Windows Server. To install WDS on a computer running the Server Core version of Windows Server, import the ServerManager Windows PowerShell module using the following Windows PowerShell command.
Import-module ServerManager
And then install the role using the following command.
Install-WindowsFeature –IncludeAllSubFeature WDS
When installing WDS on Server Core, you have to specify the location of the source files or ensure that the server has a connection to the Internet, which enables them to be downloaded automatically. Although it is possible to manage WDS from Windows PowerShell, most administrators will use the graphical WDS Remote Server Administration Tools (RSAT) from a computer running Windows 8, Windows 8.1, Windows Server 2012, or Windows Server 2012 R2 with the graphical tools to perform this task. You can use Windows PowerShell to install the role on computers running the version of Windows Server 2012 or Windows Server 2012 R2 that includes the graphical tools. When using Windows PowerShell to install WDS on a version of Windows Server 2012 that includes the graphical tools, also use the -IncludeManagementTools switch. To install WDS using the Add Roles And Features Wizard, select the Windows Deployment Services role, as shown in Figure 1-8.
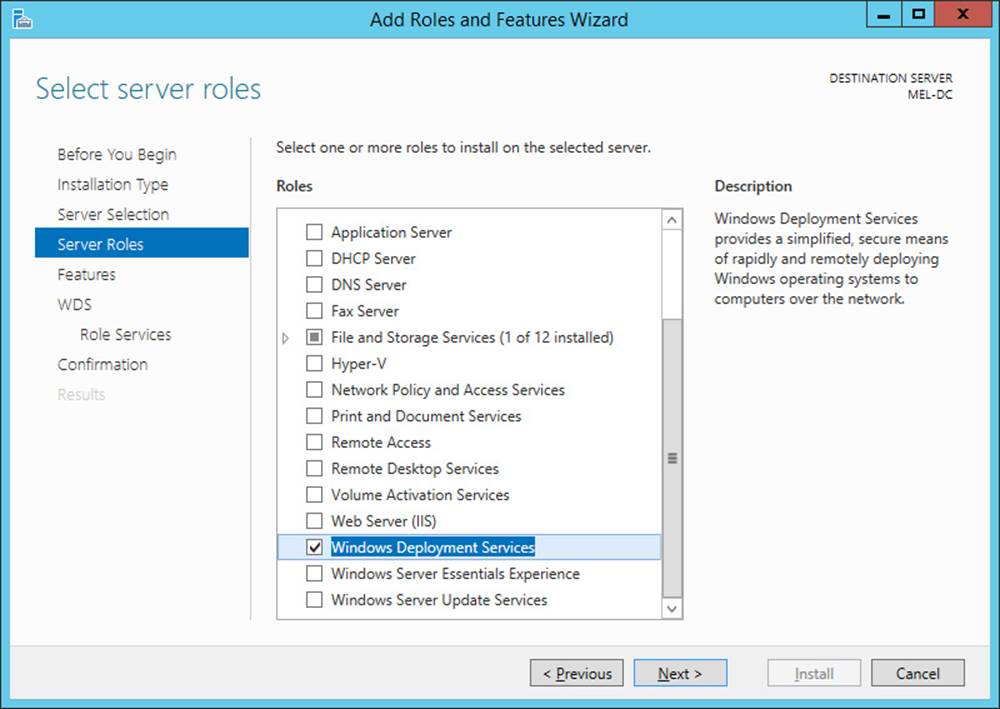
FIGURE 1-8 Install WDS role
More Info: WDS overview
You can learn more about deploying WDS by consulting the following TechNet website at http://technet.microsoft.com/en-us/library/hh831764.aspx.
Managing images
Images contain either entire operating systems or a version of a special stripped-down operating system known as Windows PE. Windows PE functions as a type of boot disk, enabling a basic environment to be loaded from which more complex maintenance and installation tasks can be performed. WDS uses four image types: boot image, install image, discover image, and capture image.
![]() Boot image A special image that enables the computer to boot and begin installing the operating system using the install image. A default boot image, named Boot.wim, is located in the sources folder of the Windows Server installation media.
Boot image A special image that enables the computer to boot and begin installing the operating system using the install image. A default boot image, named Boot.wim, is located in the sources folder of the Windows Server installation media.
![]() Install image The main type of image discussed in this chapter. Contains the operating system as well as any other included components, such as software updates and additional applications. A default install image, named Install.wim, is present in the sources folder of the Windows Server installation media. Install images can be in .vhd or .vhdx format, though you can only manage install images using the WDS console in Windows Server 2012 R2. You can only manage .vhd and .vhdx install images with WDS in Windows Server 2012 from the command line.
Install image The main type of image discussed in this chapter. Contains the operating system as well as any other included components, such as software updates and additional applications. A default install image, named Install.wim, is present in the sources folder of the Windows Server installation media. Install images can be in .vhd or .vhdx format, though you can only manage install images using the WDS console in Windows Server 2012 R2. You can only manage .vhd and .vhdx install images with WDS in Windows Server 2012 from the command line.
![]() Discover image This special image is for computers that cannot PXE boot to load appropriate network drivers to begin a session with a WDS server.
Discover image This special image is for computers that cannot PXE boot to load appropriate network drivers to begin a session with a WDS server.
![]() Capture image A special image type that enables a prepared computer to be booted so that its operating system state can be captured as an install image. You add capture images as boot images in WDS.
Capture image A special image type that enables a prepared computer to be booted so that its operating system state can be captured as an install image. You add capture images as boot images in WDS.
![]() Quick check
Quick check
![]() What type of image do you modify if you want to include support for a specific network adapter so it is present after Windows Server is first installed?
What type of image do you modify if you want to include support for a specific network adapter so it is present after Windows Server is first installed?
Quick check answer
![]() You modify an install image to include support for a specific network adapter so it is present after Windows Server is first installed.
You modify an install image to include support for a specific network adapter so it is present after Windows Server is first installed.
To import an image into WDS, perform the following steps:
1. Open the Windows Deployment Services console.
2. Click Install Images. From the Action menu, click Add Install Image.
3. Choose whether to create a new image group, or to use an existing image group.
4. Specify the location of the image file.
5. On the Available Images page of the Add Image Wizard, shown in Figure 1-9, select the operating system images that you want to add. When the image or images are added, click Next, and then click Finish.
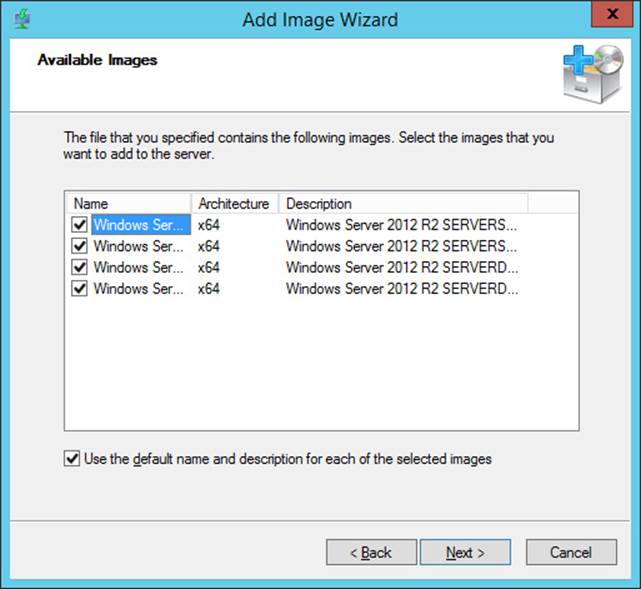
FIGURE 1-9 Select images to add to WDS
Configuring WDS
The installation defaults for WDS are suitable when you deploy the role in small environments. If you are deploying WDS in larger environments and do not choose to implement System Center 2012 R2 Virtual Machine Manager for server operating system deployments, you might want to configure the options discussed in the following sections, which are available by editing the properties of the WDS server in the Windows Deployment Services console.
PXE response settings
With PXE response settings, you can configure how the WDS server responds to computers. As Figure 1-10 shows, you can configure WDS not to respond to any client computers (this effectively disables WDS), to respond to known client computers, or to respond to all computers but require an administrator to manually approve an unknown computer. Known computers are ones that have prestaged accounts in Active Directory. You can prestage computers if you know the MAC address of the network interface card (NIC) that the computer uses. Vendors often supply a list of MAC addresses associated with computers when you purchase those computers, and you can use this list to prestage computer accounts.
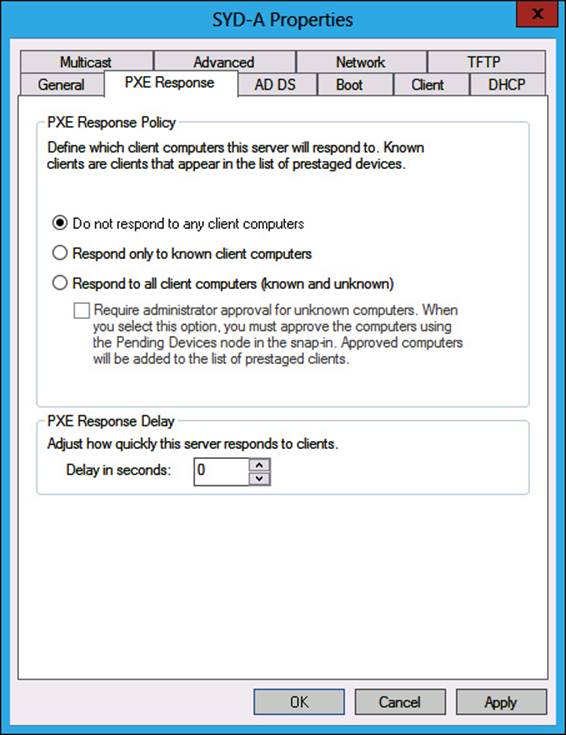
FIGURE 1-10 PXE Response settings
You use the PXE Response Delay setting when you have more than one WDS server in an environment. You can use this setting to ensure that clients receive transmissions from one WDS server over another, with the server configured with the lowest PXE response delay having priority over other WDS servers with higher delay settings.
Client naming policy
The client naming policy enables you to configure how computers installed from WDS will be named if you aren’t using deployment options that perform the action. You can also use the settings on this tab, shown in Figure 1-11, to configure domain membership and organizational unit (OU) options for the computer account.
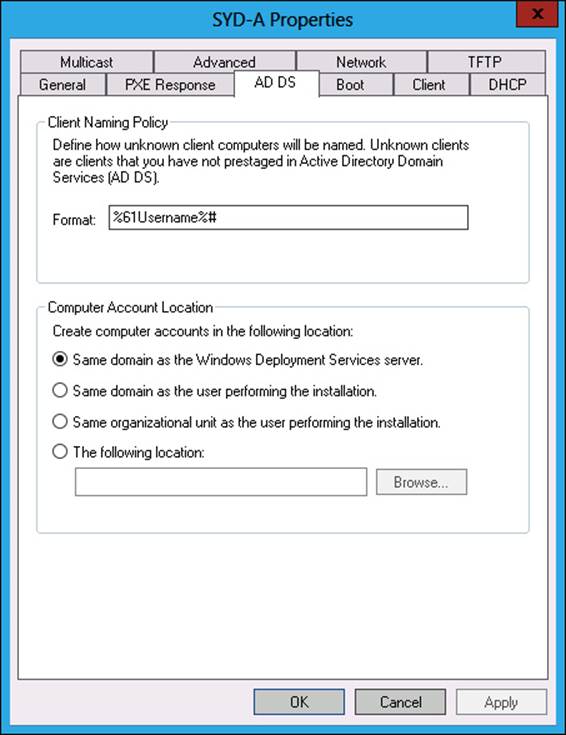
FIGURE 1-11 Client Naming Policy settings
WDS boot options
On the Boot options tab of the WDS server’s properties dialog box, shown in Figure 1-12, you can configure how clients that PXE boot interact with the WDS server. You can also configure a default boot image for each architecture supported by WDS. By default, once a client has connected to a WDS server, someone must press the F12 key to continue deploying the operating system. In environments in which you are performing a large number of simultaneous deployments, requiring this level of manual intervention might substantially delay the deployment.
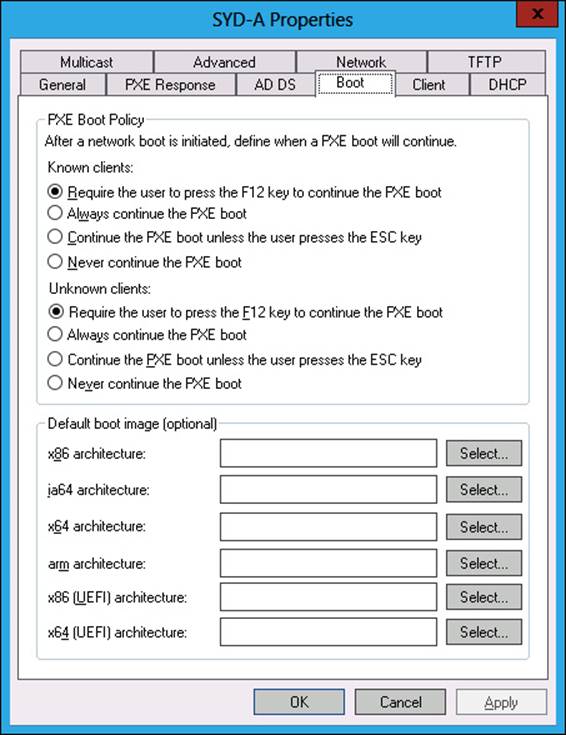
FIGURE 1-12 Boot options
Multicast options
The default settings of WDS have all computers that join the multicast transmission receiving the installation image at the same speed. If you frequently deploy operating systems, you are aware that sometimes there are 1 or 2 computers that have network adapters that slow a transmission that should take only 15 minutes into one that takes half a day. You can configure the transfer settings on the Multicast tab, shown in Figure 1-13, so that clients are partitioned into separate sessions depending on how fast they can consume the multicast transmission. You still have those slow computers taking a long time to receive the image, but the other computers connected to the transmission can complete the deployment more quickly.
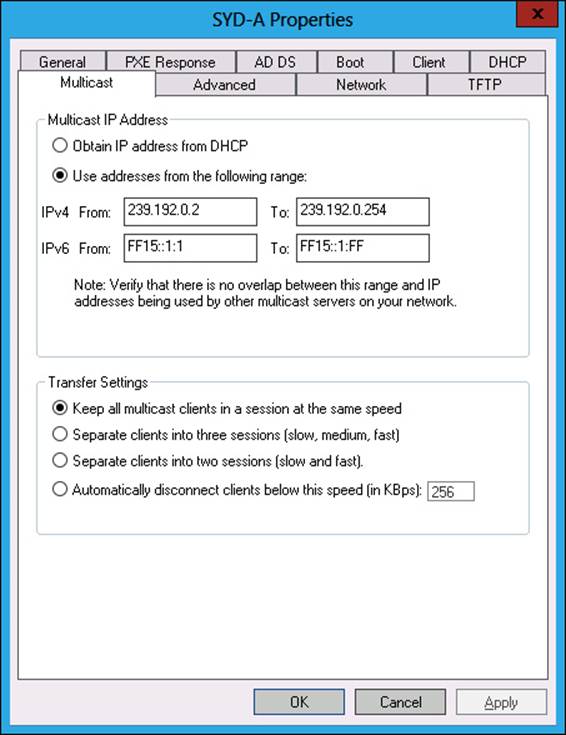
FIGURE 1-13 WDS multicast options
Other options
Although you are less likely to need them, you can configure other options on the following tabs:
![]() Advanced tab You can configure WDS to use a specific domain controller and global catalog (GC) server. You can also configure whether WDS is authorized in DHCP. DHCP authorization occurs automatically when you install the WDS role.
Advanced tab You can configure WDS to use a specific domain controller and global catalog (GC) server. You can also configure whether WDS is authorized in DHCP. DHCP authorization occurs automatically when you install the WDS role.
![]() Network tab You can specify a User Datagram Protocol (UDP) port policy to limit when UDP ports are used with transmissions. You can also configure a network profile to specify the speed of the network, minimizing the chance that WDS transmissions will slow the network down.
Network tab You can specify a User Datagram Protocol (UDP) port policy to limit when UDP ports are used with transmissions. You can also configure a network profile to specify the speed of the network, minimizing the chance that WDS transmissions will slow the network down.
![]() TFTP tab You can specify maximum block size and Trivial File Transfer Protocol (TFTP) window size.
TFTP tab You can specify maximum block size and Trivial File Transfer Protocol (TFTP) window size.
Configuring transmissions
You use WDS transmissions to set WDS to transfer the operating system image to PXE clients. When configuring a WDS transmission, you need to decide what type of multicast transmission you will perform on the Multicast Type page of the Create Multicast Transmission Wizard, as shown in Figure 1-14.
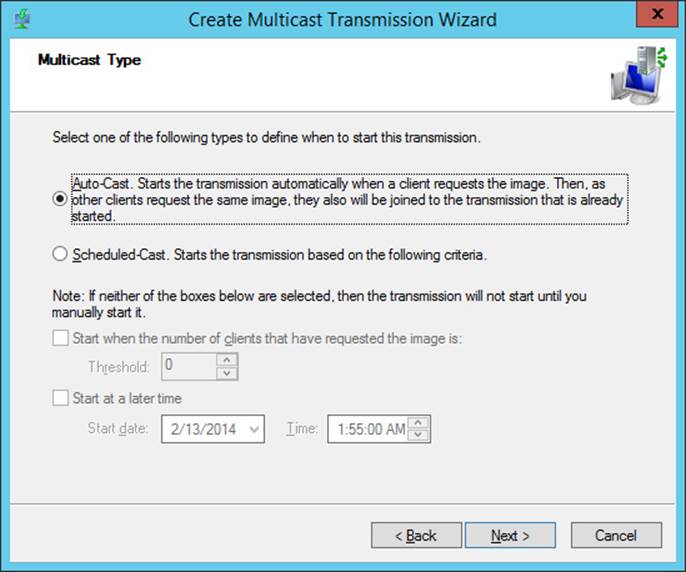
FIGURE 1-14 Multicast type
The difference between these options is as follows:
![]() Auto-Cast A transmission starts whenever a client requests the image. If another client requests the same image, the client will join the existing transmission, caching data from the current transfer, and then retrieving data that was transmitted before the client joined the transmission. This is the best option to use when you are performing one-off deployments.
Auto-Cast A transmission starts whenever a client requests the image. If another client requests the same image, the client will join the existing transmission, caching data from the current transfer, and then retrieving data that was transmitted before the client joined the transmission. This is the best option to use when you are performing one-off deployments.
![]() Scheduled-Cast You choose either to start the transmission when a specified number of clients have joined, or at a particular date and time. This is the best option to use when you are deploying the same operating system image to a large number of computers.
Scheduled-Cast You choose either to start the transmission when a specified number of clients have joined, or at a particular date and time. This is the best option to use when you are deploying the same operating system image to a large number of computers.
To configure a WDS transmission, perform the following steps:
1. Open the Windows Deployment Services console, expand the WDS server from which you want to perform the deployment and click Multicast Transmissions. On the Action menu, click Create Multicast Transmission.
2. Provide a name for the multicast transmission.
3. On the Image Selection page, specify which operating system image you want to deploy using the transmission.
4. On the Multicast Type page, specify whether you will use Auto-Cast or Scheduled-Cast. If you choose Scheduled-Cast, select the number of clients, or the transmission start time.
Real World: Virtual machine templates
As more infrastructure moves to private and public clouds, you will increasingly deploy servers from virtual machine templates, such as those that you can configure using the VMM component of System Center 2012 R2, rather than performing a traditional installation from an image. Although configuring virtual machine templates is beyond the scope of the 70-411 exam and this book, in the real world you’ll probably be deploying virtualized servers from templates more often than you will Windows Server from WDS.
Driver groups and packages
You can stage device drivers on a WDS server by importing the device driver as a package. A driver package contains the extracted driver files. You can import the driver package into WDS by locating the driver’s .inf file. When using the WDS console, you can either import individual driver packages, or all of the drivers in a set of folders.
On the WDS console, you can organize drivers into driver groups. A driver package can be a member of more than one group, and deleting a driver group does not delete the associated driver packages. Figure 1-15 shows a collection of driver packages in a group. You can use driver groups with filters to limit which driver packages are available to WDS clients.
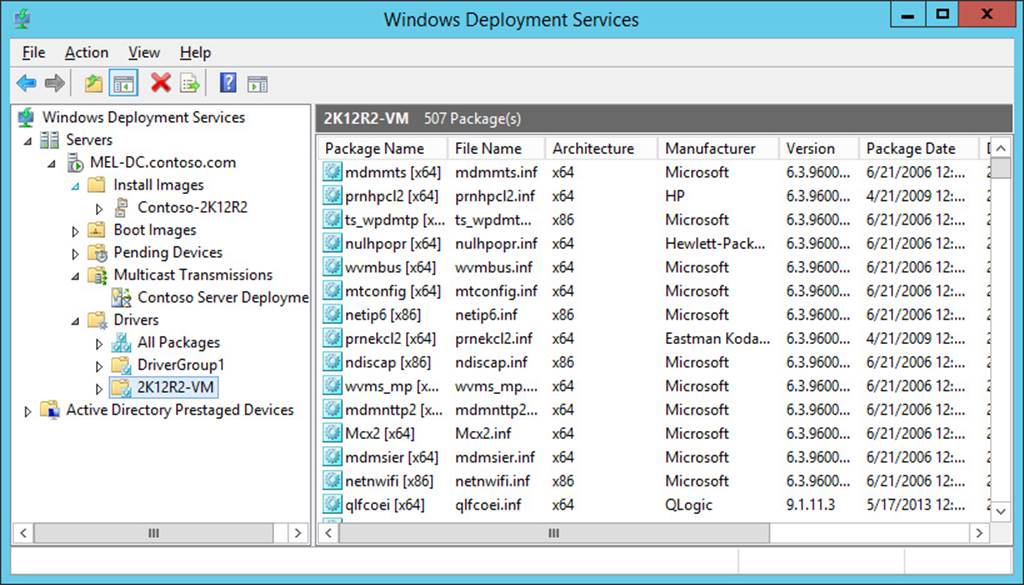
FIGURE 1-15 Driver groups and packages
More Info: Driver groups and packages
You can learn more about driver groups and packages by consulting the following TechNet article at http://social.technet.microsoft.com/wiki/contents/articles/11654.adding-drivers-to-wds-server.aspx.
Lesson summary
![]() Unless you are booting from a discover image, computers must be able to PXE boot to receive an operating system image from a WDS server.
Unless you are booting from a discover image, computers must be able to PXE boot to receive an operating system image from a WDS server.
![]() With boot images, computers with PXE-compliant network cards can load a preinstallation environment over the network from which it is possible to then load a minimal operating system.
With boot images, computers with PXE-compliant network cards can load a preinstallation environment over the network from which it is possible to then load a minimal operating system.
![]() Install images contain the operating system as well as additional components, such as software updates and applications.
Install images contain the operating system as well as additional components, such as software updates and applications.
![]() Discover images are used with computers that do not have PXE-compliant network cards. Capture images are used when you want to capture a prepared operating system.
Discover images are used with computers that do not have PXE-compliant network cards. Capture images are used when you want to capture a prepared operating system.
![]() Multicast transmissions enable the same installation image to be transmitted to multiple computers at the same time.
Multicast transmissions enable the same installation image to be transmitted to multiple computers at the same time.
![]() If a WDS server also hosts the DHCP server role, it is necessary to configure the server to listen on a separate port and to configure DHCP option tag 60 for all scopes.
If a WDS server also hosts the DHCP server role, it is necessary to configure the server to listen on a separate port and to configure DHCP option tag 60 for all scopes.
![]() You use Windows SIM to create unattended Windows Setup answer files. You can configure WDS with an unattended Windows Setup answer file to minimize the amount of interaction you need to perform when deploying Windows Server.
You use Windows SIM to create unattended Windows Setup answer files. You can configure WDS with an unattended Windows Setup answer file to minimize the amount of interaction you need to perform when deploying Windows Server.
Lesson review
Answer the following questions to test your knowledge of the information in this lesson. You can find the answers to these questions and explanations of why each answer choice is correct or incorrect in the “Answers” section at the end of this chapter.
1. You are in the process of configuring WDS so you can use it to deploy a number of computers that will run the Windows Server 2012 operating system. All of the computers in your organization have PXE–compliant network cards. Which of the following images must you import into WDS to perform a basic operating system deployment? (Choose all that apply.)
A. Boot image
B. Install image
C. Capture image
D. Discover image
2. You have just used Windows PowerShell to add the WDS role to a computer in the Melbourne branch office running the Windows Server 2012 operating system. The computer already functioned as a domain controller, DHCP server, and DNS server. You attempt to perform a test deployment of a Windows Server 2012 install image, but the PXE network card on the test server cannot connect to WDS. Which of the following strategies should you pursue to resolve this problem? (Choose all that apply.)
A. Configure WDS not to listen on DHCP ports.
B. Configure WDS not to listen on DNS ports.
C. Configure DHCP options to support WDS.
D. Authorize the WDS server in AD.
3. At the moment, WDS does not respond to client computers. You want to configure WDS so it responds to all clients, but an administrator must manually approve deployments to any computers with unrecognized MAC addresses. Which of the following settings must you configure to accomplish this goal? (Choose two. Each answer forms part of a complete solution.)
A. Do Not Respond To Any Client Computers
B. Require Administrator Approval For Unknown Computers
C. Respond Only To Known Client Computers
D. Respond To All Client Computers (Known And Unknown)
Lesson 3: Servicing and updating deployed servers
Windows Server Update Services (WSUS) 4.0 is a role that is built into Windows Server 2012 and Windows Server 2012 R2. WSUS functions as a local mirror of the Microsoft Update servers on the Internet. Organizations that have deployed WSUS can use Group Policy to configure client and server operating systems to check for available updates against a local WSUS server instead of checking against the Microsoft Update servers on the Internet. The primary benefits to you as an administrator in deploying WSUS, is that you can minimize the amount of update traffic that goes across your organization’s Internet connection and take control of which updates are approved for deployment to computers in your organization.
After this lesson, you will be able to:
![]() Deploy Windows Server Update Services.
Deploy Windows Server Update Services.
![]() Use Windows Server Update Services to manage updates.
Use Windows Server Update Services to manage updates.
Estimated lesson time: 45 minutes
Automated update deployment with WSUS
WSUS, and before it, Software Update Services (SUS), has been available as free add-ins for Windows Server operating systems for more than a decade. WSUS 4.0 is the version of WSUS released with Windows Server 2012 and Windows Server 2012 R2. Unlike previous versions of the Windows Server operating system, in which you needed to download WSUS separately or install a special update to make the role available, WSUS 4.0 can be deployed directly as a server role.
Because it has been available free of charge for so long, WSUS is widely deployed with Microsoft, registering more than 1 million WSUS servers regularly synchronizing against the Microsoft Update servers on the Internet. Although there are more sophisticated update deployment solutions available from Microsoft and third-party vendors, WSUS is the most commonly used update deployment solution besides Windows Update.
New WSUS features
Administrators who have used WSUS 3.0 Service Pack 2 (SP2), which can be deployed on servers running Windows Server 2003, Windows Server 2003 R2, Windows Server 2008, and Windows Server 2008 R2, will find WSUS 4.0 very familiar. The big changes between WSUS 3.0 SP2 and WSUS 4.0 are as follows:
![]() Integrated Administration console WSUS 3.0 SP2 had a console that was separate from the Server Manager console. The WSUS 4.0 console is integrated into the Windows Server 2012 and Windows Server 2012 R2 Server Manager console.
Integrated Administration console WSUS 3.0 SP2 had a console that was separate from the Server Manager console. The WSUS 4.0 console is integrated into the Windows Server 2012 and Windows Server 2012 R2 Server Manager console.
![]() Supports Server Core You can install WSUS 4.0 on computers running the Windows Server 2012 and Windows Server 2012 R2 operating system deployed with the Server Core installation option. This applies only to Windows Server 2012 and Windows Server 2012 R2. You can’t install WSUS 4.0 on computers running Windows Server 2008 R2 installed with the Server Core installation option.
Supports Server Core You can install WSUS 4.0 on computers running the Windows Server 2012 and Windows Server 2012 R2 operating system deployed with the Server Core installation option. This applies only to Windows Server 2012 and Windows Server 2012 R2. You can’t install WSUS 4.0 on computers running Windows Server 2008 R2 installed with the Server Core installation option.
![]() Windows PowerShell support WSUS 4.0 includes Windows PowerShell support for several commonly performed administrative functions.
Windows PowerShell support WSUS 4.0 includes Windows PowerShell support for several commonly performed administrative functions.
Deploy and manage WSUS
You can install WSUS 4.0 as a role on Windows Server 2012 and Windows Server 2012 R2 in both the Server Core and full administrative interface configurations. The advantage of deploying WSUS on Server Core installations is that these deployments require fewer updates. If you do deploy WSUS on a Server Core deployment, you need to ensure that you install the WSUS RSAT components on another computer, either running Windows 8, Windows 8.1, Windows Server 2012, or Windows Server 2012 R2, to perform WSUS administration tasks. Although WSUS 4.0 does include Windows PowerShell support, not all WSUS functionality has been replicated in Windows PowerShell.
When you install WSUS, you can choose between using a local Windows Internal Database (WID) or a SQL Server instance. The advantage of using a SQL Server instance is that it’s easier to back up and you can run more complex reports. The majority of WSUS deployments use the built-in WID database. When you install WSUS 4.0 on Windows Server 2012 or Windows Server 2012 R2, all prerequisite components are also installed.
Products, security classifications, and languages
During setup, you are asked to choose which update you want to download based on product name, security classification, and languages. Although you can choose to download updates for all product categories for all classifications in all languages, you’ll minimize the amount of configuration required later if you download updates only for products used on your organizational network.
Real World: You still need to approve the updates
Remember that you need to choose whether to approve updates. If you aren’t selective, you’ll have to spend a lot of time dealing with updates that aren’t relevant to the computers you are responsible for managing.
When WSUS synchronizes, it may update the list of available product names to reflect newly released software. If your organization deploys a new product, if it retires an old product, or if you simply want to alter which updates are synchronized, you can do this in the Products And Classifications dialog box, available through Options on the Update Services console, and shown in Figure 1-16.
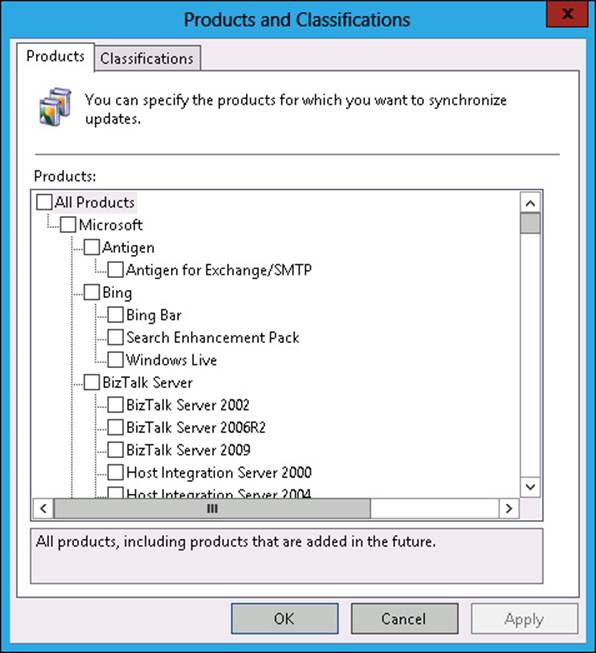
FIGURE 1-16 Products and classifications
Autonomous and replica modes
In large organizations there are likely to be multiple WSUS servers because even if a single WSUS server can support about 25,000 clients, it’s better to have a local WSUS server at each large site, rather than having clients pull updates and approvals across wide area network (WAN) links. Instead of administrators performing the same approvals on each WSUS server in the organization, you can configure a WSUS server as a replica of another server. When you configure a WSUS server as a replica, as shown in Figure 1-17, the downstream server copies all update approvals, settings, computers, and groups from its parent. You can configure the Update Source settings, as well as specify information that enables WSUS to use a proxy server, through the Update Source And Proxy Server item in Options, on the Update Services console.
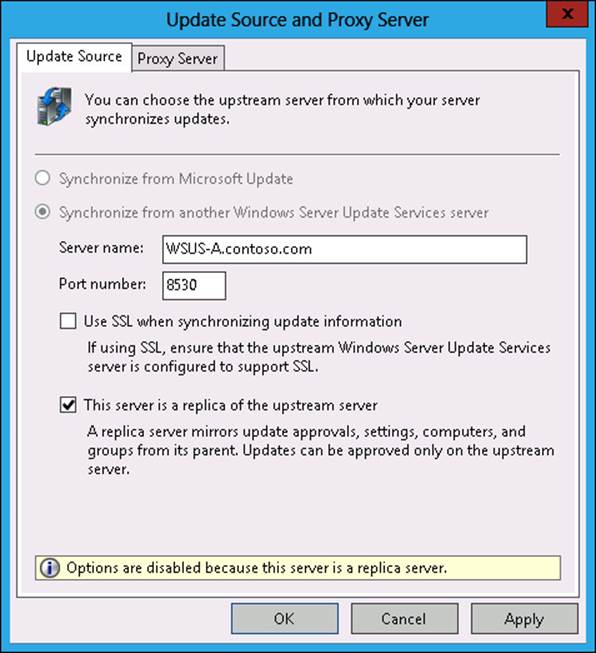
FIGURE 1-17 WSUS server as a replica
More Info: WSUS topologies
You can learn more about WSUS topologies by consulting the following TechNet website at http://technet.microsoft.com/en-us/library/hh852344.aspx.
Update files
One of the benefits of deploying WSUS is that clients on the local network download their updates from the WSUS server rather than downloading updates from the Microsoft Update servers on the Internet. You can configure update storage location settings using the Update Files And Languages item on the Options area of the Update Services console. You can configure the following options, which are shown in Figure 1-18:
![]() Store Update Files Locally On This Server When you choose this option, you can choose whether to download files only after they have been approved; download express installation files, which install more quickly on clients; or download files from Microsoft Update. With the last option, you can configure a server as a replica server, but have update files downloaded from Microsoft Update rather than the upstream replica server.
Store Update Files Locally On This Server When you choose this option, you can choose whether to download files only after they have been approved; download express installation files, which install more quickly on clients; or download files from Microsoft Update. With the last option, you can configure a server as a replica server, but have update files downloaded from Microsoft Update rather than the upstream replica server.
![]() Don’t Store Update Files Locally; Computers Install From Microsoft Update When you configure this option, clients use WSUS for update approvals, but retrieve the updates from the Microsoft Update servers on the Internet. This option is most appropriate when you are providing update approvals to clients located outside of the organizational network.
Don’t Store Update Files Locally; Computers Install From Microsoft Update When you configure this option, clients use WSUS for update approvals, but retrieve the updates from the Microsoft Update servers on the Internet. This option is most appropriate when you are providing update approvals to clients located outside of the organizational network.

FIGURE 1-18 Update file location
Windows PowerShell cmdlets
WSUS 4.0 includes Windows PowerShell support. Although you can use Windows PowerShell to perform a certain number of management tasks on a preconfigured WSUS server, you are more likely to perform WSUS administration tasks using the Update Services console. The Windows PowerShell commands available with WSUS are as follows:
![]() Add-WsusComputer Adds a computer to a target WSUS group.
Add-WsusComputer Adds a computer to a target WSUS group.
![]() Approve-WsusUpdate Approves a specific update for deployment.
Approve-WsusUpdate Approves a specific update for deployment.
![]() Deny-WsusUpdate Denies an update for deployment.
Deny-WsusUpdate Denies an update for deployment.
![]() Get-WsusClassification Enables you to view all WSUS classifications.
Get-WsusClassification Enables you to view all WSUS classifications.
![]() Get-WsusComputer Enables you to filter computers known to the WSUS server by operating system, name, update installation status, and other criteria.
Get-WsusComputer Enables you to filter computers known to the WSUS server by operating system, name, update installation status, and other criteria.
![]() Get-WsusProduct Lists all available products that are available to WSUS.
Get-WsusProduct Lists all available products that are available to WSUS.
![]() Get-WsusServer Provides information about the WSUS server.
Get-WsusServer Provides information about the WSUS server.
![]() Invoke-WsusServerCleanup Cleans up WSUS, including removing superseded updates.
Invoke-WsusServerCleanup Cleans up WSUS, including removing superseded updates.
![]() Set-WsusClassification Enables or disables synchronization of a specific category of updates.
Set-WsusClassification Enables or disables synchronization of a specific category of updates.
![]() Set-WsusProduct Enables or disables synchronization of a specific product’s updates.
Set-WsusProduct Enables or disables synchronization of a specific product’s updates.
![]() Set-WsusServerSynchronization Enables you to configure the WSUS server synchronization schedule.
Set-WsusServerSynchronization Enables you to configure the WSUS server synchronization schedule.
WSUS security roles
In large organizations, you are more likely to separate the roles of server administrator and update administrator. When you install WSUS, two local security groups are created. By adding users to these groups, you grant users the permission to perform the tasks assigned with these roles. The roles are as follows:
![]() WSUS Administrators Users who are added to the local WSUS Administrators group can perform any WSUS administration task. These tasks include approving updates, managing computer groups, configuring automatic approval rules, and modifying the WSUS server’s update source.
WSUS Administrators Users who are added to the local WSUS Administrators group can perform any WSUS administration task. These tasks include approving updates, managing computer groups, configuring automatic approval rules, and modifying the WSUS server’s update source.
![]() WSUS Reporters Users who are members of this role can run reports on the WSUS server. These reports detail the update compliance status on the basis of update and computer. For example, a user who is a member of this group can run a WSUS report and determine which computers are missing a specific critical update.
WSUS Reporters Users who are members of this role can run reports on the WSUS server. These reports detail the update compliance status on the basis of update and computer. For example, a user who is a member of this group can run a WSUS report and determine which computers are missing a specific critical update.
![]() Quick check
Quick check
![]() You want WSUS servers in branch office locations to use the same approval settings as the WSUS server in your organization’s head office. How do you configure the branch office WSUS servers to accomplish this goal?
You want WSUS servers in branch office locations to use the same approval settings as the WSUS server in your organization’s head office. How do you configure the branch office WSUS servers to accomplish this goal?
Quick check answer
![]() You can configure the branch office WSUS servers as replicas of the WSUS server in your organization’s head office. When you do this, branch office servers will use the same approval settings as the upstream server.
You can configure the branch office WSUS servers as replicas of the WSUS server in your organization’s head office. When you do this, branch office servers will use the same approval settings as the upstream server.
WSUS groups
You can use WSUS groups to organize computers for the purpose of deploying updates. For example, you might have a WSUS group for servers in Sydney and another WSUS group for servers in Melbourne. A computer can be a member of multiple WSUS groups, and WSUS groups can exist in parent-child relationships. For example, the Australia WSUS group might have both the Melbourne and Sydney WSUS groups as members. Updates approved for the Australia group are automatically approved for members of the Melbourne and Sydney groups unless overridden.
You can assign computers to WSUS groups manually or through Group Policy. Computers can be assigned to WSUS groups through Group Policy only if the computer groups already exist on the WSUS server. To assign a computer manually, the computer must have already reported to the WSUS server. Computers that have reported to the WSUS server, but have not been assigned to a group, will be members of the Unassigned Computers group.
An administrator must create WSUS groups. To create a WSUS group, perform the following steps:
1. Open the Update Services console.
2. Click the group you want to have as the parent group. The Computers/All Computers group is the parent group for all groups.
3. From the Action menu, click Add Computer Group.
4. Specify the computer group name, and click Add.
Real World: Simple names
Keep the computer group names simple because you have to also use them with Group Policy when using client-side targeting.
WSUS policies
You can configure most WSUS client options through Group Policy. Many of these policies are related to the experience that users of client operating systems have when updates are installed and are not directly applicable to updating server operating systems. Windows Update policies are located in the Computer Configuration\Policies\Administrative Templates\Windows Components\Windows Update node of a standard GPO, as shown in Figure 1-19.
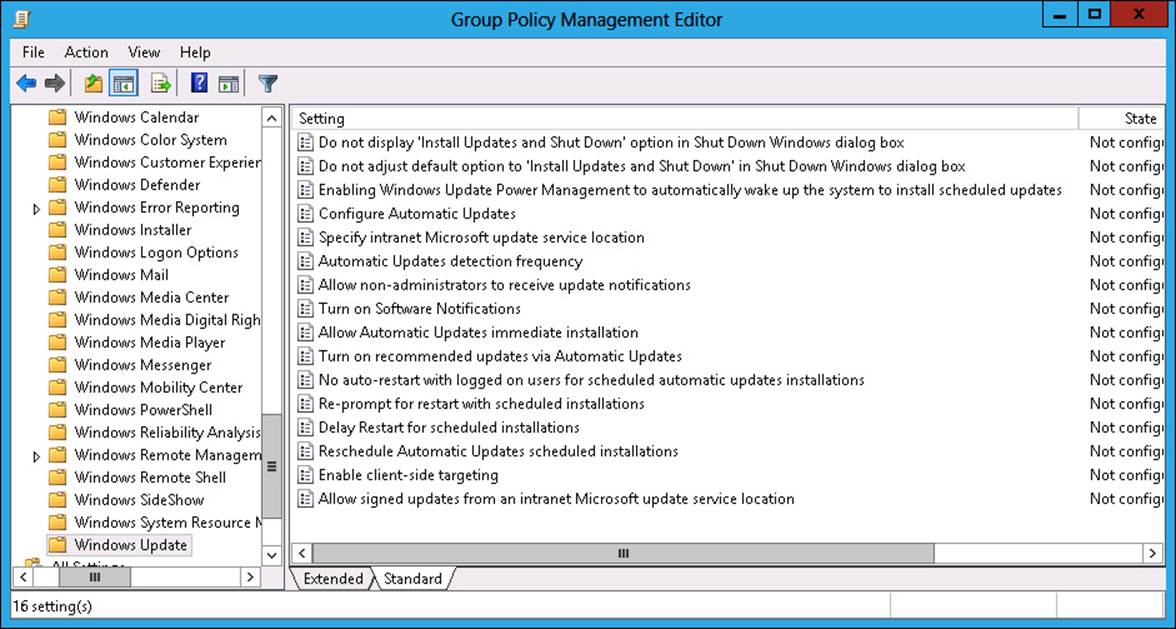
FIGURE 1-19 Windows Update–related policies
The most important policies from the perspective of the server administrator are as follows:
![]() Configure Automatic Updates You can enable automatic updating, specify a day for update installations, and a time for update installation to occur. It’s usually not a good idea to have this one policy to apply to all servers in your organization. Having all servers install and reboot at the same time can cause substantial disruptions.
Configure Automatic Updates You can enable automatic updating, specify a day for update installations, and a time for update installation to occur. It’s usually not a good idea to have this one policy to apply to all servers in your organization. Having all servers install and reboot at the same time can cause substantial disruptions.
![]() Specify Intranet Microsoft Update Service Location You can specify the location of the WSUS server and the statistics server. (The statistics server receives information on successful update installation and is usually the same as the WSUS server.)
Specify Intranet Microsoft Update Service Location You can specify the location of the WSUS server and the statistics server. (The statistics server receives information on successful update installation and is usually the same as the WSUS server.)
![]() Automatic Update Detection Frequency Determines how often the computer checks for updates.
Automatic Update Detection Frequency Determines how often the computer checks for updates.
![]() Enable Client-Side Targeting Use this policy to specify which WSUS groups computers should be a member of. If names do not match, computers will end up in the Unassigned Computers group.
Enable Client-Side Targeting Use this policy to specify which WSUS groups computers should be a member of. If names do not match, computers will end up in the Unassigned Computers group.
Real World: Migrating to System Center 2012 Configuration Manager
If your organization shifts to using System Center 2012 Configuration Manager, Windows Intune, or another product to manage software updates, remember to remove any existing WSUS-related policies. If you don’t do this, it might cause conflicts that lead to computers not receiving updates in a timely manner.
Deploying updates
When you deploy updates, you decide whether to deploy the update, to which computer groups you deploy the update, and what deadline should apply to the deployment. You can deploy an update multiple times to different groups, so you can deploy an update to a test group and then, if no issues arise with the update, deploy the update more generally. To deploy an update, perform the following steps:
1. Open the Update Services console and select the Updates\All Updates node. You can also choose to select a child node, such as Critical Updates, if you want to view only available critical updates.
2. Set the Approval setting to Unapproved and the Status to Any, as shown in Figure 1-20, and click Refresh. All unapproved updates are then listed.
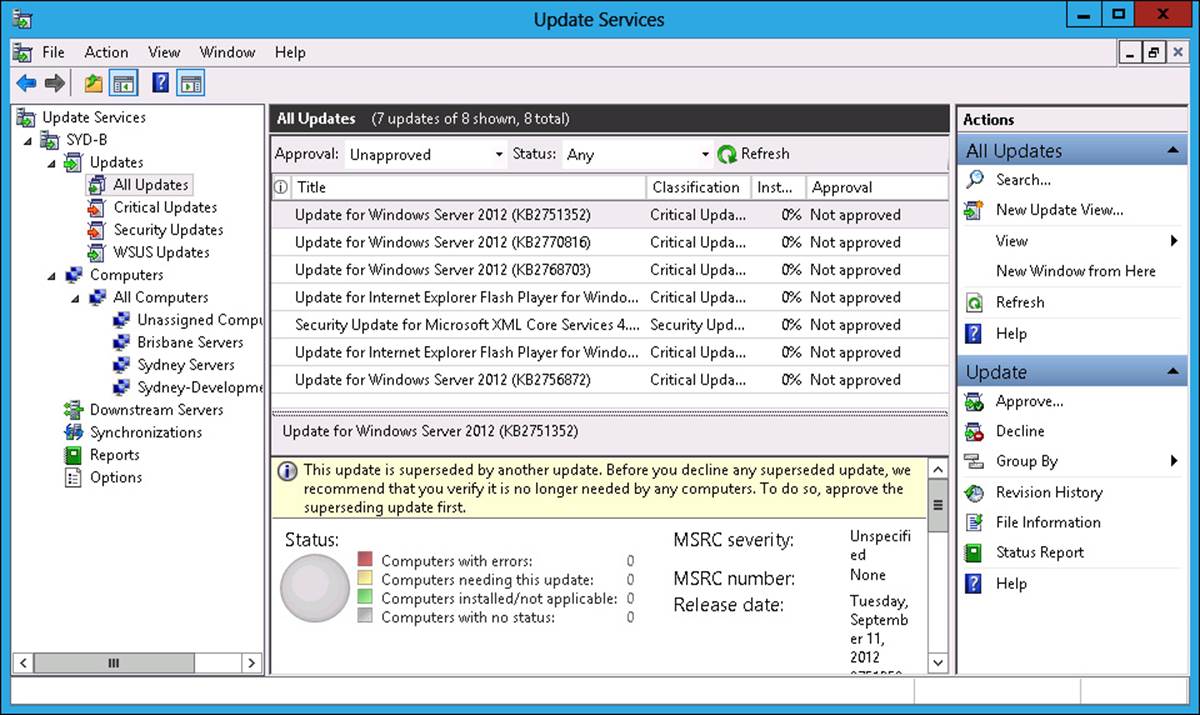
FIGURE 1-20 Unapproved update list
3. Click an update, or click multiple updates, if you want to select more than one update; then, click Approve on the Actions pane.
4. In the Approve Updates dialog box, select which computer groups the update is approved for. Figure 1-21 shows updates approved for the Sydney-Development-Servers group. You can choose between the following settings:
![]() Approved For Install Approves the update.
Approved For Install Approves the update.
![]() Approved For Removal Removes a previously deployed update.
Approved For Removal Removes a previously deployed update.
![]() Not Approved Does not approve the update.
Not Approved Does not approve the update.
![]() Keep Existing Approvals Inherits the approval from the parent group.
Keep Existing Approvals Inherits the approval from the parent group.
![]() Deadline Specifies an update deployment deadline.
Deadline Specifies an update deployment deadline.
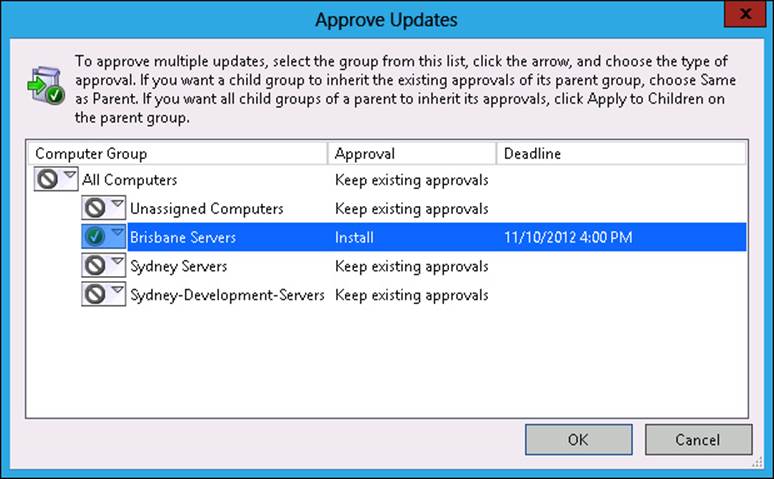
FIGURE 1-21 Approve updates for installation
Prior to deploying updates, you should perform a synchronization, which will ensure that the WSUS server is to be up to date before choosing whether to deploy updates.
More Info: Deploying updates with WSUS
To learn more about deploying updates with WSUS, consult the following TechNet webpage at http://technet.microsoft.com/en-us/library/hh852348.aspx.
Automatic approval rules
Automatic approval rules enable specifically categorized updates to be automatically approved. For example, you might choose to automatically approve critical updates for the Sydney-Development-Servers WSUS group, as shown in Figure 1-22.
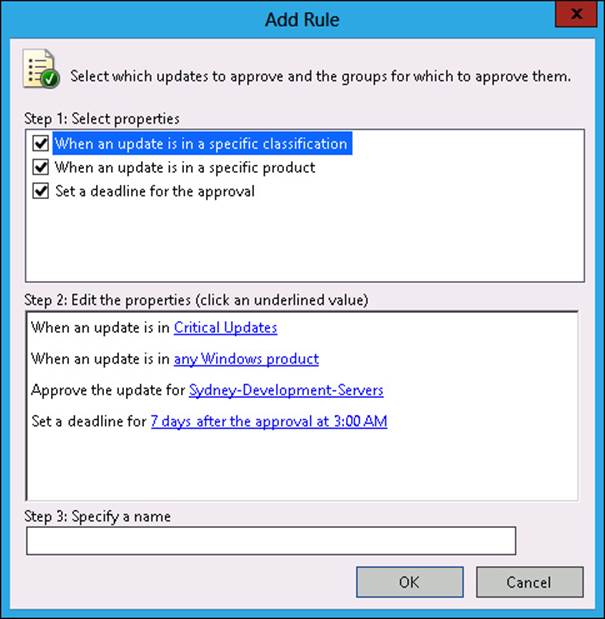
FIGURE 1-22 Automatic approval rules
To configure an automatic approval rule, perform the following steps:
1. Open the Update Services console. You can do this from the Tools menu of Server Manager, or by right-clicking the server in a server group and clicking Windows Server Update Services.
2. On the Update Services console, click Options and then click Automatic Approvals.
3. In the Automatic Approvals dialog box, click New Rule.
4. In the Add Rule dialog box, choose the following rule options:
![]() When An Update Is In A Specific Classification You can choose that the rule applies when an update matches a specific classification or number of classifications. Update classifications include Critical Updates, Definition Updates, Drivers, Feature Packs, Security Updates, Service Packs, Tools, Update Rollups, and Updates. Microsoft includes classifications for each software update when it publishes the update.
When An Update Is In A Specific Classification You can choose that the rule applies when an update matches a specific classification or number of classifications. Update classifications include Critical Updates, Definition Updates, Drivers, Feature Packs, Security Updates, Service Packs, Tools, Update Rollups, and Updates. Microsoft includes classifications for each software update when it publishes the update.
![]() When An Update Is For A Specific Product You can specify products, either by category, such as Exchange, or by specific product, such as Exchange Server 2013.
When An Update Is For A Specific Product You can specify products, either by category, such as Exchange, or by specific product, such as Exchange Server 2013.
![]() Approve The Update For A Specific Computer Group The update can be approved for selected computer groups.
Approve The Update For A Specific Computer Group The update can be approved for selected computer groups.
![]() Set An Approval Deadline Sets an installation deadline for the update based on the time and date the update was first approved.
Set An Approval Deadline Sets an installation deadline for the update based on the time and date the update was first approved.
Real World: Suitable for canaries
Automatic approval rules aren’t suitable for production servers hosting important workloads because it is possible that an update will be installed without being properly tested. Automatic approval rules are suitable for test groups. You should populate your test group with users who are more likely to “offer feedback” if something goes wrong. Just as a canary in a coal mine was used by miners to detect dangerous gas, “canary users” are likely to raise an alarm when a software update causes problems that indicate it shouldn’t be deployed in a production environment. Users who complain are much more valuable as deployment targets for update testing than users who ignore problems and do not provide feedback.
Lesson summary
![]() Install WSUS in autonomous mode if you want to have an administrator manage updates for computers that report to the WSUS server. Install WSUS in replica mode if you want to have other WSUS servers inherit another WSUS server’s configuration.
Install WSUS in autonomous mode if you want to have an administrator manage updates for computers that report to the WSUS server. Install WSUS in replica mode if you want to have other WSUS servers inherit another WSUS server’s configuration.
![]() Create computer groups using the WSUS console and then use Group Policy to assign computers to these groups.
Create computer groups using the WSUS console and then use Group Policy to assign computers to these groups.
![]() Create automatic deployment rules to automatically approve updates to WSUS clients. Use automatic deployment rules for computers only where you will not be testing updates prior to deploying them.
Create automatic deployment rules to automatically approve updates to WSUS clients. Use automatic deployment rules for computers only where you will not be testing updates prior to deploying them.
![]() Use the WSUS Administrators local group to grant users the ability to manage WSUS update deployments.
Use the WSUS Administrators local group to grant users the ability to manage WSUS update deployments.
![]() Use Windows Intune to manage update deployment to computers that are outside of the perimeter network.
Use Windows Intune to manage update deployment to computers that are outside of the perimeter network.
![]() Use System Center 2012 Configuration Manager to deploy updates to third-party products.
Use System Center 2012 Configuration Manager to deploy updates to third-party products.
Lesson review
Answer the following questions to test your knowledge of the information in this lesson. You can find the answers to these questions and explanations of why each answer choice is correct or incorrect in the “Answers” section at the end of this chapter.
1. You are in the process of configuring WSUS 4.0 to manage software updates for computers in your organization. You have created a WSUS computer group named Sydney-Servers. You want all servers that have computer accounts in the Sydney-Servers OU to be automatically added to this computer group. Which of the following group policies would you configure to assign the servers in the Sydney-Servers OU to the Sydney-Servers WSUS computer group? (Choose all that apply.)
A. Configure Automatic Updates
B. Enable Client-Side Targeting
C. Delay Restart For Scheduled Installations
D. Specify An Intranet Microsoft Update Service Location
2. Your organization has a single WSUS server named SYDNEY-WSUS. You want to ensure that all software updates marked as Security and Critical for Windows Server 2012 R2 are automatically deployed to a group of computers in the Sydney office that are part of the development environment. The deployment of these updates should not require explicit administrator approval. (Choose three. Each answer forms part of a complete solution.)
A. Create a local security group on SYDNEY-WSUS named UpdateTest.
B. Create a WSUS group on SYDNEY-WSUS named UpdateTest.
C. Add all computers that are part of the development environment to UpdateTest.
D. Create an automatic approval rule for Critical and Security updates for the UpdateTest group.
3. You are in the process of configuring WSUS servers in the Melbourne and Perth branch offices. You have already configured a WSUS server in the Sydney head office. You want to have a consistent set of update approvals across the organization, but have each branch office server retrieve updates from the Microsoft Update servers on the Internet. Clients in each branch office should retrieve updates from their local WSUS server. Which of the following settings should you configure? (Choose all that apply.)
A. Configure the Sydney server as a replica of the Melbourne and Perth servers.
B. Configure the Melbourne and Perth servers to store update files locally. Enable the Download files from Microsoft Update; do not download from upstream server option.
C. Configure the Melbourne and Perth servers to not store update files locally.
D. Configure the Melbourne and Perth servers as replicas of the Sydney WSUS server.
Practice exercises
The goal of this section is to provide you with hands-on practice with the following:
![]() Configuring Windows images
Configuring Windows images
![]() Configuring Windows Deployment Services
Configuring Windows Deployment Services
![]() Deploying and configuring WSUS
Deploying and configuring WSUS
To perform the exercises in this section, you need access to an evaluation version of Windows Server 2012 R2. You should also have access to virtual machines SYD-DC, MEL-DC, and CBR-DC, the setup instructions for which are described in the Introduction. You should ensure that you have a checkpoint of these virtual machines that you can revert to at the end of the practice exercises.
Exercise 1: Prepare update files
In this exercise, you download a software update from the Internet. To complete this exercise, perform the following steps:
1. In Hyper-V Manager, right-click SYD-DC, and click Settings.
2. In the Settings For SYD-DC dialog box, shown in Figure 1-23, click Add Hardware, click Network Adapter, and click Add.
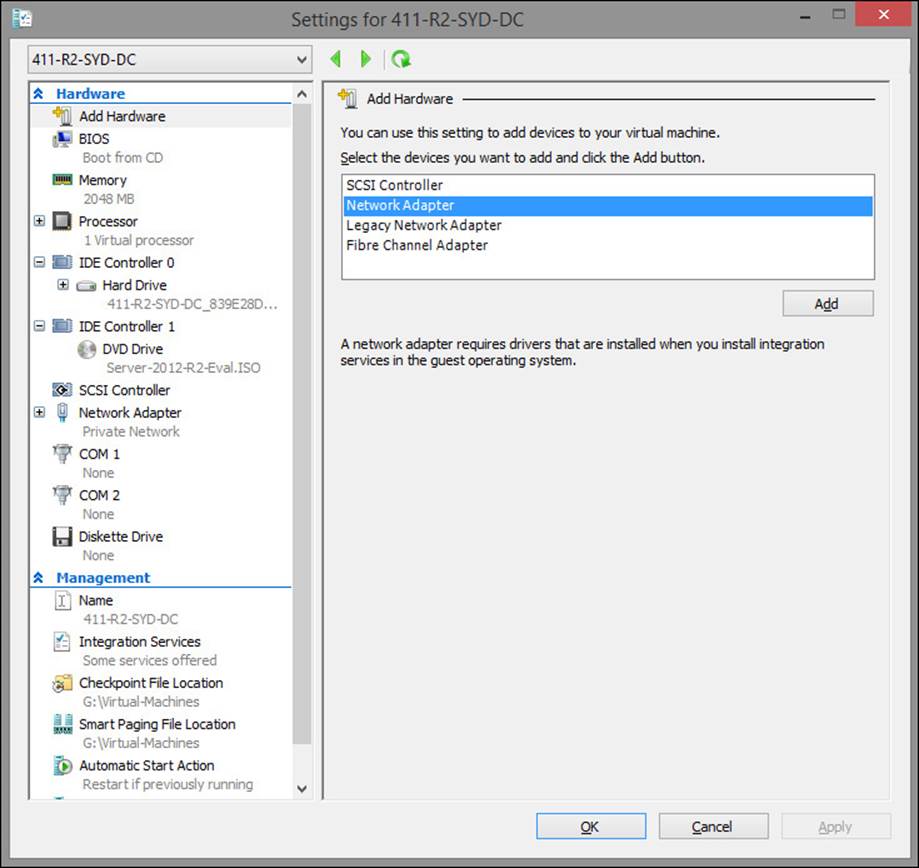
FIGURE 1-23 Add network adapter
3. In the Settings For DC dialog box, select the new network adapter.
4. On the Virtual Switch drop-down menu, click the arrow, and select a virtual switch that is connected to an external network adapter.
5. Ensure that you have connected the Windows Server 2012 R2 evaluation edition ISO to the DVD drive connected to IDE Controller 1.
6. Click OK to close the Settings for the SYD-DC dialog box.
7. On Hyper-V Manager, right-click SYD-DC, and click Start.
8. Sign on as Contoso\Don_Funk with the password Pa$$w0rd.
9. On the Server Manager console, click the Local Server node.
10. Click the text next to IE Enhanced Security Configuration.
11. In the Internet Explorer Enhanced Security Configuration dialog box, shown in Figure 1-24, ensure that the Administrators setting is configured to Off, and then click OK.
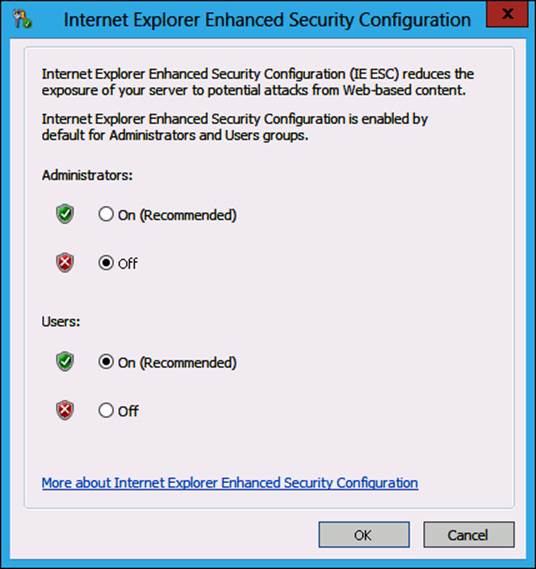
FIGURE 1-24 Configuring Internet Explorer Enhanced Security Configuration (IE ESC)
12. Click File Explorer on the taskbar.
13. Double-click Local Disk (C:).
14. On the title bar of the Local Disk (C:) window, click the New Folder icon.
15. Name the folder Updates.
16. Repeat step 13 and 14 twice. Name the new folders Images and Mount.
17. Copy the file D:\Sources\Install.wim to C:\images.
18. Open Internet Explorer from the Start screen.
19. On the Internet Explorer dialog box, click Ask Me Later.
20. In the address bar, type http://catalog.update.microsoft.com
21. When prompted, install the Microsoft Update Catalog add-in. You will need to click Yes on a User Account Control dialog box, to click Install to install the update, and to click Run Control to run the add-in.
22. In the Search box, type KB2893294, and click Search.
23. Click Add next to Security Update For Windows Server 2012 R2 (KB2893294). Ensure that you have selected the update for Windows Server 2012 R2 and not the preview.
24. Click View Basket. On the Updates In Your Basket page, shown in Figure 1-25, click Download.
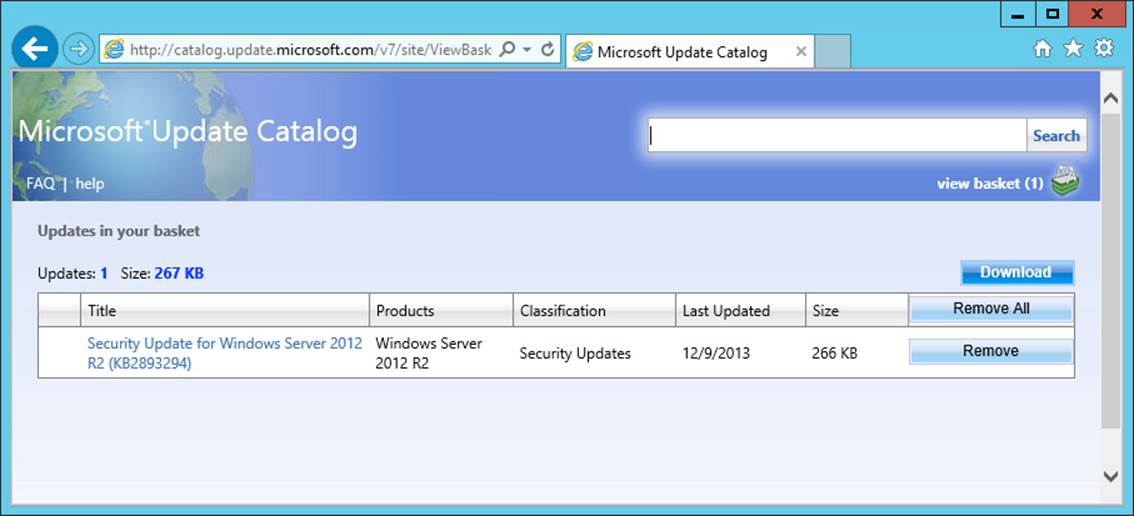
FIGURE 1-25 Microsoft Update Catalog
25. On the Download Options page, navigate to C:\Updates, click OK, and click Continue. When the update completes downloading, click Close.
Exercise 2: Servicing a WIM image
In this exercise, you service a Windows Server 2012 R2 installation image, injecting an update and deploying payload files. To complete this exercise, perform the following steps:
1. On SYD-DC, open an elevated command prompt by right clicking on the Start item and clicking Command Prompt (Admin). Click Yes when prompted on the User Account Control dialog box.
2. Execute the following command to identify the index number of the Standard Server installation.
Dism.exe /get-wiminfo /wimfile:c:\images\install.wim
3. Execute the following command to mount the Standard Edition server image located in Install.wim using the C:\Mount folder.
Dism.exe /mount-image /imagefile:c:\images\install.wim /index:2 /mountdir:c:\mount
4. Execute the following command to apply the software update you downloaded from the Microsoft Update Catalog webpage.
Dism.exe /image:c:\mount /Add-Package /PackagePath:"c:\updates\Security Update for
Windows Server 2012 R2 (KB2893294)"
5. Execute the following command to enable the .NET Framework 3.5 features using the mounted installation media as the source location.
Dism.exe /image:c:\mount /Enable-Feature /all /FeatureName:NetFx3 /Source:d:\
sources\sxs
6. Execute the following command to dismount and commit the modified image.
Dism.exe /Unmount-Wim /MountDir:c:\mount /commit
7. Keep SYD-DC running because you will use it in Exercise 2 and Exercise 3. Do not revert the virtual machine until you complete all practice exercises.
Exercise 3: Deploy Windows Deployment Services
In this exercise, you deploy WDS. To complete this exercise, perform the following steps:
1. Sign on to server MEL-DC as Administrator with the password Pa$$w0rd.
2. Open the Windows PowerShell prompt, and type the following command to join the contoso.com domain.
Add-Computer -DomainName contoso.com
3. In the Windows PowerShell Credentials dialog box, shown in Figure 1-26, type don_funk@contoso.com and Pa$$w0rd, and click OK.
FIGURE 1-26 PowerShell credentials
4. Type the following command into the Windows PowerShell prompt to restart the computer.
Restart-Computer
5. Sign on to server MEL-DC as Contoso\don_funk with the password Pa$$w0rd.
6. Connect the Windows Server 2012 R2 installation media to the emulated DVD drive of MEL-DC.
7. On the Server Manager console, launch the Add Roles And Features Wizard from the Manage menu.
8. On the Before You Begin page of the Add Roles And Features Wizard, click Next.
9. On the Select Installation Type page, click Role-based or Feature-based installation, and click Next.
10. On the Select Destination Server page, click MEL-DC.contoso.com, and click Next.
11. On the Select Server Roles page, click DHCP Server. When prompted to add additional features, click Add Features.
12. On the Select Server Roles page, click Windows Deployment Services. When prompted, click Add Features. Verify that the Add Roles And Features Wizard appears similar to Figure 1-27, and click Next.
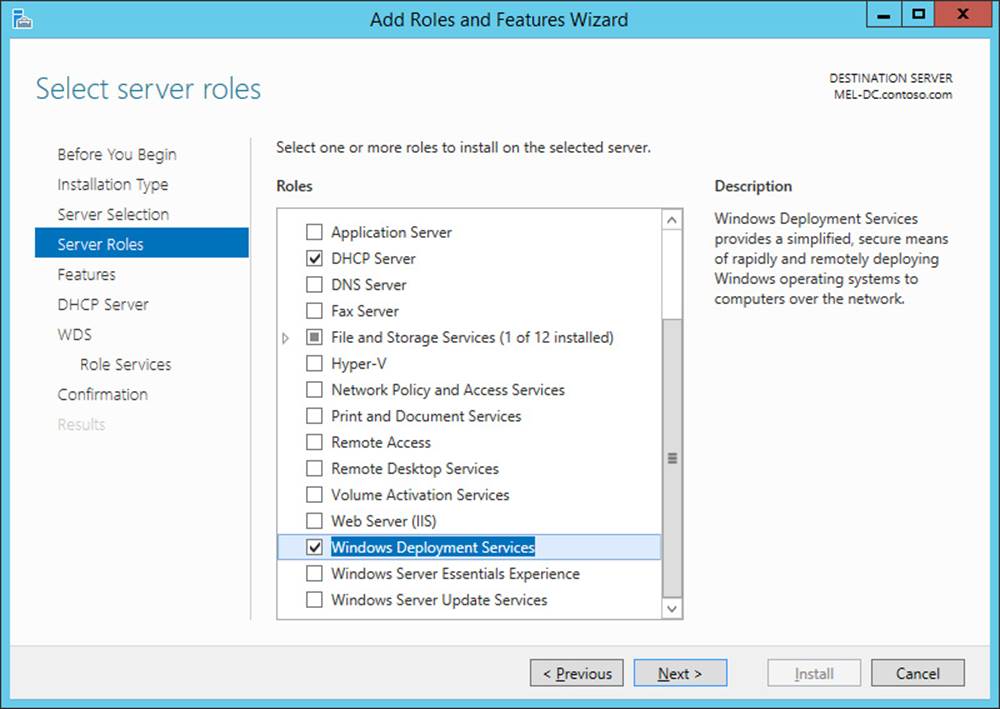
FIGURE 1-27 Adding roles and features
13. On the Features page, click Next.
14. On the DHCP Server page, click Next.
15. On the WDS page, click Next.
16. On the Select Role Services page, verify that Deployment Server and Transport Server are selected, as shown in Figure 1-28, and click Next.
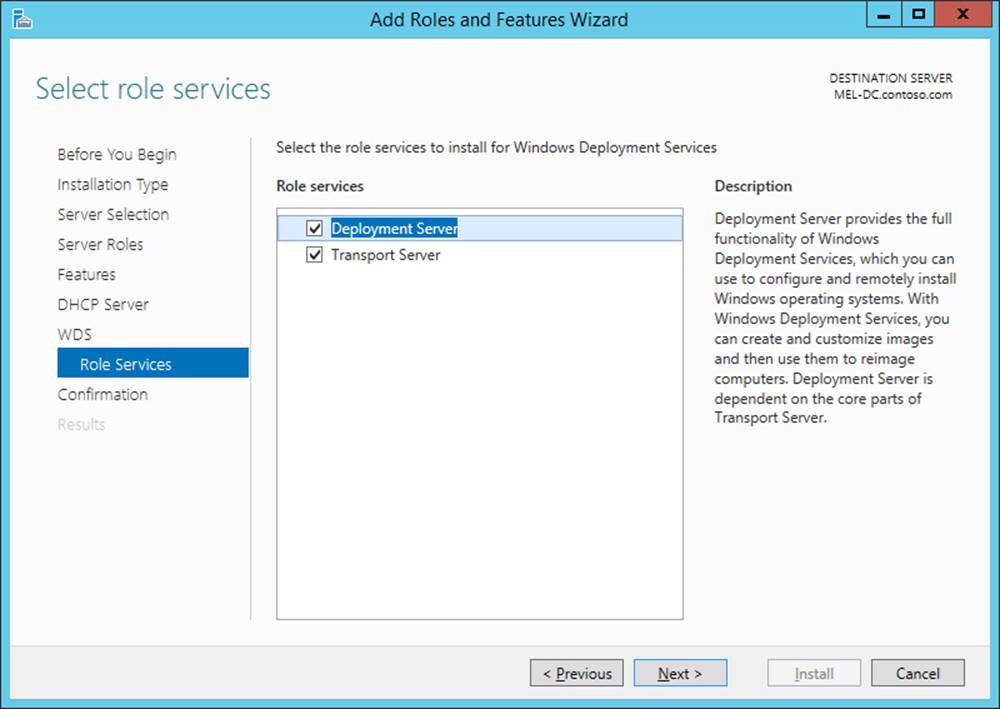
FIGURE 1-28 Adding the WDS Role Services
17. On the Confirmation page, click Install.
18. When the installation completes, click Close to close the Add Roles And Features Wizard. Refresh Server Manager Console.
19. On the Tools menu, click DHCP.
20. On the DHCP console, click Mel-dc.contoso.com.
21. On the Action menu, click Authorize.
22. On the DHCP console, click IPv4. On the Action menu, click New Scope. This will start the New Scope Wizard. Click Next.
23. On the Scope Name page, type the name WDS Scope, and click Next.
24. On the IP Address Range page, shown in Figure 1-29, enter the following settings and click Next:
![]() Start IP Address: 10.10.10.100
Start IP Address: 10.10.10.100
![]() End IP address: 10.10.10.200
End IP address: 10.10.10.200
![]() Length: 24
Length: 24
![]() Subnet Mask: 255.255.255.0
Subnet Mask: 255.255.255.0
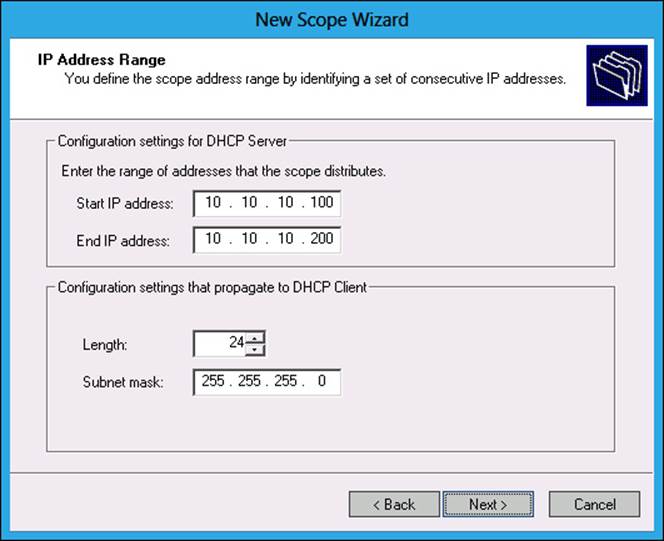
FIGURE 1-29 Creating a DHCP scope
25. On the Add Exclusions And Delay page, click Next.
26. On the Lease Duration page, click Next.
27. On the Configure DHCP Options page, click Yes, I Want To Configure These Options Now, and click Next.
28. On the Router (Default Gateway) page, click Next.
29. On the Domain Name And DNS Servers page, verify that 10.10.10.10 is present, as shown in Figure 1-30, and then click Next.
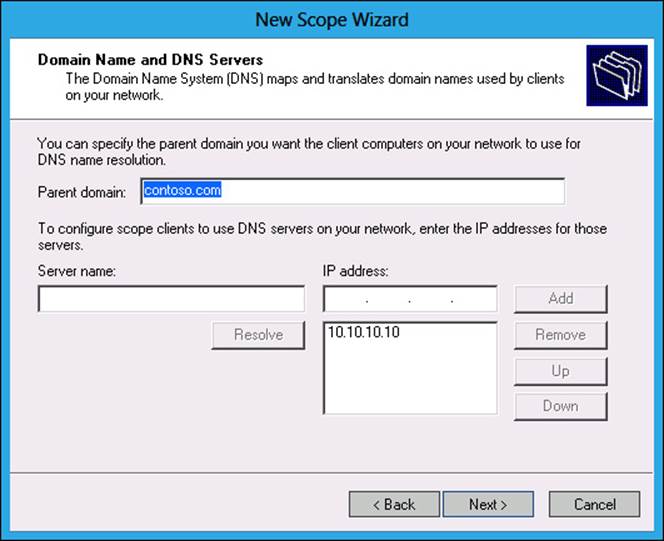
FIGURE 1-30 Configuring DHCP options
30. On the WINS Servers page, click Next.
31. On the Activate Scope page, click Yes, I Want To Activate This Scope Now, and click Next.
32. On the Completing The New Scope Wizard page, click Finish.
33. Close the DHCP console.
Exercise 4: Configure Windows Deployment Services
In this exercise, you configure WDS and import installation and boot images. To complete this exercise, perform the following steps:
1. Open the Windows Deployment Services console from the Tools menu in Server Manager.
2. Expand Servers. Click MEL-DC.contoso.com. On the Action menu, click Configure Server. This will launch the Windows Deployment Services Configuration Wizard. Click Next.
3. On the Install Options page, shown in Figure 1-31, click Integrated With Active Directory, and then click Next.
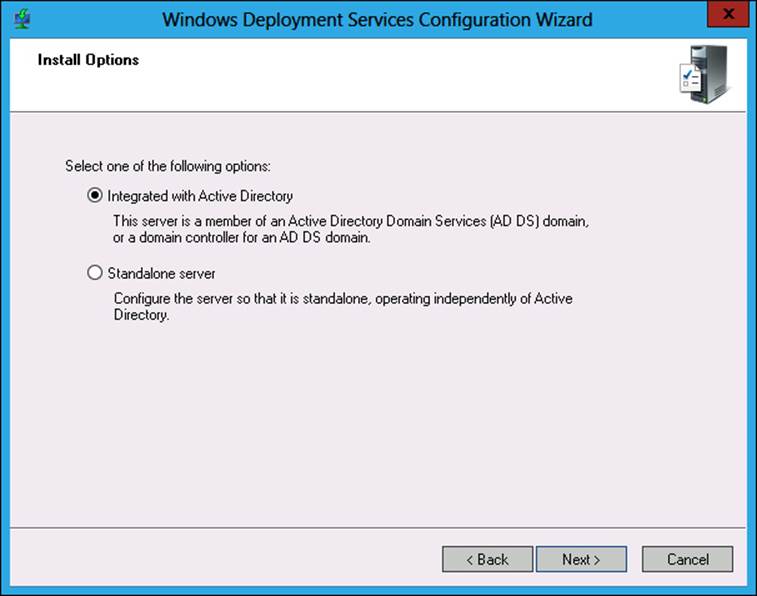
FIGURE 1-31 Configuring WDS
4. On the Remote Installation Folder Location page, verify that C:\RemoteInstall is selected, and click Next.
5. In the System Volume Warning dialog box, click Yes.
6. In the Proxy DHCP Server dialog box, shown in Figure 1-32, verify that Do Not Listen On DHCP And DHCPv6 Ports, and Configure DHCP Options For Proxy DHCP are selected; then click Next.
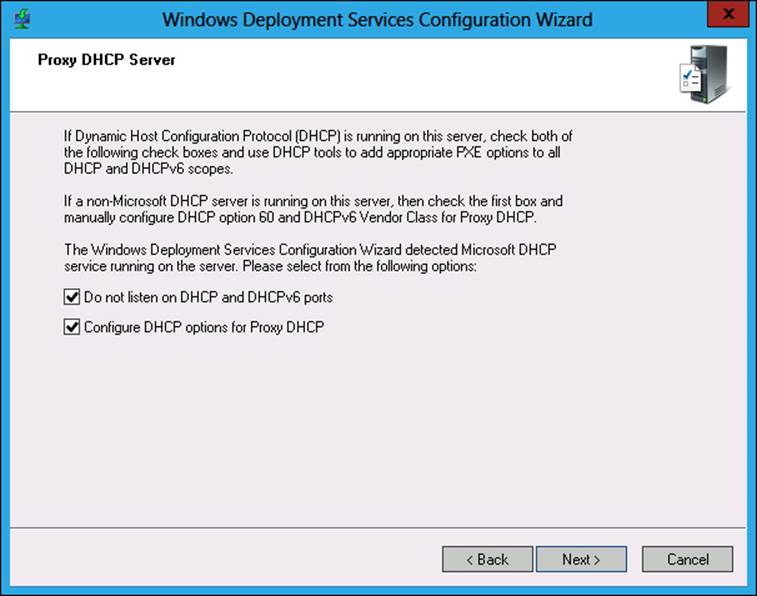
FIGURE 1-32 Configuring Proxy DHCP Server
7. In the PXE Server Initial Settings dialog box, click Respond To All Client Computers (Known And Unknown) and Require Administrator Approval For Unknown Computers as shown in Figure 1-33, and click Next. Click Finish to complete the Windows Deployment Services Configuration Wizard.
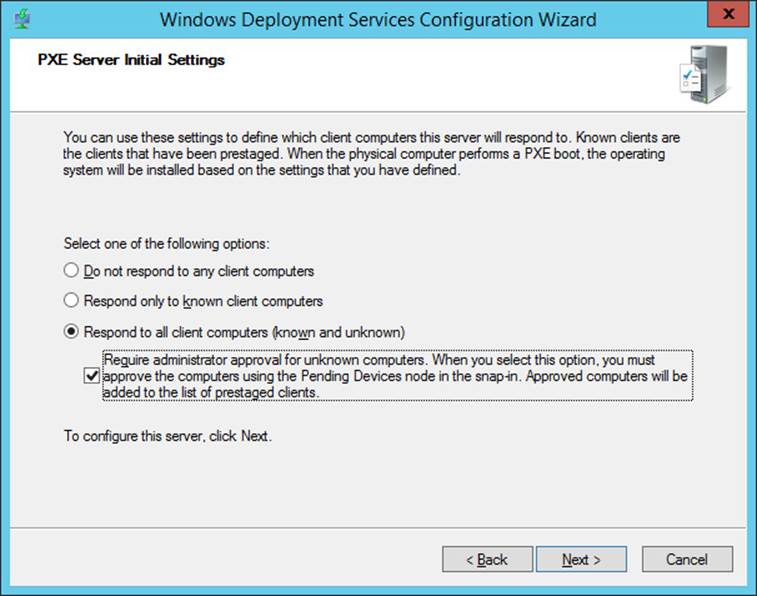
FIGURE 1-33 Configuring PXE Server Initial Settings
8. On the Windows Deployment Services console, click MEL-DC.contoso.com. On the Action menu, click All Tasks, and click Start.
9. In the Server dialog box, click OK.
10. Click Install Images. On the Action menu, click Add Install Image.
11. On the Image Group page of the Add Image Wizard, type the name Contoso-2K12R2 next to Create An Image Group; then click Next.
12. On the Image File page, type the location \\syd-dc\c$\images\install.wim, as shown in Figure 1-34, and click Next.

FIGURE 1-34 Adding image
13. In the Available Images dialog box, ensure that all four images are selected, and click Next.
14. On the Summary page, click Next. When the images are imported, click Finish.
15. On the Windows Deployment Services console, click Boot Images. On the Action menu, click Add Boot Image.
16. In the Image File location dialog box, shown in Figure 1-35, type d:\sources\boot.wim and click Next.
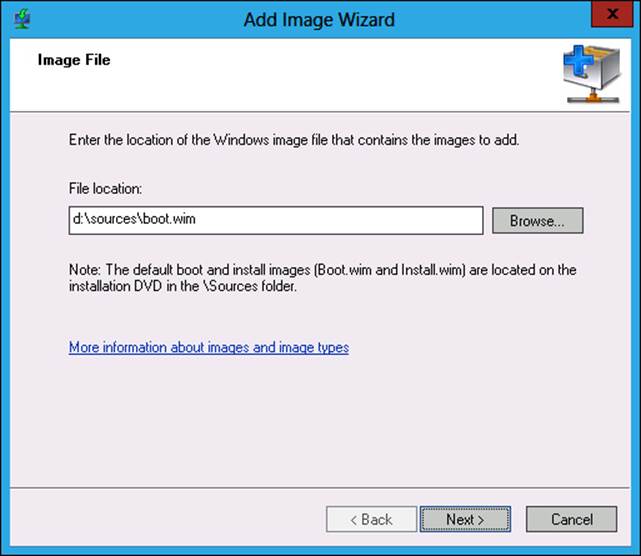
FIGURE 1-35 Adding boot image
17. On the Image Metadata page, accept the default image name and description, and click Next.
18. On the Summary page, click Next. Click Finish to close the Add Image Wizard.
19. Click Multicast Transmissions. On the Action menu, click Create Multicast Transmission.
20. On the Transmission Name page of the Create Multicast Transmission Wizard dialog box, type Contoso Server Deployment and click Next.
21. On the Image Selection page, shown in Figure 1-36, select Contoso-2K12R2, and click Next.
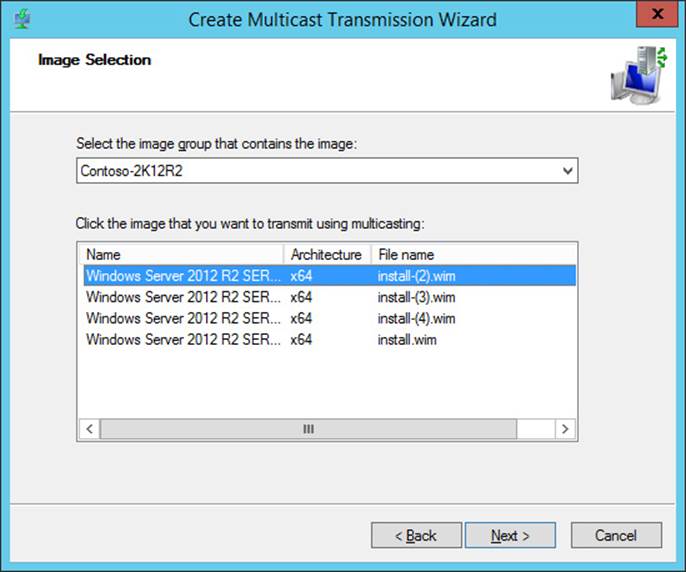
FIGURE 1-36 Creating a multicast transmission
22. On the Multicast Type page, click Auto-Cast, and click Next.
23. On the Operation Complete page, click Finish.
Exercise 5: Import driver package
In this exercise, you import a driver package into WDS. To complete this exercise, perform the following steps:
1. On the WDS console, right-click on the Drivers node, and click Add Driver Package.
2. On the Driver Package Location page of the Add Driver Package Wizard, click Select All Driver Packages From A Folder, and enter the address c:\windows\system32\driverstore as shown in Figure 1-37, and click Next.
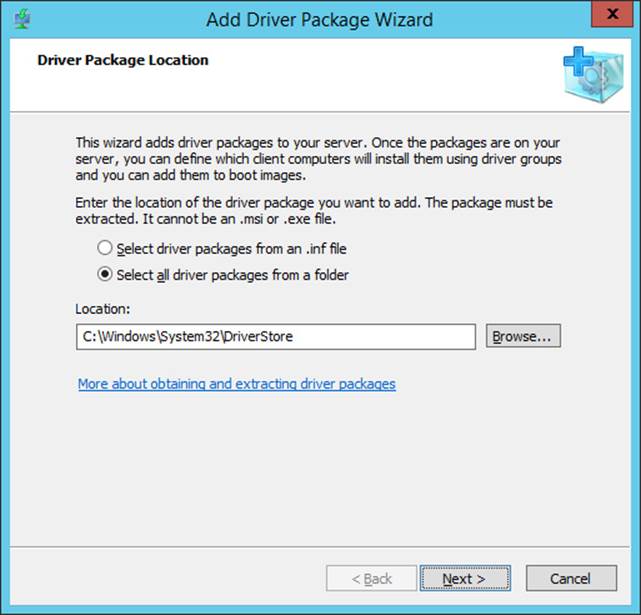
FIGURE 1-37 Import driver packages
3. On the Available Driver Packages, ensure that all packages are selected as shown in Figure 1-38, and click Next.
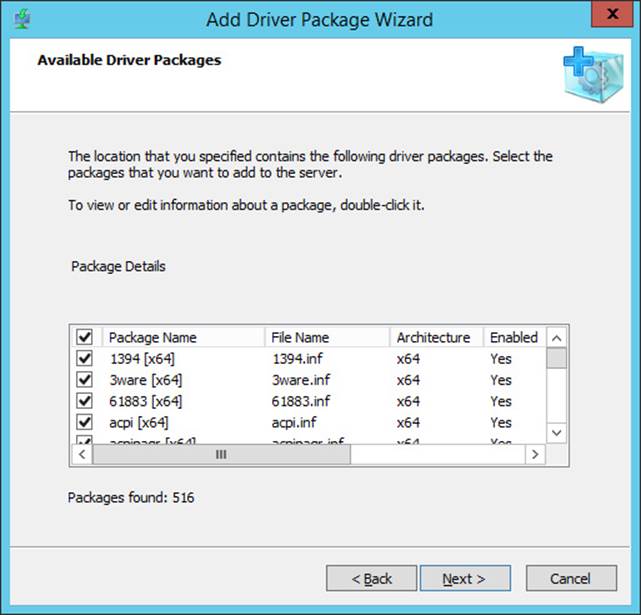
FIGURE 1-38 List of available driver packages
4. On the Summary page, click Next.
5. On the Task Progress page, click Next.
6. On the Failed Package page, click Next.
7. On the Driver Groups page, click Create A New Driver Group Named, and type 2K12R2-VM as shown in Figure 1-39, and then click Next.
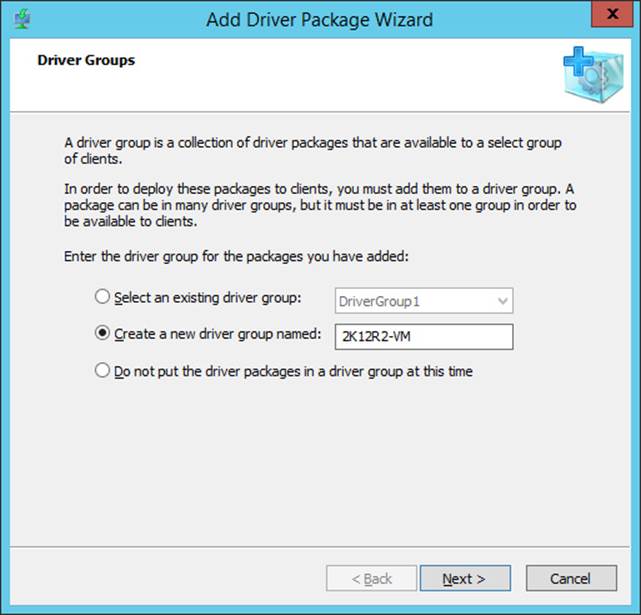
FIGURE 1-39 List of available driver packages
8. On the Task Complete dialog box, clear the check next to Modify The Filters For This Group Now, and click Finish.
Exercise 6: Deploy WSUS
In this exercise, you deploy the WSUS server role on ADL-DC. To complete this exercise, perform the following steps:
1. Sign on to server ADL-DC as Administrator with the password Pa$$w0rd.
2. Open the Windows PowerShell prompt and type the following command to join the contoso.com domain.
Add-Computer -DomainName contoso.com
3. In the Windows PowerShell Credentials dialog box, shown in Figure 1-40, type don_funk@contoso.com and Pa$$w0rd, and click OK.
FIGURE 1-40 PowerShell credentials
4. Type the following command into the Windows PowerShell prompt to shut down the computer.
Stop-Computer
5. In Hyper-V Manager, right-click ADL-DC, and click Settings.
6. In the Settings For ADL-DC dialog box, click Network Adapter, and click Add.
7. In the Settings For ADL-DC dialog box, select the new network adapter.
8. On the Virtual Switch: drop down menu, click the arrow and select a virtual switch that is connected to an external network adapter.
9. Click OK to close the Settings For ADL-DC dialog box.
10. Start ADL-DC.
11. Sign on to server ADL-DC with the Contoso\don_funk account.
12. Click File Explorer on the taskbar and then double-click Local Disk (C:).
13. Click the New Folder item on the title bar. Name the new folder Updates.
14. On the Manage menu of the Server Manager console, click Add Roles And Features.
15. On the Before You Begin page of the Add Roles And Features Wizard, click Next.
16. On the Select Installation Type page, click Role-based or Feature-based Installation, and click Next.
17. On the Select Destination Server page, click ADL-DC.contoso.com, and click Next.
18. On the Select Server Roles page, click Windows Server Update Services.
19. In the Add Roles And Features Wizard pop-up dialog box, click Add Features. Click Next.
20. On the Features page, click Next two times.
21. On the Select Role Services page, shown in Figure 1-41, select both WID Database and WSUS Services, and click Next.

FIGURE 1-41 Adding WSUS roles
22. On the Content Location Selection page, type the address c:\updates, and click Next.
23. On the Web Server Role (IIS) page, click Next twice.
24. On the Confirm Installation Selections page, click Install.
25. When the installation completes, close the Add Roles And Features Wizard.
Exercise 7: Configure WSUS
In this exercise, you configure the WSUS server role on ADL-DC. To complete this exercise, perform the following steps:
1. From the Tools menu on the Server Manager console, open the Windows Server Update Services console.
2. In the Complete WSUS Installation dialog box, shown in Figure 1-41, click Run. After the post–installation configuration completes, click Close.
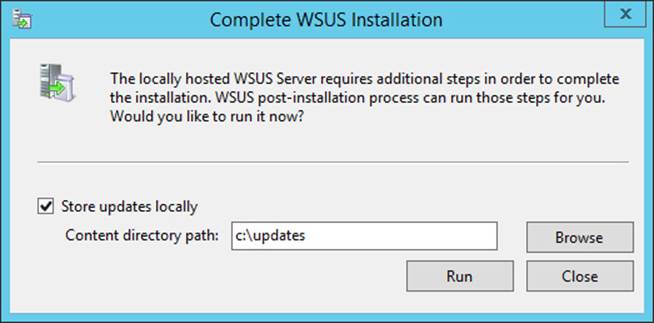
FIGURE 1-42 Complete WSUS Installation dialog box
3. On the Before You Begin page of the Windows Server Update Services Configuration Wizard, click Next.
4. On the Microsoft Update Improvement Program page, click Next.
5. On the Choose Upstream Server page, click Synchronize From Microsoft Update, as shown in Figure 1-43, and click Next.
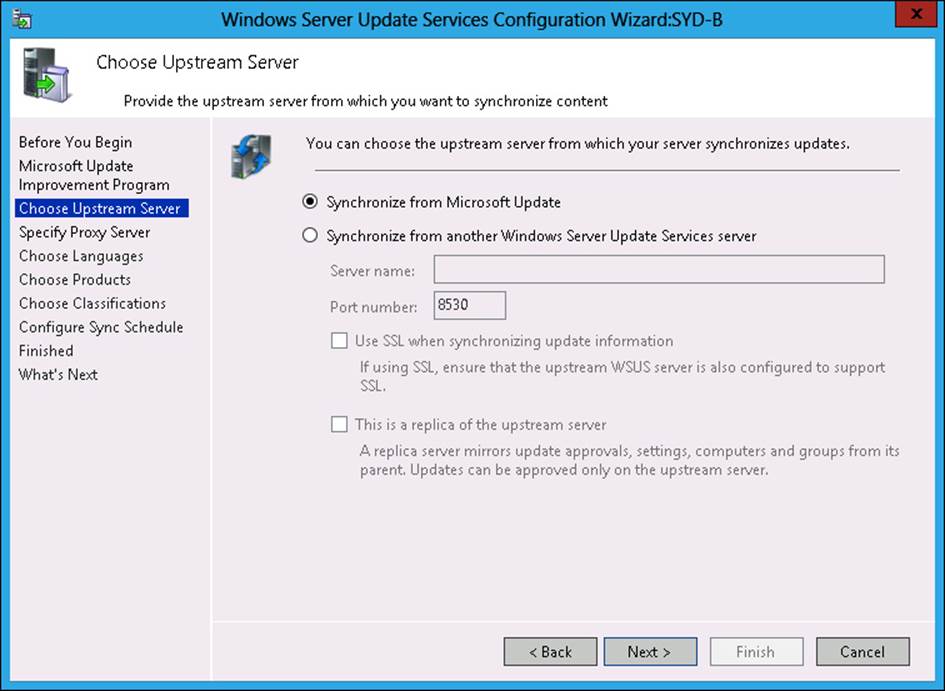
FIGURE 1-43 Choosing the upstream server
6. On the Specify Proxy Server page, click Next.
7. On the Connect To Upstream Server page, click Start Connecting. This operation may take several minutes to complete. When the operation completes, click Next.
8. On the Choose Languages page, click Next.
9. On the Choose Product page, shown in Figure 1-44, select Windows Server 2012 R2, and click Next.
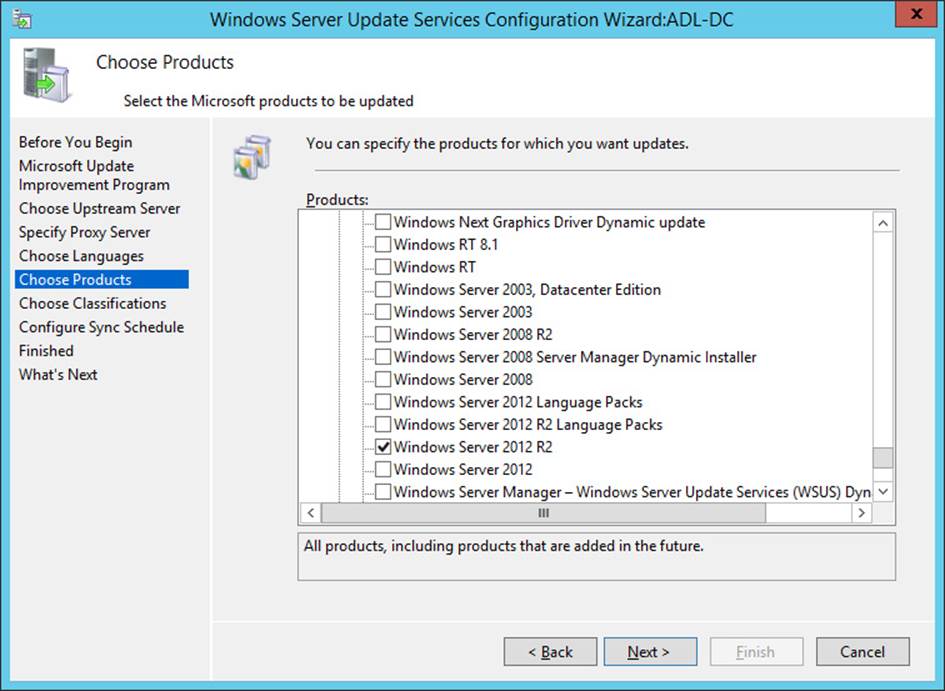
FIGURE 1-44 Choosing products
10. On the Choose Classifications page, click All Classifications, and click Next.
11. On the Set Sync Schedule page, click Synchronize Manually, and click Next.
12. On the Finished page, click Finish.
Exercise 8: WSUS groups and rules
In this exercise, you configure WSUS groups and rules on ADL-DC. To complete this exercise, perform the following steps:
1. From the Tools menu on the Server Manager console, open Windows Server Update Services.
2. On the Update Services console, expand ADL-DC\Computers, and click All Computers.
3. In the Actions pane, click Add Computer Group.
4. In the Add Computer Group dialog box, shown in Figure 1-45, type Sydney Servers, and click Add.
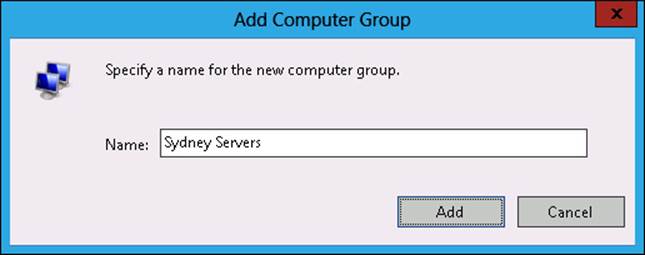
FIGURE 1-45 Add Computer Group dialog box
5. Repeat steps 3 and 4 to add the Brisbane Servers computer group.
6. Click Options, and then click Automatic Approvals.
7. In the Automatic Approvals dialog box, click New Rule.
8. In the Add Rule dialog box, shown in Figure 1-46, select the following options and then click OK:
![]() When An Update Is In A Specific Classification: Critical Updates
When An Update Is In A Specific Classification: Critical Updates
![]() When An Update Is In A Specific Product: Windows Server 2012 R2
When An Update Is In A Specific Product: Windows Server 2012 R2
![]() Approve The Update For: Sydney Servers
Approve The Update For: Sydney Servers
![]() Name: Sydney Servers Critical Updates
Name: Sydney Servers Critical Updates
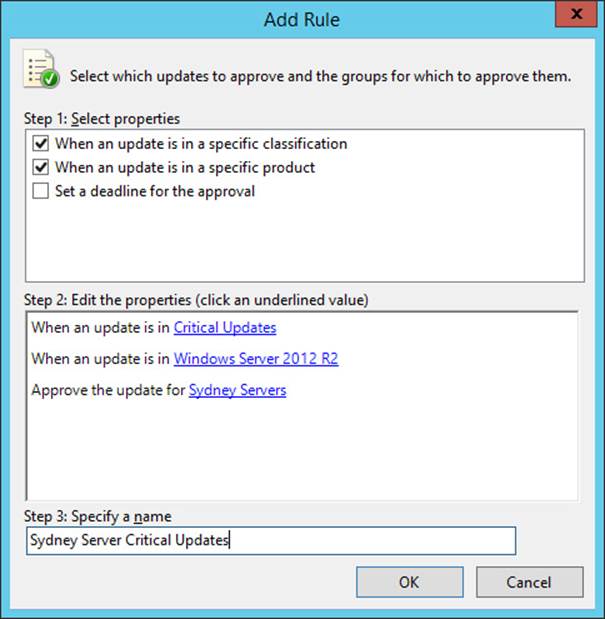
FIGURE 1-46 Adding an approval rule
Suggested practice exercises
The following additional practice exercises are designed to give you more opportunities to practice what you’ve learned and to help you successfully master the lessons presented in this chapter.
![]() Exercise 1 Use the Microsoft Update Catalog and the Dism.exe command-line utility to locate Windows Server 2012 R2 device drivers and add them to the Datacenter Edition image of Windows Server 2012.
Exercise 1 Use the Microsoft Update Catalog and the Dism.exe command-line utility to locate Windows Server 2012 R2 device drivers and add them to the Datacenter Edition image of Windows Server 2012.
![]() Exercise 2 Use WDS to perform a PXE deployment of Windows Server 2012 R2 to a virtual machine that does not have an operating system installed.
Exercise 2 Use WDS to perform a PXE deployment of Windows Server 2012 R2 to a virtual machine that does not have an operating system installed.
![]() Exercise 3 Create WSUS groups for development Exchange and SQL Servers. Configure automatic deployment rules to automatically approve critical updates for Exchange and SQL Server for the Exchange and SQL groups, respectively.
Exercise 3 Create WSUS groups for development Exchange and SQL Servers. Configure automatic deployment rules to automatically approve critical updates for Exchange and SQL Server for the Exchange and SQL groups, respectively.
Real World: Automatic updates to development servers
You should always test updates before applying them to servers in production environments. Some organizations have updates automatically deployed to servers in development environments and then check to see whether any issues arise that might prevent those updates from being deployed to production servers.
Answers
This section contains the answers to the lesson review questions in this chapter.
Lesson 1
1. Correct answer: B
A. Incorrect. You can use ImageX.exe to mount, capture, and apply images. You can’t use ImageX.exe to apply software updates in .msu format to an existing image.
B. Correct. You can use Dism.exe to apply software updates in .msu format to an existing image.
C. Incorrect. The Syspep.exe utility enables you to prepare an image for capture. You can’t use this utility to apply software updates to an existing image.
D. Incorrect. You use the Diskpart.exe utility to modify disks and volumes. You can’t use this utility to apply software updates in .msu format to an existing image.
2. Correct answer: C
A. Incorrect. You use the /Add-Driver switch when you want to add drivers to a mounted image.
B. Incorrect. You use the /Enable-Feature switch when you want to enable an operating system feature.
C. Correct. You use the /Add-Package switch when you want to add software updates in .msu format to a mounted operating system image.
D. Incorrect. You use the /Add-ProvisionedAppxPackage when you want to add an application package in .appx format to a mounted operating system image.
3. Correct answer: C
A. Incorrect. You commit an image only after you have made modifications to the image.
B. Incorrect. You capture an image when you’ve deployed a new operating system and you want to write the changes to that operating system.
C. Correct. You must mount an offline installation image before you can modify the image.
D. Incorrect. You discard an image only if you do not want to save the changes that you made to an image.
Lesson 2
1. Correct answers: A and B
A. Correct. The boot images enable computers to PXE boot.
B. Correct. The install image provides computers with the Windows Server 2012 operating system.
C. Incorrect. Capture images are used to create install images. You don’t need to be able to create install images to perform basic operating system deployment because they are included with the installation media.
D. Incorrect. Discover images are used with computers that can’t perform a PXE boot and can’t acquire a boot image.
2. Correct answers: A and C
A. Correct. By default, WDS and DHCP use the same port. When colocating these services, ensure that WDS is configured to use a different port.
B. Incorrect. An incorrectly configured WDS server can listen on the same port as a DHCP server, but it can’t listen on the port used by a DNS server unless substantial modifications are made to the configuration.
C. Correct. Configuring DHCP options sets option tag 60 to DHCP scopes that enables clients to determine the appropriate port to use for WDS transmissions.
D. Incorrect. By default, WDS does not need to be authorized. You can enable authorization as a requirement for WDS, but this is not a default setting.
3. Correct answers: B and D
A. Incorrect. You want the WDS server to respond to client computers, so you should not choose this setting.
B. Correct. You want an administrator to manually approve deployments. To accomplish this, you must configure this setting.
C. Incorrect. If you select this option, WDS automatically rejects connections from computers with unknown MAC addresses.
D. Correct. This option needs to be selected with the Require Administrator Approval For Unknown Computers option. After it is selected, known computers will receive images from WDS, and unknown computers will be able to receive images from WDS after approval.
Lesson 3
1. Correct answer: B
A. Incorrect. This policy enables you to configure whether a computer will receive automatic updates. This policy cannot be used to assign a computer to a WSUS computer group.
B. Correct. This policy enables you to specify the name of the WSUS group in which the computer should be a member.
C. Incorrect. This policy enables you to set a period of time between when updates are installed and any necessary restarts occur. This policy can’t be used to assign a computer to a WSUS computer group.
D. Incorrect. You use this policy to specify the location of the WSUS server. This policy can’t be used to assign a computer to a WSUS computer group.
2. Correct answers: B, C, and D
A. Incorrect. WSUS computer groups are separate from local security groups. You need to create a WSUS group on SYDNEY-WSUS.
B. Correct. You need to create a WSUS group if you want to target specific computers with an automatic approval rule.
C. Correct. By adding the computers to the UpdateTest group, you can target these computers with an automatic approval rule.
D. Correct. Creating an automatic approval rule for the UpdateTest group enables you to have critical and security updates automatically approved to computers that are members of this group.
3. Correct answers: B and D
A. Incorrect. You want to have the Melbourne and Perth servers as replicas of the Sydney server.
B. Correct. You want the Melbourne and Perth servers to retrieve updates from Microsoft Update and then have clients in those branch offices retrieve updates from those local servers.
C. Incorrect. You need to configure the Melbourne and Perth servers to store update files locally. If they don’t do this, clients in these branch offices will retrieve updates from the Microsoft Update servers on the Internet.
D. Correct. Replicas take approval information and update metadata from upstream servers, which enables the approvals from the Sydney office to flow down to the Melbourne and Perth offices. Although the approvals flow down, these replicas can still retrieve the actual update files from the Microsoft Update servers.
All materials on the site are licensed Creative Commons Attribution-Sharealike 3.0 Unported CC BY-SA 3.0 & GNU Free Documentation License (GFDL)
If you are the copyright holder of any material contained on our site and intend to remove it, please contact our site administrator for approval.
© 2016-2026 All site design rights belong to S.Y.A.