Training Guide Administering Windows Server 2012 R2 (2014)
Chapter 3. Configuring name resolution
Name resolution involves translating human readable names, most commonly fully qualified domain names (FQDNs), into IP addresses. Most name resolution on Windows networks occurs through DNS. Although it is possible to use third-party DNS solutions with Active Directory, it’s simpler to deploy the built-in DNS Server role. This role can be installed on computers running the full GUI or Server Core installation of Windows Server 2012, or Windows Server 2012 R2. Windows Server 2012 and Windows Server 2012 R2 also support single-label name resolution with the Windows Internet Name Service (WINS) role. For organizations that are tired of maintaining WINS servers, it is possible to transition to using GlobalNames zones with DNS. Windows Server 2012 and Windows Server 2012 R2 also support the Peer Name Resolution Protocol (PNRP), which is a peer-to-peer IPv6 name resolution protocol that does not require a centralized name resolution server infrastructure.
Lessons in this chapter:
![]() Lesson 1: Understanding DNS zones and forwarders
Lesson 1: Understanding DNS zones and forwarders
![]() Lesson 2: Configuring WINS and managing GlobalNames zones
Lesson 2: Configuring WINS and managing GlobalNames zones
![]() Lesson 3: Understanding advanced DNS options
Lesson 3: Understanding advanced DNS options
Before you begin
To complete the practice exercises in this chapter:
![]() You need to have deployed computers SYD-DC, MEL-DC, and ADL-DC as described in the Introduction, using the evaluation edition of Windows Server 2012 R2.
You need to have deployed computers SYD-DC, MEL-DC, and ADL-DC as described in the Introduction, using the evaluation edition of Windows Server 2012 R2.
Lesson 1: Understanding DNS zones and forwarders
Windows Server 2012 DNS supports several different types of DNS zones. The difference between DNS zone types comes down to the nature of that collection of records, whether that collection is updatable, and how that collection will replicate to other DNS servers. Part of the 70-411 exam involves being able to choose the correct zone type to resolve a specific problem and knowing what steps you need to take to configure that zone to meet your organization’s needs. Forwarders are a method of redirecting DNS queries to specific servers. You use them to improve DNS performance or allow connections to specific DNS zones that might otherwise not be directly accessible.
After this lesson, you will be able to:
![]() Distinguish between DNS zone types.
Distinguish between DNS zone types.
![]() Understand stub zones and forwarders.
Understand stub zones and forwarders.
![]() Manage zone delegation.
Manage zone delegation.
![]() Manage zone transfer.
Manage zone transfer.
Estimated lesson time: 45 minutes
DNS zone types
The DNS Server service in Windows Server 2012 supports several zone types, each of which is appropriate for a different set of circumstances. To pass the 70-411 exam, you’ll need to know the difference among primary, secondary, and stub zones. You’ll also need to know the difference between a zone that is Active Directory integrated and one that is not. You will also need to have an understanding of the different replication scopes that are available for each type of DNS zone.
Active Directory integrated zones

Active Directory integrated zones can be replicated to all domain controllers in a domain, all domain controllers in a forest, or all domain controllers enrolled in a specific Active Directory partition. You can create an Active Directory integrated zone only on a writable domain controller. You can configure primary and stub zones as Active Directory integrated zones. Domain controllers with DNS servers that host Active Directory integrated zones can process updates to those zones.
You make a zone Active Directory integrated by selecting the Store The Zone In Active Directory option on the Zone Type page of the New Zone Wizard, as shown in Figure 3-1.
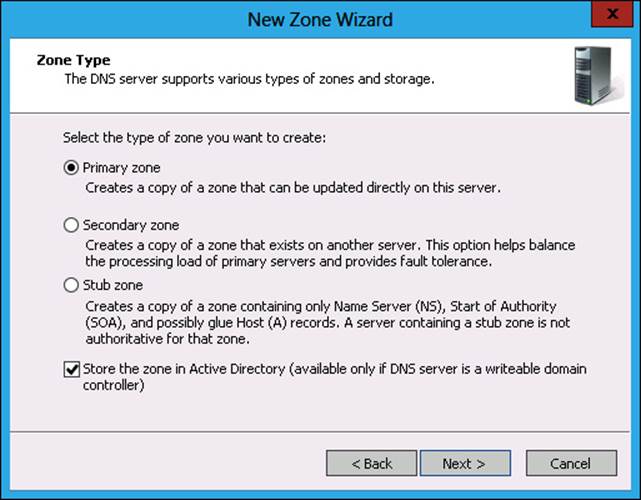
FIGURE 3-1 Configuring the Primary Zone to be Active Directory integrated
When you choose to make a zone Active Directory integrated, you get the option of configuring a replication scope, as shown in Figure 3-2. You can configure the zone to be replicated so that it will be present on all domain controllers in the domain, in the forest, or within the scope of a custom Active Directory partition. You can also choose the option of replicating for Windows 2000 compatibility.
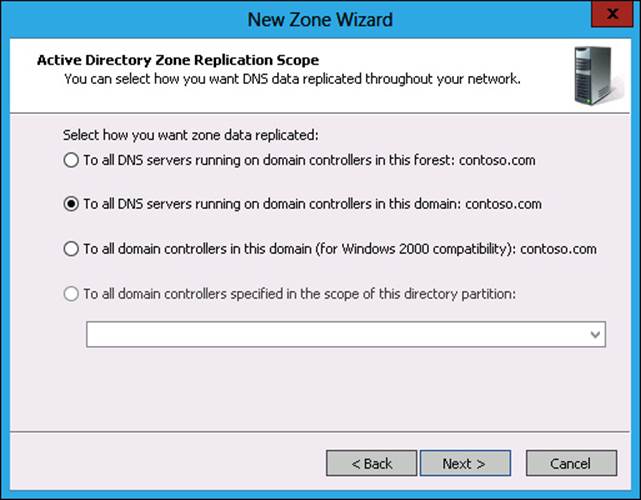
FIGURE 3-2 Replication scope
Using custom directory partitions allows you to replicate to some (but not all) domain controllers. You can select this option only if there is an existing application directory partition. You can use the Add-DNSServerDirectoryPartition cmdlet to create a directory partition. For example, to create a DNS Server directory partition called Tasmania, execute this command:
Add-DNSServerDirectoryPartition –Name Tasmania
More Info: Creating application directory partitions
You can learn more about creating custom partitions to manage the scope of DNS replication by consulting the following MSDN article at http://msdn.microsoft.com/en-us/library/windows/desktop/ms675765(v=vs.85).aspx.
When creating a DNS zone, you must specify whether the zone will support dynamic updates. Dynamic updates allow clients to update DNS records. This is useful in environments in which clients change IP addresses on a regular basis. When a client gets a new IP address, it can update the record associated with its host name in the appropriate DNS zone. As Figure 3-3 shows, there are three options:
![]() Allow Only Secure Dynamic Updates You can use this option only with Active Directory integrated zones. Only authenticated clients can update DNS records.
Allow Only Secure Dynamic Updates You can use this option only with Active Directory integrated zones. Only authenticated clients can update DNS records.
![]() Allow Both Nonsecure And Secure Dynamic Updates With this option, any client can update a record. Although this option is convenient, it is also insecure because any client can update the DNS zone, potentially redirecting clients that trust the quality of the information stored on the DNS server.
Allow Both Nonsecure And Secure Dynamic Updates With this option, any client can update a record. Although this option is convenient, it is also insecure because any client can update the DNS zone, potentially redirecting clients that trust the quality of the information stored on the DNS server.
![]() Do Not Allow Dynamic Updates When you choose this option, all DNS updates must be performed manually. This option is very secure, but it is also labor-intensive.
Do Not Allow Dynamic Updates When you choose this option, all DNS updates must be performed manually. This option is very secure, but it is also labor-intensive.
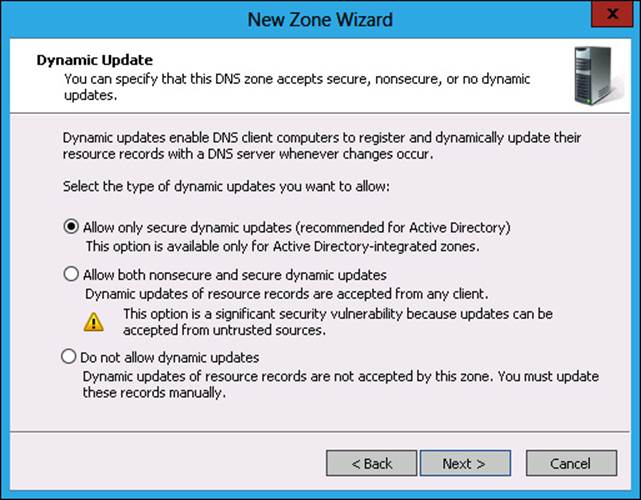
FIGURE 3-3 Dynamic update options
An Active Directory integrated zone can replicate to a read-only domain controller (RODC), but this zone is read-only and cannot process updates to the zone, as is the case with a traditional writable domain controller. An RODC will forward any zone update traffic directed at it, to a writable domain controller.
You can create an Active Directory integrated primary zone by using the Add-DnsServerPrimaryZone cmdlet with the ReplicationScope parameter. For example, to create the Active Directory integrated zone cpandl.com to replicate to all domain controllers in the forest, issue this command.
Add-DnsServerPrimaryZone –Name cpandl.com –ReplicationScope Forest
When you first install Active Directory, the installation process ensures that the DNS zone associated with the root domain is automatically configured as an Active Directory integrated zone and is replicated to all domain controllers in the forest.
Primary and secondary zones
In traditional DNS implementations, a single server hosting a primary zone processes all zone updates, and a collection of secondary servers replicates zone data from the primary zone. One drawback to this model is that a failure of the primary server means that no zone updates can occur until the primary zone is restored.
Windows Server 2012 supports two types of primary zones: Active Directory integrated zones and standard primary zones. Active Directory integrated zones can be hosted only on computers that also function as domain controllers. Computers running Windows Server 2012 that are not domain controllers can host standard primary zones. When you create a primary zone on a computer that is not a domain controller, the wizard does not enable you to specify a replication scope for the zone.
A secondary zone is a read-only copy of a primary zone. Secondary zones cannot process updates. They can only retrieve updates from a primary zone. Secondary zones cannot be Active Directory integrated zones, but you can configure a secondary zone of a zone that is an Active Directory integrated primary zone. Prior to configuring a secondary zone, you need to configure the primary zone that it will replicate from to enable transfers to that zone. You can do this on the Zone Transfers tab of the zone properties, as shown in Figure 3-4. Secondary zones work best when the primary zone they replicate from does not update frequently. If the primary zone is frequently updated, it is possible that the secondary zone may have out-of-date records.
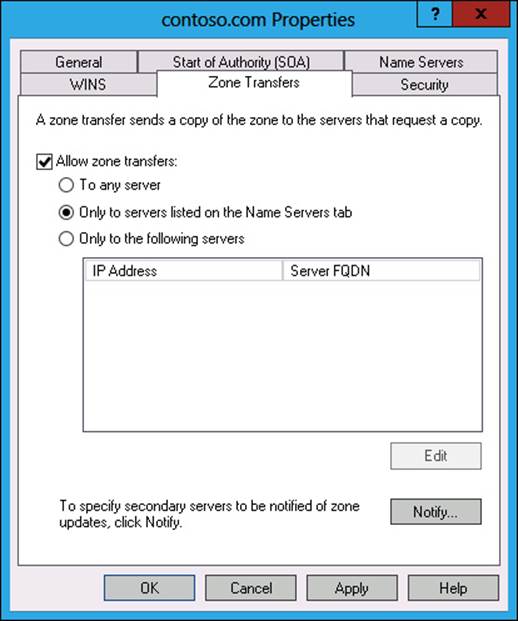
FIGURE 3-4 Using the Zone Transfers tab to configure replication scope
Reverse lookup zones
Reverse lookup zones translate IP addresses into FQDNs. You can create IPv4 or IPv6 reverse lookup zones, and reverse lookup zones can be configured as Active Directory integrated zones. You can configure reverse lookup zones as standard primary, secondary, or stub zones. The domain controller promotion process automatically creates a reverse lookup zone based on the IP address of the first domain controller promoted in the organization.
Reverse lookup zones are dependent on the network ID of the IP address range they represent. IPv4 reverse lookup zones can represent only /8, /16, or /24 (the old Class A, Class B, and Class C) networks. You can’t create a single reverse lookup zone for IP subnets that don’t fit into these categories, and the smallest reverse lookup zone you can create is for subnet mask /24 (255.255.255.0).
You can create a reverse lookup zone by performing the following steps:
1. In the DNS Manager Console, right-click Reverse Lookup Zones, and click New Zone.
2. On the Zone Type page, select the type of reverse lookup zone that you want to create. You can create a primary or a stub zone that can be Active Directory integrated if you are managing a DNS server on a domain controller, or create a secondary zone if the reverse lookup zone is being replicated from an existing primary reverse lookup zone.
3. If you have chosen to make the lookup zone Active Directory integrated, you’ll need to choose the zone replication scope.
4. On the Reverse Lookup Zone Name page, choose between IPv4 and IPv6 Reverse Lookup Zone.
5. You can configure the reverse lookup zone either on the basis of choosing Network ID or Reverse Lookup Zone Name, as shown in Figure 3-5. The name is automatically generated when you provide the ID.
6. You can then choose whether to enable secure dynamic updates, enable nonsecure and secure dynamic updates, or not enable dynamic updates.
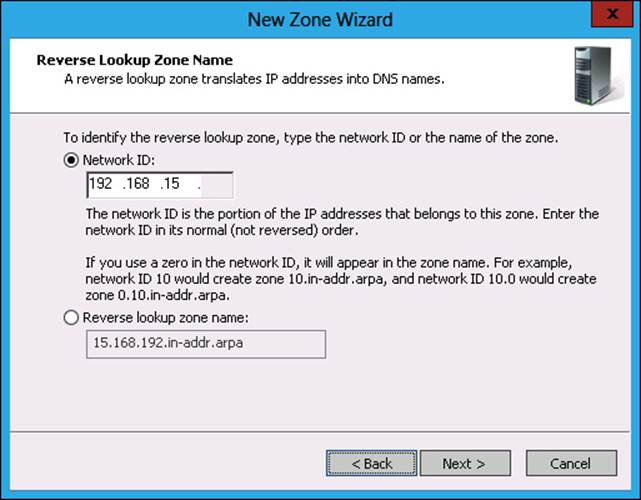
FIGURE 3-5 Configuring reverse lookup zones adding the Network ID
Real World: Reverse lookup zones
Few applications actually require that you configure reverse lookup zones. In most organizations, the only reverse lookup zone will be the one automatically created when Active Directory is installed. One of the few times when reverse lookup zones seemed necessary is when configuring Simple Mail Transfer Protocol (SMTP) gateways because some anti-spam checks perform a reverse IP address lookup to verify the identity of the SMTP gateway. The difficulty is that often the IP address of the SMTP gateway, being a public address, belongs to the Internet service provider (ISP). This means that creating the reverse lookup zone entry is often beyond your direct control as a systems administrator.
Zone delegation
Zone delegations function as pointers to the next DNS layer down in the DNS hierarchy. For example, if your organization uses the contoso.com DNS zone and you want to create a separate australia.contoso.com DNS zone, you can perform a zone delegation so that the DNS servers for the contoso.com DNS zone would point to the DNS servers for the australia.contoso.com DNS zone. When you create a new child domain in an Active Directory forest, zone delegation occurs automatically. When you are performing a manual delegation, create the delegated zone on the target DNS server prior to performing the delegation from the parent zone.
You can configure a zone delegation by performing the following steps:
1. Create the primary zone, either standard or Active Directory integrated, on the DNS server that will host the delegated zone.
2. In the DNS Manager Console, right-click the zone that you want to create a delegation for, and click New Delegation.
3. On the Delegated Domain Name page of the New Delegation Wizard, shown in Figure 3-6, enter the name of the delegated domain.
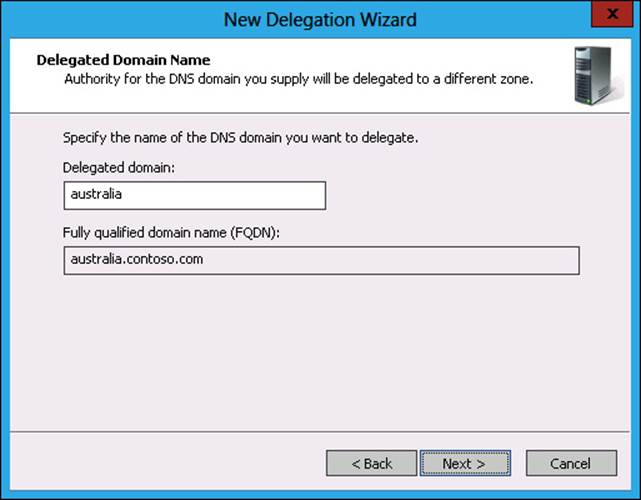
FIGURE 3-6 Adding zone delegation
4. On the Name Servers page, shown in Figure 3-6, add the address of the DNS server that hosts the zone for which you are creating a delegation. The wizard will check that the DNS server is authoritative for the delegated zone.
You can create delegations using the Add-DnsServerZoneDelegation cmdlet. Although you can delegate several levels, remember that the maximum length of a FQDN is 255 bytes, and the maximum length of a FQDN for an Active Directory Domain Services domain controller is 155 bytes.
More Info: Zone delegation
You can learn more about DNS zone delegation by consulting the following TechNet article at http://technet.microsoft.com/en-us/library/cc771640.aspx.
Split DNS
Split DNS, sometimes named “split-brain DNS”, enables organizations to use the same namespace for internal and external hosts, but enables those organizations to ensure that external hosts can’t resolve internal names. For example, an organization might want to enable internal users to resolve the addresses www.tailspintoys.com and aus-fs1.tailspintoys.com, but enable external users to resolve only www.tailspintoys.com.
Real World: Split DNS
Many organizations don’t bother hosting the publicly resolvable zone associated with their organization, but instead have it hosted on their ISP’s DNS servers.
To implement split DNS, create two zones on different name servers for the same DNS zone. For example, you can configure split DNS in the following way:
![]() Contoso.com is an Active Directory integrated primary zone replicated to all domain controllers on your organization’s internal network. Internal clients would run queries against these DNS servers for the contoso.com zone.
Contoso.com is an Active Directory integrated primary zone replicated to all domain controllers on your organization’s internal network. Internal clients would run queries against these DNS servers for the contoso.com zone.
![]() Contoso.com is a standard primary zone hosted on a computer running Windows Server 2012 that is not a member of a domain and is located on your organization’s perimeter network. External clients would run queries against this DNS server for the contoso.com zone.
Contoso.com is a standard primary zone hosted on a computer running Windows Server 2012 that is not a member of a domain and is located on your organization’s perimeter network. External clients would run queries against this DNS server for the contoso.com zone.
You can configure the standard primary zone hosted on the computer on the perimeter network to accept only manual updates. You can then manually populate the zone with those records that external hosts should be able to resolve, such as the address of web servers and mail gateways.
![]() Quick check
Quick check
![]() In which circumstances are you unable to create an Active Directory integrated primary zone on a computer running Windows Server 2012 with the DNS Server role installed?
In which circumstances are you unable to create an Active Directory integrated primary zone on a computer running Windows Server 2012 with the DNS Server role installed?
Quick check answer
![]() You can’t create an Active Directory integrated primary zone if the Windows Server 2012 computer hosting the DNS Server service is not a domain controller.
You can’t create an Active Directory integrated primary zone if the Windows Server 2012 computer hosting the DNS Server service is not a domain controller.
Forwarders and conditional forwarders
Forwarders and conditional forwarders enable your DNS server to forward traffic to specific DNS servers when a lookup request cannot be handled locally. If you don’t configure a forwarder, or if a configured forwarder can’t be contacted, the DNS Server service will forward the request to a DNS root server, and the request will be resolved normally.
Forwarders
You are likely to use a DNS forwarder, rather than have your DNS server just use the root server when you want to have a specific DNS server on the Internet handle your organization’s DNS resolution traffic. You are most likely to configure your organization’s ISP’s DNS server as a forwarder. When you do this, the ISP’s DNS server performs all the query work, returning the result to your organization’s DNS server that returns the result of the query back to the original requesting client.
You configure forwarders on a per-DNS server level. You can configure a forwarder using the DNS Manager, by editing the properties of a DNS server and then editing the list of forwarders on the Forwarders tab, as shown in Figure 3-7.
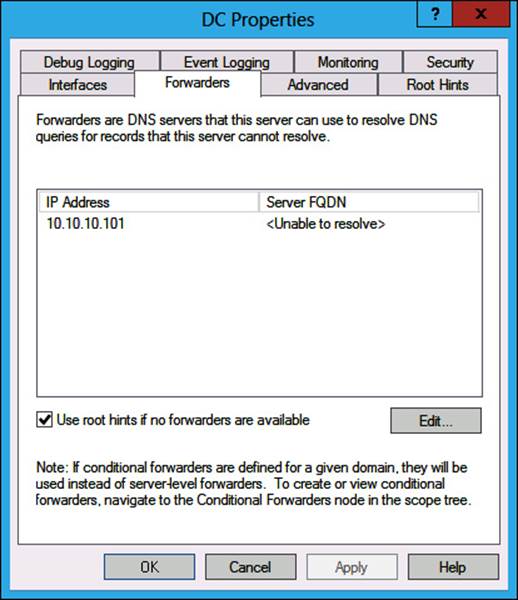
FIGURE 3-7 Configuring a DNS forwarder
You can create a DNS forwarder using the Add-DnsServerForwarder cmdlet. For example, to create a DNS forwarder for a DNS server with IP address 10.10.10.111, issue this command.
Add-DnsServerForwarder 10.10.10.111
You can’t create a forwarder on one DNS server and then have it replicate to all other DNS servers in the forest or the domain, although this is possible with conditional forwarders and stub zones.
Real World: ISP’s DNS servers
There are several important things to remember if you configure a forwarder to your ISP’s DNS server. The first is that your ISP might change the address of the DNS server without warning. Most ISP customers use Dynamic Host Configuration Protocol (DHCP) to obtain DNS server addresses. If your organization changes ISPs, remember to change the address of your forwarders. Also, remember that it must be changed on each DNS server. It isn’t something you can do on one server and have it replicate throughout all the other DNS servers in your organization.
Conditional forwarders
Conditional forwarders forward address requests from only specific domains, rather than all requests that can’t be resolved by the DNS server. When configured, a conditional forwarder takes precedence over a forwarder. Conditional forwarders are useful when your organization has a trust relationship or partnership with another organization. You can configure a conditional forwarder that directs all traffic to host names within that organization instead of them having to be resolved by the standard DNS-resolution process.
To create a conditional forwarder, perform the following steps:
1. Open DNS Manager.
2. Expand the DNS server on which you want to create the conditional forwarder. Since conditional forwarders can be replicated to all DNS servers in a forest or domain, you have to create the forwarder only once.
3. Right-click Conditional Forwards, and choose New Conditional Forwarder.
4. Enter the DNS domain name of the zone for the forwarder. For example, if you want all traffic for hosts in the wingtiptoys.com zone to be forwarded to specific DNS servers, type wingtiptoys.com as the DNS domain name.
5. Enter the IP address or addresses of the DNS server to which you want to forward DNS traffic.
6. Select whether the conditional forwarder will be stored within Active Directory. Choose whether to replicate the forwarder to all servers in the forest or in the domain, as shown in Figure 3-8.
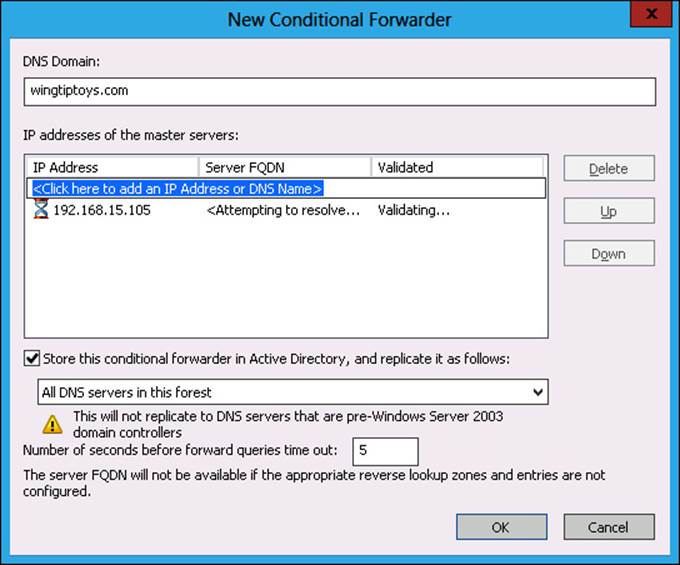
FIGURE 3-8 Configuring conditional forwarders
You can create conditional forwarders using the Add-DnsServerConditionalForwarderZone PowerShell cmdlet. For example, to create a conditional forwarder for the DNS domain tailspintoys.com that forwards DNS queries to the server at IP address 10.10.10.102 and replicates that conditional forwarder to all DNS servers within the Active Directory forest, issue this command.
Add-DnsServerConditionalForwarderZone –MasterServers 10.10.10.102 –Name tailspintoys.com
–ReplicationScope Forest
Stub zones
A stub zone is a special zone that stores authoritative name server records for a target zone. Stub zones have an advantage over forwarders when the address of a target zone’s authoritative DNS server changes on a regular basis. Stub zones are often used to host the records for authoritative DNS servers in delegated zones. Using stub zones in this way ensures that delegated zone information is up to date. If you create the stub zone on a writable domain controller, as shown in Figure 3-9, it can be stored with Active Directory and replicated to other DCs in the domain or forest.

FIGURE 3-9 Creating a stub zone
You can create a stub zone by performing the following steps:
1. In DNS Manager, right-click Forward Lookup Zones and click New Zone.
2. On the Zone Type page of the New Zone Wizard, select Stub Zone, as shown in Figure 3-9.
3. If you chose the Store The Zone In Active Directory option, you see the Active Directory Zone Replication Scope page. Choose whether to replicate the stub zone to all domain controllers in the forest, in the domain, or to all domain controllers enrolled in a specific directory partition.
4. Provide the stub zone with the name of the target DNS zone.
5. On the Master DNS Servers page, shown in Figure 3-10, provide the address of an authoritative DNS name server for the zone. Choose the Use The Above Servers To Create A Local List Of Master Servers option to generate a list of all authoritative name servers in the target DNS zone.
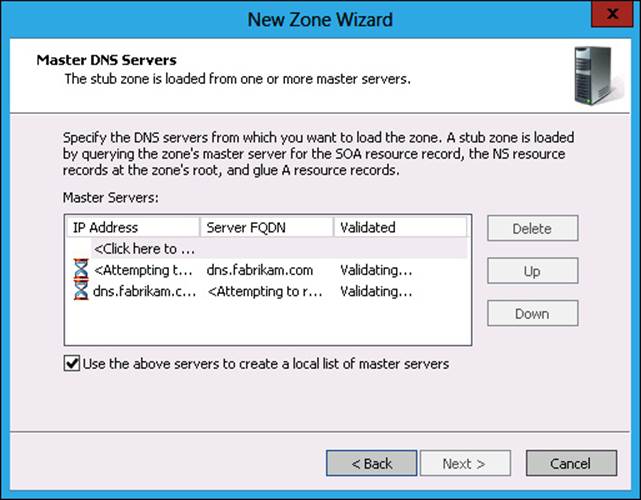
FIGURE 3-10 List of stub zone master DNS servers
You can add a stub zone using the Add-DnsServerStubZone cmdlet. For example, to add a DNS stub zone for the fabrikam.com zone using the DNS server at 10.10.10.222 that replicates to all DNS servers in the forest, execute this command.
Add-DnsServerStubZone –MasterServers 10.10.10.222 –Name fabrikam.com –ReplicationScope
Forest –LoadExisting
Lesson summary
![]() Primary and stub zones can be configured as Active Directory integrated zones.
Primary and stub zones can be configured as Active Directory integrated zones.
![]() Active Directory integrated zones can be replicated to all domain controllers in a domain, in the forest, or that have a specific DNS application partition.
Active Directory integrated zones can be replicated to all domain controllers in a domain, in the forest, or that have a specific DNS application partition.
![]() Reverse lookup zones translate IP addresses into FQDNs.
Reverse lookup zones translate IP addresses into FQDNs.
![]() Reverse lookup zones can be Active Directory integrated zones.
Reverse lookup zones can be Active Directory integrated zones.
![]() Secondary zones are read-only.
Secondary zones are read-only.
![]() Conditional forwarders forward all traffic for a particular zone to a particular DNS server.
Conditional forwarders forward all traffic for a particular zone to a particular DNS server.
![]() Forwarders forward all traffic not handled by conditional forwarders to a specific DNS server.
Forwarders forward all traffic not handled by conditional forwarders to a specific DNS server.
Lesson review
Answer the following questions to test your knowledge of the information in this lesson. You can find the answers to these questions and explanations of why each answer choice is correct or incorrect in the “Answers” section at the end of this chapter.
1. You want to create a new DNS zone. Only computers that are members of the domain should be able to update the zone. You should not have to perform zone updates manually. Which of the following steps should you take to accomplish this goal? (Choose all that apply.)
A. Configure the contoso.com zone as an Active Directory integrated primary.
B. Configure the contoso.com zone as a standard primary zone.
C. Configure the zone to enable only secure dynamic updates.
D. Configure the zone to not enable dynamic updates.
2. Which of the following network IDs is associated with the reverse lookup zone 15.168.192.in-addr.arpa?
A. 192.168.15.0 /16
B. 15.168.192.0 /24
C. 192.168.15.0 /24
D. 15.168.192.0 /24
3. You want to create a delegation for the zone australia.fabrikam.com. This zone will be hosted on a DNS server with the IP address 10.100.10.10. The DNS server that is authoritative for the zone fabrikam.com is hosted on a computer with the IP address 10.10.10.10. Which of the following steps must you take first? (Choose all that apply.)
A. Create the zone australia.fabrikam.com on the computer that hosts the DNS server with the IP address 10.10.10.10.
B. Create the zone australia.fabrikam.com on the computer that hosts the DNS server with the IP address 10.100.10.10.
C. Create the delegation using the zone fabrikam.com on the computer that hosts the DNS server with the IP address 10.100.10.10.
D. Create the delegation using the zone fabrikam.com on the computer that hosts the DNS server with the IP address 10.10.10.10.
4. A partner organization frequently alters the IP addresses of its authoritative name servers. Clients in the partner DNS zone also change their DNS records frequently. You want to enable clients in your organizational network to be able to quickly resolve addresses in the partner’s DNS zone without worrying that your own DNS server is hosting stale DNS records. Which of the following should you create on your local DNS server to accomplish this goal? (Choose all that apply.)
A. Secondary zone
B. Conditional forwarder
C. Forwarder
D. Stub zone
5. You want to have all DNS requests for nonlocal addresses go to your ISP’s DNS server, except those for hosts located in the margiestravel.com zone. Any requests for hosts located in the margiestravel.com zone should automatically be forwarded to a DNS server with a specific IP address. Which of the following should you configure to accomplish this goal? (Choose all that apply.)
A. Stub zone
B. Forwarder
C. Conditional forwarder
D. Secondary zone
Lesson 2: Configuring WINS and managing GlobalNames zones
Both WINS and GlobalNames zones provide single-label name resolution solutions. Single-label name resolution solutions are often required because custom code and scripts, some dating back to the days when Windows NT 4.0 was the server operating system of choice, don’t use the DNS FQDNs. In this lesson, you learn how to provide an appropriate single-label name resolution solution for your organizational network.
After this lesson, you will be able to:
![]() Configure WINS.
Configure WINS.
![]() Manage GlobalNames zones.
Manage GlobalNames zones.
![]() Understand Peer Name Resolution Protocol (PNRP).
Understand Peer Name Resolution Protocol (PNRP).
Estimated lesson time: 45 minutes
WINS
WINS is an older name resolution technology that resolves NetBIOS names to IP addresses. WINS was primarily used on networks running Windows NT 4.0 and has been declining in utilization ever since. Other than small changes to make WINS less vulnerable to malicious attacks, the functionality of WINS has not changed substantially since the release of Windows Server 2003 almost a decade ago. Windows Server 2012 still includes the WINS role because a large number of organizations have need for single-label name resolution functionality. Single-label name resolution is required when a host is referred to on the network with a single name, such as Windows Server Update Services (WSUS), rather than an FQDN such as wsus.contoso.internal. Depending on how DNS is configured, some clients can use their DNS host suffix to locate hosts on the basis of a single label. You can also integrate DNS with WINS.
To install and configure the WINS role on a computer running Windows Server 2012, perform the following steps:
1. From Server Manager, use the Manage menu to launch the Add Roles And Features Wizard.
2. Select the WINS Server feature, as shown in Figure 3-11.
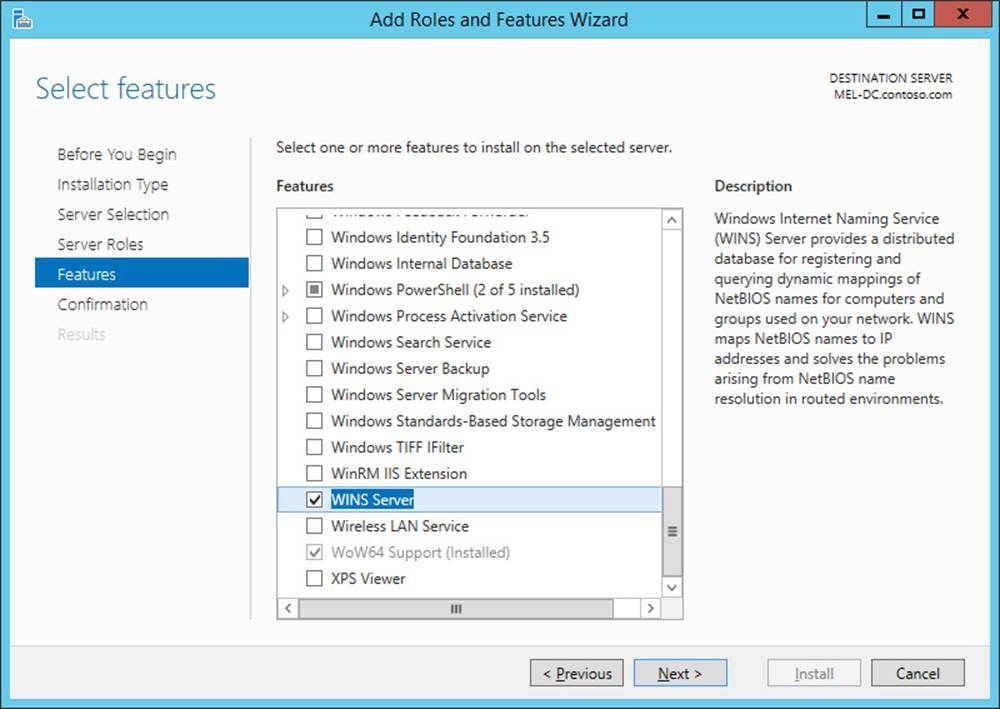
FIGURE 3-11 Adding the WINS Server feature of the Add Roles And Features Wizard
To install WINS using Windows PowerShell, use the following command.
Install-WindowsFeature WINS
Unless the routers are specially configured, NetBIOS traffic doesn’t cross subnet boundaries. This means that unless you take specific steps, the WINS database will not be populated with address entries by hosts on remote networks. WINS does support the creation of static address entries, and you can use it to manually populate the WINS database with the addresses of important hosts that must be resolvable using single-label names. Client computers must know the address of a WINS server to utilize it for single-label name resolution. You can configure a client with the address of a WINS server by configuring DHCP option 044. You can also configure the address of a WINS server by editing the TCP/IPv4 properties on a specific network adapter, as shown in Figure 3-12.
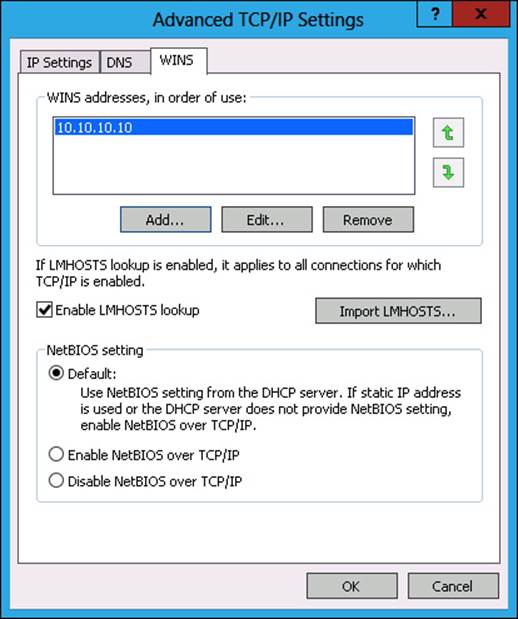
FIGURE 3-12 Adding a WINS server address
You can configure WINS servers on different subnets as replication partners. When you do this, these WINS servers exchange address data with one another. WINS uses two types of partners in replication:
![]() Push partner A WINS server that notifies a pull partner that the WINS database has been updated. The pull partner will respond with a replication request, and database changes will be replicated. Push replication occurs only when a certain number of updates to the database have occurred.
Push partner A WINS server that notifies a pull partner that the WINS database has been updated. The pull partner will respond with a replication request, and database changes will be replicated. Push replication occurs only when a certain number of updates to the database have occurred.
![]() Pull partner Waits for notification that the database has been updated and then replicates database changes.
Pull partner Waits for notification that the database has been updated and then replicates database changes.
To replicate database entries bidirectionally, each server must be a push partner and a pull partner. You configure replication on a per-WINS server basis using the Replication Partner Properties dialog box, as shown in Figure 3-13. This dialog box enables you to configure the push and pull replication intervals. On the General tab of this dialog box, you can configure WINS so that it replicates only with known partners. On small networks, you can enable automatic partner configuration. When you do this, WINS automatically detects other WINS servers. You should not use this on larger networks because of the increase in traffic.
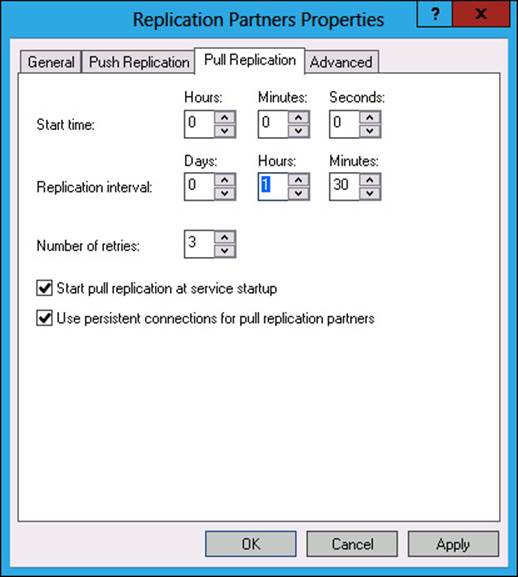
FIGURE 3-13 Configuring WINS replication properties
You can configure a replication partner by performing the following steps:
1. In the WINS console, right-click Replication Partners, and click New Replication Partner.
2. Enter the name or IP address of the server that you want to add as a replication partner in the New Replication Partner dialog box, shown in Figure 3-14.
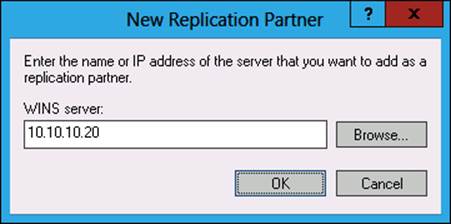
FIGURE 3-14 Replication partner properties
More Info: WINS
To learn more about WINS, consult the following TechNet article at http://technet.microsoft.com/en-us/library/hh831671.aspx.
You can integrate WINS with DNS by configuring WINS forward lookup. You can do this on the WINS tab of the zone properties in DNS Manager, as shown in Figure 3-15. When you do this, the DNS server will check with the WINS server if it can’t find a record for a single-label name within the zone queried.
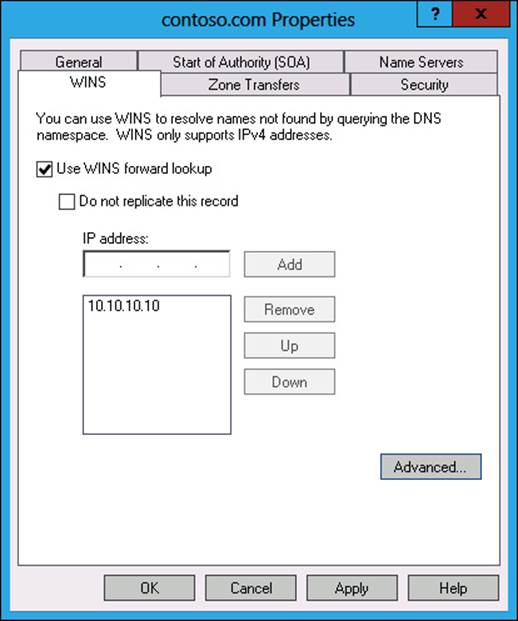
FIGURE 3-15 WINS integration properties
![]() Quick check
Quick check
![]() You want to ensure that a WINS server retrieves all updates made on a remote WINS server every two hours. What should you configure to accomplish this goal?
You want to ensure that a WINS server retrieves all updates made on a remote WINS server every two hours. What should you configure to accomplish this goal?
Quick check answer
![]() You configure the pull replication interval to ensure that a WINS server retrieves all updates made on a remote server every two hours.
You configure the pull replication interval to ensure that a WINS server retrieves all updates made on a remote server every two hours.
GlobalNames zones
GlobalNames zones are a single-label name resolution replacement that can utilize existing DNS infrastructure. GlobalNames zones can function as a single-label name resolution replacement for WINS, enabling organizations to retire their existing WINS servers. You can use the GlobalNames zone as long as your organization’s DNS servers are running Windows Server 2008, Windows Server 2008 R2, or Windows Server 2012.
Your organization should consider deploying GlobalNames zones instead of WINS in the following situations:
![]() Your organization is transitioning to IPv6. WINS does not support IPv6, and you need to support single-label name resolution.
Your organization is transitioning to IPv6. WINS does not support IPv6, and you need to support single-label name resolution.
![]() Single-label name resolution is limited to a small number of hosts that rarely change. GlobalNames zones must be updated manually.
Single-label name resolution is limited to a small number of hosts that rarely change. GlobalNames zones must be updated manually.
![]() You have a large number of suffix search lists because of a complex naming strategy or disjoined namespace.
You have a large number of suffix search lists because of a complex naming strategy or disjoined namespace.
Entries in the GlobalNames zones must be populated manually. GlobalNames zones entries are alias (CNAME) records to existing DNS A or AAAA records. The existing DNS A and AAAA records can be dynamically updated, which flow on to records in the GlobalNames zone.
To deploy a GlobalNames zone in a forest, perform the following steps:
1. On a domain controller configured as a DNS server, create a new Active Directory integrated forward lookup zone that is configured to replicate to every domain controller in the forest using the New Zone Wizard.
2. On the Zone Name page, type the name GlobalNames as the zone name, as shown in Figure 3-16. You can also accomplish the same task by running the following Windows PowerShell command.
Add-DnsServerPrimaryZone –Name GlobalNames –ReplicationScope Forest
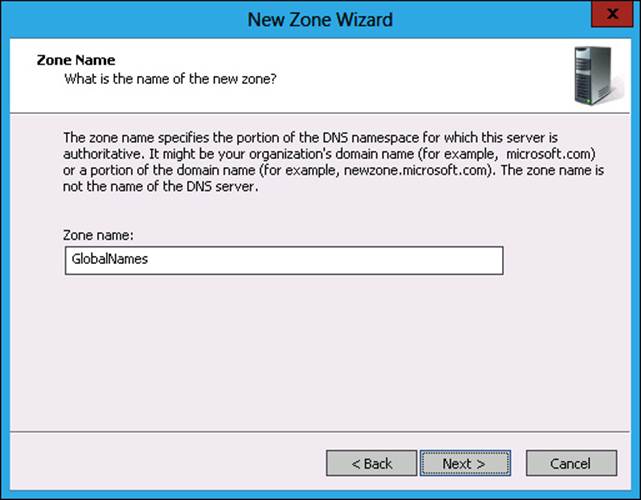
FIGURE 3-16 Adding a GlobalNames zone
3. Activate the GlobalNames zone on each authoritative DNS server hosted on a domain controller in the forest by executing the following Windows PowerShell command (where DNSServerName is the name of the domain controller hosting DNS).
Set-DnsServerGlobalNameZone –ComputerName DNSServerName –Enable $True
To populate the GlobalNames zone, create alias (CNAME) records in the zone that point to A or AAAA records in existing zones. You will learn more about DNS host records in Lesson 3: “Understanding advanced DNS options”.
More Info: GlobalNames zones
To learn more about GlobalNames zones, consult the following TechNet article at http://technet.microsoft.com/en-us/library/cc731744.aspx.
Peer Name Resolution Protocol (PNRP)
Peer Name Resolution Protocol (PNRP) provides IPv6 with a peer-to-peer name resolution. Devices connected to the Internet that are assigned an IPv6 address can publish their peer name/address combination to peers. This includes both FQDN and single-label names. Other devices query peers to learn IPv6 addressing information. For example, imagine that there are computers named Sydney, Melbourne, Canberra, Adelaide, Brisbane, Hobart, and Perth. Computer Sydney needs to know the IPv6 address of Perth. Sydney is near Canberra, Melbourne, and Brisbane. Sydney will query Canberra, Melbourne, and Brisbane in turn to determine whether any of them knows the IPv6 address of Perth. Rather than using a central server such as DNS or WINS, PNRP uses the information that each computer knows about every other computer to determine address information. PNRP has the following properties:
![]() Does not require centralized infrastructure. Servers are required only for bootstrapping.
Does not require centralized infrastructure. Servers are required only for bootstrapping.
![]() Can scale to billions of names and is fault-tolerant. Multiple computers can host copies of the same PNRP record.
Can scale to billions of names and is fault-tolerant. Multiple computers can host copies of the same PNRP record.
![]() Names are updated in real time, and PNRP is designed to not return stale addresses.
Names are updated in real time, and PNRP is designed to not return stale addresses.
![]() Can be used to name services rather than just computers.
Can be used to name services rather than just computers.
![]() Names can be published in a secure or insecure manner. When published in a secure manner, PNRP uses public key cryptography to validate records.
Names can be published in a secure or insecure manner. When published in a secure manner, PNRP uses public key cryptography to validate records.
![]() Installed as a feature, as shown in Figure 3-17.
Installed as a feature, as shown in Figure 3-17.
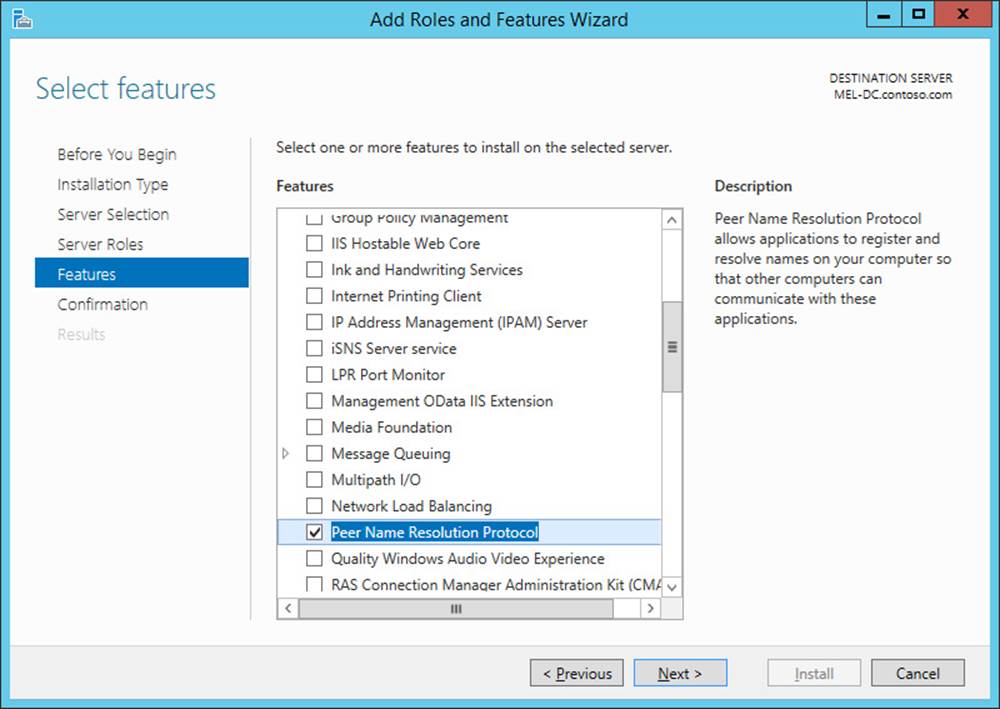
FIGURE 3-17 PNRP feature
PNRP peer groups are termed clouds. When installed, PNRP can use the following clouds:
![]() Global cloud Uses the global IPv6 address scope and represents all computers and devices connected to the Internet. There is a single global cloud.
Global cloud Uses the global IPv6 address scope and represents all computers and devices connected to the Internet. There is a single global cloud.
![]() Link-local cloud All addresses in the link-local IPv6 address scope. It roughly corresponds to the local subnet. An organization can have multiple link-local clouds.
Link-local cloud All addresses in the link-local IPv6 address scope. It roughly corresponds to the local subnet. An organization can have multiple link-local clouds.
More Info: Peer Name Resolution Protocol (PNRP)
To learn more about PNRP, consult the following TechNet article at http://technet.microsoft.com/en-us/library/cc732919.aspx.
Lesson summary
![]() WINS provides single-label name resolution based on a NetBIOS name.
WINS provides single-label name resolution based on a NetBIOS name.
![]() You can create static WINS mappings or enable mappings to be generated automatically.
You can create static WINS mappings or enable mappings to be generated automatically.
![]() WINS does not support IPv6.
WINS does not support IPv6.
![]() A GlobalNames zone is a special DNS zone type that enables single-label name resolution.
A GlobalNames zone is a special DNS zone type that enables single-label name resolution.
![]() GlobalNames zones support IPv4 and IPv6.
GlobalNames zones support IPv4 and IPv6.
![]() The GlobalNames zone can be replicated like any other DNS zone.
The GlobalNames zone can be replicated like any other DNS zone.
![]() You must configure updates for the GlobalNames zone manually.
You must configure updates for the GlobalNames zone manually.
![]() PNRP is a peer-to-peer name resolution protocol that enables name resolution without requiring a name server infrastructure.
PNRP is a peer-to-peer name resolution protocol that enables name resolution without requiring a name server infrastructure.
Lesson review
Answer the following questions to test your knowledge of the information in this lesson. You can find the answers to these questions and explanations of why each answer choice is correct or incorrect in the “Answers” section at the end of this chapter.
1. Which of the following technologies can you use to provide IPv6 single-label name resolution? (Choose all that apply.)
A. DHCP
B. DNS GlobalNames zone
C. WINS
D. PNRP
2. Which DHCP option should you configure to provide clients with the IP address of a WINS server?
A. 006
B. 044
C. 004
D. 015
3. You want to provide single-label name resolution on your organization’s network without deploying WINS. You must be able to update these records manually. Which of the following technologies should you use to accomplish this goal?
A. Reverse lookup zone
B. Stub zone
C. Secondary zone
D. GlobalNames zone
4. Which of the following technologies enable you to provide name resolution on a local area network without having to deploy a centralized server? (Choose all that apply.)
A. DNS
B. WINS
C. PNRP
D. DHCP
5. You have created and enabled a GlobalNames zone on a domain controller in your organization. You have configured the zone to replicate to all domain controllers in the forest. You want to enable the GlobalNames zone on another domain controller that hosts the DNS Server service. Which of the following Windows PowerShell cmdlets would you use to accomplish this goal? (Choose all that apply.)
A. Set-DnsServer
B. Set-DnsServerConditionalForwarderZone
C. Set-DnsServerGlobalNameZone
D. Set-DNSServerForwarder
Lesson 3: Understanding advanced DNS options
Once DNS has been deployed on your network, you’ll probably want to look further into what you can do to keep it running in a fast and secure manner. Until recently, there was no way for DNS clients to determine whether a resource record returned by a DNS server was valid. It was entirely possible that the DNS server responding to the record request had been hijacked by a third-party attacker and was redirecting clients to malicious sites instead of their intended destination. Domain Name System Security Extensions (DNSSEC) is a technology that leverages public key cryptography to enable supported DNS clients to be certain that the DNS record returned by a DNS server is valid. Aging and scavenging enables administrators to reduce the chance that stale resource records will clog up DNS zones.
After this lesson, you will be able to:
![]() Manage resource records.
Manage resource records.
![]() Configure zone scavenging.
Configure zone scavenging.
![]() Manage round robin DNS.
Manage round robin DNS.
![]() Use DNS security.
Use DNS security.
Estimated lesson time: 30 minutes
Resource records
DNS supports a large number of resource records. The most basic resource record maps an FQDN to an IP address. More complex resource records provide information about the location of services, such as SMTP servers and domain controllers. You can create 26 different types of resource records in a DNS zone using DNS Manager. In this section, you’ll learn about the most commonly used resource record types.
Host records
Host records are the most common form of record. They map FQDNs to IP addresses. There are two types of host record. The first is an A record, which is used to map FQDNs to IPv4 addresses. The second type are AAAA records, which are used to map FQDNs to IPv6 addresses. You can add a new host record to a zone by right-clicking the zone in DNS Manager and then clicking New Host (A or AAAA). This will open the New Host dialog box, shown in Figure 3-18. You have the option of also creating a pointer (PTR) resource record in the appropriate reverse lookup zone, if one exists. You can add host records with the Add-DnsServerResourceRecordA cmdlet. You can add AAAA records with the Add-DnsServerResourceRecordAAAA cmdlet.
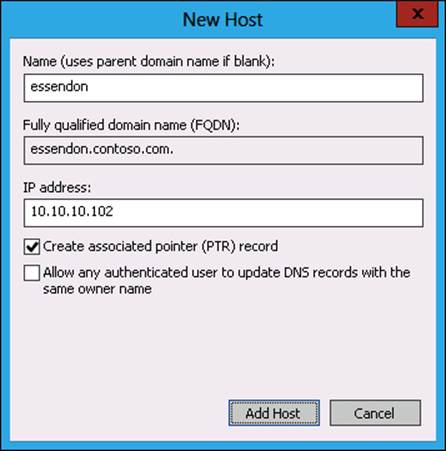
FIGURE 3-18 Adding a new host record
Alias (CNAME)
An alias, or CNAME record enables you to provide an alternate name when there is an existing host record. You can create as many aliases for a particular record as you need to. You can create a new alias in a zone by right-clicking the zone in DNS Manager and clicking New Alias (CNAME). This will open the New Resource Record dialog box, shown in Figure 3-19. When you create an alias, you must point the alias to an existing host record. You can use the Browse button to navigate to the target host record or enter it manually. You can add an alias record to a zone from Windows PowerShell by using the Add-DnsServerResourceRecordCName cmdlet.
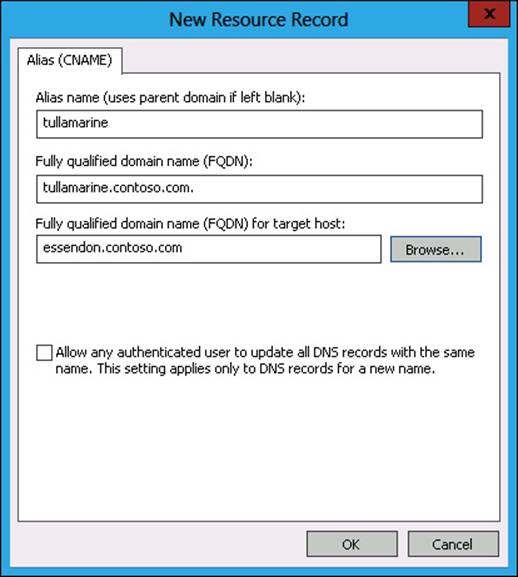
FIGURE 3-19 Adding a new CNAME record
Mail exchanger
Mail exchanger (MX) records are used to locate mail gateways. For example, when a remote mail gateway wants to forward an email message to an email address associated with your organization’s DNS zone, it will perform an MX lookup to determine the location of the mail gateway. Once that determination has been made, the remote mail gateway will contact the local gateway and transmit the message. MX records must map to existing host records. You can create an MX record by right-clicking the zone in DNS Manager, clicking New Mail Exchanger (MX), and entering information in the New Resource Record dialog box, shown in Figure 3-20. The Mail Server Priority field is available to allow for the existence of more than one MX record in a zone. This is often used when organizations have multiple mail gateways. This is done so that if an organization’s primary mail gateway fails, remote mail servers will forward message traffic to other mail gateways. You can add MX records using the Add-DnsServerResourceRecordMX PowerShell cmdlet.
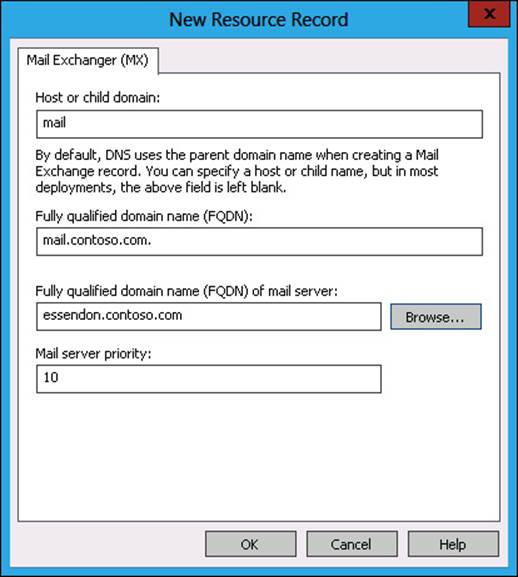
FIGURE 3-20 Adding a new MX record
Pointer record
Pointer (PTR) records enable you to connect IP addresses to FQDNs. PTR records are hosted in reverse lookup zones. When you create a host record, a PTR record is automatically created by default if an appropriate reverse lookup zone exists. To create a PTR record, right-click the reverse lookup zone in DNS Manager, click New Pointer (PTR), and in the New Resource Record dialog box, shown in Figure 3-21, enter the PTR record information. You can create a PTR record from Windows PowerShell by using the Add-DnsServerResourceRecordPtr cmdlet.
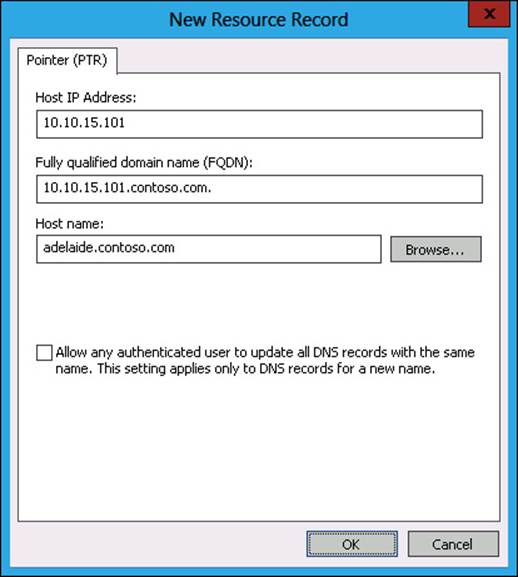
FIGURE 3-21 Adding a new pointer record
More Info: Resource records
To learn more about resource records, consult the following TechNet article at http://technet.microsoft.com/en-us/library/cc730624.aspx.
Zone aging and scavenging
Aging and scavenging provide a technique to reduce the incidence of stale resource records in a primary DNS zone. Stale records are records that are out of date or no longer relevant. If your organization has zones that relate to users of portable computers, such as laptops and tablets, those zones may end up accumulating stale resource records. This can lead to the following problems:
![]() DNS queries return stale rather than relevant results.
DNS queries return stale rather than relevant results.
![]() Large zones can cause DNS server performance problems.
Large zones can cause DNS server performance problems.
![]() Stale records may present DNS names being reassigned to different devices.
Stale records may present DNS names being reassigned to different devices.
To resolve these problems, you can configure the DNS Server service to do the following:
![]() Time stamp resource records that are dynamically added to primary zones. This occurs when you enable aging and scavenging.
Time stamp resource records that are dynamically added to primary zones. This occurs when you enable aging and scavenging.
![]() Age resource records based on a refresh time period.
Age resource records based on a refresh time period.
![]() Scavenge resource records that are still present beyond the refresh period.
Scavenge resource records that are still present beyond the refresh period.
To configure aging and scavenging on a zone, perform the following steps:
1. In DNS Manager, right-click the zone and click Properties.
2. On the General tab of the Zone Properties dialog box, click Aging.
3. In the Zone Aging/Scavenging Properties dialog box, shown in Figure 3-22, enable the Scavenge Stale Resource Records option and set the No-Refresh Interval and the Refresh Interval.
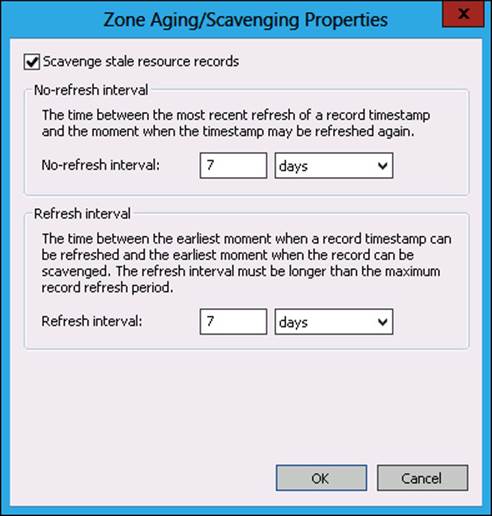
FIGURE 3-22 Zone aging/scavenging properties
Once configured, aging and scavenging will occur automatically. It is also possible to trigger scavenging by right-clicking the DNS server in DNS Manager and then clicking Scavenge Stale Resource Records. You should be aware that statically created records may not have a creation data and therefore will not be removed by the scavenging process. You can configure aging and scavenging using the Set-DnsServerScavenging cmdlet. For example, to enable scavenging of stale resource records on all zones on a DNS server and to set the No-Refresh and Refresh Intervals to 10 days, issue this command.
Set-DnsServerScavenging –ApplyOnAllZones –RefreshInterval 10.0:0:0 –ScavengingInterval
10.0:0:0 –ScavengingState $True
More Info: Aging and scavenging
To learn more about zone aging and scavenging, consult the following TechNet article at http://technet.microsoft.com/en-us/library/cc771677.aspx.
![]() Quick check
Quick check
![]() What type of record do you create in a reverse lookup zone if you want to map an IP address to an FQDN?
What type of record do you create in a reverse lookup zone if you want to map an IP address to an FQDN?
Quick check answer
![]() You create a PTR record if you want to map an IP address to an FQDN.
You create a PTR record if you want to map an IP address to an FQDN.
DNSSEC
Domain Name System Security Extensions (DNSSEC) adds security to DNS by enabling DNS servers to validate the responses given by other DNS servers. DNSSEC enables digital signatures to be used with DNS zones. When the DNS resolver issues a query for a record in a signed zone, the authoritative DNS server provides both the record and a digital signature that enables validation of that record.
To sign a zone, perform the following steps:
1. Right-click the zone in DNS manager, click DNSSEC, and then click Sign The Zone.
2. On the Signing Options page, shown in Figure 3-23, select Use Default Settings To Sign The Zone.
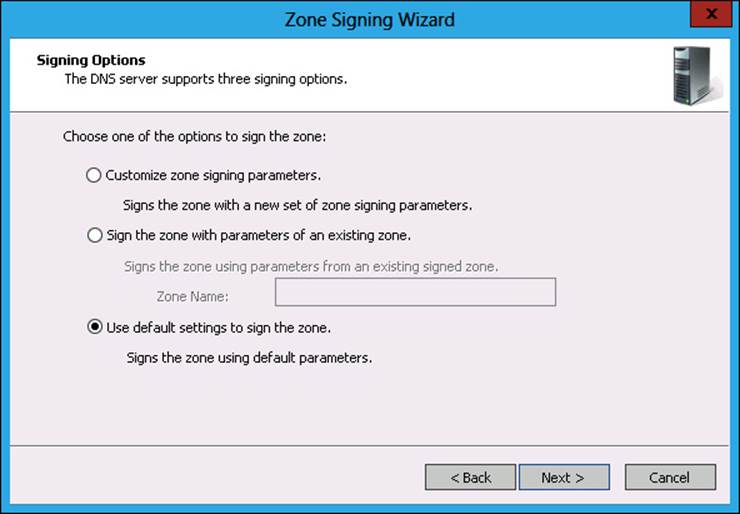
FIGURE 3-23 Using zone signing default settings
When you configure DNSSEC, three new resource records are used, as shown in Figure 3-24.
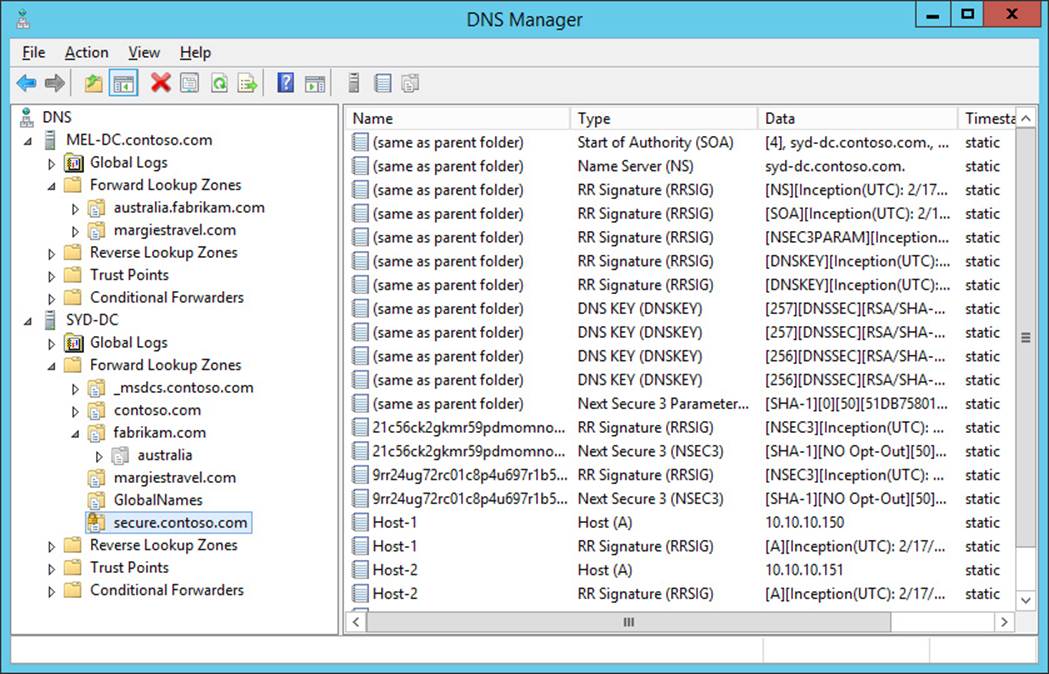
FIGURE 3-24 Zone configured with DNSSEC
These records have the following properties:
![]() Resource Record Signature (RRSIG) record This record is stored within the zone, and each is associated with a different zone record. When the DNS server is queried for a zone record, it returns the record and the associated RRSIG record. RRSIG records are visible when you query a secure zone, as shown in Figure 3-25.
Resource Record Signature (RRSIG) record This record is stored within the zone, and each is associated with a different zone record. When the DNS server is queried for a zone record, it returns the record and the associated RRSIG record. RRSIG records are visible when you query a secure zone, as shown in Figure 3-25.
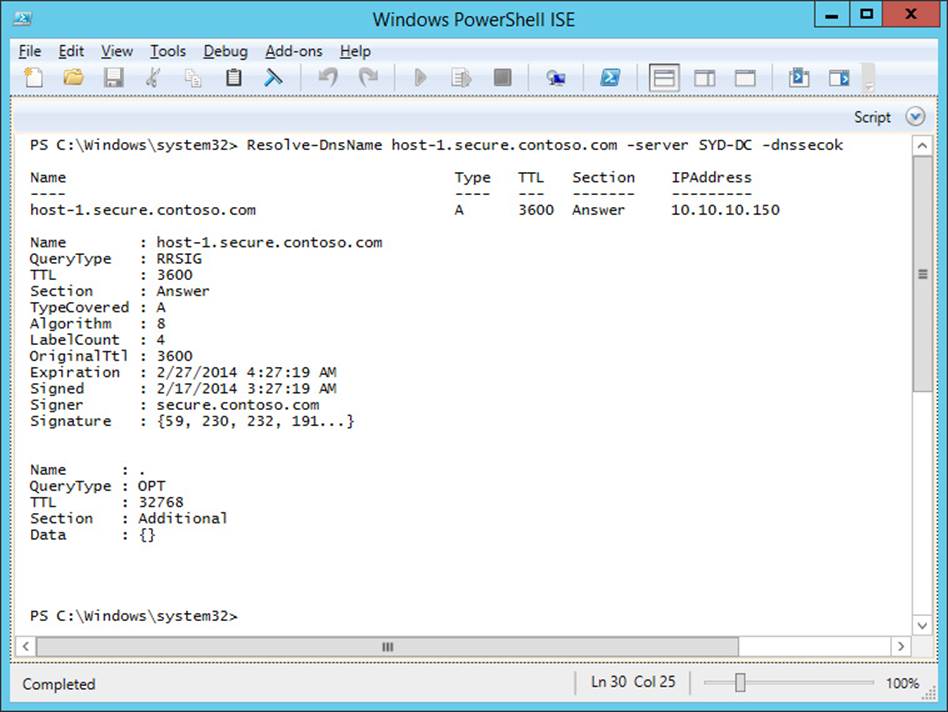
FIGURE 3-25 Displaying RRSIG record
![]() DNSKEY This is a public key resource record that enables the validation of RRSIG records.
DNSKEY This is a public key resource record that enables the validation of RRSIG records.
![]() Next Secure (NSEC/NSEC3) record This record is used as proof that a record does not exist. For example, if a query is looking for ftp.contoso.com, the contoso.com zone is configured with DNSSEC. If there is no record for ftp.contoso.com, the NSEC record will be returned, informing the host making the query that no such record exists. NSEC3 are an advanced record that provide increased security over NSEC records but serve the same general purpose.
Next Secure (NSEC/NSEC3) record This record is used as proof that a record does not exist. For example, if a query is looking for ftp.contoso.com, the contoso.com zone is configured with DNSSEC. If there is no record for ftp.contoso.com, the NSEC record will be returned, informing the host making the query that no such record exists. NSEC3 are an advanced record that provide increased security over NSEC records but serve the same general purpose.
In addition to the special resource records, a DNSSEC implementation has the following components:
![]() Trust anchor This is a special public key associated with a zone. Trust anchors enable a DNS server to validate DNSKEY resource records. If you deploy DNSSEC on a DNS server hosted on a domain controller, the trust anchors can be stored in the Active Directory forest directory partition. This replicates the trust anchor to all DNS servers hosted on domain controllers in the forest.
Trust anchor This is a special public key associated with a zone. Trust anchors enable a DNS server to validate DNSKEY resource records. If you deploy DNSSEC on a DNS server hosted on a domain controller, the trust anchors can be stored in the Active Directory forest directory partition. This replicates the trust anchor to all DNS servers hosted on domain controllers in the forest.
![]() DNSSEC Key Master A special DNS server that you use to generate and manage signing keys for a DNSSEC-protected zone. Any computer running Windows Server 2012 that hosts a primary zone, whether standard or integrated, can function as a DNSSEC Key Master. A single computer can function as a DNSSEC Key Master for multiple zones. The DNSSEC Key Master role can be transferred to another DNS server that hosts the primary zone.
DNSSEC Key Master A special DNS server that you use to generate and manage signing keys for a DNSSEC-protected zone. Any computer running Windows Server 2012 that hosts a primary zone, whether standard or integrated, can function as a DNSSEC Key Master. A single computer can function as a DNSSEC Key Master for multiple zones. The DNSSEC Key Master role can be transferred to another DNS server that hosts the primary zone.
![]() Key Signing Key (KSK) You use the KSK to sign all DNSKEY records at the zone root. You create the KSK using the DNSSEC Key Master.
Key Signing Key (KSK) You use the KSK to sign all DNSKEY records at the zone root. You create the KSK using the DNSSEC Key Master.
![]() Zone Signing Key (ZSK) You use the ZSK to sign zone data. An example of this is individual records hosted in the zone. You create the ZSK using the DNSSEC Key Master.
Zone Signing Key (ZSK) You use the ZSK to sign zone data. An example of this is individual records hosted in the zone. You create the ZSK using the DNSSEC Key Master.
You configure the Name Resolution Policy Table (NRPT) with rules to determine how clients interact with DNSSEC-protected zones. You create entries in the table. An example is requiring that all queries against a specific zone require DNSSEC validation. You can configure the NRPT using Group Policy or through Windows PowerShell.
To create an NRPT, perform the following steps:
1. Open Group Policy Management and edit the Default Domain Policy.
2. Navigate to the Computer Configuration\Policies\Windows Settings\Name Resolution Policy node and enter the information.
3. Fill out the rule information. Figure 3-26 shows a rule requiring that the secure.contoso.com zone use DNSSEC.
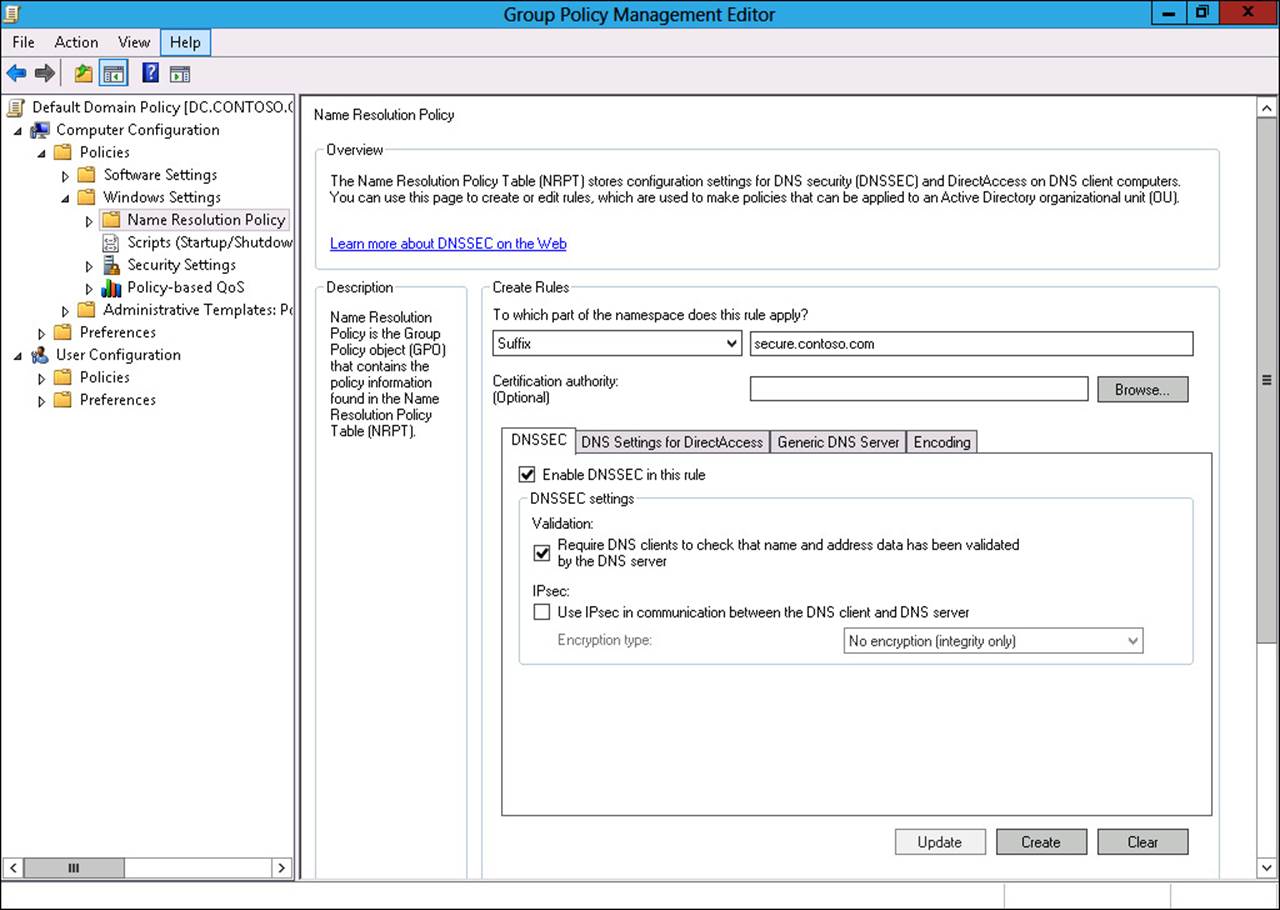
FIGURE 3-26 NRPT policy
More Info: DNSSEC
To learn more about DNSSEC, consult the following TechNet article at http://technet.microsoft.com/en-us/library/jj200221.aspx.
Lesson summary
![]() A and AAAA records map FQDNs to IP addresses.
A and AAAA records map FQDNs to IP addresses.
![]() PTR records map IP addresses to FQDNs.
PTR records map IP addresses to FQDNs.
![]() CNAME records enable you to create aliases for FQDNs.
CNAME records enable you to create aliases for FQDNs.
![]() MX records are used to provide information about the location of mail servers.
MX records are used to provide information about the location of mail servers.
![]() Scavenging and aging enable you to minimize the amount of stale resource records in a DNS zone.
Scavenging and aging enable you to minimize the amount of stale resource records in a DNS zone.
![]() Scavenging and aging can only scavenge dynamically generated resource records.
Scavenging and aging can only scavenge dynamically generated resource records.
![]() DNSSEC uses public key cryptography to sign DNS zones and resource records.
DNSSEC uses public key cryptography to sign DNS zones and resource records.
![]() When a query occurs against a DNSSEC signed zone, both the requested record and a key to validate the records are provided.
When a query occurs against a DNSSEC signed zone, both the requested record and a key to validate the records are provided.
Lesson review
Answer the following questions to test your knowledge of the information in this lesson. You can find the answers to these questions and explanations of why each answer choice is correct or incorrect in the “Answers” section at the end of this chapter.
1. What type of resource record do you create if you want to have a different name associated with an existing FQDN?
A. A record
B. MX record
C. PTR record
D. CNAME record
2. You have just deployed a server that will function as an SMTP gateway on your organization’s perimeter network. This server has been assigned an FQDN, and an entry exists pointing to the server in the reverse lookup zone associated with the server’s public IP address. Which type of resource record should you create if you want to ensure that the mail servers of external organizations can recognize this server as your organization’s external mail gateway?
A. CNAME record
B. PTR record
C. MX record
D. A record
3. Which of the following Windows PowerShell cmdlets should you use to create a host record that maps an FQDN with an IPv6 address?
A. Add-DnsServerResourceRecordCName
B. Add-DnsServerResourceRecordAAAA
C. Add-DnsServerResourceRecordMX
D. Add-DnsServerResourceRecordPtr
4. Which of the following can you enable to reduce the number of stale resource records in a zone?
A. Secure dynamic updates
B. Aging and scavenging
C. DNSSEC
D. Zone transfers
5. You want to ensure that clients can validate the authenticity of DNS records in several primary zones that are hosted on DNS servers in your organization. Which of the following should you enable to accomplish this goal? (Choose all that apply.)
A. DNSSEC
B. Zone transfers
C. Aging and scavenging
D. Secure dynamic updates
Practice exercises
The goal of this section is to provide you with hands-on practice with the following:
![]() Managing DNS zones
Managing DNS zones
![]() Single-label name resolution
Single-label name resolution
![]() Configuring and managing DNSSEC
Configuring and managing DNSSEC
To perform the exercises in this section, you need access to an evaluation version of Windows Server 2012 R2. You should also have access to virtual machines SYD-DC, MEL-DC, CBR-DC, and ADL-DC, the setup instructions for which are described in the Introduction. You should ensure that you have a checkpoint of these virtual machines that you can revert to at the end of the practice exercises. You should revert the virtual machines to this initial state prior to beginning these exercises.
Exercise 1: Manage DNS zones
In this exercise, you create a new Active Directory integrated zone, configure this zone to replicate to all domain controllers in the forest, and configure the zone to accept only secure dynamic updates. To complete this exercise, perform the following steps:
1. Sign on to SYD-DC as Contoso\don_funk.
2. In Server Manager, click the Tools menu, and click DNS.
3. In the DNS Manager Console, expand SYD-DC, and click Forward Lookup Zones, as shown in Figure 3-27.
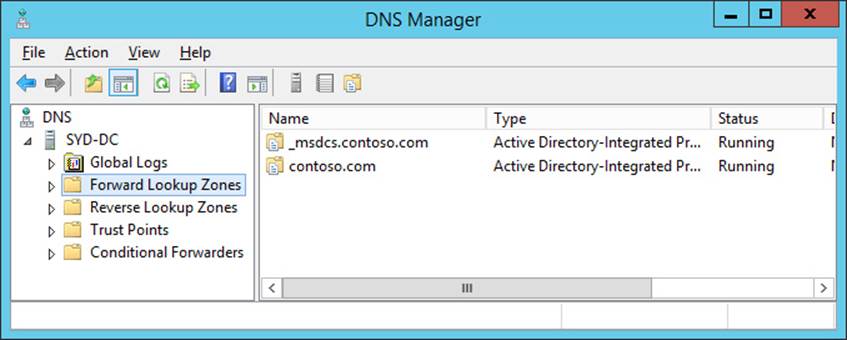
FIGURE 3-27 Forward Lookup Zones
4. In the Action menu, click New Zone.
5. On the first page of the New Zone Wizard, click Next.
6. On the Zone Type page, click Primary Zone and ensure that Store The Zone In Active Directory is selected, as shown in Figure 3-28, and click Next.
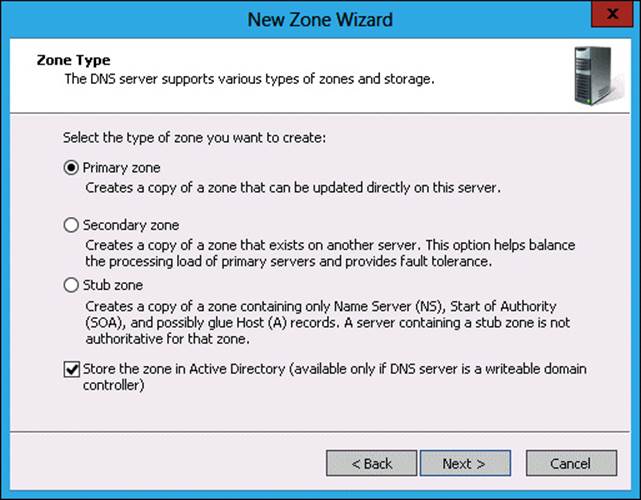
FIGURE 3-28 Active Directory integrated primary zone
7. In the Active Directory Zone Replication Scope page, click To All DNS Servers Running On Domain Controllers In This Forest: Contoso.com, as shown in Figure 3-29, and click Next.
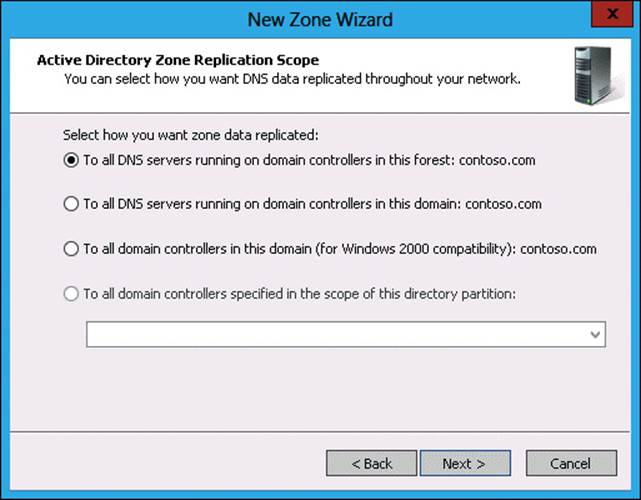
FIGURE 3-29 Zone replication scope
8. On the Zone Name page, type fabrikam.com and click Next.
9. On the Dynamic Update page, click Allow Only Secure Dynamic Updates, as shown in Figure 3-30, and click Next.
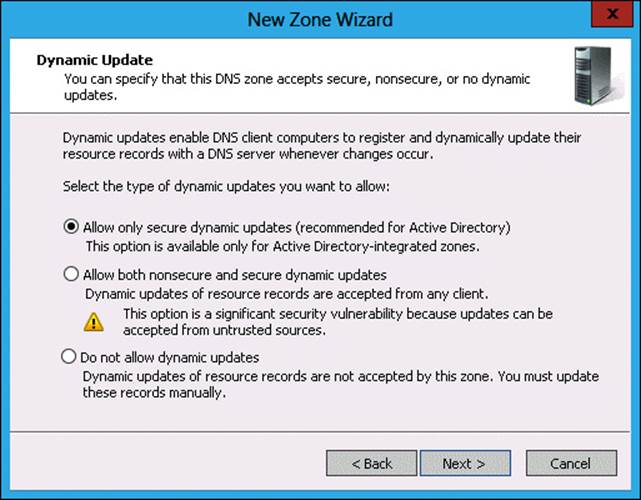
FIGURE 3-30 Configuring secure dynamic updates
10. Click Finish to complete the New Zone Wizard.
Exercise 2: Configure partition-based replication
In this exercise, you create a new Active Directory DNS partition and then create a new Active Directory integrated zone that replicates to DNS servers enrolled in this partition. To complete this exercise, perform the following steps:
1. On SYD-DC, right-click the Windows PowerShell prompt, and click Run As Administrator.
2. Execute the following command to create a new Active Directory DNS partition named Tasmania:
Add-DNSServerDirectoryPartition –Name Tasmania
3. Close the Windows PowerShell window.
4. In the DNS Manager console, click Forward Lookup Zones.
5. In the Action menu, click New Zone.
6. On the Welcome page of the New Zone Wizard, click Next.
7. In the Zone Type page, click Primary Zone, verify that Store The Zone In Active Directory is selected, and click Next.
8. In the Active Directory Zone Replication Scope page, click To All Domain Controllers Specified In The Scope Of This Directory Partition and click Tasmania, as shown in Figure 3-31, and click Next.
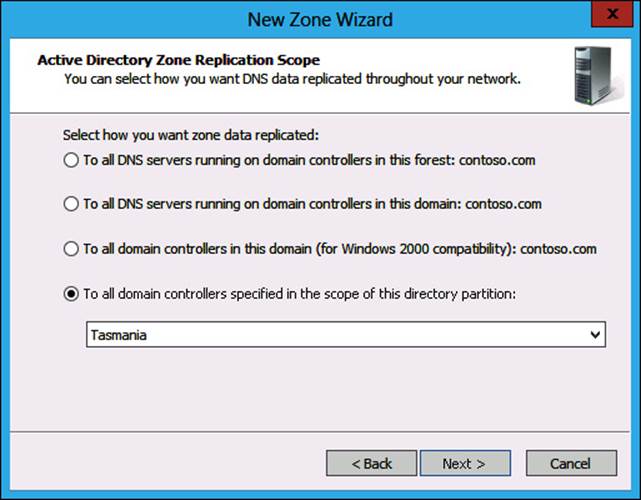
FIGURE 3-31 Replicating to a specific directory partition
9. In the Zone Name Wizard page, type margiestravel.com, as shown in Figure 3-32, and click Next.

FIGURE 3-32 Providing a zone name
10. In the Dynamic Update page, click Do Not Allow Dynamic Updates, as shown in Figure 3-33, and click Next.
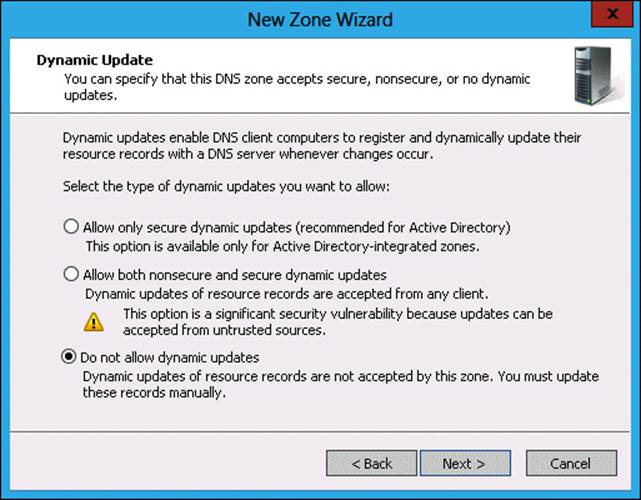
FIGURE 3-33 Do Not Allow Dynamic Updates
11. Click Finish to complete the New Zone Wizard.
Exercise 3: DNS delegation and secondary zones
In this exercise, you install the DNS role and perform a zone delegation. To complete this exercise, perform the following steps:
1. Start MEL-DC, and sign in using the Administrator account with the password Pa$$w0rd.
2. Open the Windows PowerShell prompt and type the following commands.
Add-Computer -DomainName contoso.com
3. In the Windows PowerShell Credentials dialog box type don_funk@contoso.com and Pa$$w0rd, and click OK.
4. Type the following command in the Windows PowerShell prompt to restart the computer.
Restart-Computer
5. Ensure that you are signed on to SYD-DC as Contoso\don_funk.
6. In Server Manager on SYD-DC, click All Servers.
7. In the Manage menu, click Add Servers.
8. In the Name box, type MEL-DC and click Find Now.
9. In the Add Servers dialog box, click MEL-DC, and click the arrow button, as shown in Figure 3-34, and click OK.
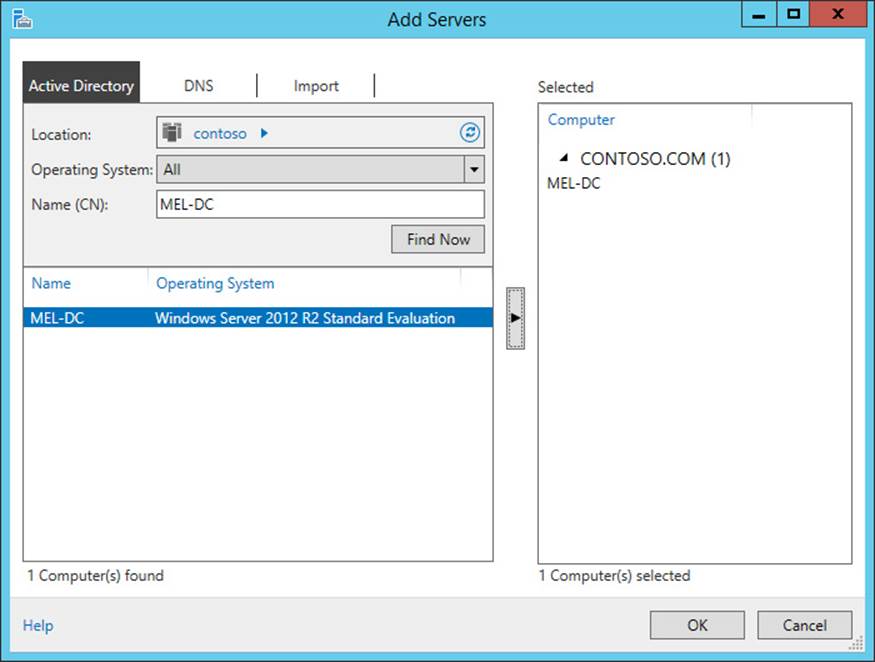
FIGURE 3-34 Adding servers to a group
10. In the All Servers area of Server Manager on SYD-DC, click MEL-DC. From the Manage menu, click Add Roles And Features.
11. In the Before You Begin page of the Add Roles And Features Wizard, click Next.
12. In the Installation Type page, click Role-Based Or Feature-Based Installation, and click Next.
13. In the Select Destination Server page, click MEL-DC.contoso.com, and click Next.
14. In the Select Server Roles page, click DNS Server. In the Add Roles And Features Wizard pop-up list, click Add Features.
15. Verify that the Add Roles And Features Wizard appears the same as shown in Figure 3-35 and click Next.
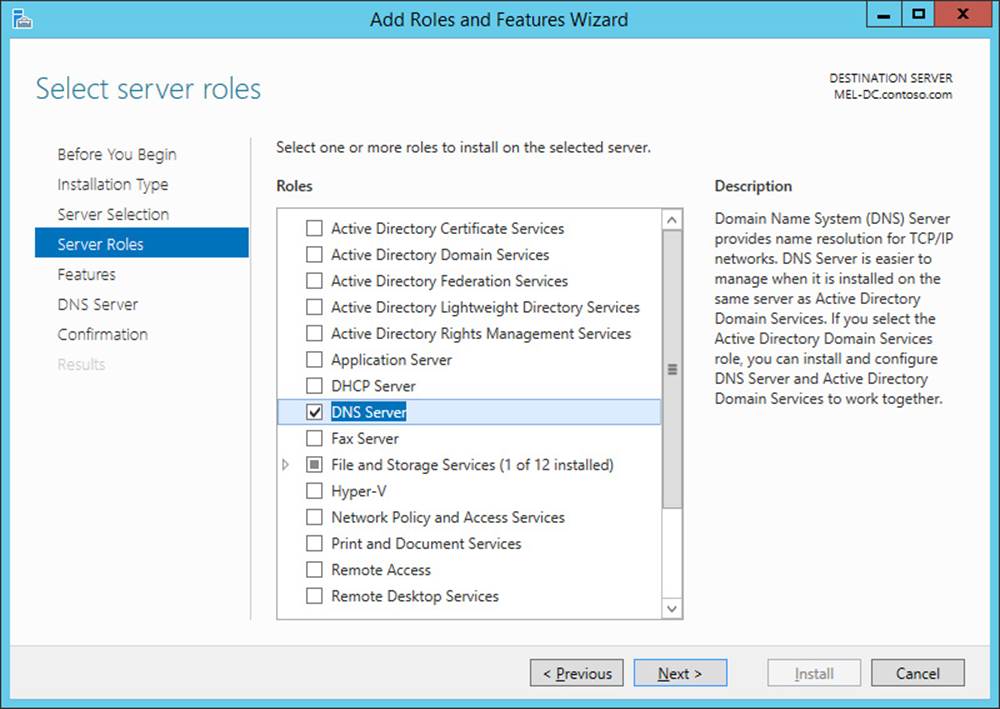
FIGURE 3-35 Installing DNS Server role
16. In the Select Features page, click Next.
17. In the DNS Server page, click Next.
18. In the Confirm Installation Selections page, click Install, and then click Close.
19. In DNS Manager console, click DNS. In the Action menu, click Connect To DNS Server.
20. In the Connect To DNS Server dialog box, click The Following Computer: and type MEL-DC.contoso.com, as shown in Figure 3-36. Click OK.

FIGURE 3-36 Connecting to a DNS server
21. In the DNS Manager Console, click Forward Lookup Zones under MEL-DC.contoso.com, as shown in Figure 3-37.
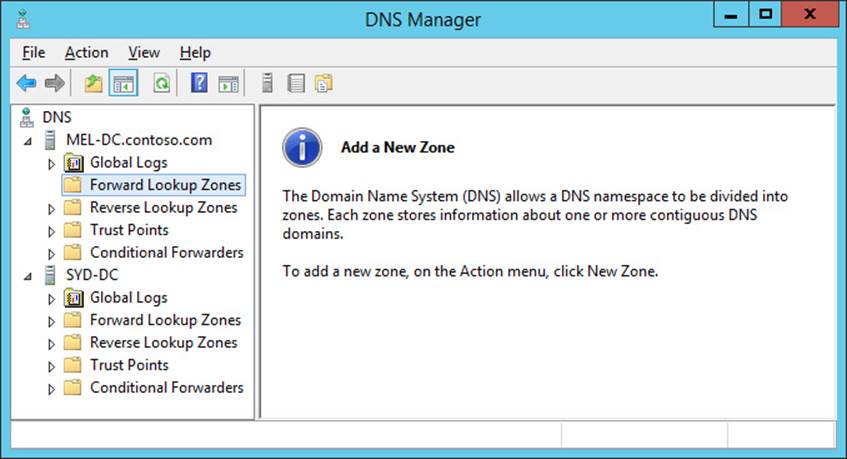
FIGURE 3-37 Connecting to two DNS servers
22. Click Action, and click New Zone.
23. In the Welcome page of the New Zone Wizard, click Next.
24. In the Zone Type page of the New Zone Wizard, click Primary Zone. Note (as shown in Figure 3-38) that the option to store the zone in Active Directory is not present because MEL-DC is not an Active Directory domain controller. Click Next.

FIGURE 3-38 Configuring a primary zone
25. In the Zone Name page, type australia.fabrikam.com, and click Next.
26. In the Zone File page, click Create A New File With This File Name, as shown in Figure 3-39, and click Next.
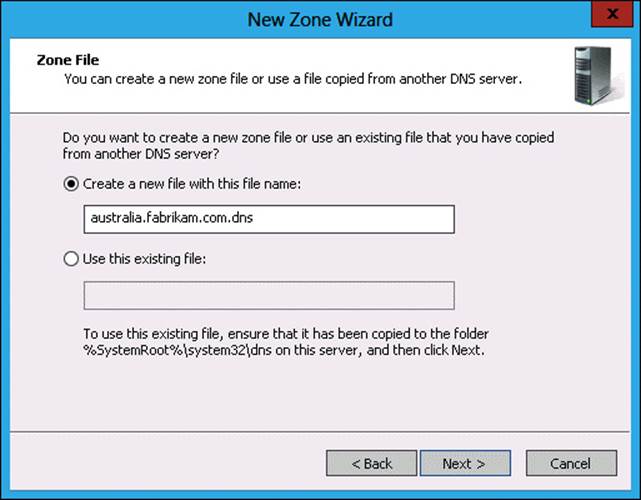
FIGURE 3-39 Creating a zone file
27. In the Dynamic Update page, click Do Not Allow Dynamic Updates, and click Next.
28. In the Completion page, click Finish.
29. In the DNS Manager Console, expand SYD-DC\Forward Lookup Zones and click Fabrikam.com.
30. In the Action menu, click New Delegation.
31. In the Welcome page of the New Delegation Wizard, click Next.
32. In the Delegated Domain Name page, type australia, as shown in Figure 3-40, and click Next.
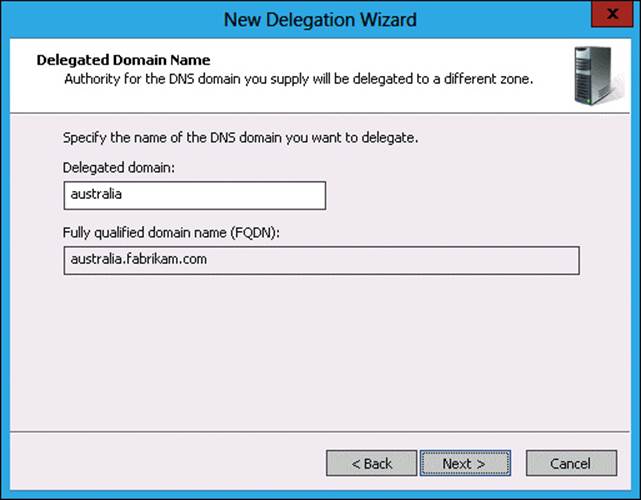
FIGURE 3-40 Configuring a delegated domain
33. In the Name Servers page, click Add.
34. In the New Name Server Record dialog box, type MEL-DC.contoso.com and click Resolve. Click OK.
35. Verify that the Name Servers page of the New Delegation Wizard matches Figure 3-41 and then click Next.
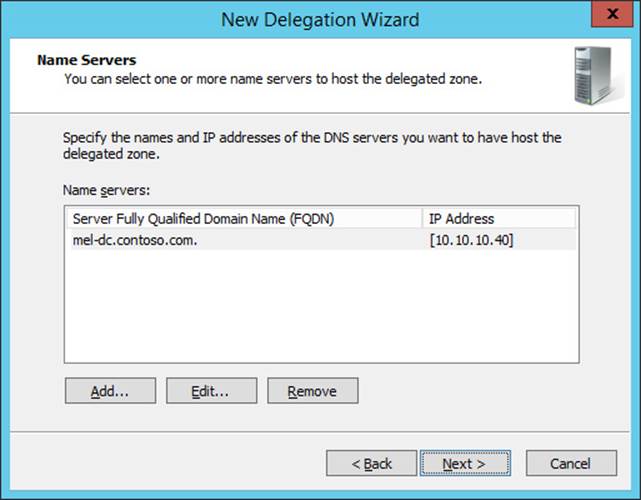
FIGURE 3-41 Delegated name server
36. Click Finish to close the New Delegation Wizard.
Exercise 4: Configure a secondary zone
In this exercise, you configure a DNS server to host the secondary zone copy of a DNS zone. To complete this exercise, perform the following steps:
1. On SYD-DC, in DNS Manager, click Margiestravel.com.
2. In the Action menu, click Properties.
3. On the Zone Transfers tab, click Allow Zone Transfers, and click Only To The Following Servers.
4. Click Edit. In the Allow Zone Transfers dialog box, click the text <Click Here To Add An IP Address Or DNS Name>, type MEL-DC.contoso.com, and press Enter.
5. Click No Such Host Is Known, and click Delete. Even though an error symbol is present, click OK.
6. Verify that the Zone Transfers tab matches Figure 3-42, and click OK.
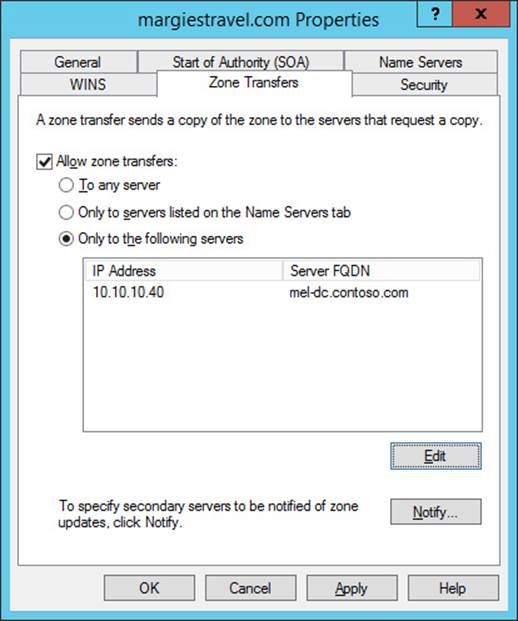
FIGURE 3-42 Configuring zone transfers
7. In the DNS Manager Console, click Forward Lookup Zones under MEL-DC.contoso.com, as shown in Figure 3-43.
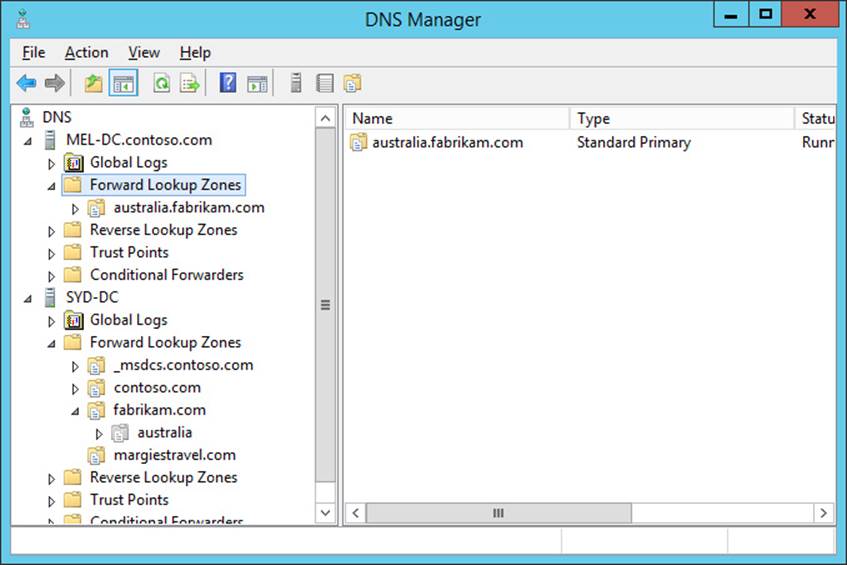
FIGURE 3-43 Forward Lookup Zones
8. In the Action menu, click New Zone.
9. In the Welcome page of the New Zone Wizard, click Next.
10. In the Zone Type page, click Secondary Zone, as shown in Figure 3-44, and click Next.

FIGURE 3-44 Secondary zone
11. In the Zone Name page, type margiestravel.com and click Next.
12. In the Master DNS Servers page, type SYD-DC.contoso.com, press Enter, and click Next (as shown in Figure 3-45).

FIGURE 3-45 Master DNS Servers
13. Click Finish and verify that margiestravel.com is listed as a secondary zone on MEL-DC.contoso.com, as shown in Figure 3-46.
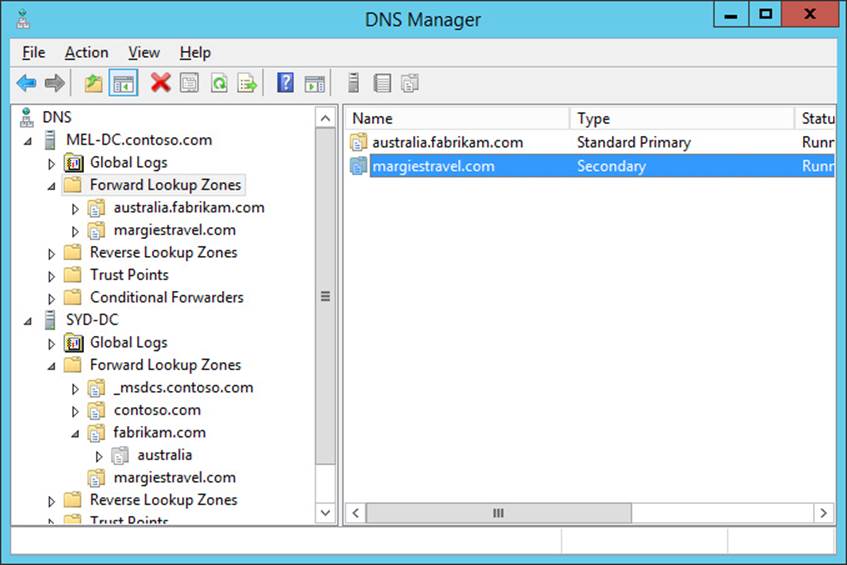
FIGURE 3-46 Secondary zone configured
Exercise 5: Single-label name resolution
In this exercise, you configure single-label name resolution. To complete this exercise, perform the following steps:
1. In the DNS Manager, click Forward Lookup Zones under SYD-DC.
2. Click the Action Menu, and click New Zone.
3. In the Welcome page of the New Zone Wizard, click Next.
4. In the Zone Type page, click Primary Zone, ensure that Store The Zone In Active Directory is selected, and click Next.
5. In the Active Directory Zone Replication Scope page, click To All DNS Servers Running On Domain Controllers In This Forest: Contoso.com and click Next.
6. In the Zone Name page, type GlobalNames, as shown in Figure 3-47, and click Next.
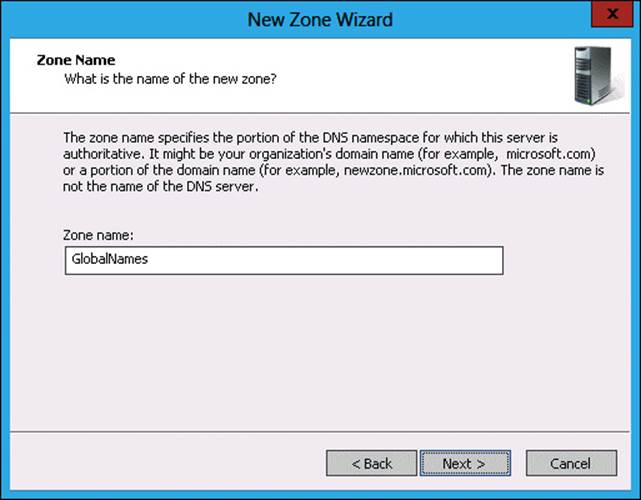
FIGURE 3-47 Secondary zone configured
7. In the Dynamic Update page, click Do Not Allow Dynamic Updates, and click Next.
8. In the Completing The New Zone Wizard page, click Finish.
9. Right-click the Windows PowerShell icon on the taskbar, and click Run As Administrator.
10. Issue the following command to enable the GlobalNames zone on SYD-DC.
Set-DnsServerGlobalNameZone –ComputerName SYD-DC –Enable $True
11. Switch to DNS Manager.
12. Click the GlobalNames zone. In the Action menu, click New Alias (CNAME).
13. In the New Resource Record dialog box, configure the following information, as shown in Figure 3-48, and click OK.
![]() Alias Name (Uses Parent Domain If Left Blank): Wollongong
Alias Name (Uses Parent Domain If Left Blank): Wollongong
![]() Fully Qualified Domain Name (FQDN) For Target Host: MEL-DC.contoso.com
Fully Qualified Domain Name (FQDN) For Target Host: MEL-DC.contoso.com

FIGURE 3-48 Record in GlobalNames zone
14. In the Windows PowerShell prompt, type the following to verify single name resolution.
nslookup Wollongong
Exercise 6: Configure and manage DNSSEC
In this exercise, you configure and manage DNSSEC. To complete this exercise, perform the following steps:
1. In DNS Manager, click Forward Lookup Zones under SYD-DC.
2. In the Action menu, click New Zone.
3. In the Welcome page of the New Zone Wizard, click Next.
4. In the Zone Type page, click Primary Zone, enable the Store The Zone In Active Directory option, and click Next.
5. In the Active Directory Zone Replication Scope page, click To All DNS Servers Running On Domain Controllers In This Forest: Contoso.com.
6. In the Zone Name page, type the zone name as secure.contoso.com, as shown in Figure 3-49, and click Next.

FIGURE 3-49 Creating a new zone
7. In the Dynamic Update page, click Allow Only Secure Dynamic Updates, and click Next.
8. In the Completing The New Zone Wizard page, click Finish.
9. In the DNS Manager, click Secure.contoso.com under Forward Lookup Zones.
10. In the Action menu, click New Host (A Or AAAA).
11. In the New Host dialog box, configure the following details, as shown in Figure 3-50, and then click Add Host.
![]() Name: Host-1
Name: Host-1
![]() IP Address: 10.10.10.150
IP Address: 10.10.10.150
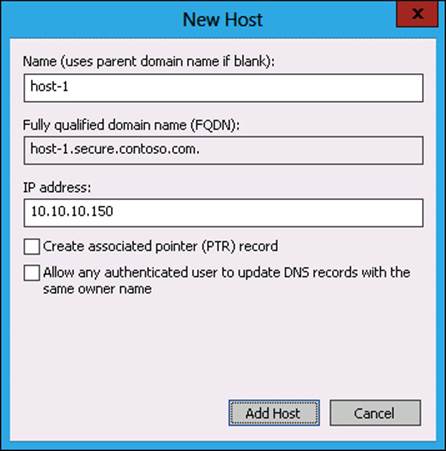
FIGURE 3-50 Creating a new host
12. In the New Host dialog box, configure the following details, click Add Host, and click Done:
![]() Name: Host-2
Name: Host-2
![]() IP Address: 10.10.10.151
IP Address: 10.10.10.151
13. Run the following Windows PowerShell command to verify that no RRSIG record is present.
Resolve-DNSname host-1.secure.contoso.com –server SYD-DC –dnssecok
14. In DNS Manager, click Secure.contoso.com.
15. From the Action menu, click DNSSEC and click Sign The Zone.
16. In the DNS Security Extensions (DNSSEC) page of the Zone Signing Wizard, click Next.
17. In the Signing Options page, click Use Default Settings To Sign The Zone, as shown in Figure 3-51, and click Next.
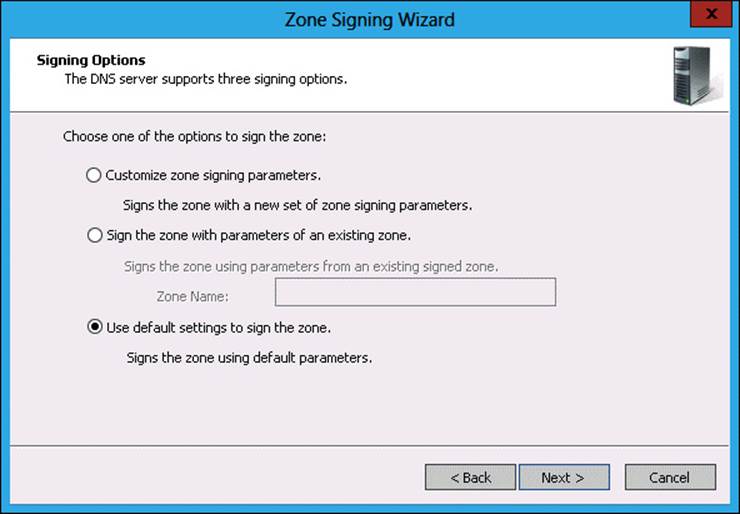
FIGURE 3-51 Sign DNS Zone
18. In the DNS Security Extensions page, click Next.
19. In the Signing The Zone page, click Finish.
20. Click Secure.contoso.com and from the Action menu, click Refresh.
21. View the contents of the Secure.contoso.com zone in DNS Manager to verify the presence of the new DNSKEY, RRSIG, and NSEC3 records.
22. Rerun the Windows PowerShell command from step 13 and note the presence of the RRSIG record.
Suggested practice exercises
The following additional practice exercises are designed to give you more opportunities to practice what you’ve learned and to help you successfully master the lessons presented in this chapter.
![]() Exercise 1 Configure a primary zone on MEL-DC. Configure a secondary zone of the primary zone on SYD-DC. Create host records in the primary zone on MEL-DC and verify that they replicate to the secondary zone on SYD-DC.
Exercise 1 Configure a primary zone on MEL-DC. Configure a secondary zone of the primary zone on SYD-DC. Create host records in the primary zone on MEL-DC and verify that they replicate to the secondary zone on SYD-DC.
![]() Exercise 2 Install Peer Name Resolution Protocol on SYD-DC, MEL-DC, and ADL-DC. Use PNRP to resolve the IPv6 address of each server.
Exercise 2 Install Peer Name Resolution Protocol on SYD-DC, MEL-DC, and ADL-DC. Use PNRP to resolve the IPv6 address of each server.
![]() Exercise 3 Use Windows PowerShell to create A, CNAME, PTR, and MX records in the secure.contoso.com zone created in Exercise 3.
Exercise 3 Use Windows PowerShell to create A, CNAME, PTR, and MX records in the secure.contoso.com zone created in Exercise 3.
Answers
This section contains the answers to the lesson review questions in this chapter.
Lesson 1
1. Correct answers: A and C
A. Correct. Configuring the zone as Active Directory integrated primary enables you to configure the zone to accept only secure dynamic updates.
B. Incorrect. You cannot configure a standard primary zone so that it will accept only secure dynamic updates. A standard primary zone can be configured to accept both secure and insecure dynamic updates.
C. Correct. Configuring this setting ensures that only computers that are members of the domain can update the zone.
D. Incorrect. If you do not configure the zone to allow dynamic updates, you have to perform zone updates manually.
2. Correct answer: C
A. Incorrect. This network ID would be associated with the 168.192.in-addr.arpa zone.
B. Incorrect. This network ID would be associated with the 192.186.15.in-addr.arpa zone.
C. Correct. Zone names use octets in reverse. The zero is dropped from the zone name.
D. Incorrect. This network ID would be associated with the 15.168.192.0.in-addr.apra zone.
3. Correct answer: B
A. Incorrect. You should not create the target zone on the computer on which you are going to perform the delegation, unless that computer will host that zone. In this situation, the target zone will be hosted on the computer with IP address 10.100.10.10.
B. Correct. You must create the target zone on the server that will host that zone prior to performing the delegation.
C. Incorrect. You must create the target zone before you perform a delegation.
D. Incorrect. You must create the target zone before you perform a delegation.
4. Correct answer: D
A. Incorrect. Although configuring a secondary zone will provide a local copy of the partner organization’s zone, a better approach is to use a stub zone because the zone updates frequently. This way, clients on your organizational network can quickly locate the authoritative name servers in the partner zone and resolve addresses in that zone accurately.
B. Incorrect. Conditional forwarders use static entries for authoritative servers in the target zone. Because the authoritative servers in the target zone often change, a conditional forwarder is quickly out of date.
C. Incorrect. Forwarders are used to forward all queries, rather than queries to a specific zone.
D. Correct. The best approach is to use a stub zone. This way, clients on your organizational network can quickly locate the authoritative name servers in the partner zone and resolve addresses in that zone accurately.
5. Correct answers: B and C
A. Incorrect. A stub zone replicates authoritative name server information from a target zone. In this situation, you simply want to forward traffic for hosts in a specific zone to a specific DNS server.
B. Correct. You need to configure a forwarder that will forward traffic to your ISP’s DNS server.
C. Correct. A conditional forwarder will forward all traffic to the margiestravel.com DNS zone, to a DNS server at a specific address.
D. Incorrect. You want to forward client request traffic either to your ISP’s DNS server or to the margiestravel.com DNS server. Hosting a secondary zone of the margiestravel.com DNS zone does not accomplish this goal.
Lesson 2
1. Correct answer: B and D
A. Incorrect. DHCP provides network address information to clients, but can’t be used to provide IPv6 single-label name resolution.
B. Correct. GlobalNames zones can be used to provide single-label name resolution for IPv6.
C. Incorrect. WINS does not support IPv6.
D. Correct. PNRP provides single-label name resolution for IPv6.
2. Correct answer: B
A. Incorrect. DNS option 005 is used to provide clients with the address of DNS servers.
B. Correct. DNS option 044 is used to provide clients with the address of WINS servers.
C. Incorrect. Option 004 is used to provide clients with the address of time servers.
D. Incorrect. Option 015 is used to provide clients with their DNS domain name.
3. Correct answer: D
A. Incorrect. Reverse lookup zones are used to translate IP addresses into FQDNs. They can’t be used for single-label name resolution.
B. Incorrect. Stub zones are used to store the addresses of authoritative name servers. They can’t be used for single-label name resolution.
C. Incorrect. Secondary zones are read-only replicas of primary zones, although it is possible to create a secondary zone of a GlobalNames zone.
D. Correct. GlobalNames zones allow you to provide single-label name resolution without deploying WINS. You can manually update a GlobalNames zone.
4. Correct answer: C
A. Incorrect. DNS requires the deployment of a centralized server to respond to DNS lookup requests.
B. Incorrect. WINS requires the deployment of a centralized server to respond to WINS lookup requests.
C. Correct. PNRP provides IPv6 name resolution without requiring the deployment of a centralized server.
D. Incorrect. DHCP provides IP address information. It can’t be used to resolve name resolution queries.
5. Correct answer: C
A. Incorrect. Although Set-DnsServer can be used to configure the properties of a DNS server, it can’t be used to enable GlobalNames zone.
B. Incorrect. You use this cmdlet to configure DNS conditional forwarders.
C. Correct. You use the Set-DnsServerGlobalNameZone cmdlet to enable GlobalNames zones once they are created.
D. Incorrect. You use this cmdlet to configure a DNS server forwarder.
Lesson 3
1. Correct answer: D
A. Incorrect. A records are associated with IP addresses. In this case, you want to associate a new name with an existing FQDN.
B. Incorrect. MX records are used to provide MX information.
C. Incorrect. PTR records are used to associate IP addresses with FQDNs.
D. Correct. A CNAME record, also known as an alias record, allows you to provide an alternate name that points to an existing A record.
2. Correct answer: C
A. Incorrect. You don’t need to create an alias record; you need to create an MX record to allow the mail servers of external organizations to locate your organization’s mail gateway.
B. Incorrect. A PTR record already exists in this scenario.
C. Correct. MX records are used by mail gateways to determine the address of remote mail gateways during message delivery.
D. Incorrect. An A record already exists for this host.
3. Correct answer: B
A. Incorrect. You use the Add-DnsServerResourceRecordCName cmdlet to add an alias rather than an AAAA record.
B. Correct. You use the Add-DnsServerResourceRecordAAAA cmdlet to create an AAAA record. AAAA records map FQDNs to IPv6 addresses.
C. Incorrect. You use the Add-DnsServerResourceRecordMX cmdlet to add MX records to a DNS zone.
D. Incorrect. You use the Add-DNSSErverResourceRecordPtr cmdlet to add a pointer record. A pointer record has already been configured for this host.
4. Correct answer: B
A. Incorrect. Secure dynamic updates ensure that only authorized hosts can update records in a DNS zone. They do not reduce the number of stale resource records.
B. Correct. By time stamping records, aging and scavenging ensures that stale resource records are removed from a zone in a timely manner.
C. Incorrect. You use DNSSEC to validate the authenticity of DNS records.
D. Incorrect. You configure zone transfers to authorize which servers can perform zone transfers of a DNS zone.
5. Correct answer: A
A. Correct. You can use DNSSEC to validate the authenticity of DNS records.
B. Incorrect. You configure zone transfers to authorize which servers can perform zone transfers of a DNS zone.
C. Incorrect. Aging and scavenging ensures that stale resource records are removed from a zone in a timely manner. You can’t use aging and scavenging to validate the authenticity of records.
D. Incorrect. Secure dynamic updates ensure that only authorized hosts can update records in a DNS zone. This technology does not allow a client to determine the authenticity of the results of a DNS query.
All materials on the site are licensed Creative Commons Attribution-Sharealike 3.0 Unported CC BY-SA 3.0 & GNU Free Documentation License (GFDL)
If you are the copyright holder of any material contained on our site and intend to remove it, please contact our site administrator for approval.
© 2016-2026 All site design rights belong to S.Y.A.