Training Guide Administering Windows Server 2012 R2 (2014)
Chapter 7. Administering network policies
Network policies determine the conditions under which clients can connect to a network, either locally or through remote methods such as a Remote Desktop Gateway (RD Gateway) server or a Virtual Private Network (VPN) server. On networks with Windows Server 2012 and Windows Server 2012 R2 deployed, these policies are hosted and configured on servers with the Network Policy Server (NPS) role installed. In this chapter, you’ll learn how to deploy and configure an NPS, configure different networks, and understand Network Access Protection (NAP) policies, as well as learn to configure and deploy the infrastructure required to support those policies.
Lessons in this chapter:
![]() Lesson 1: Understanding Network Policy Server policies
Lesson 1: Understanding Network Policy Server policies
![]() Lesson 2: Understanding Network Access Protection enforcement methods
Lesson 2: Understanding Network Access Protection enforcement methods
![]() Lesson 3: Understanding Network Access Protection infrastructure
Lesson 3: Understanding Network Access Protection infrastructure
Before you begin
To complete the practice exercises in this chapter:
![]() You need to have deployed computers SYD-DC, MEL-DC, and ADL-DC, as described in the Introduction, using the evaluation edition of Windows Server 2012 R2.
You need to have deployed computers SYD-DC, MEL-DC, and ADL-DC, as described in the Introduction, using the evaluation edition of Windows Server 2012 R2.
Lesson 1: Understanding Network Policy Server policies
The Network Policy Server (NPS) is a central component of Windows Server 2012 and Windows Server 2012 R2-based remote access and Network Access Protection (NAP) solutions. In this lesson, you’ll learn how to deploy the NPS server role, and how to configure connection request policies and client configuration. You’ll learn about IP filters, encryption, IP settings, and NPS templates. You’ll also learn about some of the concepts that are important in understanding the use of NPS policies in both NAP and Remote Authentication Dial-In User Service (RADIUS) scenarios.
After this lesson, you will be able to:
![]() Configure connection request policies.
Configure connection request policies.
![]() Configure client configuration.
Configure client configuration.
![]() Configure IP filters.
Configure IP filters.
![]() Configure encryption.
Configure encryption.
![]() Configure IP settings.
Configure IP settings.
![]() Configure NPS templates.
Configure NPS templates.
Estimated lesson time: 45 minutes
NPS deployment

NPS enables you to configure network access policies. These policies can be related to remote connection requests, such as through a VPN or RD Gateway server, or they can be related to client health, which you use when deploying NAP. You can also configure a Windows Server 2012 or Windows Server 2012 R2 server with the NPS role as a RADIUS proxy. A RADIUS proxy forwards remote access connection requests to another RADIUS server that can authorize or deny that request.
You can configure the NPS role on Windows Server 2012 or Windows Server 2012 R2 to function in one or more of the following capacities:
![]() NAP policy server
NAP policy server
![]() RADIUS server
RADIUS server
![]() RADIUS proxy
RADIUS proxy
Note: RADIUS
This lesson focuses on NPS policies as they relate to NAP and RADIUS. You’ll learn about using NPS as a RADIUS server and RADIUS proxy in more detail in Chapter 8, “Administering remote access.”
When deploying the NPS role, you can also choose to install the Health Registration Authority (HRA) and the Host Credential Authorization Protocol (HCAP), as shown in Figure 7-1. The HRA enables you to deploy health certificates to computers in NAP scenarios. The HRA requires that web server components also be installed. The HCAP enables the integration of NAP and Cisco Network Access Control (Cisco NAC). In this configuration, the NPS server provides authorization for Cisco NAC clients.
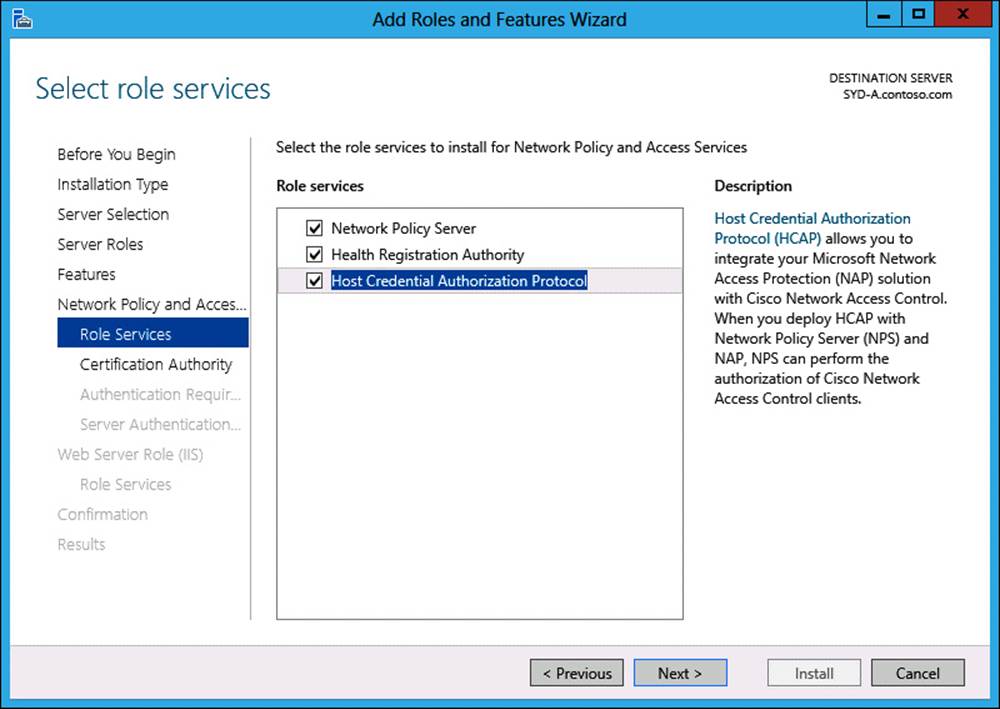
FIGURE 7-1 Selecting NPS role services
To install the NPS role on a computer running Windows Server 2012 or Windows Server 2012 R2, perform the following steps:
1. In Server Manager, click Manage, and click Add Roles and Features.
2. On the Before You Begin page of the Add Roles And Features Wizard, click Next.
3. On the Select Installation Type page, click Role-Based Or Feature-Based Installation, and click Next.
4. On the Select Destination Server page, click the server on which you want to deploy the NPS role, and click Next.
5. On the Select Server Roles page, click Network Policy And Access Services, as shown in Figure 7-2.
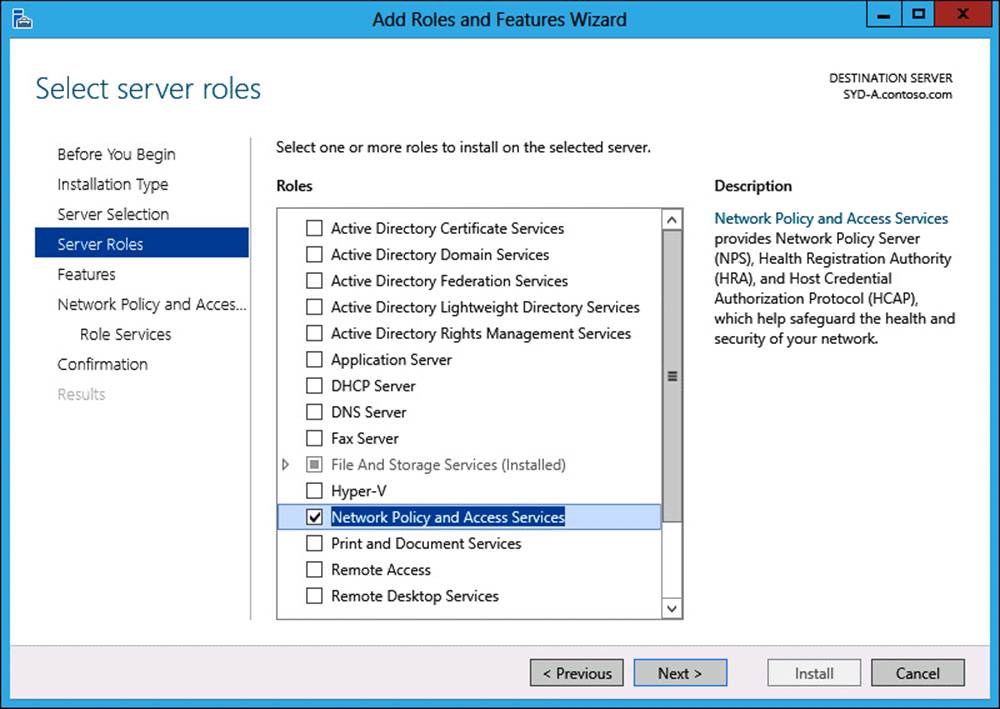
FIGURE 7-2 Installing the Network Policy And Access Services role
6. When you click Network Policy And Access Services, the Add Roles And Features Wizard dialog box prompts you to install the Remote Server Administration Tools associated with this role. Click Add Features.
7. Click Next three times until you reach the Select Role Services page.
8. On the Select Role Services page, you can choose to install the HRA and the HCAP role services. When you choose to install these role services, the Add Roles And Features Wizard automatically prompts you to install additional required components, such as Web Server components.
9. If you choose to deploy the HRA, you are prompted to choose a Certification Authority (CA), as shown in Figure 7-3. You can choose to select a CA later if one is not present, a locally installed CA, or another existing CA on the network. Click Next.
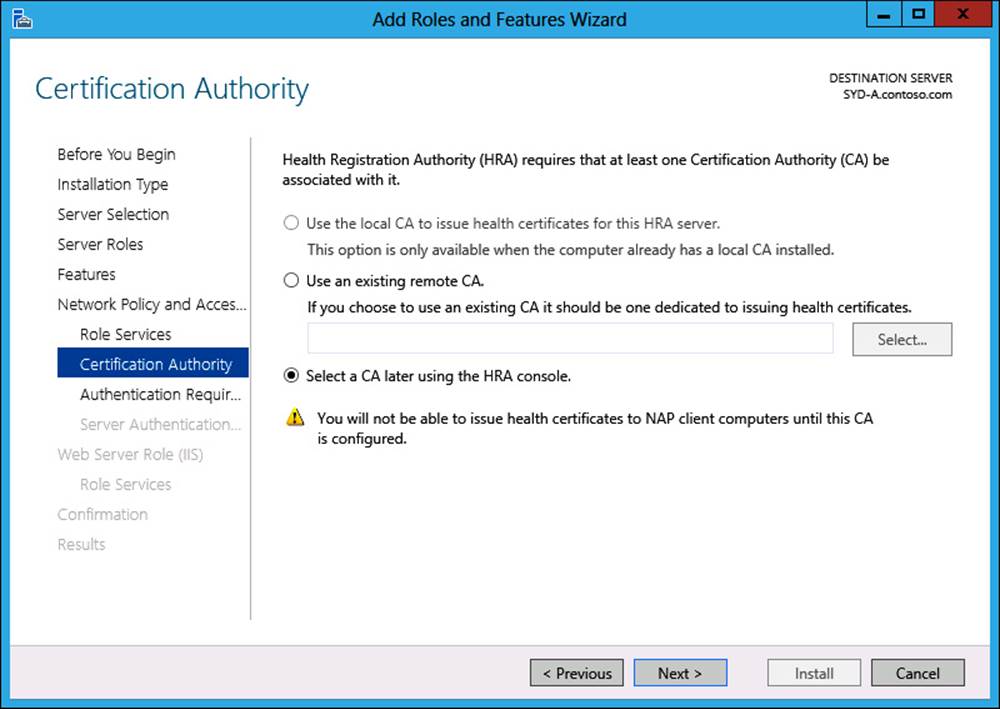
FIGURE 7-3 Selecting an HRA CA
10. When configuring the HRA, you must also determine whether you will limit the request for HRA certificates to users who are members of an Active Directory directory services domain, or enable anonymous requests for certificates. You can choose between these options on the Authentication Requirements page of the Add Roles and Features Wizard, as shown in Figure 7-4. Click Next.

FIGURE 7-4 Configuring Authentication Requirements for the HRA
11. The HRA and HCAP role services also require that you configure an SSL certificate for communication with the server. If no existing SSL certificate is present on the server, you can enable SSL later by configuring a certificate for the default website in Internet Information Services (IIS). Click Next.
12. On the Web Server Role (IIS) And Role Services page, click Next.
13. On the Confirm Installation Selections page of the Add Roles and Features Wizard, click Install. When the installation completes, click Close.
Connection request policies
A connection request policy is a set of conditions that enable you to specify which RADIUS server performs the authorization and authentication process for specific RADIUS clients. You can configure multiple connection request policies on a server with the NPS role installed. When multiple policies are present, as shown in Figure 7-5, policies are processed according to the policy processing order. The first policy where conditions are met will be used.

FIGURE 7-5 Policy processing order
Network access server type
One of the first steps you undertake when creating a connection request policy is to specify the type of network access server that will be sending traffic to the NPS server. You configure the type of network access server on the Specify Connection Request Policy Name And Connection Type page, as shown in Figure 7-6.
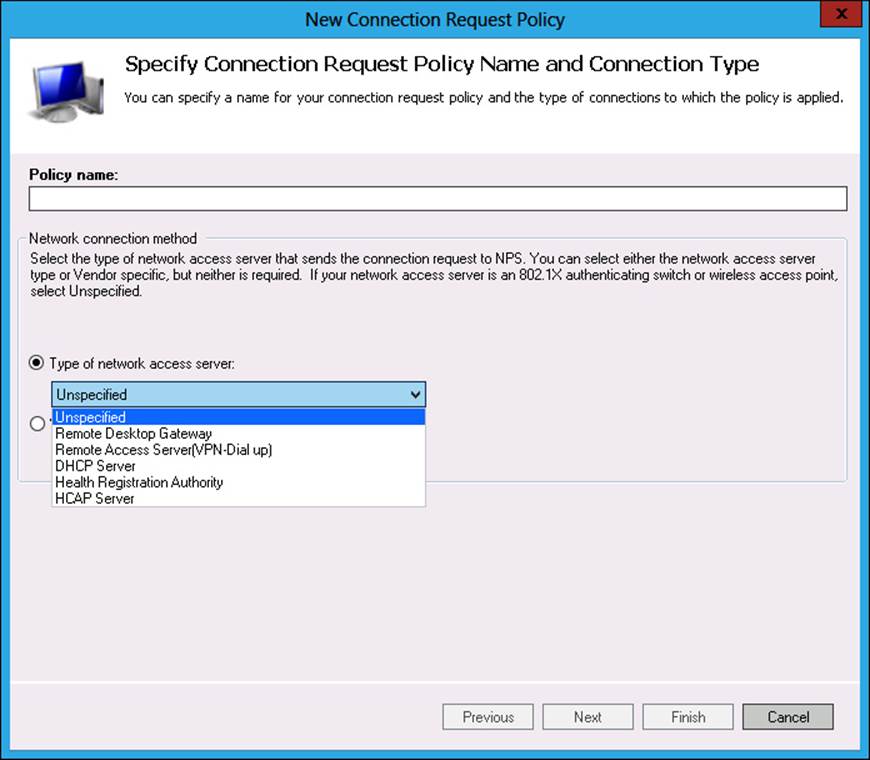
FIGURE 7-6 Default connection request policy
When configuring the policy, you can choose from the following connection types:
![]() Remote Desktop Gateway Use this option when you are configuring the NPS server to perform authentication for an RD Gateway server.
Remote Desktop Gateway Use this option when you are configuring the NPS server to perform authentication for an RD Gateway server.
![]() Remote Access Server (VPN-Dial Up) Use this option when you are configuring the NPS server to perform authentication for remote access. You can use this method with both VPN and dial-up servers.
Remote Access Server (VPN-Dial Up) Use this option when you are configuring the NPS server to perform authentication for remote access. You can use this method with both VPN and dial-up servers.
![]() DHCP Server Use this option when configuring NAP with the Dynamic Host Configuration Protocol (DHCP) enforcement method.
DHCP Server Use this option when configuring NAP with the Dynamic Host Configuration Protocol (DHCP) enforcement method.
![]() Health Registration Authority Use this option when configuring NAP with the IPsec enforcement option.
Health Registration Authority Use this option when configuring NAP with the IPsec enforcement option.
![]() HCAP Server Use this option when configuring the NPS server to work with Cisco’s HCAP implementation.
HCAP Server Use this option when configuring the NPS server to work with Cisco’s HCAP implementation.
![]() Unspecified Use this type if you are configuring NPS to perform authentication for an 802.1x authenticating switch or wireless access point.
Unspecified Use this type if you are configuring NPS to perform authentication for an 802.1x authenticating switch or wireless access point.
You can also configure a vendor-specific network access server and use the vendor-specific ID if you are configuring NPS to perform authentication from a third-party access server.
Request policy conditions
When you configure multiple policies, the policies are evaluated in numerical order, with the first policy that matches the specified conditions being used. You add conditions on the Specify Conditions page of the New Connection Request Policy dialog box. You select a condition in the Select Condition dialog box, shown in Figure 7-7.

FIGURE 7-7 Adding conditions
Although at least one condition must exist, you can also use multiple conditions when you create a connection request policy. You can select from the following conditions:
![]() Location Groups Use this condition when you are using the NPS server to authenticate clients that use Cisco’s HCAP protocol.
Location Groups Use this condition when you are using the NPS server to authenticate clients that use Cisco’s HCAP protocol.
![]() User Name The user name as specified in the RADIUS message. This name includes both the user account name and the RADIUS realm name. You can use wildcards when configuring this condition.
User Name The user name as specified in the RADIUS message. This name includes both the user account name and the RADIUS realm name. You can use wildcards when configuring this condition.
![]() Access Client IPv4 Address The IPv4 address of the client requesting access.
Access Client IPv4 Address The IPv4 address of the client requesting access.
![]() Access Client IPv6 Address The IPv6 address of the client requesting access.
Access Client IPv6 Address The IPv6 address of the client requesting access.
![]() Framed Protocol Use this condition when you want to apply the policy to clients using a specific framing protocol such as PPP.
Framed Protocol Use this condition when you want to apply the policy to clients using a specific framing protocol such as PPP.
![]() Service Type Enables you to create a condition that depends on the type of service. The Service Type options are shown in Figure 7-8.
Service Type Enables you to create a condition that depends on the type of service. The Service Type options are shown in Figure 7-8.

FIGURE 7-8 Service type options
![]() Tunnel Type Use this condition to create a policy that applies only to a specific type of tunnel, such as an LT2P/IPsec tunnel.
Tunnel Type Use this condition to create a policy that applies only to a specific type of tunnel, such as an LT2P/IPsec tunnel.
![]() Day And Time Restrictions Enables you to create a condition determining when connection attempts will be accepted or denied. Day and time restrictions are based upon the time zone set on the NPS server. The Day And Time Restrictions dialog box is shown in Figure 7-9.
Day And Time Restrictions Enables you to create a condition determining when connection attempts will be accepted or denied. Day and time restrictions are based upon the time zone set on the NPS server. The Day And Time Restrictions dialog box is shown in Figure 7-9.
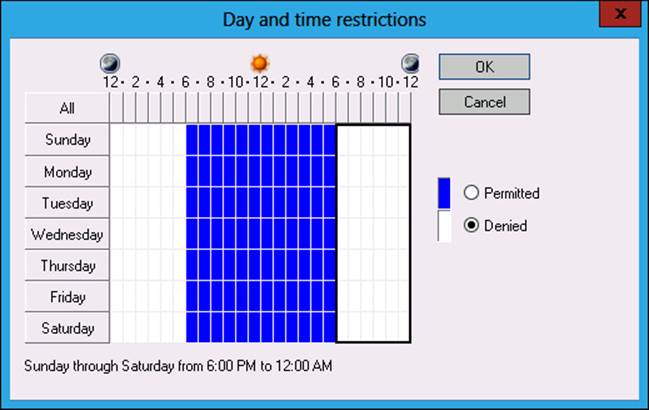
FIGURE 7-9 Day and time restrictions
![]() Identity Type Enables the policy to be associated with a specific mechanism (for example, a NAP statement of health).
Identity Type Enables the policy to be associated with a specific mechanism (for example, a NAP statement of health).
![]() Calling Station ID This RADIUS client property enables the policy to match the telephone number of the network access server to which the client connected. For example, if the dial-up server had the phone number 555-5555, it could be used as the calling station ID.
Calling Station ID This RADIUS client property enables the policy to match the telephone number of the network access server to which the client connected. For example, if the dial-up server had the phone number 555-5555, it could be used as the calling station ID.
![]() Client Friendly Name This RADIUS client property enables the policy to match the identity of the RADIUS client that forwarded the connection request to the NPS server. For example, if the VPN server were named VPN-ALPHA, it could be used as the client friendly name.
Client Friendly Name This RADIUS client property enables the policy to match the identity of the RADIUS client that forwarded the connection request to the NPS server. For example, if the VPN server were named VPN-ALPHA, it could be used as the client friendly name.
![]() Client IPv4 Address This RADIUS client property enables the policy to match the IPv4 address of the RADIUS client that forwarded the connection request to the NPS server. For example, you could use the IPv4 address of a VPN server as the client IPv4 address.
Client IPv4 Address This RADIUS client property enables the policy to match the IPv4 address of the RADIUS client that forwarded the connection request to the NPS server. For example, you could use the IPv4 address of a VPN server as the client IPv4 address.
![]() Client IPv6 Address This RADIUS client property enables the policy to match the IPv6 address of the RADIUS client that forwarded the connection request to the NPS server. For example, you could use the IPv6 address of a VPN server as the client IPv6 address.
Client IPv6 Address This RADIUS client property enables the policy to match the IPv6 address of the RADIUS client that forwarded the connection request to the NPS server. For example, you could use the IPv6 address of a VPN server as the client IPv6 address.
![]() Client Vendor Enables you to use the name of the RADIUS client vendor that is forwarding connection requests to the NPS server.
Client Vendor Enables you to use the name of the RADIUS client vendor that is forwarding connection requests to the NPS server.
![]() Called Station ID Similar to the RADIUS client property, this property enables you to specify the telephone number of the network access server. In this and the following property items, the network access server is not using RADIUS, but is forwarding authentication traffic to the server with the NPS role installed.
Called Station ID Similar to the RADIUS client property, this property enables you to specify the telephone number of the network access server. In this and the following property items, the network access server is not using RADIUS, but is forwarding authentication traffic to the server with the NPS role installed.
![]() NAS Identifier In this scenario, NAS is the acronym of Network Access Server rather than Network Attached Storage. This property enables you to specify a character string representing the name of the network access server.
NAS Identifier In this scenario, NAS is the acronym of Network Access Server rather than Network Attached Storage. This property enables you to specify a character string representing the name of the network access server.
![]() NAS IPv4 Address This property enables you to specify the IPv4 address of the network access server.
NAS IPv4 Address This property enables you to specify the IPv4 address of the network access server.
![]() NAS IPv6 Address Use this property to specify the IPv6 address of the network access server.
NAS IPv6 Address Use this property to specify the IPv6 address of the network access server.
![]() NAS Port Type Use this property to specify the types of access media, including ISDN, VPN, Ethernet, or Cable, as shown in Figure 7-10.
NAS Port Type Use this property to specify the types of access media, including ISDN, VPN, Ethernet, or Cable, as shown in Figure 7-10.
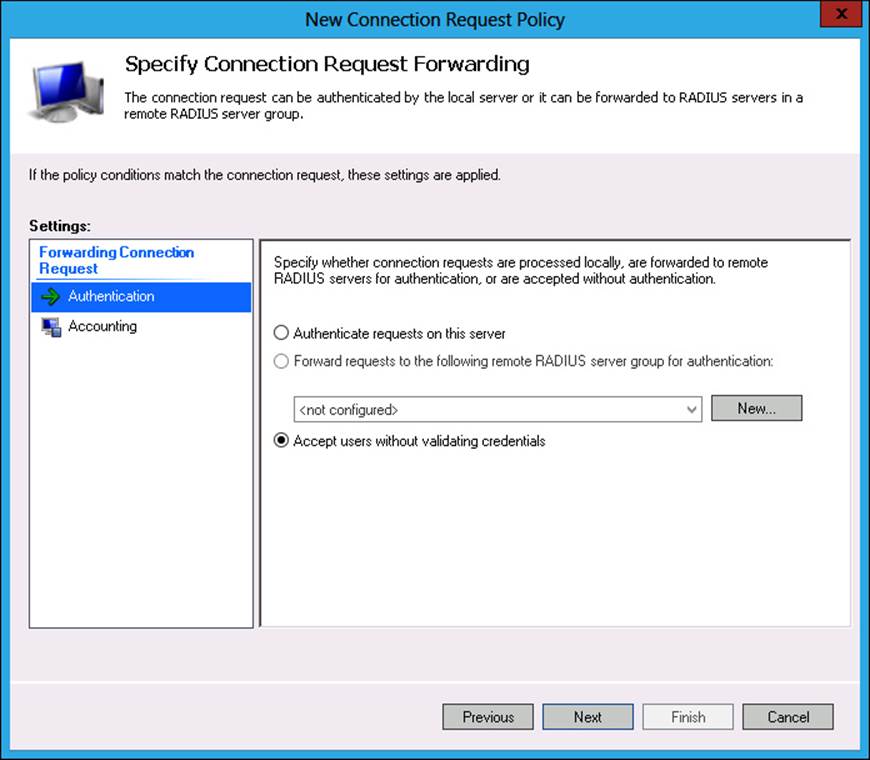
FIGURE 7-10 NAS Port Type dialog box
Real World: RADIUS clients
RADIUS terminology can be confusing. It is important to remember that RADIUS clients are not the same as remote access clients. For example, a VPN or dial-up server that forwards authentication requests to an NPS server is a RADIUS client. The remote computer making the connection to the VPN or dial-up server is not a RADIUS client.
Connection request forwarding
By configuring a connection request forwarding setting, you can specify whether the local server performs authentication or forwards authentication traffic to a remote RADIUS server group. You can also configure connection request forwarding so that users are automatically accepted without any credential validation, as shown in Figure 7-11. You can also configure accounting on the Specify Connection Request Forwarding page. Accounting enables you to record RADIUS traffic.
FIGURE 7-11 Connection request forwarding
Authentication methods
The Specify Authentication Methods page enables you to configure which authentication method or methods clients can use. These settings override any authentication methods specified in the network policy. When you specify multiple methods, the NPS server attempts the most-secure method, and then the next most secure method, until it reaches the least-secure specified method. The most secure authentication types are the Extensible Authentication Protocols (EAPs), which include the following (as shown in Figure 7-12):
![]() Microsoft: Smart Card Or Other Certificate
Microsoft: Smart Card Or Other Certificate
![]() Microsoft: Protected EAP (PEAP)
Microsoft: Protected EAP (PEAP)
![]() Microsoft: Secured Password (EAP-MSCHAP v2)
Microsoft: Secured Password (EAP-MSCHAP v2)

FIGURE 7-12 Adding an EAP
You can also configure NPS to support less-secure authentication protocols, as shown in Figure 7-13. The less-secure authentication protocols, from most secure to least secure, are the following:
![]() Microsoft Encrypted Authentication Version 2 (MS-CHAP-v2) When enabling this authentication method, you can also allow users to change passwords after that password has expired. MS-CHAP-v2 was first introduced with Windows NT 4.0 Service Pack 4.
Microsoft Encrypted Authentication Version 2 (MS-CHAP-v2) When enabling this authentication method, you can also allow users to change passwords after that password has expired. MS-CHAP-v2 was first introduced with Windows NT 4.0 Service Pack 4.
![]() Microsoft Encrypted Authentication (MS-CHAP) A less-secure version of MS-CHAP-v2. You can also allow users to change passwords after the password expiration date.
Microsoft Encrypted Authentication (MS-CHAP) A less-secure version of MS-CHAP-v2. You can also allow users to change passwords after the password expiration date.
![]() Encrypted Authentication (CHAP) Unless there is an excellent reason otherwise, don’t use this authentication protocol. You should use this protocol only if you need to support old clients that don’t support more secure authentication protocols.
Encrypted Authentication (CHAP) Unless there is an excellent reason otherwise, don’t use this authentication protocol. You should use this protocol only if you need to support old clients that don’t support more secure authentication protocols.
![]() Unencrypted Authentication (PAP, SPAP) You use these protocols only if you need to support old clients that don’t support more-secure authentication protocols. Use these protocols with care because they pass credentials in cleartext format.
Unencrypted Authentication (PAP, SPAP) You use these protocols only if you need to support old clients that don’t support more-secure authentication protocols. Use these protocols with care because they pass credentials in cleartext format.
![]() Allow Clients To Connect Without Negotiating An Authentication Method This option enables clients to connect without requiring a specific authentication method.
Allow Clients To Connect Without Negotiating An Authentication Method This option enables clients to connect without requiring a specific authentication method.
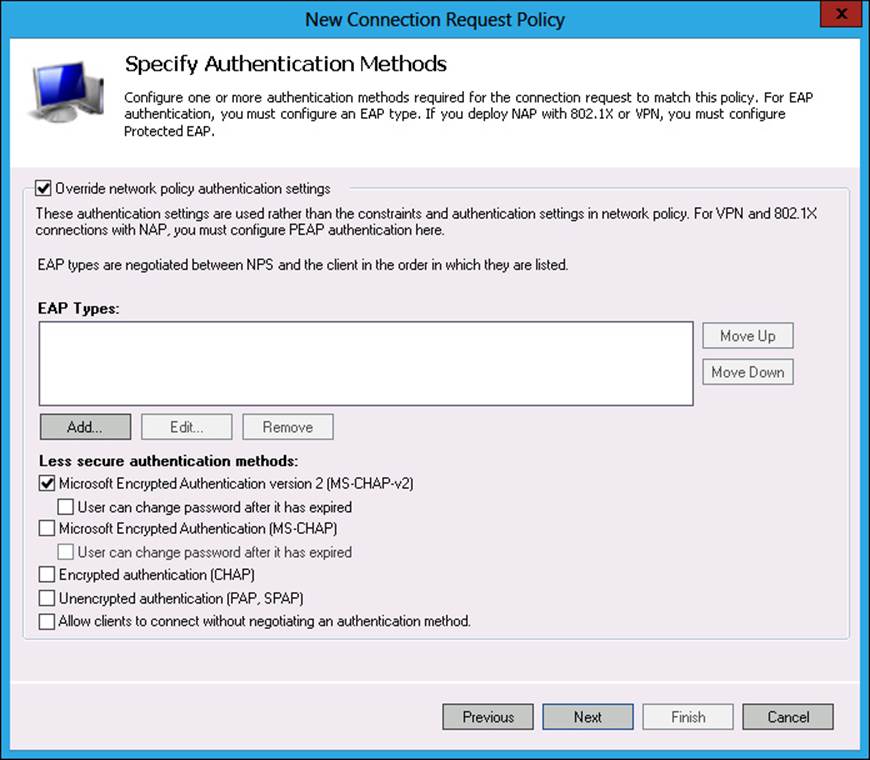
FIGURE 7-13 Authentication methods
Realm and RADIUS attributes
You can apply a realm name as well as RADIUS attributes to a connection request policy. This is often done when the computer with the NPS server role installed is functioning as a RADIUS proxy. When functioning as a proxy, the server with the NPS role installed can alter attributes that were passed to it by a RADIUS client. This process enables the RADIUS server providing authentication to use the altered attributes instead of the ones sent by the client. When functioning as a RADIUS proxy, the server with the NPS role installed can also add additional attributes to the traffic forwarded to the RADIUS server that provides authentication services. You perform these steps on the Configure Settings page shown in Figure 7-14.
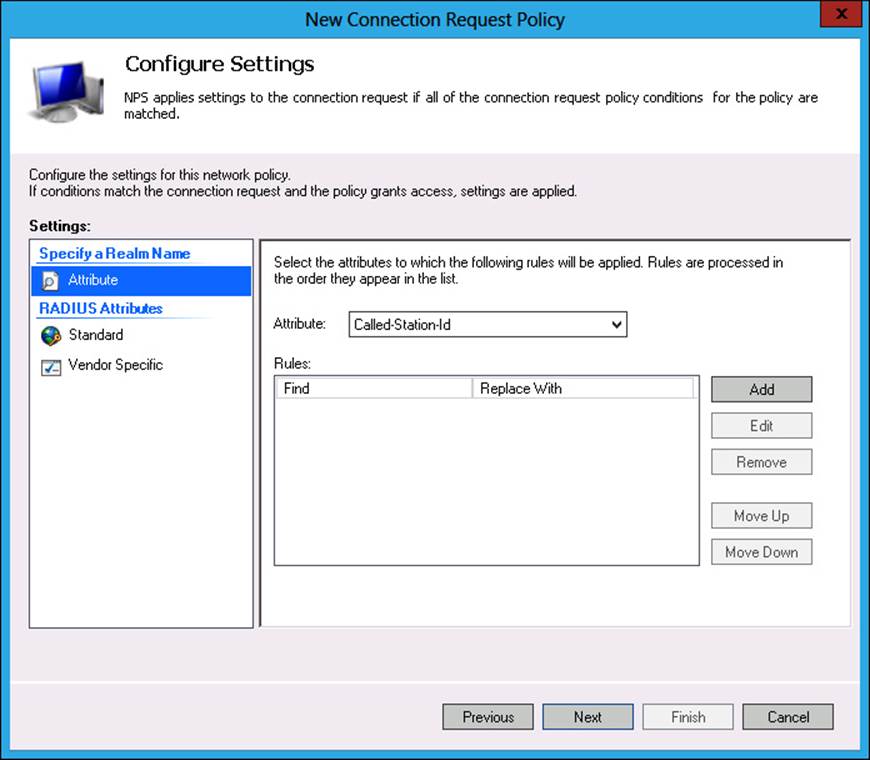
FIGURE 7-14 Configure settings page
Default connection request policy
Windows Server 2012 and Windows Server 2012 R2 create a default connection request policy when you deploy the NPS role. The name of this policy is Use Windows Authentication For All Users and it is assigned the processing order of 999999. The NPS server uses this policy as a last resort. The policy, shown in Figure 7-15, has the following properties, with all other properties not configured:
![]() Authentication Methods: Not Configured
Authentication Methods: Not Configured
![]() Authentication: Authenticate Requests On This Server
Authentication: Authenticate Requests On This Server
![]() Conditions: Sunday To Saturday, 00:00 To 24:00
Conditions: Sunday To Saturday, 00:00 To 24:00
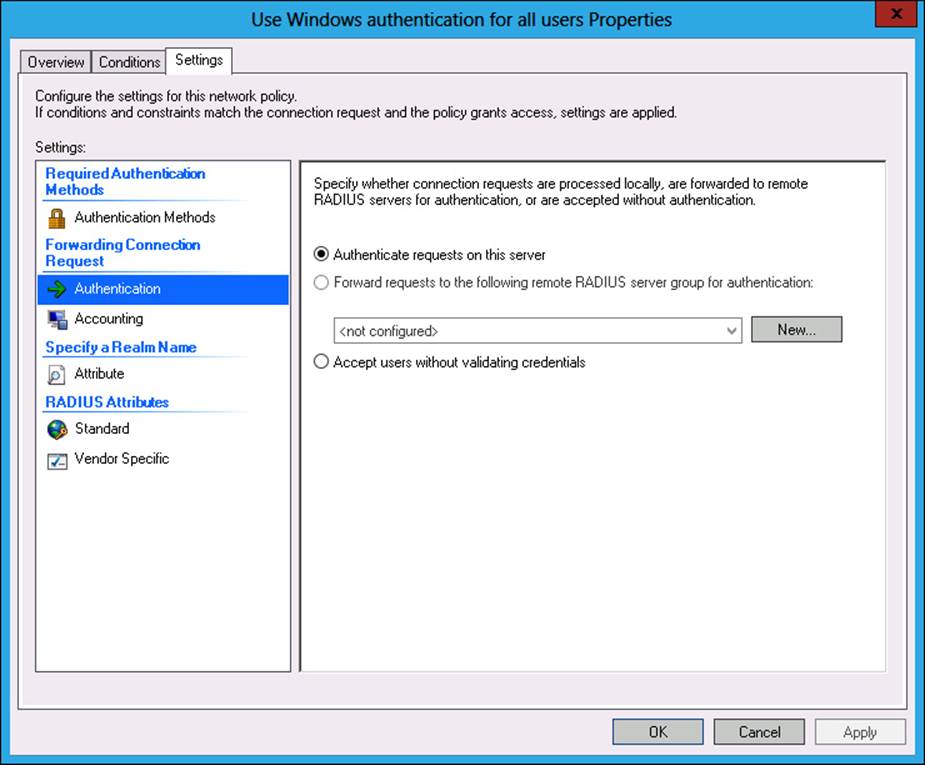
FIGURE 7-15 Default connection request policy
Creating a connection request policy
You can create a connection request policy from the NPS console. To create a connection request policy, perform the following steps:
1. Open the NPS console from the Tools menu in Server Manager.
2. Expand the Policies node, and click Connection Request Policies, as shown in Figure 7-16.
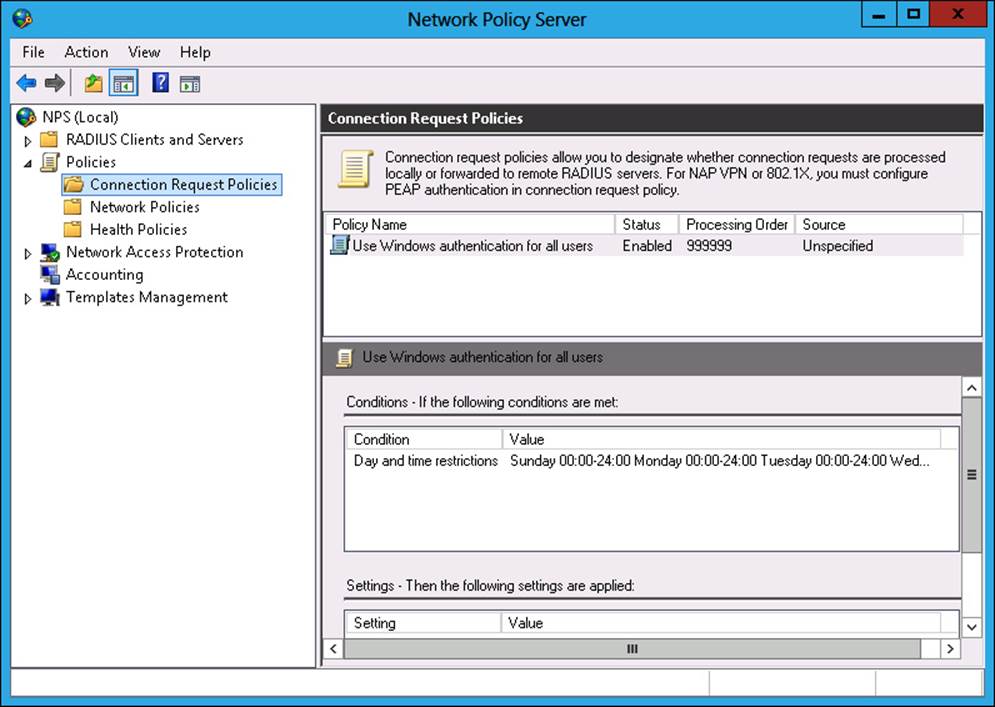
FIGURE 7-16 Connection Request Policies node of the NPS console
3. On the Action menu, click New.
4. On the Specify Connection Request Policy Name And Connection Type page, provide a policy name and specify the type of network access server to which the policy applies.
5. On the Specify Conditions page, add at least one condition that differentiates the policy from any other policies on the server with the NPS role installed.
6. On the Specify Connection Request Forwarding page, specify whether the local server will perform authentication, or whether the server with the NPS role installed will function as a RADIUS proxy and forward requests to a remote server. You can also configure accounting on this page.
More Info: Connection request policies
For more information about connection request policies, consult the following TechNet document at http://technet.microsoft.com/en-us/library/cc753603.aspx.
7. On the Specify Authentication Methods page, choose whether to override network policy authentication settings. If you do, you must specify which authentication methods you will use in place of the ones specified in the network policy.
8. If the server with the NPS role installed is functioning as a RADIUS proxy, you can configure additional attributes as well as replace existing attributes forwarded by a RADIUS client on the Configure Settings page.
9. You then complete the New Connection Request Policy Wizard. The policy will be assigned the next available processing order number. You can right-click the policy and select Move Up or Move Down to change the policy processing order.
![]() Quick check
Quick check
![]() How do you ensure that one connection request policy applies to one group of users and a second connection request policy applies to a different group of users?
How do you ensure that one connection request policy applies to one group of users and a second connection request policy applies to a different group of users?
Quick check answer
![]() Configure different conditions in each connection request policy.
Configure different conditions in each connection request policy.
Client configuration
In some environments, a computer must authenticate before it can connect to a network. You can configure this authentication using 802.1X group policy items. You configure separate policies for wired networks and wireless networks.
To configure the default wired or wireless network policies, perform the following steps:
1. Open the Group Policy Management Console (GPMC) from the Tools menu of the Server Manager console.
2. Expand the Forest\Domains\Domain FQDN\Group Policy Objects (GPO) node and select the policy that you want to use to enforce 802.1X configuration. You can also create a new policy and link it to an appropriate location for this purpose, as shown in Figure 7-17.
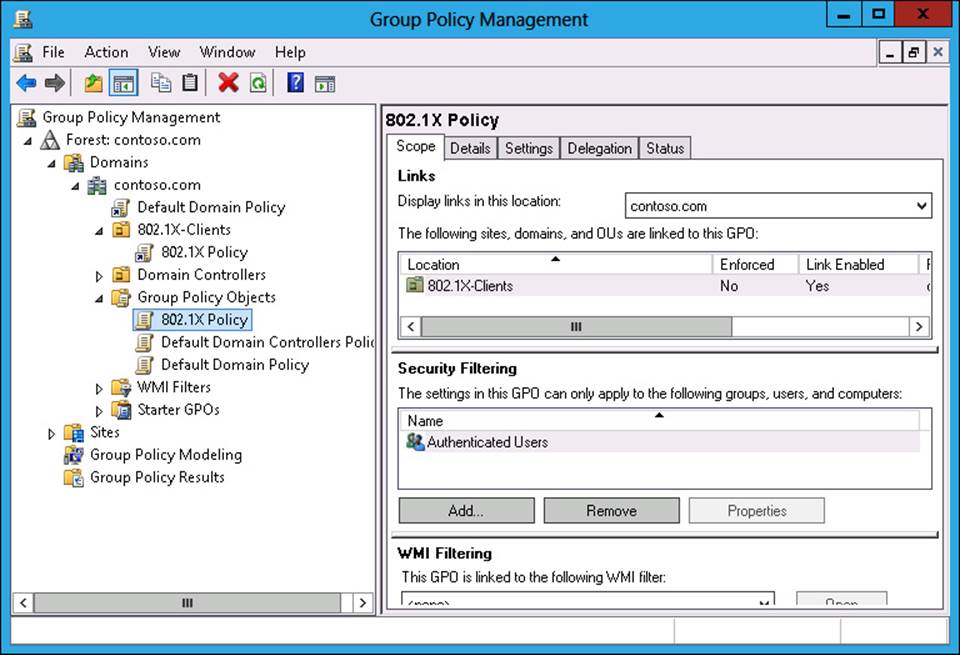
FIGURE 7-17 Custom GPO for 802.1X policies
3. On the Action menu, click Edit.
4. Expand the Computer Configuration\Policies\Windows Settings\Security Settings node.
5. Under this node there are two policy areas, as shown in Figure 7-18:
![]() Wired Network (IEEE 802.3) Policies
Wired Network (IEEE 802.3) Policies
![]() Wireless Network (IEEE 802.11) Policies
Wireless Network (IEEE 802.11) Policies
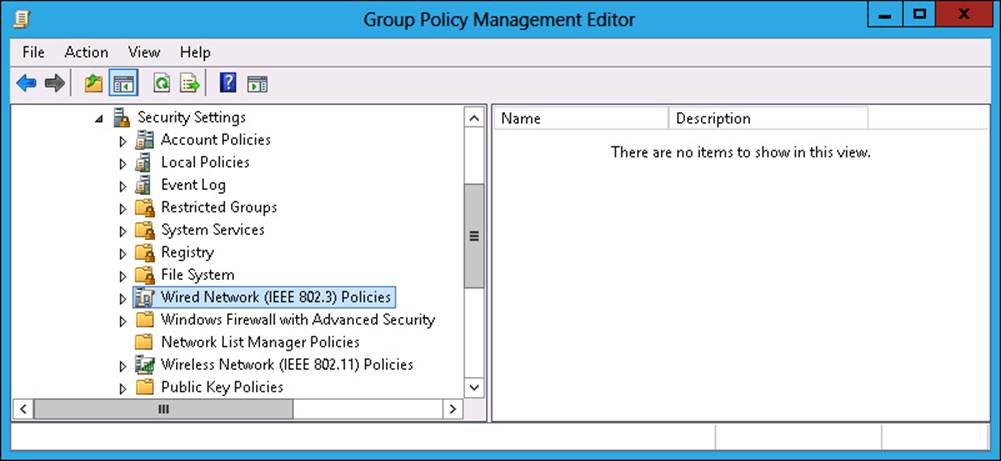
FIGURE 7-18 Selecting Wired Network (IEEE 802.3) Policies
6. You use the same technique to configure either wired network or wireless network policies. To configure these policies, click either Wired Network (IEE 802.3) Policies or Wireless Network (IEEE 802.11) Policies. On the Action menu, click Create A New Wired Network Policy For Windows Vista And Later Releases/Create A New Wireless Network Policy For Windows Vista And Later Releases.
7. On the General tab of the New Wired Network Policy Properties dialog box, shown in Figure 7-19, provide a name for the policy. The default policy setting is to use Windows Wired Auto Config. You can also configure a block on shared user credentials for computers running the Windows 7, Windows 8, or Windows 8.1 operating systems.
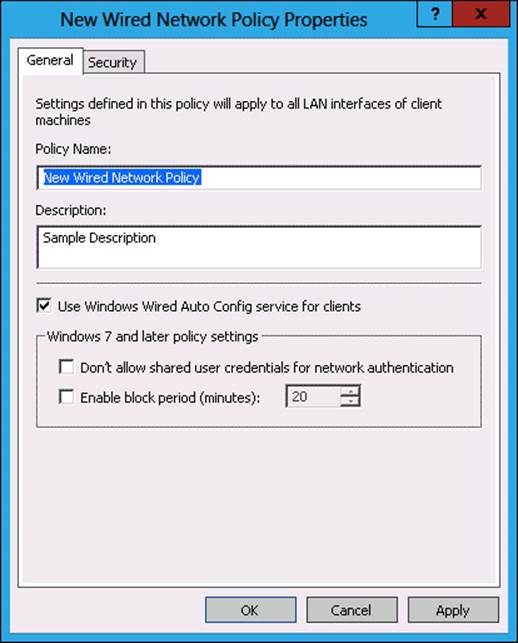
FIGURE 7-19 Wired network policy properties
8. On the Security tab, shown in Figure 7-20, you can configure a network authentication method and an authentication mode. The authentication mode determines whether a user’s credentials, the computer’s credentials, or both are used to authenticate to gain network access. These settings can be overridden by a connection request policy.
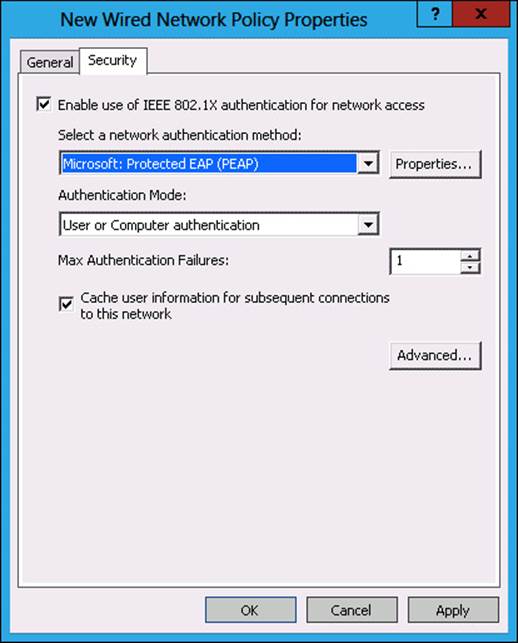
FIGURE 7-20 Wired network policy security
9. If you click the Advanced option, you can access advanced security settings for the network policy. Through these settings, shown in Figure 7-21, you can configure single sign-on settings and advanced 802.1X settings. You can configure Single Sign On to occur immediately before user logon or after user logon.
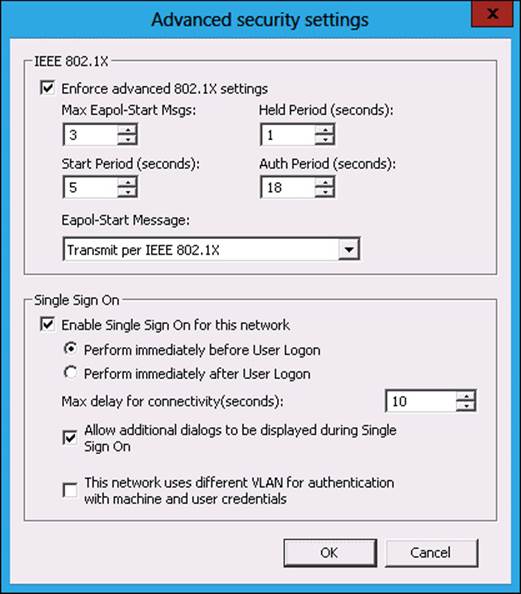
FIGURE 7-21 Wired network policy single sign-on settings
10. Click OK to commit policy changes. Close the Group Policy Management Editor.
More Info: Client configuration
For more information about client computer configuration, consult the following TechNet article at http://technet.microsoft.com/en-us/library/cc731479.aspx.
IP filters
IP filters enable you to control incoming and outgoing traffic based on source and destination IP address, as well as port and protocol. You use IP address filters to limit communication between clients and specific hosts and services on the network. You can configure IP filters on the Settings page of the Network Policy properties, as shown in Figure 7-22, or when creating a network policy.
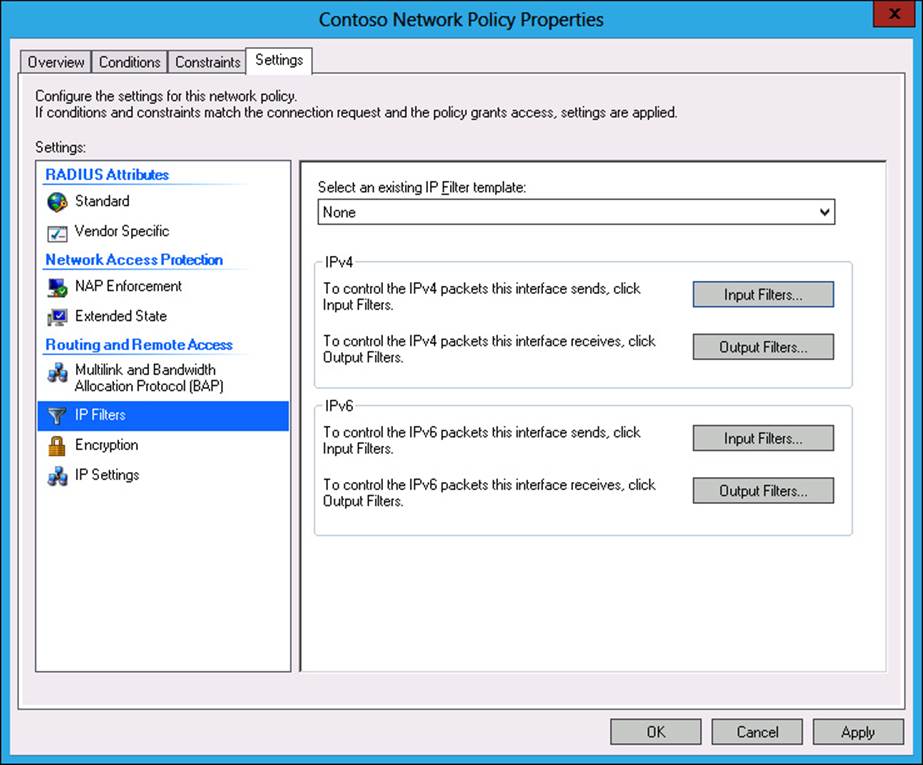
FIGURE 7-22 Network policy IP filters
Encryption
When configuring network policies, you can select which types of encryption the connection can use on the Configure Settings page of the New Network Policy Wizard or by editing the properties of an existing network policy. If you want to force network connections to use strong encryption, ensure that the No Encryption and Basic Encryption settings are not selected in the network policy, as shown in Figure 7-23. The key length determines the strength of the encryption. Although increased key length does improve security, it also comes at the cost of increased processor overhead.
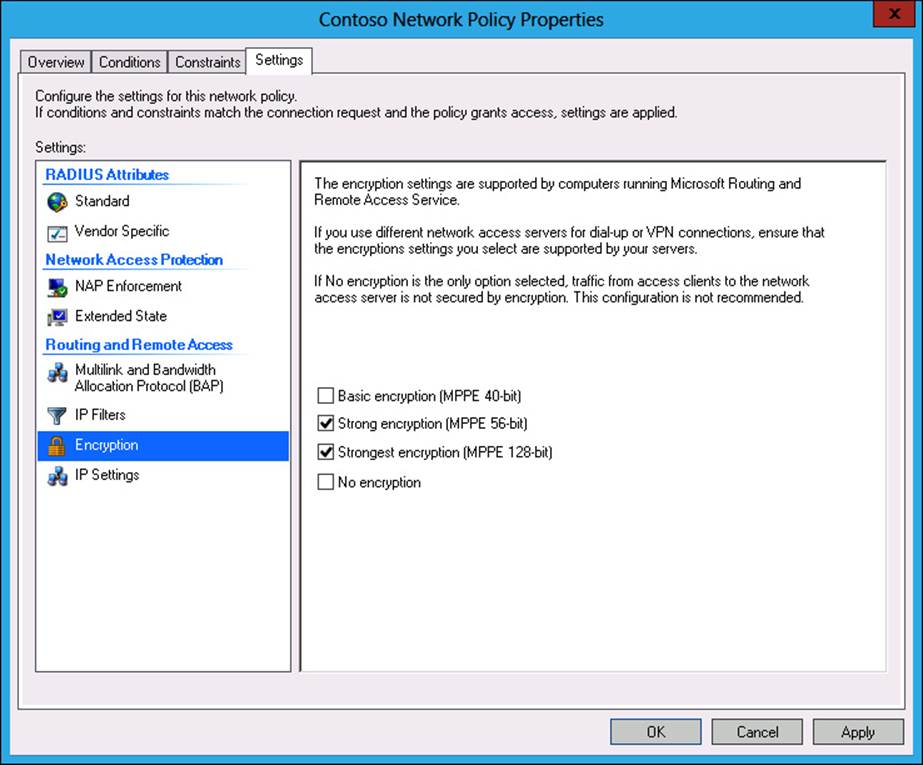
FIGURE 7-23 Network policy encryption settings
IP settings
IP settings, which you can configure when creating a network policy or by editing the properties of a policy, as shown in Figure 7-24, enable you to configure how a client receives an IP address. You can configure the following settings:
![]() Server Must Supply An IP Address
Server Must Supply An IP Address
![]() Client May Request An IP Address
Client May Request An IP Address
![]() Server Settings Determine IP Address Assignment
Server Settings Determine IP Address Assignment
![]() Assign A Static IPv4 Address
Assign A Static IPv4 Address
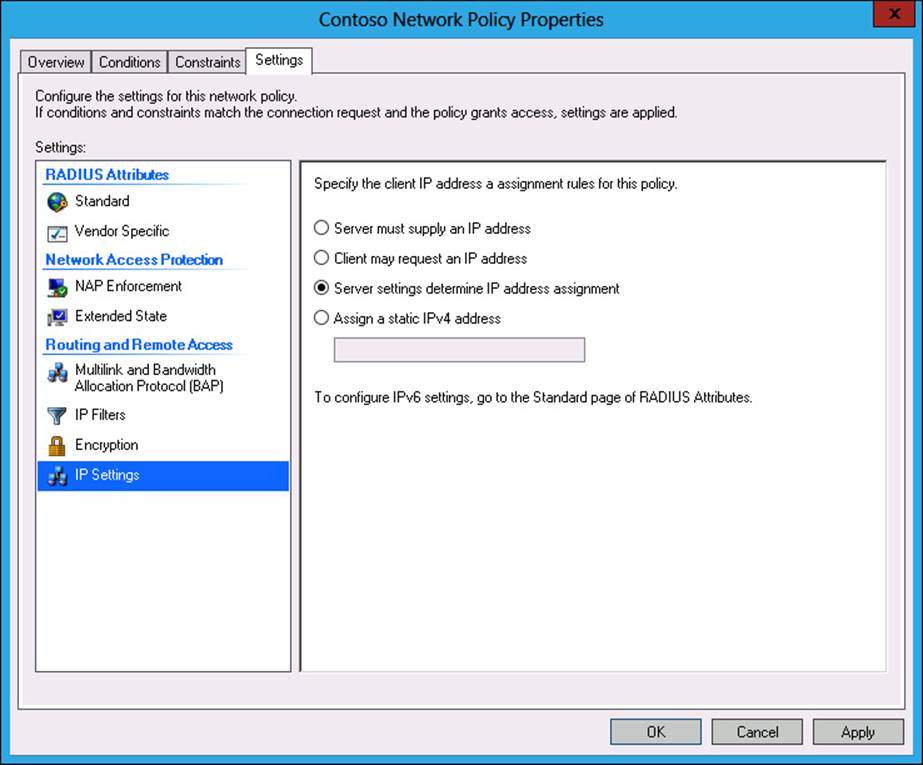
FIGURE 7-24 Network policy IP address settings
You can configure an IPv6 address on the Standard page of the RADIUS attributes section.
Creating network policies
Network policies determine which users and computers are authorized to connect to the network. Network policies are often used with NAP. The process of creating network policies is similar to creating connection request policies. Both sets of policies share many of the same elements. To create a network policy, perform the following steps:
1. In the NPS console, click Network Policies under the Policies node, as shown in Figure 7-25.
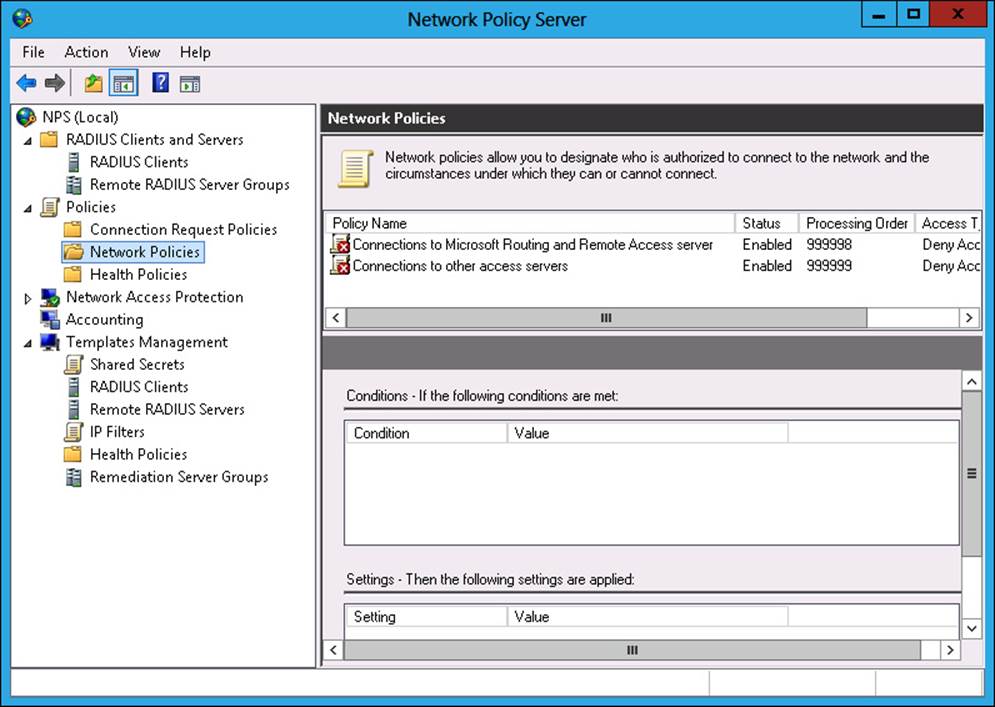
FIGURE 7-25 Network policies
2. On the Action menu, click New.
3. On the Specify Network Policy Name And Connection Type page, enter a policy name and specify the type of network access server. The options are the following:
![]() Remote Desktop Gateway
Remote Desktop Gateway
![]() Remote Access Server (VPN-Dial Up)
Remote Access Server (VPN-Dial Up)
![]() DHCP Server
DHCP Server
![]() Health Registration Authority
Health Registration Authority
![]() HCAP Server
HCAP Server
4. On the Specify Conditions page, select one or more conditions that determine whether the policy applies. The options, shown in Figure 7-26, are these:
![]() Windows Groups The user or computer must belong to a Windows security group.
Windows Groups The user or computer must belong to a Windows security group.
![]() Machine Groups The computer must belong to a Windows security group.
Machine Groups The computer must belong to a Windows security group.
![]() User Groups The user must belong to a Windows security group.
User Groups The user must belong to a Windows security group.
![]() Location Groups Must be part of an HCAP location group.
Location Groups Must be part of an HCAP location group.
![]() HCAP User Groups Must be part of an HCAP user group.
HCAP User Groups Must be part of an HCAP user group.
![]() Day And Time Restrictions Policy applies only at specific dates and times.
Day And Time Restrictions Policy applies only at specific dates and times.
![]() Identity Type Limits clients to those that can be identified in a specific way, such as an NAP statement of health.
Identity Type Limits clients to those that can be identified in a specific way, such as an NAP statement of health.
![]() MS-Service Class Requires the client to have an IP address lease from a specific DHCP scope.
MS-Service Class Requires the client to have an IP address lease from a specific DHCP scope.
![]() Health Policies Client must meet the criteria of a specific health policy.
Health Policies Client must meet the criteria of a specific health policy.
![]() NAP-Capable Computers Specifies whether the computer must or must not be participating in an NAP implementation.
NAP-Capable Computers Specifies whether the computer must or must not be participating in an NAP implementation.
![]() Operating System Enables the policy to apply to specific operating systems and processor architecture (x86, x64, ia64).
Operating System Enables the policy to apply to specific operating systems and processor architecture (x86, x64, ia64).
![]() Policy Expiration Determines when the policy expires.
Policy Expiration Determines when the policy expires.
![]() Access Client IPv4 Address The client’s IPv4 address, not the RADIUS client’s IP address.
Access Client IPv4 Address The client’s IPv4 address, not the RADIUS client’s IP address.
![]() Access Client IPv6 Address The client’s IPv6 address.
Access Client IPv6 Address The client’s IPv6 address.
![]() Authentication Type Authentication method used, which includes CHAP, EAP, MS-CHAP v1, MS-CHAP v2, PAP, PEAP, and Unauthenticated.
Authentication Type Authentication method used, which includes CHAP, EAP, MS-CHAP v1, MS-CHAP v2, PAP, PEAP, and Unauthenticated.
![]() Allowed EAP Types Allowed EAP types, which includes Microsoft: Smart Card or other certificate, Microsoft PEAP, and Microsoft: EAP-MSCHAP v2.
Allowed EAP Types Allowed EAP types, which includes Microsoft: Smart Card or other certificate, Microsoft PEAP, and Microsoft: EAP-MSCHAP v2.
![]() Framed Protocol Policy applies only to clients using the specified framed protocol, such as PPP or SLIP.
Framed Protocol Policy applies only to clients using the specified framed protocol, such as PPP or SLIP.
![]() Service Type Applies when the client uses a particular service type.
Service Type Applies when the client uses a particular service type.
![]() Tunnel Type Applies when the client uses a particular tunnel type.
Tunnel Type Applies when the client uses a particular tunnel type.
![]() Calling Station ID RADIUS calling station ID.
Calling Station ID RADIUS calling station ID.
![]() Client Friendly Name RADIUS client name.
Client Friendly Name RADIUS client name.
![]() Client IPv4 Address RADIUS IPv4 address.
Client IPv4 Address RADIUS IPv4 address.
![]() Client IPv6 Address RADIUS IPv6 address.
Client IPv6 Address RADIUS IPv6 address.
![]() Client Vendor RADIUS client vendor.
Client Vendor RADIUS client vendor.
![]() MS-RAS Vendor RADIUS vendor ID.
MS-RAS Vendor RADIUS vendor ID.
![]() Called Station ID Telephone number of the network access server.
Called Station ID Telephone number of the network access server.
![]() NAS Identifier Network access server name.
NAS Identifier Network access server name.
![]() NAS IPv4 Address Network access server IPv4 address.
NAS IPv4 Address Network access server IPv4 address.
![]() NAS IPv6 Address Network access server IPv6 address.
NAS IPv6 Address Network access server IPv6 address.
![]() NAS Port Type Network access server media type, including ISDN, wireless, VPN, or tunnel.
NAS Port Type Network access server media type, including ISDN, wireless, VPN, or tunnel.
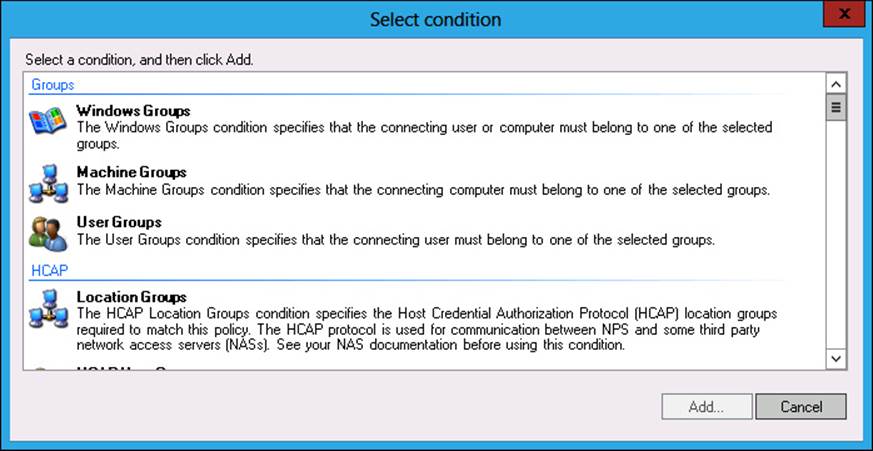
FIGURE 7-26 Selecting conditions
5. On the Specify Access Permission page, choose whether access is granted or blocked to computers or users that meet the specified conditions.
6. On the Configure Authentication Methods page, specify which authentication methods the client can use to authenticate.
7. On the Configure Constraints page, shown in Figure 7-27, you can configure the following properties:
![]() Idle Timeout
Idle Timeout
![]() Session Timeout
Session Timeout
![]() Called Station ID
Called Station ID
![]() Day And Time Restrictions
Day And Time Restrictions
![]() NAS Port Type
NAS Port Type
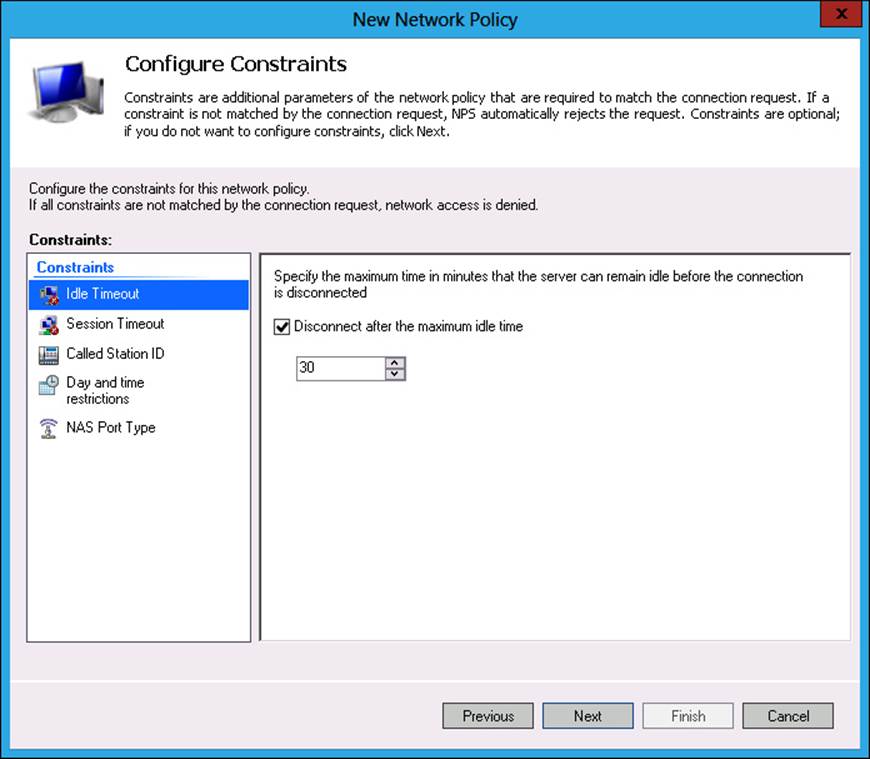
FIGURE 7-27 Configuring constraints
8. On the Configure Settings page of the New Network Policy Wizard, you can configure the following:
![]() RADIUS Attributes
RADIUS Attributes
![]() NAP Enforcement
NAP Enforcement
![]() Multilink and Bandwidth Allocation Protocol
Multilink and Bandwidth Allocation Protocol
![]() IP Filters
IP Filters
![]() Encryption
Encryption
![]() IP Settings
IP Settings
9. Clicking Next enables you to complete the wizard. You can then alter the position of the policy by moving it up and down. Clients use the first policy for which they meet the conditions.
NPS templates
NPS templates, shown in Figure 7-28, enable you to save a specific NPS component configuration so that it can be reused or exported to another server with the NPS role installed. You can apply the template to multiple policies to ensure uniform configuration. You can configure the following templates:
![]() Shared Secrets
Shared Secrets
![]() RADIUS Clients
RADIUS Clients
![]() Remote RADIUS Servers
Remote RADIUS Servers
![]() Health Policies
Health Policies
![]() Remediation Server Groups
Remediation Server Groups
![]() IP Filters
IP Filters

FIGURE 7-28 Network policy IP address settings
To configure a template, click the type of template that you want to configure in the NPS console. Then, from the Action menu, click New. Configure the template in the same way that you would configure the associated properties in a policy. Figure 7-29 shows the creation of an IP filters template.
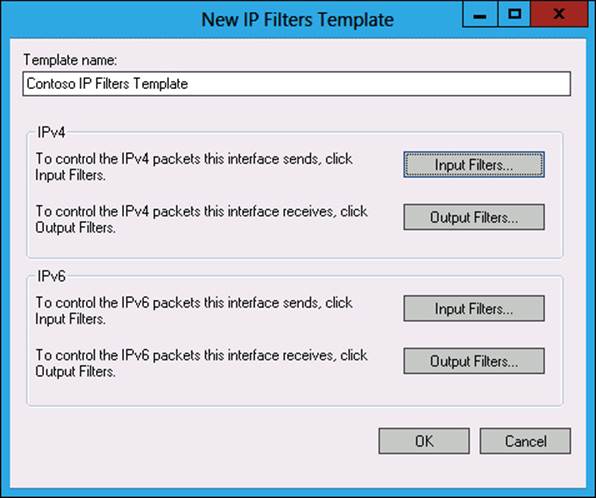
FIGURE 7-29 IP filters template
Lesson summary
![]() Connection request policies enable you to configure how a request for a connection is processed.
Connection request policies enable you to configure how a request for a connection is processed.
![]() IP filters are parts of network policy that enable you to restrict traffic on the basis of a source and destination IP address, as well as on a port and protocol.
IP filters are parts of network policy that enable you to restrict traffic on the basis of a source and destination IP address, as well as on a port and protocol.
![]() Encryption settings are parts of a network policy that determine the minimum level of encryption required.
Encryption settings are parts of a network policy that determine the minimum level of encryption required.
![]() NPS templates enable you to apply settings to multiple policies.
NPS templates enable you to apply settings to multiple policies.
Lesson review
Answer the following questions to test your knowledge of the information in this lesson. You can find the answers to these questions and explanations of why each answer choice is correct or incorrect in the “Answers” section at the end of this chapter.
1. You are configuring a connection request policy for clients that will be connecting to a Virtual Desktop Infrastructure (VDI) deployment on a trusted network from clients on the Internet. Clients should be able to connect using a Remote Desktop connection. Which of the following connection types should you configure when creating a connection request policy?
A. HCAP server
B. Remote access server
C. DHCP server
D. RD Gateway
2. You want to configure a connection request policy to support clients connecting to the internal network from clients on the Internet using the L2TP/IPsec protocol. Which of the following connection types should you use when creating a connection request policy to support this configuration?
A. RD Gateway
B. DHCP server
C. Remote access server
D. HCAP server
3. You want to configure a connection request policy to support integration with Cisco NAC. Which of the following connection types should you use when creating a connection request policy to support this configuration?
A. Remote access server
B. HCAP server
C. DHCP server
D. RD Gateway
4. You want to configure a network policy that applies only at certain times of the week. Which of the following conditions should you use when creating a network policy to meet this goal?
A. Windows Groups
B. Machine Groups
C. User Groups
D. Day And Time Restrictions
5. You want to configure a network policy that applies to certain computers, but not others. Which of the following conditions should you use to accomplish this goal? (Choose all that apply.)
A. Windows Groups
B. User Groups
C. Day And Time Restrictions
D. Machine Groups
Lesson 2: Understanding Network Access Protection enforcement methods
NAP enables you to limit network access to client computers that have met a specific set of health criteria. These health criteria are configurable and can include ensuring that an antimalware checker is installed and running, that Windows Firewall is enabled, and that the computer has recently checked for available software updates. There are five different methods that you can use for NAP enforcement. Some of these methods are appropriate only for specific scenarios, others require special equipment, and some can be implemented without requiring substantial changes to the existing network’s configuration. In this lesson, you’ll learn about the different NAP enforcement methods. In Lesson 3, you’ll learn about the infrastructure required to support NAP.
After this lesson, you will be able to:
![]() Configure DHCP enforcement.
Configure DHCP enforcement.
![]() Configure IPsec enforcement.
Configure IPsec enforcement.
![]() Configure 802.1X enforcement.
Configure 802.1X enforcement.
![]() Configure VPN enforcement.
Configure VPN enforcement.
![]() Configure RD Gateway enforcement.
Configure RD Gateway enforcement.
Estimated lesson time: 45 minutes
DHCP enforcement
When you configure NAP DHCP enforcement, an appropriately configured DHCP server will provide clients with an IP address for a trusted network only if they meet the NAP health policy requirements. If the client does not meet the NAP health policy requirements, the NAP can be configured to provide the client with an address on a remediation network, enabling the client to apply the updates and changes necessary to become compliant.
When you use DHCP enforcement, client health is assessed each time the client attempts to obtain or renew an IP address lease, which means that there is a direct relationship with the length of the DHCP lease and the frequency at which a NAP health check is performed. Organizations that implement long DHCP leases are more likely to have noncompliant clients with valid addresses than organizations that implement shorter DHCP lease times. DHCP enforcement works only with IPv4, and you can’t use DHCP enforcement as a NAP enforcement method on IPv6-only networks.
Real World: Getting around DHCP enforcement
Any user who knows how to manually configure the IP address can get around DHCP enforcement. As generations of users who grew up with computers move into the workplace, basic network configuration knowledge is becoming more widespread.
Deploying NAP by using the DHCP enforcement method requires that you take the following steps:
1. Create a connection request policy and a network policy on the server with the NPS role installed. You can do it manually or by selecting Dynamic Host Configuration Protocol (DHCP) as the Network Connection Method in the Configure NAP Wizard, as shown in Figure 7-30.
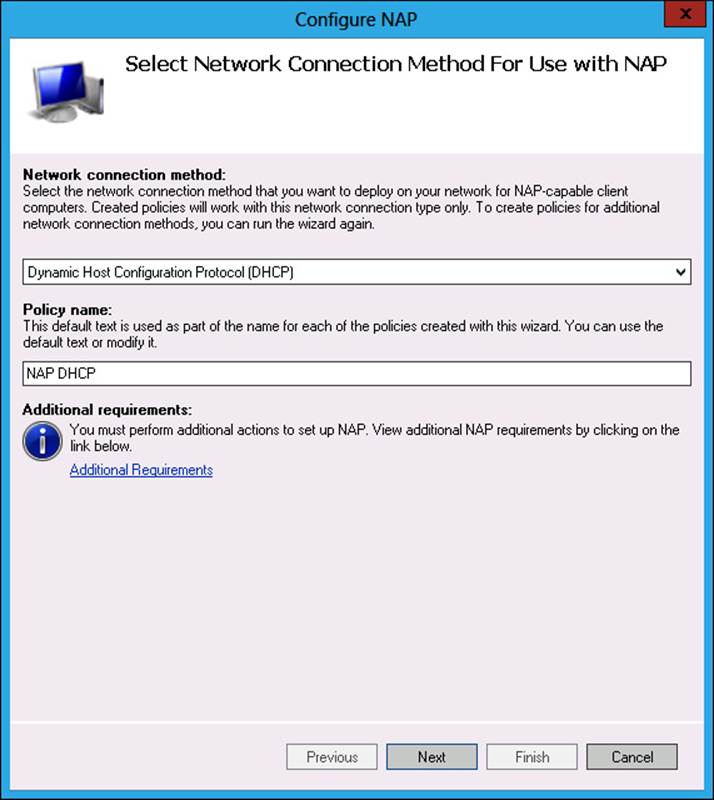
FIGURE 7-30 Configuring the DHCP enforcement method
2. Configure Group Policy to enable the NAP DHCP enforcement client, as shown in Figure 7-31, and the NAP service on computers that will be NAP clients. The DHCP Quarantine Enforcement Client is located on the Computer Configuration\Policies\Windows Settings\Security Settings\Network Access Protection\NAP Client Configuration\Enforcement Clients node.
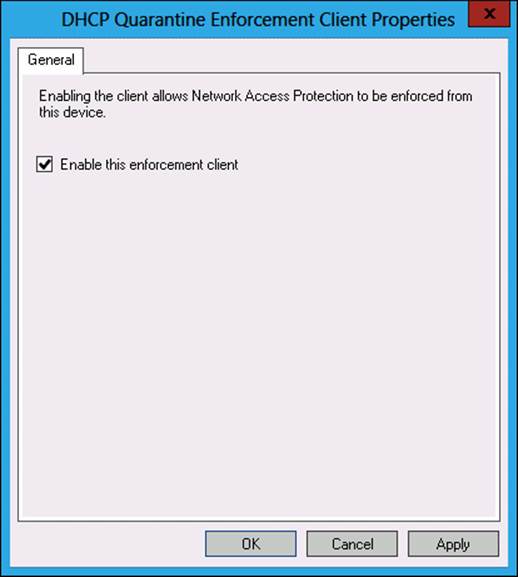
FIGURE 7-31 Enabling DHCP quarantine enforcement client policy
3. Enable NAP, either for individual DHCP scopes or for all DHCP scopes configured on the DHCP server. You can configure the properties at the DHCP server level on the Network Access Protection tab of IPv4 properties, as shown in Figure 7-32. When configuring the DHCP server for NAP, you need to specify what actions to take if the DHCP server can’t reach the server with the NPS role installed. The options are to enable normal access, place clients on a restricted network, or ignore client DHCP requests.

FIGURE 7-32 Enabling NAP for all DHCP scopes
4. Ensure that you configure the appropriate Windows Security Health Validator (WSHV), or System Health Agents (SHAs) and System Health Validators (SHVs). You’ll learn more about these components in Lesson 3.
More Info: DHCP enforcement
For more information about DHCP enforcement, consult the following TechNet article at http://technet.microsoft.com/en-us/library/cc733020.aspx.
IPsec enforcement
IPsec is a technology that enables communication to be authenticated and encrypted. When configured appropriately, any computer that uses IPsec communicates only with other hosts that it can authenticate. You can configure IPsec communication to use trusted digital certificates for authentication.
NAP using IPsec enforcement builds on this process. Instead of the client computer being directly issued a special certificate to be used for IPsec authentication from a CA, the client computer is issued a certificate used for IPsec authentication from a health certificate server. Health certificate servers issue these certificates only if a client can demonstrate that it meets the health requirements configured through NAP. After a client is issued a health certificate, that certificate is available for authentication only as long as the client remains healthy. The NAP client disallows use of the certificate when the client is noncompliant. This method enables clients to have their health status immediately remediated, unlike other NAP methods that apply only initially or on a periodic basis, such as when a DHCP lease needs to be renewed.
To configure NAP with IPsec enforcement, perform the following steps:
1. On the server with the NPS role installed, configure a connection request policy, network policy, and NAP health policy. You can do this manually, or you can select the IPsec With Health Registration Authority (HRA) network connection method in the Configure NAP Wizard, as shown in Figure 7-33.
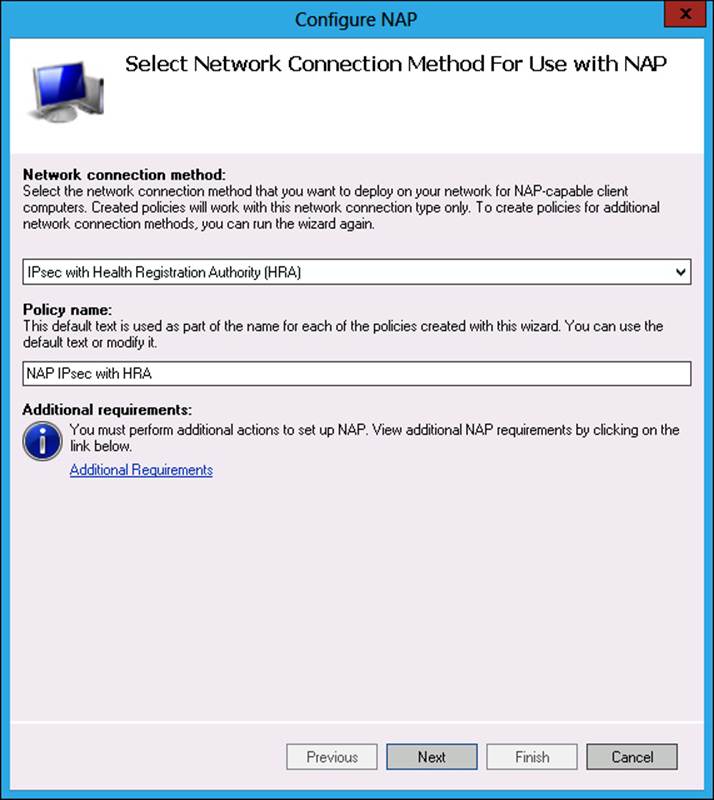
FIGURE 7-33 Configuring NAP with IPsec enforcement
2. Deploy the Health Registration Authority NPS role service. You can deploy it on the server with the NPS role installed.
3. Deploy an enterprise root or subordinate Active Directory Certificate Services (AD CS) server. This enables you to configure custom certificate templates.
More Info: IPsec enforcement
For more information about IPsec enforcement, consult the following TechNet article at http://technet.microsoft.com/en-us/library/cc771899.aspx.
4. Configure the IPsec Relying Party Properties policy, as shown in Figure 7-34, and enable the NAP service on clients. The IPsec Relying Party Properties policy is located in the Computer Configuration\Policies\Windows Settings\Security Settings\Network Access Protection\NAP Client Configuration\Enforcement Clients node.
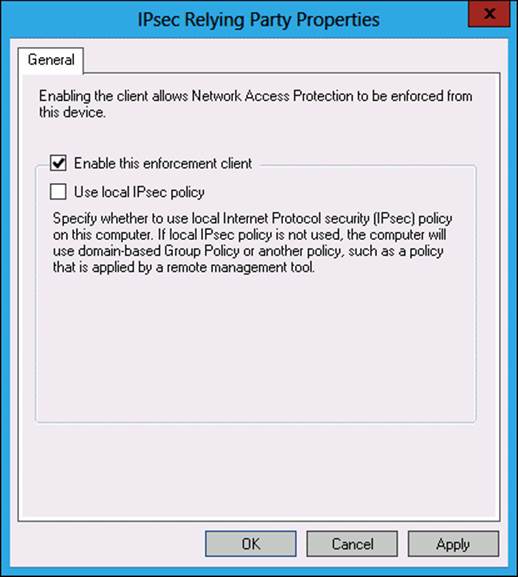
FIGURE 7-34 Configuring NAP with IPsec enforcement
5. Ensure that you configure the appropriate WSHV, or SHAs and SHVs.
![]() Quick check
Quick check
![]() Which NAP enforcement method also helps minimize the chance of intercepted network traffic being read by unauthorized third parties?
Which NAP enforcement method also helps minimize the chance of intercepted network traffic being read by unauthorized third parties?
Quick check answer
![]() The IPsec enforcement method encrypts network traffic, meaning that any captured is enciphered and will be unintelligible to unauthorized third parties attempting to read it.
The IPsec enforcement method encrypts network traffic, meaning that any captured is enciphered and will be unintelligible to unauthorized third parties attempting to read it.
802.1X enforcement
NAP enforcement for 802.1X uses authenticating switches and wireless access points and only grants network access to computers that meet client health requirements. This enforcement method requires switches and wireless access points that can perform 802.1x network authentication. When a computer is compliant, it is placed on the trusted network. When a computer is noncompliant, it is either:
![]() Placed onto a separate VLAN. This VLAN is configured with access to remediation servers.
Placed onto a separate VLAN. This VLAN is configured with access to remediation servers.
OR
![]() Packet filters are applied to the client that limit network access to remediation servers.
Packet filters are applied to the client that limit network access to remediation servers.
With 802.1X enforcement, changes in client health have an immediate effect, with a noncompliant client automatically placed on a restricted network until it returns to a healthy state.
Real World: More expensive equipment
The drawback of 802.1X enforcement is its reliance on hardware that supports forwarding authentication traffic to an NPS server. Many small-sized and medium-sized organizations use consumer networking hardware that does not support this type of advanced feature.
Although you configure 802.1X enforcement for wired and wireless networks separately, both require you to enable the EAP Quarantine Enforcement Client policy shown in Figure 7-35. This policy is located in the Computer Configuration\Policies\Windows Settings\Security Settings\Network Access Protection\NAP Client Configuration\Enforcement Clients node. You also need to ensure that the NAP service is running on all NAP client computers.

FIGURE 7-35 Enable 802.1X enforcement
To configure 802.1X enforcement for wired networks, you need to perform the following steps:
![]() On the server with the NPS role installed, configure a connection request policy, network policy, and NAP health policy. You can do this by configuring each policy separately, or by using the Configure NAP Wizard and selecting the IEEE 802.1X (Wired) network connection method on the Configure NAP Wizard, as shown in Figure 7-36.
On the server with the NPS role installed, configure a connection request policy, network policy, and NAP health policy. You can do this by configuring each policy separately, or by using the Configure NAP Wizard and selecting the IEEE 802.1X (Wired) network connection method on the Configure NAP Wizard, as shown in Figure 7-36.

FIGURE 7-36 Configuring Wired 802.1X enforcement
![]() Configure 802.1X switches to forward authentication traffic to the server with the NPS role installed.
Configure 802.1X switches to forward authentication traffic to the server with the NPS role installed.
![]() If you want to use PEAP-TLS or EAP-TLS with smart cards or certificates for authentication, deploy AD CS.
If you want to use PEAP-TLS or EAP-TLS with smart cards or certificates for authentication, deploy AD CS.
![]() If you want to use PEAP-MS-CHAP v2, you can use a local AD CS deployment or purchase server certificates from a trusted third-party certification authority.
If you want to use PEAP-MS-CHAP v2, you can use a local AD CS deployment or purchase server certificates from a trusted third-party certification authority.
![]() Ensure that you configure appropriate WSHV, or SHA and SHVs.
Ensure that you configure appropriate WSHV, or SHA and SHVs.
To configure 802.1X enforcement for wireless networks, you need to perform the following steps:
![]() On the server with the NPS role installed, configure a connection request policy, network policy, and NAP health policy. You can do this by configuring each policy separately, or by using the Configure NAP Wizard and selecting the IEEE 802.1X (Wireless) network connection method in the Configure NAP Wizard, as shown in Figure 7-37.
On the server with the NPS role installed, configure a connection request policy, network policy, and NAP health policy. You can do this by configuring each policy separately, or by using the Configure NAP Wizard and selecting the IEEE 802.1X (Wireless) network connection method in the Configure NAP Wizard, as shown in Figure 7-37.
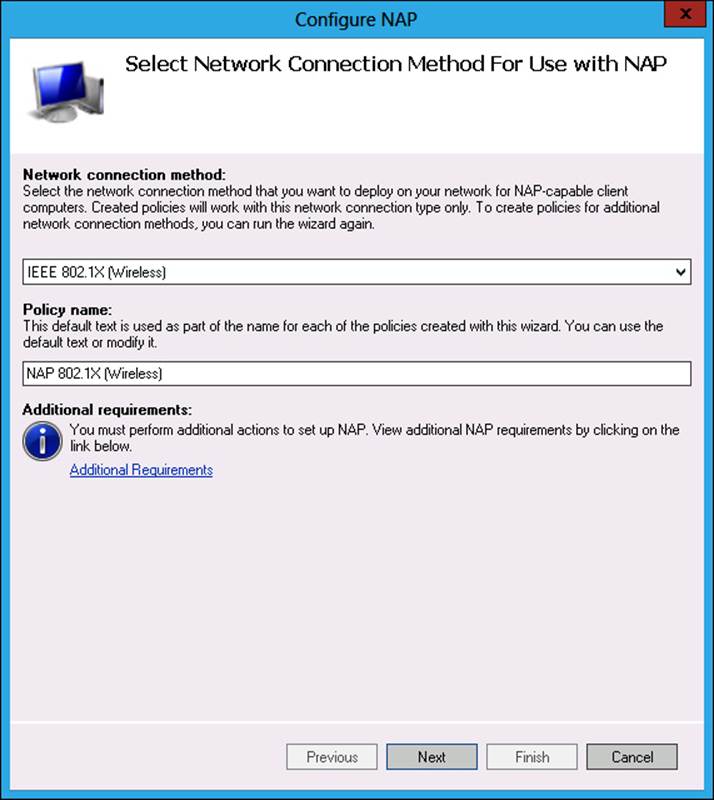
FIGURE 7-37 Configuring Wireless 802.1X enforcement
![]() Configure 802.1X wireless access points to forward authentication traffic to the server with the NPS role installed.
Configure 802.1X wireless access points to forward authentication traffic to the server with the NPS role installed.
![]() Ensure that you configure appropriate WSHV, or SHAs and SHVs.
Ensure that you configure appropriate WSHV, or SHAs and SHVs.
More Info: 802.1X enforcement
For more information about 802.1x enforcement, consult the following TechNet article at http://technet.microsoft.com/en-us/library/cc770861.aspx.
VPN enforcement
VPN enforcement enables you to stop clients that don’t meet your organization’s health requirements from successfully establishing VPN connections. When you configure VPN enforcement, you can simply block incoming connections from unhealthy clients or you can redirect unhealthy clients to a remediation network in which they can return to a healthy state. You can also allow full access for a limited time, after which the noncompliant client is disconnected.
To configure NAP VPN enforcement, perform the following steps:
1. On the server with the NPS role installed, configure a connection request policy, network policy, and NAP health policy. You can do this by configuring each policy separately or by selecting the Virtual Private Network (VPN) network connection method in the Configure NAP Wizard, as shown in Figure 7-38.
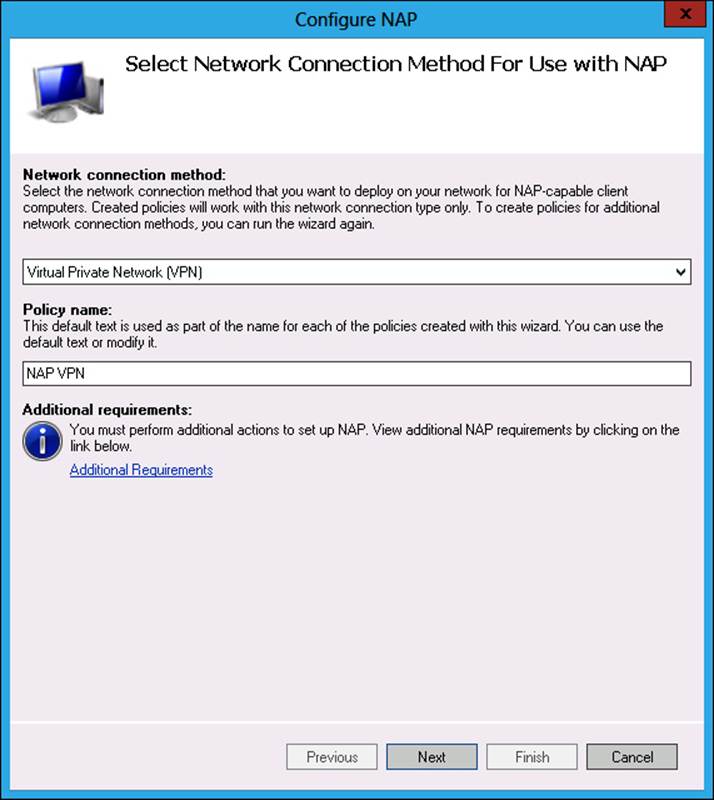
FIGURE 7-38 Configuring NAP VPN enforcement
2. Deploy the remote access role on a computer running Windows Server 2012 or Windows Server 2012 R2. Configure the remote access server as a VPN server and configure the server with the NPS role installed as the primary RADIUS server. It is also possible to use Windows Server 2008 or Windows Server 2008 R2 as a VPN server in this scenario.
3. On computers running Windows 7, Windows 8, and Windows 8.1, you enable the EAP Quarantine Enforcement Client policy when configuring NAP clients. On computers running Windows XP and Windows Vista, you enable the Remote Access Enforcement Client for Windows XP And Windows Vista policy, as shown in Figure 7-39. These policies are located in the Computer Configuration\Policies\Windows Settings\Security Settings\Network Access Protection\NAP Client Configuration\Enforcement Clients node. You also need to ensure that the NAP service is running on all NAP client computers.
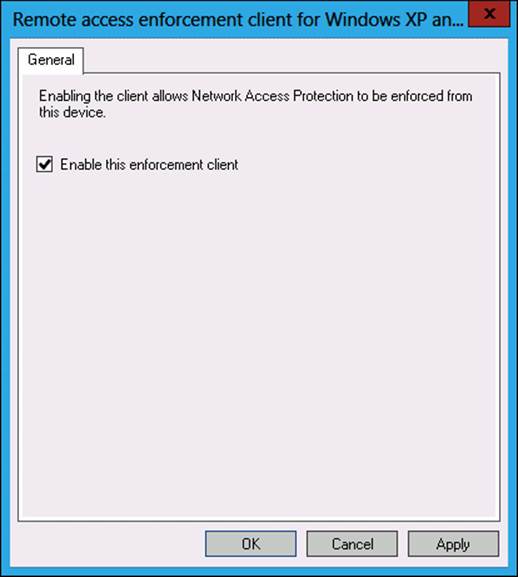
FIGURE 7-39 Configuring VPN enforcement
4. If you want to use PEAP-TLS or EAP-TLS with smart cards or certificates for VPN authentication, deploy AD CS.
5. If you want to use PEAP-MS-CHAP v2 for VPN authentication, you can use a local AD CS deployment or purchase server certificates from a trusted third-party certification authority.
6. Ensure that you configure the appropriate WSHV, or SHAs and SHVs.
Note: VPN enforcement
For more information about VPN enforcement, consult the following TechNet article at http://technet.microsoft.com/en-us/library/cc753622.aspx.
RD Gateway enforcement
RD Gateway servers allow access to Remote Desktop servers on trusted networks to clients on untrusted networks, such as the Internet. Remote Desktop servers can include RD Session Host servers, RD RemoteApp applications, Remote Desktop running on Windows 7, Windows 8, and Windows 8.1 client computers, as well as connections through Remote Desktop Connection Broker to VDI.
RD Gateway servers enable you to provide access to these servers without needing to configure VPN connections or DirectAccess. The Remote Desktop connection client, built into the Windows Client operating system, supports RD Gateway servers. You can configure the Remote Desktop connection client so that it makes a direct connection to a Remote Desktop server when the client is on a protected network and attempts an indirect connection through a configured RD Gateway server when the client is connected to an untrusted network.
Real World: BYOD scenarios
RD Gateway enforcement is useful for organizations that allow Bring Your Own Device (BYOD) scenarios. Instead of allowing users to directly connect to sensitive servers and resources using their own computers, organizations can use an RD Gateway server to enable indirect connections to these resources. By combining an RD Gateway server with NAP, it is possible to ensure that the BYOD clients have met a minimum standard of computer health before successfully connecting to the RD Gateway server.
To configure NAP with RD Gateway enforcement, perform the following steps:
1. On the server with the NPS role installed, configure a connection request policy, network policy, and NAP health policy. You can do this by configuring each policy separately, or by using the Configure NAP Wizard and selecting the Remote Desktop Gateway (RD Gateway) network connection method on the Configure NAP Wizard, as shown in Figure 7-40.

FIGURE 7-40 Configuring RD Gateway policies
2. Deploy an RD Gateway server, which must be accessible to clients on the untrusted network from which connections will be made. It also needs to be connected to the trusted network on which Remote Desktop servers are present.
3. Enable NAP health policy checks on the RD Gateway server. You can do this by adding the RD Gateway Manager snap-in to a custom Microsoft Management Console (MMC) and then configuring options on the RD CAP Store tab of the RD Gateway Server properties, as shown inFigure 7-41.
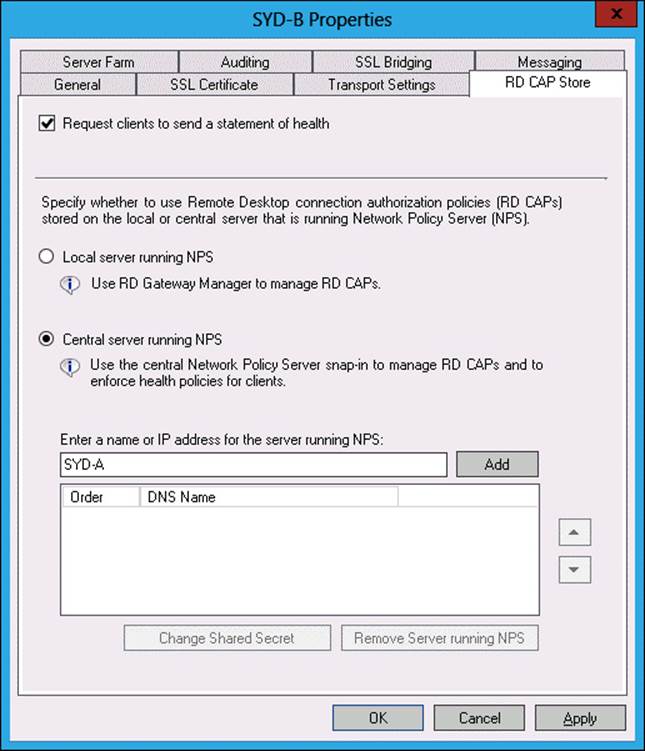
FIGURE 7-41 Configuring RD Gateway to use NAP
4. Enable the RD Gateway Quarantine Enforcement Client Properties policy shown in Figure 7-42. This policy is located in the Computer Configuration\Policies\Windows Settings\Security Settings\Network Access Protection\NAP Client Configuration\Enforcement Clients node. You also need to ensure that the NAP service is running on all NAP client computers.
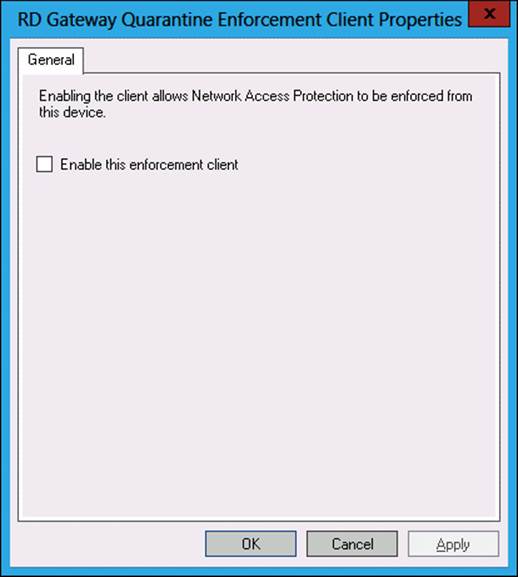
FIGURE 7-42 RD Gateway enforcement client
5. If you want to use PEAP-TLS or EAP-TLS with smart cards or certificates for RD Gateway authentication, deploy AD CS.
6. If you want to use PEAP-MS-CHAP v2 for RD Gateway authentication, you can use a local AD CS deployment or purchase server certificates from a trusted third-party certification authority.
7. Ensure that you configure the appropriate WSHV, or SHAs and SHVs.
More Info: RD Gateway enforcement
For more information about RD Gateway enforcement, consult the following TechNet article at http://technet.microsoft.com/en-us/library/cc771213.aspx.
Lesson summary
![]() NAP enables you to limit network access to clients that are able to demonstrate that they meet configured health criteria.
NAP enables you to limit network access to clients that are able to demonstrate that they meet configured health criteria.
![]() NAP DHCP enforcement restricts the leasing of IPv4 addresses to healthy clients.
NAP DHCP enforcement restricts the leasing of IPv4 addresses to healthy clients.
![]() NAP IPsec enforcement issues the certificates required to communicate in an encrypted and authenticated manner with other hosts on the network, only to healthy clients.
NAP IPsec enforcement issues the certificates required to communicate in an encrypted and authenticated manner with other hosts on the network, only to healthy clients.
![]() NAP 802.1x enforcement uses authenticating switches and wireless access points to limit network connectivity to clients that are deemed healthy.
NAP 802.1x enforcement uses authenticating switches and wireless access points to limit network connectivity to clients that are deemed healthy.
![]() NAP VPN enforcement uses client health to limit VPN connections.
NAP VPN enforcement uses client health to limit VPN connections.
![]() NAP RD Gateway enforcement limits connections through an RD Gateway server to clients that are healthy.
NAP RD Gateway enforcement limits connections through an RD Gateway server to clients that are healthy.
Lesson review
Answer the following questions to test your knowledge of the information in this lesson. You can find the answers to these questions and explanations of why each answer choice is correct or incorrect in the “Answers” section at the end of this chapter.
1. You want to limit connections from the Internet to your organization’s Remote Desktop session host servers to those clients that can demonstrate that they are healthy. Which NAP enforcement method should you implement?
A. IPsec enforcement
B. 802.1X enforcement
C. VPN enforcement
D. RD Gateway enforcement
2. You want to stop laptop computers that are not up to date with software updates and antimalware definitions from connecting to your organization’s wireless access points. Which NAP enforcement method should you implement?
A. 802.1X enforcement
B. DHCP enforcement
C. RD Gateway enforcement
D. VPN enforcement
3. You want to provide IPv4 address leases only to computers that are up to date with software updates and antimalware definitions. Which NAP enforcement method should you implement?
A. VPN enforcement
B. 802.1X enforcement
C. IPsec enforcement
D. DHCP enforcement
4. You want to allow only computers that are up to date with software updates and antimalware definitions to communicate in an authenticated and encrypted manner with secure servers on a trusted internal network. Which NAP enforcement method should you implement?
A. DHCP enforcement
B. IPsec enforcement
C. VPN enforcement
D. RD Gateway enforcement
5. You want to limit remote access connections from hosts on the Internet using LT2P to client computers that are up to date with software updates and antimalware definitions. Which NAP enforcement method should you implement?
A. RD Gateway enforcement
B. 802.1X enforcement
C. VPN enforcement
D. IPsec enforcement
Lesson 3: Understanding Network Access Protection infrastructure
After you have decided on a NAP enforcement method, you need to think about what configuration settings will determine whether a client is deemed healthy or unhealthy. You do this by configuring health validators. In this lesson, you will learn how to configure SHVs and you will learn how to configure health policies and remediation server groups. You will also learn how to configure HRAs that distribute health certificates when using the NAP with the IPsec enforcement method.
After this lesson, you will be able to:
![]() Configure Windows Security Health Validators.
Configure Windows Security Health Validators.
![]() Configure System Health Validators.
Configure System Health Validators.
![]() Configure health policies.
Configure health policies.
![]() Configure Health Registration Authorities.
Configure Health Registration Authorities.
![]() Configure remediation server groups.
Configure remediation server groups.
Estimated lesson time: 45 minutes
Windows Security Health Validator
The WSHV includes a list of settings that you can configure as a benchmark for determining whether a client computer is deemed healthy or unhealthy by the NAP process. A client must meet the requirements of each setting that you enable in the WSHV, shown in Figure 7-43, to be healthy. Not meeting any enabled condition means that the client will be determined to be in an unhealthy state.
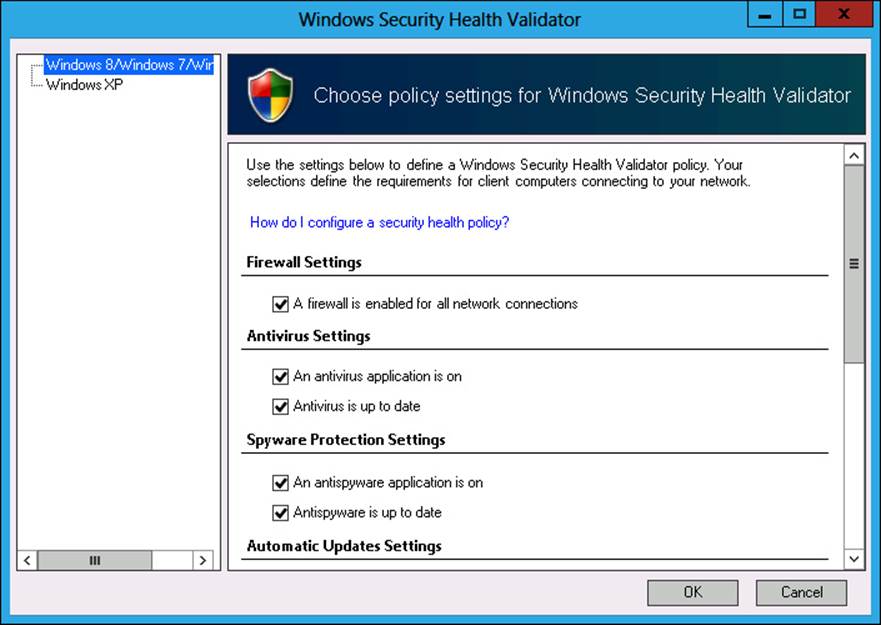
FIGURE 7-43 Configuring WSHV
You can configure the following settings in the WSHV:
![]() A Firewall Is Enabled For All Network Connections Windows Firewall or a third-party firewall recognized by the operating system component known as Action Center is enabled for all network connection types. Although it is possible that a third-party firewall may be present and functioning on the client computer, the firewall is not accounted for by NAP unless that firewall is registered with Action Center.
A Firewall Is Enabled For All Network Connections Windows Firewall or a third-party firewall recognized by the operating system component known as Action Center is enabled for all network connection types. Although it is possible that a third-party firewall may be present and functioning on the client computer, the firewall is not accounted for by NAP unless that firewall is registered with Action Center.
![]() An Antivirus Application Is On An antivirus application registered with Action Center is installed and enabled.
An Antivirus Application Is On An antivirus application registered with Action Center is installed and enabled.
![]() Antivirus Is Up To Date An antivirus application registered with Action Center reports that it has recently performed a successful definition update. If the antivirus application could not update in a period specified by the application vendor, it will report to Action Center that it is not up to date.
Antivirus Is Up To Date An antivirus application registered with Action Center reports that it has recently performed a successful definition update. If the antivirus application could not update in a period specified by the application vendor, it will report to Action Center that it is not up to date.
![]() An Antispyware Application Is On An antispyware application is registered with Action Center and enabled. Some applications function as both antivirus and antispyware and register with Action Center in both these categories.
An Antispyware Application Is On An antispyware application is registered with Action Center and enabled. Some applications function as both antivirus and antispyware and register with Action Center in both these categories.
![]() Antispyware Is Up To Date The antispyware application registered with Action Center has successfully performed a definition update check recently. If the antimalware application could not update in a period specified by the application vendor, it will report to Action Center that it is not up to date.
Antispyware Is Up To Date The antispyware application registered with Action Center has successfully performed a definition update check recently. If the antimalware application could not update in a period specified by the application vendor, it will report to Action Center that it is not up to date.
![]() Automatic Updating Is Enabled Windows Update is enabled on the client computer.
Automatic Updating Is Enabled Windows Update is enabled on the client computer.
![]() Security Updates Settings This collection of settings, shown in Figure 7-44, enables you to go beyond just ensuring that automatic updating is enabled. You can configure the following settings:
Security Updates Settings This collection of settings, shown in Figure 7-44, enables you to go beyond just ensuring that automatic updating is enabled. You can configure the following settings:
![]() Restrict Access For Clients That Do Not Have All Available Security Updates Installed This option restricts access if any available security update is missing from the client computer.
Restrict Access For Clients That Do Not Have All Available Security Updates Installed This option restricts access if any available security update is missing from the client computer.
![]() Specify The Minimum Severity Level Required For Updates Options are Low And Above, Moderate And Above, Important And Above, and Critical Only.
Specify The Minimum Severity Level Required For Updates Options are Low And Above, Moderate And Above, Important And Above, and Critical Only.
![]() Specify The Number Of Hours Allowed Since The Client Has Checked For New Security Updates Enables you to specify a maximum number of hours that can have elapsed since the client last performed an update check.
Specify The Number Of Hours Allowed Since The Client Has Checked For New Security Updates Enables you to specify a maximum number of hours that can have elapsed since the client last performed an update check.
![]() Windows Update Use this option if clients retrieve updates from Windows Update.
Windows Update Use this option if clients retrieve updates from Windows Update.
![]() Windows Server Update Services Configure this option if clients are configured to use a Windows Server Update Services (WSUS) server on the organizational network.
Windows Server Update Services Configure this option if clients are configured to use a Windows Server Update Services (WSUS) server on the organizational network.
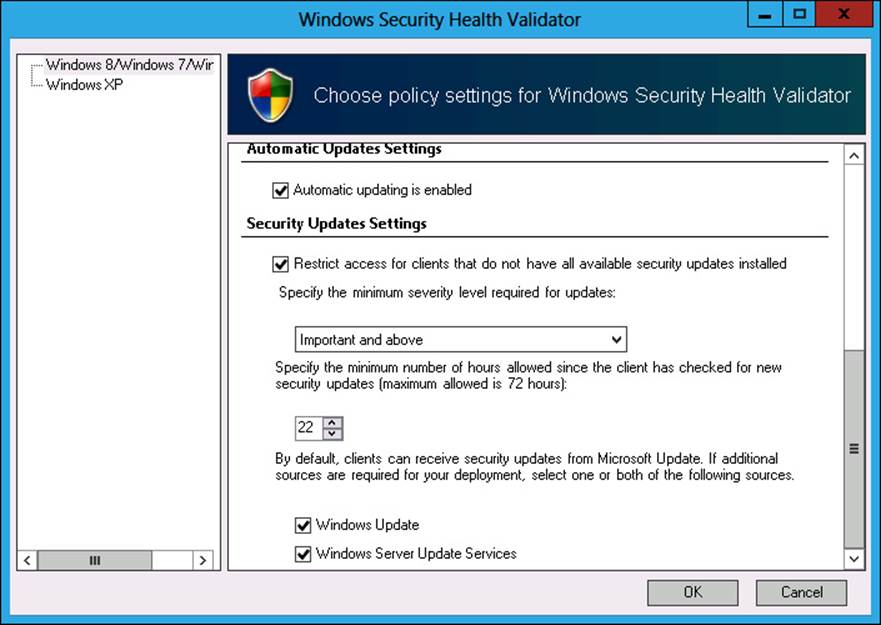
FIGURE 7-44 Windows Security Health Validator dialog box
More Info: WSHVs
For more information about WSHVs, consult the following TechNet document at http://technet.microsoft.com/en-us/library/cc731260.aspx.
System Health Validators and System Health Agents
SHVs and SHAs are client and server components that you can configure to validate the health of a client computer. The SHA resides on the client, and the SHV is located on the server with the NPS role installed. The WSHV is an SHV created by Microsoft.
More Info: SHVs
For more information about SHVs, consult the following TechNet document at http://technet.microsoft.com/en-us/library/cc771201.aspx.
SHVs and corresponding SHAs are also available from third parties that might deal with specific settings in the products made by those third parties. For example, it is possible to get SHVs and SHAs for third-party operating systems so that clients with those operating systems installed can participate in a NAP implementation.
Real World: WSHV
For most NAP deployments, the built-in WSHV will meet organizational needs. You will need to look at third-party SHVs if there are non-Windows Client operating systems used regularly on your network.
Health policies
Health policies must include one or more SHVs. When a properly configured client attempts to connect to a network where NAP is enabled, the client computer will forward a statement of health of the server with the NPS role installed. The server with the NPS role installed compares the statement of health against the health policy and determines whether the client is compliant. You configure health policies on the server with the NPS role installed. Figure 7-45 shows a health policy. You can use any installed SHVs in a health policy.

FIGURE 7-45 A health policy in the WSHV
More Info: Health policies
For more information about health policies, consult the following TechNet article at http://technet.microsoft.com/en-us/library/cc771934.aspx.
When configuring a health policy with multiple SHVs, you can choose whether a client will be deemed healthy if only some, but not all, of the SHV checks are passed. You can configure the following options in a health policy:
![]() Client Passes All SHV Checks
Client Passes All SHV Checks
![]() Client Fails All SHV Checks
Client Fails All SHV Checks
![]() Client Passes One Or More SHV Checks
Client Passes One Or More SHV Checks
![]() Client Fails One Or More SHV Checks
Client Fails One Or More SHV Checks
![]() Client Reported As Transitional By One Or More SHVs
Client Reported As Transitional By One Or More SHVs
![]() Client Reported As Infected By One Or More SHVs
Client Reported As Infected By One Or More SHVs
![]() Client Reported As Unknown By One Or More SHVs
Client Reported As Unknown By One Or More SHVs
A client must pass all conditions in an SHV to pass an SHV check. A failure of any condition in an SHV means that the check for that SHV has failed.
![]() Quick check
Quick check
![]() What is the minimum number of SHVs in a health policy?
What is the minimum number of SHVs in a health policy?
Quick check answer
![]() A health policy requires a minimum of one SHV.
A health policy requires a minimum of one SHV.
Health Registration Authorities
The HRA is an NPS role service that obtains and distributes health certificates from a CA when you deploy NAP with IPsec enforcement. You must configure the HRA to interact with a CA. You can do that when setting up the HRA or by using the Add Certification Authority task in the Actions pane, as shown in Figure 7-46.
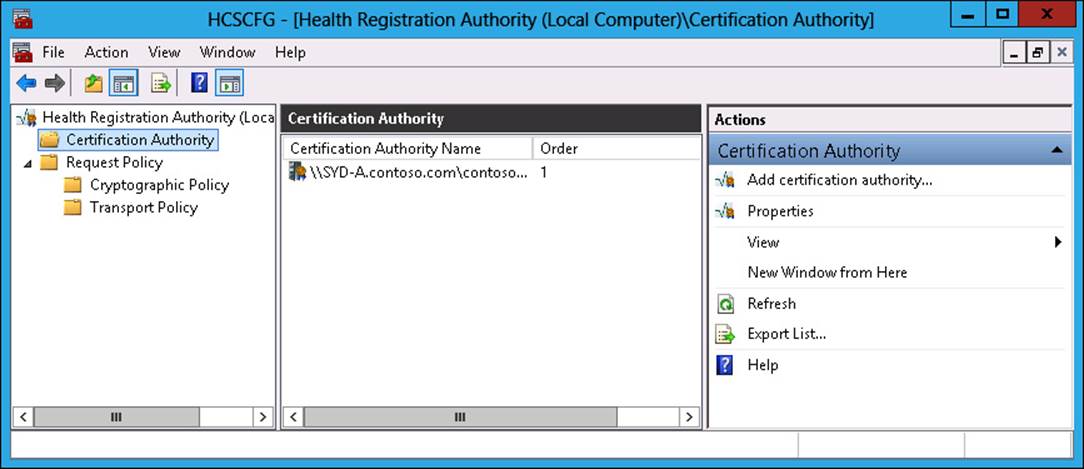
FIGURE 7-46 CA to be used with an HRA
HRA cryptographic policies, shown in Figure 7-47, involve specifying which asymmetric keys algorithms, hash keys algorithms, and cryptographic service providers are accepted by the HRA. By default, an HRA will accept all supported asymmetric key and hash algorithms, and cryptographic service providers supported on Windows Client operating systems, but you can limit support to specific algorithms and cryptographic service providers by editing the properties of the cryptographic policy.
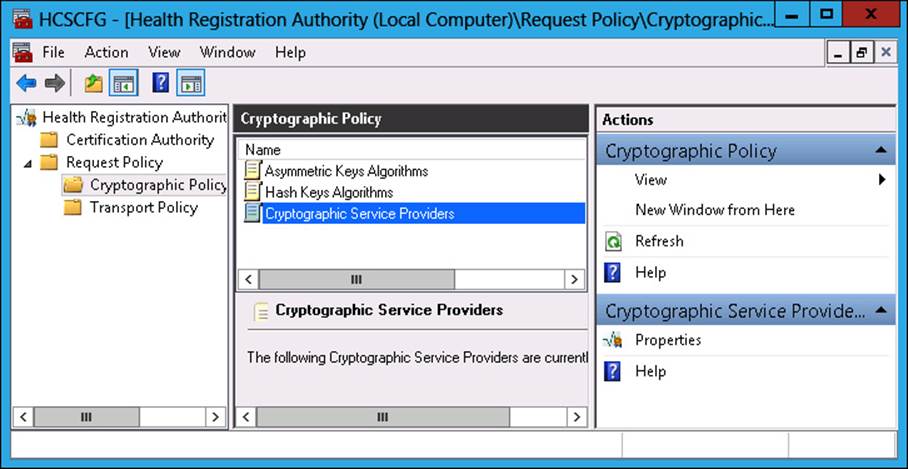
FIGURE 7-47 Cryptographic policies
Configuring a transport policy involves specifying which HTTP user agents can be used with the HRA. As Figure 7-48 shows, by default, any agent can be used with the HRA. You can limit the agent based on the agent string.
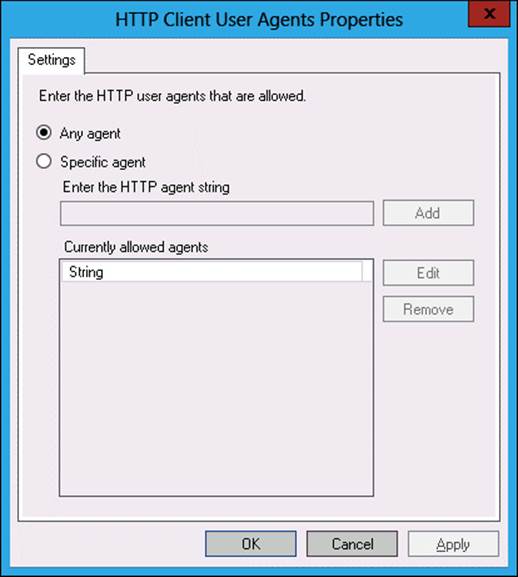
FIGURE 7-48 Transport agent policies.
It is necessary to modify the HRA cryptographic policy or transport policy only in organizations that have stringent security requirements. It is unlikely that you’ll need to perform this action if your organization does not require the strictest level of security.
More Info: HRAs
For more information about HRAs, consult the following TechNet article at http://technet.microsoft.com/en-us/library/cc732365.aspx.
Remediation server groups
A remediation server group is a collection of servers located on a restricted network that host the resources that allow noncompliant clients to reach a state of compliance. For example, a remediation server group may host a WSUS deployment, antivirus and antispyware definitions, and any other software necessary to bring a computer to a compliant state. You configure remediation server groups in the NPS console by clicking the Remediation Server Groups node under Network Access Protection, and clicking New in the Action menu. You then add all servers that will participate in the remediation server group in the New Remediation Server Group dialog box, shown in Figure 7-49.
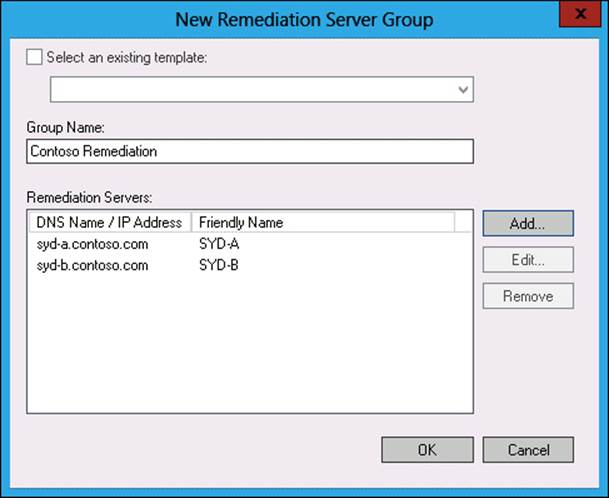
FIGURE 7-49 Remediation server group
More Info: Remediation server groups
For more information about remediation server groups, consult the following TechNet article at http://technet.microsoft.com/en-us/library/cc770646.aspx.
Lesson summary
![]() The WSHV is the built-in SHV available with Windows Server 2012 and Windows Server 2012 R2.
The WSHV is the built-in SHV available with Windows Server 2012 and Windows Server 2012 R2.
![]() SHVs are collections of conditions used to determine client health, such as whether a firewall is enabled.
SHVs are collections of conditions used to determine client health, such as whether a firewall is enabled.
![]() SHAs assess a client to determine compliance with the conditions in the SHV.
SHAs assess a client to determine compliance with the conditions in the SHV.
![]() Health policies determine which SHVs are used to calculate client health in NAP scenarios.
Health policies determine which SHVs are used to calculate client health in NAP scenarios.
![]() HRAs are used to issue health certificates in a NAP IPsec implementation.
HRAs are used to issue health certificates in a NAP IPsec implementation.
![]() Remediation server groups are collections of servers that host services that enable unhealthy clients to return to a healthy state.
Remediation server groups are collections of servers that host services that enable unhealthy clients to return to a healthy state.
Lesson review
Answer the following questions to test your knowledge of the information in this lesson. You can find the answers to these questions and explanations of why each answer choice is correct or incorrect in the “Answers” section at the end of this chapter.
1. Which of the following should you configure if you want clients to be able to return to a healthy state after being found noncompliant by the NAP process?
A. SHV
B. Health policy
C. Remediation server group
D. HRA
2. Which of the following NPS role services must be deployed to issue health certificates when you deploy NAP with IPsec?
A. Health policy
B. Remediation server group
C. SHV
D. HRA
3. In which of the following NAP components do you configure individual items such as whether a firewall is enabled or an antivirus application is installed?
A. SHV
B. HRA
C. Health policy
D. Remediation server group
4. Which of the following do you select as a benchmark for health when configuring a NAP policy?
A. Remediation server group
B. Health policy
C. SHV
D. HRA
Practice exercises
The goal of this section is to provide you with hands-on practice with the following:
![]() Installing the NPS role
Installing the NPS role
![]() Configuring WSHV
Configuring WSHV
![]() Configuring a remediation server group
Configuring a remediation server group
![]() Configuring client policy for DHCP enforcement
Configuring client policy for DHCP enforcement
![]() Configuring NAP DHCP enforcement
Configuring NAP DHCP enforcement
To perform the exercises in this section, you need access to an evaluation version of Windows Server 2012 R2. You should also have access to virtual machines SYD-DC, MEL-DC, CBR-DC, and ADL-DC, the setup instructions for which are described in the Introduction. You should ensure that you have a checkpoint of these virtual machines that you can revert to at the end of the practice exercises. You should revert the virtual machines to this initial state prior to beginning these exercises.
Exercise 1: Installing the DHCP role
In this exercise, you install the DHCP role, which is necessary to support the later implementation of NAP. To complete this exercise, perform the following steps:
1. Ensure that SYD-DC is powered on.
2. Start MEL-DC and sign in using the Administrator account with the password Pa$$w0rd.
3. Open the Windows PowerShell prompt and type the following commands.
Add-Computer -DomainName contoso.com
4. In the Windows PowerShell Credentials dialog box type don_funk@contoso.com and Pa$$w0rd, and click OK.
5. Type the following command in the Windows PowerShell prompt to restart the computer.
Restart-Computer
6. Start ADL-DC and sign in using the Administrator account with the password Pa$$w0rd.
7. Open the Windows PowerShell prompt and type the following commands
Add-Computer -DomainName contoso.com
8. In the Windows PowerShell Credentials dialog box type don_funk@contoso.com and Pa$$w0rd, and click OK.
9. Type the following command in the Windows PowerShell prompt to restart the computer.
Restart-Computer
10. Sign on to MEL-DC with the contoso\don_funk account.
11. On the Manage menu of the Server Manager console, click Add Roles And Features.
12. On the Before You Begin page of the Add Roles and Features Wizard, click Next.
13. On the Installation Type page, click Role-Based Or Feature-Based Installation, and click Next.
14. On the Select Destination Server page, click MEL-DC.contoso.com, and click Next.
15. On the Select Server Roles page, click DHCP Server.
16. In the Add Roles And Features Wizard dialog box that pops up, click Add Features, and click Next.
17. On the Features page, click Next.
18. On the DHCP Server page, click Next.
19. On the Confirmation page, click Install, and then click Close.
20. On the Tools menu, click DHCP.
21. Click MEL-DC.contoso.com, as shown in Figure 7-50.
FIGURE 7-50 DHCP console
22. On the Action menu, click Authorize.
23. Close the DHCP console.
24. Click the notification icon next to the Manage menu, and click Complete DHCP configuration.
25. On the DHCP Post-Install Configuration Wizard dialog box, click Next.
26. On the Authorization page, click Commit.
27. On the Summary page, click Close.
Exercise 2: Deploying the NPS role
In this exercise, you deploy the NPS role on MEL-DC. To complete this exercise, perform the following steps:
1. On MEL-DC, click Add Roles And Features from the Manage menu.
2. On the Before You Begin page of the Add Roles and Features Wizard, click Next.
3. On the Select Installation Type page, click Role-Based Or Feature-Based Installation, and click Next.
4. On the Select Destination Server page, click MEL-DC.contoso.com, and click Next.
5. On the Select Server Roles page, click Network Policy And Access Services.
6. In the Add Roles And Features Wizard dialog box that pops up, click Add Features, and then click Next.
7. On the Select Features page, click Next.
8. On the Network Policy And Access Services page, click Next.
9. On the Role Services page, ensure that Network Policy Server is selected, as shown in Figure 7-51, and click Next.

FIGURE 7-51 Selecting NPS role service
10. On the Confirmation page, click Install, and then click Close.
Exercise 3: Configuring Windows Security Health Validator
In this exercise, you configure the WSHV on the server with the NPS role installed. To complete this exercise, perform the following steps:
1. On MEL-DC, on the Tools menu, click Network Policy Server.
2. Expand Network Access Protection\System Health Validators\Windows Security Health Validator and click Settings, as shown in Figure 7-52.
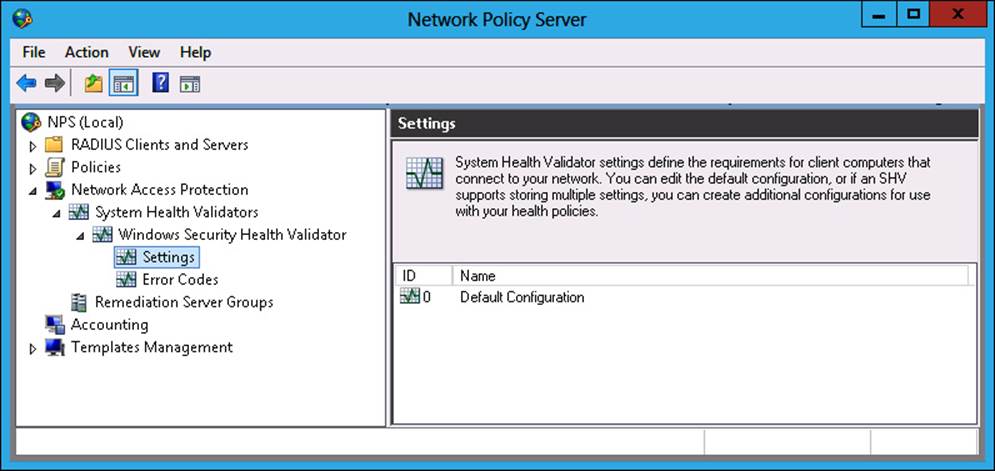
FIGURE 7-52 Selecting WSHV settings
3. Click Default Configuration. On the Action menu, click Properties.
4. In the Windows Security Health Validator dialog box, scroll down and click Restrict Access For Clients That Do Not Have All Available Security Updates Installed, as shown in Figure 7-53. Set the minimum severity level to Critical Only, and click OK.

FIGURE 7-53 Security Updates Settings
Exercise 4: Configuring a remediation server group
In this exercise, you configure remediation server groups. To complete this exercise, perform the following steps:
1. On MEL-DC, in the NPS console, click Remediation Server Groups, as shown in Figure 7-54.
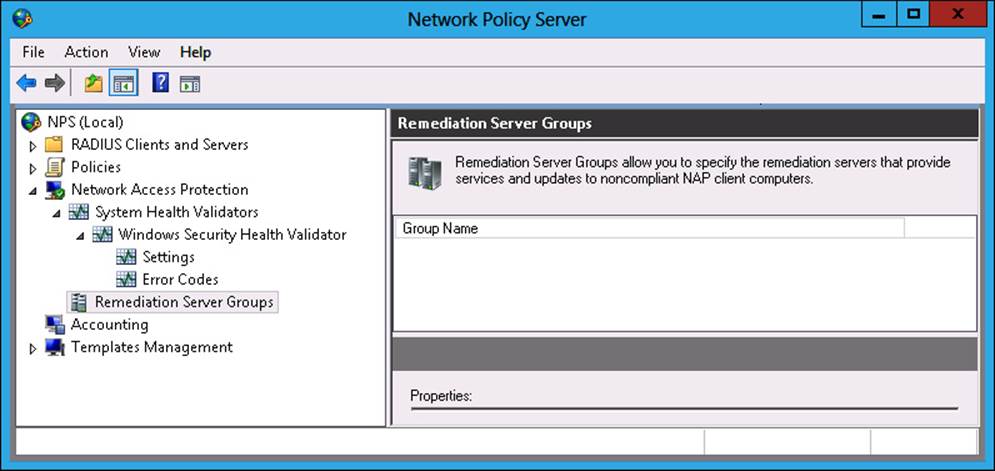
FIGURE 7-54 Remediation server groups
2. On the Action menu, click New.
3. In the New Remediation Server Group dialog box, type Contoso Remediation Group in the Group Name, and click Add.
4. In the Add New Server dialog box, type the friendly name ADL-DC and the DNS name ADL-DC.contoso.com, and then click Resolve. Click OK.
5. Verify that the New Remediation Server Group dialog box matches Figure 7-55, and click OK.
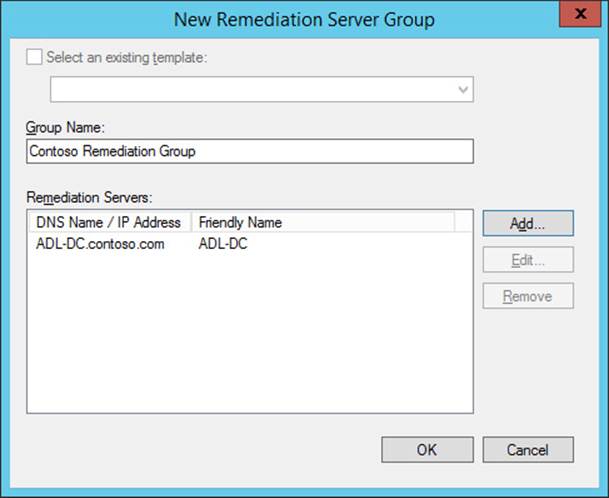
FIGURE 7-55 Remediation server groups
Exercise 5: Configuring client policies for DHCP enforcement
In this exercise, you use the GPMC and the DHCP console, and then configure client policies to support DHCP enforcement. To complete this exercise, perform the following steps:
1. On MEL-DC, right-click the Windows PowerShell icon on the taskbar, right-click Windows PowerShell, and click Run As Administrator. At the User Account Control prompt, click Yes.
2. Execute the following commands.
Install-WindowsFeature GPMC,RSAT-ADDS
3. Close Windows PowerShell.
4. On the Tools menu of Server Manager, click Group Policy Management.
5. In the Group Policy Management Console, expand Forest: Contoso.com\Domains\contoso.com\ and select Group Policy Objects.
6. On the Action menu, click New.
7. On the New GPO dialog box, type DHCP-Enforcement and click OK.
8. In the Group Policy Management Console, right-click the DHCP-Enforcement policy and click Edit.
9. Expand the Computer Configuration\Policies\Windows Settings\Security Settings\Network Access Protection node, and click NAP Client Configuration, as shown in Figure 7-56.
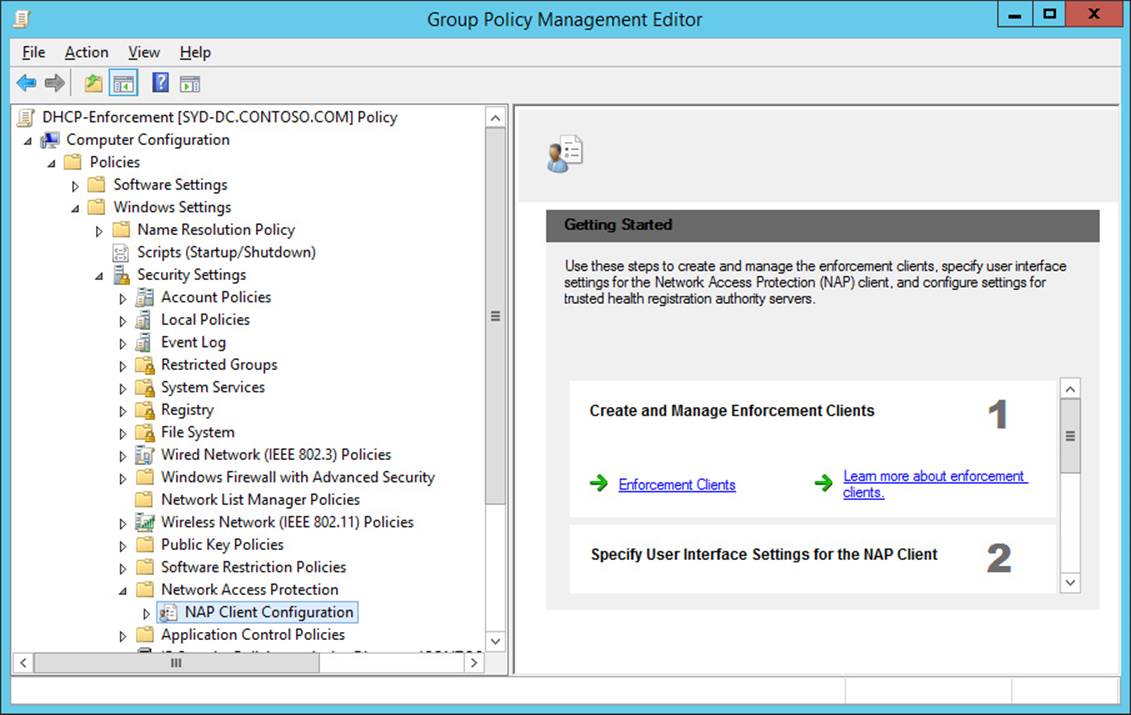
FIGURE 7-56 NAP client configuration
10. Click Enforcement Clients, and then click DHCP Quarantine Enforcement Client.
11. On the Action menu, click Enable.
12. Close the Group Policy Management Editor.
13. Close the GPMC.
14. On the Tools menu of the Server Manager console, click Active Directory Users And Computers.
15. Expand Contoso.com, and click Computers. On the Action menu, click New, and click Group.
16. In the New Object - Group dialog box, type the name NAP-Exempt, as shown in Figure 7-57, and click OK.
FIGURE 7-57 NAP-Exempt group
17. Close Active Directory Users And Computers.
Exercise 6: Configuring NAP DHCP enforcement
In this exercise, you configure NAP DHCP enforcement. To complete this exercise, perform the following steps:
1. In the NPS console on MEL-DC, click NPS (Local), and then click Configure NAP.
2. On the Select Network Connection Method For Use With NAP page, use the drop-down list to select Dynamic Host Configuration Protocol (DHCP), as shown in Figure 7-58, and click Next.

FIGURE 7-58 DHCP NAP policy
3. On the RADIUS Clients page, click Next.
4. On the Specify DHCP Scopes page, click Next.
5. On the Machine Groups page, click Add.
6. In the Select Group dialog box, type NAP-Exempt, click Check Names, and click OK.
7. Verify that the Configure Machine Groups page matches Figure 7-59, and click Next.
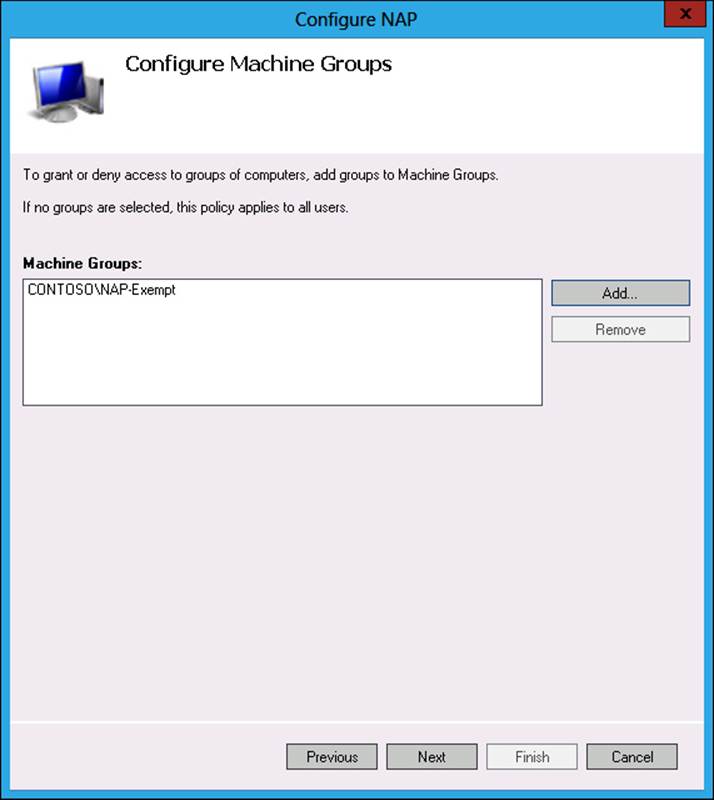
FIGURE 7-59 Configuring machine groups
8. On the Remediation Server Group page, use the drop-down list to select Contoso Remediation Group, as shown in Figure 7-60, and click Next.
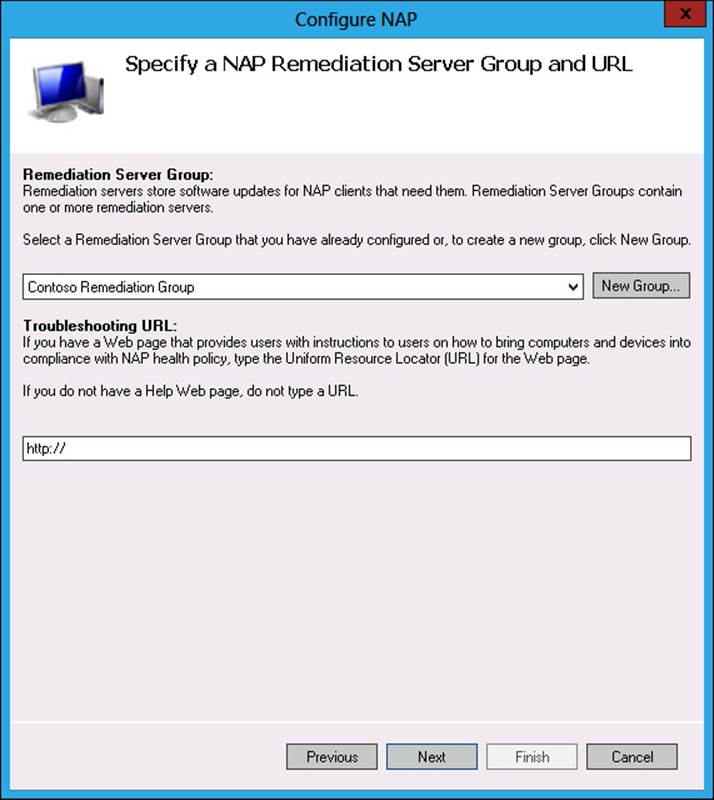
FIGURE 7-60 Remediation server groups
9. On the Define NAP Health Policy page, verify that Windows Security Health Validator is selected, that Auto-Remediation is enabled, and that Deny Full Network Access To NAP-Ineligible Client Computers is selected, as shown in Figure 7-61, and click Next.
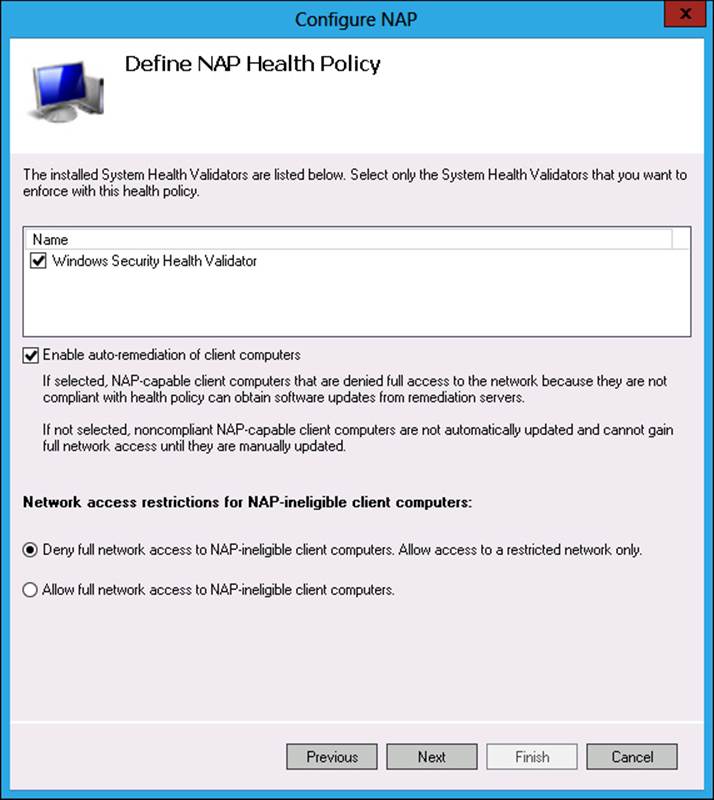
FIGURE 7-61 Defining NAP health policy
10. On the Completing NAP Enforcement Policy And RADIUS Client Configuration page, click Finish.
Suggested practice exercises
The following additional practice exercises are designed to give you more opportunities to practice what you’ve learned and to help you successfully master the lessons presented in this chapter.
![]() Exercise 1 Install an enterprise root CA and a Health Registration Authority
Exercise 1 Install an enterprise root CA and a Health Registration Authority
![]() Exercise 2 Configure NAP with IPsec enforcement
Exercise 2 Configure NAP with IPsec enforcement
![]() Exercise 3 Configure a remediation server group
Exercise 3 Configure a remediation server group
Answers
This section contains the answers to the lesson review questions in this chapter.
Lesson 1
1. Correct answer: D
A. Incorrect. You use the HCAP server connection request type when configuring integration with Cisco NAC.
B. Incorrect. You use the remote access server when configuring connection request policies related to dial-up and VPN services.
C. Incorrect. You use DHCP server when configuring policies to support NAP with DHCP enforcement.
D. Correct. You use the RD Gateway connection type for a connection request policy when you want to allow Remote Desktop Connection connections from untrusted networks.
2. Correct answer: C
A. Incorrect. You use the RD Gateway connection type for a connection request policy when you want to allow Remote Desktop Connection connections from untrusted networks.
B. Incorrect. You use DHCP server when configuring policies to support NAP with DHCP enforcement.
C. Correct. You use the remote access server connection request type when configuring connection request policies related to dial-up and VPN services.
D. Incorrect. You use the HCAP server connection request type when configuring integration with Cisco NAC.
3. Correct answer: B
A. Incorrect. You use the remote access server connection request type when configuring connection request policies related to dial-up and VPN services.
B. Correct. You use the HCAP server connection request type when configuring integration with Cisco NAC.
C. Incorrect. You use DHCP server when configuring policies to support NAP with DHCP enforcement.
D. Incorrect. You use the RD Gateway connection type for a connection request policy when you want to allow Remote Desktop Connection connections from untrusted networks.
4. Correct answer: D
A. Incorrect. Use the Windows Groups condition if you want to configure a network policy that applies to either user or computer accounts that are members of a security group.
B. Incorrect. Use the Machine Groups condition if you want to configure a network policy that applies to computer accounts in a specific group.
C. Incorrect. Use the User Groups condition if you want to configure a network policy that applies to user accounts in a specific group.
D. Correct. Use the Day And Time Restrictions to configure a policy that applies only at certain times of the week.
5. Correct answer: A and D
A. Correct. Use the Windows Groups condition if you want to configure a network policy that applies to either user or computer accounts that are members of a security group.
B. Incorrect. Use the User Groups condition if you want to configure a network policy that applies to user accounts in a specific group.
C. Incorrect. Use the Day And Time Restrictions to configure a policy that applies only at certain times of the week.
D. Correct. Use the Machine Groups condition if you want to configure a network policy that applies to computer accounts in a specific group.
Lesson 2
1. Correct answer: D
A. Incorrect. IPsec enforcement enables healthy clients to communicate with other hosts on the network in an encrypted and authenticated manner.
B. Incorrect. 802.1x enforcement enables the use of authenticating switches and wireless access points to limit network connectivity to clients that are deemed healthy.
C. Incorrect. VPN enforcement limits VPN connections to clients that are healthy.
D. Correct. RD Gateway enforcement limits connections through an RD Gateway server to clients that are healthy.
2. Correct answer: A
A. Correct. 802.1x enforcement allows the use of authenticating switches and wireless access points to limit network connectivity to clients that are deemed healthy.
B. Incorrect. The DHCP enforcement method enables you to restrict the leasing of IPv4 addresses to healthy clients.
C. Incorrect. RD Gateway enforcement limits connections through an RD Gateway server to clients that are healthy.
D. Incorrect. VPN enforcement limits VPN connections to clients that are healthy.
3. Correct answer: D
A. Incorrect. VPN enforcement limits VPN connections to clients that are healthy.
B. Incorrect. 802.1x enforcement allows the use of authenticating switches and wireless access points to limit network connectivity to clients that are deemed healthy.
C. Incorrect. IPsec enforcement enables healthy clients to communicate with other hosts on the network in an encrypted and authenticated manner.
D. Correct. The DHCP enforcement method enables you to restrict the leasing of IPv4 addresses to healthy clients.
4. Correct answer: B
A. Incorrect. The DHCP enforcement method enables you to restrict the leasing of IPv4 addresses to healthy clients.
B. Correct. IPsec enforcement enables healthy clients to communicate with other hosts on the network in an encrypted and authenticated manner.
C. Incorrect. VPN enforcement limits VPN connections to clients that are healthy.
D. Incorrect. RD Gateway enforcement limits connections through an RD Gateway server to clients that are healthy.
5. Correct answer: C
A. Incorrect. RD Gateway enforcement limits connections through an RD Gateway server to clients that are healthy.
B. Incorrect. 802.1x enforcement allows the use of authenticating switches and wireless access points to limit network connectivity to clients that are deemed healthy.
C. Correct. VPN enforcement limits VPN connections to clients that are healthy.
D. Incorrect. IPsec enforcement enables healthy clients to communicate with other hosts on the network in an encrypted and authenticated manner.
Lesson 3
1. Correct answer: C
A. Incorrect. An SHV is a set of specific health conditions, such as whether a firewall is enabled and antimalware software is installed, all of which must be met to pass an SHV check in a health policy.
B. Incorrect. A health policy is a collection of one or more SHVs. Health policy settings determine whether a client is compliant.
C. Correct. A collection of servers that hosts software updates and antimalware definitions that enable noncompliant clients to return to health.
D. Incorrect. An HRA is used in an NAP IPsec enforcement to issue health certificates.
2. Correct answer: B and D
A. Incorrect. A health policy is a collection of one or more SHVs. Health policy settings determine whether a client is compliant.
B. Incorrect. A collection of servers that host software updates and antimalware definitions that enable noncompliant clients to return to health.
C. Incorrect. An SHV is a set of specific health conditions, such as whether a firewall is enabled and antimalware software is installed, all of which must be met to pass an SHV check in a health policy.
D. Correct. An HRA is used in a NAP IPsec enforcement to issue health certificates.
3. Correct answer: A
A. Correct. An SHV is a set of specific health conditions, such as whether a firewall is enabled and antimalware software is installed, all of which must be met to pass an SHV check in a health policy.
B. Incorrect. An HRA is used in a NAP IPsec enforcement to issue health certificates.
C. Incorrect. A health policy is a collection of one or more SHVs. Health policy settings determine whether a client is compliant.
D. Incorrect. A collection of servers that host software updates and antimalware definitions that enable noncompliant clients to return to health.
4. Correct answer: B
A. Incorrect. A collection of servers that host software updates and antimalware definitions that enable noncompliant clients to return to health.
B. Correct. A health policy is a collection of one or more SHVs. Health policy settings determine whether a client is compliant.
C. Incorrect. An SHV is a set of specific health conditions, such as whether a firewall is enabled and antimalware software is installed, all of which must be met to pass an SHV check in a health policy.
D. Incorrect. An HRA is used in a NAP IPsec enforcement to issue health certificates.
All materials on the site are licensed Creative Commons Attribution-Sharealike 3.0 Unported CC BY-SA 3.0 & GNU Free Documentation License (GFDL)
If you are the copyright holder of any material contained on our site and intend to remove it, please contact our site administrator for approval.
© 2016-2026 All site design rights belong to S.Y.A.