Training Guide Administering Windows Server 2012 R2 (2014)
Chapter 8. Administering remote access
In the modern workplace, work rarely stops at the door of the building. Approximately 60 percent of computers used on the networks of modern organizations are laptop and tablet computers instead of traditional desktop computers. People are just as likely to be working from home or a coffee shop as they are from a desk in the office environment. Remote access enables you to grant users on untrusted networks, such as the Internet, access to trusted networks, such as the ones that host your organization’s critical servers. In this chapter, you learn how to configure RADIUS servers, clients, and proxies. You learn how to configure Windows Server 2012 and Windows Server 2012 R2 as a Routing and Remote Access server. You also learn how to configure DirectAccess.
Lessons in this chapter:
![]() Lesson 1: Configuring RADIUS
Lesson 1: Configuring RADIUS
![]() Lesson 2: Configuring VPN and routing
Lesson 2: Configuring VPN and routing
![]() Lesson 3: Configuring DirectAccess
Lesson 3: Configuring DirectAccess
Before you begin
To complete the practice exercises in this chapter:
![]() You need to have deployed computers SYD-DC, MEL-DC, and ADL-DC, as described in the Introduction, using the evaluation edition of Windows Server 2012 R2.
You need to have deployed computers SYD-DC, MEL-DC, and ADL-DC, as described in the Introduction, using the evaluation edition of Windows Server 2012 R2.
Lesson 1: Configuring RADIUS
Remote Authentication Dial-In User Service (RADIUS) is a standard protocol supported by almost all advanced networking devices. It enables you to configure authentication and authorization for network connections, from connections from remote access clients on the Internet, to connections made through authenticating switches and wireless access points. Deploying a RADIUS server on a trusted network enables you to keep remote access servers, such as Virtual Private Network (VPN) servers deployed on the perimeter network, more secure. If you use RADIUS for authentication, the VPN server on the perimeter network doesn’t have to maintain an account database. It simply handles connections, forwarding authentication and authorization traffic to a RADIUS server. If attackers can compromise the VPN server on the perimeter network, they can’t gain access to the account database because it is hosted on a RADIUS server on the protected network. In this lesson, you learn about RADIUS servers, RADIUS proxies, RADIUS clients, and RADIUS accounting.
After this lesson, you will be able to:
![]() Deploy RADIUS servers.
Deploy RADIUS servers.
![]() Manage RADIUS proxies.
Manage RADIUS proxies.
![]() Configure RADIUS clients.
Configure RADIUS clients.
![]() Configure RADIUS accounting.
Configure RADIUS accounting.
Estimated lesson time: 45 minutes
RADIUS servers

A RADIUS server performs authentication, authorization, and accounting for VPN, 802.1x wireless access point and authenticating switches, and dial-up connections. The Network Policy Server (NPS) role is Microsoft’s implementation of a RADIUS server.
You can install the NPS role by performing the following steps:
1. In Server Manager, click Add Roles And Features from the Manage menu.
2. On the Before You Begin page, click Next.
3. On the Select Installation Type page, click Role-Based Or Feature-Based Installation, and click Next.
4. On the Select Destination Server page, select the server on which you want to install the NPS role, and click Next.
5. On the Select Server Roles page, click Network Policy And Access Services, as shown in Figure 8-1.
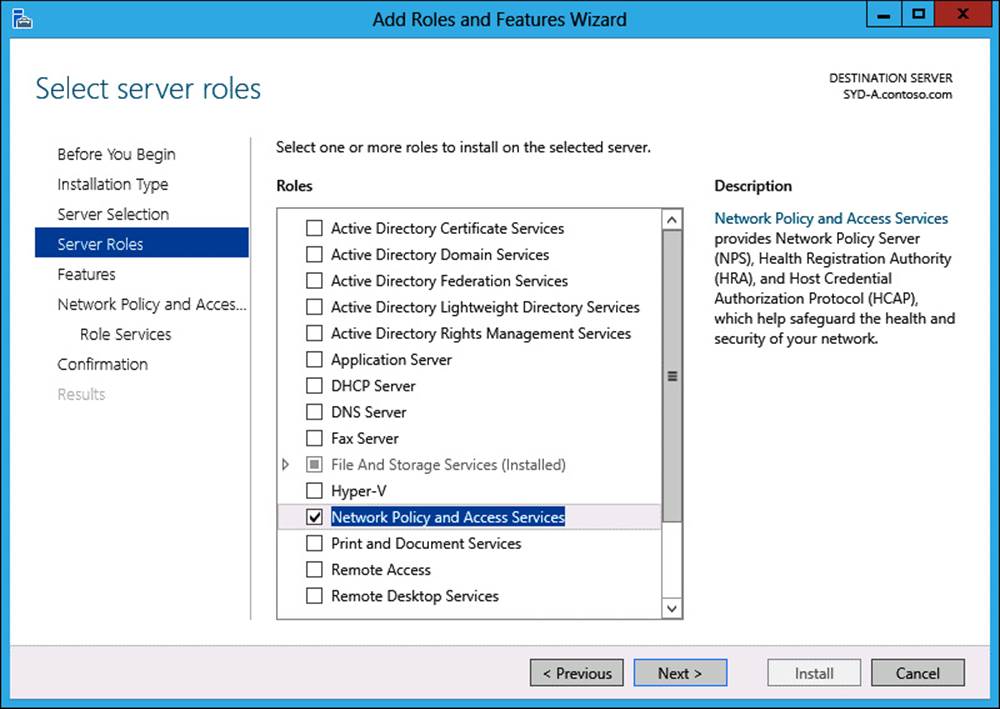
FIGURE 8-1 Installing the NPS role
6. In the Add Roles And Features Wizard dialog box, click Add Features.
7. On the Select Server Roles page, click Next.
8. On the Select Features page, click Next.
9. On the Network Policy And Access Service pace, click Next.
10. On the Select Role Services page, ensure that Network Policy Server is selected, as shown in Figure 8-2, and click Next.
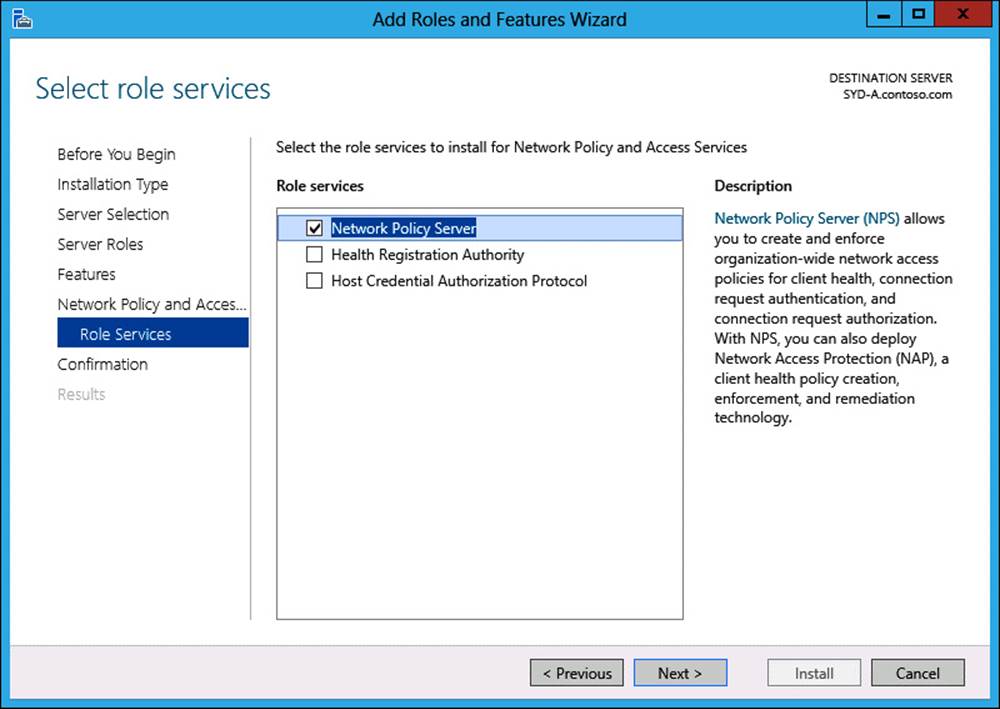
FIGURE 8-2 Installing the NPS role service
11. On the Confirm Installation Selections page, click Install, and then click Close.
Given that NPS is an implementation of the RADIUS protocol, you can use NPS with other third-party products that support the RADIUS protocol, as well as other versions of Microsoft products that support RADIUS. The NPS role’s support for the RADIUS protocol means that you can integrate it with most third-party remote and network access products. Active Directory functions as the user account database when a server with the NPS role installed is a member of an Active Directory Domain Services (AD DS) domain. You configure whether the local server performs RADIUS authentication when creating a connection request policy, or by editing the properties of a connection request policy, as shown in Figure 8-3.
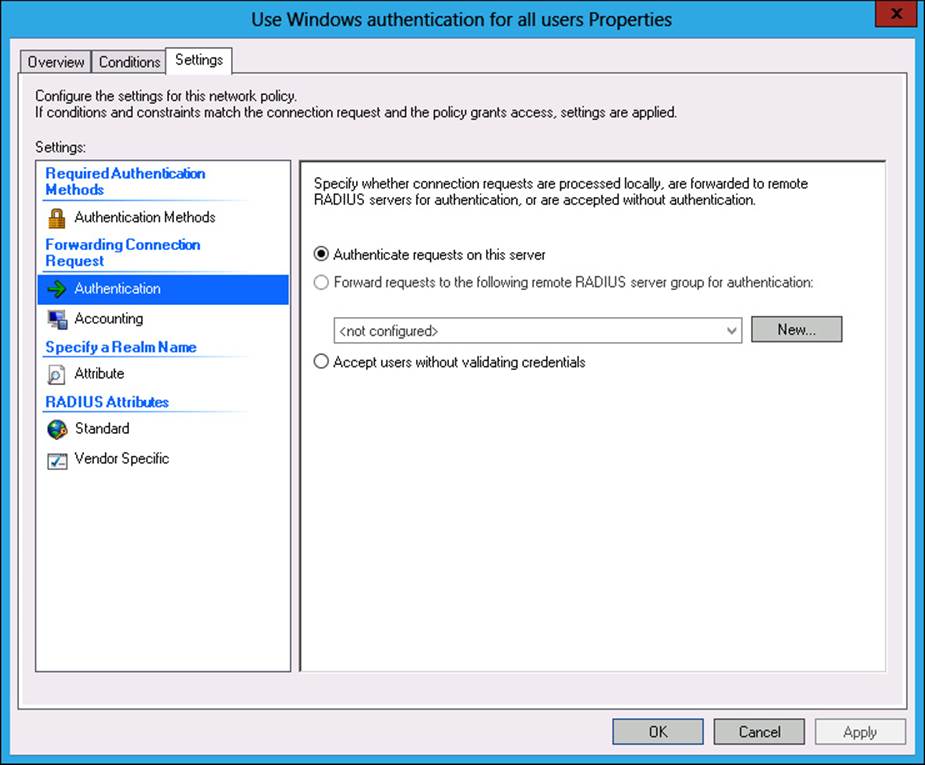
FIGURE 8-3 Configuring authentication
More Info: RADIUS servers
For more information about RADIUS servers, consult the following TechNet article at http://technet.microsoft.com/en-us/library/cc755248.aspx.
RADIUS proxies
A RADIUS proxy forwards traffic from RADIUS clients to other RADIUS servers based upon the properties of the connection request. When you configure a server with the NPS role installed as a RADIUS proxy, information about messages passed on to RADIUS servers from RADIUS clients is recorded in the accounting log. A server configured as a RADIUS proxy functions as a RADIUS client from the perspective of the RADIUS server performing authentication.
You deploy a RADIUS proxy when you need to provide authentication and authorization for users that have accounts in other Active Directory forests. For example, if there are three forests in your organization in which no forest trusts have been configured, but only one VPN server, you can use a RADIUS proxy to forward authentication traffic to RADIUS servers in the other forests. If a forest trust has been configured, you don’t need to use a RADIUS proxy. You can also use a RADIUS proxy when you need authentication to occur against an account database running on a third-party operating system. Figure 8-4 shows a configuration in which requests are forwarded to the CONTOSO RADIUS server group.
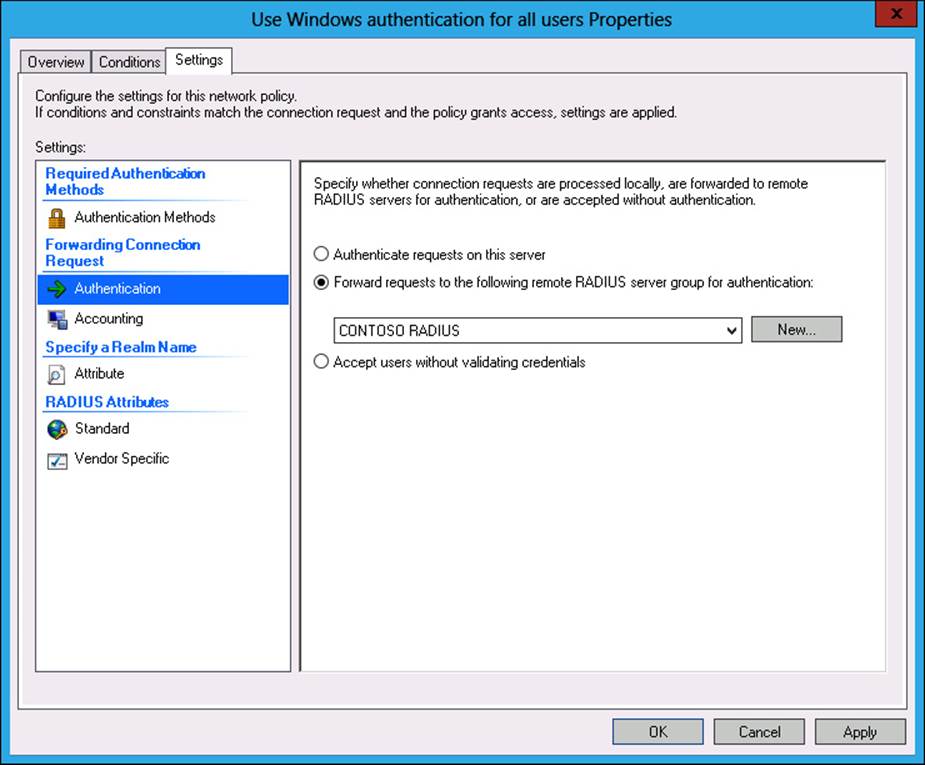
FIGURE 8-4 Configuring NPS to forward RADIUS requests
To configure a server with the NPS role installed to function as a RADIUS proxy, you need to have configured a remote RADIUS server group. You perform this task in the New Remote RADIUS Server Group dialog box, shown in Figure 8-5. A remote RADIUS server group is a collection of RADIUS servers to which a RADIUS proxy can forward authentication traffic. You configure the priority and weight of each server in the group to determine the balance of traffic forwarded from the proxy. Weight is for load balancing allocation and priority is used in high availability situations.
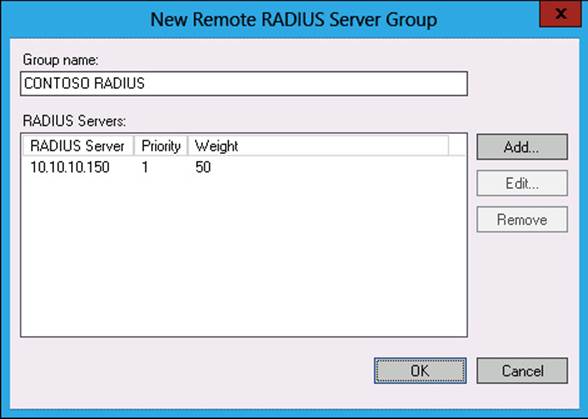
FIGURE 8-5 Remote RADIUS server group
You can add additional servers to the group if the current RADIUS servers can’t cope with the current traffic load. To add a server to the group, perform the following steps:
1. In the New Remote RADIUS Server Group dialog box, click Add.
2. In the Add RADIUS Server dialog box, enter the fully qualified domain name (FQDN) or IP address of the RADIUS server that you want to add to the group, as shown in Figure 8-6, and click Verify.
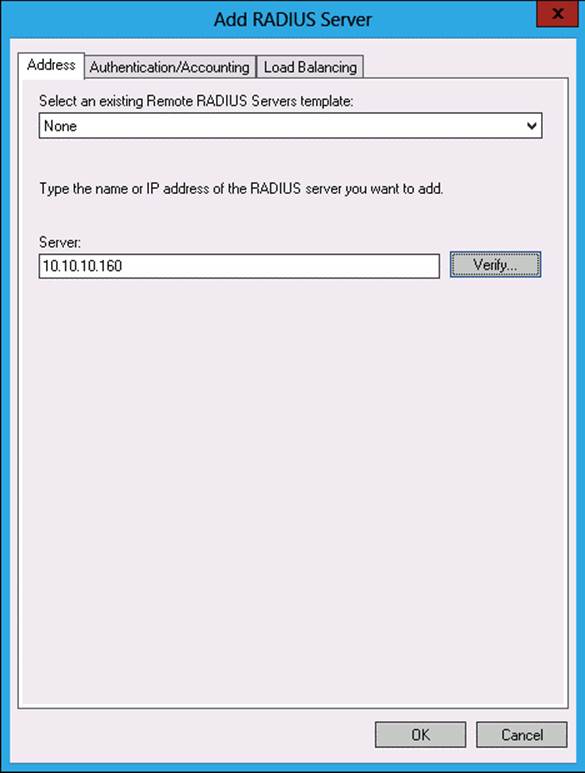
FIGURE 8-6 Adding a server to a remote RADIUS server group
More Info: RADIUS proxies
For more information about RADIUS proxies, consult the following TechNet article at http://technet.microsoft.com/en-us/library/cc731320.aspx.
3. On the Authentication/Accounting tab, you can configure the shared secret between the RADIUS proxy server and the RADIUS server. You can also configure the accounting port and determine whether the same shared secret is used for authentication and accounting, as shown inFigure 8-7.
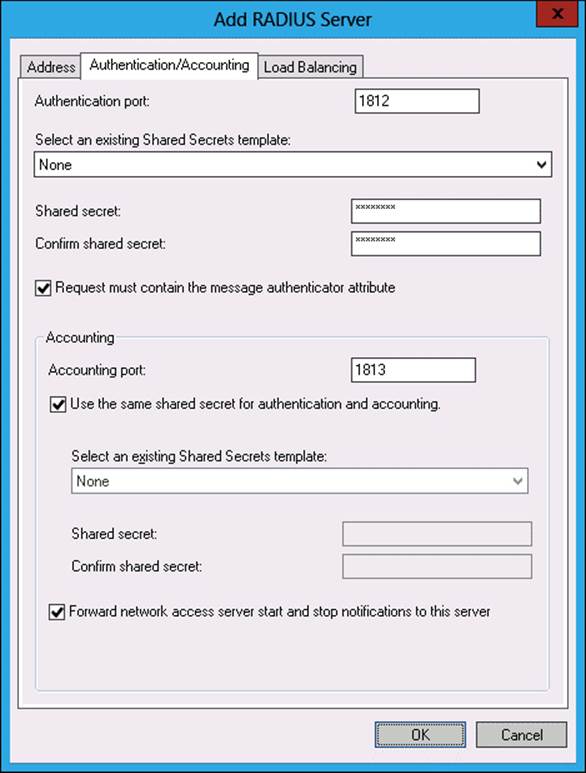
FIGURE 8-7 Configuring RADIUS server authentication and accounting
4. The Load Balancing tab enables you to configure timeout settings for a server. They determine how long the proxy will wait before sending authentication traffic to another RADIUS server in the remote RADIUS server group.
![]() Quick check
Quick check
![]() What is the main difference between a RADIUS server and a RADIUS proxy?
What is the main difference between a RADIUS server and a RADIUS proxy?
Quick check answer
![]() A RADIUS proxy forwards authentication and authorization requests to a RADIUS server. A RADIUS server performs authentication and authorization tasks.
A RADIUS proxy forwards authentication and authorization requests to a RADIUS server. A RADIUS server performs authentication and authorization tasks.
RADIUS clients
When many IT professionals are first introduced to the term RADIUS client, they assume that it is something similar to a laptop computer on the Internet trying to make a remote access connection. A RADIUS client is a device that forwards authentication and authorization traffic to a RADIUS server. A RADIUS client can be one of the following:
![]() Another RADIUS server In this case, the RADIUS server is acting as a proxy. The response from the RADIUS server is forwarded back to the client through the proxy.
Another RADIUS server In this case, the RADIUS server is acting as a proxy. The response from the RADIUS server is forwarded back to the client through the proxy.
![]() A wireless access point that uses 802.1x authentication Rather than have the wireless access point perform authentication and authorization, the wireless access point functions as a RADIUS client and forwards authentication and authorization traffic to the RADIUS server. The response from the RADIUS server determines whether the connection is allowed or denied.
A wireless access point that uses 802.1x authentication Rather than have the wireless access point perform authentication and authorization, the wireless access point functions as a RADIUS client and forwards authentication and authorization traffic to the RADIUS server. The response from the RADIUS server determines whether the connection is allowed or denied.
![]() A switch that uses 802.1x authentication Rather than have the authenticating switch perform authentication and authorization, the authenticating switch functions as a RADIUS client and forwards authentication and authorization traffic to the RADIUS server. The response from the RADIUS server determines whether the connection is allowed or denied.
A switch that uses 802.1x authentication Rather than have the authenticating switch perform authentication and authorization, the authenticating switch functions as a RADIUS client and forwards authentication and authorization traffic to the RADIUS server. The response from the RADIUS server determines whether the connection is allowed or denied.
![]() A VPN server The VPN server handles the setup of the VPN connection. The authentication and authorization is handled by another server. The response from the RADIUS server determines whether the connection is allowed or denied. This configuration is more secure because the account database is not hosted on the VPN server. If the VPN server is on a perimeter network, you configure a firewall to allow RADIUS authentication and authorization traffic between the VPN server and the RADIUS server on the protected network.
A VPN server The VPN server handles the setup of the VPN connection. The authentication and authorization is handled by another server. The response from the RADIUS server determines whether the connection is allowed or denied. This configuration is more secure because the account database is not hosted on the VPN server. If the VPN server is on a perimeter network, you configure a firewall to allow RADIUS authentication and authorization traffic between the VPN server and the RADIUS server on the protected network.
![]() A dial-up server Although dial-up is less likely to be used today, especially because few recent models of laptops ship with modems that use a phone line to make a connection, dial-up servers can function as RADIUS clients. In this configuration, they forward authentication and authorization traffic to a RADIUS server and then allow or deny the connection based on the response.
A dial-up server Although dial-up is less likely to be used today, especially because few recent models of laptops ship with modems that use a phone line to make a connection, dial-up servers can function as RADIUS clients. In this configuration, they forward authentication and authorization traffic to a RADIUS server and then allow or deny the connection based on the response.
To configure NPS to interact with a RADIUS client, perform the following steps:
1. In the NPS console, click RADIUS Clients under RADIUS Clients And Servers, as shown in Figure 8-8.
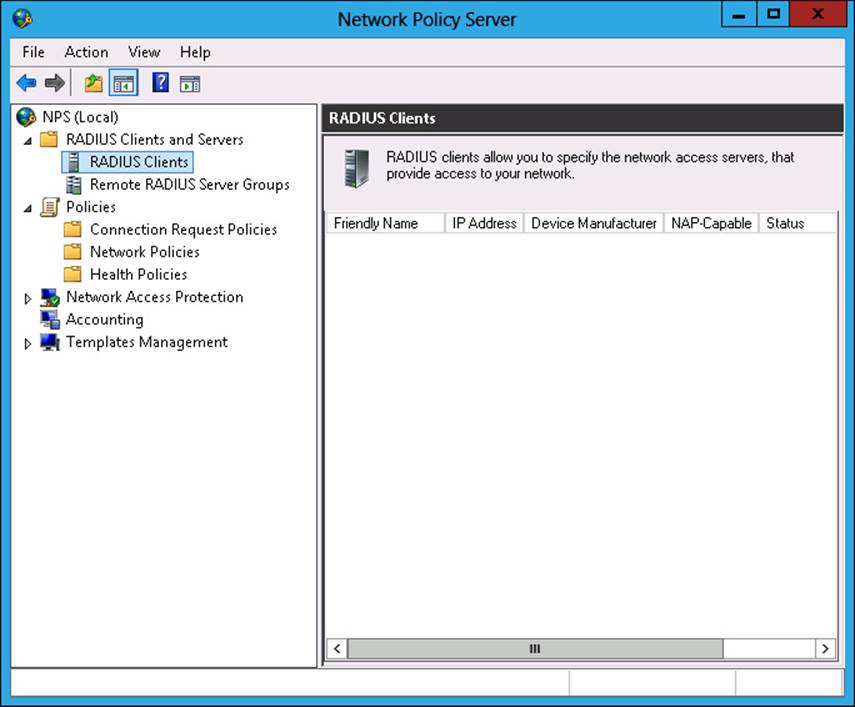
FIGURE 8-8 RADIUS clients node
2. On the Action menu, click New.
3. In the New RADIUS Client dialog box, shown in Figure 8-9, provide the following details:
![]() Friendly Name This option enables you to enter a name that reminds you of the client’s function.
Friendly Name This option enables you to enter a name that reminds you of the client’s function.
![]() Address (IP Or DNS) Provides the IP address or FQDN of the RADIUS client.
Address (IP Or DNS) Provides the IP address or FQDN of the RADIUS client.
![]() Shared Secret You can choose a preconfigured shared secret template or configure a shared secret manually. A shared secret enables the RADIUS client and the RADIUS server to verify each other’s identity.
Shared Secret You can choose a preconfigured shared secret template or configure a shared secret manually. A shared secret enables the RADIUS client and the RADIUS server to verify each other’s identity.
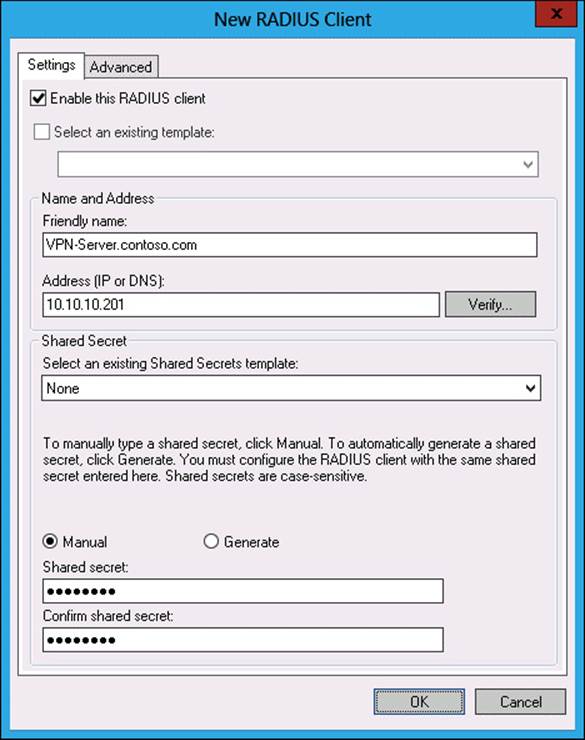
FIGURE 8-9 Configuring RADIUS client basic settings
4. On the Advanced tab of the New RADIUS Client dialog box, shown in Figure 8-10, you can configure a RADIUS client vendor from a list of 23. You can also specify whether the RADIUS client is NAP-capable and configure RADIUS attribute requirements.
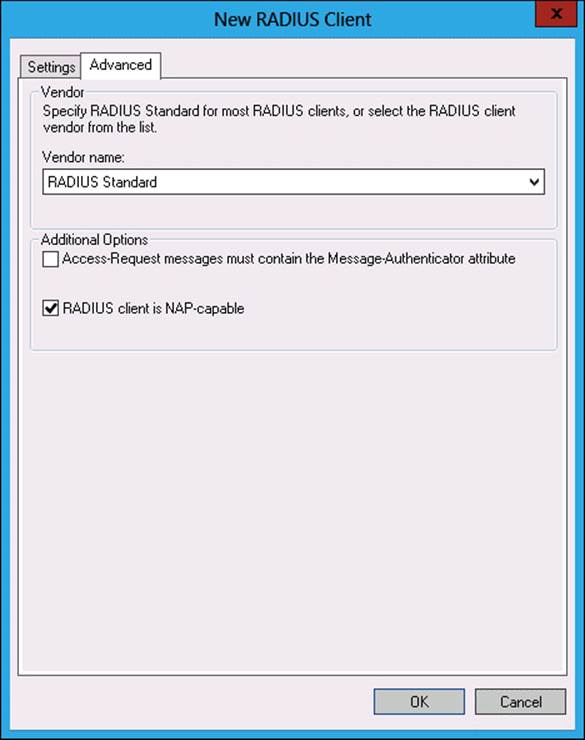
FIGURE 8-10 RADIUS client advanced settings
Note: RADIUS clients
For more information about RADIUS clients, consult the following TechNet article at http://technet.microsoft.com/en-us/library/cc754033.aspx.
RADIUS accounting
RADIUS accounting is a function that you can configure on a server that hosts the NPS role that enables you to record successful and failed connection attempts through devices that participate in your organization’s RADIUS infrastructure. You can use the RADIUS accounting function available in NPS to record the following information:
![]() User authentication requests
User authentication requests
![]() Access-Accept messages
Access-Accept messages
![]() Access-Reject messages
Access-Reject messages
![]() Accounting requests and responses
Accounting requests and responses
![]() Periodic status updates
Periodic status updates
You can configure RADIUS accounting on a server with the NPS role installed in one of the following three ways:
![]() Event logging This method is the least sophisticated. You use this method to audit and troubleshoot connection attempts. The events are written to the event log.
Event logging This method is the least sophisticated. You use this method to audit and troubleshoot connection attempts. The events are written to the event log.
![]() Logging user authentication and accounting requests to a local file Enables logs to be written in Internet Authentication Service (IAS) and database-compatible format. This method writes data to a flat file that can be viewed with a text file editor or a tool such as Microsoft LogParser. This type of logging is appropriate when there are only a small number of remote access clients.
Logging user authentication and accounting requests to a local file Enables logs to be written in Internet Authentication Service (IAS) and database-compatible format. This method writes data to a flat file that can be viewed with a text file editor or a tool such as Microsoft LogParser. This type of logging is appropriate when there are only a small number of remote access clients.
![]() Logging user authentication and accounting requests to a Microsoft SQL Server XML-compliant database Logging to an SQL Server database has the advantage of enabling multiple servers with the NPS role installed to write accounting data to a single location. Because the data is stored on a SQL Server instance, it can be queried using Microsoft SQL Server syntax. In large environments in which RADIUS accounting data needs to be regularly examined, administrators can write a web application to query and extract data from this database.
Logging user authentication and accounting requests to a Microsoft SQL Server XML-compliant database Logging to an SQL Server database has the advantage of enabling multiple servers with the NPS role installed to write accounting data to a single location. Because the data is stored on a SQL Server instance, it can be queried using Microsoft SQL Server syntax. In large environments in which RADIUS accounting data needs to be regularly examined, administrators can write a web application to query and extract data from this database.
To configure RADIUS accounting on a server with the NPS role installed, perform the following steps:
1. Select the Accounting node in the NPS console, as shown in Figure 8-11.
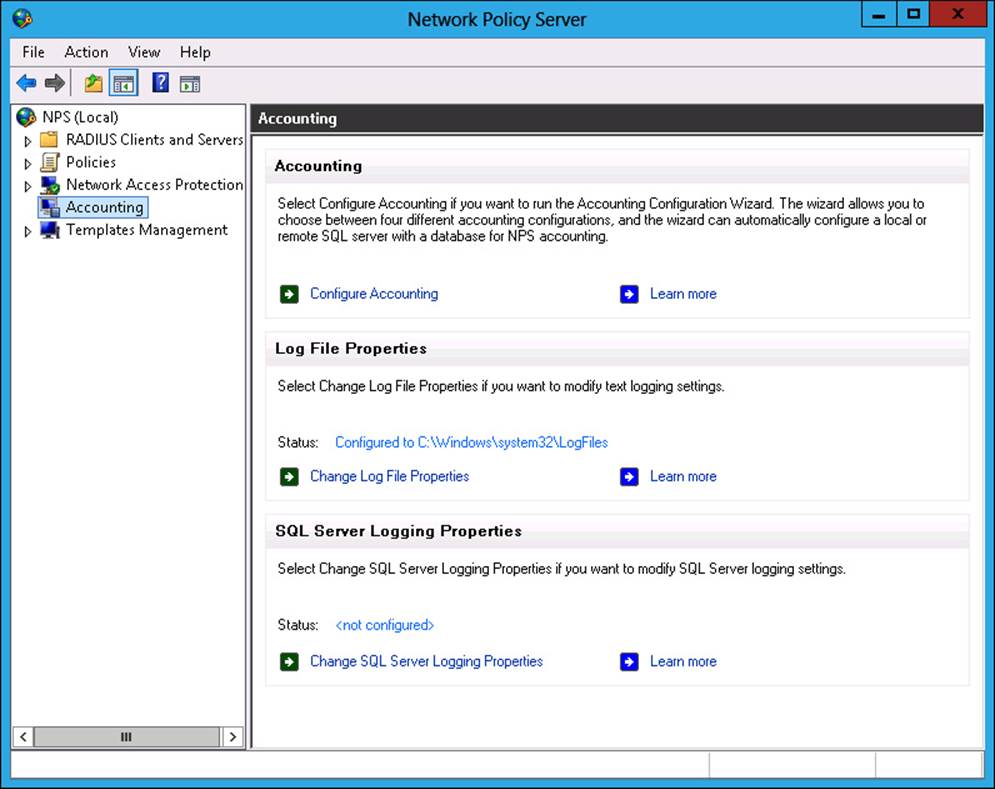
FIGURE 8-11 Accounting node of the NPS console
2. Click Configure Accounting. On the Introduction page of the Accounting Configuration Wizard, click Next.
3. On the Select Accounting Options page, shown in Figure 8-12, select one of the following options, and click Next.
![]() Log To A SQL Server Database Choose this option if you only want to use SQL Server for logging.
Log To A SQL Server Database Choose this option if you only want to use SQL Server for logging.
![]() Log To A Text File On The Local Computer Choose this option if you want to use only a local text file to store RADIUS accounting logs.
Log To A Text File On The Local Computer Choose this option if you want to use only a local text file to store RADIUS accounting logs.
![]() Simultaneously Log To A SQL Server Database And A Local Text File Choose this option if you want to use both the local text file and a SQL Server instance to record RADIUS accounting data.
Simultaneously Log To A SQL Server Database And A Local Text File Choose this option if you want to use both the local text file and a SQL Server instance to record RADIUS accounting data.
![]() Log To A SQL Server Database Using Text File Logging For Failover Use this option if you want a SQL Server database to be used for logging and a text file to be used only when logs can’t be written to the SQL Server instance.
Log To A SQL Server Database Using Text File Logging For Failover Use this option if you want a SQL Server database to be used for logging and a text file to be used only when logs can’t be written to the SQL Server instance.
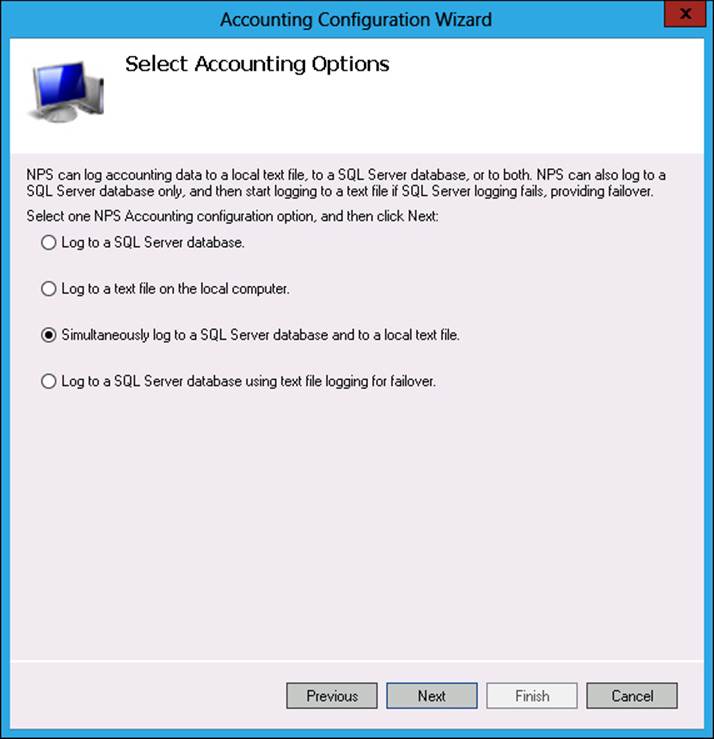
FIGURE 8-12 Accounting options
4. When configuring SQL logging, specify the information that you want logged, as shown in Figure 8-13. You can configure NPS to log the following RADIUS accounting data:
![]() Accounting Requests
Accounting Requests
![]() Authentication Requests
Authentication Requests
![]() Periodic Accounting Status
Periodic Accounting Status
![]() Periodic Authentication Status
Periodic Authentication Status
![]() Logging Failure Action
Logging Failure Action

FIGURE 8-13 SQL Server logging options
5. Click Finish to complete the Accounting Configuration Wizard.
When configuring logging, you can enable an option that will block connection requests if logging fails. When considering whether to implement this option, you should balance the inconvenience of disallowing network access, which could be substantial if you have deployed NAP, against the security impact of having connections that would otherwise be authenticated and authorized being denied because a log entry cannot be written.
Note: RADIUS accounting
For more information about RADIUS accounting, consult the following TechNet article at http://technet.microsoft.com/en-us/library/cc725566.aspx.
Lesson summary
![]() NPS is the role that enables Windows Server 2012 and Windows Server 2012 R2 to function as a RADIUS server.
NPS is the role that enables Windows Server 2012 and Windows Server 2012 R2 to function as a RADIUS server.
![]() A RADIUS server performs authentication and authorization for traffic forwarded to it from a RADIUS client.
A RADIUS server performs authentication and authorization for traffic forwarded to it from a RADIUS client.
![]() A RADIUS proxy forwards traffic from RADIUS clients to RADIUS servers. A RADIUS proxy can forward traffic to different RADIUS servers based on the properties of the traffic.
A RADIUS proxy forwards traffic from RADIUS clients to RADIUS servers. A RADIUS proxy can forward traffic to different RADIUS servers based on the properties of the traffic.
![]() A RADIUS client is a device that sends authentication and authorization traffic to a RADIUS server. A VPN server can be a RADIUS client.
A RADIUS client is a device that sends authentication and authorization traffic to a RADIUS server. A VPN server can be a RADIUS client.
![]() RADIUS accounting records authorization request data. RADIUS accounting data can be written to the event log, to a local log file, or to an SQL Server database.
RADIUS accounting records authorization request data. RADIUS accounting data can be written to the event log, to a local log file, or to an SQL Server database.
Lesson review
Answer the following questions to test your knowledge of the information in this lesson. You can find the answers to these questions and explanations of why each answer choice is correct or incorrect in the “Answers” section at the end of this chapter.
1. Your organization has three Active Directory forests that don’t have a trust relationship. You have a single VPN server that handles all incoming VPN connections. This VPN server is a dedicated hardware device deployed on the perimeter network. You want to configure the deployment so that authentication and authorization traffic is forwarded to existing RADIUS servers in each forest based on the connecting user’s account properties. Which of the following must you deploy to accomplish this goal?
A. RADIUS server
B. RADIUS proxy
C. RADIUS client
D. RADIUS accounting
2. You want to deploy a server on your organization’s internal network that will respond to authentication and authorization requests from a dedicated hardware device that functions as a VPN server that is deployed on your organization’s perimeter network. Which of the following must you deploy to accomplish this goal?
A. RADIUS accounting
B. RADIUS server
C. RADIUS proxy
D. RADIUS client
3. Your organization has purchased a dedicated hardware device that functions as a VPN server, and you have deployed this device on your organization’s perimeter network. You want to allow your organization’s existing RADIUS server, deployed as a Windows Server 2012 R2 server with the NPS enrolled to accept and respond to authentication and authorization traffic from this device. Which of the following should you configure on the server with the NPS role installed to accomplish this goal?
A. RADIUS client
B. RADIUS accounting
C. RADIUS server
D. RADIUS proxy
4. You want to ensure that data about authentication and authorization traffic forwarded to your server with the NPS role installed on the internal network is written to an SQL Server database rather than to a local file. Which of the following should you configure to accomplish this goal?
A. RADIUS proxy
B. RADIUS client
C. RADIUS accounting
D. RADIUS server
5. Which of the following information must you provide when configuring a RADIUS client on a RADIUS server? (Choose three. Each answer forms part of a complete solution.)
A. Friendly name
B. Authentication protocol
C. IP address or FQDN
D. Shared secret
Lesson 2: Configuring VPN and routing
You can configure Windows Server 2012 and Windows Server 2012 R2 to function as a VPN server, a local area network (LAN) router, and an NAT device. An advantage of deploying Windows Server 2012 and Windows Server 2012 R2 as a VPN server over a dedicated hardware device is that you can then use VPN protocols such as IKEv2 and advanced authentication methods, which aren’t always possible with dedicated hardware devices. In this lesson, you will learn how to deploy the Routing and Remote Access role, deploy Windows Server 2012 and Windows Server 2012 R2 as a VPN server, and configure LAN routing and NAT.
After this lesson, you will be able to:
![]() Deploy Routing and Remote Access.
Deploy Routing and Remote Access.
![]() Implement NAT.
Implement NAT.
![]() Configure VPN settings.
Configure VPN settings.
![]() Configure routing.
Configure routing.
![]() Configure Web Application proxy in pass-through mode.
Configure Web Application proxy in pass-through mode.
Estimated lesson time: 45 minutes
Deploy Routing and Remote Access
The Remote Access role service enables you to provide network access and routing functionality using a computer running Windows Server 2012 and Windows Server 2012 R2 that you might otherwise provision using a dedicated hardware device. The Remote Access role enables you to provide the following services to computers:
![]() Access to trusted networks (such as an organization’s internal network) for clients on untrusted networks (such as the Internet) through VPNs or DirectAccess.
Access to trusted networks (such as an organization’s internal network) for clients on untrusted networks (such as the Internet) through VPNs or DirectAccess.
![]() Network routing using the Routing Information Protocol (RIP) and static routes, enabling you to connect separate IPv4 and IPv6 networks. It also enables you to configure encrypted site-to-site tunnels that can be used as wide area network (WAN) links between branch offices across the Internet.
Network routing using the Routing Information Protocol (RIP) and static routes, enabling you to connect separate IPv4 and IPv6 networks. It also enables you to configure encrypted site-to-site tunnels that can be used as wide area network (WAN) links between branch offices across the Internet.
To deploy Routing and Remote Access on a computer running Windows Server 2012 and Windows Server 2012 R2, perform the following steps:
1. In Server Manager, click Manage, and click Add Roles And Features.
2. On the Before You Begin page of the Add Roles And Features Wizard, click Next.
3. On the Select Installation Type page, click Role-Based Or Feature-Based Installation, and click Next.
4. On the Server Selection page, select the server on which you want to deploy the Routing and Remote Access role. Any servers that are part of the management server’s All Servers server pool are present in this dialog box, and Windows Server 2012 and Windows Server 2012 R2 enable you to use this wizard to install roles both locally and remotely. Click Next.
5. On the Select Server Roles page, select Remote Access, as shown in Figure 8-14.
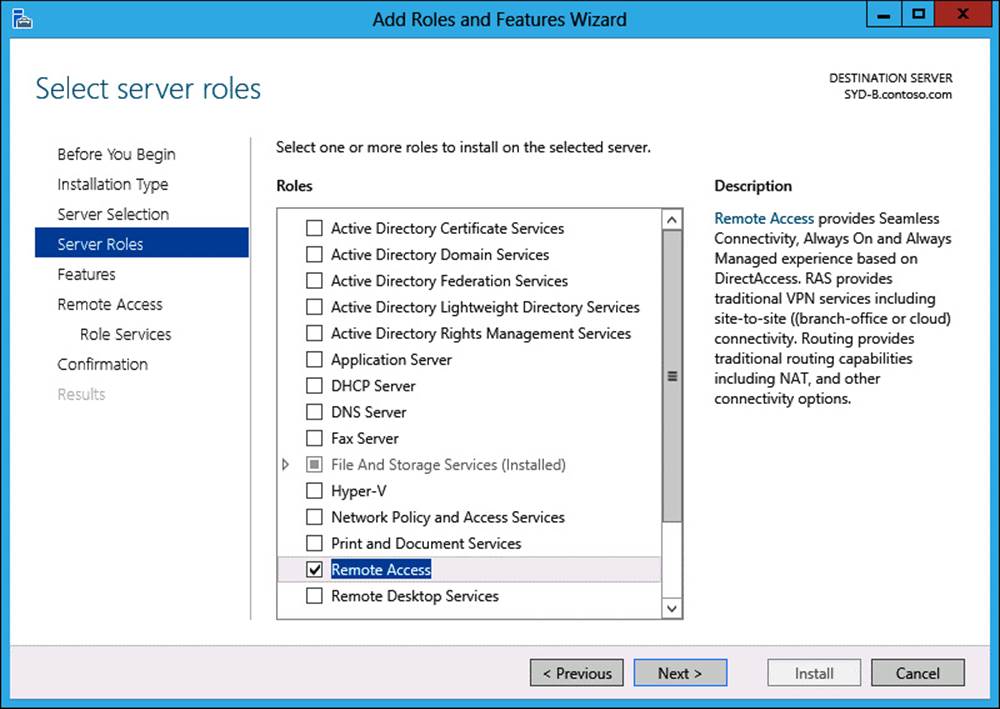
FIGURE 8-14 Adding the Remote Access role
6. On the Add Roles And Features Wizard dialog box that pops up, click Add Features, and then click Next.
7. On the Select Features page, click Next.
8. On the Remote Access page, click Next.
9. On the Select Role Services page, shown in Figure 8-15, you can choose one or both of the following role services:
![]() DirectAccess And VPN (RAS) Choose this option if you want to configure Windows Server 2012 or Windows Server 2012 R2 as a DirectAccess or VPN server, or to allow the server to perform both those functions.
DirectAccess And VPN (RAS) Choose this option if you want to configure Windows Server 2012 or Windows Server 2012 R2 as a DirectAccess or VPN server, or to allow the server to perform both those functions.
![]() Routing Choose this option if you want to configure Windows Server 2012 or Windows Server 2012 R2 as a router between subnets or to provide NAT services.
Routing Choose this option if you want to configure Windows Server 2012 or Windows Server 2012 R2 as a router between subnets or to provide NAT services.
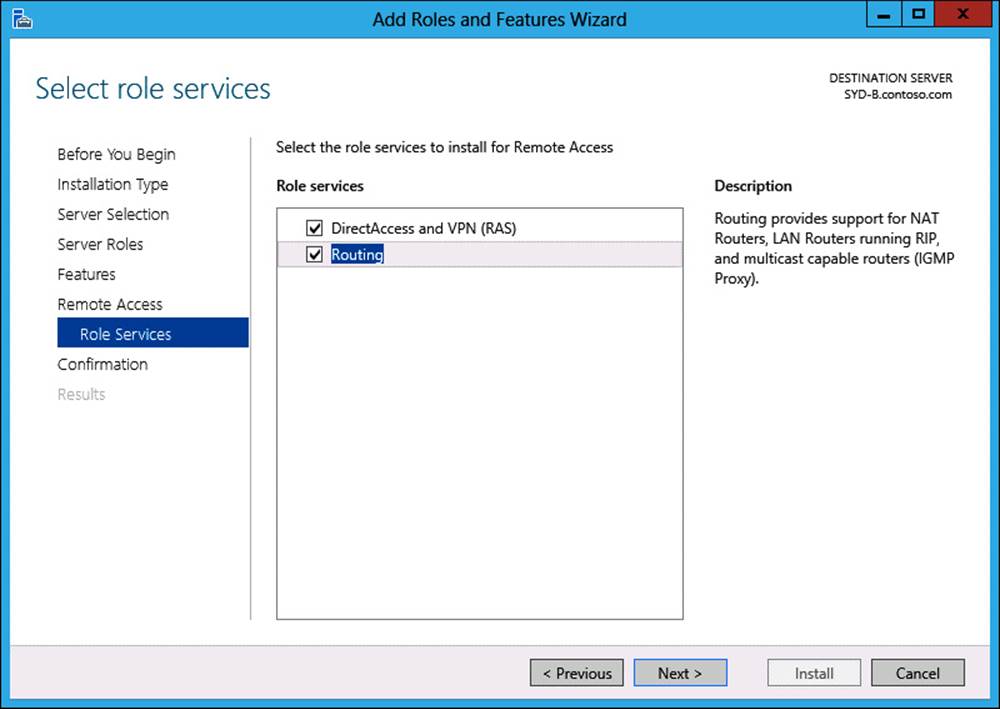
FIGURE 8-15 Adding VPN, DirectAccess, and Routing role services
10. Click Next. On the Confirmation page, click Install, and then click Close.
Note: DirectAccess
Configuring and deploying DirectAccess is covered in Lesson 3, “Configuring DirectAccess.”
Configure VPN settings
After you install the Remote Access role on a computer running Windows Server 2012 or Windows Server 2012 R2, you can configure the server as a VPN server. Before you deploy Windows Server 2012 or Windows Server 2012 R2 as a VPN server, ensure that you have met the following requirements:
![]() The computer that will function as the VPN server needs to have two network adapters. Prior to configuring the VPN server, you need to determine which interface will accept incoming traffic from untrusted networks. You specify this network interface during VPN setup.
The computer that will function as the VPN server needs to have two network adapters. Prior to configuring the VPN server, you need to determine which interface will accept incoming traffic from untrusted networks. You specify this network interface during VPN setup.
![]() Determine how clients from untrusted networks will receive IP addresses on the trusted network. You can configure the VPN server to interact with an existing Dynamic Host Configuration Protocol (DHCP) server on the trusted network. When you do this, the VPN server leases blocks of 10 IP addresses and assigns them to remote clients. You also have the option of manually configuring an address pool from which the VPN server can lease IP addresses. When you do this, you must ensure that the manually selected IP addresses are not already in use and are not used in future by clients other than those that connect using the VPN server.
Determine how clients from untrusted networks will receive IP addresses on the trusted network. You can configure the VPN server to interact with an existing Dynamic Host Configuration Protocol (DHCP) server on the trusted network. When you do this, the VPN server leases blocks of 10 IP addresses and assigns them to remote clients. You also have the option of manually configuring an address pool from which the VPN server can lease IP addresses. When you do this, you must ensure that the manually selected IP addresses are not already in use and are not used in future by clients other than those that connect using the VPN server.
![]() Decide whether you want the VPN server to authenticate connections or pass authentication requests on to a server with the NPS role installed. You might choose to configure the VPN server to pass authentication requests on to a server with the NPS role installed if you have multiple servers or if you have configured a stand-alone server as a VPN server as a way of enhancing security.
Decide whether you want the VPN server to authenticate connections or pass authentication requests on to a server with the NPS role installed. You might choose to configure the VPN server to pass authentication requests on to a server with the NPS role installed if you have multiple servers or if you have configured a stand-alone server as a VPN server as a way of enhancing security.
To configure a server with the Remote Access role installed as a VPN server, perform the following steps:
1. On the Tools menu in Server Manager, click Remote Access Management.
2. In the Remote Access Management console, select the server on which you want to configure Remote Access, as shown in Figure 8-16, and click Run The Remote Access Setup Wizard. You can also choose to run the Getting Started Wizard. Running the Getting Started Wizard provides fewer configuration options, but it may be suitable for less experienced administrators.
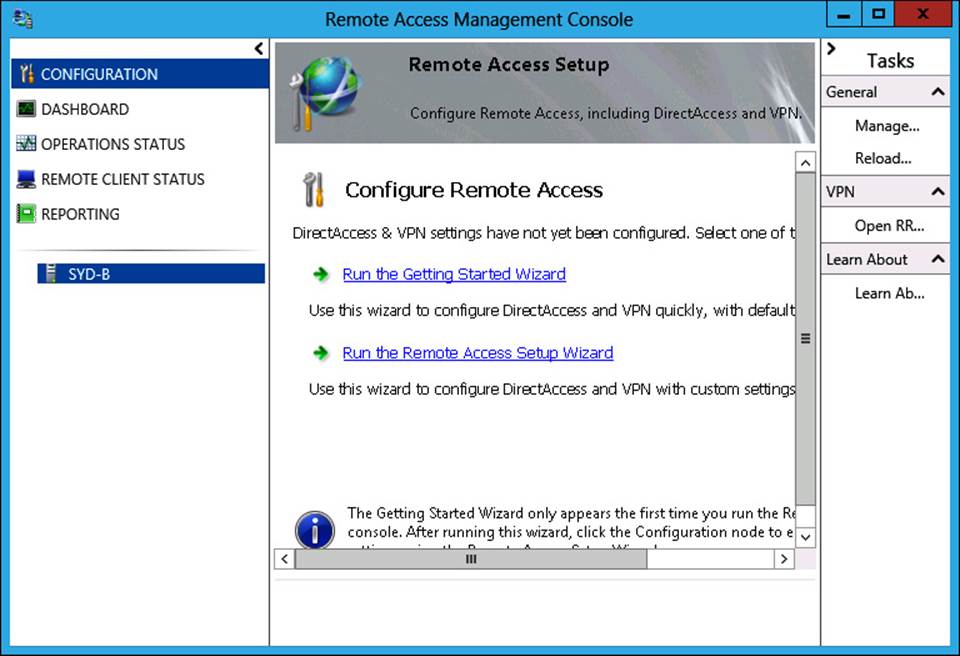
FIGURE 8-16 Remote Access Management console
3. In the Configure Remote Access dialog box, shown in Figure 8-17, click Deploy VPN Only. You’ll learn about configuring DirectAccess in Lesson 3, “Configuring DirectAccess.”
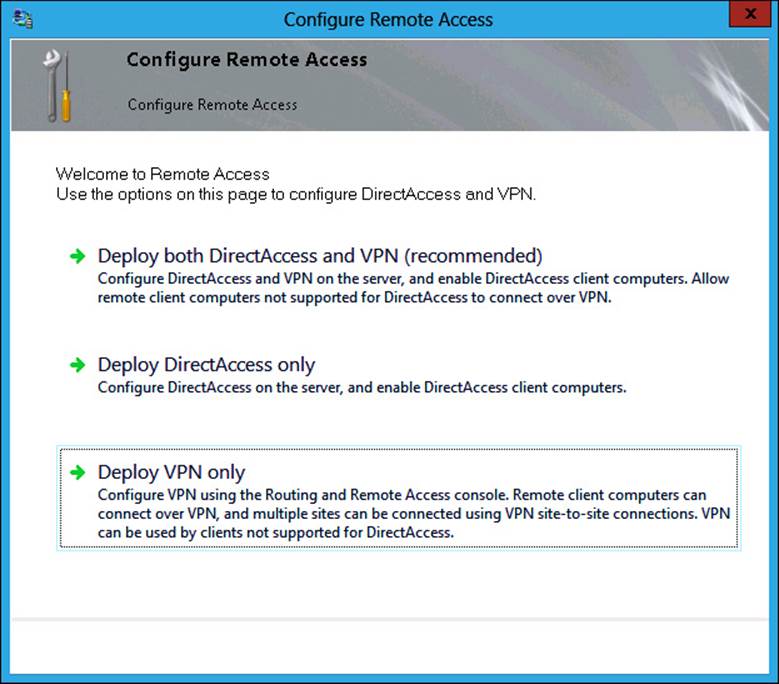
FIGURE 8-17 Selecting Deploy VPN Only
4. When you choose this option, the Routing And Remote Access console opens.
5. Click the server that will function as the remote access server, as shown in Figure 8-18, and click Configure And Enable Routing And Remote Access on the Action menu.
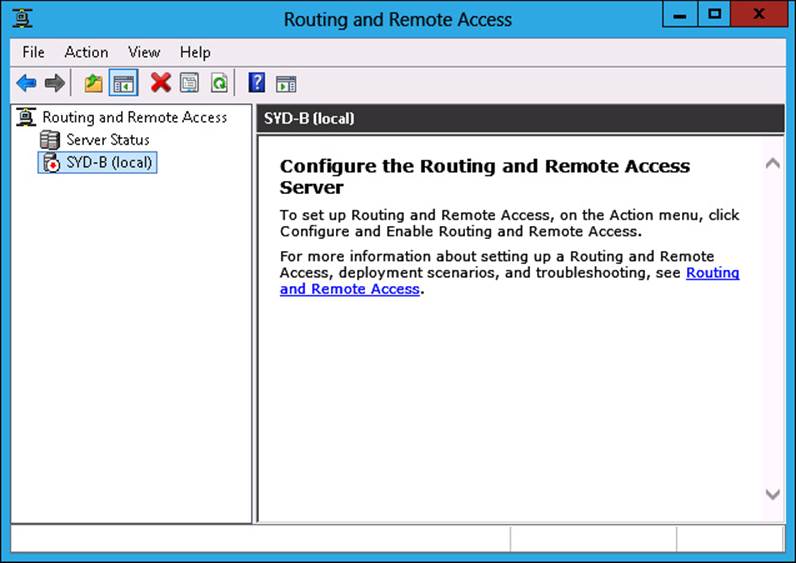
FIGURE 8-18 Routing And Remote Access console
6. On the Welcome page of the Routing And Remote Access Setup Wizard, click Next.
7. On the Configuration page, click Remote Access (Dial-Up Or VPN) as shown in Figure 8-19, and click Next.

FIGURE 8-19 Selecting Remote Access (Dial-Up Or VPN)
8. On the Remote Access page, you have the option of selecting both dial-up and VPN connections. Select VPN and click Next.
9. On the VPN Connection page, select the adapter that is connected to the Internet, as shown in Figure 8-20, and click Next. Note that the simulated Internet connection in the figure is a private IP address, whereas in a production deployment it would be a public IP address.
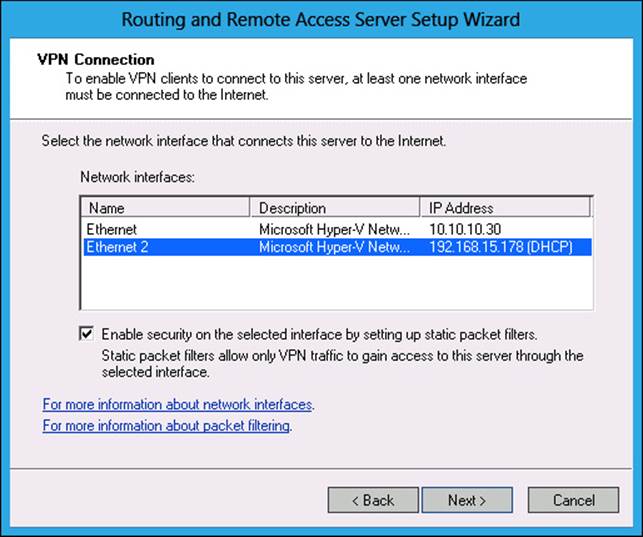
FIGURE 8-20 Selecting network interface
10. On the IP Address Assignment page, choose whether you want to assign IP addresses automatically, such as having the VPN server lease them from a DHCP server, or configure them manually. Click Next.
11. If you choose to configure IP addresses manually, you can add an IP address range on the Address Range Assignment page of the wizard, shown in Figure 8-21, and then click Next.
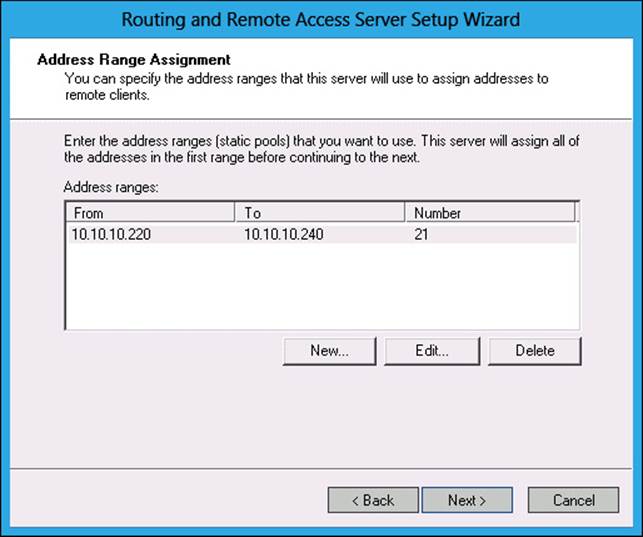
FIGURE 8-21 Selecting a network interface
12. On the Managing Multiple Remote Access Servers page, shown in Figure 8-22, choose whether you want Routing And Remote Access to authenticate connections or whether you want to forward authentication requests to a RADIUS server. This example uses Routing And Remote Access.
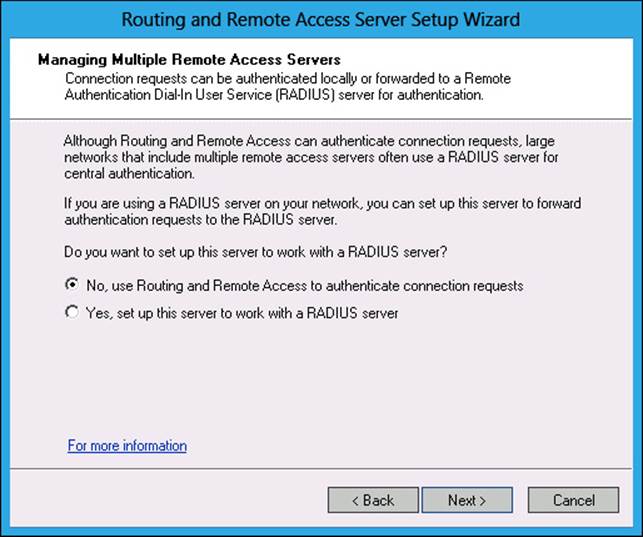
FIGURE 8-22 Configuring authentication
13. If you configure Routing And Remote Access, the next page finishes the wizard. When you complete the wizard, VPN connections will be enabled from the server.
VPN authentication
When planning to allow clients to remotely connect to trusted networks, consider the authentication protocols that can be used to establish those connections. Although Windows Server 2012 and Windows Server 2012 R2 support many protocols that have been in use for some time, these protocols are often less secure than more recently developed protocols. Windows Server 2012 and Windows Server 2012 R2 support the following protocols, listed from most secure to least secure:
![]() Extensible Authentication Protocol-Transport Level Security (EAP-TLS) You use this protocol with smart cards or digital certificates. You can use this protocol only if you are using RADIUS authentication or if the remote access server performing authentication is domain-joined.
Extensible Authentication Protocol-Transport Level Security (EAP-TLS) You use this protocol with smart cards or digital certificates. You can use this protocol only if you are using RADIUS authentication or if the remote access server performing authentication is domain-joined.
![]() Microsoft Challenge Handshake Authentication Protocol version 2 (MS-CHAPv2) Provides mutual authentication. This means that not only is the user authenticated but the service that the user is connecting to is also authenticated. Allows for the encryption of the authentication process and the session.
Microsoft Challenge Handshake Authentication Protocol version 2 (MS-CHAPv2) Provides mutual authentication. This means that not only is the user authenticated but the service that the user is connecting to is also authenticated. Allows for the encryption of the authentication process and the session.
![]() Extensible Authentication Protocol-Message Digest 5 Challenge Handshake Authentication (EAP-MD5 CHAP) Supports encryption of authentication data through MD5 hashing and also uses the EAP framework. Used to support third-party clients.
Extensible Authentication Protocol-Message Digest 5 Challenge Handshake Authentication (EAP-MD5 CHAP) Supports encryption of authentication data through MD5 hashing and also uses the EAP framework. Used to support third-party clients.
![]() Challenge Handshake Authentication Protocol (CHAP) Authentication data is encrypted through MD5 hashing. The data is not encrypted.
Challenge Handshake Authentication Protocol (CHAP) Authentication data is encrypted through MD5 hashing. The data is not encrypted.
![]() Shiva Password Authentication Protocol (SPAP) This 1990s protocol is supported by Windows Server 2012 and Windows Server 2012 R2. It provides basic encrypted authentication that can be deciphered using automated techniques if the appropriate traffic is captured. Not recommended for use.
Shiva Password Authentication Protocol (SPAP) This 1990s protocol is supported by Windows Server 2012 and Windows Server 2012 R2. It provides basic encrypted authentication that can be deciphered using automated techniques if the appropriate traffic is captured. Not recommended for use.
![]() Password Authentication Protocol (PAP) This protocol does not encrypt authentication data, meaning that if the authentication is captured, user name and password data can be read directly without having to be decrypted.
Password Authentication Protocol (PAP) This protocol does not encrypt authentication data, meaning that if the authentication is captured, user name and password data can be read directly without having to be decrypted.
VPN protocols
A Windows Server 2012 or Windows Server 2012 R2 VPN server supports four VPN tunneling protocols. In most organizations, you leave the protocols enabled. Clients attempt to negotiate a connection using the most secure protocol available to them. The protocols that are available depend on the operating system, with protocols available to computers running Windows 7, Windows 8, and Windows 8.1, and not available to computers running Windows XP. VPN servers on computers running Windows Server 2012 and Windows Server 2012 R2 support the following protocols:
![]() IKEv2
IKEv2
![]() SSTP
SSTP
![]() L2TP/IPSec
L2TP/IPSec
![]() PPTP
PPTP
IKEv2
IKEv2 is the most recent VPN protocol supported by Microsoft. The drawback of IKEv2 is that you can use it only with VPN clients running the Windows 7, Windows 8, and Windows 8.1 operating systems. IKEv2 has the following features:
![]() Supports IPv6
Supports IPv6
![]() Enables VPN reconnect
Enables VPN reconnect
![]() Supports EAP and Computer certificates for client authentication
Supports EAP and Computer certificates for client authentication
![]() Does not support PAP or CHAP
Does not support PAP or CHAP
![]() Only supports MS-CHAPv2 with EAP
Only supports MS-CHAPv2 with EAP
![]() Supports data origin authentication, data integrity, replay protection, and data confidentiality
Supports data origin authentication, data integrity, replay protection, and data confidentiality
![]() Uses UDP port 500
Uses UDP port 500
VPN reconnect enables the automatic reconnection of VPN connections without requiring users to perform manual authentication. VPN reconnect works across different connections, so a VPN connection can remain active when a user switches between hotspots or a wired and wireless connection. VPN reconnect allows for automatic reconnection without authentication for periods of disruption for up to 8 hours.
SSTP
SSTP became available with the release of Windows Vista and Windows Server 2008. It is supported on clients running Windows Vista, Windows 7, Windows 8, and Windows 8.1, but not supported on clients running the Windows XP operating system. SSTP functions by encapsulating PPTP traffic over the Secure Sockets Layer (SSL) channel of the Secure Hypertext Transfer Protocol (HTTPS). The advantage of SSTP is that it uses TCP port 443, which means that it is likely to work in locations in which other protocols, such as IKEv2, L2TP/IPsec, and PPTP, do not work because of intervening firewalls.
SSTP has the following requirements:
![]() Supported only on clients running Windows Vista, Windows 7, Windows 8, and Windows 8.1.
Supported only on clients running Windows Vista, Windows 7, Windows 8, and Windows 8.1.
![]() Requires that the client trusts the Certification Authority (CA) that issued the VPN server’s SSL certificate.
Requires that the client trusts the Certification Authority (CA) that issued the VPN server’s SSL certificate.
![]() The SSL certificate must be configured with a name that matches the FQDN of the IP address of the external interface of the VPN server.
The SSL certificate must be configured with a name that matches the FQDN of the IP address of the external interface of the VPN server.
![]() Can’t be used to create VPN connections if there is a web proxy that requires authentication.
Can’t be used to create VPN connections if there is a web proxy that requires authentication.
L2TP/IPsec
L2TP/IPsec is supported by clients running the Windows XP, Windows Vista, Windows 7, Windows 8, and Windows 8.1 operating systems. It is the most secure VPN protocol that you can deploy with a Windows Server 2012 or Windows Server 2012 R2 VPN server if you need to support clients running the Windows XP operating system. Although L2TP/IPsec usually requires the deployment of digital certificates, it is possible, with special configuration, to get L2TP/IPsec to work with preshared keys. When used with digital certificates, L2TP/IPsec VPN clients must trust the CA that issued the certificate to the VPN server, and the VPN server must trust the CA that issued the certificates to the clients. The simplest way to implement L2TP/IPsec is by also deploying an Enterprise CA on the trusted network. L2TP/IPsec supports all authentication protocols that are supported with Windows Server 2012 and Windows Server 2012 R2, which means you can use the protocol with advanced authentication methods such as smart cards.
PPTP
PPTP is the oldest VPN protocol supported by Windows Server 2012 and Windows Server 2012 R2. It is also the least secure. It is most often used when organizations that need to support clients running Windows XP haven’t deployed the certificate infrastructure required to implement L2TP/IPsec. PPTP connections provide data confidentiality, but do not provide data integrity or data origin protection. That means that captured data can’t be read, but you can’t be sure that the transmitted data was the same data sent by the client.
![]() Quick check
Quick check
![]() Which protocols can you use if you need to support VPN clients running the Windows XP operating system?
Which protocols can you use if you need to support VPN clients running the Windows XP operating system?
Quick check answer
![]() You can use the PPTP or L2TP/IPSec protocols if you need to support VPN clients running the Windows XP operating system. SSTP is supported only on clients running the Windows Vista, Windows 7, Windows 8, and Windows 8.1 client operating systems. IKEv2 is supported only on clients running the Windows 7, Windows 8, and Windows 8.1 client operating systems.
You can use the PPTP or L2TP/IPSec protocols if you need to support VPN clients running the Windows XP operating system. SSTP is supported only on clients running the Windows Vista, Windows 7, Windows 8, and Windows 8.1 client operating systems. IKEv2 is supported only on clients running the Windows 7, Windows 8, and Windows 8.1 client operating systems.
Configure routing
You can configure Windows Server 2012 and Windows Server 2012 R2 to function as a network router in the same way that you configure a traditional hardware device to perform this role. To perform this function, the computer must have two or more network adapters. Windows Server 2012 and Windows Server 2012 R2 support using Routing Information Protocol v2 (RIP) for route discovery. You can also use the Routing And Remote Access console to configure static routes.
To configure Windows Server 2012 or Windows Server 2012 R2 to function as a router, perform the following steps:
1. From the Tools menu of Server Manager, click Routing And Remote Access.
2. In the Routing And Remote Access console, click the server that you want to configure. On the Action menu, click Configure And Enable Routing And Remote Access.
3. On the Welcome page of the Routing And Remote Access Server Setup Wizard, click Next.
4. On the Configuration page, select Custom Configuration, and click Next.
5. On the Custom Configuration page, select LAN Routing, as shown in Figure 8-23, and click Next.
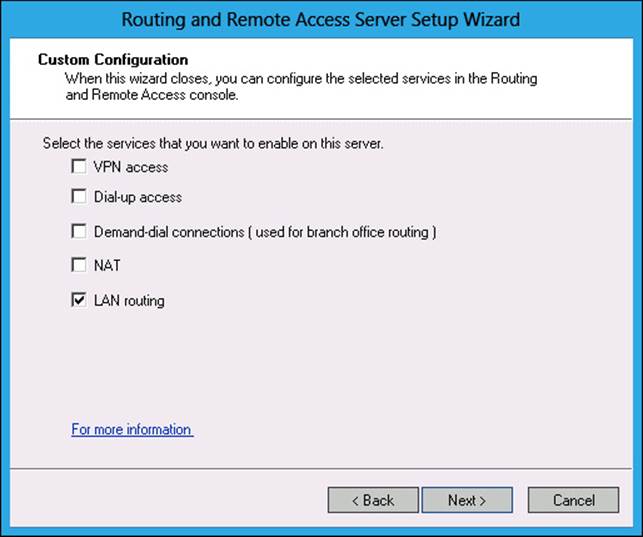
FIGURE 8-23 LAN routing
6. Click Finish. In the Routing And Remote Access dialog box, click Start Service.
7. In the Routing And Remote Access console, right-click the server, and click Properties.
8. On the General tab of the server properties dialog box, select IPv6 Router, as shown in Figure 8-24, to enable the server to also route IPv6 traffic.
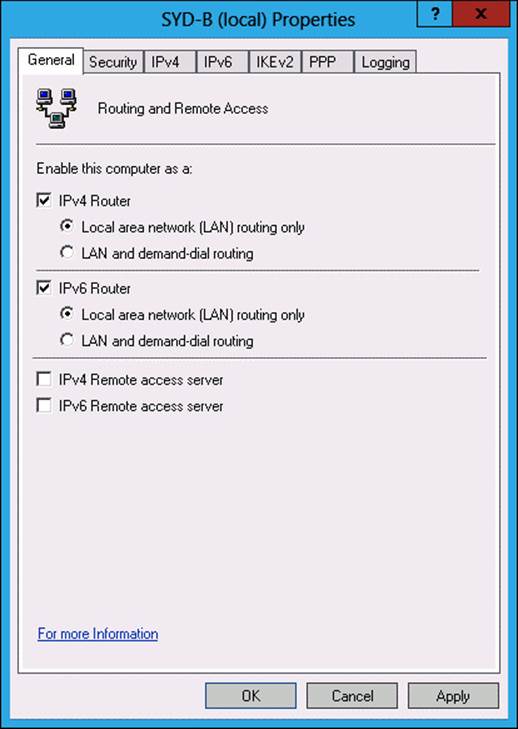
FIGURE 8-24 Enabling IPv6 routing
Real World: Windows Server routers
In most real world deployments, you’ll deploy a dedicated hardware device to function as a router because it’s cheaper than deploying computer hardware and an operating system.
Network address translation (NAT)
Network address translation (NAT) enables you to share an Internet connection with computers on an internal network. In a typical NAT configuration, the NAT server has two network interfaces. One network interface is connected to the Internet. The second network interface connects to a network with a private IP address range. Computers on the private IP address range can then establish communication with computers on the Internet. It is also possible to configure port forwarding so that all traffic sent to a particular port on the NAT server’s public interface is directed to a specific IP address/port combination on a host on the private IP address range.
To configure a computer running the Windows Server 2012 or Windows Server 2012 R2 operating system with two network adapters to function as a NAT device, one of which is connected to the Internet, perform the following steps:
1. Open the Routing And Remote Access console from the Tools menu in Server Manager.
2. Select the server that you want to configure. On the Action menu, click Configure and Enable Routing And Remote Access.
3. On the Welcome To The Routing And Remote Access Server Setup Wizard, click Next.
4. On the Configuration page, select Network Address Translation (NAT), as shown in Figure 8-25, and click Next.

FIGURE 8-25 Enabling NAT
5. On the NAT Internet Connection page, select the network interface that connects to the Internet, as shown in Figure 8-26, and click Next. In this figure, the interface connected to the Internet uses a private IP address.
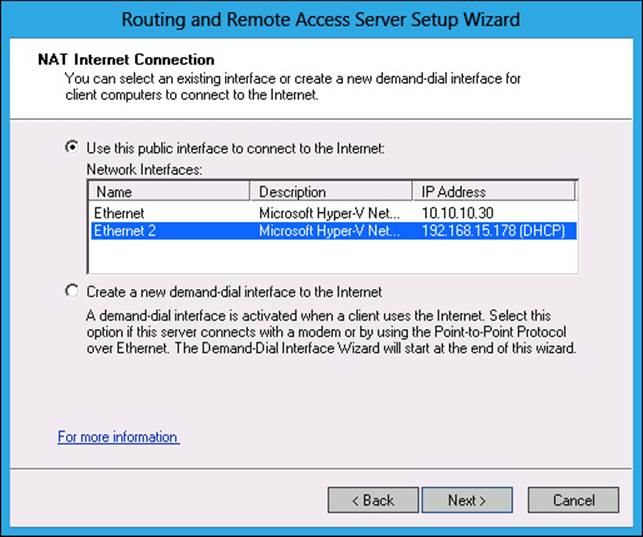
FIGURE 8-26 Configuring a NAT Internet connection
6. Click Finish to close the Routing And Remote Access Server Setup Wizard.
You can configure NAT properties by right-clicking the NAT node in the Routing And Remote Access console and clicking Properties. Using this properties dialog box, you can configure the assignment of addresses for hosts on the private network, as shown in Figure 8-27. You can use the Name Resolution tab to determine how name resolution works on the private network. It enables clients to communicate using single names or FQDNs rather than IP addresses.
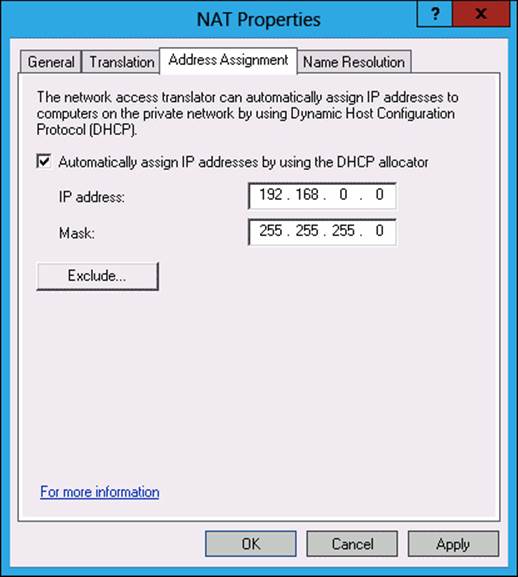
FIGURE 8-27 NAT address allocation
Web Application Proxy in pass-through mode
Web Application Proxy is a remote access role that allows you to configure a reverse proxy to publish applications and services hosted on protected networks to hosts on untrusted networks, such as the Internet. When you publish an application through Web Application Proxy, you can choose to use AD FS to perform pre-authentication, and configure pass-through mode. When you configure pass-through mode, as shown in Figure 8-28, the Web Application Proxy passes all authentication traffic through to the server hosting the published application.
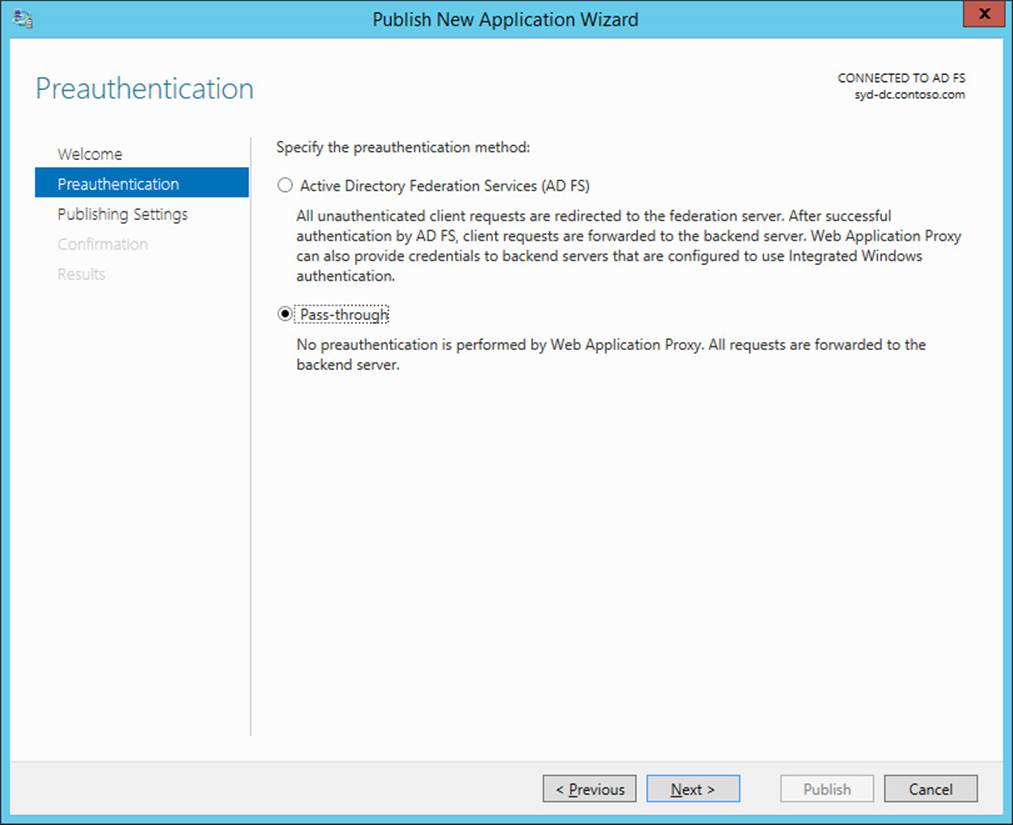
FIGURE 8-28 Publishing an application in pass-through mode
To deploy Web Application Proxy, you need to already have deployed AD FS on a server in the domain. When you deploy the Web Application Proxy, you specify the address of the AD FS server. You also need to import a copy of the web server certificate used with AD FS, including the private key, onto the server that will host the Web Application Proxy. As the server that hosts the Web Application Proxy will be responsible for proxying traffic from hosts on untrusted networks to applications hosted on protected networks, it should be configured as a stand alone server rather than be domain joined.
More Info: Web Application Proxy with pass-through preauthentication
For more information about configuring Web Application Proxy with Pass-through preauthentication, consult the following TechNet article at http://technet.microsoft.com/en-us/library/dn383655.aspx.
Lesson summary
![]() The Routing And Remote Access role enables you to configure a computer running Windows Server 2012 or Windows Server 2012 R2 to provide dial-up, VPN, NAT, and LAN routing services.
The Routing And Remote Access role enables you to configure a computer running Windows Server 2012 or Windows Server 2012 R2 to provide dial-up, VPN, NAT, and LAN routing services.
![]() NAT enables a single Internet connection to be shared by multiple computers.
NAT enables a single Internet connection to be shared by multiple computers.
![]() LAN routing enables the routing of network traffic between subnets. LAN routing supports routing of both IPv4 and IPv6 traffic.
LAN routing enables the routing of network traffic between subnets. LAN routing supports routing of both IPv4 and IPv6 traffic.
![]() The SSTP VPN protocol uses HTTPS to carry VPN traffic. It can be used in firewalled environments that block other VPN protocols.
The SSTP VPN protocol uses HTTPS to carry VPN traffic. It can be used in firewalled environments that block other VPN protocols.
![]() IKEv2 supports VPN reconnect. VPN reconnect enables disrupted VPN connections to be reestablished up to 8 hours later without requiring user reauthentication.
IKEv2 supports VPN reconnect. VPN reconnect enables disrupted VPN connections to be reestablished up to 8 hours later without requiring user reauthentication.
![]() Web Application Proxy in pass-through mode allows you to publish web applications that perform their own authentication to clients on untrusted networks using a reverse proxy.
Web Application Proxy in pass-through mode allows you to publish web applications that perform their own authentication to clients on untrusted networks using a reverse proxy.
Lesson review
Answer the following questions to test your knowledge of the information in this lesson. You can find the answers to these questions and explanations of why each answer choice is correct or incorrect in the “Answers” section at the end of this chapter.
1. You have a number of VPN clients that are running the Windows XP operating system. You have deployed a computer running Windows Server 2012 R2 as a VPN server. Which of the following VPN protocols can be used with Windows XP clients? (Choose all that apply.)
A. SSTP
B. IKEv2
C. L2TP/IPSec
D. PPTP
2. Which of the following VPN protocols can be used only with clients running the Windows 7, Windows 8, or Windows 8.1 client operating system?
A. PPTP
B. L2TP/IPSec
C. IKEv2
D. SSTP
3. Several users in your organization regularly stay at hotels that have firewalls that allow only outbound traffic on TCP port 80 and 443. Which of the following VPN protocols should you enable to allow these users to connect to your organization’s Windows Server 2012 R2 VPN server?
A. IKEv2
B. L2TP/IPSec
C. SSTP
D. PPTP
4. Which of the following VPN protocols support automatic reconnection of VPN connections for up to 8 hours without requiring manual user reauthentication?
A. SSTP
B. IKEv2
C. PPTP
D. L2TP/IPSec
5. You are in the process of running the Routing And Remote Access Setup Wizard. Which of the following options should you select if you want to allow a group of computers on your organization’s network that don’t need to be able to accept direct inbound communication from hosts on the Internet to share an Internet connection?
A. VPN access
B. Dial-up access
C. NAT
D. LAN router
Lesson 3: Configuring DirectAccess
DirectAccess provides an always-on, computer-authenticated VPN solution that enables client computers to maintain connections to an organization’s internal network without requiring that a user perform manual authentication. In this lesson, you learn how to deploy and configure DirectAccess as well as learn DirectAccess’ infrastructure requirements.
After this lesson, you will be able to:
![]() Understand DirectAccess.
Understand DirectAccess.
![]() Understand DirectAccess infrastructure.
Understand DirectAccess infrastructure.
![]() Configure DNS to support DirectAccess.
Configure DNS to support DirectAccess.
![]() Configure certificates for DirectAccess.
Configure certificates for DirectAccess.
![]() Configure DirectAccess clients.
Configure DirectAccess clients.
Estimated lesson time: 45 minutes
Understanding DirectAccess
DirectAccess is an always-on, computer-authenticated IPv6 VPN connection that becomes active any time a client computer can establish an Internet connection when on an untrusted network. Any IPv6-capable application on the DirectAccess client has full access to resources on the trusted network. DirectAccess has the following benefits:
![]() Automatic connection to a trusted network when a client connects to the Internet. Does not require user authentication as is the case with a traditional VPN connection.
Automatic connection to a trusted network when a client connects to the Internet. Does not require user authentication as is the case with a traditional VPN connection.
![]() Uses a variety of protocols including HTTPs to enable IPv6 connectivity. This enables DirectAccess to establish connections in almost all circumstances in which an Internet connection is present.
Uses a variety of protocols including HTTPs to enable IPv6 connectivity. This enables DirectAccess to establish connections in almost all circumstances in which an Internet connection is present.
![]() Supports remote management of clients, including manage-out support. Manage-out support is a Windows Server 2012 and Windows Server 2012 R2 feature that enables remote management functionality of DirectAccess clients, enabling incoming access to the client for the purposes of maintenance and administration.
Supports remote management of clients, including manage-out support. Manage-out support is a Windows Server 2012 and Windows Server 2012 R2 feature that enables remote management functionality of DirectAccess clients, enabling incoming access to the client for the purposes of maintenance and administration.
![]() DirectAccess integrates with server and domain isolation as well as NAP. This enables organizations to maintain the health state of clients as long as the client has an active Internet connection.
DirectAccess integrates with server and domain isolation as well as NAP. This enables organizations to maintain the health state of clients as long as the client has an active Internet connection.
DirectAccess in Windows Server 2012 and Windows Server 2012 R2 have the following changes from the implementation available in Windows Server 2008 R2:
![]() DirectAccess no longer requires that two consecutive public IPv4 addresses be assigned to the network adapter connected to the Internet.
DirectAccess no longer requires that two consecutive public IPv4 addresses be assigned to the network adapter connected to the Internet.
![]() It isn’t necessary to deploy Active Directory Certificate Services (AD CS) on the trusted network.
It isn’t necessary to deploy Active Directory Certificate Services (AD CS) on the trusted network.
Real World: Simplifying remote access
The real reason to go to the trouble of configuring DirectAccess is that it vastly simplifies providing remote access. Users simply have a connection to the trusted internal network without having to mess with configuring their VPN connection. In some organizations, establishing a VPN connection involves complex authentication routines such as using a special identification device in which users have to type the number currently displayed on the device within a short period of time before they can connect.
DirectAccess infrastructure
The biggest change between DirectAcces s in Windows Server 2008 R2 and DirectAccess in Windows Server 2012 and Windows Server 2012 R2 is how much simpler the process of configuring DirectAccess is. DirectAccess is also included with the Essentials version of Windows Server 2012. The Essentials versions of Windows Server 2012 and Windows Server 2012 R2 are aimed at small businesses and simplifies many complex systems administration tasks in the way that the Small Business Server line of products once did. The main thing to remember about deploying DirectAccess is that unlike other remote access technologies, the computer making the DirectAccess connection must be a member of the same Active Directory forest as the DirectAccess server. DirectAccess uses computer authentication, whereas most other remote access solutions authenticate based on the user’s credentials.
More Info: DirectAccess infrastructure
For more information about DirectAccess infrastructure, consult the following TechNet article at http://technet.microsoft.com/en-us/library/jj574174.aspx.
DirectAccess topology
DirectAccess supports multiple deployment topologies. You don’t have to deploy the DirectAccess server with a network adapter directly connected to the Internet. You can integrate the DirectAccess server with your organization’s existing edge topology. During deployment of the DirectAccess server, the Remote Access Server Wizard asks you which of the topologies reflects your server configuration, as shown in Figure 8-29.
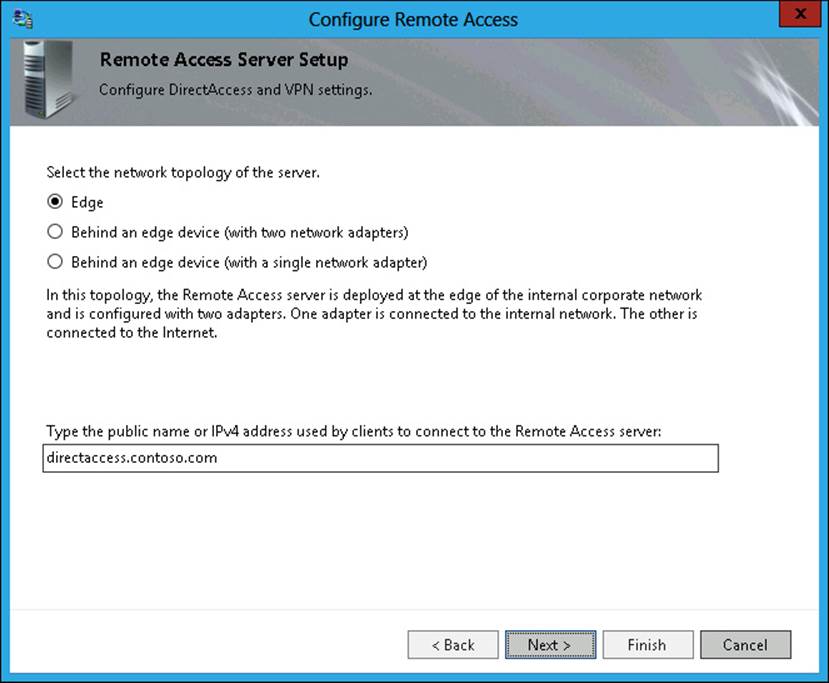
FIGURE 8-29 Selecting network topology
The difference between them is as follows:
![]() Edge This is the traditional DirectAccess deployment. The computer hosting the server has two network adapters. The first network adapter is connected directly to the Internet and has been assigned one or more public IPv4 addresses. The second network adapter connects directly to the internal trusted network.
Edge This is the traditional DirectAccess deployment. The computer hosting the server has two network adapters. The first network adapter is connected directly to the Internet and has been assigned one or more public IPv4 addresses. The second network adapter connects directly to the internal trusted network.
![]() Behind An Edge Device (With Two Network Adapters) In this deployment, the DirectAccess server is located behind a dedicated edge firewall. This can be a computer running Forefront Threat Management Gateway 2010, Unified Access Gateway 2010, or a third-party hardware firewall device. In this configuration, one of the network adapters on the DirectAccess server is connected to the perimeter network behind the edge firewall. The second network adapter connects directly to the internal trusted network. Figure 8-30 shows the process of configuring this topology.
Behind An Edge Device (With Two Network Adapters) In this deployment, the DirectAccess server is located behind a dedicated edge firewall. This can be a computer running Forefront Threat Management Gateway 2010, Unified Access Gateway 2010, or a third-party hardware firewall device. In this configuration, one of the network adapters on the DirectAccess server is connected to the perimeter network behind the edge firewall. The second network adapter connects directly to the internal trusted network. Figure 8-30 shows the process of configuring this topology.
![]() Behind An Edge Device (With A Single Network Adapter) The DirectAccess server has a single network adapter connected to the internal network. The edge firewall passes traffic to the DirectAccess server.
Behind An Edge Device (With A Single Network Adapter) The DirectAccess server has a single network adapter connected to the internal network. The edge firewall passes traffic to the DirectAccess server.
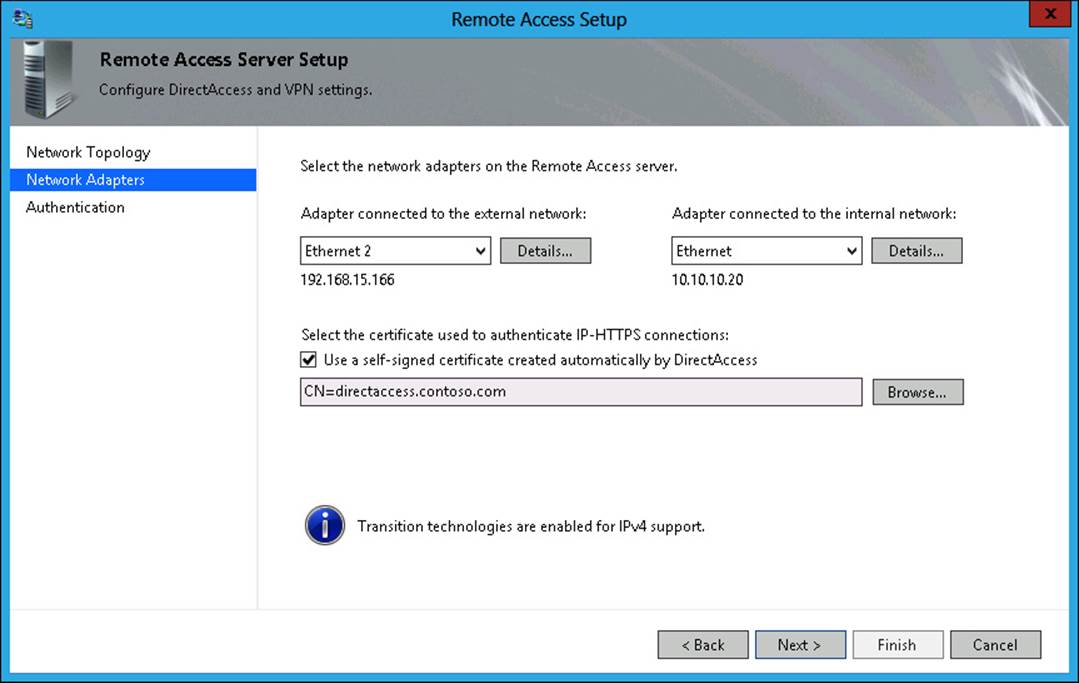
FIGURE 8-30 Selecting network topology
DirectAccess server
The DirectAccess server is a domain-joined computer running Windows Server 2012 or Windows Server 2012 R2 that accepts connections from DirectAccess clients on untrusted networks, such as the Internet, and provides access to resources on trusted networks. The DirectAccess server performs the following roles:
![]() Authenticates DirectAccess clients connecting from untrusted networks
Authenticates DirectAccess clients connecting from untrusted networks
![]() Functions as an IPsec tunnel mode endpoint for DirectAccess traffic from untrusted networks
Functions as an IPsec tunnel mode endpoint for DirectAccess traffic from untrusted networks
Before you can configure a computer running Windows Server 2012 or Windows Server 2012 R2 to function as a DirectAccess server, you must ensure that it meets the following requirements:
![]() The server must be a member of an Active Directory Directory Services domain.
The server must be a member of an Active Directory Directory Services domain.
![]() If the server is connected directly to the Internet, it must have two network adapters: one that has a public IP address and one that is connected to the trusted internal network.
If the server is connected directly to the Internet, it must have two network adapters: one that has a public IP address and one that is connected to the trusted internal network.
![]() The server does not need to be directly connected to the Internet if it is published through Microsoft Forefront Threat Management Gateway (TMS) 2010 or Microsoft Forefront Unified Access Gateway (UAG) 2010. In this scenario, the DirectAccess server can have only one network adapter that is connected to the trusted network.
The server does not need to be directly connected to the Internet if it is published through Microsoft Forefront Threat Management Gateway (TMS) 2010 or Microsoft Forefront Unified Access Gateway (UAG) 2010. In this scenario, the DirectAccess server can have only one network adapter that is connected to the trusted network.
![]() The DirectAccess server can be deployed behind a NAT device, which limits DirectAccess to use IP over HTTPS (IP-HTTPS).
The DirectAccess server can be deployed behind a NAT device, which limits DirectAccess to use IP over HTTPS (IP-HTTPS).
![]() A server connected to the Internet requires only a single public IPv4 address. However, Two-Factor Authentication (Smart Card Or One-Time Password [OTP]), shown in Figure 8-31, requires two consecutive public IPv4 addresses.
A server connected to the Internet requires only a single public IPv4 address. However, Two-Factor Authentication (Smart Card Or One-Time Password [OTP]), shown in Figure 8-31, requires two consecutive public IPv4 addresses.
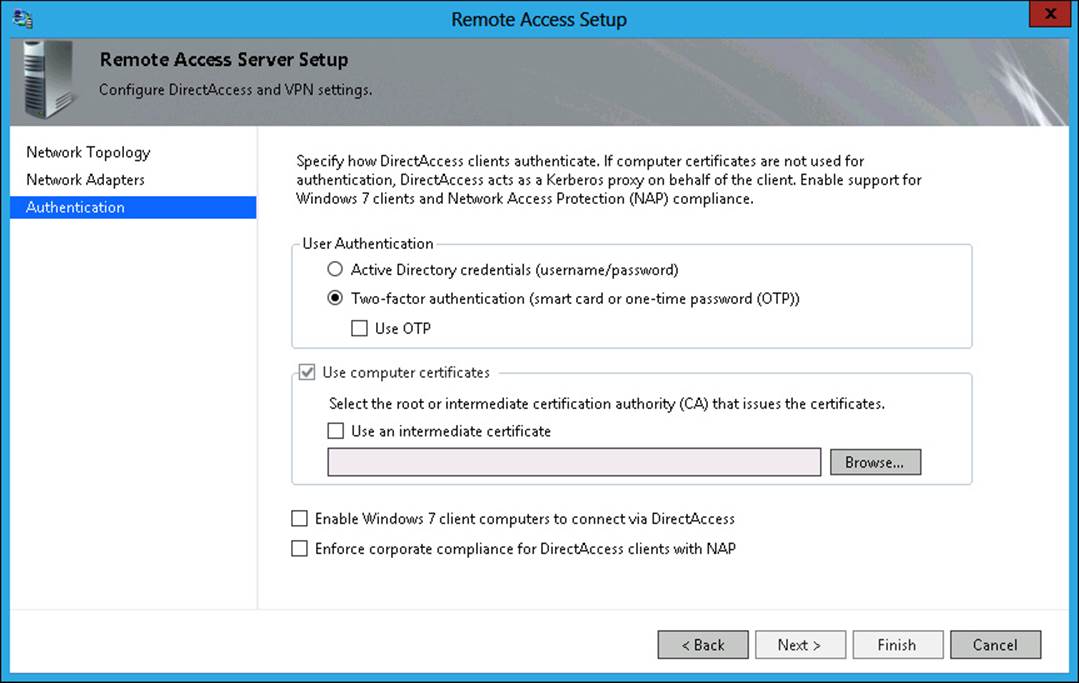
FIGURE 8-31 Configuring two-factor authentication
![]() The DirectAccess server can also host a VPN server. This functionality was not present in the Windows Server 2008 R2 version of DirectAccess.
The DirectAccess server can also host a VPN server. This functionality was not present in the Windows Server 2008 R2 version of DirectAccess.
![]() You can configure DirectAccess in a network load-balanced configuration of up to eight nodes.
You can configure DirectAccess in a network load-balanced configuration of up to eight nodes.
![]() The SSL certificate installed on the DirectAccess server must contain an FQDN that resolves through DNS servers on the Internet to the public IP address assigned to the DirectAccess server or to the gateway through which the DirectAccess server is published.
The SSL certificate installed on the DirectAccess server must contain an FQDN that resolves through DNS servers on the Internet to the public IP address assigned to the DirectAccess server or to the gateway through which the DirectAccess server is published.
![]() The SSL certificate installed on the DirectAccess server must have a Certificate Revocation List (CRL) distribution point that is accessible to clients on the Internet.
The SSL certificate installed on the DirectAccess server must have a Certificate Revocation List (CRL) distribution point that is accessible to clients on the Internet.
Real World: Certificate requirements
You should strongly consider obtaining the SSL certificate for your organization’s DirectAccess server from a public CA. If you do this, you don’t have to worry about publishing the CRL from your internal certificate services deployment out to a location that is accessible to the Internet. Using a trusted third-party CA ensures that the CRL will be available to clients on the Internet. Although purchasing a certificate costs money, the financial cost is likely to be less than the cost to the organization of having you install and configure a CRL distribution point on a location accessible to clients on the Internet.
A DirectAccess implementation also relies on the following infrastructure being present:
![]() Active Directory domain controller DirectAccess clients and servers must be members of an Active Directory domain. By necessity, when you deploy a domain controller, you also deploy a DNS server. By its nature, Active Directory also makes Group Policy available.
Active Directory domain controller DirectAccess clients and servers must be members of an Active Directory domain. By necessity, when you deploy a domain controller, you also deploy a DNS server. By its nature, Active Directory also makes Group Policy available.
![]() Group Policy When you configure DirectAccess, the setup wizard creates a set of Group Policy Objects (GPOs) that are configured with settings that you choose in the wizard. They apply to DirectAccess clients, DirectAccess servers, and servers that you use to manage DirectAccess.
Group Policy When you configure DirectAccess, the setup wizard creates a set of Group Policy Objects (GPOs) that are configured with settings that you choose in the wizard. They apply to DirectAccess clients, DirectAccess servers, and servers that you use to manage DirectAccess.
Prepare DNS servers by removing the ISATAP name from the global query block list. You must take this step on all DNS servers hosted on computers running the Windows Server 2008, Windows Server 2008 R2, Windows Server 2012, and Windows Server 2012 R2 operating systems. You can do this by removing ISATAP from the GlobalQueryBlockList value on the Computer\HKEY_LOCAL_MACHINE\SYSTEM\CurrentControlSet\Services\DNS\Parameters hive of the registry so that it contains only the wpad entry, as shown in Figure 8-32. You’ll have to restart the DNS server after making this configuration change.
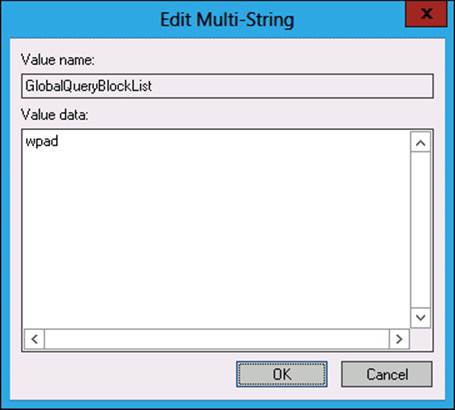
FIGURE 8-32 The wpad entry
You can also remove ISATAP from the DNS global query block list by issuing the following command on each DNS server.
Dnscmd /config /globalqueryblocklist wpad
More Info: DirectAccess infrastructure
For more information about configuring a DirectAccess server, consult the following TechNet article at http://technet.microsoft.com/en-us/library/jj574180.aspx.
Network Location Server
The Network Location Server (NLS) is a specially configured server that enables clients to determine whether they are on a trusted or an untrusted network. The NLS server’s only function is to respond to specially crafted HTTPS requests. When the client determines that it has a connection to any network, it sends this specially crafted HTTPS request. If there is a response to this request, the client determines that it is on a trusted network and disables the DirectAccess components. If there is no response to this request, the client assumes that it is connected to an untrusted network and initiates a DirectAccess connection.
DirectAccess clients are informed of the location of the NLS through Group Policy. You don’t have to configure these policies manually because they are created automatically when you use the DirectAccess Setup Wizard. Any server that hosts a website and has an SSL certificate installed can function as the NLS. You should ensure that the NLS is highly available because a failure of this server will cause all clients configured for DirectAccess on the trusted network to assume that they are on an untrusted network.
![]() Quick check
Quick check
![]() What is the name of the server that the DirectAccess client contacts to determine whether it is on the trusted network?
What is the name of the server that the DirectAccess client contacts to determine whether it is on the trusted network?
Quick check answer
![]() The DirectAccess client contacts the NLS to determine whether it is on the trusted network.
The DirectAccess client contacts the NLS to determine whether it is on the trusted network.
DirectAccess clients
DirectAccess clients have the following requirements:
![]() The computer either must already be a member of an Active Directory domain or be configured for offline domain join. The computer must be a member of the domain prior to actually using DirectAccess to connect to internal network resources.
The computer either must already be a member of an Active Directory domain or be configured for offline domain join. The computer must be a member of the domain prior to actually using DirectAccess to connect to internal network resources.
![]() The computer must be running one of the following operating systems:
The computer must be running one of the following operating systems:
![]() Windows 8.1 Enterprise edition (x86 and x64)
Windows 8.1 Enterprise edition (x86 and x64)
![]() Windows 8 Enterprise edition (x86 and x64)
Windows 8 Enterprise edition (x86 and x64)
![]() Windows 7 Enterprise and Ultimate editions
Windows 7 Enterprise and Ultimate editions
DirectAccess clients are configured through GPOs. The configuration GPO is automatically created through the DirectAccess setup process. This GPO is filtered so that it applies only to the security group that you’ve designated as hosting the DirectAccess clients. These GPOs are shown in Figure 8-33.
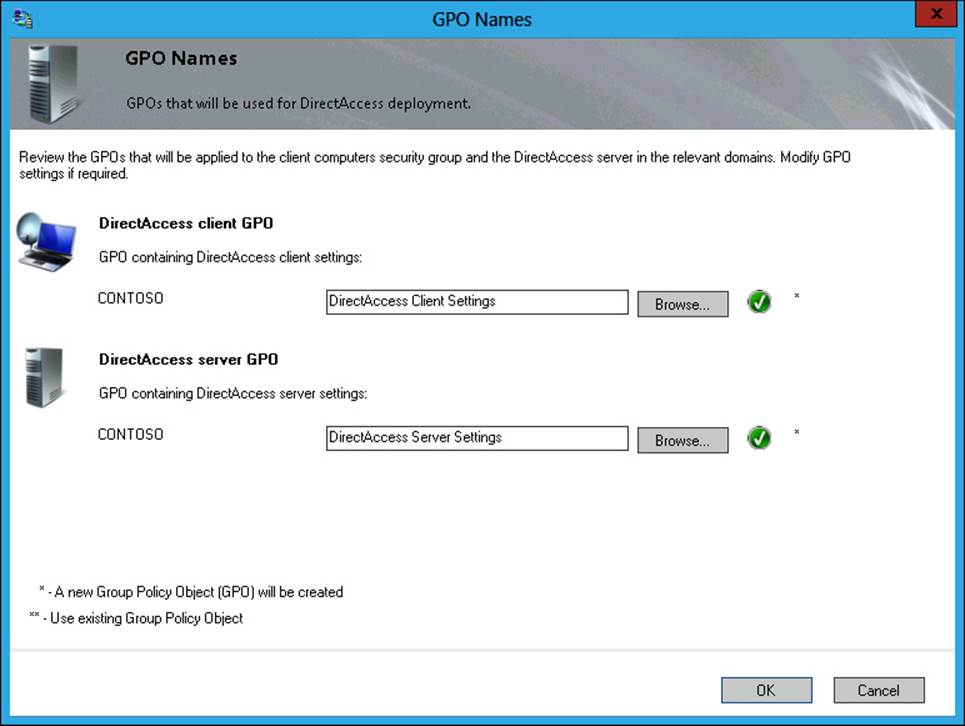
FIGURE 8-33 DirectAccess GPOs
Although you can use all editions of Windows Server 2008 R2, Windows Server 2012, and Windows Server 2012 R2 as DirectAccess clients, this configuration is not recommended because these operating systems are rarely used as desktop operating systems (except for a few IT professionals). A server at a branch office site should use a statically configured WAN link instead of a DirectAccess connection to connect back to resources in the head office.
Configure DirectAccess
After you understand the infrastructure requirements, configuring DirectAccess is straight-forward. To configure DirectAccess, perform the following steps:
1. Create a security group in Active Directory. Add the computer accounts of all computers that will be DirectAccess clients. This security group can have any name, but a name such as DirectAccess_Clients makes it easy to remember why you created it. Figure 8-34 shows the selection of the custom created DirectAccess_Clients group when running the Remote Access Setup Wizard.
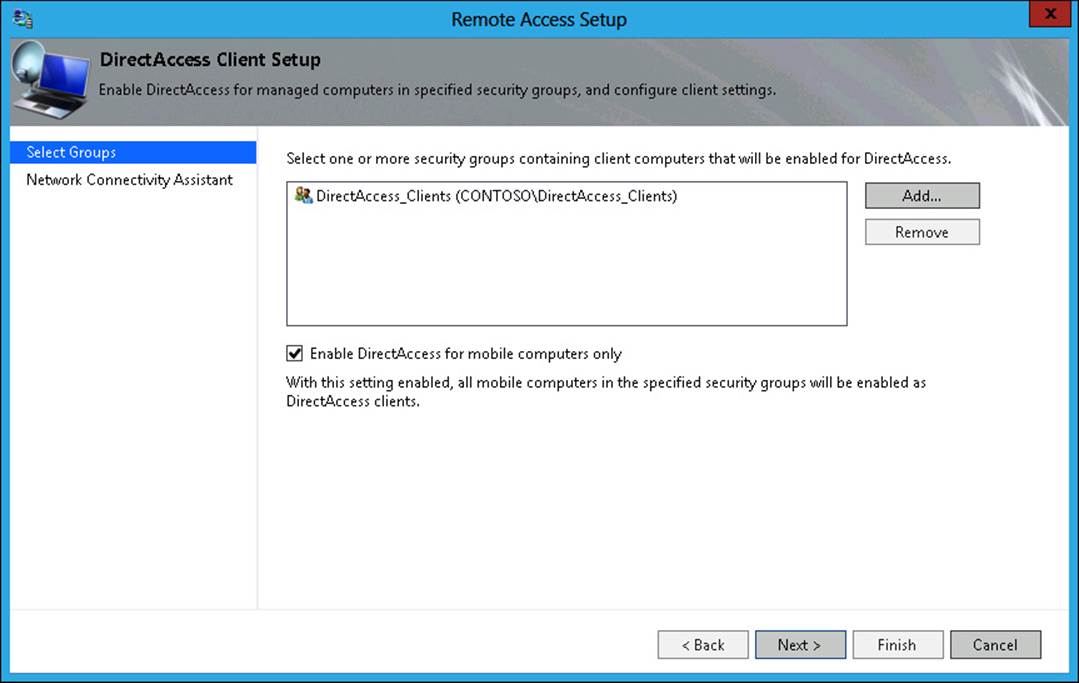
FIGURE 8-34 Creating a security group for DirectAccess clients
2. Ensure that you configure DNS with the following information:
![]() The externally resolvable DNS zone needs to have a record mapping the FQDN of the external interface of the DirectAccess server to the public IPv4 address of the DirectAccess server.
The externally resolvable DNS zone needs to have a record mapping the FQDN of the external interface of the DirectAccess server to the public IPv4 address of the DirectAccess server.
![]() If you use a certificate issued by your organization’s CA, ensure that a DNS record exists for the CRL location.
If you use a certificate issued by your organization’s CA, ensure that a DNS record exists for the CRL location.
![]() The internal DNS zone needs a record mapping the name of the NLS to an IP address.
The internal DNS zone needs a record mapping the name of the NLS to an IP address.
![]() Remove ISATAP from the global query block list on all DNS servers in the organization.
Remove ISATAP from the global query block list on all DNS servers in the organization.
3. If you use your organization’s CA, you have to configure an appropriate certificate template as well as deploy a CRL distribution point in a location that can be accessed by clients on the Internet. This certificate template can be a duplicate of the Web Server Certificate Template, as shown in Figure 8-35. You can use this certificate for both the SSL certificate for the NLS and the IP-HTTPS certificate for the DirectAccess server. If you don’t use your organization’s CA to issue certificates, you can use certificates from a public CA for the NLS and the DirectAccess server.

FIGURE 8-35 Certificate and Web Server Certificate templates
4. Configure firewall rules for all hosts on the trusted network that should be accessible to DirectAccess clients so they enable inbound and outbound ICMPv6 echo requests. You can configure these rules in a GPO that applies to hosts that should be accessible to DirectAccess clients. The rules should have the following properties:
![]() Rule Type: Custom
Rule Type: Custom
![]() Protocol Type: ICMPv6
Protocol Type: ICMPv6
![]() Specific ICMP Types: Echo Request (see Figure 8-36).
Specific ICMP Types: Echo Request (see Figure 8-36).
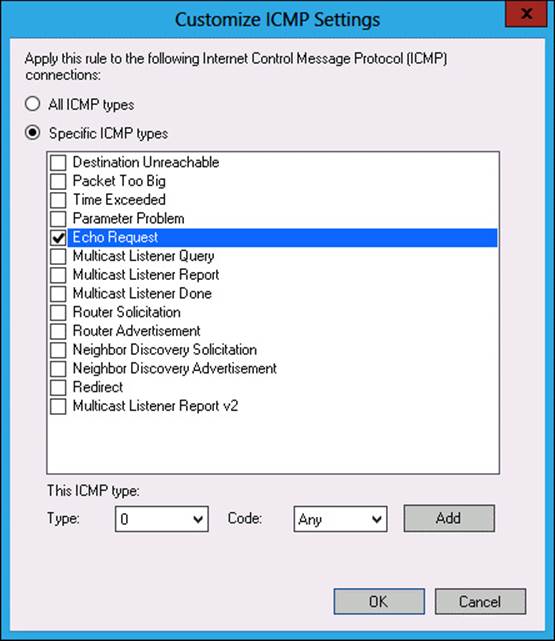
FIGURE 8-36 IPv6 ICMP echo request
5. Install the Remote Access role on the computer that will function as the DirectAccess server.
6. Open the Remote Access console. As Figure 8-37 shows, you can choose between running the Getting Started Wizard and the Remote Access Setup Wizard. The Getting Started Wizard enables administrators to quickly deploy DirectAccess by requiring a minimal amount of information. The Remote Access Setup Wizard requires a detailed response, but enables administrators to customize their deployment. The rest of this procedure deals with the Remote Access Setup Wizard.
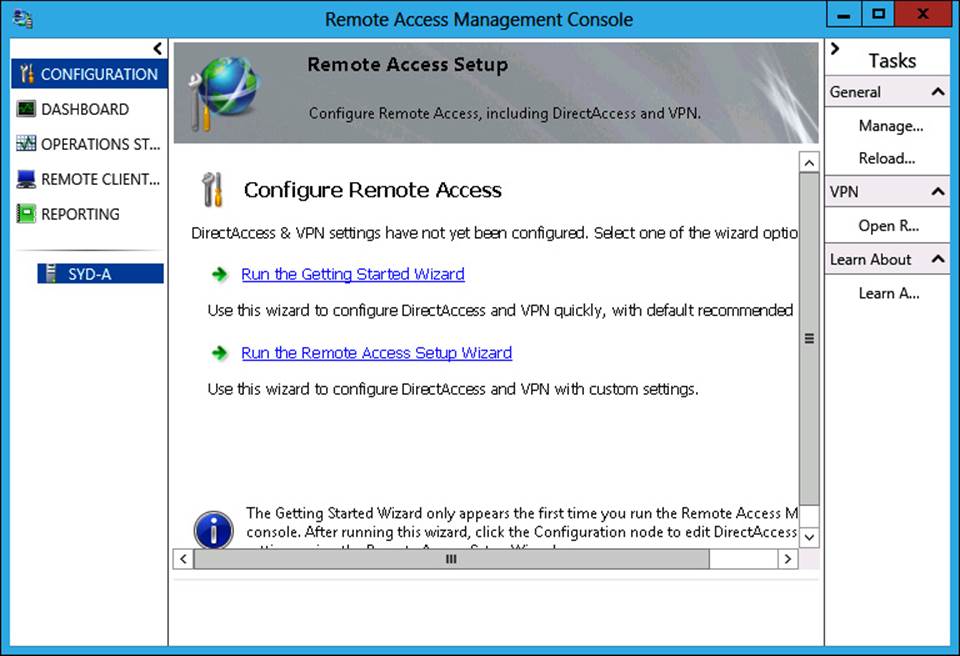
FIGURE 8-37 Choosing a wizard option
7. The Configure Remote Access page of the Configure Remote Access Wizard enables you to choose among deploying DirectAccess And VPN, DirectAccess Only, or VPN Only.
8. When you select Deploy DirectAccess Only, you are provided with the Remote Access Setup diagram shown in Figure 8-38. This diagram involves a series of steps that enable you to configure the DirectAccess server, clients, and infrastructure. There are four steps:
![]() Step 1: Remote Clients
Step 1: Remote Clients
![]() Step 2: Remote Access Server
Step 2: Remote Access Server
![]() Step 3: Infrastructure Servers
Step 3: Infrastructure Servers
![]() Step 4: Application Servers
Step 4: Application Servers
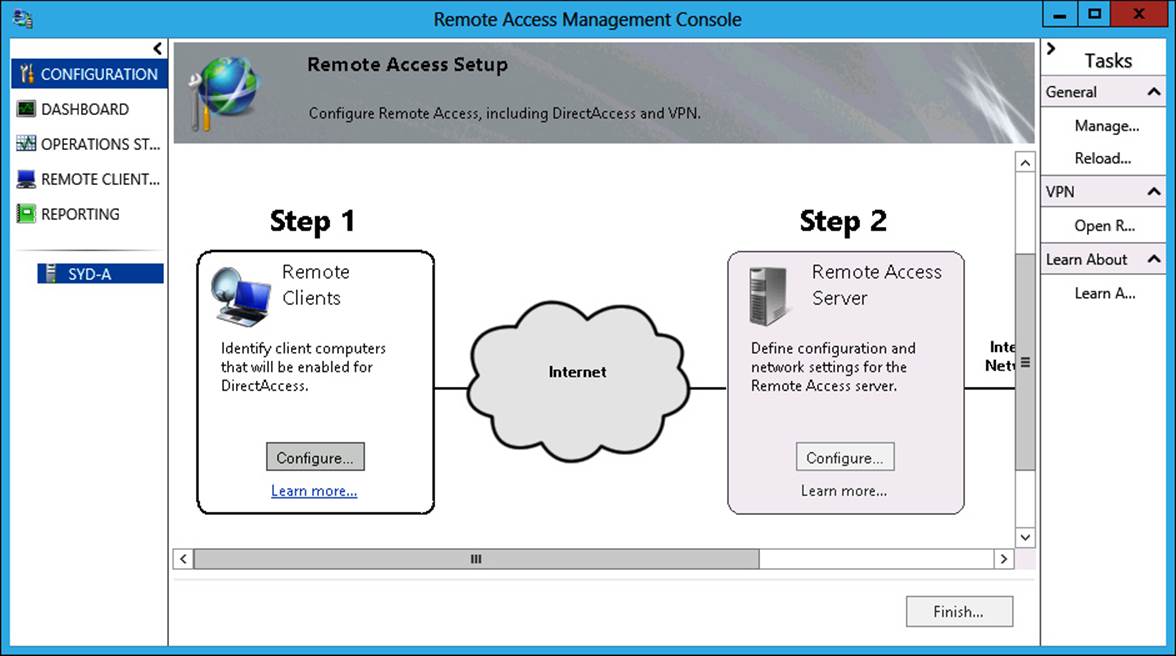
FIGURE 8-38 Remote Access Setup
Step 1: Remote Clients
The Step 1: Remote Clients section of Remote Access Setup enables you configure which computers will function as DirectAccess clients. When you click the Configure button in the Step 1 area, a three-page wizard appears that enables you to configure the following settings:
1. Choose Deploy Full DirectAccess For Client Access And Remote Management or Deploy DirectAccess For Remote Management Only, as shown in Figure 8-39. If you choose the first option, the people using DirectAccess clients can access internal network resources when they have an active Internet connection. If you choose the second option, you can perform management tasks on the computer when it’s connected on the Internet, but the user can’t access internal resources.
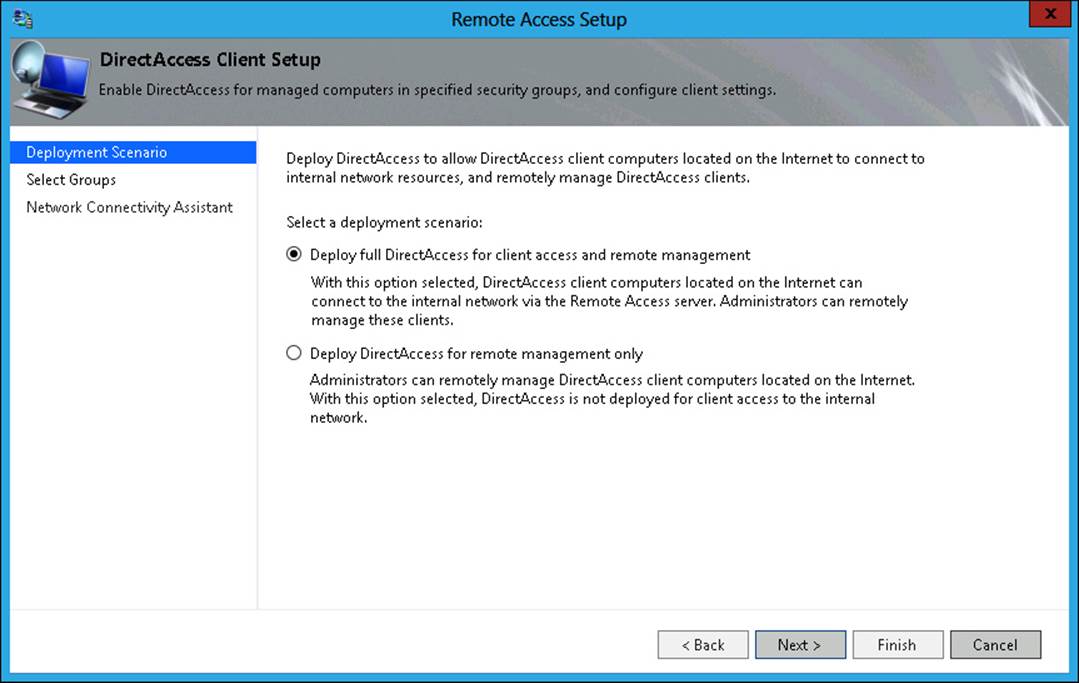
FIGURE 8-39 Select client access and remote management, or remote management only
2. Select which security groups that contain computer accounts will be enabled for DirectAccess, as shown in Figure 8-40. On this page, you can choose Enable DirectAccess For Mobile Computers Only and Use Force Tunneling. When you enable force tunneling, computers designated as DirectAccess clients connect through the remote access server when they connect to both the Internet and the internal trusted network.
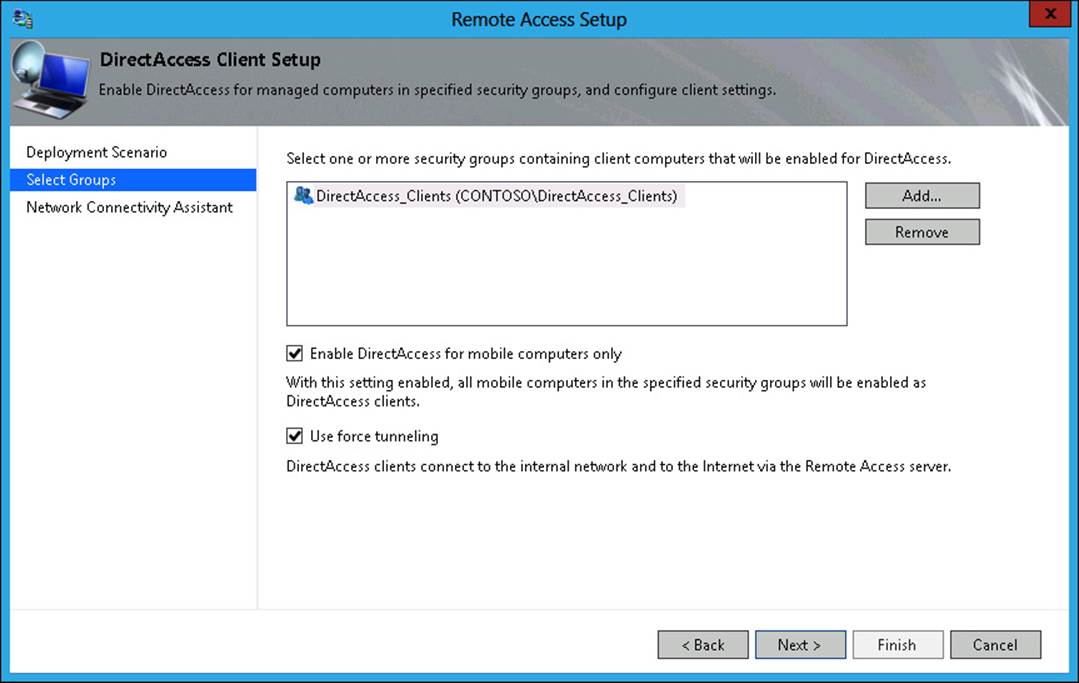
FIGURE 8-40 Selecting which security groups that contain computer accounts are enabled for DirectAccess
3. On the Network Connectivity Assistant (NCA) page shown in Figure 8-41, you can configure connectivity information for clients, such as providing the DirectAccess connection name, the email address of the helpdesk, and whether DirectAccess clients use local name resolution.
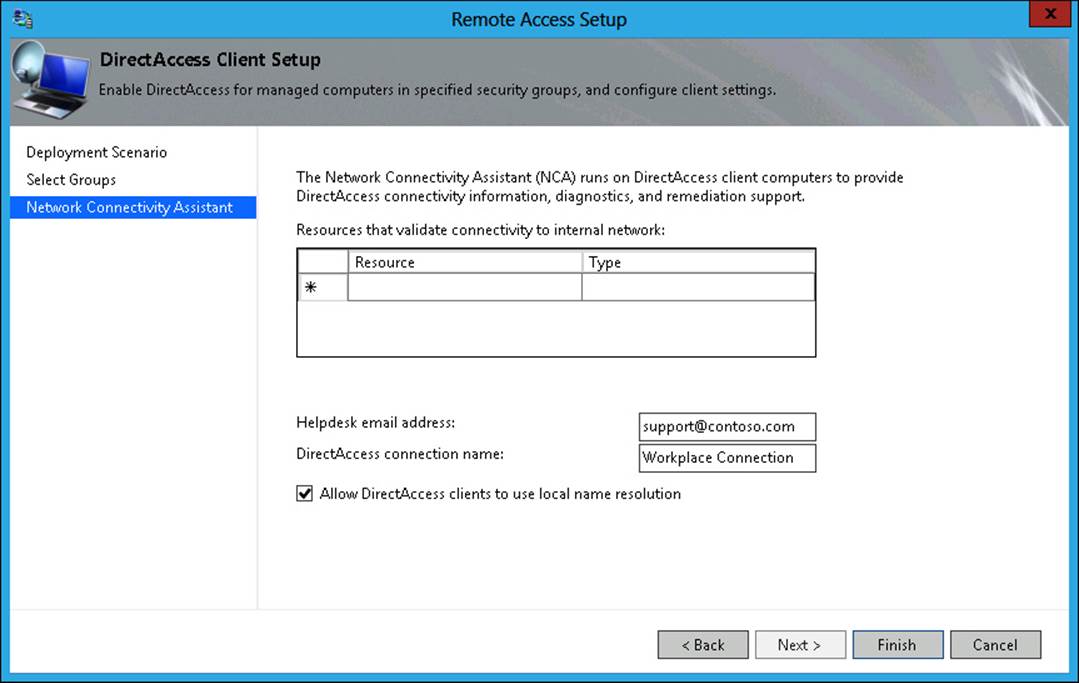
FIGURE 8-41 NCA configuration
Step 2: Remote Access Server
The Step 2: Remote Access Server section of the Remote Access Setup diagram has a three-page wizard that enables you to do the following:
1. Configure the network topology and specify the public name or IPv4 address that clients use to connect to DirectAccess. The topology options are Edge, Behind Edge (Two Network Adapters), and Behind Edge (Single Network Adapter). These topologies were described earlier in the chapter in the DirectAccess topology section.
2. On the Network Adapters page, verify the network adapter configuration. You can also choose the certificate used to authenticate IP-HTTPS connections. It should be a typical SSL certificate that uses an FQDN that clients use for connections. You can also choose to have a self-signed certificate used, although this is not recommended except on test deployments.
3. On the authentication page, choose whether you want to use Active Directory or Two-Factor Authentication. You can also configure authentication to use computer certificates. When you do this, you must specify the CA from which the computer certificates must be issued. As Figure 8-42 shows, you can also determine whether you will allow computers running the Windows 7 operating system to connect and whether you will enforce NAP policies on clients that have made DirectAccess connections.
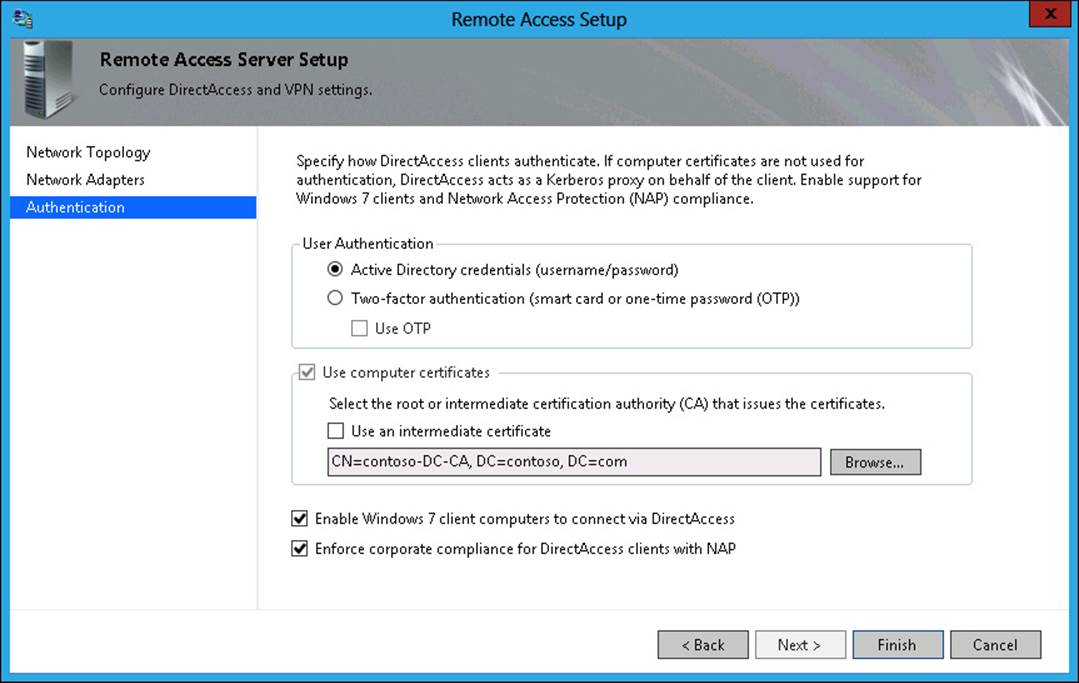
FIGURE 8-42 Configuring remote access authentication
Step 3: Infrastructure Servers
After you have configured the remote access clients and the remote access server, the next step is to configure infrastructure servers. The Infrastructure Server Setup Wizard takes you through the following steps:
1. On the first page, specify the location of the NLS by using the URL of the server. If specifying a separate server, remember to use https rather than http in the address. You also have the option of configuring the DirectAccess server as the remote access server and using a self-signed certificate, as shown in Figure 8-43. Self-signed certificates are more appropriate for tests rather than production deployments.

FIGURE 8-43 NLS address configuration
2. The DNS page enables you to specify the DNS suffixes that should be used with the name resolution and the address of the internal DNS server. On this page, shown in Figure 8-44, you can also configure how clients should use the DNS server of their local Internet connection. These are the options:
![]() Use the DNS server of the local connection if the name isn’t resolvable using the DNS server on the trusted network.
Use the DNS server of the local connection if the name isn’t resolvable using the DNS server on the trusted network.
![]() Use the DNS server of the local connection if the name isn’t resolvable using the DNS server on the trusted network, or if the DNS server on the trusted network cannot be contacted.
Use the DNS server of the local connection if the name isn’t resolvable using the DNS server on the trusted network, or if the DNS server on the trusted network cannot be contacted.
![]() Use the DNS server of the local connection if any DNS error occurs.
Use the DNS server of the local connection if any DNS error occurs.
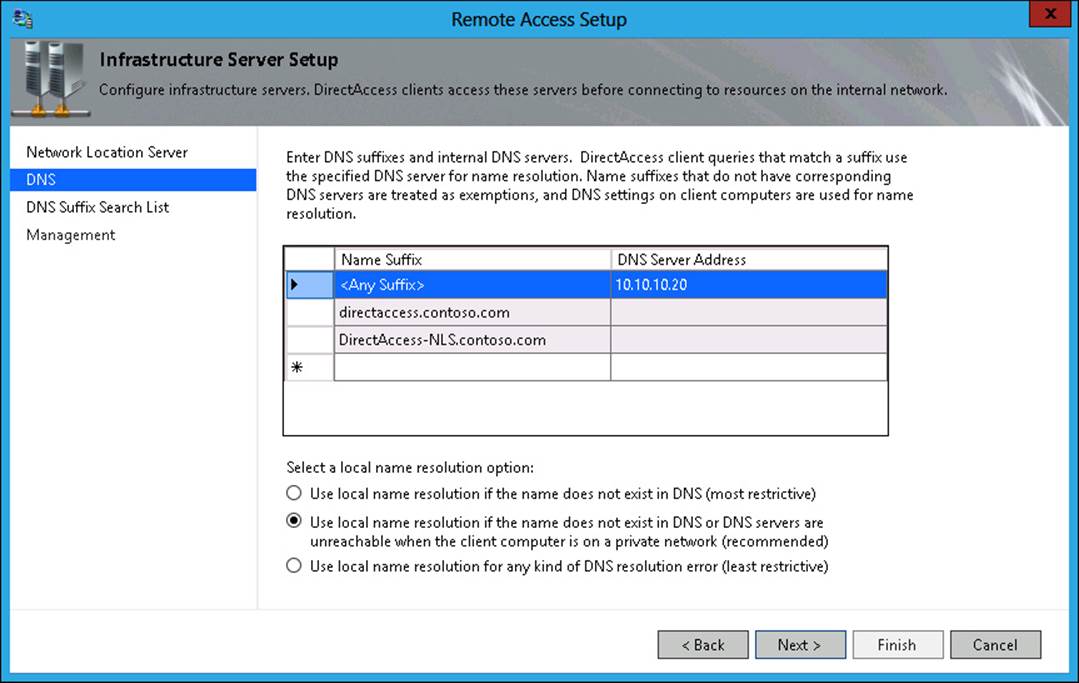
FIGURE 8-44 DirectAccess DNS configuration
3. The DNS Suffix Search List enables you to configure any DNS suffixes that should be used by the client for any unqualified names. The default settings add the domain name suffix.
4. The Management Servers page, shown in Figure 8-45, enables you to configure the servers used for DirectAccess client management. You can also configure NAP remediation servers if you are using NAP with DirectAccess.
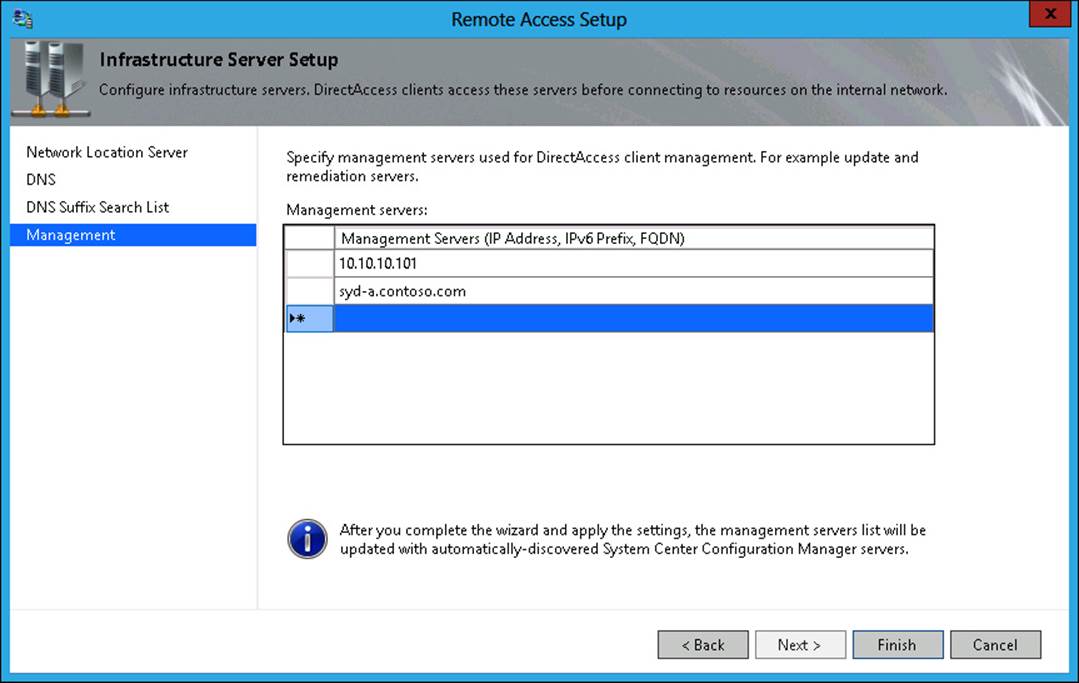
FIGURE 8-45 DirectAccess Management Server configuration
Step 4: Application Servers
Step 4 of the Remote Access Management Console setup enables you to configure the addresses of application servers that require end-to-end authentication when interacting with DirectAccess clients. Unlike the other steps, this step involves configuring only one dialog box, in which you specify the security group that contains the computer accounts for which you want to require end-to-end authentication and encryption. This dialog box is shown in Figure 8-46. You can also use this dialog box to limit DirectAccess clients so they can connect only to servers in the listed groups and can’t connect to other servers on the trusted network. You use this option in environments with stringent security requirements.
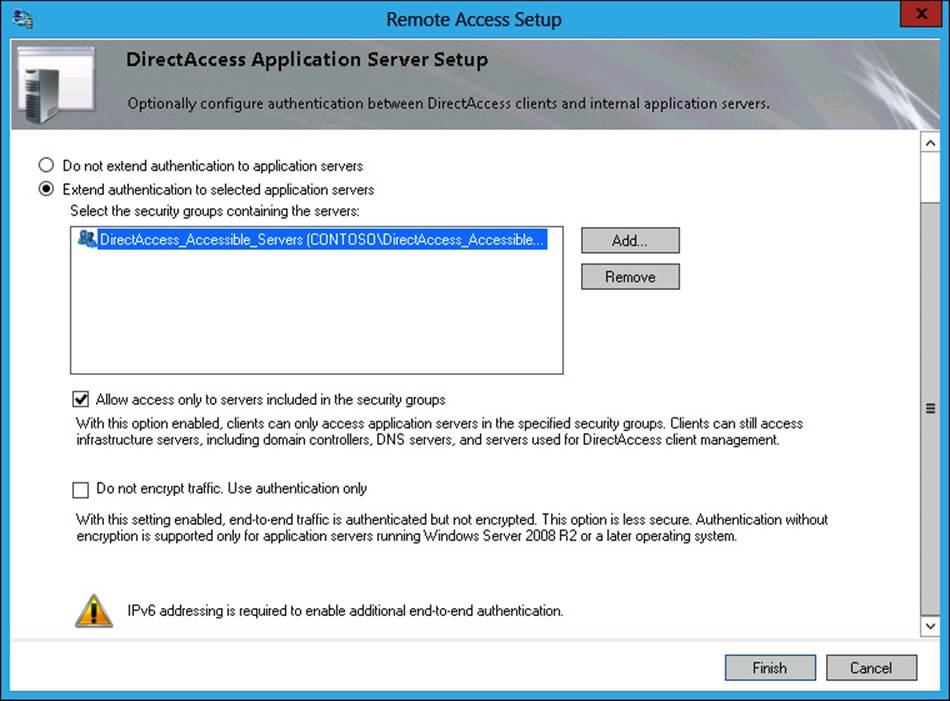
FIGURE 8-46 Configuring authentication between DirectAccess clients and servers
Lesson summary
![]() DirectAccess clients send traffic to the NLS server to determine whether they are located on the trusted network or on the Internet.
DirectAccess clients send traffic to the NLS server to determine whether they are located on the trusted network or on the Internet.
![]() You need to install an SSL/web server certificate from a trusted CA on the NLS server and the DirectAccess server.
You need to install an SSL/web server certificate from a trusted CA on the NLS server and the DirectAccess server.
![]() You must remove ISATAP from the DNS global query block list on all DNS servers in order to use DirectAccess.
You must remove ISATAP from the DNS global query block list on all DNS servers in order to use DirectAccess.
![]() A DirectAccess Edge deployment requires two network adapters. One adapter is connected to the Internet. The other adapter is connected to an internal trusted network.
A DirectAccess Edge deployment requires two network adapters. One adapter is connected to the Internet. The other adapter is connected to an internal trusted network.
![]() A DirectAccess server can be deployed behind an edge device, such as a firewall, with one or two network adapters.
A DirectAccess server can be deployed behind an edge device, such as a firewall, with one or two network adapters.
![]() The DirectAccess server must be a member of an Active Directory domain.
The DirectAccess server must be a member of an Active Directory domain.
![]() If deployed behind a NAT device, DirectAccess can use only IP over HTTPS.
If deployed behind a NAT device, DirectAccess can use only IP over HTTPS.
![]() DirectAccess can be deployed with a single public IPv4 address.
DirectAccess can be deployed with a single public IPv4 address.
![]() To support two-factor authentication or one-time password, the DirectAccess server requires two consecutive public IPv4 addresses.
To support two-factor authentication or one-time password, the DirectAccess server requires two consecutive public IPv4 addresses.
![]() Only computers running Windows 8.1 Enterprise Edition, Windows 8 Enterprise edition and Windows 7 Enterprise and Ultimate editions can be configured to use DirectAccess.
Only computers running Windows 8.1 Enterprise Edition, Windows 8 Enterprise edition and Windows 7 Enterprise and Ultimate editions can be configured to use DirectAccess.
![]() DirectAccess clients must be members of an Active Directory domain. It is possible to configure remote domain join with DirectAccess.
DirectAccess clients must be members of an Active Directory domain. It is possible to configure remote domain join with DirectAccess.
Lesson review
Answer the following questions to test your knowledge of the information in this lesson. You can find the answers to these questions and explanations of why each answer choice is correct or incorrect in the “Answers” section at the end of this chapter.
1. Which of the following client operating systems can function as a DirectAccess client? (Choose all that apply.)
A. Windows RT
B. Windows 8 Enterprise edition
C. Windows 7 Ultimate edition
D. Windows Vista Ultimate edition
2. You want to use two-factor authentication with DirectAccess clients. Which of the following conditions must be met to implement this configuration?
A. The DirectAccess server’s Internet interface must be assigned a single public IPv4 address.
B. The DirectAccess server’s Internet interface must be assigned two consecutive public IPv4 addresses.
C. The DirectAccess server must be configured to use RADIUS authentication.
D. ISATAP must be added to the DNS global query block list on all DNS servers.
3. On which of the following servers must you deploy a web server/SSL certificate when deploying DirectAccess? (Choose all that apply.)
A. Active Directory domain controller
B. DNS server
C. DirectAccess server
D. NSL server
4. Which server does a client attempt to contact to determine whether it is on an internal trusted network before initiating a DirectAccess connection?
A. DirectAccess server
B. DNS server
C. NLS server
D. DHCP server
5. In which of the following situations can a DirectAccess client use only IP over HTTPS?
A. The DirectAccess server has a network interface connected directly to the Internet.
B. The DirectAccess server has a network interface with a public IP address and is located on a perimeter network.
C. The DirectAccess server is behind a NAT device.
D. The DirectAccess server’s public interface is assigned two nonconsecutive public IPv4 addresses.
Practice exercises
The goal of this section is to provide you with hands-on practice with the following:
![]() Configure a RADIUS server
Configure a RADIUS server
![]() Configure a RADIUS server group
Configure a RADIUS server group
![]() Configure a RADIUS client
Configure a RADIUS client
![]() Set up RADIUS accounting
Set up RADIUS accounting
![]() Deploy a VPN server
Deploy a VPN server
To perform the exercises in this section, you need access to an evaluation version of Windows Server 2012 R2. You should also have access to virtual machines SYD-DC, MEL-DC, CBR-DC, and ADL-DC, the setup instructions for which are described in the Introduction. You should ensure that you have a checkpoint of these virtual machines that you can revert to at the end of the practice exercises. You should revert the virtual machines to this initial state prior to beginning these exercises.
Exercise 1: Configure a RADIUS server
In this exercise, you configure SYD-DC as a RADIUS server. To complete this exercise, perform the following steps:
1. Start SYD-DC.
2. Start MEL-DC and sign on as Administrator.
3. Open the Windows PowerShell prompt and type the following commands.
Add-Computer -DomainName contoso.com
4. In the Windows PowerShell Credentials dialog box type don_funk@contoso.com and Pa$$w0rd, and click OK.
5. Type the following command in the Windows PowerShell prompt to restart the computer.
Restart-Computer
6. Sign on to SYD-DC as Contoso\don_funk.
7. In the Server Manager console, click Manage, and click Add Roles And Features.
8. On the Before You Begin page of the Add Roles And Features Wizard, click Next.
9. On the Select Installation Type page, click Role-Based Or Feature-Based Installation, and click Next.
10. On the Select Destination Server page, click SYD-DC.contoso.com, and click Next.
11. On the Server Roles page, click Network Policy And Access Services.
12. In the Add Roles And Features Wizard dialog box, click Add Features. Click Next.
13. On the Select Features page, click Next.
14. On the Network Policy And Access Services page, click Next.
15. On the Select Role Services page, verify that Network Policy Server is selected, as shown in Figure 8-47, and click Next.
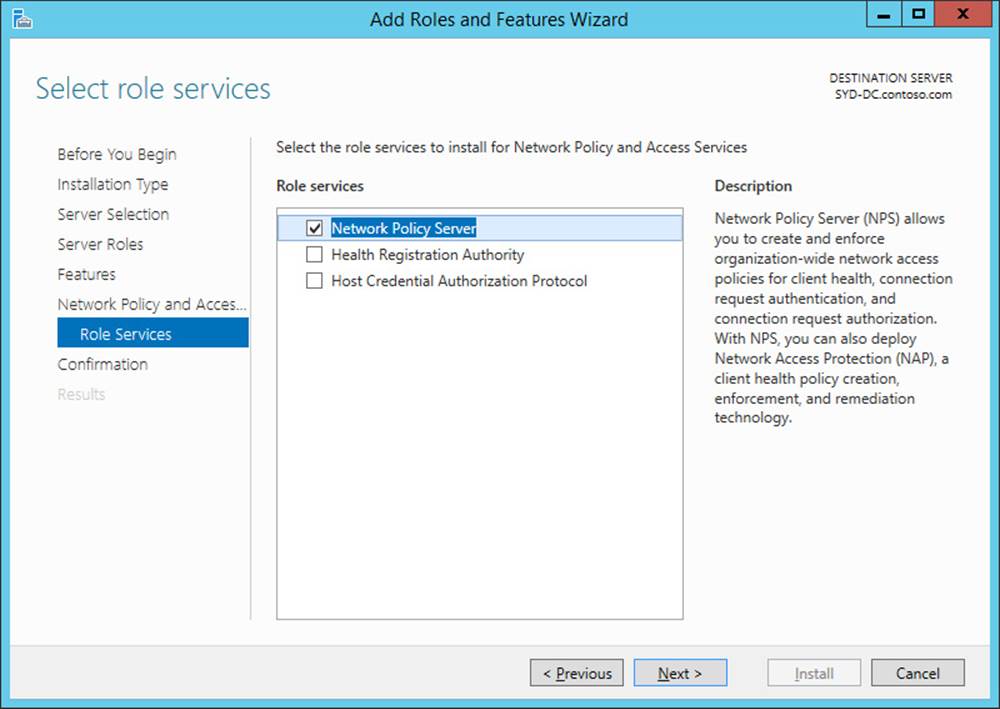
FIGURE 8-47 Verifying NPS role service
16. On the Confirmation page, click Install, and then click Close.
Exercise 2: Configure a remote RADIUS server group
In this exercise, you configure a RADIUS server group. To complete this exercise, perform the following steps:
1. In the Server Manager console on SYD-DC, click Tools, and then click Network Policy Server.
2. In the NPS console, expand RADIUS Clients And Servers and click Remote RADIUS Server Groups, as shown in Figure 8-48.
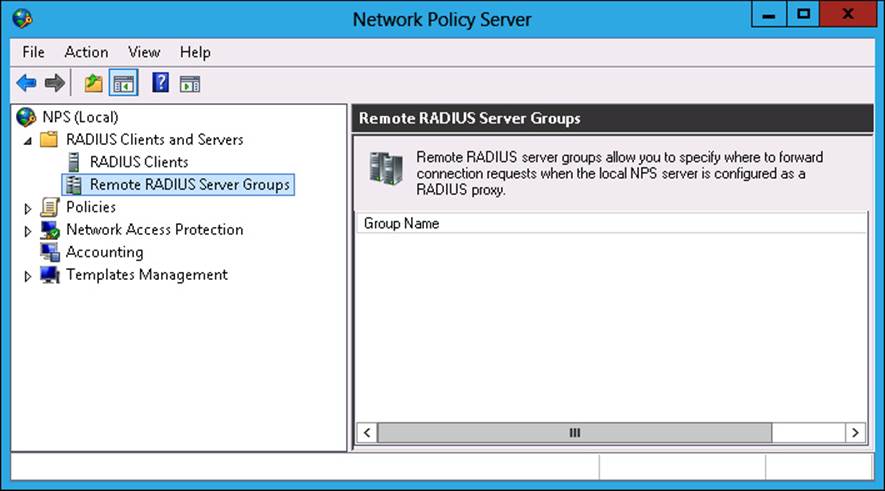
FIGURE 8-48 Remote RADIUS Server Groups node
3. On the Action menu, click New.
4. In the New Remote RADIUS Server Group dialog box, type the name CONTOSO REMOTE GROUP, as shown in Figure 8-49.
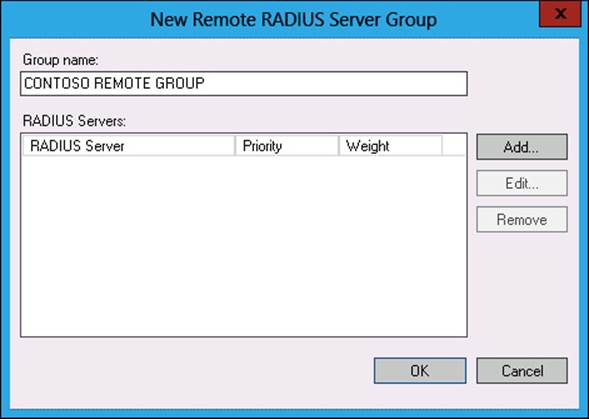
FIGURE 8-49 Contoso remote RADIUS server group
5. In the New Remote RADIUS Server Group dialog box, click Add.
6. In the Add RADIUS Server dialog box, type SYD-RADIUS-1.contoso.com, as shown in Figure 8-50, and click OK. Do not click Verify.
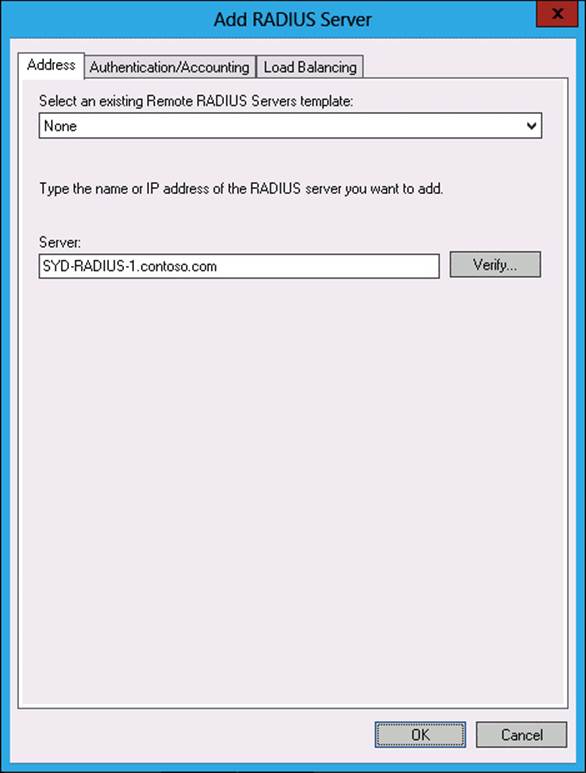
FIGURE 8-50 New remote RADIUS server
7. Click OK to close the New Remote RADIUS Server Group dialog box.
Exercise 3: Configure a RADIUS client
In this exercise, you configure a RADIUS client. To complete this exercise, perform the following steps:
1. On SYD-DC, in the NPS console, click RADIUS Clients under RADIUS Clients And Servers.
2. On the Action menu, click New.
3. In the New RADIUS client dialog box, configure the following information and click OK (see Figure 8-51).
![]() Friendly Name: MEL-DC
Friendly Name: MEL-DC
![]() Address: MEL-DC.contoso.com
Address: MEL-DC.contoso.com
![]() Shared Secret: Pa$$w0rd
Shared Secret: Pa$$w0rd
![]() Confirm Shared Secret: Pa$$w0rd
Confirm Shared Secret: Pa$$w0rd
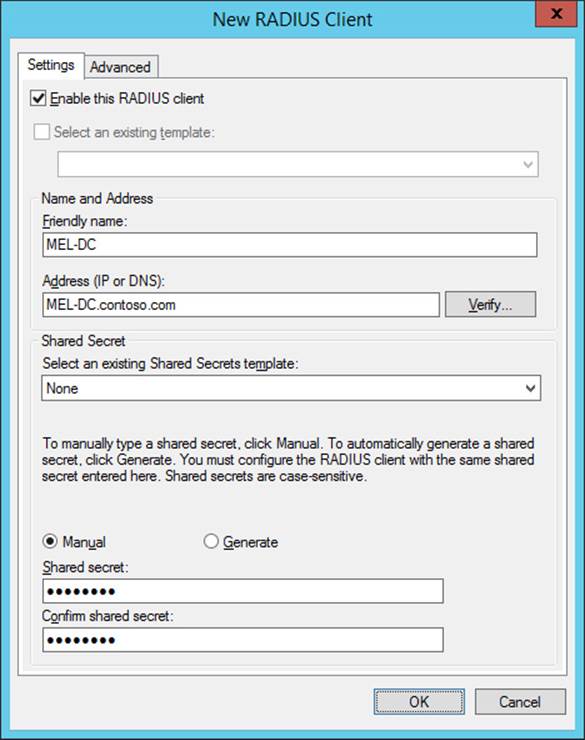
FIGURE 8-51 New RADIUS client
Exercise 4: Set up RADIUS accounting
In this exercise, you configure RADIUS accounting. To complete this exercise, perform the following steps:
1. In the NPS console on SYD-DC, click Accounting, and then click Configure Accounting.
2. On the Introduction page of the Accounting Configuration Wizard, click Next.
3. On the Select Accounting Options page, click Log To A Text File On The Local Computer, as shown in Figure 8-52, and click Next.
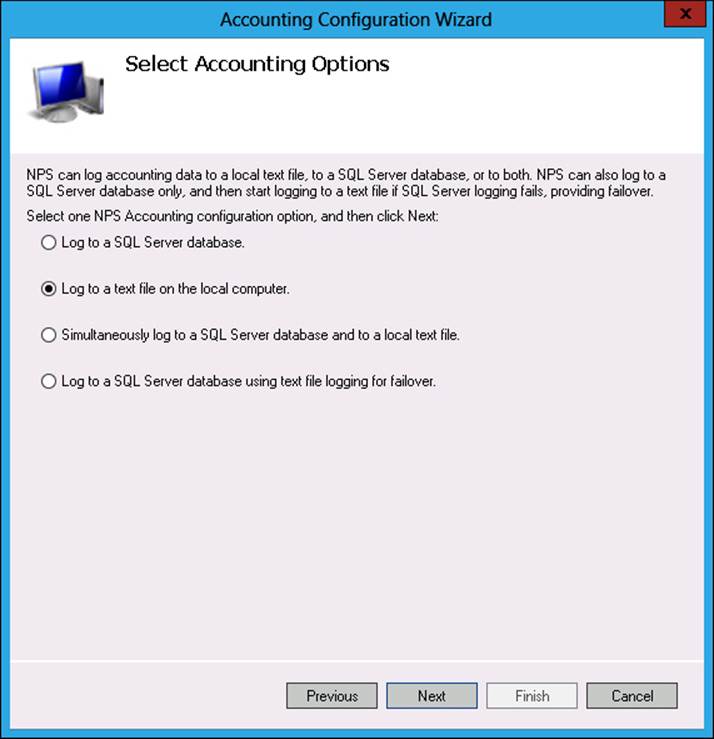
FIGURE 8-52 Accounting options
4. On the Configure Local File Logging page, ensure that Accounting Requests, Authentication Requests, Periodic Accounting Status, and Periodic Authentication Status are selected. Also ensure that logs are written to the C:\Windows\System32\LogFiles folder.
5. Remove the option If Logging Fails, Discard Connection Requests, as shown in Figure 8-53, and click Next.
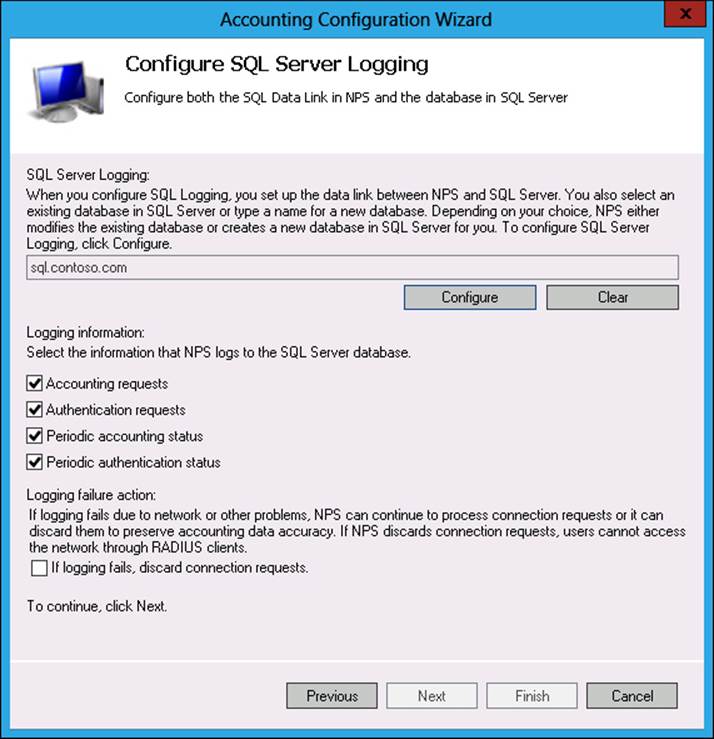
FIGURE 8-53 Local file logging options
6. On the Summary page, click Next, and then click Close.
Exercise 5: Install a VPN server
In this exercise, you configure MEL-DC as a VPN server. To complete this exercise, perform the following steps:
1. Sign on to MEL-DC as Contoso\don_funk.
2. On the Manage menu of the Server Manager console, click Add Roles And Features.
3. On the Before You Begin page, click Next.
4. On the Select Installation Type page, click Role-Based Or Feature-Based Installation, and click Next.
5. On the Select Destination Server page, click MEL-DC.contoso.com, and click Next.
6. On the Select Server Roles page, click Remote Access.
7. On the Select Features page, click Next.
8. On the Remote Access page, click Next.
9. On the Select Role Services page, ensure that DirectAccess And VPN (RAS) is selected, as shown in Figure 8-54, click Add Features, and click Next.
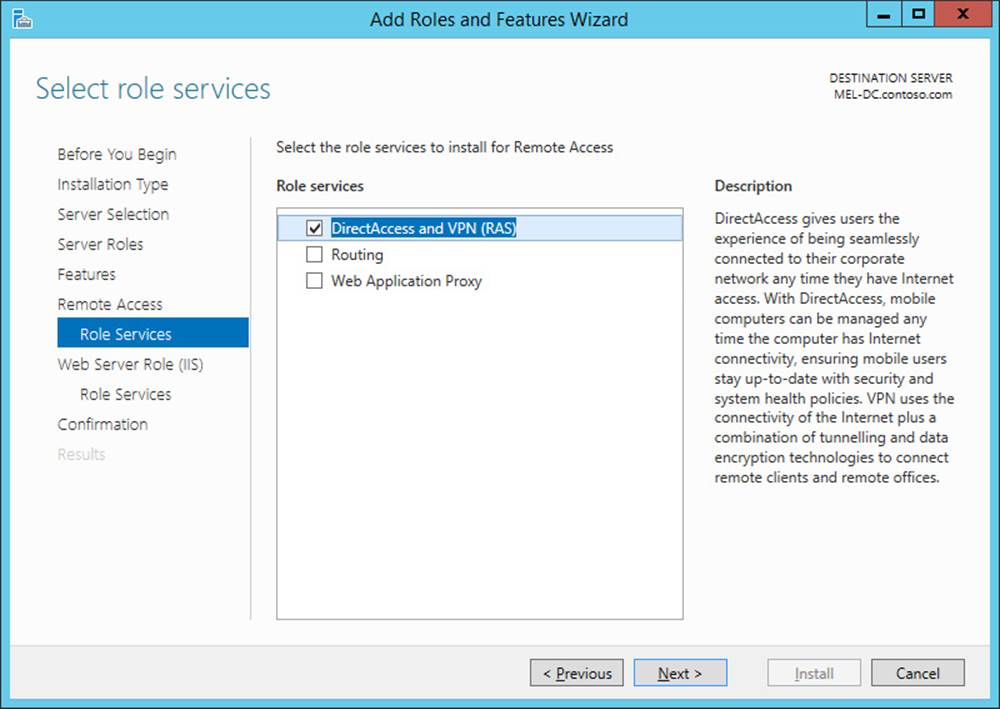
FIGURE 8-54 Local file logging options
10. On the Web Server Role (IIS) page, click Next.
11. On the Select Role Services page, click Next.
12. On the Confirmation page, click Install, and then click Close.
Exercise 6: Configure a VPN server
In this exercise, you configure MEL-DC as a VPN server. To complete this exercise, perform the following steps:
1. On the Tools menu of the Server Manager console on MEL-DC, click Routing And Remote Access.
2. In the Routing And Remote Access console, click MEL-DC.
3. On the Action menu, click Configure and Enable Routing And Remote Access.
4. On the Welcome To The Routing And Remote Access Server Setup Wizard page of the Routing And Remote Access Server Setup Wizard, click Next.
5. On the Configuration page, click Custom Configuration, and click Next.
6. On the Custom Configuration page, click VPN Access, as shown in Figure 8-55, and click Next.
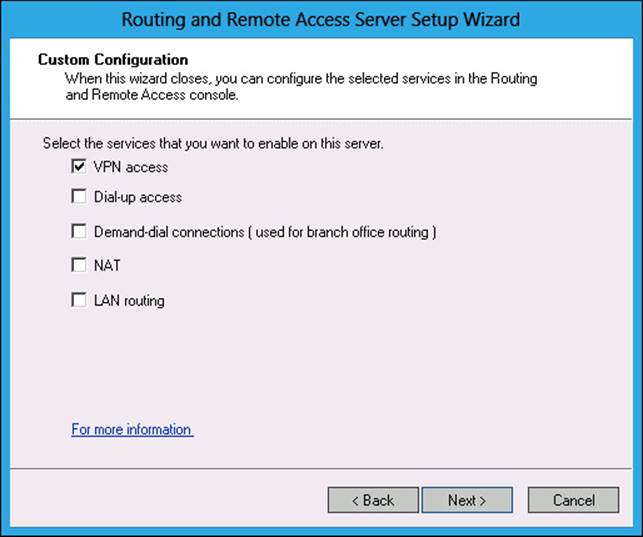
FIGURE 8-55 Choosing VPN Access
7. Click Finish to complete the setup wizard.
8. In the Routing And Remote Access dialog box, click Start Service.
Exercise 7: Prepare for Web Application Proxy
In this exercise, you configure the necessary certificate services infrastructure so that you can deploy ADL-DC as a Web Application Proxy server. To complete this exercise, perform the following steps:
1. While signed on to SYD-DC as contoso\don_funk, right-click the Windows PowerShell icon on the taskbar, right-click Windows PowerShell, and click Run As Administrator.
2. In the Windows PowerShell window, type the following command and press Enter.
Install-WindowsFeature ADCS-Cert-Authority,ADFS-Federation -IncludeManagementTools
3. In the Windows PowerShell window, type the following command and press Enter.
Add-KdsRootKey -EffectiveTime (Get-Date).AddHours(-10)
4. Close the Windows PowerShell window.
5. On the Server Manager console, click the Refresh icon, and then click the Notification icon.
6. Click Configure Active Directory Certificate Services On The Destination Server.
7. On the Credentials page of the AD CS Configuration Wizard, continue to click Next, accepting the default settings until you reach the Confirmation page.
8. On the Confirmation page, click Configure, and then click Close.
9. On the Server Manager console, click Tools, and then click Certification Authority.
10. In the Certification Authority console, expand Contoso-SYD-DC-CA, and click Certificate Templates.
11. On the Action menu, click Manage.
12. In the Certificate Templates Console, click on the Web Server certificate template.
13. On the Action menu, click Duplicate Template.
14. On the General tab of the Properties Of New Template dialog box, set the name to Web Server 2.
15. On the Request Handling tab of the Properties Of New Template dialog box, select Allow Private Key To Be Exported, as shown in Figure 8-56.
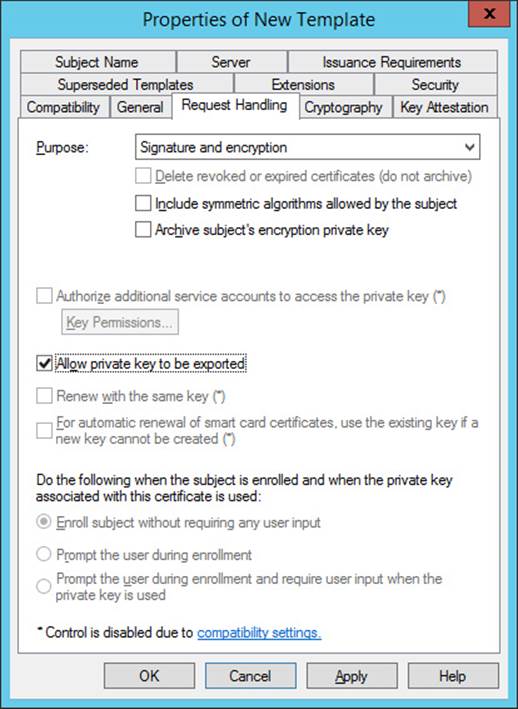
FIGURE 8-56 Allow private key export
16. On the Security tab of the Properties Of New Template dialog box, click Authenticated Users and assign the Read(Allow), Write(Allow), and Enroll(Allow) permissions as shown in Figure 8-57. Click OK to close the Properties Of New Template dialog box.
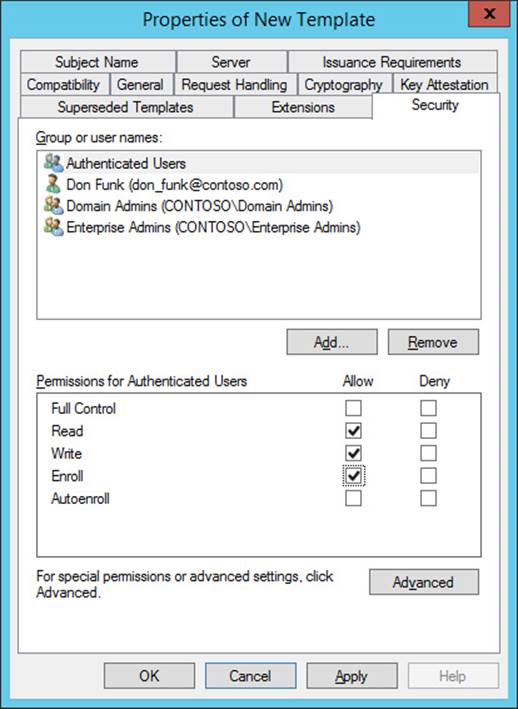
FIGURE 8-57 Configure template permissions
17. Close the Certificate Templates console.
18. In the Certification Authority console, click the Certificate Templates node. On the Action menu click New, and click Certificate Template To Issue.
19. On the Enable Certificate Templates dialog box, click Web Server 2, as shown in Figure 8-58, and click OK.
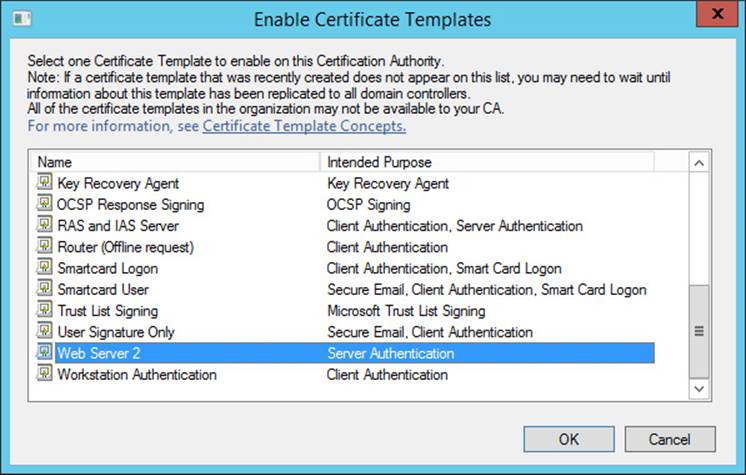
FIGURE 8-58 Select certificate template
20. Right-click the Start button, and click Run.
21. In the Run dialog box, type mmc.exe. On the User Account Control dialog box, click Yes.
22. On the File menu of the Console1 dialog box, click Add/Remove Snap-In.
23. In the Add Or Remove Snap-Ins dialog box, click Certificates, and click Add.
24. On the Certificates Snap-In dialog box, click Computer account, click Next, and then click Finish. Click OK to close the Add Or Remove Snap-Ins dialog box.
25. In the Console1 dialog box, expand Certificates, expand Personal, and click Certificates.
26. From the Action menu, click All Tasks, and click Request New Certificate.
27. On the Before You Begin page of the Certificate Enrollment dialog box, click Next twice.
28. On the Request Certificates page, shown in Figure 8-59, click More Information Is Required To Enroll For This Certificate.
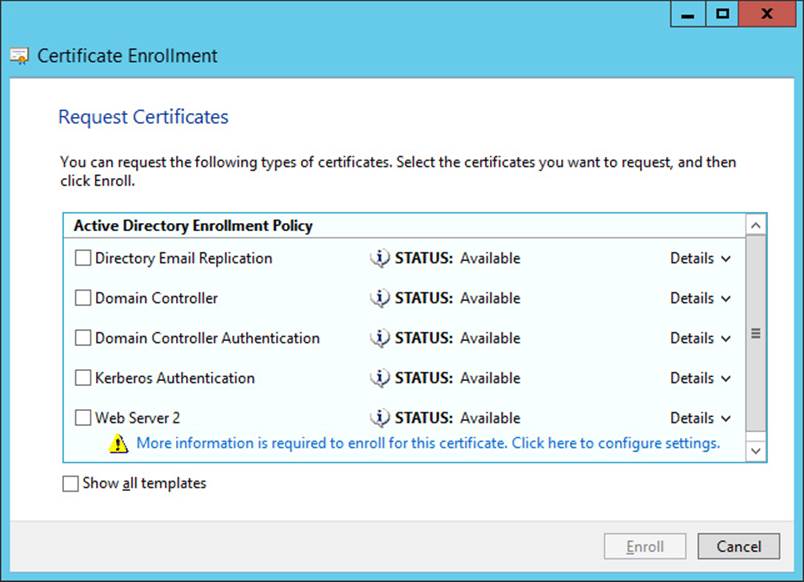
FIGURE 8-59 Configure more information
29. On the Certificate Properties dialog box, click Full DN, and click Common Name.
30. In the value box, type syd-dc.contoso.com and click Add, as shown in Figure 8-60, and then click OK.
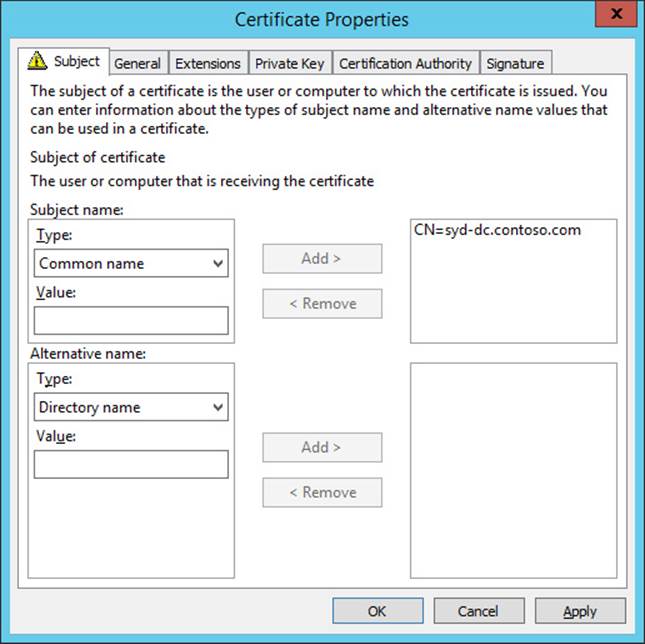
FIGURE 8-60 Specify common name
31. Click Web Server 2, click Enroll, and click Finish.
32. In console 1, click on the Syd-dc.contoso.com certificate.
33. On the Action menu, click All Tasks, and click Export.
34. On the Welcome To The Certificate Export Wizard, click Next.
35. On the Export Private Key page, click Yes, Export The Private Key, as shown in Figure 8-61, and click Next twice.
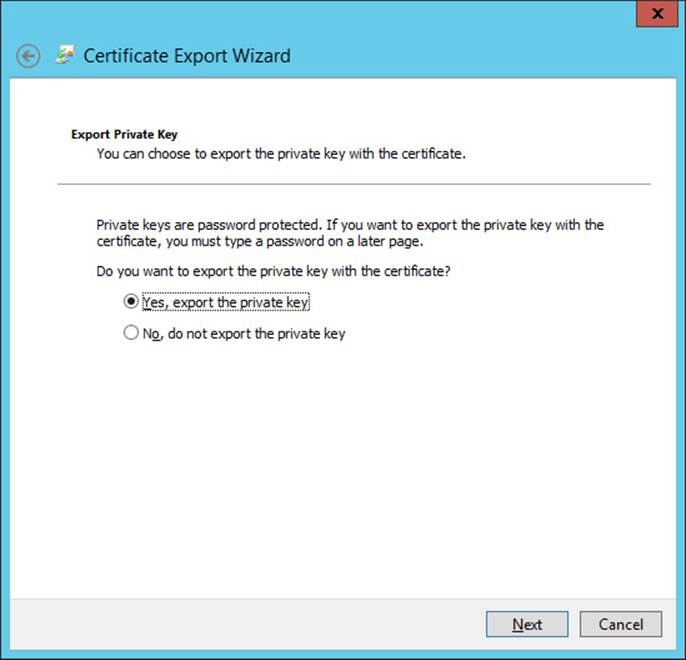
FIGURE 8-61 Allow private key export
36. On the Security page of the Certificate Export Wizard, set the password as Pa$$w0rd and click Next.
37. On the File To Export dialog box, type c:\SYD-DC-CERT, click Next, click Finish, and click OK.
Exercise 8: Configure AD FS to support Web Application Proxy
In this exercise, you configure AD FS on SYD-DC, as this role is needed to support the deployment of ADL-DC as a Web Application Proxy server. To complete this exercise, perform the following steps:
1. On the Server Manager console, click the Notification icon, and then click Configure The Federation Service On This Server.
2. On the Welcome page of the Active Directory Federation Services Configuration Wizard, click Next twice.
3. On the Specify Service Properties page, click the drop down menu next to SSL Certificate and click Syd-dc.contoso.com. Set the Federation Service Display Name to Syd-dc.contoso.com, as shown in Figure 8-62, and click Next.
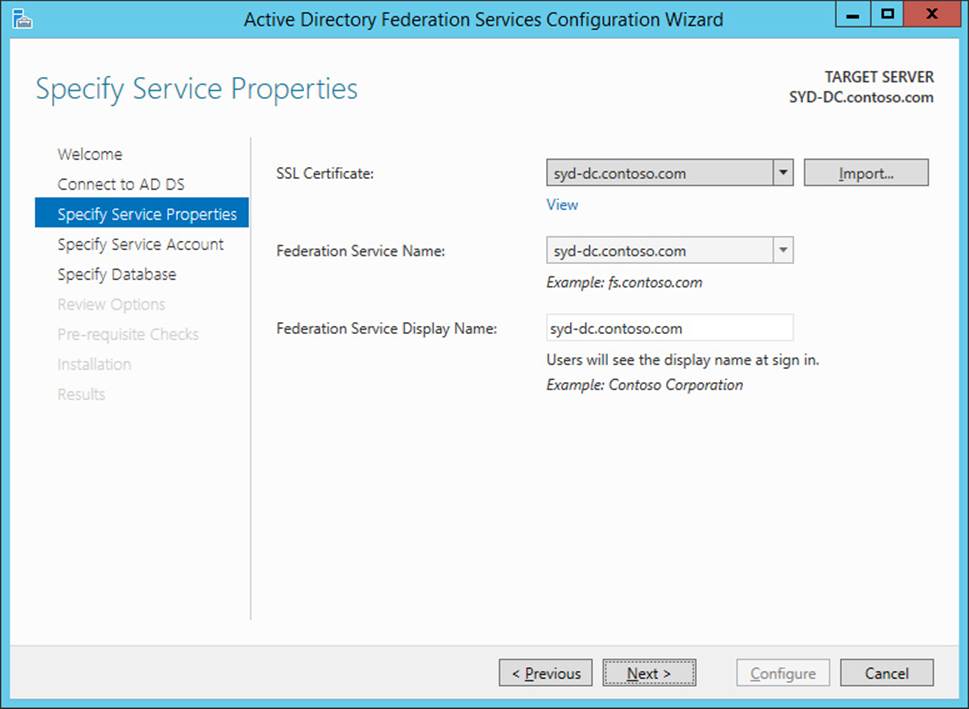
FIGURE 8-62 Allow private key export
4. On the Specify Service Account name page, click Create A Group Managed Service Account, and set the name to CONTOSO\ADFSGMSA as shown in Figure 8-63, and click Next.
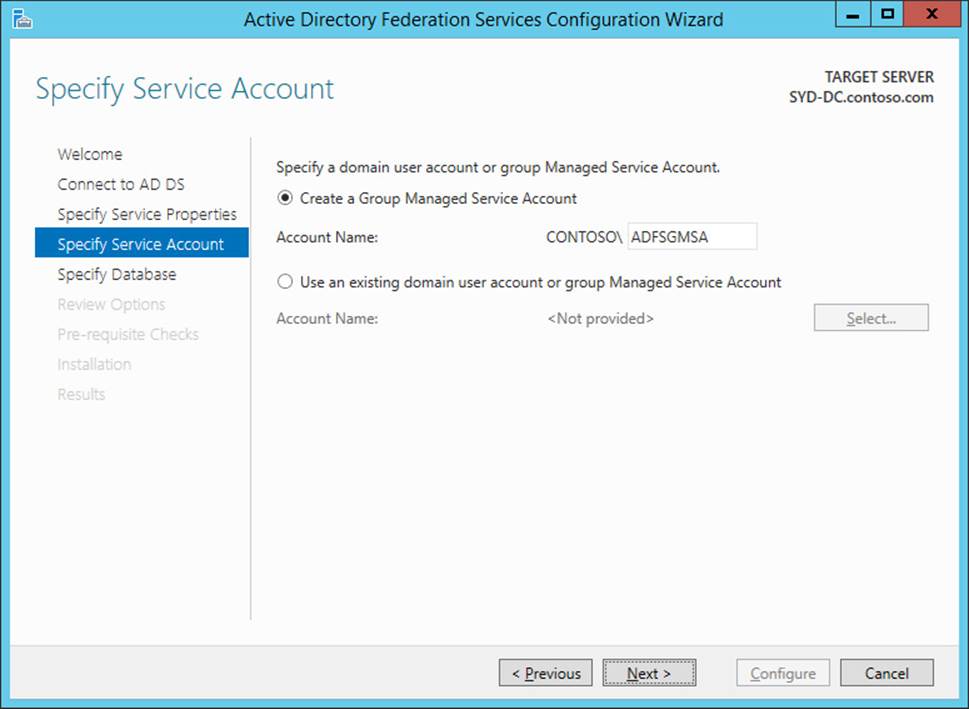
FIGURE 8-63 Specify the group managed service account
5. On the Specify Database page, click Create A Database On This Server Using Windows Internal Database, and click Next twice.
6. On the Pre-requisite Checks page, click Configure.
7. Ignore the warnings on the results page and click Close.
Exercise 9: Deploy Web Application Proxy with pass-through preauthentication
In this exercise, you deploy ADL-DC as a Web Application Proxy server and configure the publication of an application using pass-through preauthentication. To complete this exercise, perform the following steps:
1. Start and sign in to ADL-DC as Administrator with the password Pa$$w0rd.
2. Right-click the Start button, and click Run.
3. In the Run dialog box, type \\SYD-DC\C$\SYD-DC-CERT.pfx and click OK.
4. On the Welcome To The Certificate Import Wizard, click Local Machine, as shown in Figure 8-64, and click Next.
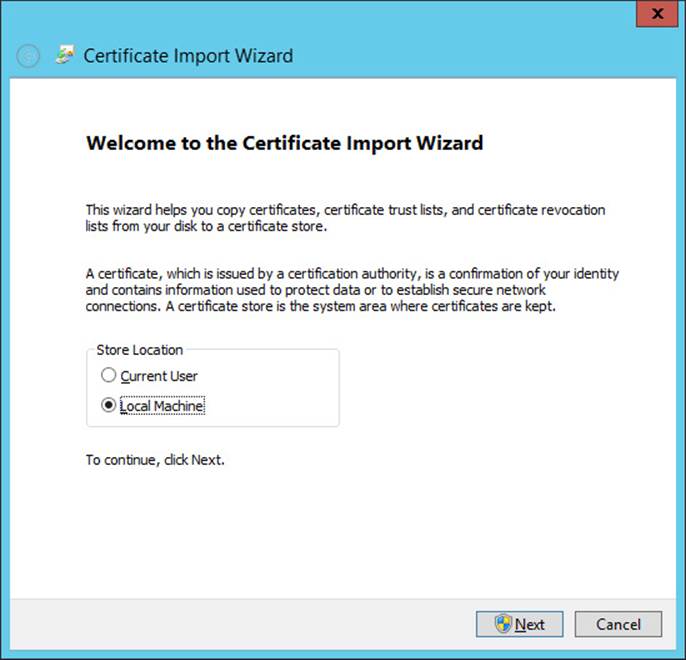
FIGURE 8-64 Import certificate
5. On the File To Import page, click Next.
6. On the Private Key Protection page, type the password Pa$$w0rd and click Next.
7. On the Certificate Store page, select Automatically Select The Certificate Store Based On The Type Of Certificate, click Next, click Finish, and click OK.
8. On the Manage menu of the Server Manager console, click Add Roles And Features.
9. On the Before You Begin page of the Add Roles And Features Wizard, click Next three times.
10. On the Select Server Roles page, click Remote Access, and click Next three times.
11. On the Select Role Services page, click Web Application Proxy, as shown in Figure 8-65, and then click Add Features. Click Next, click Install, and click Close.
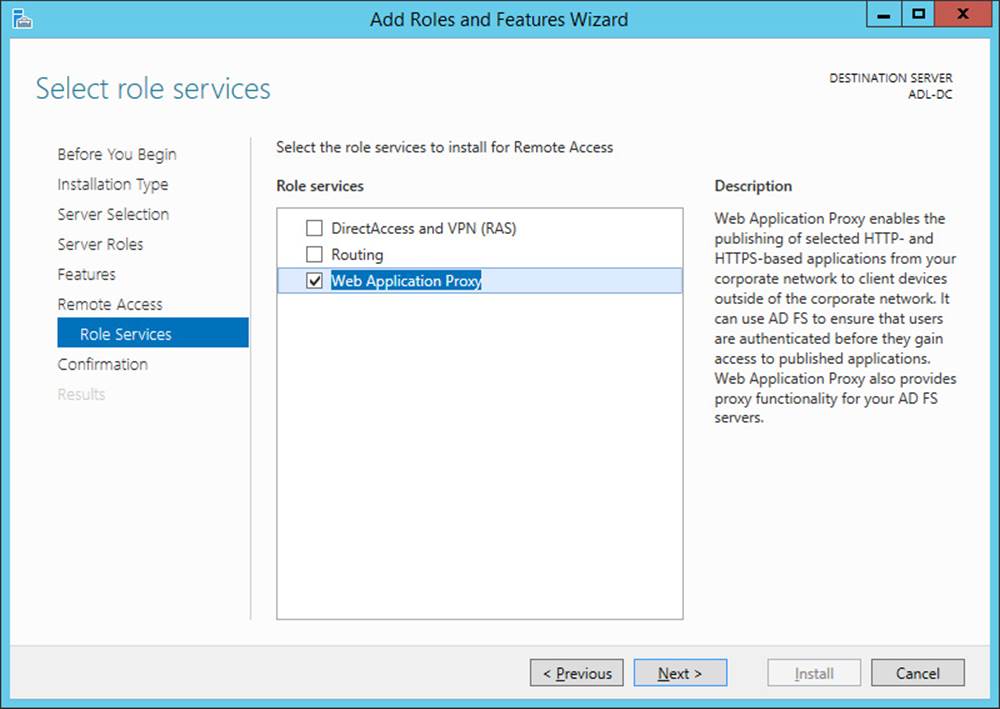
FIGURE 8-65 Import certificate
12. Click the Notification icon on the Server Manager console and click Open The Web Application Proxy Wizard.
13. On the Welcome page of the Web Application Proxy Configuration Wizard, click Next.
14. On the Federation Server page, type the federation service as syd-dc.contoso.com, the user name as contoso\don_funk and the password as Pa$$w0rd as shown in Figure 8-66, and click Next.
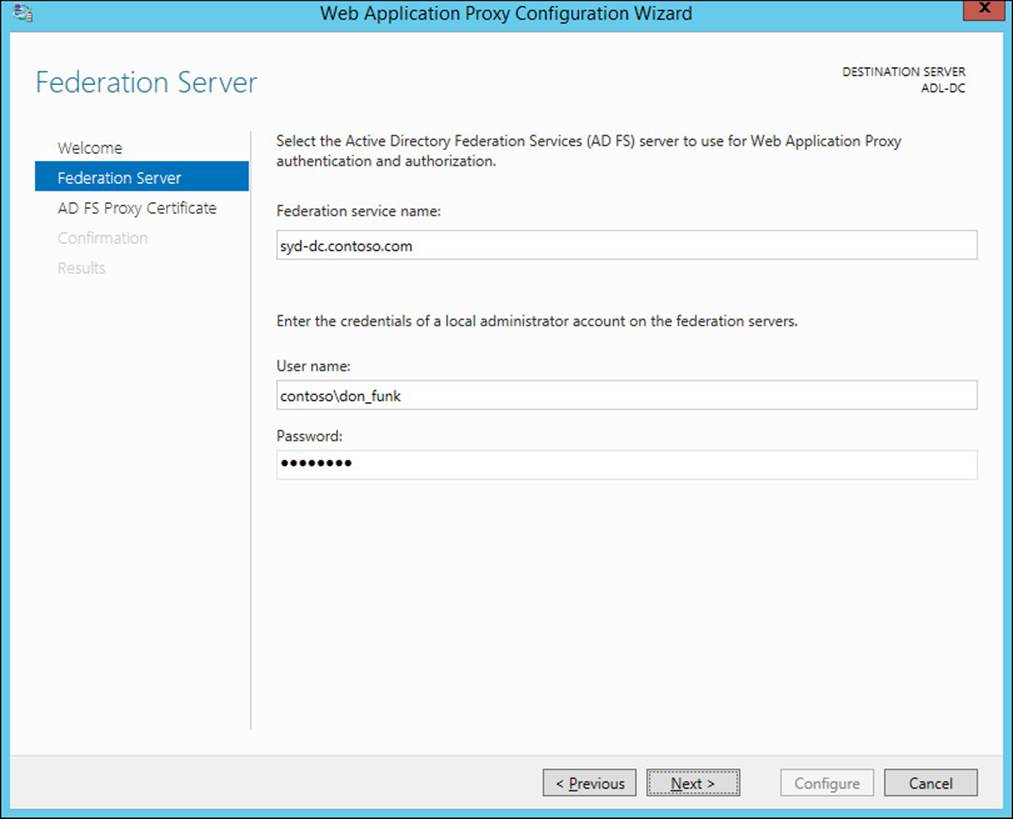
FIGURE 8-66 Federation Service name
15. On the AD FS Proxy Certificate page, click the down arrow, click SYD-DC.contoso.com, and click Next.
16. On the Confirmation page, click Configure, and then click Close.
17. In the Tasks pane of the Remote Access Management Console, click Publish.
18. On the Welcome page of the Publish New Application Wizard, click Next.
19. On the Preauthentication page, click Pass-Through as shown in Figure 8-67, and click Next.

FIGURE 8-67 pass-through authentication
20. On the Publishing Settings page, configure the following information as shown in Figure 8-68 and click Next, click Publish, and click Close.
![]() Name: syd-dc.contoso.com
Name: syd-dc.contoso.com
![]() External URL: https://syd-dc.contoso.com
External URL: https://syd-dc.contoso.com
![]() External Certificate: syd-dc.contoso.com
External Certificate: syd-dc.contoso.com
![]() Backend Server URL: https://syd-dc.contoso.com
Backend Server URL: https://syd-dc.contoso.com
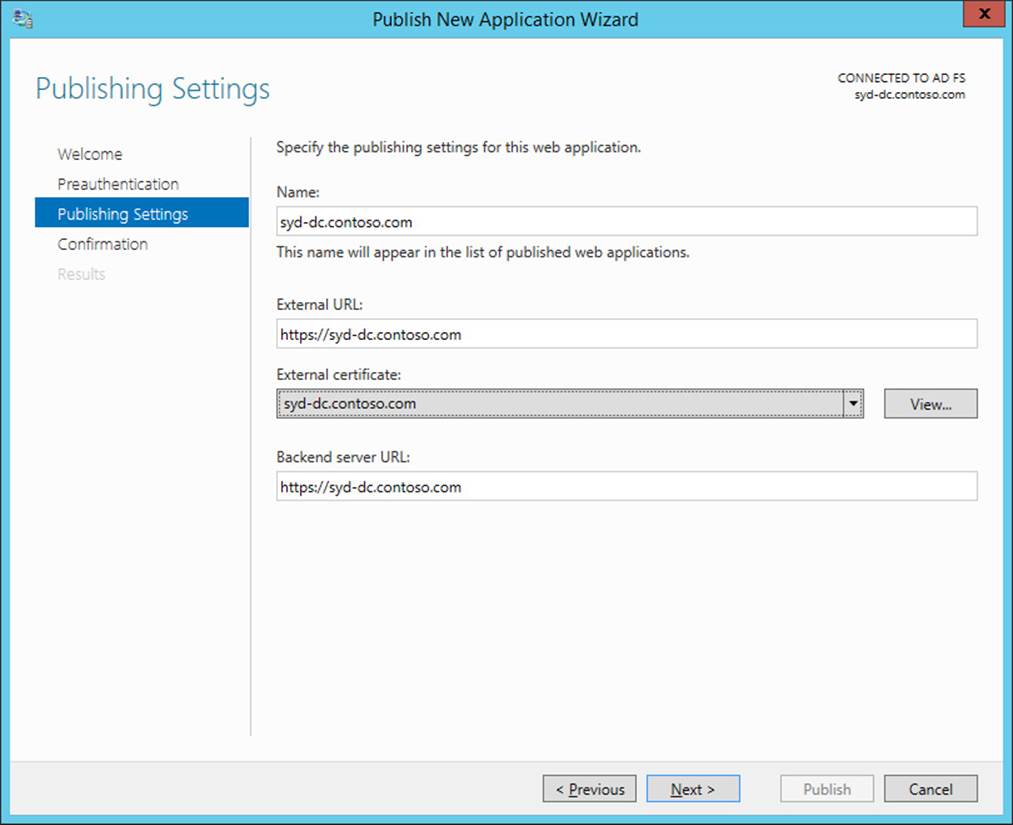
FIGURE 8-68 Publishing settings
Suggested practice exercises
The following additional practice exercises are designed to give you more opportunities to practice what you’ve learned and to help you successfully master the lessons presented in this chapter.
![]() Exercise 1 Deploy the NPS role on ADL-DC. Configure ADL-DC as a RADIUS client of MEL-DC.
Exercise 1 Deploy the NPS role on ADL-DC. Configure ADL-DC as a RADIUS client of MEL-DC.
![]() Exercise 2 Configure ADL-DC as a NAT router.
Exercise 2 Configure ADL-DC as a NAT router.
![]() Exercise 3 Configure CBR-DC as a DirectAccess server.
Exercise 3 Configure CBR-DC as a DirectAccess server.
Answers
This section contains the answers to the lesson review questions in this chapter.
Lesson 1
1. Correct answer: B
A. Incorrect. A RADIUS server performs authentication and authorization operations on RADIUS traffic forwarded to it by a RADIUS client. A RADIUS proxy is a RADIUS client of a RADIUS server.
B. Correct. A RADIUS proxy forwards authentication and authorization traffic to RADIUS server groups based on the properties of the traffic.
C. Incorrect. RADIUS clients forward authentication and authorization traffic to RADIUS servers or proxies.
D. Incorrect. RADIUS accounting records authentication and authorization request data.
2. Correct answer: B
A. Incorrect. RADIUS accounting records authentication and authorization request data.
B. Correct. A RADIUS server performs authentication and authorization operations on RADIUS traffic forwarded to it by a RADIUS client. A RADIUS proxy is a RADIUS client of a RADIUS server.
C. Incorrect. A RADIUS proxy forwards authentication and authorization traffic to RADIUS server groups based on the properties of the traffic.
D. Incorrect. RADIUS clients forward authentication and authorization traffic to RADIUS servers or proxies.
3. Correct answer: A
A. Correct. RADIUS clients forward authentication and authorization traffic to RADIUS servers or proxies.
B. Incorrect. RADIUS accounting records authentication and authorization request data.
C. Incorrect. A RADIUS server performs authentication and authorization operations on RADIUS traffic forwarded to it by a RADIUS client. A RADIUS proxy is a RADIUS client of a RADIUS server.
D. Incorrect. A RADIUS proxy forwards authentication and authorization traffic to RADIUS server groups based on the properties of the traffic.
4. Correct answer: C
A. Incorrect. A RADIUS proxy forwards authentication and authorization traffic to RADIUS server groups based on the properties of the traffic.
B. Incorrect. RADIUS clients forward authentication and authorization traffic to RADIUS servers or proxies.
C. Correct. RADIUS accounting records authentication and authorization request data.
D. Incorrect. A RADIUS server performs authentication and authorization operations on RADIUS traffic forwarded to it by a RADIUS client. A RADIUS proxy is a RADIUS client of a RADIUS server.
5. Correct answers: A, C, and D
A. Correct. You specify a friendly name when configuring a RADIUS client on a RADIUS server.
B. Incorrect. You don’t specify an authentication protocol when configuring a RADIUS client on a RADIUS server.
C. Correct. You specify an IP address or FQDN when configuring a RADIUS client on a RADIUS server.
D. Correct. You specify a shared secret when configuring a RADIUS client on a RADIUS server.
Lesson 2
1. Correct answers: C and D
A. Incorrect. The SSTP protocol VPN protocol can be used by computers running the Windows Vista, Windows 7, Windows 8, and Windows 8.1 client operating systems.
B. Incorrect. The IKEv2 protocol can be used by computers running the Windows 7, Windows 8, and Windows 8.1 client operating systems.
C. Correct. The L2TP/IPsec protocol can be used by computers running the Windows XP, Windows Vista, Windows 7, Windows 8, and Windows 8.1 client operating systems.
D. Correct. The L2TP/IPsec protocol can be used by computers running the Windows XP, Windows Vista, Windows 7, Windows 8, and Windows 8.1 client operating systems.
2. Correct answer: C
A. Incorrect. The L2TP/IPsec protocol can be used by computers running the Windows XP, Windows Vista, Windows 7, Windows 8, and Windows 8.1 client operating systems.
B. Incorrect. The L2TP/IPsec protocol can be used by computers running the Windows XP, Windows Vista, Windows 7, Windows 8, and Windows 8.1 client operating systems.
C. Correct. The IKEv2 protocol can be used by computers running Windows 7 and Windows 8 client operating systems.
D. Incorrect. The SSTP protocol VPN protocol can be used by computers running the Windows Vista, Windows 7, and Windows 8, and Windows 8.1 client operating systems.
3. Correct answer: C
A. Incorrect. You can’t use IKEv2 through firewalls in hotels that allow both secure and insecure web traffic only.
B. Incorrect. You can’t use L2TP/IPSec through firewalls in hotels that allow both secure and insecure web traffic only.
C. Correct. SSTP uses port 443, making it possible to use this VPN protocol through firewalls in hotels that allow secure web traffic.
D. Incorrect. You can’t use PPTP through firewalls in hotels that allow both secure and insecure web traffic only.
4. Correct answer: B
A. Incorrect. SSTP doesn’t support VPN reconnect.
B. Correct. This VPN protocol supports VPN reconnect. VPN reconnect enables reestablishment of disrupted VPN connections for up to 8 hours after the disruption occurred without requiring manual user reauthentication.
C. Incorrect. PPTP doesn’t support VPN reconnect.
D. Incorrect. L2TP/IPsec doesn’t support VPN reconnect.
5. Correct answer: C
A. Incorrect. You configure VPN access to provide protected network access to clients on the Internet. You can’t use VPN access to enable protected network clients to share an Internet connection.
B. Incorrect. You configure dial-up access if you want to enable access to your organization’s internal network for clients that have modems. You can’t use dial-up access to allow protected network clients to share an Internet connection.
C. Correct. You can use NAT to enable a group of computers on a private network to share an Internet connection.
D. Incorrect. You choose LAN router if you need to make a group of computers on your organization’s network that has public IP addresses accessible to hosts on the Internet.
Lesson 3
1. Correct answers: B and C
A. Incorrect. Windows RT can’t be joined to a domain and can’t function as a DirectAccess client.
B. Correct. Windows 8 Enterprise edition can be configured as a DirectAccess client. This is the only edition of Windows 8 that can be used with DirectAccess.
C. Correct. Windows 7 Ultimate edition can be configured as a DirectAccess client. You can also configure computers running Windows 7 Enterprise edition as DirectAccess clients.
D. Incorrect. Windows Vista can’t be configured as a DirectAccess client.
2. Correct answer: D
A. Incorrect. The DirectAccess server’s Internet interface must be assigned two consecutive public IPv4 addresses.
B. Correct. The DirectAccess server’s Internet interface must be assigned two consecutive public IPv4 addresses.
C. Incorrect. DirectAccess does not use RADIUS authentication.
D. Correct. You must remove ISATAP from the DNS global query block list on all DNS servers to use DirectAccess.
3. Correct answer: D
A. Incorrect. You don’t need to deploy a web server/SSL certificate on a domain controller when deploying DirectAccess.
B. Incorrect. You don’t need to deploy a web server/SSL certificate on a DNS server when deploying DirectAccess.
C. Incorrect. You must deploy a web server/SSL certificate on the NLS server when deploying DirectAccess.
D. Correct. You must deploy a web server/SSL certificate on the NLS server when deploying DirectAccess.
4. Correct answer: C
A. Incorrect. DirectAccess clients attempt to contact the NLS server to determine their network location before attempting to initiate a DirectAccess connection.
B. Incorrect. DirectAccess clients attempt to contact the NLS server to determine their network location before attempting to initiate a DirectAccess connection.
C. Correct. DirectAccess clients attempt to contact the NLS server to determine their network location before attempting to initiate a DirectAccess connection.
D. Incorrect. DirectAccess clients attempt to contact the NLS server to determine their network location before attempting to initiate a DirectAccess connection.
5. Correct answer: C
A. Incorrect. IP over HTTPS is the option only when a DirectAccess server is deployed behind a NAT device.
B. Incorrect. IP over HTTPS is the option only when a DirectAccess server is deployed behind a NAT device.
C. Correct. IP over HTTPS is the option only when a DirectAccess server is deployed behind a NAT device.
D. Incorrect. IP over HTTPS is the option only when a DirectAccess server is deployed behind a NAT device.
All materials on the site are licensed Creative Commons Attribution-Sharealike 3.0 Unported CC BY-SA 3.0 & GNU Free Documentation License (GFDL)
If you are the copyright holder of any material contained on our site and intend to remove it, please contact our site administrator for approval.
© 2016-2026 All site design rights belong to S.Y.A.