Training Guide Configuring Advanced Windows Server 2012 R2 Services(2014)
Chapter 3. Advanced DHCP and DNS
Windows Server 2012 and Windows Server 2012 R2 include several tools that increase the functionality, security, and manageability of name and Internet Protocol (IP) address spaces. It is important to be able to efficiently manage the name and address space because of the increase in computers on organizational networks that use dynamically assigned names and addresses. This chapter discusses IP address management (IPAM), a technology that simplifies the centralized management of Dynamic Host Control Protocol (DHCP) and Domain Name System (DNS) servers. Maintaining the integrity of the DNS is also important, and in recent years there have been an increase in attacks against DNS infrastructure. In this chapter you discover several different methods that enable you to harden your organization’s DNS infrastructure.
Lessons in this chapter:
![]() Lesson 1: Implementing an advanced DNS solution
Lesson 1: Implementing an advanced DNS solution
![]() Lesson 2: Implementing an advanced DHCP solution
Lesson 2: Implementing an advanced DHCP solution
![]() Lesson 3: Deploying and managing IPAM
Lesson 3: Deploying and managing IPAM
Before you begin
To complete the practice exercises in this chapter, you need to have deployed computers SYD-DC, MEL-DC, CBR-DC, and ADL-DC as described in the Introduction, using the evaluation edition of Windows Server 2012 R2.
Lesson 1: Implementing an advanced DNS solution
DNS is one of those core network services to which many administrators pay little attention. It’s possible to manage a Windows Server 2012 R2 Active Directory implementation without having to open the DNS Manager console. In some environments, especially those that have stricter than average security requirements, you might need to go beyond the default configuration to make your organization’s DNS implementation more secure. In this lesson, find out about Domain Name System Security Extensions (DNSSEC), how to log DNS traffic, and how to configure a GlobalNames Zone. You read about several steps that you can take to harden a DNS server against attack by nefarious third parties.
After this lesson, you will be able to:
![]() Configure DNSSEC
Configure DNSSEC
![]() Configure DNS logging
Configure DNS logging
![]() Configure a GlobalNames Zone
Configure a GlobalNames Zone
![]() Configure recursion
Configure recursion
![]() Configure DNS socket pool
Configure DNS socket pool
![]() Enable cache locking
Enable cache locking
![]() Configure netmask ordering
Configure netmask ordering
![]() Configure delegated administration
Configure delegated administration
![]() View DNS server statistics
View DNS server statistics
Estimated lesson time: 30 minutes
DNSSEC
DNSSEC provides clients with a way of verifying the integrity of the results of a DNS query. DNSSEC accomplishes this by cryptographically signing DNS zone data. When a client queries a record in a zone signed using DNSSEC, the DNS server returns both the record and the record’s digital signature that enables the client to validate that record as shown in Figure 3-1.

FIGURE 3-1 View the Resource Record Signature (RRSIG) record
When you sign a zone, the following new resource records are created:
![]() Resource Record Signature (RRSIG) record This record is stored in the DNS zone, and each one is associated with an individual zone record. When a DNS query against the secure zone is performed, the DNS server returns both the record queried and the associated RRSIG record.
Resource Record Signature (RRSIG) record This record is stored in the DNS zone, and each one is associated with an individual zone record. When a DNS query against the secure zone is performed, the DNS server returns both the record queried and the associated RRSIG record.
![]() DNSKEY This special record allows for cryptographic verification of the RRSIG records.
DNSKEY This special record allows for cryptographic verification of the RRSIG records.
![]() Next Secure (NSEC/NSEC3) record This record provides proof that a queried record does not exist. For example, if a DNS client is querying the record unicorn.contoso.com and there is no unicorn.contoso.com host record hosted in the contoso.com zone, the DNS server returns an NSEC record.
Next Secure (NSEC/NSEC3) record This record provides proof that a queried record does not exist. For example, if a DNS client is querying the record unicorn.contoso.com and there is no unicorn.contoso.com host record hosted in the contoso.com zone, the DNS server returns an NSEC record.
When you implement DNSSEC, the following additional cryptographic keys are created:
![]() Trust anchor This is a special public cryptographic key associated with a specific zone. The DNSKEY record is validated against this key. When you use DNSSEC with an Active Directory Integrated Zone, the trust anchor is replicated to all DNS servers hosted on domain controllers in the forest.
Trust anchor This is a special public cryptographic key associated with a specific zone. The DNSKEY record is validated against this key. When you use DNSSEC with an Active Directory Integrated Zone, the trust anchor is replicated to all DNS servers hosted on domain controllers in the forest.
![]() Key Signing Key (KSK) This special cryptographic key is used to sign all DNSKEY records. This key is created by a computer that hosts the DNSSEC Key Master role. The DNSSEC Key Master is a computer, usually the first DNS server on which DNSSEC is implemented, that generates and manages signing keys for a DNSSEC protected zone. A single DNS server can function as a DNSSEC Key Master for multiple zones.
Key Signing Key (KSK) This special cryptographic key is used to sign all DNSKEY records. This key is created by a computer that hosts the DNSSEC Key Master role. The DNSSEC Key Master is a computer, usually the first DNS server on which DNSSEC is implemented, that generates and manages signing keys for a DNSSEC protected zone. A single DNS server can function as a DNSSEC Key Master for multiple zones.
![]() Zone Signing Key (ZSK) This special cryptographic key is used to sign zone data, such as individual host records. The ZSK is created using the DNSSEC Key Master.
Zone Signing Key (ZSK) This special cryptographic key is used to sign zone data, such as individual host records. The ZSK is created using the DNSSEC Key Master.
You can configure the Group Policy to ensure that clients only accept records from a DNS server for a specific zone if those records have been signed using DNSSEC. You do this by configuring the Name Resolution Policy Table (NRPT), which is located in the Computer Configuration\Policies\Windows Settings\Name Resolution Policy node of a GPO. Figure 3-2 shows configuring Group Policy in such a way that clients who are querying records in the contoso.com zone only accept those records as valid if they are correctly signed using DNSSEC.
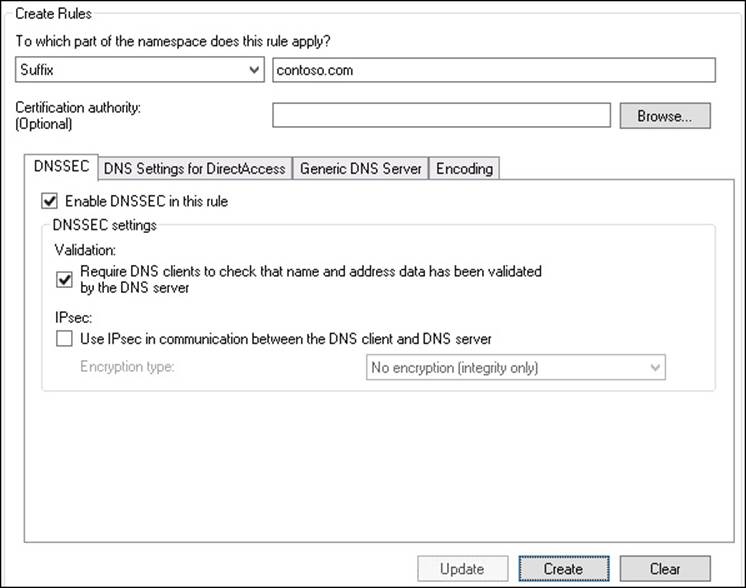
FIGURE 3-2 Require DNSSEC for a specific DNS suffix
DNSSEC is appropriate for high-security environments, such as those where Internet Protocol Security (IPSec) and authenticating switches are also in use. DNSSEC protects against attacks where clients are fed false DNS information. In many small-sized to medium-sized environments, the likelihood of such an attack is minimal. In high-security environments, enabling DNSSEC is a prudent precaution.
More Info: DNSSEC
To learn more about DNSSEC zone, consult the following article: http://technet.microsoft.com/en-us/library/jj200221.aspx.
DNS event logs
The DNS server log is located in the Applications And Services Logs folder in Event Viewer. Depending upon how you configure event logging on the Event Logging tab of the DNS server’s properties, as shown in Figure 3-3, this event log records information including:
![]() Changes to the DNS service. For example when the DNS Server service is stopped or started.
Changes to the DNS service. For example when the DNS Server service is stopped or started.
![]() Zone loading and signing events.
Zone loading and signing events.
![]() Modifications to DNS server configuration.
Modifications to DNS server configuration.
![]() DNS warning and error events.
DNS warning and error events.
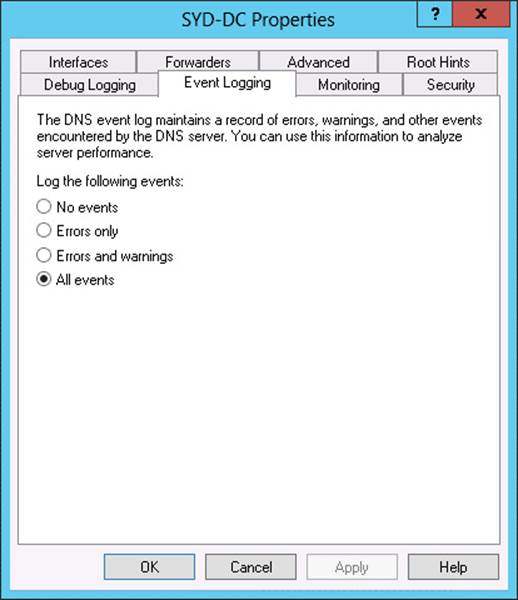
FIGURE 3-3 Configure the DNS event logs
By default the DNS server records all of these events. It’s also possible to configure the DNS server to only log errors, or errors and warning events. The key with any type of logging is that you should only enable logging for information that you might need to review at some time. Many administrators log everything “just in case” even though they will only ever be interested in a specific type of event.
In the event that you need to debug how a DNS server is performing, you can enable debug logging on the Debug Logging tab of the DNS server’s properties dialog box as shown in Figure 3-4. Debug logging is resource intensive, and you should only use it when you have a specific problem related to the functionality of the DNS server. You can configure debug logging to use a filter so that only traffic from specific hosts is recorded, rather than traffic from all hosts that interact with the DNS server.
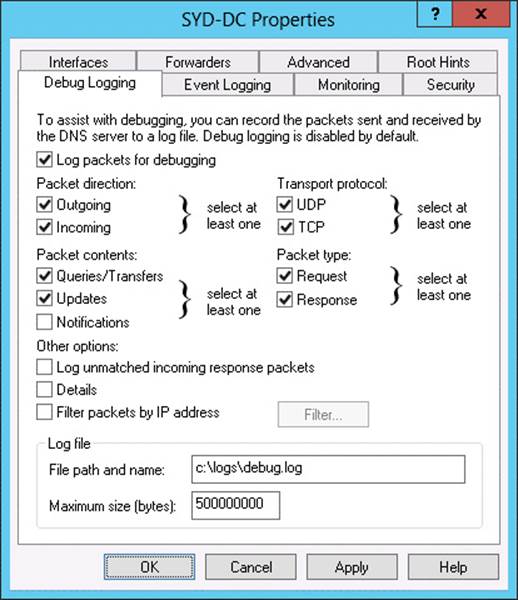
FIGURE 3-4 Configure debug logging
GlobalNames zones

GlobalNames zones provide single-label name resolution. Single-label name resolution allows single names to be translated to IP addresses, such as Windows Server Update Services (WSUS), rather than requiring fully qualified domain names (FQDN) such as wsus.contoso.com. In the past, single-label name resolution has been handled by Windows Internet Name Service (WINS), a service that translates NetBIOS names to IPv4 addresses. GlobalNames zones are hosted on DNS servers and are intended as a replacement technology for WINS. You use alias (CNAME) records when populating a GlobalNames zone, which maps the single-label name to an existing FQDN as shown in Figure 3-5.
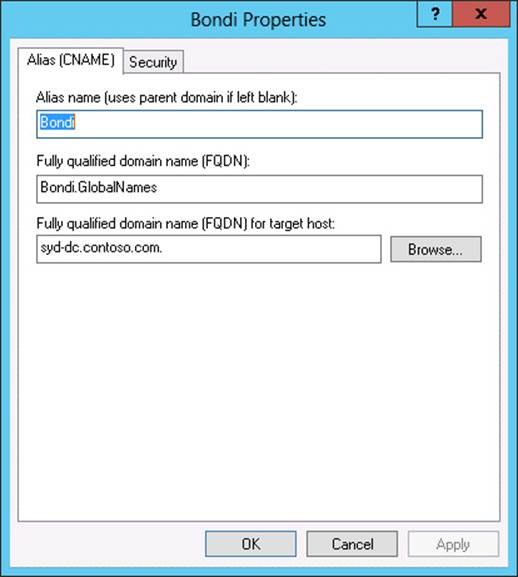
FIGURE 3-5 A CNAME record
Consider using GlobalNames zones in the following circumstances:
![]() You need to provide single-label name resolution when your network uses IPv6 addressing. WINS does not support IPv6, whereas a single-label record in the GlobalNames zone are mapped to A or AAAA records, allowing both IPv4 and IPv6 name resolution.
You need to provide single-label name resolution when your network uses IPv6 addressing. WINS does not support IPv6, whereas a single-label record in the GlobalNames zone are mapped to A or AAAA records, allowing both IPv4 and IPv6 name resolution.
![]() You need to provide single-label name resolution for a small number of hosts. An advantage of WINS is that it’s dynamically populated. You must populate the GlobalNames zone manually by creating CNAME records.
You need to provide single-label name resolution for a small number of hosts. An advantage of WINS is that it’s dynamically populated. You must populate the GlobalNames zone manually by creating CNAME records.
More Info: GlobalNames zone
To learn more about the GlobalNames zone, consult the following article: http://technet.microsoft.com/en-us/library/cc731744.aspx.
To deploy the GlobalNames zone, you need to do the following:
![]() Create a new Active Directory integrated forward lookup zone named GlobalNames that you have configured to replicate throughout the forest.
Create a new Active Directory integrated forward lookup zone named GlobalNames that you have configured to replicate throughout the forest.
![]() Manually activate the GlobalNames zone on each DNS server in the forest by running the following Windows PowerShell command (substituting DNSServerName name for the FQDN of the DNS server):
Manually activate the GlobalNames zone on each DNS server in the forest by running the following Windows PowerShell command (substituting DNSServerName name for the FQDN of the DNS server):
Set-DNSServerGlobalNameZone –ComputerName DNSServerName –Enable $True
![]() Quick check
Quick check
• What type of DNS records does a GlobalNames zone host?
Quick check answer
• A GlobalNames zone hosts CNAME, also known as alias, records.
Advanced DNS options
In high-security environments there are a number of steps that you can take to make a DNS server more secure from attackers who attempt to spoof the server so that it provides records that redirect clients to malicious sites. Although DNSSEC provides security for zones hosted on the server, most DNS server traffic involves retrieving information from remote DNS servers and then passing that information on to clients. In this section you find out about settings that you can configure to ensure that the information relayed to clients retains its integrity in the event that a nefarious third party attempts to spoof your organization’s DNS servers.
DNS socket pool
DNS socket pool is a technology that makes cache-tampering and spoofing attacks more difficult by using source port randomization when issuing DNS queries to remote DNS servers. To spoof the DNS server with an incorrect record, the attacker needs to guess which randomized port was used as well as the randomized transaction ID issued with the query. A DNS server running on Windows Server 2012 or Windows Server 2012 R2 uses a socket pool of 2,500 by default. You can use the dnscmd command-line tool to vary the socket pool between 0 and 10,000. For example, to set the socket pool size to 4,000, issue the following command:
dnscmd /config /socketpoolsize 4000
You must restart the DNS service before the reconfigured socket pool size is used.
More Info: DNS socket pool
To learn more about the DNS socket pool, consult the following article: http://technet.microsoft.com/en-us/library/ee683907(v=ws.10).aspx.
DNS cache locking
DNS cache locking enables you to control when information stored in the DNS server’s cache can be overwritten. For example, when a recursive DNS server responds to a query for a record that is hosted on another DNS server, it caches the results of that query so that it doesn’t have to contact the remote DNS server if the same record is queried again within the TTL (Time to Live) value of the resource record. DNS cache locking prevents record data in a DNS server’s cache from being overwritten until a configured percentage of the TTL value has expired. By default, the DNS cache locking value is set to 100, but you can reset it using the Set-DNSServerCache cmdlet with the LockingPercent option. For example, to set the cache locking value to 80 percent, issue the following command and then restart the DNS server service:
Set-DNSServerCache –LockingPercent 80
More Info: DNS cache locking
To learn more about the DNS Cache Locking zone, consult the following article: http://technet.microsoft.com/en-us/library/ee683892(v=ws.10).aspx.
DNS recursion
DNS servers on Windows Server 2012 or Windows Server 2012 R2 perform recursive queries on behalf of clients by default. This means that when the client asks the DNS server to find a record that isn’t stored in a zone hosted by the DNS server, the DNS server goes out and finds the result of that query and passes it back to the client. It’s possible for nefarious third parties to use recursion as a denial-of-service (DoS) attack vector, slowing a DNS server to the point where it becomes unresponsive. You can disable recursion on the Advanced tab of the DNS server’s properties as shown in Figure 3-6.

FIGURE 3-6 Configure advanced DNS properties
More Info: DNS recursion
To learn more about the DNS recursion, consult the following article: http://technet.microsoft.com/en-us/library/cc771738.aspx.
Netmask ordering
Netmask ordering ensures that the DNS server returns the host record on the requesting client’s subnet if such a record exists. For example, imagine that the following host records existed on a network that used 24-bit subnet masks:
![]() 10.10.10.105 wsus.contoso.com
10.10.10.105 wsus.contoso.com
![]() 10.10.20.105 wsus.contoso.com
10.10.20.105 wsus.contoso.com
![]() 10.10.30.105 wsus.contoso.com
10.10.30.105 wsus.contoso.com
If netmask ordering is enabled and a client with the IP address 10.10.20.50 performs a lookup of wsus.contoso.com, it is always returned the record 10.10.20.105 because this record is on the same subnet as the client. If netmask ordering is not enabled, then the DNS server returns records in a round robin fashion. If the requesting client is not on the same network as any of the host records, then the DNS server also returns records in a round robin fashion. Netmask ordering is useful for services such as Windows Server Update Services (WSUS) that you might have at each branch office. When you use it, the DNS server redirects the client in the branch office to a resource on the local subnet when one exists.
Netmask ordering is enabled by default on Windows Server 2012 and Windows Server 2012 R2 DNS servers. You can verify that netmask ordering is enabled by viewing the advanced properties of the DNS server as shown in Figure 3-7.
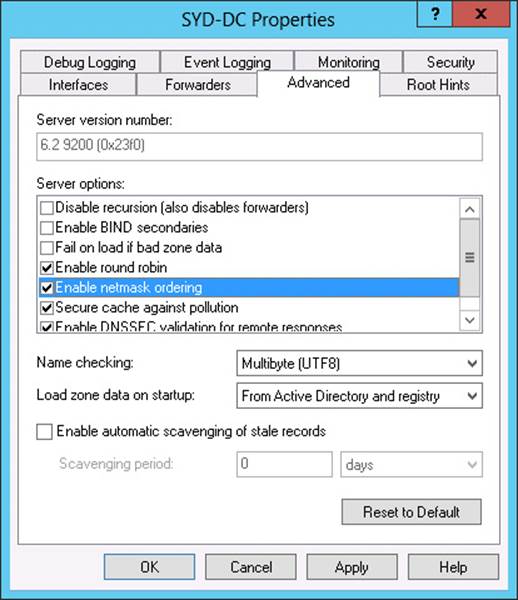
FIGURE 3-7 Enable netmask ordering
Real World: Defaults are usually good
For the most part, the defaults such as netmask ordering and round robin are going to be suitable for your environment, and you probably won’t need to change them. When both are enabled, netmask ordering takes priority over round robin, meaning that a record on the same subnet will be returned where appropriate and in a round robin manner if no such record exists. The one that you’re likely to want to enable is automatic scavenging of stale records. This is especially useful if you have a DNS zone that services a large number of mobile clients. If you don’t enable scavenging, the zone becomes populated with the records of computers that might have touched your network a long time ago but never returned.
Delegated administration
In some larger environments, you might want to separate administrative privileges so that the people who are responsible for managing your organization’s DNS servers don’t have other permissions, such as the ability to create user accounts or reset passwords. By default, members of the Domain Admins group are able to perform all DNS administration tasks on DNS servers within a domain. Members of the Enterprise Admins group are able to perform all DNS administration tasks on any DNS server in the forest.
You can use the DNSAdmins domain local group to grant users the ability to view and modify DNS data as well as server configuration of DNS servers within a domain. You add users to this group when you want to allow them to perform DNS administration tasks without giving them additional permissions. You can assign permissions that allow users or security groups to manage a specific DNS server using the Security tab of the server’s properties as shown in Figure 3-8.
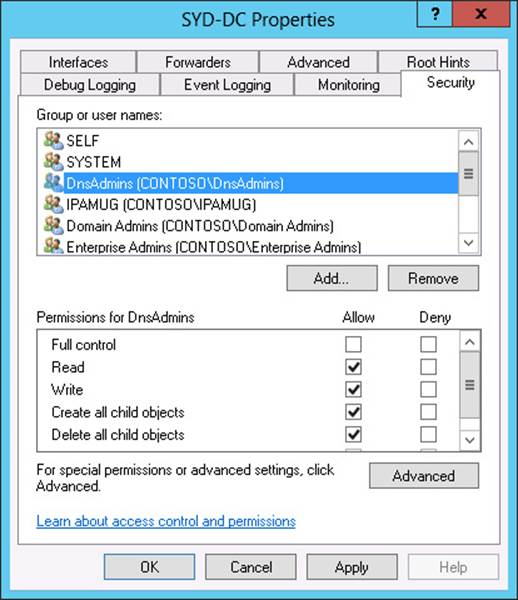
FIGURE 3-8 The DnsAdmins security group
You can also configure permissions at the zone level. You do this by assigning a security principal permissions on the Security tab of the zone’s properties as shown in Figure 3-9. You might do this when you want to allow a specific person to manage host records without assigning them any other permissions. Today most organizations allow DNS records to be updated dynamically. This means that the only zones where you might need to configure special permissions to allow manual management are special ones, such as those that are accessible to clients on the Internet.
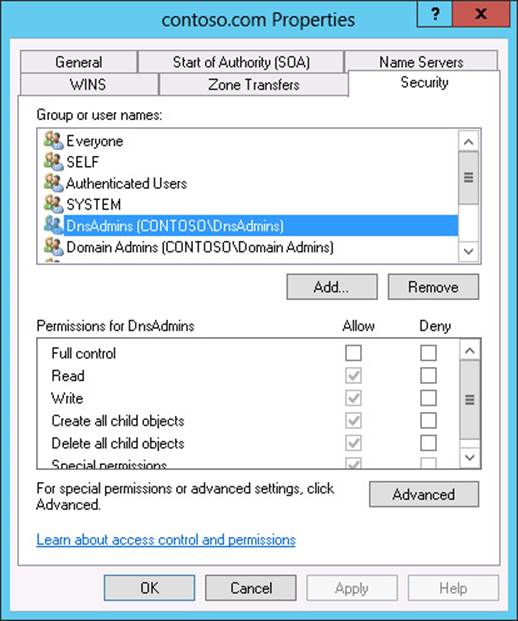
FIGURE 3-9 Configure zone-level permissions
Analyze zone level statistics
You can understand how a DNS zone is being utilized by clients, by viewing DNS statistics. You can do this on computers running the Windows Server 2012 R2 operating system by using the Get-DnsServerStatistics cmdlet. Some of the information that you can view using this cmdlet includes:
![]() Cache statistics View information about the number of requests that the DNS server satisfies from cache.
Cache statistics View information about the number of requests that the DNS server satisfies from cache.
![]() DNSSEC statistics Provides data about successful and failed DNSSEC validations.
DNSSEC statistics Provides data about successful and failed DNSSEC validations.
![]() Error statistics Detailed information about the number of errors, including bad keys, bad signatures, refusals, and unknown errors.
Error statistics Detailed information about the number of errors, including bad keys, bad signatures, refusals, and unknown errors.
![]() Master statistics Contains information about zone transfer statistics.
Master statistics Contains information about zone transfer statistics.
![]() Query statistics Information about queries made to the DNS server.
Query statistics Information about queries made to the DNS server.
![]() Record statistics Data about number of records in the cache and memory utilization.
Record statistics Data about number of records in the cache and memory utilization.
![]() Recursion statistics Information about how the DNS server solves recursive queries.
Recursion statistics Information about how the DNS server solves recursive queries.
You can view statistics related to a specific zone by using the –Zonename parameter. For example, if you wanted to view the statistics of the australia.adatum.com zone, you would issue the following command from an elevated Windows PowerShell prompt on a computer that hosts the DNS server role:
Get-DnsServerStatistics –Zonename australia.adatum.com
More Info: DNS statistics
To learn more about DNS statistics, consult the following article: http://technet.microsoft.com/en-us/en-us/library/dn305898.aspx.
Lesson summary
![]() DNSSEC uses digital signatures to allow clients to verify the integrity of DNS records returned from a DNS server.
DNSSEC uses digital signatures to allow clients to verify the integrity of DNS records returned from a DNS server.
![]() The NRPT enables you to configure whether a client requires a specific zone to be signed using DNSSEC.
The NRPT enables you to configure whether a client requires a specific zone to be signed using DNSSEC.
![]() A DNS event log records DNS events such as service startup and shutdown as well as errors.
A DNS event log records DNS events such as service startup and shutdown as well as errors.
![]() Debug logging enables you to record DNS traffic and events more thoroughly, though this has an effect on performance.
Debug logging enables you to record DNS traffic and events more thoroughly, though this has an effect on performance.
![]() GlobalNames zone provides single-label DNS resolution and can serve as a replacement for WINS.
GlobalNames zone provides single-label DNS resolution and can serve as a replacement for WINS.
![]() The DNS socket pool allows for port randomization with DNS requests as a way of protecting against spoofing attacks.
The DNS socket pool allows for port randomization with DNS requests as a way of protecting against spoofing attacks.
![]() DNS cache locking blocks a record stored in the DNS server’s cache from being overwritten until a specified percentage of the record’s TTL has expired.
DNS cache locking blocks a record stored in the DNS server’s cache from being overwritten until a specified percentage of the record’s TTL has expired.
![]() You can enable DNS recursion as a way of hardening a DNS server against attacks that use recursion as a way of denying service.
You can enable DNS recursion as a way of hardening a DNS server against attacks that use recursion as a way of denying service.
![]() Netmask ordering allows the DNS server to return a DNS record that is on the same IP subnet as the client, if such a record exists.
Netmask ordering allows the DNS server to return a DNS record that is on the same IP subnet as the client, if such a record exists.
![]() You can analyze zone level statistics using the Get-DnsServerStatistics cmdlet.
You can analyze zone level statistics using the Get-DnsServerStatistics cmdlet.
Lesson review
Answer the following questions to test your knowledge of the information in this lesson. You can find the answers to these questions and explanations of each answer choice in the “Answers” section at the end of this chapter.
1. The contoso.com zone hosts DNS records that map FQDNs of hosts in the zone to their IPv6 addresses. You have configured a GlobalNames zone and want to allow single-label name resolution of the name WSUS to the appropriate IPv6 address. Which type of record should you create in the GlobalNames zone to accomplish this goal?
A. Host (AAAA)
B. Alias (CNAME)
C. Mail Exchanger (MX)
D. Pointer (PTR)
2. You have deployed WSUS servers to each of your organization’s branch offices. Each branch office is located on its own subnet. You have created DNS records that use the same name, wsus.contoso.com, for each of the WSUS servers in these different branch offices. You want to ensure that when a client makes a name request for the record wsus.contoso.com, the DNS server returns the record that corresponds to an IP address on the client’s local subnet. Which of the following DNS options do you configure to accomplish this goal?
A. Socket pool
B. Cache locking
C. Recursion
D. Netmask ordering
3. The DNS server that hosts your organization’s external address space is under attack from nefarious third parties who are slowing it down by constantly launching DNS queries against the server for hosts in zones not hosted on the server. The DNS server should only return data for zones that it hosts directly. Which of the following settings should you configure to stop it responding to queries for hostnames located in zones that it does not host?
A. Recursion
B. Netmask ordering
C. Cache locking
D. Socket pool
4. You want to ensure that a record stored in the DNS server’s cache cannot be overwritten until 90 percent of its TTL period has expired. Which of the following DNS server settings would you configure to accomplish this goal?
A. Netmask ordering
B. Recursion
C. Socket pool
D. Cache locking
5. You want to increase the number of ports available that can be used when the DNS server makes a query. Which of the following DNS server settings should you configure to accomplish this goal?
A. Socket pool
B. Netmask ordering
C. Recursion
D. Cache locking
Lesson 2: Implementing an advanced DHCP solution
Like DNS, DHCP is another network service that most administrators barely pay attention to after they’ve configured it. The main concern that most administrators have with DHCP is that up until the release of Windows Server 2012, it’s been difficult to configure as a highly available service. Although DNS became highly available through being able to be hosted on any domain controller, the problem with making DHCP highly available was ensuring that when multiple DHCP servers were in play, duplicate addresses weren’t assigned to separate clients. In this lesson you find out about superscopes and multicast scopes. You also see how you can make DHCP more fault tolerant by implementing split scopes or by deploying DHCP failover.
After this lesson, you will be able to:
![]() Create and manage DHCP superscopes
Create and manage DHCP superscopes
![]() Implement and maintain multicast scopes
Implement and maintain multicast scopes
![]() Create DHCP split scopes
Create DHCP split scopes
![]() Configure DHCP Name Protection
Configure DHCP Name Protection
![]() Implement DHCP failover
Implement DHCP failover
![]() Configure DNS registration
Configure DNS registration
Estimated lesson time: 30 minutes
Superscopes
A superscope is a collection of individual DHCP scopes. You might create a superscope when you want to bind existing scopes together for administrative reasons. For example, you might have a subnet in a building that is close to fully allocated. You add a second subnet to the building and then bind them together into a superscope. The process of binding several separate logical subnets together on the same physical network is known as multinetting. Figure 3-10 shows a superscope.
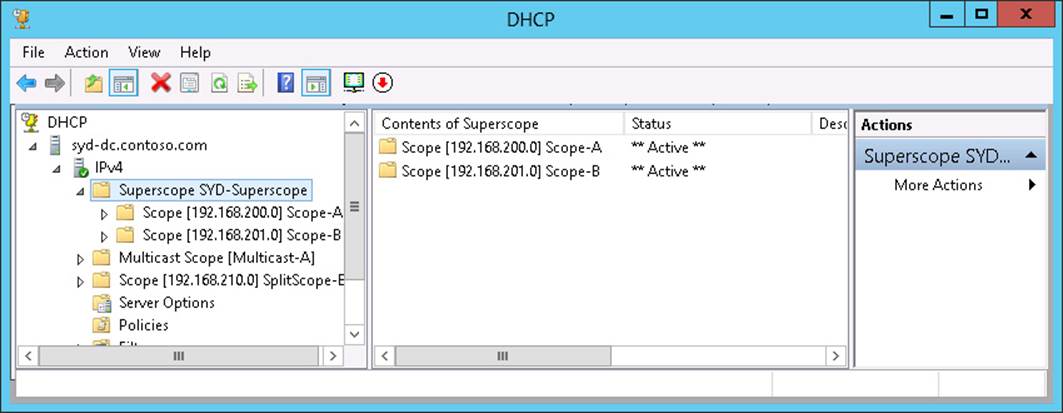
FIGURE 3-10 A superscope
There needs to be at least one existing scope present on the DHCP server before you can create a superscope. After you have created a superscope, you can add new subnets to, or remove subnets from, that scope. It’s also possible to deactivate subnets within a scope, while keeping others active. You might use this technique when migrating clients from one IP address range to another, having both the source and destination scopes part of the same superscope, activating the new scope, and deactivating the original scope as necessary when performing the migration.
More Info: Superscopes
To learn more about superscopes consult the following article: http://technet.microsoft.com/en-us/library/dd759168.aspx.
Multicast scopes
A multicast address is an address that allows many communications on a network. When you use multicast, multiple hosts on a network listen for traffic on a single multicast IP address. Multicast addresses are in the IPv4 range of 224.0.0.0 through to 239.255.255.255. Multicast scopes are collections of multicast addresses. You can configure a Windows Server 2012 or Windows Server 2012 R2 DHCP server to host multicast scopes. Multicast scopes are also known as MADCAP (Multicast Address Dynamic Client Allocation Protocol) scopes as applications that require access to multicast addresses support the MADCAP application programming interface (API). Figure 3-11 shows a multicast scope.

FIGURE 3-11 A multicast scope
More Info: Multicast scopes
To learn more about multicast scopes consult the following article: http://technet.microsoft.com/en-us/library/dd759152.aspx.
Windows Deployment Services are the most common use of multicast addresses in infrastructures that use the default configurations of Windows Server 2012 or Windows Server 2012 R2. You can, however, configure the Windows Deployment Services (WDS) server with its own set of multicast addresses, and you don’t need to configure a special multicast scope in DHCP to support this role.
![]() Quick check
Quick check
![]() What is the range of multicast IP addresses?
What is the range of multicast IP addresses?
Quick check answer
![]() Multicast IP addresses are in the range of 224.0.0.0 through 239.255.255.255
Multicast IP addresses are in the range of 224.0.0.0 through 239.255.255.255
Split scopes
Split scope is one method of providing fault tolerance for a DHCP scope. The idea behind a split scope is that you host one part of the scope on one DHCP server, and a second smaller part of the scope on a second DHCP server. Usually this split has 80 percent of the addresses on the first DHCP server, and 20 percent of the addresses on the partner server. In this scenario, the DHCP server that hosts the 20 percent portion of the address space is usually located on a remote subnet. In this scenario you use a DHCP Relay Agent configured with a delay so that the majority of addresses are leased from the DHCP server that hosts 80 percent of the address space. Split scopes are most likely to be used in scenarios where your DHCP servers aren’t running on the Windows Server 2012 operating system. If you want to provide fault tolerance for scopes hosted on servers running Windows Server 2012 or Windows Server 2012 R2, you should instead implement DHCP failover.
More Info: Split scopes
To learn more about split scopes, consult the following information. This information deals with Windows Server 2003 configurations, but is still relevant to Windows Server 2012 and Windows Server 2012 R2: http://technet.microsoft.com/en-us/library/cc757346(v=ws.10).aspx.
DNS registration
You can configure a DHCP server running the Windows Server 2012 or Windows Server 2012 R2 operating system to register a host’s name in DNS when that DHCP server leases an address to a client. When you do this, you ensure that addresses stored in the DNS zone match the IP addresses leased by the DHCP server. This is useful in environments where hosts are often changing IP addresses because it ensures that the DNS server has the most up-to-date name/IP address mapping. You configure DNS registration at the DHCP server level or at the individual DHCP scope level. Figure 3-12 shows the DNS registration page of a DHCP scope named ALPHA where dynamic registration is configured.
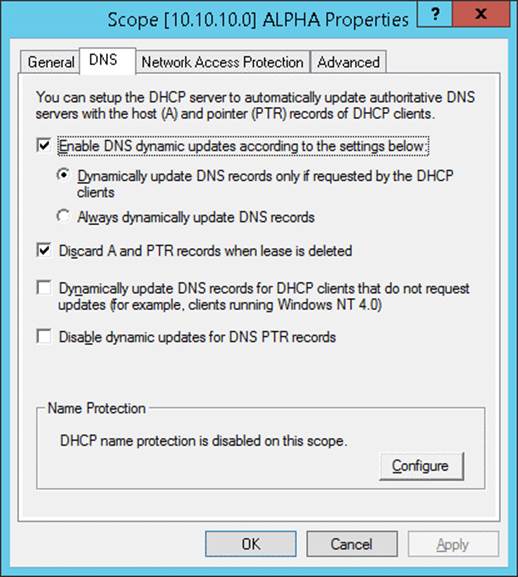
FIGURE 3-12 DNS registration
You can configure the following DNS registration options:
![]() Enable DNS Dynamic Updates According To The Settings Below This setting allows you to configure the DHCP server to only update DNS records when requested by the client (the default value). You can also configure registration to always dynamically update DNS records each time the DHCP server leases an address.
Enable DNS Dynamic Updates According To The Settings Below This setting allows you to configure the DHCP server to only update DNS records when requested by the client (the default value). You can also configure registration to always dynamically update DNS records each time the DHCP server leases an address.
![]() Discard A And PTR Records When Lease Is Deleted Enabled by default, the DHCP server will instruct the DNS server to remove any associated host and reverse lookup records when a DHCP lease expires and is deleted. Use this option in scopes that support transient clients, such as those that only infrequently connect to a specific network.
Discard A And PTR Records When Lease Is Deleted Enabled by default, the DHCP server will instruct the DNS server to remove any associated host and reverse lookup records when a DHCP lease expires and is deleted. Use this option in scopes that support transient clients, such as those that only infrequently connect to a specific network.
![]() Dynamically Update DNS Records For DHCP Clients That Do Not Request Updates Enabling this setting will ensure that DNS records are always updated when the DHCP server leases an address. Selecting this option configures the DHCP server to perform registration in a manner similar to when the Always Dynamically Update DNS records option is enabled.
Dynamically Update DNS Records For DHCP Clients That Do Not Request Updates Enabling this setting will ensure that DNS records are always updated when the DHCP server leases an address. Selecting this option configures the DHCP server to perform registration in a manner similar to when the Always Dynamically Update DNS records option is enabled.
![]() Disable Dynamic Updates For DNS PTR Records This option configures the DHCP server to update host (A) records, but does not update records in a reverse lookup zone. This option is useful for organizations that haven’t configured reverse lookup zones where attempts to register PTR records cause errors in the event log.
Disable Dynamic Updates For DNS PTR Records This option configures the DHCP server to update host (A) records, but does not update records in a reverse lookup zone. This option is useful for organizations that haven’t configured reverse lookup zones where attempts to register PTR records cause errors in the event log.
Name Protection
DHCP Name Protection is a feature that enables you to ensure that the hostnames that a DHCP server registers with a DNS server are not overwritten in the event that a non-Windows operating system has the same name. DHCP Name Protection also protects names from being overwritten by hosts that use static addresses that conflict with DHCP-assigned addresses.
For example, in the contoso.com domain there is a computer running the Windows 8.1 operating system that has the name Auckland. It receives its IP address information from a Windows Server 2012 DHCP server. The DHCP server registers this name in DNS, and a record associating the name Auckland.contoso.com with the IP address assigned to the computer running Windows 8.1 is now present in the contoso.com DNS zone. A newly installed computer running on a distribution of Linux is also assigned the name Auckland. Because Name Protection has been enabled, this new computer is unable to overwrite the existing record with a record associating the name Auckland.contoso.com with the Linux computer’s IP address. If Name Protection had not been enabled, it’s possible that the record would have been overwritten.
You can enable Name Protection on a scope by clicking Configure on the DNS tab of the IPv4 or IPv6 properties dialog box as shown in Figure 3-13. You can also do this using the Set-DhcpServerv4DnsSetting or the Set-DhcpServerv6DnsSetting cmdlet. For example, to configure the DHCP server on computer MEL-DC so that Name Protection is enabled on all IPv4 scopes, issue the command:
Set-DhcpServerv4DnsSetting –Computer MEL-DC –NameProtection $true

FIGURE 3-13 Configure Name Protection
More Info: Name Protection
To learn more about Name Protection, consult the following article: http://technet.microsoft.com/en-us/library/dd759188.aspx.
DHCP failover
DHCP failover enables you to configure DHCP to be highly available without using split scopes. DHCP failover is a feature new to Windows Server 2012. You have two options when configuring DHCP failover:
![]() Hot standby mode This relationship is a traditional failover relationship and is shown in Figure 3-14. When you configure this relationship, the primary server handles all DHCP traffic unless it becomes unavailable. You can configure DHCP servers to be in multiple separate relationships, so it’s possible that a DHCP server can be the primary server in one relationship and a hot standby server in another relationship. When configuring this relationship, you specify a percentage of the address ranges to be reserved on the standby server. The default value is 5 percent. This 5 percent of addresses is available as soon as the primary server is unavailable. The hot standby server takes control of the entire address range when the figure specified by the state switchover interval is reached. The default value for this interval is 60 minutes.
Hot standby mode This relationship is a traditional failover relationship and is shown in Figure 3-14. When you configure this relationship, the primary server handles all DHCP traffic unless it becomes unavailable. You can configure DHCP servers to be in multiple separate relationships, so it’s possible that a DHCP server can be the primary server in one relationship and a hot standby server in another relationship. When configuring this relationship, you specify a percentage of the address ranges to be reserved on the standby server. The default value is 5 percent. This 5 percent of addresses is available as soon as the primary server is unavailable. The hot standby server takes control of the entire address range when the figure specified by the state switchover interval is reached. The default value for this interval is 60 minutes.
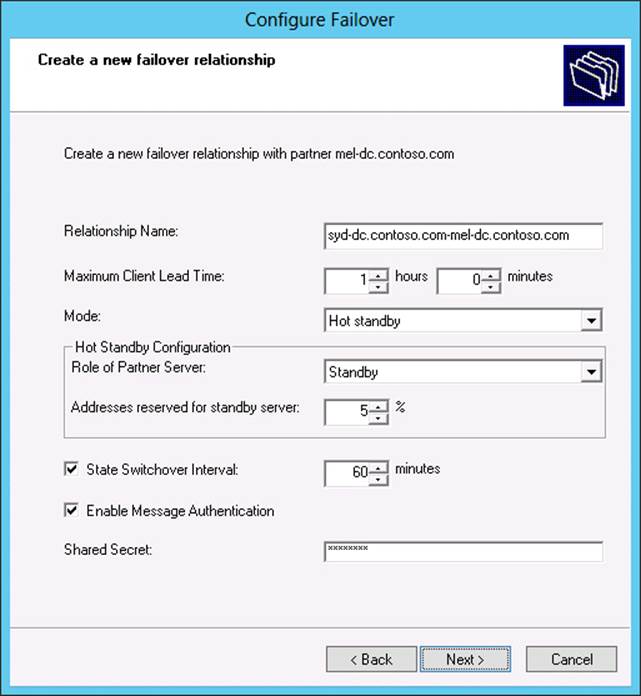
FIGURE 3-14 Configure a hot standby relationship
![]() Load sharing mode This is the default mode when you create a DHCP failover relationship. In this mode both servers provide IP addresses to clients according to the ratio defined by the load balance percentage as shown in Figure 3-15. The default is for each server to share 50 percent of the load. The Maximum Client Lead Time is used to renew DHCP leases issued by the failed partner.
Load sharing mode This is the default mode when you create a DHCP failover relationship. In this mode both servers provide IP addresses to clients according to the ratio defined by the load balance percentage as shown in Figure 3-15. The default is for each server to share 50 percent of the load. The Maximum Client Lead Time is used to renew DHCP leases issued by the failed partner.
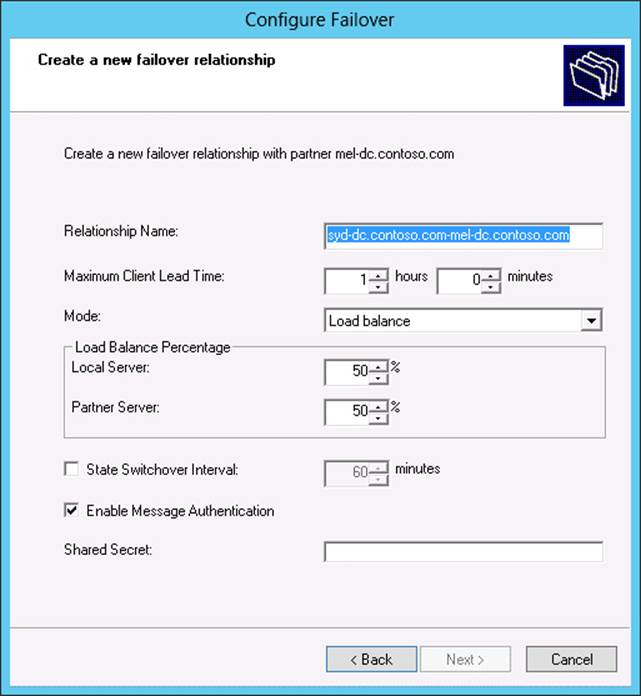
FIGURE 3-15 Configure load balanced DHCP
Prior to configuring DHCP failover, you need to remove any split scopes between the potential partners. You can also choose a shared secret to authenticate replication traffic, although you won’t have to enter this secret on the partner DHCP server.
More Info: DHCP failover
To learn more about DHCP failover consult the following article: http://technet.microsoft.com/en-us/library/hh831385.aspx.
Lesson summary
![]() Superscopes enable you to combine existing DHCP scopes for the purpose of administration.
Superscopes enable you to combine existing DHCP scopes for the purpose of administration.
![]() Multicast scopes enable you to provide multicast address ranges to applications that require multicast addresses.
Multicast scopes enable you to provide multicast address ranges to applications that require multicast addresses.
![]() Split scopes enable you to host parts of the same scope on different DHCP servers. Split scopes provide high availability if DHCP servers don’t run the Windows Server 2012 operating system.
Split scopes enable you to host parts of the same scope on different DHCP servers. Split scopes provide high availability if DHCP servers don’t run the Windows Server 2012 operating system.
![]() DNS registration allows you to have the DHCP server update DNS with the DHCP client’s name and IP address information.
DNS registration allows you to have the DHCP server update DNS with the DHCP client’s name and IP address information.
![]() Name Protection enables you to configure DHCP so that names registered on behalf of Windows clients in DNS can’t be overwritten by hosts using operating systems unrelated to Microsoft.
Name Protection enables you to configure DHCP so that names registered on behalf of Windows clients in DNS can’t be overwritten by hosts using operating systems unrelated to Microsoft.
![]() DHCP failover is a technology new to Windows Server 2012. It enables DHCP servers to be configured in a partner relationship. In hot standby mode, one DHCP server serves as a hot standby for another server, only taking over if the first server becomes unavailable. In load sharing mode, the DHCP servers share IP address allocation duties for the same scope.
DHCP failover is a technology new to Windows Server 2012. It enables DHCP servers to be configured in a partner relationship. In hot standby mode, one DHCP server serves as a hot standby for another server, only taking over if the first server becomes unavailable. In load sharing mode, the DHCP servers share IP address allocation duties for the same scope.
Lesson review
Answer the following questions to test your knowledge of the information in this lesson. You can find the answers to these questions and explanations of each answer choice in the “Answers” section at the end of this chapter.
1. Your organization has two DHCP servers at its central site. The first one is hosted on a computer running the Windows Server 2012 operating system. The second DHCP server is hosted on a computer running the Windows Server 2008 R2 operating system. You want to make a DHCP scope highly available so that clients can still obtain address leases if one of these DHCP servers fail. Which of the following strategies should you implement to accomplish this goal?
A. Configure DHCP failover. Use hot standby mode.
B. Configure DHCP failover. Use load sharing mode.
C. Configure a split scope.
D. Configure a superscope.
2. Your organization has two DHCP servers at its central site. Both DHCP servers are running on the Windows Server 2012 operating system. One DHCP server also hosts the company’s intranet site. You want to configure DHCP so that one DHCP server handles the majority of the organization’s DHCP traffic and the other DHCP server, installed on the server that hosts the intranet site, only leases addresses if the first one becomes unavailable. The second DHCP server should be able to lease addresses from the entire scope until such time as the first DHCP server is returned to service. Which of the following strategies should you implement to accomplish this goal?
A. Configure DHCP failover. Use load sharing mode.
B. Configure a split scope.
C. Configure DHCP failover. Use hot standby mode.
D. Configure a superscope.
3. You are about to add a large number of users and computers to one of the existing buildings at your company. Unfortunately the existing DHCP scope used at this building is close to exhaustion. You want to configure DHCP so that clients on this physical network can be leased addresses from either the original or an additional address range, but allow these ranges to be administered as a single combined entity. Which of the following strategies should you implement to accomplish this goal?
A. Configure a superscope.
B. Configure a split scope.
C. Configure DHCP failover. Use load sharing mode.
D. Configure DHCP failover. Use hot standby mode.
4. Your organization’s head office has two DHCP servers that are hosted on computers running the Windows Server 2012 operating system. You want to configure these DHCP servers so that they share scopes and respond to client requests in a load-balanced manner. In the event that one server fails, the other server should be able to lease addresses from the entirety of any scope that it hosts after the partner server has been unavailable for a preconfigured amount of time. Which of the following strategies should you implement to accomplish this goal?
A. Configure a split scope.
B. Configure DHCP failover. Use load sharing mode.
C. Configure DHCP failover. Use hot standby mode.
D. Configure a superscope.
Lesson 3: Deploying and managing IPAM
IP Address Management (IPAM) is a technology introduced with the release of Windows Server 2012 that simplifies the process of managing multiple DHCP and DNS servers. Rather than having to keep detailed records to track scopes and DHCP servers, IPAM enables you to view and manage this information centrally. In this lesson you find out about the functionality of the IPAM feature and how you can deploy IPAM to manage your organization’s DHCP and DNS servers.
After this lesson, you will be able to:
![]() Configure IPAM
Configure IPAM
![]() Configure server discovery
Configure server discovery
![]() Create and manage IP blocks and ranges
Create and manage IP blocks and ranges
![]() Track IP addresses
Track IP addresses
![]() Delegate IPAM administration
Delegate IPAM administration
![]() Configure IPAM database storage
Configure IPAM database storage
Estimated lesson time: 45 minutes
Introduction to IPAM
IPAM enables you to centralize the management of DHCP and DNS servers. Rather than managing each server separately, you can use IPAM to manage them from a single console. You can use a single IPAM server to manage up to 150 separate DHCP servers and up to 500 individual DNS servers. A single IPAM server is able to manage 6,000 separate DHCP scopes and 150 separate DNS zones. You can perform tasks such as creating address scopes, configuring address reservations, and managing DHCP and DNS options globally, rather than having to perform these tasks on a server-by-server basis.
You can also use IPAM to search stored IP address lease data, MAC address data, and corresponding user sign on and sign off information. Microsoft estimates that the Windows Internal Database (WID) used by IPAM is able to store three years of IP address utilization data for an organization that has 100,000 users before data must be purged.
More Info: IPAM
To get more of an overview of IPAM, consult the following article: http://technet.microsoft.com/en-us/library/jj878343.aspx.
Deploy IPAM
You can only install the IPAM feature on a computer that is a member of an Active Directory domain. IPAM is also limited so that you can only use it to manage DHCP and DNS servers that are members of the same Active Directory forest. You can’t use IPAM to manage standalone servers or servers that are members of different forests. You can have multiple IPAM servers within a single Active Directory forest. You are likely to do this if your organization is geographically dispersed.
It’s important to note IPAM cannot manage a locally installed DHCP or DNS server. For this reason you should install the IPAM feature on a server that doesn’t host the DNS or DHCP roles. IPAM is also not supported on computers that host the domain controller server role. Additionally, if you want to use the IPAM server to manage IPv6 address ranges, you need to ensure that IPv6 is enabled on the computer that will host the IPAM server.
More Info: Deploying the IPAM server
To learn more about deploying the IPAM server, consult the following TechNet document: http://technet.microsoft.com/en-us/library/jj878327.aspx.
Configure IPAM database storage
You could only use the version of IPAM that shipped with Windows Server 2012 with the Windows Internal Database (WID). The version of IPAM available in Windows Server 2012 R2 supports using a SQL Server 2012 instance for hosting IPAM data. This allows you to host the IPAM database on a host that is separate from the IPAM server. Microsoft recommends that the SQL Server instance be devoted to hosting the IPAM database. You should not host other databases on this instance.
Configure server discovery
Server discovery is the process where the IPAM server checks with Active Directory to locate domain controllers, DNS servers, and DHCP servers. You select which domains to discover in the Configure Server Discovery dialog box, as shown in Figure 3-16.
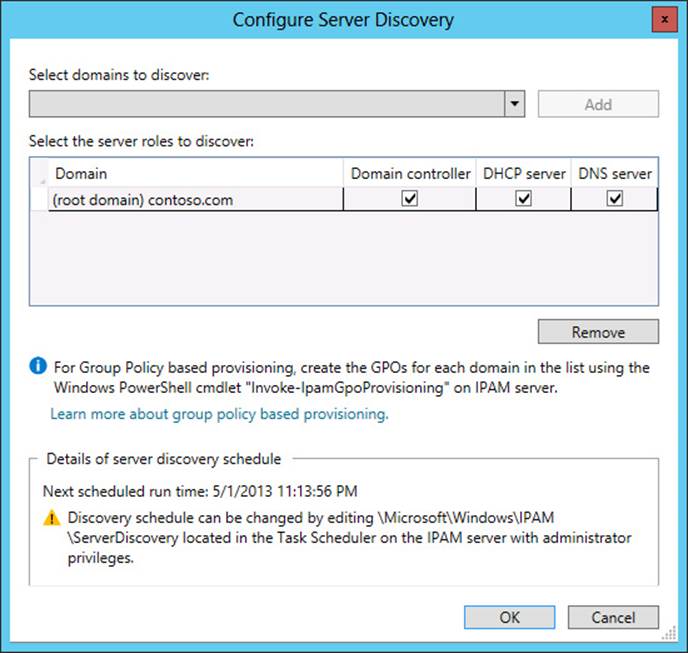
FIGURE 3-16 Configure server discovery
After you’ve completed server discovery, you need to run a special PowerShell cmdlet that creates and provisions Group Policy objects that allow the servers to be managed by the IPAM server. When you set up the IPAM server, you choose a GPO name prefix as shown in Figure 3-17. You use this prefix when executing the Invoke-IpamGpoProvisioning Windows PowerShell cmdlet that creates the appropriate GPOs.
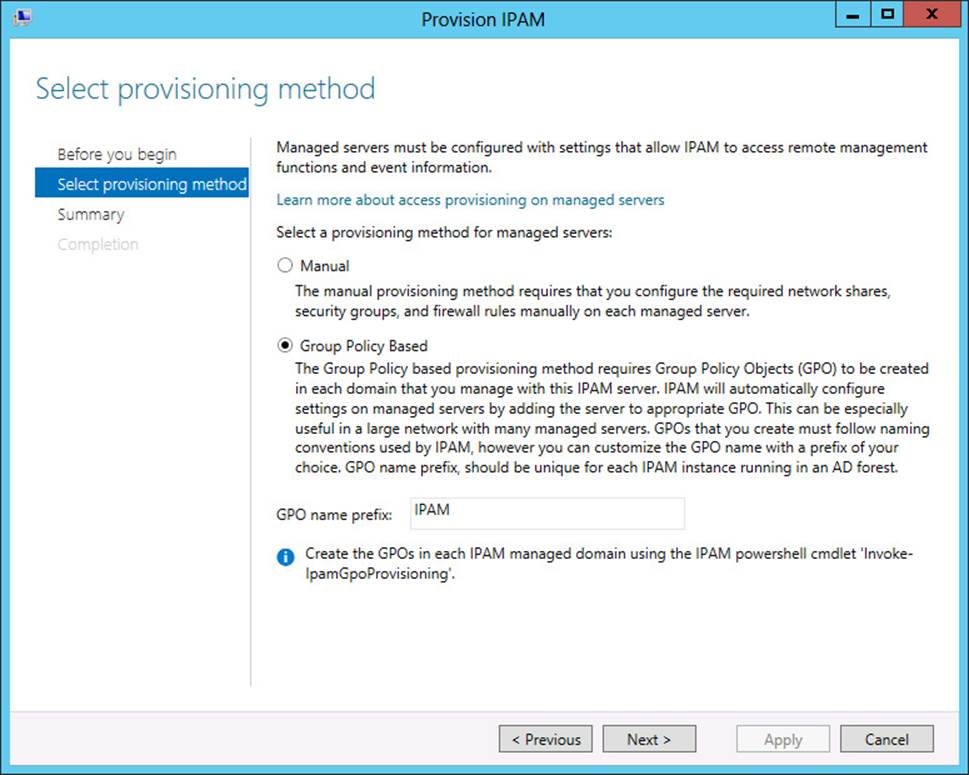
FIGURE 3-17 Select a provisioning method
If you use the GPO prefix IPAM, the three GPOs are named:
![]() IPAM_DC_NPS
IPAM_DC_NPS
![]() IPAM_DHCP
IPAM_DHCP
![]() IPAM_DNS
IPAM_DNS
Until these GPOs apply to the discovered servers, these servers are listed as having an IPAM Access Status of Blocked. After the GPOs are applied to the discovered servers, the IPAM Access Status changes to Unblocked as shown in Figure 3-18.

FIGURE 3-18 Server inventory
When the discovered service has an IPAM Access Status set to Unblocked, you can edit the properties of the server and set it to Managed as shown in Figure 3-19. After you do this, you can use IPAM to manage the selected services on the server.
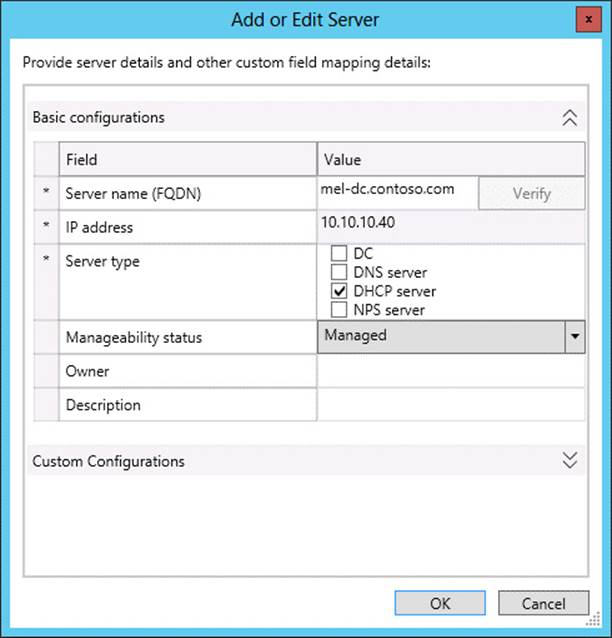
FIGURE 3-19 Configure server manageability
More Info: Server discovery
To learn more about server discovery, consult the following article: http://technet.microsoft.com/en-us/library/jj878355.aspx.
Managing the IP address space
The benefit of IPAM is that it enables you to manage all of the IP addresses in your organization. IPAM supports the management of IPv4 public and private addresses whether they are statically or dynamically assigned. IPAM enables you to detect if there are overlapping IP address ranges defined in DHCP scopes on different servers. It also enables you to determine IP address utilization and whether there are free IP addresses in a specific range, and create DHCP reservations centrally without having to configure them on individual DHCP servers. IPAM also enables you to create DNS records based on IP address lease information.
IPAM separates the IP address space into blocks, ranges, and individual addresses. An IP address block, shown in Figure 3-20, is a large collection of IP addresses that you use to organize the address space used in your organization at the highest level. An organization might only have one or two address blocks: one for its entire internal network and another smaller block that represents the public IP address space used by the organization.
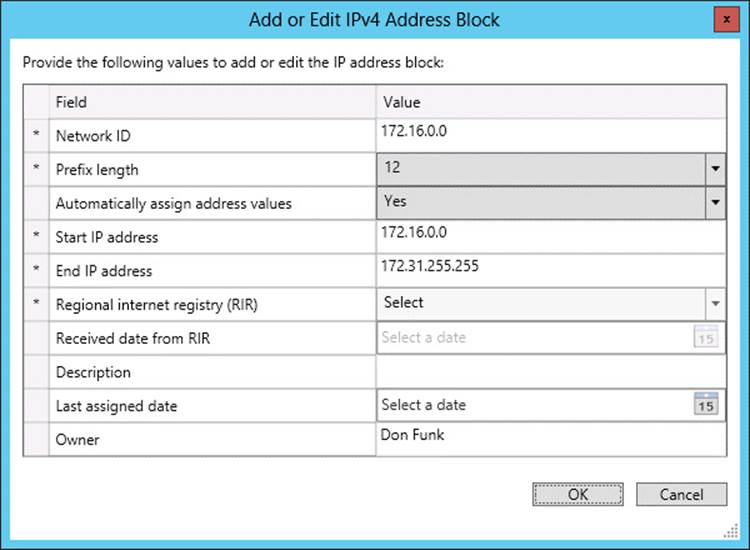
FIGURE 3-20 An IPv4 address block
An IP address range is part of an IP address block. An IP address range cannot map to multiple IP address blocks. Generally an IP address range corresponds to a DHCP scope. Figure 3-21 shows an IP address range.
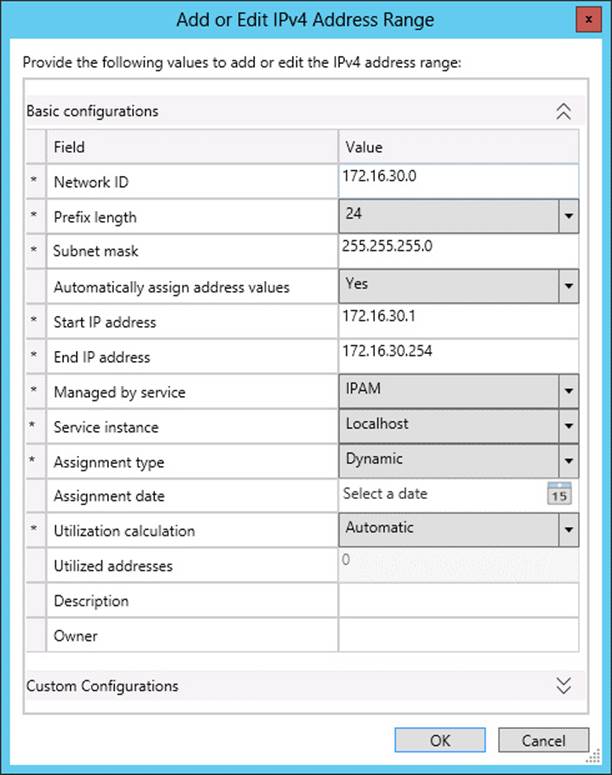
FIGURE 3-21 An IPv4 address range
An IP address maps to a single IP address range. As Figure 3-22 shows, an IP address includes information about an associated MAC address, how the address is assigned, and when that assignment expires.

FIGURE 3-22 Add an IPv4 address
More Info: Managing IP address space
To learn more about managing IP address space, consult the following article: http://technet.microsoft.com/en-us/library/jj878303.aspx.
IP address tracking
One of the most important features of IPAM is its ability to track IP addresses by correlating DHCP leases with user and computer authentication events on managed domain controllers and Network Policy Servers (NPS). IP address tracking enables you to figure out which user was associated with a specific IP address at a particular point of time, something that can be important when trying to determine the cause of unauthorized activity on the organizational network.
As Figure 3-23 shows, you can search for IP address records using one of the following four parameters:
![]() IP address Track by IPv4 address, but IPAM does not support tracking on the basis of IPv6 address.
IP address Track by IPv4 address, but IPAM does not support tracking on the basis of IPv6 address.
![]() By client ID Track IP address activity on the basis of media access control (MAC) address.
By client ID Track IP address activity on the basis of media access control (MAC) address.
![]() By host name Track by the computer’s name as registered in DNS.
By host name Track by the computer’s name as registered in DNS.
![]() By user name Track a user name by providing a host name.
By user name Track a user name by providing a host name.
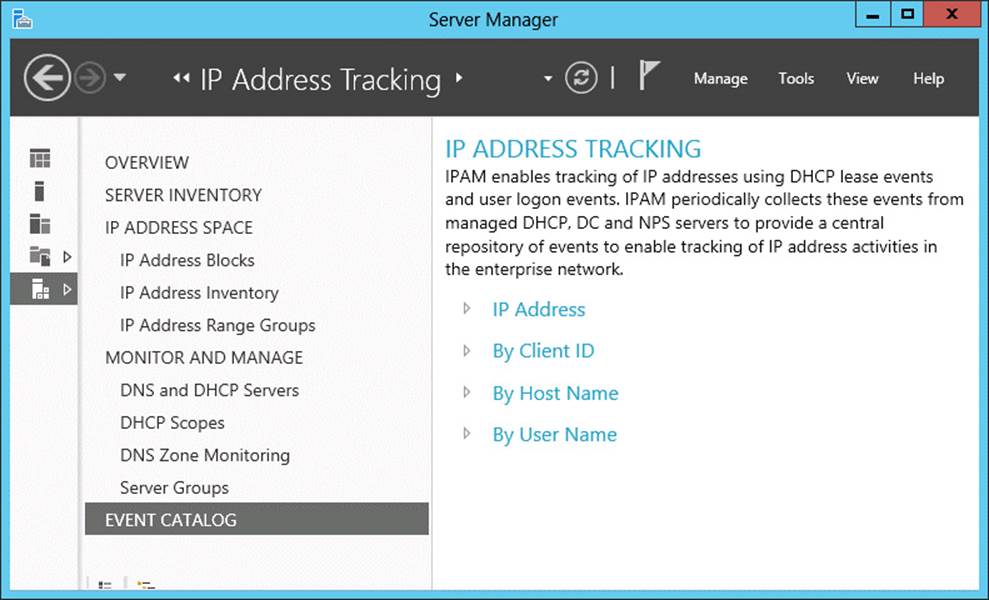
FIGURE 3-23 IP address tracking
More Info: IP address tracking
To learn more about IP address tracking, consult the following article: http://technet.microsoft.com/en-us/library/jj878332.aspx.
You can track only data that has been recorded since IPAM has been deployed. So although it is possible to store several years of data in the Windows Internal Database that IPAM uses, you’re limited to being able to retrieve only events that have been recorded after IPAM was configured.
![]() Quick check
Quick check
![]() You want to determine which IP addresses a computer with a particular MAC address was assigned to over a specific period. What IP address tracking category would you use to determine this information?
You want to determine which IP addresses a computer with a particular MAC address was assigned to over a specific period. What IP address tracking category would you use to determine this information?
Quick check answer
![]() You would track by client ID when you have a computer’s MAC address and want to extract additional information from IPAM address tracking.
You would track by client ID when you have a computer’s MAC address and want to extract additional information from IPAM address tracking.
IPAM administration
You can delegate administrative permissions by adding user accounts to one of five local security groups on the IPAM server. By default, members of the Domain Admins and Enterprise Admins groups are able to perform all tasks on the IPAM server. The five local security groups, shown in Figure 3-24, enable you to delegate the following permissions:
![]() IPAM Users Members of this group are able to view IPAM server information such as address space and operational event information, but they are unable to view IP address tracking information.
IPAM Users Members of this group are able to view IPAM server information such as address space and operational event information, but they are unable to view IP address tracking information.
![]() IPAM MSM Administrators MSM stands for multi-server management. Users added to this group have all the rights of the IPAM Users group and are able to perform common IPAM management tasks such as managing server inventory. They have read-only access to the IP address space. They are unable to view or perform IP address tracking tasks.
IPAM MSM Administrators MSM stands for multi-server management. Users added to this group have all the rights of the IPAM Users group and are able to perform common IPAM management tasks such as managing server inventory. They have read-only access to the IP address space. They are unable to view or perform IP address tracking tasks.
![]() IPAM ASM Administrators ASM stands for address space management administrator. Users added to this group are able to perform all tasks that can be performed by members of the IPAM Users group, but they are also able to manage the IP address space. They cannot perform monitoring tasks and are unable to perform IP address tracking tasks.
IPAM ASM Administrators ASM stands for address space management administrator. Users added to this group are able to perform all tasks that can be performed by members of the IPAM Users group, but they are also able to manage the IP address space. They cannot perform monitoring tasks and are unable to perform IP address tracking tasks.
![]() IPAM IP Audit Administrators Members of this group are able to manage server inventory and perform common management tasks, but they have read-only access to the IP address space and IP address tracking information.
IPAM IP Audit Administrators Members of this group are able to manage server inventory and perform common management tasks, but they have read-only access to the IP address space and IP address tracking information.
![]() IPAM Administrators Members of this group are able to perform all tasks on the IPAM server including viewing IP address tracking information.
IPAM Administrators Members of this group are able to perform all tasks on the IPAM server including viewing IP address tracking information.
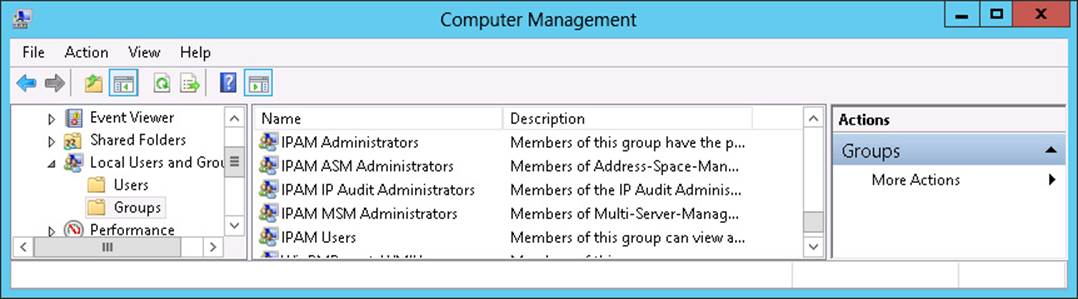
FIGURE 3-24 IPAM local user groups
More Info: IPAM administration
To learn more about IPAM administration, consult the following article: http://technet.microsoft.com/en-us/library/jj878348.aspx.
Lesson summary
![]() IPAM enables you to centrally manage DHCP and DNS servers.
IPAM enables you to centrally manage DHCP and DNS servers.
![]() You cannot deploy the IPAM server on a domain controller. You should not deploy a DNS or DHCP server on the IPAM server if you want to manage those servers using IPAM.
You cannot deploy the IPAM server on a domain controller. You should not deploy a DNS or DHCP server on the IPAM server if you want to manage those servers using IPAM.
![]() The IPAM server must be a member of an Active Directory domain and can only manage DHCP and DNS servers that are members of the same forest.
The IPAM server must be a member of an Active Directory domain and can only manage DHCP and DNS servers that are members of the same forest.
![]() You can use IP address tracking to search the IPAM database on the basis of IP address, MAC address, computer name, or user name.
You can use IP address tracking to search the IPAM database on the basis of IP address, MAC address, computer name, or user name.
![]() Members of the Domain Admins and Enterprise Admins groups have full administrative access to the IPAM server. There are five local security groups on the IPAM server that you can use to delegate administrative privileges.
Members of the Domain Admins and Enterprise Admins groups have full administrative access to the IPAM server. There are five local security groups on the IPAM server that you can use to delegate administrative privileges.
![]() The IPAM role available with Windows Server 2012 R2 can use a SQL Server 2012 instance to host the IPAM database.
The IPAM role available with Windows Server 2012 R2 can use a SQL Server 2012 instance to host the IPAM database.
Lesson review
Answer the following questions to test your knowledge of the information in this lesson. You can find the answers to these questions and explanations of each answer choice in the “Answers” section at the end of this chapter.
1. You need to give a user the ability to view IP address tracking information stored in your organization’s IPAM server without adding him or her to the IPAM Administrators group. To which of the following IPAM-related security groups could you add this user to grant this privilege?
A. IPAM Users
B. IPAM IP Audit Administrators
C. IPAM MSM Administrators
D. IPAM ASM Administrators
2. You need to give a user the ability to manage the IP Address Space on an IPAM server without adding the user to the IPAM Administrators group. To which of the following IPAM-related security groups could you add this user to grant this privilege?
A. IPAM MSM Administrators
B. IPAM Users
C. IPAM ASM Administrators
D. IPAM IP Audit Administrators
3. You want to use IPAM’s IP address tracking feature to determine which IP addresses a computer with a specific MAC address was assigned by your organization’s DHCP servers during a particular week. Which of the following categories should you search on to accomplish this goal?
A. IP address
B. Client ID
C. Host name
D. User name
4. You are in the process of configuring IPAM. You have run the discovery process and discovered three servers that host the DHCP server role. The server’s IPAM Access Status is listed in the IPAM Server Inventory as Blocked. Which of the following steps should you take so that this status changes to unblocked? (Choose two.)
A. Ensure that you have provisioned the GPOs using the Invoke-IpamGPOProvisioning cmdlet.
B. Verify that Group Policy is applied correctly to the server hosting the IPAM server role.
C. Verify that Group Policy is applied correctly to the three servers hosing the DHCP server role.
D. Restart the IPAM server.
Practice exercises
The goal of this section is to provide you with hands-on practice with the following:
![]() Configuring DNSSEC
Configuring DNSSEC
![]() Configuring NRPT
Configuring NRPT
![]() Creating GlobalNames zone
Creating GlobalNames zone
![]() Configuring advanced DNS server options
Configuring advanced DNS server options
![]() Configuring a DHCP superscope
Configuring a DHCP superscope
![]() Deploying a split scope
Deploying a split scope
![]() Configuring DHCP Name Protection
Configuring DHCP Name Protection
![]() Setting up a multicast scope
Setting up a multicast scope
![]() Enabling DHCP failover
Enabling DHCP failover
![]() Configuring and deploying IPAM
Configuring and deploying IPAM
To perform the exercises in this section, you need access to an evaluation version of Windows Server 2012 R2. You should also have access to virtual machines SYD-DC, MEL-DC, CBR-DC, and ADL-DC, the setup instructions for which are described in the Introduction. You should ensure that you have a checkpoint of these virtual machines that you can revert to at the end of the practice exercises. You should revert the virtual machines to this initial state prior to beginning these exercises.
Exercise 1: Configure MEL-DC
In this exercise, you configure MEL-DC to be a member of the contoso.com domain. To complete this exercise, perform the following steps:
1. Ensure that SYD-DC is started.
2. Start MEL-DC and sign on as Administrator with the password Pa$$w0rd.
3. On the Local Server node of the Server Manager console, verify that the local IP address is set to 10.10.10.40 and then click on the WORKGROUP link next to Workgroup.
4. On the Computer Name tab of the System Properties dialog box, click Change.
5. In the Computer Name/Domain Changes dialog box, click Domain and type contoso.com as shown in Figure 3-25 and then click OK.
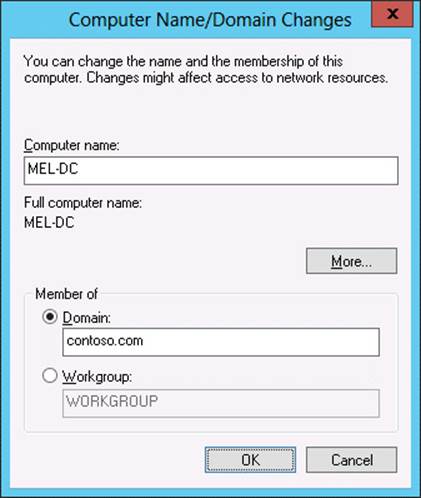
FIGURE 3-25 Join the domain
6. In the Windows Security dialog box, type the user name don_funk and the password Pa$$word and then click OK.
7. On the Computer Name/Domain Changes dialog box, shown in Figure 3-26, click OK.
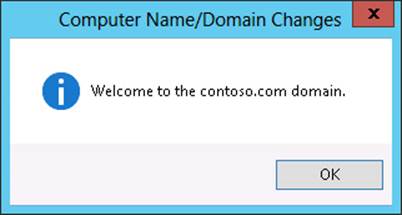
FIGURE 3-26 Verify the domain join
8. In the dialog box that informs you that you need to restart the computer to apply changes, click OK.
9. Click Close on the System Properties dialog box.
10. Click Restart Now on the Microsoft Windows dialog box.
11. When MEL-DC restarts, sign in as contoso\don_funk with the password Pa$$w0rd.
Exercise 2: Configure DNSSEC
In this exercise, you configure DNSSEC on the contoso.com zone. To complete this exercise, perform the following steps:
1. Ensure that you are signed on to SYD-DC as contoso\don_funk.
2. From the Tools menu of the Server Manager console, click DNS.
3. In the DNS Manager console, expand the SYD-DC\Forward Lookup Zones node and click the Contoso.com node.
4. Verify that the records present in the Contoso.com zone match those shown in Figure 3-27.
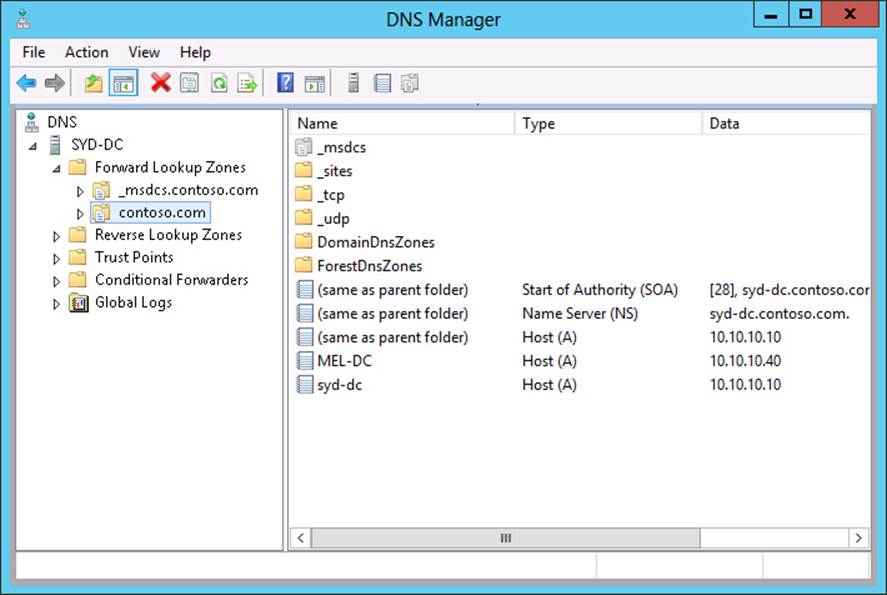
FIGURE 3-27 The unsigned DNS zone
5. On the Action menu, click DNSSEC and click Sign The Zone.
6. On the DNS Security Extensions (DNSSEC) page of the Zone Signing Wizard, click Next.
7. On the Signing Options page, click Use Default Settings To Sign The Zone as shown in Figure 3-28 and click Next.
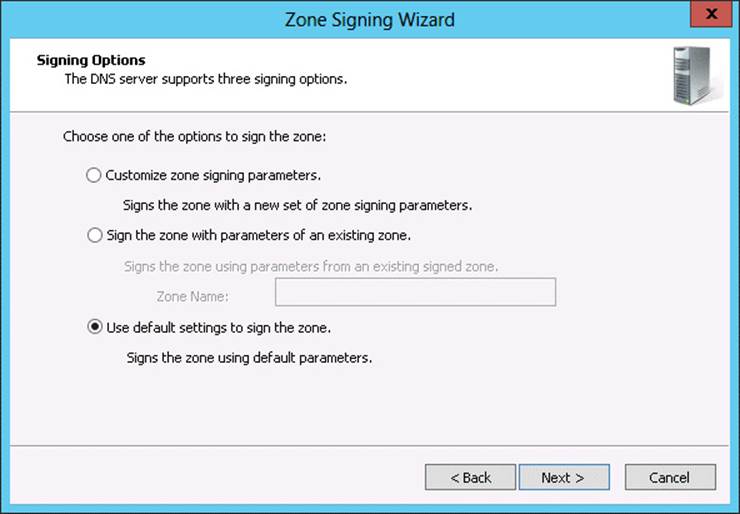
FIGURE 3-28 Configure zone signing options
8. On the DNS Security Extensions (DNSSEC) page, verify that the Key Master is set to SYD-DC as shown in Figure 3-29 and click Next.
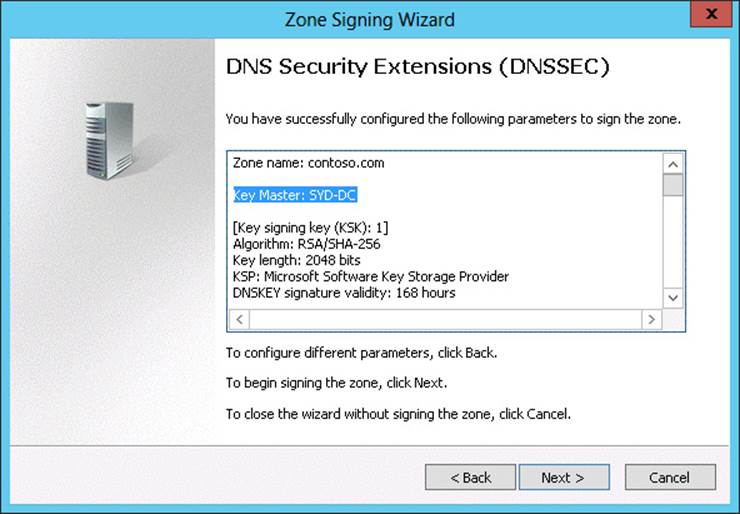
FIGURE 3-29 Verify the Key Master is SYD-DC
9. On the Signing The Zone page of the Zone Signing Wizard, click Finish.
10. On the Action menu of the DNS Manager console, click Refresh and verify the presence of the new DNS records as well as the DNSSEC icon on the zone as shown in Figure 3-30.
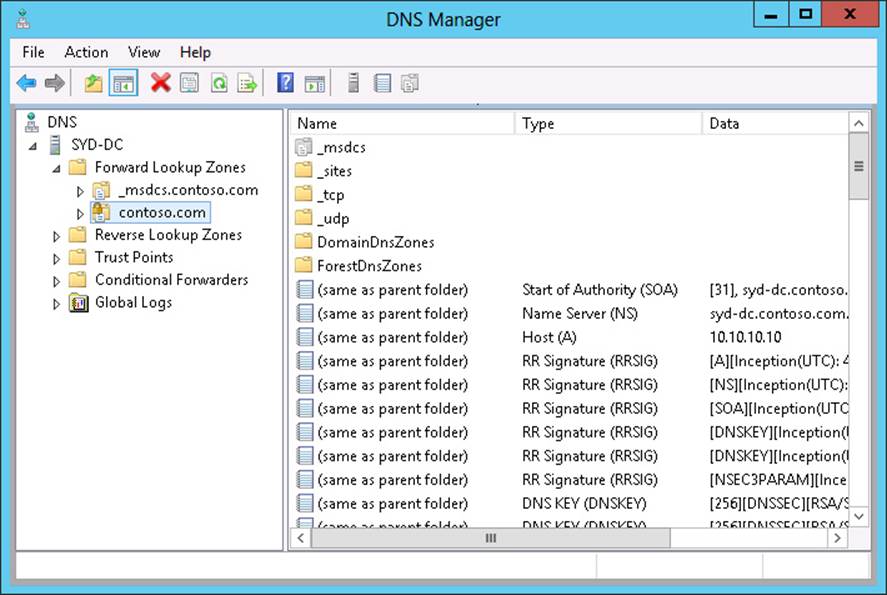
FIGURE 3-30 View the signed DNS zone
Exercise 3: Configure the name resolution policy
In this exercise, you configure the Group Policy so that clients will verify the integrity of DNS records in the contoso.com zone. To complete this exercise, perform the following steps:
1. Ensure that you are signed on to SYD-DC as contoso\don_funk.
2. On the Tools menu of the Server Manager console, click Group Policy Management.
3. In the Group Policy Management Console, expand the Forest: Contoso.com node, expand the Domains node, expand the Contoso.com node, and click Default Domain Policy as shown in Figure 3-31. Click OK on the Group Policy Management Console dialog box.
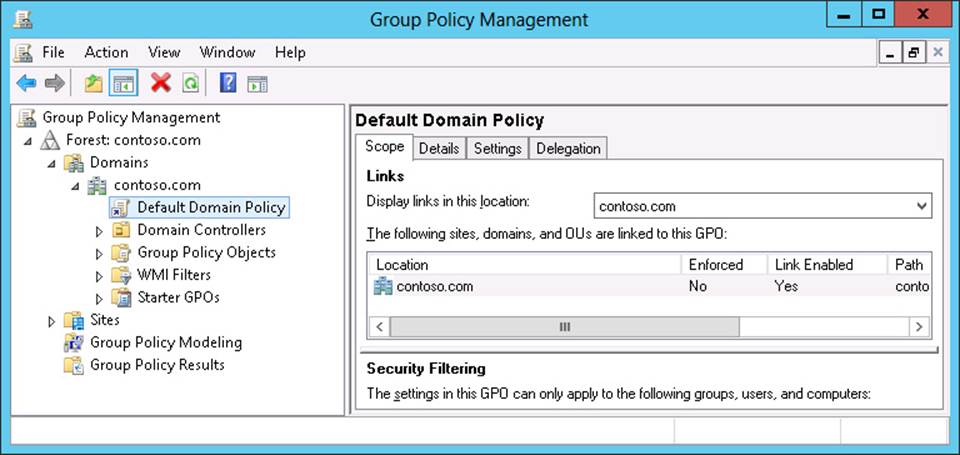
FIGURE 3-31 Configure the Name Resolution Policy
4. On the Action menu, click Edit.
5. In the Group Policy Management Editor, expand the Computer Configuration\Policies\Windows Settings node and click Name Resolution Policy.
6. In the Name Resolution Policy area, type contoso.com in the text box next to the Suffix drop-down menu, select the Enable DNSSEC in This Rule check box, and select the Require DNS Clients To Check That Name And Address Data Has Been Validated By The DNS Server as shown in Figure 3-32. Click Create.
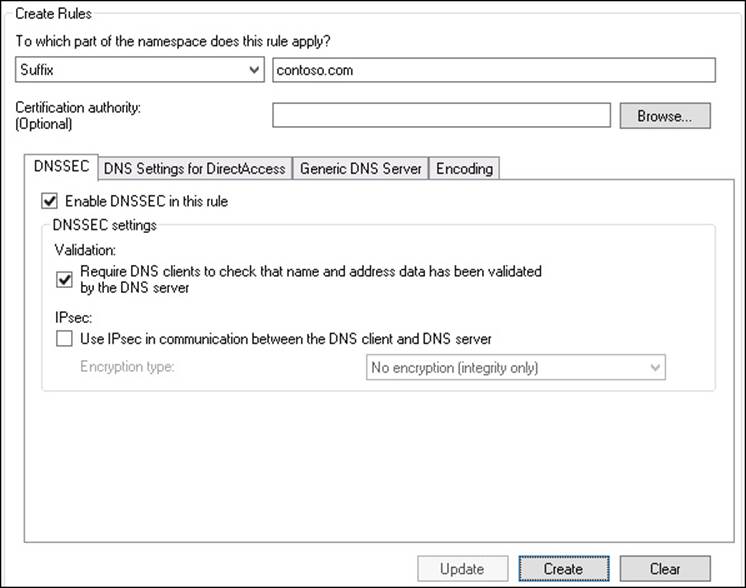
FIGURE 3-32 Configure the Name Resolution Policy
7. In the Group Policy Management Editor, scroll down to view the Name Resolution Policy Table and verify that the settings match those shown in Figure 3-33. Click Apply.
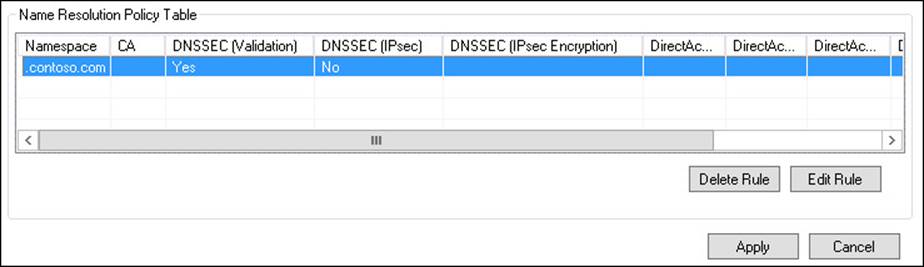
FIGURE 3-33 Verify the Name Resolution Policy
8. Close the Group Policy Management Editor and the Group Policy Management Console.
9. On the taskbar, click the Windows PowerShell icon.
10. Type the following command and press Enter to force a Group Policy update
Gpupdate /force
11. Type the following command and press Enter to verify that an RRSIG record exists for mel-dc.contoso.com as shown in Figure 3-34:
resolve-dnsname mel-dc.contoso.com –server syd-dc -dnssecok
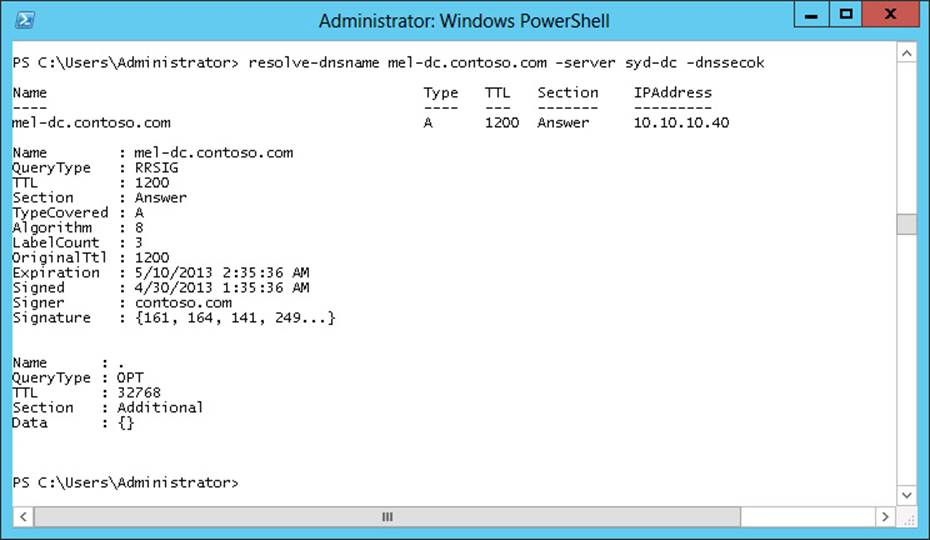
FIGURE 3-34 Verify the DNS record
12. Close the Windows PowerShell window.
Exercise 4: Increase the size of the DNS socket pool
In this exercise, you increase the size of the DNS socket pool. To complete this exercise, perform the following steps:
1. When signed on to SYD-DC as contoso\don_funk, right-click the Windows PowerShell icon on the taskbar and click Run As Administrator. Click Yes in the User Account Control dialog box.
2. Type the following command and press Enter to view the currently configured DNS socket pool site:
(Get-DNSServer).ServerSetting.SocketPoolSize
3. Type the following command and press Enter to change the DNS socket pool size to 4,000:
Dnscmd /config /socketpoolsize 4000
4. Type the following command and press Enter:
Restart-Service DNS
5. Type the following command and press Enter to verify the new DNS socket pool size:
(Get-DNSServer).ServerSetting.SocketPoolSize
Exercise 5: Modify DNS Cache Locking
In this exercise, you verify the current DNS Cache Locking setting, change this setting, and then verify the change. To complete this exercise, perform the following steps:
1. Ensure that you are signed on to SYD-DC as contoso\don_funk and have an elevated Windows PowerShell window open.
2. Type the following command and press Enter to verify the size of the current DNS cache locking setting as shown in Figure 3-35:
get-DNSServerCache
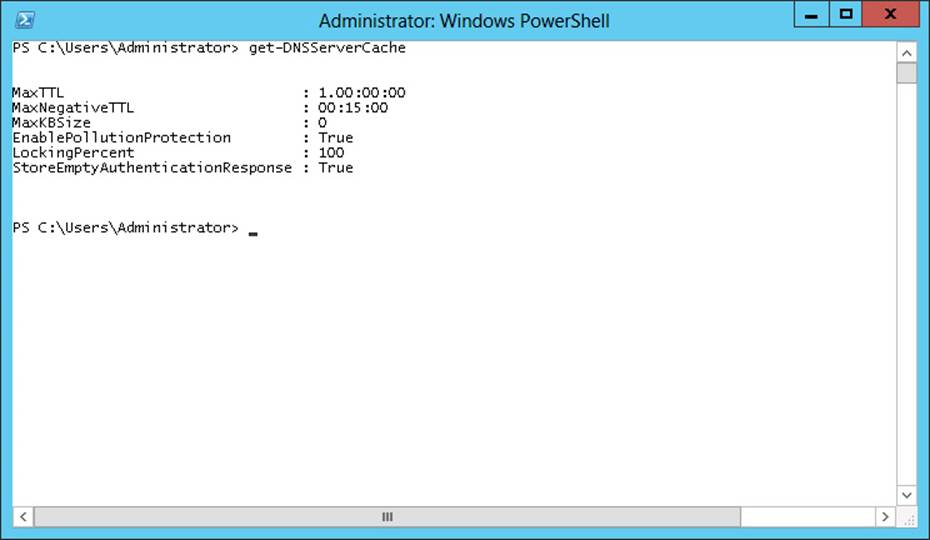
FIGURE 3-35 View the DNS Server cache settings
3. Configure the cache locking percentage to 80 percent by typing the following command and pressing Enter:
Set-DNSServerCache –LockingPercent 80
4. Restart the DNS Server service to apply the changes by typing the following command and pressing Enter:
Restart-Service DNS
5. Verify the alterations to the cache locking by typing the following command as shown in Figure 3-36 and pressing Enter:
get-DNSServerCache
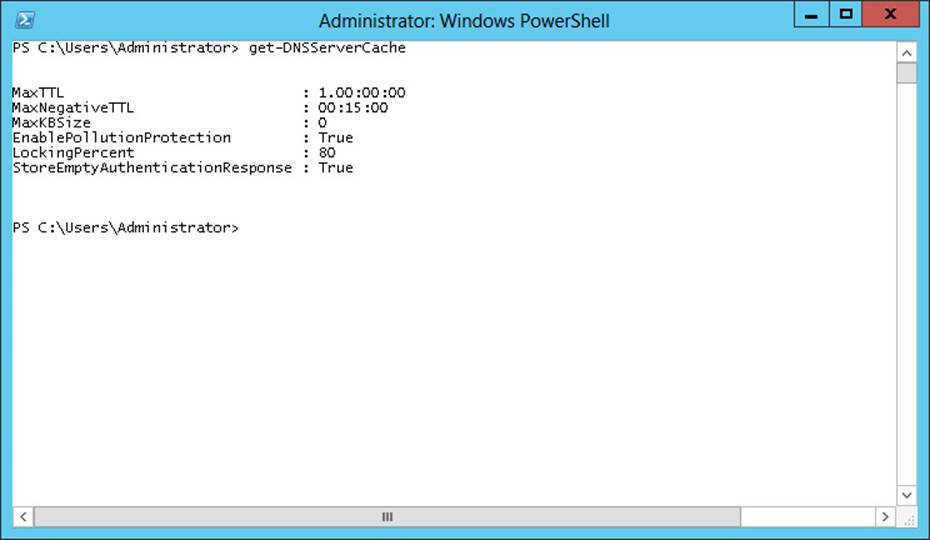
FIGURE 3-36 Verify the DNS server cache settings
Exercise 6: Create and manage a GlobalNames zone
In this exercise, you configure single-name resolution by configuring a GlobalNames zone. You then create a record in the GlobalNames zone. To complete this exercise, perform the following steps:
1. While signed on to SYD-DC as contoso\don_funk, open the DNS Manager console by clicking DNS in the Tools menu of the Server Manager console.
2. In the DNS Manager console, click the Forward Lookup Zones node under SYD-DC.
3. On the Action menu, click New Zone.
4. On the Welcome page of the New Zone Wizard, click Next.
5. On the Zone Type page, click Primary Zone, ensure that Store The Zone In Active Directory is selected, and click Next.
6. On the Active Directory Zone Replication Scope page, click To All DNS Servers Running On Domain Controllers In This Forest: Contoso.com and click Next.
7. In the Zone Name page, type GlobalNames, as shown in Figure 3-37, and click Next.
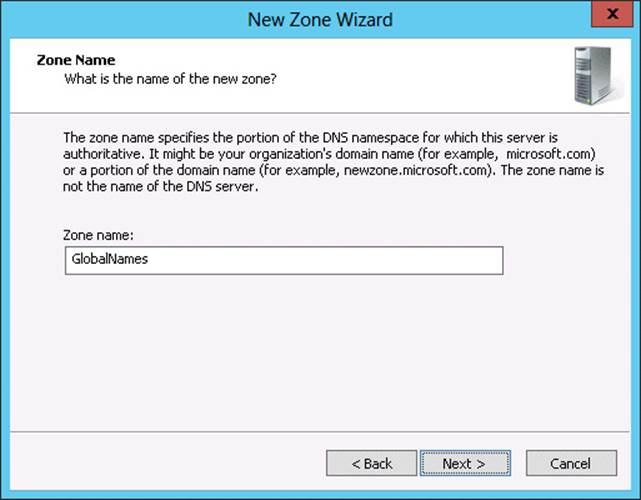
FIGURE 3-37 The zone name
8. On the Dynamic Update page, click Do Not Allow Dynamic Updates and click Next.
9. On the Completing The New Zone Wizard page, click Finish.
10. Switch to the elevated Windows PowerShell window, type the following command, and press Enter.
Set-DNSServerGlobalNameZone –ComputerName SYD-DC –Enable $True
11. Type the following command and press Enter to verify that the GlobalNameZone is enabled as shown in Figure 3-38:
Get-DNSServerGlobalNameZone
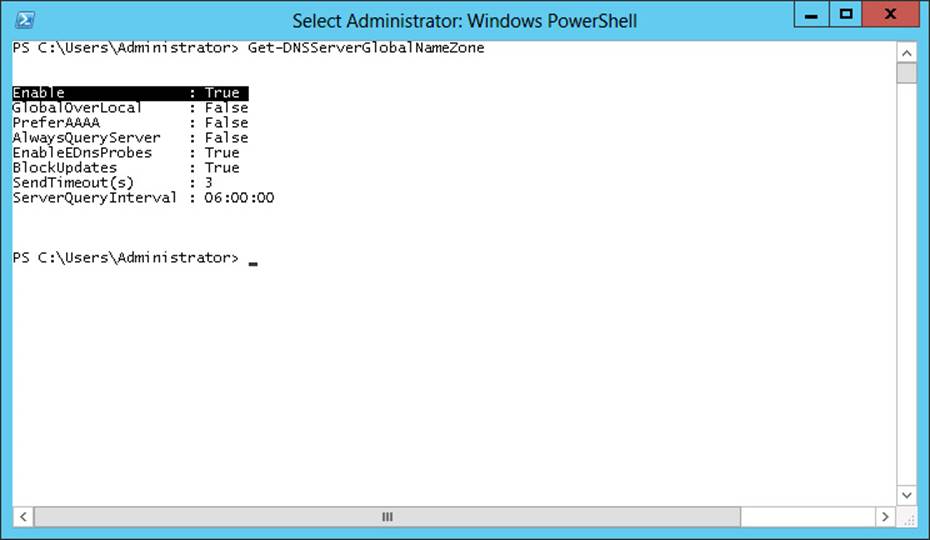
FIGURE 3-38 Verify the DNS configuration
12. Switch to the DNS Manager console and click the GlobalNames zone under Forward Lookup Zones.
13. On the Action menu, click New Alias (CNAME).
14. In the New Resource Record dialog box, configure the following information, as shown in Figure 3-39, and click OK:
![]() Alias Name (Uses Parent Domain If Left Blank): Bondi
Alias Name (Uses Parent Domain If Left Blank): Bondi
![]() Fully Qualified Domain Name (FQDN) For Target Host: syd-dc.contoso.com
Fully Qualified Domain Name (FQDN) For Target Host: syd-dc.contoso.com
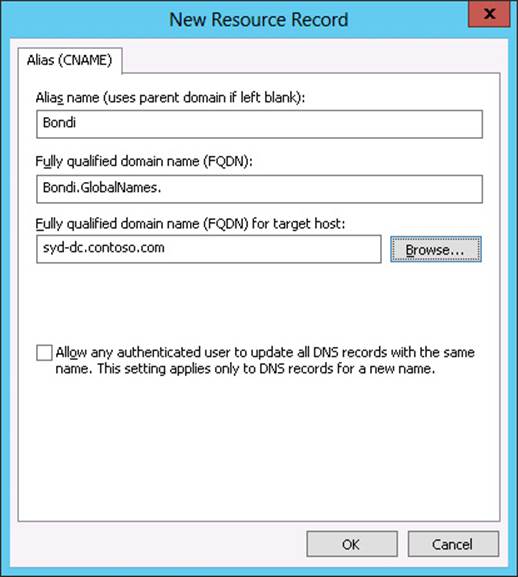
FIGURE 3-39 The CNAME record
Exercise 7: Configure and view the DNS event log
In this exercise, you configure event logging for the DNS service. To complete this exercise, perform the following steps:
1. While signed on to SYD-DC as contoso\don_funk, open the DNS Manager console.
2. In the DNS Manager console, right-click SYD-DC and click Properties.
3. On the SYD-DC Properties dialog box, click the Event Logging tab.
4. On the Event Logging tab, ensure that All Events are selected as shown in Figure 3-40 and click OK.
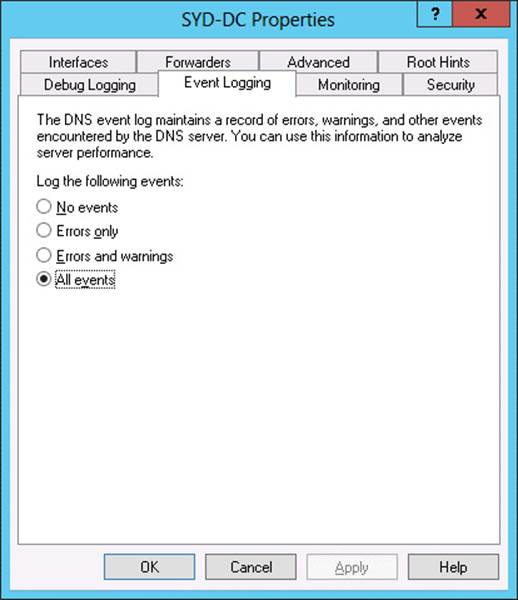
FIGURE 3-40 The DNS event log settings
5. In the Tools menu of the Server Manager console, click Event Viewer.
6. In the Event Viewer Console, expand the Applications And Service Logs node and click DNS Server.
7. In the DNS Server log, look for Event ID 7646 which confirms that the zone contoso.com is now signed with DNSSEC as shown in Figure 3-41.
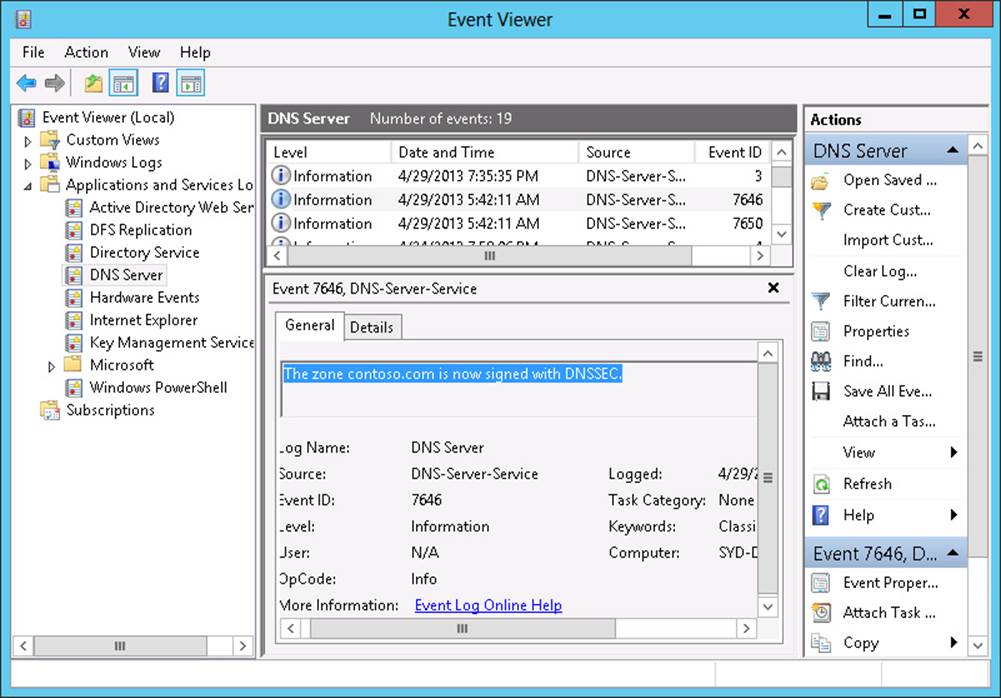
FIGURE 3-41 The DNS event
8. View the DNS event in the event log.
Exercise 8: Verify netmask ordering and disable recursion
In this exercise, you verify that netmask ordering is enabled on the DNS server hosted on SYD-DC. You also disable recursion. To complete this exercise, perform the following steps:
1. While signed on to SYD-DC as contoso\don_funk, switch to the DNS Manager console.
2. In the DNS Manager console, right-click the SYD-DC node and click Properties.
3. On the SYD-DC Properties dialog box, click the Advanced tab.
4. On the Advanced Tab of the SYD-DC Properties dialog box, select Disable Recursion (Also Disables Forwarders) and verify that Enable Netmask Ordering is enabled as shown in Figure 3-42.

FIGURE 3-42 Enable netmask ordering
5. Click OK to close the SYD-DC Properties dialog box.
6. Close the DNS Manager console.
Exercise 9: Install and activate the DHCP role
In this exercise, you install the DHCP role on MEL-DC and SYD-DC. To complete this exercise, perform the following steps:
1. Ensure that you are signed on to SYD-DC as contoso\don_funk.
2. In the Server Manager console on SYD-DC, click the All Servers node.
3. On the Manage menu, click Add Servers
4. In the Add Servers dialog box, click Find Now.
5. In the Add Servers dialog box, click MEL-DC and click the arrow to add it to the Selected box as shown in Figure 3-43. Click OK.
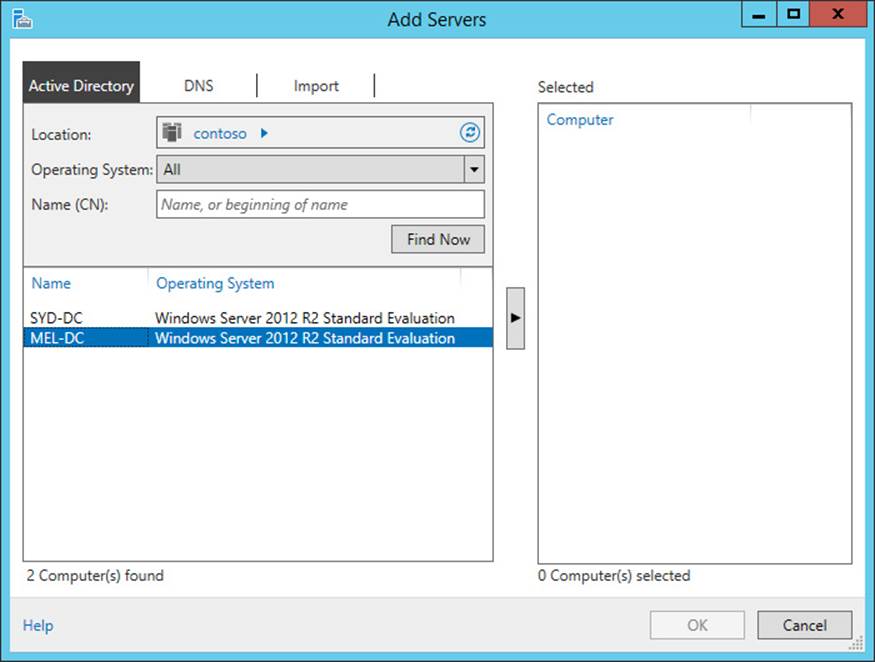
FIGURE 3-43 Add servers
6. Right-click SYD-DC and click Start Performance Counters.
7. Right-click MEL-DC and click Start Performance Counters.
8. In the Manage menu of the Server Manager console, click Add Roles And Features.
9. On the Before You Begin page of the Add Roles And Features Wizard, click Next.
10. On the Select Installation Type Page, click Role-Based or Feature-Based Installation and click Next.
11. On the Select Destination Server page, click MEL-DC.contoso.com as shown in Figure 3-44 and click Next.
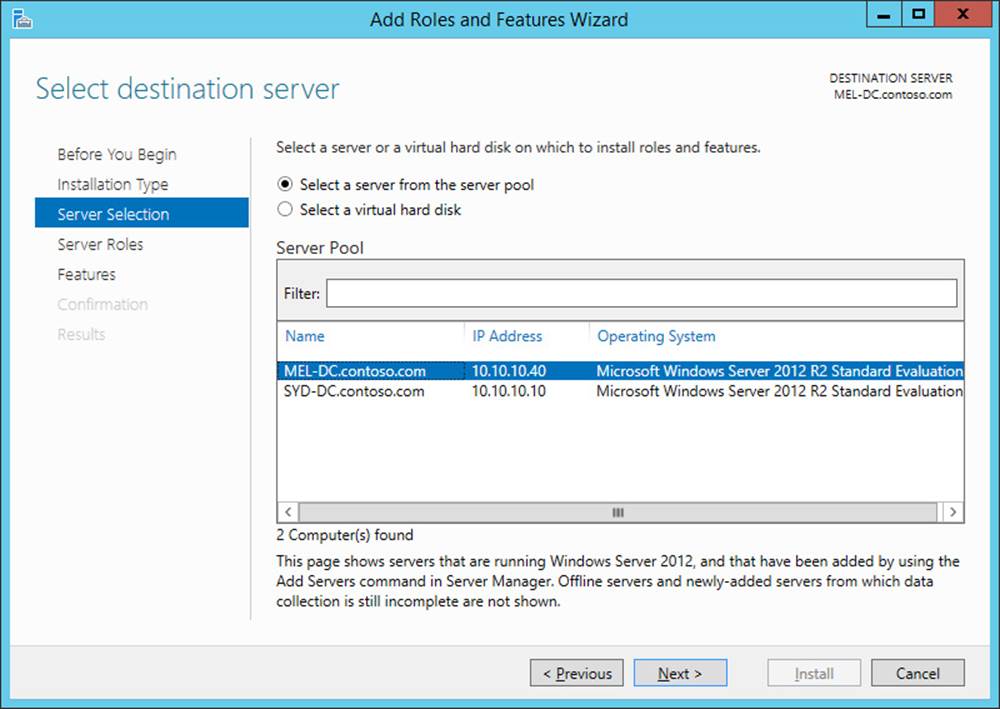
FIGURE 3-44 Select a server to manage
12. On the Select Server Roles page, click the DHCP Server check box.
13. In the Add Roles And Features Wizard dialog box, click Add Features.
14. On the Select Server Roles page, click Next three times and then click Install.
15. When the installation completes, click Close on the Installation Progress page of the Add Roles And Features Wizard.
16. On the Manage menu, click Add Roles And Features.
17. On the Before You Begin page of the Add Roles And Features Wizard, click Next twice.
18. In the Select Destination Server page, click SYD-DC.contoso.com and click Next.
19. On the Select Server Roles page, click the DHCP Server check box as shown in Figure 3-45.
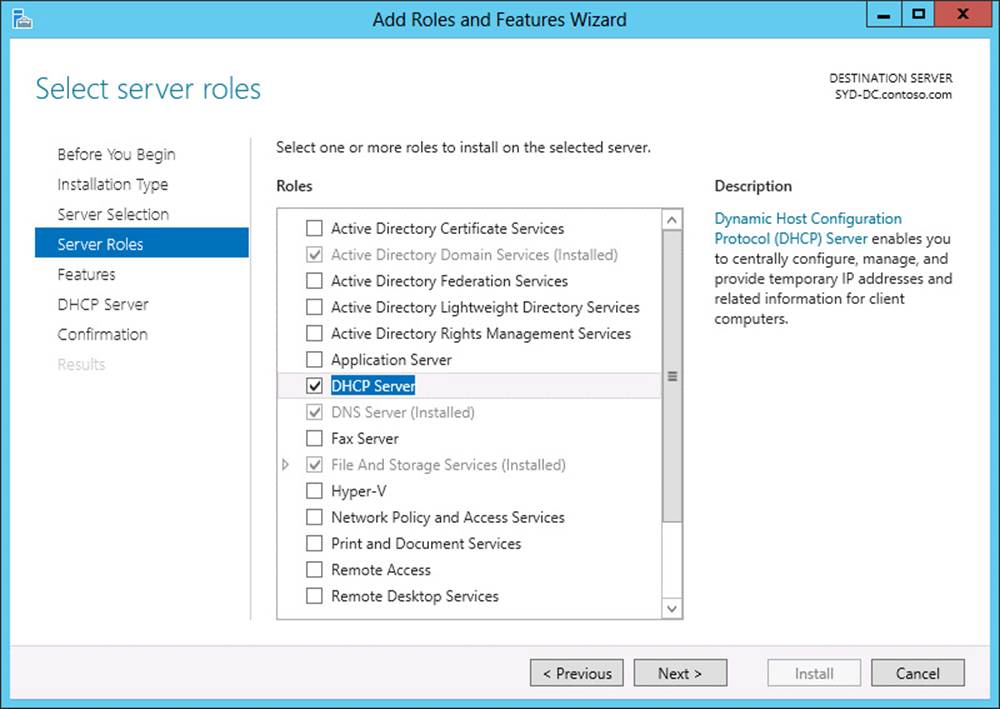
FIGURE 3-45 Add the DHCP server role
20. On the Add Roles And Features Wizard dialog box, click Add Features and then click Next three times. Click Install and then click Close.
21. In the Server Manager console on SYD-DC, click the DHCP Server node.
22. Next to the There Are 2 Jobs With New Notifications message, click More.
23. In the All Servers Task Details dialog box, shown in Figure 3-46, click the Complete DHCP Configuration link next to MEL-DC.
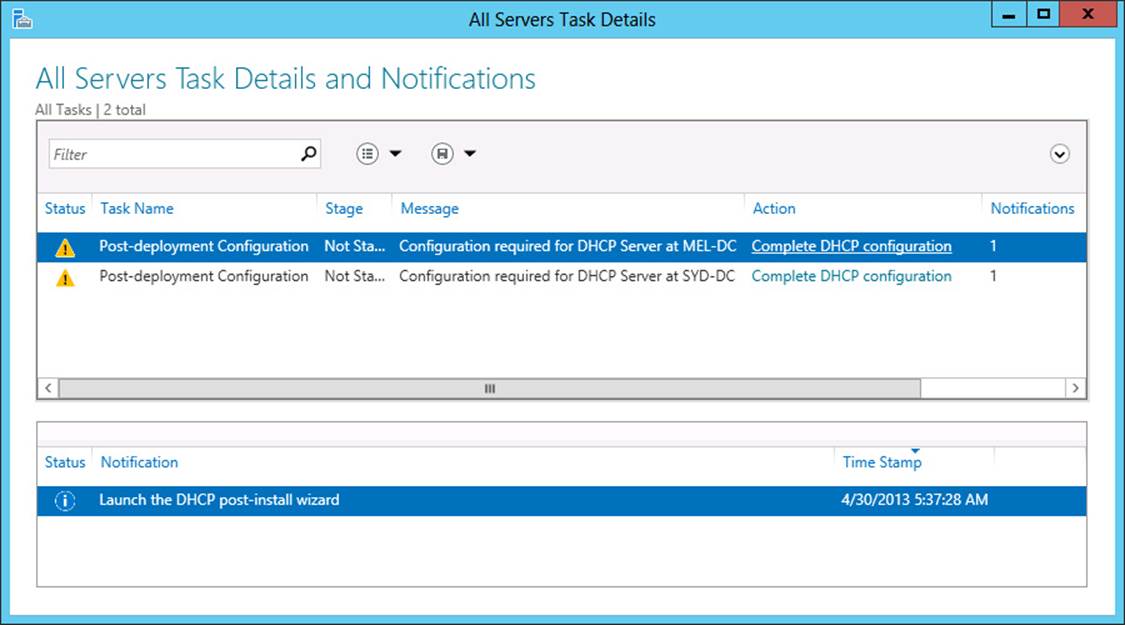
FIGURE 3-46 The post-deployment configuration notice
24. On the Description page of the DHCP Post-Install Configuration Wizard, click Next.
25. On the Authorization page, verify that the user credentials are set to CONTOSO\don_funk as shown in Figure 3-47, click Commit, and then click Close.

FIGURE 3-47 Configure the credentials
26. In the All Servers Task Details dialog box, click the Complete DHCP Configuration link next to SYD-DC.
27. On the Description page of the DHCP Post-Install Configuration Wizard, click Next.
28. On the Authorization page, verify that CONTOSO\don_funk is listed as the credentialed user, click Commit, and then click Close.
29. Verify that the Stage is listed as complete on the All Servers Task Details And Notifications dialog box as shown in Figure 3-48 and then click the close icon on the title bar.
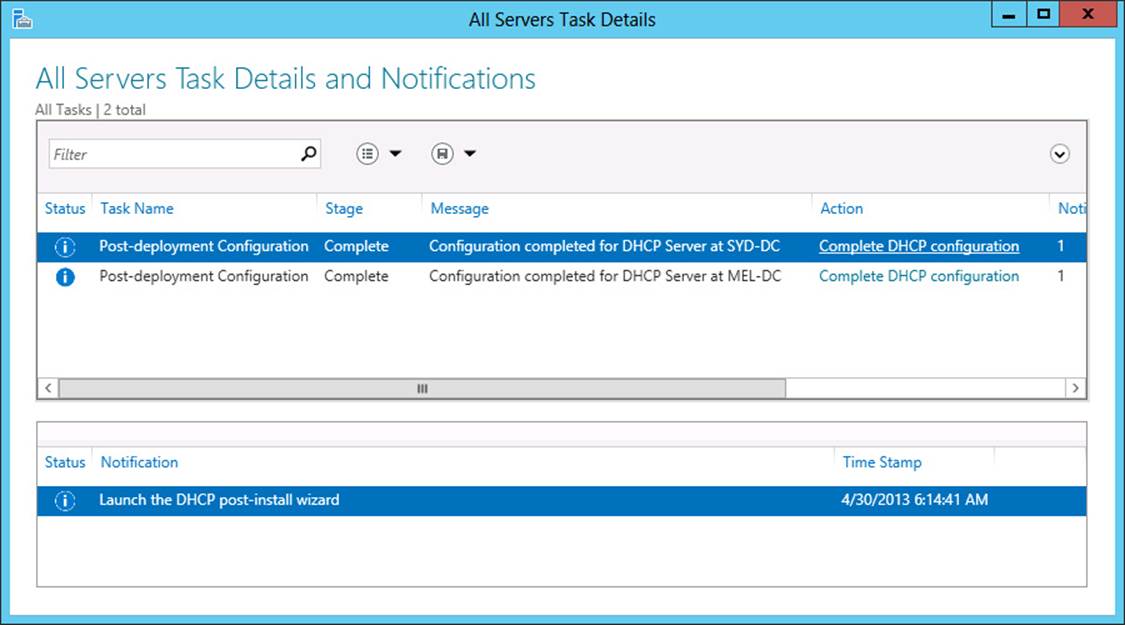
FIGURE 3-48 Verify the completion of tasks
Exercise 10: Create a DHCP superscope
In this exercise, you create a DHCP superscope. To complete this exercise, perform the following steps:
1. Ensure that you are signed on to SYD-DC with the contoso\don_funk user account.
2. On the Tools menu of the Server Manager console, click DHCP.
3. In the DHCP console, expand Syd-dc.contoso.com and click IPv4 as shown in Figure 3-49.
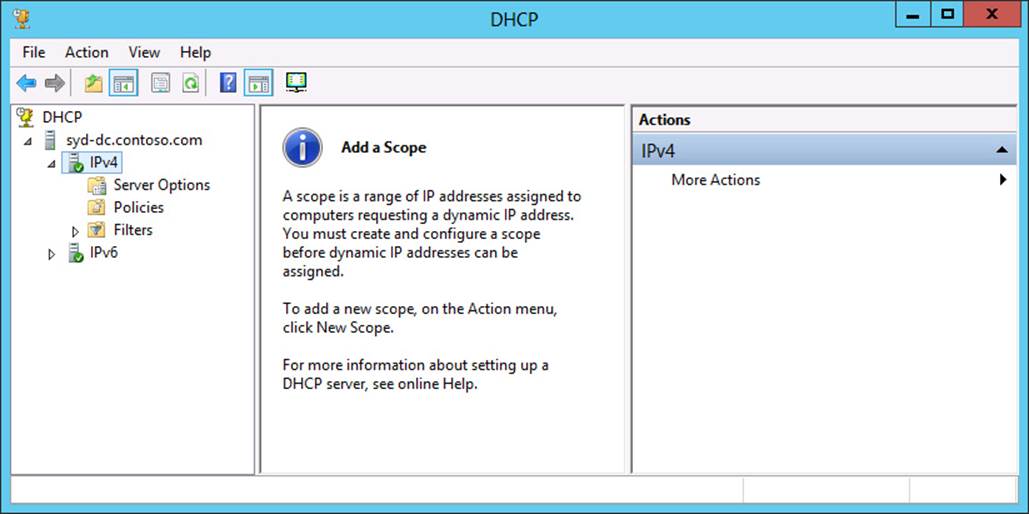
FIGURE 3-49 The DHCP console
4. On the Action menu, click New Scope.
5. On the Welcome To The New Scope Wizard page, click Next.
6. On the Scope Name page, in the Name text box, type Scope-A and click Next.
7. On the IP Address Range page, in the Start IP Address text box, enter the following information as shown in Figure 3-50 and click Next three times:
![]() Start IP Address: 192.168.200.10
Start IP Address: 192.168.200.10
![]() End IP Address: 192.168.200.230
End IP Address: 192.168.200.230
![]() Length: 24
Length: 24
![]() Subnet Mask: 255.255.255.0
Subnet Mask: 255.255.255.0
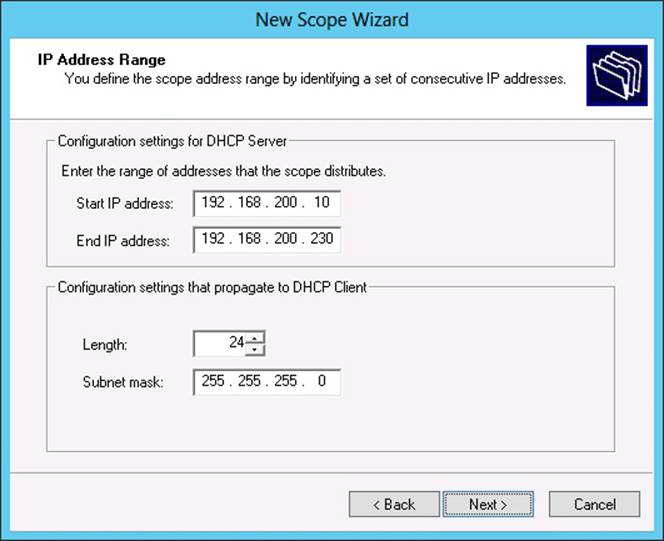
FIGURE 3-50 The IP Address Range
8. On the Configure DHCP Options page, verify that Yes, I Want To Configure These Options Now is selected and click Next.
9. On the Router (Default Gateway) page, type 192.168.200.1 as shown in Figure 3-51 and click Add. Click Next three times.
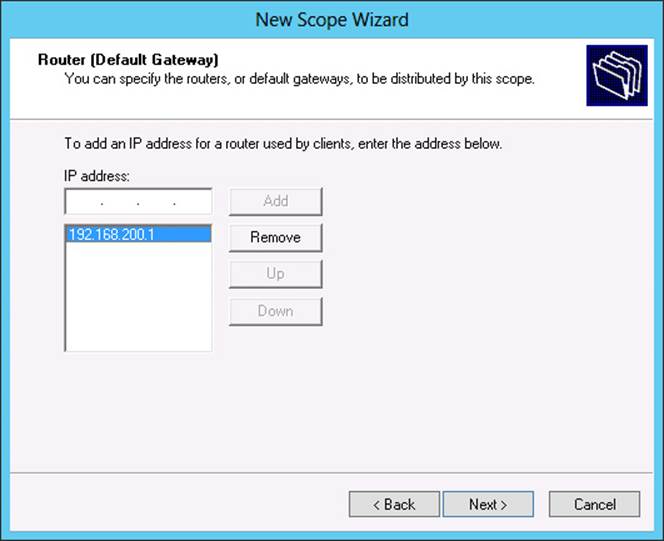
FIGURE 3-51 Configure the default gateway
10. On the Activate Scope page, click No, I Will Activate This Scope Later, click Next, and then click Finish.
11. In the DHCP console, click the IPv4 node, and on the Action menu click New Scope.
12. On the Welcome To The New Scope Wizard page, click Next.
13. On the Scope Name page, in the Name text box, type Scope-B and click Next.
14. On the IP Address Range page, in the Start IP Address text box, enter the following information and click Next three times:
![]() Start IP Address: 192.168.201.10
Start IP Address: 192.168.201.10
![]() End IP Address: 192.168.201.230
End IP Address: 192.168.201.230
![]() Length: 24
Length: 24
![]() Subnet Mask: 255.255.255.0
Subnet Mask: 255.255.255.0
15. On the Configure DHCP Options page, verify that the Yes, I Want To Configure These Options Now option is selected and click Next.
16. On the Router (Default Gateway) page, type 192.168.201.1 as shown in Figure 3-52 and click Add. Click Next three times.

FIGURE 3-52 Configure the default gateway
17. On the Activate Scope page, click No, I Will Activate This Scope Later, click Next, and click Finish.
18. In the DHCP console, click the IPv4 node. On the Action menu, click New Superscope.
19. On the Welcome To The New Superscope Wizard page, click Next.
20. On the Superscope Name page, type the name SYD-Superscope and click Next.
21. On the Select Scopes page, hold the Ctrl key and click [192.168.200.0] Scope-A and [192.168.201.0] Scope-B as shown in Figure 3-53. Click Next.
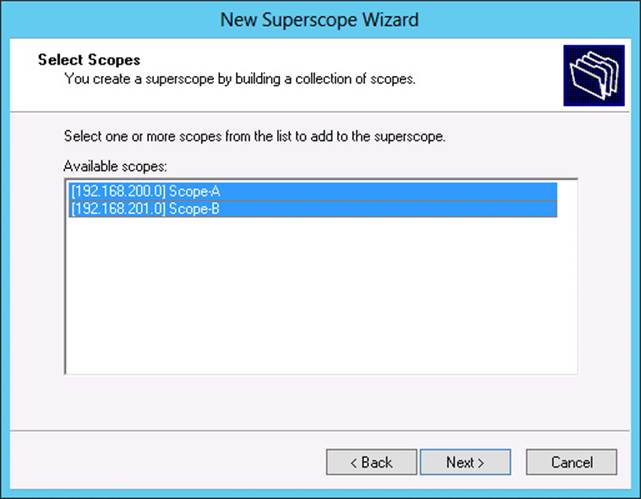
FIGURE 3-53 Create a superscope
22. On the Completing The New Superscope Wizard page, click Finish.
23. In the DHCP console, click Superscope SYD-Superscope as shown in Figure 3-54, and, on the Action menu, click Activate.
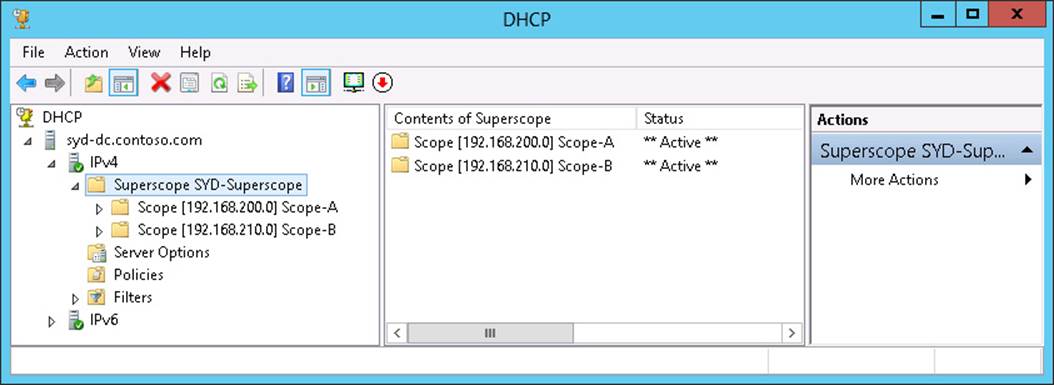
FIGURE 3-54 Verify the superscope creation
Exercise 11: Create a split scope
In this exercise, you configure a split scope that is hosted on SYD-DC and MEL-DC. To complete this exercise, perform the following steps:
1. In the DHCP console on SYD-DC, click the DHCP node, and on the Action menu click Add Server.
2. In the Add Server dialog box, click This Authorized DHCP Server and click Mel-dc.contoso.com as shown in Figure 3-55. Click OK.
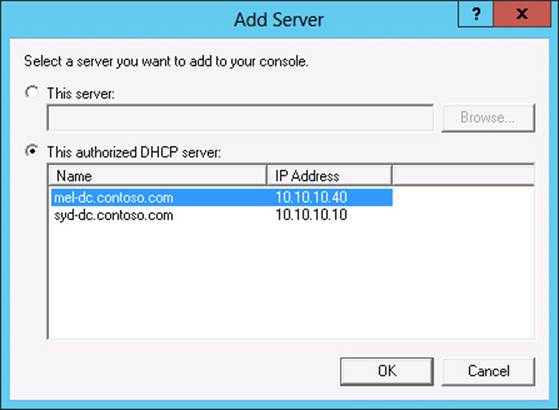
FIGURE 3-55 Add an additional DHCP server
3. In the DHCP console, expand Mel-dc.contoso.com and click the IPv4 node.
4. On the Action menu, click New Scope.
5. On the Welcome To The New Scope Wizard page, click Next.
6. On the Scope Name page, type SplitScope-A and click Next.
7. On the IP Address Range page, enter the following as shown in Figure 3-56 and click Next three times:
![]() Start IP Address: 192.168.210.100
Start IP Address: 192.168.210.100
![]() End IP Address: 192.168.210.180
End IP Address: 192.168.210.180
![]() Length: 24
Length: 24
![]() Subnet Mask: 255.255.255.0
Subnet Mask: 255.255.255.0
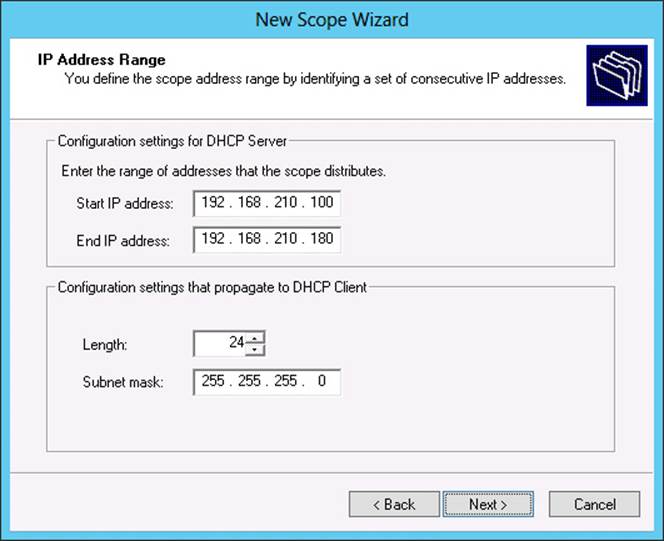
FIGURE 3-56 The address range
8. On the Configure DHCP Options page, verify that the Yes, I Want To Configure These Options Now option is selected and click Next.
9. On the Router (Default Gateway) page, type 192.168.210.1 as shown in Figure 3-57 and click Add. Click Next three times.
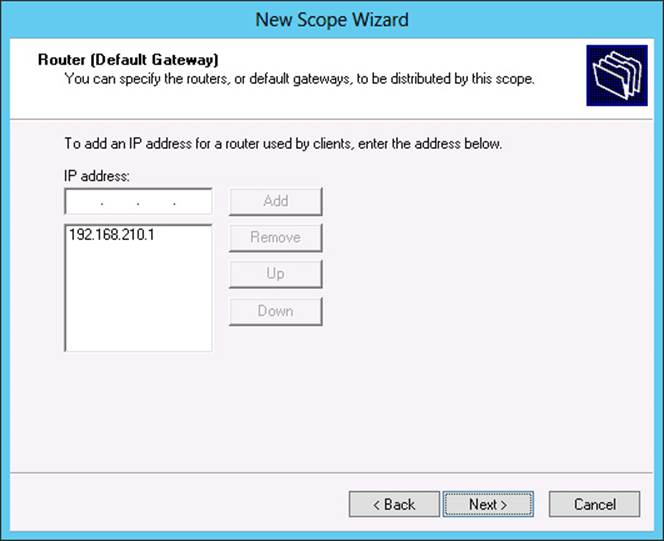
FIGURE 3-57 The default gateway address
10. On the Activate Scope page, select the Yes, I Want To Activate This Scope Now option, click Next, and then click Finish.
11. In the DHCP console, click the IPv4 node under Syd-dc.contoso.com.
12. On the Action menu, click New Scope.
13. On the Welcome To The New Scope Wizard, click Next.
14. On the Scope Name page, type SplitScope-B and click Next.
15. On the IP Address Range page, enter the following and click Next three times:
![]() Start IP Address: 192.168.210.181
Start IP Address: 192.168.210.181
![]() End IP Address: 192.168.210.200
End IP Address: 192.168.210.200
![]() Length: 24
Length: 24
![]() Subnet Mask: 255.255.255.0
Subnet Mask: 255.255.255.0
16. On the Configure DHCP Options page, verify that the Yes, I Want To Configure These Options Now option is selected and then click Next.
17. On the Router (Default Gateway) page, type 192.168.210.1 and click Add. Click Next three times.
18. On the Activate Scope page, select the Yes, I Want To Activate This Scope Now option, click Next, and then click Finish.
19. Verify that the DHCP console appears as shown in Figure 3-58.

FIGURE 3-58 Verify the DHCP configuration
Exercise 12: Configure DHCP Name Protection
In this exercise, you configure DHCP Name Protection using the graphical user interface (GUI) and using Windows PowerShell. To complete this exercise, perform the following steps:
1. In the DHCP console on SYD-DC, click the IPv4 node under the Syd-dc.contoso.com node.
2. On the Action menu, click Properties.
3. In the IPv4 Properties dialog box, click the DNS tab.
4. On the DNS tab, shown in Figure 3-59, click Configure.
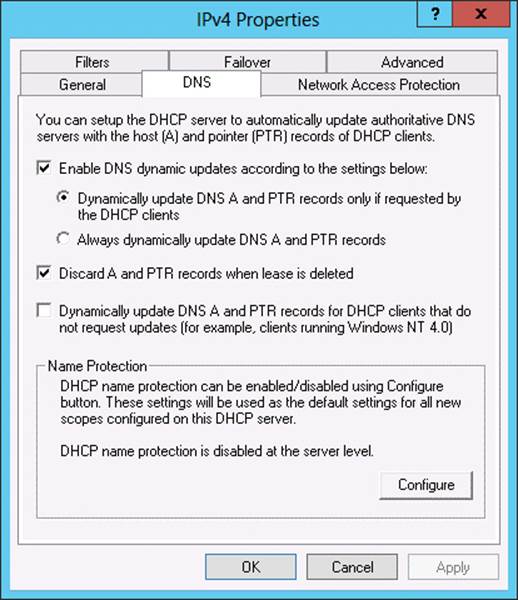
FIGURE 3-59 The DNS tab
5. On the Name Protection dialog box, check the Enable Name Protection check box as shown in Figure 3-60 and click OK.
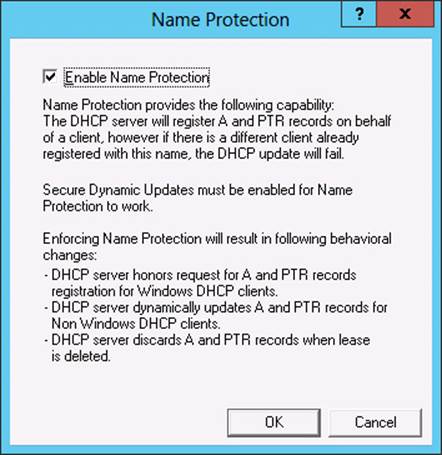
FIGURE 3-60 Enable Name Protection
6. Click OK to close the IPv4 Properties dialog box.
7. In an elevated Windows PowerShell window, type the following command as shown in Figure 3-61 and press Enter to verify the status of Name Protection on the DHCP server running on MEL-DC:
Get-DhcpServerv4DnsSetting –Computer MEL-DC
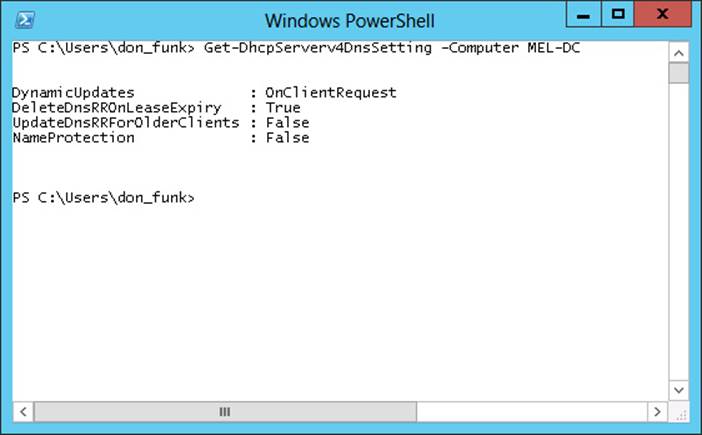
FIGURE 3-61 Verify the Name Protection status
8. In a Windows PowerShell window, type the following command and press Enter to enable Name Protection on the DHCP server hosted on mel-dc.contoso.com:
Set-DhcpServerv4DnsSetting –Computer MEL-DC –NameProtection $true
9. Verify that Name Protection is now enabled on MEL-DC by reissuing the following command as shown in Figure 3-62:
Get-DhcpServerv4DnsSetting –Computer MEL-DC
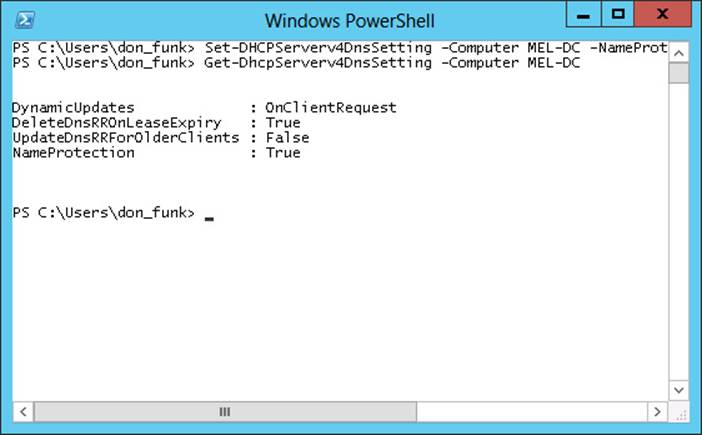
FIGURE 3-62 Verify Name Protection is enabled
Exercise 13: Create new multicast scopes
In this exercise, you create a new multicast scope that will be hosted on the DHCP server SYD-DC. To complete this exercise, perform the following steps:
1. In the DHCP console on SYD-DC, click the IPv4 node under Syd-dc.contoso.com.
2. In the Action menu, click New Multicast Scope.
3. On the Welcome To The New Multicast Scope Wizard page, click Next.
4. On the Multicast Scope Name page, enter the name Multicast-A and click Next.
5. On the IP Address Range page, configure the following settings as shown in Figure 3-63 and click Next three times:
![]() Start IP Address: 230.100.0.10
Start IP Address: 230.100.0.10
![]() End IP Address: 230.100.0.230
End IP Address: 230.100.0.230
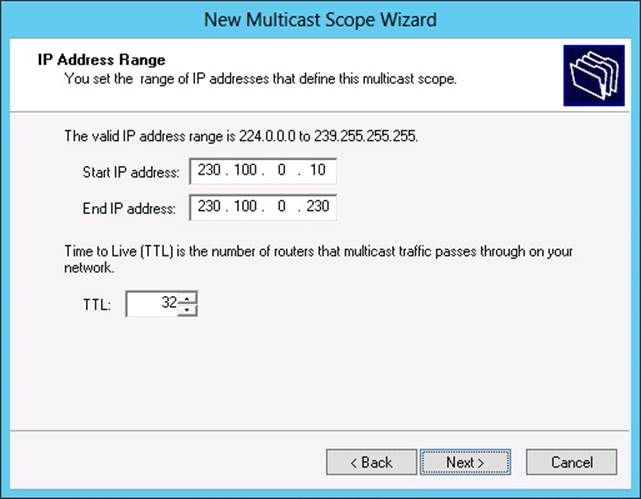
FIGURE 3-63 A new multicast range
6. On the Activate Multicast Scope page, shown in Figure 3-64, click Yes, click Next, and click Finish.
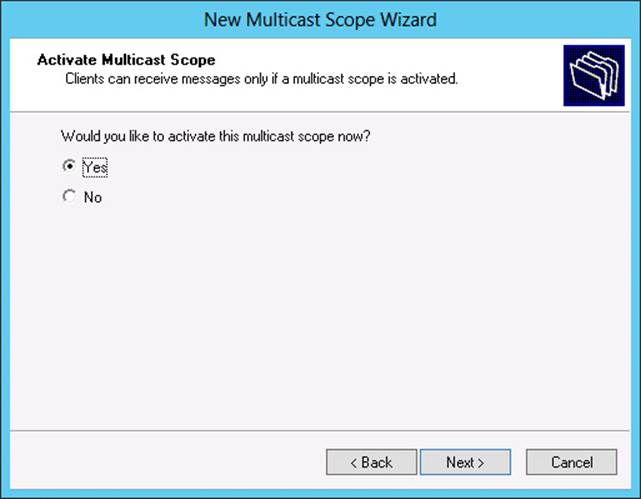
FIGURE 3-64 Activate a multicast scope
Exercise 14: Configure DHCP failover
In this exercise, you configure DHCP failover. To complete this exercise, perform the following steps:
1. In the DHCP console on SYD-DC, expand the Syd-dc.contoso.com node and click the IPv4 node.
2. On the Action menu, click Configure Failover.
3. On the Introduction To DHCP Failover page of the Configure Failover Wizard, clear the Select All check box, hold down the Ctrl key and click 192.168.200.0 and 192.168.201.0 as shown in Figure 3-65. Click Next.
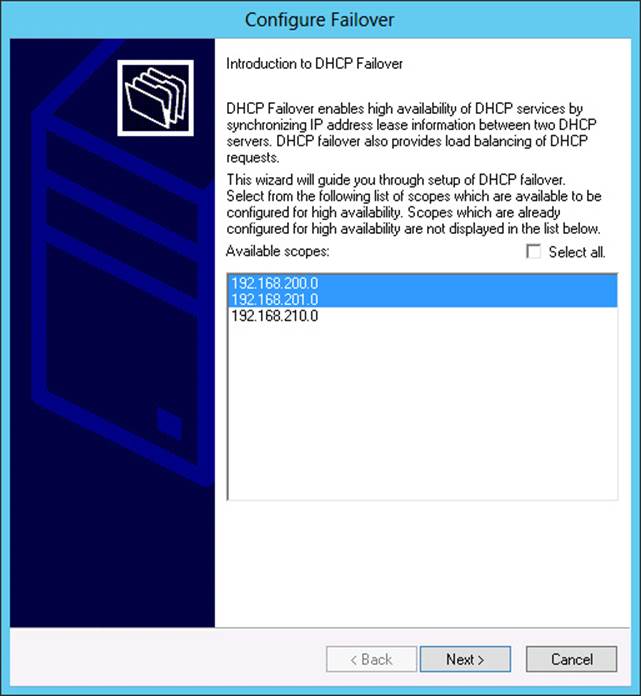
FIGURE 3-65 Configure the scopes for failover
4. On the Specify The Partner Server To Use For Failover page, click Add Server.
5. In the Add Server dialog box, select This Authorized DHCP Server and click Mel-dc.contoso.com as shown in Figure 3-66. Click OK and then click Next.
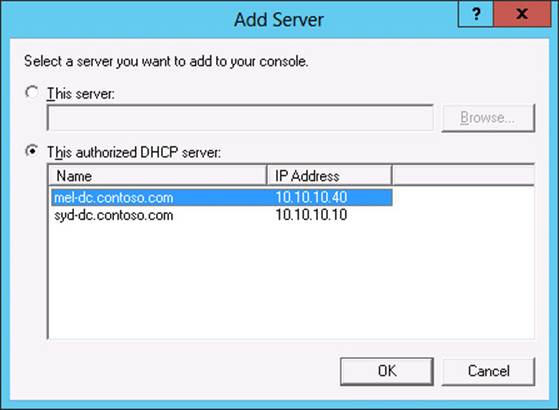
FIGURE 3-66 Add a failover server
6. On the Create A New Failover Relationship page, click the Mode drop-down menu and set it to Hot Standby. Enable the State Switchover Interval and set it to 60 Minutes as shown in Figure 3-67. Type the Shared Secret as Pa$$w0rd. Click Next, click Finish, and click Close.

FIGURE 3-67 Create a failover relationship
7. In the DHCP console, click the IPv4 node under Syd-dc.contoso.com, and on the Action menu, click Properties.
8. On the Failover tab, verify that the settings listed match Figure 3-68 and click Delete.
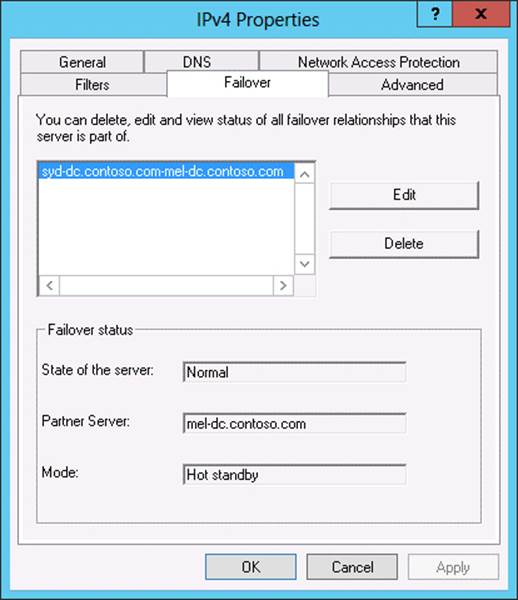
FIGURE 3-68 Delete a failover relationship
9. On the Delete Failover Relationship dialog box, click OK and click Close.
10. Click OK to close the IPv4 Properties dialog box.
Exercise 15: Install the IPAM feature
In this exercise, you join server ADL-DC to the domain and install the IPAM feature. To complete this exercise, perform the following steps:
1. Ensure that SYD-DC and MEL-DC remain powered on.
2. Turn on ADL-DC and sign on as Administrator with the password Pa$$w0rd.
3. Open a Windows PowerShell window by clicking the Windows PowerShell icon on the Desktop taskbar.
4. Type the following command and press Enter to join ADL-DC to the contoso.com domain.
Netdom join ADL-DC /domain:contoso.com
5. Restart ADL-DC and sign on as contoso\don_funk.
6. Click on Add Roles And Features on the Manage menu of the Server Manager console.
7. On the Before You Begin page of the Add Roles And Features Wizard, click Next twice.
8. On the Select Destination Server page, ensure that ADL-DC.contoso.com is selected and click Next twice.
9. On the Select Features page, click IP Address Management (IPAM) Server as shown in Figure 3-69.
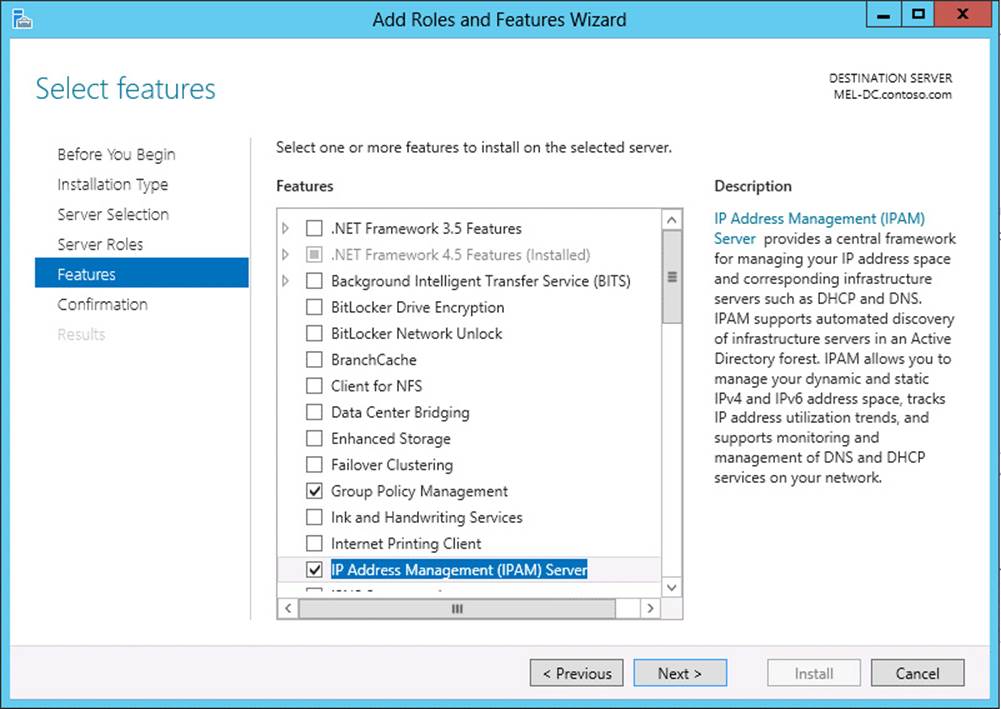
FIGURE 3-69 Add the IPAM feature
10. On the Add Roles And Features Wizard dialog box, click Add Features, click Next, and then click Install. When the installation completes, click Close.
Exercise 16: Configure IPAM GPOs and server discovery
In this exercise, you configure IPAM-related GPOs. To complete this exercise, perform the following steps:
1. While signed on to ADL-DC, click the IPAM node in the Server Manager console.
2. On the IPAM Server Tasks section, click Provision The IPAM Server.
3. On the Before You Begin page of the Provision IPAM Wizard, click Next.
4. On the Select Provisioning Method page, click Group Policy Based, and in the GPO Name Prefix box type IPAM as shown in Figure 3-70. Click Next.
FIGURE 3-70 Choose a provisioning method
5. On the Summary page, click Apply and then click Close.
6. On the IPAM Server Tasks section of the Server Manager console, click Configure Server Discovery.
7. In the Configure Server Discovery dialog box, click Add as shown in Figure 3-71 and click OK.
FIGURE 3-71 Configure discovery
8. On the IPAM Server Tasks section of the Server Manager console, click Start Server Discovery.
9. Wait 15 minutes for server discovery to complete before starting Exercise 17.
Exercise 17: Configure servers to be managed by IPAM
In this exercise, you configure servers so that they can be managed centrally by IPAM. To complete this exercise, perform the following steps:
1. On the IPAM Server Tasks section, click Select Or Add Servers To Manage And Verify IPAM Access.
2. Both SYD-DC and MEL-DC should be present as shown in Figure 3-72.
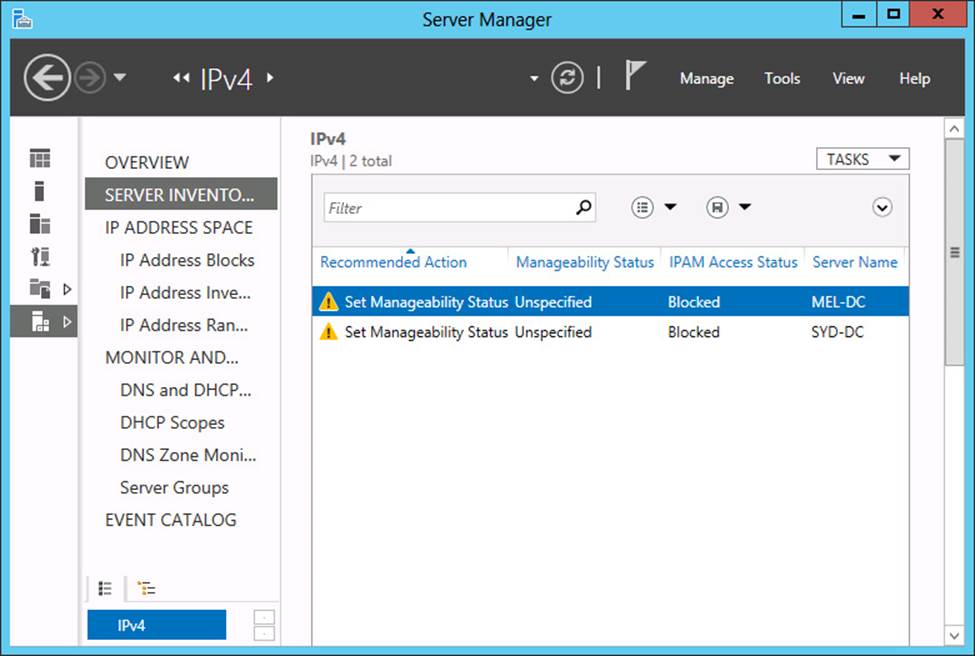
FIGURE 3-72 The server inventory
3. Right-click the Windows PowerShell icon on the taskbar and click Run As Administrator.
4. On the User Account Control dialog box, click Yes.
5. In the Windows PowerShell window, type the following command and press Enter:
Invoke-IpamGpoProvisioning –Domain contoso.com –GpoPrefixName IPAM –IpamServerFqdn
ADL-DC.contoso.com –DelegatedGpoUser "contoso\don_funk"
6. When prompted, type Y for Yes, and press Enter.
7. Switch to SYD-DC and ensure that you are signed on as contoso\don_funk.
8. Open an elevated Windows PowerShell prompt, type the following command, and press Enter:
gpupdate /force
9. On SYD-DC, on the Tools menu of the Server Manager console, click Active Directory Users And Computers.
10. Expand the Contoso.com domain and click the Computers container.
11. On the Action menu, click New, and click Group.
12. On the New Object – Group dialog box, enter the following information as shown in Figure 3-73 and click OK:
![]() Group Name: IPAM_Managed_Servers
Group Name: IPAM_Managed_Servers
![]() Group Scope: Universal
Group Scope: Universal
![]() Group Type: Security
Group Type: Security
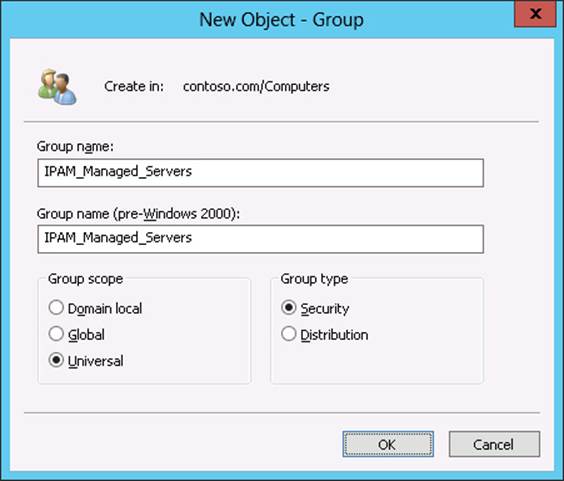
FIGURE 3-73 Create a security group
13. Right-click the IPAM_Managed_Servers group and click Properties.
14. On the Members tab of the IPAM_Managed_Servers Properties dialog box, click Add.
15. On the Select Users, Contacts, Computers, Service Accounts, Or Other Objects dialog box, click Object Types.
16. On the Object Types dialog box, select the Computers check box and click OK.
17. In the Select Users, Contacts, Computers, Service Accounts, Or Other Objects dialog box, type SYD-DC; MEL-DC, click Check Names, and click OK.
18. Verify that both MEL-DC and SYD-DC are listed as members of the group as shown in Figure 3-74 and click OK.
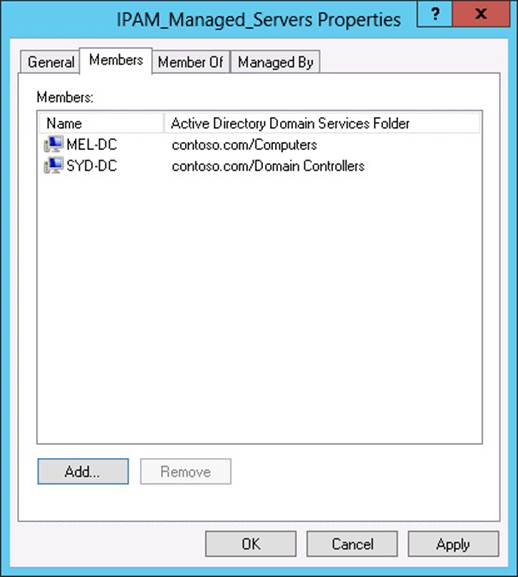
FIGURE 3-74 Verify group membership
19. On the Tools menu of the Server Manager console on SYD-DC, click Group Policy Management.
20. In the Group Policy Management Console, expand Forest: Contoso.com, Domains, Contoso.com, and click IPAM_DNS.
21. On the Group Policy Management Console pop-up box, click OK.
22. Under Security Filtering, click Add.
23. In the Select User, Computer, Or Group dialog box, type IPAM_Managed_Servers and click OK.
24. Verify that the Group Policy Management Console matches Figure 3-75.
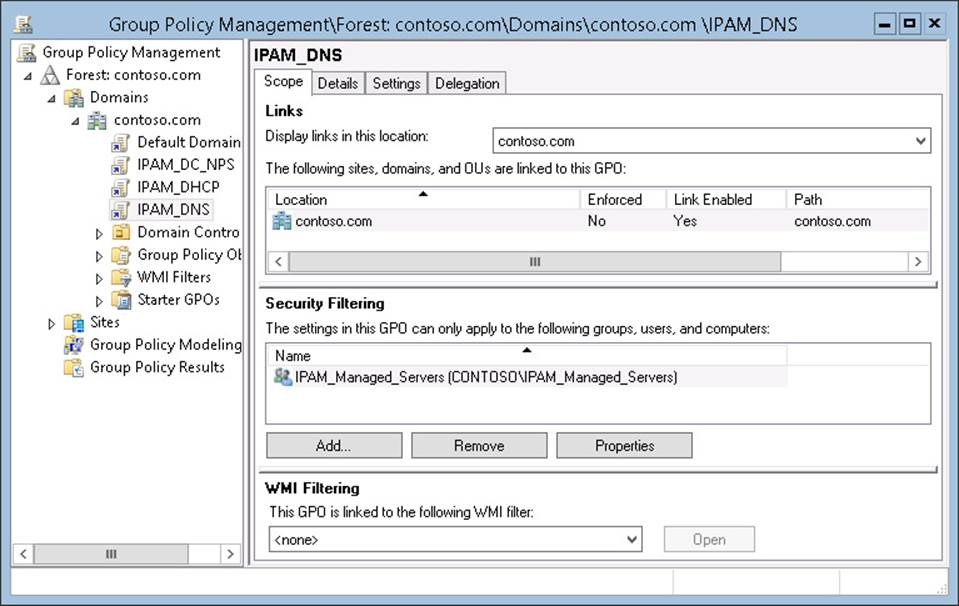
FIGURE 3-75 Group policy filtering
25. Click the IPAM_DHCP policy and click OK to dismiss the Group Policy Management Console.
26. Under Security Filtering, click Add.
27. In the Select User, Computer, Or Group dialog box, type IPAM_Managed_Servers and click OK.
28. Click the IPAM_DC_NPS policy and click OK to dismiss the Group Policy Management Console.
29. Under Security Filtering, click Add.
30. In the Select User, Computer, Or Group dialog box, type IPAM_Managed_Servers and click OK.
31. Restart SYD-DC and MEL-DC to refresh the group membership of these computers.
32. Sign on to each computer as contoso\don_funk, open an elevated Windows PowerShell prompt and type the following command:
Gpupdate /force
33. After you have updated the Group Policy, run the following command on SYD-DC and MEL-DC to verify that the IPAM-related Group Policy Objects apply to the computer as shown in Figure 3-76:
Gpresult /r /scope computer
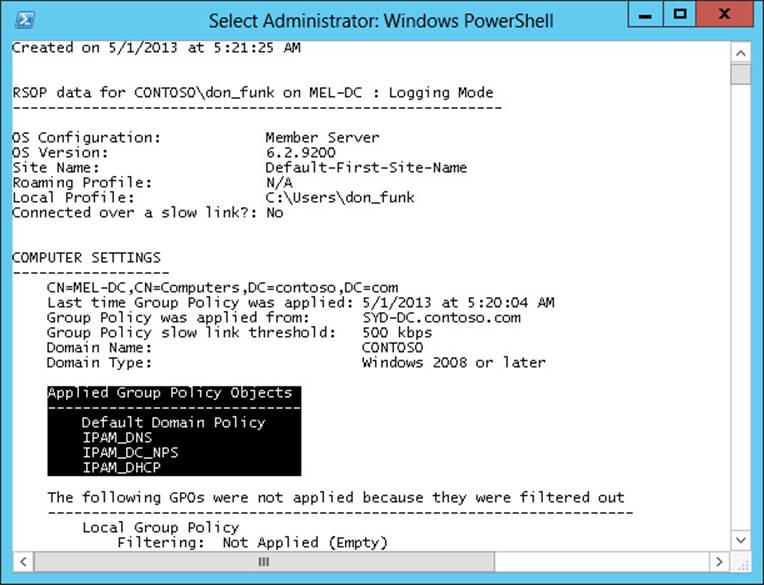
FIGURE 3-76 Verify the Group Policy application
34. On ADL-DC, open the Server Manager console, click the IPAM node, and when Overview is selected, click Select Or Add Servers To Manage And Verify IPAM Access.
35. When IPv4 is selected, right-click SYD-DC, and click Refresh Server Access Status.
36. Right-click MEL-DC and click Refresh Server Access Status.
37. Wait until the task completes and then click the Refresh icon on the taskbar and verify that both servers are listed as Unblocked, as shown in Figure 3-77.
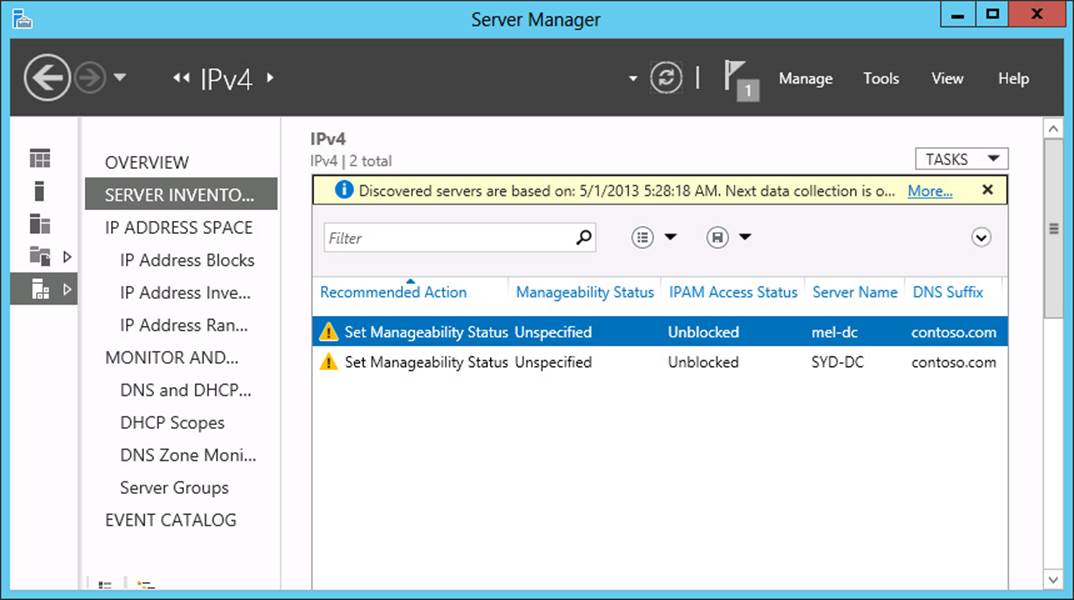
FIGURE 3-77 Verify the manageability status
Exercise 18: Manage servers using IPAM
In this exercise, you configure SYD-DC and MEL-DC to be managed by IPAM. To complete this exercise, perform the following steps:
1. On ADL-DC, in the Server Manager console, with the Server Inventory section of the IPAM area selected, right-click Mel-dc, and click Edit Server.
2. In the Add Or Edit Server dialog box, set the Manageability Status to Managed as shown in Figure 3-78 and click OK.
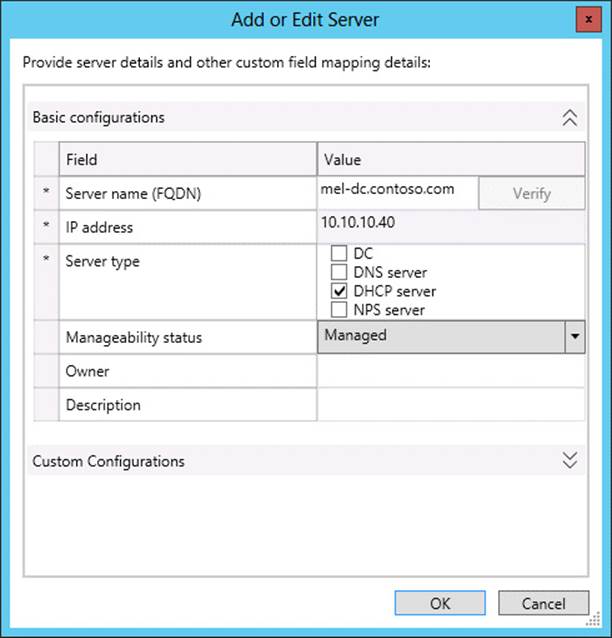
FIGURE 3-78 Configure the server manageability
3. Right-click SYD-DC, and click Edit Server.
4. In the Add Or Edit Server dialog box, set the Manageability Status to Managed, and click OK.
5. Verify that both servers now have the status of Managed and Unblocked as shown in Figure 3-79.
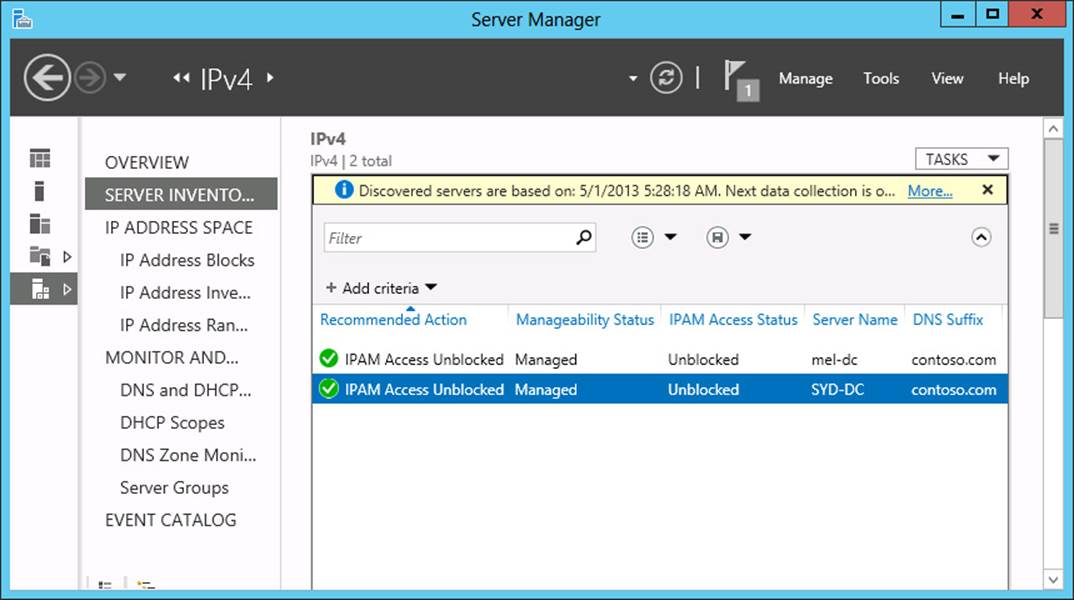
FIGURE 3-79 Verify successful configuration
Exercise 19: Use IPAM to create a DHCP scope
In this exercise, you use IPAM to create a DHCP scope on MEL-DC. To complete this exercise, perform the following steps:
1. While signed on to ADL-DC as contoso\don_funk, click the IPAM node in the Server Manager console, and then click DNS and DHCP under Monitor and Manage.
2. Right-click Mel-dc.contoso.com, and click Create DHCP Scope.
3. In the Create DHCP Scope dialog box, enter the following information as shown in Figure 3-80 and click OK:
![]() Scope Name: IPAM_Scope_A
Scope Name: IPAM_Scope_A
![]() Start IP Address: 192.168.250.10
Start IP Address: 192.168.250.10
![]() End IP Address: 192.168.250.230
End IP Address: 192.168.250.230
![]() Subnet Mask: 255.255.255.0
Subnet Mask: 255.255.255.0
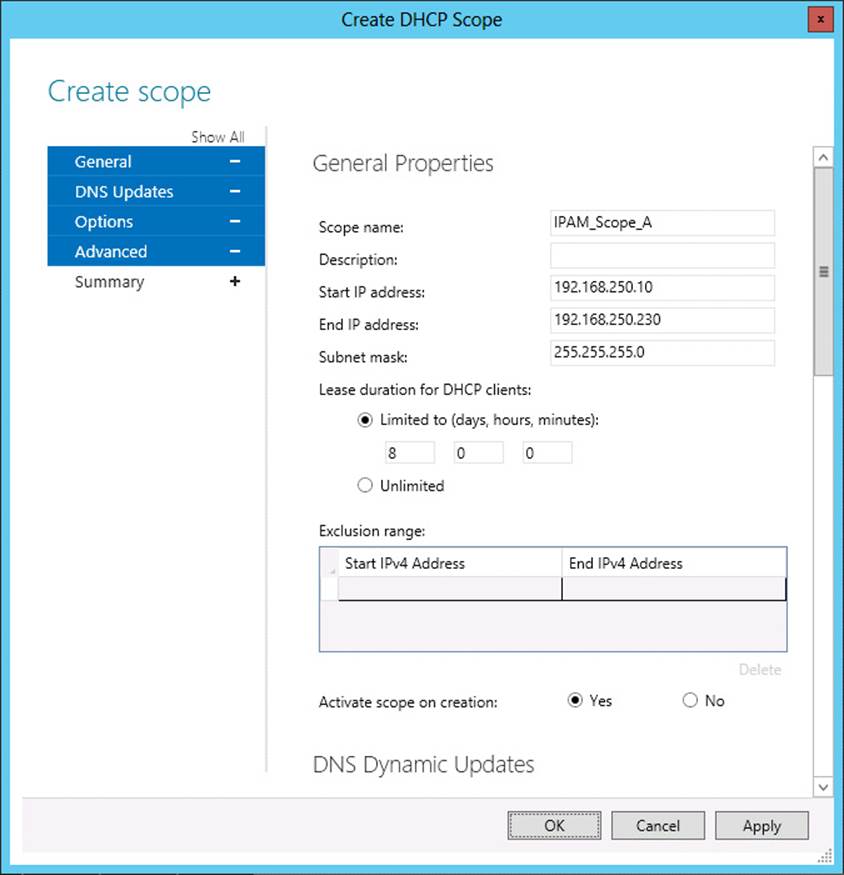
FIGURE 3-80 Create a DHCP scope
Exercise 20: Use IPAM to manage IP addresses
In this exercise, you use IPAM to manage IP addresses, including creating address blocks, creating reservations, and managing DNS records. To complete this exercise, perform the following steps:
1. While signed on to ADL-DC as contoso\don_funk, click the IPAM node in the Server Manager console, and then click IP Address Blocks under IP Address Space.
2. Click Tasks, and click Add IP Address Block.
3. In the Add Or Edit IPv4 Address Block dialog box, enter the following information as shown in Figure 3-81 and click OK:
![]() Network ID: 172.16.10.0
Network ID: 172.16.10.0
![]() Prefix Length: 24
Prefix Length: 24
![]() Description: Perth Office
Description: Perth Office
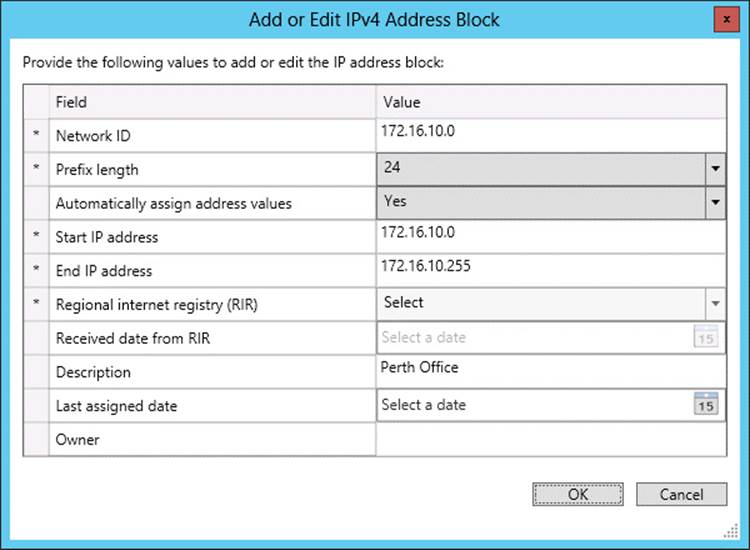
FIGURE 3-81 Add an IPv4 address block
4. Click the IP Address Inventory node. In the Tasks menu, click Add IP Address.
5. In the Add IPv4 Address dialog box shown in Figure 3-82, enter the following information and click OK:
![]() IP Address: 172.16.10.20
IP Address: 172.16.10.20
![]() MAC Address: AA-BB-CC-DD-EE-00
MAC Address: AA-BB-CC-DD-EE-00
![]() Device Type: Host
Device Type: Host
![]() Device Name: PER-DC
Device Name: PER-DC
![]() Forward Lookup Zone: Contoso.com
Forward Lookup Zone: Contoso.com
![]() Forward Lookup Primary Server: SYD-DC.contoso.com
Forward Lookup Primary Server: SYD-DC.contoso.com
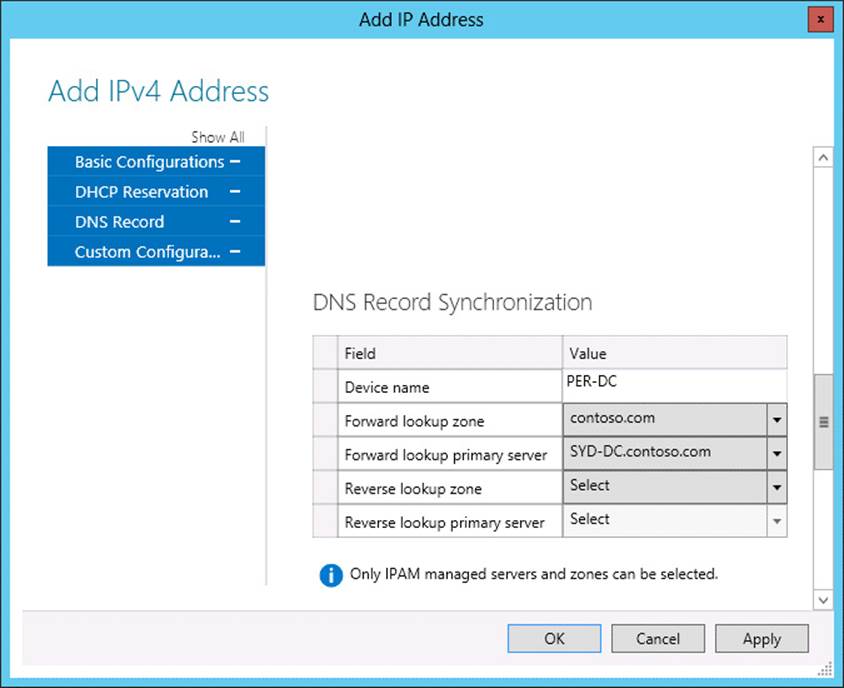
FIGURE 3-82 Configure a DNS record
6. Right-click the PER-DC IP Address Inventory Record, and click Create DNS Host Record.
7. Click the Windows PowerShell icon on the taskbar.
8. In the Windows PowerShell window, type the following command to verify that the DNS record has been created as shown in Figure 3-83:
Resolve-dnsname per-dc.contosoc.com
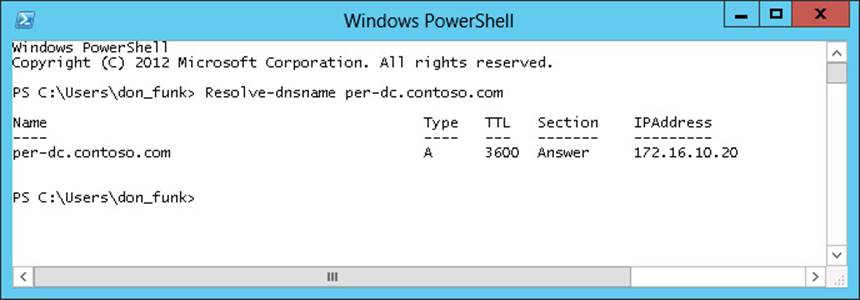
FIGURE 3-83 Verify the DNS record
Suggested practice exercises
The following additional practice exercises are designed to give you more opportunities to practice what you’ve learned and to help you successfully master the lessons presented in this chapter.
![]() Exercise 1 Use IPAM to create a DHCP scope on SYD-DC for the 172.16.10.0 /24 IP Address Range.
Exercise 1 Use IPAM to create a DHCP scope on SYD-DC for the 172.16.10.0 /24 IP Address Range.
![]() Exercise 2 Reset the DNS socket pool on SYD-DC to its original value.
Exercise 2 Reset the DNS socket pool on SYD-DC to its original value.
![]() Exercise 3 Create a new DNS zone named Margiestravel.com and configure it to use DNSSEC.
Exercise 3 Create a new DNS zone named Margiestravel.com and configure it to use DNSSEC.
Answers
This section contains the answers to the lesson review questions in this chapter.
Lesson 1
1. Correct answer: C
A. Incorrect. This method cannot be used with a DHCP server hosted on the Windows Server 2008 R2 operating system. Hot standby mode has the primary DHCP server respond to DHCP clients except in the case when the primary server is unavailable, at which point the hot standby server begins leasing addresses.
B. Incorrect. This method cannot be used with a DHCP server hosted on the Windows Server 2008 R2 operating system. Load sharing has each partner DHCP server lease addresses from the scope to DHCP clients. In the event that one DHCP server fails, the other DHCP server utilizes the whole scope after the maximum client lead time period has elapsed.
C. Correct. In a split scope, part of the scope is hosted on one DHCP server, and a smaller part is hosted on a second DHCP server. Traditionally the split between the first and second DHCP servers is 80/20. Use this option when one or both DHCP servers are not running the Windows Server 2012 operating system.
D. Incorrect. Superscopes enable you to combine existing scopes for administrative purposes. They are often implemented when there are multiple logical subnets used on the same physical network. Superscopes do not provide high availability.
2. Correct answer: C
A. Incorrect. Load sharing has each partner DHCP server lease addresses from the scope to DHCP clients. In the event that one DHCP server fails, the other DHCP server utilizes the whole scope after the maximum client lead time period has elapsed. This does not meet the requirement that the second server not lease addresses unless the first is unavailable.
B. Incorrect. In a split scope, part of the scope is hosted on one DHCP server, and a smaller part is hosted on a second DHCP server. Traditionally the split between the first and second DHCP servers is 80/20. Use this option when one or both DHCP servers are not running the Windows Server 2012 operating system. This does not meet the requirement that the second server be able to lease addresses from the entire scope if necessary.
C. Correct. Hot standby mode has the primary DHCP server respond to DHCP clients except in the case when the primary server is unavailable, at which point the hot standby server begins leasing addresses.
D. Incorrect. Superscopes enable you to combine existing scopes for administrative purposes. They are often implemented when there are multiple logical subnets used on the same physical network. Superscopes do not provide high availability.
3. Correct answer: A
A. Correct. Superscopes enable you to combine existing scopes for administrative purposes. They are often implemented when there are multiple logical subnets used on the same physical network. Superscopes do not provide high availability.
B. Incorrect. Split scopes are high-availability solutions. In a split scope, part of the scope is hosted on one DHCP server, and a smaller part is hosted on a second DHCP server. Traditionally, the split between the first and second DHCP servers is 80/20. Use this option when one or both DHCP servers are not running the Windows Server 2012 operating system.
C. Incorrect. Load sharing mode is a high-availability solution. Load sharing has each partner DHCP server lease addresses from the scope to DHCP clients. In the event that one DHCP server fails, the other DHCP server utilizes the whole scope after the maximum client lead time period has elapsed.
D. Incorrect. Hot standby mode is a high-availability solution. Hot standby mode has the primary DHCP server respond to DHCP clients except in the case when the primary is unavailable at which point the hot standby server begins leasing addresses.
4. Correct answer: B
A. Incorrect. In a split scope, part of the scope is hosted on one DHCP server, and a smaller part is hosted on a second DHCP server. Traditionally the split between the first and second DHCP servers is 80/20. Use this option when one or both DHCP servers are not running the Windows Server 2012 operating system. This solution does not distribute IP addresses in a load-balanced manner.
B. Correct. Load sharing has each partner DHCP server lease addresses from the scope to DHCP clients. In the event that one DHCP server fails, the other DHCP server utilizes the whole scope after the maximum client lead time period has elapsed.
C. Incorrect. Hot standby mode has the primary DHCP server respond to DHCP clients except in the case when the primary server is unavailable, at which point the hot standby server begins leasing addresses. This solution does not distribute IP addresses in a load-balanced manner.
D. Incorrect. Superscopes enable you to combine existing scopes for administrative purposes. They are often implemented when there are multiple logical subnets used on the same physical network. Superscopes do not provide high availability.
Lesson 2
1. Correct answer: B
A. Incorrect. Members of the IPAM Users group are unable to view IP address tracking information. This information can only be viewed by users that are members of the IPAM IP Audit Administrators and IPAM Administrators local groups.
B. Correct. This information can only be viewed by users that are members of the IPAM IP Audit Administrators and IPAM Administrators local groups.
C. Incorrect. Members of the IPAM MSM Administrators group are unable to view IP address tracking information. This information can only be viewed by users that are members of the IPAM IP Audit Administrators and IPAM Administrators local groups.
D. Incorrect. Members of the IPAM ASM Administrators group are unable to view IP address tracking information. This information can only be viewed by users that are members of the IPAM IP Audit Administrators and IPAM Administrators local groups.
2. Correct answer: C
A. Incorrect. Only members of the IPAM ASM Administrators group and the IPAM Administrators group are able to manage the IP address space on an IPAM server.
B. Incorrect. Only members of the IPAM ASM Administrators group and the IPAM Administrators group are able to manage the IP address space on an IPAM server.
C. Correct. Members of the IPAM ASM Administrators group are able to manage the IP address space on an IPAM server.
D. Incorrect. Only members of the IPAM ASM Administrators group and the IPAM Administrators group are able to manage the IP address space on an IPAM server.
3. Correct answer: B
A. Incorrect. You track by client ID when you know a computer’s MAC address to determine which IP addresses the computer was assigned.
B. Correct. You track by client ID when you know a computer’s MAC address to determine which IP addresses the computer was assigned.
C. Incorrect. You track by client ID when you know a computer’s MAC address to determine which IP addresses the computer was assigned.
D. Incorrect. You track by client ID when you know a computer’s MAC address to determine which IP addresses the computer was assigned.
4. Correct answers: A and C
A. Correct. These servers need to have the appropriate IPAM-related GPOs apply to them before their status can change to unblocked. This involves creating the GPOs using the Invoke-IpamGPOProvisioning cmdlet and then ensuring that they apply to the servers that host the services that IPAM will manage.
B. Incorrect. These servers need to have the appropriate IPAM-related GPOs apply to them before their status can change to unblocked. This involves creating the GPOs using the Invoke-IpamGPOProvisioning cmdlet and then ensuring that they apply to the servers that host the services that IPAM will manage.
C. Correct. These servers need to have the appropriate IPAM-related GPOs apply to them before their status can change to unblocked. This involves creating the GPOs using the Invoke-IpamGPOPRovisioning cmdlet and then ensuring that they apply to the servers that host the services that IPAM will manage.
D. Incorrect. Restarting the IPAM server does not alter the blocked status of the servers that you want to manage. These servers need to have the appropriate IPAM-related GPOs apply to them. This involves creating the GPOs using the Invoke-IpamGPOPRovisioning cmdlet and then ensuring that they apply to the servers that host the services that IPAM will manage.
Lesson 3
1. Correct answer: B
A. Incorrect. Members of the IPAM Users group are unable to view IP address tracking information. This information can only be viewed by users that are members of the IPAM IP Audit Administrators and IPAM Administrators local groups.
B. Correct. This information can only be viewed by users that are members of the IPAM IP Audit Administrators and IPAM Administrators local groups.
C. Incorrect. Members of the IPAM MSM Administrators group are unable to view IP address tracking information. This information can only be viewed by users that are members of the IPAM IP Audit Administrators and IPAM Administrators local groups.
D. Incorrect. Members of the IPAM ASM Administrators group are unable to view IP address tracking information. This information can only be viewed by users that are members of the IPAM IP Audit Administrators and IPAM Administrators local groups.
2. Correct answer: C
A. Incorrect. Only members of the IPAM ASM Administrators group and the IPAM Administrators group are able to manage the IP Address space on an IPAM server.
B. Incorrect. Only members of the IPAM ASM Administrators group and the IPAM Administrators group are able to manage the IP Address space on an IPAM server.
C. Correct. Members of the IPAM ASM Administrators group are able to manage the IP address space on an IPAM server.
D. Incorrect. Only members of the IPAM ASM Administrators group and the IPAM Administrators group are able to manage the IP address space on an IPAM server.
3. Correct answer: B
A. Incorrect. You track by client ID when you know a computer’s MAC address to determine which IP addresses the computer was assigned.
B. Correct. You track by client ID when you know a computer’s MAC address to determine which IP addresses the computer was assigned.
C. Incorrect. You track by client ID when you know a computer’s MAC address to determine which IP addresses the computer was assigned.
D. Incorrect. You track by client ID when you know a computer’s MAC address to determine which IP addresses the computer was assigned.
4. Correct answers: A and C
A. Correct. These servers need to have the appropriate IPAM-related GPOs applied to them before their status can change to unblocked. This involves creating the GPOs using the Invoke-IpamGPOProvisioning cmdlet and then ensuring that they apply to the servers that host the services that IPAM will manage.
B. Incorrect. These servers need to have the appropriate IPAM-related GPOs applied to them before their status can change to unblocked. This involves creating the GPOs using the Invoke-IpamGPOProvisioning cmdlet and then ensuring that they apply to the servers that host the services that IPAM will manage.
C. Correct. These servers need to have the appropriate IPAM-related GPOs applied to them before their status can change to unblocked. This involves creating the GPOs using the Invoke-IpamGPOPRovisioning cmdlet and then ensuring that they apply to the servers that host the services that IPAM will manage.
D. Incorrect. Restarting the IPAM server does not alter the blocked status of the servers that you want to manage. These servers need to have the appropriate IPAM-related GPOs applied to them. This involves creating the GPOs using the Invoke-IpamGPOPRovisioning cmdlet and then ensuring that they apply to the servers that host the services that IPAM will manage.
All materials on the site are licensed Creative Commons Attribution-Sharealike 3.0 Unported CC BY-SA 3.0 & GNU Free Documentation License (GFDL)
If you are the copyright holder of any material contained on our site and intend to remove it, please contact our site administrator for approval.
© 2016-2026 All site design rights belong to S.Y.A.