Training Guide Installing and Configuring Windows Server 2012 R2 (2014)
Chapter 11. Configuring Windows Firewall and IPsec
Protecting an organization’s computers is a key role of every IT administrator. Two essential technologies that can help ensure your computers are secure are firewalls and Internet Protocol security (IPsec). Microsoft Windows Server 2012 and Windows Server 2012 R2 include a host-based firewall called Windows Firewall with Advanced Security that helps you protect the servers on your network. Windows Firewall with Advanced Security is also included in the Windows 8 client operating system.
But protecting individual computers on your network is not enough. You must also be able to protect the network traffic that flows between your computers and between your computers and other computers outside the corporate network. You can accomplish this by configuring IPsec on the computers that need to communicate with one another. Windows Firewall with Advanced Security also includes built-in functionality for configuring IPsec on the computer.
This chapter shows how to use Windows Firewall with Advanced Security to configure both firewall and IPsec functionality on computers running Windows Server 2012 or Windows Server 2012 R2.
Lessons in this chapter:
![]() Lesson 1: Configuring Windows Firewall with Advanced Security
Lesson 1: Configuring Windows Firewall with Advanced Security
![]() Lesson 2: Configuring IPsec
Lesson 2: Configuring IPsec
Before you begin
![]() You need to know how to perform a clean install of Windows Server 2012 or Windows Server 2012 R2 and perform initial configuration tasks such as configuring the server’s TCP/IP settings for Internet connectivity.
You need to know how to perform a clean install of Windows Server 2012 or Windows Server 2012 R2 and perform initial configuration tasks such as configuring the server’s TCP/IP settings for Internet connectivity.
![]() You need to know how to deploy Active Directory using Windows Server 2012 or Windows Server 2012 R2 and how to join computers to a domain.
You need to know how to deploy Active Directory using Windows Server 2012 or Windows Server 2012 R2 and how to join computers to a domain.
![]() You also need to have at least rudimentary knowledge of using Windows PowerShell.
You also need to have at least rudimentary knowledge of using Windows PowerShell.
Lesson 1: Configuring Windows Firewall with Advanced Security
Firewalls are a key technology for helping ensure the security of an information systems infrastructure. Perimeter firewalls act as gateways to provide a first level of defense against network intrusion, but host-based firewalls are equally important for both client and server systems because they provide an additional layer of protection. This lesson examines how to configure the host firewall functionality of Windows Firewall with Advanced Security on Windows Server 2012 and Windows Server 2012 R2.
After this lesson, you will be able to:
![]() Describe the architecture and operation of Windows Firewall with Advanced Security.
Describe the architecture and operation of Windows Firewall with Advanced Security.
![]() Explain how firewall profiles work and how they can be configured.
Explain how firewall profiles work and how they can be configured.
![]() Describe the different types of firewall rules supported by Windows Firewall with Advanced Security.
Describe the different types of firewall rules supported by Windows Firewall with Advanced Security.
![]() Explain the order in which Windows Firewall with Advanced Security processes firewall rules.
Explain the order in which Windows Firewall with Advanced Security processes firewall rules.
![]() Create firewall rules using the Windows Firewall with Advanced Security snap-in and Windows PowerShell.
Create firewall rules using the Windows Firewall with Advanced Security snap-in and Windows PowerShell.
![]() Configure firewall rules on target computers using Group Policy.
Configure firewall rules on target computers using Group Policy.
Estimated lesson time: 30 minutes
Understanding Windows Firewall with Advanced Security
Windows Firewall with Advanced Security is a host-based, stateful firewall included in Windows Server 2012, Windows Server 2012 R2, Windows 8, and Windows 8.1. The feature was first introduced in Windows Vista and Windows Server 2008, and its functionality has been enhanced in several ways in later Windows versions.

As a host-based firewall, Windows Firewall with Advanced Security is designed to protect the local computer—unlike a perimeter firewall, which is designed to protect the network itself. However, to protect a network, you also need to protect each computer on the network because if even a single computer is compromised, it could provide an attacker with a way to compromise the rest of the network.
As a stateful firewall, Windows Firewall with Advanced Security can keep track of the state of packets as they travel across the network. Packets that match a specified rule can be either allowed or denied depending on how the rule has been configured. Windows Firewall with Advanced Security can inspect and filter both inbound and outbound packets, and it supports both Internet Protocol version 4 (IPv4) and Internet Protocol version 6 (IPv6).
Windows Firewall with Advanced Security also includes built-in functionality for creating rules that govern IPsec communications. This means you can use Windows Firewall with Advanced Security to encrypt and secure communications between computers on the network.
Windows Firewall with Advanced Security interoperates with other Windows features to help ensure the security of the computer. To fully understand how Windows Firewall with Advanced Security works, you need to understand these other features:
![]() Windows Filtering Platform
Windows Filtering Platform
![]() Windows service hardening
Windows service hardening
![]() Network location awareness
Network location awareness
Windows Filtering Platform
Windows Filtering Platform (WFP) is a collection of application programming interfaces (APIs) and system services that allow for the creation of network-filtering applications on Windows Vista or later. By using WFP, third-party developers can create host-based security tools such as these:
![]() Firewalls
Firewalls
![]() Intrusion-detection systems
Intrusion-detection systems
![]() Network-monitoring tools
Network-monitoring tools
![]() Antivirus programs
Antivirus programs
![]() Parental controls
Parental controls
WFP is also the underlying engine used for implementing packet-filtering logic in Windows Firewall with Advanced Security. The components of WFP include the following:
![]() Base Filter Engine (BFE) This component runs in user mode and receives filtering requests from Windows Firewall with Advanced Security. Such requests are then forwarded to the Generic Filter Engine.
Base Filter Engine (BFE) This component runs in user mode and receives filtering requests from Windows Firewall with Advanced Security. Such requests are then forwarded to the Generic Filter Engine.
![]() Generic Filter Engine (GFE) This component runs in kernel mode and receives filtering requests from the BFE. The GFE then makes such requests available to callout modules that map to different layers of the Transmission Control Protocol/Internet Protocol (TCP/IP) protocol stack. As the TCP/IP protocol stack processes a packet, each callout module calls the GFE to determine whether to accept or reject the packet.
Generic Filter Engine (GFE) This component runs in kernel mode and receives filtering requests from the BFE. The GFE then makes such requests available to callout modules that map to different layers of the Transmission Control Protocol/Internet Protocol (TCP/IP) protocol stack. As the TCP/IP protocol stack processes a packet, each callout module calls the GFE to determine whether to accept or reject the packet.
![]() Callout modules These run in kernel mode and are used by the GFE to inspect the different layers of a packet as the packet is passed down the TCP/IP protocol stack. For example, the Transport Layer module is used to inspect the Transport Layer protocol portion of the packet, which is either TCP or User Datagram Protocol (UDP).
Callout modules These run in kernel mode and are used by the GFE to inspect the different layers of a packet as the packet is passed down the TCP/IP protocol stack. For example, the Transport Layer module is used to inspect the Transport Layer protocol portion of the packet, which is either TCP or User Datagram Protocol (UDP).
More Info: Windows Filtering Platform
For more information about WFP, including its components, its functions, and how to write programs that use its API, see “Windows Filtering Platform” at http://msdn.microsoft.com/en-us/library/windows/desktop/aa366510.aspx.
When you start a computer running Windows Vista or later, Windows Firewall with Advanced Security initially uses boot-time filters to protect the system during the early stages of the boot process. Once the BFE starts, the boot-time filters are replaced by persistent filters that are stored in the registry and applied whenever the BFE is running. Once the Windows Firewall service starts, the policy rules and settings that have been configured for Windows Firewall with Advanced Security are applied.
Windows service hardening
Windows service hardening is a collection of strategies that helps protect critical Windows services from behaving abnormally. Windows service hardening is thus designed to help reduce the possible damage that could occur if a Windows service is compromised by an attacker.
Windows service hardening is implemented using strategies such as the following:
![]() Using LocalService or NetworkService instead of LocalSystem as the security context for a service whenever possible
Using LocalService or NetworkService instead of LocalSystem as the security context for a service whenever possible
![]() Assigning services only the minimum Windows privileges they need to perform their function
Assigning services only the minimum Windows privileges they need to perform their function
![]() Implementing per-service identity using the per-service security identifier (SID), which allows services to apply explicit access control lists (ACLs) to resources used only by the service
Implementing per-service identity using the per-service security identifier (SID), which allows services to apply explicit access control lists (ACLs) to resources used only by the service
![]() Applying a write-restricted access token to the service process so that attempts by the service to write to resources that do not explicitly grant access to the per-service SID will fail
Applying a write-restricted access token to the service process so that attempts by the service to write to resources that do not explicitly grant access to the per-service SID will fail
Windows service hardening also protects Windows services by using service restriction rules, which are not user-configurable. Service restriction rules define the types of network packets that can be transmitted by or received from a Windows service. When a packet is being examined, service restriction rules are applied before Windows Firewall with Advanced Security rules are applied.
Network location awareness
Network location awareness is a feature of Windows Vista and later that allows network-aware applications to change their behavior based on the computer’s network connectivity. The three network location types that a computer running Windows can detect are these:
![]() Public A computer on a public network is considered to be shared with the world. By default, when a Windows computer connects to a new network for the first time, the network location type for that network is configured as public.
Public A computer on a public network is considered to be shared with the world. By default, when a Windows computer connects to a new network for the first time, the network location type for that network is configured as public.
![]() Private A computer on a private network is not directly accessible by the world. To configure the network location type of a Windows computer as private, you must be a local administrator on the computer.
Private A computer on a private network is not directly accessible by the world. To configure the network location type of a Windows computer as private, you must be a local administrator on the computer.
![]() Domain A computer that belongs to an Active Directory domain is automatically assigned a network location type of domain.
Domain A computer that belongs to an Active Directory domain is automatically assigned a network location type of domain.
Windows Firewall with Advanced Security uses network location awareness to determine which firewall profile will be used for protecting each connection on the computer. This is described in more detail in the next section.
Note: Network location awareness on multihomed computers
If a computer is multihomed (connected to more than one network), each connection is assigned the appropriate network location type based on the type of network to which it is connected.
Managing firewall profiles
Computers today are often connected to different networks at different times, and they might even be connected to several networks at the same time. Each type of network can have a different set of security requirements:
![]() A computer connected to a public network should consider that network unsafe because of the threat of malware from the Internet. As a result, Windows Firewall with Advanced Security on such a computer should be configured to restrict most forms of traffic.
A computer connected to a public network should consider that network unsafe because of the threat of malware from the Internet. As a result, Windows Firewall with Advanced Security on such a computer should be configured to restrict most forms of traffic.
![]() A computer connected to a private network, such as a small office/home office (SOHO) with Internet access provided by a network address translation (NAT) router, should have Windows Firewall with Advanced Security configured in a less restrictive way than for a public network. This is necessary to allow the computer to communicate freely with other computers on the same private network.
A computer connected to a private network, such as a small office/home office (SOHO) with Internet access provided by a network address translation (NAT) router, should have Windows Firewall with Advanced Security configured in a less restrictive way than for a public network. This is necessary to allow the computer to communicate freely with other computers on the same private network.
![]() A computer that belongs to an Active Directory domain should have Windows Firewall with Advanced Security configured even less restrictively than for a private network. This is because Active Directory environments usually include additional layers of security, such as perimeter firewalls that further isolate the network from the outside world.
A computer that belongs to an Active Directory domain should have Windows Firewall with Advanced Security configured even less restrictively than for a private network. This is because Active Directory environments usually include additional layers of security, such as perimeter firewalls that further isolate the network from the outside world.
A typical day with an enterprise laptop might be as follows:
1. Bob brings his laptop to work, inserts it into the docking station, turns it on, and logs on to Active Directory.
2. Bob takes a lunch break and decides to get more work done, so he uses the Wi-Fi hotspot at the coffee shop to establish a connection to the Internet and browses the news for a while. Because his company has implemented DirectAccess, Bob can safely connect to resources on his company’s network even while he’s connected to the public Internet.
3. When Bob returns to the office, he is informed that he has to visit a small customer site to help the customers troubleshoot a problem on their workgroup network. When Bob arrives at the customer site, he connects his laptop to their network so that he can help them resolve their problem.
4. While connected to the customer’s network, Bob realizes he needs to access a resource on his own company’s network. Unfortunately, the NAT router on the customer’s network has not been configured to allow DirectAccess traffic, so Bob has to establish a virtual private network (VPN) connection to his company’s network.
Examining the day just described for Bob, you can see that the following scenarios came into play:
1. In the morning, Bob connects to one network (his company’s network). This network has a network location type of domain.
2. At lunch, Bob connects to two networks:
![]() A Wi-Fi network, which has a network location type of public
A Wi-Fi network, which has a network location type of public
![]() His company’s network (via DirectAccess), which has a network location type of domain
His company’s network (via DirectAccess), which has a network location type of domain
3. At the customer site, Bob initially connects to one network (the customer’s network). Because this network is a workgroup and not a domain, the network location type is private.
4. Later at the customer site, Bob needs to remain connected to the customer’s network while also connecting to his own company’s network. To do this, Bob establishes a VPN connection to his company’s network. At this point, Bob is connected to two networks:
![]() The customer’s network, which has a network location type of private
The customer’s network, which has a network location type of private
![]() His own company’s network, which has a network location type of domain
His own company’s network, which has a network location type of domain
Although the preceding example uses client systems, it’s common for servers to be multihomed and connected to multiple networks in certain scenarios. For example, a clustered Hyper-V host in a production environment might be simultaneously connected to the following networks:
![]() Production network This is the network that client systems are able to access and from which they can consume services.
Production network This is the network that client systems are able to access and from which they can consume services.
![]() Management network This network is used only for managing the servers using a systems-management platform such as Microsoft System Center Configuration Manager.
Management network This network is used only for managing the servers using a systems-management platform such as Microsoft System Center Configuration Manager.
![]() Failover clustering network This network is used for failover cluster communications, such as heartbeat communications, and for connecting to a cluster shared volume (CSV).
Failover clustering network This network is used for failover cluster communications, such as heartbeat communications, and for connecting to a cluster shared volume (CSV).
![]() Live migration network This network is used to support the live migration of virtual machines.
Live migration network This network is used to support the live migration of virtual machines.
Multihomed servers are also common in edge scenarios in which the server is connected to both the corporate intranet and the public Internet.
Windows Firewall with Advanced Security makes securing the preceding scenarios possible by implementing a separate firewall profile for each network connection on the computer. A firewall profile is a grouping of firewall rules and other configuration settings that are applied to a network connection that has a specific network location type. Windows Firewall with Advanced Security applies firewall profiles to all types of network connections on the computer, including network adapters and tunnel interfaces.
Windows Firewall with Advanced Security has three firewall profiles, which correspond to the three network location types on the Windows platform:
![]() Domain profile This profile is automatically applied to any network connection that Windows identifies as having a network location type of domain.
Domain profile This profile is automatically applied to any network connection that Windows identifies as having a network location type of domain.
![]() Private profile This profile is automatically applied to any network connection that Windows identifies as having a network location type of private.
Private profile This profile is automatically applied to any network connection that Windows identifies as having a network location type of private.
![]() Public profile This profile is automatically applied to any network connection that Windows identifies as having a network location type of public.
Public profile This profile is automatically applied to any network connection that Windows identifies as having a network location type of public.
All three profiles can be active at the same time on a computer if Windows detects that there are network connections of each type present. You can view the status of each firewall profile on a computer by opening the Windows Firewall with Advanced Security Microsoft Management Console (MMC) snap-in. One way of doing this on Windows Server 2012 or Windows Server 2012 R2 is by selecting Windows Firewall with Advanced Security from the Tools menu of Server Manager. Once the snap-in is open, select the root node in the console tree and examine the Overview section in the details pane.
Figure 11-1 shows an example of this for a computer that has only one network connection of the domain type. Note that all three profiles have Windows Firewall turned on for them, but only the domain profile is active. The other profiles are turned on so that if a connection to a private or public network is established on the computer, firewall protection will immediately be implemented for such a connection.
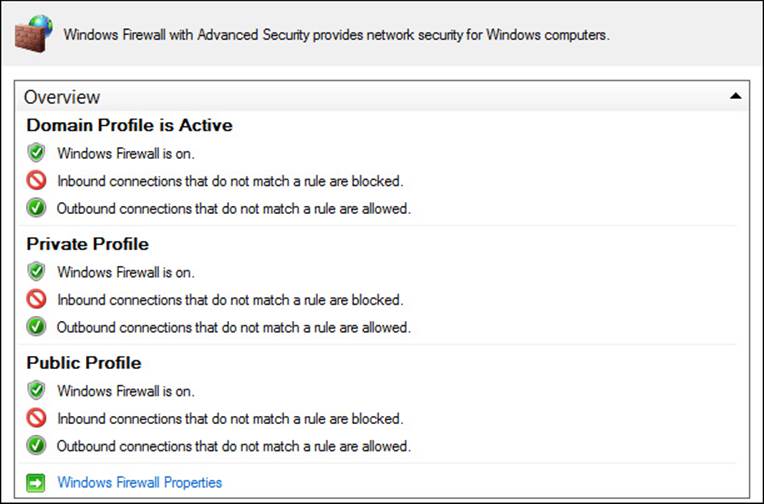
FIGURE 11-1 View the status of firewall profiles.
Configuring profiles
By default, all three firewall profiles are enabled on Windows computers. You can change the state of any profile or configure its properties by right-clicking the root node in the Windows Firewall with Advanced Security snap-in and selecting Properties. Doing this opens the Windows Firewall with Advanced Security properties shown in Figure 11-2.
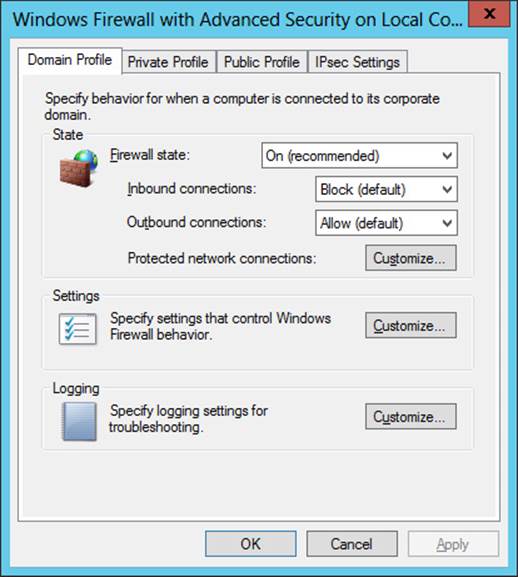
FIGURE 11-2 Configure the firewall profile settings.
You can use this properties dialog box to configure the following properties for the selected profile:
![]() Firewall State You use this setting to enable or disable Windows Firewall with Advanced Security for the selected profile. Microsoft recommends that you always leave this set to On.
Firewall State You use this setting to enable or disable Windows Firewall with Advanced Security for the selected profile. Microsoft recommends that you always leave this set to On.
![]() Inbound Connections You use this setting to configure how Windows Firewall with Advanced Security handles incoming traffic. These are the three available options:
Inbound Connections You use this setting to configure how Windows Firewall with Advanced Security handles incoming traffic. These are the three available options:
![]() Block Blocks all connections that do not have firewall rules that explicitly allow the connection
Block Blocks all connections that do not have firewall rules that explicitly allow the connection
![]() Block All Connections Blocks all connections, regardless of any firewall rules that explicitly allow the connection
Block All Connections Blocks all connections, regardless of any firewall rules that explicitly allow the connection
![]() Allow Allows the connection unless there is a firewall rule that explicitly blocks the connection
Allow Allows the connection unless there is a firewall rule that explicitly blocks the connection
The default value for the inbound connections property is Block. This means that if an inbound rule for the profile explicitly allows a certain type of incoming traffic, the host will accept any traffic matching that rule. But if a certain type of incoming traffic does not match any of the inbound rules for the profile, the host will not accept that type of traffic.
![]() Outbound Connections You use this setting to configure how Windows Firewall with Advanced Security handles outgoing traffic. The only two options available here are Block and Allow. The default setting for the Outbound Connections property is Allow, which means that all traffic leaving the host is allowed to pass through the firewall unless an explicit outbound rule prohibits this for a certain type of outgoing traffic.
Outbound Connections You use this setting to configure how Windows Firewall with Advanced Security handles outgoing traffic. The only two options available here are Block and Allow. The default setting for the Outbound Connections property is Allow, which means that all traffic leaving the host is allowed to pass through the firewall unless an explicit outbound rule prohibits this for a certain type of outgoing traffic.
![]() Protected Network Connections This setting opens a dialog box you can use to specify which network connections should be protected by the rules associated with the selected profile. For example, on a multihomed computer with two network connections to different networks of type private, the dialog box for the private profile would display two check boxes. By default, both private networks would be protected, but by clearing the check boxes you can disable this protection for either or both networks.
Protected Network Connections This setting opens a dialog box you can use to specify which network connections should be protected by the rules associated with the selected profile. For example, on a multihomed computer with two network connections to different networks of type private, the dialog box for the private profile would display two check boxes. By default, both private networks would be protected, but by clearing the check boxes you can disable this protection for either or both networks.
The Settings and Logging options are described in the next two sections.
Configuring profile settings
Clicking Customize in the Settings section of a profile’s properties opens the dialog box shown in Figure 11-3, which you can use to specify other settings that control the behavior of Windows Firewall with Advanced Security. For example, you can do the following:
![]() Specify whether Windows Firewall with Advanced Security should display a notification to the user when a program on the user’s computer is blocked from receiving inbound connections. When such a notification is displayed, the user can select an option that unblocks the program as long as the user has sufficient privileges (belongs to the local Administrators or Network Configuration Operators security group). When the user chooses to unblock a program, an inbound program rule for the program is automatically created on the user’s computer.
Specify whether Windows Firewall with Advanced Security should display a notification to the user when a program on the user’s computer is blocked from receiving inbound connections. When such a notification is displayed, the user can select an option that unblocks the program as long as the user has sufficient privileges (belongs to the local Administrators or Network Configuration Operators security group). When the user chooses to unblock a program, an inbound program rule for the program is automatically created on the user’s computer.
![]() Allow unicast responses to multicast or broadcast requests to allow Windows Firewall with Advanced Security to wait several seconds for unicast responses from other computers to which the local computer has sent multicast or broadcast messages.
Allow unicast responses to multicast or broadcast requests to allow Windows Firewall with Advanced Security to wait several seconds for unicast responses from other computers to which the local computer has sent multicast or broadcast messages.
![]() Rule merging allows users who are members of the local Administrators or Network Configuration Operators security group on the computer to create and apply local rules that are merged with any rules being applied to the computer by Group Policy.
Rule merging allows users who are members of the local Administrators or Network Configuration Operators security group on the computer to create and apply local rules that are merged with any rules being applied to the computer by Group Policy.
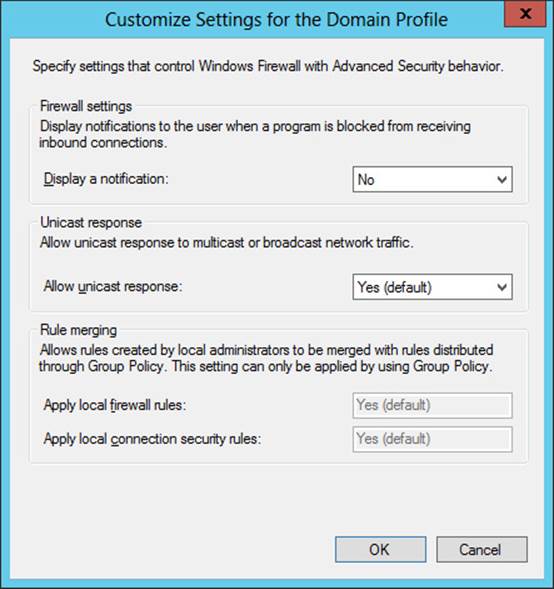
FIGURE 11-3 Configure other settings for a firewall profile.
Configuring logging
Clicking Customize in the Logging section of a profile’s properties opens the dialog box shown in Figure 11-4, which you can use to specify how Windows Firewall with Advanced Security logging operations will behave for the selected profile. For example, you can do the following:
![]() Specify a location for the firewall log file to be saved.
Specify a location for the firewall log file to be saved.
![]() Specify the maximum size in kilobytes (KBs) to which the log file can grow. Once the log file reaches this size, the file has .old appended to its file name and a second file is created. When the second file reaches the maximum size, the existing *.old file is deleted and the second file becomes the new *.old file.
Specify the maximum size in kilobytes (KBs) to which the log file can grow. Once the log file reaches this size, the file has .old appended to its file name and a second file is created. When the second file reaches the maximum size, the existing *.old file is deleted and the second file becomes the new *.old file.
![]() Specify whether a log entry should be created when Windows Firewall with Advanced Security disallows a connection for any reason. These entries can be identified by the word DROP in the Action field.
Specify whether a log entry should be created when Windows Firewall with Advanced Security disallows a connection for any reason. These entries can be identified by the word DROP in the Action field.
![]() Specify whether a log entry should be created when Windows Firewall with Advanced Security allows an inbound connection for any reason. These entries can be identified by the word ALLOW in the Action field.
Specify whether a log entry should be created when Windows Firewall with Advanced Security allows an inbound connection for any reason. These entries can be identified by the word ALLOW in the Action field.
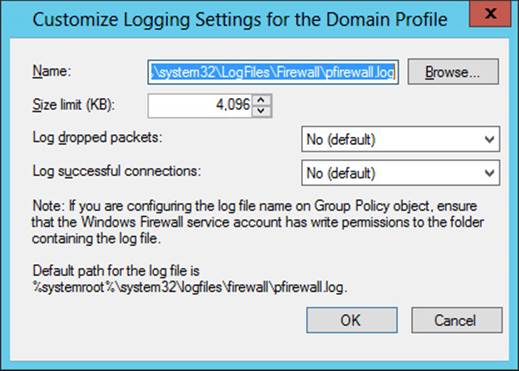
FIGURE 11-4 Configure logging for a firewall profile.
Note: Firewall operational logs
Another useful source for viewing information about firewall policy changes for Windows Firewall with Advanced Security is the operational log found here in Event Viewer:
Applications and Services Logs/Microsoft/Windows/Windows Firewall with
Advanced Security/Firewall
You can also enable the FirewallVerbose operational log if you need more detailed information about firewall policy events.
Configuring profiles using Windows PowerShell
You can also use Windows PowerShell to view and configure settings for firewall profiles. For example, you can use the Get-NetFirewallProfile cmdlet to display the currently active settings for the domain profile on the local computer like this:
PS C:\> Get-NetFirewallProfile -Name Domain -PolicyStore ActiveStore
Name : Domain
Enabled : True
DefaultInboundAction : Block
DefaultOutboundAction : Allow
AllowInboundRules : True
AllowLocalFirewallRules : True
AllowLocalIPsecRules : True
AllowUserApps : True
AllowUserPorts : True
AllowUnicastResponseToMulticast : True
NotifyOnListen : False
EnableStealthModeForIPsec : True
LogFileName : %systemroot%\system32\LogFiles\Firewall\pfirewall.log
LogMaxSizeKilobytes : 4096
LogAllowed : False
LogBlocked : False
LogIgnored : True
DisabledInterfaceAliases :
To modify any of these profile settings, use the Set-NetFirewallProfile cmdlet. For help using this cmdlet, type Get-Help Set-NetFirewallProfile in the Windows PowerShell console.
More Info: Windows Firewall with Advanced Security cmdlets
To display a list of all Windows Firewall with Advanced Security cmdlets in the NetSecurity module for Windows PowerShell, type Get-Command –Module NetSecurity in the Windows PowerShell console. To get help for any of these cmdlets, use the Get-Help cmdlet or see “Network Security Cmdlets in Windows PowerShell” at http://technet.microsoft.com/en-us/library/jj554906.aspx.
Configuring firewall rules
The core functionality of Windows Firewall with Advanced Security is expressed by rules. A rule is a set of criteria that determines whether a network packet should be handled. The two basic types of rules you can configure in Windows Firewall with Advanced Security are
![]() Firewall rule A set of criteria that specifies whether a particular type of traffic passing between the local computer and other computers on the network should be accepted (passed) or rejected (blocked).
Firewall rule A set of criteria that specifies whether a particular type of traffic passing between the local computer and other computers on the network should be accepted (passed) or rejected (blocked).
![]() Connection security rule A set of criteria that specifies how traffic passing between the local computer and other computers on the network should be protected using IPsec.
Connection security rule A set of criteria that specifies how traffic passing between the local computer and other computers on the network should be protected using IPsec.
The remainder of this lesson deals with firewall rules. Connection security rules are covered in Lesson 2 later in this chapter.
Types of firewall rules
As Figure 11-5 shows, you can use Windows Firewall with Advanced Security to configure two types of firewall rules:
![]() Inbound rule A rule that specifies how incoming network traffic should be handled—that is, traffic originating from other computers and having the local computer as its destination
Inbound rule A rule that specifies how incoming network traffic should be handled—that is, traffic originating from other computers and having the local computer as its destination
![]() Outbound rule A rule that specifies how outgoing network traffic should be handled—that is, traffic originating from the local computer and having other computers or network devices as its destination
Outbound rule A rule that specifies how outgoing network traffic should be handled—that is, traffic originating from the local computer and having other computers or network devices as its destination
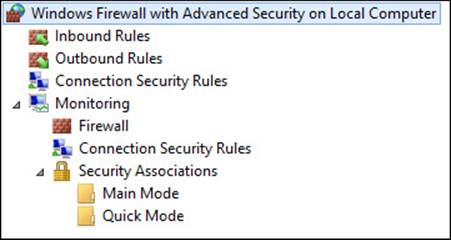
FIGURE 11-5 Firewall rules can be either inbound or outbound.
You can configure both inbound and outbound rules to either allow (permit) or deny (block) traffic based on the criteria contained in the rule. Because many types of network traffic are possible, Windows Firewall with Advanced Security also has special rules called default rules that determine how traffic should be handled when it doesn’t match any of the criteria contained in any of the inbound and outbound rules. Unless otherwise configured by the system’s administrator, the default rules for all three firewall profiles are as follows:
![]() Inbound default rule Block all traffic originating from other computers and having the local computer as its destination
Inbound default rule Block all traffic originating from other computers and having the local computer as its destination
![]() Outbound default rule Allow all traffic originating from the local computer and having other computers or network devices as its destination
Outbound default rule Allow all traffic originating from the local computer and having other computers or network devices as its destination
You can configure the inbound and outbound default rules for each firewall profile on the corresponding tab of the properties sheet of the root node in the Windows Firewall with Advanced Security snap-in. To see how to do this, refer to Figure 11-2 earlier in this chapter.
Rules processing
When Windows Firewall with Advanced Security processes a packet of network traffic, one or more rules might apply to that particular packet. Figure 11-6 shows the order in which rules are applied to both inbound and outbound traffic, which is as follows:
1. Any rules that allow traffic that would otherwise be blocked are applied first. These rules have the Override Block Rules option selected, and they are discussed in Lesson 2 later in this chapter. If the packet matches such a rule, the rule is applied and rules processing stops at this point.
2. Rules that explicitly block traffic are applied second. If the packet matches such a rule, the rule is applied and rules processing stops at this point.
3. Rules that explicitly allow traffic are applied third. If the packet matches such a rule, the rule is applied and rules processing stops at this point.
4. The default rule is applied last.
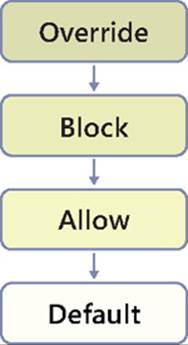
FIGURE 11-6 Windows Firewall with Advanced Security processes rules in this order.
When Windows Firewall with Advanced Security processes firewall rules, as soon as a packet matches a rule the rule is applied and rules processing stops at that point. For example, if a block rule (described in step 2) blocks a particular type of packet, an allow rule (described in step 3) for the same type of packet would not be applied because allow rules have a lower priority than block rules. So the net result is to block that particular type of packet.
Rule groups
Windows Firewall with Advanced Security includes a number of predefined inbound and outbound rules. These rules are used for filtering the different types of traffic associated with different Windows features and services. As Figure 11-7 shows, these predefined rules are grouped into rule groups. Each rule group contains one or more rules used to control traffic for a particular Windows feature or service. For example, the Windows Remote Management (HTTP-In) rule group contains two rules: one that applies to only the public profile and another that applies to both the domain and private profiles.
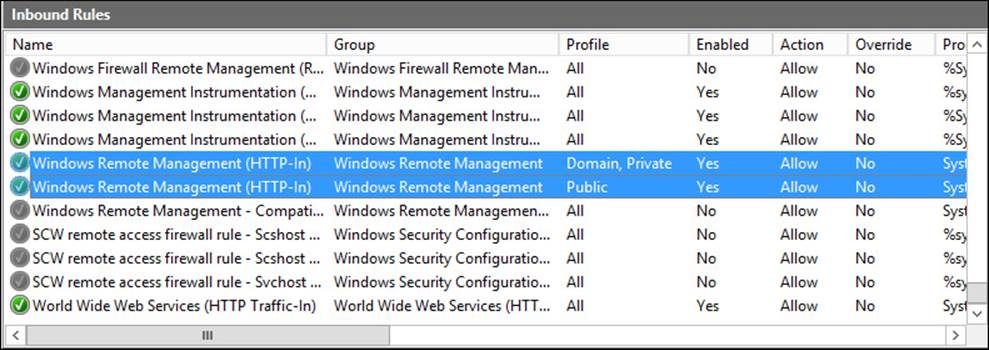
FIGURE 11-7 This is an example of a rule group.
Creating firewall rules
You can manually create new firewall rules (either inbound or outbound) using either Windows Firewall with Advanced Security or Windows PowerShell. As Figure 11-8 shows, there are four types of firewall rules you can create:
![]() Program rule This is a rule that specifies how traffic associated with a specific program (executable) running on the local computer should be handled.
Program rule This is a rule that specifies how traffic associated with a specific program (executable) running on the local computer should be handled.
![]() Port rule This is a rule that specifies how traffic associated with a specific TCP or UDP port or port range on the local computer should be handled.
Port rule This is a rule that specifies how traffic associated with a specific TCP or UDP port or port range on the local computer should be handled.
![]() Predefined rule This is a rule that specifies how traffic associated with a specific Windows feature or service running on the local computer should be handled.
Predefined rule This is a rule that specifies how traffic associated with a specific Windows feature or service running on the local computer should be handled.
![]() Custom rule This is a rule that specifies how traffic should be handled based on any of the traffic-filtering criteria supported by Windows Firewall with Advanced Security.
Custom rule This is a rule that specifies how traffic should be handled based on any of the traffic-filtering criteria supported by Windows Firewall with Advanced Security.
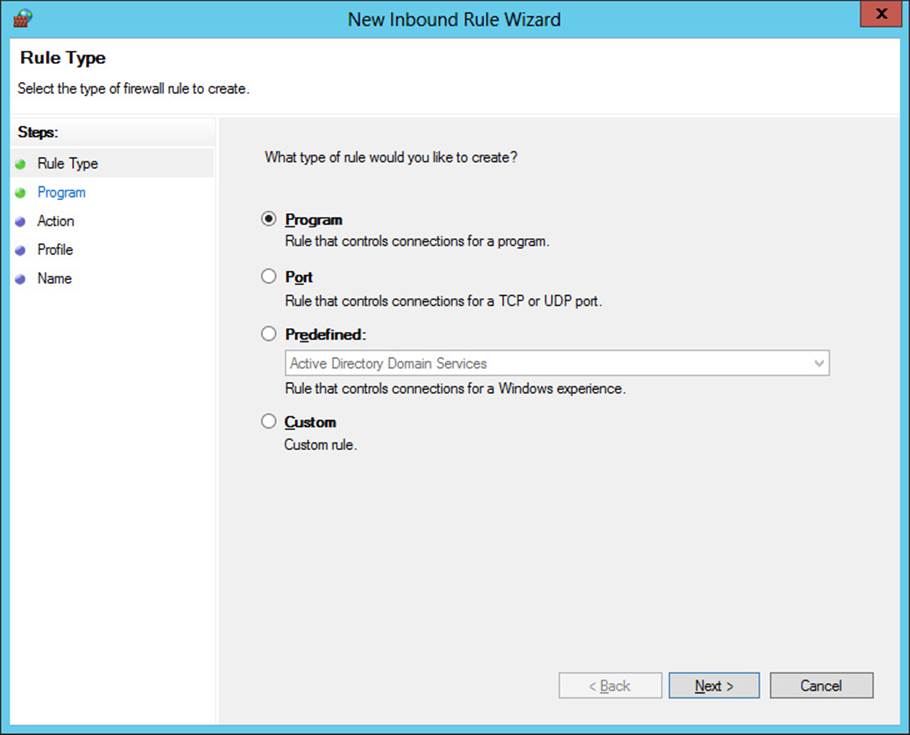
FIGURE 11-8 You can create these types of firewall rules using Windows Firewall with Advanced Security.
To create new firewall rules using the New Inbound (or Outbound) Rule Wizard, right-click the Inbound (or Outbound) node in the Windows Firewall with Advanced Security snap-in, select New Rule, and follow the steps of the wizard. The sections that follow explain more about the steps involved in creating each of these different types of firewall rules.
Creating a program rule
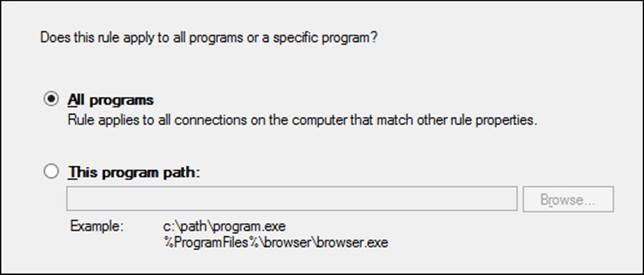
You can take the following steps to create a new program rule using the Windows Firewall with Advanced Security snap-in:
1. Launch the New Inbound (or Outbound) Rule Wizard and select Program on the Rule Type page.
2. On the Program page, specify the full program path and executable name of the program on the local computer to which you want the new rule to apply. Alternatively, you can select All Programs to have the new rule apply to all traffic that matches the criteria specified in the rule:
3. On the Action page, select one of the following:
![]() Allow The Connection Selecting this option causes traffic to be allowed regardless of whether the traffic is protected using IPsec.
Allow The Connection Selecting this option causes traffic to be allowed regardless of whether the traffic is protected using IPsec.
![]() Allow The Connection If It Is Secure Selecting this option causes traffic to be allowed only when the traffic is protected using IPsec.
Allow The Connection If It Is Secure Selecting this option causes traffic to be allowed only when the traffic is protected using IPsec.
![]() Block The Connection Selecting this option causes traffic to be blocked regardless of whether the traffic is protected using IPsec.
Block The Connection Selecting this option causes traffic to be blocked regardless of whether the traffic is protected using IPsec.
4. On the Profile page, select the firewall profiles to which the new rule should apply. By default, new rules apply to all three profiles (domain, private, and public).
5. On the Name page, specify a name and optional description for the new rule.
Note: Enabled by default
When you create a new firewall rule using the New Inbound (or Outbound) Rule Wizard, the new rule is automatically enabled by default.
More Info: The Allow The Connection If It Is Secure option
The Allow The Connection If It Is Secure option will be discussed in more detail in Lesson 2, which covers connection security rules.
Creating a port rule
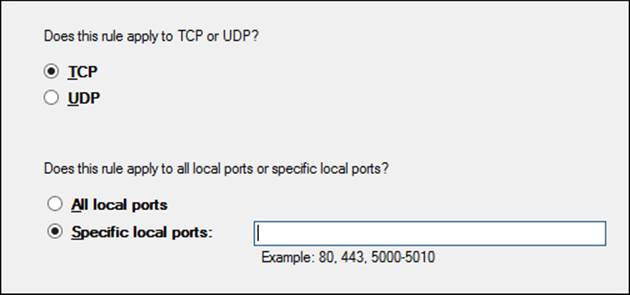
You can take the following steps to create a new port rule using the Windows Firewall with Advanced Security snap-in:
1. Launch the New Inbound (or Outbound) Rule Wizard and select Port on the Rule Type page.
2. On the Protocols And Ports page, begin by specifying whether the new rule should apply to TCP or UDP ports. Then specify whether the rule should apply to all local ports or to only specific ports:
3. The options on the Action, Profile, and Name pages are the same as those described in the previous section.
Creating a predefined rule
You can take the following steps to create a new predefined rule using the Windows Firewall with Advanced Security snap-in:
1. Launch the New Inbound (or Outbound) Rule Wizard and select Predefined on the Rule Type page.
2. Click the list control shown in Figure 11-8 earlier and select the Windows feature or service that you will use the new rule to control.
3. On the Predefined Rules page, select one or more predefined rules to be created.
4. The options on the Action page are the same as those described earlier.
Once you have created a predefined rule, you can open its properties by double-clicking the rule in either the Inbound Rules or Outbound Rules sections of the Windows Firewall with Advanced Security snap-in. As Figure 11-9 shows, predefined rules are called out with a special informational message bar, and the administrator can configure only a subset of the criteria in the rule. This is true regardless of whether the predefined rule was created automatically when you installed its associated Windows feature or you manually created the rule.
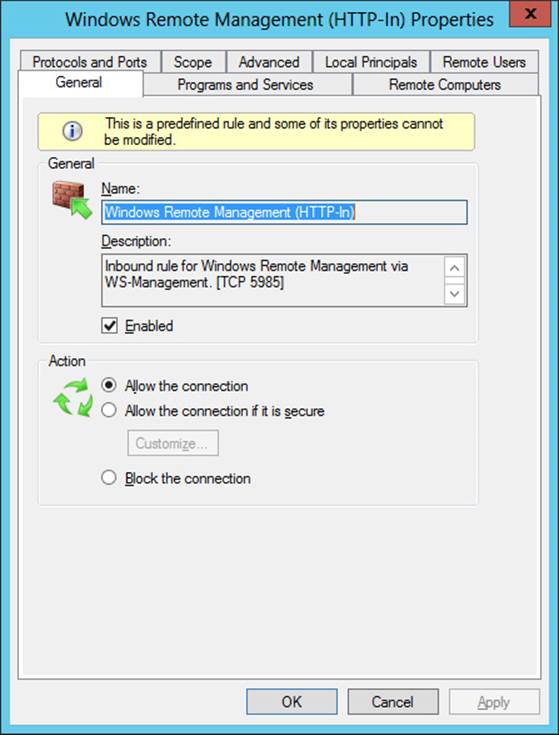
FIGURE 11-9 Predefined rules have limited options you can configure.
Creating a custom rule
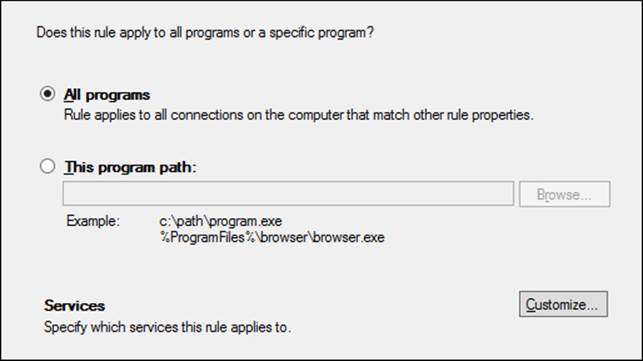
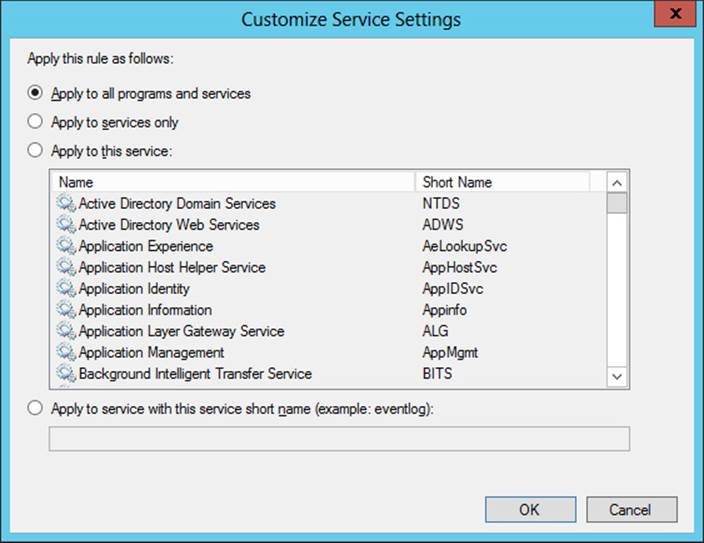
You can take the following steps to create a new program rule using the Windows Firewall with Advanced Security snap-in:
1. Launch the New Inbound (or Outbound) Rule Wizard and select Custom on the Rule Type page.
2. On the Program page, specify the full program path and executable name of the program on the local computer to which you want the new rule to apply. Alternatively, you can select All Programs to have the new rule apply to all traffic that matches the criteria specified in the rule:
You can also click Customize to specify the Windows services to which the new rule should apply. Doing this opens the Customize Service Settings dialog box, which you use to configure the rule so that it applies to one of the following:
![]() All programs and services running on the local computer
All programs and services running on the local computer
![]() All services running on the local computer
All services running on the local computer
![]() A particular service running on the local computer
A particular service running on the local computer
![]() A particular service that has a specified short name running on the local computer
A particular service that has a specified short name running on the local computer
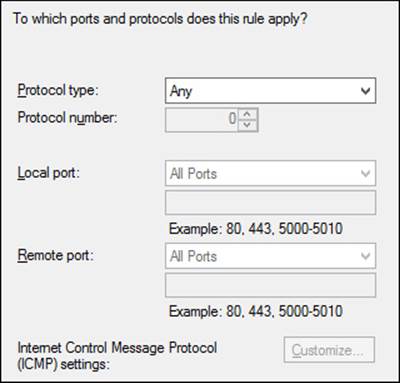
3. On the Protocols And Ports page, begin by specifying the type of protocol to which the rule should apply. Supported protocol types include TCP, UDP, ICMPv4, IGMP, IPv6, ICMPv6, L2TP, and others. If you select either ICMPv4 or ICMPv6, you can click Customize to specify whether the rule should apply to all types or to specific types of ICMP messages. You can also select Any to have the rule apply to all types of protocols or select Custom to have the rule apply to a protocol number you specify.
Then specify whether the rule should apply to all local ports or only to specific ports for both local and remote ports:
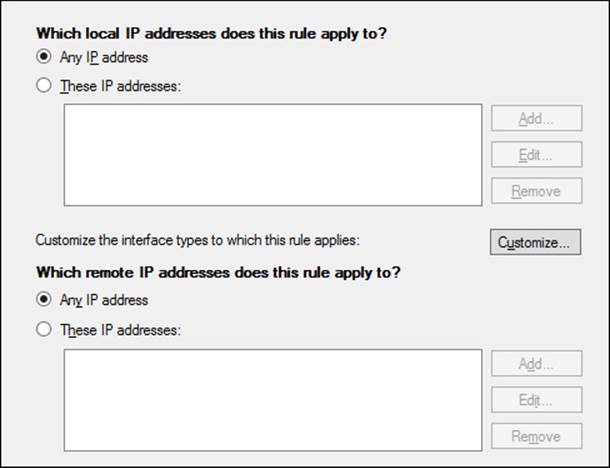
4. On the Scope page, specify the local and remote IP addresses to which the new rule should apply:
5. The options on the Action, Profile, and Name pages are the same as those described earlier.
![]() Quick check
Quick check
![]() Which default firewall rule for inbound connections is most secure? Why is it not usually used?
Which default firewall rule for inbound connections is most secure? Why is it not usually used?
Quick check answer
![]() Block All Connections is the most secure because it blocks all inbound traffic to the local computer. This setting is usually not used, however, because it prevents the user from downloading webpages, receiving email, or otherwise communicating over the network.
Block All Connections is the most secure because it blocks all inbound traffic to the local computer. This setting is usually not used, however, because it prevents the user from downloading webpages, receiving email, or otherwise communicating over the network.
Creating firewall rules using Windows PowerShell
You can also use Windows PowerShell cmdlets from the NetSecurity module to view, create, modify, and remove firewall rules on both the local and remote computers. For example, to display a list of inbound rules in the Network Discovery rule group on the local computer, you can use the Get-NetFirewallRule cmdlet like this:
PS C:\> Get-NetFirewallRule -PolicyStore ActiveStore `
-DisplayGroup "Network Discovery" -Direction Inbound | `
ft Name,DisplayName,Enabled,Action -AutoSize
Name DisplayName Enabled Action
---- ----------- ------- ------
NETDIS-UPnPHost-In-TCP Network Discovery (UPnP-In) False Allow
NETDIS-NB_Name-In-UDP Network Discovery (NB-Name-In) False Allow
NETDIS-NB_Datagram-In-UDP Network Discovery (NB-Datagram-In) False Allow
NETDIS-WSDEVNTS-In-TCP Network Discovery (WSD EventsSecure-In) False Allow
NETDIS-WSDEVNT-In-TCP Network Discovery (WSD Events-In) False Allow
NETDIS-SSDPSrv-In-UDP Network Discovery (SSDP-In) False Allow
NETDIS-FDPHOST-In-UDP Network Discovery (WSD-In) False Allow
NETDIS-LLMNR-In-UDP Network Discovery (LLMNR-UDP-In) False Allow
NETDIS-FDRESPUB-WSD-In-UDP Network Discovery (Pub-WSD-In) False Allow
As a second example, you can create a new rule to block outgoing traffic over TCP port 80 on the local computer by using the New-NetFirewallRule cmdlet as follows:
PS C:\> New-NetFirewallRule -DisplayName "Block Outbound Port 80" `
-Direction Outbound -LocalPort 80 -Protocol TCP -Action Block
Name : {19e3a3b5-ec0d-4e17-b98d-a0005e96bf20}
DisplayName : Block Outbound Port 80
Description :
DisplayGroup :
Group :
Enabled : True
Profile : Any
Platform : {}
Direction : Outbound
Action : Block
EdgeTraversalPolicy : Block
LooseSourceMapping : False
LocalOnlyMapping : False
Owner :
PrimaryStatus : OK
Status : The rule was parsed successfully from the store. (65536)
EnforcementStatus : NotApplicable
PolicyStoreSource : PersistentStore
PolicyStoreSourceType : Local
The PolicyStoreSource property for the new rule is PersistentStore. This means the new rule is a static rule that is configured in the local policy store on the computer instead of through Group Policy. By default, the new rule is enabled and is configured for all three firewall profiles.
Creating rules for refreshing Group Policy
As indicated in Lesson 1 of Chapter 10, “Implementing Group Policy,” beginning with Windows Server 2012 you can remotely force a refresh of Group Policy on computers belonging to an Active Directory domain. For this to work, certain firewall ports on the remote computer must be opened. Instead of manually creating the necessary rules in Windows Firewall with Advanced Security on the remote computer, you can use two new built-in Starter GPOs included in Windows Server 2012 and Windows Server 2012 R2 to create Group Policy Objects (GPOs) that have firewall rules designed for special purposes. These new Starter GPOs are shown in Figure 11-10 and are as follows:
![]() Group Policy Remote Update Firewall Ports The Group Policy remote-refresh capability described in Chapter 10 requires that certain firewall ports be opened on the computers targeted by a refresh action. You can use the Group Policy Remote Update Firewall Ports Starter GPO as a template for creating a GPO that automatically opens the firewall ports required for this purpose on computers targeted by the GPO. The required inbound firewall rules that must be enabled are as follows:
Group Policy Remote Update Firewall Ports The Group Policy remote-refresh capability described in Chapter 10 requires that certain firewall ports be opened on the computers targeted by a refresh action. You can use the Group Policy Remote Update Firewall Ports Starter GPO as a template for creating a GPO that automatically opens the firewall ports required for this purpose on computers targeted by the GPO. The required inbound firewall rules that must be enabled are as follows:
![]() Remote Scheduled Tasks Management (RPC-EPMAP)
Remote Scheduled Tasks Management (RPC-EPMAP)
![]() Remote Scheduled Tasks Management (RPC)
Remote Scheduled Tasks Management (RPC)
![]() Windows Management Instrumentation (WMI-in)
Windows Management Instrumentation (WMI-in)
![]() Group Policy Reporting Firewall Ports The capability of the Group Policy Management Console (GPMC) to collect Resultant Set of Policy (RSoP) information from a remote computer requires that certain firewall ports be opened on the remote computer. You can use the Group Policy Reporting Firewall Ports Starter GPO as a template for creating a GPO that automatically opens the firewall ports required for this purpose on computers targeted by the GPO. The required inbound firewall rules that must be enabled are as follows:
Group Policy Reporting Firewall Ports The capability of the Group Policy Management Console (GPMC) to collect Resultant Set of Policy (RSoP) information from a remote computer requires that certain firewall ports be opened on the remote computer. You can use the Group Policy Reporting Firewall Ports Starter GPO as a template for creating a GPO that automatically opens the firewall ports required for this purpose on computers targeted by the GPO. The required inbound firewall rules that must be enabled are as follows:
![]() Remote Event Log Management (RPC-EPMAP)
Remote Event Log Management (RPC-EPMAP)
![]() Remote Event Log Management (RPC)
Remote Event Log Management (RPC)
![]() Remote Event Log Management (NP-in)
Remote Event Log Management (NP-in)
![]() Windows Management Instrumentation (WMI-in)
Windows Management Instrumentation (WMI-in)
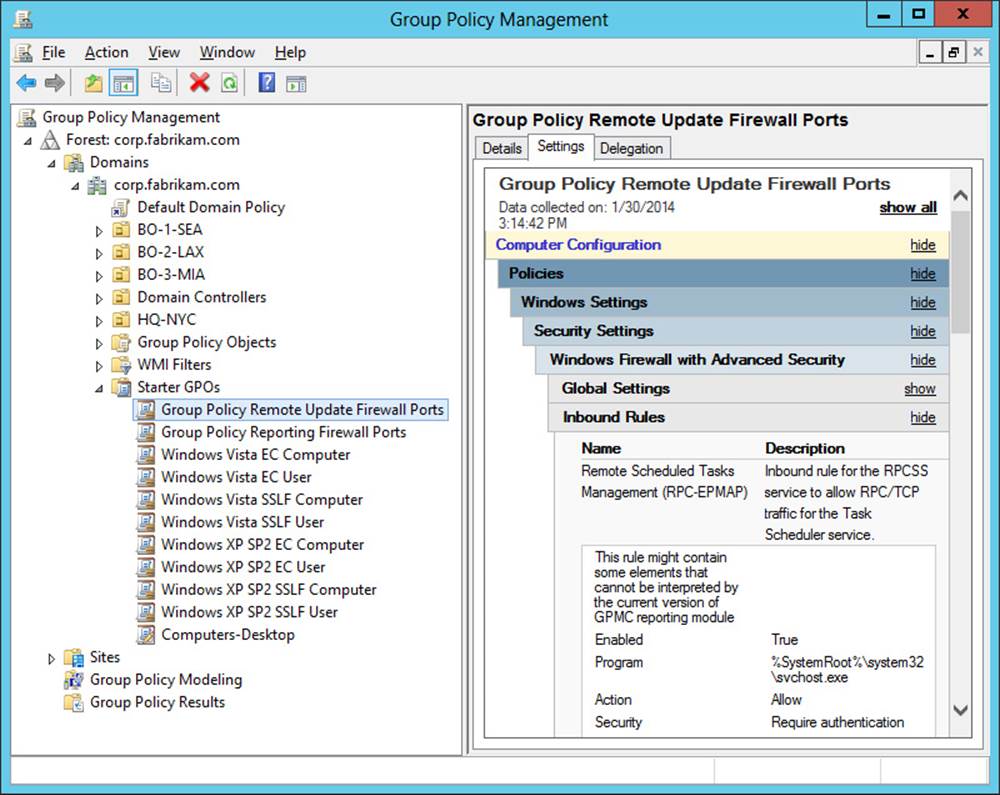
FIGURE 11-10 Firewall rules are defined in Starter GPOs for enabling a remote refresh of Group Policy.
Viewing and managing rules
You can view and manage firewall rules using either the Windows Firewall with Advanced Security snap-in or Windows PowerShell. As Figure 11-11 shows, you can use the Windows Firewall with Advanced Security snap-in to filter inbound or outbound rules in several ways:
![]() Filter By Profile Use this option to display all rules associated with a specific firewall profile.
Filter By Profile Use this option to display all rules associated with a specific firewall profile.
![]() Filter By State Use this option to display either all enabled rules or all disabled rules.
Filter By State Use this option to display either all enabled rules or all disabled rules.
![]() Filter By Group Use this option to display all the rules associated with a specific rule group.
Filter By Group Use this option to display all the rules associated with a specific rule group.
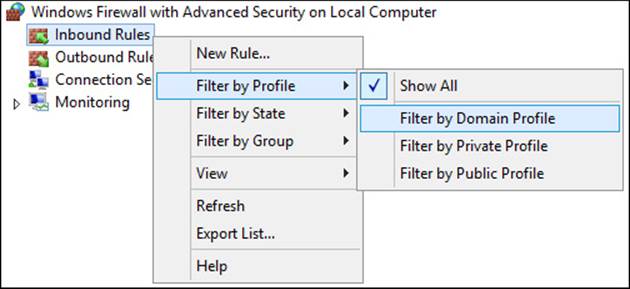
FIGURE 11-11 Filtering rules can make them easier to manage.
After you display the rules you want to manage, you can right-click them and select any of the following options:
![]() Enable Use this option to enable a rule that is currently disabled.
Enable Use this option to enable a rule that is currently disabled.
![]() Disable Use this option to disable a rule that is currently enabled.
Disable Use this option to disable a rule that is currently enabled.
![]() Delete Use this option to delete a rule that is no longer needed.
Delete Use this option to delete a rule that is no longer needed.
![]() Properties Use this option to open the properties of the rule and configure any editable criteria for the rule.
Properties Use this option to open the properties of the rule and configure any editable criteria for the rule.
You can also use the Monitoring node in the console tree of the Windows Firewall with Advanced Security snap-in to view the state and configuration of each firewall profile and to view active firewall rules associated with a firewall. Figure 11-12 shows some details about the Domain Profile when the Monitoring node is selected on a computer.
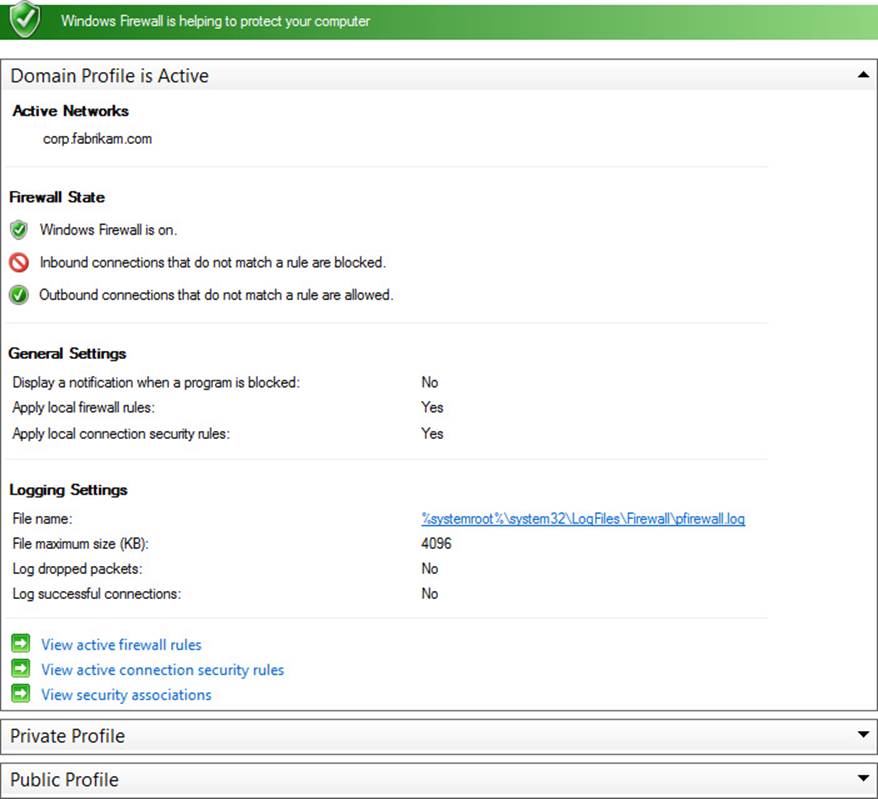
FIGURE 11-12 You can use the Monitoring node to view details about each profile.
As shown previously, you can use the Get-NetFirewallProfile and Get-NetFirewallRule cmdlets to display information about firewall profiles and rules on computers.
Configuring rules using Group Policy
Although Windows Firewall with Advanced Security is useful for configuring firewall rules and settings on the local computer, in managed environments you will want to use Group Policy to deploy firewall rules and settings on targeted computers. To do this, you can follow these steps:
1. Use the Group Policy Management Editor to either create a new GPO or open a GPO that targets the computers on which you want to deploy the firewall policy. You typically do this using the Group Policy Management Console.
2. Expand the console tree to display the following policy node (as shown in Figure 11-13):
Computer Configuration\Policies\Windows Settings\Security Settings
\Windows Firewall with Advanced Security\Windows Firewall with Advanced Security
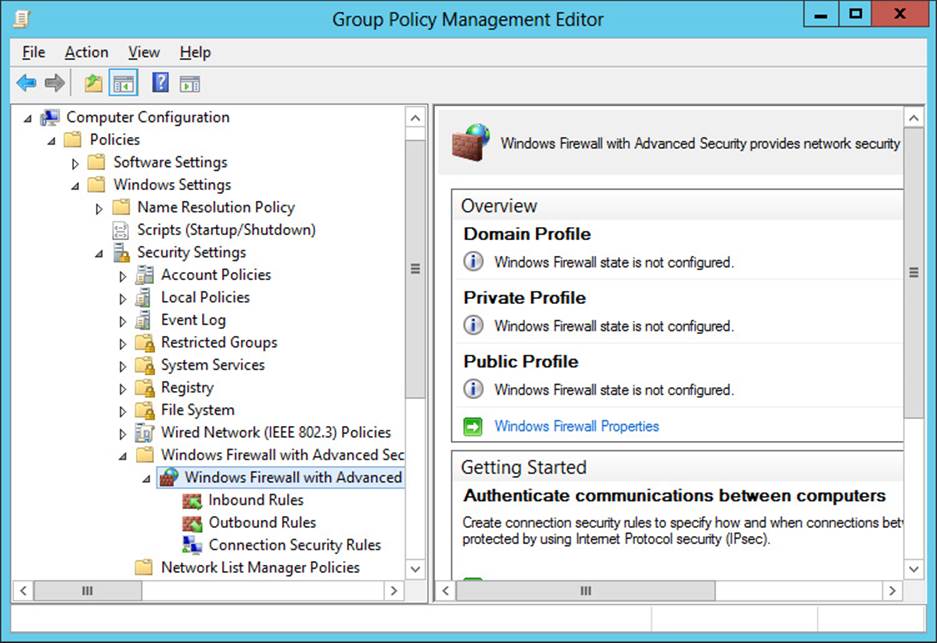
FIGURE 11-13 Configure firewall rules and settings on targeted computers using Group Policy.
3. In the details pane, click Windows Firewall Properties if you want to deploy settings for firewall profiles to the targeted computers.
4. To deploy inbound rules to the targeted computers, right-click Inbound Rules and select New Rule. Then complete the steps in the New Inbound Rule Wizard to configure the new inbound rule.
5. To deploy outbound rules to the targeted computers, right-click Outbound Rules and select New Rule. Then complete the steps in the New Outbound Rule Wizard to configure the new outbound rule.
Note: Connection security rules
Configuring connection security rules is discussed in the next lesson of this chapter.
You can also use Windows PowerShell to configure firewall rules and settings in a GPO and then use the GPO to deploy the firewall policy to targeted computers. For example, you can start by using the Get-NetFirewallProfile cmdlet to view the value of the NotifyOnListen policy setting for the domain firewall profile in the Sales GPO of the corp.fabrikam.com domain:
PS C:\> Get-NetFirewallProfile -Name Domain -PolicyStore corp.fabrikam.com\Sales | `
fl NotifyOnListen
NotifyOnListen : NotConfigured
The command output indicates that this firewall policy setting is not configured in the Sales GPO. To enable this setting, you can pipe the output of the preceding command into the Set-NetFirewallProfile command like this:
C:\> Get-NetFirewallProfile -Name Domain -PolicyStore corp.fabrikam.com\Sales | `
Set-NetFirewallProfile -NotifyOnListen True
You can use Get-NetFirewallProfile again to verify the result:
PS C:\> Get-NetFirewallProfile -Name Domain -PolicyStore corp.fabrikam.com\Sales | `
fl NotifyOnListen
NotifyOnListen : True
Now you can create a new rule to block outgoing traffic over TCP port 80 on computers targeted by the Sales GPO. To begin, using the Get-NetFirewallRule cmdlet to target the Sales GPO indicates that there are currently no firewall rules configured in this GPO:
PS C:\> Get-NetFirewallRule -PolicyStore corp.fabrikam.com\Sales
You can use the New-NetFirewallRule cmdlet to create the new rule in the GPO as follows:
PS C:\> New-NetFirewallRule -PolicyStore corp.fabrikam.com\Sales `
-DisplayName "Block Outbound Port 80" -Direction Outbound -LocalPort 80 `
-Protocol TCP -Action Block
Name : {0c7a9c6c-af48-4acf-bcdd-adcf8d9790b2}
DisplayName : Block Outbound Port 80
Description :
DisplayGroup :
Group :
Enabled : True
Profile : Any
Platform : {}
Direction : Outbound
Action : Block
EdgeTraversalPolicy : Block
LooseSourceMapping : False
LocalOnlyMapping : False
Owner :
PrimaryStatus : OK
Status : The rule was parsed successfully from the store. (65536)
EnforcementStatus : NotApplicable
PolicyStoreSource :
PolicyStoreSourceType : GroupPolicy
Opening the Sales GPO in the Windows Firewall with Advanced Security snap-in will verify that the new rule has been configured as expected in the firewall policy for the GPO.
Lesson summary
![]() Windows Firewall with Advanced Security interoperates with other Windows features—such as Windows Filtering Platform, Windows service hardening, and network location awareness—to help ensure the security of the computer.
Windows Firewall with Advanced Security interoperates with other Windows features—such as Windows Filtering Platform, Windows service hardening, and network location awareness—to help ensure the security of the computer.
![]() A firewall profile is a grouping of firewall rules and other configuration settings that are applied to a network connection that has a specific network location type.
A firewall profile is a grouping of firewall rules and other configuration settings that are applied to a network connection that has a specific network location type.
![]() Windows Firewall with Advanced Security has three firewall profiles (domain, private, and public) that correspond to the three network location types.
Windows Firewall with Advanced Security has three firewall profiles (domain, private, and public) that correspond to the three network location types.
![]() All three firewall profiles can be active at the same time on a computer if Windows detects that there are network connections of each type present.
All three firewall profiles can be active at the same time on a computer if Windows detects that there are network connections of each type present.
![]() Firewall rules can be either inbound rules or outbound rules. Types of firewall rules include program, port, predefined, and custom.
Firewall rules can be either inbound rules or outbound rules. Types of firewall rules include program, port, predefined, and custom.
![]() The default firewall rule for inbound connections can be configured as Block, Block All Connections, or Allow. By default, it is set to Block.
The default firewall rule for inbound connections can be configured as Block, Block All Connections, or Allow. By default, it is set to Block.
![]() The default firewall rule for outbound connections can be configured as Block or Allow. By default, it is set to Allow.
The default firewall rule for outbound connections can be configured as Block or Allow. By default, it is set to Allow.
![]() Windows Firewall with Advanced Security processes firewall rules in the following order of priority: override, block, allow, default. As soon as a packet matches a rule, the rule is applied and rules processing stops at that point.
Windows Firewall with Advanced Security processes firewall rules in the following order of priority: override, block, allow, default. As soon as a packet matches a rule, the rule is applied and rules processing stops at that point.
![]() You can configure and manage firewall policy and rules by using Windows Firewall with Advanced Security, the cmdlets in the NetSecurity module of Windows PowerShell, or the Windows Firewall with Advanced Security node in a Group Policy Object.
You can configure and manage firewall policy and rules by using Windows Firewall with Advanced Security, the cmdlets in the NetSecurity module of Windows PowerShell, or the Windows Firewall with Advanced Security node in a Group Policy Object.
Lesson review
Answer the following questions to test your knowledge of the information in this lesson. You can find the answers to these questions and explanations of why each answer choice is correct or incorrect in the “Answers” section at the end of this chapter.
1. Which of the following statements is not true regarding firewall profiles in Windows Firewall with Advanced Security? (Choose all that apply.)
A. The domain profile is automatically applied to any network connection that Windows identifies as having a network location type of domain.
B. Only one firewall profile can be active at any given time.
C. The default behavior of the domain profile is to block inbound connections unless those connections are explicitly allowed by firewall rules.
D. To display the currently active settings for the domain profile on the local computer, you can use the Get-NetFirewallProfile cmdlet with the –PolicyStore PersistentStore parameter.
2. You have two firewall rules configured on the computer as follows:
![]() Rule A explicitly blocks outbound traffic from the svchost.exe process running on the computer.
Rule A explicitly blocks outbound traffic from the svchost.exe process running on the computer.
![]() Rule B explicitly allows outbound traffic from the svchost.exe process running on the computer.
Rule B explicitly allows outbound traffic from the svchost.exe process running on the computer.
In addition, the outbound default rule is set to Block.
The svchost.exe process running on the computer attempts to send a packet to another computer on the network. Which answer best describes what will happen?
A. The packet will be allowed because rule B has a higher priority than rule A.
B. The packet will be blocked because rule B has a higher priority than rule A.
C. The packet will be blocked because rule A has a higher priority than rule B.
D. The packet will be blocked because the outbound default rule is set to Block.
3. You want to create a firewall rule that blocks inbound traffic to %windir%regedit.exe on the computer. Which type of rule can you use to do this? (Choose all that apply.)
A. Program rule
B. Port rule
C. Predefined rule
D. Custom rule
Lesson 2: Configuring IPsec
Internet Protocol security (IPsec) is a set of extensions that bring network-level peer authentication, data-origin authentication, data integrity, data confidentiality (encryption), and replay protection to the TCP/IP protocol suite. IPsec enables administrators to protect network traffic against eavesdropping, interception, and modification. This lesson examines how to implement IPsec in different scenarios using Windows Firewall with Advanced Security on Windows Server 2012 and Windows Server 2012 R2.
After this lesson, you will be able to:
![]() Explain basic IPsec concepts such as encapsulation, IPsec protocols, security associations, key-exchange algorithms, authentication methods, data-integrity algorithms, and data-encryption algorithms.
Explain basic IPsec concepts such as encapsulation, IPsec protocols, security associations, key-exchange algorithms, authentication methods, data-integrity algorithms, and data-encryption algorithms.
![]() Configure IPsec settings using the Windows Firewall with Advanced Security snap-in and Windows PowerShell.
Configure IPsec settings using the Windows Firewall with Advanced Security snap-in and Windows PowerShell.
![]() Describe the different types of connection security rules.
Describe the different types of connection security rules.
![]() Configure connection security rules using the Windows Firewall with Advanced Security snap-in and Windows PowerShell.
Configure connection security rules using the Windows Firewall with Advanced Security snap-in and Windows PowerShell.
![]() Configure authenticated bypass for a firewall rule in an environment in which IPsec is being used.
Configure authenticated bypass for a firewall rule in an environment in which IPsec is being used.
![]() Monitor main mode and quick mode security associations.
Monitor main mode and quick mode security associations.
Estimated lesson time: 30 minutes
Understanding connection security
You can implement IPsec using Windows Firewall with Advanced Security by creating and configuring connection security rules. A connection security rule is a set of criteria configured in Windows Firewall with Advanced Security that specifies how IPsec will be used to secure traffic between the local computer and other computers on the network. You can use connection security rules to specify whether a network connection between two computers must be authenticated before data can be exchanged between them. You can also use connection security rules to make sure any data exchanged between the computers is encrypted to protect against eavesdropping or modification.
To understand how you can implement connection security using IPsec, you first need to understand the following IPsec concepts:
![]() Encapsulation
Encapsulation
![]() IPsec protocols
IPsec protocols
![]() Security associations
Security associations
![]() Key-exchange algorithms
Key-exchange algorithms
![]() Authentication methods
Authentication methods
![]() Data-integrity algorithms
Data-integrity algorithms
![]() Data-encryption algorithms
Data-encryption algorithms
The sections that follow go into more detail about these concepts as they apply to Windows Server 2012, Windows Server 2012 R2, Windows 8, and Windows 8.1.
More Info: Understanding IPsec
For more information on IPsec works, refer to the IPsec portal at http://technet.microsoft.com/en-us/network/bb531150.aspx.
Encapsulation
IPsec protects data sent over an unsecure network by encapsulating a payload of network packets. This can be done in two ways:
![]() Transport mode The payload is encapsulated with an IPsec header.
Transport mode The payload is encapsulated with an IPsec header.
![]() Tunnel mode The payload is encapsulated with an additional IP header.
Tunnel mode The payload is encapsulated with an additional IP header.
IPsec protocols
IPsec supports two protocols for encrypting the payload of packets, encapsulating the payload of packets, or both:
![]() Authentication Header (AH) This mechanism provides data-origin authentication, data integrity, and anti-replay protection for the entire packet (both the IP header and the data payload carried in the packet) except for the fields in the IP header that are allowed to change in transit. It does not provide data confidentiality, which means that it does not encrypt the data. The data is readable but protected from modification.
Authentication Header (AH) This mechanism provides data-origin authentication, data integrity, and anti-replay protection for the entire packet (both the IP header and the data payload carried in the packet) except for the fields in the IP header that are allowed to change in transit. It does not provide data confidentiality, which means that it does not encrypt the data. The data is readable but protected from modification.
![]() Encapsulating Security Protocol (ESP) This mechanism provides data-origin authentication, data integrity, anti-replay protection, and the option of confidentiality for the IP payload only. ESP in transport mode does not protect the entire packet with a cryptographic checksum, and the IP header is not protected.
Encapsulating Security Protocol (ESP) This mechanism provides data-origin authentication, data integrity, anti-replay protection, and the option of confidentiality for the IP payload only. ESP in transport mode does not protect the entire packet with a cryptographic checksum, and the IP header is not protected.
Security associations
A security association (SA) is a mutually agreed-upon collection of cryptographic keys and policies that one IPsec-enabled computer uses for secure unicast communications with another IPsec-enabled computer. You can think of an SA as a kind of contract that specifies how the computers will use IPsec to securely exchange information with each other.
To establish an SA between them, the computers can use one of the following IPsec protocols:
![]() Internet Key Exchange (IKE) This mechanism is defined in RFC 2409 and combines the Internet Security Association and Key Management Protocol (ISAKMP) of RFC 2408 with the Oakley Key Determination Protocol (Oakley) of RFC 2412. IKE is supported on computers that are running Windows 2000 or later.
Internet Key Exchange (IKE) This mechanism is defined in RFC 2409 and combines the Internet Security Association and Key Management Protocol (ISAKMP) of RFC 2408 with the Oakley Key Determination Protocol (Oakley) of RFC 2412. IKE is supported on computers that are running Windows 2000 or later.
![]() Authenticated IP (AuthIP) This mechanism is a Microsoft proprietary extension of IKE that provides improved negotiation of authentication methods and supports additional authentication methods not included in IKE. AuthIP is supported on computers running Windows Vista, Windows Server 2008, or later.
Authenticated IP (AuthIP) This mechanism is a Microsoft proprietary extension of IKE that provides improved negotiation of authentication methods and supports additional authentication methods not included in IKE. AuthIP is supported on computers running Windows Vista, Windows Server 2008, or later.
When two computers negotiate to establish IPsec communications between them, key exchange is performed during two phases:
![]() Main mode This phase of IPsec negotiation is performed first and is used to generate a shared master key that the computers can use to securely exchange keying information.
Main mode This phase of IPsec negotiation is performed first and is used to generate a shared master key that the computers can use to securely exchange keying information.
![]() Quick mode This phase of IPsec negotiation uses the master key from main mode to generate one or more session keys that the computers can use to ensure data integrity and encryption.
Quick mode This phase of IPsec negotiation uses the master key from main mode to generate one or more session keys that the computers can use to ensure data integrity and encryption.
Because each SA defines only one-way communications, an IPsec session requires two SAs.
Real World: Making VPN connections more reliable
Support for Internet Key Exchange version 2 (IKEv2), a virtual private network (VPN) tunneling protocol described in RFC 4306, was first introduced in Windows 7 and Windows Server 2008 R2. Beginning with Windows Server 2012, IKEv2 supports additional scenarios, including IPsec end-to-end, transport-mode connections, and support for Suite B (RFC 4869) requirements. From a practical standpoint, this improvement means that a Windows Server 2012 or Windows Server 2012 R2 VPN server allows a security association to remain unchanged despite changes in the underlying connection.
Key-exchange algorithms
In cryptographic systems, keys are used to encrypt and decrypt communications between different entities. To send and receive encrypted traffic over a network, IPsec-enabled computers must have access to the same shared session key. The key must first be securely exchanged between the computers. This sharing of keys is accomplished through a process called key exchange.
The key-exchange algorithms supported for IPsec communications in Windows 8, Windows 8.1, Windows Server 2012, and Windows Server 2012 R2 are as follows:
![]() Diffie–Hellman Group 1 (DH Group 1) This algorithm is not recommended and is provided for backward compatibility only.
Diffie–Hellman Group 1 (DH Group 1) This algorithm is not recommended and is provided for backward compatibility only.
![]() DH Group 2 This algorithm is stronger than DH Group 1.
DH Group 2 This algorithm is stronger than DH Group 1.
![]() DH Group 14 This algorithm is stronger than DH Group 2.
DH Group 14 This algorithm is stronger than DH Group 2.
![]() DH Group 24 This algorithm was introduced in Windows Server 2012 and is stronger than DH Group 14.
DH Group 24 This algorithm was introduced in Windows Server 2012 and is stronger than DH Group 14.
![]() Elliptic Curve Diffie–Hellman P-256 This algorithm is stronger than DH Group 2. It has medium resource usage and is compatible only with Windows Vista and later.
Elliptic Curve Diffie–Hellman P-256 This algorithm is stronger than DH Group 2. It has medium resource usage and is compatible only with Windows Vista and later.
![]() Elliptic Curve Diffie–Hellman P-384 This algorithm has the strongest security but also the highest resource usage. It is compatible only with Windows Vista and later.
Elliptic Curve Diffie–Hellman P-384 This algorithm has the strongest security but also the highest resource usage. It is compatible only with Windows Vista and later.
Authentication methods
In reference to IPsec, an authentication method is a process by which IPsec-enabled computers verify their identity with each other before secure communications can begin. A number of authentication methods are supported for IPsec communications in Windows 8, Windows 8.1, Windows Server 2012, and Windows Server 2012 R2. The authentication methods available depend on whether they are being used for first or second authentication.
The authentication methods available for first authentication are as follows:
![]() Computer (Kerberos V5) This authentication method is compatible with Windows 2000 or later.
Computer (Kerberos V5) This authentication method is compatible with Windows 2000 or later.
![]() Computer (NTLMv2) This authentication method can be used on networks that include systems running an earlier version of the Windows operating system and on stand-alone systems.
Computer (NTLMv2) This authentication method can be used on networks that include systems running an earlier version of the Windows operating system and on stand-alone systems.
![]() Computer certificate The default signing algorithm for this authentication method is RSA, but Elliptic Curve Digital Signature Algorithm (ECDSA)–P256 and ECDSA-P384 are also supported signing algorithms. You can also use an intermediate certificate authority (CA) as a certificate store in addition to using a root CA, and certificate-to-account mapping is also supported. Note that you can also configure first authentication to accept only health certificates when using a network access protection (NAP) infrastructure.
Computer certificate The default signing algorithm for this authentication method is RSA, but Elliptic Curve Digital Signature Algorithm (ECDSA)–P256 and ECDSA-P384 are also supported signing algorithms. You can also use an intermediate certificate authority (CA) as a certificate store in addition to using a root CA, and certificate-to-account mapping is also supported. Note that you can also configure first authentication to accept only health certificates when using a network access protection (NAP) infrastructure.
![]() Preshared key This authentication method is not recommended except for test environments.
Preshared key This authentication method is not recommended except for test environments.
The authentication methods available for second authentication are as follows:
![]() User (Kerberos V5) This authentication method is compatible with Windows 2000 or later.
User (Kerberos V5) This authentication method is compatible with Windows 2000 or later.
![]() User (NTLMv2) This authentication method can be used on networks that include systems running an earlier version of the Windows operating system and on stand-alone systems.
User (NTLMv2) This authentication method can be used on networks that include systems running an earlier version of the Windows operating system and on stand-alone systems.
![]() User certificate The default signing algorithm for this authentication method is RSA, but ECDSA-P256 and ECDSA-P384 are also supported signing algorithms. You can also use an intermediate CA as a certificate store in addition to using a root CA, and certificate-to-account mapping is also supported.
User certificate The default signing algorithm for this authentication method is RSA, but ECDSA-P256 and ECDSA-P384 are also supported signing algorithms. You can also use an intermediate CA as a certificate store in addition to using a root CA, and certificate-to-account mapping is also supported.
![]() Computer health certificate The default signing algorithm for this authentication method is RSA, but ECDSA-P256 and ECDSA-P384 are also supported signing algorithms. You can also use an intermediate CA as a certificate store in addition to using a root CA, and certificate-to-account mapping is also supported.
Computer health certificate The default signing algorithm for this authentication method is RSA, but ECDSA-P256 and ECDSA-P384 are also supported signing algorithms. You can also use an intermediate CA as a certificate store in addition to using a root CA, and certificate-to-account mapping is also supported.
Data-integrity algorithms
Data integrity ensures that the data exchanged between IPsec-enabled computers has not been modified in transit between them. Data integrity is accomplished by the use of message hashes, which are used to digitally sign packets so that the computer receiving them can be sure that the packets haven’t been tampered with.
The data-integrity algorithms supported for IPsec communications in Windows 8, Windows 8.1, Windows Server 2012, and Windows Server 2012 R2 are as follows:
![]() Message-Digest Algorithm 5 (MD5) This algorithm is not recommended and is provided for backward compatibility only.
Message-Digest Algorithm 5 (MD5) This algorithm is not recommended and is provided for backward compatibility only.
![]() Secure Hash Algorithm 1 (SHA-1) This algorithm is stronger than MD5 but uses more resources.
Secure Hash Algorithm 1 (SHA-1) This algorithm is stronger than MD5 but uses more resources.
![]() SHA 256-bit (SHA-256) This algorithm can be used for main mode only and is supported on Windows Vista SP1 and later.
SHA 256-bit (SHA-256) This algorithm can be used for main mode only and is supported on Windows Vista SP1 and later.
![]() SHA-384 This algorithm can be used for main mode only and is supported on Windows Vista SP1 and later.
SHA-384 This algorithm can be used for main mode only and is supported on Windows Vista SP1 and later.
![]() Advanced Encryption Standard-Galois Message Authentication Code 128-bit (AES-GMAC 128) This algorithm can be used for quick mode only and is supported on Windows Vista SP1 and later. It is equivalent to AES-GCM 128 for integrity.
Advanced Encryption Standard-Galois Message Authentication Code 128-bit (AES-GMAC 128) This algorithm can be used for quick mode only and is supported on Windows Vista SP1 and later. It is equivalent to AES-GCM 128 for integrity.
![]() AES-GMAC 192 This algorithm can be used for quick mode only and is supported on Windows Vista SP1 and later. It is equivalent to AES-GCM 192 for integrity.
AES-GMAC 192 This algorithm can be used for quick mode only and is supported on Windows Vista SP1 and later. It is equivalent to AES-GCM 192 for integrity.
![]() AES-GMAC 256 This algorithm can be used for quick mode only and is supported on Windows Vista SP1 and later. It is equivalent to AES-GCM 256 for integrity.
AES-GMAC 256 This algorithm can be used for quick mode only and is supported on Windows Vista SP1 and later. It is equivalent to AES-GCM 256 for integrity.
![]() AES-GCM 128 This algorithm can be used for quick mode only and is supported on Windows Vista SP1 and later. It is equivalent to AES-GMAC 128 for integrity.
AES-GCM 128 This algorithm can be used for quick mode only and is supported on Windows Vista SP1 and later. It is equivalent to AES-GMAC 128 for integrity.
![]() AES-GCM 192 This algorithm can be used for quick mode only and is supported on Windows Vista SP1 and later. It is equivalent to AES-GMAC 192 for integrity.
AES-GCM 192 This algorithm can be used for quick mode only and is supported on Windows Vista SP1 and later. It is equivalent to AES-GMAC 192 for integrity.
![]() AES-GCM 256 This algorithm can be used for quick mode only and is supported on Windows Vista SP1 and later. It is equivalent to AES-GMAC 256 for integrity.
AES-GCM 256 This algorithm can be used for quick mode only and is supported on Windows Vista SP1 and later. It is equivalent to AES-GMAC 256 for integrity.
Data-encryption algorithms
Data encryption ensures that data exchanged between IPsec-enabled computers is protected from viewing. IPsec can regenerate encryption keys so that if one key is exposed, all the data is not compromised.
The data-encryption algorithms supported for IPsec communications in Windows 8, Windows 8.1, Windows Server 2012, and Windows Server 2012 R2 are as follows:
![]() Data Encryption Standard (DES) This algorithm is not recommended and is provided for backward compatibility only.
Data Encryption Standard (DES) This algorithm is not recommended and is provided for backward compatibility only.
![]() Triple-DES (3DES) This algorithm is more secure than DES but has higher resource usage.
Triple-DES (3DES) This algorithm is more secure than DES but has higher resource usage.
![]() Advanced Encryption Standard-Cipher Block Chaining 128-bit (AES-CBC 128) This algorithm is faster and stronger than DES. It is supported on Windows Vista and later.
Advanced Encryption Standard-Cipher Block Chaining 128-bit (AES-CBC 128) This algorithm is faster and stronger than DES. It is supported on Windows Vista and later.
![]() AES-CBC 192 This algorithm is stronger than AES-CBC 128 and has medium resource usage. It is supported on Windows Vista and later.
AES-CBC 192 This algorithm is stronger than AES-CBC 128 and has medium resource usage. It is supported on Windows Vista and later.
![]() AES-CBC 256 This algorithm has the strongest security but also the highest resource usage. It is supported on Windows Vista and later.
AES-CBC 256 This algorithm has the strongest security but also the highest resource usage. It is supported on Windows Vista and later.
![]() AES-GCM 128 This algorithm can be used for quick mode only. It is faster and stronger than DES and is supported on Windows Vista and later. Note that AES-GCM 128 must be specified for both data integrity and encryption if this algorithm is used.
AES-GCM 128 This algorithm can be used for quick mode only. It is faster and stronger than DES and is supported on Windows Vista and later. Note that AES-GCM 128 must be specified for both data integrity and encryption if this algorithm is used.
![]() AES-GCM 192 This algorithm can be used for quick mode only. It has medium resource usage and is supported on Windows Vista and later. Note that AES-GCM 192 must be specified for both data integrity and encryption if this algorithm is used.
AES-GCM 192 This algorithm can be used for quick mode only. It has medium resource usage and is supported on Windows Vista and later. Note that AES-GCM 192 must be specified for both data integrity and encryption if this algorithm is used.
![]() AES-GCM 256 This algorithm can be used for quick mode only and is faster and stronger than DES. It is supported on Windows Vista and later. Note that AES-GCM 256 must be specified for both data integrity and encryption if this algorithm is used.
AES-GCM 256 This algorithm can be used for quick mode only and is faster and stronger than DES. It is supported on Windows Vista and later. Note that AES-GCM 256 must be specified for both data integrity and encryption if this algorithm is used.
Configuring IPsec settings
In contrast to firewall settings, which are configured for each firewall profile separately, IPsec settings are systemwide settings that define defaults for IPsec communications between the local computer and other computers on the network. You can configure these systemwide IPsec settings using the Windows Firewall with Advanced Security snap-in (using the Windows Firewall with Advanced Security policy node under Computer Configuration\Policies\Windows Settings\Security Settings in a GPO) or Windows PowerShell.
To configure IPsec settings using the Windows Firewall with Advanced Security snap-in on the local computer, right-click the root node in the console tree, select Properties, and switch to the IPsec Settings tab as shown in Figure 11-14. These are the settings you can configure here:
![]() IPsec Defaults Use this option to configure the default IPsec settings that the local computer will use when attempting to establish secure connections with other IPsec-enabled computers. To configure these settings, click the Customize button to open the Customize IPsec Defaults dialog box shown in Figure 11-15 in the next section.
IPsec Defaults Use this option to configure the default IPsec settings that the local computer will use when attempting to establish secure connections with other IPsec-enabled computers. To configure these settings, click the Customize button to open the Customize IPsec Defaults dialog box shown in Figure 11-15 in the next section.
![]() IPsec Exemptions Use this option to configure how IPsec handles Internet Control Message Protocol (ICMP) traffic. By default, ICMP traffic is not exempted from using IPsec, but you can change this by selecting Yes from the list control.
IPsec Exemptions Use this option to configure how IPsec handles Internet Control Message Protocol (ICMP) traffic. By default, ICMP traffic is not exempted from using IPsec, but you can change this by selecting Yes from the list control.
![]() IPsec Tunnel Authorization Use this option to configure the users and computers that you want to be authorized to establish IPsec communications with the local computer. To configure these settings, select Advanced and click the Customize button to open the Customize IPsec Tunnel Authorizations dialog box shown in Figure 11-19 later in this lesson.
IPsec Tunnel Authorization Use this option to configure the users and computers that you want to be authorized to establish IPsec communications with the local computer. To configure these settings, select Advanced and click the Customize button to open the Customize IPsec Tunnel Authorizations dialog box shown in Figure 11-19 later in this lesson.
FIGURE 11-14 Configure systemwide IPsec settings on the computer.
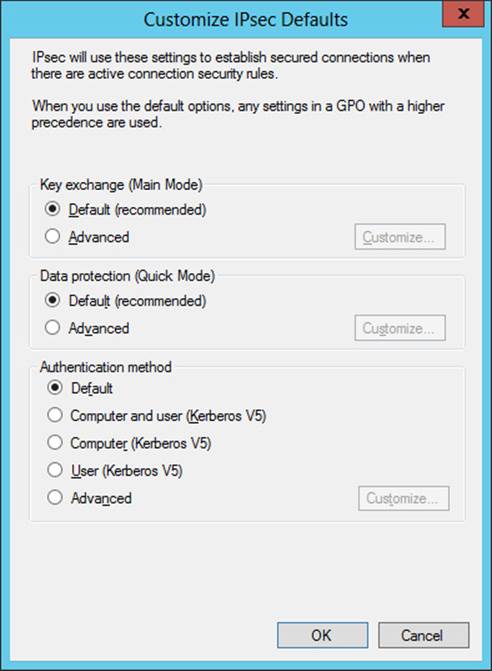
FIGURE 11-15 This is the dialog box for customizing IPsec defaults.
Customizing IPsec defaults
As described in the previous section, the Customize IPsec Defaults dialog box shown in Figure 11-15 is used to configure the default IPsec settings that the local computer will use when attempting to establish secure connections with other IPsec-enabled computers. The types of default settings you can configure include settings for the following:
![]() Key exchange (main mode)
Key exchange (main mode)
![]() Data protection (quick mode)
Data protection (quick mode)
![]() Authentication method
Authentication method
Figure 11-16 shows the default IPsec settings for key exchange. The process for applying them is as follows:
1. Start by attempting to use the Diffie–Hellman Group 2 key-exchange algorithm to negotiate using SHA-1 for data integrity and AES-CBC 128 for data encryption.
2. If that fails, attempt to use DH Group 2 to negotiate using SHA-1 for data integrity and 3DES for data encryption.
You can add other security methods to the list of methods the computer should attempt to use. You can also configure key lifetimes and other key-exchange options using this dialog box.
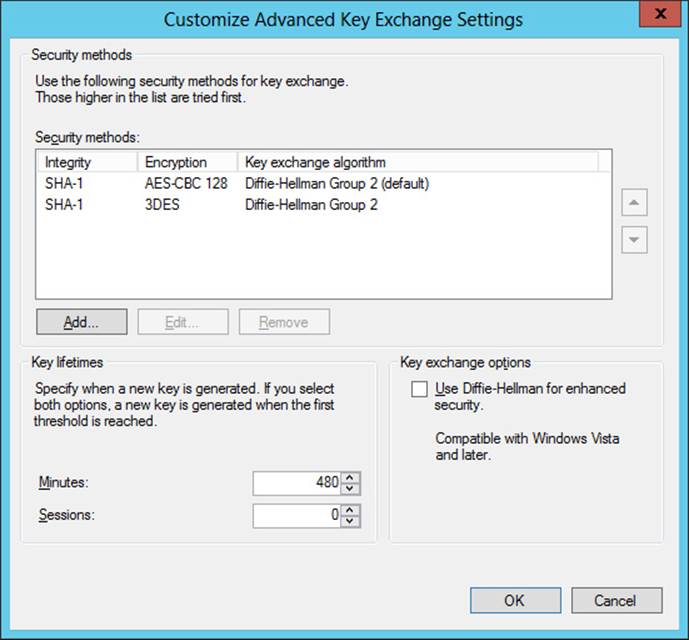
FIGURE 11-16 Configure advanced key-exchange settings.
Figure 11-17 shows the default IPsec settings for data protection. The process for applying them is as follows:
![]() If data integrity is required but data encryption is not, then do the following:
If data integrity is required but data encryption is not, then do the following:
1. Start by attempting to use ESP to negotiate using SHA-1 for data integrity.
2. If that fails, attempt to use AH to negotiate using SHA-1 for data integrity.
![]() If both data integrity and encryption are required, then do the following:
If both data integrity and encryption are required, then do the following:
1. Start by attempting to use ESP to negotiate using SHA-1 for data integrity and AES-CBC 218 for data encryption.
2. If that fails, attempt to use AH to negotiate using SHA-1 for data integrity and 3DES for data encryption.
You can use this dialog box to add other data-integrity and encryption algorithms to the list of algorithms the computer should attempt to use. You can also use it to require encryption for all IPsec communications on the computer.
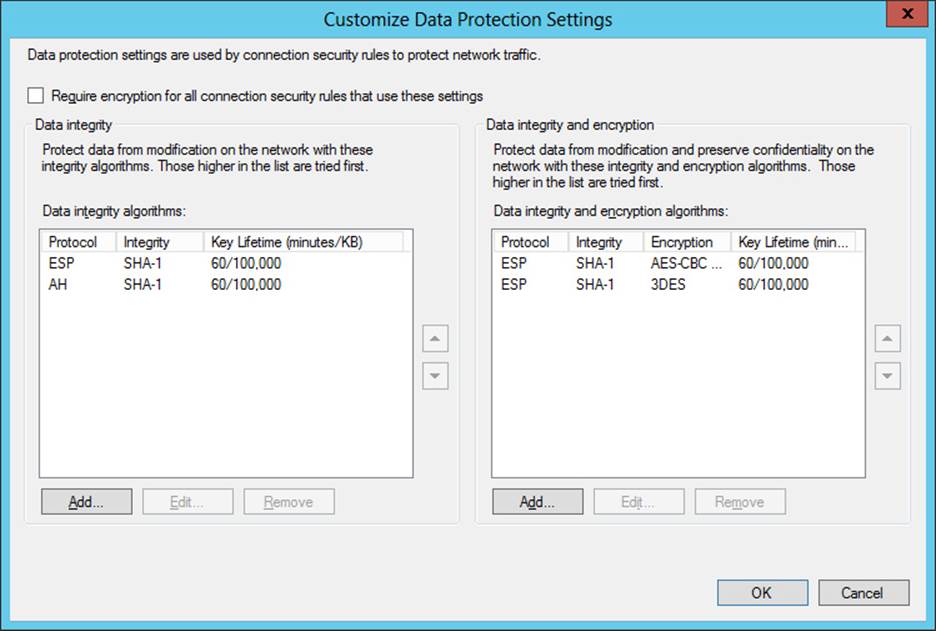
FIGURE 11-17 Configure data-integrity and encryption settings.
As Figure 11-18 shows, the default authentication methods that IPsec uses for first and second authentication are as follows:
![]() For first authentication, the only authentication method attempted is Computer (Kerberos V5). If desired, you can add authentication methods and prioritize how they are used.
For first authentication, the only authentication method attempted is Computer (Kerberos V5). If desired, you can add authentication methods and prioritize how they are used.
![]() For second authentication, no authentication is attempted. If desired, you can add authentication methods and prioritize how they are used.
For second authentication, no authentication is attempted. If desired, you can add authentication methods and prioritize how they are used.
You can also use this dialog box to specify whether first or second authentication should be considered optional.
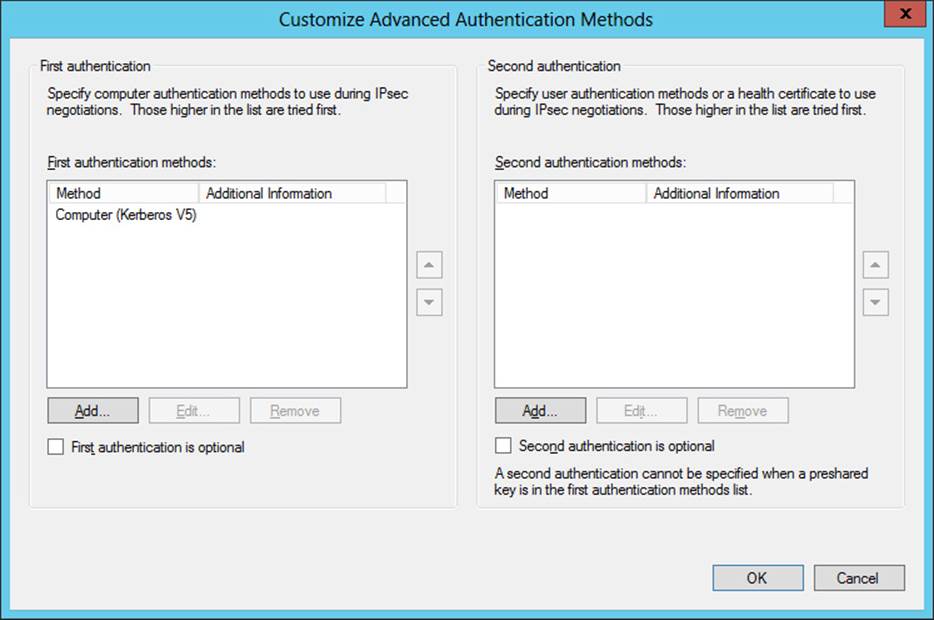
FIGURE 11-18 Configure authentication methods.
Customizing IPsec tunnel authorizations
If IPsec tunnel connections will be allowed with the computer, you can use the Customize IPsec Tunnel Authorizations dialog box shown in Figure 11-19 to configure this. Using this dialog box, you can specify
![]() Which computers are authorized to establish tunnel connections with the local computer.
Which computers are authorized to establish tunnel connections with the local computer.
![]() Which users are authorized to establish tunnel connections with the local computer.
Which users are authorized to establish tunnel connections with the local computer.
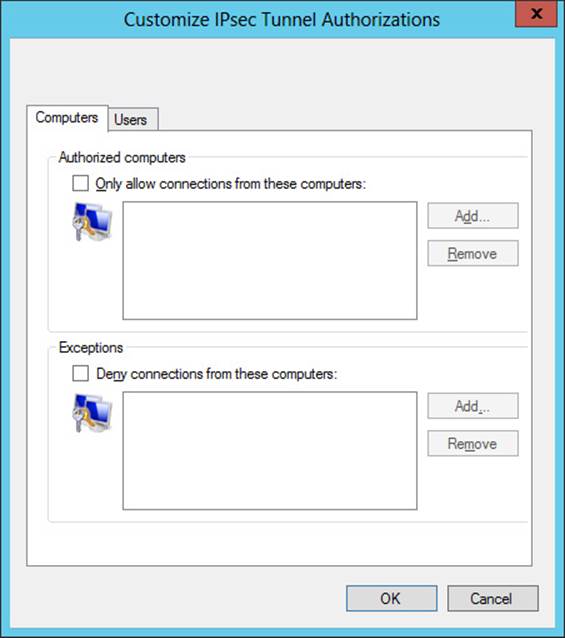
FIGURE 11-19 Configure IPsec tunnel authorizations.
You can also specify exceptions for each of the preceding settings.
Configuring IPsec settings using Windows PowerShell
You can also use Windows PowerShell to configure IPsec settings in the policy store on the local computer, a remote computer, or a GPO. You can do this using the cmdlets from the NetSecurity module of Windows PowerShell.
For example, you can use the Get-NetIPsecMainModeCryptoSet cmdlet to display the main mode cryptographic sets on a computer:
PS C:\> Get-NetIPsecMainModeCryptoSet -PolicyStore ActiveStore
Name : {E5A5D32A-4BCE-4e4d-B07F-4AB1BA7E5FE1}
DisplayName : Service Hardcoded Default Phase1 CryptoSet
Description : Service Hardcoded Default Phase1 CryptoSet
DisplayGroup :
Group :
Proposal : {
0 : Encryption: AES128
: Hash: SHA1
: KeyExchange: DH2
1 : Encryption: DES3
: Hash: SHA1
: KeyExchange: DH2
}
MaxMinutes : 480
MaxSessions : 0
ForceDiffieHellman : False
PrimaryStatus : OK
Status : The rule was parsed successfully from the store. (65536)
EnforcementStatus :
PolicyStoreSource : No Policy Store (Hardcoded)
PolicyStoreSourceType : Hardcoded
Compare the preceding command output to Figure 11-16 earlier in this lesson. To configure the main mode cryptographic sets on the computer, you can use the Set-NetIPsecMainModeCryptoSet cmdlet.
As a second example, you can use the Get-NetIPsecPhase1AuthSet cmdlet to display how first authentication is configured on the computer:
PS C:\> Get-NetIPsecPhase1AuthSet -PolicyStore ActiveStore
Name : {E5A5D32A-4BCE-4e4d-B07F-4AB1BA7E5FE3}
DisplayName : Service Hardcoded Default Phase1 AuthSet
Description : Service Hardcoded Default Phase1 AuthSet
DisplayGroup :
Group :
Proposal : {
0 : MachineKerb
}
PrimaryStatus : OK
Status : The rule was parsed successfully from the store. (65536)
EnforcementStatus :
PolicyStoreSource : No Policy Store (Hardcoded)
PolicyStoreSourceType : Hardcoded
Compare the preceding command output to Figure 11-18 earlier in this lesson. To configure first authentication on the computer, you can use the Set-NetIPsecPhase1AuthSet cmdlet.
![]() Quick check
Quick check
![]() A local computer running Windows Server 2012 R2 is using the 3DES algorithm for data encryption when using IPsec to communicate with a remote computer running an unknown operating system. Why is the local computer not using the more secure AES-CBC 128 algorithm instead?
A local computer running Windows Server 2012 R2 is using the 3DES algorithm for data encryption when using IPsec to communicate with a remote computer running an unknown operating system. Why is the local computer not using the more secure AES-CBC 128 algorithm instead?
Quick check answer
![]() This is probably because the operating system on the remote computer does not support data encryption using the AES-CBC 128 algorithm. By default, Windows Server 2012 R2 starts by attempting to use the Diffie–Hellman Group 2 key-exchange algorithm to negotiate using SHA-1 for data integrity and AES-CBC 128 for data encryption. If that fails, it attempts to use DH Group 2 to negotiate using SHA-1 for data integrity and 3DES for data encryption.
This is probably because the operating system on the remote computer does not support data encryption using the AES-CBC 128 algorithm. By default, Windows Server 2012 R2 starts by attempting to use the Diffie–Hellman Group 2 key-exchange algorithm to negotiate using SHA-1 for data integrity and AES-CBC 128 for data encryption. If that fails, it attempts to use DH Group 2 to negotiate using SHA-1 for data integrity and 3DES for data encryption.
Configuring connection security rules
After you configure the IPsec defaults for the computer, you can create connection security rules. As explained at the start of this lesson, a connection security rule is a set of criteria that specifies how IPsec will be used to secure traffic between the local computer and other computers on the network. You can use connection security rules to specify whether a network connection between two computers must be authenticated before data can be exchanged between them and to make sure any data exchanged between the computers is encrypted to protect against eavesdropping or modification.
Types of connection security rules
You can create connection security rules by using the New Connection Security Rule Wizard. As Figure 11-20 shows, Windows Firewall with Advanced Security supports five types of connection security rules:
![]() Isolation You can use this type of connection security rule to isolate computers from other computers. For example, you can use isolation rules to protect computers that are joined to your domain from computers that are outside your domain.
Isolation You can use this type of connection security rule to isolate computers from other computers. For example, you can use isolation rules to protect computers that are joined to your domain from computers that are outside your domain.
![]() Authentication Exemption You can use this type of connection security rule to specify computers that should be exempted from being required to authenticate, regardless of any other connection security rules that have been configured. For example, you can use authentication exemption rules to allow access to domain controllers and other infrastructure servers with which the computer needs to communicate before authentication can be performed.
Authentication Exemption You can use this type of connection security rule to specify computers that should be exempted from being required to authenticate, regardless of any other connection security rules that have been configured. For example, you can use authentication exemption rules to allow access to domain controllers and other infrastructure servers with which the computer needs to communicate before authentication can be performed.
![]() Server-To-Server You can use this type of connection security rule to protect communications between two computers, two groups of computers, two subnets, or some combination of these, such as between a computer and a subnet. For example, you can use server-to-server rules to protect communications between a database server and a front-end web server.
Server-To-Server You can use this type of connection security rule to protect communications between two computers, two groups of computers, two subnets, or some combination of these, such as between a computer and a subnet. For example, you can use server-to-server rules to protect communications between a database server and a front-end web server.
![]() Tunnel You can use this type of connection security rule to protect communications between two computers using IPsec tunnel mode instead of IPsec transport mode. For example, you can use tunnel rules to specify a gateway computer that routes traffic to a private network.
Tunnel You can use this type of connection security rule to protect communications between two computers using IPsec tunnel mode instead of IPsec transport mode. For example, you can use tunnel rules to specify a gateway computer that routes traffic to a private network.
![]() Custom You can use this type of connection security rule to configure custom rules using criteria from other rule types except tunnel rules.
Custom You can use this type of connection security rule to configure custom rules using criteria from other rule types except tunnel rules.
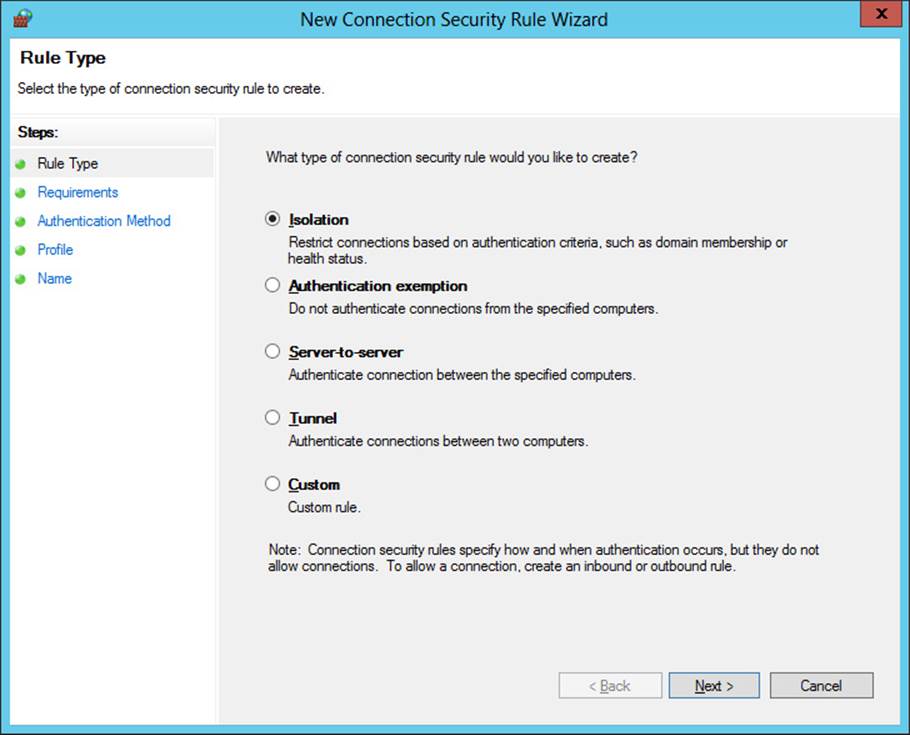
FIGURE 11-20 Windows Firewall with Advanced Security supports five types of connection security rules.
To create new connection security rules using the New Connection Security Rule Wizard, right-click the Connection Security Rules node in the Windows Firewall with Advanced Security snap-in, select New Rule, and follow the steps of the wizard. The sections that follow explain in more detail the steps involved in creating each of these different types of connection security rules.
Creating an isolation rule
You can take the following steps to create a new isolation rule using the Windows Firewall with Advanced Security snap-in:
1. Launch the New Connection Security Rule Wizard and choose Isolation on the Rule Type page.
2. On the Requirements page, specify whether to request or require authentication for inbound connections, outbound connections, or both by selecting one of the following options:
![]() Request Authentication For Inbound And Outbound Connections This option is typically used in low-security environments or those in which computers are unable to use the IPsec authentication methods available with Windows Firewall with Advanced Security. You can also use it for computers in the boundary zone in a server and in a domain isolation scenario.
Request Authentication For Inbound And Outbound Connections This option is typically used in low-security environments or those in which computers are unable to use the IPsec authentication methods available with Windows Firewall with Advanced Security. You can also use it for computers in the boundary zone in a server and in a domain isolation scenario.
![]() Require Authentication For Inbound Connections And Request Authentication For Outbound Connections This option is typically used in environments where computers are able to use the IPsec authentication methods available with Windows Firewall with Advanced Security. You can also use it for computers in the main isolation zone in a server and in a domain isolation scenario.
Require Authentication For Inbound Connections And Request Authentication For Outbound Connections This option is typically used in environments where computers are able to use the IPsec authentication methods available with Windows Firewall with Advanced Security. You can also use it for computers in the main isolation zone in a server and in a domain isolation scenario.
![]() Require Authentication For Inbound And Outbound Connections This option is typically used in environments where network traffic must be controlled and secured. You can also use it for computers in the main isolation zone in a server and in a domain isolation scenario.
Require Authentication For Inbound And Outbound Connections This option is typically used in environments where network traffic must be controlled and secured. You can also use it for computers in the main isolation zone in a server and in a domain isolation scenario.
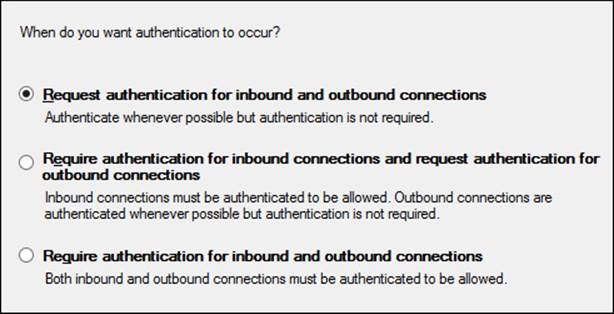
3. On the Authentication Method page, specify whether to use the default authentication method or to specify a different method or list of methods:
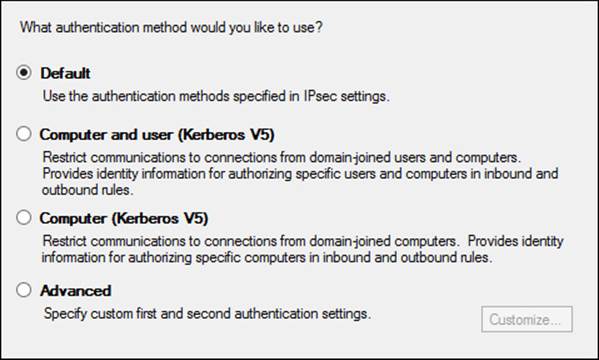
4. On the Profile page, select the firewall profiles to which the new rule should apply. By default, new connection security rules apply to all three profiles (domain, private, and public).
5. On the Name page, specify a name and optional description for the new rule.
Note: Enabled by default
When you create a new connection security rule using the New Connection Security Rule Wizard, the new rule is automatically enabled by default.
Creating an authentication exemption rule
You can take the following steps to create a new authentication exemption rule using the Windows Firewall with Advanced Security snap-in:
1. Launch the New Connection Security Rule Wizard and select Authentication Exemption on the Rule Type page.
2. On the Exempt Computers page, specify the computers to which the exemption should apply:
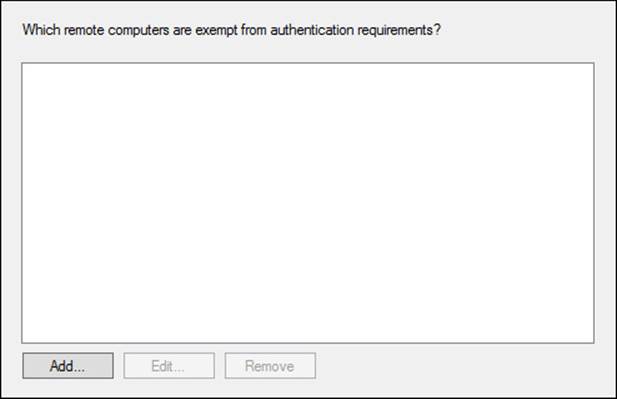
By clicking Add on this page, you can specify exempted computers by the following characteristics:
![]() An IP address (IPv4 or IPv6)
An IP address (IPv4 or IPv6)
![]() An IP subnet (IPv4 or IPv6)
An IP subnet (IPv4 or IPv6)
![]() A range of IP addresses (IPv4 or IPv6)
A range of IP addresses (IPv4 or IPv6)
![]() A predefined set of computers such as DHCP servers, DNS servers, computers on the local subnet, and so on
A predefined set of computers such as DHCP servers, DNS servers, computers on the local subnet, and so on
3. The options on the Profile and Name pages are the same as those described in the previous section.
Creating a server-to-server rule
You can take the following steps to create a new server-to-server rule using the Windows Firewall with Advanced Security snap-in:
1. Launch the New Connection Security Rule Wizard and select Server-To-Server on the Rule Type page.
2. On the Endpoints page, specify an IP address or range of addresses for each of the two endpoints in the secured connection:
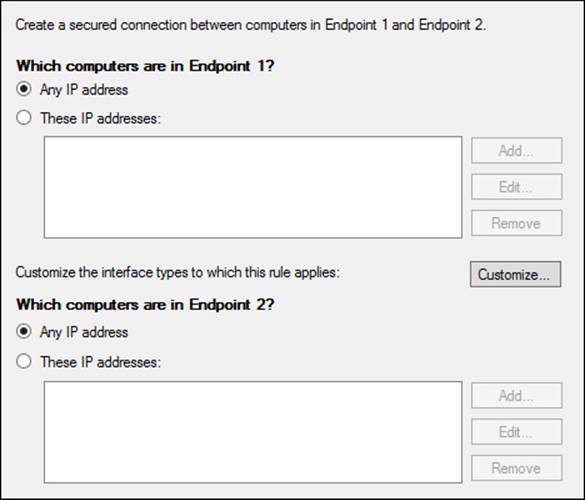
3. On the Requirements page, specify whether to request or require authentication for inbound connections, outbound connections, or both by selecting one of the same three options described earlier for isolation rules.
4. On the Authentication Method page, specify whether to use a computer certificate as the authentication method or specify a custom list of first and second authentication methods. If you choose to use a computer certificate as the authentication method, there are some additional settings you can configure.
5. The options on the Profile and Name pages are the same as those described in the previous section.
Creating a tunnel rule
You can take the following steps to create a new tunnel rule using the Windows Firewall with Advanced Security snap-in:
1. Launch the New Connection Security Rule Wizard and select Tunnel on the Rule Type page.
2. On the Tunnel Type page, specify the type of tunnel you want to create as indicated by the options shown here:
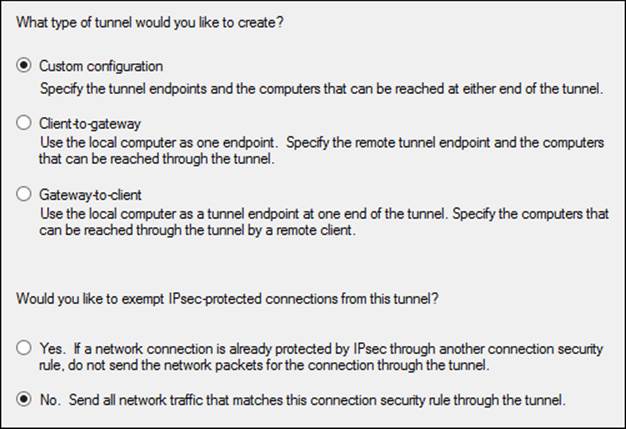
3. On the Requirements page, choose one of the available authentication options. Depending on which tunnel type you specified on the previous wizard page, these options might include the following:
![]() Require Authentication For Inbound And Outbound Connections This option is typically used in environments where network traffic must be controlled and secured.
Require Authentication For Inbound And Outbound Connections This option is typically used in environments where network traffic must be controlled and secured.
![]() Request Authentication For Inbound And Outbound Connections This option is typically used in low-security environments or those in which computers are unable to use the IPsec authentication methods available with Windows Firewall with Advanced Security.
Request Authentication For Inbound And Outbound Connections This option is typically used in low-security environments or those in which computers are unable to use the IPsec authentication methods available with Windows Firewall with Advanced Security.
![]() Require Authentication For Inbound Connections. Do Not Establish Tunnels For Outbound Connections This option is typically used on a computer that serves as a tunnel endpoint for remote clients. The rule is used to indicate that the tunnel applies only to inbound network traffic from the clients.
Require Authentication For Inbound Connections. Do Not Establish Tunnels For Outbound Connections This option is typically used on a computer that serves as a tunnel endpoint for remote clients. The rule is used to indicate that the tunnel applies only to inbound network traffic from the clients.
![]() Do Not Authenticate This option is typically used to create an authentication exemption for connections to computers that do not require IPsec protection.
Do Not Authenticate This option is typically used to create an authentication exemption for connections to computers that do not require IPsec protection.
4. On the Tunnel Endpoints page, specify the IP addresses of the endpoints for the tunnel connection. The options available on this page will depend on which option you selected on the Tunnel Type page.
5. The options on the Authentication Method, Profile, and Name pages are the same as those described in the previous section.
Creating a custom rule
Creating a custom rule involves configuring options on the Endpoints, Requirements, Authentication Method, Protocols And Ports, Profile, and Name pages. The only new page here is the Protocol And Ports page shown in Figure 11-21. You can use this page to specify which protocol and which port or ports specified in a network packet match this connection security rule. Once you have done this, only network traffic that matches the criteria on this page and the Endpoints page matches the rule and will be subject to its authentication requirements.
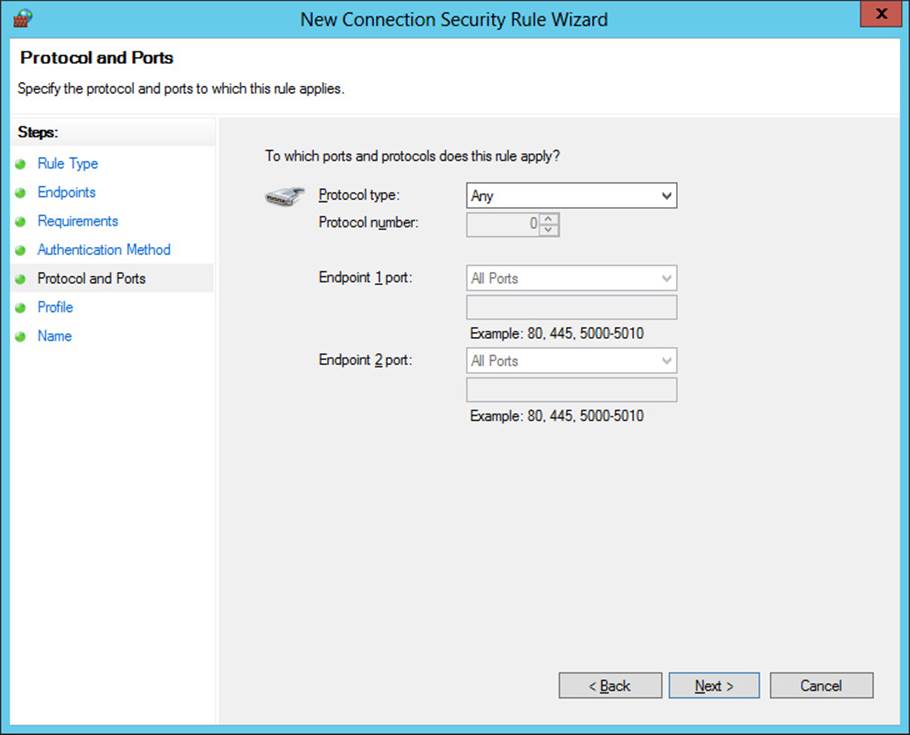
FIGURE 11-21 Configure protocols and ports for a custom connection security rule.
Creating connection security rules using Windows PowerShell
You can also use Windows PowerShell to view, create, configure, and remove connection security rules in the policy store on the local computer, a remote computer, or a GPO. You can do this using the cmdlets from the NetSecurity module of Windows PowerShell.
For example, you can use the New-NetIPsecRule cmdlet to create a new server isolation rule in the persistent store on the local machine that requires both inbound and outbound authentication:
PS C:\> New-NetIPsecRule -DisplayName "Server Isolation Rule" `
-InboundSecurity Require -OutboundSecurity Require
IPsecRuleName : {8215b76f-e6f2-42da-a8b9-1f8416b9a358}
DisplayName : Server Isolation Rule
Description :
DisplayGroup :
Group :
Enabled : True
Profile : Any
Platform : {}
Mode : Transport
InboundSecurity : Require
OutboundSecurity : Require
QuickModeCryptoSet : Default
Phase1AuthSet : Default
Phase2AuthSet : Default
KeyModule : Default
AllowWatchKey : False
AllowSetKey : False
LocalTunnelEndpoint :
RemoteTunnelEndpoint :
RemoteTunnelHostname :
ForwardPathLifetime : 0
EncryptedTunnelBypass : False
RequireAuthorization : False
User : Any
Machine : Any
PrimaryStatus : OK
Status : The rule was parsed successfully from the store. (65536)
EnforcementStatus : NotApplicable
PolicyStoreSource : PersistentStore
PolicyStoreSourceType : Local
If you open the Windows Firewall with Advanced Security snap-in at this point and select the Connection Security Rules node, you will see the new rule that you created.
You can also use the Get-NetIPsecRule cmdlet to view connection security rules, Set-NetIPsecRule to modify them, or Remove-NetIPsecRule to delete them. For more help concerning any of these cmdlets, use the Get-Help cmdlet.
Configuring authenticated bypass
In Lesson 2 of this chapter, you learned how to create firewall rules using the New Inbound (or Outbound) Rule Wizard, which you can launch from the Windows Firewall with Advanced Security snap-in. One of the configuration options in that wizard was deferred until later because it has to do with how firewall rules interact with IPsec. That setting is the Allow The Connection If It Is Secure option on the Action page. (See Figure 11-22.)
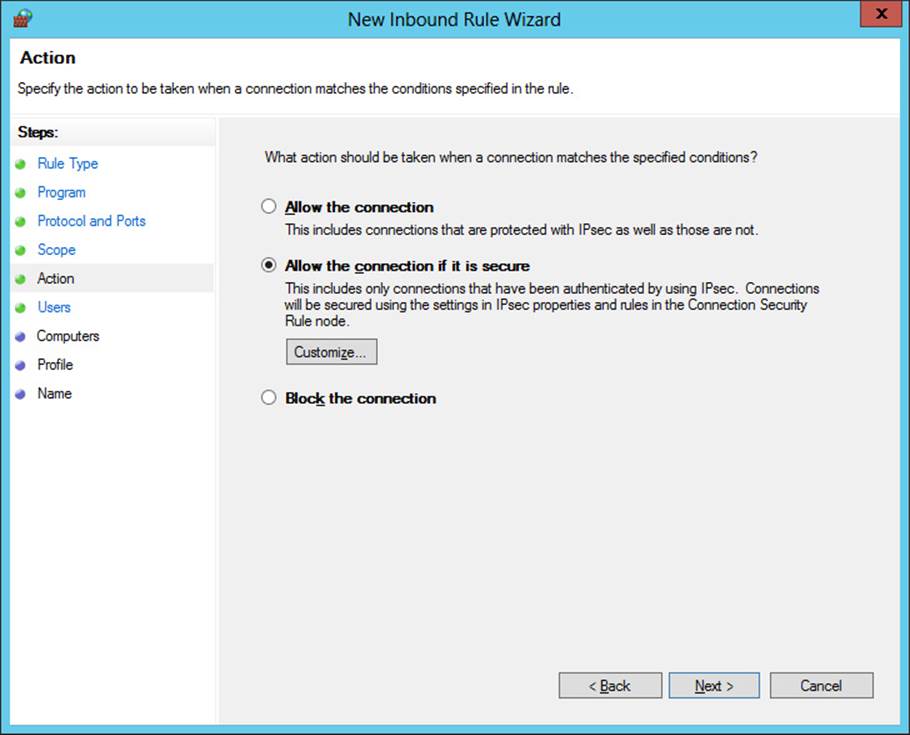
FIGURE 11-22 Configure a new firewall rule to allow only connections that are protected by IPsec.
Selecting this option specifies that only connections protected by IPsec will be allowed by the new firewall rule. Such IPsec protection is implemented separately using connection security rules.
As Figure 11-22 shows, selecting the Allow The Connection If It Is Secure option also adds two new wizard pages named Users and Computers to the New Inbound (or Outbound) Rule Wizard. You can use these two new pages to specify trusted users, computers, or both that are allowed to connect to the local computer.
The default behavior of a firewall rule that has the Allow The Connection If It Is Secure option selected is for network traffic matching the firewall rule to be allowed if the traffic is both authenticated and integrity-protected by IPsec. This default option is supported on computers running Windows Vista, Windows Server 2008, or later.
By clicking Customize on the Action page, you can change this behavior by selecting a different option on the Customize Allow If Secure Settings dialog box shown in Figure 11-23. Specifically, you can select from the following options:
![]() Require The Connections To Be Encrypted Choosing this option adds the requirement of data encryption to the default requirements of authentication and data integrity. If you are creating an inbound rule, you can also select Allow The Computers To Dynamically Negotiate Encryption to allow the network connection to send and receive unencrypted traffic while an IPsec encryption algorithm is being negotiated after IPsec authentication has been achieved.
Require The Connections To Be Encrypted Choosing this option adds the requirement of data encryption to the default requirements of authentication and data integrity. If you are creating an inbound rule, you can also select Allow The Computers To Dynamically Negotiate Encryption to allow the network connection to send and receive unencrypted traffic while an IPsec encryption algorithm is being negotiated after IPsec authentication has been achieved.
![]() Allow The Connection To Use Null Encapsulation Choosing this option requires that matching network traffic use IPsec authentication, but it does not require either integrity or encryption protection. You should select this option only if you have network equipment or software that is not compatible with either the ESP or AH integrity protocols.
Allow The Connection To Use Null Encapsulation Choosing this option requires that matching network traffic use IPsec authentication, but it does not require either integrity or encryption protection. You should select this option only if you have network equipment or software that is not compatible with either the ESP or AH integrity protocols.
![]() Override Block Rules Choosing this option allows matching network traffic to override any firewall rules that would block such traffic. In general, firewall rules that explicitly block a connection take priority over firewall rules that explicitly allow the connection. But if you select the Override Block Rules option, the connection will be allowed even if a different rule is configured to block it.
Override Block Rules Choosing this option allows matching network traffic to override any firewall rules that would block such traffic. In general, firewall rules that explicitly block a connection take priority over firewall rules that explicitly allow the connection. But if you select the Override Block Rules option, the connection will be allowed even if a different rule is configured to block it.
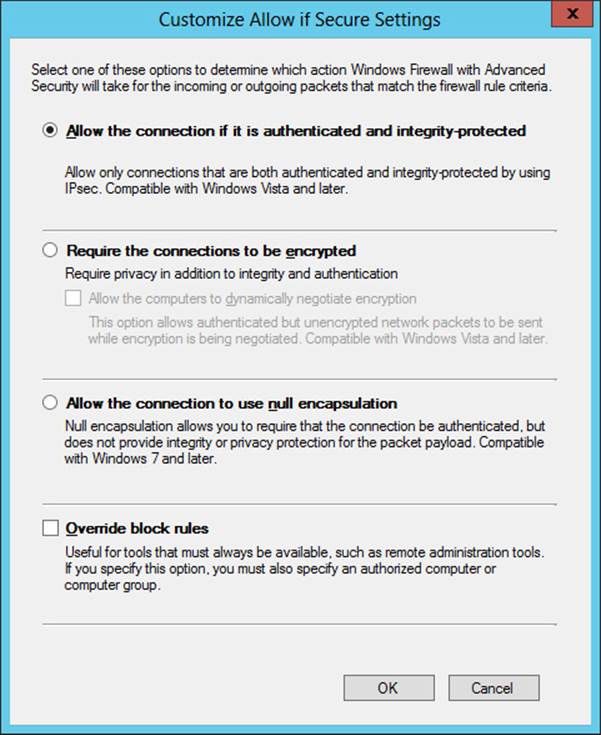
FIGURE 11-23 Configure the behavior of a firewall rule that has the Allow The Connection If It Is Secure option selected.
Important: Security warning
If you select the Allow The Computers To Dynamically Negotiate Encryption check box shown in Figure 11-23, network traffic will be sent in clear text while an encryption algorithm is being negotiated.
Selecting the Override Block Rules option when creating a new firewall rule is called authenticated bypass because it means that matching network traffic is allowed because it has been authenticated as coming from an authorized and trusted user or computer. As Figure 11-24 shows, you must specify at least one trusted computer when configuring authenticated bypass for a firewall rule.

FIGURE 11-24 Configure trusted computers for an authenticated bypass firewall rule.
Note: Cannot override blocking all connections
If you configured Windows Firewall with Advanced Security to block all connections, the Override Block Rules option will not override such behavior.
Monitoring IPsec
After you create and configure connection security rules, you can use both the Windows Firewall with Advanced Security snap-in and Windows PowerShell to monitor IPsec communications between the local computer and other computers on the network.
As Figure 11-25 shows, you can select the Connection Security Rules node under the Monitoring node to view all active connection security rules configured on the computer. This includes rules created manually on the computer and rules configured by Group Policy targeting the computer. To view more information about any rule, right-click the rule and select Properties.
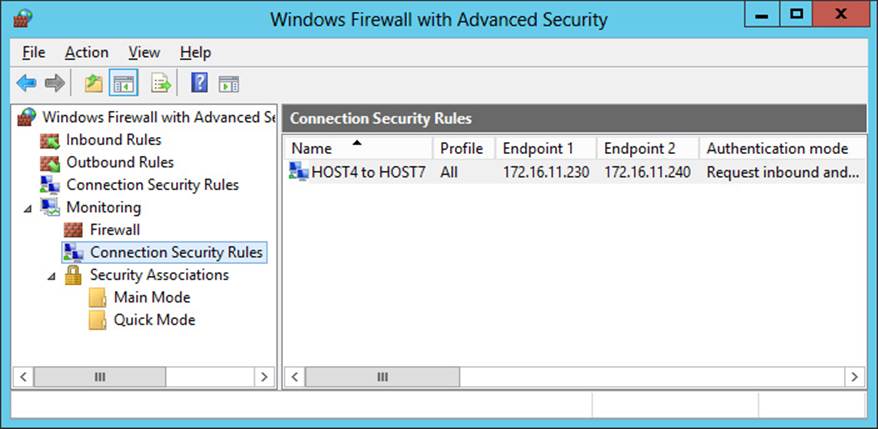
FIGURE 11-25 View active connection security rules on the computer.
As Figure 11-26 shows, you can select the Main Mode node under the Connection Security Rules node to view all active main mode SAs and their endpoints, authentication methods, and other properties.
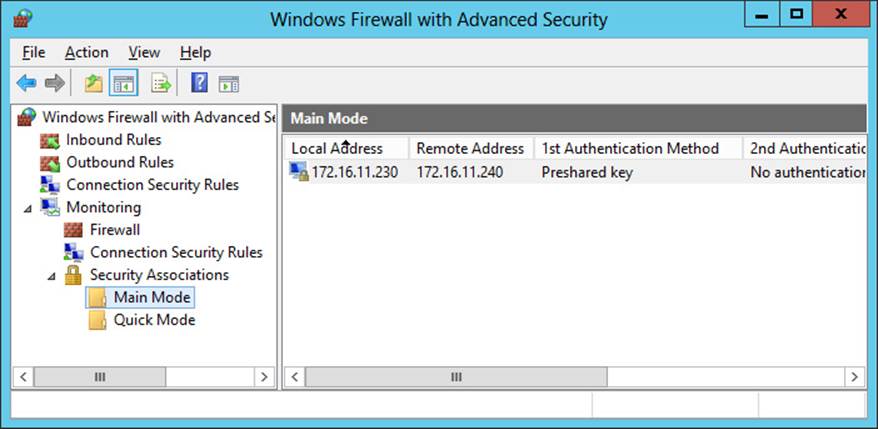
FIGURE 11-26 View active main mode SAs on the computer.
As Figure 11-27 shows, you can select the Quick Mode node under the Connection Security Rules node to view all active quick mode SAs and their endpoints, ports, protocols, and other properties.
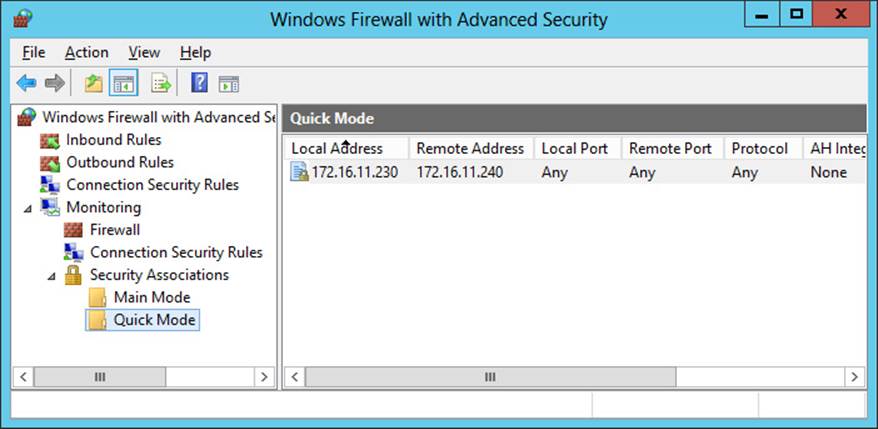
FIGURE 11-27 View active quick mode SAs on the computer.
You can also use Windows PowerShell to view active SAs on the local computer or a remote computer. For example, you can use the Get-NetIPsecMainModeSA cmdlet to view a list of active main mode SAs for the local computer as follows:
PS C:\> Get-NetIPsecMainModeSA
Name : 246
LocalEndpoint : 172.16.11.230
RemoteEndpoint : 172.16.11.240
LocalFirstId.Identity :
LocalFirstId.ImpersonationType : None
LocalFirstId.AuthenticationMethod : PresharedKey
LocalFirstId.Flags : None
RemoteFirstId.Identity :
RemoteFirstId.ImpersonationType : None
RemoteFirstId.AuthenticationMethod : PresharedKey
RemoteFirstId.Flags : None
LocalSecondId.Identity :
LocalSecondId.ImpersonationType :
LocalSecondId.AuthenticationMethod :
LocalSecondId.Flags :
RemoteSecondId.Identity :
RemoteSecondId.ImpersonationType :
RemoteSecondId.AuthenticationMethod :
RemoteSecondId.Flags :
CipherAlgorithm : AES128
HashAlgorithm : SHA1
GroupId : DH2
KeyModule : IkeV1
MaxQMSAs : 0
LifetimeSeconds : 28800
LocalUdpEncapsulationPort :
RemoteUdpEncapsulationPort :
ExtendedFilterId : 0
As a second example, you can use the Get-NetIPsecQuickModeSA cmdlet to view a list of active quick mode SAs for the local computer like this:
PS C:\> Get-NetIPsecQuickModeSA
Name : 1
LocalEndpoint : 172.16.11.230
RemoteEndpoint : 172.16.11.240
TransportLayerFilterName : HOST4 to HOST7
EncapsulationMode : Transport
Direction : Inbound
LocalPort : 0
RemotePort : 0
IpProtocol : 0
InterfaceAlias : vEthernet (CONTOSO Virtual Switch)
RealIfProfileId : 3
LocalUdpEncapsulationPort :
RemoteUdpEncapsulationPort :
SPI : 1339644182
FirstTransformType : EspAuth
FirstIntegrityAlgorithm : SHA1
FirstCipherAlgorithm : None
SecondSpi :
SecondTransformType : None
SecondIntegrityAlgorithm : None
SecondCipherAlgorithm : None
Flags : NdBoundary, NoExplicitCredMatch, AllowNullTargetNameMatch,
NdPeerBoundary, PeerSupportsGuaranteeEncryption
MmSaId : 246
PfsGroupId : None
PeerV4PrivateAddress : 0.0.0.0
QuickModeFilterid : 76478
LifetimeSeconds : 3600
LifetimeKilobytes : 100000
LifetimePackets : 2147483647
IdleDurationSeconds : 300
NdAllowClearTimeoutSeconds : 10
NapContext : 0
QmSaId : 2592036190
VirtualIfTunnelId : 0
TrafficSelectorId : 0
MmTargetName :
EmTargetName :
ExplicitCredentials :
Name : 1
LocalEndpoint : 172.16.11.230
RemoteEndpoint : 172.16.11.240
TransportLayerFilterName : HOST4 to HOST7
EncapsulationMode : Transport
Direction : Outbound
LocalPort : 0
RemotePort : 0
IpProtocol : 0
InterfaceAlias : vEthernet (CONTOSO Virtual Switch)
RealIfProfileId : 3
LocalUdpEncapsulationPort :
RemoteUdpEncapsulationPort :
SPI : 928181826
FirstTransformType : EspAuth
FirstIntegrityAlgorithm : SHA1
FirstCipherAlgorithm : None
SecondSpi :
SecondTransformType : None
SecondIntegrityAlgorithm : None
SecondCipherAlgorithm : None
Flags : NdBoundary, NoExplicitCredMatch, AllowNullTargetNameMatch,
NdPeerBoundary, PeerSupportsGuaranteeEncryption
MmSaId : 246
PfsGroupId : None
PeerV4PrivateAddress : 0.0.0.0
QuickModeFilterid : 76478
LifetimeSeconds : 3600
LifetimeKilobytes : 100000
LifetimePackets : 2147483647
IdleDurationSeconds : 300
NdAllowClearTimeoutSeconds : 10
NapContext : 0
QmSaId : 2592036190
VirtualIfTunnelId : 0
TrafficSelectorId : 0
MmTargetName :
EmTargetName :
ExplicitCredentials :
Real World: Connection security operational logs
Another useful source for viewing information about IPsec policy changes for Windows Firewall with Advanced Security is the operational log found in Event Viewer:
Applications and Services Logs/Microsoft/Windows/Windows Firewall with
Advanced Security/ConnectionSecurity
You can also enable the ConnectionSecurityVerbose operational log if you need more detailed information about IPsec policy events.
Lesson summary
![]() IPsec involves a number of different concepts, mechanisms, and technologies that you should understand before you attempt to implement it in your production environment.
IPsec involves a number of different concepts, mechanisms, and technologies that you should understand before you attempt to implement it in your production environment.
![]() IPsec can provide authentication, data integrity, data encryption, or any combination of the three to protect network traffic.
IPsec can provide authentication, data integrity, data encryption, or any combination of the three to protect network traffic.
![]() You can configure IPsec settings on a computer by using the Windows Firewall with Advanced Security snap-in, Group Policy, or Windows PowerShell.
You can configure IPsec settings on a computer by using the Windows Firewall with Advanced Security snap-in, Group Policy, or Windows PowerShell.
![]() Connection security rules can be of the isolation, authentication exemption, server-to-server, tunnel, or custom type.
Connection security rules can be of the isolation, authentication exemption, server-to-server, tunnel, or custom type.
![]() You can create and manage connection security rules using the Windows Firewall with Advanced Security snap-in, Group Policy, or Windows PowerShell.
You can create and manage connection security rules using the Windows Firewall with Advanced Security snap-in, Group Policy, or Windows PowerShell.
![]() Authenticated bypass allows matching network traffic that has been authenticated as coming from an authorized and trusted user or computer.
Authenticated bypass allows matching network traffic that has been authenticated as coming from an authorized and trusted user or computer.
![]() You can monitor main mode and quick mode security associations by using the Windows Firewall with Advanced Security snap-in or Windows PowerShell.
You can monitor main mode and quick mode security associations by using the Windows Firewall with Advanced Security snap-in or Windows PowerShell.
Lesson review
Answer the following questions to test your knowledge of the information in this lesson. You can find the answers to these questions and explanations of why each answer choice is correct or incorrect in the “Answers” section at the end of this chapter.
1. Diffie–Hellman Group 14 is an example of what?
A. An IPsec authentication method
B. An IPsec data-integrity algorithm
C. An IPsec data-encryption algorithm
D. An IPsec key-exchange algorithm
2. You want to use IPsec to protect communications between a server and computers on a specific subnet of your network. Which type of connection security rule can you create to do this? (Choose all that apply.)
A. Isolation rule
B. Authentication exemption rule
C. Server-to-server rule
D. Custom rule
3. When creating connection security rules, which authentication option would you typically use in an environment that includes computers unable to use the IPsec authentication methods available with Windows Firewall with Advanced Security?
A. Request Authentication For Inbound And Outbound Connections
B. Require Authentication For Inbound Connections And Request Authentication For Outbound Connections
C. Require Authentication For Inbound And Outbound Connections
D. Do Not Authenticate
Practice exercises
The goal of this section is to provide you with hands-on practice with the following:
![]() Configuring firewall rules
Configuring firewall rules
![]() Implementing IPsec
Implementing IPsec
To perform the following exercises, you need at least two domain-joined installations of Windows Server 2012 R2 using the Server With A GUI installation option. For example, one of the servers could be a domain controller in the corp.fabrikam.com domain and the other server could be a member server in the same domain. The servers can be either physical servers or virtual machines. You should be logged on to each server using a user account that is a member of the Domain Admins group. For the purposes of these exercises, the names of the servers are assumed to be HOST4 and HOST7 and their IP addresses are, respectively, 172.16.11.230 and 172.16.11.240. If your servers have different names or IP addresses, you should modify the steps in these exercises accordingly.
Exercise 1: Configuring firewall rules
In this exercise, you create and configure firewall rules and examine what happens when firewall rules conflict with one another.
1. Log on to HOST4 and use Server Manager to install the Web Server (IIS) role on the computer.
2. Use the Local Server page of Server Manager to turn off the IE Enhanced Security Configuration for Administrators.
3. Launch Internet Explorer and verify that you can open the default IIS8 home page of the Default Web Site on the local computer by typing http://localhost into the address bar.
4. Log on to HOST7 and use the Local Server page of Server Manager to turn off the IE Enhanced Security Configuration for Administrators.
5. Launch Internet Explorer and verify that you can open the default IIS8 home page of the Default Web Site on HOST4 by typing http:// followed by the host’s IP address (for example http://172.16.11.230) into the address bar.
6. Open the Windows Firewall with Advanced Security snap-in from the Tools menu of Server Manager, right-click the root node, and select Properties.
7. Configure the settings on the Domain Profile tab so that the default firewall rule for outbound connections is to block traffic. Then click Apply.
8. Delete the browsing history in Internet Explorer, making sure to deselect the Preserve Favorites Website Data option, and then press F5 to attempt to open the site http://172.16.11.230 again.
Question: Why can’t the site be displayed?
Answer: The default rule is applied last when firewall rules are processed. Because the default outbound rule is Block, access to the site is blocked.
9. Change the settings on the Domain Profile tab so that the default firewall rule for outbound connections is to allow traffic. Then click OK.
10. Press F5 in Internet Explorer to verify that you can open the Default Web Site on HOST4.
11. Right-click the Outbound Rules node in the Windows Firewall with Advanced Security snap-in and select New Rule to launch the New Outbound Rule Wizard.
12. On the Rule Type page, select Port.
13. On the Protocols And Ports page, select TCP, select Specific Remote Ports, and type 80 in the text box.
14. On the Action page, leave Block The Connection selected.
15. Accept the default settings on the Profile page.
16. Type Block TCP port 80 on the Name page and click Finish to create the new firewall rule.
17. Delete the browsing history in Internet Explorer, making sure to deselect the Preserve Favorites Website Data option, and then press F5 to attempt to open the Default Web Site on HOST4 again.
Question: Why can’t the site be displayed?
Answer: An explicit outbound port rule blocks the HTTP request from accessing the site on TCP port 80.
18. Select the Inbound Rules node, right-click the rule named Block TCP port 80, and select Disable Rule.
19. Press F5 in Internet Explorer to verify that you can open the Default Web Site on HOST4.
Question: Why is the site now displayed?
Answer: The outbound port rule to block TCP port 80 has been disabled, and the default outbound rule is to allow outgoing traffic.
20. Right-click the Outbound Rules node in the Windows Firewall with Advanced Security snap-in and select New Rule to launch the New Outbound Rule Wizard again.
21. On the Rule Type page, select Program.
22. On the Program page, select TCP, select This Program Path, and browse to select the following executable:
C:\ProgramFiles (x86)\Internet Explorer\iexplore.exe
23. On the Action page, leave Block The Connection selected.
24. Accept the default settings on the Profile page.
25. Type Block Internet Explorer on the Name page and click Finish to create the new firewall rule.
26. Delete the browsing history in Internet Explorer, making sure to deselect the Preserve Favorites Website Data option, and then press F5 to attempt to open the Default Web Site on HOST4.
Question: Why can’t the site be displayed?
Answer: An explicit outbound program rule blocks the HTTP request from accessing the site on TCP port 80.
27. Select the Inbound Rules node, right-click the rule named Block Internet Explorer, and select Disable Rule.
28. Right-click the rule named Block TCP port 80 and select Enable Rule.
29. Delete the browsing history in Internet Explorer, making sure to deselect the Preserve Favorites Website Data option, and then press F5 to attempt to open the Default Web Site on HOST4 again. You should not be able to access the site because of the outbound rule that blocks access to TCP port 80.
30. At this point, you should continue directly to practice exercise 2.
Exercise 2: Implementing IPsec
In this exercise, you create connection security rules to implement IPsec communications between HOST4 and HOST7.
1. Switch to HOST4 and open the Windows Firewall with Advanced Security snap-in.
2. Right-click the Connection Security Rules node beneath the root node and select New Rule to open the New Connection Security Rule Wizard.
3. On the Rule Type page, select Server-To-Server.
4. On the Endpoints page, in the Which Computers Are In Endpoint 1? section, select These IP Addresses. Then click Add, type the IIP address for HOST4, and click OK.
5. On the same page, in the Which Computers Are In Endpoint 2? section, select These IP Addresses. Then click Add, type the IP address for HOST7, and click OK.
6. On the Requirements page, leave Request Authentication For Inbound And Outbound Connections selected.
7. On the Authentication Method page, select Advanced and click Customized to open the Customize Advanced Authentication Methods dialog box.
8. In the First Authentication Methods section, click Add, select Preshared Key (Not Recommended), type mytestkey, and click OK twice. Click Next.
9. Accept the default settings on the Profile page and click Next.
10. Type HOST4 to HOST7 on the Name page and click Finish to create the new connection security rule.
11. Select the Connection Security Rules node under the Monitoring node, and verify that the new connection security rule is active (listed).
12. Open a Windows PowerShell prompt and ping HOST7 to attempt to establish IPsec communications between HOST4 and HOST7.
13. Switch to the Windows Firewall with Advanced Security snap-in and select the Main Mode node under the Connection Security Rules node.
Question: Why hasn’t a main mode SA been established yet between HOST4 and HOST7?
Answer: Connection security rules must be configured on both computers before IPsec communications can be established between them.
14. Switch to HOST7 and open the Windows Firewall with Advanced Security snap-in.
15. Right-click the Connection Security Rules node beneath the root node and select New Rule to open the New Connection Security Rule Wizard.
16. On the Rule Type page, select Server-To-Server.
17. On the Endpoints page, in the Which Computers Are In Endpoint 1? section, select These IP Addresses. Then click Add, type the IP address for HOST7, and click OK.
18. On the same page, in the Which Computers Are In Endpoint 2? section, select These IP Addresses. Then click Add, type the IP address for HOST4, and click OK.
19. On the Requirements page, leave Request Authentication For Inbound And Outbound Connections selected.
20. On the Authentication Method page, select Advanced and click Customized to open the Customize Advanced Authentication Methods dialog box.
21. In the First Authentication Methods section, click Add, select Preshared Key (Not Recommended), type mytestkey, and click OK twice. Click Next.
22. Accept the default settings on the Profile page and then click Next.
23. Type HOST7 to HOST4 on the Name page and click Finish to create the new connection security rule.
24. Select the Connection Security Rules node under the Monitoring node and verify that the new connection security rule is active (listed).
25. Open a Windows PowerShell prompt and ping HOST4 to attempt to establish IPsec communications between HOST7 and HOST4.
26. Switch to the Windows Firewall with Advanced Security snap-in and select the Main Mode node under the Connection Security Rules node. You should see a main mode SA with HOST7’s IP address as the local address and HOST4’s IP address as the remote address.
27. Right-click the main mode SA and select Properties. Click OK after viewing the properties of the SA.
28. Select the Quick Mode node under the Connection Security Rules node. You should see a quick mode SA with 172.16.11.240 as the local address and 172.16.11.230 as the remote address.
29. Right-click the quick mode SA and select Properties. Click OK after viewing the properties of the SA.
30. Launch Internet Explorer and attempt to open the Default Web Site on HOST4. You should see a message saying that the page can’t be displayed. This is because the outbound firewall rule you created earlier to block TCP port 80 is still in effect on HOST7.
31. Select the Outbound Rules node in the Windows Firewall with Advanced Security snap-in.
32. Right-click the rule named Block TCP Port 80 and select Properties to open the properties for the firewall rule.
33. On the General tab, select Allow The Connection If It Is Secure and then click OK.
34. Press F5 in Internet Explorer to verify that you can open the Default Web Site on HOST4.
Suggested practice exercises
The following additional practice exercises are designed to give you more opportunities to practice what you’ve learned and to help you successfully master the lessons presented in this chapter.
![]() Exercise 1 Redo practice exercise 1 using Windows PowerShell commands instead of using the Windows Firewall with Advanced Security snap-in.
Exercise 1 Redo practice exercise 1 using Windows PowerShell commands instead of using the Windows Firewall with Advanced Security snap-in.
![]() Exercise 2 Redo practice exercise 2 using Windows PowerShell commands instead of using the Windows Firewall with Advanced Security snap-in.
Exercise 2 Redo practice exercise 2 using Windows PowerShell commands instead of using the Windows Firewall with Advanced Security snap-in.
Answers
This section contains the answers to the lesson review questions in this chapter.
Lesson 1
1. Correct answers: B and D
A. Incorrect: Windows Firewall with Advanced Security has three firewall profiles, which correspond to the three network location types on the Windows platform. The domain profile is automatically applied to any network connection that Windows identifies as having a network location type of domain. The private profile is automatically applied to any network connection that Windows identifies as having a network location type of private. The public profile is automatically applied to any network connection that Windows identifies as having a network location type of public.
B. Correct: All three profiles can be active at the same time on a computer if Windows detects that there are network connections of each type present.
C. Incorrect: The Inbound Connections setting lets you configure how Windows Firewall with Advanced Security handles incoming traffic. The default option is Block, which blocks all connections that do not have firewall rules that explicitly allow the connection. The other two options are Block All Connections, which blocks all connections regardless of any firewall rules that explicitly allow the connection, and Allow, which allows the connection unless there is a firewall rule that explicitly blocks the connection.
D. Correct: To display the currently active settings for the domain profile on the local computer, you can use the Get-NetFirewallProfile cmdlet with the –PolicyStore ActiveStore parameter. The active store is policy store that contains the currently active policy, which is the sum of all policy stores that apply to the computer. The persistent store is the policy store that contains the persistent policy for the local computer. This policy is not from GPOs and has been created manually or programmatically (during application installation) on the computer.
2. Correct answer: C
A. Incorrect: Rules that explicitly allow some form of traffic have lower, not higher, priority than rules that explicitly block the same form of traffic. Because rule A is a block rule and rule B is an allow rule, rule A has higher priority than rule B.
B. Incorrect: Rules that explicitly allow some form of traffic have lower, not higher, priority than rules that explicitly block the same form of traffic. Because rule A is a block rule and rule B is an allow rule, rule A has higher priority than rule B.
C. Correct: Rules that explicitly block some form of traffic are applied before rules that explicitly allow the same form of traffic. Because rule A is a block rule and rule B is an allow rule, rule A has higher priority and is applied first. The result is that outbound traffic from the svchost.exe process running on the computer is blocked.
D. Incorrect: When firewall rules are processed by Windows Firewall with Advanced Security, as soon as a packet matches a rule the rule is applied and rules processing stops at that point. Because outbound traffic from the svchost.exe process running on the computer matches rule A, rules processing stops at that point and the outbound default rule is not applied to the traffic.
3. Correct answers: A and D
A. Correct: A program rule specifies how traffic associated with a specific program (executable) running on the local computer should be handled.
B. Incorrect: A port rule specifies how traffic associated with a specific TCP or UDP port or port range on the local computer should be handled.
C. Incorrect: A predefined rule specifies how traffic associated with a specific Windows feature or service running on the local computer should be handled.
D. Correct: A custom rule specifies how traffic should be handled based on any of the traffic-filtering criteria supported by Windows Firewall with Advanced Security. These criteria include being able to specify a program (executable) running on the local computer.
Lesson 2
1. Correct answer: D
A. Incorrect: IPsec authentication methods include computer or user (Kerberos V5), computer or user (NTLMv2), computer or user certificate, computer health certificate, and preshared key.
B. Incorrect: IPsec data-integrity algorithms include MD5, SHA-1, SHA-256, SHA-384, AES-GMAC 128, AES-GMAC 192, AES-GMAC 256, AES-GCM 128, AES-GCM 192, and AES-GCM 256.
C. Incorrect: IPsec data-encryption algorithms include DES, 3DES, AES-CBC 128, AES-CBC 192, AES-CBC 256, AES-GCM 128, AES-GCM 192, and AES-GCM 256.
D. Correct: IPsec key-exchange algorithms include, Diffie–Hellman Group 1, Diffie–Hellman Group 2, Diffie–Hellman Group 14, Diffie–Hellman Group 24, Elliptic Curve Diffie–Hellman P-256, and Elliptic Curve Diffie–Hellman P-384.
2. Correct answers: C and D
A. Incorrect: You can use isolation rules to isolate computers from other computers. For example, you can use isolation rules to protect computers that are joined to your domain from computers that are outside your domain.
B. Incorrect: You can use authentication exemption rules to specify computers that should be exempted from being required to authenticate, regardless of any other connection security rules that have been configured. For example, you can use authentication exemption rules to allow access to domain controllers and other infrastructure servers with which the computer needs to communicate before authentication can be performed.
C. Correct: You can use server-to-server rules to protect communications between two computers, two groups of computers, two subnets, or some combination of these, such as between a computer and a subnet. For example, you can use server-to-server rules to protect communications between a database server and a front-end web server.
D. Correct: You can configure custom rules using criteria from other rule types except tunnel rules. This means you can create a custom rule that has the same effect as a server-to-server rule.
3. Correct answer: A
A. Correct: The Request Authentication For Inbound And Outbound Connections option is typically used in low-security environments or those in which computers are unable to use the IPsec authentication methods available with Windows Firewall with Advanced Security. You can also use it for computers in the boundary zone in a server and in a domain isolation scenario.
B. Incorrect: The Require Authentication For Inbound Connections And Request Authentication For Outbound Connections option is typically used in environments where computers are able use the IPsec authentication methods available with Windows Firewall with Advanced Security. You can also use it for computers in the main isolation zone in a server and in a domain isolation scenario.
C. Incorrect: The Require Authentication For Inbound And Outbound Connections option is typically used in environments where network traffic must be controlled and secured. You can also use it for computers in the main isolation zone in a server and in a domain isolation scenario.
D. Incorrect: The Do Not Authenticate option is typically used to create an authentication exemption for connections to computers that do not require IPsec protection.
All materials on the site are licensed Creative Commons Attribution-Sharealike 3.0 Unported CC BY-SA 3.0 & GNU Free Documentation License (GFDL)
If you are the copyright holder of any material contained on our site and intend to remove it, please contact our site administrator for approval.
© 2016-2026 All site design rights belong to S.Y.A.