Training Guide Installing and Configuring Windows Server 2012 R2 (2014)
Chapter 2. Deploying servers
Whether you administer a small business with a server room in the back office or a data center for a large enterprise, deploying servers is a key part of your job. Although installing a handful of servers can still be done manually, provisioning hundreds or thousands of server workloads in a virtualized data center is an entirely different affair.
Windows Server 2008 introduced the Server Core installation option with a reduced servicing footprint that made it ideal for enterprise deployment, but smaller organizations often chose the GUI option because it was easier to configure after installation. With Windows Server 2012 and later now supporting post-installation conversion between Server Core and GUI, however, Server Core has become the default installation option for organizations of all sizes.
A key step in the process of planning for server provisioning is setting up a build lab where you can build and maintain the reference images you will be deploying in your production environment. In addition to Windows Server 2012 R2, such images can include applications, software updates, and device drivers needed to ensure a successful install. Microsoft provides tools, some of them free, that organizations can use for implementing deployment strategies that meet their needs.
This chapter provides you with the basic knowledge you will need to perform your job by deploying servers running Windows Server 2012 R2 using the tools and best practices Microsoft recommends.
Lessons in this chapter:
![]() Lesson 1: Installation options
Lesson 1: Installation options
![]() Lesson 2: Preparing the build lab
Lesson 2: Preparing the build lab
![]() Lesson 3: Building images
Lesson 3: Building images
![]() Lesson 4: Deploying images
Lesson 4: Deploying images
Before you begin
To complete the practice exercises in this chapter
![]() You need Windows Server 2012 R2 installation media, either in the form of an .iso file (if you will be performing the practice exercises using virtual machines running on a Hyper-V host) or on bootable media (if you will be performing the practice exercises using physical systems).
You need Windows Server 2012 R2 installation media, either in the form of an .iso file (if you will be performing the practice exercises using virtual machines running on a Hyper-V host) or on bootable media (if you will be performing the practice exercises using physical systems).
![]() You should have two server systems available for testing purposes that meet the minimum hardware requirements for installing Windows Server 2012 R2. These server systems should have no operating system installed, and they can be either physical systems or virtual machines running on a Hyper-V host. The network where the servers reside should have Internet connectivity.
You should have two server systems available for testing purposes that meet the minimum hardware requirements for installing Windows Server 2012 R2. These server systems should have no operating system installed, and they can be either physical systems or virtual machines running on a Hyper-V host. The network where the servers reside should have Internet connectivity.
![]() You also should have at least rudimentary knowledge of using Windows PowerShell.
You also should have at least rudimentary knowledge of using Windows PowerShell.
Lesson 1: Installation options
Choosing which installation option to deploy is an important consideration when planning the deployment of your servers. Windows Server 2012 and later include capabilities for post-installation conversion between the Server Core and Server With A GUI installation options. They also include a Minimal Server Interface option that can provide additional benefits in some scenarios. In addition, a capability called Features On Demand enables administrators to completely remove the installation binaries for roles and features that won’t be needed for their servers. This lesson describes these various capabilities and how to perform the conversion task.
After this lesson, you will be able to:
![]() Understand the different installation options and their possible benefits.
Understand the different installation options and their possible benefits.
![]() Understand the Minimal Server Interface option.
Understand the Minimal Server Interface option.
![]() Use Server Manager or Windows PowerShell to convert between installation options on a running Windows Server 2012 installation.
Use Server Manager or Windows PowerShell to convert between installation options on a running Windows Server 2012 installation.
![]() Use Windows PowerShell to convert between installation options on an offline virtual hard disk (VHD) of a virtual machine on which Windows Server 2012 has been installed.
Use Windows PowerShell to convert between installation options on an offline virtual hard disk (VHD) of a virtual machine on which Windows Server 2012 has been installed.
![]() Understand the Features On Demand capability and its possible benefits.
Understand the Features On Demand capability and its possible benefits.
Estimated lesson time: 20 minutes
Understanding installation options
Administrators of smaller Windows Server environments in the past have traditionally relied heavily on GUI-based tools for administering servers because such tools are easy to use. Scripting might occasionally have been used for some repetitive tasks, such as performing a bulk creation of user accounts in Active Directory, but most server management was done through the GUI in one of the following ways:
![]() By logging on interactively to a server’s console
By logging on interactively to a server’s console
![]() By logging on remotely to a server using Remote Desktop Connection (Mstsc.exe)
By logging on remotely to a server using Remote Desktop Connection (Mstsc.exe)
![]() By using the Remote Server Administration Tools (RSAT) installed on a workstation
By using the Remote Server Administration Tools (RSAT) installed on a workstation
With the shift toward centralizing IT infrastructure within data centers and cloud computing, however, most midsized and large organizations now prefer to automate as much Windows Server administration as possible by using scripting. With the enhanced Windows PowerShell support in Windows Server 2012 and later, such automation has become much easier.
Choosing an installation option
The default installation option when you install Windows Server 2012 and later is the Server Core Installation option instead of the Server With A GUI (formerly called Full) option as in previous versions of Windows Server. The reasons for this change are as follows:
![]() Server Core requires less disk space than Server With A GUI, which can be important in data centers that use virtualization to consolidate multiple virtualized server workloads per physical host machine.
Server Core requires less disk space than Server With A GUI, which can be important in data centers that use virtualization to consolidate multiple virtualized server workloads per physical host machine.
![]() Server Core has a smaller attack surface, which makes it more secure for data center and cloud computing.
Server Core has a smaller attack surface, which makes it more secure for data center and cloud computing.
![]() Server Core requires fewer software updates, which means less servicing overhead.
Server Core requires fewer software updates, which means less servicing overhead.
![]() Administrators can switch between different installation options after Windows Server 2012 or later has been deployed, which means you can change your Server Core installations to Server With A GUI installations without having to wipe and reinstall.
Administrators can switch between different installation options after Windows Server 2012 or later has been deployed, which means you can change your Server Core installations to Server With A GUI installations without having to wipe and reinstall.
This means that administrators should always install the Server Core option when deploying Windows Server 2012 or later unless they have a compelling reason to install the Server With A GUI option instead.
Managing servers in small environments
Administrators in small environments that have only a few servers can still take advantage of all the benefits that come from running the Server Core installation even if they don’t feel confident working from the command line. They can do this by following these steps:
1. Install Windows Server 2012 or later on the servers using the Server With A GUI installation option.
2. Perform all initial configuration of the server by using the GUI tools available in this installation option.
3. Use Windows PowerShell as described later in this chapter to convert the Server With A GUI installation to a Server Core installation.
4. Install the Remote Server Administration Tools (RSAT) for Windows 8.1 on a client computer running Windows 8.1 and use these convenient GUI tools for managing servers running Windows Server 2012 or later.
This procedure makes it easy for such administrators to configure their servers while still allowing them to take advantage of the smaller attack surface, servicing overhead, and disk space requirements of the Server Core option.
You can obtain RSAT for Windows 8.1 from the Microsoft Download Center at http://www.microsoft.com/en-us/download/details.aspx?id=39296. Note that the earlier version, RSAT for Windows 8, can only be used to manage servers running Windows Server 2012, not Windows Server 2012 R2. Both of these versions of RSAT have limited functionality for managing Windows Server 2008 R2, Windows Server 2008, and Windows Server 2003. For a detailed compatibility matrix showing which management features these versions of RSAT support, see Microsoft Support article KB 2693643 at http://support.microsoft.com/kb/2693643.
Minimal Server Interface
In addition to the two installation options (Server Core and Server With A GUI) from which you can choose when you deploy Windows Server 2012 and later, there is a third installation option available called the Minimal Server Interface. This installation option can be configured only after deployment by using either Server Manager or Windows PowerShell. It has all the functionality of Server With A GUI except for the following capabilities, which are not included:
![]() User interface (Start screen and desktop)
User interface (Start screen and desktop)
![]() Windows Explorer
Windows Explorer
![]() Internet Explorer
Internet Explorer
![]() Some of the Control Panel utilities
Some of the Control Panel utilities
The Minimal Server Interface installation has a smaller servicing footprint than the Server With A GUI installation, but administrators can still use it to run local GUI management tools for administering a server.
Converting between installation options
You can use either Windows PowerShell or, in some cases, the Server Manager console included in Windows Server 2012 and later to convert between different installation options. For example, to use Server Manager to convert between a Server With A GUI installation and a Minimal Server Interface installation, launch the Remove Roles And Features Wizard and remove the Server Graphical Shell feature, as shown in Figure 2-1.
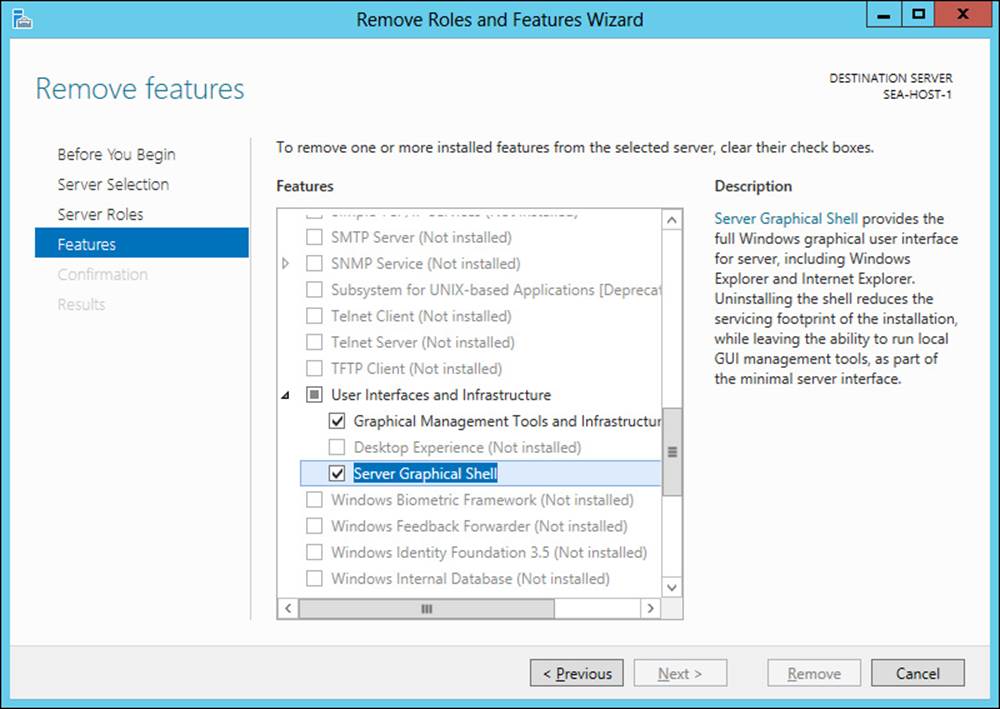
FIGURE 2-1 Convert a Server With A GUI installation to a Minimal Server Interface installation.
As Figure 2-1 shows, Server With A GUI installations of Windows Server 2012 and later have two features installed that are not installed on Server Core installations:
![]() Graphical Management Tools And Infrastructure This feature includes various infrastructure components and components that provide the Minimal Server Interface that supports GUI management tools, such as MMC consoles. It does not include Windows Explorer, Internet Explorer, or the Start screen. The Windows PowerShell name for this feature is Server-Gui-Mgmt-Infra.
Graphical Management Tools And Infrastructure This feature includes various infrastructure components and components that provide the Minimal Server Interface that supports GUI management tools, such as MMC consoles. It does not include Windows Explorer, Internet Explorer, or the Start screen. The Windows PowerShell name for this feature is Server-Gui-Mgmt-Infra.
![]() Server Graphical Shell This feature includes components that provide the full graphical user interface, such as Windows Explorer, Internet Explorer, and the Start screen. The Windows PowerShell name for this feature is Server-Gui-Shell.
Server Graphical Shell This feature includes components that provide the full graphical user interface, such as Windows Explorer, Internet Explorer, and the Start screen. The Windows PowerShell name for this feature is Server-Gui-Shell.
In addition, a feature called Desktop Experience can be installed to provide Windows 8 or later features such as desktop themes, photo management, and Windows Media Player. The Windows PowerShell name for this feature is Desktop-Experience.
Using Windows PowerShell
In most cases, administrators will want to use Windows PowerShell to convert between the different installation options, especially if they are managing remote servers in a data center or Infrastructure as a Service (IaaS) cloud environment. The two Windows PowerShell cmdlets used for converting between different installation options of Windows Server 2012 and later are the following:
![]() Install-WindowsFeature This cmdlet can be used to install one or more roles, role services, or features. The cmdlet also supersedes the older cmdlet Add-WindowsFeature that was used in previous versions of Windows Server, but Add-WindowsFeature remains as an alias for the newer cmdlet.
Install-WindowsFeature This cmdlet can be used to install one or more roles, role services, or features. The cmdlet also supersedes the older cmdlet Add-WindowsFeature that was used in previous versions of Windows Server, but Add-WindowsFeature remains as an alias for the newer cmdlet.
![]() Uninstall-WindowsFeature This cmdlet can be used to remove one or more roles, role services, or features. The cmdlet also supersedes the older cmdlet Remove-WindowsFeature that was used in previous versions of Windows Server, but Remove-WindowsFeature remains as an alias for the newer cmdlet.
Uninstall-WindowsFeature This cmdlet can be used to remove one or more roles, role services, or features. The cmdlet also supersedes the older cmdlet Remove-WindowsFeature that was used in previous versions of Windows Server, but Remove-WindowsFeature remains as an alias for the newer cmdlet.
Both of the preceding cmdlets can be used for installing or uninstalling features on either of the following:
![]() Running installations of Windows Server 2012 or later
Running installations of Windows Server 2012 or later
![]() Offline virtual hard disks (VHDs) on which Windows Server 2012 or later has been installed
Offline virtual hard disks (VHDs) on which Windows Server 2012 or later has been installed
Note that to install a particular feature on a Windows installation or offline VHD, the feature binaries first must be available for installation. Most feature binaries are available locally in the side-by-side store (%windir%\winsxs folder) on installations of Windows Vista and later. Note, however, that when you perform a clean installation of Windows Server 2012 or later using the Server Core installation option, the feature binaries for the Graphical Management Tools And Infrastructure feature and Server Graphical Shell feature are not staged in the local side-by-side store of a Server Core installation. This means that if you want to install these features on a Server Core installation, you must specify an alternate source for their binaries—for example, a mounted .wim file of a Windows Server 2012 or later installation of the same service pack level. Alternatively, you can allow the feature binaries to be downloaded and installed from Windows Update, although this can take some time with larger feature binaries. These two methods for obtaining feature binaries that are not available in the local side-by-side store are demonstrated in one of the practice exercises in this chapter.
More Info: What does “staged” mean?
When you want to service a Windows installation by adding or removing a feature, the package containing the binaries for installing that feature can be in one of three states:
![]() Installed The package has been installed and is present in the WinSxS folder.
Installed The package has been installed and is present in the WinSxS folder.
![]() Staged The package has not been installed but is present in the WinSxS folder.
Staged The package has not been installed but is present in the WinSxS folder.
![]() Absent The package is not installed and is not present in the WinSxS folder. This state is also sometimes referred to as “disabled with payload removed.”
Absent The package is not installed and is not present in the WinSxS folder. This state is also sometimes referred to as “disabled with payload removed.”
Packages that are not present in the WinSxS folder can still be installed in Windows Server 2012 and later if you use the –Source parameter for the Install-WindowsFeature cmdlet to specify a mounted .wim file. As an alternative, you can omit the –Source parameter and allow the necessary package to be downloaded from Windows Update. The Features On Demand capability in Windows Server 2012 and later, described later in this lesson, also enables administrators to remove packages from the WinSxS folder, which could not be done on installations of previous versions of Windows.
Converting Server Core to Server With A GUI
To use Windows PowerShell to convert a Server Core installation of Windows Server 2012 or later to a Server With A GUI installation, run the following command:
Install-WindowsFeature Server-Gui-Mgmt-Infra,Server-Gui-Shell -Restart
-Source C:\mountdir\windows\winsxs
The path C:\mountdir\windows\winsxs for the –Source parameter in the preceding command specifies a mounted Server With A GUI image in the install.wim file in the \sources folder of your Windows Server installation media.
Alternatively, you could allow the necessary feature binaries to be downloaded and installed from Windows Update by omitting the –Source parameter as follows:
Install-WindowsFeature Server-Gui-Mgmt-Infra,Server-Gui-Shell -Restart
Note that if you previously converted a Server With A GUI installation to a Server Core installation and did not remove the binaries for these features, the binaries remain staged in the WinSxS folder and therefore do not need to be downloaded from Windows Update.
Converting Server Core to Minimal Server Interface
To use Windows PowerShell to convert a Server Core installation of Windows Server 2012 or later to a Minimal Server Interface installation, use this command:
Install-WindowsFeature Server-Gui-Mgmt-Infra-Restart -Source C:\mountdir\windows\winsxs
The explanation of the –Source parameter is the same as in the previous section. To download and install the feature binaries from Windows Update instead of a locally mounted .wim image, use this command:
Install-WindowsFeature Server-Gui-Mgmt-Infra -Restart
Converting Server With A GUI to Server Core
To use Windows PowerShell to convert a Server With A GUI installation of Windows Server 2012 or later to a Server Core installation, run the following command:
Uninstall-WindowsFeature Server-Gui-Mgmt-Infra,Server-Gui-Shell -Restart
Converting Server With A GUI to Minimal Server Interface
To use Windows PowerShell to convert a Server With A GUI installation of Windows Server 2012 or later to a Minimal Server Interface installation, use this command:
Uninstall-WindowsFeature Server-Gui-Mgmt-Infra -Restart
![]() Quick check
Quick check
![]() What action does the Windows PowerShell command Install-WindowsFeature Server-Gui-Mgmt-Infra –Restart perform when it is run on a Server Core installation of Windows Server 2012 R2?
What action does the Windows PowerShell command Install-WindowsFeature Server-Gui-Mgmt-Infra –Restart perform when it is run on a Server Core installation of Windows Server 2012 R2?
Quick check answer
![]() It converts the server to a Minimal Server Interface installation by downloading the necessary feature binaries from Windows Update.
It converts the server to a Minimal Server Interface installation by downloading the necessary feature binaries from Windows Update.
Converting between installation options in offline VHDs
To convert an offline VHD on which a Server Core installation of Windows Server 2012 or later has been installed, run Install-WindowsFeature with the –Source parameter as shown previously, but also include the –vhd parameter to specify the path to the .vhd file. For example, consider a virtual machine named SERVER6 whose system drive is a VHD located in the following folder on the Hyper-V host:
C:\Users\Public\Documents\Hyper-V\Virtual Hard Disks\SERVER6.vhdx
If the virtual machine is offline (stopped), you can convert the Windows Server installation on the VHD from Server Core to Server With A GUI by performing the following steps:
1. Create a new folder named C:\mountdir on your Hyper-V host. You will use this folder to mount the install.wim file on your Windows Server installation media so that the Install-WindowsFeature cmdlet can obtain the necessary feature binaries from the WinSxS folder of a Server With A GUI image in the .wim file.
2. Insert your Windows Server installation media into your Hyper-V host.
3. Open a command prompt on your Hyper-V host and type dism /get-wiminfo /wimfile:D:\sources\install.wim to display the index numbers of the Windows Server 2012 or later images in the .wim file. Make a note of the Server With A GUI image that is from the same edition as your Server Core installation. For example, if you installed the SERVERDATACENTERCORE image on your server, note the index number of the SERVERDATACENTER image in the .wim file.
4. Mount the .wim file by typing dism /mount-wim /wimfile:D:\sources\install.wim /Index:<n> /mountdir:C:\mountdir /readonly at an elevated command prompt, where <n> is the previously noted image number.
5. Open the Windows PowerShell console and run the following command:
Install-WindowsFeature Server-Gui-Mgmt-Infra,Server-Gui-Shell
-vhd " C:\Users\Public\Documents\Hyper-V\Virtual Hard Disks\SERVER6.vhdx"
-Source c:\mountdir\windows\winsxs
6. Restart the server and then start the virtual machine using Hyper-V Manager, open it using Virtual Machine Connection, and confirm that it is now running a Server With A GUI installation of Windows Server.
Features On Demand
Beginning with Windows Server 2012, you can completely remove the installation binaries for features from the side-by-side store (WinSxS folder) of a running Windows installation or an offline VHD on which Windows has been installed. Administrators may consider doing this on some installations for the following reasons:
![]() To further reduce the disk footprint of the installation
To further reduce the disk footprint of the installation
![]() To enhance the security of the installation by removing binaries for features that will not be needed
To enhance the security of the installation by removing binaries for features that will not be needed
To completely remove the binaries of a feature, use the Uninstall-WindowsFeature cmdlet with the –Remove parameter. For example, if you convert a Server With A GUI installation to a Server Core installation, the binaries for the Server-Gui-Mgmt-Infra and Server-Gui-Shell features remain staged in the side-by-side store. If you decide that you will not be reinstalling those features, you can remove their binaries by running the following Windows PowerShell command:
Uninstall-WindowsFeature Server-Gui-Mgmt-Infra,Server-Gui-Shell -Remove
Note that if you remove the binaries for a feature, you can still reinstall the feature later (and stage the binaries in the side-by-side store again) by using the Install-WindowsFeature cmdlet and either using Windows Update for downloading the binaries or specifying a mounted .wim file using the –Source parameter, as described previously.
There are many things that you can do with these tools for online and offline installations. For an in-depth discussion of converting between installation options, see http://technet.microsoft.com/en-us/library/hh831786.aspx.
Lesson summary
![]() The Server Core installation is the default installation option for Windows Server 2012 and later.
The Server Core installation is the default installation option for Windows Server 2012 and later.
![]() You can use Server Manager to convert a Server With A GUI installation to a Server Core installation or a Minimal Server Interface installation.
You can use Server Manager to convert a Server With A GUI installation to a Server Core installation or a Minimal Server Interface installation.
![]() You can use the Install-WindowsFeature and Uninstall-WindowsFeature Windows PowerShell cmdlets to convert between different installation options on a running installation of Windows Server 2012 or later.
You can use the Install-WindowsFeature and Uninstall-WindowsFeature Windows PowerShell cmdlets to convert between different installation options on a running installation of Windows Server 2012 or later.
![]() You can use the Install-WindowsFeature and Uninstall-WindowsFeature Windows PowerShell cmdlets to convert between different installation options on an offline VHD of a virtual machine that has Windows Server 2012 or later installed.
You can use the Install-WindowsFeature and Uninstall-WindowsFeature Windows PowerShell cmdlets to convert between different installation options on an offline VHD of a virtual machine that has Windows Server 2012 or later installed.
![]() You can use the Uninstall-WindowsFeature cmdlet to completely remove the installation binaries from the side-by-side store of a running installation of Windows Server 2012 or later or an offline VHD of a virtual machine that has Windows Server 2012 or later installed.
You can use the Uninstall-WindowsFeature cmdlet to completely remove the installation binaries from the side-by-side store of a running installation of Windows Server 2012 or later or an offline VHD of a virtual machine that has Windows Server 2012 or later installed.
Lesson review
Answer the following questions to test your knowledge of the information in this lesson. You can find the answers to these questions and explanations of why each answer choice is correct or incorrect in the “Answers” section at the end of this chapter.
1. Which installation option of Windows Server 2012 R2 potentially has the smallest disk footprint?
A. Server With A GUI
B. Server Core
C. Minimal Server Interface
D. Full
2. What action does the following Windows PowerShell command perform?
Uninstall-WindowsFeature Server-Gui-Shell -Restart
A. It converts a Server Core installation to a Server With A GUI installation.
B. It converts a Server With A GUI installation to a Server Core installation.
C. It converts a Server Core installation to a Minimal Server Interface installation.
D. It converts a Server With A GUI installation to a Minimal Server Interface installation.
3. You deployed a Server Core installation of Windows Server 2012 R2 in a virtualized environment running on a Hyper-V host. Because of limitations in available storage space for the host, you want to further reduce the disk footprint of your Server Core installation. Which of the following actions could you perform to try to do this? (Choose all that apply.)
A. Uninstall any roles or features that are not needed on the server.
B. Use the –Remove parameter with the Uninstall-WindowsFeature cmdlet to remove the binaries for unneeded roles and features from the local side-by-side store on the server.
C. Use the –Source parameter with the Install-WindowsFeature cmdlet to specify a mounted Windows Image (.wim) file where binaries you removed from the local side-by-side store on the server can be found.
D. Use Server Manager to remove the binaries for unneeded roles and features from the local side-by-side store on the server.
Lesson 2: Preparing the build lab
Building images of Windows operating systems involves many considerations. Understanding the life cycle of image management is foundational for successfully building and deploying Windows images. Microsoft Deployment Toolkit (MDT) is the tool of choice for building Windows images, and setting up a build lab with MDT can help simplify the task of deploying Windows operating systems. This lesson explains the image life-cycle management process and how to set up a build lab that uses MDT 2013 to build reference images of Windows Server 2012 and later.
After this lesson, you will be able to:
![]() Understand the image life-cycle management process.
Understand the image life-cycle management process.
![]() Understand how to set up a build lab for creating reference images for deploying customized installations of Windows Server 2012 or later.
Understand how to set up a build lab for creating reference images for deploying customized installations of Windows Server 2012 or later.
![]() Describe the steps of the reference image build process.
Describe the steps of the reference image build process.
![]() Explain how to set up a technician computer for deploying Windows Server 2012 or later using MDT 2013.
Explain how to set up a technician computer for deploying Windows Server 2012 or later using MDT 2013.
Estimated lesson time: 15 minutes
Understanding image life-cycle management
The goal of image life-cycle management is to facilitate the process of building and maintaining reference images of Windows operating systems that can be used for deploying Windows to target systems. Depending on the version of Windows being deployed and the needs of your organization, such target systems might be
![]() Client PCs or tablet devices
Client PCs or tablet devices
![]() Physical server systems
Physical server systems
![]() Virtual machines on Hyper-V hosts in the data center
Virtual machines on Hyper-V hosts in the data center
![]() Virtual machines running in an Infrastructure as a Service (IaaS) private cloud
Virtual machines running in an Infrastructure as a Service (IaaS) private cloud

A reference image is a standardized Windows operating system image (.wim file) that might include some or all of the following:
![]() Applications
Applications
![]() Device drivers
Device drivers
![]() Software updates or hotfixes
Software updates or hotfixes
![]() Per-user customizations
Per-user customizations
![]() Per-machine customizations
Per-machine customizations
Note: Per-user vs. per-machine customizations
Per-user customizations of reference images generally involve changes to the default user profile. These changes will then be applied to each new user who logs on to the system. Per-machine customizations involve modifications that apply to all users who log on to the system. An example of a per-machine customization is configuring the image so that Remote Desktop is enabled on systems on which the image is deployed.
Per-user customizations are commonly implemented only when engineering reference images of Windows client operating systems such as Windows 8.1. Per-user customizations are not commonly implemented when engineering reference images of versions of Windows Server.
Build lab vs. production environment
The process and tools used for building reference images should be kept separate from the process and tools used for deploying images, as illustrated in Figure 2-2. The build lab should contain only systems, tools, and other software needed to create and test reference images you will be deploying in your production environment.
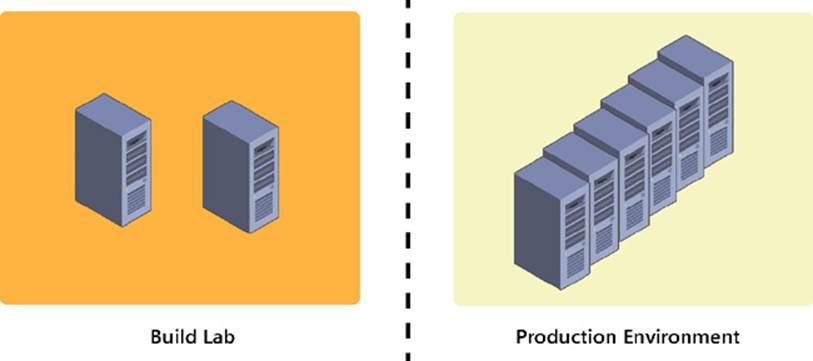
FIGURE 2-2 Keep your build lab and production environments separate from each other.
Setting up your build lab
The build lab is used for building and testing reference images that will later be deployed in your production environment. The components of a build lab can vary, but they should generally include the following:
![]() Hyper-V host Most of the image engineering process can be performed within a virtual environment. For building reference images of Windows Server 2012 or later, you need a physical host system that supports hardware virtualization and is running Windows Server 2008 R2 or later with the Hyper-V role installed.
Hyper-V host Most of the image engineering process can be performed within a virtual environment. For building reference images of Windows Server 2012 or later, you need a physical host system that supports hardware virtualization and is running Windows Server 2008 R2 or later with the Hyper-V role installed.
![]() Technician computer The technician computer has the necessary tools installed for building reference images of Windows Server 2012 or later. In the example of a build lab shown in Figure 2-3, the technician computer is a virtual machine running on your Hyper-V host, but it could also be a physical system if Hyper-V is not being used in the build lab.
Technician computer The technician computer has the necessary tools installed for building reference images of Windows Server 2012 or later. In the example of a build lab shown in Figure 2-3, the technician computer is a virtual machine running on your Hyper-V host, but it could also be a physical system if Hyper-V is not being used in the build lab.
![]() Reference computer The reference computer is the system from which the reference image is created by sysprepping and capturing the installation of Windows on the computer. This reference computer must be a bare-metal system—that is, it must have no operating system installed on it. In the build lab shown in Figure 2-3, the reference computer is another virtual machine running on your Hyper-V host, but it could also be a physical system if Hyper-V is not being used in the build lab.
Reference computer The reference computer is the system from which the reference image is created by sysprepping and capturing the installation of Windows on the computer. This reference computer must be a bare-metal system—that is, it must have no operating system installed on it. In the build lab shown in Figure 2-3, the reference computer is another virtual machine running on your Hyper-V host, but it could also be a physical system if Hyper-V is not being used in the build lab.
![]() Physical systems These are samples of the different types of system hardware used in your production environment on which you will later be deploying your reference image. After you build your reference image, you should test it by deploying it on these sample physical systems to make sure no issues will arise when you deploy it in your production environment. These sample systems can be virtual machines if you will be deploying your reference image only onto virtual machines in your production environment—for example, if you will be deploying some type of private-cloud solution.
Physical systems These are samples of the different types of system hardware used in your production environment on which you will later be deploying your reference image. After you build your reference image, you should test it by deploying it on these sample physical systems to make sure no issues will arise when you deploy it in your production environment. These sample systems can be virtual machines if you will be deploying your reference image only onto virtual machines in your production environment—for example, if you will be deploying some type of private-cloud solution.
![]() DHCP server Network connectivity must be established between the technician and reference computers before the technician computer can be used to deploy Windows onto the reference computer, so a DHCP server can be used to dynamically assign an IP address to the reference computer. However, a static IP address can also be manually assigned to the reference computer at the start of the deployment process. The DHCP server is therefore optional, but it is recommended to simplify the automation of the reference-image build process.
DHCP server Network connectivity must be established between the technician and reference computers before the technician computer can be used to deploy Windows onto the reference computer, so a DHCP server can be used to dynamically assign an IP address to the reference computer. However, a static IP address can also be manually assigned to the reference computer at the start of the deployment process. The DHCP server is therefore optional, but it is recommended to simplify the automation of the reference-image build process.
![]() Windows Deployment Services This is a server running Windows Server 2008 R2 or later that has the Windows Deployment Services role installed. This server can be either physical, as shown in Figure 2-3, or virtual (running as a virtual machine on the Hyper-V host). The Windows Deployment Services server simplifies the task of deploying the reference image onto the sample physical systems by eliminating the need to burn your images onto bootable media to kick-start the reference-image testing process. This server is optional if you will be deploying your reference image only onto virtual machines, because you can easily mount your boot images manually in Hyper-V for deploying your reference image to virtual machines in your build environment.
Windows Deployment Services This is a server running Windows Server 2008 R2 or later that has the Windows Deployment Services role installed. This server can be either physical, as shown in Figure 2-3, or virtual (running as a virtual machine on the Hyper-V host). The Windows Deployment Services server simplifies the task of deploying the reference image onto the sample physical systems by eliminating the need to burn your images onto bootable media to kick-start the reference-image testing process. This server is optional if you will be deploying your reference image only onto virtual machines, because you can easily mount your boot images manually in Hyper-V for deploying your reference image to virtual machines in your build environment.
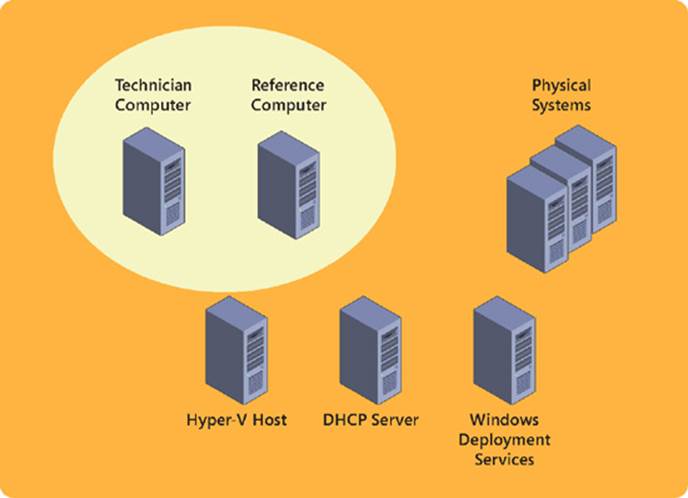
FIGURE 2-3 This is an example of how to set up a build lab.
Windows PowerShell for Windows Deployment Services
The biggest improvement to Windows Deployment Services in Windows Server 2012 R2 is the addition (at last!) of Windows PowerShell support. Previously, in Windows Server 2012 and earlier, if you wanted to automate repetitive tasks by using Windows Deployment Services you needed to use the Wdsutil.exe command-line utility, which enabled you to configure WDS servers, add or remove images, create capture or discover images, export or make copies of images, configure namespaces, configure and manage multicast transmissions, start and stop WDS services, and perform many other kinds of tasks. Unfortunately, the syntax of Wdsutil.exe is difficult and its output is challenging to parse in scripts, so in practice the utility was of limited use for automating complex deployment scenarios.
Beginning with Windows Server 2012 R2, however, there are now almost three dozen new Windows PowerShell cmdlets that can be used to automate almost any task involving Windows Deployment Services. Writing scripts that use these new cmdlets is easy for administrators who are familiar with the basics of Windows PowerShell because these new cmdlets follow the standard syntax for Windows PowerShell cmdlets.
To display a complete list of the available cmdlets in the WDS module, use Server Manager or Windows PowerShell to install the Windows Deployment Services server role, as described in Chapter 3, “Server remote management.” Then open a Windows PowerShell prompt on the server and type the following command:
Get-Command -Module WDS
To get help concerning any cmdlet, use the Get-Help cmdlet in the usual way. For a complete list of the Windows Deployment Services cmdlets and their syntax with examples, see http://technet.microsoft.com/library/dn283416.aspx.
![]() Quick check
Quick check
![]() Why are per-user customizations not usually performed when building a reference image for server deployment?
Why are per-user customizations not usually performed when building a reference image for server deployment?
Quick check answer
![]() Administrators generally don’t bother customizing the desktop environment of servers because they usually manage them remotely using administrative tools and scripts.
Administrators generally don’t bother customizing the desktop environment of servers because they usually manage them remotely using administrative tools and scripts.
Understanding the reference-image build process
After you set up your build lab, you can begin building and testing the reference images you will be deploying on systems in your production environment. As Figure 2-4 shows, the general steps in the process of building a reference image are as follows:
1. Customize the deployment process Use the technician computer to customize the process of deploying Windows by choosing whether to include applications, software updates, hotfixes, language packs, out-of-box device drivers, and various per-user or per-machine customizations when the operating system is deployed.
2. Deploy the image to a reference computer Next deploy Windows onto your reference computer along with any additional software or customizations you configured.
3. Sysprep the deployed image The System Preparation Tool (Sysprep) then executes on your reference computer to prepare the installation for cloning by removing machine-specific information, such as the computer’s security identifier (SID).
4. Capture the deployed image The sysprepped installation is then captured in the form of a Windows Image (.wim) file and copied to the technician computer. The captured and sysprepped image is now referred to as the reference image.
5. Deploy the reference image to the test systems Then use the technician computer to deploy the reference image to sample systems in your build lab. These sample systems can be either samples of physical systems taken from your production environment or virtual machines running on the Hyper-V host in your build lab.
6. Verify the result Now log on to the sample systems on which you deployed your reference image. Perform any tests needed to ensure that the deployed image works properly and has all the software and customizations your production environment requires.
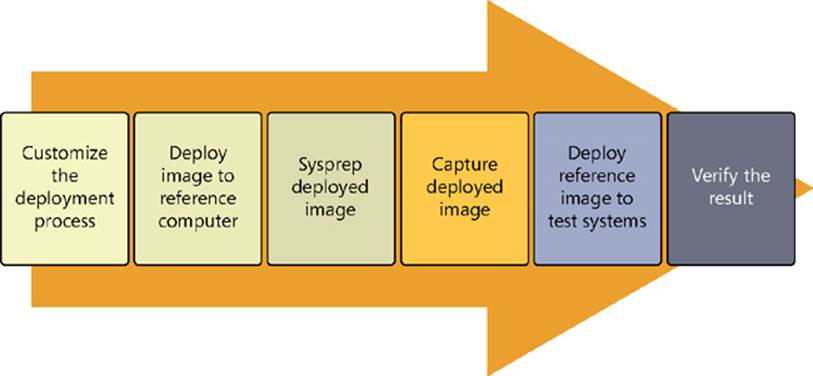
FIGURE 2-4 These are the steps involved in building and testing a reference image.
Real World: Maintaining reference images
You might need to update reference images as time progresses. For example, you might decide you need to add software to your image or make some other customizations because of changing business requirements. The best way of maintaining your reference images is to periodically rebuild them when needed. But rebuilding an image does not mean taking your existing captured and sysprepped reference image, deploying it to your reference computer again, adding new applications or other software to it and making any other necessary customizations, and then sysprepping and capturing it again. Running sysprep multiple times like this on a Windows installation is unsupported and can cause unpredictable results when you deploy your image into your production environment.
Instead, when you decide you need to update your reference image in some way, you should go back to the beginning and customize the process used to build your reference image. Then run this process again to create your updated reference image.
Setting up the technician computer
To set up a technician computer for building reference images to deploy Windows Server 2012 or later, you need the following tools:
![]() Microsoft Deployment Toolkit (MDT) 2013 MDT is a free Solution Accelerator from Microsoft that includes comprehensive tools and guidance for automating and customizing operating system and application deployment. MDT 2013 is available in both x64 and x86 versions, and it can be used to deploy Windows 8.1, Windows 8, Windows 7, Windows Server 2012 R2, Windows Server 2012, and Windows Server 2008 R2. For more information about MDT and to download the latest version, see http://technet.microsoft.com/en-us/solutionaccelerators/dd407791.aspx.
Microsoft Deployment Toolkit (MDT) 2013 MDT is a free Solution Accelerator from Microsoft that includes comprehensive tools and guidance for automating and customizing operating system and application deployment. MDT 2013 is available in both x64 and x86 versions, and it can be used to deploy Windows 8.1, Windows 8, Windows 7, Windows Server 2012 R2, Windows Server 2012, and Windows Server 2008 R2. For more information about MDT and to download the latest version, see http://technet.microsoft.com/en-us/solutionaccelerators/dd407791.aspx.
![]() Windows Assessment and Deployment Kit (ADK) for Windows 8.1 The ADK is a collection of tools you can use to customize, assess, and deploy Windows operating systems to new computers. The ADK supersedes the Windows Automated Installation Kit (Windows AIK) used by MDT 2012 and earlier, and it includes additional tools that previously had to be downloaded separately. For more information about the ADK and to download the latest version, see http://technet.microsoft.com/en-us/library/hh824947.aspx.
Windows Assessment and Deployment Kit (ADK) for Windows 8.1 The ADK is a collection of tools you can use to customize, assess, and deploy Windows operating systems to new computers. The ADK supersedes the Windows Automated Installation Kit (Windows AIK) used by MDT 2012 and earlier, and it includes additional tools that previously had to be downloaded separately. For more information about the ADK and to download the latest version, see http://technet.microsoft.com/en-us/library/hh824947.aspx.
In addition to the preceding tools, you also need the following:
![]() Windows Server 2012 or later installation media (.iso file or DVD)
Windows Server 2012 or later installation media (.iso file or DVD)
![]() Any applications, language packs, software updates, hotfixes, or out-of-box device drivers that you want to include in your reference image
Any applications, language packs, software updates, hotfixes, or out-of-box device drivers that you want to include in your reference image
Navigating MDT and ADK versions
Be sure you understand the different versions of MDT and ADK available and how they work together; otherwise, you might face limitations regarding the versions of Windows Server you will be able to build and deploy in your environment. This is especially important if you will also be using MDT to build and deploy client versions of Microsoft Windows.
Here are the salient points you need to keep in mind:
![]() You cannot use MDT 2012 or earlier to deploy either Windows Server 2012 R2 or Windows Server 2012. You also cannot deploy either Windows 8.1 or Windows 8 using this version of MDT.
You cannot use MDT 2012 or earlier to deploy either Windows Server 2012 R2 or Windows Server 2012. You also cannot deploy either Windows 8.1 or Windows 8 using this version of MDT.
![]() MDT 2012 Update 1 was the first version of MDT to enable you to deploy Windows Server 2012 and Windows 8. However, you cannot use this version of MDT to deploy either Windows Server 2012 R2 or Windows 8.1.
MDT 2012 Update 1 was the first version of MDT to enable you to deploy Windows Server 2012 and Windows 8. However, you cannot use this version of MDT to deploy either Windows Server 2012 R2 or Windows 8.1.
![]() MDT 2013 is the first version of MDT that enables you to deploy Windows Server 2012 R2 and Windows 8.1. You also can use this version of MDT to deploy Windows Server 2012 and Windows 8.
MDT 2013 is the first version of MDT that enables you to deploy Windows Server 2012 R2 and Windows 8.1. You also can use this version of MDT to deploy Windows Server 2012 and Windows 8.
![]() MDT 2013 requires that you install the ADK for Windows 8.1; MDT 2012 Update 1 requires that you install the ADK for Windows 8. You cannot use the ADK for Windows 8.1 with MDT 2012 Update 1 or use the ADK for Windows 8 with MDT 2013.
MDT 2013 requires that you install the ADK for Windows 8.1; MDT 2012 Update 1 requires that you install the ADK for Windows 8. You cannot use the ADK for Windows 8.1 with MDT 2012 Update 1 or use the ADK for Windows 8 with MDT 2013.
This gets even more confusing if you’re using MDT with System Center Configuration Manager because only specific versions of MDT are supported for different versions of System Center Configuration Manager. A full discussion of such matters is beyond the scope of this book (though integration of MDT with System Center Configuration Manager is described in Lesson 4), but you can easily find relevant guidance by searching TechNet.
Upgrading MDT versions
If you are currently using MDT 2010 in your environment for deploying Windows Server 2008 R2 or Windows 7, upgrading to MDT 2012 Update 1 is fairly straightforward:
1. Back up your deployment share.
2. Uninstall the Windows AIK on your technician computer.
3. Install the ADK for Windows 8 and reboot the computer.
4. Open the Deployment Workbench for MDT and upgrade your deployment share.
5. Regenerate the boot images in your deployment share.
6. Use the new boot images for your deployments.
Note that there is no need to uninstall MDT 2010 before installing MDT 2012 Update 1.
If you are currently using MDT 2012 Update 1 in your environment for deploying Windows Server 2012 or Windows 8, upgrading to MDT 2013 is also straightforward:
1. Back up your deployment share.
2. Uninstall the ADK for Windows 8.
3. Install the ADK for Windows 8.1 and reboot.
4. Upgrade your deployment share.
5. Regenerate your boot images.
6. Perform your deployments.
Additional steps might be required in both of these scenarios if you are also using Windows Deployment Services and/or Configuration Manager as part of your deployment infrastructure. Note also that you cannot upgrade directly from MDT 2010 to MDT 2013; you first need to upgrade to MDT 2012 Update 1.
Lesson summary
![]() A reference image is a standardized Windows operating system image that might also include applications, device drivers, software updates, and customizations.
A reference image is a standardized Windows operating system image that might also include applications, device drivers, software updates, and customizations.
![]() You should generally keep your build lab separate from your production environment.
You should generally keep your build lab separate from your production environment.
![]() A build lab that uses MDT and other components can be set up in a virtualized environment running on a Hyper-V host.
A build lab that uses MDT and other components can be set up in a virtualized environment running on a Hyper-V host.
![]() The reference-image build process includes steps such as customization, reference-system deployment, sysprep and capture, test system deployment, and verification.
The reference-image build process includes steps such as customization, reference-system deployment, sysprep and capture, test system deployment, and verification.
![]() To build reference images for deploying Windows Server 2012 or later, you should use MDT 2013 with the ADK for Windows 8.1.
To build reference images for deploying Windows Server 2012 or later, you should use MDT 2013 with the ADK for Windows 8.1.
Lesson review
Answer the following questions to test your knowledge of the information in this lesson. You can find the answers to these questions and explanations of why each answer choice is correct or incorrect in the “Answers” section at the end of this chapter.
1. Which of the following is not recommended when setting up your build lab? (Choose all that apply.)
A. Using a Hyper-V host for performing image engineering within a virtual environment
B. Using virtual machines for testing your reference image when the servers in the production environment in which you will be deploying your reference image are physical systems
C. Using a DHCP server to dynamically assign an IP address to your reference computer
D. Installing the necessary tools for building reference images on your reference computer
2. Which component of a build lab helps eliminate the need to burn boot images onto DVD media to kick-start the reference-image testing process?
A. DHCP server
B. Technician computer
C. Reference computer
D. Windows Deployment Services
3. A Windows installation that has been sysprepped and captured is referred to as what?
A. A reference computer
B. A reference installation
C. A reference image
D. A test system
Lesson 3: Building images
After you set up your build lab, you’re ready to build your reference images. This lesson describes the steps involved in installing and configuring MDT 2013 to build Windows Server 2012 R2 reference images. The lesson also describes how to test your images to ensure they will work properly when deployed in production.
After this lesson, you will be able to:
![]() Understand the steps involved in building reference images for Windows Server 2012 R2 deployment.
Understand the steps involved in building reference images for Windows Server 2012 R2 deployment.
![]() Install MDT 2013 and the ADK for Windows 8.1.
Install MDT 2013 and the ADK for Windows 8.1.
![]() Create and configure deployment shares by importing operating-system source files, out-of-box device drivers, applications, and packages.
Create and configure deployment shares by importing operating-system source files, out-of-box device drivers, applications, and packages.
![]() Create and customize task sequences for building and deploying images.
Create and customize task sequences for building and deploying images.
![]() Understand the function of the two MDT configuration files.
Understand the function of the two MDT configuration files.
![]() Generate installation boot media by updating a deployment share.
Generate installation boot media by updating a deployment share.
![]() Deploy and capture a reference image by using MDT 2013.
Deploy and capture a reference image by using MDT 2013.
![]() Test reference images to ensure they work as intended.
Test reference images to ensure they work as intended.
Estimated lesson time: 30 minutes
Building reference images using MDT 2013
To use a technician computer to build reference images for deploying Windows Server 2012 R2 using MDT 2013, you need to perform the following steps:
1. Install the ADK on the technician computer.
2. Install MDT 2013 on the technician computer.
3. Create a deployment share using the Deployment Workbench.
4. Import the Windows Server 2012 R2 operating-system source files.
5. Import any out-of-box drivers needed by the target production systems.
6. Import any applications you want to include in your image.
7. Import any packages—such as hotfixes, software updates, or language packs—that you want to include in your image.
8. Create a task sequence for deploying, sysprepping, and capturing the reference image.
9. Customize the MDT configuration files to automate some or all of the deployment process.
10. Update the deployment share to create boot images for kick-starting the deployment process.
11. Deploy Windows Server 2012 R2 onto the reference computer, run Sysprep, capture a reference image, and copy it to the deployment share.
Step 1. Installing the ADK for Windows 8.1
The ADK for Windows 8.1 can be installed on the following versions of Windows:
![]() Windows Server 2012 R2
Windows Server 2012 R2
![]() Windows Server 2012
Windows Server 2012
![]() Windows Server 2008 R2
Windows Server 2008 R2
![]() Windows Server 2008 with Service Pack 2 (SP2)
Windows Server 2008 with Service Pack 2 (SP2)
![]() Windows 8.1
Windows 8.1
![]() Windows 8
Windows 8
![]() Windows 7
Windows 7
![]() Windows Vista
Windows Vista
The ADK also requires the Microsoft .NET Framework 4.5 and installs it automatically if it is not already present on the computer.
To install the ADK, you must perform the following steps:
1. Ensure that the computer on which you will be installing the ADK supports installation of the product and that all the necessary software requirements have been met.
2. Download the installation bootstrap file (adksetup.exe) for the ADK from the Microsoft Download Center at http://www.microsoft.com/en-us/download/details.aspx?id=39982.
3. Double-click the installation bootstrap file and follow the prompts to install the ADK components you want to install on the computer. The components from which to choose include the following:
![]() Application Compatibility Toolkit (ACT)
Application Compatibility Toolkit (ACT)
![]() Deployment Tools
Deployment Tools
![]() Windows Preinstallation Environment (Windows PE)
Windows Preinstallation Environment (Windows PE)
![]() User State Migration Tool (USMT)
User State Migration Tool (USMT)
![]() Volume Activation Management Tool (VAMT)
Volume Activation Management Tool (VAMT)
![]() Windows Performance Toolkit
Windows Performance Toolkit
![]() Windows Assessment Services
Windows Assessment Services
![]() Microsoft SQL Server 2012 Express
Microsoft SQL Server 2012 Express
Note: ADK components
For a basic Windows Server deployment using MDT, the only ADK components you need are the Deployment Tools and the Windows Preinstallation Environment (Windows PE). For the deployment of desktop versions of Windows, you might need other ADK components as well.
Step 2. Installing MDT 2013
MDT 2013 can be installed on the following versions of Windows:
![]() Windows Server 2012 R2
Windows Server 2012 R2
![]() Windows Server 2012
Windows Server 2012
![]() Windows Server 2008 R2
Windows Server 2008 R2
![]() Windows 8.1
Windows 8.1
![]() Windows 8
Windows 8
![]() Windows 7
Windows 7
The software prerequisites for installing MDT 2013 on Windows 7 or Windows Server 2008 R2 include the following:
![]() Microsoft Management Console version 3.0
Microsoft Management Console version 3.0
![]() Microsoft .NET Framework 3.5 with Service Pack 1 (SP1) or later
Microsoft .NET Framework 3.5 with Service Pack 1 (SP1) or later
![]() Windows PowerShell version 2.0 or later
Windows PowerShell version 2.0 or later
The software prerequisites for installing MDT 2013 on Windows 8.1, Windows 8, Windows Server 2012 R2, or Windows Server 2012 include the following:
![]() The ADK for Windows 8.1
The ADK for Windows 8.1
![]() Microsoft .NET Framework 4.0, which is included in the operating system
Microsoft .NET Framework 4.0, which is included in the operating system
![]() Windows PowerShell version 3.0, which is included in the operating system
Windows PowerShell version 3.0, which is included in the operating system
These software requirements are outlined in the release notes for MDT 2013, which you can download from http://www.microsoft.com/en-us/download/details.aspx?id=40796.
Note: USMT
The MDT 2013 Release Notes suggest that the User State Migration Tool (USMT) of the ADK is also a prerequisite. However, USMT is intended for migrating user profiles on client versions of Windows, and it is not needed for these exercises.
To install and configure MDT 2013, you must perform the following steps:
1. Ensure that the computer on which you will be installing MDT 2013 supports the installation of the product and that all the necessary software requirements have been met.
2. Download the appropriate version (x64 or x86) of the MDT 2013 Windows Installer (.msi) file for the platform on which you will be installing it by using the download link on the Microsoft Deployment Toolkit home page at http://www.microsoft.com/en-us/download/details.aspx?id=40796.
3. Double-click the .msi file and follow the prompts to install MDT 2013 on the computer.
Step 3. Creating a deployment share
After you install the ADK and MDT on a computer, the next step is to create a deployment share. A deployment share is a shared folder on the technician computer that will be used to contain and manage the following items:
![]() Operating-system source files for building and deploying images
Operating-system source files for building and deploying images
![]() Out-of-box drivers for target systems that need them
Out-of-box drivers for target systems that need them
![]() Applications to be deployed on target systems
Applications to be deployed on target systems
![]() Packages—for example, software updates or language packs
Packages—for example, software updates or language packs
![]() Task sequences, which are used to control the deployment process
Task sequences, which are used to control the deployment process
![]() Advanced configuration features, such as selection profiles, the MDT database, media deployment points, and linked deployment shares
Advanced configuration features, such as selection profiles, the MDT database, media deployment points, and linked deployment shares
![]() Hidden items not displayed in the Deployment Workbench, such as Windows PE images for initiating the Lite Touch Installation (LTI) deployment process on target systems
Hidden items not displayed in the Deployment Workbench, such as Windows PE images for initiating the Lite Touch Installation (LTI) deployment process on target systems
In addition, the deployment share includes a Monitoring node that can be used for monitoring the progress and status of LTI deployments while they happen.
To create a deployment share, you must perform the following steps:
1. Launch the Deployment Workbench, which is used for building, capturing, and deploying Windows images to target systems.
2. Right-click the Deployment Shares node and select New Deployment Share.
3. Follow the prompts of the New Deployment Share Wizard and do the following:
![]() Specify the path, the share name, and a description for the deployment share.
Specify the path, the share name, and a description for the deployment share.
![]() Configure the deployment share by selecting or clearing the options shown here:
Configure the deployment share by selecting or clearing the options shown here:
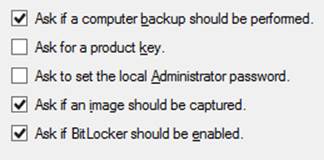
Figure 2-5 shows the Deployment Workbench after creating a deployment share called MDT Deployment Share.
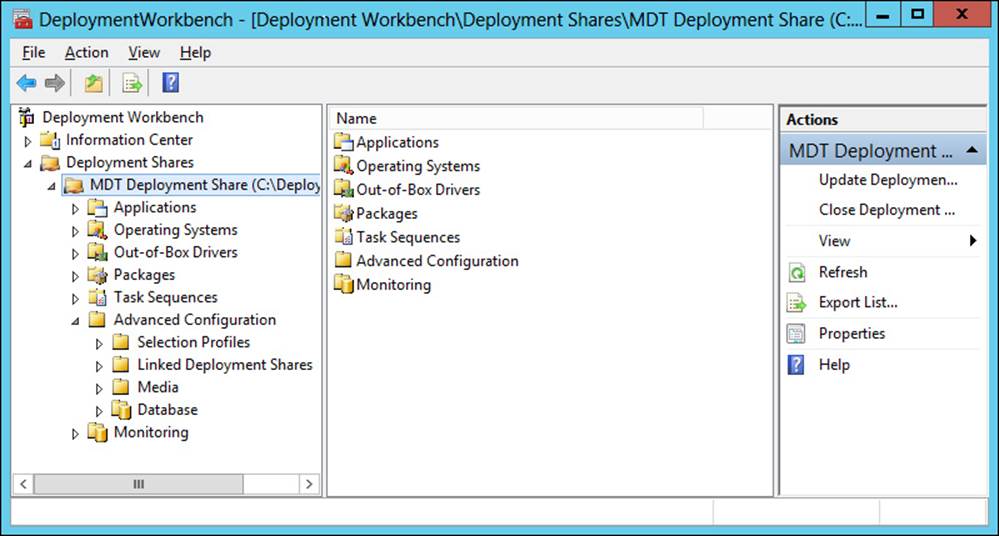
FIGURE 2-5 The Deployment Workbench has MDT Deployment Share selected to show its structure.
Step 4. Importing operating-system source files
After you create a deployment share, the next step is to use the Deployment Workbench to import source files for the operating systems you plan to deploy. Before you can build and capture a reference image of a master installation of a supported version of Windows, you must import a full set of source files for that version of Windows. You can also import previously captured image files or images stored on a Windows Deployment Service server on your network into your deployment share.
To import the source files for a Windows operating system, you must perform the following steps:
1. Launch the Deployment Workbench if it is not already running and expand the node for the deployment share you created earlier.
2. Right-click the Operating Systems node in your deployment share and select Import Operating System as shown here:
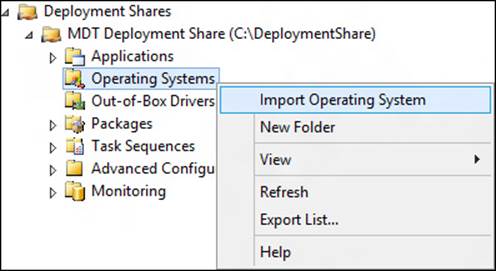
3. Follow the prompts of the Import Operating System Wizard to import a full set of source files for the Windows operating system you plan to deploy.
Step 5. Importing out-of-box drivers
If the computer on which you will be deploying your master installation of Windows requires any special device drivers, you should import these drivers into your deployment share. This is especially important when deploying server versions of Windows onto systems that have mass storage devices, such as RAID controllers, that are either very old or very new, because in both cases the drivers for these controllers might not be included with Windows Server 2012 R2. If you don’t import boot-critical mass storage drivers into your deployment share, MDT might not be able to find a local storage device on which to install Windows.
To import out-of-box drivers, you must perform the following steps:
1. Obtain the device drivers needed for the hardware on which you will be installing Windows.
2. Launch the Deployment Workbench if it is not already running and expand the node for the deployment share you created earlier.
3. Right-click the Out-of-Box Drivers node in your deployment share and select Import Drivers.
4. Follow the prompts of the Import Drivers Wizard to import the drivers into the deployment share.
Finding and importing device drivers
Device drivers can be one of the most frustrating and problematic aspects of Windows deployment for a number of reasons:
![]() It can be difficult to find the drivers you need. Some vendors, such as Dell and HP, provide special tools for finding and downloading drivers for their hardware, and you will have to learn how to use their tools.
It can be difficult to find the drivers you need. Some vendors, such as Dell and HP, provide special tools for finding and downloading drivers for their hardware, and you will have to learn how to use their tools.
![]() Device drivers must be in a certain form before you can import them into the Deployment Workbench. Specifically, you need the driver’s INF file. If the vendor makes its drivers available as .cab files, you can easily extract these into a folder and import them into the Deployment Workbench. If the vendor makes them available as Setup programs (.exe files), however, you might need to use a third-party tool like WinRAR to extract the driver files from the .exe file before you can import them.
Device drivers must be in a certain form before you can import them into the Deployment Workbench. Specifically, you need the driver’s INF file. If the vendor makes its drivers available as .cab files, you can easily extract these into a folder and import them into the Deployment Workbench. If the vendor makes them available as Setup programs (.exe files), however, you might need to use a third-party tool like WinRAR to extract the driver files from the .exe file before you can import them.
![]() Driver incompatibilities can cause problems during deployment. For example, if you use the wrong mass storage driver when deploying Windows to a system, the installation process might fail. This problem often arises when a deployment share is being used to deploy several different versions of Windows and you have imported all the drivers for each of the versions into the Out-of-Box Drivers folder of your deployment share. When you do this, during the deployment process Windows will decide which drivers to use by using Plug and Play. Unfortunately, with this approach a 32-bit driver might end up getting installed on 64-bit hardware or vice versa, resulting in a failed deployment.
Driver incompatibilities can cause problems during deployment. For example, if you use the wrong mass storage driver when deploying Windows to a system, the installation process might fail. This problem often arises when a deployment share is being used to deploy several different versions of Windows and you have imported all the drivers for each of the versions into the Out-of-Box Drivers folder of your deployment share. When you do this, during the deployment process Windows will decide which drivers to use by using Plug and Play. Unfortunately, with this approach a 32-bit driver might end up getting installed on 64-bit hardware or vice versa, resulting in a failed deployment.
You can prevent such problems by creating a hierarchy of subfolders beneath the Out-of-Box Drivers folder, with each subfolder representing a specific Windows version and architecture. You can then further differentiate drivers according to the make and model of the system hardware to which they apply by creating a deeper subfolder hierarchy, such as the following:
Out-Of-Box Drivers
--- Operating System 1
------ Make 1
--------- Model 1
--------- Model 2...
------ Make 2...
--- Operating System 2...
You then import the specific drivers needed for each Windows version or architecture into the appropriate driver subfolder. You can then use another MDT feature called selection profiles to associate each driver subfolder with a different task sequence, which enables each task sequence being used to deploy a different version or architecture of Windows on each make or model of hardware in your environment. The downside of the driver subfolders approach is that it is more work to set up than just dumping all the drivers into the Out-of-Box Drivers folder and letting Plug and Play decide which ones to use during deployment.
Step 6. Importing applications
If you plan on deploying applications when you deploy Windows to target systems, you can import the application source files into the Applications node of your deployment share. Including applications is common when deploying client versions of Windows, but it is less frequent when deploying server versions of Windows because of the complexity of installing and configuring server applications such as Microsoft Exchange, Microsoft SharePoint, and Microsoft SQL Server.
Step 7. Importing packages
If you need to include software updates, language packs, or other packages when you deploy Windows, you can import these as packages into the Packages node of your deployment share. Packages must be in the form of .cab or .msu files if you want to import them into your deployment share.
Note: Software updates and deployment
Software updates can also be installed on your master installation by specifying a Windows Server Update Services (WSUS) server in the CustomSettings.ini file of your deployment share.
Step 8. Creating a task sequence
The next step is to create a task sequence. A task sequence defines the series of steps that will be performed during the deployment process and determines whether any additional software or customizations will be included when Windows is installed. For your build lab, you need to create a task sequence of type Standard Server Task Sequences that can be used to deploy Windows, with any additional software or customizations indicated, onto the reference computer. You can also use this task sequence to run Sysprep on the deployed installation of Windows, capture an image of the installation, and copy it to the Captures folder of the deployment share on your technician computer.
You can create task sequences by right-clicking the Task Sequences subfolder of a deployment share and selecting New Task Sequence to launch the New Task Sequence Wizard, shown in Figure 2-6.
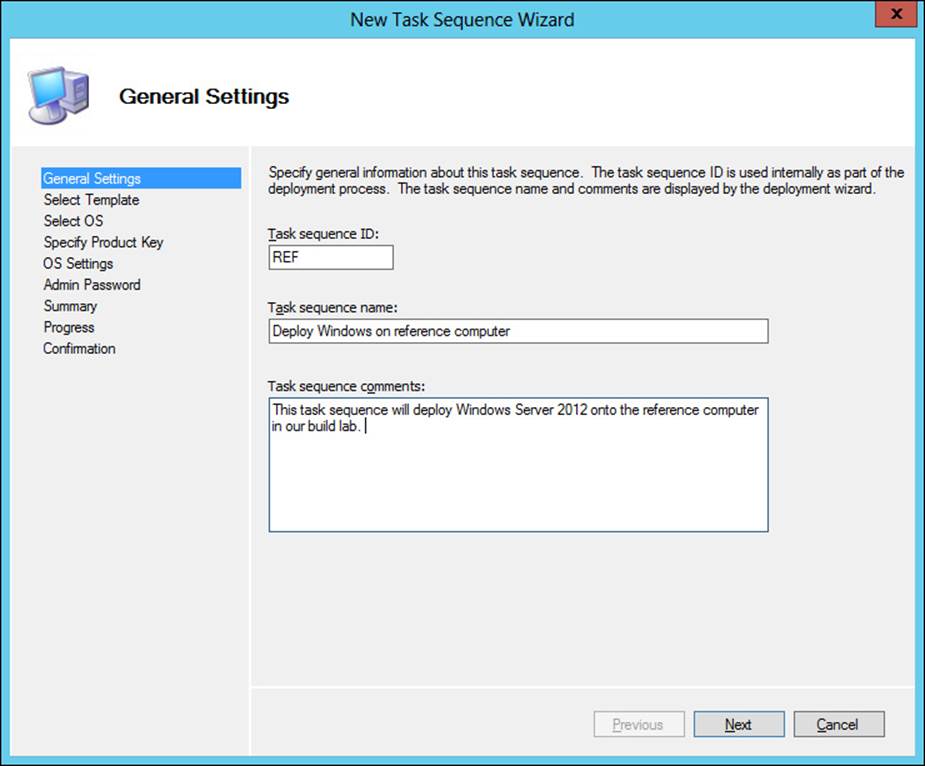
FIGURE 2-6 Create a new task sequence for deploying Windows to the reference computer.
Step 9. Automating the deployment process
At this point, you can choose to automate some or all of the deployment process in your build lab. You can implement automation in two ways. First, you can automate the general flow of the deployment process by modifying the two configuration files associated with the deployment share, located at C:\DeploymentShare$\Control:
![]() BootStrap.ini This file contains any information needed to successfully establish a connection between the deployment share and the computer on which Windows will be installed.
BootStrap.ini This file contains any information needed to successfully establish a connection between the deployment share and the computer on which Windows will be installed.
![]() CustomSettings.ini This file is used to control the remainder of the deployment process by displaying or hiding various pages of the Windows Deployment Wizard, which runs on the computer on which Windows is being installed.
CustomSettings.ini This file is used to control the remainder of the deployment process by displaying or hiding various pages of the Windows Deployment Wizard, which runs on the computer on which Windows is being installed.
Second, you can automate various aspects of the deployment process by making modifications to the task sequence used to perform your deployment. As Figure 2-7 shows, when you double-click a task sequence in the Deployment Workbench, the Task Sequence tab of its properties sheet displays a series of task-sequence groups, such as the following:
![]() Initialization
Initialization
![]() Validation
Validation
![]() State Capture
State Capture
![]() Preinstall
Preinstall
![]() Install
Install
![]() Postinstall
Postinstall
![]() State Restore
State Restore
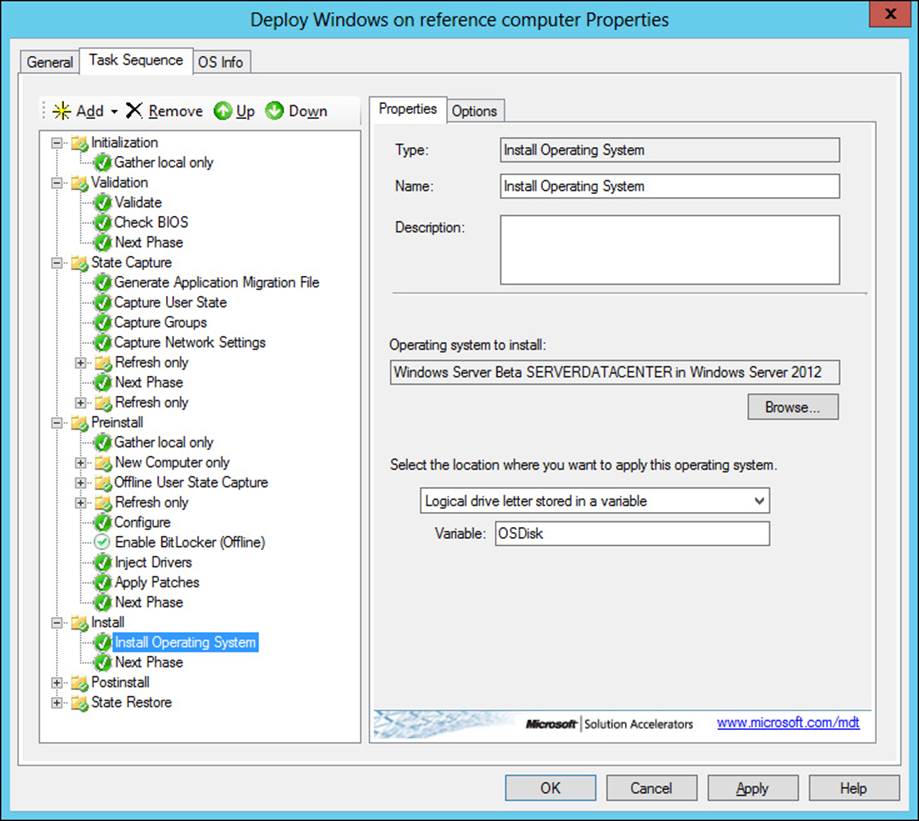
FIGURE 2-7 Customize a task sequence.
Each task-sequence group corresponds to a particular phase of the deployment process and consists of one or more task-sequence steps. For example, the Validation phase, which identifies whether the target computer is capable of running the scripts necessary to complete the deployment process, performs the following three steps in the order shown:
1. Validate Verifies that the target computer meets the specified deployment prerequisite conditions
2. Check BIOS Checks the BIOS of the target computer to ensure that it is compatible with the operating system you are deploying
3. Next Phase Updates the Phase property to the next phase in the deployment process
You can customize your task sequences in the following ways:
![]() By modifying the values and selections of properties on different task-sequence step pages
By modifying the values and selections of properties on different task-sequence step pages
![]() By moving selected task-sequence groups or steps up or down to change when they take place during the overall deployment process
By moving selected task-sequence groups or steps up or down to change when they take place during the overall deployment process
![]() By adding new task-sequence steps to existing task-sequence groups
By adding new task-sequence steps to existing task-sequence groups
![]() By adding new task-sequence groups and adding steps to them as desired
By adding new task-sequence groups and adding steps to them as desired
More information about customizing task sequences can be found in the documentation included when you download MDT from the Microsoft Download Center.
Real World: Automating your build lab
Depending on how you configured your deployment share when you created it, the CustomSettings.ini file associated with the deployment share will be configured to display most (if not all) pages of the Windows Deployment Wizard. In other words, you will have to respond to a series of prompts displayed on the reference computer to install Windows on the computer.
If you edit the CustomSettings.ini file by adding property/value pairs to it, however, you can automate most or even all of the MDT deployment process. You can also modify your task sequence to further customize your automated build process—for example, so that it downloads and installs any necessary software updates from Windows Update or Windows Server Update Services (WSUS) on your network as part of the reference-image build process.
Automation is a good thing in build labs because it simplifies the task of maintaining your reference images by regenerating them when the need arises.
Step 10. Updating the deployment share
Before you can use the technician computer to build a reference image, you must update the deployment share to create or regenerate the boot images that will be used to kick-start the deployment process on the reference computer. To update a deployment share, right-click it, select Update Deployment Share, and follow the wizard prompts. Updating a deployment share might take several minutes. The process creates two types of boot media:
![]() LiteTouchPE_arch.iso ISO files can be created for two architectures (x64 and x86) and can be either burned or copied to installation media and used to boot physical computers or attached to virtual machines to boot them into the deployment process.
LiteTouchPE_arch.iso ISO files can be created for two architectures (x64 and x86) and can be either burned or copied to installation media and used to boot physical computers or attached to virtual machines to boot them into the deployment process.
![]() LiteTouchPE_arch.wim WIM files can also be created for two architectures (x64 and x86) and imported into a Windows Deployment Services server (if you have one) to enable target systems (physical or virtual) to PXE-boot into the deployment process.
LiteTouchPE_arch.wim WIM files can also be created for two architectures (x64 and x86) and imported into a Windows Deployment Services server (if you have one) to enable target systems (physical or virtual) to PXE-boot into the deployment process.
Note: Selecting boot image format
Because Windows Server 2012 and later can be installed only on x64 system hardware, you must use either the LiteTouchPE_x64.wim or LiteTouchPE_x64.wim files as your boot image for kick-starting the deployment process. You cannot use ISO or WIM files for the x86 architecture for deploying Windows Server 2012 or Windows Server 2012 R2.
Step 11. Deploying the master image and capturing the reference image
At this point, you are ready to use your technician computer to deploy Windows Server 2012 or later, along with any additional software or customizations you have specified, to the reference computer in your build lab. To do this, you complete the following steps:
1. Boot the bare-metal reference computer by using the boot image (either ISO or WIM) created in step 10.
2. Proceed through the steps of the Windows Deployment Wizard as they appear on the reference computer, responding to each prompt as appropriate. For example, on the Capture Image page shown in Figure 2-8, you can select the option Capture An Image Of This Reference Computer, which installs Windows, runs Sysprep, captures an image, and copies the image over the network to the Captures folder of your deployment share on your technician computer.
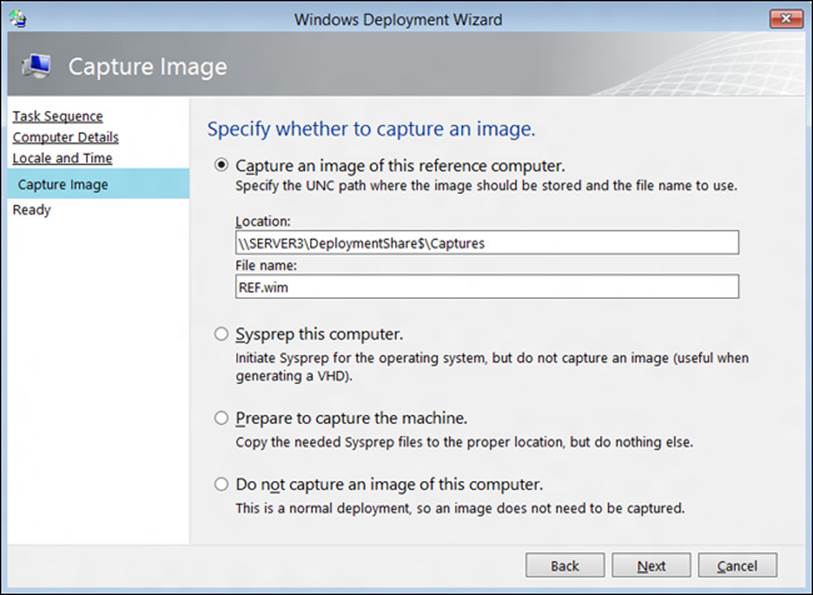
FIGURE 2-8 Specify that an image be captured when the installation is finished.
![]() Quick check
Quick check
![]() Which MDT configuration file could you configure to control which pages of the Windows Deployment Wizard are displayed on target systems during the deployment process?
Which MDT configuration file could you configure to control which pages of the Windows Deployment Wizard are displayed on target systems during the deployment process?
Quick check answer
![]() CustomSettings.ini
CustomSettings.ini
Testing reference images
After you build your reference image, you should first deploy it on a test system in your build lab to make sure everything works as intended. Depending on whether your production environment has physical servers or virtual machines, you can choose either physical servers or virtual machines as your test system.
To test your reference image, use your build lab to do the following:
1. Create a new task sequence of type Standard Server Task Sequence that you will use to deploy your reference image to your test system.
2. Prepare your boot media for the deployment process by doing one of the following:
![]() Burning the LiteTouchPE_64.iso file to DVD media for manually booting a physical test system
Burning the LiteTouchPE_64.iso file to DVD media for manually booting a physical test system
![]() Attaching the LiteTouchPE_64.iso to a virtual machine for manually booting a virtual test system
Attaching the LiteTouchPE_64.iso to a virtual machine for manually booting a virtual test system
![]() Importing the LiteTouchPE_64.wim file into a Windows Deployment Services server for automatically booting a test system (physical or virtual) by using PXE boot
Importing the LiteTouchPE_64.wim file into a Windows Deployment Services server for automatically booting a test system (physical or virtual) by using PXE boot
3. Boot the test system and deploy your reference image onto it.
4. When the deployment process has completed, log on to your test system and verify that the software and customizations you specified to be included in the installation have been installed and applied as intended.
When you’re satisfied that your reference image works properly, you are ready to deploy it onto systems in your production environment.
Lesson summary
![]() The ADK for Windows 8.1 should be installed on the technician computer before installing MDT 2013.
The ADK for Windows 8.1 should be installed on the technician computer before installing MDT 2013.
![]() A deployment share is a shared folder on the technician computer that can contain operating-system source files, out-of-box drivers, applications, packages such as software updates, task sequences, and other advanced configuration features.
A deployment share is a shared folder on the technician computer that can contain operating-system source files, out-of-box drivers, applications, packages such as software updates, task sequences, and other advanced configuration features.
![]() You can modify two MDT configuration files (BootStrap.ini and CustomSettings.ini) to automate some or all of the deployment process.
You can modify two MDT configuration files (BootStrap.ini and CustomSettings.ini) to automate some or all of the deployment process.
![]() You can customize task sequences to modify which actions are performed during the deployment process.
You can customize task sequences to modify which actions are performed during the deployment process.
![]() Updating a deployment share generates boot media that can be used to kick-start the deployment process.
Updating a deployment share generates boot media that can be used to kick-start the deployment process.
![]() You can use MDT in your build lab to deploy a reference computer and to sysprep and capture its installation as a reference image.
You can use MDT in your build lab to deploy a reference computer and to sysprep and capture its installation as a reference image.
Lesson review
Answer the following questions to test your knowledge of the information in this lesson. You can find the answers to these questions and explanations of why each answer choice is correct or incorrect in the “Answers” section at the end of this chapter.
1. Which of the following is not a software prerequisite for installing MDT 2013 on a technician computer running Windows 7 to deploy Windows Server 2012 R2?
A. Microsoft Management Console version 3.0
B. Microsoft .NET Framework 3.5 with Service Pack 1 (SP1) or later
C. Windows PowerShell version 2.0 or later
D. The latest version of the Windows Automated Installation Kit (Windows AIK)
2. When building reference images, what step should you always perform after importing your operating-system source files, out-of-box drivers, applications, and packages into your deployment share; creating and customizing any necessary task sequences; and modifying the configuration files for your deployment share?
A. Deploy and capture the reference image.
B. Update the deployment share.
C. Create selection profiles.
D. Create linked deployment shares.
3. What is the name of the task-sequence group that controls the phase of the deployment process during which the BIOS of the target computer is checked to ensure that it is compatible with the operating system you are deploying?
A. Validate
B. Preinstall
C. Install
D. Postinstall
Lesson 4: Deploying images
After you build your customized reference image of Windows Server 2012 or later, you can use various tools and approaches for deploying the image in your production environment. In addition to manual installations, which are suitable only for organizations that have a handful of computers to deploy, the two main deployment strategies are Lite Touch Installation (LTI) and Zero Touch Installation (ZTI).
After this lesson, you will be able to:
![]() Make decisions concerning which deployment strategy and tools should be used to set up the deployment infrastructure of your production environment.
Make decisions concerning which deployment strategy and tools should be used to set up the deployment infrastructure of your production environment.
![]() Explain the LTI approach to deploying Windows images and the tools needed for this approach.
Explain the LTI approach to deploying Windows images and the tools needed for this approach.
![]() Describe the steps involved in performing an LTI deployment using a reference image created in a build lab.
Describe the steps involved in performing an LTI deployment using a reference image created in a build lab.
![]() Explain the ZTI approach to deploying Windows images and the tools needed for this approach.
Explain the ZTI approach to deploying Windows images and the tools needed for this approach.
![]() Describe what System Center Configuration Manager provides for deployment that MDT with Windows Deployment Services doesn’t provide.
Describe what System Center Configuration Manager provides for deployment that MDT with Windows Deployment Services doesn’t provide.
![]() Describe some of the benefits of integrating MDT with System Center Configuration Manager.
Describe some of the benefits of integrating MDT with System Center Configuration Manager.
Estimated lesson time: 15 minutes
Preparing the deployment infrastructure
Setting up the deployment infrastructure for your production environment involves making the following decisions:
![]() Which type of deployment strategy (LTI or ZTI) best meets the needs of your business
Which type of deployment strategy (LTI or ZTI) best meets the needs of your business
![]() What deployment tools are needed to implement your deployment strategy
What deployment tools are needed to implement your deployment strategy
Figure 2-9 shows the general setup for a deployment infrastructure in a production environment. For the LTI approach, all components except System Center Configuration Manager are generally required. For the ZTI approach, all the components shown should usually be used.
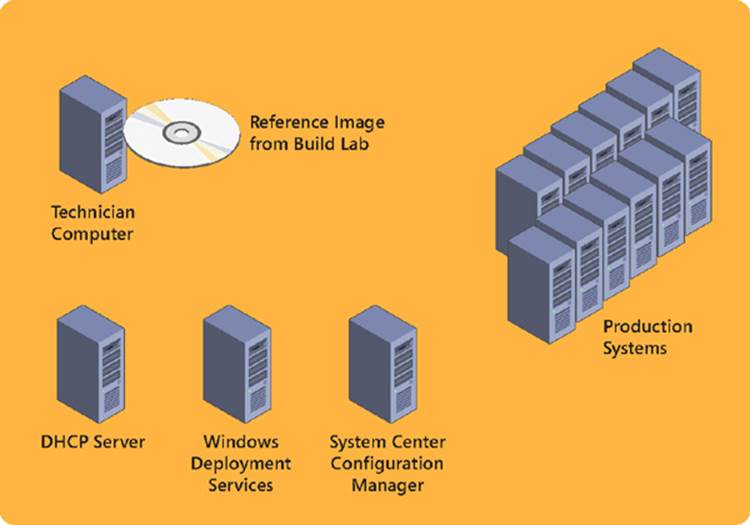
FIGURE 2-9 This is the general setup for a production-environment deployment structure.
Using the LTI approach
LTI is a high-volume deployment strategy for small to midsized organizations that combines MDT with Windows Deployment Services, a server role of Windows Server 2008 and later that enables new computers to be deployed through network-based installation. By including Windows Deployment Services in the deployment infrastructure of your production environment, target systems such as bare-metal servers can PXE-boot using the LiteTouchPE_x64.wim boot image created when you update the deployment share in the MDT Deployment Workbench.
In a deployment infrastructure based on MDT and Windows Deployment Services, the deployment process works like this:
1. In your build lab, create a reference image of Windows Server 2012 or later with any applications, drivers, software updates, or packages needed for servers in your production environment.
2. The next step depends on whether your build lab is isolated from your production environment:
![]() If your build lab is isolated from your production environment, copy the deployment share folder from the MDT technician computer in your build lab to removable media. Then paste the deployment share folder into the file system of the technician computer in your production environment, share the folder, open it in the Deployment Workbench, and update the network path references in the Bootstrap.ini file as needed.
If your build lab is isolated from your production environment, copy the deployment share folder from the MDT technician computer in your build lab to removable media. Then paste the deployment share folder into the file system of the technician computer in your production environment, share the folder, open it in the Deployment Workbench, and update the network path references in the Bootstrap.ini file as needed.
![]() If your build lab shares network connectivity with your production environment, you can use the Linked Deployment Shares feature to replicate the deployment share in your build lab to the technician computer in your production environment. The advantage of this is that when you make changes to your build lab, the changes are reflected in your production environment. The disadvantage is that you might have task sequences or other customizations in your production environment that should be used only for your build lab.
If your build lab shares network connectivity with your production environment, you can use the Linked Deployment Shares feature to replicate the deployment share in your build lab to the technician computer in your production environment. The advantage of this is that when you make changes to your build lab, the changes are reflected in your production environment. The disadvantage is that you might have task sequences or other customizations in your production environment that should be used only for your build lab.
3. Next use the Deployment Workbench in your production environment to create a Standard Server Task Sequence for deploying your reference image to target systems. Modify the settings in the CustomSettings.ini file to automate the steps of the deployment process. Then update the deployment share to regenerate the boot images in the \Boot folder of your deployment share folder.
4. Import the LiteTouchPE_x64.wim boot image from your deployment share into the Boot Images folder of the Windows Deployment Services server in your production environment.
5. Turn on each target system in your production environment, press F12, and select the option to PXE-boot the system.
6. The target systems then download the LTI boot image from the Windows Deployment Services server, connect to the deployment share, and install the reference image.
Using the ZTI approach
ZTI is a high-volume deployment strategy for midsized to large organizations that combines MDT with System Center Configuration Manager, which is part of the System Center family of products from Microsoft. System Center Configuration Manager provides a complete systems management platform that organizations can use to do the following:
![]() Deploy operating systems, applications, and software updates
Deploy operating systems, applications, and software updates
![]() Monitor and remediate computers for compliance purposes
Monitor and remediate computers for compliance purposes
![]() Monitor hardware and perform software inventorying
Monitor hardware and perform software inventorying
![]() Remotely administer computers
Remotely administer computers
Compared to the LTI approach, which uses MDT with Windows Deployment Services, the ZTI approach to deployment, which uses System Center Configuration Manager, provides the following additional benefits:
![]() Support for replication. (MDT requires using Distributed File System Replication.)
Support for replication. (MDT requires using Distributed File System Replication.)
![]() Support for performing multicast deployment. (MDT requires using Windows Deployment Services.)
Support for performing multicast deployment. (MDT requires using Windows Deployment Services.)
![]() Support for the bandwidth management of image transfers.
Support for the bandwidth management of image transfers.
![]() Support for reporting on driver availability for devices across your organization.
Support for reporting on driver availability for devices across your organization.
![]() Support for complex repartitioning schemes and for formatting disks. (This can also be done using MDT, but it requires custom scripting using Diskpart.)
Support for complex repartitioning schemes and for formatting disks. (This can also be done using MDT, but it requires custom scripting using Diskpart.)
![]() Tolerance of poor or intermittent network connectivity.
Tolerance of poor or intermittent network connectivity.
![]() Support for client operating system–initiated deployment.
Support for client operating system–initiated deployment.
![]() Support for fully unattended deployment.
Support for fully unattended deployment.
![]() Support for offline deployment from media and CD/DVD spanning.
Support for offline deployment from media and CD/DVD spanning.
![]() Support for encryption and password protection.
Support for encryption and password protection.
Although System Center Configuration Manager can be used by itself for deploying Windows to target systems, integrating MDT with System Center Configuration Manager provides additional advantages, such as task-sequence templates for different types of deployment scenarios, wizards to create packages and task sequences from MDT templates, wizards to create new boot images, and more.
To deploy Windows Server 2012 R2 using the ZTI approach, you should use the following:
![]() MDT 2013
MDT 2013
![]() System Center Configuration Manager 2012 R2
System Center Configuration Manager 2012 R2
More Info: System Center Configuration Manager 2012 R2
For more information on System Center Configuration Manager 2012 R2, visit the System Center Technical Resources page on TechNet at http://technet.microsoft.com/en-us/systemcenter/default.
Lesson summary
![]() Key decisions in planning a deployment infrastructure for a production environment are selecting a deployment strategy and choosing tools for implementing your strategy.
Key decisions in planning a deployment infrastructure for a production environment are selecting a deployment strategy and choosing tools for implementing your strategy.
![]() LTI is a high-volume deployment strategy for small to midsized organizations that combines MDT with Windows Deployment Services.
LTI is a high-volume deployment strategy for small to midsized organizations that combines MDT with Windows Deployment Services.
![]() Windows Deployment Services enables bare-metal target systems to PXE-boot using the LiteTouchPE_x64.wim boot image created when your MDT deployment share is updated.
Windows Deployment Services enables bare-metal target systems to PXE-boot using the LiteTouchPE_x64.wim boot image created when your MDT deployment share is updated.
![]() ZTI is a high-volume deployment strategy for midsized to large organizations that combines MDT with System Center Configuration Manager.
ZTI is a high-volume deployment strategy for midsized to large organizations that combines MDT with System Center Configuration Manager.
![]() The ZTI approach to deployment using System Center Configuration Manager provides many additional benefits over LTI, especially for larger organizations.
The ZTI approach to deployment using System Center Configuration Manager provides many additional benefits over LTI, especially for larger organizations.
![]() Although System Center Configuration Manager can be used by itself for deploying Windows to target systems, combining System Center Configuration Manager with MDT provides some additional advantages.
Although System Center Configuration Manager can be used by itself for deploying Windows to target systems, combining System Center Configuration Manager with MDT provides some additional advantages.
Lesson review
Answer the following questions to test your knowledge of the information in this lesson. You can find the answers to these questions and explanations of why each answer choice is correct or incorrect in the “Answers” section at the end of this chapter.
1. Which of the following is not true concerning the LTI approach? (Choose all that apply.)
A. LTI is a high-volume deployment strategy for midsized to large organizations that combines MDT with System Center Configuration Manager.
B. You use LTI to deploy the reference images created in your build lab onto systems in your production environment.
C. You can use LTI to deploy Windows Server 2012 R2 onto physical systems only, not virtual machines.
D. You can start LTI by pressing F12 on each target system and selecting the option to PXE-boot the system.
2. Which of the following are benefits of using the ZTI approach over LTI? (Choose all that apply.)
A. Support for bandwidth management of image transfer
B. Support for reporting on driver availability for devices across your organization
C. Tolerance of poor or intermittent network connectivity
D. Support for fully unattended deployment
Practice exercises
The goal of this section is to provide you with hands-on practice with the following:
![]() Converting between installation options
Converting between installation options
![]() Building a reference image by using MDT 2013
Building a reference image by using MDT 2013
To perform the following exercises, you need the following:
![]() A server with a clean installation of Windows Server 2012 R2 using the Server With A GUI installation option. The server should be a stand-alone server belonging to a workgroup, have Internet connectivity, and have no additional roles or features installed. You should be logged on interactively to the server using a user account that is a member of the local Administrators group. For the purposes of these exercises, the name of the server is assumed to be SERVER1.
A server with a clean installation of Windows Server 2012 R2 using the Server With A GUI installation option. The server should be a stand-alone server belonging to a workgroup, have Internet connectivity, and have no additional roles or features installed. You should be logged on interactively to the server using a user account that is a member of the local Administrators group. For the purposes of these exercises, the name of the server is assumed to be SERVER1.
![]() A second server that meets the requirements for installing Windows Server 2012 R2 but that currently has no operating system installed. This server should be connected to the same network as the first server. It will be used as the reference computer for Exercise 2.
A second server that meets the requirements for installing Windows Server 2012 R2 but that currently has no operating system installed. This server should be connected to the same network as the first server. It will be used as the reference computer for Exercise 2.
Both servers can be either physical server systems or virtual machines running on a Hyper-V host. If your Hyper-V host is running Windows Server 2008 R2, you must install the hotfix described in http://support.microsoft.com/kb/2744129 before virtual machines with Windows Server 2012 R2 installed can run on the host. This is not an issue if your Hyper-V host has Windows Server 2012 or later installed.
If you will be using physical server systems for Exercise 2, you will need a DVD writer drive and recordable DVD media so you can burn the .iso boot image file created by MDT onto DVD media to deploy the image onto your reference computer.
Exercise 1: Converting between installation options
In this exercise, you install and configure a Server Core installation of Windows Server 2012 R2. You then use Windows PowerShell to convert your server first to a Minimal Server Interface installation and then to a Server With A GUI installation, using a locally mounted image rather than over the Internet.
1. Boot your server using Windows Server 2012 R2 installation media. If you are using a bare-metal physical server, insert your installation media and turn on the server. If you are using a new virtual machine, select the Install An Operating System From A Boot CD/DVD-ROM option on the Installation Options page of the New Virtual Machine Wizard, select the .iso image file for your installation media, complete the wizard, and start the virtual machine.
2. When the Windows Setup Wizard appears, verify your language, time/currency, and keyboard/input settings and then click Next.
3. On the next wizard page, click Install Now.
4. On the Select The Operating System You Want To Install page, select Windows Server 2012 R2 (Server Core Installation) and then click Next.
5. On the License Terms page, read and accept the license terms and then click Next.
6. On the Which Type Of Installation Do You Want? page, click Custom: Install Windows Only (Advanced).
7. On the Where Do You Want To Install Windows? page, click Next to begin installing Windows. Your server will reboot several times during the installation process.
8. When the installation is finished and the logon screen appears, click OK, type a password for the built-in Administrator account twice, press Enter, and click OK to log on to your server. Because you installed Windows Server 2012 R2 using the Server Core Installation option, you will see only a command prompt window and no desktop.
9. Type sconfig and press Enter to run the Server Configuration command-line utility.
10. Type 2, press Enter, and then type SERVER1 as the new name for your server. Press Enter twice, wait for your server to restart, and then log on again as Administrator.
11. Type sconfig in the command prompt window to run the Server Configuration command-line utility again. Press Enter whenever needed to select configuration options and run commands.
12. Type 8 to display a list of network adapters on the server. Make a note of the index number of an active network adapter, type this index number, and then press Enter.
13. Type 1 to configure IP address settings for the selected adapter.
14. Type S to specify that the adapter will have a static IP address assigned to it. Note that you must choose the IP address, subnet mask, default gateway, and DNS server settings you assign to the adapter to enable your server to have connectivity with the Internet.
15. Type the IP address you want to assign to the adapter.
16. Type the subnet mask you want to assign to the adapter.
17. Type the default gateway you want to assign to the adapter.
18. Type 2 to configure DNS server settings for the adapter.
19. Type the IP address of the preferred DNS server you want to assign to the adapter.
20. Type the IP address of the alternate DNS server you want to assign to the adapter.
21. Type 4 to return to the main menu of the Sconfig.exe utility.
22. Type 6 to verify that your server has Internet connectivity by checking Windows Update for any recommended updates for your server.
23. In the new command prompt window that opens, type R to search only for recommended updates for your server.
24. When a list of recommended updates appears, type A to download and install all recommended updates on your server.
25. If a Restart Required dialog box appears, click Yes, wait for your server to restart, and then log on again as Administrator.
26. Type mmc.exe in the command prompt window and verify that the Microsoft Management Console (MMC) is not available in the Server Core Installation option.
27. Disconnect your server from the network so that it cannot access the Internet.
28. Type mkdir C:\mountdir to create a new folder to mount the install.wim file found in the \sources folder of your installation media.
29. Type dism /get-wiminfo /wimfile:<drive>:sources\install.wim, where <drive> is the drive letter for your server’s bootable media. Make a note of the index number of a Server With A GUI image in the install.wim file.
30. Type dism /mount-wim /wimfile:<drive>:\sources\install.wim /index:<index_number> /mountdir:C:\mountdir /readonly to mount the image that has the index number you noted in the previous step.
31. Type powershell and press Enter to change the command prompt window to a Windows PowerShell console.
32. Run the command Install-WindowsFeature Server-Gui-Mgmt-Infra –Restart –Source C:\mountdir\windows\winsxs to convert your server from a Server Core installation to a Minimal Server Interface installation. When the feature is finished installing, wait for your server to restart and then log on again as Administrator.
33. Close the Server Manager console when it opens.
34. Type mmc.exe and press Enter in the command prompt window and verify that the Microsoft Management Console (MMC) is available in the Minimal Server Interface option.
35. Close the MMC and reconnect your server to the network so that it can access the Internet again.
36. Type powershell and press Enter to change the command prompt window to a Windows PowerShell console.
37. Run the command Install-WindowsFeature Server-Gui-Shell –Restart to convert your server from a Minimal Server Interface installation to a Server With A GUI installation. Because the feature you are installing must first be downloaded from Windows Update, the installation might take several minutes to complete. When the feature is finished installing, wait for your server to restart and then log on again as Administrator.
38. Verify that the server now has a standard Windows desktop that includes all administrative tools and utilities.
Exercise 2: Building a reference image by using MDT 2013
In this exercise, you install and configure MDT 2013 and its prerequisites on SERVER1, your stand-alone server running Windows Server 2012 R2 that you used in the previous exercise. You then use MDT to deploy Windows Server 2012 R2 on a reference computer (your other server system), run Sysprep.exe on the installation, capture an image from it, and upload the captured reference image to the deployment share on your technician computer.
1. Log on to the Server With A GUI installation of Windows Server 2012 R2 that you used in Exercise 1 using a user account that is a member of the built-in Administrators group on the server.
2. When Server Manager opens, select Local Server from the navigation pane.
3. Make sure that the Computer Name property displays SERVER1. If it doesn’t, click the current server name and change the name of the server to SERVER1. Reboot the server when prompted and return to step 1 above.
4. Make sure that the network interface card (NIC) on the server has TCP/IP configured properly so that the server has connectivity with the Internet. If it doesn’t, click the current NIC settings and manually configure an IP address, subnet mask, default gateway, and DNS server address as needed.
5. On the Local Server page, in the Properties tile, change the IE Enhanced Security Configuration setting from On to Off for Administrators.
6. Press Windows key+R, type iexplore, and press OK to launch Internet Explorer in desktop mode.
7. Open the URL http://www.microsoft.com/en-us/download/details.aspx?id=39982 in Internet Explorer and use it to download the ADK for Windows 8.1 installation bootstrap file (adksetup.exe) from the Microsoft Download Center.
8. Double-click the bootstrap file to launch the Assessment And Deployment Kit installation wizard and accept the default options on the Specify Location, Join The Customer Experience Improvement Program, and License Agreement pages.
9. On the Select The Features You Want To Install page, make sure only the following options are selected:
![]() Deployment Tools
Deployment Tools
![]() Windows Preinstallation Environment (Windows PE)
Windows Preinstallation Environment (Windows PE)
10. Click Install to install the selected ADK components on the computer. Note that the installation might take some time because of the size of the download.
11. Download the Windows Installer (.msi) file for the x64 version of MDT 2013 from the Microsoft Download Center by following the link on the Microsoft Deployment Toolkit home page at http://www.microsoft.com/en-us/download/details.aspx?id=40796&fwLinkID=325278.
12. Double-click the .msi file to launch the Setup Wizard and follow the prompts to accept the Microsoft Software License Terms and install the default MDT components.
13. Press the Windows key to switch to the modern user interface.
14. Click the Deployment Workbench tile to launch the Deployment Workbench.
15. Right-click the Deployment Shares node in the console tree and select New Deployment Share.
16. Proceed through the New Deployment Share Wizard using the default options on the Path, Share, and Descriptive Name pages.
17. On the Options page, clear all the check boxes except the one labeled Ask If An Image Should Be Captured.
18. Finish the wizard to create the deployment share.
19. Right-click the Operating Systems node of your deployment share and select Import Operating System.
20. Proceed through the Import Operating System Wizard using the default options on all pages except for the Source page, where you must specify the path to a directory where the Windows Server 2012 R2 installation files can be found. For example, you could specify the DVD drive on the computer where your Windows Server 2012 R2 installation media has been inserted.
21. Right-click the Task Sequences node of your deployment share and select New Task Sequence.
22. On the General Settings page of the New Task Sequence Wizard, type REFIMG as the task sequence ID and Capture Reference Image as the task sequence name.
23. On the Select Template page, leave Standard Server Task Sequence selected.
24. On the Select OS page, select a Windows image that doesn’t have CORE as part of its name.
25. On the Specify Product Key page, leave the option Do Not Specify A Product Key selected.
26. On the OS Settings page, type Contoso Ltd. in the Organization field.
27. On the Admin Password page, type Pa$$w0rd in both fields.
28. Complete the wizard to create your new task sequence.
29. In the Task Sequences node of your deployment share, right-click the new task sequence you created and select Properties.
30. Switch to the Task Sequence tab of the properties sheet.
31. Expand the State Restore task-sequence group to show the task-sequence steps within it.
32. Click the Windows Update (Pre-Application Installation) step to display its properties.
33. Switch to the Options tab for this step and clear the following two check boxes:
![]() Disable This Step
Disable This Step
![]() Continue On Error
Continue On Error
34. Click Apply and verify that the Windows Update (Pre-Application Installation) step now has a green check-mark icon beside it.
35. Click the Windows Update (Post-Application Installation) step to display its properties.
36. Switch to the Options tab for this step and clear the following two check boxes:
![]() Disable This Step
Disable This Step
![]() Continue On Error
Continue On Error
37. Click Apply and verify that the Windows Update (Post-Application Installation) step now has a green check-mark icon beside it.
38. Click OK to close the properties of your task sequence.
39. Right-click the node representing your deployment share and select Update Deployment Share.
40. Accept the default options of the Update Deployment Share Wizard to update your deployment share and create boot media for kick-starting the deployment process. This might take several minutes to complete.
41. If your build lab is using virtual machines in a Hyper-V environment, copy the LiteTouchPE_x64.iso file from the C:\DeploymentShare\Boot folder on your technician computer to a shared folder (for example, C:\Boot) on your host machine. Make sure the shared folder has NTFS and shared folder permissions to allow Everyone full access to the contents of the folder. If your build lab is using physical systems instead of virtual machines, burn the preceding ISO file to bootable media.
42. If your build lab is using virtual machines, create a new virtual machine as your reference computer, configure it to connect to the virtual network on which your technician computer virtual machine resides and assign the LiteTouchPE_x64.iso file to the virtual DVD drive of your new virtual machine. Then start the new virtual machine and open the virtual machine in a Virtual Machine Connection window. If your build lab is using physical systems, insert your bootable media into the reference system and turn on the system.
43. When the Welcome screen for Microsoft Deployment Toolkit appears on your reference computer, click Configure With Static IP Address.
44. In the Configure Network screen that appears next, clear the Enable DHCP check box and specify an IP address, subnet mask, default gateway, and DNS server address so that your reference computer can communicate with both your technician computer and the Internet. Then click Finish to return to the Welcome screen and click Run The Deployment Wizard To Install A New Operating System.
45. In the User Credentials dialog box, type Administrator for the user name, type Pa$$w0rd for the password, and type the host name of your technician computer for the domain. (If your technician computer is domain-joined, you can specify the AD DS domain name instead of the host name.)
46. Click OK to launch the Windows Deployment Wizard.
47. On the Task Sequence page, select the task sequence named Capture Reference Image you created earlier and click Next.
48. On the Computer Details page, type REFCOMP as the computer name and click Next.
49. Verify the language and time settings on the Local And Time page and then click Next.
50. On the Capture Image page, select Capture An Image Of This Reference Computer. Make a note of the file name that will be assigned to the captured .wim file and the folder to which the .wim file will be uploaded on the technician computer and then click Next.
51. On the Ready page, click Begin to start the deployment process. Observe the following actions as they are being performed:
A. Information is gathered about the reference computer.
B. The operating system is installed on the reference computer.
C. Software updates are downloaded from Windows Update and installed on the reference computer.
D. The Windows installation on the reference computer is sysprepped to remove machine-specific information.
E. The Windows installation on the reference computer is captured as a .wim file, and this file is then uploaded to your technician computer.
52. When the deployment is finished, verify that a reference image named REFIMG.wim now exists in the Captures subfolder of the deployment share on your technician computer.
Suggested practice exercises
The following additional practice exercises are designed to give you more opportunities to practice what you’ve learned and to help you successfully master the lessons presented in this chapter:
![]() Exercise 1 Modify the CustomSettings.ini file in Exercise 2 of this lesson to hide all pages of the Windows Deployment Wizard by providing responses to the information for which these pages would prompt you when you deploy Windows Server 2012 R2 onto your reference computer.
Exercise 1 Modify the CustomSettings.ini file in Exercise 2 of this lesson to hide all pages of the Windows Deployment Wizard by providing responses to the information for which these pages would prompt you when you deploy Windows Server 2012 R2 onto your reference computer.
![]() Exercise 2 Set up an LTI deployment infrastructure with MDT, Windows Deployment Services, and a DHCP server and use it to deploy the reference image you created in Exercise 2 of this lesson to a physical system that meets the requirements for installing Windows Server 2012 R2.
Exercise 2 Set up an LTI deployment infrastructure with MDT, Windows Deployment Services, and a DHCP server and use it to deploy the reference image you created in Exercise 2 of this lesson to a physical system that meets the requirements for installing Windows Server 2012 R2.
![]() Exercise 3 Download an evaluation copy of System Center Configuration Manager 2012 R2 from the TechNet Evaluation Center and learn how to perform a ZTI deployment of the reference image you created in Exercise 2 of this lesson.
Exercise 3 Download an evaluation copy of System Center Configuration Manager 2012 R2 from the TechNet Evaluation Center and learn how to perform a ZTI deployment of the reference image you created in Exercise 2 of this lesson.
Answers
This section contains the answers to the lesson review questions in this chapter.
Lesson 1
1. Correct answer: B
A. Incorrect: The Server With A GUI installation option has one more installed feature than the Minimal Server Interface option and two more than the Server Core option.
B. Correct: The Server Core installation option requires the least disk space.
C. Incorrect: The Minimal Server Interface installation option has one more installed feature than the Server Core option.
D. Incorrect: Full installation is the name used for the Server With A GUI installation option on previous versions of Windows Server.
2. Correct answer: D
A. Incorrect: To convert a Server Core installation to a Server With A GUI installation, you can use the following command:
Install-WindowsFeature Server-Gui-Mgmt-Infra,Server-Gui-Shell -Restart
B. Incorrect: To convert a Server With A GUI installation to a Server Core installation, you can use the following command:
Uninstall-WindowsFeature Server-Gui-Mgmt-Infra,Server-Gui-Shell -Restart
C. Incorrect: To convert a Server Core installation to a Minimal Server Interface installation, you can use the following command:
Install-WindowsFeature Server-Gui-Mgmt-Infra -Restart
D. Correct: This command will convert a Server With A GUI installation to a Minimal Server Interface installation.
3. Correct answers: A and B
A. Correct: If you have any roles or features installed on your server that are not needed, you can reduce the server’s disk footprint by uninstalling them. When you do this, however, the binaries for these roles and features will remain staged in the local side-by-side store on the server.
B. Correct: You can use the Uninstall-WindowsFeature cmdlet with the –Remove parameter to completely remove the binaries of a role or feature from the local side-by-side store on the server. Doing this can further reduce the disk footprint of your server.
C. Incorrect: The –Source parameter is used with the Install-WindowsFeature cmdlet to enable roles and features to be installed when their binaries are not present in the local side-by-side store on the server.
D. Incorrect: To remove the binaries for unneeded roles and features from the local side-by-side store on the server, you must use Windows PowerShell. You cannot use Server Manager to do this.
Lesson 2
1. Correct answers: B and D
A. Incorrect: Most of the image engineering process can be performed within a virtual environment running on a Hyper-V host.
B. Correct: If the servers in the production environment to which you will be deploying your reference image are physical systems, you should use sample physical systems taken from production for testing your reference image.
C. Incorrect: Automation of the image-building process can be simplified by using a DHCP server to dynamically assign an IP address to your reference computer.
D. Correct: You must install the necessary tools for building reference images on your technician computer, not your reference computer.
2. Correct answer: D
A. Incorrect: A DHCP server can be used to dynamically assign an IP address to the reference computer.
B. Incorrect: The technician computer has the necessary tools installed for building reference images.
C. Incorrect: The reference computer is the system on which the reference image is created.
D. Correct: The Windows Deployment Services server simplifies the task of deploying the reference image onto the sample physical systems by eliminating the need to burn your boot images onto DVD media to kick-start the reference-image testing process.
3. Correct answer: C
A. Incorrect: The reference computer is the system from which the reference image is created by sysprepping and capturing the installation of Windows on the computer.
B. Incorrect: The installation of Windows on the reference computer is known as the reference installation.
C. Correct: The sysprepped installation of Windows on the reference computer is captured in the form of a Windows Image (.wim) file and copied to the technician computer. The captured, sysprepped image is referred to as the reference image.
D. Incorrect: Test computers are systems (virtual or physical) on which the reference image is deployed to verify that the image works as intended.
Lesson 3
1. Correct answer: D
A. Incorrect: Microsoft Management Console version 3.0 is a prerequisite for installing MDT 2013 on a technician computer running Windows 7.
B. Incorrect: Microsoft .NET Framework 3.5 with Service Pack 1 (SP1) or later is a prerequisite for installing MDT 2013 on a technician computer running Windows 7.
C. Incorrect: Windows PowerShell version 2.0 or later is a prerequisite for installing MDT 2013 on a technician computer running Windows 7.
D. Correct: The Windows Assessment and Deployment Kit (ADK) for Windows 8 is a collection of tools you can use to customize, assess, and deploy Windows operating systems to new computers. The ADK supersedes the Windows Automated Installation Kit (Windows AIK) used by earlier versions of MDT, and it includes additional tools that previously had to be downloaded separately.
2. Correct answer: B
A. Incorrect: Before you deploy and capture the reference image, you should update your deployment share to create or regenerate the boot images that will be used to kick-start the deployment process on the reference computer.
B. Correct: After performing all these steps, you should update your deployment share to create or regenerate the boot images that will be used to kick-start the deployment process on the reference computer.
C. Incorrect: Selection profiles are an advanced feature of MDT that can optionally be used in a build lab where appropriate.
D. Incorrect: Linked deployment shares are an advanced feature of MDT that is generally used in the deployment infrastructure of a production environment, not in a build lab.
3. Correct answer: A
A. Correct: The Validate task-sequence group controls the steps in the phase that verifies that the target computer is capable of running the scripts necessary to complete the deployment process. This includes checking that the BIOS of the target computer is compatible with the operating system being deployed.
B. Incorrect: The Preinstall task-sequence group controls the steps in the phase that completes any tasks that need to be done (such as creating new partitions) before the target operating system is installed on the target computer.
C. Incorrect: The Install task-sequence group controls the steps in the phase that installs the target operating system on the target computer.
D. Incorrect: The Postinstall task-sequence group controls the steps in the phase that completes any tasks that need to be done before restoring the user-state migration data. These tasks customize the target operating system before starting the target computer the first time (such as installing updates or adding drivers).
Lesson 4
1. Correct answers: A and C
A. Correct: ZTI is a high-volume deployment strategy for midsized to large organizations that combines MDT with System Center Configuration Manager. LTI is a high-volume deployment strategy for small to midsized organizations that combines MDT with Windows Deployment Services, a server role of Windows Server 2008 and later that enables new computers to be deployed through network-based installation.
B. Incorrect: To use LTI to deploy Windows Server 2012 R2, begin in your build lab by creating a reference image of Windows Server 2012 R2 with any applications, drivers, software updates, or packages needed for servers in your production environment.
C. Correct: LTI can be used to deploy Windows Server 2012 R2 onto both physical systems and virtual machines.
D. Incorrect: LTI can be started by pressing F12 on each target system and selecting the option to PXE-boot the system using a Windows Deployment Services server.
2. Correct answers: A, B, C, and D
A. Correct: System Center Configuration Manager provides support for bandwidth management of an image transfer. MDT alone does not.
B. Correct: System Center Configuration Manager provides support for reporting on driver availability for devices across your organization. MDT alone does not.
C. Correct: System Center Configuration Manager tolerates poor or intermittent network connectivity. MDT alone does not.
D. Correct: System Center Configuration Manager provides support for fully unattended deployment. MDT alone does not.