Windows Server 2012 R2 Essentials & Configuration (2014)
Chapter 8. Core Active Directory administration
§ Tools for managing Active Directory
§ Managing computer accounts
§ Managing domain controllers, roles, and catalogs
§ Managing organizational units
§ Managing sites
§ Maintaining Active Directory
§ Troubleshooting Active Directory
Core Active Directory administration focuses on key tasks you perform routinely with Active Directory Domain Services (AD DS), such as creating computer accounts or joining computers to a domain. In this chapter, you’ll learn about the tools you can use to manage Active Directory and about specific techniques for managing computers, domain controllers, and organizational units (OUs).
Tools for managing Active Directory
Several sets of tools are available for managing Active Directory, including graphical administration tools, command-line tools, support tools, and Windows PowerShell cmdlets.
Active Directory administration tools
Active Directory administration tools are provided as snap-ins for the Microsoft Management Console (MMC). You use the following key tools to manage Active Directory:
§ Active Directory Administrative Center. For performing management tasks.
§ Active Directory Domains And Trusts. For working with domains, domain trees, and domain forests.
§ Active Directory Module For Windows PowerShell. For managing Active Directory when you are working with Windows PowerShell.
§ Active Directory Sites And Services. For managing sites and subnets.
§ Active Directory Users And Computers. For managing users, groups, computers, and organizational units.
§ Group Policy Management. For managing the way Group Policy is used in the organization. It provides access to Resultant Set of Policy (RSoP) for modeling and logging.
SECURITY ALERT
Windows Firewall can affect remote administration with some MMC snap-ins. If Windows Firewall is enabled on a remote computer and you receive an error message stating that you don’t have appropriate rights, the network path isn’t found, or access is denied, you might need to configure an exception on the remote computer for incoming TCP port 445. To resolve this problem, you can enable the Windows Firewall: Allow Inbound Remote Administration Exception policy setting within Computer Configuration\Policies\Administrative Templates\Network\Network Connections\Windows Firewall\Domain Profile. Alternatively, enter the following at a command prompt on the remote computer: netsh firewall set portopening tcp 445 smb enable. See Microsoft Knowledge Base Article 840634 for more details (support.microsoft.com/default.aspx?scid=kb;en-us;840634).
You can access the Active Directory administration tools from the Tools menu in Server Manager, or add them to any updateable MMC. If you’re using another computer with access to a Windows Server domain, the tools won’t be available until you install them. One technique for installing these tools is to use the Add Roles And Features Wizard to add the Remote Server Administration Tools feature for AD DS.
Active Directory command-line tools
Several tools are provided to let you manage Active Directory from the command line:
§ Adprep. Allows you to manually prepare a Windows forest or domain for installation of Windows domain controllers (DCs). To prepare a forest or a domain, use adprep /forestprep and adprep /domainprep, respectively. If you plan to install any read-only domain controllers, you should also run adprep /rodcprep for the forest.
REAL WORLD
As discussed in Chapter 7 Server Manager for Windows Server 2012 R2 automatically prepares forests and domains for you. However, you must use an account with appropriate permissions. For forest and RODC prep to succeed, you need to use an administrator account that is a member of Enterprise Admins, Schema Admins, or Domain Admins in the forest root domain. For domain prep to succeed, you need to use an account that is a member of the Domain Admins group in an applicable domain.
You can run Adprep on any server running a 64-bit version of Windows Server 2008 R2 or later. The server needs network connectivity to the schema master for the forest and the infrastructure master of the domain where you want to add the domain controller. The server from which you are running Adprep should be domain joined.
§ Dsadd. Adds computers, contacts, groups, organizational units, and users to Active Directory. Enter dsadd objectname /? at a command prompt to display Help information about using the command, such as dsadd computer /?.
§ Dsget. Displays properties of computers, contacts, groups, organizational units, users, sites, subnets, and servers registered in Active Directory. Enter dsget objectname /? at a command prompt to display Help information about using the command, such as dsget subnet /?.
§ Dsmod. Modifies properties of computers, contacts, groups, organizational units, users, and servers that exist in Active Directory. Enter dsmod objectname /? at a command prompt to display Help information about using the command, such as dsmod server /?.
§ Dsmove. Moves a single object to a new location within a single domain or renames the object without moving it. Enter dsmove /? at a command prompt to display Help information about using the command.
§ Dsquery. Uses search criteria to find computers, contacts, groups, organizational units, users, sites, subnets, and servers in Active Directory. Enter dsquery /? at a command prompt to display Help information about using the command.
§ Dsrm. Removes objects from Active Directory. Enter dsrm /? at a command prompt to display Help information about using the command.
§ Ntdsutil. Allows the user to view site, domain, and server information; manage operations masters; and perform database maintenance of Active Directory. Enter ntdsutil /? at a command prompt to display Help information about using the command.
Whereas Adprep is located in the \support\adprep folder on the Windows Server 2012 R2 installation media, the other tools become available when you install the Remote Server Management Tools for AD DS.
Active Directory support tools
Many support tools for Active Directory are included in the management tools for AD DS. Table 8-1 lists some of the most useful support tools for configuring, managing, and troubleshooting Active Directory.
Table 8-1. Quick Reference for Active Directory Support Tools
|
SUPPORT TOOL |
EXECUTABLE NAME |
DESCRIPTION |
|
ADSI Edit |
Adsiedit.msc |
Opens and edits the Active Directory Services Interface for domain, schema, and configuration containers |
|
Active Directory Administration Tool |
Ldp.exe |
Performs Lightweight Directory Access Protocol (LDAP) operations on Active Directory |
|
Directory Services Access Control Lists Utility |
Dsacls.exe |
Manages access control lists (ACLs) for objects in Active Directory |
|
Distributed File System Utility |
Dfsutil.exe |
Manages the Distributed File System (DFS) and displays DFS information |
|
DNS Server Troubleshooting Tool |
Dnscmd.exe |
Manages properties of Domain Name System (DNS) servers, zones, and resource records |
|
Replication Diagnostics Tool |
Repadmin.exe |
Manages and monitors replication by using the command line |
|
Windows Domain Manager |
Netdom.exe |
Allows domain and trust relationships management from the command line |
Using Active Directory Users And Computers
Active Directory Users And Computers is one of the primary administration tools you use to manage Active Directory. With this utility, you can handle all user, group, and computer-related tasks, and manage organizational units.
You can start Active Directory Users And Computers by selecting its related option on the Tools menu in Server Manager. You can also add Active Directory Users And Computers as a snap-in to any console that can be updated. By default, Active Directory Users And Computers works with the domain to which your computer is currently connected. You can access computer and user objects in this domain through the console tree, as shown in Figure 8-1. If you can’t find a domain controller, or if the domain you want to work with isn’t shown, you might need to connect to a domain controller in the current domain or to a domain controller in a different domain. Other high-level tasks you might want to perform with Active Directory Users And Computers are viewing advanced options or searching for objects.
When you access a domain in Active Directory Users And Computers, the following standard set of folders is displayed:
§ Builtin. The list of built-in user accounts and groups.
§ Computers. The default container for computer accounts.
§ Domain Controllers. The default container for domain controllers.
§ ForeignSecurityPrincipals. Information about objects from a trusted external domain. Normally, these objects are created when an object from an external domain is added to a group in the current domain.
§ Managed Service Accounts. The default container for managed service accounts.
§ Microsoft Exchange Security Groups. The default container for groups used by Microsoft Exchange Server. This folder is listed only if Exchange Server is running in the environment.
§ Saved Queries. Contains saved search criteria so that you can quickly perform previously run Active Directory searches.
§ Users. The default container for users.
Active Directory Users And Computers has advanced options that aren’t displayed by default. To access these options and display the following additional folders, tap or click View, and then select Advanced Features:
§ LostAndFound. Contains objects that have been orphaned. You can delete or recover them.
§ NTDS Quotas. Contains directory service quota data.
§ Program Data. Contains stored Active Directory data for Microsoft applications.
§ System. Contains built-in system settings.
§ TPM Devices. Lists devices with Trusted Platform Module (TPM) owner information stored in Active Directory.
You can also add folders for organizational units. In Figure 8-1, there are multiple administrator-created organizational units in the cpandl.com domain. These include Corporate PCs, CustServices, Development, Engineering, and Finance.

Figure 8-1. When you’re working with Active Directory Users And Computers, you can access computer and user objects through the console tree.
By default, you are connected to the local domain and to the first domain controller that responds to your request. You can work with any domain in the forest provided that you have the proper access permissions. To do this, you simply connect to the domain by following these steps:
1. In the console tree, press and hold or right-click Active Directory Users And Computers, and then tap or click Change Domain.
2. The Change Domain dialog box displays the current (or default) domain. Enter a new domain name, or tap or click Browse, select a domain in the Browse For Domain dialog box, and then tap or click OK.
3. If you always want to use this domain when working with Active Directory Users And Computers, select the Save This Domain Setting For The Current Console check box, and then tap or click OK. Otherwise, just tap or click OK.
If you start Active Directory Users And Computers and no objects are available, it might be because you are not connected to a domain, or a domain controller could not be located. You need to connect to a domain controller to access user, group, and computer objects. To connect to a domain controller, follow these steps:
1. In the console tree, press and hold or right-click Active Directory Users And Computers, and then tap or click Change Domain Controller.
The current domain and domain controller you’re working with in the Change Directory Server dialog box are displayed.
2. The Change To list displays the available controllers in the domain. The default selection is Any Writable Domain Controller. If you select this option, you’ll be connected to the domain controller that responds to your request first. Otherwise, choose a specific domain controller to which you want to connect.
3. If you always want to use this domain controller when working with Active Directory Users And Computers, select the Save This Setting For The Current Console check box, and then tap or click OK. Otherwise, just tap or click OK.
NOTE
The Change Directory Server dialog box also shows you the site associated with domain controllers in addition to the domain controller type, version, and status. If the domain controller type is listed as GC, the domain controller is also hosting a global catalog.
You might also want to connect to a specific domain controller for troubleshooting. For example, if you suspect that replication isn’t working properly, you might want to inspect the objects on a specific controller. After you’re connected, you can look for discrepancies in recently updated objects.
Active Directory Users And Computers has a built-in search feature you can use to find accounts, shared resources, and other directory objects. You can easily search the current domain, a specific domain, or the entire directory.
You search for directory objects by following these steps:
1. In the console tree, press and hold or right-click the current domain or a specific container that you want to search, and then tap or click Find. This opens a Find dialog box similar to the one shown in Figure 8-2.
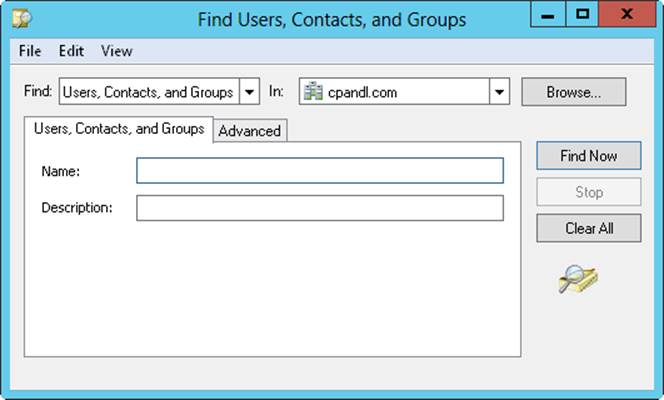
Figure 8-2. In the Find dialog box, you can search for resources in Active Directory.
2. In the Find list, choose the type of search you want. The options include the following:
o Users, Contacts, And Groups. Search for user and group accounts, and also contacts listed in the directory service.
o Computers. Search for computer accounts by type, name, and owner.
o Printers. Search for printers by name, model, and features.
o Shared Folders. Search for shared folders by name or keyword.
o Organizational Units. Search for organizational units by name.
o Custom Search. Perform an advanced search or LDAP query.
o Common Queries. Search quickly for account names, account descriptions, disabled accounts, nonexpiring passwords, and days since the last logon.
3. Using the In list, select the location you want to search. If you chose a container to search in step 2, such as Computers, this container is selected by default. To search all objects in the directory, tap or click Entire Directory.
4. Enter your search parameters, and then tap or click Find Now. As shown in Figure 8-3, any matching entries are displayed in the search results. Double-tap or double-click an object to view or modify its property settings. Press and hold or right-click the object to display a shortcut menu of options for managing the object.
NOTE
The search type determines which text boxes and tabs are available in the Find dialog box. In most cases, you’ll simply want to enter the name of the object you’re looking for in the Name box, but other search options are available. For example, with printers, you can search for a color printer, a printer that can print on both sides of the paper, a printer that can staple, and more.
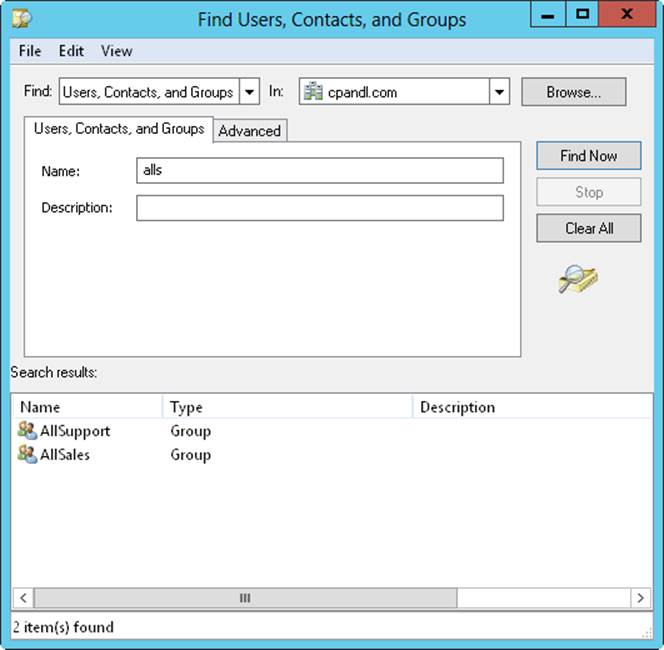
Figure 8-3. Objects that match search criteria are displayed in the search results; you can manage them by pressing and holding or right-clicking their entries.
Active Directory Administrative Center and Windows PowerShell
Active Directory Administrative Center, shown in Figure 8-4, provides a task-orientated interface for managing Active Directory. To start this tool, select the related option from the Tools menu in Server Manager. You can use this tool to perform many common tasks, including the following ones:
§ Connect to one or more domains.
§ Create and manage user accounts, groups, and organizational units.
§ Create and manage password settings objects.
§ Create and manage authentication policy objects.
§ Perform global searches of Active Directory.
§ Raise forest and domain functional levels.
§ Recover deleted objects from the Active Directory Recycle Bin.
Active Directory Administrative Center is installed by default on Windows Server 2012 R2 and is available on client computers when you install the Remote Server Administration Tools (RSAT). This tool uses Windows PowerShell to perform administration tasks and relies on the Microsoft .NET Framework. Both of these features must be installed and properly configured for you to use Active Directory Administrative Center.
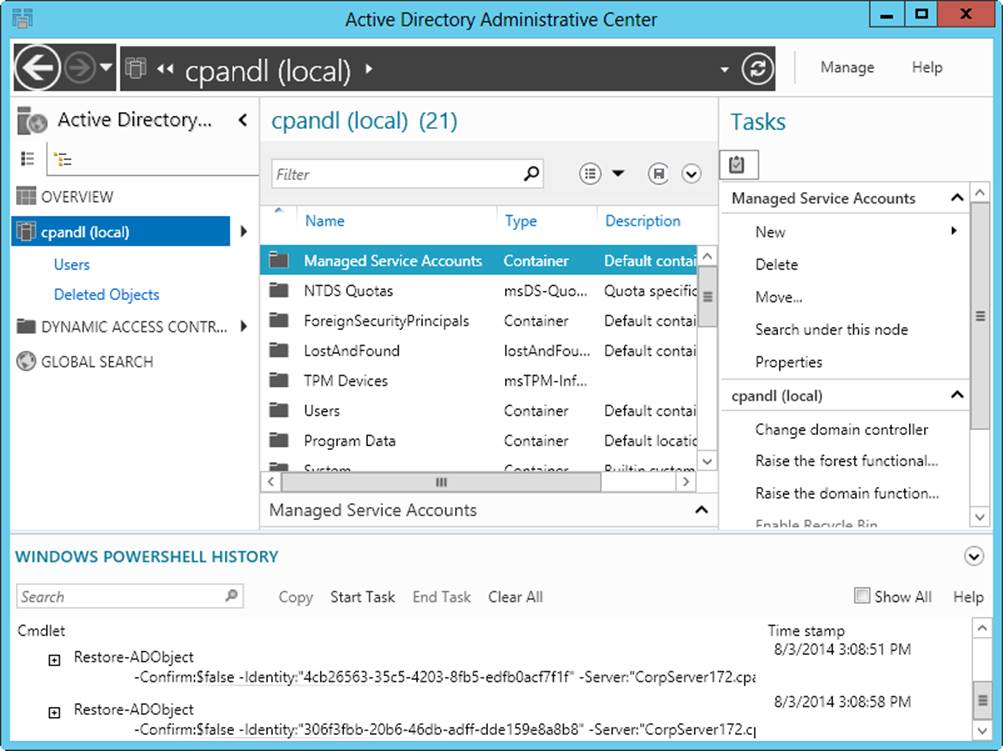
Figure 8-4. Perform task-oriented management of Active Directory.
In Active Directory Administrative Center, the local domain is opened for management by default. If you want to work with a different domain, tap or click Manage, and then tap or click Add Navigation Nodes. In the Add Navigation Nodes dialog box, select the domain you want to work with, and then tap or click OK. Afterward, you can select the domain by tapping or clicking it in the left pane.
By default, you are connected to the first domain controller that responds to your request. For troubleshooting replication, you might want to connect to a specific domain controller. After you’re connected, you can inspect the objects on that controller and look for discrepancies in recently updated objects. To connect to a specific domain controller, tap or click the domain node in the left pane, and then tap or click Change Domain Controller.
Displayed in the Change Domain Controller dialog box are the current domain and domain controller you’re working with, as shown in Figure 8-5. Select a domain controller to use, and then tap or click Change.
Like Active Directory Users And Computers, Active Directory Administrative Center has built-in search features that you can use to find directory objects. The most basic of these is the search filter, which is available when you select a directory container in the left pane.
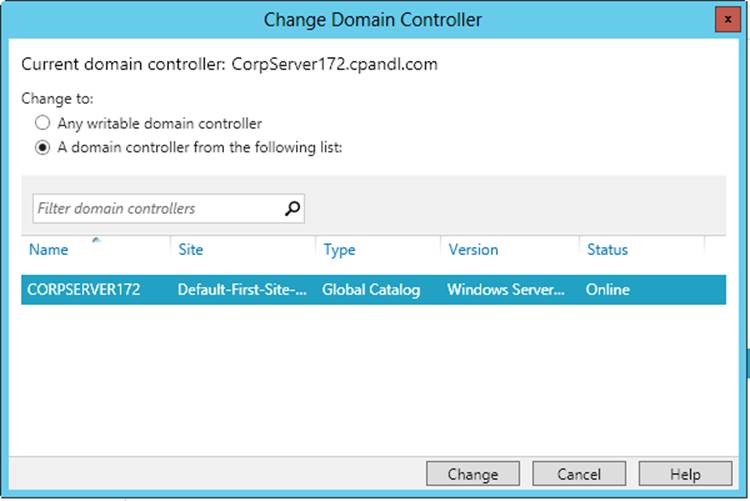
Figure 8-5. Change the domain controller.
Using the search filter, you can quickly find container-level objects within a domain or child OUs within a selected OU. When you select a domain node in the left pane, you can use the filter to quickly find top-level organizational units or built-in containers that start with the letters or words you enter as the filter. For example, you could select the domain node in the left pane and then enter sa in the Filter box to find top-level organizational units that begin with the letters “sa,” such as Sales. As such, a search doesn’t include child OUs or subcontainers; it wouldn’t include the SalesVT or SalesCA organizational units that were child OUs of Sales.
When you select a specific container, you can search within that container by using the same filtering technique. When you select the Global Search node, you can search the names of all container-level objects and also users, groups, computers, and so on for the currently selected container node.
With global searches, you can change the associated container node by tapping or clicking Scope and then selecting a node to use. Select Global Catalog Search as the node to search nonstandard objects, such as attribute schemas, display specifiers, intersite transports, or class schemas.
REAL WORLD
Technically, the filter is based on the start string of any name part of an object. For groups, this means the group name and group Security Accounts Manager (SAM) account name are included. For users, this means the first name, last name, full name, user principal name (UPN), and group SAM account name are included.
Additionally, Active Directory Administrative Center makes use of the web services provided by Active Directory Web Services (ADWS). At least one domain controller in each Active Directory domain you want to manage must have ADWS installed and have the related services running. Connections are made over TCP port 9389 by default, and firewall policies must enable an exception on this port for ADWS.
You can also work with Active Directory by using the Active Directory module for Windows PowerShell. The module is automatically imported when you select the related option on the Tools menu in Server Manager and when you are working with Windows PowerShell 3.0 or later on computers where the Remote Server Administration Tools are installed. Otherwise, this module is not imported into Windows PowerShell by default, and you need to import it before you can work with any Active Directory cmdlets.
At the Windows PowerShell prompt, you can import the Active Directory module by entering Import-Module ActiveDirectory. After the module is imported, you can use it with the currently running instance of Windows PowerShell. The next time you start Windows PowerShell, you need to import the module again if you want to use its features. Alternatively, you can select the Active Directory Module For Windows PowerShell option on the Tools menu in Server Manager to import the module when Windows PowerShell starts.
At the Windows PowerShell prompt, you can list all available cmdlets by entering get-command. Use Get-Help to get more information about how cmdlets are used. If you enter get-help *-*, you get a list of all cmdlets that includes a synopsis of the purpose of each cmdlet. To get Help documentation about a specific cmdlet, enter get-help followed by the cmdlet name. Several dozen Active Directory cmdlets are available, and you can get a list of the ones you’ll use the most by entering get-help *-ad* at the Windows PowerShell prompt.
NOTE
The Active Directory module for Windows PowerShell is installed by default on Windows Server 2012 R2, and it’s available on client computers when you install the Remote Server Administration Tools and select the related options. Windows PowerShell relies on the .NET Framework and Windows Remote Management (WinRM) to perform administrative tasks.
Managing computer accounts
Computer accounts are stored in Active Directory as objects. You use them to control access to the network and its resources. You can add computer accounts to any standard container displayed in Active Directory Users And Computers. The best folders to use are Computers, Domain Controllers, and any organizational units you’ve created.
Creating computer accounts on a workstation or server
The easiest way to create a computer account is to log on to the computer you want to configure and then join a domain, as described in the “Joining a computer to a domain or workgroup” section later in this chapter. When you do this, the necessary computer account is created automatically and placed in the Computers folder or the Domain Controllers folder, as appropriate. You can also create a computer account in either Active Directory Users And Computers or Active Directory Administrative Center before you try to install the computer.
Creating computer accounts in Active Directory Administrative Center
Using Active Directory Administrative Center, you can create a standard computer account, add the account as a member of specific groups, and set properties about the manager of the computer. To do this, follow these steps:
1. In the Active Directory Administrative Center console tree, press and hold or right-click the container in which you want to place the computer account, tap or click New, and then tap or click Computer. This opens the Create Computer dialog box shown in Figure 8-6.
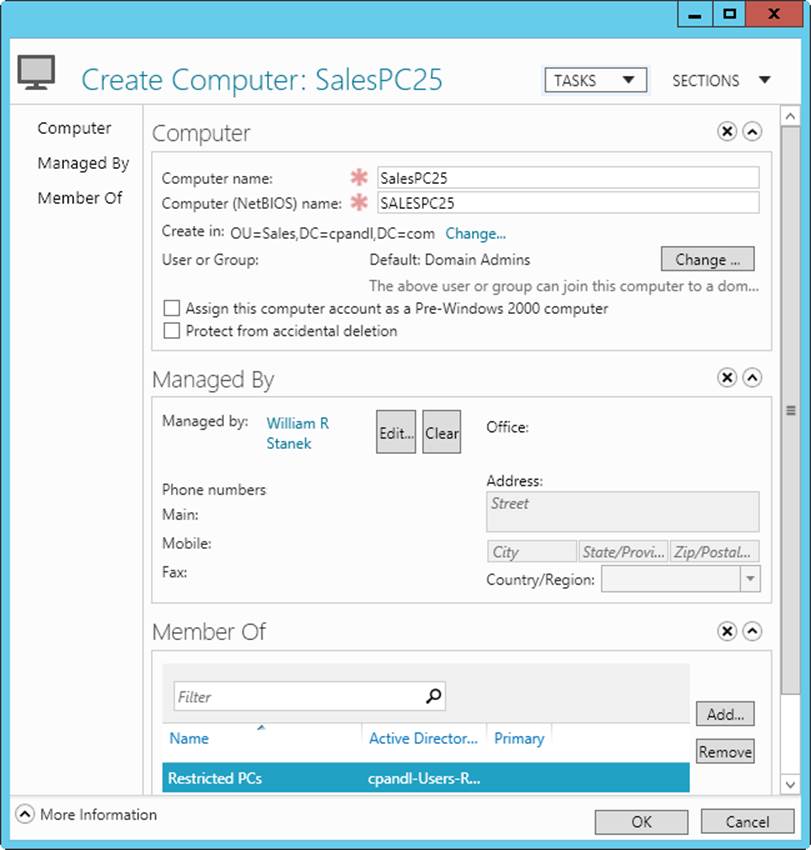
Figure 8-6. Create new computer accounts, and set their managed by and member of properties.
2. Enter the computer name.
3. By default, only members of Domain Admins can join this computer to the domain. To allow a different user or group to join the computer to the domain, tap or click Change, and then select a user or group account in the Select User Or Group dialog box.
NOTE
You can select any existing user or group account. This allows you to delegate the authority to join this computer account to the domain.
4. If this account will be used with applications written for legacy operating systems, select Assign This Computer Account As A Pre–Windows 2000 Computer.
5. Optionally, select Protect From Accidental Deletion to mark the account as protected in Active Directory. Protected accounts can be deleted only if you remove the Protect flag prior to attempting to delete the account.
6. Optionally, assign a security principal as the manager of the computer by tapping or clicking Edit under Managed By, and then selecting a user or group to designate as the manager in the Select User Or Group dialog box. Who you assign as a computer’s manager depends on corporate policy and can include the primary user of the computer, a branch manager at a particular office, or a support contact.
7. The computer account is added to the appropriate default computer group automatically. Typically, this is Domain Computers. You can add the computer account to other groups by tapping or clicking Add under Member Of and then using the Select Groups dialog box to specify groups that have accounts to which the computer account should belong.
8. Tap or click OK to create the computer account.
Creating computer accounts in Active Directory Users And Computers
You can create two types of computer accounts: standard computer accounts and managed computer accounts. Managed computer accounts are available when you’ve installed Windows Deployment Services in your domain.
Using Active Directory Users And Computers, you can create a standard computer account by following these steps:
1. In the Active Directory Users And Computers console tree, press and hold or right-click the container in which you want to place the computer account, tap or click New, and then tap or click Computer. This starts the New Object - Computer Wizard shown in Figure 8-7.
2. Enter the computer name.
3. By default, only members of Domain Admins can join this computer to the domain. To allow a different user or group to join the computer to the domain, tap or click Change, and then select a user or group account in the Select User Or Group dialog box.
NOTE
You can select any existing user or group account. This allows you to delegate the authority to join this computer account to the domain.
4. If this account will be used with applications written for legacy operating systems, select Assign This Computer Account As A Pre–Windows 2000 Computer.
5. If Windows Deployment Services are not installed, tap or click OK to create the computer account. Otherwise, tap or click Next twice, and then tap or click Finish.
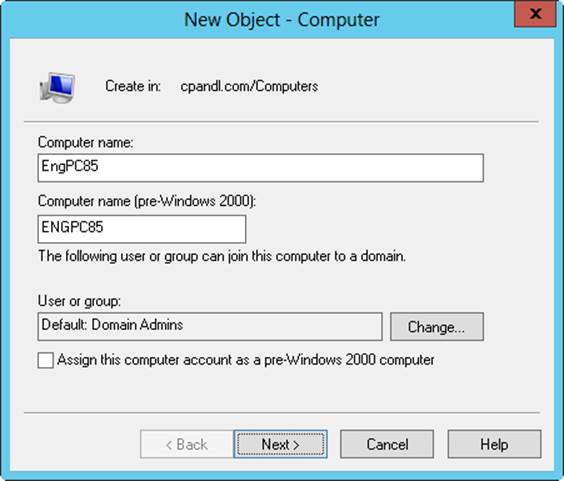
Figure 8-7. Create new computer accounts by using the New Object - Computer Wizard.
When you are working with Windows Deployment Services, managed computer accounts are used to prestage computer accounts so that a computer can be automatically installed. Using Active Directory Users And Computers, you can create a managed computer account by following these steps:
1. Complete steps 1–4 in the previous procedure. Tap or click Next to display the Managed page.
2. Select the This Is A Managed Computer check box, and then enter the computer’s globally unique identifier/universally unique identifier (GUID/UUID). Tap or click Next.
3. On the Host Server page, you have the option to specify which host server to use or to allow any available host server to be used for remote installation. To select a host server, select The Following Remote Installation Server. In the Find dialog box, tap or click Find Now to display a list of all remote installation servers in the organization. Tap or click the host server you want to use, and then tap or click OK to close the Find dialog box.
4. Tap or click Next, and then tap or click Finish.
REAL WORLD
You can find the GUID/UUID in the system BIOS or displayed on the computer case. If Windows PowerShell is installed, you can collect the GUID/UUID by using the Win32_ComputerSystemProduct class of the Windows Management Instrumentation (WMI) interface. The following example returns the universally unique identifier (UUID) of the computer you are logged on to:
get-wmiobject -class win32_computersystemproduct | fl uuid
Here, you return the UUID of a remote computer:
get-wmiobject -class win32_computersystemproduct -computername
engpc24 | format-list pscomputername, uuid
After you create a standard or manager computer account in Active Directory Users And Computers, you might want to mark the account as protected. Protected accounts can be deleted only if you remove the Protect flag prior to attempting to delete the account.
To mark a computer account as protected, follow these steps:
1. In Active Directory Users And Computers, ensure that Advanced Features is selected on the View menu.
2. Double-tap or double-click the computer account to open its Properties dialog box.
3. On the Object tab, select Protect Object From Accidental Deletion, and then tap or click OK.
Viewing and editing computer account properties
Using Active Directory Users And Computers or Active Directory Administrative Center, you can view and edit computer account properties by following these steps:
1. In the console tree, expand the domain node.
2. Select the container or organizational unit in which the computer account is located.
3. Double-tap or double-click the account. This displays a Properties dialog box that allows you to view and edit settings.
In Active Directory Users And Computers, advanced tabs and settings are available only when the Advanced Features option is selected on the View menu. In Active Directory Administrative Center, most advanced options are available via tabs on the Extensions panel.
Deleting, disabling, and enabling computer accounts
If you no longer need a computer account, you can delete it permanently from Active Directory. You can also temporarily disable the account and later enable it to be used again.
To delete, disable, or enable computer accounts, follow these steps:
1. Open Active Directory Users And Computers or Active Directory Administrative Center. In the console tree, select the container in which the computer account is located.
2. Press and hold or right-click the computer account, and then do one of the following:
o Tap or click Delete to delete the account permanently. Tap or click Yes to confirm the deletion.
o Tap or click Disable Account to temporarily disable the account, and tap or click Yes to confirm the action. A red circle with an X indicates that the account is disabled.
o Tap or click Enable Account to enable the account so that it can be used again.
If the account is protected, you need to clear the Protect flag before you can delete the account. Double-tap or double-click the account to open its Properties dialog box. Clear the Protect Object From Accidental Deletion check box, and then tap or click OK. In Properties dialog boxes for Active Directory Users And Computers, this check box is on the Object tab. In Active Directory Administrative Center, this check box is on the Computer panel.
TIP
If an account is currently in use, you might not be able to disable it. Try shutting down the computer or disconnecting the computer session in the Sessions folder of Computer Management.
Resetting locked computer accounts
Computer accounts have passwords, just like user accounts. Unlike user accounts, however, computer account passwords are managed and maintained automatically. To perform this automated management, computers in the domain store a computer account password, which is changed every 30 days by default, and a secure channel password for establishing secure communications with domain controllers. The secure channel password is also updated by default every 30 days, and both passwords must be synchronized. If the secure channel password and the computer account password get out of sync, the computer won’t be allowed to log on to the domain, and a domain authentication error message will be logged for the Netlogon service with an event ID of 3210 or 5722.
If this happens, you need to reset the computer account password. One way to do this is to press and hold or right-click the computer account in Active Directory Users And Computers, and then select Reset Account. You then need to remove the computer from the domain (by making the computer a member of a workgroup or another domain) and then rejoin the computer to the domain.
REAL WORLD
Several other ways to reset the computer account password in the same way are available. In Active Directory Administrative Center, you press and hold or right-click the computer account, and then select Reset Account. At the command prompt, you can use Dsmod Computer -Reset to reset a computer account password. In Windows PowerShell, you can use Reset-ComputerMachinePassword and also Set-ADAccountPassword with the –Reset option to reset a computer account password. The following command runs Reset-ComputerMachinePassword on a remote computer:
Invoke-Command -ComputerName EngPC84 -ScriptBlock
{Reset-ComputerMachinePassword}
All of these options might require the additional steps of removing the computer from the domain (by making the computer a member of a workgroup or another domain) and then rejoining the computer to the domain. The additional steps might be required because the password must be synchronized between the local computer and the domain.
Several tools allow you to reset a computer’s password and sync the changes in the domain. On computers where Windows PowerShell is installed, you can use Test-ComputerSecureChannel to test the secure connection between a local computer and a domain. You’ll want to log on locally to the computer, open a Windows PowerShell prompt, and then enter the command:
test-computersecurechannel
You can use the –Server option to test the communications channel with a specific domain controller. If the command returns False, there is a communications problem, and you can use the –Repair option to reset the account password on the local computer and write this change to the related Computer object on a domain controller in the domain. The password change is then replicated to other domain controllers.
Another tool for resetting a computer’s password and syncing changes is the Netdom command-line utility. See Microsoft Knowledge Base Article 325850 for more details (support.microsoft.com/default.aspx?scid=kb;en-us;325850).
You can use Netdom Verify to test the secure connection between a local computer and a domain. You can use Netdom Resetpwd to reset the account password on the local computer and write this change to the related Computer object on a domain controller in the domain, which in turn ensures that the password change is replicated to other domain controllers.
For a member server, you can reset the computer account password by following these steps:
1. Log on locally to the computer. At a command prompt, enter netdom resetpwd /s:ServerName /ud:domain\UserName /pd:*, where ServerName is the name of the domain controller to use to set the password, domain\UserName specifies an administrator account with the authority to change the password, and * indicates that Netdom should prompt you for the account password before continuing.
2. Enter your password when prompted. Netdom changes the computer account password locally and on the domain controller. The domain controller distributes the password change to other domain controllers in the domain.
3. Restart the computer.
For domain controllers, you must perform additional steps. After you log on locally, you must stop the Kerberos Key Distribution Center service and set its startup type to Manual. After you restart the computer and verify that the pass-word has been successfully reset, you can restart the Kerberos Key Distribution Center service and set its startup type back to Automatic.
Moving computer accounts
Computer accounts are normally placed in the Computers or Domain Controllers containers, or in customized organizational unit containers. You can move an account to a different container by selecting the computer account in Active Direc-tory Users And Computers and then dragging the account to the new location. You can’t click and drag accounts in Active Directory Administrative Center.
Using either tool, you can also use the following technique to move computer accounts:
1. In the console tree, select the container in which the computer account is located.
2. Press and hold or right-click the computer account you want to move, and then tap or click Move. This displays the Move dialog box, shown in Figure 8-8.
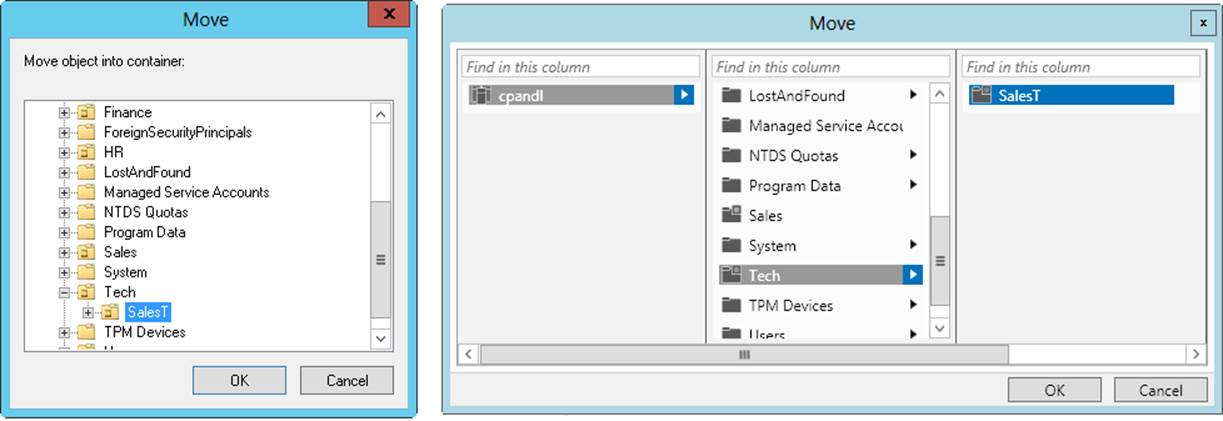
Figure 8-8. In the Move dialog box, you can move computer accounts to different containers. (The dialog box in Active Directory Users And Computers is on the left, and the dialog box in Active Directory Administrative Center is on the right.)
3. In the Move dialog box, use the options provided to select the container to which you want to move the computer. Browse to subcontainers or child OUs as necessary, and then tap or click OK.
Managing computers
As its name indicates, Computer Management is used to manage computers. Whether you’re working with Active Directory Users And Computers or Active Directory Administrative Center, you can open Computer Management and connect to a specific computer by pressing and holding or right-clicking the computer entry and then selecting Manage from the shortcut menu. This starts Computer Management and automatically connects to the selected computer.
Joining a computer to a domain or workgroup
A computer joined to a domain or workgroup can log on and access the network. Before you get started, make sure that networking components are properly installed on the computer. These should have been installed during the setup of the operating system. TCP/IP settings must be correct and permit communications between the computer you’re configuring and a controller in the domain. If Dynamic Host Configuration Protocol (DHCP), Windows Internet Name Service (WINS), and DNS are properly installed on the network, workstations don’t need to be assigned a static IP address or have a special configuration. The only requirements are a computer name and a domain name, which you can specify when joining the computer to the domain.
REAL WORLD
Windows Server 2012 R2 automatically grants the Add Workstations To The Domain user right to the implicit group Authenticated Users. This means that any user who logs on to the domain as a User and is authenticated can add workstations to the domain without needing administration privileges. However, as a security precaution, the number of workstations any such user can add to the domain is limited to 10. If an authenticated user exceeds this limit, an error message is displayed.
Although you can use the Ldp.exe tool from the Windows Server 2012 R2 Support Tools to override the default limit on the number of computers an authenticated user can join to a domain (as set by the ms-DS-MachineAccountQuota attribute), this isn’t a good security practice. A better technique, and a more appropriate technique where security is a concern, is to create the necessary computer account in a specific OU beforehand or to grant the user the advanced security privilege Create Account Objects for the Computers container. You also might want to grant certain users the Delete Account Objects privilege for the Computers container so that designated users can remove computer accounts from the domain.
During installation of the operating system, a network connection was probably configured for the computer, or you might have previously joined the computer to a domain or a workgroup. If so, you can join the computer to a new domain or workgroup. For joining a computer running Windows Vista or later, and Windows Server 2008 or later, to a domain, see the “Configuring server name and domain membership” section in Chapter 3
If the name change is unsuccessful, a message is displayed informing you that the change was unsuccessful or that the account credentials already exist. This problem can occur when you’re changing the name of a computer that’s already connected to a domain and when the computer has active sessions in that domain. Exit applications that might be connected to the domain, such as File Explorer accessing a shared folder over the network. Then repeat the process for changing the computer’s name.
If you have other problems joining a domain, be sure that the computer you’re configuring has the proper networking configuration. The computer must have Networking Services installed, and TCP/IP properties must have the correct DNS server settings.
All authenticated users have the Add Workstations To The Domain user right by default and can create up to 10 computer accounts when joining computers to a domain. Users who have the Create Account Objects privilege for the Computers container aren’t restricted in this way; they can create an unlimited number of computer accounts in the domain. However, computer accounts created by authenticated users have Domain Admins as the account owner, whereas computer accounts created by users with the Create Account Objects privilege have the creator as the owner. If you grant the Create Account Objects privilege, you also might want to grant the Delete Account Objects privilege so that certain users can remove compu-ter accounts from the domain.
You grant the Create Account Objects, the Delete Account Objects privilege, or both privileges for the Computers container by following these steps:
1. Open Active Directory Users And Computers or Active Directory Administrative Center. In Active Directory Users And Computers, ensure that Advanced Features is enabled on the View menu.
2. Press and hold or right-click the Computers container, and then tap or click Properties.
3. On the Security tab, tap or click Advanced. In the Advanced Security Settings For Computers dialog box, tap or click Add to open the Permission Entry For Computers dialog box.
4. Tap or click Select A Principal. In the Select User, Computer, Service Account, Or Group dialog box, enter the name of the user or group to whom you want to grant privileges, and then tap or click OK. Click OK again.
Using offline domain join
Computers running editions of Windows 7 and later designed for workplaces support offline domain join, as do servers running Windows Server 2008 R2 or later. The related utility, Djoin.exe, is included with these editions of Windows. Any member of Domain Admins can perform offline domain joins (as can anyone who is granted the appropriate user rights).
The basic steps for performing an offline domain join operation follow:
1. Create the computer account in Active Directory, and then force replication of the shared secrets of the computer that is to join the domain.
2. Write the relevant state information that the computer needs to join the domain to a text file, and then make the state information available to the computer.
3. When the computer starts, Windows reads the provisioning data, and the computer is joined to the domain.
NOTE
Client computers must be connected to the corporate network to join a domain or receive domain settings. With the remote domain join feature, Windows Server 2012 R2 provides the capability for computers running Windows 8 or later to join a domain and receive domain settings remotely from the Internet.
You run Djoin.exe at an elevated, administrator command prompt to provision the computer account metadata. The computer account metadata is written to a .txt file. After provisioning the computer, you can run Djoin.exe again to request the computer account metadata and insert it into the Windows directory of the destination computer. Alternatively, you can save the computer account metadata in an Unattend.xml file and then specify the Unattend.xml file during an unattended operating system installation.
You can use a .txt file for provisioning by following these steps:
1. Using an account that is allowed to join computers to the domain, log on to a computer that is a member of the domain.
2. Use Djoin.exe to create a text file that contains the computer account metadata. To do this, at an elevated, administrator command prompt, enter djoin /provision /domain DomainName /machine MachineName /savefile FileName, where DomainName is the name of the domain to join, MachineName is the computer name, and FileName is name of the .txt file where the metadata should be saved, such as:
3. djoin /provision /domain cpandl /machine HrComputer15 /savefile
Hrcomputer15.txt
TIP
By default, computer accounts are created in the Computers container. If you want to use a different container, you can add the /Machineou parameter and then specify the container to use. If the computer account object is already created, you can still generate the required metadata by adding the /reuse parameter. If your domain controller is not yet running Windows Server 2008 R2 or Windows Server 2012 R2, add the /downlevel command.
4. On the new computer, use Djoin.exe to import the .txt file. At an elevated, administrator command prompt, enter djoin /requestODJ /loadfile FileName /windowspath %SystemRoot% /localos, where FileName is the name of the metadata file, such as:
5. djoin /requestODJ /loadfile HrComputer15.txt /windowspath
%SystemRoot% /localos
6. Ensure that the new computer is connected to the network, and then restart it. During startup, the computer will be joined to the domain.
You can use an Unattend.xml file for provisioning by creating a section in the Unattend.xml file and then adding the contents of the metadata .txt file to the –AccountData element, as shown in this example:
<Component>
<Component name=Microsoft-Windows-UnattendedJoin>
<Identification>
<Provisioning>
<AccountData> Insert metadata here! </AccountData>
</Provisioning>
</Identification>
</Component>
After you create the Unattend.xml file, start the new computer in safe mode or start the computer in the Windows Preinstallation Environment (Windows PE), and then run the Setup command with an answer file, as shown in the following example:
setup /unattend: FullPathToAnswerFile
Here, FullPathToAnswerFile is the full file path to the Unattend.xml file.
Managing domain controllers, roles, and catalogs
Domain controllers perform many important tasks in Active Directory domains. Many of these tasks are discussed in Chapter 7.
Installing and demoting domain controllers
You install a domain controller by configuring Active Directory Domain Services on a server. Later, if you don’t want the server to handle controller tasks, you can demote the server. It will then act as a member server again. You follow a similar procedure to install or demote servers, but before you do, you should consider the impact on the network and read the “Understanding the directory structure” section in Chapter 7.
As that section explains, when you install a domain controller, you might need to transfer operations master roles and reconfigure the global catalog structure. Also, before you can install Active Directory Domain Services, DNS must be working on the network. When you install AD DS, you can include DNS server installation, if it is needed. When you create a new domain, a DNS delegation is created automatically during the installation process, and to do this requires credentials that have permissions to update the parent DNS zones.
To add the first domain controller that runs Windows Server 2012 R2 to an existing Active Directory infrastructure, the Active Directory Installation Wizard automatically runs Adprep.exe as needed for the forest and domain. Preparing the forest and domain includes updating the Active Directory schema as needed, creating new objects and containers as needed, and modifying security descriptors and access control lists as needed. For forest prep, the account you use must be a member of the Schema Admins group, the Enterprise Admins group, and the Domain Admins group of the domain that hosts the schema master, which is, by default, the forest root domain. For domain prep, you use an account that can log on to the infrastructure master and is a member of the Domain Admins group. For RODC prep, you must use an account that is a member of the Enterprise Admins group.
Before you demote a domain controller, you should shift any key responsibilities to other domain controllers. This means moving the global catalog off the server and transferring any operations master roles, if necessary. You must also remove any application directory partitions that are on the server.
REAL WORLD
Note that with Windows Server 2012 R2 and later, all AD DS installation and configuration tasks are performed via Server Manager. You no longer have to run an installation wizard and a separate command-line promotion task. You also might not need to manually prepare Active Directory for Windows Server 2012 R2.
Also note that you don’t have to demote a domain controller to rename it. You can rename a domain controller at any time. The only problem is that the server is unavailable to users during the renaming process, and you might need to force a directory refresh to reestablish proper communications with the server. You can’t, however, move a domain controller to a different domain. You must demote the domain controller, update the domain settings for the server and its computer account, and then promote the server to be a domain controller once more.
To install a domain controller, follow these steps:
1. In Server Manager, the local server is added automatically for management. If you want to install AD DS on another server, you need to add the server for management by using the Add Servers option. Using Server Manager for remote management requires the configuration discussed in Chapter 3 and a minimum set of permissions. Typically, you must have Domain Admin or other explicit permissions to add a server and remotely manage it. To install a new Active Directory forest, you must be logged on as the local Administrator for the computer. To install a new child domain or new domain tree, you must be logged on as a member of the Enterprise Admins group. To install an additional domain controller in an existing domain, you must be logged on as a member of the Domain Admins group.
2. In Server Manager, tap or click Manage, and then tap or click Add Roles And Features. This starts the Add Roles And Features Wizard. If the wizard displays the Before You Begin page, read the Welcome message, and then tap or click Next.
3. On the Select Installation Type page, select Role-Based Or Feature-Based Installation, and then tap or click Next.
4. On the Select Destination Server page, the server pool shows servers you’ve added for management. Tap or click the server you are configuring, and then tap or click Next.
5. On the Select Server Roles page, select Active Directory Domain Services, and then tap or click Next twice. Tap or click Install. This runs the Active Directory Domain Services Installation Wizard.
6. When the initial installation task completes, you need to tap or click Promote This Server To A Domain Controller to start the Active Directory Domain Services Configuration Wizard. If you closed the Add Roles And Features Wizard window, you need to tap or click the Notifications icon, and then tap or click Promote This Server To A Domain Controller.
MORE INFO
If the installation fails, note the error and take appropriate corrective action before restarting this procedure. Typical installation errors will relate to permissions, such as those required for preparing the forest or domain for first use of Windows Server. Here, log off and then log back on with an account that has the appropriate permissions.
7. If the computer is currently a member server, the wizard takes you through the steps needed to install Active Directory, which might include automatically preparing the directory schema in the forest and domain for Windows Server 2012 R2. You need to specify whether this is a domain controller for a new domain or an additional domain controller for an existing domain. To verify that a domain controller is installed correctly, you should do the following: check the Directory Service event log for errors, ensure that the SYSVOL folder is accessible to clients, verify that name resolution is working through DNS, and verify replication of changes to Active Directory.
To demote a domain controller, follow these steps:
1. In Server Manager, tap or click Manage, and then tap or click Remove Roles And Features. This starts the Remove Roles And Features Wizard. If the wizard displays the Before You Begin page, read the Welcome message, and then tap or click Next.
2. On the Select Destination Server page, the server pool shows servers you’ve added for management. Tap or click the server you are configuring, and then tap or click Next.
3. On the Remove Server Roles page, clear the check box for Active Directory Domain Services to specify that this is the role you want to remove.
4. A new dialog box opens. Here, you might want to clear the Remove Management Tools check box to ensure that the AD DS management tools aren’t uninstalled and then click Continue. Otherwise, click Remove Features. Click Next twice.
5. On the Credentials page, note your current logon account. If necessary, provide alternate credentials with permissions to remove the domain controller. Click Next.
6. If the Warnings page is displayed, note the warnings, select Proceed With Removal, and then click Next.
7. Enter and then confirm a new password for the server’s local Administrator account. The passwords must match. Click Next.
8. On the Confirm Removal Selections page, you have the option of selecting the Restart The Destination Server Automatically If Required check box. Because a restart of the server is required to complete the removal, you might want to choose this option and then confirm it by tapping or clicking Yes. When you are ready to proceed, and then click Remove.
CAUTION
Demoting a server gracefully transfers any roles held by the server. However, if previous attempts to demote the domain controller have failed, you can repeat this procedure and then select the Force The Removal Of This Domain Controller check box as part of the removal process. Here, the flexible single master operations (FSMO) roles of the domain controller might be left in an invalid state until they are reassigned by an administrator. The domain data also might be left in an inconsistent state.
REAL WORLD
An alternative technique for installing domain controllers is to use backup media. To install a domain controller from backup media, create a backup of the system state data of a domain controller, and then restore it on a different server. When you create a domain controller from backup media, you eliminate the need to replicate the entire directory database over the network to the new domain controller. This can really save the day when you have bandwidth limitations or the directory database has thousands of entries.
Viewing and transferring domainwide roles
You can use Active Directory Users And Computers to view or change the location of domainwide operations master roles. At the domain level, you can work with roles for relative ID (RID) masters, primary domain controller (PDC) emulator masters, and infrastructure masters.
NOTE
Operations master roles are discussed in the “Understanding operations master roles” section in Chapter 7. You use Active Directory Domains And Trusts to set the domain naming master role and Active Directory Schema to change the schema master role. The fastest way to determine the current FSMO for all roles is to enter netdom query fsmo at a command prompt.
You can view the current operations master roles by following these steps:
1. In Active Directory Users And Computers, press and hold or right-click Active Directory Users And Computers in the console tree. On the shortcut menu, point to All Tasks, and then tap or click Operations Masters. This opens the Operations Masters dialog box, shown in Figure 8-9.
2. The Operations Masters dialog box has three tabs. The RID tab shows the location of the current RID master. The PDC tab shows the location of the current PDC emulator master. The Infrastructure tab shows the location of the current infrastructure master.
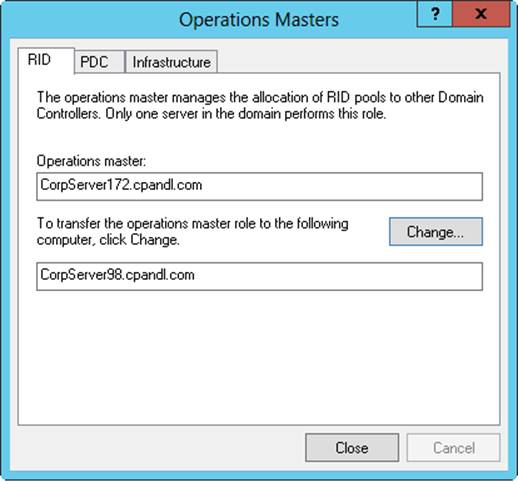
Figure 8-9. In the Operations Masters dialog box, transfer operations masters to new locations or simply view their current locations.
You can transfer the current operations master roles by following these steps:
1. Start Active Directory Users And Computers. In the console tree, press and hold or right-click Active Directory Users And Computers, and then tap or click Change Domain Controller.
2. In the Change Directory Server dialog box, tap or click This Domain Controller Or AD LDS Instance, select the domain controller to which you want to transfer an operations master role, and then tap or click OK.
3. In the console tree, press and hold or right-click Active Directory Users And Computers. On the shortcut menu, point to All Tasks, and then tap or click Operations Masters.
4. In the Operations Masters dialog box, tap or click the RID, PDC, or Infrastructure tab as appropriate for the type of role you want to transfer.
5. Tap or click Change to transfer the role to the previously selected domain controller, and then tap or click OK.
Viewing and transferring the domain naming master role
You can use Active Directory Domains And Trusts to view or change the location of the domain naming master in the domain forest. In Active Directory Domains And Trusts, the root level of the control tree shows the currently selected domain.
TIP
If you need to connect to a different domain, connect to a domain controller by following steps similar to those described in the “Using Active Directory Users And Computers” section earlier in this chapter. The only difference is that you press and hold or right-click Active Directory Domains And Trusts in the console tree.
To transfer the domain naming master role, follow these steps:
1. Start Active Directory Domains And Trusts. In the console tree, press and hold or right-click Active Directory Domains And Trusts and then tap or click Change Active Directory Domain Controller.
2. In the Change Directory Server dialog box, select the This Domain Controller Or AD LDS Instance option, select the domain controller to which you want to transfer the domain naming master role, and then tap or click OK.
3. In the console tree, press and hold or right-click Active Directory Domains And Trusts, and then tap or click Operations Master. This opens the Operations Master dialog box.
4. The Domain Naming Operations Master box displays the current domain naming master. Tap or click Change to transfer this role to the previously selected domain controller.
5. Tap or click Close.
Viewing and transferring schema master roles
You use Active Directory Schema to view or change the schema master’s location. Enter regsvr32 schmmgmt.dll at an elevated, administrator command prompt to register Active Directory Schema. You can then transfer the schema master role by following these steps:
1. Add the Active Directory Schema snap-in to an MMC.
2. In the console tree, press and hold or right-click Active Directory Schema, and then tap or click Change Active Directory Domain Controller.
3. Select Any Writable Domain Controller to let Active Directory select the new schema master, or select This Domain Controller Or AD LDS Instance and then select the new schema master.
4. Tap or click OK. In the console tree, press and hold or right-click Active Directory Schema, and then tap or click Operations Master.
5. Tap or click Change in the Change Schema Master dialog box. Tap or click OK, and then tap or click Close.
Transferring roles by using the command line
Another way to transfer roles is to use Netdom to list current FSMO role holders and then Ntdsutil.exe to transfer roles. Ntdsutil is a command-line tool for managing Active Directory. Follow these steps to transfer roles at the command line:
1. Get a list of the current FSMO role holders by entering netdom query fsmo at a command prompt.
2. It is recommended (but not required) that you log on to the console of the server you want to assign as the new operations master. You can log on to the console locally or use Remote Desktop Connection.
3. Open a command prompt. One way to do this is by pressing the Windows key, typing cmd.exe, and then pressing Enter.
4. At the command prompt, enter ntdsutil. This starts the Directory Services Management Tool.
5. At the ntdsutil prompt, enter roles. This puts the utility in Operations Master Maintenance mode.
6. At the fsmo maintenance prompt, enter connections. At the server connections prompt, enter connect to server followed by the fully qualified domain name of the domain controller to which you want to assign the FSMO role, such as:
connect to server engdc01.technology.adatum.com
7. After you’ve established a successful connection, enter quit to exit the server connections prompt. At the fsmo maintenance prompt, type transfer, type the identifier for the role to transfer, and then press Enter. The identifiers are as follows:
o pdc. For the PDC emulator role
o rid master. For the RID master role
o infrastructure master. For the infrastructure master role
o schema master. For the schema master role
o domain naming master. For the domain naming master role
8. Enter quit at the fsmo maintenance prompt, and then enter quit at the –ntdsutil prompt.
Seizing roles by using the command line
Occasionally, you might find yourself in a situation where you can’t gracefully transfer server roles. For example, a domain controller acting as the RID master might have a drive failure that takes down the entire server. If you’re unable to get the server back online, you might need to seize the RID master role and assign this role to another domain controller.
NOTE
Seize a server role only if the domain controller managing the current role is out of service. When the original server comes back online, the server will recognize the role change and accept it.
Don’t seize a role without first determining how up to date the domain controller that will take over the role is with respect to the previous role owner. Active Directory tracks replication changes by using update sequence numbers (USNs). Because replication takes time, not all domain controllers will necessarily be up to date. If you compare a domain controller’s USN to that of other servers in the domain, you can determine whether the domain controller is the most up to date with respect to changes from the previous role owner. If the domain controller is up to date, you can transfer the role safely. If the domain controller isn’t up to date, you can wait for replication to occur and then transfer the role to the domain controller.
Windows Server 2012 R2 includes several tools for working with Active Directory replication. One tool you can use is Repadmin. You can display the status of the last inbound replication for a domain controller by using Repadmin /Showrepl. The syntax is:
repadmin /showrepl DomainControllerName NamingContext
Here, DomainControllerName is the fully qualified domain name of the domain controller, and NamingContext is the distinguished name of the domain in which the server is located. In this example, you examine the default partition for Server252 in the Cpandl.com domain:
repadmin /showrepl server252.cpandl.com dc=cpandl,dc=com
NOTE
Windows PowerShell parses commands differently from the command prompt. Typically, you can enter commands at the Windows PowerShell prompt in the same way you enter them at the command prompt. In this case, though, Windows PowerShell will misinterpret dc=cpandl,dc=com as two separate parameters. To prevent this, enclose the value in quotation marks: “dc=cpandl,dc=com”.
To display the highest sequence number for a specified naming context on each replication partner of a designated domain controller, enter the following at a command prompt:
repadmin /showutdvec DomainControllerName NamingContext
In this example, you display the highest sequence number for the default configuration partition on Server252 in the Cpandl.com domain:
repadmin /showutdvec server252.cpandl.com dc=cpandl,dc=com
The output shows the highest USN on replication partners for the default configuration partition:
Default-First-Site-Name\SERVER252 @ USN 45164 @ Time 2014-03-30 11:35:24
Default-First-Site-Name\SERVER147 @ USN 45414 @ Time 2014-03-30 11:42:16
If Server252 was the previous role owner, and the domain controller you are examining has an equal or larger USN for Server252, the domain controller is up to date. However, if Server252 was the previous role owner, and the domain controller you are examining has a lower USN for Server252, the controller is not up to date and you should wait for replication to occur before seizing the role. You can also use Repadmin /Syncall to force the domain controller that is the most up to date with respect to the previous role owner to replicate with all of its replication partners.
In Windows PowerShell, you can use replication management cmdlets to view and troubleshoot Active Directory replication. Related cmdlets include the following:
§ Get-ADReplicationAttributeMetadata. Gets the replication metadata for the attributes of the distinguished name specified
§ Get-ADReplicationFailure. Gets information about replication failure for a specified server, site, domain, or forest, if applicable
§ Get-ADReplicationPartnerMetadata. Gets replication metadata for a specified server, site, domain, or forest
§ Get-ADReplicationQueueOperation. Gets pending operations in a server’s replication queue
§ Get-ADReplicationUpToDatenessVectorTable. Gets the highest USN for the specified server, site, domain, or forest
§ Sync-ADObject. Replicates the specified directory object
Use Get-ADReplicationPartnerMetadata to get information about inbound replications for a server with the following syntax:
Get-ADReplicationPartnerMetadata -Target Object
[-Scope Server|Site|Domain|Forest] [-Partition Domain|Schema|Configuration|*]
Here, –Target sets the name of the server, site, domain, or forest to work with. Setting the scope is required when you are working with objects other than servers. Setting the partition is required when you want to work with partitions other than the default. In this example, you examine the default partition on CorpServer98:
get-adreplicationpartnermetadata -target corpserver98
You also can examine all partitions on the server by using the following syntax:
get-adreplicationpartnermetadata -target corpserver98 -partition *
Like Repadmin /Showutdvec, Get-ADReplicationUpToDatenessVectorTable displays the highest sequence numbers for partitions being replicated and can help you troubleshoot replication issues. Here is the basic syntax:
Get-ADReplicationUpToDatenessVectorTable -Target Object
[-Scope Server|Site|Domain|Forest] [-Partition Domain|Schema|Configuration|*]
In this example, you display the highest sequence number for the default partition (the domain configuration partition) on CorpServer98:
get-adreplicationuptodatenessvectortable -target corpserver98
The output shows the highest USN on replication partners for the default configuration partition:
LastReplicationSuccess : 3/30/2014 1:45:57 PM
Partition : DC=cpandl,DC=com
PartitionGuid : c39cfdbd-e1a1-4c4c-9355-85d7ea05c10a
Partner : CN=NTDS Settings,CN=CORPSERVER172,CN=Servers,
CN=Default-First-Site-Name,CN=Sites,CN=Configuration,DC=cpandl,DC=com
PartnerInvocationId : fb32931c-e319-473a-8069-d781f980057b
Server : CorpServer98.cpandl.com
UsnFilter : 82656
LastReplicationSuccess : 3/30/2014 1:48:44 PM
Partition : DC=cpandl,DC=com
PartitionGuid : c39cfdbd-e1a1-4c4c-9355-85d7ea05c10a
Partner : CN=NTDS Settings,CN=CORPSERVER98,CN=Servers,
CN=Default-First-Site-Name,CN=Sites,CN=Configuration,DC=cpandl,DC=com
PartnerInvocationId : d8bf2da2-b08d-4d36-bc53-1b7f62643437
Server : CorpServer98.cpandl.com
UsnFilter : 12593
You interpret the output much like you would interpret output from Repadmin /Showutdvec. If you suspect a problem, you can use Get-ADReplicationFailure to examine replication issues. Here is the basic syntax:
Get-ADReplicationFailure -Target Object [-Scope Server|Site|Domain|Forest]
Knowing this, you can display information about all replication failures in the Cpandl.com domain by entering the following:
get-adreplicationfailure -Target "cpandl.com" -Scope Domain
You can display information for a specific site by entering the following:
get-adreplicationfailure -Target "NewYork-FirstSite" -Scope Site
Or you can display information for a specific server by entering the following:
get-adreplicationfailure -Target CorpServer172
Follow these steps to seize a server role:
1. Enter netdom query fsmo at a command prompt to get a list of the current FSMO role holders.
2. Ensure that the current domain controller with the role you want to seize is permanently offline. If the server can be brought back online, don’t perform this procedure unless you intend to completely reinstall this server.
3. It is recommended that you log on to the console of the server you want to assign as the new operations master. You can log on to the console locally or use Remote Desktop Connection.
4. Open a Command Prompt.
5. At the command prompt, enter ntdsutil. This starts the Directory Services Management Tool.
6. At the ntdsutil prompt, enter roles. This puts the utility in Operations Master Maintenance mode.
7. At the fsmo maintenance prompt, enter connections. At the server connections prompt, enter connect to server followed by the fully qualified domain name of the domain controller to which you want to assign the FSMO role, such as:
connect to server engdc01.technology.adatum.com
8. After you’ve established a successful connection, enter quit to exit the server connections prompt. At the fsmo maintenance prompt, type seize, type the identifier for the role to seize, and then press Enter. The identifiers are as follows:
o pdc. For the PDC emulator role
o rid master. For the RID master role
o infrastructure master. For the infrastructure master role
o schema master. For the schema master role
o domain naming master. For the domain naming master role
9. Enter quit at the fsmo maintenance prompt, and then enter quit at the ntdsutil prompt.
Configuring global catalogs
Global catalogs have an important role on the network. This role is discussed in the “Understanding the directory structure” section in Chapter 7. You configure additional global catalogs by enabling domain controllers to host the global catalog. In addition, if you have two or more global catalogs within a site, you might want a domain controller to stop hosting the global catalog. You do this by disabling the global catalog on the domain controller.
You enable or disable a global catalog by following these steps:
1. In Active Directory Sites And Services, expand the site you want to work with in the console tree.
2. Expand the Servers folder for the site, and then select the server you want to configure to host the global catalog.
3. In the details pane, press and hold or right-click NTDS Settings, and then tap or click Properties.
4. To enable the server to host the global catalog, select the Global Catalog check box on the General tab.
5. To disable the global catalog, clear the Global Catalog check box on the General tab.
CAUTION
Don’t enable or disable global catalogs without proper planning and analysis of the impact on the network. In a large enterprise environment, designating a domain controller as a global catalog can cause data related to thousands of Active Directory objects to be replicated across the network.
Configuring universal group membership caching
Universal membership caching eliminates the dependency on the availability of a global catalog server during logons. When you enable this feature on a domain operating at the Windows Server 2003 or higher functional level, any domain controller can resolve logon requests locally without having to go through the global catalog server. As discussed in the “Universal group membership caching” section in Chapter 7, this has advantages and disadvantages.
You can enable or disable universal group membership caching by following these steps:
1. In Active Directory Sites And Services, expand and then select the site you want to work with.
2. In the details pane, press and hold or right-click NTDS Site Settings, and then tap or click Properties.
3. To enable universal group membership caching, select the Enable Universal Group Membership Caching check box on the Site Settings tab. Then, in the Refresh Cache From list, choose a site from which to cache universal group memberships. The selected site must have a working global catalog server.
4. To disable universal group membership caching, clear the Enable Universal Group Membership Caching check box on the Site Settings tab.
5. Tap or click OK.
Managing organizational units
As discussed in Chapter 7, organizational units help you organize objects, set Group Policy with a limited scope, and more. In this section, you’ll learn how to create and manage organizational units.
Creating organizational units
You usually create organizational units to mirror your organization’s business or functional structure. You might also want to create units for administrative reasons, such as if you want to delegate rights to users or administrators. You can create organizational units as subgroups of a domain or as child units within an existing organizational unit.
To create an organizational unit, follow these steps:
1. In Active Directory Users And Computers or Active Directory Administrative Center, press and hold or right-click the domain node or existing organizational unit folder in which you want to add an organizational unit. Tap or click New on the shortcut menu, and then tap or click Organizational Unit.
2. Enter the name of the organizational unit, and then tap or click OK.
3. You can now move accounts and shared resources to the organizational unit. See the “Moving computer accounts” section earlier in this chapter for an example.
Viewing and editing organizational unit properties
You can view and edit organizational unit properties by following these steps:
1. Open Active Directory Users And Computers or Active Directory Administrative Center.
2. Press and hold or right-click the organizational unit you want to work with, and then tap or click Properties. This displays a Properties dialog box that lets you view and edit settings.
Renaming and deleting organizational units
You can rename or delete an organizational unit by following these steps:
1. In Active Directory Users And Computers, press and hold or right-click the organizational unit folder you want to work with.
2. To delete the organizational unit, tap or click Delete. Then confirm the action by tapping or clicking Yes.
3. To rename the organizational unit, tap or click Rename. Type a new name for the organizational unit, and then press Enter.
In Active Directory Administrative Center, you delete organizational units in the same way, but to rename an organizational unit, you open its Properties dialog box, type the new name, and then tap or click OK.
Moving organizational units
You can move organizational units to different locations within a domain at any time. In Active Directory Users And Computers, simply select the organizational unit and then drag it to the desired location.
Using either Active Directory Users And Computers or Active Directory Administrative Center, you can also follow these steps to move organizational units:
1. Press and hold or right-click the organizational unit folder you want to move, and then tap or click Move.
2. In the Move dialog box, expand the domain, select the container to which you want to move the organizational unit, and then tap or click OK.
Managing sites
The Active Directory Domain Services Installation Wizard creates a default site and a default site link when you install Active Directory Domain Services on the first domain controller in a site. The default site is named Default-First-Site-Name, and the default site link is called DEFAULTIPSITELINK. You can rename the default site and site link as necessary. You must create subsequent sites and site links manually.
Configuring a site is a multipart process that includes the following steps:
1. Creating the site
2. Creating one or more subnets and associating them with the site
3. Associating a domain controller with the site
4. Linking the site to other sites by using site links and, if necessary, creating site link bridges
I discuss these tasks in the sections that follow.
Creating sites
Any administrator who is a member of Domain Admins or Enterprise Admins can create sites. You can create a site by following these steps:
1. In Active Directory Sites And Services, press and hold or right-click the Sites container in the console root, and then tap or click New Site.
2. In the New Object - Site dialog box, shown in Figure 8-10, enter a name for the site, such as Chicago-First-Site. Site names cannot contain spaces or any special characters other than a dash.
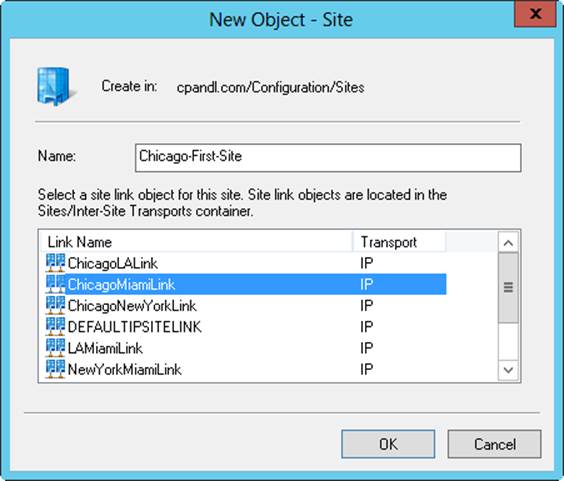
Figure 8-10. Create the site by setting the site name and a related site link.
3. Tap or click the site link that you will use to connect this site to other sites. If the site link you want to use doesn’t exist, select the default site link and change the site link settings later.
4. Tap or click OK. A prompt is displayed detailing the steps you must complete to finish site configuration. Tap or click OK again.
5. To complete site configuration, complete the remaining configuration tasks.
TIP
You can rename a site at any time. In Active Directory Sites And Services, press and hold or right-click the site, and then select Rename. Type the new name for the site, and then press Enter.
Creating subnets
Each site you define must have associated subnets that detail the network segments that belong to the site. Any computer with an IP address on a network segment associated with a site is considered to be located in the site. Although a single site can have multiple subnets associated with it, a subnet can be associated with only one site.
To create a subnet and associate it with a site, follow these steps:
1. In Active Directory Sites And Services, press and hold or right-click the Subnets container in the console tree, and then tap or click New Subnet. This displays the New Object - Subnet dialog box, shown in Figure 8-11.
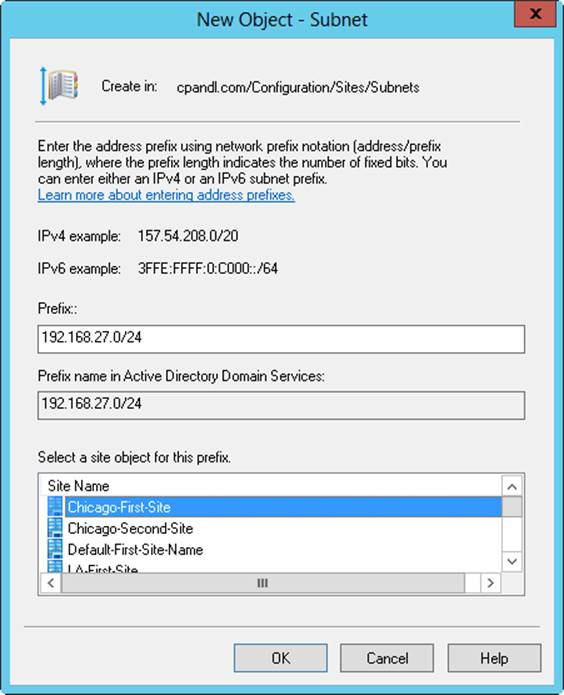
Figure 8-11. Create the subnet by entering the network prefix and selecting an associated site.
2. In the Prefix box, enter the IPv4 or IPv6 network address prefix by using the network prefix notation. In network prefix notation, you enter the network ID and then a forward slash, and then you specify which bits are used for the network ID. For example, if the network ID is 192.168.27.0 and the first 24 bits identify the network ID, you enter 192.168.27.0/24 as the network prefix notation.
3. Select the site with which the subnet should be associated, and then tap or click OK.
TIP
You can change the site association for a subnet at any time. In Active Directory Sites And Services, double-tap or double-click the subnet in the Subnets folder, and then on the General tab, change the site association in the Site list.
Associating domain controllers with sites
Every site should have at least one domain controller associated with it. By adding a second domain controller to a site, you provide fault tolerance and redundancy. If at least one domain controller in the site is also a global catalog server, you can ensure that directory searches and authentication traffic are isolated to the site.
You can add domain controllers to sites automatically or manually. When you associate subnets with a site, any new domain controllers you install are placed in the site automatically if the domain controller’s IP address is within the valid range of IP addresses for the subnet. Existing domain controllers are not automatically associated with sites, however. You must manually associate any existing domain controllers with a new site by moving the domain controller object into the site.
Before you can move a domain controller from one site to another, you must determine in which site the domain controller is currently located. A quick way to do that is to enter the following command at a command prompt:
dsquery server -s DomainControllerName | dsget server -site
Here, DomainControllerName is the fully qualified domain name of the domain controller, such as:
dsquery server -s server241.cpandl.com | dsget server -site
The output of this command is the name of the site in which the designated domain controller is located.
To move a domain controller from one site to another site, follow these steps:
1. In Active Directory Sites And Services, any domain controllers associated with a site are listed in the site’s Servers node. Select the site that the domain controller is currently associated with.
2. Press and hold or right-click the domain controller, and then tap or click Move. In the Move Server dialog box, tap or click the site that should contain the server, and then tap or click OK.
NOTE
Don’t move a domain controller to a site if the domain controller is not on a subnet associated with the site. If you change subnet and site associations, you need to move domain controllers in the affected subnets to the appropriate site containers.
Configuring site links
Sites are groups of IP subnets that are connected by reliable, high-speed links. Most of the time, all subnets on the same local network are part of the same site. Networks with multiple sites are connected via site links. Site links are logical, transitive connections between two or more sites. Each site link has a replication schedule, a replication interval, a link cost, and a replication transport.
Because site links are used over wide area network links, bandwidth availability and usage are important considerations when configuring site links. By default, site links are scheduled to replicate data 24 hours a day, seven days a week at an interval of at least 180 minutes. If you know a link has bandwidth limitations, you might need to alter the schedule to allow user traffic to have priority during peak usage times.
When you have multiple links between sites, you need to consider the relative priority of each link. You assign priority based on the availability and reliability of the connection. The default link cost is set to 100. If there are multiple possible routes to a site, the route with the lowest site link cost is used first. Therefore, the most reliable paths with the most bandwidth between sites should be configured in most cases to have the lowest site link cost.
You can configure site links to use either remote procedure call (RPC) over IP or Simple Mail Transfer Protocol (SMTP) as the transport protocol. With IP as the transport, domain controllers establish an RPC over IP connection with a single replication partner at a time and replicate Active Directory changes synchronously. Because RPC over IP is synchronous, both replication partners must be available at the time the connection is established. You should use RPC over IP when there are reliable, dedicated connections between sites.
With SMTP as the transport, domain controllers convert all replication traffic to email messages that are sent between the sites asynchronously. Because SMTP replication is asynchronous, both replication partners do not have to be available at the time the connection is established, and replication transactions can be stored until a destination server is available. You should use SMTP when links are unreliable or not always available.
NOTE
If you plan to use SMTP, you must set up a certificate authority (CA). Certificates from the CA are used to digitally sign and encrypt the SMTP messages sent between the sites. With IP, CAs are not required by default.
You can create a site link between two or more sites by following these steps:
1. In Active Directory Sites And Services, expand the Sites container, and then expand the Inter-Site Transports container.
2. Press and hold or right-click the container for the transport protocol you want to use (either IP or SMTP), and then tap or click New Site Link.
3. In the New Object - Site Link dialog box, shown in Figure 8-12, enter a name for the site link, such as ChicagotoSeattleLink. Site link names cannot contain spaces or special characters other than a dash.
4. In the Sites Not In This Site Link list, tap or click the first site that should be included in the link, and then tap or click Add to add the site to the Sites In This Site Link list. Repeat this process for each site you want to add to the link. You must include at least two sites. Tap or click OK.
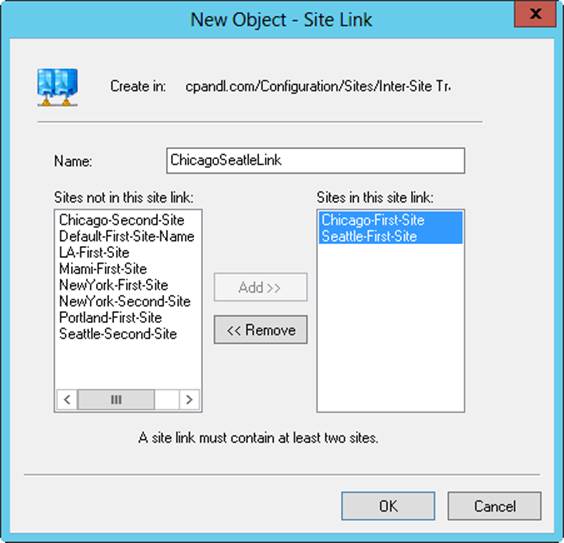
Figure 8-12. Create the site link by entering a name for the link and then selecting the associated sites.
When you finish creating the site link, you should configure the link’s properties. This allows you to specify the link cost, replication schedule, and replication interval. To configure site link properties, follow these steps:
1. In Active Directory Sites And Services, press and hold or right-click the site link in the details pane, and then tap or click Properties.
2. In the Properties dialog box, the General tab is selected by default. In the Cost box, set the relative cost of the link. The default cost is 100.
3. In the Replicate Every box, set the replication interval. The default interval is 180 minutes.
4. The default replication schedule is 24 hours a day, seven days a week. To set a different schedule, tap or click Change Schedule, set the replication schedule in the Schedule For dialog box, and then tap or click OK.
You can change the sites associated with a site link at any time by following these steps:
1. In Active Directory Sites And Services, press and hold or right-click the site link in the details pane, and then tap or click Properties.
2. In the Properties dialog box, the General tab is selected by default. In the Sites Not In This Site Link list, tap or click the first site that should be included in the link, and then tap or click Add to add the site to the Sites In This Site Link list. Repeat this process for each site you want to add to the link.
3. In the Sites In This Site Link list, tap or click the first site that should not be included in the link, and then tap or click Remove to add the site to the Sites Not In This Site Link list. Repeat this process for each site you want to remove from the link. Tap or click OK.
Configuring site link bridges
All site links are transitive by default. This means that when more than two sites are linked for replication and use the same transport, site links are bridged automatically, allowing links to be transitive between sites. Because of transitivity, any two domain controllers can make a connection across any consecutive series of links. For example, a domain controller in site A could connect to a domain controller in site C through site B.
The link path that domain controllers choose for connections across sites is largely determined by the site link bridge cost. The site link bridge cost is the sum of all the links included in the bridge; generally, the path with the lowest total site link bridge cost is used.
Knowing the costs of links and link bridges, you can calculate the effects of a network link failure and determine the paths that will be used when a connection is down. For example, a domain controller in site A would normally connect to a domain controller in site C through site B. However, if the connection to site B is down, the two domain controllers would choose an alternate path automatically if one is available, such as going through site D and site E to establish a connection.
Intersite replication topology is optimized for a maximum of three hops by default. In large-site configurations, this can have unintended consequences, such as the same replication traffic going over the same link several times. In this case, you should disable automatic site link bridging and manually configure site link bridges. Otherwise, you typically do not want to disable automatic site link bridging.
Within an Active Directory forest, you can enable or disable site link transitivity on a per-transport protocol basis. This means all site links that use a particular transport either use site link transitivity or don’t use it. You can configure transitivity for a transport protocol by following these steps:
1. In Active Directory Sites And Services, expand the Sites container, and then expand the Inter-Site Transports container.
2. Press and hold or right-click the container for the transport protocol you want to work with (either IP or SMTP), and then tap or click Properties.
3. To enable site link transitivity, select Bridge All Site Links, and then tap or click OK. When site link transitivity is enabled, any site link bridges you’ve created for a particular transport protocol are ignored.
4. To disable site link transitivity, clear the Bridge All Site Links check box, and then tap or click OK. When site link transitivity is disabled, you must configure site link bridges for the affected protocol.
After you’ve disabled transitive links, you can manually create a site link bridge between two or more sites by following these steps:
1. In Active Directory Sites And Services, expand the Sites container, and then expand the Inter-Site Transports container.
2. Press and hold or right-click the container for the transport protocol you want to work with (either IP or SMTP), and then tap or click New Site Link Bridge.
3. In the New Object—Site Link Bridge dialog box, enter a name for the site link bridge. Bridge names cannot contain spaces or special characters other than a dash.
4. In the Site Links Not In This Site Link Bridge list, select a site link that should be included in the bridge, and then tap or click Add to add the site link to the Site Links In This Site Link Bridge list. Repeat this process for each site link you want to add to the bridge. A bridge must include at least two site links. Tap or click OK.
You can change the site links associated with a site link bridge at any time by following these steps:
1. In Active Directory Sites And Services, select the container for the transport protocol you want to work with, press and hold or right-click the site link bridge you want to work with, and then tap or click Properties.
2. In the Properties dialog box, the General tab is selected by default. In the Site Links Not In This Site Link Bridge list, tap or click the first site link that should be included in the bridge, and then tap or click Add to add the site link to the Site Links In This Site Link Bridge list. Repeat this process for each site link you want to add to the bridge.
3. In the Site Links In This Site Link Bridge list, tap or click the first site link that should not be included in the bridge, and then tap or click Remove to add the site link to the Site Links Not In This Site Link Bridge list. Repeat this process for each site link you want to remove from the bridge. Tap or click OK.
Maintaining Active Directory
To ensure proper operations of Active Directory, you need to perform periodic monitoring and maintenance. In your monitoring and maintenance efforts, you’ll find that some tools are instrumental to your success. In this section, I’ll introduce these tools and some general maintenance tasks.
Using ADSI Edit
When you are diagnosing problems and troubleshooting, the Active Directory administration tool you should use is Active Directory Service Interfaces Editor (ADSI Edit). You can use ADSI Edit to manage the definitions of object classes and their attributes in the schema and to work with other naming contexts, including the default naming context, the Configuration naming context, and the RootDSE naming context. If you want to create custom attributes for users or groups, use ADSI Edit, which you can start by using the related option on the Tools menu in Server Manager.
You can use the ADSI Edit snap-in to connect to a naming context by following these steps:
1. Press and hold or right-click the ADSI Edit node in the console tree, and then select Connect To. This displays the Connection Settings dialog box, shown in Figure 8-13.

Figure 8-13. Connect to a naming context in ADSI Edit.
2. In the Connection Settings dialog box, the Select A Well Known Naming Context list is enabled by default. Choose the naming context you want to work with.
3. When you tap or click OK, you are connected to any available domain controller in your logon domain. To connect to a different domain or server, choose Select Or Type A Domain Or Server, and then choose the server or domain you want to work with along with an optional port number for the connection, such as FileServer252.cpandl.com:389. Port 389 is the default port for LDAP.
After you select a naming context, domain, and server, you are connected to and can work with the naming context. As Figure 8-14 shows, when you connect to multiple naming contexts, you have separate nodes for managing each context. For troubleshooting, you can also connect to the same naming context on different servers in the same domain. By comparing the values associated with properties on one server with those on another, you can identify a replication problem.
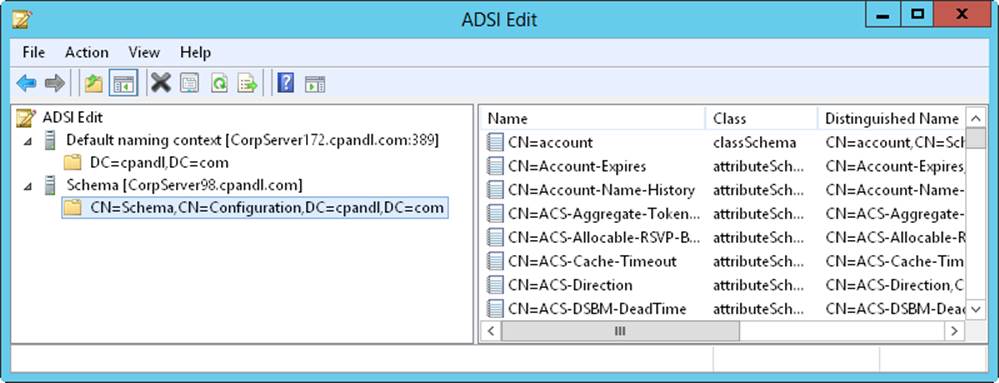
Figure 8-14. Browse the naming contexts to examine related containers and properties.
Examining intersite topology
The intersite topology generator (ISTG) on a site is responsible for generating the intersite replication topology. When calculating the replication topology, the ISTG can use considerable processing power, especially as the size of the network grows. Because of this, you should closely monitor the ISTGs in each site to ensure that they are not overloaded.
You can determine which domain controller is the ISTG by following these steps:
1. In Active Directory Sites And Services, expand the Sites container, and then expand the site for the ISTG you want to locate in the console tree.
2. In the details pane, double-tap or double-click NTDS Site Settings. In the NTDS Site Settings dialog box, the current ISTG is listed in the Inter-Site Topology Generator panel.
Replication between sites normally is performed by bridgehead servers. A bridgehead server is a domain controller designated by the ISTG to perform intersite replication. The ISTG configures a bridgehead server for each Active Directory partition that needs to be replicated and maintains a separate replication topology for each type of partition. Although a single bridgehead server can be responsible for replicating multiple directory partitions, the replication topology for each partition is maintained separately.
Domain controllers that operate as bridgehead servers have an additional workload that increases with the number and frequency of replication changes. As you should do with the ISTG, you should periodically monitor designated bridgehead servers to ensure that they do not become overloaded. You can list the bridgehead servers in a site by entering the following command at a command prompt:
repadmin /bridgeheads site:SiteName
Here, SiteName is the name of the site, such as:
repadmin /bridgeheads site:SacramentoSite
If current bridgehead servers become overloaded, or if you have domain controllers you would prefer to be bridgehead servers, you can designate preferred bridgehead servers to use. Once you designate a preferred bridgehead server for a site, the ISTG uses the preferred bridgehead server for intersite replication. If the preferred bridgehead server goes offline or is unable to replicate for any reason, intersite replication stops until the server is again available or you change the preferred bridgehead server configuration.
When you designate preferred bridgeheads, you should always configure multiple preferred bridgehead servers in each site. The ISTG will then choose one of the servers you’ve designated as the preferred bridgehead server. If this server fails, the ISTG would then choose another server from the list of preferred bridgehead servers.
You must configure a bridgehead server for each partition that needs to be replicated. This means you must configure at least one domain controller with a replica of each directory partition as a bridgehead server. If you don’t do this, replication of the partition will fail and the ISTG will log an event in the Directory Services event log detailing the failure.
You can configure a domain controller as a preferred bridgehead server by following these steps:
1. In Active Directory Sites And Services, domain controllers associated with a site are listed in the site’s Servers node. Press and hold or right-click the server you want to designate as a preferred bridgehead, and then tap or click Properties.
2. In the Properties dialog box, select the intersite transport protocol for which the server should be a preferred bridgehead in the Transports Available For Inter-Site Data Transfer list and then tap or click Add. Repeat as necessary to specify both IP and SMTP. Tap or click OK.
When you’ve designated preferred bridgehead servers, you can recover from replication failure in several ways. You can remove the failed servers as preferred bridgehead servers and then specify different preferred bridgehead servers, or you can remove all servers as preferred bridgehead servers and then allow the ISTG to select the bridgehead servers that should be used. To stop a server from being a preferred bridgehead for a particular transport protocol, follow these steps:
1. In Active Directory Sites And Services, domain controllers associated with a site are listed in the site’s Servers node. Press and hold or right-click the server you want to stop using as a preferred bridgehead, and then tap or click Properties.
2. Select the transport protocol in the This Server Is A Preferred Bridgehead Server For The Following Transports list, and then tap or click Remove. Tap or click OK.
Troubleshooting Active Directory
As part of routine maintenance, you need to monitor domain controllers, global catalog servers, bridgehead servers, and site links. If you suspect problems with Active Directory, you should look at replication in most cases as the starting point for your diagnostics and troubleshooting. By configuring monitoring of Active Directory intrasite and intersite replication, you can diagnose and resolve most replication problems. Keep in mind, though, that Active Directory replication has several service dependencies, including LDAP, DNS, Kerberos version 5 authentication, and RPC.
These important services must be functioning properly to allow directory updates to be replicated. During replication, Active Directory relies on various TCP and UDP ports being open between domain controllers. By default, the ports used are as follows:
§ LDAP uses TCP and UDP on port 389 for standard traffic, and TCP on port 686 for secure traffic.
§ Global catalogs use TCP on port 3268. Kerberos version 5 uses TCP and UDP on port 88.
§ DNS uses TCP and UDP on port 53.
§ SMB over IP uses TCP and UDP on port 445.
Additionally, for replication of files in the System Volume (SYSVOL) shared folders on domain controllers, Active Directory uses either the file replication service (FRS) or the DFS Replication Service. The appropriate replication service must be running and properly configured to replicate the SYSVOL.
As mentioned earlier in the chapter, Active Directory tracks changes by using update sequence numbers (USNs). Any time a change is made to the directory, the domain controller processing the change assigns the change a USN. Each domain controller maintains its own local USNs and increments the value each time a change occurs. The domain controller also assigns the local USN to the object attribute that changed. Each object has a related attribute, usnChanged, which is stored with the object and identifies the highest USN that has been assigned to any of the object’s attributes.
Each domain controller tracks its local USN and also the local USNs of other domain controllers. During replication, domain controllers compare the USN values received to what is stored. If the current USN value for a particular domain controller is higher than the stored value, changes associated with that domain controller need to be replicated. If the current value for a particular domain controller is the same as the stored value, changes for that domain controller do not need to be replicated.
You can monitor replication from the command line by using Repadmin. With Repadmin, most command-line parameters accept a list of the domain controllers you want to work with, called DSA_List. You can specify the values for DSA_List as follows:
§ *. A wildcard character that includes all domain controllers in the organization
§ PartialName. A partial server name followed by the * wildcard character to match the remainder of the server name
§ Site:SiteName. The name of the site for which you want to include domain controllers
§ Gc. All global catalog servers in the organization
Although Repadmin has many parameters and you can use it in many ways, you’ll perform certain tasks more than others. To view detailed help for each task, enter the following example at the command prompt: repadmin /?:kcc. Table 8-2 shows some of these tasks.
Table 8-2. Common Replication Tasks and Commands
|
TASK |
COMMAND |
|
Forcing the Knowledge Consistency Checker (KCC) to recalculate the intrasite replication topology for a specified domain controller. |
repadmin /kcc DSA_List [/async] |
|
Listing bridgehead servers that match the DSA_List. |
repadmin /bridgeheads [DSA_List] [/verbose] |
|
Listing calls made but not yet answered by the specified server to other servers. |
repadmin /showoutcalls [DSA_List] |
|
Listing domains trusted by a specified domain. |
repadmin /showtrust [DSA_List] |
|
Listing failed replication events that were detected by the KCC. |
repadmin /failcache [DSA_List] |
|
Listing connection objects for the specified domain controllers. Defaults to the local site. |
repadmin /showconn [DSA_List] |
|
Listing computers that have opened sessions with a specified domain controller. |
repadmin /showctx [DSA_List] |
|
Listing the name of the ISTG for a specified site. |
repadmin istg [DSA_List] [/verbose] |
|
Listing replication partners for each directory partition on the specified domain controller. |
repadmin /showrepl [DSA_List] |
|
Listing a summary of the replication state. |
repadmin /replsummary [DSA_List] |
|
Listing server certificates loaded on the specified domain controllers. |
repadmin /showcert [DSA_List] |
|
Listing tasks waiting in the replication queue. |
repadmin /queue [DSA_List] |
|
Listing the time between intersite replications that are using the ISTG Keep Alive time stamp. |
repadmin /latency [DSA_List] [/verbose] |
All materials on the site are licensed Creative Commons Attribution-Sharealike 3.0 Unported CC BY-SA 3.0 & GNU Free Documentation License (GFDL)
If you are the copyright holder of any material contained on our site and intend to remove it, please contact our site administrator for approval.
© 2016-2026 All site design rights belong to S.Y.A.