Windows Server 2012 R2 Essentials & Configuration (2014)
Chapter 9. Creating user and group accounts
§ Windows Server security model
§ Differences between user and group accounts
§ Default user accounts and groups
§ Account capabilities
§ Using default group accounts
§ User account setup and organization
§ Configuring account policies
§ Configuring user rights policies
§ Adding a user account
§ Adding a group account
§ Handling global group membership
§ Implementing managed accounts
Managing accounts is one of your primary tasks as a Windows administrator. Chapter 8 discusses computer accounts. This chapter examines user and group accounts. With user accounts, you can enable individual users to log on to the network and access network resources. With group accounts, you manage resources for multiple users. The permissions and privileges you assign to user and group accounts determines which actions users can perform and which computer systems and resources they can access.
Although you might be tempted to give users wide access, you need to balance a user’s need for job-related resources with your need to protect sensitive resources or privileged information. For example, you don’t want everyone in the company to have access to payroll data. Consequently, you should be sure that only those who need that information have access to it.
In this chapter, you’ll learn how to manage domain accounts. Although local system accounts are discussed, they are not the primary focus. For further discussion of configuring local system accounts, see Chapter 5, “Managing user access and security,” in Windows 8.1 Administration Pocket Consultant: Essentials & Configuration (Microsoft Press, 2013). Keep in mind that Windows 8.1 adds a special type of local account called a Microsoft account. Microsoft accounts can be thought of as synchronized accounts. When you connect a local or domain account to a Microsoft account, the account becomes a connected local account or connected domain account.
Windows Server security model
You control access to network resources with the components of the Windows Server security model. The key components you need to know about are those used for authentication and access controls.
Authentication protocols
Windows Server authentication is implemented as a two-part process consisting of an interactive logon and network authentication. When a user logs on to a computer by using a domain account, the interactive logon process authenticates the user’s logon credentials, which confirms the user’s identity to the local computer and grants access to Active Directory Domain Services (AD DS). Afterward, when-ever the user attempts to access network resources, network authentication is used to determine whether the user has permission to do so.
Windows Server 2012 R2 supports many network authentication protocols. Active Directory uses Kerberos V5 as the default authentication protocol. NTLM authentication is maintained only for backward compatibility. In Group Policy, you can control how NTLM is used with the security option Network Security: LAN Manager Authentication Level. The default authentication level in most cases is Send NTLMv2 Response Only. With this authentication level, clients use NTLM 2 for authentication and session security if the server supports it. Active Directory can also use client certificates for authentication.
A key feature of the Windows Server authentication model is that it supports single sign-on, which works as follows:
1. A user logs on to the domain by using a logon name and password, or by inserting a smart card into a card reader.
2. The interactive logon process authenticates the user’s access. With a local account, the credentials are authenticated locally, and the user is granted access to the local computer. With a domain account, the credentials are authenticated in Active Directory, and the user has access to local and network resources.
3. The user can authenticate to any computer in the domain through the network authentication process.
With domain accounts, the network authentication process typically is automatic (through single sign-on). With local accounts, users must provide a user name and password every time they access a network resource.
Windows Server includes Active Directory Federation Services (AD FS), which extends single sign-on to trusted resources on the Internet. Using AD FS, organizations can extend their existing Active Directory infrastructure to provide access to trusted Internet resources, which can include third parties and geographically separated units of the same organization. After you configure federated servers, users at the organization can sign on once to the organization’s network and are then automatically logged on to trusted web applications hosted by partners on the Internet. Federated Web Single Sign-On uses federated authorization for seamless access. In addition to user identity and account information, security tokens used in federated authorization include authorization claims that detail user authorization and specific application entitlement.
Access controls
Active Directory is object-based. Users, computers, groups, shared resources, and many other entities are all defined as objects. Access controls are applied to these objects with security descriptors. Security descriptors do the following:
§ List the users and groups that are granted access to objects.
§ Specify permissions the users and groups have been assigned.
§ Track events that should be audited for objects.
§ Define ownership of objects.
Individual entries in the security descriptor are referred to as access control entries (ACEs). Active Directory objects can inherit ACEs from their parent objects. This means that permissions for a parent object can be applied to a child object. For example, all members of the Domain Admins group inherit permissions granted to this group.
When working with ACEs, keep the following points in mind:
§ ACEs are created with inheritance enabled by default.
§ Inheritance takes place immediately after the ACE is created and saved.
§ All ACEs contain information specifying whether the permission is inherited or explicitly assigned to the related object.
Claims-based access controls
To the standard access controls, Windows Server 2012 R2 adds Kerberos armoring, compound identities, and claims-based access controls. Kerberos armoring improves domain security by allowing domain-joined clients and domain controllers to communicate over secure, encrypted channels. Compound identities incorporate not only the groups that a user is a member of, but also user claims, device claims, and resource properties.
Claims-based access controls can be configured in several ways. The most basic approach is to define conditions that limit access as part of a resource’s advanced security permissions. Typically, these conditions add device claims or user claims to the access controls. User claims identify users; device claims identify devices. For example, to access the Human Resources share, you might add a device claim to ensure that the computer being used to access a resource is a member of HR Computers, and add a user claim that ensures that the user is a member of the HR Managers group.
Kerberos armoring, compound identities, and claims-based access controls can also work together as part of a new authorization platform that allows dynamic access to resources by configuring central access policies. With central access policies, you define central access rules in Active Directory, and those rules are applied dynamically throughout the enterprise. Central access rules use conditional expressions that require you to determine the resource properties required for the policy, the claim types and security groups required for the policy, and the servers where the policy should be applied.
Before you can define and apply an access rule, you’ll likely need to define resource properties and claim types:
§ Resource properties create property definitions for resources. For example, you might add Department and Country properties to files so that you can dynamically control access by department and country.
§ Claim types create claim definitions for resources. For example, you might create a user claim to add Department and Country properties to User objects so that you can dynamically control access by department and country.
After you create resource properties and claim types and determine where the policy should be applied, you can create an access rule and then add it to a central access policy. Adding the rule to a policy makes the rule available for dynamic control. You then need to apply the policy across file servers by using Group Policy.
Claims-based policy must be enabled for Default Domain Controllers policy. You do this by enabling and configuring the KDC Support For Claims, Compound Authentication And Kerberos Armoring policy in the Administrative Templates policies for Computer Configuration under System\KDC. The policy must be configured to use a specific mode. Here are the available modes:
§ Supported. Domain controllers support claims, compound identities, and Kerberos armoring. Client computers that don’t support Kerberos armoring can be authenticated.
§ Always Provide Claims. This mode is the same as Supported, but domain controllers always return claims for accounts.
§ Fail Unarmored Authentication Requests. Kerberos armoring is mandatory. Client computers that don’t support Kerberos armoring cannot be authenticated.
The Kerberos Client Support For Claims, Compound Authentication And Kerberos Armoring policy in the Administrative Templates policies for Computer Configuration under System\Kerberos controls whether the Kerberos client running on Windows 8.1 and Windows Server 2012 R2 requests claims and compound authentication. The policy must be enabled for compatible Kerberos clients to request claims and compound authentication for Dynamic Access Control and Kerberos armoring.
REAL WORLD
Claims-based policy should be enabled for all domain controllers in a domain to ensure consistent application. A domain must have at least one domain controller running Windows Server 2012 R2, and file servers must run Windows Server 2012 R2. By default, domain controllers are placed in the Domain Controllers organizational unit (OU), and Default Domain Controllers policy has the highest precedence among Group Policy Objects (GPOs) linked to the Domain Controllers OU. If your organization uses a different approach, you need to ensure that the GPO with the highest precedence for the appropriate OU has claims-based policy enabled and configured properly.
Central access policies
Central access policies don’t replace traditional access controls. Instead, they are designed to enhance existing access controls by defining very precisely the specific attributes users and devices must have to access resources. The easiest way to manage central access policy is to use Active Directory Administrative Center.
An overview of the policy creation and deployment process follows:
1. Open Active Directory Administrative Center. In the left pane, List View is selected by default. Tap or click Tree View to display the tree view. Next, expand Dynamic Access Control in the left pane, and then select Claim Types.
2. Use the Claim Types node to create and manage claim types. For example, right-click the Claim Types node, click New, and then select Claim Type to start creating a new claim type.
3. Use the Resource Properties node to create and manage resource properties. For example, right-click the Resource Properties node, click New, and then select Resource Property to start creating a new resource property.
NOTE
Resource properties are also added as classification definition properties on file servers.
4. Use the Central Access Rules node to create and manage central access rules. For example, right-click the Central Access Rules node, click New, and then select Central Access Rule to start creating a new access rule.
5. Use the Central Access Policies node to create and manage central access policies. For example, right-click the Central Access Policies node, click New, and then select Central Access Policy to start creating a new access policy.
To complete the deployment, you need to edit the highest precedence GPO linked to the OU where you put file servers and then enable central access policies. To do this, follow these steps:
1. In Group Policy Management, open the GPO for editing.
2. Browse Computer Configuration policies to Windows Settings\Security Settings\File System.
3. Press and hold or right-click Central Access Policy, and then tap or click Manage Central Access Policies. This opens the Central Access Policies Configuration dialog box.
4. In the Central Access Policies Configuration dialog box, available policies are listed in the left pane, and currently applied policies are listed in the right pane. To apply a policy, tap or click it in the left pane and then tap or click Add. To remove a policy, tap or click it in the right pane and then tap or click Remove. Tap or click OK.
After the Group Policy changes take effect on your servers, the dynamic controls are available. You can speed the refresh along by entering gpupdate /force at an elevated, administrator command prompt.
Servers that you want to apply dynamic controls to must have, at a minimum, the File And Storage Services role with the File Server, Storage Services, and File Server Resource Manager role services. You need the File Server Resource Manager role service and the related tools to apply classification property definitions to folders.
After you enable central access policy, and any time you update your classification property definitions, you need to wait for Global Resource Properties from Active Directory to refresh on your file servers. You can speed this along by opening Windows PowerShell and entering update-fsrmclassificationpropertydefinition. Do this on each file server where you want to configure central access policies.
To complete the deployment of central access policies, you need to edit the properties of each folder where you want a central access policy to apply and do the following:
1. Add the appropriate classification definitions on the folder’s Classification tab. On the Classification tab, each resource property you created will be listed. Select each property in turn, and then set its value as appropriate.
2. Enable the appropriate policy by using advanced security settings for the folder. On the Security tab, tap or click Advanced, and then tap or click the Central Policy tab. Any currently selected or applied policy is listed along with a description that allows you to review the rules of that policy. When you tap or click Change, you can use the selection list provided to select a policy to apply, or you can choose No Central Access Policy to stop using the policy. Tap or click OK.
Repeat this process for each top-level or other folder where you want to limit access. Files and folders within the selected folder will inherit the access rule automatically unless you specify otherwise. As an example, if you create an access rule called “HR Managers in the US” and define Department and Country resource definitions, you could edit the HR folder’s properties, select the Classification tab, and then use the options available to set Department to HR and Country to US. Then you could apply the “HR Managers in the US” policy by using the advanced security settings for the folder.
Differences between user and group accounts
Windows Server 2012 R2 provides user accounts and group accounts (of which users can be a member). User accounts are designed for individuals. Group accounts are designed to make the administration of multiple users easier. Although you can log on with user accounts, you can’t log on with a group account. Group accounts are usually referred to simply as groups.
REAL WORLD
Windows Server supports the InetOrgPerson object. Essentially, this object is the same as a user object, and you can use it as such. However, the real purpose for the InetOrgPerson object is to allow for compatibility and transition from third-party X.500 and Lightweight Directory Access Protocol (LDAP) directory services that use this object to represent users. If you are migrating from a third-party directory service and end up with many InetOrgPerson objects, don’t worry. These objects are security principals just like user accounts. You can set passwords for InetOrgPerson objects and change the object class if you want to. When you change the object class, the InetOrgPerson object is converted to a user object, and from then on it is listed as the User type in Active Directory Users And Computers.
User accounts
Two types of user accounts are defined in Windows Server:
§ User accounts defined in Active Directory are called domain user accounts. Through single sign-on, domain user accounts can access resources throughout the domain. You create domain user accounts in Active Directory Users And Computers.
§ User accounts defined on a local computer are called local user accounts. Local user accounts have access to the local computer only, and they must authenticate themselves before they can access network resources. You create local user accounts with the Local Users And Groups utility.
NOTE
In a domain, only member servers and workstations have local user and group accounts. On the initial domain controller for a domain, these accounts are moved from the local Security Accounts Manager (SAM) database to Active Directory and then become domain accounts.
Logon names, passwords, and public certificates
All user accounts are identified with a logon name. In Windows Server, this logon name has two parts:
§ User name. The text label for the account
§ User domain or workgroup. The workgroup or domain where the user account exists
For the user wrstanek, whose account is created in the cpandl.com domain, the full logon name is wrstanek@cpandl.com. The pre–Windows 2000 logon name is CPANDL\wrstanek.
When working with Active Directory, you might also need to specify the fully qualified domain name (FQDN) for a user. The FQDN for a user is the combination of the Domain Name System (DNS) domain name, the container or organizational unit that contains the user, and the user name. For example, for the user cpandl.com\users\wrstanek, cpandl.com is the DNS domain name, users is the container or organizational unit location, and wrstanek is the user name.
User accounts can also have passwords and public certificates associated with them. Passwords are authentication strings for an account. Public certificates combine a public and private key to identify a user. You log on with a password interactively. You log on with a public certificate by using a smart card and a smart card reader.
Security identifiers and user accounts
Although Windows Server displays user names to describe privileges and permissions, the key identifiers for accounts are security identifiers (SIDs). SIDs are unique identifiers that are generated when you create accounts. Each account’s SID consists of the domain’s security ID prefix and a unique relative ID (RID), which is allocated by the relative ID master.
Windows Server uses these identifiers to track accounts independently from user names. SIDs serve many purposes. The two most important purposes are to allow you to change user names easily and to allow you to delete accounts without worrying that someone might gain access to resources simply by re-creating an account with the same name.
When you change a user name, you tell Windows Server to map a particular SID to a new name. When you delete an account, you tell Windows Server that a particular SID is no longer valid. Afterward, even if you create an account with the same user name, the new account won’t have the same privileges and permissions as the previous one. That’s because the new account will have a new SID.
Group accounts
In addition to user accounts, Windows Server provides groups. Generally speaking, you use groups to grant permissions to similar types of users and to simplify account administration. If a user is a member of a group that can access a resource, that particular user can access the same resource. Thus, you can give a user access to various work-related resources just by making the user a member of the correct group. Note that although you can log on to a computer with a user account, you can’t log on to a computer with a group account.
Because different Active Directory domains might have groups with the same name, groups are often referred to by domain\groupname, such as cpandl\gmarketing for the gmarketing group in the cpandl domain. When you work with Active Directory, you might also need to specify the FQDN for a group. The FQDN for a group is the concatenation of the DNS domain name, the container or organizational unit location, and the group name. For the group cpandl.com\users\gmarketing, cpandl.com is the DNS domain name, users is the container or organizational unit location, and gmarketing is the group name.
REAL WORLD
Employees in a marketing department probably need access to all marketing-related resources. Instead of granting access to these resources to each individual employee, you could make the users members of a marketing group. That way, they automatically obtain the group’s privileges. Later, if a user moves to a different department, you simply remove the user from the group, thus revoking all access permissions. Compared to having to revoke access for each individual resource, this technique is pretty easy, so you’ll want to use groups whenever possible.
Group types
Windows Server supports three types of groups:
§ Local. Groups that are defined on a local computer. Local groups are used on the local computer only. You create local groups with the Local Users And Groups utility.
§ Security. Groups that can have security descriptors associated with them. You define security groups in domains by using Active Directory Users And Computers.
§ Distribution. Groups that are used as email distribution lists. They can’t have security descriptors associated with them. You define distribution groups in domains by using Active Directory Users And Computers.
NOTE
Most general discussions about groups focus on local groups and security groups rather than on distribution groups. Distribution groups are only for email distribution and are not for assigning or managing access.
Group scope
In Active Directory, groups can have different scopes—domain local, built-in local, global, and universal. That is, the groups are valid in different areas, as described here:
§ Domain local. Groups primarily used to assign access permissions to resources within a single domain. Domain local groups can include members from any domain in the forest and from trusted domains in other forests. Typically, global and universal groups are members of domain local groups.
§ Built-in local. Groups with a special group scope that have domain local permissions and, for simplicity, are often included in the term domain local groups. The difference between built-in local groups and other groups is that you can’t create or delete built-in local groups. You can only modify built-in local groups. References to domain local groups apply to built-in local groups unless otherwise noted.
§ Global. Groups that are used primarily to define sets of users or computers in the same domain that share a similar role, function, or job. Members of global groups can include only accounts and groups from the domain in which they’re defined.
§ Universal. Groups that are used primarily to define sets of users or computers that should have wide permissions throughout a domain or forest. Members of universal groups include accounts, global groups, and other universal groups from any domain in the domain tree or forest.
BEST PRACTICES
Universal groups are very useful in large enterprises where you have multiple domains. If you plan properly, you can use universal groups to simplify system administration. You shouldn’t change the members of universal groups frequently. Each time you change the members of a universal group, you need to replicate those changes to all the global catalogs in the domain tree or forest. To reduce changes, assign other groups rather than user accounts to the universal group. For more information, see the “When to use domain local, global, and universal groups” section later in this chapter.
When you work with groups, the group’s scope restricts what you can and cannot do. Table 9-1 offers a quick summary of these items. For complete details about creating groups, see the “Adding a group account” section later in this chapter.
Table 9-1. How Group Scope Affects Group Capabilities
|
GROUP CAPABILITY |
DOMAIN LOCAL SCOPE |
GLOBAL SCOPE |
UNIVERSAL SCOPE |
|
Members |
Accounts, global groups, and universal groups from any domain; domain local groups from the same domain only |
Accounts and global groups from the same domain only |
Accounts from any domain, in addition to global and universal groups from any domain |
|
Member of |
Can be put into other domain local groups and assigned permissions only in the same domain |
Can be put into other groups and assigned permissions in any domain |
Can be put into other groups and assigned permissions in any domain |
|
Scope conversion |
Can be converted to universal scope provided that it doesn’t have as its member another group having domain local scope |
Can be converted to universal scope provided that it’s not a member of any other group having global scope |
Can’t be converted to any other group scope |
Security identifiers and group accounts
As with user accounts, Windows Server tracks group accounts with unique SIDs. This means that you can’t delete a group account, re-create it, and then expect all the permissions and privileges to remain the same. The new group will have a new SID, and all the permissions and privileges of the old group are lost.
Windows Server creates a security token for each user logon. The security token specifies the user account ID and the SIDs of all the security groups to which the user belongs. The token’s size grows as the user is added to additional security groups, which has the following consequences:
§ The security token must be passed to the user logon process before logon can be completed. As the number of security group memberships grows, the logon process takes longer.
§ To determine access permissions, the security token is sent to every computer that the user accesses. Therefore, the size of the security token has a direct impact on the network traffic load.
NOTE
Distribution group memberships aren’t distributed with security tokens, so distribution group memberships don’t affect the token size.
When to use domain local, global, and universal groups
Domain local, global, and universal groups provide many options for configuring groups in the enterprise. Although these group scopes are designed to simplify administration, poor planning can make them your worst administration nightmare. Ideally, you use group scopes to help you create group hierarchies that are similar to your organization’s structure and the responsibilities of particular groups of users. The best uses for domain local, global, and universal groups are as follows:
§ Domain local. Groups with domain local scope have the smallest extent of all groups. Use groups with domain local scope to help you manage access to resources such as printers and shared folders.
§ Global. Use groups with global scope to help you manage user and computer accounts in a particular domain. Then you can grant access permissions to a resource by making the group with global scope a member of the group with domain local scope.
§ Universal. Groups with universal scope have the largest extent. Use groups with universal scope to consolidate groups that span domains. Typically, you do this by adding global groups as members. Then, when you change membership of the global groups, the changes aren’t replicated to all global catalogs because the membership of the universal group didn’t change.
TIP
If your organization doesn’t have two or more domains, you don’t really need to use universal groups. Instead, build your group structure with domain local and global groups. Then, if you ever bring another domain into your domain tree or forest, you can easily extend the group hierarchy to accommodate the integration.
To put this in perspective, consider the following scenario. Suppose that you have branch offices in Seattle, Chicago, and New York. Each office has its own domain, which is part of the same domain tree or forest. These domains are called Seattle, Chicago, and NY, respectively. You want to make it easy for any administrator (from any office) to manage network resources, so you create a group structure that is very similar at each location. Although the company has marketing, IT, and engineering departments, let’s focus on the structure of the marketing department. At each office, members of the marketing department need access to a shared printer called MarketingPrinter and a shared data folder called MarketingData. You also want users to be able to share and print documents. For example, Bob in Seattle should be able to print documents so that Ralph in New York can pick them up on his local printer, and Bob should also be able to access the quarterly report in the shared folder at the New York office.
To configure the groups for the marketing departments at the three offices, you’d follow these steps:
1. Create global groups for each marketing group. In the Seattle domain, create a group named GMarketing and add the members of the Seattle marketing department to it. In the Chicago domain, create a group named GMarketing and add the members of the Chicago marketing department to it. In the NY domain, create a group named GMarketing and add the members of the New York marketing department to it.
2. In each location, create domain local groups that grant access to the shared printers and shared folders. Name the printer group LocalMarketingPrinter, and name the shared folder group LocalMarketingData. The Seattle, Chicago, and NY domains should each have their own local groups.
3. Create a group with universal scope in the domain at any branch office. Name the group UMarketing. Add Seattle\GMarketing, Chicago\GMarketing, and NY\GMarketing to this group.
4. Add UMarketing to the LocalMarketingPrinter and LocalMarketingData groups at each office. Marketing users should now be able to share data and printers.
Default user accounts and groups
When you install Windows Server 2012 R2, the operating system installs default users and groups. These accounts are designed to provide the basic setup necessary to grow your network. Three types of default accounts are provided:
§ Built-in. User and group accounts installed with the operating system, applications, and services
§ Predefined. User and group accounts installed with the operating system
§ Implicit. Special groups, also known as special identities, created implicitly when accessing network resources
NOTE
Although you can modify default users and groups, you can’t delete default users and groups created by the operating system because you wouldn’t be able to re-create them. The SIDs of the old and new accounts wouldn’t match, and the permissions and privileges of these accounts would be lost.
Built-in user accounts
Built-in user accounts have special purposes in Windows Server. All Windows Server systems have several built-in user accounts, including the following ones:
§ LocalSystem. A pseudoaccount for running system processes and handling system-level tasks. This account is part of the Administrators group on the server and has all user rights on the server. If you configure applications or services to use this account, the related processes have full access to the server system. Many services run under the LocalSystem account. In some cases, these services also have the privilege to interact with the desktop. Services that need alternative privileges or logon rights run under the LocalService or NetworkService account.
§ LocalService. A pseudoaccount with limited privileges. This account grants access to the local system only. The account is part of the Users group on the server and has the same rights as the NetworkService account, except that it is limited to the local computer. Configure applications or services to use this account when related processes don’t need to access other servers.
§ NetworkService. A pseudoaccount for running services that need additional privileges and logon rights on a local system and the network. This account is part of the Users group on the server and provides fewer permissions and privileges than the LocalSystem account (but more than the LocalService account). Specifically, processes running under this account can interact throughout a network by using the credentials of the computer account.
When you install add-ons or other applications on a server, other default accounts might be installed.
Predefined user accounts
Several predefined user accounts are installed with Windows Server, including Administrator and Guest. With member servers, predefined accounts are local to the individual system they’re installed on.
Predefined accounts have counterparts in Active Directory. These accounts have domainwide access and are completely separate from the local accounts on individual systems.
Administrator account
Administrator is a predefined account that provides complete access to files, directories, services, and other facilities. In Active Directory, the Administrator account has domainwide access and privileges. Otherwise, the Administrator account generally has access only to the local system. Although files and directories can be protected from the Administrator account temporarily, the Administrator account can take control of these resources at any time by changing the access permissions. By default, the Administrator account is enabled for use, but you can disable or rename it to enhance security.
SECURITY ALERT
To prevent unauthorized access to the system or domain, be sure to give the Administrator account an especially secure password. Also, because this is a known Windows account, you might want to rename the account as an extra security precaution. If you rename the original Administrator account, you might also want to create a dummy Administrator account. This dummy account should have no permissions, rights, or privileges, and you should disable it.
You usually won’t need to change the basic settings for the Administrator account. However, you might need to change its advanced settings, such as membership in particular groups. By default, the Administrator account for a domain is a member of these groups: Administrators, Domain Admins, Domain Users, Enterprise Admins, Group Policy Creator Owners, and Schema Admins. You’ll find more information about these groups in the next section.
REAL WORLD
In a domain environment, you use the local Administrator account primarily to manage the system when you first install it. This allows you to set up the system without getting locked out. You probably won’t use the account after the system has been installed. Instead, you should make your administrators members of the Administrators group. This ensures that you can revoke administrator privileges without having to change the passwords for all the Administrator accounts.
For a system that’s part of a workgroup where each individual computer is managed separately, you typically rely on this account any time you need to perform your system administration duties. Here, you probably don’t want to set up individual accounts for each person who has administrative access to a system. Instead, use a separate administrator account on each computer.
Guest account
The Guest account is designed for users who need one-time or occasional access. Although guests have limited system privileges, you should be very careful about using this account. Whenever you use this account, you open the system to potential security problems. The risk is so great that the account is initially disabled when you install Windows Server.
The Guest account is a member of the Domain Guests and Guests groups by default. Note that the Guest account—like all other named accounts—is also a member of the implicit group Everyone. The Everyone group typically has access to files and folders by default. The Everyone group also has a default set of user rights.
SECURITY ALERT
If you decide to enable the Guest account, be sure to restrict its use and change the password regularly. As with the Administrator account, you might want to rename the account as an added security precaution.
Built-in and predefined groups
Built-in groups are installed with all Windows Server systems. Use built-in and predefined groups to grant a user the group’s privileges and permissions. You do this by making the user a member of the group. For example, you give a user administrative access to the system by making a user a member of the local Administrators group. You give a user administrative access to the domain by making a user a member of the Domain Admins group in Active Directory.
Implicit groups and special identities
Implicit groups are assigned implicitly during logon and are based on how a user accesses a network resource. For example, if a user accessed a resource through an interactive logon, the user is automatically a member of the implicit group named Interactive. Although you can’t view the membership of special identities, you can grant membership in implicit groups to users, groups, and computers.
To reflect the modified role, implicit groups are also referred to as special identities. A special identity is a group whose membership can be set implicitly, such as during logon, or explicitly through security access permissions. As is the case with other default groups, the availability of a specific implicit group depends on the current configuration. Implicit groups are discussed later in this chapter.
Account capabilities
When you set up a user account, you can grant the user specific capabilities. You generally assign these capabilities by making the user a member of one or more groups, thus giving the user the capabilities of these groups. You withdraw capabilities by removing group membership.
In Windows Server, you can assign the following types of user rights as capabilities to an account:
§ Privileges. Grants permissions to perform specific administrative tasks. You can assign privileges to both user and group accounts. An example of a privilege is the ability to shut down the system.
§ Logon rights. Grants logon permissions. You can assign logon rights to both user and group accounts. An example of a logon right is the ability to log on locally.
§ Built-in capabilities. Assigned to groups and includes the group’s automatic capabilities. Built-in capabilities are predefined and unchangeable, but they can be delegated to users with permission to manage objects, organizational units, or other containers. An example of a built-in capability is the ability to create, delete, and manage user accounts. This capability is assigned to administrators and account operators. Thus, if a user is a member of the Administrators group, the user can create, delete, and manage user accounts.
§ Access permissions. Defines the operations that can be performed on network resources. You can assign access permissions to users, computers, and groups. An example of an access permission is the ability to create a file in a directory.
As an administrator, you deal with account capabilities every day. To help track built-in capabilities, refer to the following sections. Keep in mind that although you can’t change a group’s built-in capabilities, you can change a group’s default rights. For example, an administrator could revoke network access to a computer by removing a group’s right to access the computer from the network.
Privileges
A privilege is a user right assignment that grants permissions to perform a specific administrative task. You assign privileges through group policies, which can be applied to individual computers, organizational units, and domains. Although you can assign privileges to both users and groups, you’ll usually want to assign privileges to groups. In this way, users are automatically assigned the appropriate privileges when they become members of a group. Assigning privileges to groups also makes it easier to manage user accounts.
Table 9-2 provides a brief summary of each privilege you can assign to users and groups. To learn how to assign privileges, see the “Configuring user rights policies” section later in this chapter.
Table 9-2. Windows Server 2012 R2 Privileges for Users and Groups
|
PRIVILEGE |
DESCRIPTION |
|
Act As Part Of The Operating System |
Allows a process to authenticate as any user and gain access to resources as any user. Processes that require this privilege should use the LocalSystem account, which already has this privilege. |
|
Add Workstations To Domain |
Allows users to add computers to the domain. |
|
Adjust Memory Quotas For A Process |
Allows users to adjust process-based memory usage quotas. |
|
Back Up Files And Directories |
Allows users to back up the system regardless of the permissions set on files and directories. |
|
Bypass Traverse Checking |
Allows users to pass through directories while navigating an object path regardless of permissions set on the directories. The privilege doesn’t allow the user to list directory contents. |
|
Change The System Time |
Allows users to set the time for the system clock. |
|
Change The Time Zone |
Allows users to set the time zone for the system clock. All users have this privilege by default. |
|
Create A Pagefile |
Allows users to create and change the paging file size for virtual memory. |
|
Create A Token Object |
Allows processes to create token objects that can be used to gain access to local resources. Processes that require this privilege should use the LocalSystem account, which already has this privilege. |
|
Create Global Objects |
Allows processes to create global objects. LocalService and NetworkService have the privilege by default. |
|
Create Permanent Shared Objects |
Allows processes to create directory objects in the object manager. Most components already have this privilege; it’s not necessary to specifically assign it. |
|
Create Symbolic Links |
Allows an application that a user is running to create symbolic links. Symbolic links make it appear as though a document or folder is in a specific location when it actually resides in another location. Use of symbolic links is restricted by default to enhance security. |
|
Debug Programs |
Allows users to perform debugging. |
|
Enable Computer And User Accounts To Be Trusted For Delegation |
Allows computers and users to change or apply the trusted-for-delegation setting, provided they have write access to the object. |
|
Force Shutdown From A Remote System |
Allows users to shut down a computer from a remote location on the network. |
|
Generate Security Audits |
Allows processes to make security log entries for auditing object access. |
|
Impersonate A Client After Authentication |
Allows Web applications to act as clients during the processing of requests. Services and users can also act as clients. |
|
Increase A Process Working Set |
Allows an application that a user is running to increase the memory that the related process working set uses. A process working set is the set of memory pages currently visible to a process in physical memory. Allowing for increases in memory pages reduces page faults and enhances performance. |
|
Increase Scheduling Priority |
Allows processes to increase the scheduling priority assigned to another process, provided that they have write access to the process. |
|
Load And Unload Device Drivers |
Allows users to install and uninstall Plug and Play device drivers. This doesn’t affect device drivers that aren’t Plug and Play, which can be installed only by administrators. |
|
Lock Pages In Memory |
Allows processes to keep data in physical memory, preventing the system from paging data to virtual memory on disk. |
|
Manage Auditing And Security Log |
Allows users to specify auditing options and access the security log. You must turn on auditing in the group policy first. |
|
Modify An Object Label |
Allows a user process to modify the integrity label of objects, such as files, registry keys, or processes owned by other users. This privilege can be used to lower the priority of other processes. Processes running under a user account can modify the label of any object the user owns without requiring this privilege. |
|
Modify Firmware Environment Values |
Allows users and processes to modify system environment variables. |
|
Perform Volume Maintenance Tasks |
Allows for the administration of removable storage, the disk defragmenter, and disk management. |
|
Profile A Single Process |
Allows users to monitor the performance of nonsystem processes. |
|
Profile System Performance |
Allows users to monitor the performance of system processes. |
|
Remove Computer From Docking Station |
Allows a laptop to be undocked and removed from the network. |
|
Replace A Process Level Token |
Allows processes to replace the default token for subprocesses. |
|
Restore Files And Directories |
Allows users to restore backed-up files and directories, regardless of the permissions set on files and directories. |
|
Shut Down The System |
Allows users to shut down the local computer. |
|
Synchronize Directory Service Data |
Allows users to synchronize directory service data on domain controllers. |
|
Take Ownership Of Files Or Other Objects |
Allows users to take ownership of files and any other Active Directory objects. |
Logon rights
A logon right is a user rights assignment that grants logon permissions. You can assign logon rights to both user and group accounts. As with privileges, you assign logon rights through group policies, and you’ll usually want to assign logon rights to groups rather than to individual users.
Table 9-3 provides a brief summary of each logon right you can assign to users and groups. Assigning logon rights is covered in the “Configuring user rights policies” section later in this chapter.
Table 9-3. Windows Server 2012 R2 Logon Rights for Users and Groups
|
LOGON RIGHT |
DESCRIPTION |
|
Access Credential Manager As A Trusted Caller |
Grants permission to establish a trusted connection to Credential Manager. Credentials, such as a user name and password or smart card, provide identification and proof of identification. |
|
Access This Computer From The Network |
Grants remote access to the computer. |
|
Allow Log On Locally |
Grants permission to log on at the computer’s keyboard. On domain controllers, this right is restricted by default and only members of the following groups can log on locally: Administrators, Account Operators, Backup Operators, Print Operators, and Server Operators. |
|
Allow Log On Through Remote Desktop Services |
Grants access through Remote Desktop Services. This right is necessary for remote assistance and remote desktop use. |
|
Deny Access To This Computer From The Network |
Denies remote access to the computer through network services. |
|
Deny Logon As Batch Job |
Denies the right to log on through a batch job or script. |
|
Deny Logon As Service |
Denies the right to log on as a service. |
|
Deny Logon Locally |
Denies the right to log on by using the computer’s keyboard. |
|
Deny Logon Through Remote Desktop Services |
Denies the right to log on through Remote Desktop Services. |
|
Log On As A Batch Job |
Grants permission to log on as a batch job or script. |
|
Log On As A Service |
Grants permission to log on as a service. The LocalSystem account has this right. A service that runs under a separate account should be assigned this right. |
Built-in capabilities for groups in Active Directory
The built-in capabilities that are assigned to groups in Active Directory depend on a computer’s configuration. Using the Local Group Policy Editor, shown in Figure 9-1, you can view the capabilities that have been assigned to each group by expanding Computer Configuration\Windows Settings\Security Settings\Local Policies and then selecting the User Rights Assignment node.
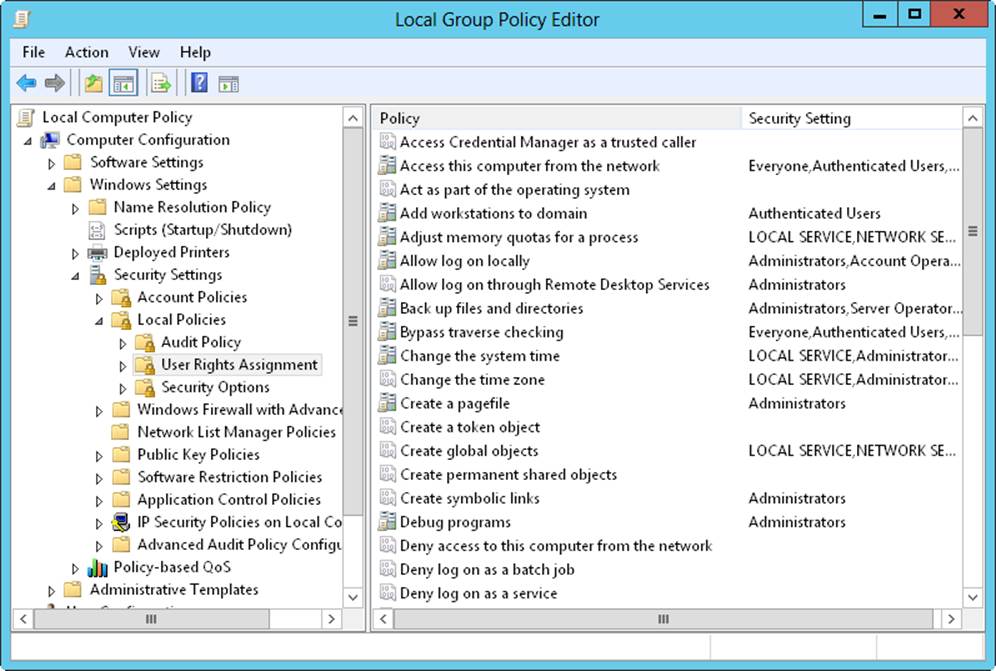
Figure 9-1. View the built-in capabilities that are used with groups.
Note that any action that’s available to the Everyone group is available to all groups, including the Guests group. This means that although the Guests group doesn’t have explicit permission to access the computer from the network, a member of the Guests group can still access the system because the Everyone group has this right.
Table 9-4 summarizes capabilities you can delegate to other users and groups. As you study the table, note that restricted accounts include the Administrator user account, the user accounts of administrators, and the group accounts for Administrators, Server Operators, Account Operators, Backup Operators, and Print Operators. Because these accounts are restricted, Account Operators can’t create or modify them.
Table 9-4. Other Capabilities for Built-in and Local Groups
|
TASK |
DESCRIPTION |
GROUP NORMALLY ASSIGNED |
|
Assign User Rights |
Allows users to assign user rights to other users |
Administrators |
|
Create And Delete Groups |
Allows users to create new groups and delete existing groups |
Administrators, Account Operators |
|
Create And Delete Printers |
Allows users to create and delete printers |
Administrators, Server Operators, Printer Operators |
|
Create, Delete, And Manage User Accounts |
Allows users to administer domain user accounts |
Administrators, Account Operators |
|
Manage Group Policy Links |
Allows users to apply existing group policies to sites, domains, and organizational units for which they have write access to the related objects |
Administrators |
|
Manage Network Configuration |
Allows users to configure networking |
Administrators, Network Configuration Operators |
|
Manage Performance Logs |
Allows users to configure performance logging |
Administrators, Performance Log Users |
|
Manage Printers |
Allows users to modify printer settings and manage print queues |
Administrators, Server Operators, Printer Operators |
|
Modify The Membership Of A Group |
Allows users to add and remove users from domain groups |
Administrators, Account Operators |
|
Monitor Performance Logs |
Allows users to monitor performance logging |
Administrators, Performance Monitor Users |
|
Perform Cryptographic Operations |
Allows users to manage cryptographic options |
Administrators, Cryptographic Operators |
|
Read All User Information |
Allows users to view user account information |
Administrators, Server Operators, Account Operators |
|
Read Event Logs |
Allows users to read event logs |
Administrators, Event Log Readers |
|
Reset Passwords On User Accounts |
Allows users to reset passwords on user accounts |
Administrators, Account Operators |
Using default group accounts
The default group accounts are designed to be versatile. By assigning users to the correct groups, you can make managing your Windows Server 2012 R2 workgroup or domain a lot easier. Unfortunately, with so many groups, understanding the purpose of each isn’t easy. To help, let’s take a closer look at groups used by administrators and groups that are implicitly created.
Groups used by administrators
An administrator is someone who has wide access to network resources. Administrators can create accounts, modify user rights, install printers, manage shared resources, and more. The main administrator groups are Administrators, Domain Admins, and Enterprise Admins. Table 9-5compares the administrator groups.
Table 9-5. Administrator Groups Overview
|
ADMINISTRATOR GROUP TYPE |
NETWORK ENVIRONMENT |
GROUP SCOPE |
MEMBERSHIP |
|
Administrators |
Active Directory domains |
Domain local |
Administrator, Domain Admins, Enterprise Admins |
|
Administrators |
Workgroups, computers not part of a domain |
Local |
Administrator |
|
Domain Admins |
Active Directory domains |
Global |
Administrator |
|
Enterprise Admins |
Active Directory domains |
Global or Universal |
Administrator |
|
Schema Admins |
Active Directory domains |
Universal |
Administrator |
TIP
The Administrator account and the global groups Domain Admins and Enterprise Admins are members of the Administrators group. The Administrator account is used to access the local computer. Domain Admins membership allows other administrators to access the system from elsewhere in the domain. Enterprise Admins membership allows other administrators to access the system from other domains in the current domain tree or forest. To prevent enterprisewide access to a domain, you can remove Enterprise Admins from this group.
Administrators is a local group that provides full administrative access to an individual computer or a single domain, depending on its location. Because this account has complete access, you should be very careful about adding users to this group. To make someone an administrator for a local computer or domain, all you need to do is make that person a member of this group. Only members of the Administrators group can modify this account.
Domain Admins is a global group designed to help you manage resources in a domain. Members of this group have full control of a domain. This group has administrative control over all computers in a domain because it’s a member of the Administrators group by default on all domain controllers, all domain workstations, and all domain member servers at the time they join the domain. To make someone an administrator for a domain, make that person a member of this group.
TIP
The Administrator account is a member of Domain Admins by default. This means that if a user logs on to a computer as the administrator and the computer is a member of the domain, the user will have complete access to all resources in the domain.
Enterprise Admins is a global group designed to help you manage resources in a forest. Members of this group have full control of all domains in a forest. This group has administrative control over all domain controllers in the enterprise because the group is a member of the Administrators group by default on all domain controllers in a forest. To make someone an administrator for the enterprise, make that person a member of this group.
TIP
The Administrator account is a member of Enterprise Admins by default. This means that if someone logs on to a computer as the administrator and the computer is a member of the domain, the user will have complete access to the domain tree or forest.
Schema Admins is a universal group designed to help you manage schema in Active Directory. Members of this group can work with and manage schema in the domain. Before someone can edit schema, they need to be a member of this group.
Implicit groups and identities
Windows Server defines a set of special identities you can use to assign permissions in certain situations. You usually assign permissions implicitly to special identities. However, you can assign permissions to special identities directly when you modify Active Directory objects. The special identities include the following:
§ Anonymous Logon. Any user accessing the system through anonymous logon has the Anonymous Logon identity. This identity allows anonymous access to resources such as a webpage published on a corporate intranet server.
§ Authenticated Users. Any user accessing the system through a logon process has the Authenticated Users identity. This identity allows access to shared resources within the domain, such as files in a shared folder that should be accessible to all the workers in the organization.
§ Batch. Any user or process accessing the system as a batch job (or through the batch queue) has the Batch identity. This identity allows batch jobs to run scheduled tasks, such as a nightly cleanup job that deletes temporary files.
§ Creator Group. Windows Server uses this special identity group to automatically grant access permissions to users who are members of the same group or groups as the creator of a file or a directory.
§ Creator Owner. The person who created the file or the directory is a member of this special identity group. Windows Server uses this identity to automatically grant access permissions to the creator of a file or directory.
§ Dial-Up. Any user accessing the system through a dial-up connection has the Dial-Up identity. This identity distinguishes dial-up users from other types of authenticated users.
§ Enterprise Domain Controllers. Domain controllers with enterprisewide roles and responsibilities have the Enterprise Domain Controllers identity. This identity allows them to perform certain tasks in the enterprise by using transitive trusts.
§ Everyone. All interactive, network, dial-up, and authenticated users are members of the Everyone group. This special identity group gives wide access to a system resource.
§ Interactive. Any user logged on to the local system has the Interactive identity. This identity allows only local users to access a resource.
§ Network. Any user accessing the system through a network has the Network identity. This identity allows only remote users to access a resource.
§ Proxy. Users and computers accessing resources through a proxy have the Proxy identity. This identity is used when proxies are implemented on the network.
§ Remote Desktop Services User. Any user accessing the system through Remote Desktop Services has the Remote Desktop Services User identity. This identity allows Remote Desktop Services users to access Remote Desktop Services applications and to perform other necessary tasks with Remote Desktop Services.
§ Restricted. Users and computers with restricted capabilities have the Restricted identity.
§ Self. The Self identity refers to the object itself and allows the object to modify itself.
§ Service. Any service accessing the system has the Service identity. This identity grants access to processes being run by Windows Server services.
§ System. The Windows Server operating system itself has the System identity. This identity is used when the operating system needs to perform a system-level function.
User account setup and organization
A key part of an administrator’s job is to create accounts, and this chapter shows you how. User and group accounts allow Windows Server 2012 R2 to track and manage information about users, including permissions and privileges. To create user accounts, you primarily use the following two account administration tools:
§ Active Directory Users And Computers, which is designed to administer accounts throughout an Active Directory domain
§ Local Users And Groups, which is designed to administer accounts on a local computer
The most important aspects of account creation are account setup and account organization. Without the appropriate guidelines and policies, you might quickly find that you need to rework all your user accounts. Before you create accounts, determine the policies you’ll use for setup and organization.
Account naming policies
A key policy you need to set is the naming scheme for accounts. User accounts have display names and logon names. The display name (or full name) is the name displayed to users and the name referenced in user sessions. The logon name is the name used to log on to the domain. Logon names are discussed briefly in the “Logon names, passwords, and public certificates” section earlier in this chapter.
Rules for display names
For domain accounts, the display name is normally the concatenation of the user’s first name, middle initial, and last name, but you can set it to any string value. The display names must follow these rules:
§ Local display names must be unique on an individual computer.
§ Display names must be unique throughout a domain.
§ Display names must be no more than 64 characters.
§ Display names can contain alphanumeric characters and special characters.
Rules for logon names
Logon names must follow these rules:
§ Local logon names must be unique on an individual computer, and global logon names must be unique throughout a domain.
§ Logon names can contain as many as 256 characters. However, it isn’t practical to use logon names that have more than 64 characters.
§ A pre–Windows 2000 logon name is given to all accounts. By default, this logon name is set to the first 20 characters of the Windows logon name. The pre–Windows 2000 logon name must be unique throughout a domain.
§ Users logging on to the domain by using a computer that runs Windows 2000 or a later release can use their standard logon names or their pre–Windows 2000 logon names, regardless of the domain operations mode.
§ Logon names can’t contain certain characters. The following characters are invalid:
“ / \ [ ] ; | = , + * ? < >
§ Logon names can contain all other special characters, including spaces, periods, dashes, and underscores. Generally, however, it is not a good idea to use spaces in account names.
NOTE
Although Windows Server stores user names in the case that you enter, user names aren’t case sensitive. For example, you can access the Administrator account with the user name Administrator, administrator, or ADMINISTRATOR. Thus, user names are case aware but not case sensitive.
Naming schemes
Most small organizations tend to assign logon names that use the user’s first or last name. But you can have more than one person with the same name in an organi-zation of any size. Rather than having to rework your logon naming scheme when you run into problems, select a good naming scheme now and make sure that other administrators use it. You should use a consistent procedure for naming accounts—one that allows your user base to grow, limits the possibility of name conflicts, and ensures that your accounts have secure names that aren’t easily exploited. If you follow these guidelines, the types of naming schemes you might want to use include the following:
§ User’s first name and last initial
§ User’s first initial and last name
§ User’s first initial, middle initial, and last name
§ User’s first initial, middle initial, and first five characters of the last name
§ User’s first name and last name
SECURITY ALERT
In environments with strict security, you can assign a numeric code for the logon name. This numeric code should be at least 20 characters. Combine this strict naming method with smart cards and smart card readers to allow users to quickly log on to the domain without having to type in all those characters. Don’t worry—users can still have a display name that humans can read.
Password and account policies
Domain accounts use passwords or private keys from certificates to authenticate access to network resources. This section focuses on passwords.
Using secure passwords
A password is a case-sensitive string that can contain more than 127 characters with Active Directory and up to 14 characters with the legacy Security Manager. Valid characters for passwords are letters, numbers, and symbols. When you set a password for an account, Windows Server stores the password in an encrypted format in the account database.
But simply having a password isn’t enough. The key to preventing unauthorized access to network resources is to use secure passwords. The difference between an average password and a secure password is that secure passwords are difficult to guess and crack. You make passwords difficult to guess and crack by using combinations of all the available character types—including lowercase letters, uppercase letters, numbers, and symbols. For example, instead of using happydays for a password, you would use haPPy2Days&, Ha**y!day5, or even h*99Y%d*ys.
You might also want to use password phrases. With a password phrase, the password contains multiple words and punctuation, like a sentence. For example, you might use the password phrase This problem is 99 times ten! A password phrase that includes punctuation and numbers meets all complexity requirements and is incredibly difficult to crack.
Unfortunately, no matter how secure you make a user’s password initially, the user will eventually choose his own password. Therefore, you should set account policies that define a secure password for your systems. Account policies are a subset of the policies configurable in Group Policy.
Setting account policies
As I mentioned in earlier chapters, you can apply group policies at various levels within the network structure. You manage local group policies in the manner discussed in the “Managing local group policies” section in Chapter 6 You manage global group policies as explained in “Managing site, domain, and organizational unit policies,” also in Chapter 6.
Account policies should be configured in the highest precedence GPO that is linked to a domain. By default, the highest precedence GPO linked to a domain is the Default Domain Policy GPO. After you access the Default Domain Policy GPO or other appropriate GPO, you can set account policies by following these steps:
1. In the Group Policy Management Editor, shown in Figure 9-2, open the Account Policies node by expanding Computer Configuration\Windows Settings\Security Settings. The console tree shows the name of the com-puter or domain you are configuring. Be sure that this is the appropriate network resource to configure.
NOTE
Domain policies have precedence over local policies. The GPO with a link order of 1 in the domain always has the highest precedence.
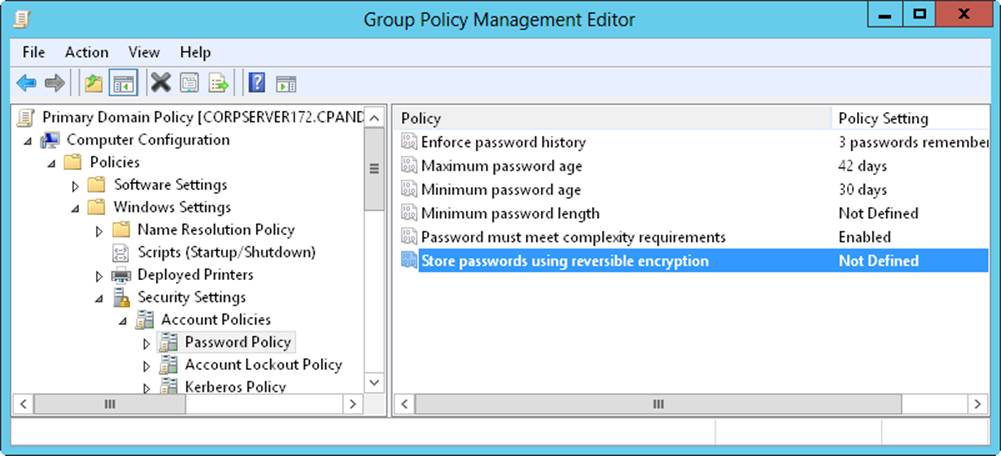
Figure 9-2. Use the Account Policies node to set policies for passwords and general account use.
2. You can now manage account policies through the Password Policy, Account Lockout Policy, and Kerberos Policy nodes. To configure a policy, double-tap or double-click its entry, or press and hold or right-click it and then tap or click Properties. This opens a Properties dialog box for the policy, shown in Figure 9-3.
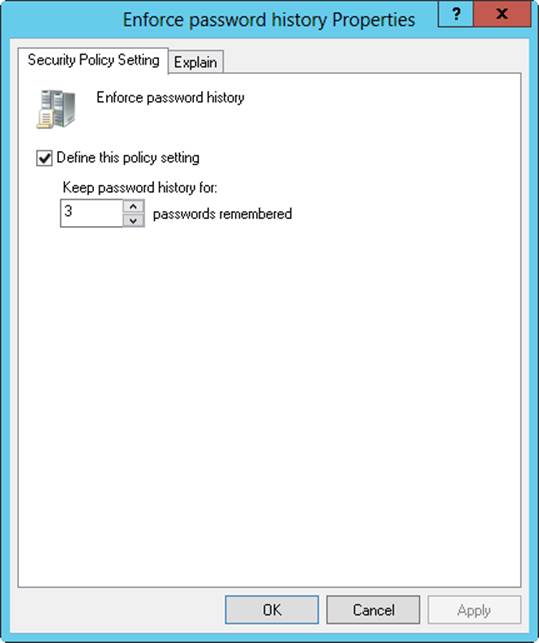
Figure 9-3. Define and configure global group policies in the Properties dialog box.
All policies are either defined or not defined. That is, they are either configured for use or not configured for use. A policy that isn’t defined in the current container could be inherited from another container.
NOTE
Kerberos policies aren’t used with local computers. Kerberos policies are available only with group policies that affect domains. For stand-alone servers, you can change the local policy settings. However, you cannot change the local policy settings for domain controllers or member servers.
3. Select or clear the Define This Policy Setting check box to specify whether a policy is defined.
TIP
Policies can have additional options for configuration. Often these options are buttons labeled Enabled and Disabled. Tapping or clicking Enabled turns on the policy restriction. Tapping or clicking Disabled turns off the policy restriction. Some policies are negations, which means that by enabling them you are actually negating the item. For example, Disable Log On As A Service is the negation of the item Log On As A Service.
Specific procedures for working with account policies are discussed in the “Configuring password policies,” “Configuring account lockout policies,” and “Configuring Kerberos policies” sections later in this chapter.
Configuring account policies
As you learned in the previous section, there are three types of account policies: password policies, account lockout policies, and Kerberos policies. The sections that follow explain how to configure each of these policies.
Configuring password policies
Password policies, listed here, control security for passwords:
§ Enforce Password History
§ Maximum Password Age
§ Minimum Password Age
§ Minimum Password Length
§ Password Must Meet Complexity Requirements
§ Store Passwords Using Reversible Encryption
The uses of these policies are discussed in the following sections.
Enforce Password History
Enforce Password History sets how frequently old passwords can be reused. With this policy, you can discourage users from alternating between several common passwords. Windows Server can store up to 24 passwords for each user in the password history.
To disable this feature, set the value of the password history to 0. To enable this feature, set the value of the password history by using the Passwords Remembered box. Windows Server then tracks old passwords by using a password history that’s unique for each user, and users aren’t allowed to reuse any of the stored passwords.
NOTE
To prevent users from bypassing settings for Enforce Password History, don’t allow them to change passwords immediately. This stops users from changing their passwords several times to get back to an old password. You can set the time required to keep a password with the Minimum Password Age policy as discussed later in the chapter.
Maximum Password Age
Maximum Password Age determines how long users can keep a password before they have to change it. The aim is to force users to change their passwords periodically. When you use this feature, set a value that makes sense for your network. Generally, you use a shorter period when security is very important and a longer period when security is less important.
You can set the maximum password age to any value from 0 through 999. A value of 0 specifies that passwords don’t expire. Although you might be tempted to set no expiration date, users should change passwords regularly to ensure the network’s security. Where security is a concern, good values are 30, 60, or 90 days. Where security is less important, good values are 120, 150, or 180 days.
NOTE
Windows Server notifies users when the password expiration date is approaching. Any time the expiration date is fewer than 30 days away, a warning is displayed when the user logs on stating that he or she has to change the password within a specific number of days.
Minimum Password Age
Minimum Password Age determines how long users must keep a password before they can change it. You can use this box to prevent users from bypassing the password system by entering a new password and then changing it right back to the old one.
If the minimum password age is set to 0, users can change their passwords immediately. To prevent this, set a specific minimum age. Reasonable settings are from three to seven days. In this way, you make sure that users are less inclined to switch back to an old password but are able to change their passwords in a reasonable amount of time if they want to. Keep in mind that a minimum password age could prevent a user from changing a compromised password. If a user can’t change the password, an administrator has to make the change.
Minimum Password Length
Minimum Password Length sets the minimum number of characters for a password. If you haven’t changed the default setting, you should do so immediately. The default in some cases is to allow empty passwords (passwords with zero characters), which is definitely not a good idea.
For security reasons, you’ll generally want passwords of at least eight characters, because long passwords are usually more difficult to crack than short ones. If you want greater security, set the minimum password length to 14 characters.
Password Must Meet Complexity Requirements
Beyond the basic password and account policies, Windows Server includes facilities for creating additional password controls. These facilities enforce the use of secure passwords that follow these guidelines:
§ Passwords must have at least six characters.
§ Passwords can’t contain the user name, such as stevew, or parts of the user’s full name, such as steve.
§ Passwords must use at least three of the four available character types: lowercase letters, uppercase letters, numbers, and symbols.
To enforce these rules, enable Passwords Must Meet Complexity Requirements.
Store Passwords Using Reversible Encryption
Passwords in the password database are encrypted. This encryption can’t normally be reversed. The only time you would want to change this setting is when your organization uses applications that need to read the password. If this is the case, enable Store Password Using Reversible Encryption For All Users.
With this policy enabled, passwords might as well be stored as plain text—it presents the same security risks. With this in mind, a much better technique is to enable the option on a per-user basis and then only as required to meet the user’s actual needs.
Configuring account lockout policies
Account lockout policies, listed here, control how and when accounts are locked out of the domain or the local system:
§ Account Lockout Threshold
§ Account Lockout Duration
§ Reset Account Lockout Counter After
These policies are discussed in the sections that follow.
Account Lockout Threshold
Account Lockout Threshold sets the number of logon attempts that are allowed before an account is locked out. If you decide to use lockout controls, you should use a value that balances the need to prevent account cracking with the needs of users who are having difficulty accessing their accounts.
The main reason users might not be able to access their accounts properly the first time is that they forgot their passwords. If this is the case, they might need several attempts to log on properly. Workgroup users could also have problems accessing a remote system if their current passwords don’t match the passwords that the remote system expects. For example, the remote system might record several bad logon attempts before a user receives a prompt to enter the correct password because Windows Server has attempted to automatically log on to the remote system. In a domain environment, this normally doesn’t happen because of the single sign-on feature.
You can set the lockout threshold to any value from 0 to 999. The lockout threshold is set to 0 by default, which means that accounts won’t be locked out because of invalid logon attempts. Any other value sets a specific lockout threshold. Keep in mind that the higher the lockout value, the higher the risk that a hacker might be able to break into your system. A reasonable range of values for this threshold is from 7 to 15. This is high enough to rule out user error and low enough to deter hackers.
Account Lockout Duration
If someone violates the lockout controls, Account Lockout Duration sets the length of time that the account is locked. You can set the lockout duration to a specific length of time by using a value between 1 and 99,999 minutes, or to an indefinite length of time by setting the lockout duration to 0.
The best security policy is to lock the account indefinitely. When you do, only an administrator can unlock the account. This prevents hackers from trying to access the system again and forces users who are locked out to seek help from an administrator, which is usually a good idea. By talking to the user, you can determine what the user is doing wrong and help the user avoid further problems.
TIP
When an account is locked out, open the Properties dialog box for the account in Active Directory Users And Computers. Tap or click the Account tab, and then select the Unlock Account check box.
Reset Account Lockout Counter After
Every time a logon attempt fails, Windows Server raises the value of a threshold that tracks the number of bad logon attempts. To maintain a balance between potential lockouts from valid security concerns and lockouts that could occur from simple human error, another policy determines how long to maintain information regarding bad logon attempts. This policy is called Reset Account Lockout Counter After, and you use it to reset the bad logon attempts counter to 0 after a certain waiting period. The way the policy works is simple: If the waiting period for Reset Account Lockout Counter After has elapsed since the last bad logon attempt, the bad logon attempts counter is reset to 0. The bad logon attempts counter is also reset when a user logs on successfully.
If the Reset Account Lockout Counter After policy is enabled, you can set it to any value from 1 to 99,999 minutes. As with Account Lockout Threshold, you need to select a value that balances security needs against user access needs. A good value is from one to two hours. This waiting period should be long enough to force hackers to wait longer than they want to before trying to access the account again.
If the Reset Account Lockout Counter After policy isn’t set or is disabled, the bad logon attempts counter is reset only when a user successfully logs on.
NOTE
Bad logon attempts against a password-protected screen saver at a workstation don’t increase the lockout threshold. Similarly, if you press Ctrl+Alt+Delete to lock a server or workstation, bad logon attempts against the Unlock dialog box don’t count.
Configuring Kerberos policies
Kerberos V5 is the primary authentication mechanism used in an Active Directory domain. The Kerberos protocol uses tickets to verify the identification of users and network services. Tickets contain encrypted data that confirms identity for the purposes of authentication and authorization.
You can control ticket duration, renewal, and enforcement with the following policies:
§ Enforce User Logon Restrictions
§ Maximum Lifetime For Service Ticket
§ Maximum Lifetime For User Ticket
§ Maximum Lifetime For User Ticket Renewal
§ Maximum Tolerance For Computer Clock Synchronization
These policies are discussed in the sections that follow.
SECURITY ALERT
Only administrators with an intimate understanding of Kerberos security should change these policies. If you change these policies to inefficient settings, you might cause serious problems on the network. The default Kerberos policy settings usually work just fine.
Enforce User Logon Restrictions
Enforce User Logon Restrictions ensures that any restrictions placed on a user account are enforced. For example, if the user’s logon hours are restricted, this policy enforces the restriction. By default, the policy is enabled and you should disable it only in rare circumstances.
Maximum Lifetime
Maximum Lifetime For Service Ticket and Maximum Lifetime For User Ticket set the maximum duration for which a service or user ticket is valid. By default, service tickets have a maximum duration of 600 minutes, and user tickets have a maximum duration of 10 hours.
You can change the duration of tickets. For service tickets, the valid range is from 0 to 99,999 minutes. For user tickets, the valid range is from 0 to 99,999 hours. A value of 0 effectively turns off expiration. Any other value sets a specific ticket lifetime.
A user ticket that expires can be renewed, provided that the renewal takes place within the time set for Maximum Lifetime For User Ticket Renewal. By default, the maximum renewal period is seven days. You can change the renewal period to any value from 0 to 99,999 days. A value of 0 effectively turns off the maximum renewal period, and any other value sets a specific renewal period.
Maximum Tolerance
Maximum Tolerance For Computer Clock Synchronization is one of the few Kerberos policies you might need to change. By default, computers in the domain must be synchronized within five minutes of one another. If they aren’t, authentication fails.
If you have remote users who log on to the domain without synchronizing their clocks to the network time server, you might need to adjust this value. You can set any value from 0 to 99,999. A value of 0 indicates that there’s no tolerance for a time difference, which means the remote user’s system must be precisely time-synchronized or authentication will fail.
Configuring authentication policies
Authentication policies are an advanced configuration option for large enterprises. You use authentication policies to do the following:
§ Restrict the authentication methods available to user, service, and computer accounts.
§ Specify access control conditions that restrict the devices that can request Kerberos tickets for user, service and computer accounts.
Authentication policies and related options are available only when an Active Directory domain is operating at the Windows Server 2012 R2 or higher functional level. Authentication policies are enforced during initial Kerberos authentication and whenever a user, computer or service requests access to a server services. You use authentication policy silos to identify the users, computers, managed services accounts, and group managed service accounts to which you want to apply authentication settings; to fine-tune which accounts are to be protected; and to define explicitly permitted accounts.
Several object classes in the Active Directory schema were implemented to support authentication policies and silos, including:
§ Authentication Policies container. Used to store Authentication Policy objects in Active Directory
§ Authentication Policy object. Used to configure Kerberos Ticket Granting Ticket properties and specify authentication conditions based on account type
§ Authentication Policy Silos container. Used to store Authentication Policy Silo objects in Active Directory Domain Services
§ Authentication Policy Silo object. Defines the authentication policy or policies to be applied to accounts that inherit this object
NOTE
A default Authentication Policies container is created under the System container in a domain and it stores the Authentication Policy objects (APOs). You add APOs to the Authentication Policies Container to define the various sets of authentication settings you want to use.
You use authentication policies in conjunction with the Protected Users security group. Any accounts that should have additional protections should be added to the Protected Users group, restricted by using an Authentication Policy object, and then optionally identified in an authentication policy silo to fine-tune the way controls are applied. Membership in the Protected Users group ensures that only Kerberos can be used for authentication. Otherwise, if NTLM is used for authentication, access control conditions that you define in policies will not be properly applied.
Both types of policies can be configured in auditing only or enforce mode. With auditing only mode, policy restrictions are audited rather than enforced. With enforced mode, policy restrictions are strictly enforced.
In Active Directory Administrative Center, you create and manage authentication policies by using the options in the Authentication\Authentication Policies node. To create an authentication policy, select the Authentication\Authentication Policies node in the left pane. Next, under Tasks, select New and then select Authentication Policy. In the Create Authentication Policy dialog box, use the options provided to define the new policy and specify access control conditions for each type of account to which the policy will apply.
Authentication Policy Silos allow you to apply authentication policies in several different ways. When you create the object, you can specify a single authentication policy to apply to all member accounts or use a separate authentication policy for each type of security principal. As part of creating the authentication policy silo, you also can specify explicitly permitted accounts.
In Active Directory Administrative Center, you create and manage authentication silos by using the options on the Authentication\Authentication Policy Silos node. To create an authentication policy silo, select the Authentication\Authentication Policies node in the left pane. Next, under Tasks, select New and then select Authentication Policy Silo. Use the options in the Create Authentication Policy Silo dialog box to create the authentication policy silo.
Configuring user rights policies
User accounts have built-in capabilities and user rights. Although you can’t change built-in capabilities for accounts, you can manage user rights for accounts. Typically, you apply user rights to users by making them members of the appropriate group or groups. You can also apply rights directly, and you do this by managing the user rights for the user’s account.
SECURITY ALERT
Any user who’s a member of a group that’s assigned a certain right also has that right. For example, if the Backup Operators group has the right, and jsmith is a member of this group, jsmith also has this right. Keep in mind that changes you make to user rights can have a far-reaching effect. Because of this, only experienced administrators should make changes to the user rights policy.
You assign user rights through the Local Policies node of Group Policy. As the name implies, local policies pertain to a local computer. However, you can configure local policies and then import them into Active Directory. You can also configure these local policies as part of an existing GPO for a site, a domain, or an organizational unit. When you do this, the local policies apply to computer accounts in the site, domain, or organizational unit.
To administer user rights policies, follow these steps:
1. Open the GPO you want to work with, and then open the Local Policies node by working your way down the console tree. To do so, expand Computer Configuration\Windows Settings\Security Settings\Local Policies.
2. Select User Rights Assignment to manage user rights. To configure a user rights assignment, double-tap or double-click a user right, or press and hold or right-click it and then tap or click Properties. This opens a Properties dialog box.
3. Configure the user rights. To configure local user rights, follow steps 1–3 in the “Configuring local user rights” section later in this chapter. To configure global user rights, follow steps 1–6 in the following section.
Configuring global user rights
For a site, a domain, or an organizational unit, you configure individual user rights by following these steps:
1. Open the Properties dialog box for the user right, which is similar to the one shown in Figure 9-4. If the policy isn’t defined, select Define These Policy Settings.
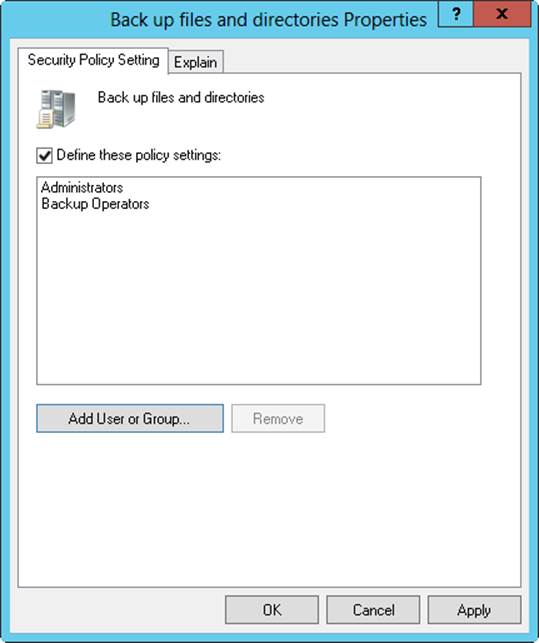
Figure 9-4. In the Properties dialog box, define the user right, and then apply the right to users and groups.
2. To apply the right to a user or group, tap or click Add User Or Group. Then, in the Add User Or Group dialog box, tap or click Browse. This opens the Select Users, Computers, Service Accounts, Or Groups dialog box, shown in Figure 9-5.
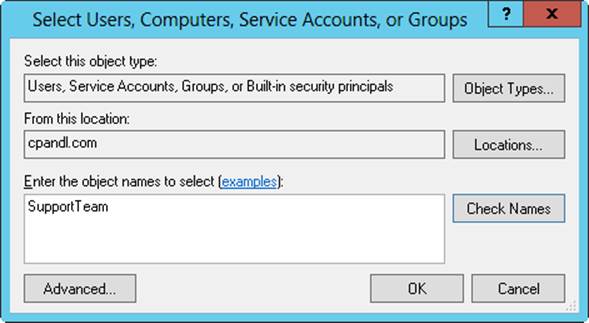
Figure 9-5. In the Select Users, Computers, Service Accounts, Or Groups dialog box, apply the user right to users and groups.
SECURITY ALERT
Windows Firewall running on a domain controller might prevent you from using the Select Users, Computers, Service Accounts, Or Groups dialog box. This can occur when you aren’t logged on locally to the domain controller and are working remotely. You might need to configure an exception on the domain controller for incoming TCP port 445. You can do this by expanding Computer Configuration\Administrative Templates\Network\Network Connections\Windows Firewall\Domain Profile. In the details pane, double-tap or double-click the Windows Firewall: Allow Inbound Remote Administration Exception policy, and then select Enabled. Alternatively, you can configure an exception by entering the following at a command prompt on the domain controller: netsh firewall set portopening tcp 445 smb enable. See Microsoft Knowledge Base Article 840634 (support.microsoft.com/default.aspx?scid=kb;en-us;840634) for more details.
3. Enter the name of the user or group you want to use in the box provided, and then tap or click Check Names. By default, the search is configured to find built-in security principals and user accounts. To add groups to the search, tap or click Object Types, select Groups in the list box, and then tap or click OK.
4. After you select the account names or groups to add, tap or click OK. The Add User Or Group dialog box should now show the selected accounts. Tap or click OK again.
5. The Properties dialog box is updated to reflect your selections. If you made a mistake, select a name and remove it by tapping or clicking Remove.
6. When you have finished granting the right to users and groups, tap or click OK.
Configuring local user rights
For local computers, apply user rights by following these steps:
1. Open the Properties dialog box for the user right, which is similar to the one shown in Figure 9-6. Remember that site, domain, and organizational unit policies have precedence over local policies.
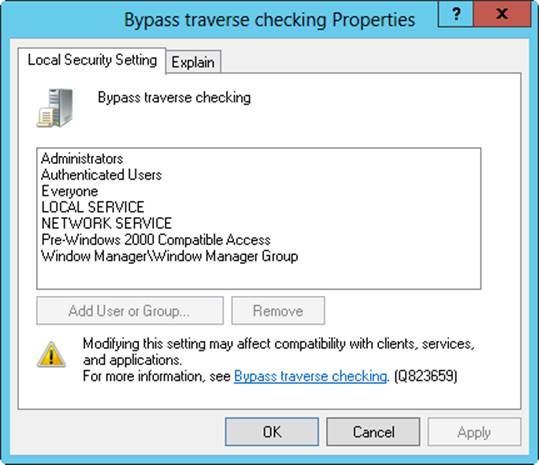
Figure 9-6. In the Properties dialog box, define the user right and then apply the right to users and groups. If you can’t edit local user rights, you might be working with a domain controller.
2. The Properties dialog box shows current users and groups that have been given a user right. To remove the user right, select a user or group and then tap or click Remove.
3. You can apply the user right to additional users and groups by tapping or clicking Add User Or Group. This opens the Select Users, Computers, Service Accounts, Or Groups dialog box shown previously in Figure 9-5. You can now add users and groups.
Adding a user account
You need to create a user account for each user who wants to use your network resources. You create domain user accounts with Active Directory Users And Computers. You create local user accounts with Local Users And Groups.
Creating domain user accounts
Generally, you can create new domain accounts in two ways:
§ Create a completely new user account. Press and hold or right-click the container in which you want to place the user account, tap or click New, and then tap or click User. This opens the New Object - User Wizard, shown in Figure 9-7. When you create a new account, the default system settings are used.
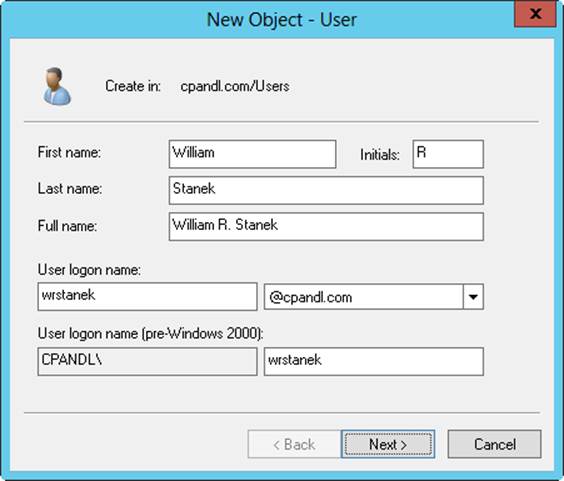
Figure 9-7. Configure the user display and logon names.
§ Base the new account on an existing account. Press and hold or right-click the user account you want to copy in Active Directory Users And Computers, and then tap or click Copy. This starts the Copy Object - User Wizard, which is essentially the same as the New Object - User Wizard. However, when you create a copy of an account, the new account gets most of its environment settings from the existing account. For more information about copying accounts, see the “Copying domain user accounts” section in Chapter 10, “Managing existing user and group accounts.”
With either the New Object - User Wizard or the Copy Object - User Wizard, you can create an account by following these steps:
1. As shown in Figure 9-7, the first wizard page lets you configure the user display name and logon name. Enter the user’s first name, middle initial, and last name in the boxes provided. These boxes are used to create the full name, which is the user’s display name.
2. Make changes to the Full Name field as necessary. For example, you might want to enter the name in LastName FirstName MiddleInitial format or in FirstName MiddleInitial LastName format. The full name must be unique in the domain and must have 64 or fewer characters.
3. In the User Logon Name box, enter the user’s logon name. Use the drop-down list to select the domain to associate the account with. This sets the fully qualified logon name.
4. The first 20 characters of the logon name are used to set the pre–Windows 2000 logon name. This logon name must be unique in the domain. If necessary, change the pre–Windows 2000 logon name.
5. Tap or click Next, and then configure the user’s password on the page shown in Figure 9-8.
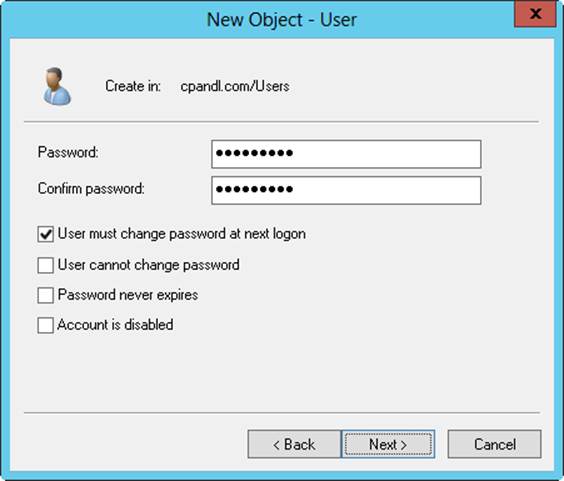
Figure 9-8. Use the New Object - User Wizard to configure the user’s password.
The options for this page are as follows:
o Password. The password for the account. This password should follow the conventions of your password policy.
o Confirm Password. A box to ensure that you assign the account password correctly. Simply reenter the password to confirm it.
o User Must Change Password At Next Logon. If selected, the user must change the password upon logon.
o User Cannot Change Password. If selected, the user can’t change the password.
o Password Never Expires. If selected, the password for this account never expires. This setting overrides the domain account policy. Generally, it’s not a good idea to set a password so that it doesn’t expire—this defeats the purpose of having passwords in the first place.
o Account Is Disabled. If selected, the account is disabled and can’t be used. Use this check box to temporarily prevent anyone from using an account.
6. Tap or click Next, and then tap or click Finish to create the account. If you have problems creating the account, you receive a warning, and you need to use the Back button to reenter information in the user name and password pages as necessary.
After you create the account, you can set advanced properties for the account as discussed later in this chapter.
You also can create user accounts by using Active Directory Administrative Center. To do this, follow these steps:
1. In the Active Directory Administrative Center console tree, press and hold or right-click the container in which you want to place the user account, tap or click New in the container pane, and then tap or click User. This opens the Create User dialog box shown in Figure 9-9.
2. Enter the user’s first name, middle initial, and last name in the boxes provided. These boxes are used to create the full name, which is the user’s display name.
3. Make changes to the Full Name box as necessary. The full name must be unique in the domain and must have 64 or fewer characters.
4. In the User UPN Logon box, enter the user’s logon name. Use the drop-down list to select the domain to associate the account with. This sets the fully qualified logon name.
5. The first 20 characters of the logon name are used to set the User SamAccountName Logon box. This is the user’s pre–Windows 2000 logon name, which must be unique in the domain.
6. All other boxes in the dialog box are optional. Set and confirm the user’s password, if desired. Optionally, select Protect From Accidental Deletion to mark the account as protected in Active Directory. Protected accounts can be deleted only if you remove the Protect flag prior to attempting to delete the account.
7. Tap or click OK to create the user account.
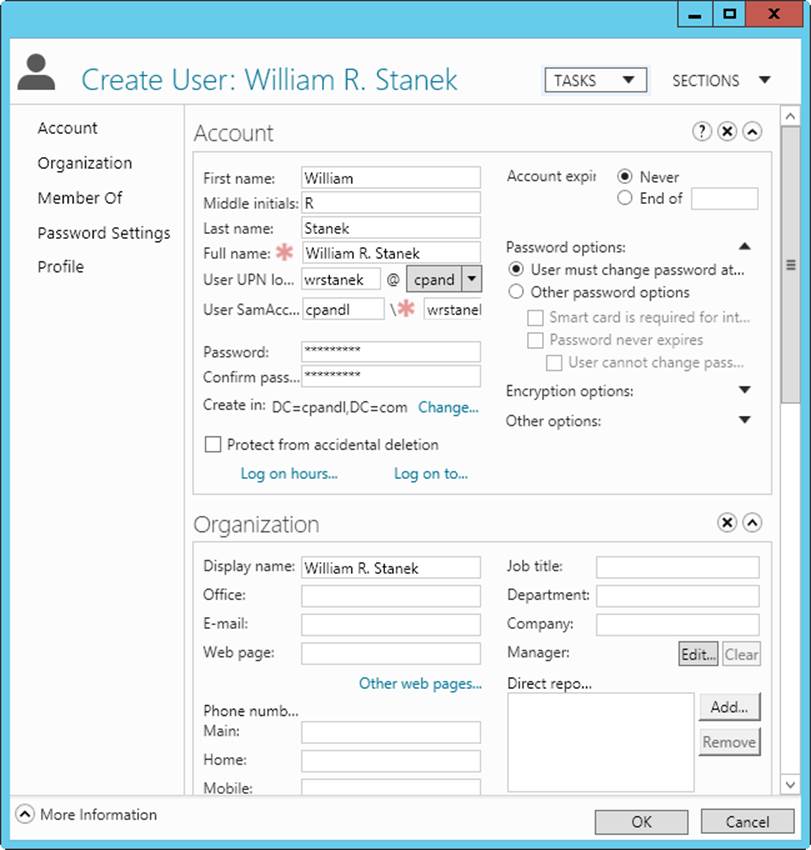
Figure 9-9. Create a new user account in Active Directory Administrative Center.
Creating local user accounts
You create local user accounts with Local Users And Groups. You can open this utility and create an account by following these steps:
1. In Server Manager, tap or click Tools and then tap or click Computer Management. Alternatively, you can press Windows+X and then click Computer Management.
2. Press and hold or right-click the Computer Management entry in the console tree, and then tap or click Connect To Another Computer. You can now choose the system whose local accounts you want to manage. Domain controllers don’t have local users and groups.
3. Under System Tools, choose Local Users And Groups.
4. Press and hold or right-click Users, and then tap or click New User. This opens the New User dialog box, shown in Figure 9-10. You use each of the boxes in the dialog box as follows:
o User Name. The logon name for the user account. This name should follow the conventions for the local user name policy.
o Full Name. The full name of the user, such as William R. Stanek.
o Description. A description of the user. Typically, you enter the user’s job title, such as Webmaster. You could also enter the user’s job title and department.
o Password. The password for the account. This password should follow the conventions of your password policy.
o Confirm Password. A second entry to ensure that you assign the account password correctly. Simply reenter the password to confirm it.
o User Must Change Password At Next Logon. If selected, the user must change the password upon logon.
o User Cannot Change Password. If selected, the user can’t change the password.
o Password Never Expires. If selected, the password for this account never expires. This setting overrides the local account policy.
o Account Is Disabled. If selected, the account is disabled and can’t be used. Use this check box to temporarily prevent anyone from using an account.
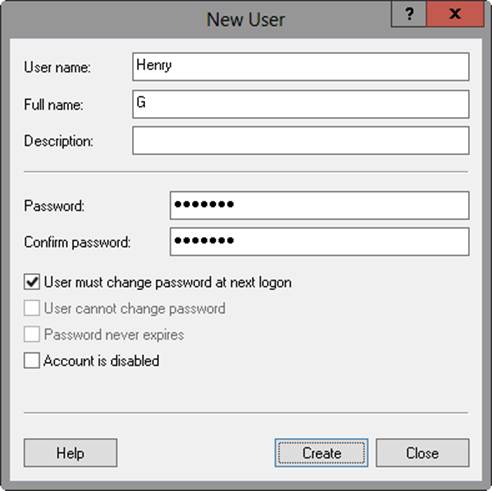
Figure 9-10. Configuring a local user account is different from configuring a domain user account.
5. Tap or click Create when you have finished configuring the new account.
Adding a group account
You use group accounts to manage privileges for multiple users. You create global group accounts in Active Directory Users And Computers. You create local group accounts in Local Users And Groups.
As you set out to create group accounts, remember that you create group accounts for similar types of users. The types of groups you might want to create include the following:
§ Groups for departments within the organization. Generally, users who work in the same department need access to similar resources. You’ll often create groups that are organized by department, such as Business Development, Sales, Marketing, and Engineering.
§ Groups for users of specific applications. Users often need access to an application and resources related to the application. If you create application-specific groups, you can be sure that users have proper access to the necessary resources and application files.
§ Groups for roles within the organization. You can also organize groups by user roles within the organization. For example, executives probably need access to different resources than supervisors and general users do. By creating groups based on roles within the organization, you can ensure that proper access is given to the users who need it.
Creating a global group
To create a global group, follow these steps:
1. Start Active Directory Users And Computers. Press and hold or right-click the container in which you want to place the user account, tap or click New, and then tap or click Group. This opens the - New Object - Group dialog box, shown in Figure 9-11.
2. The first 20 characters of the group name are used to set the pre–Windows 2000 group name. This group name must be unique in the domain. If necessary, change the pre–Windows 2000 group name.
3. Select a group scope (Domain Local, Global, or Universal).
4. Select a group type (either Security or Distribution).
5. Tap or click OK to create the group. After you create the account, you can add members and set additional properties, as discussed later in this chapter.
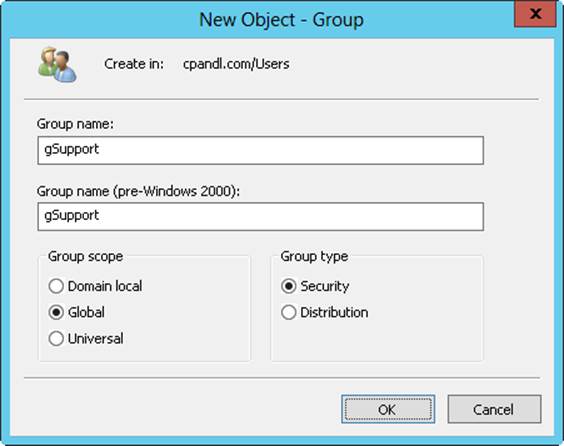
Figure 9-11. The New Object - Group dialog box allows you to add a new global group to the domain.
You also can create groups by using Active Directory Administrative Center. To do this, follow these steps:
1. In the Active Directory Administrative Center console tree, press and hold or right-click the container in which you want to place the group, tap or click New in the container pane, and then tap or click Group. This opens the Create Group dialog box shown in Figure 9-12.
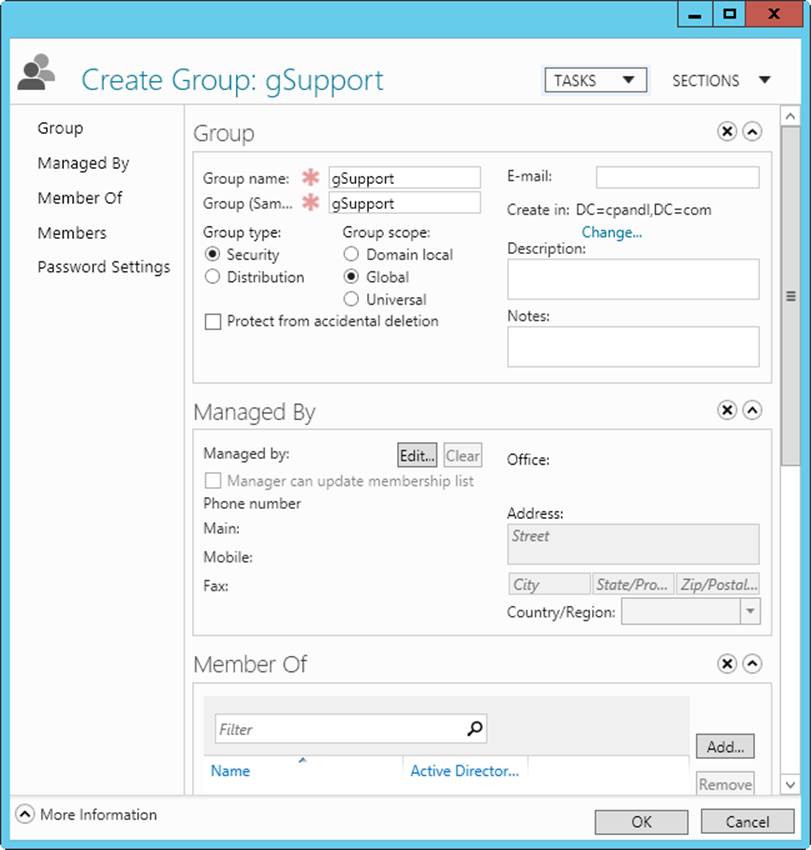
Figure 9-12. Create a new group in Active Directory Administrative Center.
2. Enter a name for the group. Global group account names follow the same naming rules as display names for user accounts. They aren’t case sensitive and can be up to 64 characters.
3. The first 20 characters of the group name are used to set the group SAMAccountName group name. This is the pre–Windows 2000 group name, which must be unique in the domain. Accept the default or enter a new value.
4. Select a group type (either Security or Distribution).
5. Select a group scope (Domain Local, Global, or Universal).
6. All other selections in the dialog box are optional. Optionally, select Protect From Accidental Deletion to mark the account as protected in Active Directory. Protected accounts can be deleted only if you remove the Protect flag prior to attempting to delete the account.
7. Tap or click OK to create the group.
Creating a local group and assigning members
You create local groups with Local Users And Groups. You can access this utility and create a group by following these steps:
1. In Server Manager, tap or click Tools and then tap or click Computer Management. Press and hold or right-click the Computer Management entry in the console tree, and then tap or click Connect To Another Computer. You can now choose the system whose local accounts you want to manage. Domain controllers don’t have local users and groups.
2. Under System Tools, choose Local Users And Groups.
3. Press and hold or right-click Groups, and then tap or click New Group. This opens the New Group dialog box, shown in Figure 9-13.
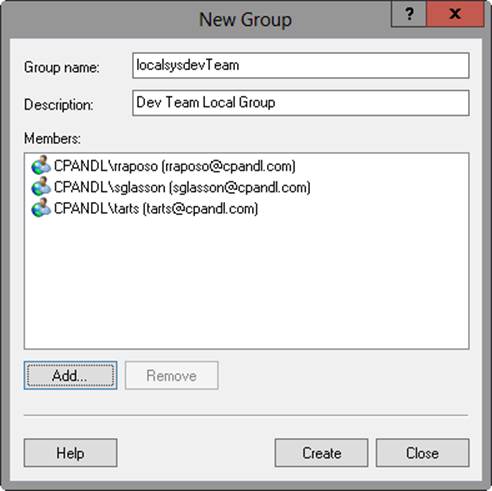
Figure 9-13. In the New Group dialog box, you can add a new local group to a computer.
4. After you enter a name and description of the group, tap or click the Add button to add names to the group. This opens the Select Users dialog box.
5. In the Select Users dialog box, enter the name of a user you want to use in the Name box, and then tap or click Check Names. If matches are found, select the account you want to use, and then tap or click OK. If no matches are found, update the name you entered and try searching again. Repeat this step as necessary, and then tap or click OK.
6. The New Group dialog box is updated to reflect your selections. If you made a mistake, select a name and tap or click Remove.
7. Tap or click Create when you’ve finished adding or removing group members.
Handling global group membership
To configure group membership, you use Active Directory Users And Computers or Active Directory Administrative Center. When working with groups, keep the following points in mind:
§ All new domain users are members of the group Domain Users, and their primary group is specified as Domain Users.
§ All new domain workstations and member servers are members of Domain Computers, and their primary group is Domain Computers.
§ All new domain controllers are members of Domain Controllers, and their primary group is Domain Controllers.
You manage group membership several ways:
§ Manage individual memberships.
§ Manage multiple memberships.
§ Set primary group membership for individual users and computers.
Managing individual membership
You can quickly add a user or a group to one or more groups by pressing and holding or right-clicking the account and then selecting Add To Group. This opens the Select Groups dialog box. You can now choose groups that the currently selected account should be a member of.
You can manage group membership for any type of account by following these steps:
1. Double-tap or double-click the user, computer, or group entry in Active Directory Users And Computers or Active Directory Administrative Center. This opens the account’s Properties dialog box.
2. On the Member Of tab or panel, groups that the user is currently a member of are listed. Tap or click Add to make the account a member of an additional group. This opens the Select Groups dialog box. You can now choose groups that the currently selected account should be a member of.
3. To remove the account from a group, select a group, and then tap or click Remove.
4. Tap or click OK.
If you’re working exclusively with user accounts, you can add users to groups by following these steps:
1. Select the user accounts you want to work with in Active Directory Users And Computers or Active Directory Administrative Center.
TIP
To select multiple users individually, hold down the Ctrl key and then tap or click each user account you want to select. To select a sequence of accounts, hold down the Shift key, select the first user account, and then select the last user account.
2. Press and hold or right-click one of the selections, and then tap or click Add To A Group or Add To Group as appropriate. This opens the Select Groups dialog box. You can now choose groups that the currently selected accounts should be members of.
3. Tap or click OK.
Managing multiple memberships in a group
Another way to manage group membership is to use a group’s Properties dialog box to add or remove multiple accounts. To do this, follow these steps:
1. Double-tap or double-click the group entry in Active Directory Users And Computers or Active Directory Administrative Center. This opens the group’s Properties dialog box.
2. On the Members tab or panel, current members of the group are listed alphabetically. To add accounts to the group, tap or click Add. This opens the Select Users, Contacts, Computers, Service Accounts, Or Groups dialog box. You can now choose users, computers, service accounts, and groups that should be members of the currently selected group.
3. To remove members from a group, select an account, and then tap or click Remove.
4. Tap or click OK.
Setting the primary group for users and computers
Users who access Windows Server from Macintosh or POSIX-compliant applications use primary groups. When a Macintosh user creates files or directories on a system running Windows Server, the primary group is assigned to these files or directories.
NOTE
All user and computer accounts must have a primary group regardless of whether the accounts access Windows Server systems through Macintosh. This group must be a group with global or universal scope, such as the global group Domain Users or the global group Domain Computers.
To set the primary group, follow these steps:
1. Double-tap or double-click the user or computer entry in Active Directory Users And Computers or Active Directory Administrative Center. This opens the account’s Properties dialog box.
2. On the Member Of tab or panel, select a group with global or universal scope in the Member Of list.
3. Tap or click Set Primary Group.
All users must be a member of at least one primary group. You can’t revoke membership in a primary group without first assigning the user to another primary group. To do this, follow these steps:
1. Select a different group with global or universal scope in the Member Of list, and then tap or click Set Primary Group.
2. In the Member Of list, tap or click the former primary group, and then tap or click Remove. The group membership is now revoked.
Implementing managed accounts
Microsoft Exchange Server, Microsoft Internet Information Services, Microsoft SQL Server, and other types of applications often use service accounts. On a local computer, you can configure the application to run as a built-in user account, such as Local Service, Network Service, or Local System. Although these service accounts are easy to configure and use, they usually are shared among multiple applications and services and cannot be managed on a domain level. If you configure the application to use a domain account, you can isolate the privileges for the application, but then you must manually manage the account password and any service principal names (SPNs) required for Kerberos authentication.
Windows 7 and all later releases of Windows support two additional types of accounts:
§ Managed service accounts
§ Managed virtual accounts
Managed service accounts are a special type of domain user account for managed services. These accounts reduce service outages and other issues by having Windows manage the account password and related SPNs automatically.
Managed virtual accounts are a special type of local computer account for managed services. These accounts provide the ability to access the network with a computer identity in a domain environment. Because the computer identity is used, no password management is required.
You can manage these accounts by using the Active Directory module for Windows PowerShell. Because the Active Directory module is not imported into Windows PowerShell by default, you need to import the module before you can use the cmdlets it provides. Although not originally available with Windows 7 and Windows Server 2008 R2, Windows 8, Windows 8.1, Windows Server 2012, and Windows Server 2012 R2 support group managed service accounts. Group managed service accounts provide the same functionality as standard managed service accounts but extend that functionality over multiple servers. As an example, when a client computer connects to a service hosted by a server farm, mutual authentication cannot succeed unless all the instances of the services use the same principal. By using a group managed service account, you allow each server in the farm to use the same service principal, which is managed by Windows itself rather than individually by the administrator.
Group managed service accounts are, in fact, the default type of service account for Windows 8, Windows 8.1, Windows Server 2012, and Windows Server 2012 R2. Because of this, managed service accounts can span multiple computers by default. This means you can add the account to more than one computer at a time as necessary to support clustered nodes, network load-balancing server farms, and so on. If you want to restrict a managed service account to a single computer, you must now set the –RestrictToSingleComputer option when creating the account. Don’t forget that a single computer can also have multiple managed service accounts.
In Active Directory schema, managed service accounts are represented by msDS-ManagedServiceAccounts. This object class inherits its attributes from the Computer object class, but the objects also are users. Managed service accounts use the same password-update mechanism as regular computer accounts. This means the password for the account is updated whenever the computer updates its password, which by default occurs every 30 days. Managed service accounts can automatically maintain their Kerberos SPN and support delegation.
TIP
Some applications, such as SQL Server and IIS, make use of Kerberos extensively and know how to register themselves with SPNs. If an application supports writing its own SPNs, managed service accounts will work for automatic SPN management.
NOTE
By default, all managed service accounts are created in the Managed Service Accounts container in Active Directory. This container is visible in Active Directory Users And Computers when you display advanced features.
Like computer accounts, managed service accounts do not use either domain or fine-grained password policies. Instead, they use a randomly generated 240- byte (120-character) password. Managed service accounts cannot perform interactive logons or be locked out like user accounts can be. You can add managed service accounts to groups by using Active Directory Users And Computers or Add-ADGroupMember.
Creating and using managed service accounts
With managed service accounts, you create an actual account, which is stored by default in the Managed Service Accounts container in Active Directory. Next, you associate the account with a computer in Active Directory and then install the managed service account on a local server to add it to the account as a local user. Finally, you configure the local service to use the account. Put another way, you must do the following:
1. Create the managed service account.
2. Associate the account with a computer in Active Directory.
3. Install the managed service account on the computer that was associated.
4. Configure the local service to use the account.
You can use Windows PowerShell cmdlets to install, uninstall, and reset passwords for managed service accounts. After a managed service account has been installed, you can configure a service or application to use the account and no longer have to specify or change passwords because the account password is maintained by the computer. You can also configure the SPN on the service account without requiring domain administrator privileges.
You create a managed service account by using New-ADServiceAccount. The basic syntax is as follows:
New-ADServiceAccount –DisplayName DisplayName -SamAccountName SAMName
–Name Name [-RestrictToSingleComputer]
DisplayName is the display name for the account, SAMName is the pre–Windows 2000 name of the account, and Name is the pre–Windows 2000 name of the account, such as:
New-ADServiceAccount –DisplayName "SQL Agent Account"
-SamAccountName sqlagent –Name "SQL Agent"
The account will be created as a group account by default. It will have a randomly generated 240-byte (120-character) password and be created in the Managed Service Accounts container. The account is also enabled by default, but you can create the account in a disabled state by adding –Enabled $false. If you need to pass in credentials to create the account, use the –Credential parameter, as shown in this example:
$cred = Get-Credential
New-ADServiceAccount –DisplayName "IIS App Pool 1"
-SamAccountName pool1 –Name "IIS Pool 1" –Credential $cred
Although the account is listed in Active Directory Users And Computers, you shouldn’t use this management tool to work with the account. Instead, you should use the following Windows PowerShell cmdlets:
§ Get-ADServiceAccount, to get information about one or more managed service accounts
§ Set-ADServiceAccount, to set properties on an existing managed service account
§ Remove-ADServiceAccount, to remove a managed service account from Active Directory
After you create a managed service account in Active Directory, you associate it with a target computer in Active Directory by using Add-ADComputerServiceAccount. You use Remove-ADComputerServiceAccount to remove a computer association from Active Directory.
The basic syntax for Add-ADComputerServiceAccount is as follows:
Add-ADComputerServiceAccount [–Identity] ComputerName
[-ServiceAccount] MSAName
ComputerName is the name of the target computer, and MSAName is the name of the managed service account, such as:
Add-ADComputerServiceAccount IISServer84 WebServicesAccount
If you need to pass in credentials to create the account, use the –Credential parameter, as shown in this example:
$cred = Get-Credential
Add-ADComputerServiceAccount IISServer32 FarmFourServicesAccount
You can install the account on a local computer by using Install-ADServiceAccount. The basic syntax is this:
Install-ADServiceAccount [-Identity] ServiceAccountId
ServiceAccountId is the display name or SAM account name of the service account, such as:
Install-ADServiceAccount sqlagent
If you need to pass in credentials to create the account, use the –Credential parameter. Use Uninstall-ADServiceAccount to uninstall an account.
Configuring services to use managed service accounts
You can configure a service to run with the managed service account by following these steps:
1. In Server Manager, tap or click Tools, and then tap or click Computer Management.
2. As necessary, connect to the computer you want to manage. In the left pane, press and hold or right-click the Computer Management node, and then tap or click Connect To Another Computer. Enter the host name, fully qualified domain name, or IP address of the remote server, and then tap or click OK.
3. In the left pane, expand the Services And Applications node, and then select the Services node.
4. Press and hold or right-click the name of the service you want to work with, and then tap or click Properties.
5. On the Log On tab, select This Account, and then enter the name of the managed service account in the format DomainName\AccountName; or tap or click Browse to search for the account.
6. Confirm that the password box is blank, and then tap or click OK.
7. Select the name of the service, and then tap or click Start to start the service, or tap or click Restart to restart the service as appropriate. Confirm that the newly configured account name appears in the Log On As column for the service.
NOTE
A dollar sign ($) appears at the end of the account name in the Services snap-in console. When you use the Services snap-in console to configure the logon as an account, the Service Logon Right logon right is automatically assigned to the account. If you use a different tool, the account has to be explicitly granted this right.
Removing managed service accounts
If a managed service account is no longer being used on a computer, you might want to uninstall the account. Before you do this, however, you should check the Services snap-in to ensure that the account isn’t being used. To uninstall a managed service account from a local computer, use Uninstall-ADServiceAccount. The basic syntax is shown here:
Uninstall-ADServiceAccount -Identity ServiceAccountId
ServiceAccountId is the display name or SAM account name of the service account, such as:
Uninstall-ADServiceAccount -Identity sqlagent
If you need to pass in credentials to uninstall the account, use the –Credential parameter.
Managed service account passwords are reset on a regular basis based on the password reset requirements of the domain, but you can reset the password manually if needed. To reset the password for a managed service account, use Reset-ADServiceAccountPassword. The basic syntax is as follows:
Reset-ADServiceAccountPassword -Identity ServiceAccountId
ServiceAccountId is the display name or SAM account name of the service account, such as:
Reset-ADServiceAccountPassword -Identity sqlagent
If you need to pass in credentials to reset the password, use the –Credential parameter. You can modify the default password change interval for managed service accounts by using the domain policy Domain Member: Maximum Machine Account Password Age under Local Policies\Security Options. Group Policy settings under Account Policies\Password Policy are not used to modify managed service account password-reset intervals, nor can the NLTEST /SC_CHANGE_PWD command be used to reset managed service account passwords.
Moving managed service accounts
To move a managed service account from a source computer to a new destination computer, you need to do the following:
1. On the source computer, configure any services that are using the managed account to use a different account, and then run Uninstall-ADServiceAccount.
2. On the new destination computer, run Install-ADServiceAccount, and then use the Services snap-in console to configure the service to run with the managed service account.
To migrate a service from a user account to a managed service account, you need to do the following:
1. Create a new managed service account in Active Directory by using New-ADServiceAccount.
2. Install the managed service account on the appropriate computer by using Install-ADServiceAccount, and then use the Services snap-in console to configure the service to run with the managed service account.
3. You also might need to configure the access control lists on the service resources for the service management account.
Using virtual accounts
Virtual accounts require very little management. They cannot be created or deleted, and they do not require any password management. Instead, they exist automatically and are represented by the machine identity of the local computer.
With virtual accounts, you configure a local service to access the network with a computer identity in a domain environment. Because the computer identity is used, no account needs to be created and no password management is required.
You can configure a service to run with a virtual account by following these steps:
1. In Server Manager, tap or click Tools, and then tap or click Computer Management.
2. As necessary, connect to the computer you want to manage. In the left pane, press and hold or right-click the Computer Management node, and then tap or click Connect To Another Computer. Enter the host name, fully qualified domain name, or IP address of the remote server, and then tap or click OK.
3. In the left pane, expand the Services And Applications node, and then select the Services node.
4. Press and hold or right-click the name of the service you want to work with, and then tap or click Properties.
5. On the Log On tab, select This Account, and then enter the name of the service account in the format SERVICE\ComputerName.
6. Confirm that the password box is blank, and then tap or click OK.
7. Select the name of the service, and then tap or click Start to start the service, or tap or click Restart to restart the service. Confirm that the newly configured account name appears in the Log On As column for the service.
NOTE
A dollar sign ($) appears at the end of the account name in the Services snap-in console. When you use the Services snap-in console to configure the logon as an account, the Service Logon Right logon right is automatically assigned to the account. If you use a different tool, the account has to be explicitly granted this right.
All materials on the site are licensed Creative Commons Attribution-Sharealike 3.0 Unported CC BY-SA 3.0 & GNU Free Documentation License (GFDL)
If you are the copyright holder of any material contained on our site and intend to remove it, please contact our site administrator for approval.
© 2016-2026 All site design rights belong to S.Y.A.