Mastering System Center 2012 R2 Configuration Manager (2014)
Chapter 11. Inventory and Software Metering
The ability to provide detailed hardware and software inventory is one of the core features of Configuration Manager. Many companies rely on this data to obtain a clear understanding of the configuration of the computers in the environment. Hardware inventory gathers information from your systems such as the processor type, computer manufacturer, and amount of installed memory. Software inventory can gather lists of file types and versions that are installed on your computers. Combining this data with the extensive information in the Asset Intelligence knowledge base covered in Chapter 12, “Asset Intelligence,” provides value, so Configuration Manager becomes a valuable source of information about the computer infrastructure.
Software metering, the second major topic in this chapter, allows you to collect information on software usage to assist in managing software purchases and licensing. With this feature, you can report on the software that is being used in your environment and determine which users are running particular programs. You can also find software that is installed but isn’t being used, and you can report on software license requirements and other items related to license management.
In this chapter, you will learn to
· Configure and manage Software Inventory
· Configure and manage Hardware Inventory
· Configure and manage Software Metering
Inventory in Configuration Manager 2012
Gathering inventory data is considered one of the most important features of any enterprise management system. The inventory data that is gathered is often used to create reports, queries, and collections. One thing that is important to know is that the inventory data is not “live” data, because it is based on the latest inventory scan and could potentially be several days or weeks old. When a Configuration Manager client performs an inventory scan and submits the data to the client’s management point, the management point will verify the data, send it to a Configuration Manager site server, and then write it to the Configuration Manager database. Once the data is in the database, it can be used in many ways.
· You can create queries that target computers based on their hardware configuration or installed software. You can use these queries to be proactive in preventing problems such as low hard disk space. Using inventory data for this proactive step may not be as important as it may have been in previous versions because you can perform checks in real-time during application deployments with the usage of global conditions.
· You can create queries that identify computers that do not have your organization’s standard antivirus program installed. You can then use these search criteria to create a collection and then target that collection with an application deployment that will install the enterprise antivirus product.
· You can create reports showing hardware configuration and software installations that management can use to evaluate and improve the current computer environment.
Once the Configuration Manager client is installed, the first inventory is always a full inventory scan. Once it has been completed, all subsequent scans will send only delta inventory information, identifying what has changed. Delta inventory records are processed in the order in which they are received at the Configuration Manager site server. If for some reason a delta inventory is received from a client that is not in the database (such as a reimaged or new client, for example), the site server will delete the delta inventory and ask for a full inventory from that client the next time a scheduled scan is run.
Configuration Manager provides only limited support for computers that can boot up two or more operating systems. Configuration Manager clients can be discovered in multiple boot states, and the clients can be installed on each boot state. Inventory that is collected from these computers, however, will be from only the operating system that was running when the inventory scan was run.
Hardware inventory scanning will give you such information as disk space, video card type, memory installed, and much more. Configuration Manager 2012 uses Windows Management Instrumentation (WMI) to gather the needed data, and once you have learned the basics of WMI, you will find it fairly easy to modify the default hardware inventory settings.
Software inventory scanning will give you such information as the software installed, file types, and the versions of software. Unlike previous versions of Configuration Manager, in Configuration Manager 2012 the client is not configured to scan for any file types by default. The software inventory process can also collect files and store them on the primary site server, but this feature is rarely used because the collected files could create significant network usage and also consume a large amount of disk space on site servers.
Collecting Hardware Inventory
Hardware Inventory collects data from clients by querying several data stores of information that are on computers, such as the registry and WMI. The Hardware Inventory Client Agent doesn’t query all WMI classes; it only pulls the information that is defined in the client settings assigned to the client. As you learned in Chapter 6, “Client Installation,” you can have multiple client settings and assign them to different collections. Inventory scans are done on the schedule you configure in the client settings. Unless there is a problem with the client, only delta inventories will be collected after the first inventory. This greatly decreases the network traffic required by client inventory reporting because deltas are usually only a small percentage of the size of a full inventory from a client. With every hardware inventory collection done on a client, Configuration Manager updates the site database with the current inventory while keeping a history of the previous information. You can view the current and historical inventory information in queries, reports, and Resource Explorer.
Hardware Inventory will also collect certain basic information about a client’s installed software. This information is gathered from the registry. By using the software inventory, however, you can get a larger amount of and much more detailed information about the software that is present on client computers.
What Defines Hardware Inventory?
Configuration Manager gathers information about clients based on the settings defined in the client settings and the content of the configuration.mof (managed object format) file stored on the primary site server in the <Folder where Configuration Manager is installed>\inboxes\clifiles.src\hinv folder.
The configuration.mof File
The configuration.mof file defines the data classes to be inventoried by the Hardware Inventory Client Agent. Data classes can be created to inventory existing or custom WMI repository data classes or registry keys found on clients.
This file also defines and registers the WMI providers used to access computer information during hardware inventory. Registering providers defines the type of provider to be used and the classes that the provider will support. WMI can access only registered providers, so that applies to the Hardware Inventory Client Agent as well. The configuration.mof file can’t be used to register new providers for clients. New or custom providers must be sent to clients to be compiled manually before they can be added to hardware inventory.
When Configuration Manager clients request computer policies as part of their policy polling interval, the configuration.mof file is part of the policy that clients download and compile. When you add, modify, or delete data classes from the configuration.mof file, clients will automatically compile those changes the next time the client compiles a computer policy that it receives.
Later in the chapter you’ll get hands-on practice in modifying configuration.mof to extend the information collected in hardware inventory.
The Client Settings
Unlike in previous versions of Configuration Manager, you now have a graphic interface in the Configuration Manager console, as shown in Figure 11.1, to edit the reporting classes used by the inventory process. In Configuration Manager 2007 and previous SMS versions, you would modify the sms_def.mof file to define whether specific client data class information is reported. In Configuration Manager 2012, you either use the default client settings or create custom client settings to enable and disable reporting classes. The reporting classes are based on the WMI data classes that are on clients by default or have been added after the configuration.mof file has been modified.
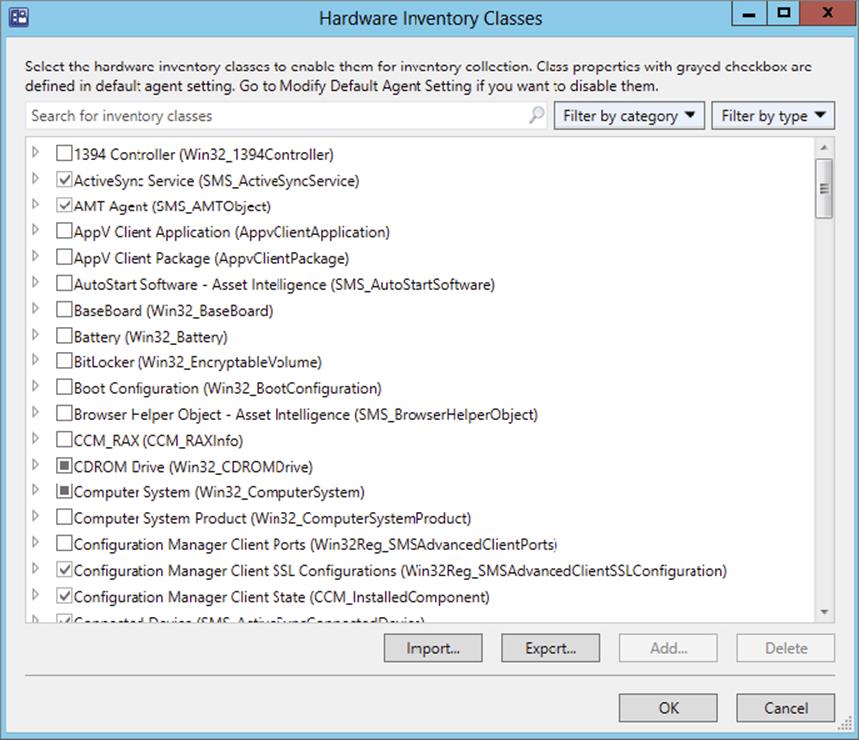
Figure 11.1 Default Hardware Inventory settings
This reporting class information in the client settings is converted to a reporting policy that is downloaded to clients as part of their computer policy polling download. After the client has finished compiling the new reporting policy, the reporting information is stored in the client WMI repository in the InventoryDataItem class of the Root\CCM\Policy\Machine WMI namespace. Unlike the configuration.mof file, the inventory client settings file is never sent to clients directly. Only the policy generated by the client settings is actually compiled by Configuration Manager clients.
Later in the chapter you will see several examples on how to extend hardware inventory.
The Default Hardware Inventory Reporting Classes
The default client settings have some reporting classes enabled. These default classes might change depending on what version of Configuration Manager and which service pack you have installed and on whether you have enabled classes for Asset Intelligence. Here is an example of the hardware inventory data classes that are enabled by default in Configuration Manager 2012 R2 with Asset Intelligence classes enabled:
1. ActiveSync Service
2. AMT Agent
3. AutoStart Software
4. Browser Helper Object
5. CDROM Drive
6. Computer System
7. Configuration Manager Client SSL
8. Configurations
9. Configuration Manager Client State
10.Connected Device
11.Desktop Monitor
12.Disk Drives
13.Disk Partitions
14.IDE Controller
15.Installed Applications (64)
16.Installed Applications
17.Installed Software — Asset Intelligence
18.Logical Disk
19.Memory
20.Mobile Device Client Agent Version
21.Mobile Device Computer System
22.Mobile Device Display
23.Mobile Device Installed Applications
24.Mobile Device Memory
25.Mobile Device OS Information
26.Mobile Device Password
27.Mobile Device Power
28.Modem
29.Motherboard
30.NAP Client
31.NAP System Health Agent
32.Network Adapter
33.Network Adapter Configuration
34.Network Client
35.Operating System
36.Parallel Port
37.PC BIOS
38.Physical Memory
39.PNP Device Driver
40.Power Capabilities
41.Power Configuration
42.Power Insomnia Reasons
43.Power Management Daily Data
44.Power Management Exclusion Settings
45.Power Management Monthly Data
46.Power Settings
47.Processor
48.Recently Used Applications
49.SCSI Controller
50.Server Feature
51.Services
52.Software Licensing Product — Asset Intelligence
53.Software Licensing Service — Asset Intelligence
54.System Console Usage — Asset Intelligence
55.System Console User — Asset Intelligence
56.Software Tag
57.Sound Devices
58.System Devices
59.System Enclosure
60.Tape Drive
61.TS Issued License
62.TS License Key Pack
63.USB Controller
64.USB Device
65.Video Controller
66.Virtual Application Packages
67.Virtual Applications
68.Virtual Machine (64)
69.Virtual Machine
70.Virtual Machine Details
71.Windows 8 Application
72.Windows 8 Application User Info
73.Windows Update Agent Version
Each one of these reporting classes has certain criteria enabled, and these represent the actual data classes that are being collected. Some reporting classes might have all their data classes being captured or only some of them. The best way to determine what is being inventoried during the hardware inventory process is to browse through the individual classes in the Configuration Manager console.
The Role of MIF Files in Hardware Inventory
Management information format (MIF) files can be used to extend hardware inventory information that is collected from clients. The type of information that can be collected by MIF files can be just about anything, depending on how the MIF file is structured. During a hardware inventory cycle, the information in a MIF file is added to the client inventory report and stored in the Configuration Manager site database, where it can be used just like default client inventory data. The two types of MIF files that can be used to extend hardware inventory in this way are NOIDMIF and IDMIF.
By default, NOIDMIF and IDMIF file information is not inventoried by Configuration Manager. For this information to be added to hardware inventory, you must enable one or both file types in the Hardware Inventory settings. When you do, Configuration Manager creates new tables or modifies existing tables in the site database to add the properties in NOIDMIF and IDMIF files. NOIDMIF and IDMIF files are not validated, so they can be used to alter tables that you don’t want altered. Doing this runs the risk that valid data could be overwritten by invalid data or large amounts of data could be imported into the Configuration Manager database, which would cause delays in all Configuration Manager functions. To lower the risk of this happening, use MIF collection only when it is absolutely necessary. Later in the chapter, you’ll see how to change the location of MIF files from the default.
More on NOIDMIF Files
NOIDMIF files are the standard MIF files that are used in Configuration Manager hardware inventory. NOIDMIF files do not contain a unique identifier for the data they contain, and hardware inventory automatically associates the NOIDMIF information with the client that it was found on. NOIDMIF files are not sent to the site server during a client hardware inventory cycle, but their data is added to the client inventory report itself.
If the classes in the NOIDMIF file don’t exist in the Configuration Manager database, the new inventory class tables are created in the Configuration Manager site database to store the new inventory information. As long as the NOIDMIF file is present on the client, the inventoried data from the NOIDMIF file will be updated in the Configuration Manager database. If the NOIDMIF file is removed, all the classes and properties relating to it are removed from the inventory of that client in the database. For NOIDMIF information to be pulled from a client, the NOIDMIF file must be stored here: %windir%\ccm\inventory\Noidmifs.
More on IDMIF Files
IDMIF files are custom MIF files that contain a unique ID and are not attached to the client that they are collected from. IDMIF files can be used to collect inventory data about devices that are not Configuration Manager clients, such as a shared network printer, an external hard drive, a copy machine, or other equipment that may not be attached to a client computer.
When you enable the IDMIF collection on your Configuration Manager site, IDMIF files are collected only if they are within the size limit that you set in the Hardware Inventory Client Agent properties. Depending on the maximum custom MIF size that you set for each site, IDMIF collection may cause increased network bandwidth usage during client inventory, which you should consider before you enable IDMIF collection.
Differences between NOIDMIF and IDMIF Files
IDMIF files are in most ways the same as NOIDMIF files. Both types have key properties that must be unique. Any class that has more than one instance must at least have one key property defined, or instances will overwrite previous instances. They differ in the following ways:
· IDMIF files must have a delta header that lists the architecture and a unique ID. NOIDMIF files are given a delta header automatically when processed by the client.
· IDMIF files must have a top-level group with the same class as the architecture being added or changed, and the class must have at least one property.
· Removing an IDMIF file from a client doesn’t cause any data to be deleted from the Configuration Manager database.
· IDMIF files aren’t added to a client’s inventory, and the files themselves are sent across the network to be processed by a site server.
Collecting Software Inventory
When you enable Software Inventory in Configuration Manager, the software inventory process collects software inventory data directly from files by gathering data from the file’s header information. Unknown files (files that don’t have any detailed information in their file headers) can also be inventoried. You can also have Configuration Manager actually collect files you configure under a certain size. Both software inventory and collected file information can be viewed in Resource Explorer, which we will discuss later in the chapter.
You can also inventory encrypted and compressed files. This may cause Software Inventory to run more slowly because of the extra processing imposed on the client computer. When you inventory an encrypted file, an unencrypted copy of the file must be made so its information can be scanned. If antivirus software is running at the same time, it may show that the software inventory process is opening the files that are being scanned and then scanning them again to make sure they aren’t infected by a virus.
Software Inventory can use a considerable amount of network capacity (especially if collecting files) and also increase disk activity along with CPU usage locally on the computer while running, depending on the number of Configuration Manager clients, how frequently you schedule Software Inventory, and the size of the files you collect (if any). If you think that Software Inventory will cause problems with your network, schedule it to run after business hours. Figure 11.2 shows the default Software Inventory settings; notice that no file types are selected by default.
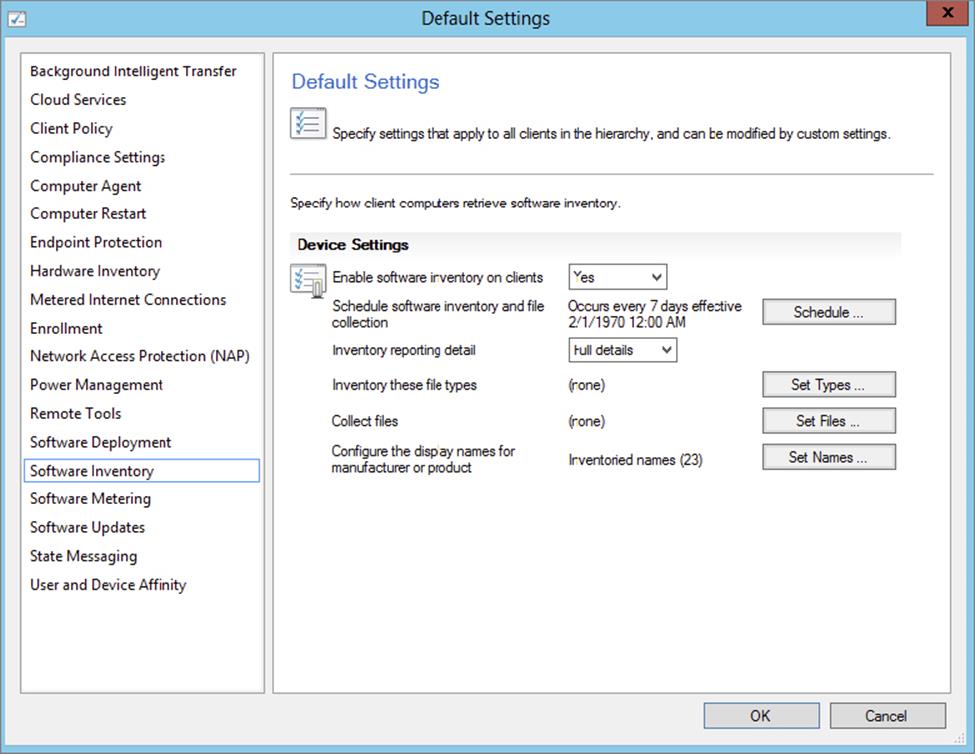
Figure 11.2 Default Software Inventory settings
More about File Collection
When a file is selected for collection, the Software Inventory Client Agent will search for that file when a software inventory scan runs on each client in the Configuration Management site. If the Software Inventory Client Agent finds a file that should be collected, then the file is attached to the inventory report and sent to the site server.
The site server keeps the five most recently changed versions of the collected files and stores them in the <Configuration Manager installation directory>\Inboxes\Sinv.box\Filecol directory. If a file has not changed since the last software inventory was collected, the file will not be collected again. Files larger than 20 MB are not collected by Configuration Manager software inventory file collection even if they are defined in the file collection settings.
This feature of Configuration Manager can greatly affect network bandwidth, as well as cause other problems, and is not typically utilized.
Display Names for Software Inventoried Products
During a software inventory cycle, the Configuration Manager 2012 software inventory process gets information from the file headers of files installed on clients. That information, including the names of the companies that made the files and the names of the files (or software products) themselves, is also inventoried. After the data is collected, you can view the information with Resource Explorer.
Because company and product names are retrieved from the file header information, any mismatches in the way these names are entered in the header information will also appear in the Configuration Manager database. These mismatches make it difficult to read and query against software inventory information since the data will appear to be under multiple company or software product names instead of a single name.
To help with this issue, you can set display names for inventoried products on the Inventoried Names tab of the Software Inventory Client Agent tab. For example, you can do the following:
1. Change variations of a company name to a single display name.
2. Refresh the view of software inventory in Resource Explorer.
You will see the changes. You will also see them when you make and run queries.
Doing this doesn’t actually change the names in the file header information of the files installed on clients; it changes the names in the Configuration Manager site database.
Using Resource Explorer to View Inventory
When hardware and software inventory is collected from clients, it can be viewed in Resource Explorer. When you start Resource Explorer, a new console opens, as shown in Figure 11.3.
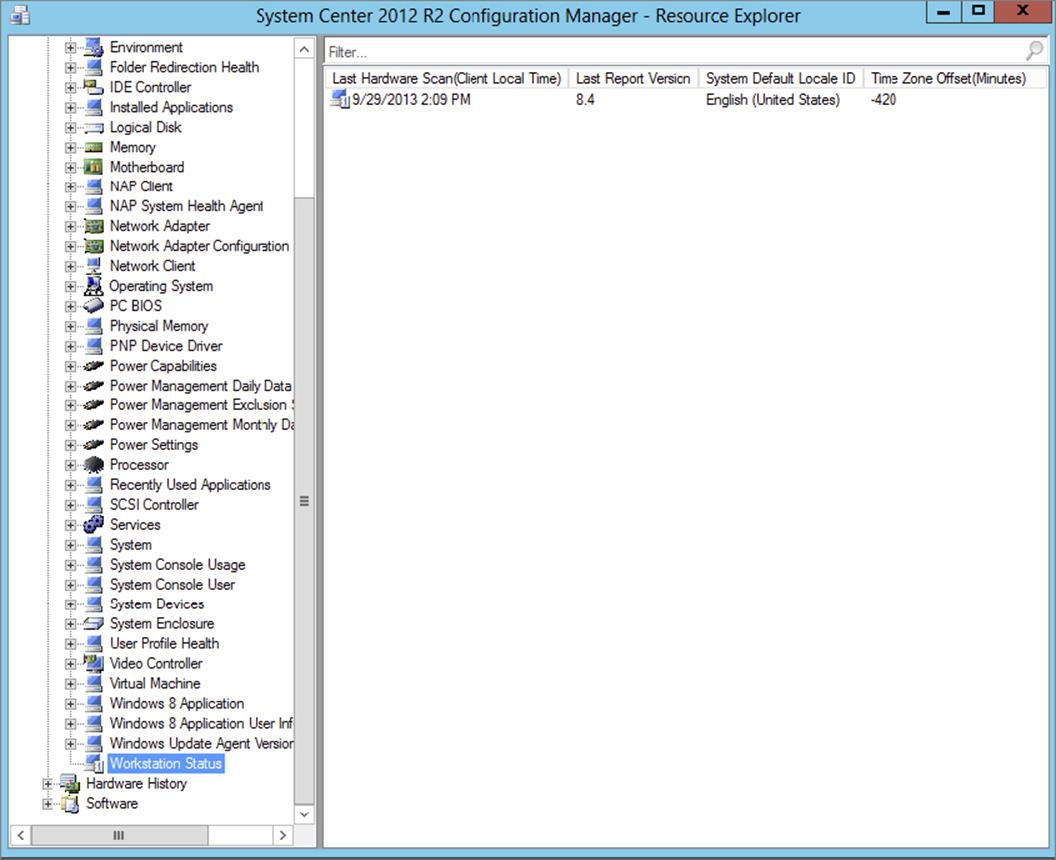
Figure 11.3 Resource Explorer
This displays the information collected from clients by hardware inventory and software inventory. The contents of the Resource Explorer details pane on the right will vary depending on what node is selected on the left pane in the console tree. You can use Resource Explorer to view client hardware, hardware history, and software inventory.
If a resource is a Configuration Manager client and if you are collecting hardware inventory at your site, the information displayed for that resource will be a list of the hardware installed on the client and other details. If you are collecting software inventory, then you will see a list of installed software on the client. If the resource isn’t a Configuration Manager client, then no information will be displayed, since no inventory will be collected from that client.
You can start Resource Explorer to view a single client’s inventory from the Configuration Manager console.
To open Resource Explorer from the Configuration Manager console, follow these steps:
1. In the Configuration Manager console, select Assets and Compliance ⇒ Overview ⇒ Devices.
2. Find the client that you want to view.
3. Once you have selected the client you want, click Start ⇒ Resource Explorer on the ribbon.
Scheduling Inventory
The hardware inventory and software inventory processes each collect inventory according to a schedule that is set in the client settings. Table 11.1 gives a simple rundown of scheduling options for each inventory process.
Table 11.1: Inventory scheduling options
|
Type |
Description |
|
Simple schedule |
An interval between inventory cycles, such as every day |
|
Custom schedule |
A start time and an interval for inventory collection, such as every Monday or the first Tuesday of every month at a specified hour of the day |
By default, both hardware and software inventory schedules are set to run every seven days. If a client is not running when an inventory is schedule to run, it will run the inventory the next time the client is started.
The simple schedule doesn’t give you as much flexibility as custom scheduling does; however, the simple schedule usually causes less network traffic because the time interval between each client’s inventory cycle is based on the time that the Configuration Manager client was installed and when the first policies are retrieved, for every client. When you use a custom schedule, all the clients will begin inventory cycles at exactly the same time.
Since software inventory is more resource intensive on clients than hardware inventory, you might consider not running software inventory as often as you do hardware inventory, depending on your organization’s needs. For example, if your organization has locked down user rights on workstations, then the software that is installed on them should not change frequently, so you can set software inventory cycles for every few days or once a week.
When you change an inventory collection schedule on the Configuration Manager site server, this will update the client computer policies downloaded and compiled by clients according to their regular client policy polling interval. When the client inventory agent detects a change in schedule, it will make a delta inventory file. The next inventory cycle will run according to the new schedule.
Configuration Manager also keeps historical inventory records for the number of days set in the Delete Aged Inventory History site maintenance task, which has a default setting of 90 days.
Scheduling Inventory
Even if all installations are unique, it is often considered best practice to have a daily hardware inventory schedule and a weekly software inventory schedule. For servers it is often considered good practice to have a custom schedule for both inventory processes. That way you can schedule when inventory will run and not put a load on the hardware during peak hours.
Configuring Inventory
Now that we have discussed the inventory process, its components, and its capabilities, you are ready to configure the inventory function to fit your company’s needs.
Configuring Hardware Inventory for a Configuration Manager Site
Before you configure Hardware Inventory, you need to know what kind of information you are gathering. In essence you have three different scenarios, as explained in Table 11.2.
Table 11.2: Inventory scenarios
|
Scenario |
How to Gather the Inventory |
|
Data class already exists in the default client settings. |
All you have to do is enable the class in either the default client settings or in custom client settings as explained later in this chapter. |
|
Data class does not exist in the default client settings but exists locally in WMI on each client. |
On the Central Administration Site, open the default client settings. Connect to a remote host containing the data class, and import the data class. |
|
Data class does not exist in the default client settings or on any of the local clients. |
On one of the clients add the information to WMI. On the Central Administration Site open the default client settings. Connect to a remote host containing the data class and import the data class. |
Configuring the Default Hardware Inventory Client Settings
To configure the default hardware inventory, select Client Settings in the Administration workspace. Open the default client agent settings properties, select Hardware Inventory, and click Set Classes, as shown in Figure 11.4. You can configure the following properties:
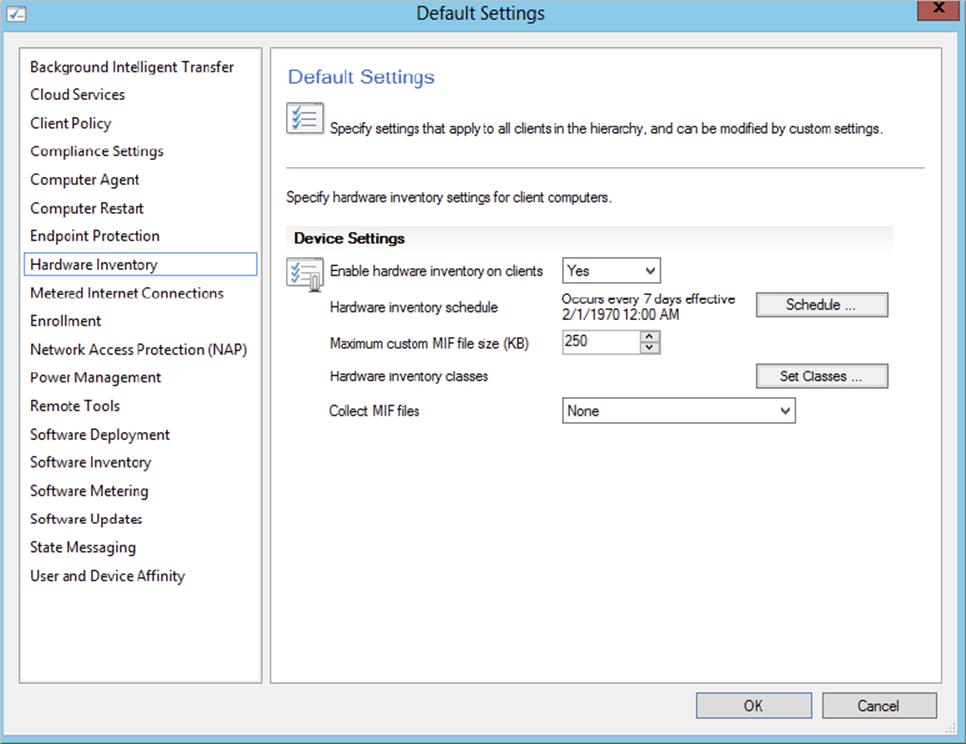
Figure 11.4 Configuring Hardware Inventory
1. Enable Hardware Inventory On Clients Configure this to True to enable (the default) or False to disable hardware inventory. Disabling hardware inventory is not recommended.
2. Hardware Inventory Schedule Click Schedule and select a simple schedule or define a custom schedule:
1. Simple Schedule This schedules hardware inventory to run at a single, specific interval for all clients that read the client settings. By default, this option is enabled and set for 7 days. For any other setting, use the Run Every field, and enter the number and type of time units (minutes, hours, days) in the simple schedule. This setting can be from 1 to 59 minutes, from 1 to 23 hours, or from 1 to 31 days.
2. Custom Schedule Click Customize to open the Custom Schedule dialog box and set the hardware inventory schedule. This gives you the ability to schedule the first start date and time for inventory to run on clients. Once the start time for inventory has passed, all future inventories will recur on the schedule that you set on all clients at the same time. The custom schedule can be set to run weekly, to run monthly, or to run on a custom interval, with the following criteria:
§ Custom weekly schedules can run from 1 to 4 weeks on the day of the week you set.
§ Custom monthly schedules can run from 1 to 12 months on either a specific day of the month from 1 to 31; the last day of each month; or the first, second, third, fourth, or last selected day of the week for each month.
§ Custom schedules can also be set on a custom interval of either 1 to 31 days, 1 to 23 hours, or 1 to 59 minutes.
3. Collect MIF Files From the drop-down box select whether you want to collect IDMIF, NOIDMIF, both types, or none of them (default setting).
4. Maximum Custom MIF File Size (KB) This is the maximum size, in kilobytes, allowed for each custom MIF file that will be collected from a client during a hardware inventory cycle. You can set the size from 1 KB to 5,120 KB; the default value is 250 KB. If a custom MIF is larger than the maximum size, the Hardware Inventory Client Agent will move the IDMIF to the \Badmifs folder, and the IDMIF file will not be sent to the site server to be processed.
5. Collect IDMIF files Adds a new architecture and attributes and classes to the Configuration Manager database.
6. Collect NOIDMIF files Extends the hardware inventory by adding attributes and classes to existing architectures on a client. They are used to extend, or add, new information about existing Configuration Manager clients to the site database.
Changing the Default MIF Storage Location on a Client
You can change the MIF storage location after the client is installed by modifying the registry keys for the IDMIF and MOIDMIF files.
To change the default location for IDMIF files, follow these steps:
1. On the client for which you want to change the MIF location settings, select Start ⇒ Run, type regedit, and then press Enter to start the Registry Editor.
2. Go to the following registry key: HKEY_LOCAL_MACHINE\SOFTWARE\Microsoft\SMS\Client\Configuration\Client Properties : IDMIF Directory.
3. Right-click IDMIF Directory, and click Modify.
4. Enter the path to which you want to change; then click OK.
5. Close the Registry Editor.
To change the default storage location for NOIDMIF files, follow these steps:
1. On the client that you want to change the MIF location settings, select Start ⇒ Run, type regedit, and then press Enter to start the Registry Editor.
2. Go to the following registry key: HKEY_LOCAL_MACHINE\SOFTWARE\Microsoft\SMS\Client\Configuration\Client Properties : NOIDMIF Directory.
3. Right-click NOIDMIF Directory, and click Modify.
4. Enter the path to which you want to change; then click OK.
5. Close the Registry Editor.
Note that this procedure will change the MIF storage location on only the client that you worked on. If you want to make this a site-wide client change, you can use the remediation feature in Settings Management.
![]()
Configure Custom Hardware Inventory Changes for All Laptops
As the Configuration Manager administrator, you have been requested to ensure that portable battery information is inventoried for all laptops.
1. Open the Configuration Manager 2012 administrative console.
2. Select the Administration workspace and browse to Client Settings.
3. On the ribbon click Create Custom Client Device Settings.
4. Type Hardware Settings for laptops in the Name field.
5. From the list of custom settings, select Hardware Inventory.
6. In the left column, select Hardware Inventory and click Set Classes.
7. Find Portable Battery (Win32_Portable) and enable the data class.
8. Click OK.
9. Click OK to save the custom client settings.
10.Back in the administrative console, select the newly created custom settings and click Deploy on the ribbon.
11.Select the All Laptop device collection and click OK.
Extending Hardware Inventory
As described in Table 11.2, you can also customize Hardware Inventory to collect information that is not reported by default or add totally new information that you want to be collected that you configure yourself.
You can extend Hardware Inventory by inventorying additional WMI classes, additional WMI class attributes, registry keys, and other customizations to fit your company’s needs. If you need to, you can also modify Hardware Inventory to reduce the amount of information reported by clients.
Before you start modifying the configuration.mof file, you should make sure you have a good idea of what you are doing and make backups of the file before you edit it. You should also consider performing the proposed changes in a Configuration Manager test lab so that you can effectively monitor the results of the changes without impacting the production environment.
There are a few resources available to help you with extending hardware inventory. For example, the article “How to Extend Hardware Inventory in Configuration Manager” discusses how to configure and extend the hardware inventory feature in Configuration Manager; see http://technet.microsoft.com/en-us/library/gg712290.aspx.
Providers Used in Hardware Inventory
When you extend hardware inventory that is collected by Configuration Manager clients, the configuration.mof file is modified to inventory client information by leveraging a registered inventory data provider. Providers used during client hardware inventory are listed at the top of the configuration.mof file and are registered on clients when they first get a computer policy, and then they compile the configuration.mof file after the Configuration Manager client is installed.
Extending Hardware Inventory Using the configuration.mof File
The configuration.mof file is used to modify data class information inventoried by clients with hardware inventory.
To modify the configuration.mof file, follow these steps:
1. Make a backup copy of the configuration.mof file, and put it in a safe location.
2. On the primary site server, go to the <Configuration Manager install folder>/inboxes/clifiles.src/hinv folder.
3. Using Notepad, open the configuration.mof file, and make any necessary changes.
Figure 11.5 shows part of the configuration.mof file.
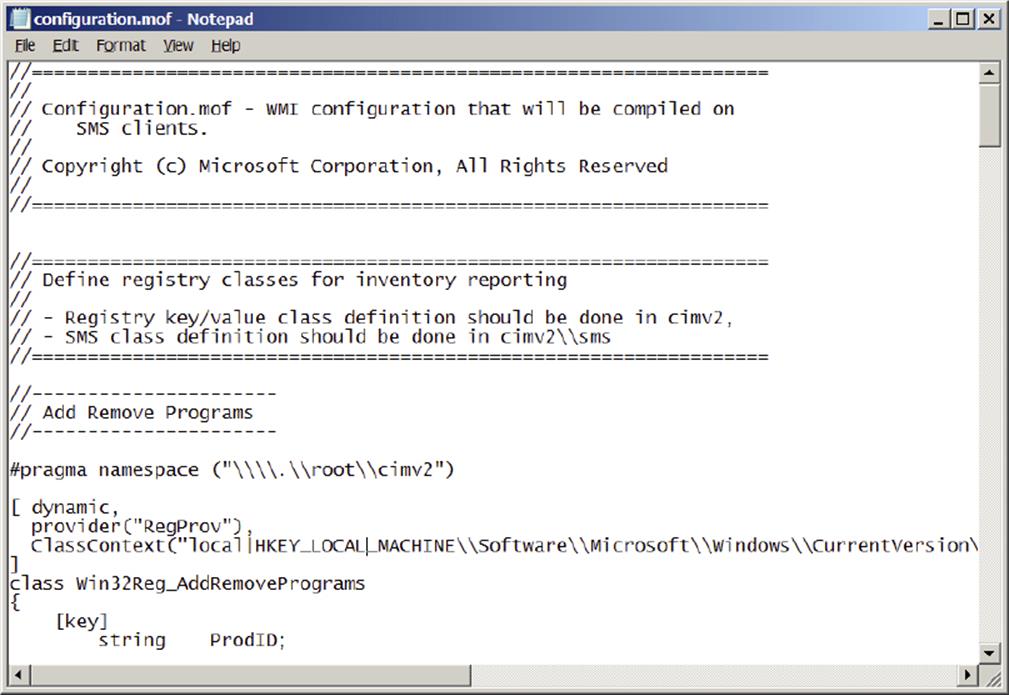
Figure 11.5 The configuration.mof file
4. Close the configuration.mof file, and save the changes.
5. Copy the configuration.mof file to the same location that is listed in step 2 and to all the primary sites in your hierarchy to propagate the changes to the other sites. Note that ConfigMgr does not copy this file for you; you must copy the file to the other primary site servers in your hierarchy in order to achieve consistent inventory results from your clients.
Extending Hardware Inventory Using the Default Client Settings
The default client settings are used to modify reporting class information inventoried by clients during hardware inventory. The default client settings contain a list of classes and attributes that relate to data classes stored in the WMI repository of Configuration Manager clients.
Classes and properties that have the reporting checkmark enabled are collected, and those without a checkmark are not. You must always modify the default classes in the default client settings at the Central Administration Site; you will not be able to enable or disable these settings in any custom client settings.
To modify the default client settings, follow these steps:
1. Navigate to the Administration workspace, under Overview select Client Settings, and open the Default Client Settings properties.
2. Select Hardware Inventory and click Set Classes.
3. Use the GUI to enable or disable any of the existing inventory data classes.
4. Choose OK to save the changes.
5. Close the Default Client Settings properties.
Configuring Software Inventory for a Configuration Manager Site
Software Inventory is enabled by default when you install Configuration Manager, but unlike previous versions, ConfigMgr 2012 will not inventory any files by default. In order to perform software inventory on files types, like files with an .EXE extension, you must configure the setting:
1. Navigate to the Administration workspace, under Overview select Client Settings, and open the Default Client Settings properties.
2. Select Software Inventory.
The first thing you will see is the default settings, as shown in Figure 11.6.
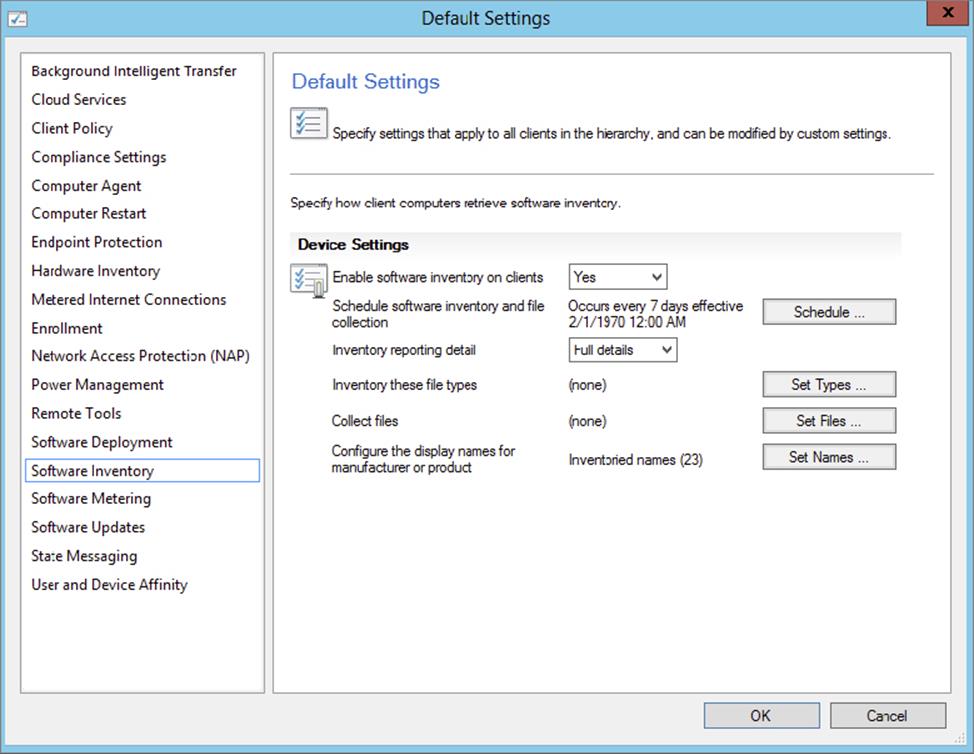
Figure 11.6 Default Software Inventory settings
3. Click Set Types.
4. Click the yellow starburst New icon to create a new entry.
5. Type *.exe, as shown in Figure 11.7, and click OK twice.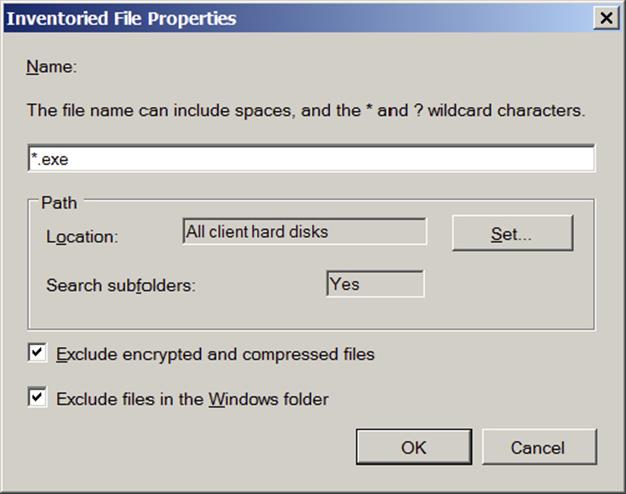
Figure 11.7 Scanning for EXE files
This will search for EXE files on the entire hard disk, excluding the Windows folder and encrypted/compressed files. If you want to, you can specify which folders to include in the scanning; likewise, you can specify a filename instead of a file type. It is worth noting that as you add file types, you will extend the amount of time that software inventory will run on the client computers.
Inventory Reporting Detail is by default set to Full Details. This will ensure that you gather information about the file regardless of whether the file has a product mentioned in the file header or not. Selecting Product Only will not gather information from unknown files.
Collect Files allows you to copy a file from the client and store a copy on the site server. When you enable this feature, the site server will keep up to five versions of each file in <Configuration Manager installation directory>\Inboxes\Sinv.box\Filecol. Even though it sounds tempting to collect files, you should think twice before enabling this feature. It can generate a substantial amount of network traffic and cause your site server to run low on disk space. As shown in Figure 11.8, you can collect a single file or all files of a certain file type.

Figure 11.8 Collecting files
6. To specify a file, click the yellow starburst New icon, and type a filename or use a wildcard to specify a given type.
7. Click Set to narrow the search to a given location; this will speed up the process.
Figure 11.9 shows how you can search for all *.sus files in the %programfiles%\MySoftware folder.
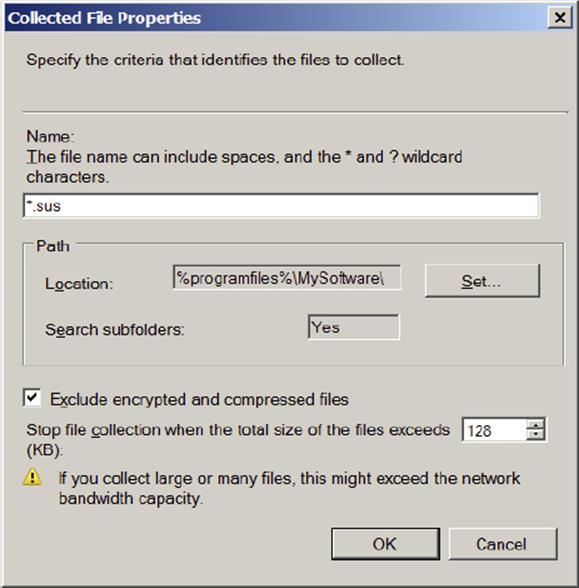
Figure 11.9 Specifying all *.sus files from a folder
Configuring the display names for manufacturer or product allows you to group files according to the correct vendor and application. As mentioned earlier in this chapter, the names are derived from the file header, which often contains alternative ways to spell the manufacturer’s name.
8. Click Set Names, and click the yellow starburst New icon to configure a new display name.
Figure 11.10 shows a new display name for Adobe applications.
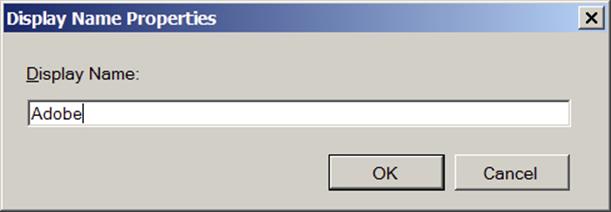
Figure 11.10 Configure a new display name.
9. Once the display name is created, select the display name and click the yellow starburst New icon to the right of Inventoried Names.
When you specify an entry in the Inventoried Names section, you can use these wildcard variables:
|
% |
Any string of zero or more characters |
|
_ (underscore) |
Any single character |
|
[ ] (brackets) |
Any single character within a range |
|
[^] |
Any single character not with a range |
10.When you have typed a name, click OK.
Figure 11.11 shows an example where all inventory names starting with “Adobe” will be grouped below the Adobe manufacturer.
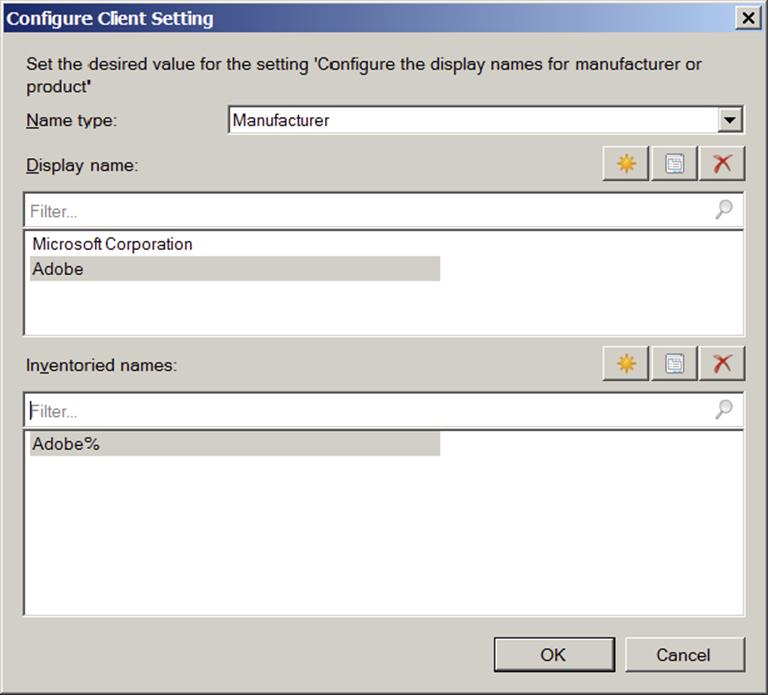
Figure 11.11 A custom display name
Viewing Software Inventory Data
Software inventory information is often used in queries and reports. In the Configuration Manager administrative console, you can use Resource Explorer to view information from a single client (Figure 11.12). You will be able to read file information including File Name, File Path, File Size, File Version, and File Modified Date. The information is divided into four sections, as described in Table 11.3.
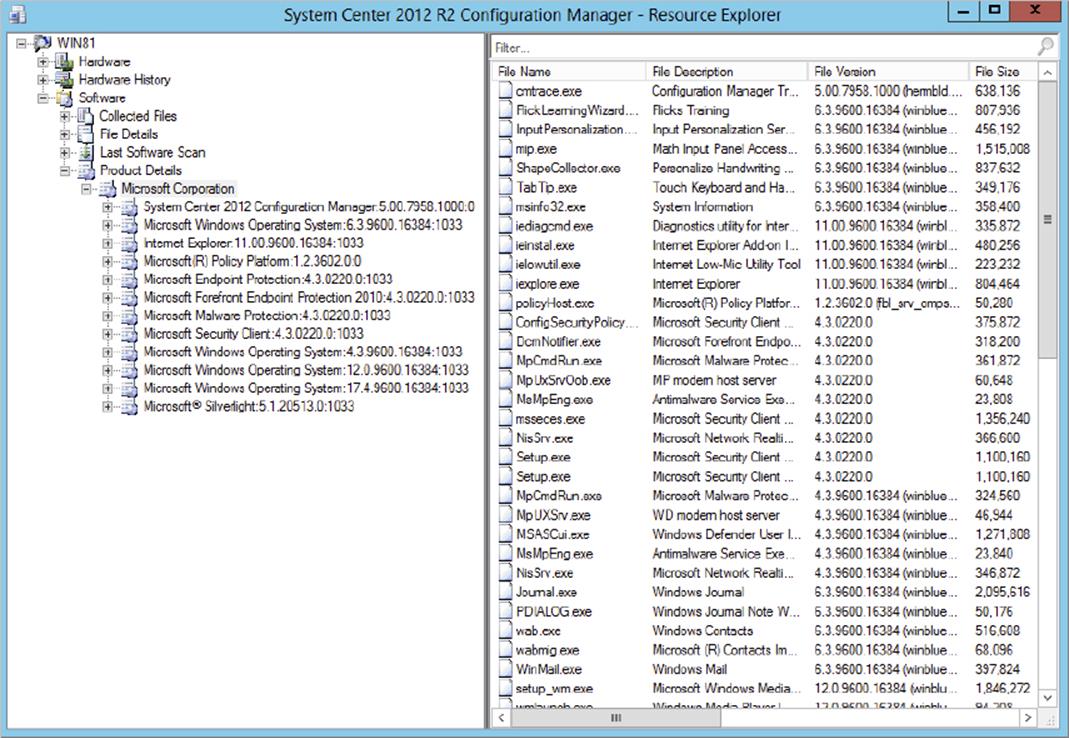
Figure 11.12 Software information in Resource Explorer
Table 11.3: Software information in Resource Explorer
|
Section |
Information available |
|
Collected Files |
Lists all files collected from the client. |
|
File Details |
Lists all inventoried files that are not associated with any vendor. |
|
Last Software Scan |
Lists the last file collection and software inventory scanning data. |
|
Products Details |
Lists all inventoried files that are associated with a vendor. You can modify the list of vendors by customizing the display name in the Software Inventory Client Settings. |
Miscellaneous Inventory Configurations and Options
The following sections cover some configuration options for inventory that don’t neatly fit into other categories.
Encrypting Client Inventory Reports
Configuration Manager can be configured to sign and encrypt data sent between the client and the management point. To enhance security for inventory, you can enable inventory encryption.
To enable inventory encryption, follow these steps:
1. In the Configuration Manager console, select the Administration workspace ⇒ Overview ⇒ Site Configuration ⇒ Sites.
2. Right-click the site and click Properties.
3. Click the Signing And Encryption tab.
4. Select Use Encryption.
5. Click OK to finish.
Excluding Files from Software Inventory
To exclude folders or entire drives from the software inventory process, create a file called skpswi.dat and save it to the root of the area (and subfolders) you want to exclude. You can skip the entire C: partition by storing the file in C:\ or a folder (and subfolders) by saving the file in the root of the folder.
You can ensure that folders and drivers are excluded by reading the FileSystemFile.log file on the client. Figure 11.13 shows how you can verify that the skpswi.dat file is working.
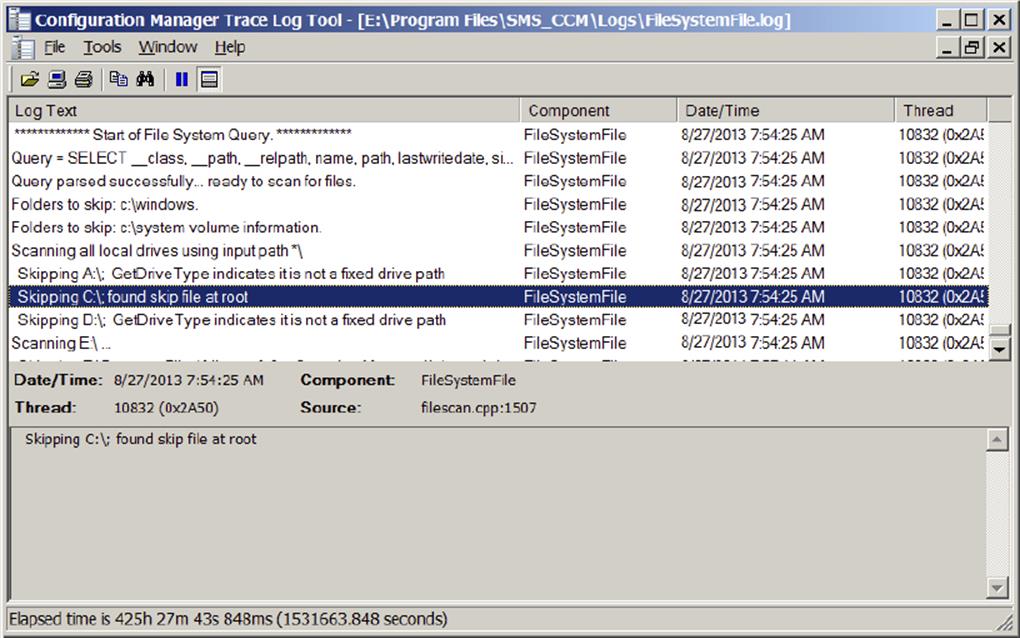
Figure 11.13 FileSystemFile.log
To exclude files from software inventory, follow these steps:
1. Using Notepad, make an empty file named skpswi.dat.
2. Right-click that file, and click Properties.
3. In the file properties for skpswi.dat, select the Hidden attribute.
4. Place the skpswi.dat file at the root of the drive or folder where you don’t want to collect software inventory.
Monitoring the File and Size Being Sent to the Management Point
One of the questions you often hear before enabling any inventory process is how much network utilization is generated by running this process? The Configuration Manager client will send Heartbeat Discovery data, hardware inventory data, and software inventory data on a regular basis. The three files generated by each of these processes will be temporarily stored in %systemroot%\ccm\inventory\temp\ before being sent to the management point. After files are sent to the management point, they will automatically be deleted from the temp folder. You can create a file called archive_reports.sms, discussed next, and save it to the same folder. This will prevent the Configuration Manager client from deleting the XML files after they are sent to the management point.
Figure 11.14 shows three files generated: one for hardware inventory, one for software inventory, and one for Heartbeat Discovery.
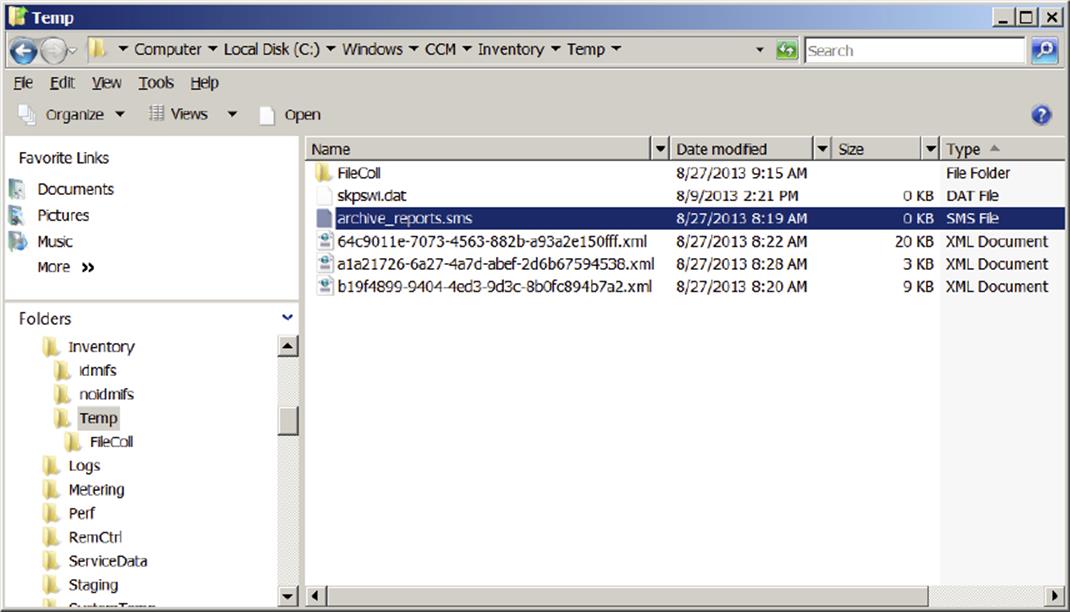
Figure 11.14 Files generated by the inventory and discovery processes
To prevent XML files from being deleted, follow these steps:
1. Using Notepad, create an empty file named archive_reports.sms (make sure that it’s not a .txt file).
2. Save the file in the %systemroot%\ccm\inventory\temp\ folder.
3. Initiate a hardware, software, and/or discovery inventory cycle on the client, and monitor the %systemroot%\ccm\inventory\temp\ folder.
You should be able to see one XML file for each process that contains data.
4. Remember to delete the archive_reports.sms file from the client once you have enough information to estimate the average file size for each of the three processes. Note that the first hardware and software inventories will be larger than subsequent inventory files, whereas the heartbeat discovery file should always be about the same size.
Viewing Collected Files
You can view collected files by opening the <:\>Program Files\Microsoft Configuration Manager\inboxes\sinv.box\FileCol\ folder on the site server or through Resource Explorer. Using Resource Explorer is by far the best method because it will link the collected files and computer together. As shown in Figure 11.15, you can open and read each collected file.
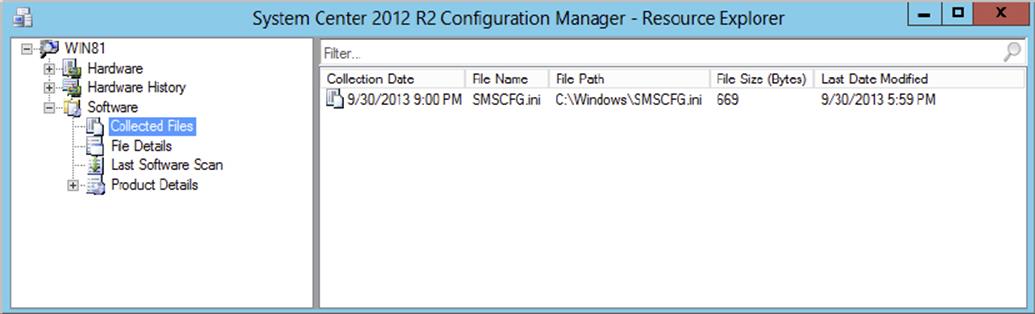
Figure 11.15 Reading a collected file in Resource Explorer
To view the collected files of a particular client, follow these steps:
1. In the Configuration Manager console, select the Assets and Compliance workspace ⇒ Overview ⇒ Devices.
2. In the Search area of the ribbon, type the name of the client you wish to find and click Search.
3. Once you have found the client you want, right-click it.
4. Then click Start ⇒ Start Resource Explorer.
5. In the left pane, select Software ⇒ Collected Files.
You will see a list of all the files that have been collected from that client in the right pane.
6. To view a file, you have two options:
· Right-click a file, and select View File.
· Right-click a file, and select Save.
Troubleshooting Inventory
The following sections cover some basic information that will help you troubleshoot specific problems. In order to troubleshoot and fully understand what’s going on behind the scenes, you need to have information about the log files in the process.
Hardware Inventory
When you troubleshoot hardware inventory, you need to know how data travels from the client to the SQL database. Inventory data will be sent from the client to the management point and then to the site server before being added to the database.
Client-Side Processing
All client-side hardware inventory processes are recorded in the InventoryAgent.log file. The log file will contain several lines that are important for you to understand.
The following line tells you what kind of inventory report will be sent from the client to the management point. It can be a full, delta, or resync report.
Inventory: Action=Hardware ReportType=Delta
The following line queries for data:
Collection: Namespace = \localhost\root\Microsoft\appvirt\client; Query = SELECT __CLASS, __PATH, __RELPATH, LastLaunchOnSystem, Name, PackageGUID, Version FROM Application; Timeout = 600 secs
The following line gives information about the number of classes that the client is searching for and the number of classes found. The information in this line is worth checking whenever you make changes to the data classes. When you enable an extra data class, the last number should increase by one.
Collection: 55/64 inventory data items successfully inventoried.
The following line basically informs you that the client-side processing has completed successfully and information has been sent to the management point.
Inventory: Successfully sent report. Destination:mp:MP_HinvEndpoint, ID: {D886D5C8-59E4-4C9C-B9CD-08D7DA40BA20}, Timeout: 80640 minutes MsgMode: Signed, Not Encrypted
Management Point Processing
At the management point the client data will be converted from an XML file to an MIF file and sent to the site server. You can monitor the process by reading the MP_HINV.log file.
Site Server Processing
At the site server the client data will be added to the SQL database by the Inventory Data Loader process. In the Dataldr.log file you will see entries similar to these:
Thread: 10368 will use GUID GUID:1E8A9DD4-C572-48F9-BEDB-B33D8E0F07F4 SMS_INVENTORY_DATA_LOADER 8/27/2013 11:34:04 AM 10368 (0x2880)
Processing Inventory for Machine: DC1 Version 1.7 Generated: 08/27/2013 11:33:27 SMS_INVENTORY_DATA_LOADER 8/27/2013 11:34:04 AM 10368 (0x2880)
Begin transaction: Machine=DC1(GUID:1E8A9DD4-C572-48F9-BEDB-B33D8E0F07F4) SMS_INVENTORY_DATA_LOADER 8/27/2013 11:34:04 AM 10368 (0x2880)
Commit transaction: Machine=DC1(GUID:1E8A9DD4-C572-48F9-BEDB-B33D8E0F07F4) SMS_INVENTORY_DATA_LOADER 8/27/2013 11:34:04 AM 10368 (0x2880)
Done: Machine=DC1(GUID:1E8A9DD4-C572-48F9-BEDB-B33D8E0F07F4) code=0 (20 stored procs in XH3JZIA70.MIF) SMS_INVENTORY_DATA_LOADER 8/27/2013 11:34:04 AM 10368 (0x2880)
The MIF file is added to the SQL database from
<:>\Program Files\Microsoft Configuration Manager\inboxes\auth\dataldr.box\Process
If you see a large number of MIF files in one of the dataldr.box folders, it’s normally a clear indication of a backlog.
When Clients Are Deleted from the Database but Not Uninstalled
A commonly seen issue occurs when an administrator accidently deletes all client computers from a collection. This will remove client data from the database, but the Configuration Manager Client Agent running on those systems is not aware of that action. In the following sequence you can see that the client is still sending delta inventory information to the site server, but since the site server does not have any existing records, it will not be able to process that delta data and asks the client to perform a resync.
In the InventoryAgent.log file on the client, notice that the first report type is delta.
<![LOG[Inventory: Action=Hardware ReportType=Delta]LOG]!><time="12:38:31.453-120" date="08-27-2013" component="InventoryAgent" context="" type=""1" thread="212" file="agentstate.cpp:1563">
The data loader component receives the delta information and tries to add it to an existing record in the database. The record does not exist in the database, which is why the MIF file is discarded and moved to the Badmifs folder. Furthermore, the data loader component will initiate a resync, which instructs the client to send up a full inventory report.
ERROR - attempt to update non-existent row. Invalid command: exec dbo.pWorkstationStatus_DATA 1,16777222,'08/27/2013 12:49:49',1,'8/27/2013 12:49:42',N'4294967305',1033,120 $$<SMS_INVENTORY_DATA_LOADER><08-27-2013 12:49:49.740-120><thread=2720 (0xAA0)>
Rollback transaction: Machine=DC1(GUID:1E8A9DD4-C572-48F9-BEDB-B33D8E0F07F4) $$<SMS_INVENTORY_DATA_LOADER><08-27-2013 12:49:49.744-120><thread=2720 (0xAA0)>
Remote client hardware inventory resync generated for client GUID:1E8A9DD4-C572-48F9-BEDB-B33D8E0F07F4; update/insert result = 2 $$<SMS_INVENTORY_DATA_LOADER><08-27-2013 12:49:49.825-120><thread=2720 (0xAA0)>
~Send resync command to local site for machine GUID:1E8A9DD4-C572-48F9-BEDB-B33D8E0F07F4. $$<SMS_INVENTORY_DATA_LOADER><08-27-2013 12:49:49.830-120><thread=2720 (0xAA0)>
STATMSG: ID=2722 SEV=I LEV=M SOURCE="SMS Server" COMP="SMS_INVENTORY_DATA_LOADER" SYS=SCCM4.sccmlab.local SITE=RC1 PID=9052 TID=2720 GMTDATE=Sat Aug 27 10:49:49.833 2013 ISTR0="DC1" ISTR1="" ISTR2="" ISTR3="" ISTR4="" ISTR5="" ISTR6="" ISTR7="" ISTR8="" ISTR9="" NUMATTRS=0 $$<SMS_INVENTORY_DATA_LOADER><08-27-2013 12:49:49.835-120><thread=2720 (0xAA0)>
~Cannot process MIF XHIJ3F4L2.MIF, moving it to e:\Program Files\Microsoft Configuration Manager\inboxes\auth\dataldr.box\BADMIFS\44p7g21x.MIF $$<SMS_INVENTORY_DATA_LOADER><08-27-2013 12:49:49.843-120><thread=2720 (0xAA0)>
On the client, the next hardware inventory will send a full hardware report to the management point. Notice the ReportType=Resync notation:
![LOG[Inventory: Opening store for action {00000000-0000-0000-0000-000000000001} ...]LOG]!><time="13:03:21.391-120" date="08-27-2013" component="InventoryAgent" context="" type="1" thread="2668" file="datastore.cpp:176">
<![LOG[Inventory: Action=Hardware ReportType=ReSync]LOG]!><time="13:03:37.734-120" date="08-27-2013" component="InventoryAgent" context="" type="1" thread="2668" file="agentstate.cpp:1563">
Once the resync report is processed, the client will be added to the database and will show up in the Configuration Manager administrative console.
When Clients Try to Inventory Data Classes That Don’t Exist
As we have already discussed, the Hardware Inventory Client Agent gets information about a computer’s hardware from the WMI data classes. Sometimes not all of the WMI data classes that Configuration Manager is set up to inventory are present on a client.
Clients with different operating systems are a good example. The default client settings are configured to inventory certain new WMI classes in Windows 2008 R2 that aren’t available on other operating systems. The hardware inventory process will still try to inventory those classes on a Windows 7 or Windows Vista client since they also read the settings in the default client settings.
When a client tries to inventory a class that doesn’t exist, you will see an entry only in the InventoryAgent.log file, because no status message will be sent to the site server. If you need to figure out whether a client is trying to inventory nonexistent data classes, you will see entries similar to Collection: Class "<Class Name>" does not exist in the InventoryAgent.log file.
Software Metering in Configuration Manager 2012
Software Metering is used to track usage of administrator-defined applications using software-metering rules. It is not used to prevent users from running an application (this is a job for the Software Restriction Group Policy). By default Configuration Manager will automatically create disabled software metering rules based on the recently used inventory data. Often you will find yourself disabling the feature and creating your own software metering rules.
Overview of Software Metering
Software Metering in Configuration Manager 2012 allows you to monitor and collect information about software usage on Configuration Manager clients. The information collected is based on the software metering rules that can be configured in the Configuration Manager console or created automatically based on usage data collected by inventory.
The Software Metering Client Agent on each client evaluates these rules, collects the requested data, and then reports it to the Configuration Manager database. The software metering process will continue to collect usage data even if it can’t connect to its management point and will send the collected data on to the site server after it connects to the network. By default clients will send the software metering usage report every seven days.
Software metering data is held on the site server until it is summarized. The summarization schedule is defined in the Site Maintenance tasks for the site. By default the process will begin every night at 00:00.
You will be able to see the software metering data in the reports once the software metering report data has been received on the site server and summarized. By default this process can take up to eight days from client activity to seeing information in reports. This might sound like a long delay, but often you will only use the reports once a month or so when evaluating licenses. Combined with software inventory, software metering gives administrators a powerful tool to help answer questions that come up in every IT organization. Examples of these questions include the following:
· What is the relationship between how many instances of a software program are installed on clients and how many actually use that software?
· Do you need to buy more licenses when renewing your license agreement with a software vendor?
· What users are still using an obsolete program?
Configuring Software Metering
The Software Metering feature is enabled by default when you install Configuration Manager. You can enabled or disable the feature by editing the default Client Agent settings or creating a custom client setting.
Configuring the Software Metering Feature
Take these steps to configure the Software Metering feature:
1. Navigate to the Administration workspace, under Overview select Client Settings, and open the Default Client Settings properties.
2. Select Software Metering, and notice the default setting, as shown in Figure 11.16.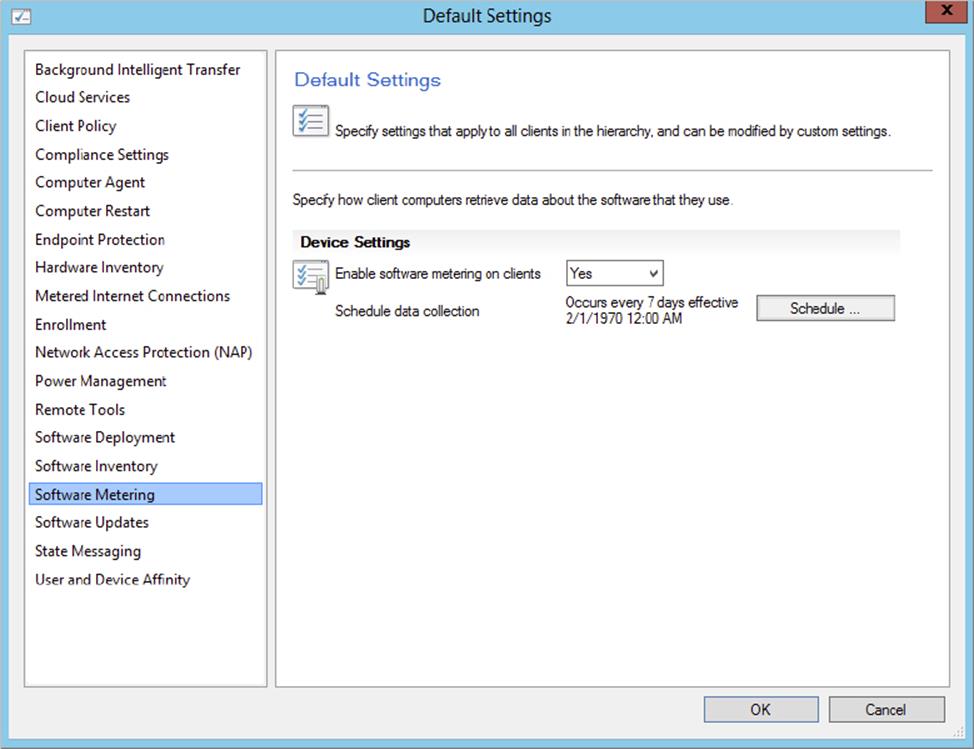
Figure 11.16 Default Software Metering settings
By default, Enable Software Metering On Clients is set to Yes.
3. To disable the feature, select No in the drop-down box.
Schedule Data Collection defines how often the Configuration Manager client will send software metering data from WMI to the site server.
Configuring Automatic Software Metering Rule Generation
As discussed earlier in the chapter, Configuration Manager will automatically create disabled software metering rules based on recently gathered inventory data. You can configure or disable the feature from the Assets And Compliance workspace.
To configure automatic rule generation, follow these steps:
1. Navigate to the Assets and Compliance workspace, under Overview select Software Metering, and click Software Metering Properties on the ribbon.
This opens the Software Metering Properties dialog box, as shown in Figure 11.17.
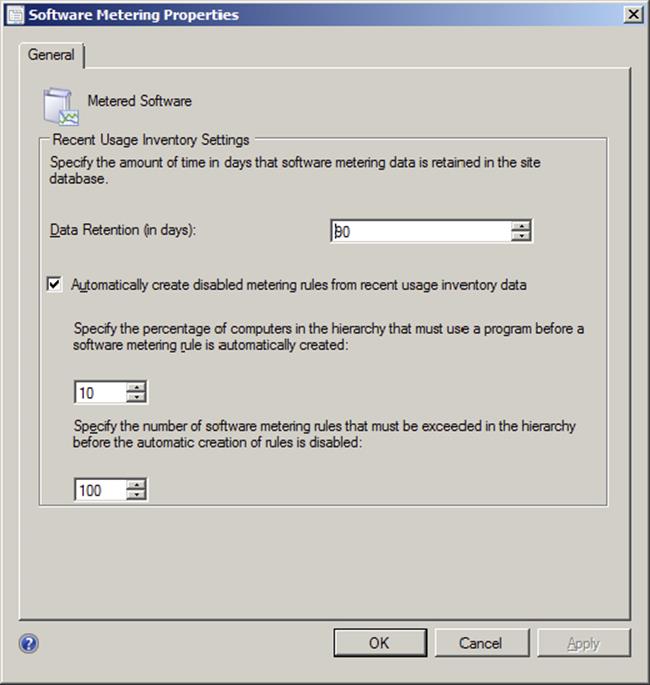
Figure 11.17 Software Metering Properties dialog box
2. You can set the following options:
· You can specify the amount of time in Data Retention (In Days) that data generated by software rules will be held in the site database. The default setting is 90 days.
· You can select the Automatically Create Disabled Metering Rules From Recent Usage Inventory Data check box.
· You can set the percentage of computers in a Configuration Manager site that must use an executable before a software metering rule for that executable is automatically created. The default setting is 10 percent.
· You can set the maximum number of rules that software metering will automatically generate. The default setting is 100 rules.
3. When you have finished setting these options, click OK.
Enabling and Disabling Software Metering Rules
You don’t have to delete a rule if you don’t want to use it; instead, you can enable it or disable it as needed if you want to keep it.
To enable or disable a software metering rule, follow these steps. Figure 11.18 shows automatically generated software metering rules in the Configuration Manager console.
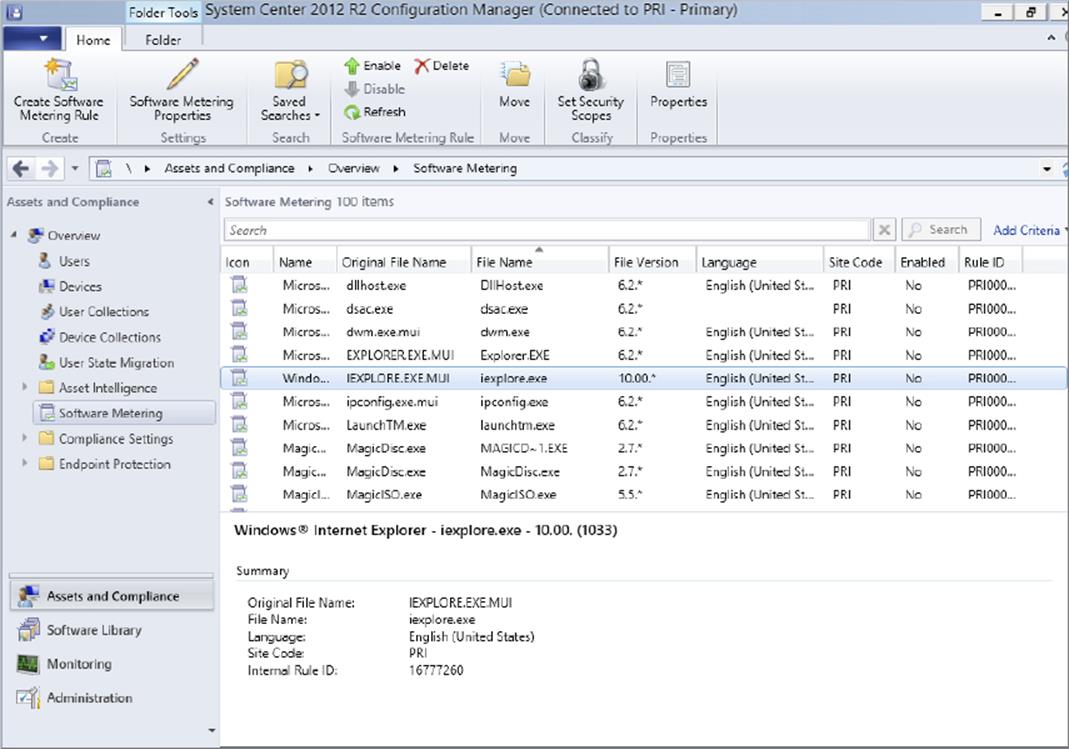
Figure 11.18 Software Metering node with software metering rules
1. Navigate to the Assets and Compliance workspace, and under Overview select Software Metering.
2. Right-click one or more rules that you want to configure, and then click either Enable or Disable.
The option that is available will depend on what state the rule is already in.
Adding a Software Metering Rule
If the automatically generated rules aren’t what you need, then you can manually make your own to meet your organization’s needs. To make your own software metering rules, follow these steps:
1. Navigate to the Assets and Compliance workspace, and under Overview select Software Metering.
2. Click Create Software Metering Rule on the ribbon.
This opens the General page of the Create Software Metering Rule Wizard, shown in Figure 11.19.
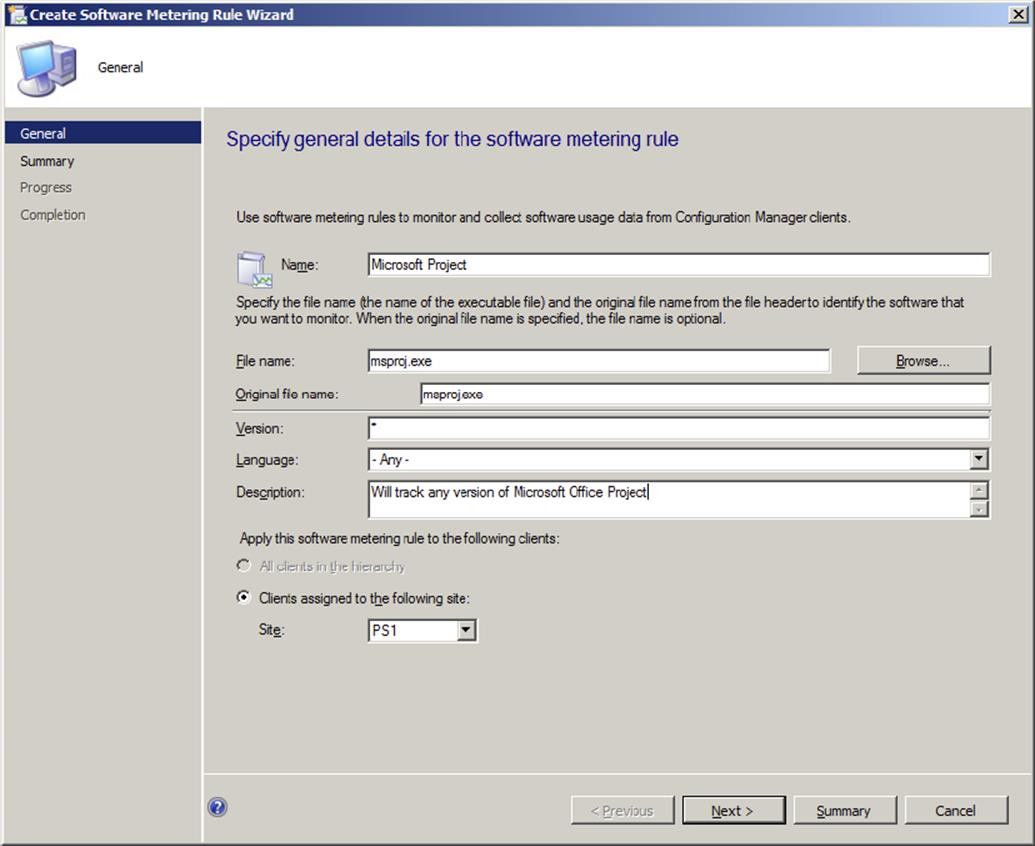
Figure 11.19 General page of the Create Software Metering Rule Wizard
This page has the following options:
1. Name The name of the software metering rule, which should be unique. You can have rules with the same name, as long as the filenames are different. This way you can track suites of applications like the Adobe Creative Suite or Microsoft Office.
2. File Name The name of the executable file you want to meter. You can click Browse to display the Open dialog box, where you can select the file that you want to meter. You can manually type in this filename, but when you do that, no checks are made to determine whether the file exists or whether it contains the needed file header information. For the best results, always use the Browse button if possible. Wildcard characters can’t be used in this field, and selecting the Original File Name field is optional.
3. Original File Name The name of the executable file that you want to meter. This name is matched to the information in the file header, not the filename itself, so you still meter it if the file is renamed. Wildcard characters can’t be used in this field, and selecting the File Name field is optional.
4. Version The version of the executable file that you want to meter. If you use the Browse button to select your file, this field will be filled out automatically from the file’s header information (as shown in Figure 11.18). You can use the wildcard character (*) to represent any string of characters or the wildcard character (?) to represent any single character. If you want to meter all versions of the file, you can use the default value (*).
5. Language The language of the file that you want to meter. The default value is English (United States). If you use the Browse button to select your file, then this is filled out automatically from the file’s header information. If you want to meter all language versions of this file, then select Any from the drop-down list.
6. Description A description that you want for the rule. This is an optional field.
7. Apply This Software Metering Rule To The Following Clients Your options are All Clients In The Hierarchy or Clients Assigned To The Following Site.
3. Fill in the information and click Next.
4. Review the information on the Summary page and click Next.
5. Click Close.
The rule is now created and will be downloaded to clients during the next machine policy cycle.
Deleting Software Metering Rules
When you delete a software metering rule, the change will be downloaded to clients during their next policy polling interval, just like when you create rules.
To delete a software metering rule, follow these steps:
1. Navigate to the Assets and Compliance workspace, and under Overview select Software Metering.
2. Find the metering rule that you want to delete, right-click it, and click Delete.
You will then see a Confirm Object Delete dialog box.
3. If you are sure that you want to delete this rule, then click Yes.
Software Metering Maintenance Tasks
Depending on how you configure software metering, you could end up with a lot of data collected in the Configuration Manager database. To help you manage that data, several maintenance tasks are included in the Configuration Manager console. There are four tasks in total in two categories—two tasks for deleting aged software metering data and two tasks for summarizing software metering data. All of these tasks are enabled by default.
To find them in the Configuration Manager console, navigate to the Administration workspace and under Overview choose Site Configuration ⇒ Sites. From the ribbon click Site Maintenance.
Figure 11.20 shows the software metering Site Maintenance settings. To edit, just double-click the task you want to configure.
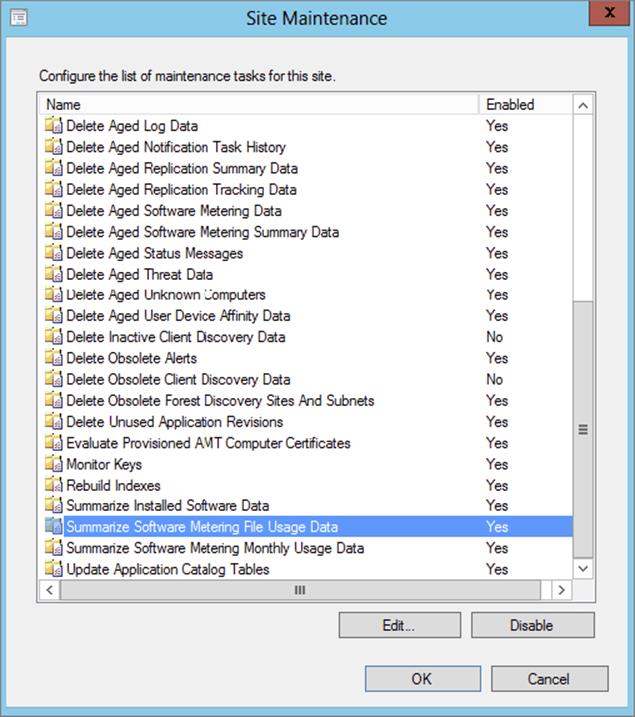
Figure 11.20 Software metering maintenance tasks
These tasks summarize software metering usage data to compress the amount that is stored in the Configuration Manager database. Summarization runs daily by default and will run only against data that is at least 12 hours old. This is required for all software metering reports to produce any meaningful data. To get an idea of what is in the most current set of summarized data, you have to know when that last summarization took place.
The Software Metering Summarization Progress report, as shown in Figure 11.21, will provide you with information about the last summarization process.

Figure 11.21 Software Metering Summarization Progress report
The Summarize Software Metering File Usage Data task summarizes software metering file usage data from several records into one record. This record gives information about the program name, version, language, and number of distinct users over intervals of 15 minutes to 1 hour. This process compresses and optimizes the amount of data stored in the Configuration Manager database.
For every hour and every 15-minute time frame within the hour, this task will calculate the total number of distinct user/computer combinations that are running the programs that are being metered. Within 15-minute intervals, this will give an approximate number of concurrent users of a metered program.
When software summary data is sent up the Configuration Manager hierarchy, data from each site is kept separate from the data from the other sites. When the data reaches a parent site, each record is marked with the site code of the site it came from.
The Summarize Software Metering Monthly Usage Data task summarizes detailed software metering usage data from many records into one record. This record gives information on the program name, program version, language, program running times, number of times used, last time used, username, and computer name. This summarization compresses the amount of data that is stored in the Configuration Manager database and is sent to the central site.
The summary data also includes the number of times each matching metered piece of software was run on a specific computer by a specific user during that month. This task is set to run every day by default, and the summary is done for a period of one month.
![]()
Manually Summarize Software Metering Data
As the Configuration Manager administrator, you have been requested to demonstrate the Software Metering feature. You need to ensure that all the latest data is summarized and is part of the reports. To do so, follow these steps:
1. Log on to the site server where you have the ConfigMgr 2012 Toolkit SP1 or higher version installed.
2. From (%program files(x86)% )\Configmgr 2012 Toolkit SP1\ServerTools, copy runmetersumm.exe to <:>\Program Files\Microsoft Configuration Manager\bin\x64.
3. Open a command prompt as administrator, and navigate to <:>\Program Files\Microsoft Configuration Manager\bin\x64.
4. Type runmetersumm.exe CM_<Configuration Manager site code>, for example, runmetersumm.exe CM_S01.
5. Press Enter, and notice the number of records that have been summarized.
Monitor Client Activity
Whenever a client runs a program, it will be registered in the mtrmgr.log file on the client. If the program has a matching software metering rule, the client agent will start tracking the process associated with the program, as shown in Figure 11.22.
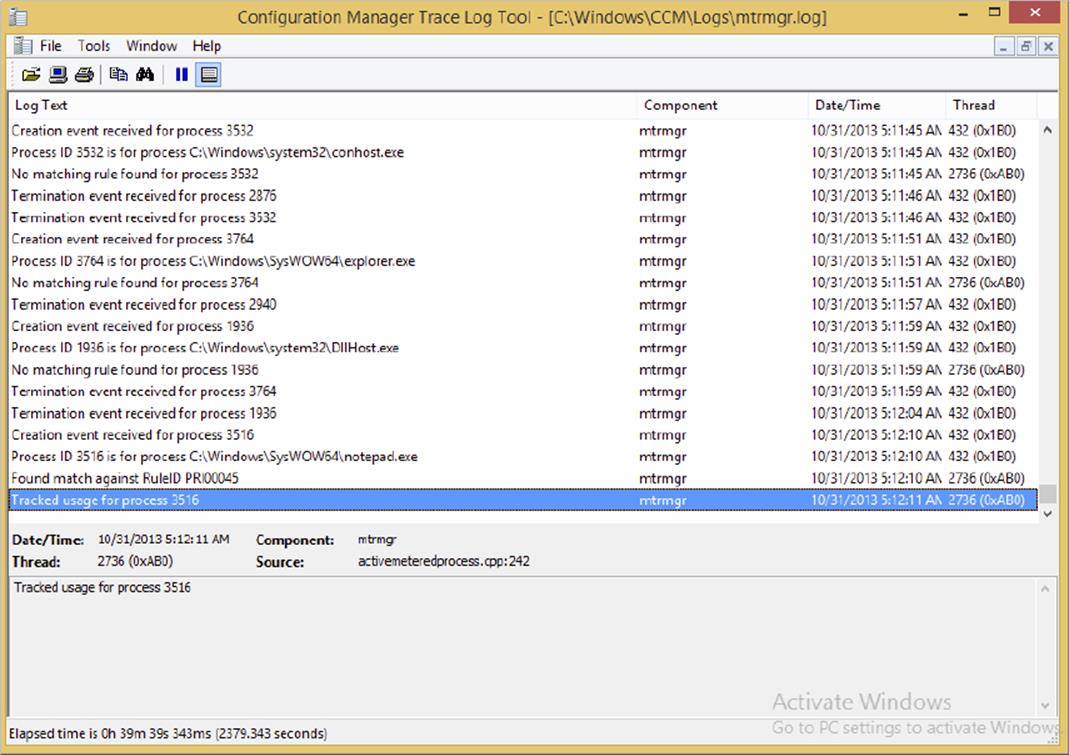
Figure 11.22 Reading the mtrmgr.log file on the client
Each client will generate a software metering usage report and send the report to the management point. You can initiate the action manually by running the Software Metering Usage Report Cycle action in the Configuration Manager Properties on the client, as shown in Figure 11.23.
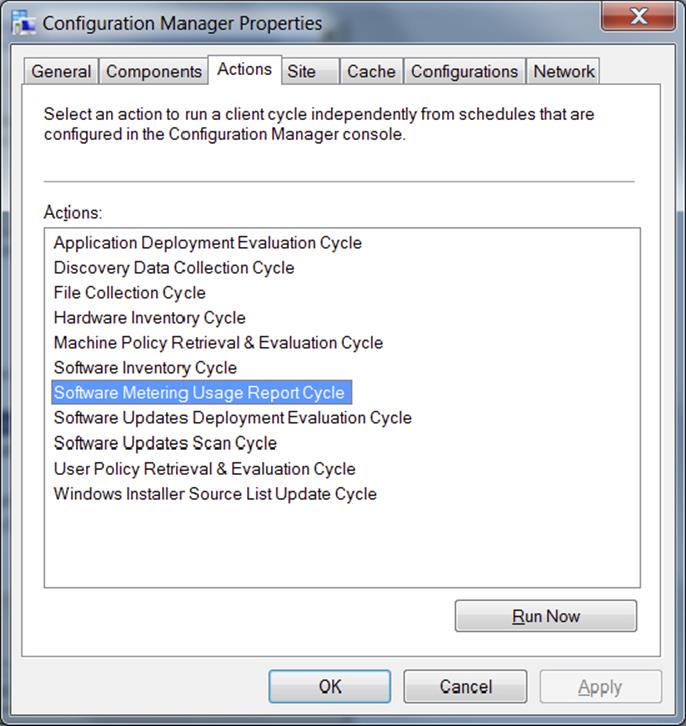
Figure 11.23 Running the Software Metering Usage Report Cycle action on the client
Activity from this process is written to the SWMTRReportGen.log file on the client. The data will be sent to the site server and recorded in the swmproc.log file on the site server.
Default Software Metering Reports
Configuration Manager 2012 ships with several canned software metering reports:
· All Software Metering Rules Applied To This Site
· Computers That Have A Metered Program Installed But Have Not Run The Program Since A Specified Date
· Computers That Have Run A Specific Metered Software Program
· Concurrent Usage For All Metered Software Programs
· Concurrent Usage Trend Analysis Of A Specific Metered Software Program
· Install Base For All Metered Software Programs
· Time Of Day Usage Summary For A Specific Metered Software Program
· Total Usage For All Metered Software Programs
· Total Usage For All Metered Software Programs On Windows Terminal Servers
· Total Usage Of Specific Metered Software Product
· Total Usage Trend Analysis For A Specific Metered Software Program
· Total Usage Trend Analysis For A Specific Metered Software Program On Windows Terminal Servers
· Users That Have Run A Specific Metered Software Program
· Software Metering Summarization Progress
One of the disadvantages of having a large number of disabled software metering rules is that all rules will be shown in the Install Base For All Metered Software Programs report. This might clutter the picture a little bit because you will see programs that you might not be interested in seeing.
By combining the values from the Install Base For All Metered Software Programs report with the Computers That Have A Metered Program Installed But Have Not Run The Program Since A Specified Date report, you can easily see how many installed instances you have and measure that against how many times the application has been used in a specific period. This will give the names of computers where you can uninstall the application and that way save money on the software budget.
The Bottom Line
1. Configure and manage Software Inventory. Configuring Software Inventory has changed in Configuration Manager 2012, although the client-processing part is almost the same as in Configuration Manager 2007.
1. Master It By default, Configuration Manager does not inventory for any file types. Where would you go to do that?
2. Configure and manage Hardware Inventory. Hardware Inventory provides a wealth of information on the hardware resources in your organization. That information is vital when planning for things such as updating standard business software or upgrading the standard operating system your organization uses. If the standard hardware inventory collected is not enough for your needs, then you have many options to extend the hardware inventory to get that vital information.
1. Master It Where do you enable or disable data classes in Hardware Inventory?
3. Configure and manage Software Metering. Keeping track of software that is installed and actually being used is a large part of being able to manage software licenses effectively. By pairing Software Metering in Configuration Manager with Software Inventory, you can get detailed information on just what software is out there and who is or is not using it. This goes a long way to help keep your software licensing in compliance.
1. Master It How long do you have to wait, at the very least, after you configure Software Metering before you can expect to see any data returned?
All materials on the site are licensed Creative Commons Attribution-Sharealike 3.0 Unported CC BY-SA 3.0 & GNU Free Documentation License (GFDL)
If you are the copyright holder of any material contained on our site and intend to remove it, please contact our site administrator for approval.
© 2016-2026 All site design rights belong to S.Y.A.