Mastering System Center 2012 R2 Configuration Manager (2014)
Chapter 16. Mobile Device Management
The power of the mobile device as a computing platform has grown significantly in recent years. The number of mobile devices is increasing all the time. The devices are a favorite among the user community and are definitely here to stay. Having a mechanism to manage these devices effectively is crucial to IT because users demand to bring their own devices.
These devices are now a significant part of the computing landscape and are only accelerating in relevance. As a result, organizations of all sizes are tasked with finding the best way to handle these devices, allowing users the flexibility inherent with these devices while balancing the needs of corporate security and management when these devices are used in an enterprise setting.
A further challenge is the sheer number of device types and operating systems in use, including devices running the Windows Phone or Windows Mobile 8 operating systems, devices from Apple such as the iPhone or iPad, devices running the Android or BlackBerry platforms, and others. Each device type and operating system allows for different management capabilities—and these capabilities will continue to evolve over time. Being able to manage these devices consistently, regardless of the type of device, is important for organizations and is exactly what Configuration Manager 2012 is designed to do. With the extension of Configuration Manager 2012 R2 to the cloud service Windows Intune, Configuration Manager has become a fully mature mobile device management solution.
This chapter will detail the mobile device management options available in Configuration Manager 2012.
In this chapter, you will learn to
· Detail the differences between lite and depth management
· Understand how to configure mobile device management
· Understand the depth-management enrollment process
What’s New in Mobile Device Management
The mobile devices world has changed at an amazing pace since the last full release of Configuration Manager, version 2007. A variety of device and operating system manufacturers are in the market, and the number of users with mobile devices has grown significantly. Mobile devices have become center stage for many users, and such devices are often the single computing device where users spend the bulk of their time. These devices often blur the lines between the individual user environment where music and photographs are important and the business environment used for apps, business email, and documents. Enterprises may choose to allow employees to use their own devices for business purposes, or there may be a requirement that IT procure and configure devices that will be used for business purposes. In either case, management of these devices is important to protect IT and corporate resources.
Configuration Manager 2012 has also changed in a significant way with the addition of support for non-Windows devices. There are two support models for devices in Configuration Manager 2012—lite management and depth management:
1. Lite Management Lite management is the mechanism used to manage Microsoft’s own Windows Phone 7/7.5 platform and is also the management mode that supports any other device capable of working with an Exchange ActiveSync connection. This includes BlackBerry, iPhone, and Android. Lite management requires Exchange Server 2010 or Exchange Server 2013 either on-premises or in the cloud.
2. There is no client software installed on the device in a lite-management scenario. The management capabilities available are dependent on the capabilities of the device and what is offered via the Exchange ActiveSync connector available in Configuration Manager 2012.
3. Depth Management Depth management is available for traditional Windows phone platforms, Windows CE, Windows Mobile, and Nokia phones running Symbian. Depth management does install client software on the device and affords more capabilities than lite management alone; for older versions, as mentioned earlier, a client can be downloaded. For newer devices with operating systems such as Windows Mobile 8, iPhone, iPad, and Android, depth management is available through the Windows Intune connector.
We’ll discuss both in detail later in the chapter. For now, it’s sufficient to know that lite management will allow any device capable of communicating with Exchange Server 2010 or Windows Server 2013 through ActiveSync to be managed.
Mobile Device Management is Evolving Quickly
It’s also worth mentioning that Configuration Manager 2012 R2 together with the Windows Intune service is the mobile device management solution going forward. Microsoft provides choice and flexibility in how you are able to manage your devices, either completely on-premises via Configuration Manager, cloud-based via Windows Intune, or via a hybrid model, using the Windows Intune Connector in Configuration Manager 2012 R2.
In this book we look at the on-premises and hybrid solutions. One way of adding new capabilities to the hybrid solution is done via the Extensions for Windows Intune, which you can find in the Configuration Manager 2012 R2 console.
Via the Extensions for Windows Intune node, in Administration Workspace ⇒ Overview ⇒ Cloud Services in the Configuration Manager console, features or supported platforms can be added without, for instance, needing to release a Service Pack for Configuration Manager 2012 R2. This is a quick and easy way to add new capabilities to your mobile device management solution.
Mobile Device Management Options
The requirements for mobile device management differ depending on whether devices are being managed using lite-management or depth-management options. For depth management you have two options: depth management with a client or depth management via the Windows Intune connector.
Let’s first look at the supported operating systems and the options you have in managing them:
1. Android Management options:
· Windows Intune connector
· Exchange connector
2. Features:
· Settings management
· Software distribution (Windows Intune only)
· Hardware inventory
· Remote wipe/retire
3. Apple iOS Management options:
· Windows Intune connector
· Exchange connector
4. Features:
· Settings management
· Software distribution (Windows Intune only)
· Hardware inventory
· Remote wipe/retire
5. Nokia Symbian Belle Management options:
· Direct via client
· Exchange connector
6. Features:
· Settings management
· Software distribution (client only)
· Hardware inventory
· Remote wipe/retire
7. Windows 8.x RT Management options:
· Windows Intune connector
8. Features:
· Settings management
· Software distribution
· Hardware inventory
· Remote wipe/retire
9. Windows CE 5.0, 6.0, and 7.0 Management options:
· Direct via client
· Exchange connector
10.Features:
· Settings management
· Software distribution (client only)
· Hardware inventory
· Remote wipe/retire
11.Windows Mobile 6.0, 6.1, and 6.5 Management options:
· Direct via client
· Exchange connector
12.Features:
· Settings management
· Hardware inventory
· Remote wipe/retire
13.Windows Phone 7.x Management options:
· Direct via client
· Exchange connector
14.Features:
· Settings management
· Hardware inventory
· Remote wipe/retire
15.Windows Phone 8 Management options:
· Windows Intune connector
· Exchange connector
16.Features:
· Settings management
· Software distribution (Windows Intune only)
· Hardware inventory
· Remote wipe/retire
Lite Management
There are a few components required for lite management of mobile devices:
· A device capable of establishing an ActiveSync connection with an Exchange server
· An Exchange Server 2010/2013 server providing ActiveSync services, either on-premises or in the cloud
· A properly configured ActiveSync connector in Configuration Manager 2012
Configuring Required Components
The first requirement is totally dependent on the capability of the device being used—a device is either able to communicate via an ActiveSync connection or it isn’t. Fortunately, most modern devices have this capability. The process of configuring the ActiveSync connection on a device may vary depending on the type of device in use. Thus, the specifics of configuring the ActiveSync connection from a device perspective are beyond the scope of discussion for this chapter.
Configuring an Exchange server to deliver ActiveSync services, the second requirement, is specifically an Exchange Server 2010 activity. There are no specific Configuration Manager requirements to consider when setting up Exchange 2010 ActiveSync. Once ActiveSync is configured and working in an Exchange Server 2010 environment, Configuration Manager can be configured to use it. How to enable ActiveSync for Exchange Server is beyond the scope of discussion for this chapter. Details on how to configure the Exchange ActiveSync component can be found with a quick Bing search. The following URLs are a good starting point to understand the setup requirements and process:
http://technet.microsoft.com/en-us/library/aa998357.aspx
http://technet.microsoft.com/en-us/library/bb124234.aspx
This leaves the third option for discussion—configuring the ActiveSync connector in Configuration Manager 2012. The ActiveSync connector option is configured from the Administration node of the console, as shown in Figure 16.1. In the console the connector is labeled Exchange Server Connectors. Note that the options available in the wizard are the only ones configurable for lite device management in Configuration Manager 2012. There may be other options for ActiveSync management available directly in Exchange Server beyond those listed in the wizard.
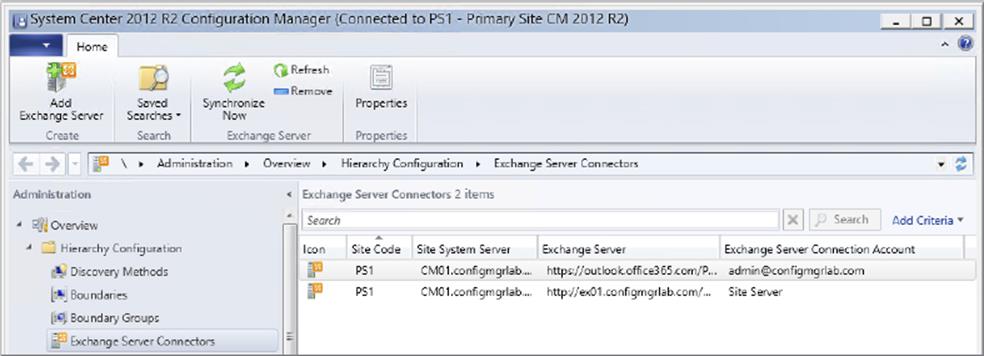
Figure 16.1 Exchange Server Connectors location in the Configuration Manager console
As shown, it’s possible to have multiple connectors configured per site depending on need.
You configure a connector by right-clicking Exchange Server Connectors and selecting Add Exchange Server. This will launch the General page of the Add Exchange Server Wizard, as shown in Figure 16.2.
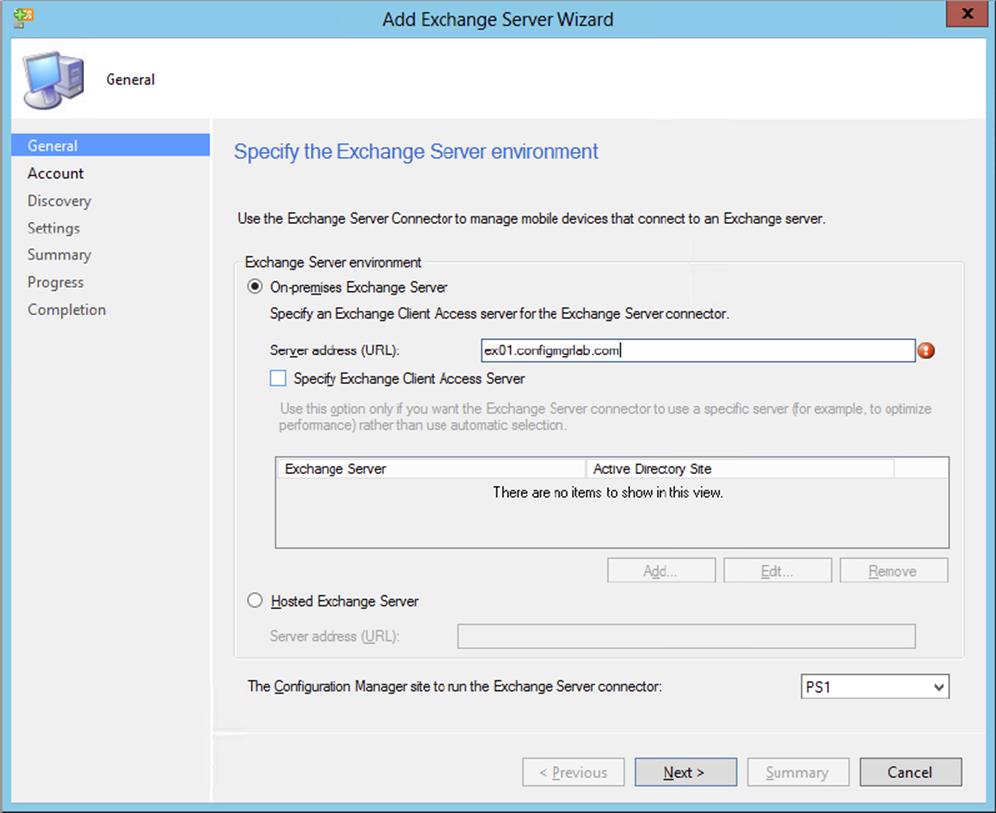
Figure 16.2 Add Exchange Server Wizard—General page
The first choice to make is whether the Exchange server being configured is an on-premises Exchange server or a hosted Exchange server. The connector works fine with both. In either case you must specify an FQDN for the Exchange server. When you specify On-Premises Exchange Server, you can also specify advanced configuration options. Selecting the Specify Exchange Client Access Server check box allows you to specify a specific Client Access Server (CAS) that should be used by the connector when more than a single CAS is available. If the advanced option is not specified, then Configuration Manager will simply choose a CAS to use based on information published in Active Directory.
The last option on the General page allows you to select which Configuration Manager site the connector should be associated with. Once the configurations on this page are complete, click Next to continue to the Account page, shown in Figure 16.3.
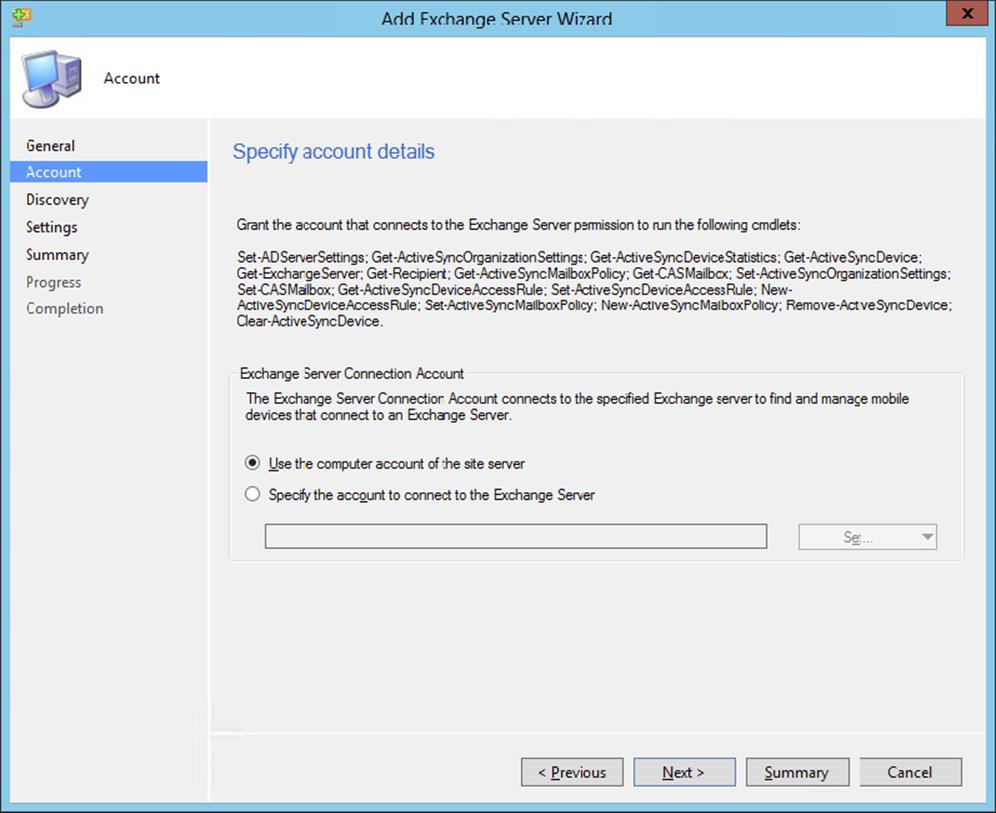
Figure 16.3 Add Exchange Server Wizard—Account page
The Account page allows administers to configure whether the Exchange Server Connection Account should be configured to use the computer account of the site server or a specific account. Regardless of the configuration you choose here, ensure that the configured account has proper rights to access the Exchange Client Access Server(s) chosen. Once configurations on this page are complete, click Next to continue to the Discovery page, shown in Figure 16.4.

Figure 16.4 Add Exchange Server Wizard—Discovery page
The Discovery page allows administrators to determine how device discovery takes place in the environment.
1. Full Synchronization Schedule This option configures the schedule and frequency for full synchronization in the environment. Full synchronization gathers all properties for new and existing mobile devices. The default option is for full synchronization to run daily at midnight.
2. Delta Synchronization Interval (Minutes) This option configures the schedule and frequency for delta synchronization in the environment. Delta synchronization identifies new mobile devices and gathers limited changes for known mobile devices. The default option is for delta synchronization to run every 240 minutes.
Full vs. Delta
Full versus delta synchronization is similar in concept to full versus delta discovery or full versus delta collection updates.
3. Ignore Mobile Devices That Are Inactive For More Than (Days) This option indicates that devices that have been inactive for the configured number of days, by default 180 days, should be ignored from further management attempts.
4. Find All Mobile Devices In The Exchange Organization/Only Find Mobile Devices In The Following Active Directory Containers The choice you make for the first setting determines whether to attempt management of all mobile devices connecting with Exchange ActiveSync or only those belonging to a specific container. If you select to limit management, individual containers with mobile devices that should be managed must be configured.
Note that if settings are not specifically configured on this page, existing settings configured in Exchange ActiveSync will be persisted as noted by the Status column on the Settings page. If settings are configured through the connector, the Status column will change to indicate Configured By Configuration Manager. Once configurations on this page are complete, click Next to continue to the Settings page, shown in Figure 16.5.
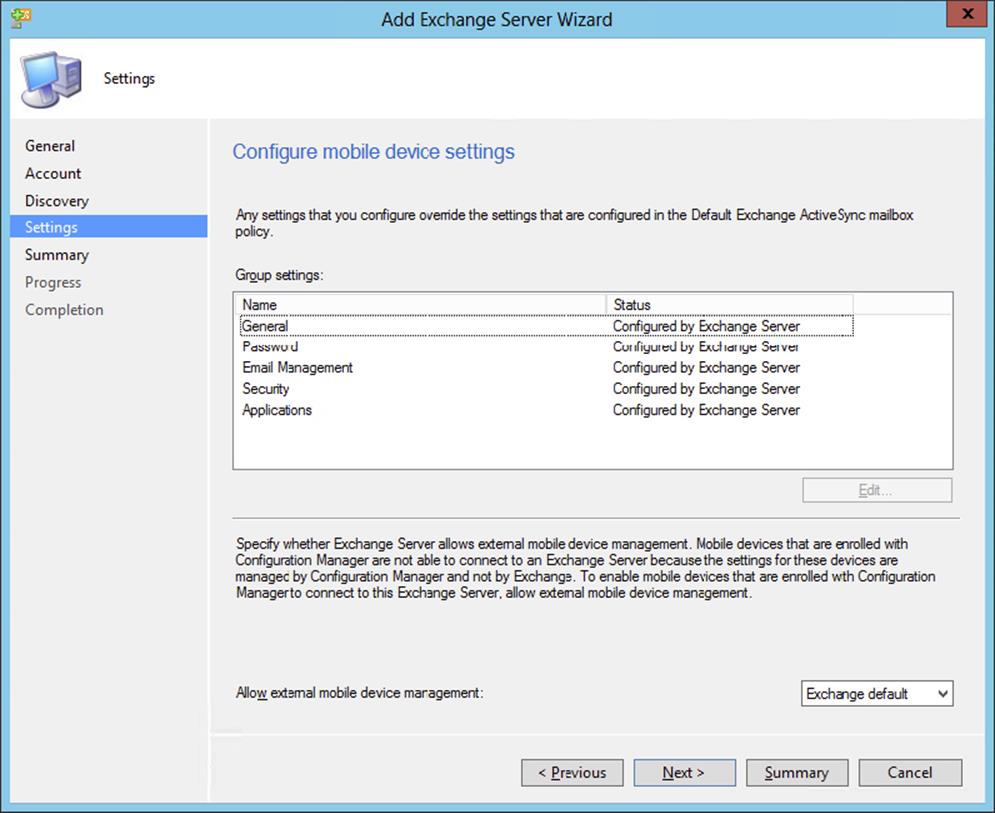
Figure 16.5 Add Exchange Server Wizard—Settings page
The Settings page is where the action is! This page is the launch point for configuring all options that are available for lite management. The categories for configurable settings are General, Password, Email Management, Security, and Applications. Further discussion on these categories follows. From this page, administrators are also able to choose whether to allow external mobile device management.
General Settings
Selecting to edit the General settings will reveal available choices for this category, as shown in Figure 16.6.
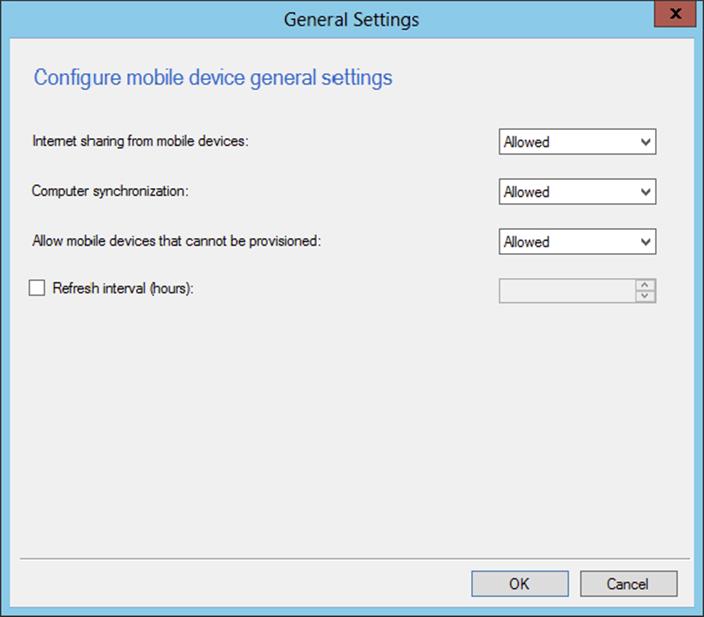
Figure 16.6 Add Exchange Server Wizard—Settings page—General Settings
1. Internet Sharing From Mobile Devices This option allows administers to either allow or prohibit Internet sharing on managed mobile devices.
2. Computer Synchronization This option allows administers to either allow or prohibit synchronization of the mobile device with computers.
3. Allow Mobile Devices That Cannot Be Provisioned This option allows administrators to either allow or prohibit mobile devices that cannot be provisioned from being visible in Configuration Manager.
4. Refresh Interval (Hours) This option allows administrators to specify a specific refresh interval, if desired.
Password Settings
Selecting to edit the Password settings will reveal available choices for this category, as shown in Figure 16.7.
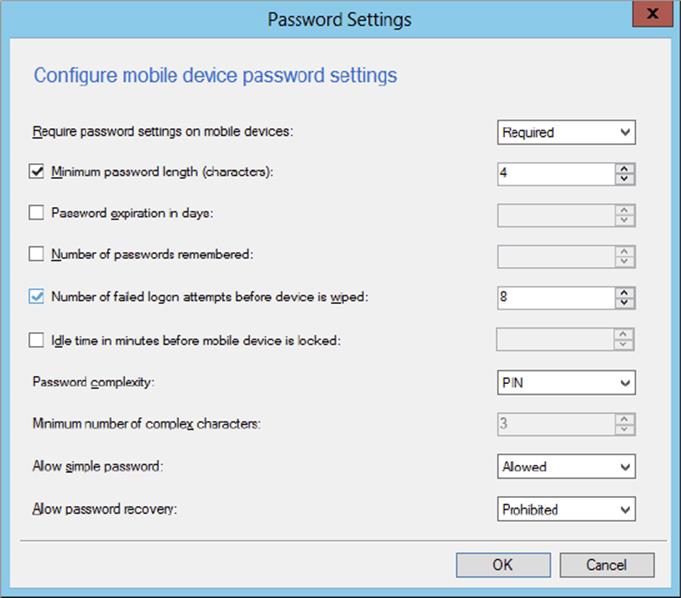
Figure 16.7 Add Exchange Server Wizard—Settings page—Password Settings
1. Require Password Settings On Mobile Devices This option allows administrators to decide whether or not to enforce password settings on the mobile device. If it’s set to Optional, additional settings on this page will not be configurable.
2. Minimum Password Length (Characters) This option allows administrators to specify a minimum password length for the mobile device. The default length is 4 characters with a maximum length of 16 characters.
3. Password Expiration In Days This option allows administrators to configure how frequently the configured password will expire and need to be reset.
4. Number of Passwords Remembered This option allows administrators to configure how many passwords are stored, thus preventing reuse of the same password again and again.
5. Number Of Failed Logon Attempts Before Device Is Wiped This option allows administrators to specify the number of bad logon attempts before the device is wiped. The default is eight invalid password attempts allowed. After the configured number of failed password attempts, the device is wiped. This is a good option to use for ensuring device security, but with the result being a complete device wipe, you must carefully evaluate the final settings you choose for this option.
6. Idle Time In Minutes Before Mobile Device Is Locked This option allows administrators to specify the length of idle time allowed before the device will lock itself, requiring a password to regain access.
7. Password Complexity This option allows administrators to specify how complex the device password should be. The default option is to specify a PIN. The other option is to specify a strong password. If a strong password is selected, the option to specify a minimum number of complex characters becomes available. The default number of strong characters is three.
8. Allow Simple Password This option specifies whether simple passwords, such as 1234, are allowed on a device. The default option allows a simple password.
9. Allow Password Recovery This option allows administrators to configure whether it is possible to recover passwords on a device. The default option prohibits this action.
Email Management Settings
Selecting to edit the Email Management settings reveals available choices for this category, as shown in Figure 16.8.
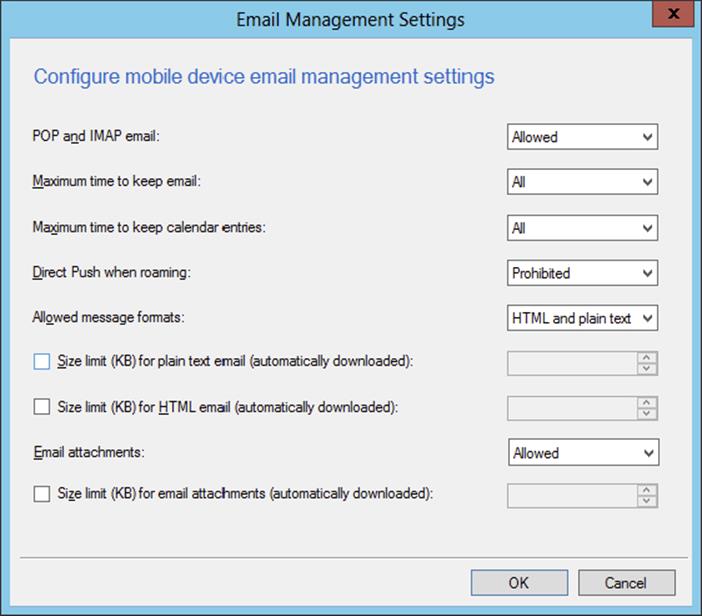
Figure 16.8 Add Exchange Server Wizard—Settings page—Email Management Settings
1. POP And IMAP Email This option allows administrators to specify whether both POP and IMAP email are allowed or prohibited. There is no option to specify that one or the other is available.
2. Maximum Time To Keep Email This option allows administrators to specify the length of time email will be retained on the device. The default option is All, which indicates that all email should be retained indefinitely. Other available options are One Day, Three Days, One Week, Two Weeks, and One Month.
3. Maximum Time To Keep Calendar Entries This option allows administrators to specify the length of time calendar entries should be retained on the device. The default option is All, which indicates that all calendar items should be retained indefinitely. Other available options are Two Weeks, One Month, Three Months, and Six Months.
4. Direct Push When Roaming This option allows administrators to determine whether email can be directly pushed while a device is in roaming status. The default option is Prohibited to help avoid additional expense in such situations.
5. Allowed Message Formats This option allows administrators to define what email formats are acceptable. The default option is HTML And Plain Text. The only other choice is Plain Text Only.
6. Size Limit (KB) For Plain Text Email (Automatically Downloaded) If specified, this option allows administrators to specify the maximum size for a plain text email that will be automatically downloaded to devices.
7. Size Limit (KB) For HTML Email (Automatically Downloaded) This option, not specified by default, allows administrators to specify the maximum size for an HTML-formatted email that will be automatically downloaded to devices.
8. Email Attachments This option allows administrators to specify whether email attachments are allowed on connected devices. The default option is Allowed.
9. Size Limit (KB) For Email Attachments (Automatically Downloaded) This option, not specified by default, allows administrators to specify the maximum size for an attachment that will be automatically downloaded to devices.
Security Settings
Selecting to edit the Security settings will reveal available choices for this category, shown in Figure 16.9.
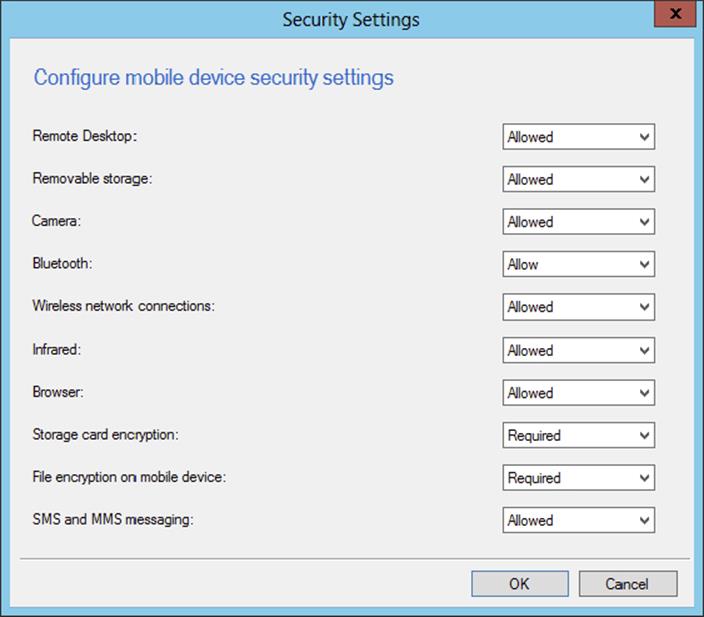
Figure 16.9 Add Exchange Server Wizard—Settings page—Security Settings
1. Remote Desktop This option allows administrators to specify whether Remote Desktop to the device is allowed.
2. Removable Storage This option allows administrators to specify whether removable storage is allowed on the device.
3. Camera This option allows administrators to specify whether the use of the camera is allowed on the device.
4. Bluetooth This option allows administrators to specify whether the use of Bluetooth is allowed on the device. An option is included in this setting to allow configuring hands-free operation only for Bluetooth.
5. Wireless Network Connections This option allows administrators to specify whether the use of wireless network connections is allowed on the device.
6. Infrared This option allows administrators to specify whether the use of infrared capabilities for a device is allowed.
7. Browser This option allows administrators to specify whether the use of a browser is permitted for a device.
8. Storage Card Encryption This option allows administrators to configure whether encryption of device storage cards is required or optional.
9. File Encryption On Mobile Devices This option allows administrators to configure whether file encryption on mobile devices is required or optional.
10.SMS And MMS Messaging This option allows administrators to configure whether messaging is allowed on devices.
Applications Settings
Selecting to edit the Applications settings will reveal available choices for this category, shown in Figure 16.10.
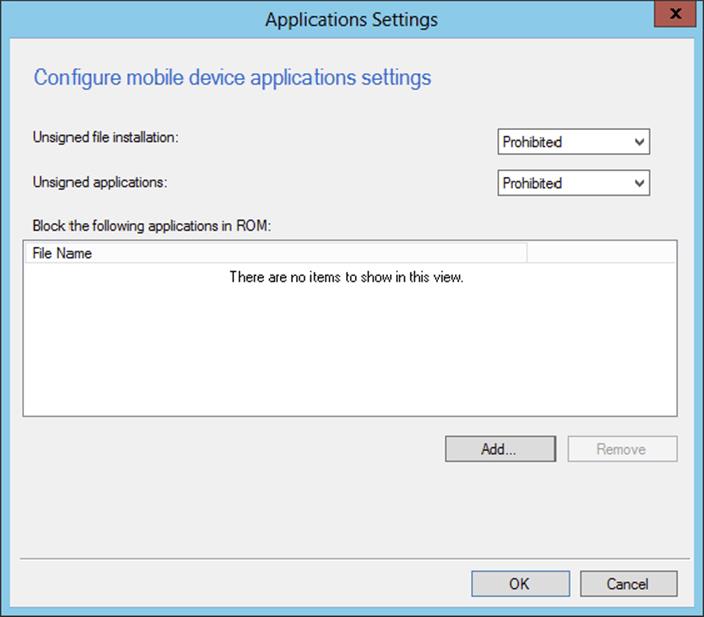
Figure 16.10 Add Exchange Server Wizard—Settings page—Application Settings
1. Unsigned File Installation This option allows administrators to specify whether installation of unsigned files is allowed on devices.
2. Unsigned Applications This option allows administrators to specify whether installation of unsigned applications is allowed on devices.
3. Block The Following Applications In ROM This option allows administrators to specify a list of applications that should be blocked from being installed on the device.
Results of Lite-Management Configuration
Once all settings are configured as required on these pages, click Next and continue through the wizard, verifying on the Summary page that all options chosen are appropriate. This action implements the settings as required on the Exchange server, and from this point devices connecting to Exchange Server through ActiveSync will receive and implement the configured settings, or at least the ones the device is capable of implementing.
After a few devices have synchronized using the ActiveSync connector, they will be visible and available for management in the Devices collections, as shown in Figure 16.11.

Figure 16.11 Lite-managed devices
Now that devices are in collections, is it possible to do any management directly at this level? Mostly no. Remember, these devices are lite managed, which means almost all management is done through the ActiveSync connector. There are a couple of things that you can do, though. Right-clicking a lite-managed device will show the options available. Specifically there are options to wipe the device and also to decide whether to block the device. This is also the location to set the primary device user, to open Resource Explorer for the device to view hardware inventory that has been collected, and also to view device properties. These options are shown in Figure 16.12.
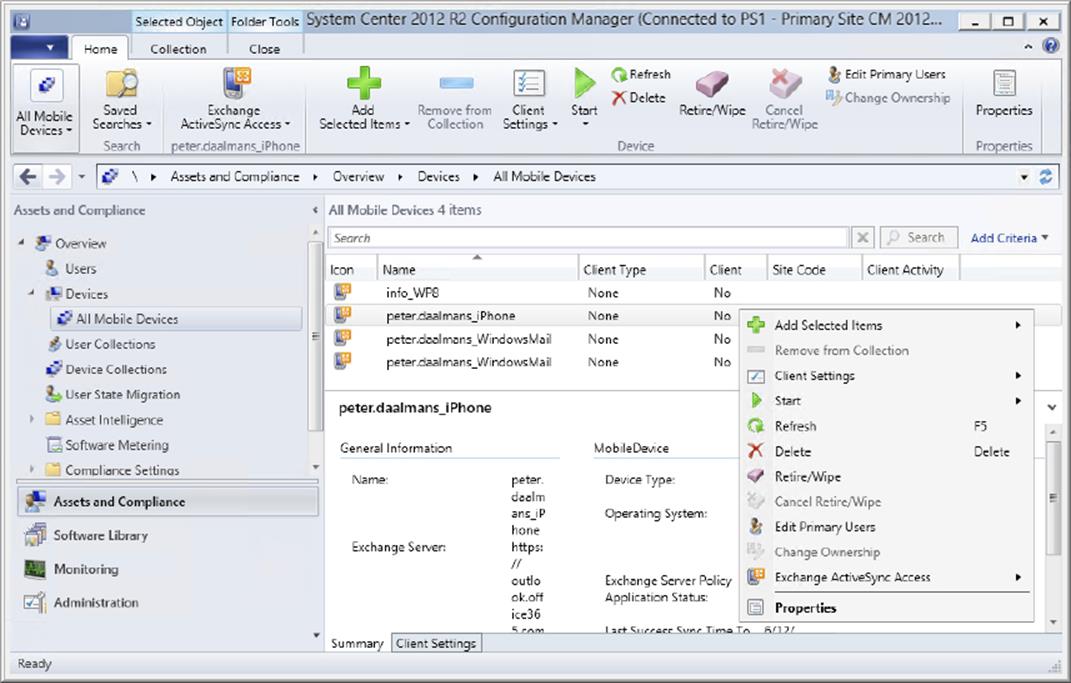
Figure 16.12 Device context menu options
Depth Management via Client
In Configuration Manager 2012 R2 you have two ways of providing depth management: depth management via installing a client directly on a (legacy) mobile device like Windows Phone 7 and Nokia Symbian devices or depth management via the Windows Intune connector.
Let’s first look at the old-fashioned way. In this scenario, some components are required and others are optional but likely needed:
Required roles
· Enrollment proxy point site system role
· Enrollment service point site system role
· Management point configured for HTTPS communication
· Microsoft enterprise certification authority
Optional roles—depending on services being provided
· Distribution point configured for HTTPS communication
· Application Catalog web service point
We describe configuring both the required and optional roles in detail in the following sections and end with discussions of depth-management device enrollment and device-settings management.
Enrollment Proxy Point Site System Role
This site system role is used by devices during initial enrollment and client installation. This is also the site system role contacted to initially download the client for depth-managed devices.
This role is configured in the DMZ and must be configured with a web server certificate from the certification authority. Installing the enrollment proxy point site system role is straightforward; simply select the server that will host the role in the Administration ⇒ Overview ⇒ Site Configuration ⇒ Servers And Site System Roles node of the console, choose to add a new site system role, and select Enrollment Proxy Point from the list. The only configurations needed for this role are shown in Figure 16.13.
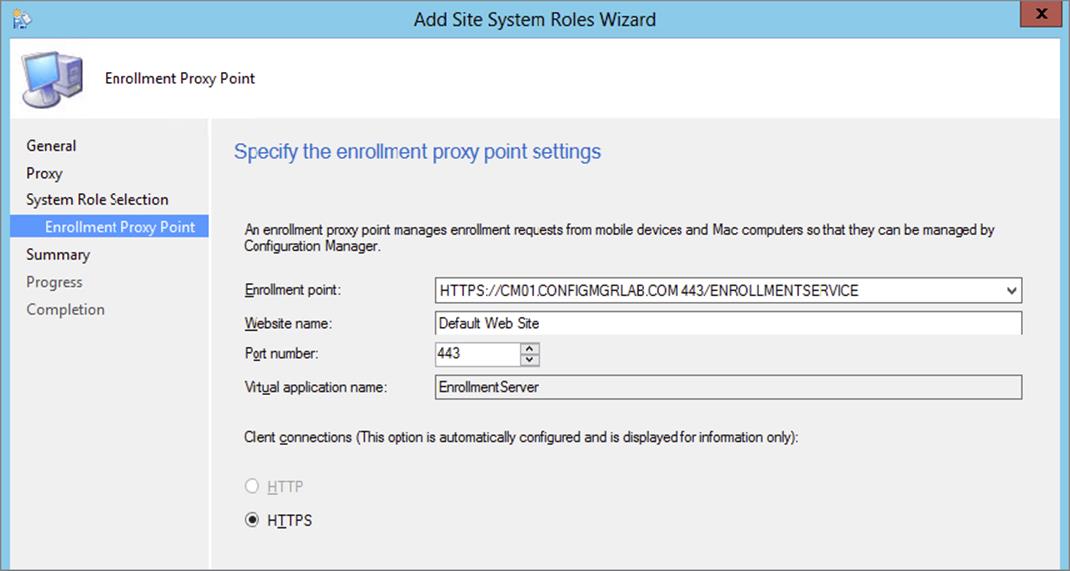
Figure 16.13 Enrollment proxy point site system role settings
1. Enrollment Point This setting allows administrators to configure the URL for the enrollment point. Typically this should be left at the default value.
2. Website Name This setting allows administrators to configure the website where the enrollment proxy point should be installed. The default is to use the default website. Often, organizations will require a website other than the default website, particularly in the DMZ. If this is the case, specify which website should host the enrollment proxy point.
3. Port Number This setting allows administrators to specify the port that should be used to connect with the enrollment proxy point. Using port 443 is typical, but this is user configurable if needed.
The remaining options on this page, Virtual Application Name and Client Connections, are displayed but are not user configurable.
Enrollment Point Site System Role
This site system role resides on the internal network, receives information from the enrollment proxy point, and interacts with the primary site server, Active Directory, and the certification authority to orchestrate the device-provisioning process. The server hosting this role must be provisioned with a web server certificate from the internal certification authority.
Installing the enrollment point site system role is straightforward; simply select the server that will host the role in the Administration ⇒ Overview ⇒ Site Configuration ⇒ Servers And Site System Roles node of the console, choose to add a new site system role, and select Enrollment Point from the list. The only configurations needed for this role are shown in Figure 16.14.
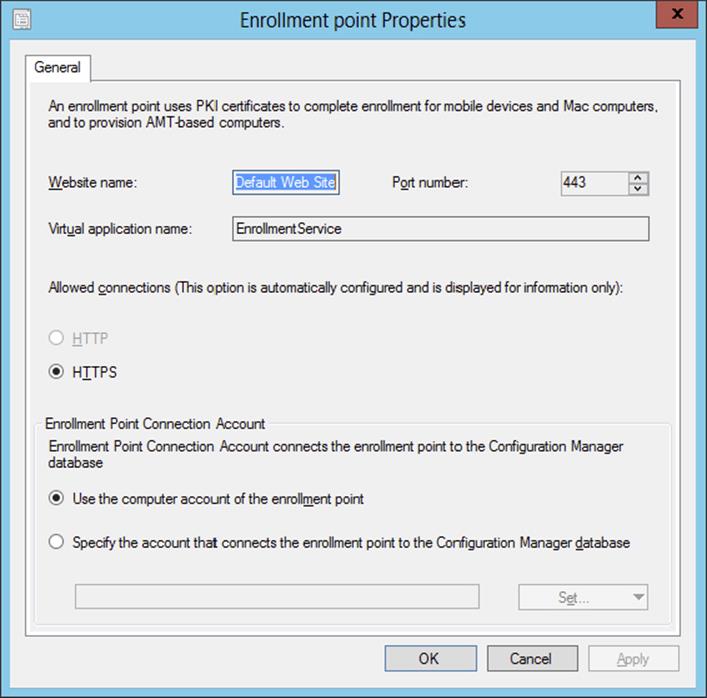
Figure 16.14 Enrollment point site system role settings
1. Website Name/Port Number This option allows administrators to configure the website name to be used for installing the enrollment point. The default is to use the default website. Some organizations disable the default website as a matter of policy. If this is the case in your organization, choose an appropriate alternative. The port number is also listed as an option and defaults to port 443. This setting will be unchanged in most environments but is user configurable if needed.
2. Virtual Application Name This option allows administrators to specify the virtual application name if different from the default.
3. The Enrollment Point Connection Account This option allows administrators to specify which account should be used to facilitate communication from the enrollment point to the primary site server. If the enrollment point is collocated on the primary site server, it is typical to allow the computer account to be used for communication. If the site system is remote, it’s possible to use the computer account of the remote site system, provided appropriate rights are granted on the primary site server. In the remote scenario it’s often easier to specify an account to use. One key deciding factor might be account password maintenance requirements. In the case of the computer account, the password is managed automatically. For user accounts, password management is manual.
The remaining option on this page, Allowed Connections, is displayed but is not user configurable.
Management Point
A management point is required for any primary site that will host clients. Managing devices also requires a management point configured to allow mobile devices to connect as well. Figure 16.15 shows the Properties page for the management point. You’ll need to adjust a couple of items if the management point will support device clients.
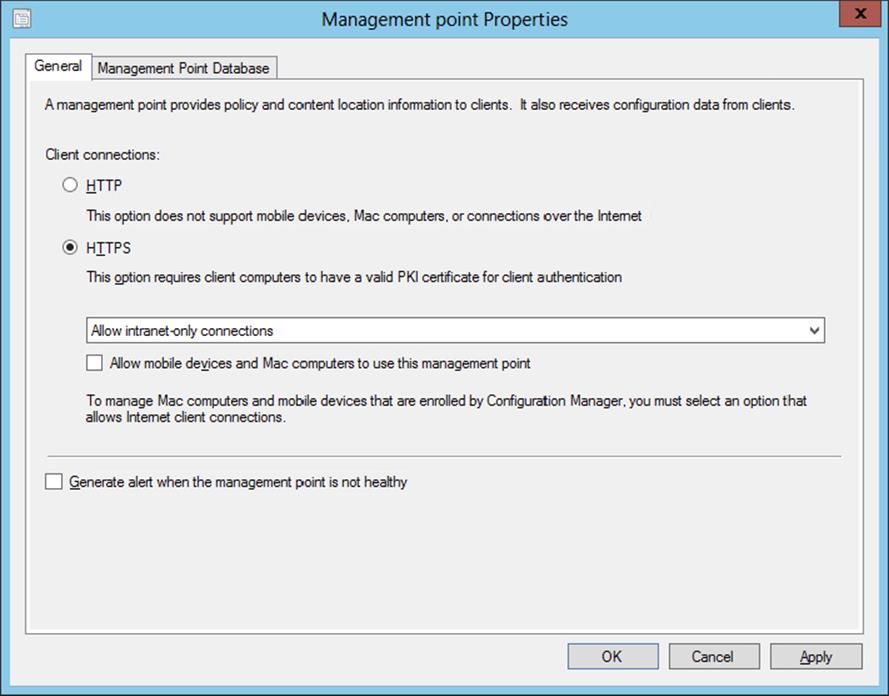
Figure 16.15 Management Point Properties page
Management points purposed for device management must be configured for HTTPS communication and, accordingly, must have a web server certificate from the configured certification authority installed. Further, the check box Allow Mobile Devices And Mac Computers To Use This Management Point must be selected.
When you decide on the placement and configuration of management points, you should consider the available configuration options as for client connections:
1. HTTP Devices connected via HTTP are typically located on the internal network. A management point purposed to support this type of device cannot also be configured to support mobile devices unless all connected computers are reconfigured to use HTTPS communication and the management point configuration is updated accordingly.
2. HTTPS Any management point can be configured to communicate with clients using HTTPS, whether the computer devices are on the internal or external network. In fact, using HTTPS communication is the most secure way to configure client/management point interaction. If a management point is configured in this way and mobile devices are also available that need to be managed, simply check the box to allow the management point to also serve mobile devices.
Microsoft Enterprise Certification Authority
Mobile devices require certificates to communicate and be approved in the environment. Certificates are a topic that seems to bring hesitation and uncertainty for many Configuration Manager administrators—often either because the topic of certificates isn’t familiar or the use of certificates might involve dependency on another operational team in the organization. Oftentimes it seems easier to just do it yourself than involve other teams! Don’t let either of these prevent you from using certificates—it’s really not difficult to do, and the added security and flexibility it brings is worth the time.
Discussing configuration of a certification authority is beyond the scope of this chapter—not to mention the fact that any discussion may or may not line up with specific organizational requirements. Documentation that walks through the process of deploying required certificates in a lab environment to afford testing of mobile device management is available at the following link:
http://technet.microsoft.com/en-us/library/gg682023.aspx
Figure 16.16 shows a screenshot of a certification authority configured to deploy the needed certificates for mobile device management.
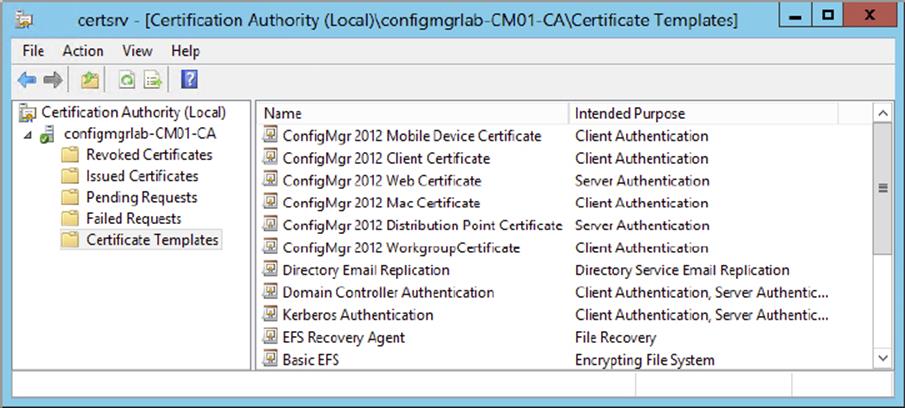
Figure 16.16 Certification authority
Distribution Point
Distribution points purposed for device management must be configured for HTTPS communication and, accordingly, must have a web server certificate from the configured certification authority installed. Making distribution points available for access by mobile devices means placing the distribution point in the DMZ. Because of this requirement and the different content required by devices, distribution points for access by mobile devices may be kept separate from those accessed by computer devices. Figure 16.17 shows distribution point properties used to enable HTTPS communication.

Figure 16.17 Distribution point Properties page
Application Catalog Web Service Point
The Application Catalog web service point is an optional site system role for use by mobile devices but is required to provide the mobile device user with the ability to wipe their own device. Like other roles, configuring the Application Catalog point for use by mobile devices requires the use of HTTPS communication, which requires that a web server certificate from the local certification authority be configured. Figure 16.18 shows the HTTPS configuration option for the Application Catalog web service point.
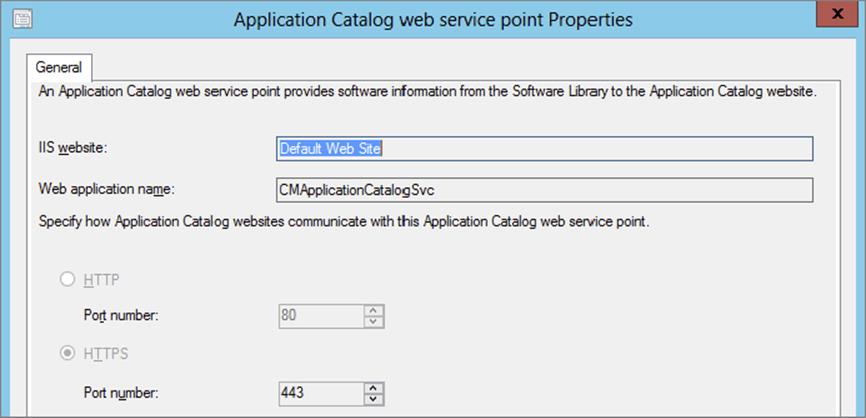
Figure 16.18 Application Catalog Web Service Point Properties page
Depth-Management Device Enrollment
The enrollment process and provisioning process require action from both the device user and the Configuration Manager administrator. The administrator portion of the configuration must be in place prior to user involvement, so our discussion will focus there first.
Administrator Configuration
The administrator must decide which users can participate in device enrollment and provisioning. This is done by configuring the client settings. The option to enable mobile device enrollment is a user setting that is available either by configuring the Default Client Settings, which combine both default user and device settings for the site, or by choosing to configure a custom settings profile for users. The Default Client Settings should be used when device enrollment should be enabled for all users, while the custom settings profile should be used where enrollment rights should be granted only to select users. The example will demonstrate the latter option:
1. To configure user-specific enrollment options, create custom user settings and enable enrollment, as shown in Figure 16.19.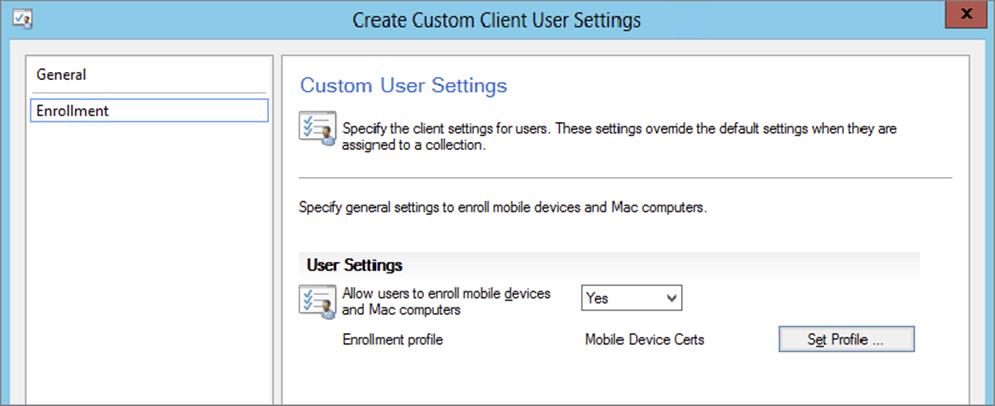
Figure 16.19 Custom user settings to enable enrollment
2. Configure a user collection that contains all users who should be granted the right of device enrollment.
This collection can consist of either individual users or groups of users.
3. With both of these items created, it’s a matter of linking the two. Simply go back to the custom user settings and assign them to the collection just created, as shown in Figure 16.20.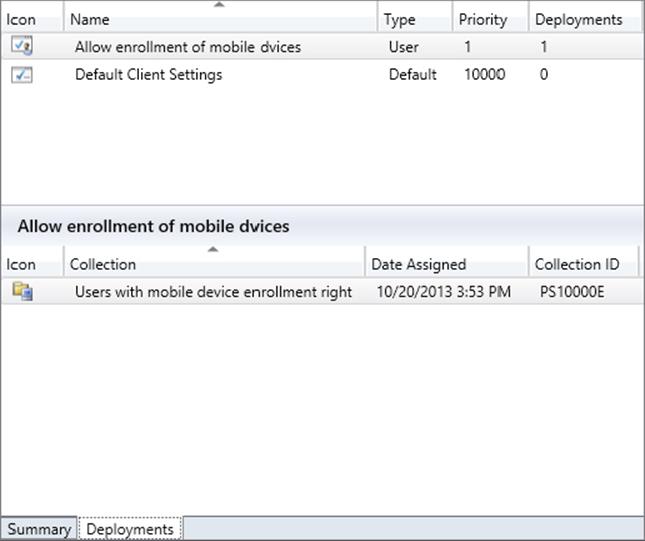
Figure 16.20 Custom user settings assigned to device enrollment collection
Complete the assignment process by right-clicking the custom setting and selecting Assign. It is also possible to link custom settings to more than a single collection.
This configuration of appropriate site systems and appropriate client settings is all that is required in order to enroll and provision devices. There is more work for the administrator to do in terms of configuring settings that should be in place on the various devices, but we’ll cover that later.
User Configuration
Actions required from the device user’s perspective are straightforward. The actual enrollment process behind the scenes is a bit more involved. The device user will need to do only two things: Install some software and enter credentials.
You can obtain the Enterprise Enrollment software from the enrollment web proxy site system by directing the device’s web browser to the URL for this site system. The default URL is
https://<enrollmentwebproxyservername>/EnrollmentServer
It’s also possible that the Enterprise Enrollment software could be made available through another means, such as an email link. Regardless of the mechanism used to deliver the Enterprise Enrollment software to the device, it must be installed. In the example scenario, we obtain the software by browsing to the enrollment web proxy site system. Figure 16.21 shows the user being prompted for what action to take when presented with the enrollment software.
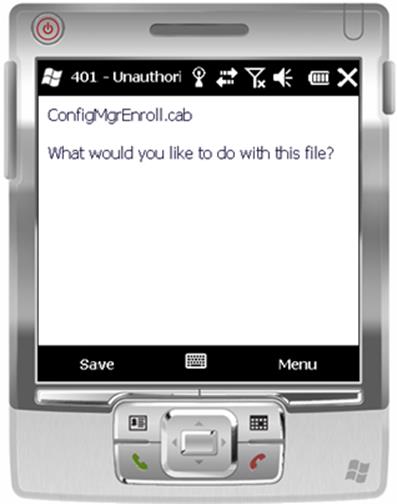
Figure 16.21 User prompted for action regarding enrollment software
For the example, we saved the software to the device before running it. This is shown in Figure 16.22.
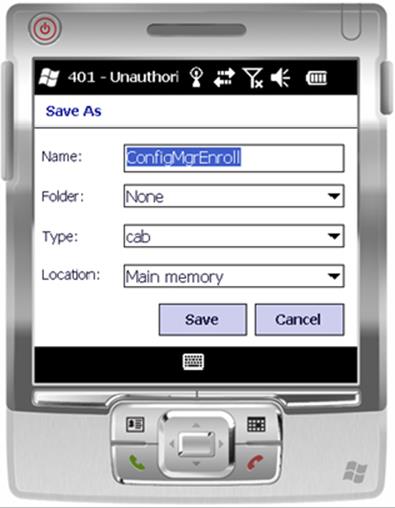
Figure 16.22 Select a location for the enrollment software
Once you’ve downloaded the software, you can find it in the root folder when viewing File Explorer on the device. For the example, do the following:
1. Locate the software and select it to begin the installation process. Figure 16.23 shows the installation process.
Figure 16.23 Enrollment software installing to the device
Once it is installed, the enrollment software should automatically launch. If it doesn’t, you can initiate it from the Start menu, as shown in Figure 16.24.
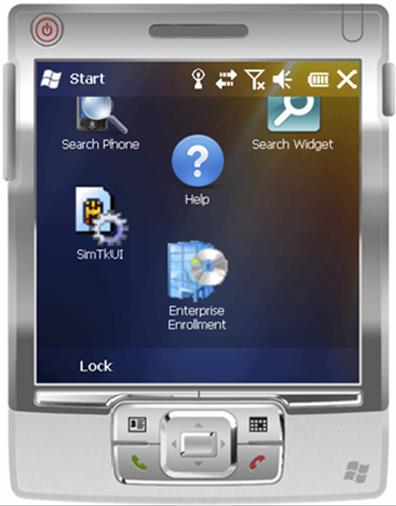
Figure 16.24 Enrollment software installed and available on the Start menu
2. Once it is launched, review the text and click Enroll, as shown in Figure 16.25.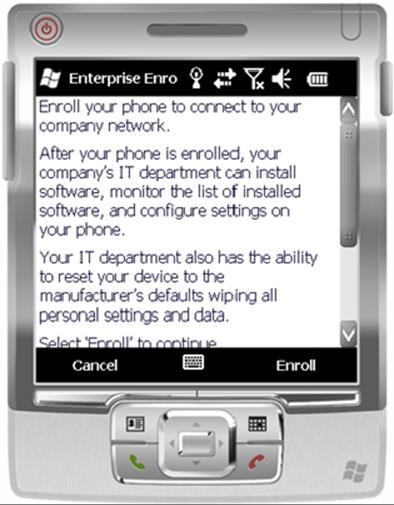
Figure 16.25 Beginning the enrollment process
3. Provide an email address, password, and server address on the credentials screen, as shown in Figure 16.26.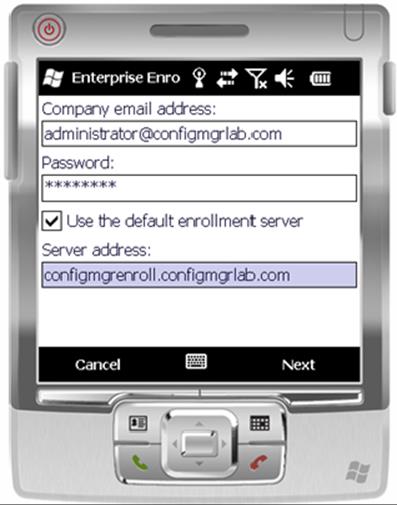
Figure 16.26 Credentials screen of the enrollment wizard
By default the option Use The Default Enrollment Server is selected. In the example scenario, the default configuration was inaccurate. Once you’ve provided the details, click Next.
A Few Words about Email Lookup and User Accounts
The email address is used to look up the proper domain account. Once looked up, the actual account in domain\user format is used for verifying credentials. You can see this in the enrollment logs, discussed later.
From here, it’s possible the user will see a warning screen regarding the site’s certificate.
4. If so, verify that the certificate is OK, and click Yes to continue.
The enrollment process begins. To the device user, the process is fairly boring, as shown in Figure 16.27.
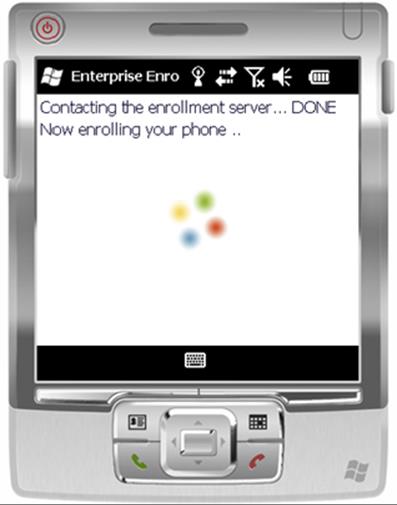
Figure 16.27 Enrollment in progress
In reality, there is a lot going on behind the scenes. In brief, the process is as follows:
1. The enrollment web proxy point takes the information supplied and passes it to the enrollment service point.
2. The enrollment service point forwards the information to the primary site for evaluation. This evaluation confirms that the user has been granted rights to enroll their device in the site.
3. Assuming the user is approved, the enrollment service point will contact the enterprise certification authority to retrieve the needed certificate and send that back to the device through the enrollment web proxy point.
After this process completes, the device is enrolled and ready to be provisioned and managed. This is shown in Figure 16.28.
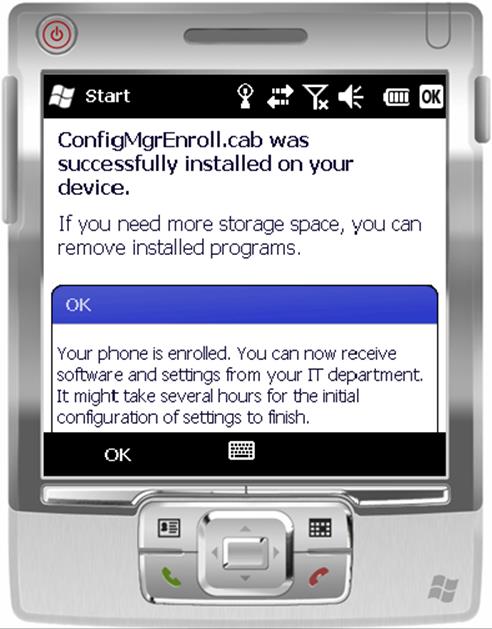
Figure 16.28 Installation and enrollment process complete
Once the enrollment process is complete, there will be a delay before the device will be fully managed by the site—sometimes as long as eight hours. After this period the device should show up in the All Mobile Devices collection as Active, as shown in Figure 16.29.
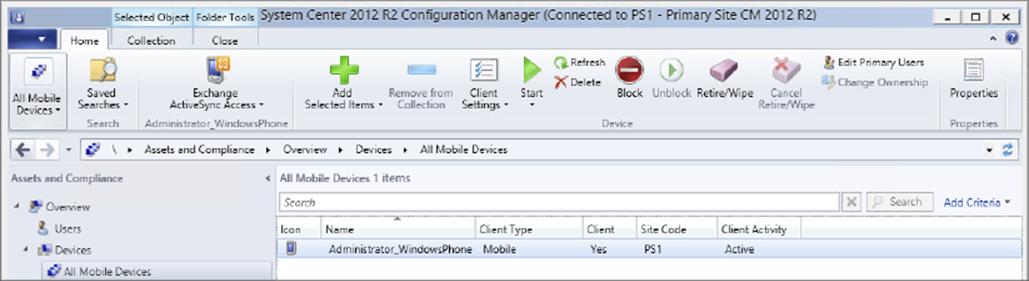
Figure 16.29 Device in Active status after enrollment and provisioning
The device should also have inventory information associated with it. This is another sign that it is properly configured and is shown in Figure 16.30.
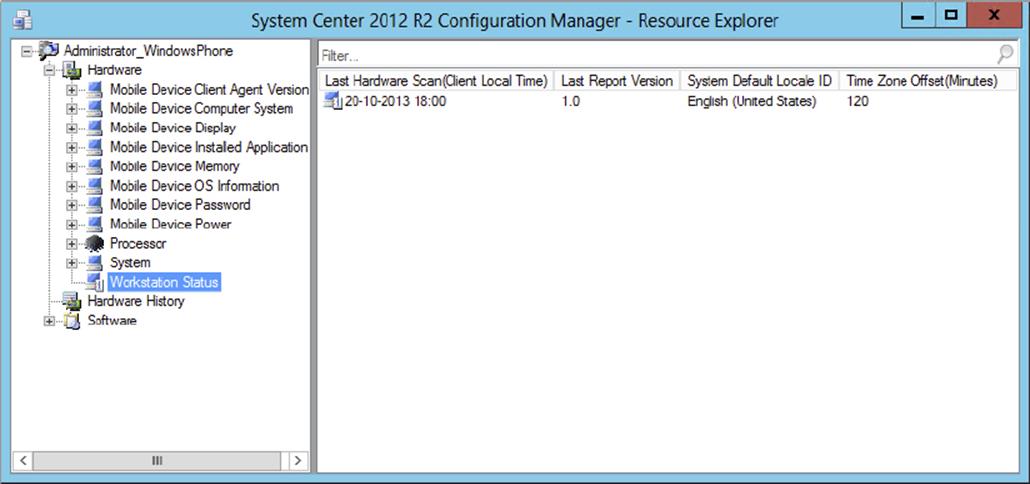
Figure 16.30 Device inventory
Previous versions of Configuration Manager separated device client settings from computer client settings. Configuration Manager 2012 unifies these settings so that, where applicable, the same values apply equally to all device types. Just remember that not all of the available settings are applicable to mobile devices. As an example, mobile devices are able to participate in hardware inventory as well as software distribution, but mobile devices do not submit software inventory. It is also possible to extend the hardware inventory for devices by modifying hardware inventory classes, which you are able to change in the Hardware Inventory section of the client settings.
As mentioned, besides this way of managing legacy mobile devices, Configuration Manager 2012 R2 provides depth management via the Windows Intune connector.
Depth Management via Windows Intune
Windows Intune is a cloud service that allows you to manage your mobile devices via Configuration Manager 2012 R2. Windows Intune is used as a middle tier for you to be able to keep in touch with your mobile devices without installing a complete infrastructure in a DMZ.
Prerequisites for Windows Intune
To be able to use the depth management option via Windows Intune, you must meet some prerequisites:
· Acquire a Windows Intune subscription.
· Configure your domain name in Windows Intune.
· Add an alternative UPN suffix to your Active Directory domain (optional).
· Synchronize your users with Windows Azure Active Directory.
1. Acquire a Windows Intune Subscription To be allowed to use the Windows Intune cloud service, you need to acquire a Windows Intune subscription. This can be done via www.windowsintune.com or a Microsoft Partner. You can also register a 30-day trial subscription.
2. Configure Your (External) Domain Name in Windows Intune When you have access to a Windows Intune subscription, your organization account that is created while registering looks like <username>@<domainname>.onmicrosoft.com. To create a user-friendly way of logging on to the company portal, you want to add your public domain name that is used for your email. Setting up your own domain name is done by following the next steps:
a. Go to your Admin page via https://account.manage.microsoft.com/ and log on with your Windows Intune administrator username.
b. Under Admin Overview select Domains, as shown in Figure 16.31.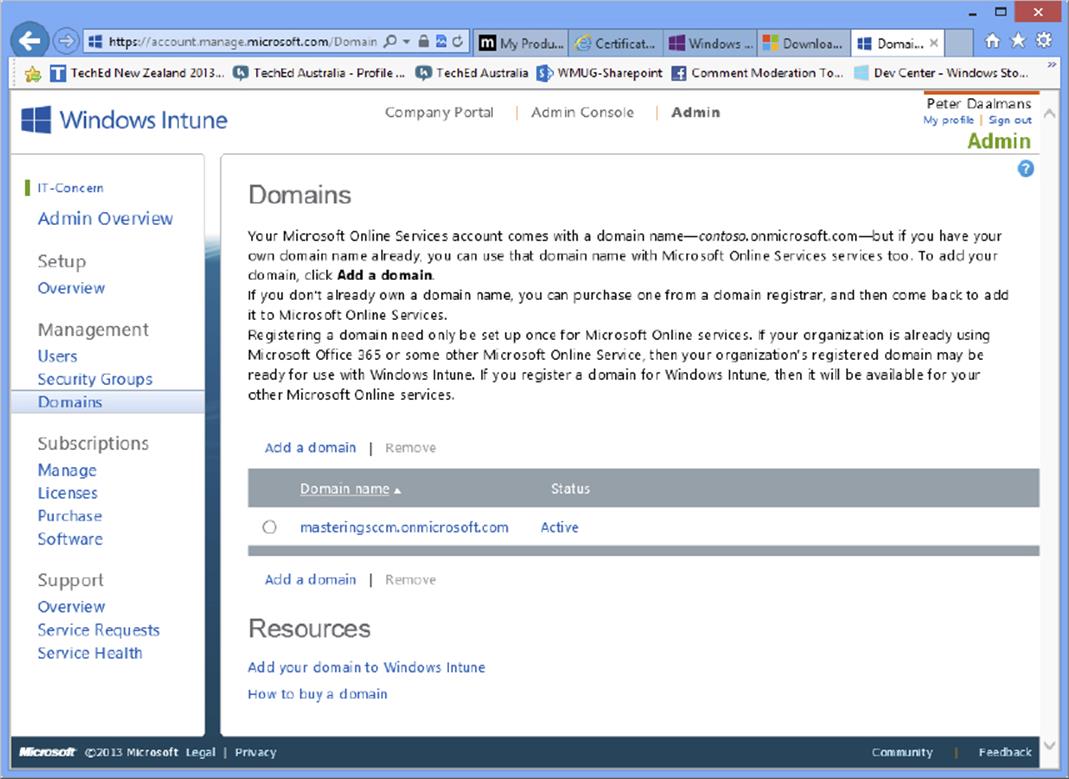
Figure 16.31 Domains page in Windows Intune
c. Click Add A Domain, supply your domain name, and click Next.
d. Before Microsoft will add your domain name, you need to prove that it is really yours. You can do this by adding a TXT or MX record in your public DNS zone. Add the TXT value (for example, MS=ms201111197) to your public DNS zone and click Verify.
e. When verification is done successfully, you will see a message that the domain has been added to your account. Click Close. Your domain is now listed with a status of Verified.
f. To support enterprise enrollment, you need to set up a CNAME DNS record that redirects enterpriseenrollment.<your domainname> (for example, enterpriseenrollment.masteringsccm.com) to manage.microsoft.com.
3. Add an Alternative UPN Suffix to Your Active Directory Domain If you have an Active Directory domain name that is only used internally, such as any .LOCAL or .LAN domain name, and your email domain name differs from Active Directory, you may need to add an alternative Universal Principal Name (UPN) suffix to your Active Directory, as follows.
a. Log on to your domain controller or server with the Active Directory management tools, and from the Start menu or Start screen open the Active Directory Domains And Trusts management console.
b. Right-click Active Directory Domain And Trusts and click Properties.
c. Supply your domain name in the Alternative UPN Suffixes field and click Add, as shown in Figure 16.32.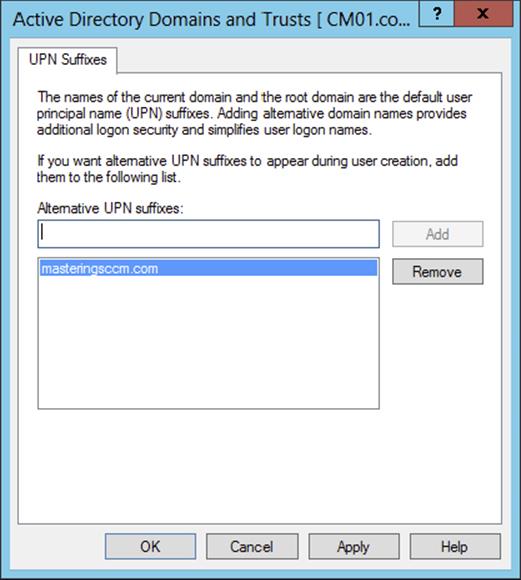
Figure 16.32 Add an alternative UPN suffix.
d. Click OK.
4. Synchronize Your Users with Windows Azure Active Directory The next step in preparing your environment for Windows Intune is setting up Active Directory synchronization. Synchronize your local Active Directory accounts to the Windows Azure Active Directory so that they can be used with Windows Intune. Follow these steps to set up Active Directory synchronization.
a. Log on to your Windows Intune admin portal (https://account.manage.microsoft.com/), select Users, and click Set Up next to Single Sign-on.
b. Your Internet browser will show 10 steps for setting up and checking Single Sign-on and Active Directory synchronization. You can see these steps at https://account.manage.microsoft.com/IdentityFederation/IdentityFederation.aspx; configure your system as described. The following global steps are described in detail.
c. Download the latest version of the Microsoft Online Services Sign-In Assistant and install the downloaded msoidcli_64bit.msi file with the default settings.
d. Install the Windows Azure Active Directory Module for Windows PowerShell by installing AdministrationConfig-EN.MSI on your server that will host single sign-on and directory synchronization services.
e. Click Activate twice on the website mentioned in step 2 of this procedure. After clicking the Activate button for Active Directory synchronization, download and install the Active Directory Sync Tool.
f. Install dirsync.exe, which may take 10 minutes or longer, accept the defaults, and start the Configuration Wizard by clicking Finish once the installation is finished.
g. Click Next and supply the organization account of Windows Intune, supply the password as shown in Figure 16.33, and click Next.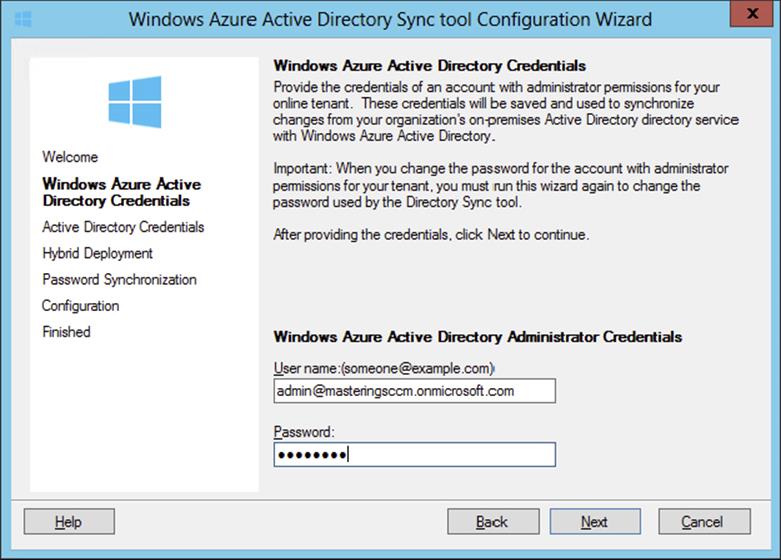
Figure 16.33 Configure the Microsoft Online Services credentials.
![]()
Disable the Password Change Requirement of the Organization Account of Windows Intune
By default a Windows Intune account password expires every 90 days. Since Configuration Manager 2012 R2 is using your organization account to connect to Windows Intune, you might need to reconfigure your Windows Intune connector every 90 days. Follow the next steps to make sure the password of the organization account does not expire. Be sure to set it with a very strong password.
1. Add the Windows Azure Active Directory Module for Windows PowerShell, and load it within Windows PowerShell.
2. Connect to Windows Azure by executing the following command:
Connect-MsolService
3. Supply the username and password of the organizational account, and click OK to connect to Windows Azure Active Directory.
4. To enable the Password Never Expires property of the organizational account in Windows Azure Active Directory, you need to execute the following command. In this example the organizational account is admin@masteringsccm.onmicrosoft.com; replace this with your own account.
Set-MsolUser -UserPrincipalName admin@masteringsccm.onmicrosoft.com -PasswordNeverExpires $True
5. Supply the name of a user account that has the Domain Admins and Enterprise Administrator Active Directory permissions in the User Name field, and click Next.
6. On the Hybrid Deployment page click Next, and select Enable Password Sync on the Password Synchronization page.
7. Click Next, and after the configuration completes, click Next again. Start the synchronization of the directories by enabling the Synchronize Your Directories Now option. Click Finish.
Enabling Windows Intune Connector
After the synchronization and the single sign-on are configured, you need to connect Configuration Manager 2012 R2 with the Windows Intune cloud service. Enabling the Windows Intune connector is done from the Configuration Manager 2012 R2 console. Follow these steps to enable the Windows Intune connector:
1. Open the Configuration Manager 2012 console, select the Administration workspace, and expand Overview ⇒ Cloud Services ⇒ Windows Intune Subscriptions.
2. Click Add Windows Intune Subscription in the Home tab of the ribbon. Click Next after reading the Introduction page of the Create Windows Intune Subscription Wizard.
3. Click Sign In, and on the Set The Mobile Device Management Authority screen, select I Understand That After I Complete The Sign-in Process, The Mobile Device Management Authority Is Permanently Set To Configuration Manager And Cannot Be Changed, as shown in Figure 16.34. Then click OK.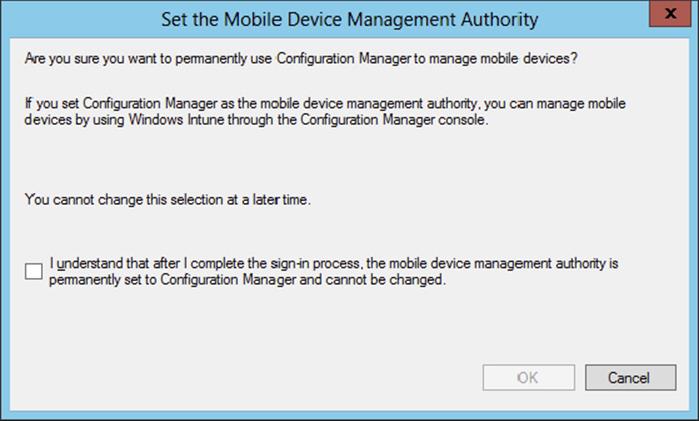
Figure 16.34 Set the mobile device management authority to Configuration Manager.
4. If you run this wizard from a Windows Server 2012 R2 operating system, you will probably get warnings from Internet Explorer that the content within this application is coming from the website listed and is being blocked by Internet Explorer Enhanced Security Configuration. Add the websites to the trusted sites by clicking Add twice.
5. After all websites are trusted you will reach the sign-in page of Windows Intune, as shown in Figure 16.35. Supply your organization’s Windows Intune account name and the password, and click Sign In.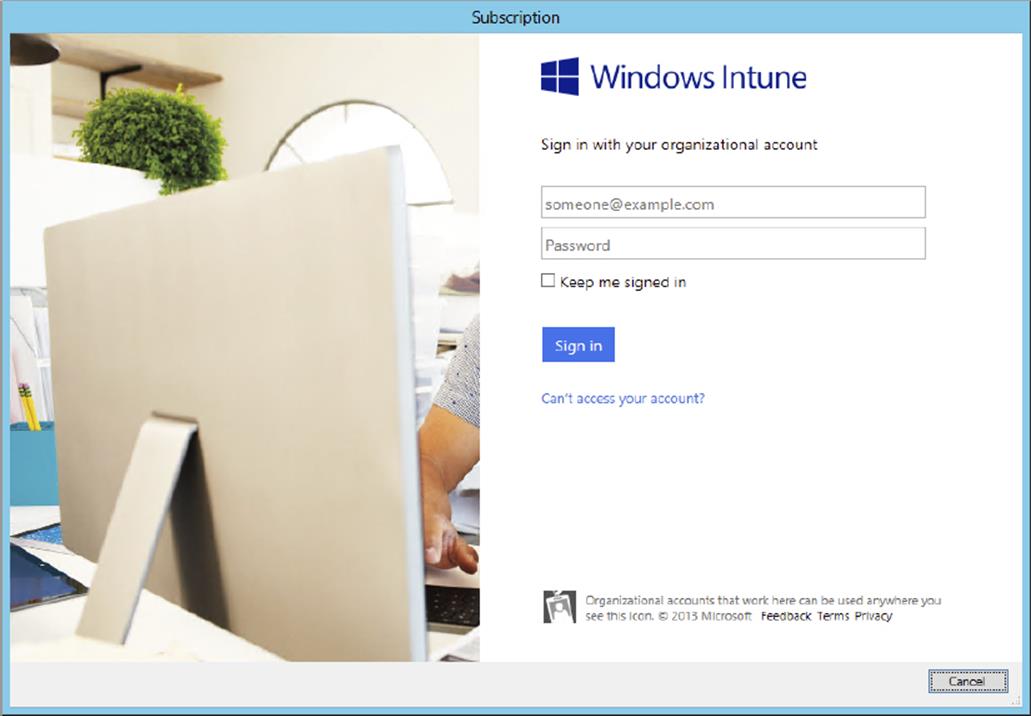
Figure 16.35 Windows Intune sign-in page
6. Back in the Create Windows Intune Subscription Wizard you will notice that the Sign In button is grayed out. Click Next to continue.
7. On the General Page, shown in Figure 16.36, you need to specify a user collection that allows its members to enroll their devices in Configuration Manager 2012 R2. Supply a company name, the URL to the company privacy documentation, and a color scheme for the company portal. If you have more than one Configuration Manager site in your hierarchy, specify the Configuration Manager site code.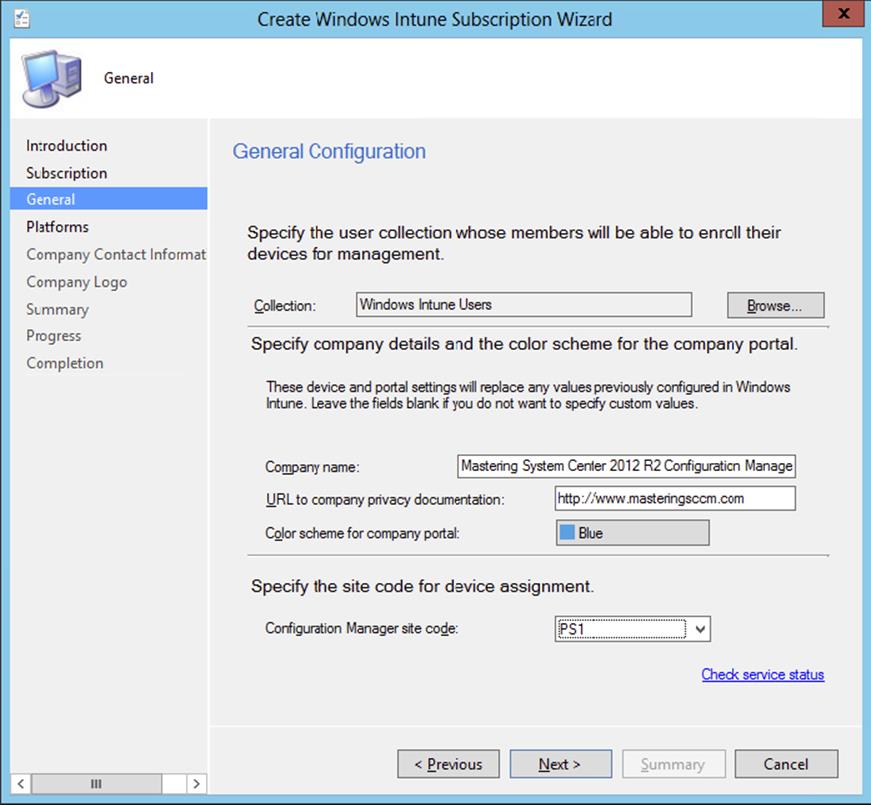
Figure 16.36 General page of the Create Windows Intune Subscription Wizard
8. The Windows Intune connector supports devices with several different operating systems, as shown in Figure 16.37.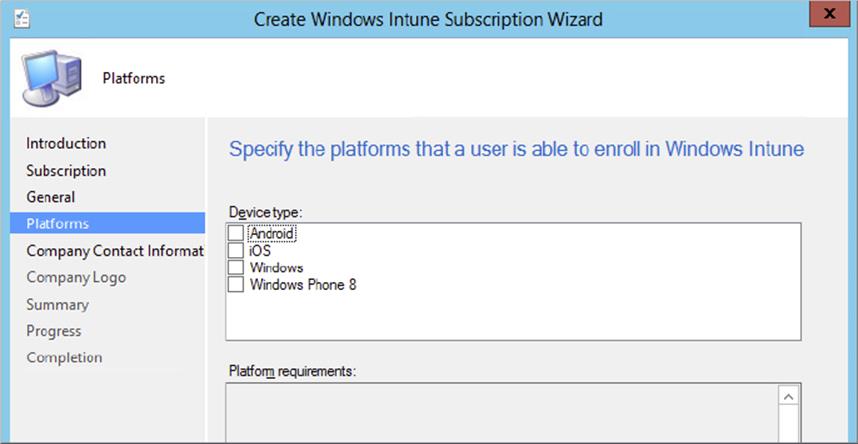
Figure 16.37 Platforms page of the Create Windows Intune Subscription Wizard
1. Android To enable users to enroll their Android device just check Enable Android Enrollment.
2. iOS To support iOS enrollment you need to specify the Apple Push Notification service (APNs) certificate. This is done in three steps:
i. Create and download a Certificate Signing Request from Windows Intune. This is done in the Configuration Manager console by navigating to Administration ⇒ Overview ⇒ Cloud Services ⇒ Windows Intune Subscriptions and clicking Create APNs Certificate Request. Supply a filename and click Download. Log into Windows Intune, and the CSR file will be saved at the configured file location. Click Close.
ii. Go to the Apple Push Certificate Portal and log on with your Apple ID. Click Create A Certificate, select I Have Read And Agree To These Terms And Conditions, click Accept, click Browse, and click Upload to upload the earlier created CSR file. Click Download when the certificate is created.
iii. Copy the downloaded MDM_ Microsoft Corporation_Certificate.pem file and upload the APNs certificate to Windows Intune by browsing to the file and clicking Next (in the wizard) or Apply in the properties of the Windows Intune subscription.
3. Windows To support the enrollment of Windows RT, Windows RT 8.1, and Win-dows 8.1, you need to add code-signing certificates and sideloading keys to allow the installation of native apps. Browse to a code-signing certificate, which you can acquire from Symantec, DigiCert, or any other certification authority you can access.
4. Windows Phone To be able to manage your Windows Phone 8 devices you need to specify the application enrollment token that can be created using your Symantec Enterprise Mobile Code Signing Certificate; you can also install a PFX of the certificate. Also configure an application package (*.xap) containing a signed company portal app.
5. If you want to test the Windows Phone–related mobile device management features, you can download and install the support tool for Windows Intune Trial Management of Window Phone 8. By installing this support tool, you have access to a script that creates a trial certificate for your environment. Some test apps are also available. Download the support tool here: http://www.microsoft.com/en-us/download/details.aspx?id=39079.
9. Supply the company contact information, as shown on Figure 16.38, and click Next.
Figure 16.38 Company Contact Information page
10.If you want to customize your company portal with a logo, you can upload two JPEG or PNG files that will appear in the company portal of Windows Intune, as shown in Figure 16.39. Click Next after uploading the logos.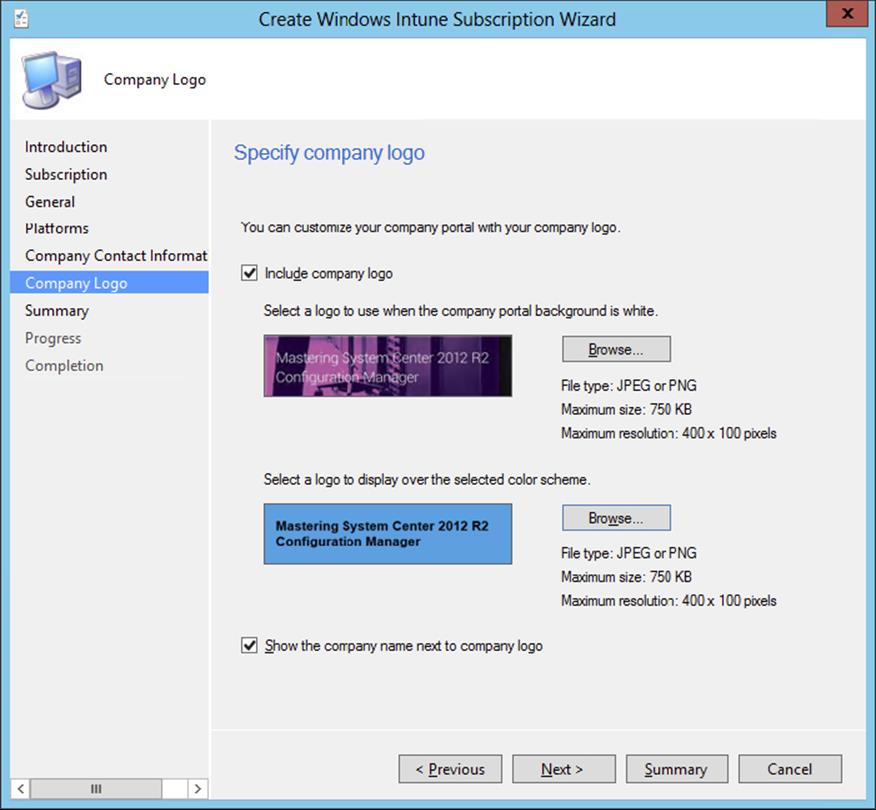
Figure 16.39 Company Logo page
11.Review the summary and click Next. Click Close when the configuration is finished.
The last step in configuring the Windows Intune connector is installing the Windows Intune connector itself. In a hierarchy the Windows Intune connector can only be installed on the CAS site server.
12.Open the Configuration Manager 2012 console, select the Administration workspace, and expand Overview ⇒ Site Configuration ⇒ Servers And Site System Roles. You will see that a site system server named \manage.microsoft.com is added, as shown in Figure 16.40. This site server is your distribution point within Windows Intune.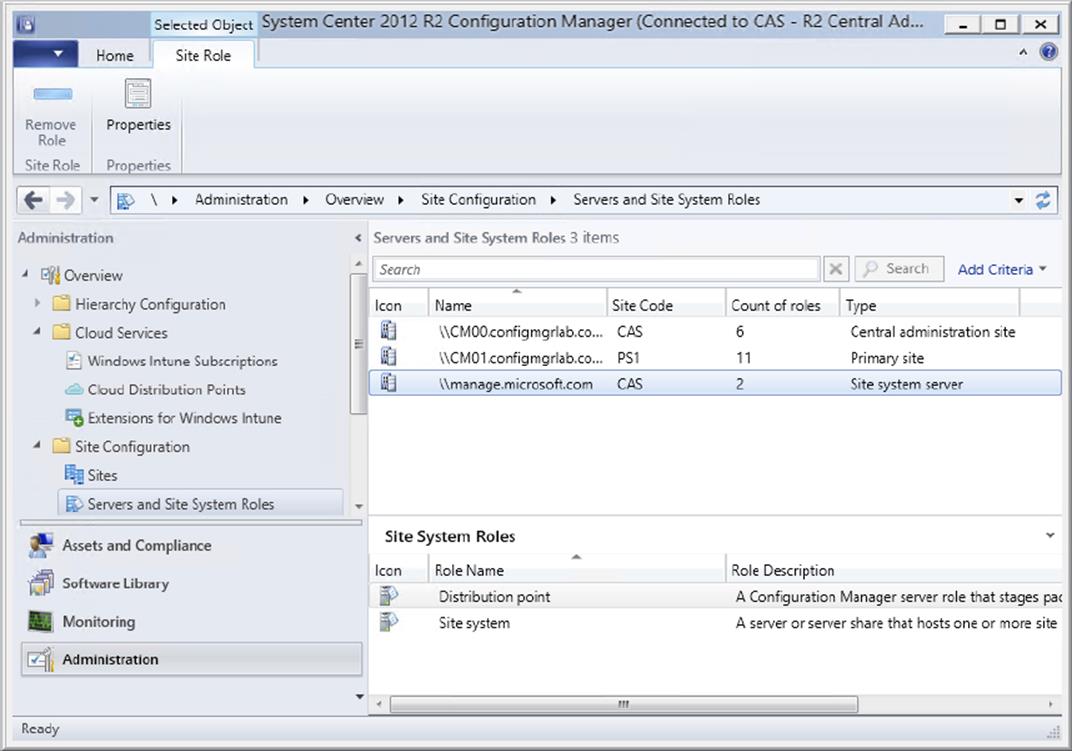
Figure 16.40 A distribution point in Windows Intune is added.
13.Select the top-most site server in the hierarchy, and click Add Site System Roles located on the Home tab of the ribbon.
14.Click Next on the General page, and click Next on the Proxy page.
15.Select the Windows Intune connector site role and click Next; review the summary and click Next.
16.Review the results, and click Close once the installation is completed.
Enrolling Mobile Devices
After the prerequisites for the Windows Intune connector are in place and the Windows Intune connector and the supported platforms are configured, you need to enroll your devices. Enrolling devices is done by the users themselves. Each operating system requires different steps.
Android
To enroll an Android device, follow these steps:
1. Go to the Google Play App Store, and search for the Windows Intune Company Portal.
2. Select the Windows Intune Company Portal, and click Install to start the installation. Click Accept to acknowledge that the Windows Intune Company Portal is able to access your storage, information about installed applications, phone calls, and network communication.
3. After the installation is finished, click Open, as shown in Figure 16.41. Next, you need to add your device to Windows Intune and Configuration Manager before you can use the company portal to install company-owned apps. Click Add This Device.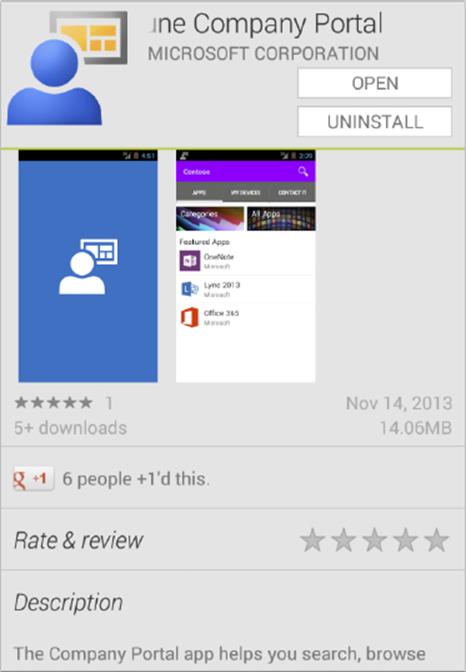
Figure 16.41 Open the Windows Intune Company Portal.
4. Next, you need to log on with your Windows Intune account that is allowed to enroll mobile devices. Click Sign In after supplying your Windows Intune credentials.
5. As part of the enrollment process you will be asked to activate the device administrator. This means that the Company Portal will be getting the device administrator permissions to perform the following actions:
· Erase all data (when executing a Remote Device Wipe)
· Change the screen-unlock password
· Set password rules
· Monitor screen-unlock attempts
· Lock the screen
· Set lock-screen password expiration
· Set storage encryption
· Disable cameras
· Disable features in keyguard.
Click Activate.
6. After activation, the mobile device will be added to the Windows Intune Company Portal, and you will be able to use the portal to install your applications.
iOS
Enrolling an iOS device can be done in two different ways: via the Windows Intune Company Portal and via the Windows Intune Management website.
Let’s first look at the process of enrolling the iOS device via the Windows Intune Company Portal. Enrolling is done by following these steps:
1. Search in the Apple App Store for the Windows Intune Company Portal app, and install the app.
2. Click Open to open the Company Portal app, and log on with your Windows Intune user account.
3. Click your device’s name in the My Devices section of the Company Portal, as shown in Figure 16.42, and click Add Device. This will start the enrollment process.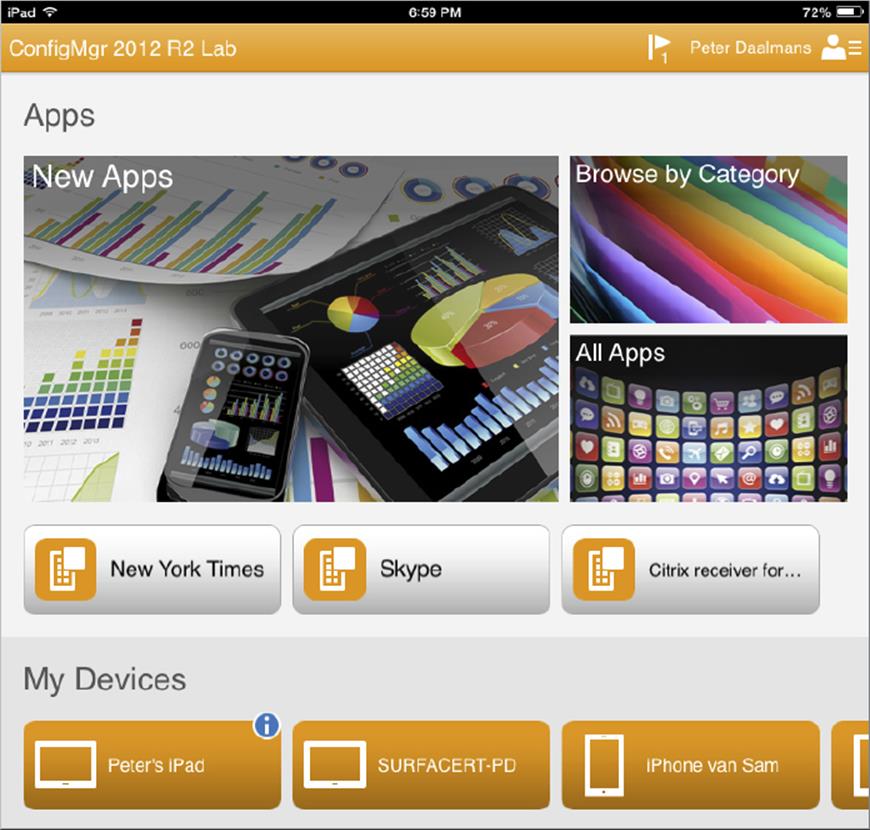
Figure 16.42 Selecting your device to start the enrollment process
4. Click Add on the next screen, which gives you information about allowing your company to manage your device.
5. In the Install Profile dialog, click Install and Install Now.
6. In the Mobile Device Management dialog, click Install.
7. Click Done once the enrollment process is finished.
You can enroll an iOS device via the management portal by following these steps:
1. On your iOS device, start your default web browser and browse to https://m.manage.microsoft.com. Supply your Windows Intune—enabled account and password, and click Sign In.
2. On the Company Apps page, click Install. Next, an Install Profile page will appear; here you need to install the Management Profile from manage.microsoft.com by clicking Install.
3. In the Install Profile dialog, click Install Now.
4. Next a warning will be shown stating that installing this profile will allow the administration to remotely manage your mobile device. Click Install.
5. Click Done once the Management Profile is installed.
Windows Phone 8
In Windows Phone 8 you can enroll your device without installing an app or browsing to a website of Windows Intune. To enroll your Windows Phone 8 device, follow these steps:
1. Choose Settings ⇒ Company Apps and click Add Account.
2. Supply your email address and password, and click Sign In.
3. Click Done when the company account is successfully added; leave Install Company App Or Hub selected. After clicking Done, you may receive a message that company policies can be applied. Your company can offer policies, certificates, and apps that help you connect to your business or secure your mobile device, as shown in Figure 16.43.
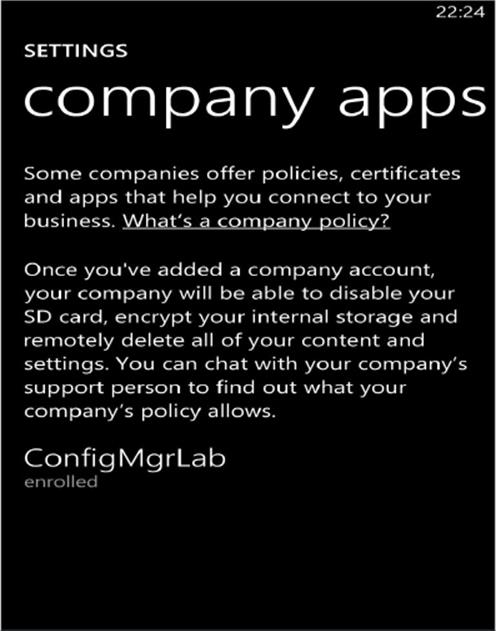
Figure 16.43 Windows Phone device enrolled
Windows RT, Windows 8.1
Windows RT and Windows 8.1 devices can also be managed without joining them to your domain. An option called Workplace Join allows you to enroll your device in Configuration Manager 2012 R2. After enrolling your device you can receive apps and settings from Configuration Manager 2012 R2. Joining your Windows RT or Windows 8.1 device can be done as follows:
1. In Windows, choose Settings ⇒ Network ⇒ Workplace.
2. Supply your user ID and click Turn On.
3. Select I Agree and click Turn On, as shown in Figure 16.44.
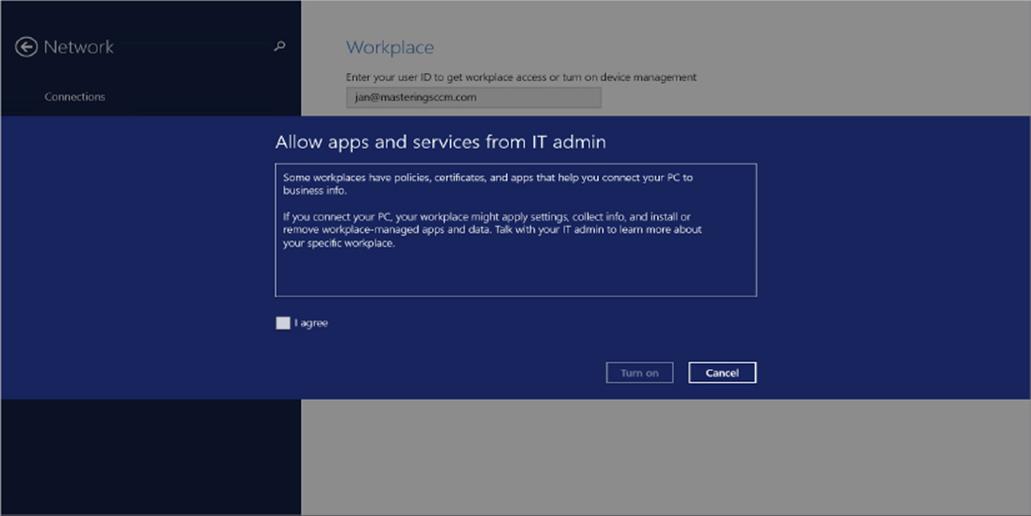
Figure 16.44 Turn on Workplace Join.
After all devices are enrolled, they will show up in the Configuration Manager 2012 R2 console, as shown in Figure 16.45.
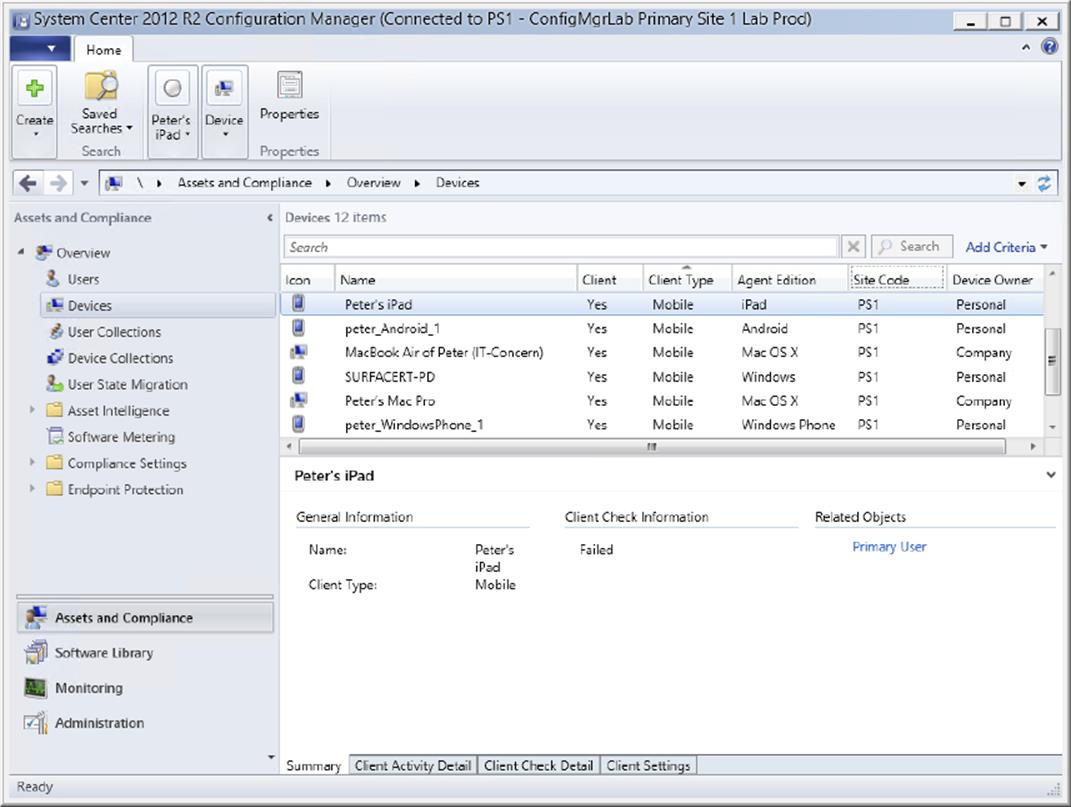
Figure 16.45 Enrolled devices in Configuration Manager
Managing Mobile Devices
After enrolling the devices, you can manage your mobile devices via Configuration Manager 2012 R2.
Complete Feature List of Managing Mobile Devices
Since the feature set of Windows Intune is changing quickly and features are added on the spot, be sure to check the latest version of the TechNet documentation for the latest status:
http://technet.microsoft.com/en-us/library/dn376523.aspx
Device Settings Management
Settings management options are available for depth devices in addition to the standard client operations. You configure these settings through Compliance Settings. Configuring settings for mobile devices requires creating one or more configuration items and then delivering them to the mobile devices by associating them with configuration baselines, which are then assigned to a given collection. Also, you can create Company Resource Access Profiles and deploy them to your mobile devices. Since the number of configuration items and baselines needed depends on individual configurations, the example will use a unified approach where a single configuration item and baseline are used for all devices:
1. Start creating the configuration item by selecting Compliance Settings ⇒ Configuration Items.
2. Right-click Configuration Items and select Create Configuration Item.
3. On the General page of the Create Configuration Item Wizard, supply a name and description and then specify that the configuration item is targeted for a mobile device.
4. Optionally, select any categories that should be used for this configuration item. Click Next.
5. On the Mobile Device Settings page, determine which settings should be managed by this configuration item.
For the example, select all settings and choose to configure additional settings, as shown in Figure 16.46. This will allow you to review all potential settings that might be enforced on a device. Click Next.
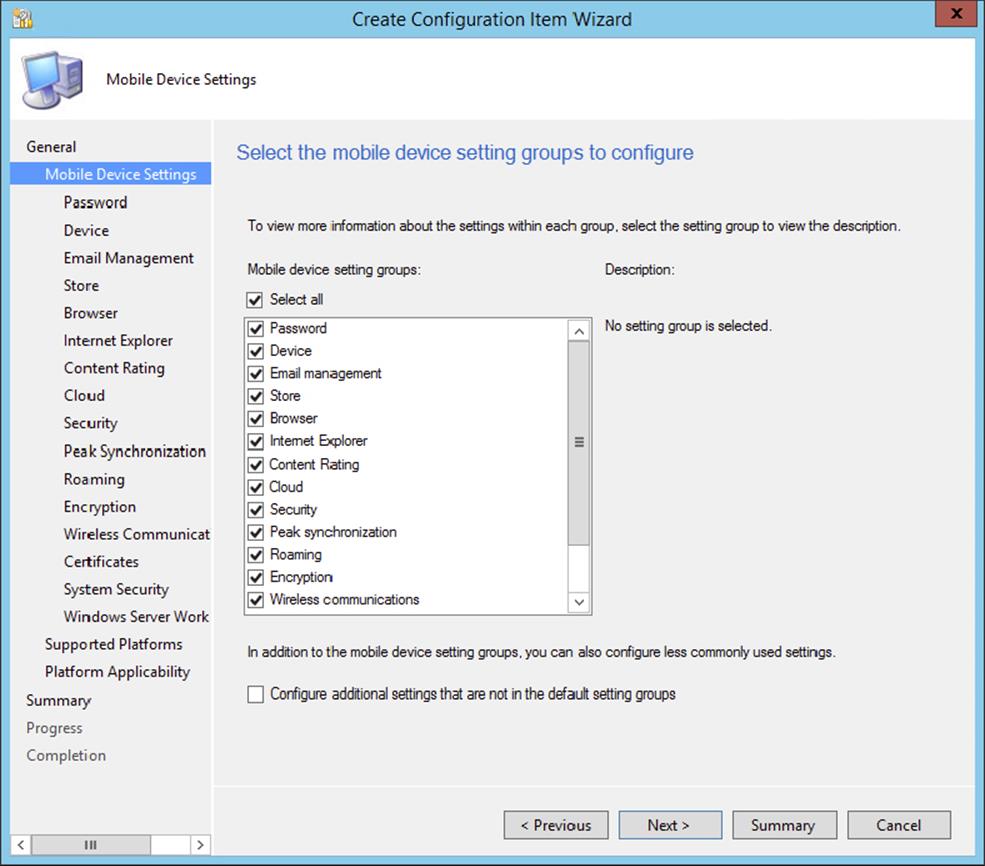
Figure 16.46 Create Configuration Item Wizard—Mobile Device Settings page
Settings vs. Device Capability
Not all devices are capable of implementing all settings. It’s fine to configure a setting in general, but the settings will be implemented only on capable devices.
6. After selecting the additional settings that will be defined by this configuration item, click Next.
7. Configure the appropriate mobile device password options.
The password settings are shown in Figure 16.47. Password settings are not configured by default.
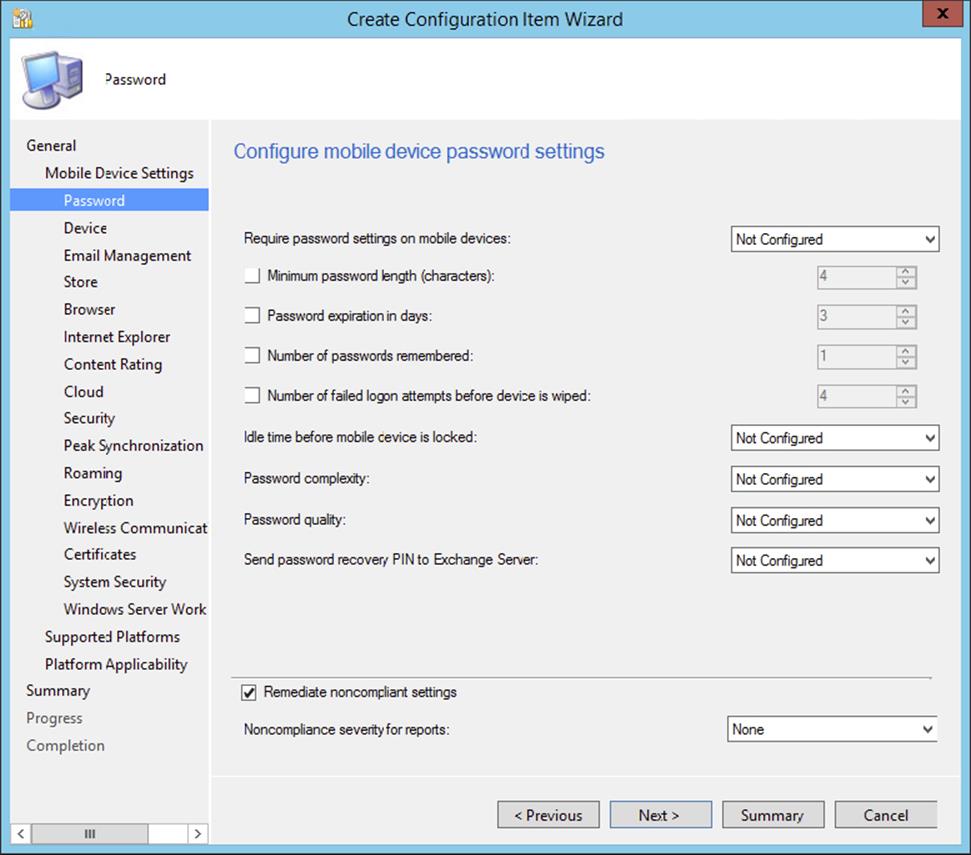
Figure 16.47 Create Configuration Item Wizard—Password page
1. Require Password Settings On Mobile Devices This option allows administrators to determine whether password settings should be enforced. Assuming this option is enabled, a few specific password configurations are possible:
· Minimum Password Length (Characters): This option allows administrators to specify the minimum number of characters that should be supplied as part of the password.
· Password Expiration In Days: This option allows administrators to specify the number of days that are allowed to elapse before requiring a password change.
· Number Of Passwords Remembered: This option allows administrators to configure how many passwords are retained. This setting is useful to prevent the reuse of passwords.
· Number Of Failed Logon Attempts Before Device Is Wiped: This option allows administrators to specify how many incorrect passwords can be supplied before the device is automatically wiped.
2. Idle Time Before Mobile Device Is Locked This option, not enabled by default, allows administrators control over how long a device might be left unlocked when idle.
3. Password Complexity This option allows administrators to specify the required password complexity level, in this case allowing either a PIN or a strong password.
4. Password Quality This option allows you to configure how the password must be built, for instance, if it must be at least Numeric, Alphabetic, or Alphanumeric. You can also configure it as Required, Low Security Biometric, or Alphanumeric With Symbols.
5. Send Password Recovery PIN To Exchange Server This option allows administrators to configure where the password recovery PIN is stored on the Exchange server.
Device Compliance Remediation
If a device is not compliant with all required settings, it will be updated to the required state by default as a result of selecting Remediate Noncompliant Settings on the Password page. When device settings are remediated, it is possible to configure that a noncompliance indication will be logged in reports. This is disabled by default.
8. After all password options are configured, click Next.
9. Configure device settings for the device on the Device page, shown in Figure 16.48.
Figure 16.48 Create Configuration Item Wizard—Configure Device Settings
1. Voice Dialing This option allows administrators to define whether voice dialing is allowed. It can be configured as Allowed or Prohibited.
2. Voice Assistant This option allows administrators to define whether the voice assistant is allowed. It can be configured as Allowed or Prohibited.
3. Voice Assistant While Locked This option allows administrators to define whether the voice assistant is allowed while locked. It can be configured as Allowed or Prohibited.
4. Screen Capture This option allows administrators to define whether screen capture is enabled or not. It can be configured as Enabled or Disabled.
5. Video Chat Client This option allows administrators to define whether the video chat client is enabled or not. It can be configured as Enabled or Disabled.
6. Add Game Center Friends This option allows administrators to define whether adding game center friends is allowed. It can be configured as Allowed or Prohibited.
7. Multiplayer Gaming This option allows administrators to define whether multiplayer gaming is allowed. It can be configured as Allowed or Prohibited.
8. Personal Wallet Software While Locked This option allows administrators to define whether personal wallet software is allowed while locked. It can be configured as Allowed or Prohibited.
9. Diagnostic Data Submission This option allows administrators to define whether diagnostic data submission is enabled or not. It can be configured as Enabled or Disabled.
10.Click Next to configure email options for the device in the Email Management settings, shown in Figure 16.49.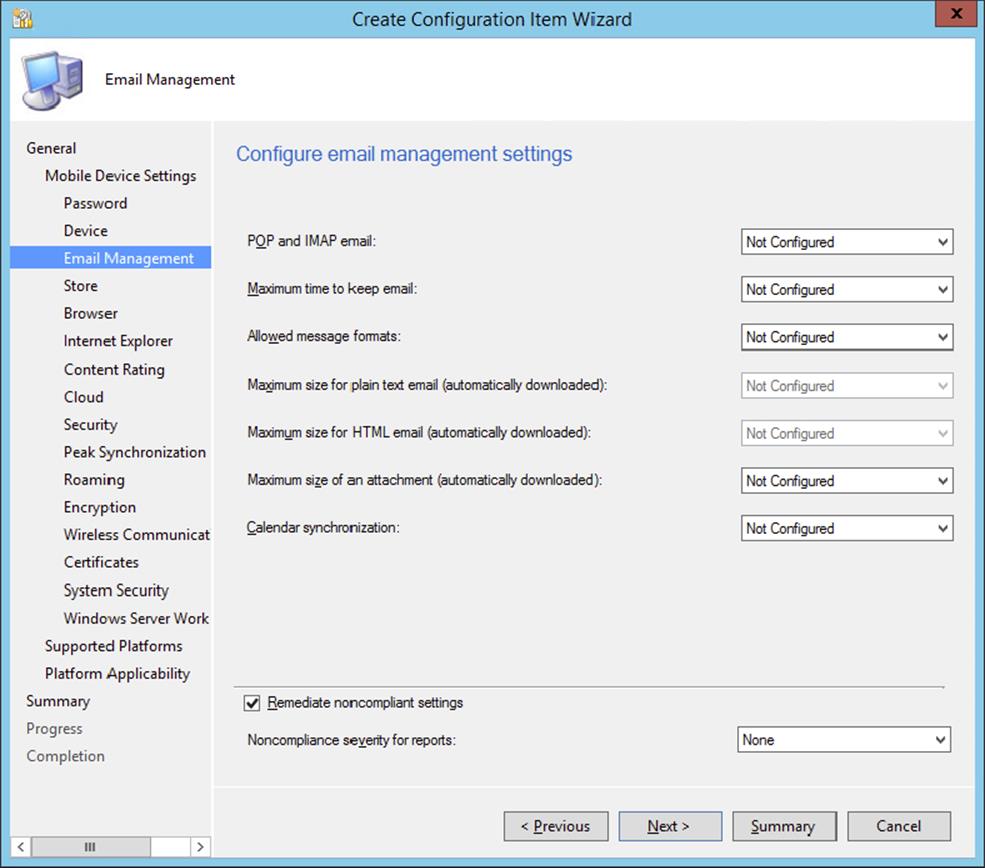
Figure 16.49 Create Configuration Item Wizard—Email Management page
1. PDP And IMAP Email This option allows administrators to define whether PDP and IMAP email are allowed. This is not an either/or setting; either both are allowed or both are prohibited.
2. Maximum Time To Keep Email This option allows administrators to specify how long email should be retained on the device.
3. Allowed Message Formats This option allows administrators to specify the format allowed for email, either plain text only or both plain text and HTML. If this option is configured, up to two additional options become available for configuration.
4. Maximum Size For Plain Text Email (Automatically Downloaded) This option allows administrators to define the size of a plain text email that is allowed to be automatically downloaded to the device. Incremental sizes are configurable up to allowing the entire email to be downloaded.
5. Maximum Size For HTML Email (Automatically Downloaded) This option allows administrators to define the size of an HTML email that is allowed to be automatically downloaded to the device. Incremental sizes are configurable up to allowing the entire email to be downloaded.
6. Maximum Size Of An Attachment (Automatically Downloaded) This option allows administrators to define the size of an attachment that is allowed to be automatically downloaded to the device. Incremental sizes are configurable up to allowing the entire email to be downloaded.
7. Calendar Synchronization This option allows administrators to specify whether calendar synchronization to the device is allowed.
11.After all email options are configured, click Next.
12.Configure the store settings, shown in Figure 16.50.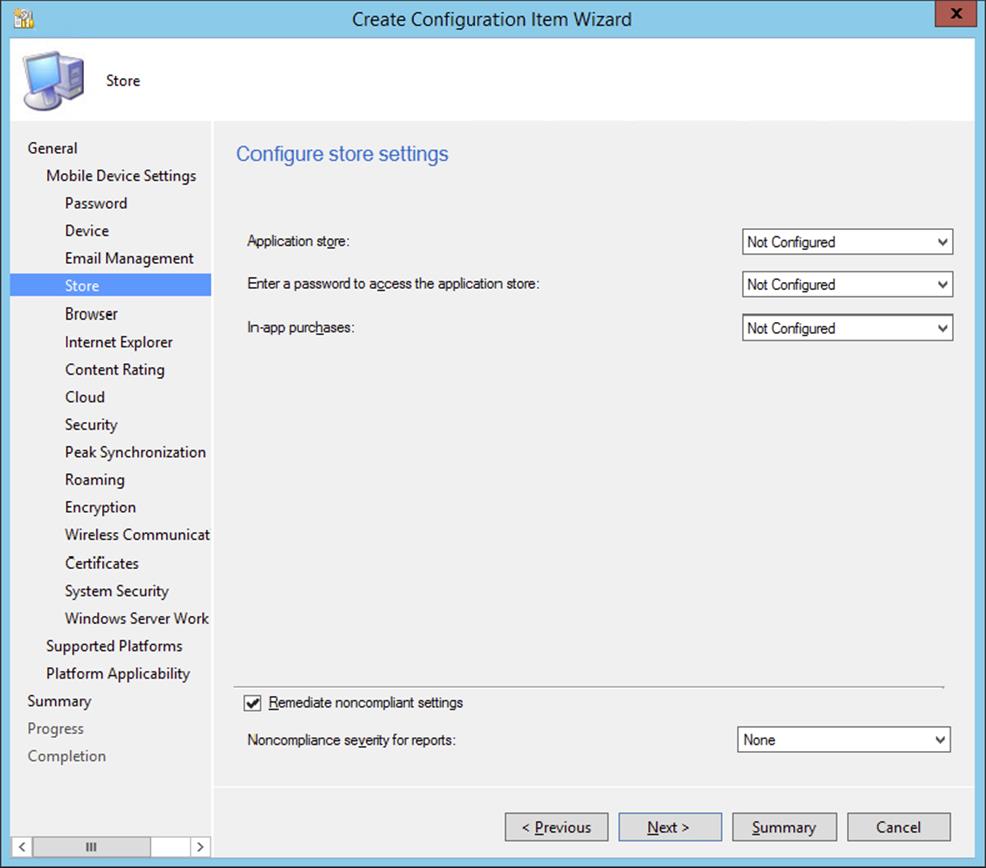
Figure 16.50 Create Configuration Item Wizard—Store page
1. Application Store This option allows administrators to specify whether accessing and using the application store of the device is allowed.
2. Enter A Password To Access The Application Store This option allows administrators to specify whether a user must enter a password when accessing an application store.
3. In-App Purchases This option allows administrators to specify whether in-app purchases are allowed.
13.After configuring the application store settings, click Next.
14.Configure the browser settings, shown in Figure 16.51.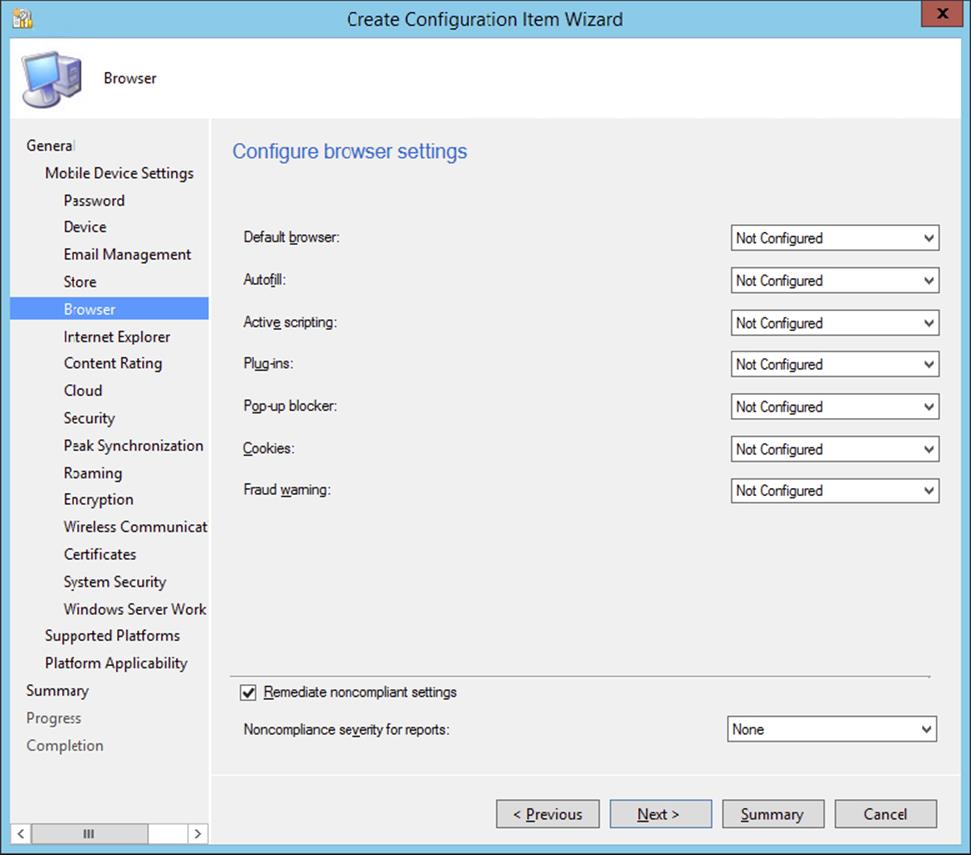
Figure 16.51 Create Configuration Item Wizard—Browser page
1. Default Browser Configure if a user is allowed to change the default browser or not.
2. Autofill Configure if the browser is allowed to use autofill or not.
3. Active Scripting Configure if the browser is allowed to use active scripting or not.
4. Plug-ins Configure if the browser is allowed to use plug-ins or not.
5. Pop-up Blocker Configure if the browser is allowed to use the pop-up blocker or not.
6. Cookies Configure if the browser is allowed to accept cookies or not.
7. Fraud Warning Configure if fraud warning in the browser is enabled or not.
15.After configuring the browser settings, click Next.
16.For the Windows-based mobile devices you can configure Internet Explorer settings, as shown in Figure 16.52.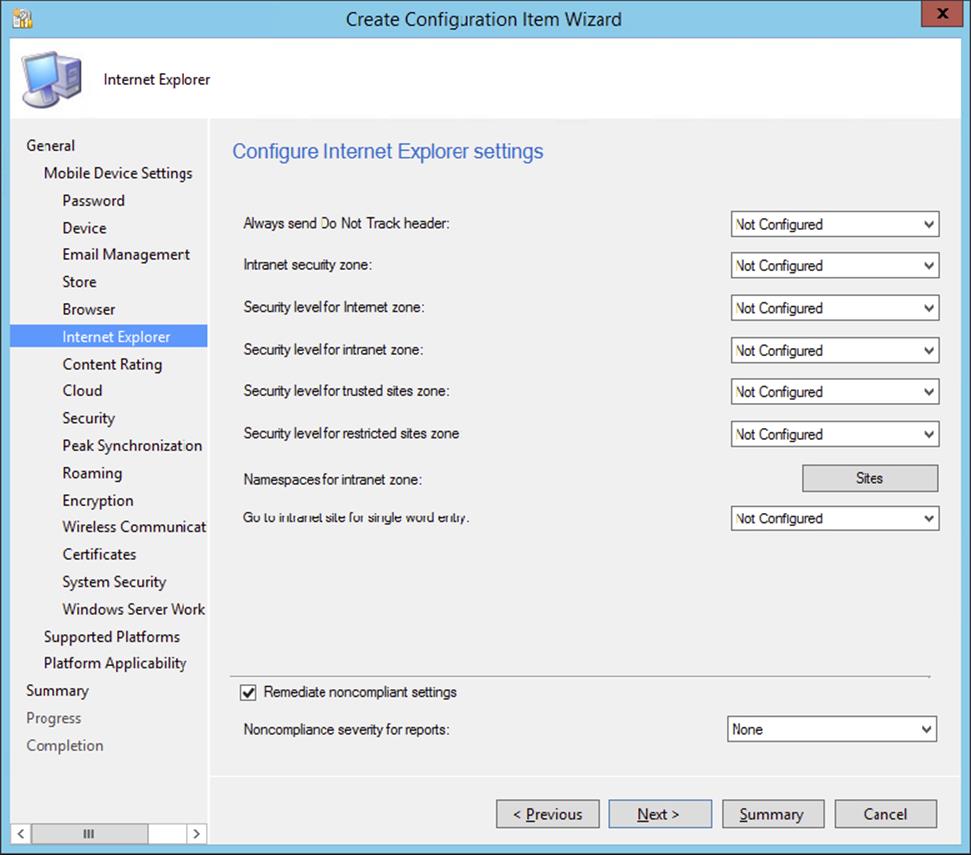
Figure 16.52 Create Configuration Item Wizard—Internet Explorer page
1. Always Send Do Not Track Header Configure whether the Always Send Do Not Track Header option can be enabled or not.
2. Intranet Security Zone Configure whether the Intranet security zone settings can be changed or not.
3. Security Level For Internet Zone Configure whether the security level for the Internet zone can be changed or not.
4. Security Level For Intranet Zone Configure whether the security level for the intranet zone can be changed or not.
5. Security Level For Trusted Sites Zone Configure whether the security level for the trusted sites zone can be changed or not.
6. Security Level For Restricted Sites Zone Configure whether the security level for the restricted sites zone can be changed or not.
7. Namespaces For Intranet Zone Preconfigure the namespaces for your intranet zone or enforce that websites are removed from the intranet zone.
8. Go To Intranet Site For Single Word Entry Configure whether a user is redirected to an intranet when supplying a single word.
17.Click Next to configure the Content Rating settings, as shown in Figure 16.53. Content ratings apply to iOS devices only.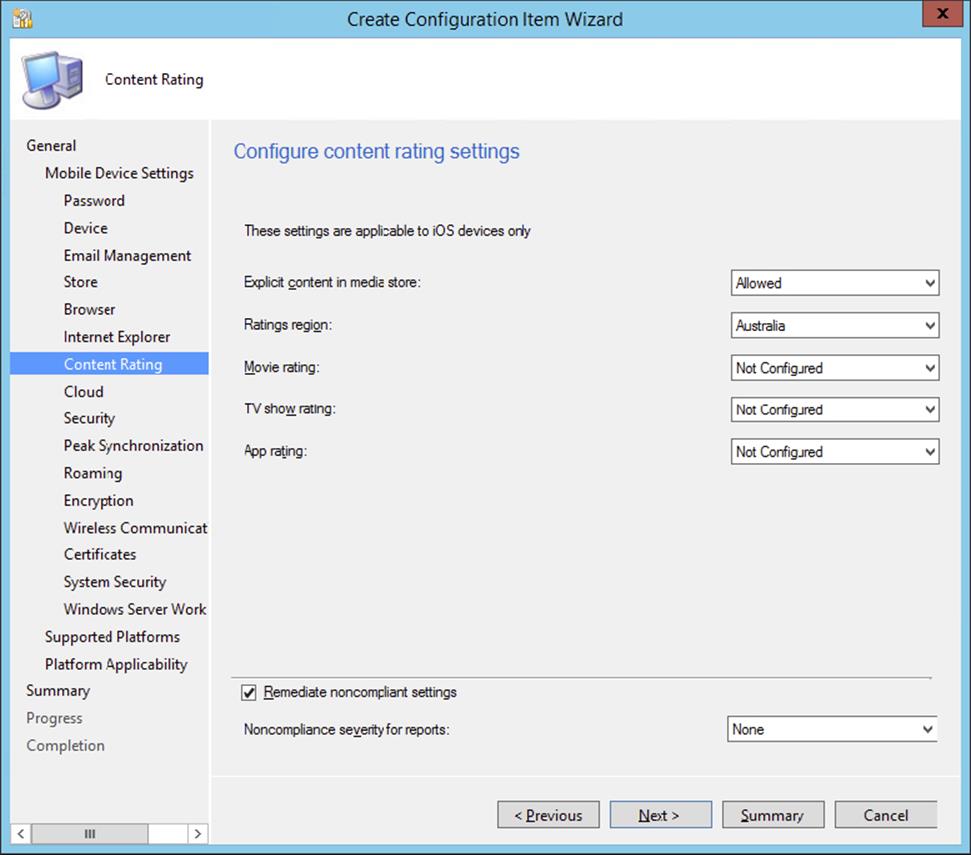
Figure 16.53 Create Configuration Item Wizard—Content Rating page
1. Explicit Content In Media Store Configure if iOS devices can be restricted to explicit media content in the Apple store.
2. Ratings Region Configure from which region the content can be acquired; the following regions can be configured: United States, Australia, Canada, Germany, France, Ireland, Japan, New Zealand, and United Kingdom.
3. Movie Rating Specify the ratings that movies downloaded from the Apple store can have. Options are Don’t Allow, G, PG, M, MA15+, R18+, and Allow All.
4. TV Show Rating Specify the ratings that TV shows downloaded from the Apple store can have. Options are Don’t Allow, P, C, G, PG, M, MA15+, AV15+, and Allow All.
5. App Rating Specify the ratings that apps downloaded from the Apple store can have. Options are Don’t Allow, 4+, 9+, 12+, 17+, and Allow All.
18.Click Next to configure the cloud settings, as shown in Figure 16.54.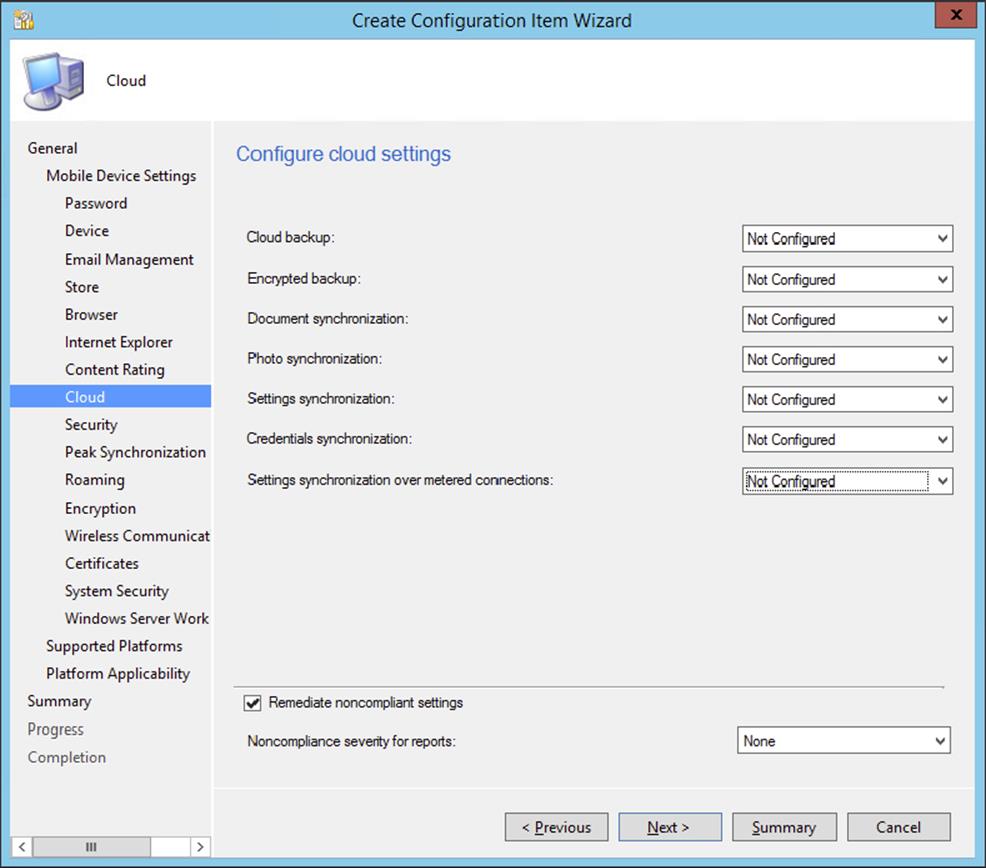
Figure 16.54 Create Configuration Item Wizard—Cloud page
1. Cloud Backup Configure whether the mobile device can back up the device to a cloud backup service or not.
2. Encrypted Backup Configure whether a backup of device can be encrypted or not.
3. Document Synchronization Configure whether documents on the mobile devices may be synchronized to a cloud service like SkyDrive or iCloud on the Internet or not.
4. Photo Synchronization Configure whether photos on the mobile devices may be synchronized to a cloud service like SkyDrive or iCloud on the Internet or not.
5. Settings Synchronization Configure whether settings on the mobile devices may be synchronized to a cloud service like SkyDrive or iCloud on the Internet or not.
6. Credentials Synchronization Configure whether credentials on the mobile devices may be synchronized to a cloud service like SkyDrive or iCloud on the Internet or not.
7. Settings Synchronization Over Metered Connections Configure whether synchronizations over metered connections are allowed or not.
19.Configure the security options for the device. The security management settings are shown in Figure 16.55.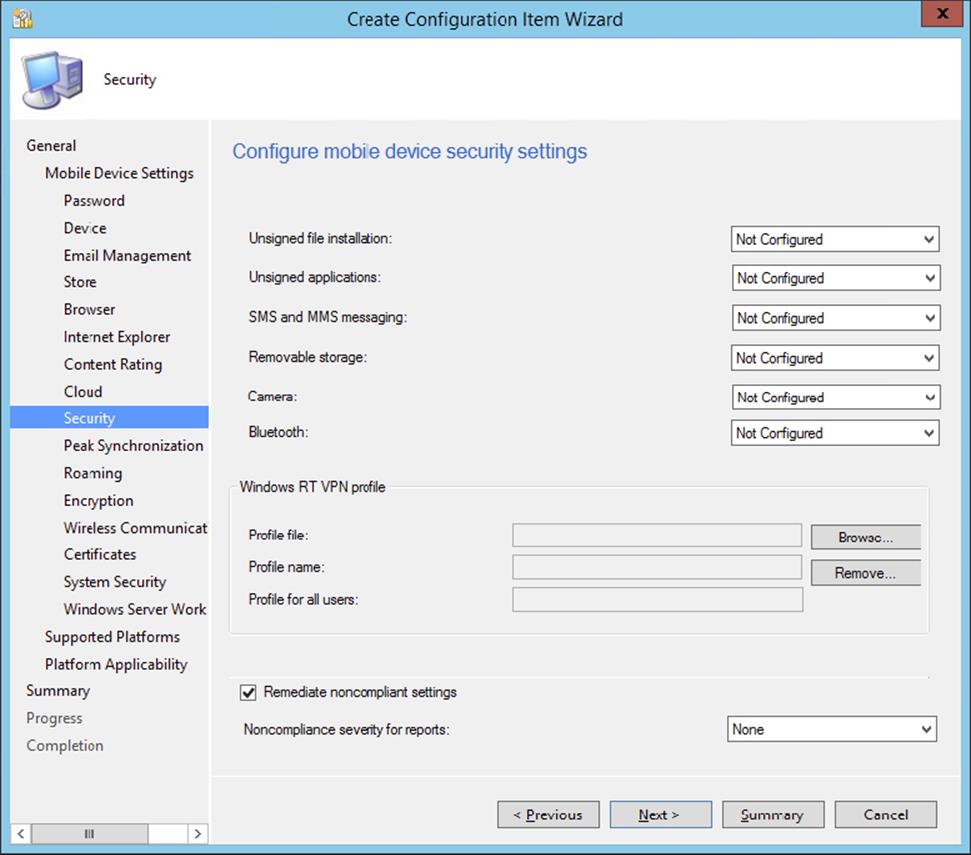
Figure 16.55 Create Configuration Item Wizard—Security page
1. Unsigned File Installation This option allows administrators to specify whether the installation of unsigned files is allowed or not allowed. If they are allowed, administrators then choose what parties are allowed this right. Available options are Mobile Operator, Manager, User Authenticated, IT Administrator, User Unauthenticated, and Trusted Provisioning Server.
2. Unsigned Applications This option allows administrators to specify whether the installation of unsigned applications is allowed or prohibited.
3. SMS And MMS Messaging This option allows administrators to configure whether SMS and MMS messaging are allowed or prohibited on the device.
4. Removable Storage This option allows administrators to configure whether removable storage is allowed or prohibited on the device.
5. Camera This option allows administrators to configure whether the camera is allowed or prohibited on the device.
6. Bluetooth This option allows administrators to configure whether Bluetooth is allowed or prohibited on the device.
7. Windows RT VPN Profile Deploy a VPN profile for a Windows RT device and define if the profile is available to all users or not.
20.After all security options are configured, click Next.
21.Configure the synchronization options for the device in the Peak Synchronization settings, shown in Figure 16.56.
Figure 16.56 Create Configuration Item Wizard—Peak Synchronization page
1. Specify Peak Time This option allows administrators to define the specific time considered to be peak on devices.
2. Peak Synchronization Frequency This option allows administrators to specify how often the device will synchronize during the defined peak time.
3. Off-Peak Synchronization Frequency This option allows administrators to specify how often the device will synchronize outside the defined peak time.
22.After all peak synchronization options are configured, click Next.
23.Configure the roaming options for the device in the Roaming settings, shown in Figure 16.57.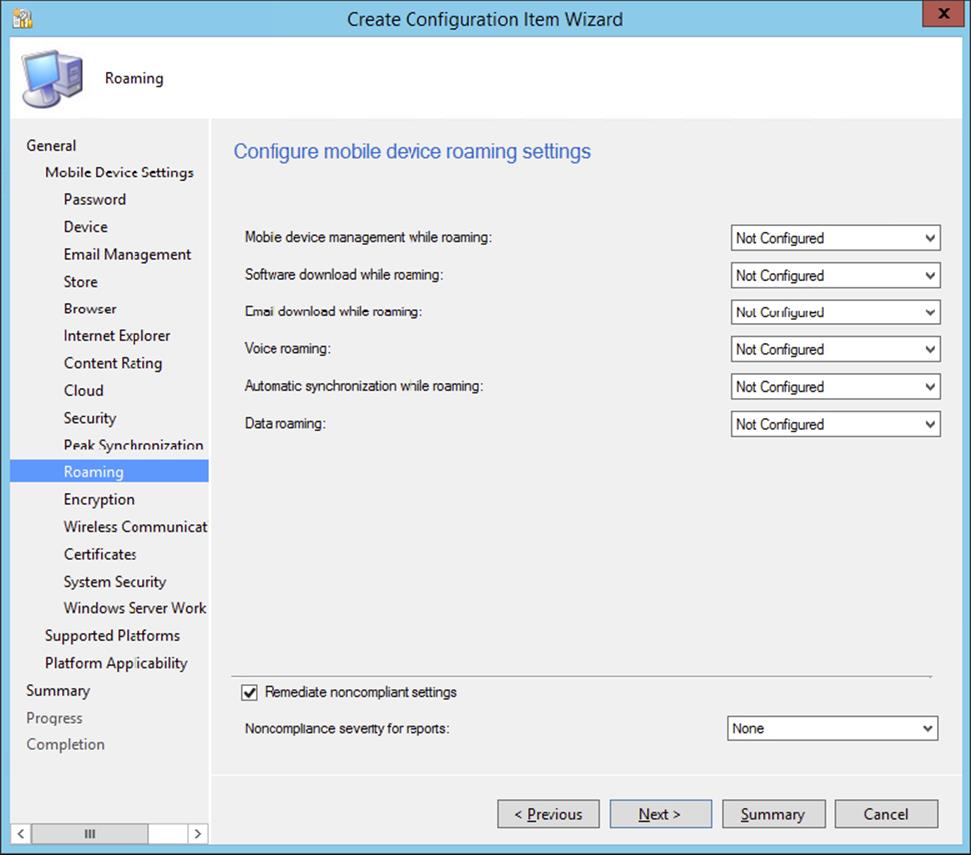
Figure 16.57 Create Configuration Item Wizard—Roaming page
1. Mobile Device Management While Roaming This option allows administrators to configure whether a device should be actively managed when roaming.
2. Software Download While Roaming This option allows administrators to specify whether software downloads should be allowed when a device is roaming.
3. Email Download While Roaming This option allows administrators to control whether email is downloaded while a device is roaming.
4. Voice Roaming This option allows administrators to control whether voice roaming is allowed.
5. Automatic Synchronization While Roaming This option allows administrators to control whether automatic synchronization is allowed while a device is roaming.
6. Data Roaming This option allows administrators to control whether data usage is allowed while a device is roaming.
24.After all the roaming options are configured, click Next.
25.Configure the encryption options for devices in the Encryption settings, shown in Figure 16.58.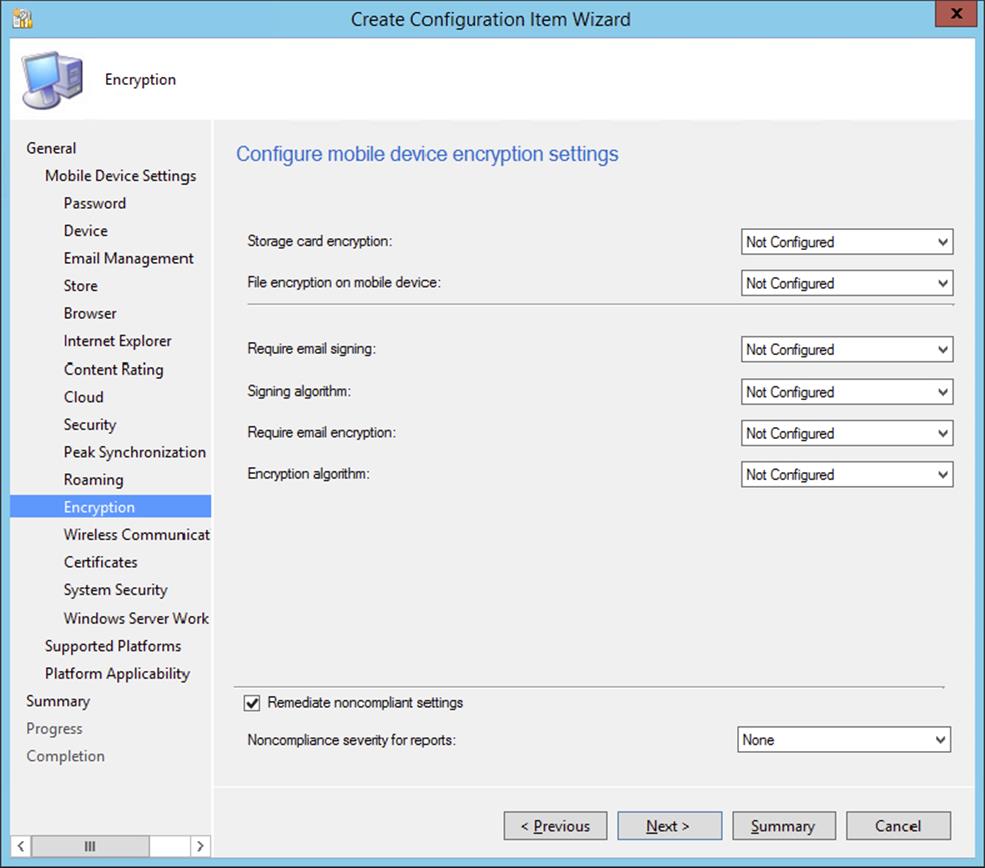
Figure 16.58 Create Configuration Item Wizard—Encryption page
1. Storage Card Encryption This option allows administrators to specify whether encryption is on or off for a device’s storage card.
2. File Encryption On Mobile Device This option allows administrators to configure whether file encryption is on or off for a device.
3. Require Email Signing/Signing Algorithm This option allows administrators to specify whether email signing is enabled or disabled. If email signing is enabled, the Signing Algorithm option allows administrators to specify whether SHA, MD5, or the default signing algorithm should be used.
4. Require Email Encryption/Encryption Algorithm This option allows administrators to configure whether email encryption is on or off for a device. If email encryption is enabled, the Encryption Algorithm option allows administrators to specify which encryption algorithm should be used. Available choices are Triple DES, DES, RC2 128-bit, RC2 64-bit, RC2 40-bit, and the default algorithm.
26.After all encryption options are configured, click Next.
27.Configure the wireless communication options for devices in the Wireless Communication settings, shown in Figure 16.59.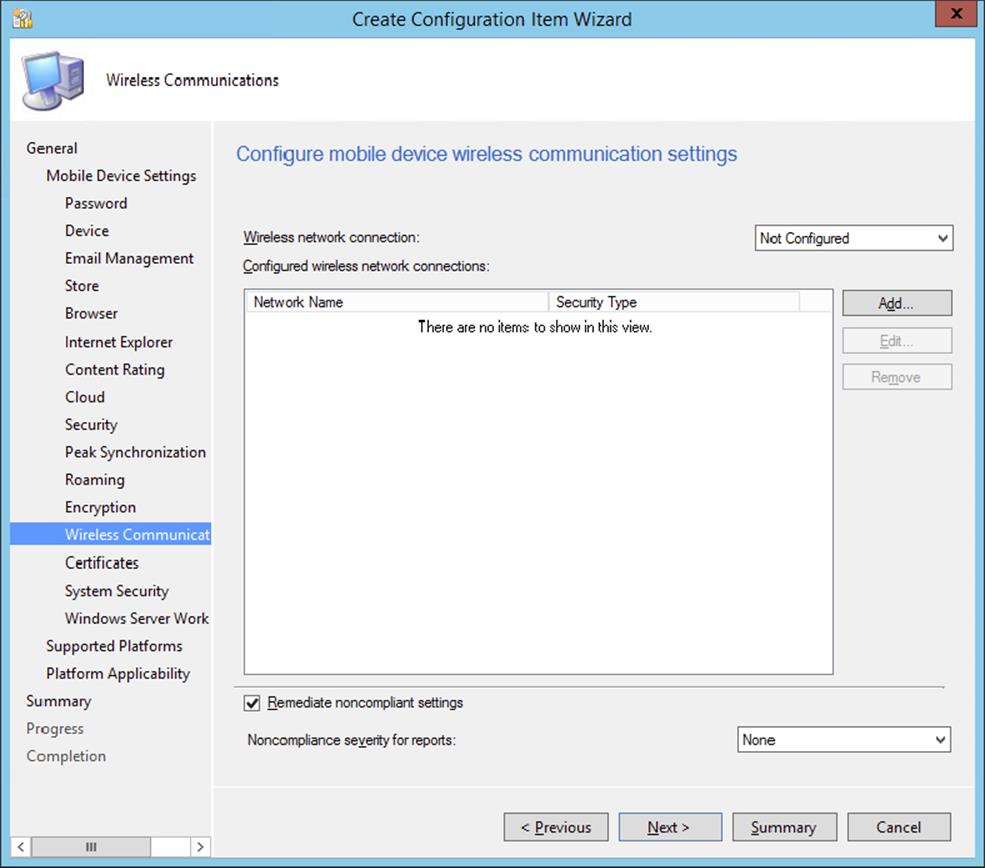
Figure 16.59 Create Configuration Item Wizard—Wireless Communications page
28.Configure whether wireless network connections are allowed or prohibited on the device.
If they are allowed, administrators can click the Add button to specify one or more networks and the associated network configuration. Available network configuration options include Proxy, 802.1X, Authentication, Data Encryption, and more. A blank Wireless Network Connection configuration page is shown in Figure 16.60.
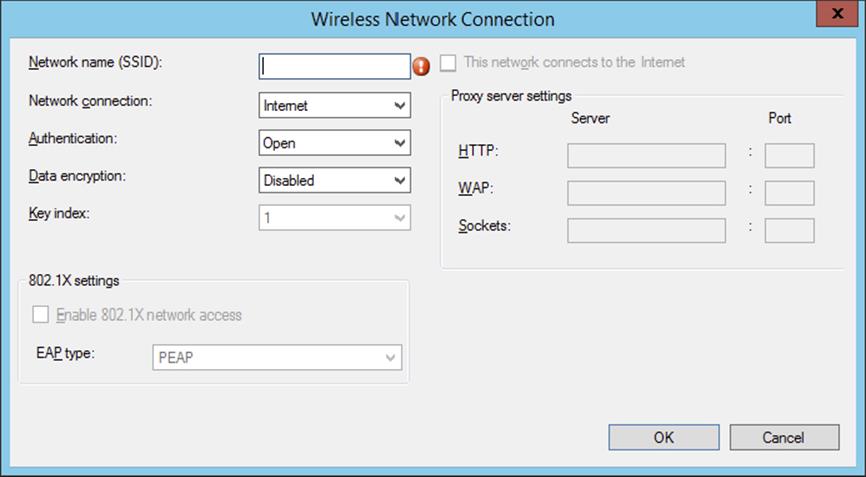
Figure 16.60 Wireless Network Connection page
29.After all wireless network connection options are configured, click Next.
30.Configure the certificate options for devices in the Certificates settings, shown in Figure 16.61.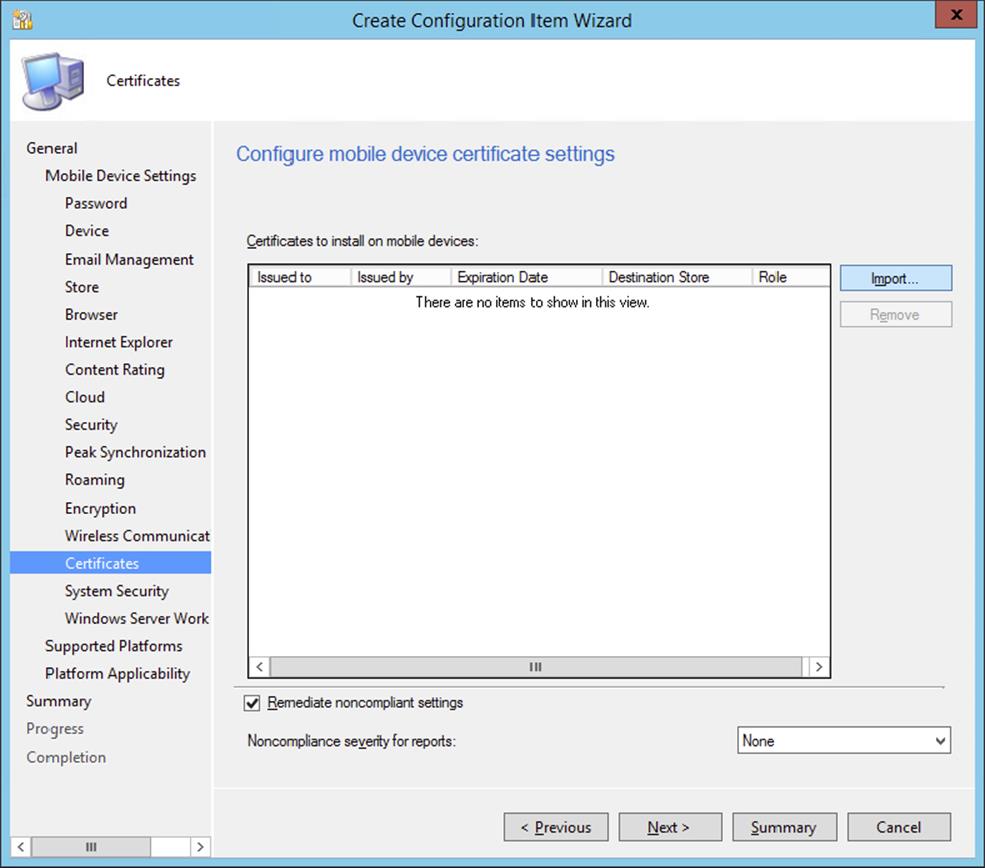
Figure 16.61 Create Configuration Item Wizard—Certificates page
The Certificates To Install On Mobile Devices option allows administrators to specify certificates that should be installed on mobile devices. Clicking the Import button brings up the Import Certificate dialog, shown in Figure 16.62, which allows certificates to be imported from the filesystem and allows administrators to specify in which certificate store the certificate should be placed on the device.

Figure 16.62 Import Certificate dialog
31.After all certificate options are configured, click Next.
32.Configure extra security settings on the System Security page, shown in Figure 16.63. This system security will apply to Windows-based devices.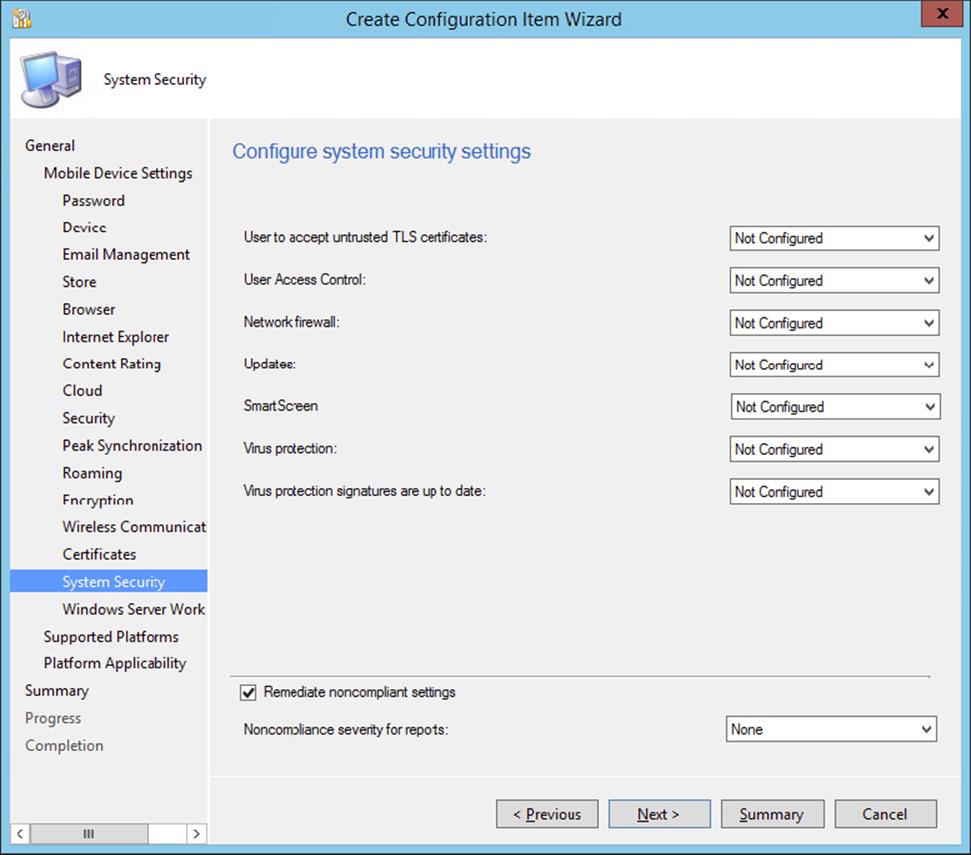
Figure 16.63 Create Configuration Item Wizard—System Security page
1. User To Accept Untrusted TLS Certificates This option allows administrators to configure whether a user is allowed to accept untrusted TLS certificates.
2. User Access Control This option allows administrators to configure how User Access Control is enabled and how it notifies them of changes to the operating system of a device.
3. Network Firewall This option allows administrators to configure whether the firewall is required or not.
4. Updates This option allows administrators to configure whether updates are installed automatically or not.
5. SmartScreen This option allows administrators to configure whether SmartScreen in Internet Explorer is enabled or not.
6. Virus Protection This option allows administrators to configure whether virus protection is required for a device.
7. Virus Protection Signatures Are Up To Date This option allows administrators to configure whether up-to-date virus protection signatures are required or not.
33.Once the security settings are configured, click Next to configure Windows Server Work Folder settings, as shown in Figure 16.64.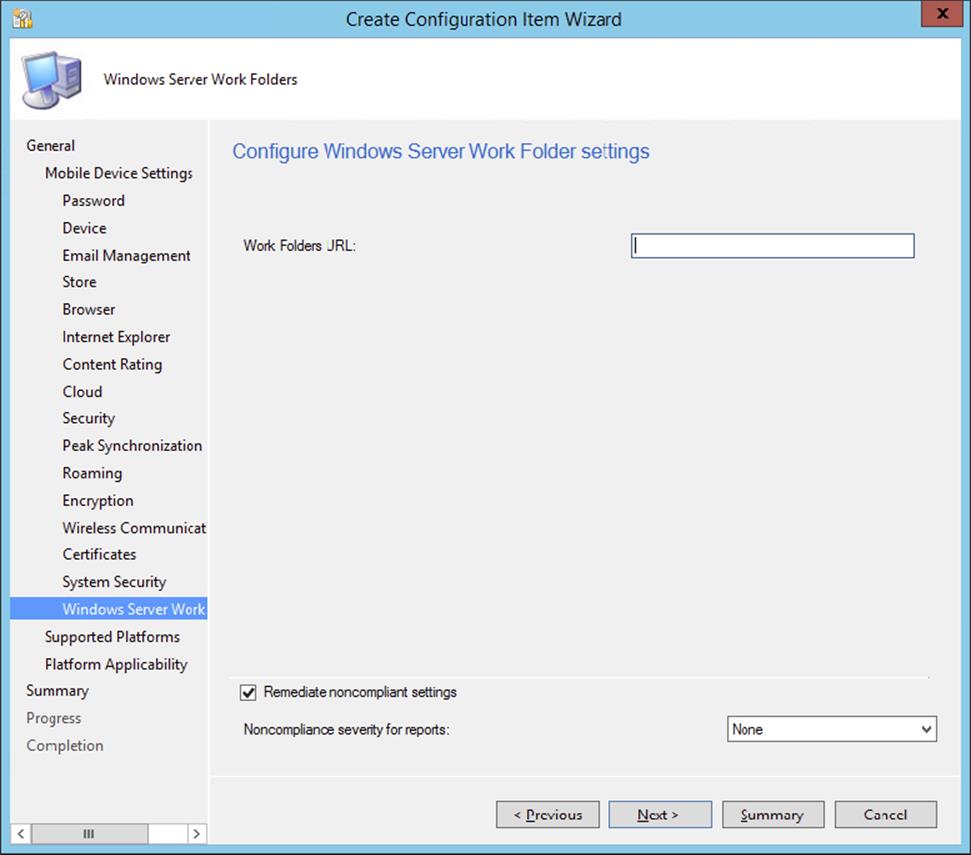
Figure 16.64 Create Configuration Item Wizard—Windows Server Work Folders page
34.Click Next to configure the Supported Platforms page, shown in Figure 16.65, specify which platforms should be targeted with the configurations just defined, and click Next.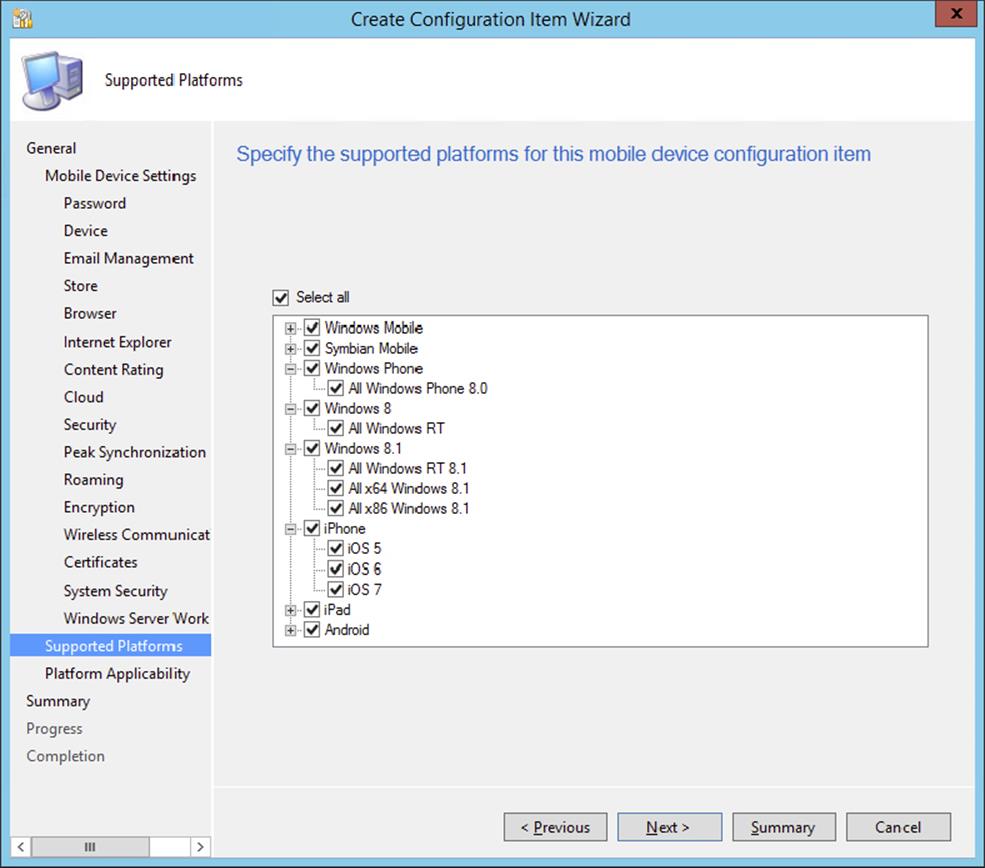
Figure 16.65 Create Configuration Item Wizard—Supported Platforms page
As already mentioned, not all settings apply to all device types. The Platform Applicability page of the wizard, shown in Figure 16.66, displays any settings that have been chosen but are not supported by a selected target platform. There is no configuration available here.

Figure 16.66 Create Configuration Item Wizard—Platform Applicability page
35.From here, simply complete the wizard to save the configuration item.
Defining the configuration item is not sufficient. Implementing the configuration item requires attaching it to a baseline and assigning that baseline to a collection. This is a general task for compliance setting management and is discussed in Chapter 14, “Compliance Settings.”
Now that we have looked at the configuration settings, we also have to look at the profiles that can be managed from Configuration Manager 2012 R2. You can use Configuration Manager to configure certificate, VPN, and Wi-Fi profiles for devices that are managed via Configuration Manager 2012 R2.
1. Start configuring the configuration item by selecting Compliance Settings ⇒ Company Resource Access.
2. Click Certificate Profiles ⇒ Create Certificate Profile in the Home tab of the ribbon.
3. Supply a name and specify the type of certificate profile that you want to create. This allows you to deploy a trusted CA certificate or use the Simple Certificate Enrollment Protocol (SCEP) settings. Before you can create a profile for a SCEP, you need to first add a Trusted CA certificate. Select the option Trusted CA Certificate and click Next.
4. Select a CA certificate file by clicking Import, and select the destination store before clicking Next, as shown in Figure 16.67. The certificate thumbprint will be imported from the certificate file and displayed.
Figure 16.67 Create Certificate Profile Wizard—Trusted CA Certificate page
5. Click Next and select the platforms that will be provisioned with this new certificate profile. Click Next.
6. Review the Summary page and click Next. Click Close when the certificate profile is created successfully.
7. After the Trusted Root CA certificate profile has been created, you can create a SCEP certificate profile. In a new Create Certificate Profile Wizard, select the option Simple Certificate Enrollment Protocol (SCEP) settings and click Next.
8. Configure the SCEP certificate enrollment parameters as shown in Figure 16.68, and click Next.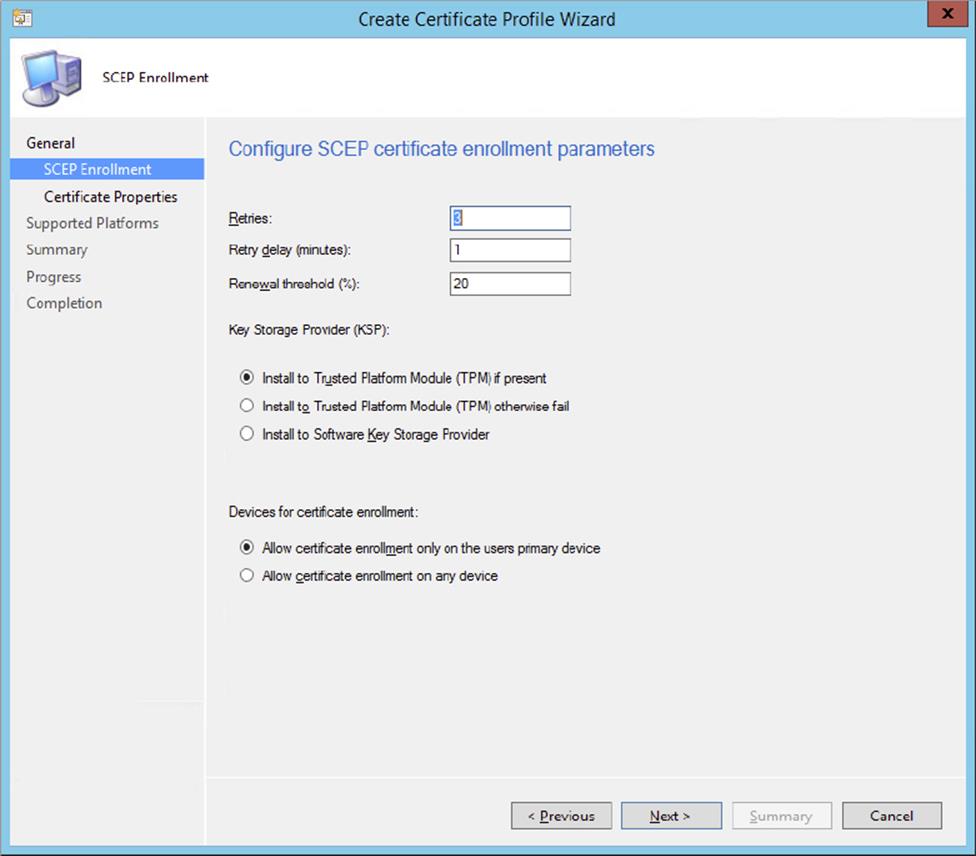
Figure 16.68 Create Certificate Profile Wizard—SCEP Enrollment page
1. Retries/Retry Delay (Minutes)/Renewal Threshold (%) Configure how often an enrollment retry may take place, with the number of minutes between retries.
2. Key Storage Provider (KSP) This option allows administrators to configure whether to install to Software Key Storage Provider, Trusted Platform Module (TPM) if present, or fail if TPM is not available.
3. Devices For Certificate Enrollment This option allows administrators to configure whether the certificate is enrolled by the user on any device or only on the user’s primary device.
9. The next step is to configure the certificate properties, as shown in Figure 16.69.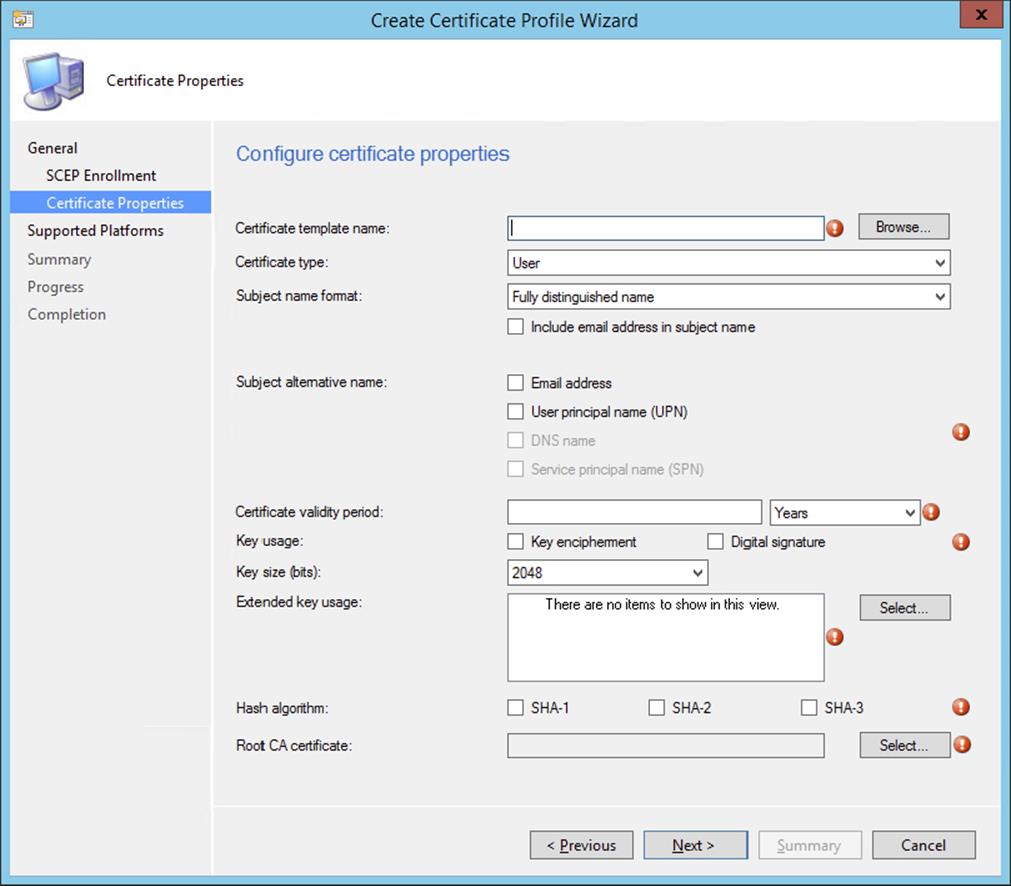
Figure 16.69 Create Certificate Profile Wizard—Certificate Properties page
1. Certificate Template Name Supply a certificate template name by clicking the Browse button. Select the issuing certificate authority and the certificate template name before clicking OK.
2. Certificate Type Define whether the certificate is a User or Device certificate.
3. Subject Name Format Depending on whether the certificate is a User or Device certificate, you can supply different name formats. If it is a User certificate, you can enable the Include Email Address In Subject Name option.
4. Subject Alternative Name Depending on whether the certificate is a User or Device certificate, you can add subject alternative names to the certificate. Alternative names can be an email address, user principal name (UPN), DNS name, or service principal name (SPN).
5. Certificate Validity Period Configure the validity period of the certificate in days, months, or years, depending on the configured certificate template.
6. Key Usage If not grayed out (depending on the certificate template), you can enable Key Encipherment and Digital Signature.
7. Key Size (Bits) If not grayed out (depending on the certificate template), you can configure the key size of the certificates.
8. Extended Key Usage If not grayed out (depending on the certificate template), you can select the extended key usage options. If grayed out, you will see the options available in the certificate template.
9. Hash Algorithm Select the SHA-1, SHA-2, or SHA3 hash algorithms that are going to be used.
10.Root CA Certificate Select the Trusted Root CA certificate profile you created earlier and click OK.
10.Click Next, and select the platforms that will be provisioned with this new certificate profile. Click Next.
11.Review the Summary page, and click Next. Click Close when the SCEP certificate profile is created successfully.
You can deploy the certificate profiles to your test collections before rolling out the profiles to a broader range of mobile devices.
As mentioned earlier, besides certificate profiles, you can use Configuration Manager 2012 R2 to create and deploy VPN profiles. To create a VPN profile, follow these steps:
1. Start configuring the configuration item by selecting Compliance Settings ⇒ Company Resource Access.
2. Click VPN Profiles and choose Create VPN Profile in the Home tab of the ribbon. Supply a name and click Next. You can also import an existing VPN profile from a file, but in this example we will create a new PPTP profile.
3. As you can see in Figure 16.70, all major VPN brands are supported; the options on the Connection page will differ per brand. In this case choose PPTP, and therefore you need to supply a server list (with the VPN server friendly names and IP addresses), decide whether all network traffic must be sent through the VPN connection, and supply the connection-specific DNS suffix.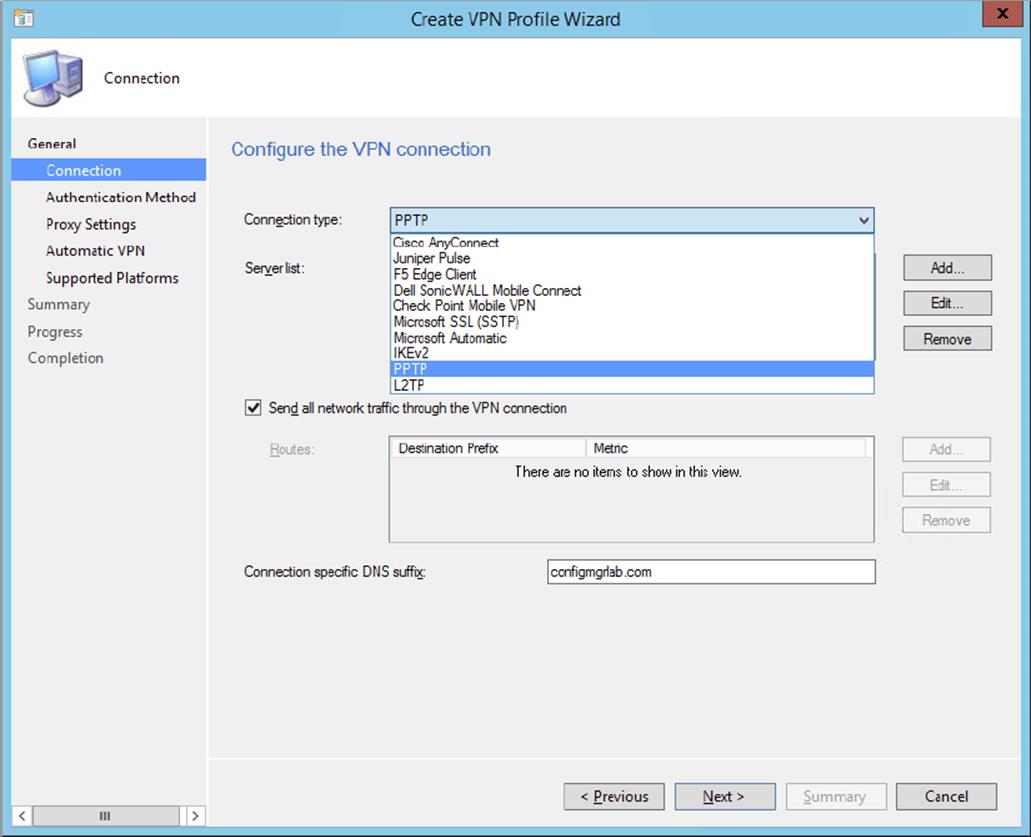
Figure 16.70 Create VPN Profile Wizard—Connection page
4. After configuring the Connection settings, click Next.
5. On the Authentication Method page, select the authentication method that is supported by the VPN device and click Next.
6. If necessary, configure proxy settings for the VPN profile. Define whether the proxy is automatically set or detected, or configure a proxy server to use. Click Next.
7. Enable VPN on-demand if you want the VPN connection to be started when a Native Windows 8.1 application is started. Supply the DNS suffix, the VPN server that uses that suffix, and when the VPN connection must be initiated, as shown in Figure 16.71.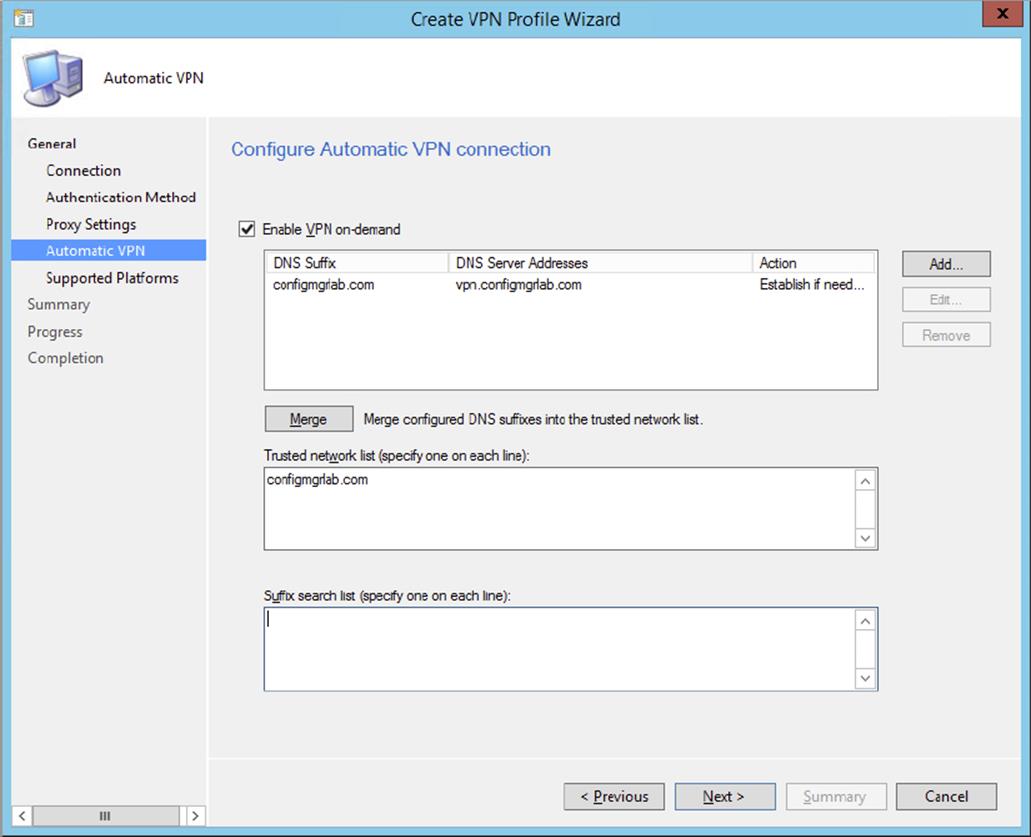
Figure 16.71 Create VPN Profile Wizard—Automatic VPN page
You can enable the Automatic VPN option while creating the Windows 8 application or on the General page of the Windows 8 Deployment Type.
8. Click Next to configure the supported Windows 8.1 and iOS platforms, and click Next again to move to the Summary screen.
9. Review the Summary page and click Next. Click Close when the VPN profile is created successfully.
You can deploy the VPN profile to your test collections before rolling out the profiles to a broader range of mobile devices.
Finally, you can create Wi-Fi profiles to deploy to your corporate mobile devices. To create a Wi-Fi profile, follow these steps:
1. Start configuring the configuration item by selecting Compliance Settings ⇒ Company Resource Access.
2. Click Wi-Fi Profiles and choose Create Wi-Fi Profile in the Home tab of the ribbon. Supply a name and click Next. You can also import an existing Wi-Fi profile from a file, but in this example we will create a new Wi-Fi profile.
3. The first step is supplying the general information about the Wi-Fi profile. Supply a network name and the SSID of the Wi-Fi network. You can also enable or disable the following options, as shown in Figure 16.72.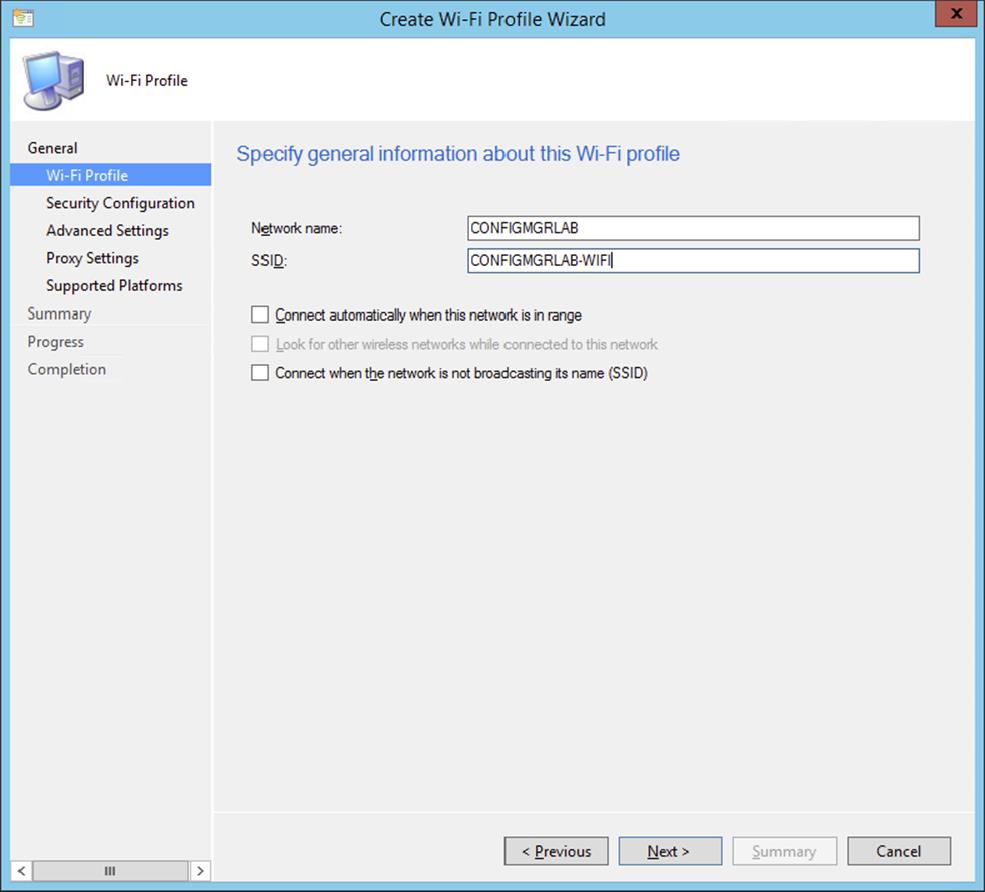
Figure 16.72 Create Wi-Fi Profile Wizard—Wi-Fi Profile page
· Connect Automatically When This Network Is In Range
· Look For Other Wireless Networks While Connected To This Network
· Connect When The Network Is Not Broadcasting Its Name (SSID)
4. The next step is to configure the security configuration. You need to configure a security type with the proper encryption information for your Wi-Fi network, as shown in Figure 16.73. Contact your network administrator for the appropriate information for your Wi-Fi network. Click Next to configure advanced settings. The advanced settings are not available for every security type.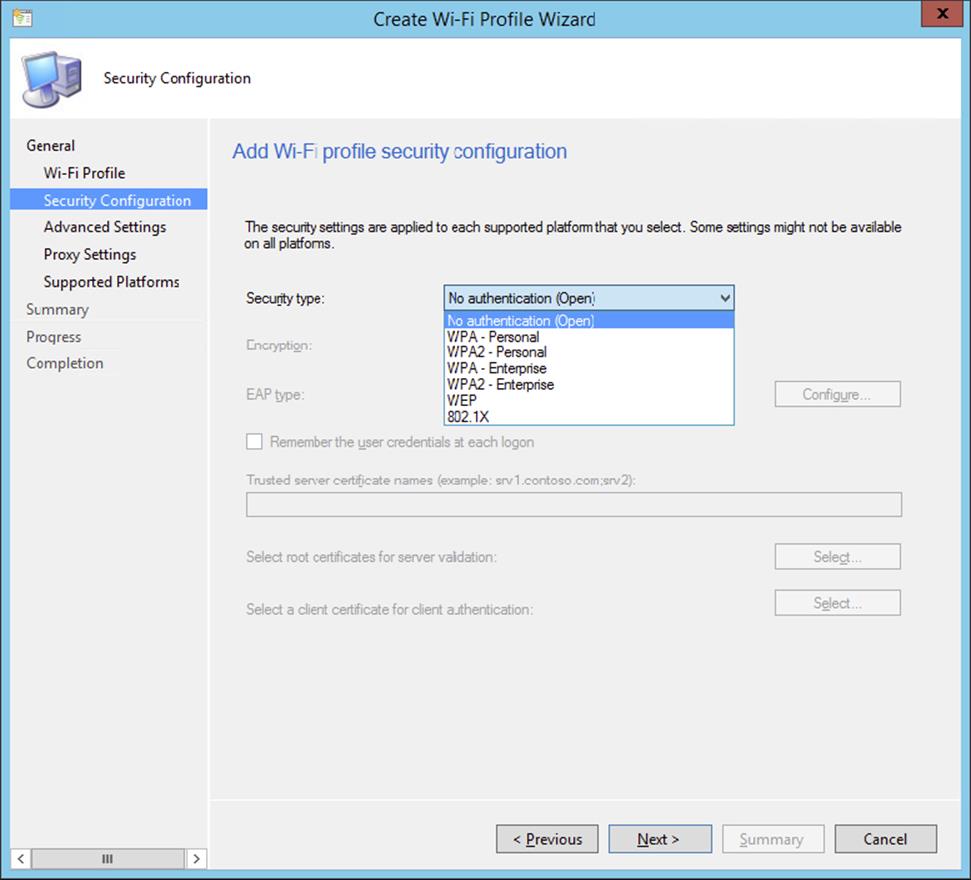
Figure 16.73 Create Wi-Fi Profile Wizard—Security Configuration page
5. If necessary, configure proxy settings for the Wi-Fi profile. Define whether the proxy is automatically set or detected, or configure a proxy server to use.
6. Click Next to configure the supported platforms. Click Next.
7. Review the Summary page and click Next. Click Close when the Wi-Fi profile is created successfully. Again, deploy the Wi-Fi profile first to your test collections before rolling it out in your environment.
Wipe vs. Selective Wipe
Letting mobile devices connect to your environment creates a risk when someone loses the mobile device or an employee leaves the company. Therefore several options are built into Configuration Manager 2012 R2 to make sure that the corporate data is removed when necessary. Before exploring the Wipe functionality, it is important that we explain a feature called Device Ownership.
Personal vs. Company-Owned Devices
In Configuration Manager you can configure a mobile device as personal or company owned. Every mobile device that is not joined to a domain and enrolled in Configuration Manager is configured as a personal device. You can change the ownership of a device as follows:
1. Start configuring the item by selecting Assets And Compliance ⇒ Overview ⇒ Devices in the Configuration Manager console.
2. Select the mobile device for which you want to change the ownership, and click Change Ownership in the Home tab of the ribbon.
3. Change the ownership from Personal to Company, as shown in Figure 16.74.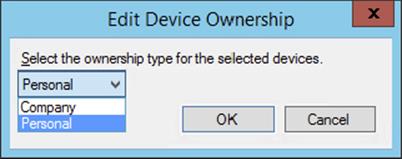
Figure 16.74 Edit Device Ownership dialog
4. After changing the ownership, click OK.
By using the device ownership options you can create collections based on the global conditions and deploy software to your company-owned devices.
Wiping a Mobile Device
You can wipe a mobile device via the Configuration Manager 2012 R2 console. Depending on whether the mobile device is personal or company owned and on the operating system, the procedure for wiping the device is different. Wiping a device can be done selectively or fully. Wiping a device fully basically initiates a factory reset of the mobile device the next time it connects to Configuration Manager.
The selective wipe experience will be a bit different on every supported platform, since not all platforms support the same features. Selective wipe can remove or revoke the following corporate information:
1. Email
2. Applications installed through the MDM channel (Windows Intune)
3. Wi-Fi profiles
4. VPN profiles
5. Certificates
6. MDM policies (settings)
7. Management agent
8. Corporate application data
Table 16.1 lists the features corresponding to the previous numbers per platform.
Table 16.1: Wipe features per platform
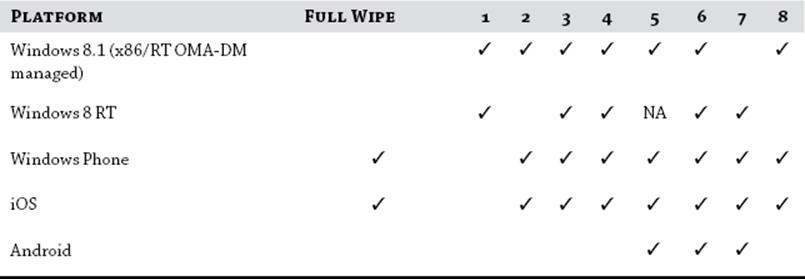
The features and the experience may differ per platform and version of Windows Intune. Consult the TechNet documentation for the latest status: http://technet.microsoft.com/en-us/library/jj884158.aspx.
Once you know what will be wiped, you can choose the right method if you need to selectively wipe a mobile device. Follow these steps:
1. Start configuring the item by selecting Assets And Compliance ⇒ Overview ⇒ Devices in the Configuration Manager console.
2. Select the mobile device you want to wipe, and choose Retire/Wipe in the Home tab of the ribbon.
3. Select either Wipe Company Content And Retire The Mobile Device From Configuration Manager (selective wipe) or Wipe The Mobile Device And Retire It From Configuration Manager, as shown in Figure 16.75. Click OK.
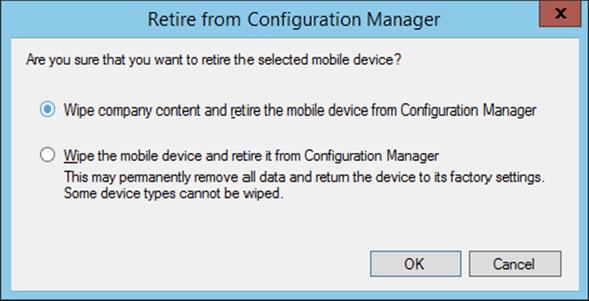
Figure 16.75 Retire From Configuration Manager dialog
Troubleshooting
The method of troubleshooting problems with mobile devices depends on the management mode chosen. For lite management, troubleshooting will be mostly focused on Exchange Server—both in terms of ensuring that the Exchange ActiveSync connector is running properly and ensuring that the Configuration Manager 2012 Exchange ActiveSync connector is properly configured and operational.
When it comes to depth management, there are a few more places to check when you run into problems. Depth-managed devices require enrollment before management can begin. The enrollment process is not difficult, but there are a number of moving parts that must be configured properly, not the least of which is certificates. When enrollment fails, it’s clear on the device that there was a problem, but it’s not always easy to collect diagnostic information from the device to understand why enrollment failed. Fortunately, there is excellent logging around the enrollment process to help. The EnrollmentService.log and EnrollmentWeb.log may contain errors that might occur as the enrollment process progresses. These logs are located in the SMS_CCM folder, under the EnrollmentPoint\logsand EnrollmentProxyPoint\logs folders, respectively.
When using the Windows Intune connector you have some different log files in the %SMS_LOG_PATH% folder. The log file cloudusersync.log will help you identify issues with synchronizing the users in the collection that holds the users who are allowed to enroll their mobile devices. The log files dmpdownloader.log, dmpuploader.log, dismgr.log, and outboundcontentmanager.log will help you identify issues with uploading and downloading apps, policies, and messages from and to Windows Intune. If you have issues when installing the Windows Intune connector, look in the following log files: sitecomp.log, connectorsetup.log, and certmgr.log.
The depth-managed mobile device client has similarities to the computer device client in that client health data is provided. Simply reviewing a device in the collections to ensure client health evaluations are current and successful, along with checking the Client Status data from the Monitoring node, is a good indicator of whether the client is behaving properly.
The Bottom Line
1. Detail the differences between lite and depth management. The management options and settings available for mobile devices will vary depending on whether lite- or depth-management options are in place.
1. Master It List mobile device management capabilities for lite versus depth management.
2. Understand how to configure mobile device management. Properly configuring mobile device management requires addressing several potential scenarios. From a Configuration Manager 2012 perspective, though, the choice is simple: lite or depth management.
1. Master It List the items that need to be configured for both lite and depth management.
3. Understand the depth-management enrollment process. From the user perspective, the enrollment process for depth management is straightforward. Behind the scenes, there are a number of moving parts. Each of these components is critical to the enrollment process.
1. Master It List the components required to enroll depth-managed devices.
All materials on the site are licensed Creative Commons Attribution-Sharealike 3.0 Unported CC BY-SA 3.0 & GNU Free Documentation License (GFDL)
If you are the copyright holder of any material contained on our site and intend to remove it, please contact our site administrator for approval.
© 2016-2026 All site design rights belong to S.Y.A.