Mastering System Center 2012 R2 Configuration Manager (2014)
Chapter 17. Role-Based Administration
Ask a System Center Configuration Manager administrator about one of the more challenging aspects of administering ConfigMgr in their environment, and they might answer “Security!” The class and instance model that was used in SMS and ConfigMgr 2007 to assign users varying levels of access and privileges was somewhat cumbersome and confusing.
System Center Operations Manager 2007 introduced the concept of role-based security administration to the System Center suite. Under the Role-Based Access Control (RBAC) model, administrators are able to use security roles and security scopes to define access to resources for the administrative users in the environment. System Center 2012 Configuration Manager adopts the RBAC security model and, as a result, greatly simplifies the administration of security in ConfigMgr 2012.
In this chapter, you will learn to
· Understand the role-based administration model in ConfigMgr 2012
· Distinguish security roles from security scopes
· Understand which objects in ConfigMgr 2012 define an administrative user
· Understand how to simulate permissions in the ConfigMgr 2012 console
Overview of Role-Based Administration
Configuration Manager 2012 uses the Role-Based Access Control model to define access to ConfigMgr features and functions. Under the RBAC model, the ConfigMgr 2012 administrator uses security roles, security scopes, and collections to define the administrative scope for the ConfigMgr administrative users. This provides the ConfigMgr administrator with the ability to define the security configuration for an administrative user in such a way that the only features of ConfigMgr 2012 that the user is able to view and interact with in the console are those that are part of their responsibility. All other items are essentially hidden and not available to the administrative user. This behavior is sometimes referred to as “Show me” behavior.
For example, consider a help desk analyst who needs the ability to deploy an application to computers in one geographic location but should not have the ability to deploy applications to computers in any other locations. Using the role-based administration model, the ConfigMgr administrator could easily create security roles, security scopes, and collections to satisfy those requirements. We will look at a sample scenario later.
One important new feature in Configuration Manager 2012 R2 is that reports can now utilize the role-based administration model. The data that is returned by all of the Configuration Manager reports will be filtered based on the permissions of the administrative user who is running the report. This greatly simplifies the process of securing access to report data.
Using Security Roles and Security Scopes
Security roles are used to organize tasks or functions, while security scopes are used to define access to objects. ConfigMgr 2012 provides some default roles and scopes, and the ConfigMgr administrator can also create their own to meet specific business needs. By using combinations of security roles, security scopes, and collections, the ConfigMgr administrator can easily control access to the environment and define what the ConfigMgr administrative users can view and manage.
As stated previously, this is sometimes referred to as “Show me” behavior and basically means that the administrative user will see only what is relevant to them and what they have access to in the ConfigMgr 2012 console. This is also known as access-based enumeration. Console objects that the administrative user has access to are visible in the console, while all others are hidden. This greatly simplifies the console experience for the administrative user and helps reduce confusion.
Managing with Flat Hierarchies
One of the design goals for ConfigMgr 2012 is that organizations should have flat ConfigMgr 2012 hierarchies. In fact, many companies may find they need only a single ConfigMgr primary site. One common reason for multiple SMS or ConfigMgr sites in previous versions of the product was to completely segregate the environment based on roles or functions. For example, one ConfigMgr 2007 primary site may have been used to manage only desktops and laptops, while another ConfigMgr 2007 primary site may have been used to manage only servers. Separating the sites completely ensured that the administrators for the desktop and laptop site could not manage the servers in any way and vice versa.
With the ability to designate control based on security roles, security scopes, and collections in ConfigMgr 2012, segregating the environment through the use of multiple primary sites is unnecessary. In ConfigMgr 2012, the ConfigMgr administrator could have all devices report to a single primary site and then use role-based security to define the required access for the administrative users. The desktop support team could be configured to see and manage only desktop computers, and the server team could be configured to see and manage only servers. Another benefit of the new security model in ConfigMgr 2012 is that the administrative objects (security roles, security scopes, and collections) need to be created only once in a ConfigMgr 2012 hierarchy with a Central Administration Site and child primary sites because that information is sent throughout the hierarchy as globally replicated data.
Security Roles
ConfigMgr 2012 uses security roles to define access to resources for administrative users. Security roles can be configured to provide administrative users with as much or as little access as they need in ConfigMgr to perform their job.
ConfigMgr 2012 includes several built-in security roles that handle many common ConfigMgr administrative task scenarios. Figure 17.1 shows the security roles that are included in ConfigMgr 2012. The following list provides a brief description of the built-in roles:
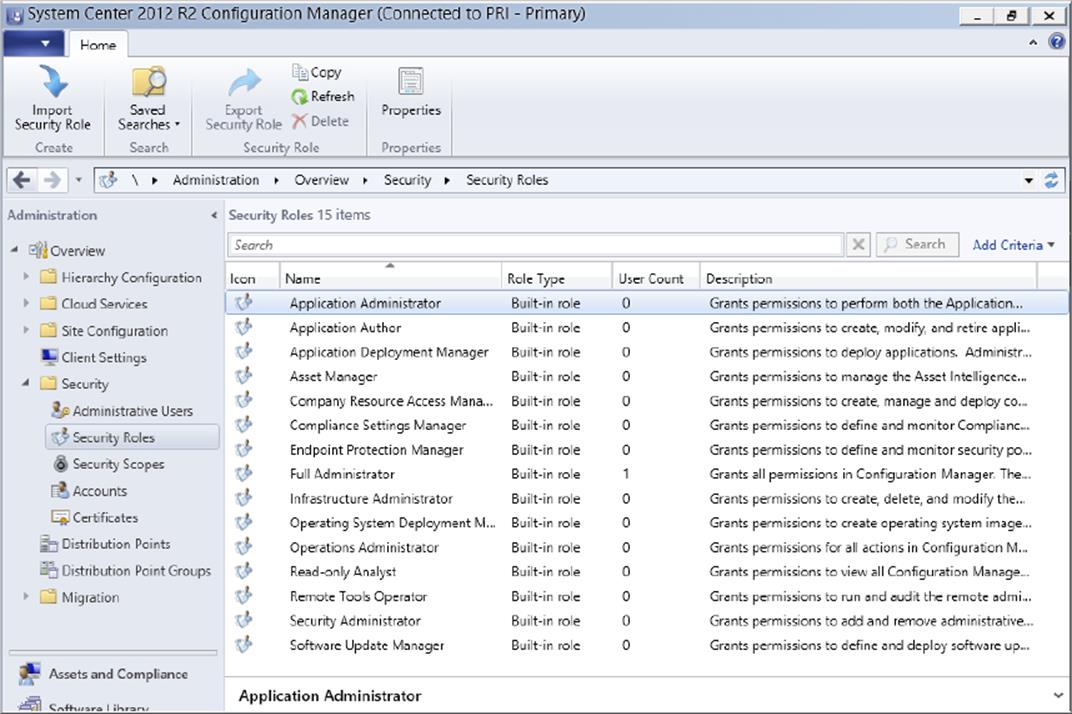
Figure 17.1 Built-in security roles
1. Application Administrator This role provides the permissions to perform both the application Deployment Manager role and the Application Author role. This role also provides the ability to manage queries, view site settings, manage collections, and edit settings for user device affinity.
2. Application Author This role provides the ability to create, modify, and delete applications. This role also provides the ability to manage packages and programs, manage alerts, and view status messages.
3. Application Deployment Manager This role provides the ability to distribute applications. Application deployment managers can view the list of applications and can manage other items related to applications, including alerts, templates, packages, and programs. They can view collections and collection membership and can also view status messages, queries, and conditional delivery rules.
4. Asset Manager This role provides the ability to manage the Asset Intelligence synchronization point, the Asset Intelligence reporting classes, hardware and software inventory, and software metering settings.
5. Compliance Resource Access Manager This role provides permissions to create, manage, and deploy the company resource access profiles. These include Wi-Fi, VPN, and certificate profiles to users and devices.
6. Compliance Settings Manager This role provides permissions to manage the Compliance Settings feature. Compliance Settings managers can create, modify, and delete configuration items and baselines. They can also deploy configuration baselines to collections, initiate compliance evaluation, and initiate remediation for noncompliant computers.
7. Endpoint Protection Manager This role provides the ability to manage and monitor Endpoint Protection security policies. Administrative users with this role can create, modify, and delete Endpoint Protection policies. They can also deploy Endpoint Protection policies to collections, create and modify alerts, and monitor Endpoint Protection status.
8. Full Administrator This role provides access to all objects. The administrator who installs ConfigMgr 2012 is automatically granted this security role.
9. Infrastructure Administrator This role allows the administrative user to create, delete, and modify the Configuration Manager Server infrastructure and also provides access to the site migration tasks.
10.Operating System Deployment Manager This role provides the ability to create operating system images and to deploy them to computers. Administrative users with this role can manage many aspects of the operating system deployment process, including the operating system installation packages and images, task sequences, drivers, boot images, and state migration settings.
11.Operations Administrator This role provides permissions for all actions in ConfigMgr 2012 except for the ability to manage security (managing administrative users, security roles, collections, and security scopes).
12.Read-only Analyst This role provides the ability to read all objects in ConfigMgr 2012.
13.Remote Tools Operator This role grants permissions to run and audit the remote administration tools. Administrative users with this role can use the ConfigMgr console to run the out-of-band management console and can use remote control, Windows Remote Assistance, and Remote Desktop Services.
14.Security Administrator This role provides the ability to add and remove administrative users and to associate administrative users with security roles, collections, and security scopes.
15.Software Update Manager This role provides the ability to define and deploy software updates. Administrative users with this role can create collections, software update groups, deployments, and templates and can enable software updates for Network Access Protection.
Full Administrator? Oh My!
As shown in the list, the Full Administrator role in ConfigMgr 2012 provides access to all objects in the environment. Users (or groups) who are assigned to this security role hold all the keys to all of the castles in the ConfigMgr 2012 environment. As a result, the number of users or groups who have this security role should be very limited. Because of the power that this role holds, the fewer the administrative users who have this role the better! Also, the organization should periodically review the access requirements for administrative users who hold this role and determine if they can be provided with a less-powerful security role.
As you can see in the preceding list, each security role provides specific permissions for various object types. If you want to see the permissions that a specific security role holds, you can view that information in the ConfigMgr 2012 console. For example, if you wanted to examine the permissions for the Application Administrator role, you would perform the following steps:
1. In the Configuration Manager administrative console, select Administration ⇒ Overview ⇒ Security ⇒ Security Roles.
2. Select the role that you want to inspect. In this case it is the Application Administrator role.
3. Click Properties in the Home tab of the ribbon.
This will open the Application Administrator Properties window.
4. Select the Permissions tab.
5. Now you can view the permissions for the role (Figure 17.2).
Figure 17.2 Application Administrator Properties
It is worth noting that you cannot change the permissions for the built-in security roles. You also cannot delete the built-in roles or export them. If you need to customize a built-in security role, then you should choose an existing role that is similar to the new role and make a copy of it. You will then have the ability to modify or delete the copied role. You can also export and import copied security roles. This import/export ability may be useful in a test or pilot ConfigMgr 2012 environment and would provide you with the ability to fine-tune the required security roles and permissions in the test site before deploying them to the production ConfigMgr 2012 site.
Also, if administrative users will perform multiple functions in ConfigMgr 2012 (such as deploy applications and use remote tools), the ConfigMgr administrator should assign multiple security roles to the administrative user instead of creating a new security role that combines a variety of tasks into a single role.
Security Scopes
ConfigMgr 2012 uses security scopes (Figure 17.3) to provide administrative users with access to secured objects. All secured objects must be assigned to at least one security scope. The association between the object and the security scope is managed from the object itself, not from the security scope.
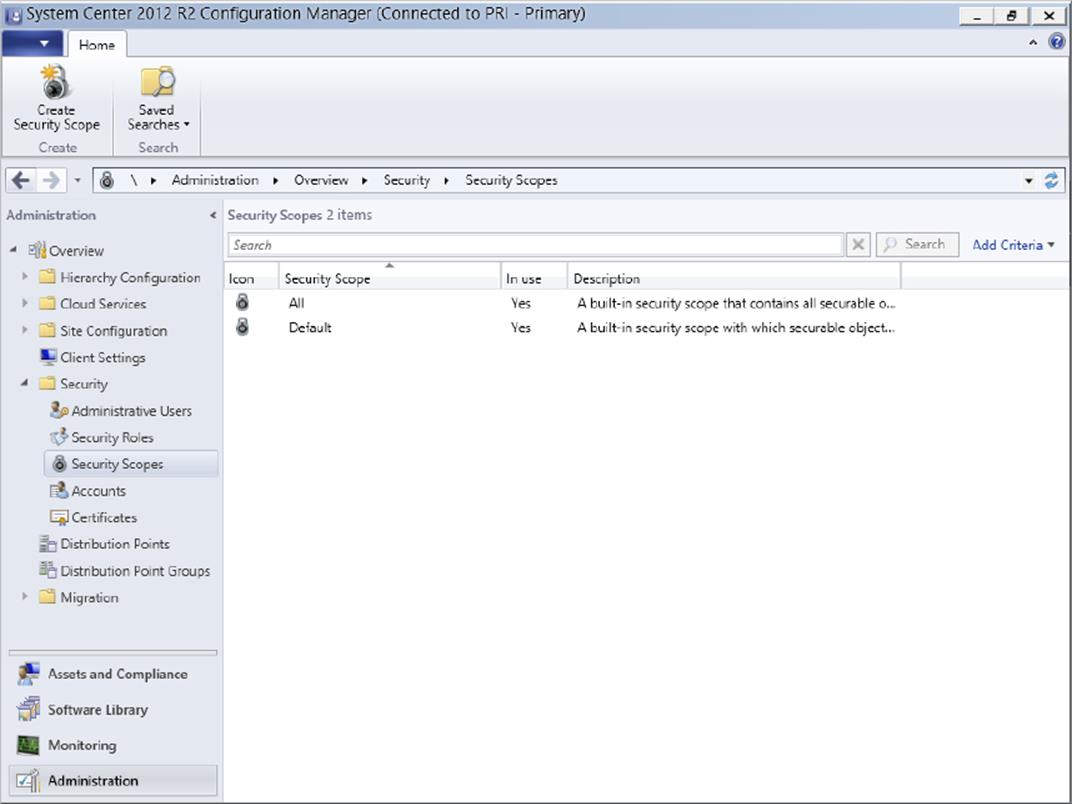
Figure 17.3 Security scopes
As shown in Figure 17.3, ConfigMgr 2012 includes two built-in security scopes: All and Default.
1. All The All security scope grants access to all scopes. Objects cannot be assigned to this security scope.
2. Default All objects are assigned to the All security scope when ConfigMgr 2012 is installed. As new objects are added to ConfigMgr 2012, they are also automatically added to the Default scope.
The ConfigMgr administrator can also create custom security scopes that are based on the needs of the environment and add the objects to the custom scopes.
Creating a Custom Security Scope
The following are the steps to create a custom security scope:
1. In the Configuration Manager administrative console, select the Administration workspace ⇒ Overview ⇒ Security ⇒ Security Scopes.
2. In the ribbon select Create Security Scope.
3. Provide a descriptive name for the security scope in the security scope Name field. In this case we will name our new scope Custom Security Scope.
You can add a description and make changes to the administrative assignments if needed.
4. Once the changes have been completed, click OK.
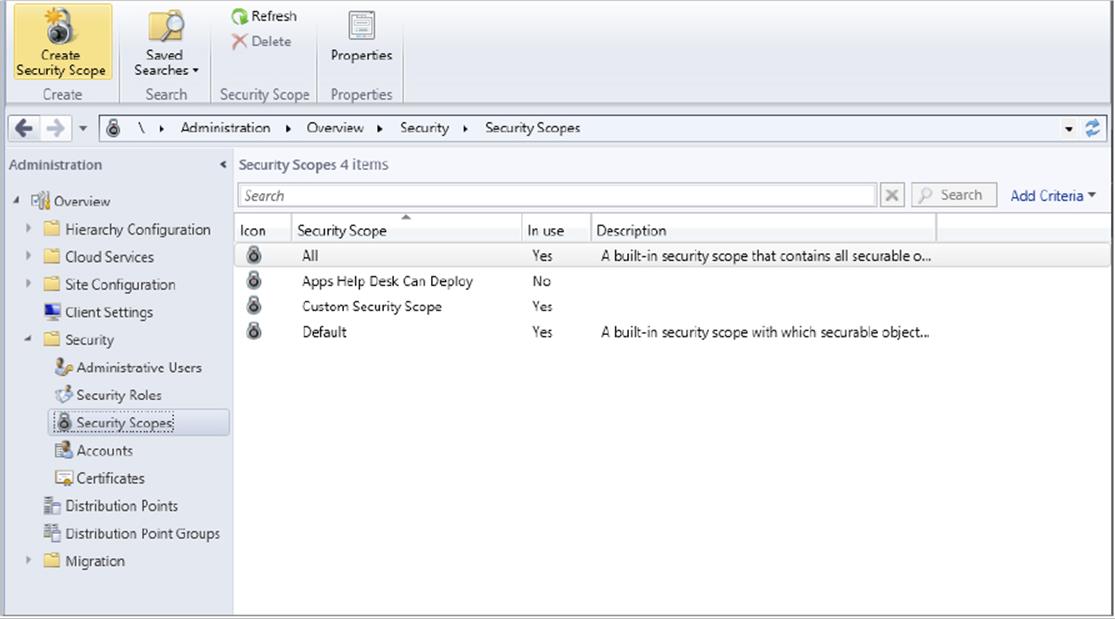
The new security scope should now be visible in the console, as shown in Figure 17.4.
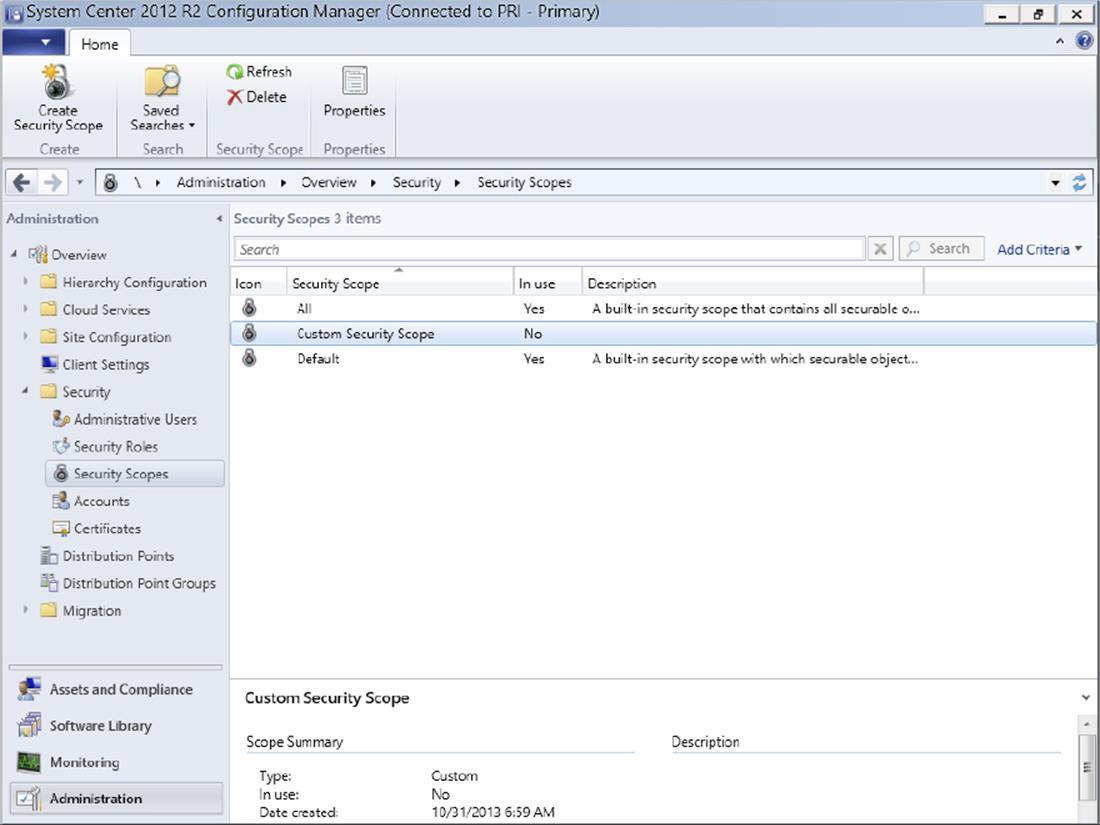
Figure 17.4 New security scope
Why Does the Column In Use Have a Value of No?
You may notice that the built-in security scopes (All and Default) show a value of Yes in the In Use column, while the security scope we just created has a value of No. The reason for this is we have not yet assigned objects to this new security scope. Once objects are assigned to the scope, it will automatically be changed to Yes. This allows the administrator to know which scopes have associated objects and which ones do not.
Security scopes can contain one or more object types, which include the following:
· Alert subscriptions
· Antimalware policies
· Applications
· Boot images
· Boundary groups
· Collections
· Configuration items
· Custom client settings
· Distribution points and distribution point groups
· Driver packages
· Global conditions
· Migration jobs
· Operating system images
· Operating system installation packages
· Packages
· Queries
· Sites
· Software metering rules
· Software update groups
· Software updates deployment packages
· Task sequences
Several object types cannot be included in security scopes and must be secured via security roles. These objects include the following:
· Active Directory forests
· Administrative users
· Alerts
· Boundaries
· Computer associations
· Default client settings
· Deployment templates
· Device drivers
· Exchange Server connectors
· Migration site-to-site mappings
· Mobile device enrollment profiles
· Security roles
· Security scopes
· Site addresses
· Site system servers and roles
· Software titles
· Software updates
· Status messages
· User device affinities
Assigning Resources to a Security Scope
Now that you understand how to create a security scope and you know which object types can be included, you will assign a resource to the new security scope you just created.
1. In the Configuration Manager administrative console, select the resource that will be added to the Custom Security Scope you created previously.
Remember that only certain types of objects can be added to security scopes.
2. For this example we will select an application called XML Notepad, which was previously configured by another administrator.
3. Select Software Library ⇒ Overview ⇒ Application Management ⇒ Applications in the ConfigMgr 2012 console, and choose the application that you want to manage.
4. Now choose the Classify section in the ribbon and then select Set Security Scopes.
You could also right-click the application and select Set Security Scopes there.
5. In the Set Security Scopes window, select the desired scope or scopes for this object and click OK.
For this scenario we will select only our new security scope, which we named Custom Security Scope in the previous exercise.
The new security scope should now be visible in the console (Figure 17.5).
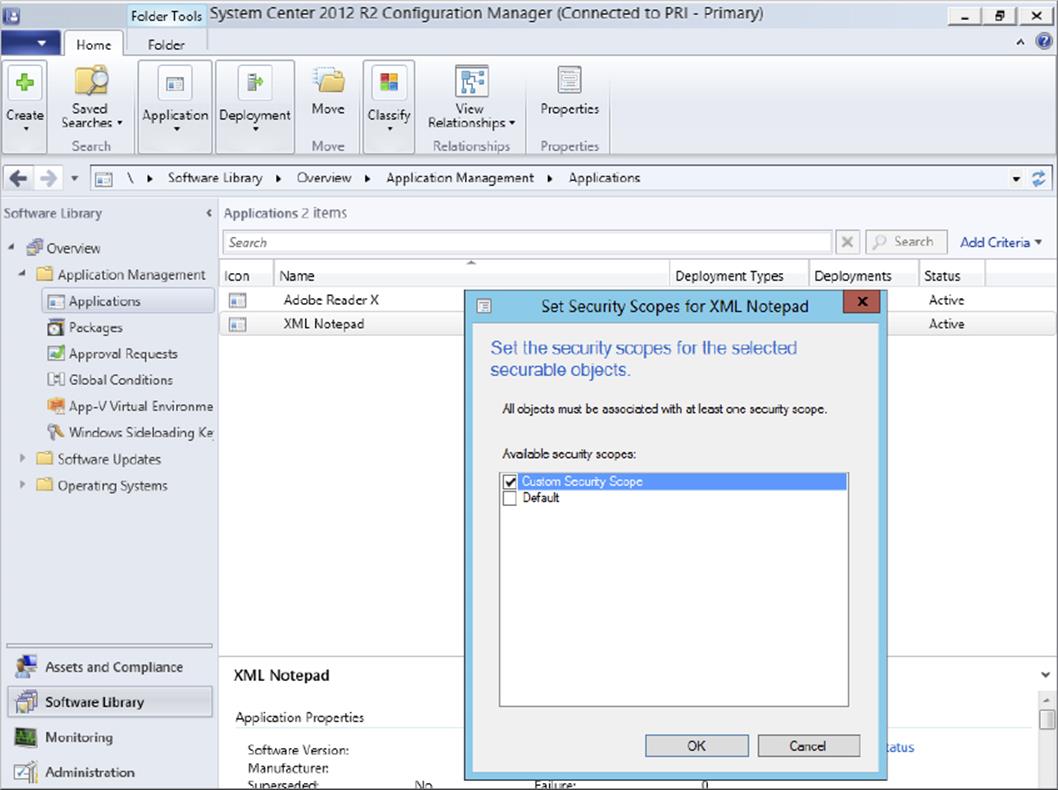
Figure 17.5 New security scope and application
6. Once the setting is applied, view the security scope and see that the In Use value is now set to Yes, as shown in Figure 17.6.
Figure 17.6 New security scope
Viewing Security Scope Objects
If you want to view all of the objects that are associated with a given security scope, a built-in report in ConfigMgr 2012 will provide that information.
1. In the Configuration Manager administrative console choose Monitoring ⇒ Overview ⇒ Reporting ⇒ Reports.
There are a few reports related to security scopes. The report we will run is titled Objects Secured By A Single Security Scope.
2. Right-click the report and select Run.
For this example we will use Application <all values> for the Object Type field, and in the Security Scope field we will specify the scope we created previously. You can either enter the scope name in the field or select the Values option to list all known values for that particular field.
3. For this scenario we will use Custom Security Scope because this was the name we gave the security scope when it was created.
4. Once the values have been set, click View Report (Figure 17.7).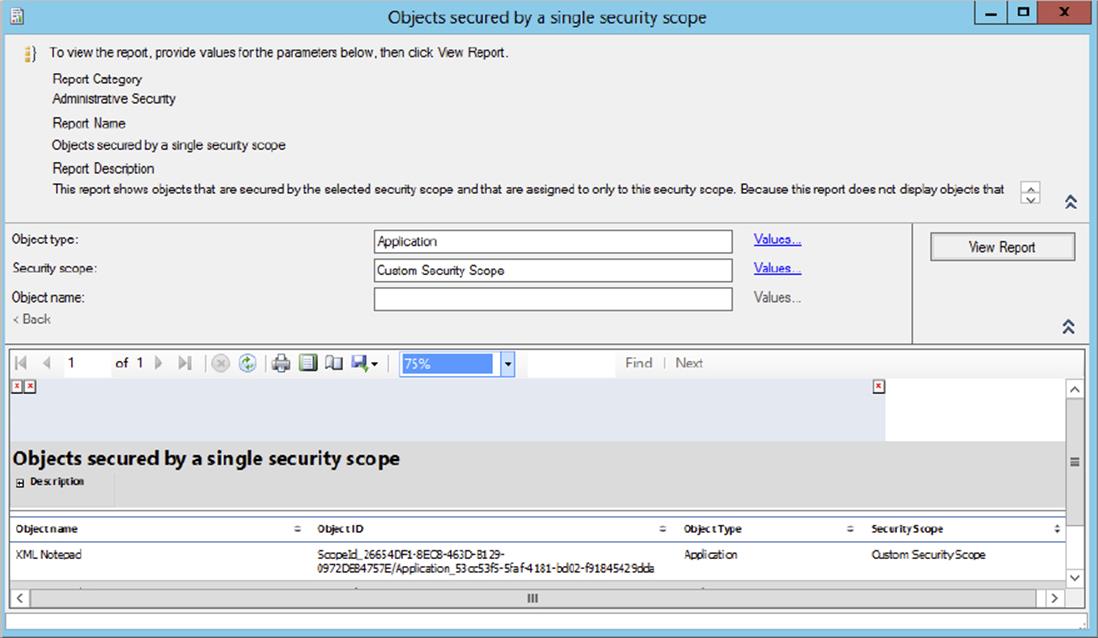
Figure 17.7 Objects Secured By A Single Security Scope report
This report is designed to show objects that are secured by only the specified security scope, which is Custom Security Scope in this scenario. If an object is secured by two or more security scopes (the Custom Security Scope and the default security scope, for example), then the object will not be displayed in this report.
Collections
We have discussed how security roles and security scopes are used in the role-based administration model in ConfigMgr 2012. In order for an administrative user to perform functions (for example, deploy an application) on a resource, the user must have access to a collection that contains the resource. We can use collections, along with security roles and security scopes, to tightly control what objects in the ConfigMgr console an administrative user can access.
Collections are probably not a new concept to the SMS and ConfigMgr veterans reading this book, but there are some changes to how collections work in ConfigMgr 2012. This chapter does not perform an exhaustive examination of those changes, but it does highlight some of the changes and differences.
Using Collections
As a bit of background, collections are a way to logically group resources, such as devices or users, and collections can be created to meet various manageability and targeting requirements. The following are just a few examples:
· Use collections to separate servers from workstations or laptops.
· Use collections to separate pilot users or devices from production resources.
· Use collections based on departments, business units, or geographical location for targeting or administrative purposes.
Once the requirements for the collection have been defined and the collection has been created, the collection can be assigned to a ConfigMgr administrative user.
Collections in ConfigMgr 2012 contain one or more rules that control the membership of the collection. There are four rule types:
1. Direct Rule This rule type allows the administrator to explicitly define the users or computers that should be members of the collection. The membership of this collection does not change unless the administrator removes the explicit entry in the collection properties or the resource is removed from ConfigMgr. You might think of this approach as hard-coding machine names into the collection membership properties.
2. Query Rule This rule type dynamically updates the membership of the collection based on a query that is run on a schedule by ConfigMgr. ConfigMgr uses query-based collections for the built-in collections. Query-based collections are very useful because they routinely evaluate the specified criteria and identify matching devices or users.
3. Include Collections Rule This new rule type allows the administrator to include members of another collection in a ConfigMgr collection. The membership of the current collection will be updated on a schedule when members of the included collection change.
4. Exclude Collections Rule This is another new rule type, and it allows the administrator to exclude the members of another collection from a ConfigMgr collection. The membership of the current collection will be updated on a schedule when members of the collection change.
Understanding the Default Collections
ConfigMgr 2012 includes a number of default collections. Some of these can be modified if need be, but none can be deleted. The following are the default collections:
1. All User Groups Contains user groups discovered during Active Directory Security Group Discovery.
2. All Users Contains users discovered during Active Directory User Discovery.
3. All Users And User Groups Contains the All Users and the All User Groups collections. This collection cannot be modified and contains the largest scope of user resources.
4. All Desktop And Server Clients Contains server and desktop devices that have the ConfigMgr 2012 client installed. Membership is determined by Heartbeat Discovery.
5. All Mobile Devices Contains mobile devices that are managed by ConfigMgr 2012. Membership is restricted to mobile devices that are successfully assigned to a site or discovered by the Exchange Server connector.
6. All Systems Contains the All Desktop And Server Clients, the All Mobile Devices, and All Unknown Computers collections. This collection cannot be modified and contains the largest scope of device resources.
7. All Unknown Computers Contains generic computer records for multiple computer platforms. It’s typically used to deploy an operating system via PXE boot, bootable media, or prestaged media.
For more information about collections, see http://technet.microsoft.com/en-us/library/gg682169.aspx.
Administrative Users
An administrative user is an individual or group who will manage resources in the ConfigMgr 2012 infrastructure. The administrative user may have very limited access to resources in the environment (for example, a help desk analyst who can only deploy Adobe Reader X to computers in a specific office location) or may have complete access to all objects in the ConfigMgr environment (the ConfigMgr administrator).
The administrative user consists of a Windows user account (or a group) and at least one security role and one security scope. If needed, a collection could be used to limit the administrative scope of the administrative user (Figure 17.8). These items are configured when the administrative user is created and can be changed later if need be.

Figure 17.8 Assigned security scopes and collections
“Assigned Security Scopes And Collections”—What Does That Mean?
One issue that comes up during the administrative user creation process requires a bit more explanation. When you create a new administrative user, two options appear when you define the assigned security scope and collection for the user (see Figure 17.8).
The first choice is All Instances Of The Objects That Are Related To The Assigned Security Roles. If this option is selected, the administrative user will be associated with the All security scope and all collections.
The second choice is Only The Instances Of Objects That Are Assigned To The Specified Security Scopes Or Collections. This option allows the ConfigMgr administrator to add or remove security scopes and/or collections in order to provide a customized administrative scope for the user.
If you modify an administrative user, a third option is available called Associate Assigned Security Roles With Specific Security Scopes And Collections. As the wording of the option implies, this option allows the administrator to create associations between security roles, security scopes, and collections for the user.
We will now apply what you have learned and walk through a real-world scenario.
![]()
Helping the Help Desk Analyst
You are the ConfigMgr 2012 administrator and have been asked to provide ConfigMgr access to an administrative user. A help desk analyst needs the ability to deploy Adobe Reader X to all computers in the Dallas location. The analyst should also have the ability to use remote tools on the computers in the Dallas location. The analyst should not be able to deploy any other software to or interact in any way with the other computers in the infrastructure.
Which Security Role(s) to Use
As the ConfigMgr administrator, you first need to identify whether any of the existing security roles meet the needs of the scenario. In the ConfigMgr 2012 console, select Administration ⇒ Overview ⇒ Security ⇒ Security Roles to view the roles that have been defined. The built-in Application Deployment Manager role appears to meet the requirements for the application delivery portion of the requirements. The built-in Remote Tools Operator role appears to meet the requirements for the remote tools functionality. So, you appear to have two existing security roles that will meet your needs. Later in this chapter you will learn how to use the RBA Viewer application to create custom security roles if need be.
You Need a Security Scope
The next step is to define the required security scope for the help desk analyst. The requirements stated that this user should only be able to deploy Adobe Reader X, so you need to create a security scope. You will use the process defined earlier in this chapter to create the security scope, and you will call the security scope Apps Help Desk Can Deploy. (See the following illustration.)
Remember that the In Use column value will be No until the security scope is associated with at least one object.
You may remember that the association between an object and the security scope is managed from the object, not from the security scope. So, you need to associate the security scope you just created with the Adobe Reader X application by performing the following steps:
1. In the ConfigMgr 2012 console, select the Adobe Reader X application in the Software Library workspace (Software Library ⇒ Overview ⇒ Application Management ⇒ Applications).
For the purposes of this scenario, assume that an administrator has already created and configured the Adobe Reader X application installation in ConfigMgr 2012 and it is ready for deployment.
2. Right-click the Adobe Reader X application and select Set Security Scopes.
3. Uncheck the Default security scope, and check the Apps Help Desk Can Deploy security scope.
4. Click OK. (See the following illustration.)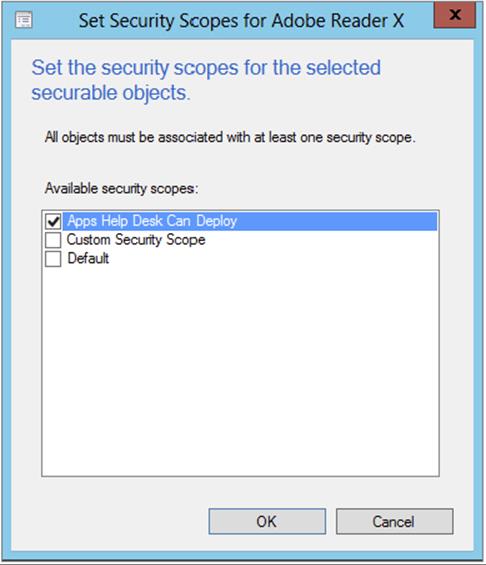
Note: You may also need to include a distribution point or a distribution point group in the security scope in order for the Deploy Software Wizard to complete when executed under the administrative user’s credentials.
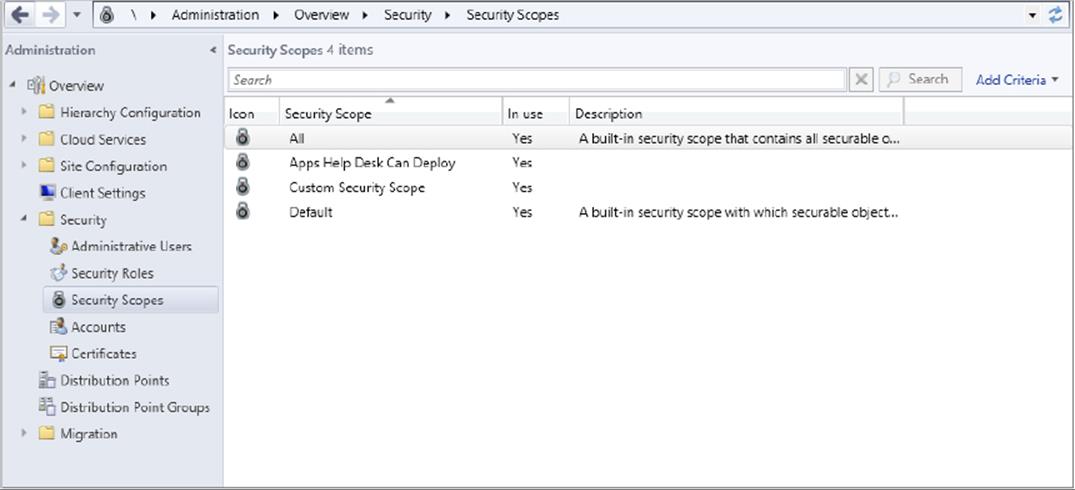
If you go back and view the status of the Apps Help Desk Can Deploy security scope in the ConfigMgr console, it should now show a value of Yes in the In Use column.
And Now You Need a Collection
There are several ways to create the collection for this scenario. In fact, someone else may have already built a collection that includes the Dallas computer devices, and you could use that collection for your scenario.
However, let’s assume you don’t already have a collection that meets your needs and you need to create one. You may already know the names of the computers in the Dallas location and you could simply create a direct membership collection and directly add the computer names to the collection. Or, you could create a query-based collection and use data that is unique to the Dallas site to find computers that match the criteria. Examples of the data could be an Active Directory site, an Active Directory organization unit, certain TCP/IP subnet ranges, a certain naming standard in the computer names, and so on. For now, assume that you were provided a list of computers in Dallas, and you’re going to add them to a direct-membership device collection called Dallas Computers.
Finally: Creating the Administrative User
You have gone through several steps to prepare the required access in ConfigMgr. This may seem rather labor intensive at first, but you created several items that may be used multiple times in future security configuration requests. Let’s take a moment to review what you will be using to create the administrative user.
You are going to use two built-in security roles for this scenario: Application Deployment Manager (so the analyst can deploy Adobe Reader X to the Dallas computers) and Remote Tools Operator (so the analyst can use remote tools on the Dallas computers).
You created a security scope called Apps Help Desk Can Deploy and associated the scope with the Adobe Reader X application. This limits the help desk analyst to the Adobe Reader X application.
You created a direct-membership collection that contains the computers in the Dallas location.
The next step is to create the actual administrative user:
1. In the ConfigMgr 2012 console, select Administration ⇒ Overview ⇒ Security ⇒ Administrative Users.
2. Either select the Add User Or Group option in the ribbon or right-click the Administrative Users option and select Add User Or Group.
You need to designate the user or group that is being configured as an administrative user. In this scenario you are managing a single user.
3. Select the user’s domain account (named HDAnalyst in this example). It is not part of the user name.
4. In the Assigned Security Roles section, use the Add option to select the security roles that you decided to use for this scenario: Application Deployment Manager and Remote Tools Operator.
5. In the Assigned Security Scopes And Collections section, select the Add option to choose the predefined collection and security scope that will limit what the help desk analyst has access to in the console. (See the following illustration.)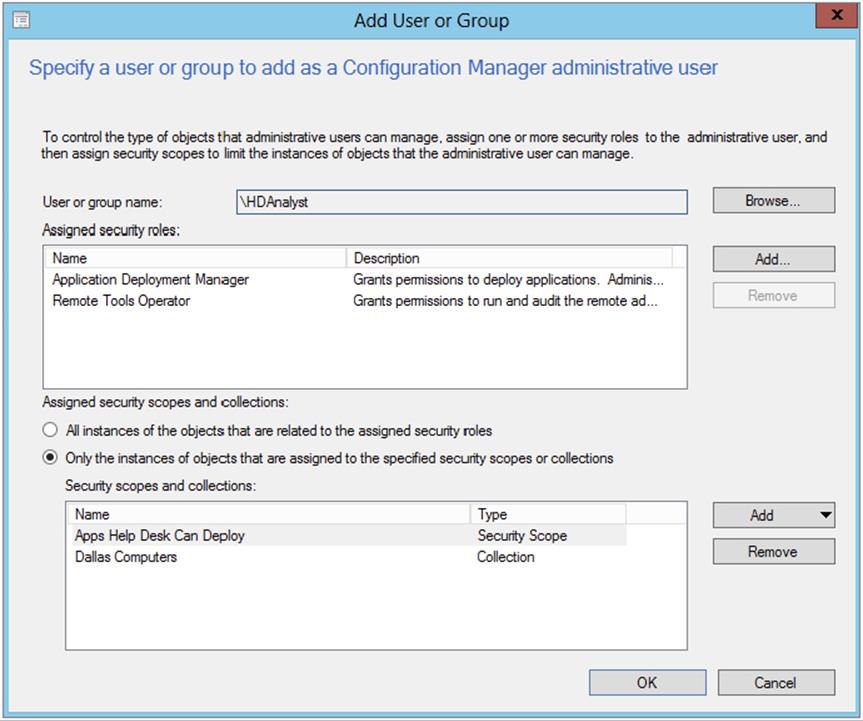
6. After adding the entries, click OK.
If there were several help desk analysts who needed the same configuration, you would probably create a group in Active Directory, add the users to that group, and then configure that group as an administrative user and avoid having to repeat these steps for each user individually.
At this point you have completed your work and are ready for the help desk analyst to test their ConfigMgr 2012 console with their logon credentials and make sure they can perform the required functions.
If you performed the configuration properly, then the administrative user HDAnalyst should be able to open the ConfigMgr 2012 console and do the following:
· View only the Dallas Computers collection in the Assets And Compliance ⇒ Overview ⇒ Device Collections view. (See the following illustration.)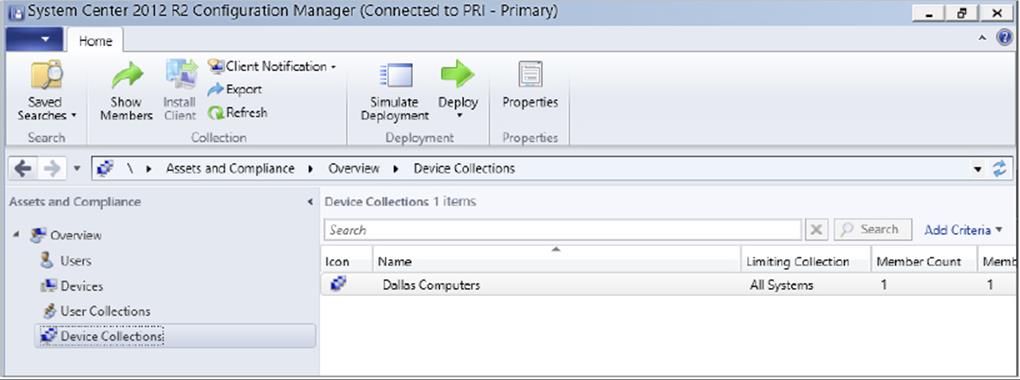
· See only the Dallas devices in the Assets And Compliance ⇒ Overview ⇒ Devices view. Also since the user can see only the Dallas devices, they can also use only remote tools against those computers. (See the following illustration.)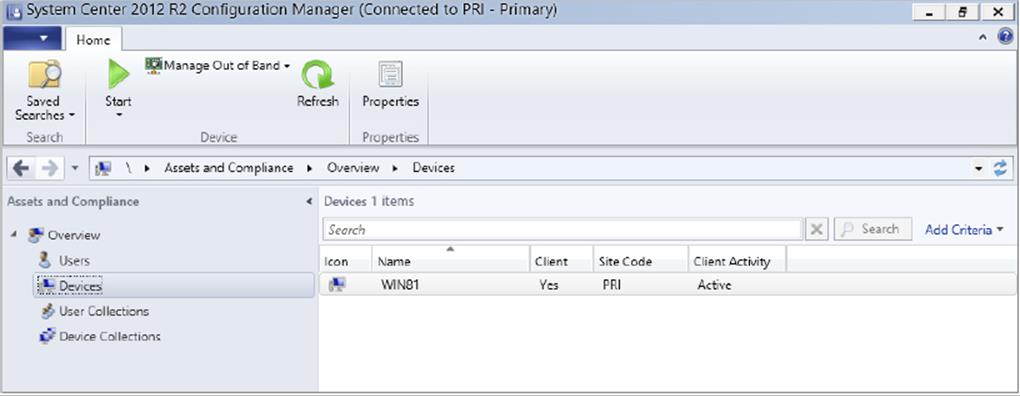
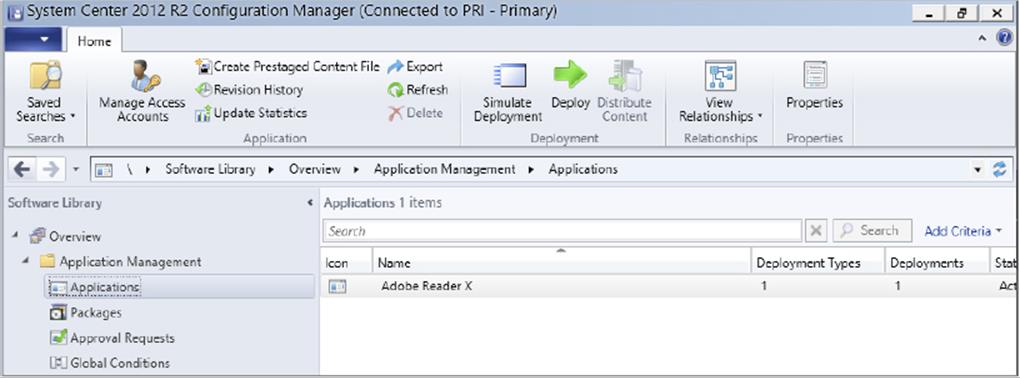
View only the Adobe Reader X application in Software Library ⇒ Overview ⇒ Application Manager ⇒ Applications, and when they deploy it, they should only be able to select the Dallas Computers collection. (See the following illustrations.)

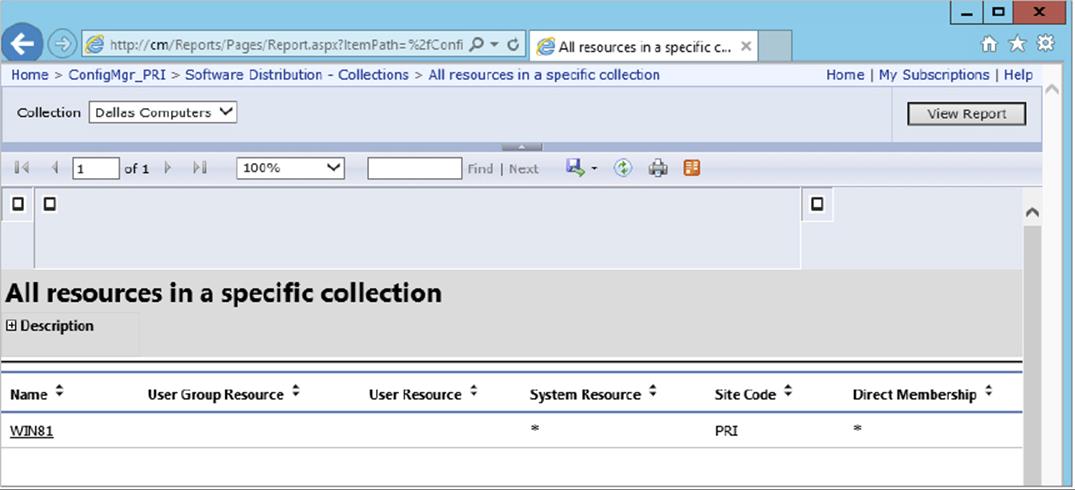
Also, as you learned earlier, Configuration Manager 2012 R2 uses the role-based administration model for reporting data as well. The HDAnalyst user should only be able to view report data about objects that the user has access to. If you open the reporting site and select the report titled All Resources In A Specific Collection, the user can only select the Dallas Computers collection and view data about the computers in the collection. (See the following illustration.)
RBA Viewer
You may already be familiar with the System Center 2012 Configuration Manager toolkit. It includes many useful utilities and tools that will help you manage your ConfigMgr environment and is available here:
www.microsoft.com/en-us/download/details.aspx?id=36213
One of the tools included in the toolkit is officially titled the Role-Based Administration Modeling and Auditing Tool, but the utility is commonly referred to as RBA Viewer. The RBA Viewer application allows you to model security roles with a specific set of permissions and also allows you to audit the security scopes and security roles of other ConfigMgr users. RBA Viewer should be very helpful as you develop the ConfigMgr security configuration for your environment.
The RBA Viewer application has a few requirements:
· The ConfigMgr 2012 console must be installed on the same computer as the RBA Viewer application.
· The user running the RBA Viewer application must be a member of the Full Administrator, Read-Only Analyst, or Security Administrator role.
· The user running RBA Viewer must be assigned to all security scopes and all collections.
· To analyze report folder security, the user must have SQL access and in order to analyze report drill through the RBA Viewer application must run on the site that has the Reporting Services point installed.
We will use a case study to demonstrate how to use RBA Viewer to create a new security role and verify that it will meet your needs.
![]()
Creating an Administrative User
You are the ConfigMgr 2012 administrator and have been asked to provide ConfigMgr access to an administrative user. The user will need the access provided by the Application Administrator security role but also will need the added ability to create and modify software metering rules. You will use the RBA Viewer to define the new security role, verify that it meets the requirements, and then export it from RBA Viewer so that it can imported into the ConfigMgr console. Click Start ⇒ ConfigMgr 2012 Toolkit and select RBA Viewer to open the RBA Viewer application.
1. In RBA Viewer you have the option to select a default security role and use that as a starting point for the required permissions, or you can start with an empty list of permissions. For this scenario we are adding additional permissions to the Application Administrator role so we will select the Application Administrator role from the list in RBA Viewer.
2. Verify that the Show Roles option is selected by clicking the icon in the top right of the RBA Viewer application and then select Application Administrator from the list of available security roles in the drop-down. See the following illustration.
3. In this example we are adding the ability to create and modify software metering rules to the permissions provided by the Application Administrator role. Scroll down in list of available items and select Software Metering Rule Under Software Metering Rule, select Read, Modify, Delete, and Create.
4. Once the required permissions have been configured click Analyze. RBA Viewer will identify any existing security roles that are similar to the permissions that have been configured in the tool.
5. Select the AdminConsole tab in the RBA Viewer to verify that the user with this security role has the proper access. With this custom security role you should have the access provided by the Application Administrator role as well as the ability to manage software metering rules. You can also use the AdminConsole feature in RBA Viewer to verify that the security role cannot access or view other settings. See the following illustration.
6. Once the permissions have been properly configured, click the Export button. This will save the security role configuration to an XML file, which you can then import into the ConfigMgr 2012 console.
7. Open the ConfigMgr 2012 console and select the Administration workspace.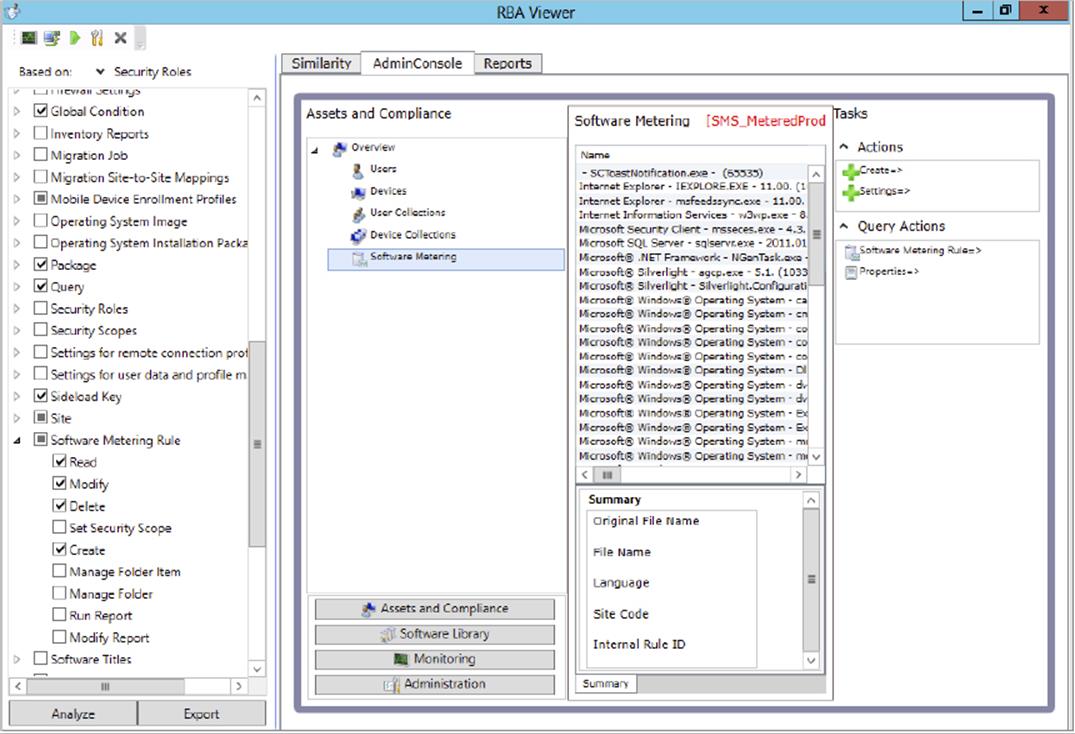
8. Select Overview ⇒ Security ⇒ Security Roles and choose the Import Security Role option from the ribbon.
9. At the Import Security Role window, select the XML file that you exported from RBA Viewer and click Open.
10.ConfigMgr 2012 will import the information from the XML file and create the security role. The security will use the name of the import file as the name of the new security role, but you can change the name if needed in the ConfigMgr console. You can also open the role and use the Permissions tab in the properties to ensure the correct permissions have been created for the role.
The Bottom Line
1. Understand the role-based administration model in ConfigMgr 2012. SMS and ConfigMgr 2007 used a class and instance security model, which could be confusing at times. ConfigMgr 2012 adopts the RBAC model, thereby making the administration of security in ConfigMgr 2012 a less-daunting task.
1. Master It What does RBAC stand for? And what does role-based administration mean?
2. Distinguish security roles from security scopes. Security roles and security scopes are important components of the role-based security model in ConfigMgr 2012.
1. Master It Can you identify the key differences between a security role and a security scope?
3. Understand which objects in ConfigMgr 2012 define an administrative user. The administrative user consists of the security role, the security scope, and collections. In this chapter you learned the differences between a security role and a security scope, and you know that collections can be used to control the objects that an administrative user can access.
1. Master It As the ConfigMgr 2012 administrator, do you need to create a custom ConfigMgr 2012 console so that the administrative user can see only what you want them to see?
4. Understand how to simulate permissions in the ConfigMgr 2012 console. The RBAC model in ConfigMgr 2012 greatly simplifies the process for creating administrative users and defining what objects in ConfigMgr they can access.
1. Master It Besides the ConfigMgr 2012 console itself, what other tool can you use to simulate ConfigMgr user security and verify that the security model will provide the desired level of access?
All materials on the site are licensed Creative Commons Attribution-Sharealike 3.0 Unported CC BY-SA 3.0 & GNU Free Documentation License (GFDL)
If you are the copyright holder of any material contained on our site and intend to remove it, please contact our site administrator for approval.
© 2016-2026 All site design rights belong to S.Y.A.