Mastering System Center 2012 R2 Configuration Manager (2014)
Chapter 18. Disaster Recovery
No matter what kind of hardware you are using for your Configuration Manager sites, there is always the possibility that hardware or some other failure will bring a site down. The only thing you can really do to prepare for something like this is to back up Configuration Manager the best you can so that you can get your site back up and running as soon as possible. Fortunately, Microsoft continues to include the Backup ConfigMgr Site Server maintenance task, which can be used to create a site backup that will provide the information you need to successfully recover your site server. In addition to the native application backup capabilities, Configuration Manager 2012 also supports two additional recovery methods. You can restore your Configuration Manager site from a site server database backup that is performed as part of a Microsoft SQL Server maintenance plan, or you can restore your site from a backup that is performed using System Center 2012 Data Protection Manager (DPM). The primary focus of this chapter will be on the configuration and usage of the Backup Site Server maintenance task.
In this chapter, you learn to
· Configure backups for Configuration Manager sites
· Recover Configuration Manager sites
· Archive backup snapshots to another location
· Reinstall the site components and reset file and registry permissions to their default settings
Planning for Disaster Recovery
Planning for disaster recovery in Configuration Manager is not complicated, but as you’ll see in the section “Recovering Configuration Manager,” it is different than it was in Configuration Manager 2007 and previous versions of System Management Server (SMS). With that in mind, you should consider the following when you are setting up your backup and recovery plans for your Configuration Manager hierarchy.
· The Configuration Manager backup task uses the Volume Shadow Copy Service (VSS), which is a part of the Windows Server operating system and is configured during the installation of Configuration Manager, to make backup snapshots.
Microsoft describes VSS as “a framework which facilitates communication between applications, storage subsystems, and storage management applications (including backup applications) in order to define point-in-time copies of storage data.” The shadow copies that are made from VSS of the site server and the site database information are used to back up and restore Configuration Manager. By using VSS, the Backup ConfigMgr Site Server maintenance task can keep server downtime for backups to a minimum.
· A complete backup of a Configuration Manager site server includes the following:
· The Configuration Manager site database (SQL)
· The Configuration Manager site database transaction log
· <ConfigurationManager installation dir>\Bin
· <ConfigurationManager installation dir>\Inboxes
· <ConfigurationManager installation dir>\Logs
· <ConfigurationManager installation dir>\Data
· <ConfigurationManager installation dir>\srvacct
· <ConfigurationManager installation dir>\install.map
· HKLM\Software\Microsoft\SMS registry keys on the site server
· Unlike most other SQL applications, the master SQL database isn’t needed to restore a Configuration Manager site, so it isn’t backed up with the Configuration Manager database when the Backup ConfigMgr Site Server maintenance task is run.
· If you have a site hierarchy with a Central Administration Site and multiple primary sites, a newly installed primary site will automatically receive all global data when the site is reinstalled.
What about Secondary Sites?
There is no backup task for Configuration Manager 2012 secondary sites, but there is a recovery option. If you need to recover a secondary site, you can select the site in the Configuration Manager console and initiate the recovery process. The secondary site will be reinstalled and the necessary data will be replicated from the primary site. This will be discussed in more detail later in the chapter.
What Is Not Included in the Backup
When planning for a backup, it is also very important to know what is not part of the backup maintenance task. As a rule of thumb, only the site server and the site database are included. You must also plan for the backup of remote site systems, add-on products, the content library, and the like.
The Content Library
The content library contains all packages (software updates, applications, and images). You will find a content library on the site server and all distribution points. You should consider adding these items to your enterprise backup solution. As a consequence of not backing up the content library, you may need to add several hours to the restore process because all files must be processed from the original source folders and inserted into the content library. With that in mind, also consider where you place source folders for any package. Organizations often host source files on the site server. This is not a recommended strategy; instead you should host all source folders on a separate file server.
Site Systems
The consequence of having a remote site system that fails is often a reinstallation of the specific site system. It is no big issue because most site systems cannot contain data and can be reinstalled quickly. Add to that the fact that you can have multiple instances of the same site system in the environment.
Configuration Manager Logs
The Backup ConfigMgr Site Server maintenance task will back up the log files located in the Logs folder (ConfigMgrInstallationPath>\Logs), but some Configuration Manager site system roles may write log files in other locations on the site server and these files are not backed up. If these log files should be backed up, you need to include them in your enterprise backup solution.
Clients
No client will be backed up during the backup maintenance task. In the event of a client failure, the new built-in client remediation task will be able to fix the error and perform a client reinstallation if needed.
SQL Reporting Services
Any customizations made to the default reports and custom reports will be lost in the event of a failure. All default reports will be recovered during the reinstallation of the site system.
When planning for a SQL Reporting Services backup you need to consider the following:
· Use the full recovery model in SQL to back up the reportserver database.
· Use the simple recovery model in SQL backup to back up the reportservertempdb database.
· Back up the encryption keys, using the rskeymgmt utility or the Reporting Services Configuration Manager.
· Back up these configuration files:
· Rsreportserver.config
· Rssvrpolicy.config
· Rsmgrpolicy.config
· Reportingservicesservice.exe.config
· Web.config for both the Report Server and Report Manager ASP.NET applications
· Machine.config for ASP.NET
· Back up any custom reports, models, and custom projects.
For more detailed information about backing up SQL Reporting Services, see
http://msdn.microsoft.com/en-us/library/ms155814.aspx
WSUS Database
Windows Server Update Services is not part of the backup, and you should consider performing a regular backup using SQL, as described in this article:
http://technet.microsoft.com/en-us/library/ms187510.aspx
System Center Updates Publisher
System Center Updates Publisher (SCUP) is a stand-alone product installed with a single database stored in the user profile. You either need to perform a backup of the database from the user profile or configure SCUP 2011 to use a database from a shared network location.
To configure SCUP 2011 to use a database in E:\SCUPDB, follow these simple steps:
1. Open Windows Explorer and navigate to C:\Users\Installation account\AppData\Local\Microsoft\System Center Updates Publisher 2011\5.00.1727.0000\.
2. Copy the database file to a shared location.
3. Navigate to the SCUP 2011 installation folder and edit the scup2011.exe.config file.
4. Find <setting name="SSCEDataFile" serializeAs="String">.
5. Add this line: <value>E:\SCUPDB\scupdb.sdf</value>
6. Save and close the file.
With the database file on the network, all you need is a backup of the file.
Microsoft Deployment Toolkit
Microsoft Deployment Toolkit (MDT) is a free stand-alone tool from Microsoft that is often used with Configuration Manager 2012. MDT can contain a SQL database that you need to include in the normal SQL backup routines. Furthermore, you need to make sure that you have a backup of any custom scripts.
User State Migration Data
The files and folders that are used to store user state data on the Configuration Manager state migration point are not backed up as part of the Backup ConfigMgr Site Server maintenance task. You should determine if these folders and files should be backed up as part of your enterprise backup solution.
Backing Up Configuration Manager
The first thing to know about backing up Configuration Manager sites is that you can automate the procedure by scheduling the Backup ConfigMgr Site Server maintenance task. We will cover this maintenance task in more detail later in the chapter.
When the Configuration Manager backup service (SMS_SITE_BACKUP) starts at the scheduled day and time, it uses instructions in the backup control file, located at
<ConfigMgr Install Location>\Inboxes\smsbkup.box\smsbkup.ctl
You can modify this file in Notepad to change what the backup service takes a snapshot of, but it isn’t usually necessary. If you modify the file, take care not to change any of the default settings. Customizations that might be valuable to add are other registry keys or file locations. Figure 18.1 shows the default smsbkup.ctl file.
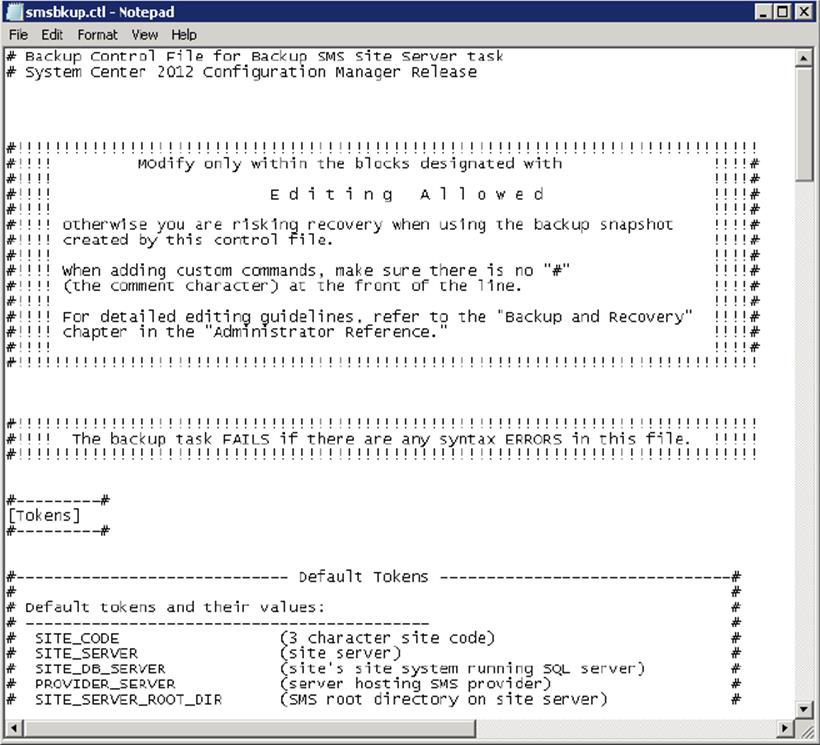
Figure 18.1 The smsbkup.ctl file
Information on the site backup process is written to the smsbkup.log file, which can be found in the default location for log files and in the location that is designated in the Backup ConfigMgr Site Server maintenance task when the task is run.
Backup Considerations for the Central Administration Site
The process of backing up and recovering a central administration site is pretty much the same as with any primary site (discussed shortly). There are special considerations to keep in mind when you back up and restore the Central Administration Site that make it different than other primary sites when you set up backups of the central site and when you recover them:
· The Central Administration Site is the busiest site in your hierarchy, which gives you a smaller time frame for scheduling a backup. Configuration changes are made on a constant basis, and you may not be able to recover them all.
· The Central Administration Site has the largest amount of data, because it is the only site that contains all global and site data. It will take longer to back up than your primary sites.
These combined factors might make you consider backing it up less frequently than your primary sites. But this is not a good idea, because the Central Administration Site is the most important site in your Configuration Manager hierarchy. If one of your primary sites fails, and for some reason your backups for that site are corrupted, you can always install a new primary site and replicate the most current global data from the Central Administration Site. That’s not the case with the Central Administration Site. With this in mind, we recommend scheduling the backup of your Central Administration Site to run every day.
A couple of steps will enable you to recover as much of your central site as possible in the event of data loss:
· Back up the Central Administration Site every day.
· Have a reference site for the central site so that the restore process will be able to recover global data that is created after the site is backed up.
With these steps, you should be able to recover most of the Central Administration Site without too much trouble. You will be able to recover global and site data from the reference site.
Copying Site Backups to Another Location
The first time the Backup ConfigMgr Site Server task runs, it creates a backup snapshot, which can be used to recover a Configuration Manager site system when it fails. The next time the backup task runs, it makes a new backup snapshot that will overwrite the one that was made during the last snapshot. This could be a problem if the current backup snapshot becomes corrupt for some reason, because there will not be another backup to restore from.
For that reason, Microsoft recommends that you archive the backup to another location off the site server itself. As a best practice, it also recommends having multiple backup archives, for the following reasons:
· It is common for backup media to fail, get misplaced, or contain only a partial backup. Recovering a failed site from an older backup is better than recovering with no backup at all.
· A corruption in a site can go undetected for several backup cycles. You may need to go back several cycles to the backup snapshot from before the site became corrupted.
· The site might have no backup at all if, for example, the Backup ConfigMgr Site Server task fails. Because the backup task removes the previous backup snapshot before it starts to back up the current data, there will not be a valid backup snapshot.
Archiving the Backup Snapshot to Another Server with AfterBackup.bat
Microsoft has included support for a batch file appropriately called AfterBackup.bat to run tasks on the site server after the backup task is complete. After you successfully run the Backup ConfigMgr Site Server maintenance task, ConfigMgr will try to run this batch file. This batch file is not installed during site setup and will have to be created manually by an administrator after a site server is configured and stored in \Microsoft Configuration Manager\inboxes\smsbkup.box.
If the AfterBackup.bat file exists and is stored in the correct folder on the site server, the batch file will run automatically once the backup task is complete. You can include commands in the AfterBackup.bat file that will archive the backup snapshot to a location off the server at the end of the backup operation and perform other post-backup tasks. The AfterBackup.bat file integrates the archive and backup operations, thus ensuring that every new backup is archived. If the batch file does not exist, it has no effect on the backup success, but in order to archive the backup snapshot, you must use another method.
Although the AfterBackup.bat file is intended to archive backup snapshots, you can include commands in that batch file that will run after every backup. As noted, the AfterBackup.bat file isn’t created for you when ConfigMgr is installed, and the ConfigMgr documentation does not explain how to set up the AfterBackup.bat file to be able to accomplish this task.
There are several ways to do this (including using third-party tools), some more complicated than others, but probably the simplest way is to use the Windows command robocopy. As illustrated in Figure 18.2, a robocopy command will copy all files from D:\CM2012.bckto a network share called \\File01\backup\CM01.
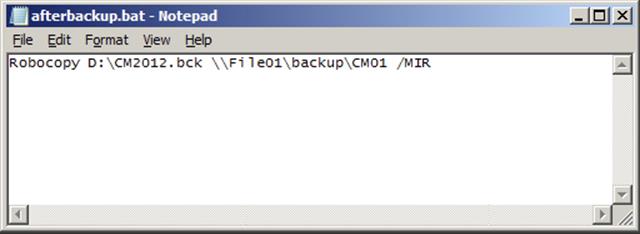
Figure 18.2 A sample Afterbackup.bat file
To create the Afterbackup.bat file, follow these simple steps:
1. Open Windows Explorer and navigate to \Microsoft Configuration Manager\inboxes\smsbkup.box.
2. Create a new ASCII batch file and name it AfterBackup.bat.
3. Type Robocopy D:\CM2012.bck \\File01\backup\CM01 /MIR.
4. Save and close the file.
5. Upon the next backup, open the smsbkup.log file and search for the text Afterbackup.bat to verify that the file has been executed.
One of the drawbacks of archiving this way is that the files will be copied over the network uncompressed to your remote file location. Depending on the size of your ConfigMgr database, archiving may take a long time and might use up a lot of bandwidth if your remote location is on a slow link. With that in mind, you can also add commands to the AfterBackup.bat file to use file compression software such as WinZip to compress the backup files before they are copied to the remote archive location.
Windows Application Log Entries Created by the Backup Process
The Backup ConfigMgr Site Server task will write backup status messages to the Application log in Windows event viewer. Table 18.1 shows a list of the events and their event IDs that are written to the Application log, as described in the Microsoft documentation. You will be able to intercept the events using a monitoring system like Microsoft System Center Operations Manager.
Table 18.1: Configuration Manager backup Application log entries
|
Event ID Number |
Message |
|
3197 |
I/O is frozen on database CM_SiteCode. No user action is required. However, if I/O is not resumed promptly, you could cancel the backup. |
|
3198 |
I/O was resumed on database CM_SiteCode. No user action is required. |
|
5040 |
This event is used to indicate that the AfterBackup.bat file was successfully started. |
|
5055 |
Component SMS_SITE_BACKUP on computer site server reported: Site Backup task is starting. This task will interact with the Windows VSS services and the appropriate writers to create a volume snapshot and then back up the required files to the specified destination. |
|
5056 |
Component SMS_SITE_BACKUP on computer site server reported: Site Backup is starting to copy the files from the snapshot. |
|
5057 |
Component SMS_SITE_BACKUP on computer site server reported: Site Backup has successfully completed copying the files from the snapshot. |
|
6829 |
Component SMS_SITE_VSS_WRITER on computer CM03 reported: SMS Writer is about to stop the ConfigMgr Services as part of the preparation for the site backup. |
|
6830 |
Component SMS_SITE_VSS_WRITER on computer site server reported: The snapshots of the volumes required for the Site Backup have been successfully created. |
|
6831 |
Component SMS_SITE_VSS_WRITER on computer site server reported: SMS Writer has started the ConfigMgr Services successfully. |
|
6833 |
Component SMS_SITE_BACKUP on computer site server reported: Site Backup has successfully completed copying the files from the snapshot. |
|
18265 |
Database backed up. |
Configuring the Backup ConfigMgr Site Server Maintenance Task
The Backup ConfigMgr Site Server maintenance task backs up a Configuration Manager site, including the site database, files, registry keys, and system configuration data. The site-recovery process does not support using third-party tools to back up your Configuration Manager site. If you are running Configuration Manager in a virtual environment, please note that taking snapshots of the site server is not a supported backup method and cannot replace using the site maintenance backup task, a SQL database backup, or a backup performed via Data Protection Manager. It is important to note that the Backup ConfigMgr Site Server maintenance task is not enabled by default and should be enabled during the initial configuration of the Configuration Manager site.
Backing Up a Site Server
To configure a daily backup do the following:
1. In the Configuration Manager console, navigate to the Administration workspace ⇒ Overview ⇒ Site Configuration ⇒ Sites.
2. Select the site and choose Settings ⇒ Site Maintenance from the ribbon.
3. Select the Backup Site Server task, and click Edit.
4. Select Enable This Task.
5. Click Set Paths and type the path for the backup folder.
If you are logged on locally to the site server, you can click Browse and select a location; otherwise, you will have to manually type a path. Depending on the location of the SQL database, you will be given three choices for where to save the database and the backup files:
· Local Drive On Site Server For Site Data And Database
This option is available if the SQL database is hosted locally on the site server.
· Network Path (UNC Name) For Site Data And Database
This option will allow you to specify a network share to store the backup files.
· Local Drives On Site Server And SQL Server
This option is available only if you have SQL running on a remote server. The SQL database will be stored locally on the SQL Server separately from the site data.
Regardless of what location you select, you need to ensure that the site server computer account has write access to the folder or share that is used to store the backup files. It is recommended to create the folder prior to running the backup task.
6. You can also modify the Start After and Latest Start Time settings if the default schedule interferes with other maintenance routines.
7. Select Enable Alerts For Backup Task Failures and click OK, as shown in Figure 18.3.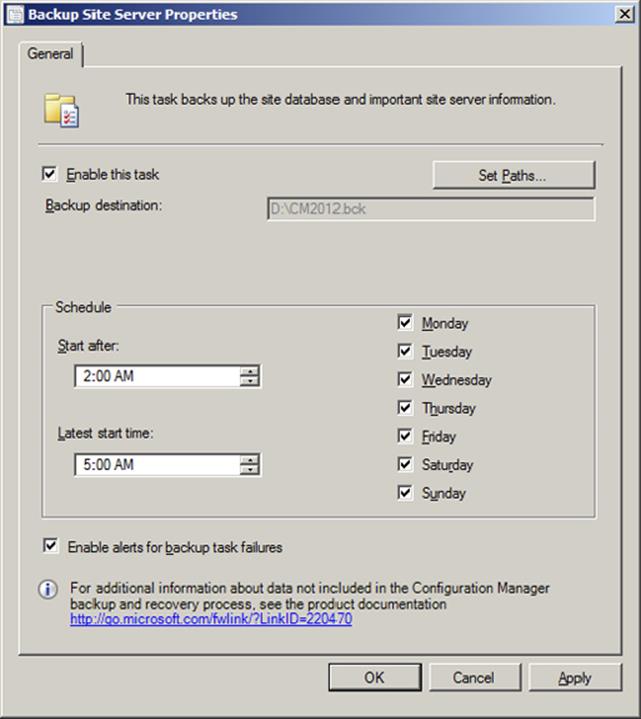
Figure 18.3 The Backup Site Server task
This will ensure a daily backup. The duration of the backup will vary from site to site, but by reading the smsbkup.log file or monitoring the events created in the viewer as described in Table 18.1, you will be able to tell the exact duration in your environment.
Testing the Site Backup
As soon as you set up the backup maintenance task on a site, you should let it run and verify that it is running. That way, you won’t be surprised to find yourself without a good backup if you have to restore one of your site servers.
To do this, follow these steps:
1. Log on to the site server.
2. Open a command prompt as administrator.
3. Type net start sms_site_backup, as shown in Figure 18.4; this will start the backup service and perform the first backup.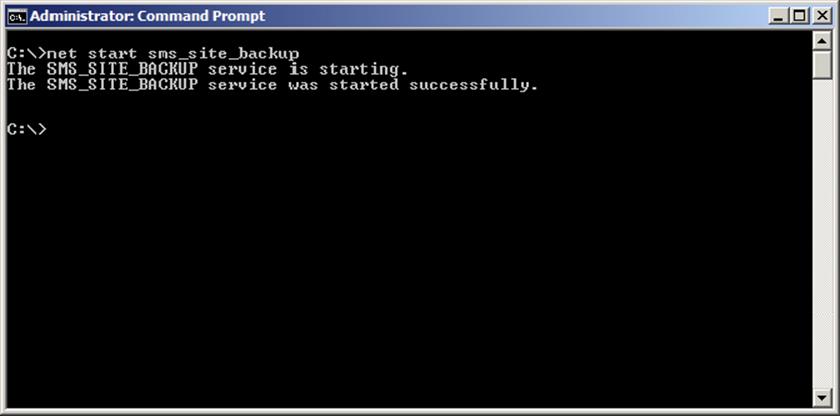
Figure 18.4 Manually starting the Backup Site Server task
4. Open CMTrace (formerly known as SMS Trace or Trace32) and monitor the smsbkup.log file from the Logs folder on the site server.
The backup log file will give you valuable information about the process. By reading the log file you can calculate the backup duration, troubleshoot errors related to the process, and see if the Afterbackup.bat file started successfully.
Common Backup Troubleshooting Methods
If the previous tests don’t help you figure out what is causing the problem with the backup, you can look for errors in a few additional places:
· Look in the Event Viewer logs for any account and/or access violations.
· The SMS_SITE_BACKUP runs under the local system account. Make sure that this account has access to any remote locations in the SMS Backup control file and that this account has the rights to perform the tasks in the control file’s [Tasks] section.
· Check the smsbkup.log file for errors.
You should be able to see a status message with the ID 5035 to indicate a successful backup. It can be found at <Configuration Manager installation directory>\Logs\smsbkup.log.
· Open the Alerts view in the Configuration Manager console and check the status of the alert titled “Site backup task failure alert at site.”
Restoring Configuration Manager
Besides getting a failed site up and running again, recovery of a Configuration Manager site is also required if that site is installed with a site code or site server name that has already been used in the hierarchy. Repairing and resynchronizing data is what site recovery is designed for, and it is required in order to avoid interruption of operations and corruption of data.
Configuration Manager provides recovery and reset tools to help you quickly and consistently complete the tasks that are essential to restoring Configuration Manager site operations. These tools allow you to run recovery and reset commands that will override existing configuration settings without having to directly access low-level data, as well as to start operations that are not available through other methods.
Understanding the Effects of a Site Failure
Configuration Manager is made up of various site systems and clients. Each site has at least one site system—namely, the site server. The site server will monitor and manage the Configuration Manager site. Each Configuration Manager site also has a site system that is the site database server and at least one site system that acts as a management point. As already established in previous chapters, the management point is the site system that allows the site server and the site’s clients to communicate properly.
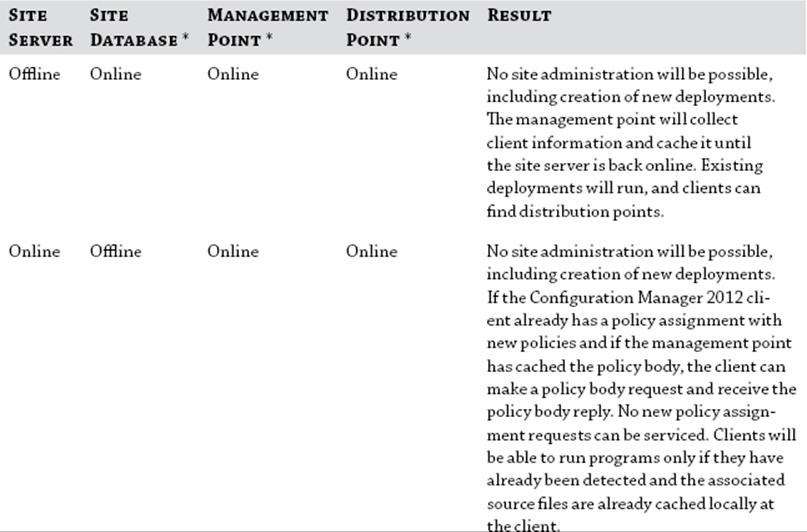
Along with these important site systems, a site can have any number of additional site systems that perform different roles for a site hierarchy. If the site server or any of its site systems fail, then they would not be able to provide the services they normally do. If more than one site role is installed on the same server and it fails, then all the services provided by that server will become unavailable. Table 18.2 shows the results of various site systems going offline or otherwise becoming unavailable.
Table 18.2: Results of Configuration Manager site failure
Recovering a Configuration Manager Site
Before starting a site restore you will need to know why you are performing the restore and what you are trying to achieve. If you experience data loss or a complete hardware failure, you will need to perform a site restore. But if you experience problems with some of the site server components, you might want to start with a site reset.
Unlike previous versions of Configuration Manager and SMS, there is no longer a specific Site Repair Wizard. Instead, the recovery process is offered as part of the standard installation process. When you start a Configuration Manager site installation, you will be given the option to recover a site, as shown in Figure 18.5.
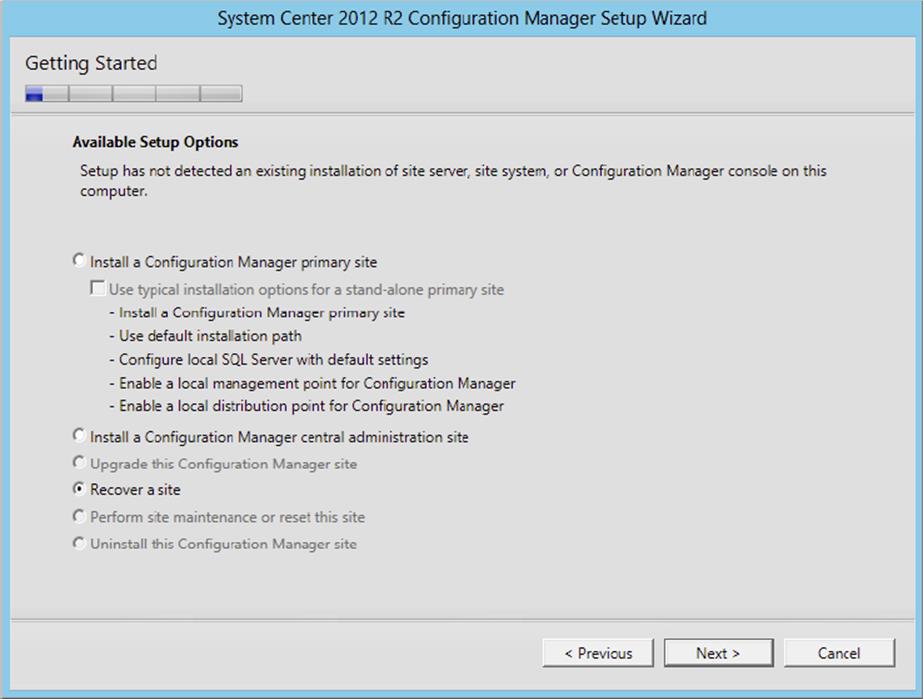
Figure 18.5 Starting the site recovery process
If you do not see the Recover A Site option, first uninstall the site. Uninstalling a site is a straightforward process for a single site. If you want to uninstall a parent site in a multisite hierarchy, you will need to manually delete the site database first.
![]()
Preparing for a Site Restore on a Central Administration Site
As a Configuration Manager administrator for YNWA Inc., you have been asked to perform a complete site restore for the Central Administration Site, named CAS. You run the setup utility but notice that you do not have the option to recover the site. You then try running the site uninstall option, but it fails because the site has multiple child sites. You realize that you first need to delete the database. To do so, you follow these steps:
1. Log on to SQL Server.
2. From the Start menu, select All Programs ⇒ Microsoft SQL Server.
3. Start SQL Server Management Studio.
4. Click New Query and enter the following query:
5. ALTER DATABASE CM_CAS
6. SET SINGLE_USER WITH ROLLBACK IMMEDIATE
Drop Database CM_CAS
7. Highlight the query statement and click Execute in the toolbar.
8. Close SQL Server Management Studio and restart the setup utility.
When you start the recovery process you will be given two site server recovery choices and four database recovery choices, as explained in Table 18.3
Table 18.3: Recovery options
|
Option |
Used When |
|
Recover This Site Server Using An Existing Backup |
You have the backup files created using Configuration Manager. This offers you a complete recovery scenario, as described later in this chapter. |
|
Reinstall The Site Server |
You do not have a backup of the site server. All site settings will be lost, and you will have to manually reconfigure the site. |
|
Recover The Site Database Using A Backup Set At The Following Location |
You have a backup of the Configuration Manager site database. This offers you a complete recovery scenario, as described later in this chapter. |
|
Create A New Database For This Site |
You are recovering a site that is part of a hierarchy, and you want to replicate data from the Central Administration Site or from another reference site. Note that this option is available only in multisite environments. Depending on the size of the site database, this will generate a lot of WAN traffic. |
|
Use A Site Database That Has Been Manually Recovered |
You already have recovered the site database using a tool other than the one provided by Configuration Manager 2012. |
|
Skip Database Recovery |
You haven’t experienced any data loss and the existing database is intact. |
Recovering Configuration Manager
As mentioned earlier in this chapter, there are major differences between recovering a ConfigMgr 2012 site and a Configuration Manager 2007 site. Gone is the Site Repair Wizard; instead, you initiate the recovery process by running the site setup process. The process can be divided into two phases:
1. Reading the ConfigMgrBackup.ini file from the backup source
2. Running the setup process based on the information in the ConfigMgrBackup.ini file combined with user input in the recovery phase
Unlike previous versions of Configuration Manager and SMS, there is no need to run a site reset process manually after recovering the site because that is an integrated part of the recovery process.
How to Start a Recovery Process
The site recovery process is designed to make recovering a Configuration Manager site as easy as possible.
Before you start the recovery process, ensure that you have the following:
· The SQL installation media
· The Configuration Manager 2012 prerequisites
· The Configuration Manager 2012 installation media
· Access to the Configuration Manager 2012 site backup files
Furthermore, ensure that you use the following:
· Same site server name (it can be a different operating system)
· Same SQL Server name (it can be a different SQL version)
· Same site code
· Same database name
· Same Configuration Manager major version
To recover from a failed site you are given two options to start the process:
· Run <Installation source>\SMSSETUP\BIN\X64\Setup.exe, and select the Recover A Site Server option.
· Run an unattended installation of Configuration Manager using the setup.exe /script option.
Recovering a Central Administration Site
To restore the Central Administration Site using the setup process, do the following:
1. On the site server, open a command prompt with administrative privileges.
2. Navigate to .\SMSSetup\BIN\X64\ in the Configuration Manager installation source and run Setup.exe.
3. Click Next in the Before You Begin page.
4. Select Recover A Site.
5. On the Site Server And Database Recovery Options page, click Browse, and select the location of the Configuration Manager backup files.
6. Select Recover This Site Server Using An Existing Backup.
7. Click Browse, and navigate to the location of the backup folder.
8. In the site database option, select Recover The Site Database Using The Backup Set At The Following Location.
9. Click Browse and navigate to the location of the backup folder.
10.Once you have selected the recovery options for the site and the database (see Figure 18.6), click Next.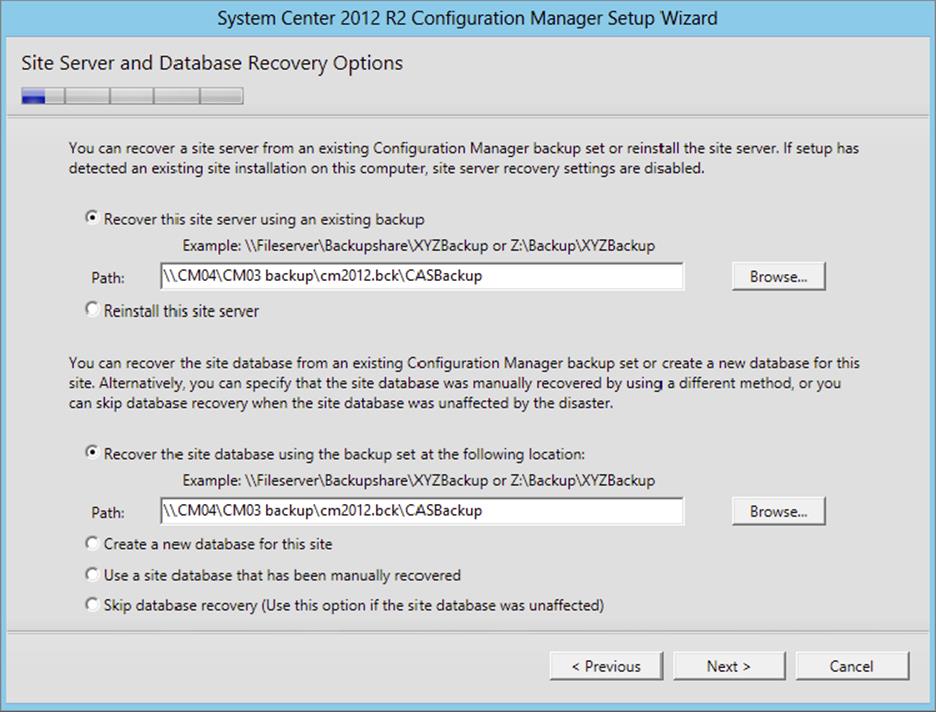
Figure 18.6 The Site Server And Database Recovery Options page
11.On the Site Recovery Information page, shown in Figure 18.7, type the name of the site to reference and click Next.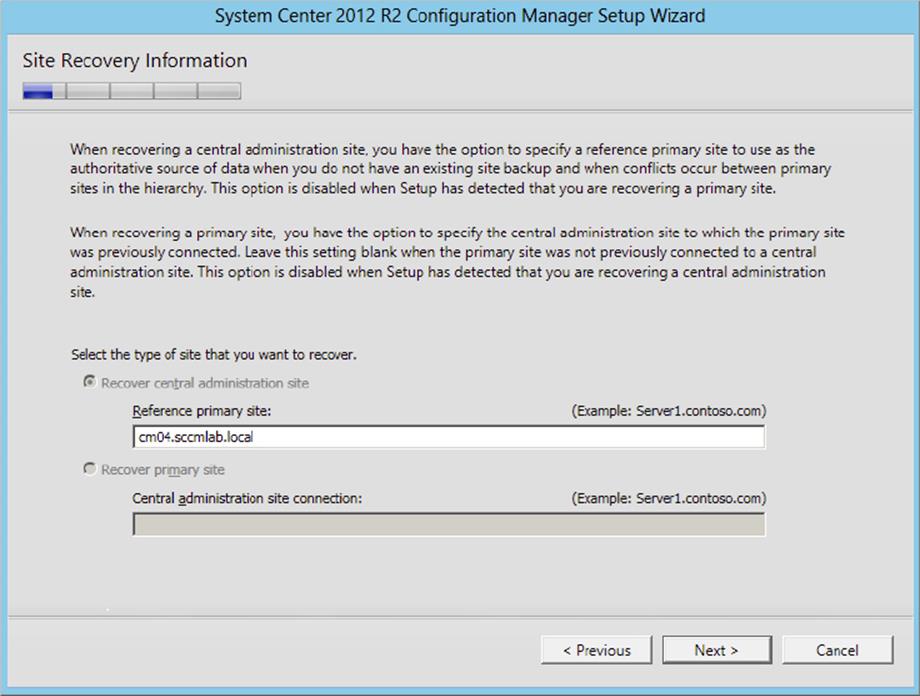
Figure 18.7 The Site Recovery Information page
The reference site will be used as the authoritative source in the recovery process. Data changes from other non-reference primary sites will be lost.
12.Accept the license terms and click Next.
13.On the Prerequisite Components page, shown in Figure 18.8, select Use Previously Downloaded Files.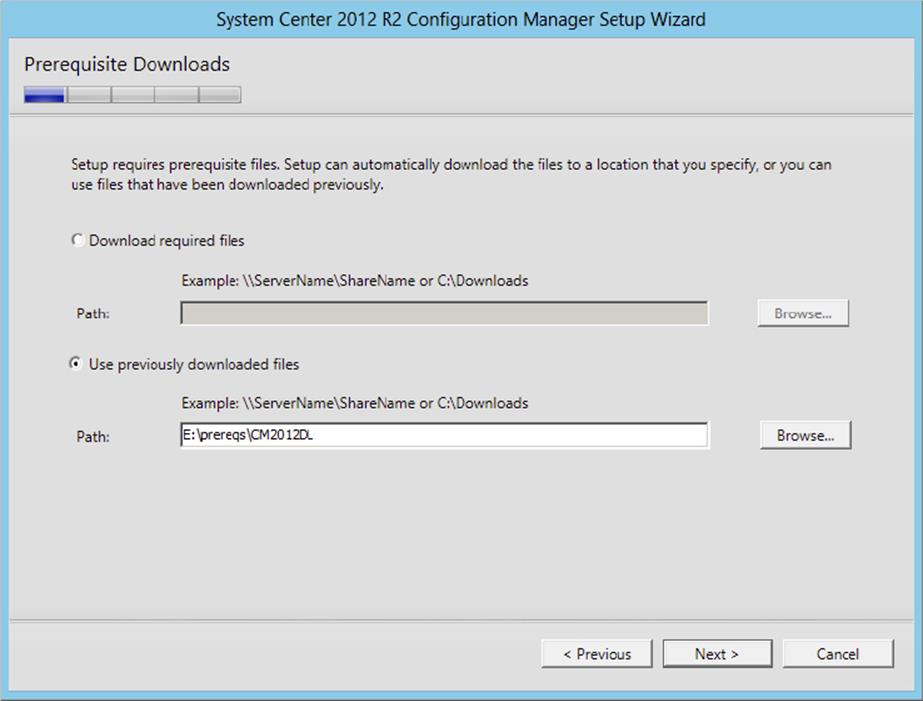
Figure 18.8 The Prerequisite Components page
14.Click Browse, and select the location where you have the stored prerequisites.
15.On the Site And Installation Settings page, shown in Figure 18.9, modify the installation folder to reflect where you want to install Configuration Manager, and click Next.
Figure 18.9 Site And Installation Settings page
16.On the Database Information page, shown in Figure 18.10, verify that the SQL Server Service Broker Port is correct, and click Next.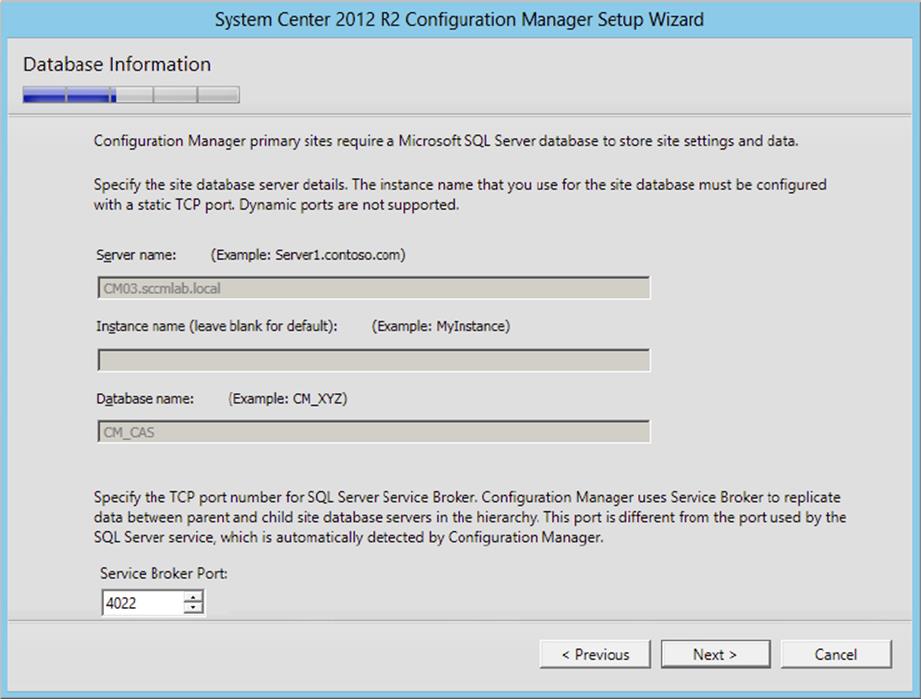
Figure 18.10 Database Information page
17.On the Settings Summary page, shown in Figure 18.11, review the information, and click Next if everything is correct.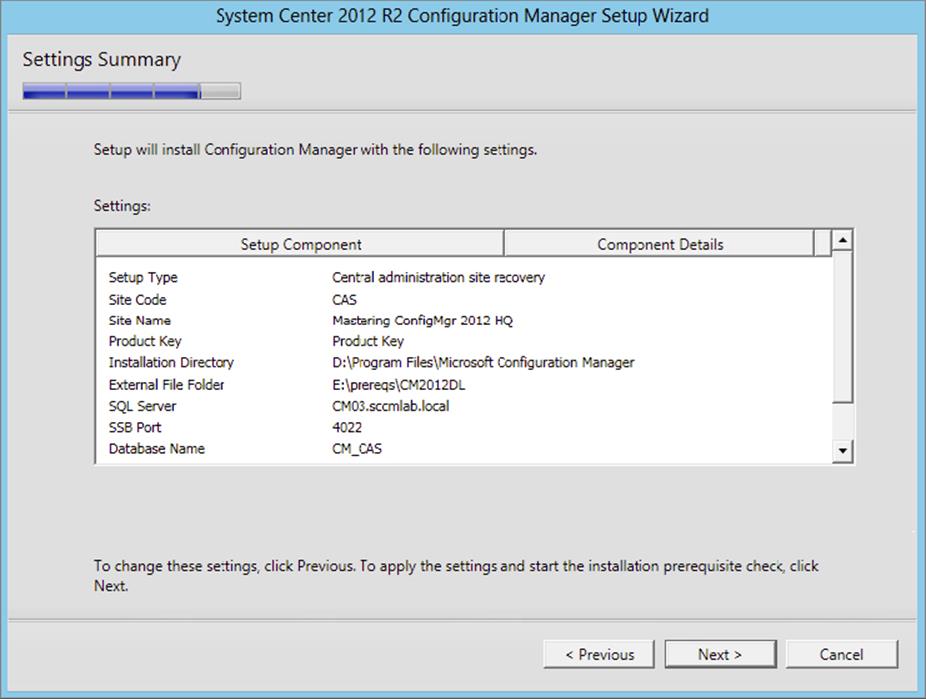
Figure 18.11 Settings Summary page
18.On the Prerequisite Check page, shown in Figure 18.12, ensure that all the prerequisites are met, and click Begin Install.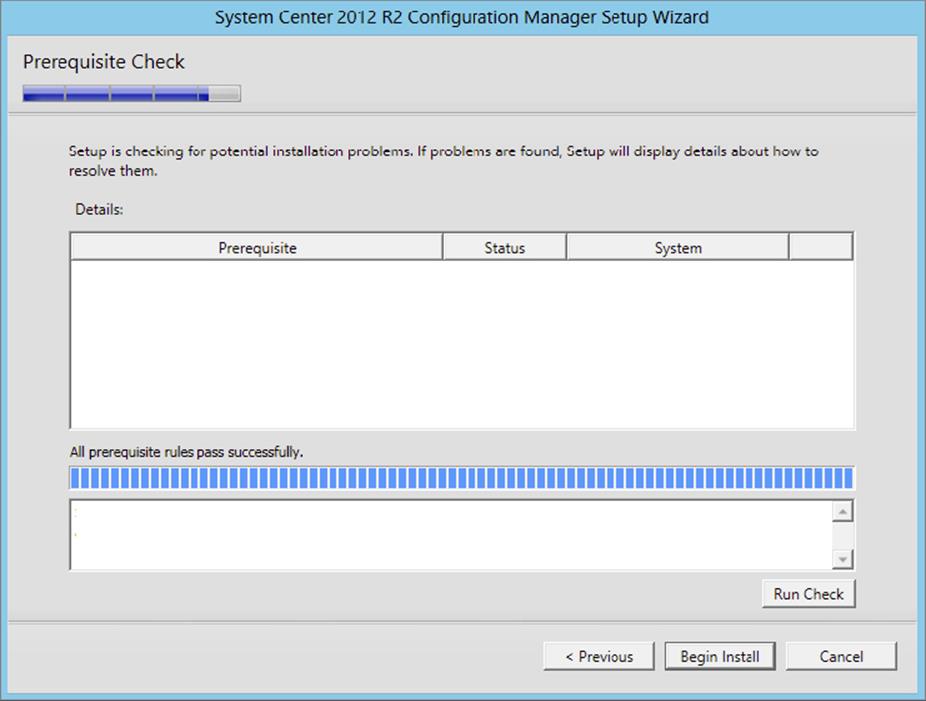
Figure 18.12 Prerequisite Check page
The installation and recovery process will require some time to finish. Once the process is finished, you will see the Install page, as shown in Figure 18.13.

Figure 18.13 Install page
19.Review the page, and click Next.
The Finished page, shown in Figure 18.14, is the last page and explains the post-recovery tasks that you must perform.
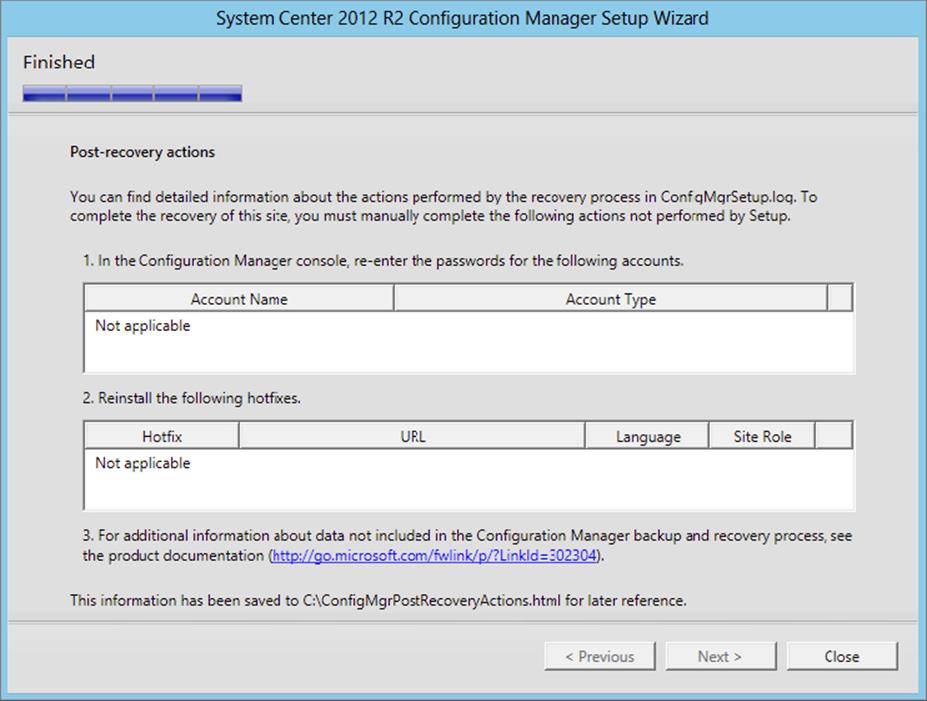
Figure 18.14 Install page
20.Read the information and click Close.
After the recovery process and the global data has been replicated from the reference site, the CAS will go through these steps:
1. Recalculate IDs.
2. Reseed identity keys.
3. Initialize a site reset to reinstall the site components.
4. Generate public keys for child sites.
Monitoring the Recovery Process
You can monitor the process by following the Setup Wizard as it moves through the different setup steps. For a deeper dive into what’s going on behind the scenes, you should open these log files:
1. ConfigMgrSetupWizard.log In this log file you will see how the backup process starts by reading the ConfigMgrBackup.ini file from the Configuration Manager backup folder. The information from the .ini file is used to configure some of the mandatory settings presented on the Site And Installation Settings page.
2. ConfigMgrSetup.log This is the main log file where you can find information about verifying the reference site and running the actual installation. Figure 18.15 illustrates that you can use the ConfigMgrSetup.log file to verify the recovery process.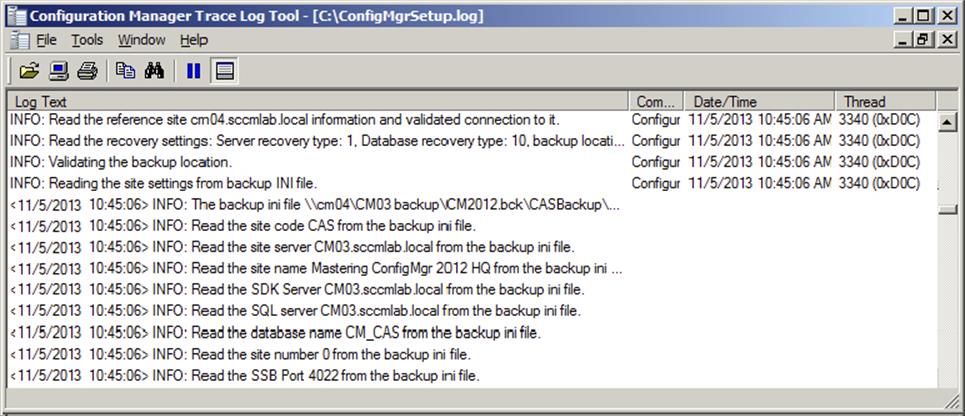
Figure 18.15 Verifying the recovery process
Recovering a Primary Child Site
Recovering a primary child site is almost identical to recovering a Central Administration Site, except that the wizard automatically will configure the Central Administration Site as the reference site.
Recovering a Primary Standalone Site
Recovering a primary standalone site is almost identical to recovering a Central Administration Site, except that the wizard will not allow you to configure any reference sites during the setup process.
Recovering a Secondary Site
System Center 2012 Configuration Manager SP1 and R2 provide the ability to recover a secondary site server. The recovery of a secondary site may be necessary if the secondary site server fails. The recovered secondary site server must meet all of the prerequisite items for the installation of a secondary site and also must have the same configuration as the failed server, including the fully qualified domain name (FQDN) and the same installation path for the Configuration Manager binary files. The Configuration Manager primary site will reinitialize the data that is required on the secondary site as part of the recovery process. If the content library still exists on the secondary site server, Configuration Manager will verify that the library is valid and utilize it. If the content library does not exist, you will need to redistribute or prestage the content to the secondary site server. You can distribute the compressed packages using USB or similar media to the remote location. At the remote distribution point, run ExtractContent.exe found in theSMS_DP$\SMS\Tools folder on the remote distribution point.
Note: During a secondary site recovery, Configuration Manager will not install SQL Server Express if it is not installed on the server being recovered. You will need to manually install SQL Server Express. If you chose to utilize Microsoft SQL Server as the database component for the secondary site, you will need to install SQL Server and ensure that the same version of SQL is being used as well as the same instance name.
Recovery Scenarios for Multisite Environments
In a multisite environment you might come across different recovery scenarios where data might be recovered from another site in the hierarchy or might be lost. Let’s look at three different scenarios. Common for all three scenarios is that you create an application with a single revision, perform a backup, and after that, modify that same application with revision 2. That way the current backup contains only revision 1.
|
Environment |
Scenario |
Revision after Recovery |
|
One primary site with a secondary child site |
Global data about the application with revision 1 being replicated to the secondary site. |
1 |
|
One CAS with two primary sites (PS1 and PS2) |
You create revision 2 on PS1, after which revision 2 is replicated to the CAS and PS2. PS1 fails and is recovered from backup. |
2 |
|
One CAS with two primary sites (PS1 and PS2) |
You create revision 2 on PS1, after which PS1 fails before synchronizing any global data and is recovered from backup. |
1 |
Unattended Recovery of a Site
Configuration Manager 2012 supports recovering a Central Administration Site and a primary site via the Setup Wizard. You can also recover these sites via an unattended recovery script.
In order to use the unattended recovery solution you will need to create the .INI file that will be read by the Setup.exe application. The name of the file is not important, but the file extension must be .INI. You will run the Configuration Manager Setup command and reference the unattended script file in the command-line syntax. For example, if your unattended recovery script is named ConfigMgrUnattendRecoverCAS.ini and is located on the C: drive in the CMRECOVERY folder, the command will be Setup.exe /script C:\CMRECOVERY\ConfigMgrUnattendCAS.ini. The account used to execute Setup.exe must have administrator rights, so you may need to open a command prompt as an administrator and then run Setup.exe from there.
The .INI file you create will provide the same information that would be required as if you were performing a site recovery via the Setup Wizard. One key difference is that no default settings are applied in the unattended scenario, and as a result, all values for the recovery process must be specified in the script file.
The information that is required in the .INI file will depend on the recovery scenario. Also, the keys in the file are not case sensitive, and when you provide values for keys you must use an equals sign to separate the key from the value. The TechNet article “Unattended Site Recovery Script File Keys” at http://technet.microsoft.com/en-us/library/gg712697.aspx#BKMK_UnattendedSiteRecoveryKeys documents the available keys that can be used in the .INI file.
Other Site Maintenance Options
Besides doing a full recovery you can start other maintenance options by running Configuration Manager Setup from the Start menu. Those options are explained in Table 18.4.
Table 18.4: Site reset and maintenance options
|
Option |
Used When |
|
Reset Site With No Configuration Changes |
You want to perform a site reset. During the site reset, all site components are reinstalled, and permissions and registry keys are restored to their default settings. |
|
Modify SQL Server Configuration |
You want to move the site database to another SQL Server. Note that this process requires that you have already copied the SQL database to the new SQL Server. The process will not detach the database from the old location or attach it to the new server. The process also allows you to modify the SQL Service broker port. |
|
Modify SMS Provider Information |
You want to install the SMS provider on another server. |
|
Modify Language Configurations |
You want to add new server and client languages to the installation. |
The Hierarchy Maintenance Tool
The Hierarchy Maintenance tool (preinst.exe) is a command-line tool that you may need to use to diagnose problems with a site system, help repair a site, shut down site systems, or do other maintenance tasks that, for whatever reason, can’t be performed using the Configuration Manager console. This tool must be run locally on the site server computer.
To use the Hierarchy Maintenance tool, do the following:
1. Open a command prompt window with administrative privileges.
2. Navigate to the location of preinst.exe, which by default is
<drive where ConfigMgr is installed>\Microsoft Configuration Manager\bin\x64\<language code>
The language code for English is 00000409.
3. Once you are there, just type preinst.exe to get a list of command-line options.
4. Then use preinst.exe with its command-line options, listed in Table 18.5 (adapted from Microsoft documentation), to complete your task.
Table 18.5: Hierarchy Maintenance tool syntax
|
Command |
Description |
|
/dump <site code> |
This command writes site control images to the root of the folder of the drive where the site is installed. /dump <site code> writes the site control file of only the site specified. /dump writes the site control files for all sites. |
|
/deljob <site code> |
This command deletes all jobs targeted to the site you specify in the command line. |
|
/delsite<site code> |
This command deletes child sites that were not previously removed successfully from the site database of its parent site. |
|
/stopsite |
This command shuts down the Configuration Manager 2012 Site Component Manager service, which will partially reset the site. When this shutdown is finished, ConfigMgr services on a site server and its remote systems are stopped. These services are flagged for reinstall, and some passwords are automatically changed when these services are reinstalled. When the shutdown cycle is started, it automatically runs and skips any computers or components that are not responding. If the Site Component Manager service can’t access a remote site system during this process, the components on the remote site system will be reinstalled when the Site Component Manager service is restarted. This will continue until Site Component Manager succeeds in reinstalling all services that are marked for reinstallation. You can restart the Site Component Manager service using Service Manager just like other Windows services. After you use the /stopsite command to start a shutdown cycle, there is nothing you can do to stop the subsequent reinstall cycles when the Site Component Manager service is restarted. You can monitor the effect of the process by reading the sitecomp.log file on the site server. |
|
/keyforparent |
This command is run on sites that you are trying to recover after failure and is used to distribute the new public key to a parent site of the failed site. The /keyforparent command places the public key of the failed site in the file <site code>.CT4 at the root of the drive from where the command is run. After the file is made, you will have to manually copy the file to the parent site’s hman.box inbox (not in the pubkey folder). |
|
/keyforchild |
This command is run on sites that you are trying to recover after failure and is used to distribute the new public key to a child site of the failed site. The /keyforchild command places the public key of the failed site in the file <site code>.CT6 at the root of the drive from where the command is run. After the file is made, you will have to manually copy the file to the child site’s hman.box inbox (not in the pubkey folder). |
|
/childkeys |
This command is run on the recovering site’s child sites and is used to distribute public keys from all child sites to the recovering site. The /childkeys command places this and all child site public keys into the file <site code>.CT6 at the root of the drive from where the command is run. After the file is made, you will have to manually copy the file to the parent site’s hman.box inbox. |
|
/parentkeys |
This command is run on the recovering site’s parent site and is used to distribute public keys from all parent sites to the recovering site. The /parentkeys command places this and all parent site public keys into the file <site code>.CT7 at the root of the drive from where the command is run. After the file is made, you will have to manually copy the file to the child site’s hman.box inbox. |
Post-Recovery Tasks
After you recover a site, there are tasks that you should perform to make sure that the site has been properly repaired and is functioning correctly:
· Monitor site processes.
· Verify site setting configuration.
· Re-enter user passwords.
All user passwords will be reset during the recovery process. You can find a list of affected user accounts in the C:\ConfigMgrPostRecoveryActions.html file, as shown in Figure 18.16.
Figure 18.16 The C:\ConfigMgrPostRecoveryActions.html file
· Reinstall previously applied hotfixes.
You can find a list of installed hotfixes in the C:\ConfigMgrPostRecoveryActions.html file.
· Verify that the content library is fully rebuilt from the original data sources. If you need to determine the package source location, you can run the SQL query SELECT * FROM V_PACKAGE command against the Configuration Manager database in Microsoft SQL Server to list the package properties.
· Recover any custom reports.
· Recover the SCUP 2011 database if that was affected. This is done by copying the database file.
· If the IIS server was configured to utilize HTTPS, you will need to reconfigure IIS to use the web server certificate.
· Reprovision previously provisioned Intel AMT computers.
This requires that you request the AMT provisioning certificate again and reconfigure the passwords for the MEBx, AMT Provisioning Removal, and AMT Provisioning and Discovery accounts.
· Recover the MDT.
· The content stored in the user state migration data folders is not backed up by Configuration Manager and should be backed up and restored via an enterprise backup process.
· If cloud distribution points are being used, you will need to update the certificate. Refer to the Microsoft TechNet article “Planning for Content Management in Configuration Manager” at http://technet.microsoft.com/en-us/library/b2516212-e524-4031-9a1f-7b768084304d#BKMK_CloudDPCerts.
![]()
Moving the Site Database
As a Configuration Manager administrator for YNWA Inc., you have been asked to move the site database and log files named CM_PS1 stored in D:\SQLDB and E:\SQLLogs from SQL1 to a new SQL Server on SQL2. Configuration Manager 2012 is installed on CM01. The new SQL Server is installed and is using the same collation configuration as the old server and the same disk layout. To move the database and log files, follow these steps:
1. Log on to CM01.
2. Open a command prompt with administrative privileges and navigate to <configuration manager install dir>\ SMS\bin\x64\<language code>.
3. Run preinst.exe /stopsite, and wait until all components and services have been successfully stopped.
4. Still in the command prompt, type Net stop ccmexec to stop the management point service.
5. Log on to the old SQL Server, Server1.
6. From the Start menu, select All Programs ⇒ Microsoft SQL Server.
7. Start SQL Server Management Studio.
8. Click New Query, and type
9. use master
10. go
11. sp_detach_db 'CM_PS1'
go
12.Highlight the query statement, and click Execute in the toolbar.
13.Copy the database and log files to the new SQL Server.
14.Log on to the new SQL Server, Server2.
15.From Start, select All Programs ⇒ Microsoft SQL Server.
16.Start SQL Server Management Studio.
17.Click New Query, and type
18. use master
19. go
20. sp_attach_db 'CM_PS1’,'D:\SQLDB\CM_PS1.MDF','E:\SQLlogs\CM_PS1_Log.LDF'
go
21.Log on to CM01, and open a command prompt with administrative privileges.
22.Navigate to <configuration manager install dir>\ Microsoft Configuration Manager\bin\x64 and run Setup.exe.
23.Select Perform Site Maintenance Or Reset This Site, as shown in the following graphic, and click Next.
24.Select Modify SQL Configuration, and click Next.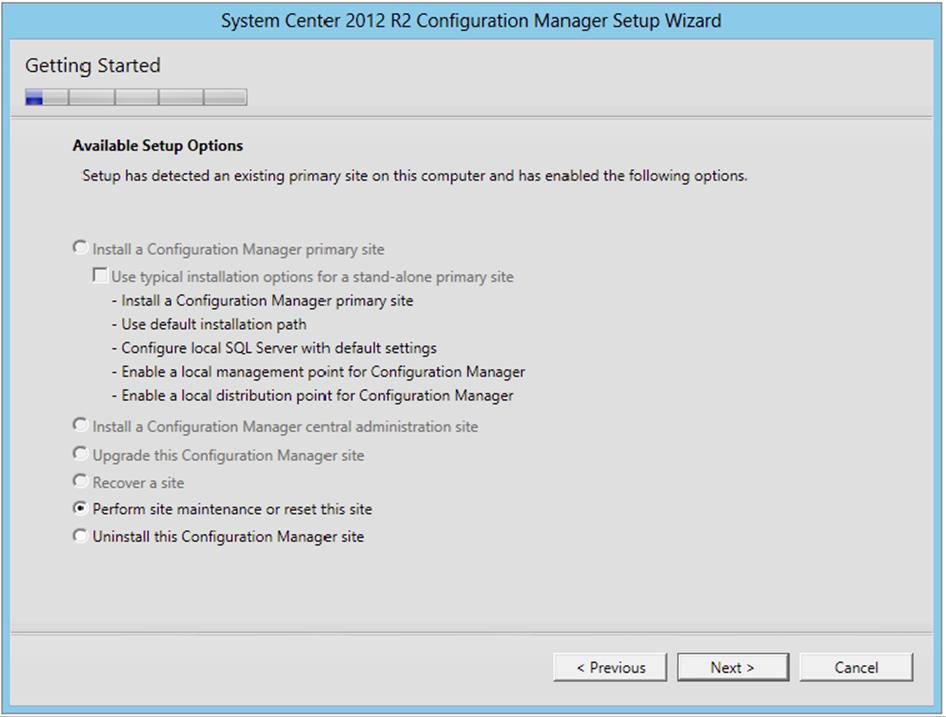
25.In the Server Name field type Server2 and click Next.
26.Once the SQL process is finished, close the wizard by clicking Close.
27.Restart the CM01 server.
The Bottom Line
1. Configure backups for Configuration Manager sites. Backing up Configuration Manager sites can be automated by scheduling the Backup ConfigMgr Site Server maintenance task. When the Configuration Manager backup service (SMS_SITE_BACKUP) starts, it uses instructions in the backup control file, located at
1. [ConfigMgr Install Location]Microsoft Configuration Manager\Inboxes\smsbkup.box\smsbkup.ctl
2. Master It Recovering a complete Configuration Manager site is only supported with site backups from what source?
2. Recover Configuration Manager sites. Recovery of a Configuration Manager site requires that you do not have a Configuration Manager site installed when starting the Setup.exe process. The recovery process will recover data from the backup files and from a reference site provided you have a multisite hierarchy.
1. Master It What is site recovery designed for?
3. Archive backup snapshots to another location. The first time the Backup ConfigMgr Site Server task runs, it creates a backup snapshot, which can be used to recover a Configuration Manager site system when it fails. The next time the backup task runs, it makes a new backup snapshot that will overwrite the one that was made during the last snapshot. This could be a problem if the current backup snapshot becomes corrupt for some reason, because there is no other backup to restore from.
1. Master It What script can you use to copy backup snapshots from the site server to a new location but is not created when ConfigMgr is installed?
4. Reinstall the site components and reset file and registry permissions to their default settings. From time to time other administrators mess around with the default permissions that are configured on the different folders and shares created by Configuration Manager.
1. Master It How can you restore the file and registry permissions without performing a complete restore?
All materials on the site are licensed Creative Commons Attribution-Sharealike 3.0 Unported CC BY-SA 3.0 & GNU Free Documentation License (GFDL)
If you are the copyright holder of any material contained on our site and intend to remove it, please contact our site administrator for approval.
© 2016-2026 All site design rights belong to S.Y.A.