Mastering System Center 2012 R2 Configuration Manager (2014)
Chapter 6. Client Installation
Once you have the Configuration Manager sites and site servers installed and configured, the next logical step is to plan the client deployment. The client deployment success rate very much depends on your knowledge of the internal network infrastructure combined with the ability to understand the components involved in the process. Once you fully understand the process, installing a large number of clients over a short period of time may be no problem. On the other hand, if you do not truly understand the process, installing a single client can be a very time-consuming experience.
No one solution for deploying the Configuration Manager client fits all organizations. Most likely you will find yourself using a mix of the different installation techniques described in this chapter.
This chapter covers the prerequisites for installing clients, a walk-through of the different client installation methods, and information needed for troubleshooting the installation process.
In this chapter, you will learn to
· Configure boundaries and boundary groups
· Select the relevant discovery methods
· Employ the correct client installation methods
· Manage Unix/Linux and Mac devices
· Ensure client health
Creating Client Settings
In order to manage a device with Configuration Manager, you must first have the client software installed. Regardless of the device and operating system on that device, we always use the term client when we refer to the software on the managed computer that interacts with the Configuration Manager site servers. A client consists of different agents that you can enable or disable. During the installation, the full Configuration Manager client is installed, and you use the Client Settings section of the Administration workspace to control the agent settings and configuration. In Configuration Manager 2012, client settings are global data and thus are no longer separately controlled by each primary site. Furthermore, you can create multiple custom client settings and assign them to individual collections. As a best practice, you should typically configure custom client settings only as exceptions to the default client settings. There may be several reasons why you would need to configure multiple client settings, for example:
· You want to control who can initiate a remote session against servers.
· You want to disable the remote tools agent on all computers in the HR department.
· You want different inventory frequencies on servers and desktops.
A set of default client settings is always configured when you install Configuration Manager. In Figure 6.1 you can see an example of where two custom client settings have been created and assigned to two different collections. Notice the number in the Deployments column; it indicates the number of collections that are affected by the custom client settings. Figure 6.2 shows the new client settings interface. You can assign your own custom client settings to any user or device collection. The same settings can be assigned to multiple collections, and one collection can have multiple assignments. In the event of a conflict, the custom setting with the lowest Order number will be assigned.
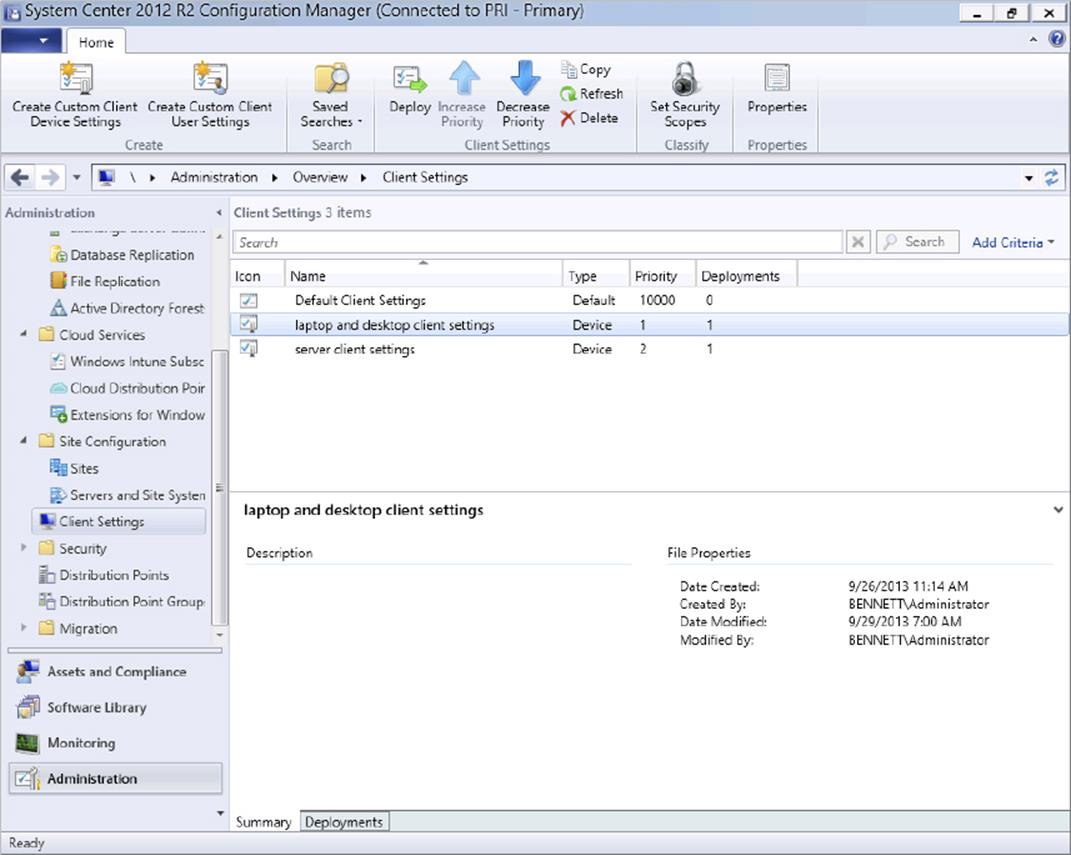
Figure 6.1 Client settings
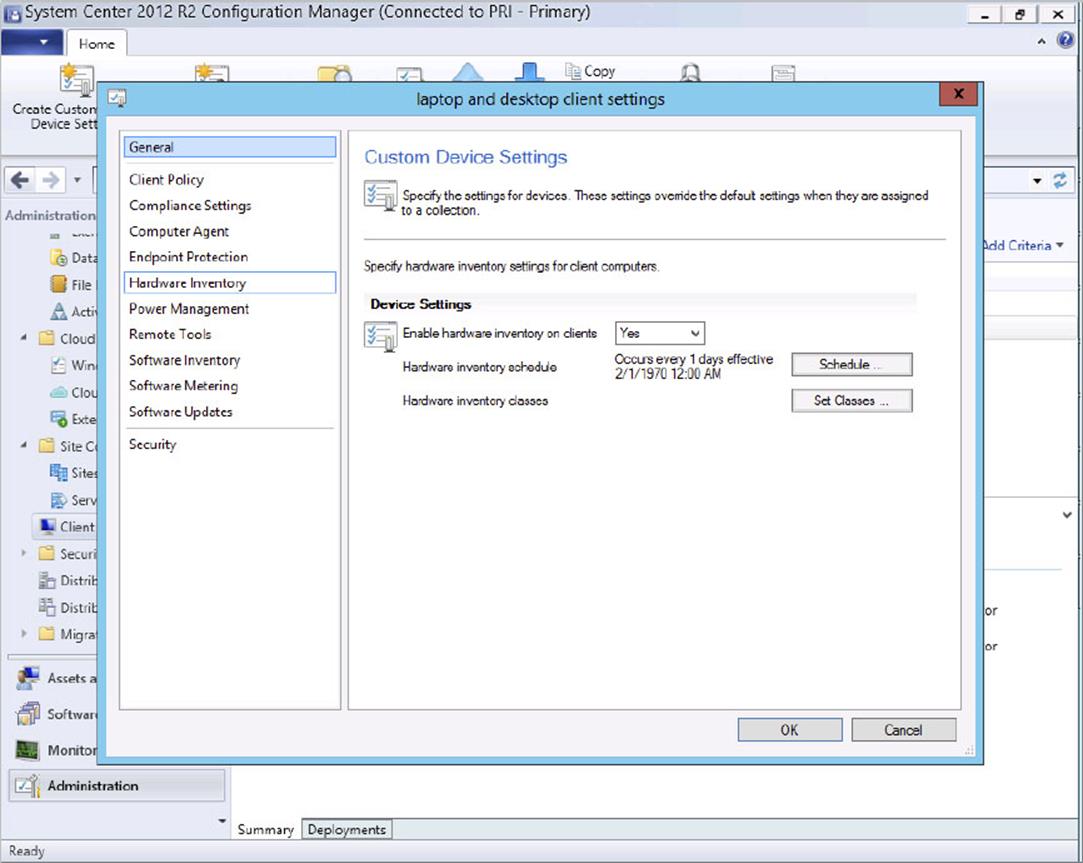
Figure 6.2 Creating custom client settings
![]()
Configure Different Custom Client Settings for All Servers
As the Configuration Manager administrator, you have been requested to ensure that only members of the global group Server Administrators can use Remote Tools on servers. Follow these steps to do so:
1. Open the Configuration Manager 2012 administrative console.
2. Select the Administration workspace and browse to Client Settings.
3. On the Home tab of the ribbon, click Create Custom Client Device Settings.
4. Type Remote settings for servers in the Name column.
5. From the list of custom settings, select Remote Tools.
6. In the left column, select the Remote Tools settings and click Set Viewers.
7. Click the yellow starburst and in the New Permitted Viewer window enter the name of the user or group that should be given access in the User or group name field. This should be in the form of domain\group name (or domain\user name). For example, Contoso\Server Administrators.
8. Click OK three times.
Notice the number shown under Permitted Viewers.
9. Click OK to save the custom client settings.
10.Back in the administrative console, select the newly created custom settings, and click Deploy on the ribbon.
11.Select the All Servers device collection, and click OK.
The individual client agent settings will be discussed in detail in later chapters. Figure 6.2 shows a client settings group that includes several of the available client actions. You can view the list of all possible settings by selecting the Default Client Settings and selecting Properties in the Ribbon. Here is a short description of each of the agent settings:
1. Background Intelligent Transfer This setting allows you to control the BITS protocol. BITS is the protocol being used by the client when it is downloading and uploading information to the management point and also when it is downloading packages from the distribution points.
2. Cloud Services This setting determines whether client computers are allowed to access cloud distribution points.
3. Client Policy The Client Policy settings control how often the client agent will contact the management point for a policy refresh:
· Client Policy Polling Interval (Minutes) defines how often the client will request a new machine policy. It can be any value between 3 minutes and 1440 minutes. Best practice (and the default value) is 60 minutes. Notice that unlike previous versions, Configuration Manager 2012 does not use policies when offering new applications to end users.
· Allow User Policy Request From Internet Clients: Use this setting if you have any Internet-facing site systems and you want to support user-centric scenarios for Internet-based clients.
4. Compliance Settings This option is used to enable the settings-management feature formerly known as Desired Configuration Management in Configuration Manager 2007.
5. Computer Agent Here you define most of the basic Configuration Manager client settings:
· Deployment Deadline settings are used to control when users will be reminded about future deployments.
· Default Application Catalog Website Point: Use this setting to define how clients will connect to the Application Catalog. It can either be automatic, a specific server, or a specific website. If you select Automatic, the management point will supply the client with a random catalog, which is not guaranteed to be the one nearest the user.
· Add Application Catalog Website To Internet Explorer Trusted Sites Zone will add the selected website to the trusted site zone.
· Organization Name is the name that will be displayed in the Software Center.
· Install Permissions can be configured to control the permissions required to start any deployment on the client. You can choose from All Users, Administrators, Primary Users, or No Users. This setting is particularly valuable when you are controlling terminal servers.
· Suspend BitLocker PIN Entry Or Restart is used to control whether you want to suspend the PIN requirements after running a deployment that requires a system restart.
· Agent Extensions Manage The Deployment Of Applications And Software Updates: Enable this setting only if required by a vendor or if you use the SDK to manage client agent notifications.
· PowerShell Execution Policy: By default PowerShell scripts will run in the context of a service. If you want to run a PowerShell script within a task sequence, you should select Bypass, which is the same as running the PowerShell script unrestricted.
· Show Notifications For New Deployments controls the default UI experience for the logged-on user when a deployment is received or about to start.
6. Computer Restart This setting allows you to control when restart notifications are shown.
7. Endpoint Protection Here you enable or disable the System Center Endpoint Protection agent. The settings are configurable only when you have enabled the Endpoint Protection Site System role:
· Manage Endpoint Protection Client On Client Computers: Configure this setting to True to start managing Endpoint Protection in the hierarchy.
· Install Endpoint Protection Client In Client Computers: When this setting is True, the Endpoint Protection client will automatically be installed. Notice that the client is already deployed during the initial Configuration Manager client installation.
· Automatically Remove Previously Installed Antimalware Software Before Endpoint Protection Client Is Installed: When this is True, an attempt to uninstall some predefined antimalware application will be performed.
· Suppress Any Required Computer Restart After The Endpoint Protection Client Is Installed: If configured to True, no restart will be performed, not even if a previous antimalware application is uninstalled first.
· Allowed Period Of Time Users Can Postpone A Required Restart To Complete The Endpoint Protection Installation (Hours): This option is configurable only if the setting to suppress computer restart is False. The number of hours will be the maximum number of hours a restart can be postponed by the user before a restart of the computer will be forced.
· Disable Alternate Sources (Such As Microsoft Windows Update, Microsoft Windows Server Update Services, Or UNS Share) For The Initial Definition Update On Client Computers: Configure this setting to False if you want to allow multiple update sources to be considered for the first definition update.
8. Hardware Inventory This option is used to scan for and report hardware installed on the computer. You can specify custom agent settings for different collections but only define hardware to collect in the default client settings. Unlike Configuration Manager 2007, there is no unique sms_def.mof file per site; instead you use the Custom Client Settings interface to specify the inventory data classes.
9. Metered Internet Connections This setting can be used to control costs if client computers are utilizing an Internet service provider that charges based on the amount of data that is used.
10.Enrollment This setting provides configuration options for enrolling mobile devices and Mac computers. It can be used to define the polling interval for mobile device legacy clients as well as defining whether or not end users are allowed to enroll mobile devices and Mac computers.
11.Network Access Protection (NAP) Use this option to enable Network Access Protection compliance on systems as well as to schedule when scans will occur. Notice that NAP requires that you have installed and configured Network Policy and Access Services in Windows Server 2008 (or higher).
12.Power Management This setting enables power management for all clients in the hierarchy and allows you to control whether end users can exclude their own devices from being part of a power management configuration. You configure each of the Power Management settings by collection.
13.Remote Tools This is used to control the Remote Tools and Remote Assistance settings for Windows XP and later systems.
14.Software Deployment Use this option to configure whether notifications should be shown when deployments are about to run. Schedule Re-evaluation For Deployments determines how often the Configuration Manager client will trigger the re-evaluation process. The process will automatically install required software that is not already installed and remove software that is supposed to be uninstalled.
15.Software Inventory This option is used to discover what software is installed on the computer. You can control which file types the agent will scan for and where. Furthermore, you can use the settings to collect software files. Collected files are not stored in the database but will be stored on the site server. Even though it might be tempting to collect files, you should think twice before enabling this feature because it can easily lead to network congestion.
16.Software Metering This option enables software metering and controls how often clients will upload the software-metering data from WMI to the management point.
17.Software Updates This setting enables software updates, controls how often clients will perform a scan for software updates, and determines whether or not all required updates should be installed upon the deployment deadline.
18.State Messaging This setting controls how often state messages are forwarded from the client to the management point.
19.User And Device Affinity This setting controls the calculations that are being used to determine when a user(s) is being considered a primary user(s) for a device.
Supported Operating Systems
The following are the more common operating systems that are supported for the Configuration Manager client. The complete list of supported operating systems is available at http://technet.microsoft.com/en-us/library/gg682077.aspx. (Mobile devices will be discussed in detail in Chapter 16, “Mobile Device Management.”)
Windows:
· Windows XP Professional Service Pack 3 for X86 (SP2 for x64)
· Windows Vista Business/Enterprise/Ultimate Edition SP2
· Windows 7 Professional/Enterprise/Ultimate
· Windows 8 Professional/Enterprise
· Windows 8.1 Professional/Enterprise
· Windows Embedded Standard 2009 X86
· Windows Embedded POS Ready 2009 X86
· WEPOS 1.1 SP3 X86
· Windows XP Embedded SP3 X86
· Windows Embedded Standard 7 X86 and X64
· Windows Server 2003 Web Edition SP2, X86
· Windows Server 2003 Standard/Enterprise/Datacenter Edition SP2
· Windows Server 2003 R2 SP2
· Windows Storage Server 2003 R2 SP2
· Windows Server 2008 Standard/Enterprise/Datacenter SP2 and Server Core
· Windows Server 2008 R2 Standard/Enterprise/Datacenter and Server Core
· Windows Server 2012 Standard/Datacenter and Server Core
· Windows Server 2012 R2 Standard/Datacenter and Server Core
The following are the prerequisites for Windows-based clients:
· Users who use the Application Catalog must configure Internet Explorer to exclude the ActiveX control Microsoft.ConfigurationManager.SoftwareCatalog.Website.ClientBridgeControl.dll from ActiveX filtering and allow it to run in the browser.
· Microsoft Windows Installer version 3.1.4000.2435 or later
· Microsoft Background Intelligent Transfer Service (BITS) version 2.5
The following are the prerequisites for Windows-based clients downloaded during the client installation:
· Microsoft Windows Update Agent version 7.0.6000.363 or later
· Microsoft Core XML Services (MSXML) version 6.20.5002 or later
· Microsoft Remote Differential Compression (RDC)
· Microsoft .NET Framework 4.0 Client Profile
· Microsoft Silverlight 4.0.50524.0
· Microsoft Visual C++ 2005 Redistributable version 8.0.50727.42
· Microsoft Visual C++ 2008 Redistributable version 9.0.30729.4148
· Windows Imaging APIs 6.0.6001.18000
· Microsoft Policy Platform 1.2.3514.0
· Microsoft SQL Server Compact 3.5 SP2 components
Configuration Manager 2012 SP1 and R2 also provide client support for Linux/Unix computers as well as Macintosh computers. The following are the supported operating system versions for these platforms:
Linux/Unix:
· Red Hat Enterprise Linux (RHEL) Version 4 (x86 & x64), Version 5 (x86 & x64), Version 6 (x86 & x64)
· Solaris Version 9 (SPARC), Version 10 (SPARC & x86), Version 11 SP1 (x86 & x64)
· SUSE Linux Enterprise Server Version 9 x86, Version 10 SP1 (x86 & x64), Version 11 SP1 (x86 & x64)
· CentOS Version 5 (x86 & x64), Version 6 (x86 & x64)
· Debian Version 5 (x86 & x64), Version 6 (x86 & x64), Version 7 (x86 & x64)
· Ubuntu Version 10.4 LTS (x86 & x64), Version 12.4 LTS (x86 & x64)
· Oracle Linux Version 5 (x86 & x64), Version 6 (x86 & x64)
· HP-UX, Version 11iv2 (IA64 & PA-RISC), Version 11iv3 (IA64 & PA-RISC)
· AIX Version 5.3 (Power), Version 6.1 (Power), Version 7.1 (Power)
Macintosh:
· Mac OS X 10.6 (Snow Leopard)
· Mac OS X 10.7 (Lion)
· Mac OS X 10.8 (Mountain Lion)
Discovering Network Objects
Discovery is the process by which Configuration Manager finds objects in the computer infrastructure and keeps them up to date in the Configuration Manager database. Objects can be users, groups, and computers. All discovery processes will generate one data discovery record (DDR) for each discovered object. For an administrator it is nice to know how many computers you have (and where they are) before you start deploying clients. To find out, you must understand the different discovery methods and when they should be used. Discovery also plays an important part in creating the collections that will support features like application deployment, updates deployment, and operating system deployment.
The only discovery method enabled by default is Heartbeat Discovery, described in a later section. Before configuring any other discovery method, you must ask yourself a few basic questions:
· What is being discovered by the method?
This is essential knowledge before configuring any of the methods. If you do not understand what’s being discovered, chances are that you will discover the wrong information.
· Why do you need the data?
If you can’t answer this question, most likely you do not need to configure the discovery method.
· How often do you need to refresh the discovery data?
Configuration Manager 2012 natively supports delta discovery, which eliminates the reason for running frequent full discovery processes.
· What is the duration of the discovery process?
Not knowing the duration of each discovery method has often resulted in backlogs and incorrect discovery schedules. Having knowledge about the log files generated by each discovery process can give you precise data and help you configure the correct schedules.
· What is the impact of configuring the method?
The discovery methods use different techniques to gather a data discovery record (DDR). Active Directory methods will query the nearest domain controller, whereas Network Discovery uses protocols like RIP and OSPF to get the information.
To configure discovery methods, perform the following steps:
1. Open the Configuration Manager administrative console.
2. Select the Administration workspace, navigate to Hierarchy Configuration, and choose Discovery Methods.
3. You can modify each of the discovery methods by selecting the discovery method and choosing Properties from the ribbon.
Active Directory Discovery Methods
Each of the Active Directory discovery methods requires a target and a schedule. The target can be a single object, an organizational unit (OU), a security/distribution group, or an entire domain. While it might not make much sense to search for a single object, specifying individual OUs or groups versus the entire domain is often considered a best practice. Especially in the pilot phase, it is an easy way to limit the number of objects you are working with. A new feature in Configuration Manager 2012 allows you to specify the account being used to run the discovery process. If none is specified, the process will run under the security context of the site server. In order to run a successful discovery, the account you specify must have Read permission on the object.
Figure 6.3 shows the Active Directory Container field that you use to define the locations where you want to search. When you click Browse, you will see the dialog shown in Figure 6.4. This dialog allows you to select the criteria for the LDAP query. You can select any container or OU within the tree view. Unlike with previous versions of Configuration Manager, you can now browse to other domains and forests.
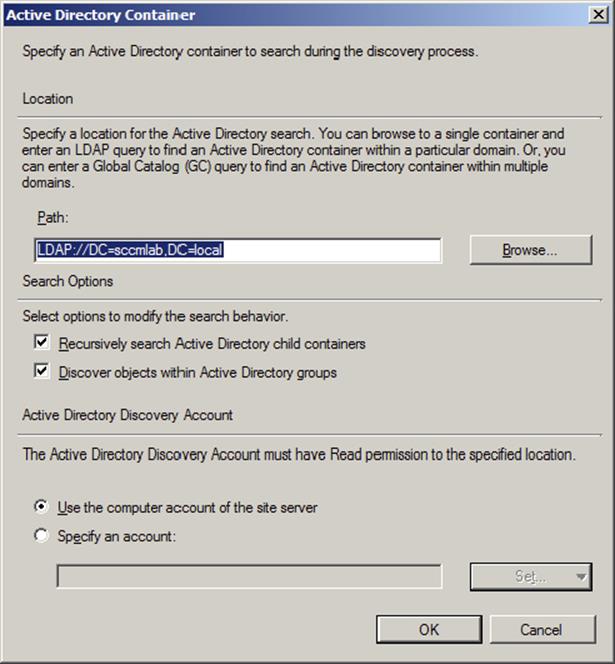
Figure 6.3 New Active Directory Container search criteria
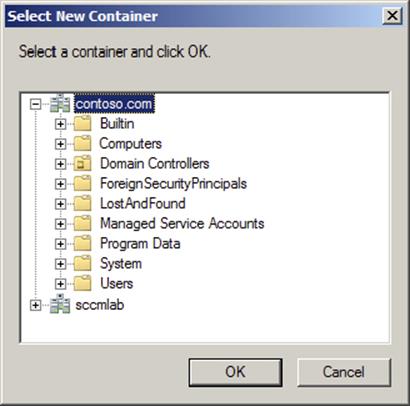
Figure 6.4 The Select New Container dialog box
![]()
Discovery Paths and Active Directory Organizational Units
It is important to know that Configuration Manager will query all objects in the specified paths every time. If you delete an old computer object from the Configuration Manager database but not from Active Directory, the same computer object will be added to the Configuration Manager database after the next discovery process unless you have configured the option to exclude computer objects that have not recently logged on or changed their password. Failure to exclude computers can have an effect on the automatic client push installation attempts because Configuration Manager will initiate a client push attempt on computers that do not have the client installed. These might be the most important reasons why you should plan the discovery processes carefully; make sure that you have an OU structure in Active Directory where you can store objects that are no longer active and exclude those OUs from the specified LDAP path. Failure to do so might lead to errors related to failed client push installation attempts and discovery of unwanted objects.
Once you choose the start location for the query, the default behavior of the query is to search all of the child objects beneath the starting point. If you do not want to search through the child OUs, you can clear the check box labeled Recursively Search Active Directory Child Containers. This is a good way to limit the data returned from the query.
The option Discover Objects Within Active Directory Groups is especially useful in scenarios where you want the Active Directory System Group Discovery method to find computer objects within Active Directory groups. Many organizations have a unique OU where they store computer groups.
Figure 6.5 shows all discovery methods available in a primary site. Let’s look at each of these methods in detail.
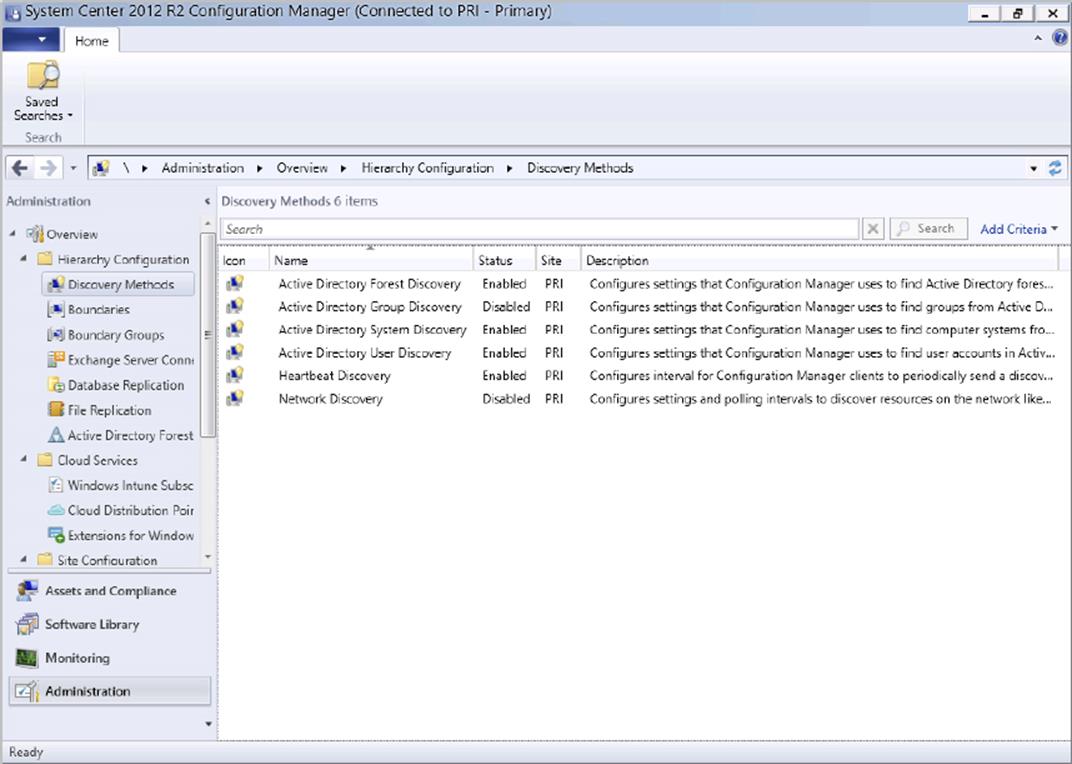
Figure 6.5 Discovery methods
Active Directory Forest Discovery
This discovery method is new to Configuration Manager 2012 and can be very helpful in environments where the Configuration Manager administrator is not always informed about IP infrastructure changes. The method returns information about domains, IP ranges, and Active Directory sites. Furthermore, as shown in Figure 6.6, you can configure the method to automatically create boundaries for the objects being discovered (IP ranges or Active Directory sites only), thus saving yourself hours of work.
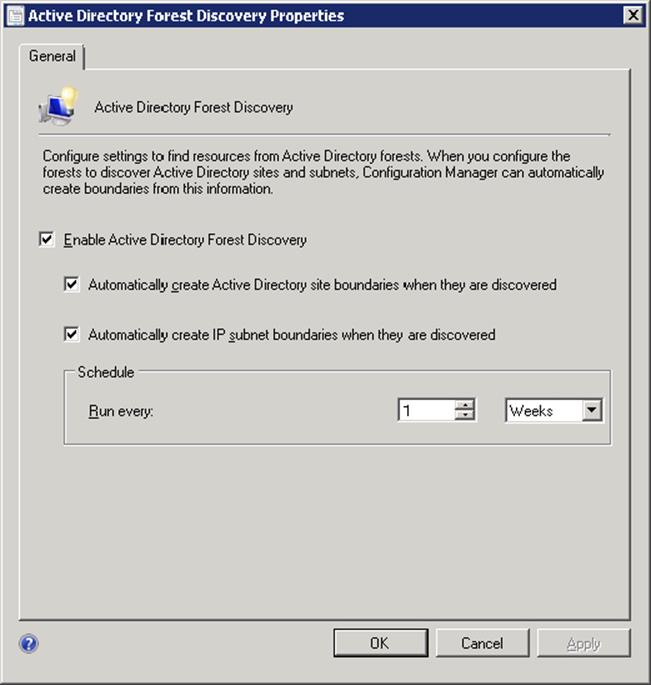
Figure 6.6 Configuring Active Directory Forest Discovery
By default the discovery process runs once a week and will only discover those forests that are created as Active Directory Forest objects in the Administration workspace. The local forest is automatically created as part of the site installation process. Figure 6.7 shows how you can specify a new forest using an account from the target forest.
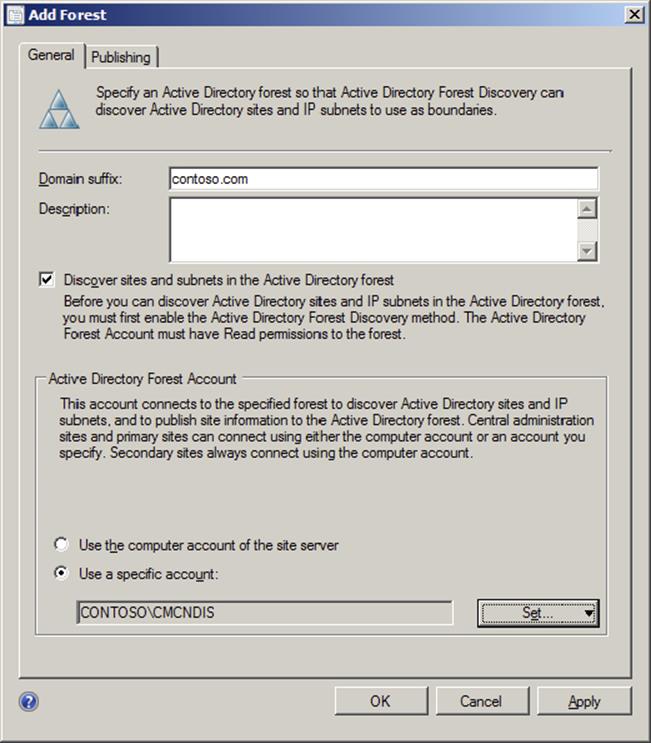
Figure 6.7 Defining a new Active Directory forest
You can monitor this discovery process by reading the ADForestDisc.log on the site server.
Active Directory System Discovery
This is the key discovery method for finding devices. In essence you configure one or more LDAP paths to Active Directory and query a domain controller for all objects in those paths. The device attributes returned by the domain controller depend on what you have configured. By default these attributes will be returned:
· ObjectGUID
· Name
· SAMAccountName
· ObjectSID
· PrimaryGroupID
· DNSHostName
· UserAccountControl
· LastLogonTimestamp
· DistinguishedName
In Figure 6.8 you see an example where custom attributes have been specified. Attributes can be specified for AD System Discovery and AD User Discovery. The information you specify will be added to the discovery data and used in queries and reports like any other discovery information. You can monitor this discovery process by reading the ADSysDis.log on the site server.
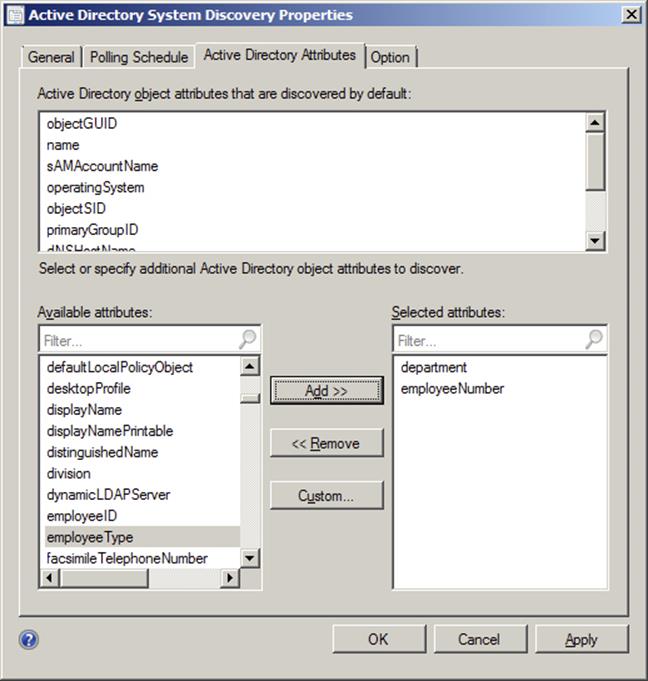
Figure 6.8 Custom Active Directory system attributes
Active Directory User Discovery
This discovery method is not used at all in the client deployment process but plays an important part of the user-centric application model. With the method enabled you will get a list of users to whom you can target different deployments such as applications. By default these attributes will be returned:
· ObjectGUID
· Name
· UserAccountControl
· SAMAccountName
· ObjectSID
· PrimaryGroupID
· DNSHostName
· DistinguishedName
· UserPrincipalName
You can monitor this discovery process by reading the ADusrdis.log on the site server.
Active Directory Group Discovery
This discovery method will discover any local groups, global groups, and universal security groups. You can search for objects within a specific group or perform the search for all groups in a specific location. The information is not really used in a client installation scenario. But once you have the client deployed, you will find the Active Directory security group very useful, especially in user target deployments. You can limit the number of objects returned in the discovery process by configuring the values on the Option tab, as shown in Figure 6.9. Notice that discovering only computers that have logged on to a domain within a specified number of days requires that the domain function level be at least Windows 2003.
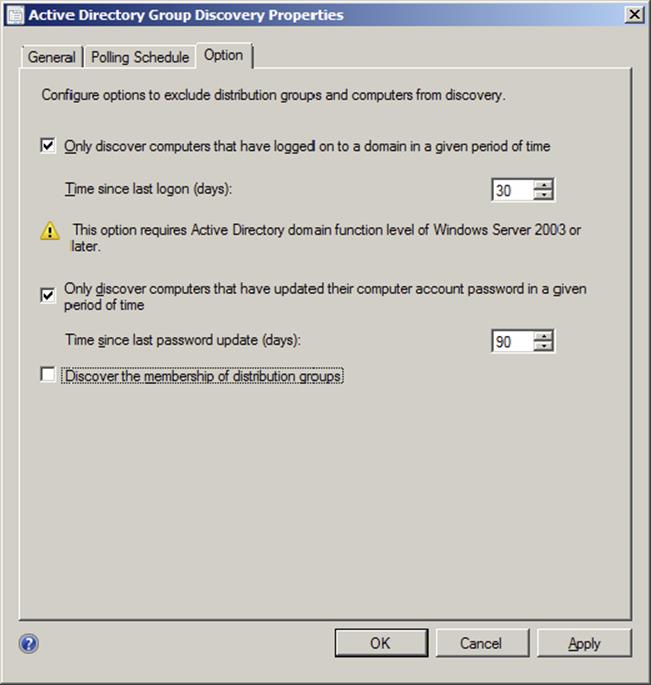
Figure 6.9 Option tab for group discovery
You can monitor this discovery process by reading the ADsgdis.log on the site server.
Heartbeat Discovery
This discovery method is enabled by default and differs from the other methods. It is the responsibility of the client to initiate the discovery process. Failure to do so can result in unwanted client installation attempts and cause the client to be marked as inactive in the Configuration Manager console. The discovery process will not discover any new objects; instead it rediscovers existing objects. You can look at this method as a way to send a keep-alive package from the client to the management point. The heartbeat record is used for the following purposes:
· Determine whether a client is marked active or inactive.
· Update the Client column from No to Yes in the console when the client is installed.
· Re-create the client in a database if you accidently deleted the object.
· Have an impact when the Clear Install Flag site maintenance task will delete the client install flag in the database. If the install flag is removed and automatic client push is enabled, a new client installation attempt will begin.
How often should you run the discovery method? By default clients will send an updated DDR to the management point every seven days, and you can change this to occur more frequently, perhaps daily, if needed to meet your requirements. As with any Configuration Manager changes, monitor the environment for any performance or file backlog issues if you make changes to the default settings. These are some of the attributes that will be returned:
· ClientInstalled
· ClientType
· ClientID
· ClientVersion
· NetBIOSName
· IPSubnet
· Domain
· ADSiteName
· IPAddress
· MACAddress
You can monitor this discovery process by reading the InventoryAgent.log on the client.
Heartbeat Discovery and Modifying Computer Names
The Heartbeat Discovery process is responsible for updating changes in the computer name to the database. If you are starting a process where you need to rename a large number of computers, consider modifying the default schedule from seven days to a more frequent interval.
Network Discovery
Let me start by saying this: Run the Network Discovery method only when no other discovery method can find the needed resources. It is considered to be the “noisiest” method and will use protocols like RIP or OSPF to discover objects. Most often you’ll need to use this method only if you have a number of workgroup clients in your environment. Network Discovery is used to discover many different types of objects. Not only can you find computers that are on the network, but you can discover any device that has an IP address as well.
You can monitor the Network Discovery process by reading the Netdisc.log on the server.
Discovery Scheduling Options
Each method also has a way of scheduling when the discovery will run. For the Active Directory discovery methods, the Polling Schedule tab resembles Figure 6.10 (in this case Active Directory System Group Discovery). The schedule determines when the site server will initiate a full discovery. You can also configure delta discovery. Delta discovery runs by default every 5 minutes and will only discover any changes made to the objects. Unlike in Configuration Manager 2007 R3, the process will discover when you modify existing objects, such as adding an existing computer account to an existing group. Using delta discovery along with the collection property Use Incremental Updates For This Collection, all changes will be reflected in the collection within 10 minutes: 5 minutes for the delta discovery and 5 more minutes for the incremental collection update.
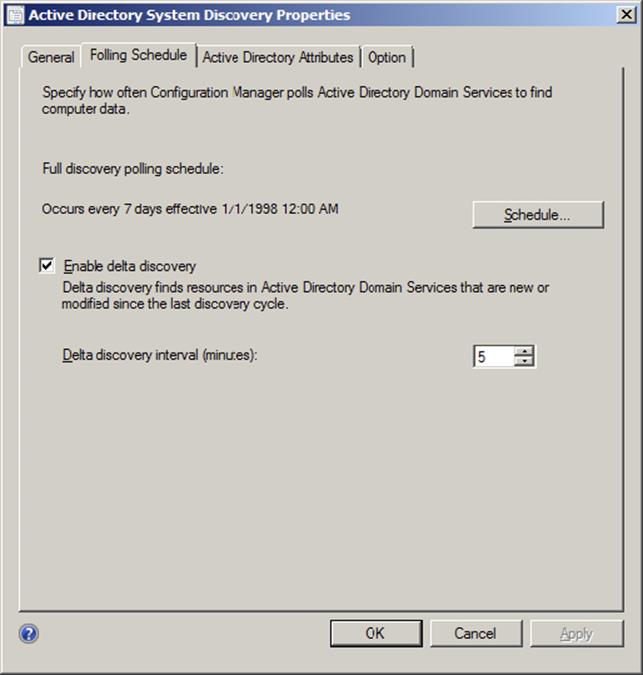
Figure 6.10 Polling Schedule tab for a discovery method
If you need to modify the schedule, click the Schedule button to display the Custom Schedule window.
The Heartbeat Discovery method schedule is found on the General tab, as shown in Figure 6.11. Notice that you can set only a simple schedule for the Heartbeat; your options are much more limited than with the Active Directory methods.
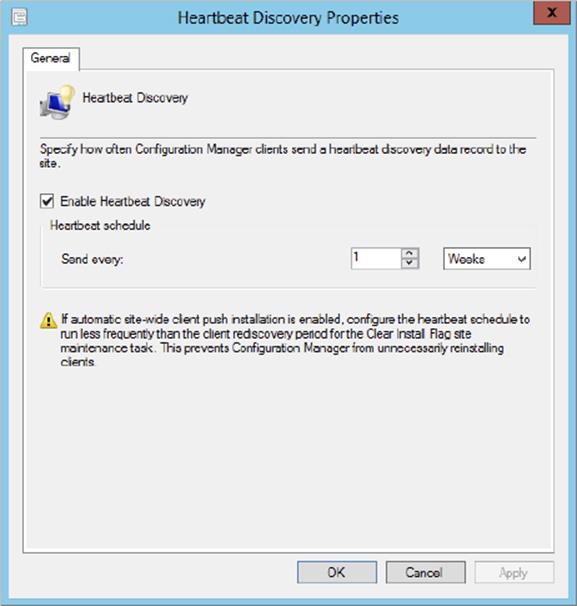
Figure 6.11 The Heartbeat Discovery General tab
You can create multiple schedules for the Network Discovery method, as shown in Figure 6.12. Configuring the options in the Custom Schedule dialog shown in Figure 6.13 gives you a lot of control over scheduling the Network Discovery agent. Because of the time required for the network searches, you may want to configure a maximum runtime.
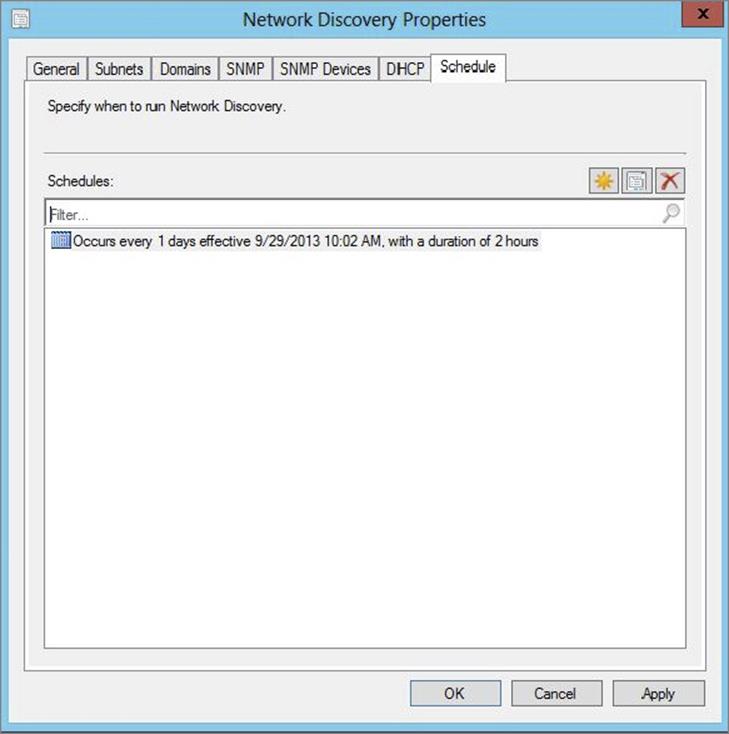
Figure 6.12 The Network Discovery Schedule tab
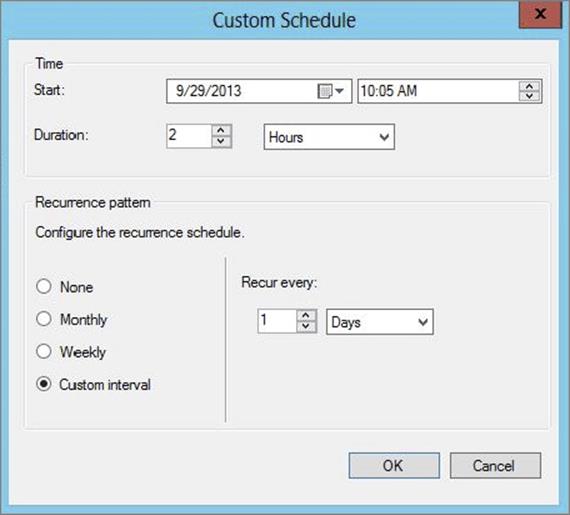
Figure 6.13 The Custom Schedule dialog for Network Discovery
Configuring Boundaries and Boundary Groups
After a client has been installed, it must be assigned to a Configuration Manager 2012 R2 site before it can be managed. Once assigned, the client will start receiving the default client policies, using the local resources of the site such as management points, distribution points, and software update points. During the installation, you can configure command-line properties to automatically assign the client a fixed site code or let an auto-assignment process begin. Note that clients will never be assigned to secondary sites, only primary sites.
Configuring boundaries has long been the way you assigned a client to a Configuration Manager/SMS client site. This has changed in Configuration Manager 2012, where a new feature has been introduced to control the assignments: boundary groups. In essence you still use boundaries, but they have no real value until they have been added to a boundary group. A boundary group is basically a collection of individual boundaries grouped together for one or two purposes:
1. Site Assignment Used to control which sites clients are assigned to
2. Content Lookup Used to control which distribution points will be used by the client
Figure 6.14 and Figure 6.15 show a site boundary added to a boundary group that is configured for site assignment.
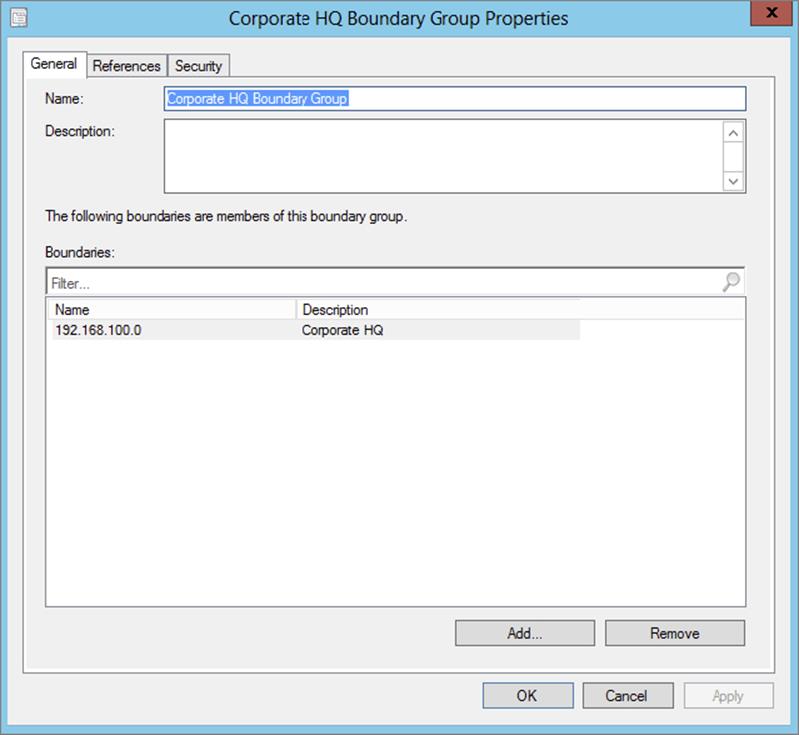
Figure 6.14 Boundary group with a list of boundaries
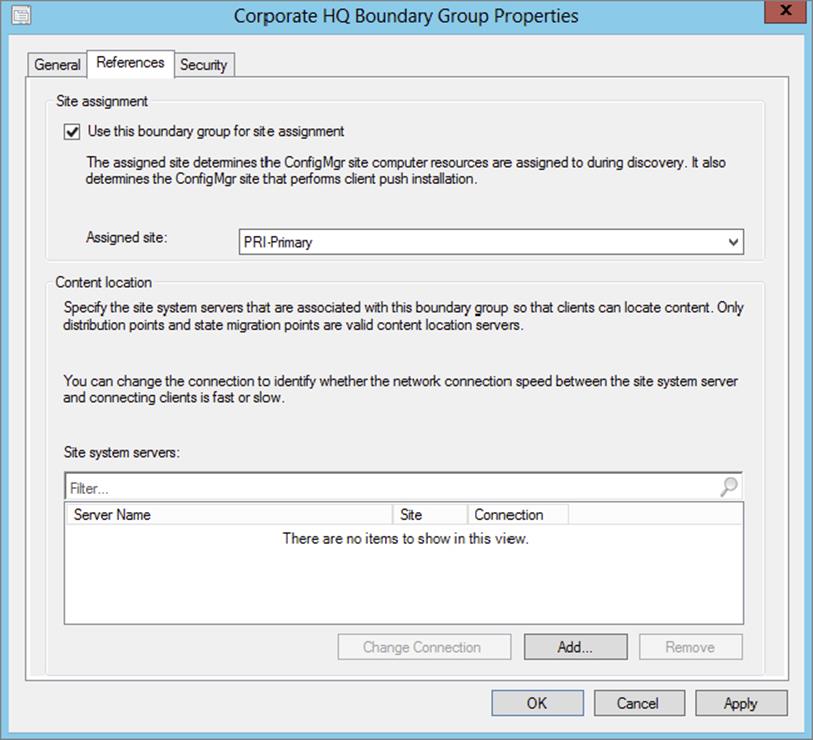
Figure 6.15 Boundary group configured for site assignment
Boundaries are basically address ranges; the following range types are supported:
· IP subnet
· Active Directory site
· IPv6 prefix
· IP address range
Even though all four boundary types are supported, there will be scenarios where one or more of the types will not work correctly. There are known issues with IP subnets and network IDs that might cause clients not to be assigned even if they fall within the boundary defined. Furthermore, AD site boundaries are not supported in IP supernetting environments. If you experience problems, you can always configure IP ranges.
![]()
Configuring a Boundary and a Boundary Group
As the Configuration Manager administrator, you have been requested to create an AD boundary and ensure it is used to assign clients to the primary site. Follow these steps:
1. Open the Configuration Manager 2012 administrative console.
2. Select the Administration workspace and browse to Overview ⇒ Hierarchy Configuration ⇒ Boundaries.
3. On the ribbon click Create Boundary.
4. Type HQ in the Description field, and under Type select Active Directory Site.
5. Click Browse, select the Active Directory site, and click OK.
6. Click OK to create the boundary.
7. Navigate to Boundary Groups, and on the ribbon click Create Boundary Group.
8. In the Name field type HQ, click Add, select the newly created boundary, and click OK.
9. Select the References tab.
10.Check the box Use This Boundary Group For Site Assignment. Select a primary site and click OK.
Client Installation Methods
As an important part of your client deployment planning, you need to ask yourself a few questions:
· How are you going to deploy the client?
Basically you can choose between a manual installation and an automatic installation. The automatic installation method comes in different flavors.
· Where are you deploying the client?
You need to know which environments need a client. Many organizations plan only for client support in the local domain just to realize later in the process that they also need to support workgroup clients, clients in DMZ, and clients in other forests.
· When do you want to deploy the client?
You need to decide whether you want to deploy all clients at once or in a controlled manner.
You have several different deployment methods to choose from; most organizations find themselves using a mix of different methods. It is important to know that there is no right or wrong method, but methods used in different scenarios have different requirements. Regardless of the installation method, you need to know the different command-line properties and when to use them. Gaining knowledge about the command-line properties will ensure that you can install clients in different environments such as workgroups, other forests, and DMZs.
Command-Line Properties
Several command-line properties are used to control the installation. Before you start the deployment, you will need to know two things:
· What command-line properties are you going to use?
· How are you going to provision the command-line properties?
The installation process will always run ccmsetup.exe and client.msi; both of these processes can be controlled using command lines. Any needed prerequisites will be installed and controlled by ccmsetup.exe. When you specify command-line properties, you should do so like this:
CCMSetup.exe [CCMsetup properties] [client.msi setup properties]
For an updated list of command-line properties, you should look at the TechNet article at this URL:
http://technet.microsoft.com/en-us/library/gg699356.aspx
The following are ccmsetup.exe command-line properties:
1. /source The /source switch is used to identify the location of the client.msi installer file. You can specify the switch multiple times to provide additional source file locations to provide for redundancy. Usage: ccmsetup.exe /source:folderpath.
2. /MP The /MP switch is used to specify the management point that will be used as a source location. As with the /source switch, you can specify multiple management points by including the switch multiple times. The setting is not used to control the management point that will be used during the site assignment process. Usage: ccmsetup.exe /MP:Server.
3. /retry:<minutes> The /retry switch is used to retry values used to determine how often a client will try to download the installation files. The client will attempt to download the files until it reaches the values specified in downloadtimeout. Usage: ccmsetup.exe /retry:30.
4. /downloadtimeout:<minutes> The /downloadtimeout switch controls the number of minutes the ccmsetup process attempts to download the needed client installation files. By default the ccmsetup process will try downloading files for one day. Usage: ccmsetup / downloadtimeout:120.
5. /noservice The /noservice switch is used to specify that the logged-in user’s account is the service account for the installation of the client. For this switch to work, the user account will need to have rights to install software; otherwise the installation will fail. Usage: ccmsetup /noservice.
6. /Service The /Service switch is used to install the client software using the security context of the local system account. For this to work, Active Directory has to be in use within your network, and the computer’s Active Directory account must have access to the installation directory where the client installation files are stored. Usage: ccmsetup /Service.
7. /Logon The /Logon switch is used to determine if a Configuration Manager client exists on the system. If a Configuration Manager 2012 client is already installed, the installation process will stop. Usage: ccmsetup.exe /Logon.
8. /forcereboot The /forcereboot switch is used to determine if the ccmsetup process needs to perform a restart of the computer in order to finish the installation. Usage: ccmsetup.exe /forcereboot.
9. /BITSPriority:<Priority> The /BITSPriority switch controls the bits download priority when downloading the client installation files. You can specify these values:
· Foreground
· High
· Normal
· Low
10.Usage: ccmsetup.exe /BITSPriority:Foreground.
11./Uninstall The /Uninstall switch is used to silently uninstall the Configuration Manager client. Usage: ccmsetup.exe /Uninstall.
12./UsePKICert The /UsePKICert switch is used to specify that the client will use a PKI certificate that uses client authentication for communication. If no certificate can be found, the client will use a self-signed certificate and communicate using HTTP. Usage:ccmsetup.exe /UsePKICert.
13./NoCRLCheck The /NoCRLCheck switch is used to specify that the client will not check the certificate revocation list before establishing HTTPS communication. This example will enable HTTPS communication and not check for any revocation lists. Usage: ccmsetup.exe /UsePKICert /NoCRLcheck.
14./config:<configuration file> The /config switch is used to specify the name of a user-defined configuration file. The configuration file replaces the default mobileclient.tcf file. It is a very good idea to modify an existing mobileclient.tcf file whenever you want to create a custom configuration file. That way you ensure that the syntax used in the file is correct. Usage: ccmsetup.exe /config:C:\Windows\ccmsetup\mysettings.txt.
The following are Client.msi command-line properties:
1. Patch This property allows you to apply client patches during the installation. At the time of writing, there are no Configuration Manager 2012 client patches. Usage: patch=\\Server\Share\clientpatch.msp.
2. CCMALWAYSINF This property with a value of 1 allows you to determine that the client will always be Internet-based, thus never connecting to the intranet. Usage: CCMALWAYSINF=1.
3. CCMCERTISSUERS This property specifies the list of certificate issuers trusted by the Configuration Manager site. Notice that the list is case-sensitive. Usage: CCMCERTISSUERS= ="CN=CM Root CA; OU=SRV; O=CM, Inc; C=US".
4. CCMCERTSEL This property allows you to control the certificate selection criteria used when the client has more than one certificate to choose from. When specifying the criteria you can search for the exact subject name (type subject: prior to the SN) or a partial match in the subject name (type subjectstr: prior to part of the subject name, object identifier, or distinguished name). Usage: CCMCERTSEL="subject:Server1.CM2012.COM".
5. CCMCERTSTORE This property allows you to specify an alternative certificate store. You should use the command line only if the certificate is not found in the default store. Usage: CCMCERTSTORE="CM2012CERT".
6. CCMFIRSTCERT With this property configured to 1 the client will automatically select the certificate with longest validity period. Usage: CCMFIRSTCERT=1.
7. CCMHOSTNAME This property is used to specify the management point for Internet-based managed clients. Usage: CCMHOSTNAME="MPServer.CM2012.COM".
8. SMSPUBLICROOTKEY This property allows you to specify the trusted root key if, for some reason, it cannot be retrieved from Active Directory. You can open the mobileclient.tcf file and copy the trusted root key. Usage: SMSPUBLICROOTKEY= 02000000A400005253413100080000010001008186332BF592B793C8B7F7C01FB32CB811465DEB71095C4442DE45661CE25031FE2B6F8D9C1C71C6C0BB335C3B5747035E028C43C35E4F8DF1E0CB8B42289A8B9F9A3143964817DCC50F0D5DB9A879705AD0F4063F4F30242472A933FE8B452BEE608147D9ECED79CA9422D5441894D152C54B0ABB920741BA0B5582482EA1231FAB0BD67AAAB82DEC50BDCE7D91FCCFB2C3F6C03C8C67C31B5F083A98860389E8D2FD93C4C5BAE6124A4977EA76B5A89AE2917687782783E003C5F215C767782C0F79A1C1E1F4D14E8B69325C8CC33C574BE774CEA9579AD765A864DB0FBBBBB854D4390473E72014111EFDFC11DDDF46EF7B1F03EF1D60A3ABDAA52E8868A0.
9. SMSROOTKEYPATH This property allows you to reinstall the trusted root key from a file. Usage: SMSROOTKEYPATH="D:\NewRootKey\Rootkey.txt".
10.RESETKEYINFORMATION This property allows you to remove the old trusted root key. This is often used when you move clients from one Configuration Manager site hierarchy to another. Usage: RESETKEYINFORMATION=TRUE.
11.CCMAdmins This property allows you to configure which admin accounts are for the client. If there is more than one account, separate the accounts with a semicolon. Usage: CCMAdmins=account1;account2;....
12.CCMAllowSilentReboot After the installation is complete, if a reboot is required, this property will cause the machine to reboot without saving any user changes. It needs to be specified only if the silent reboot is to be used. A value of 1 forces the reboot if required. Usage: CCMAllowSilentReboot.
13.CCMDebugLogging This property enables or disables debug logging. A value of 1 enables logging; a value of 0 disables logging. Usage: CCMDebugLogging=0 | 1.
14.CCMEnableLogging This property turns logging on or off. If this property is not included, then logging is disabled. Usage: CCMEnableLogging=True.
15.CCMInstallDir This is the directory where the client software will be installed. Usage: CCMInstallDir=C:\ConfigMgr.
16.CCMLogLevel This property is used to control the amount of logging activity. A value of 0 is verbose logging. A level of 1 logs all information, warning, and error conditions. A level of 2 logs warning and error conditions. A value of 3 logs error conditions only. When included, you must also use CCMEnableLogging. Usage: CCMLogLevel=0 | 1 | 2 | 3.
17.CCMLogMaxHistory This property controls the total number of previous log files within the Logs directory. When included, you must also use CCMEnableLogging. Usage: CCMLogMaxHistory=NumberOfLogFilesToKeep.
18.CCMLogMaxSize This property controls the maximum log file size. When included, you must also use CCMEnableLogging. Usage: CCMLogMaxSize=LogSizeBytes.
19.DisableCacheOpt When this property is included in the text box, it disables the Cache configuration setting within the Systems Management properties in Control Panel. Users will not be able to manipulate the settings—only administrators will be allowed to. Usage:DisableCacheOpt=True.
20.DisableSiteOpt When this property is included in the text box, it disables the Site Code configuration setting within the Systems Management properties in Control Panel. Users will not be able to manipulate the settings—only administrators will be allowed to. Usage: DisableSiteOpt=True.
21.SMSCacheDir This property controls the directory where the cache is created. Usage: SMSCacheDir=directorypath.
22.SMSCacheFlags This property can be used to control how much space the cache can occupy and the location where the cache will be stored. When used in conjunction with the SMSCacheDir property, you have control over where the cache is stored. The flags are as follows:
1. SMSCacheFlags=PercentDiskSpace Used to control the size of the cache by allocating the total cache size as a percentage of the disk size. Cannot be used with PercentFreeDiskSpace.
2. SMSCacheFlags=PercentFreeDiskSpace Used to control the size of the cache file by allocating the total cache size as a percentage of the free space on the disk. Cannot be used with PercentDiskSpace.
3. SMSCacheFlags=MaxDrive Used to place the cache on the largest drive in the system. Cannot be used with MaxDriveSpace.
4. SMSCacheFlags=MaxDriveSpace Used to place the cache on the drive with the most free space. Cannot be used with MaxDrive.
5. SMSCacheFlags=NTFSOnly Used to control the placement of the cache drive on volumes formatted with NTFS.
6. SMSCacheFlags=Compress Used to compress the files within the cache.
7. SMSCacheFlags=FailIfNoSpace Used to stop installation of the client if there is not enough space on the drive for the cache.
23.SMSCacheSize This property controls the amount of space in megabytes that the cache will consume or in percentage if used in combination with PERCENTDISKPACE or PERCENTFREEDISKSPACE. Usage: SMSCacheSize=CacheSizeInMB.
24.SMSConfigSource This property controls where the configuration source files are stored. Usage: SMSConfigSource=R | P | M | U.
25.SMSDIRECTORYLOOKUP This property controls whether WINS lookup is allowed when the client is trying to locate the management point and the site code. Usage: SMSDIRECTORYLOOKUP=NOWINS.
26.CCMHTTPPort This is the HTTP port used by the client to communicate with the site systems. Usage: CCMHTTPPort=80.
27.CCMHTTPSPort This is the HTTPS port used by the client to communicate with the site systems. Usage: CCMHTTPSPort=443.
28.SMSMP This property is used to configure the initial management point that the client communicates with. Usage: SMSMP=Server1.CM2012.COM.
29.FSP This property specifies that a fallback status point is used. Usage: FSP=Server1.CM2012.COM.
30.DNSSUFIX This property specifies the DNS domain of the management point. With this option clients will search DNS for the .srv record that includes the DNS suffix of the management point. Usage: DNSSUFFIX=CM2012.COM.
31.SMSSiteCode This property controls the site code that is assigned to the client. Usage: SMSSiteCode=Auto | SiteCode.
32.CCMEVALINTERVAL This property controls how often in minutes the client evaluation process runs. By default the process is configured to run once a day. Usage: CCMEVALINTERVAL=1440.
33.CCMEVALHOUR This property controls when the client evaluation process runs (by the hour). By default the process is configured to run at midnight. Usage: CCMEVALHOUR=14.
For example, suppose you wanted to push the client to systems, using the following options:
· Install the cache in the \Cache directory on the largest drive.
· Enable verbose logging.
· Keep five log files.
· Automatically discover the site code.
Your entry within the Property text box would look like this:
SMSSITECODE=AUTO SMSCACHEDIR=CACHE SMSCACHEFLAGS=MAXDRIVE SMSENABLELOGGING=TRUE
CCMLOGLEVEL=0 CCMLOGMAXHISTORY =5
Provisioning Command Lines
You can provision command lines in three different ways:
· Manually type the command lines during the installation.
· Publish them to Active Directory.
· Configure a Group Policy with the ConfigMgrInstallation.adm template.
If the AD schema is extended, you can type the command lines in the Installation Properties for the client push installation method. All properties you enter here will be published to Active Directory and used by any client that can access Active Directory during the installation. Notice that this applies only if you start the installation using ccmsetup.exe with no other command lines.
For those scenarios where clients cannot access the information in Active Directory, you can provision the command lines using a Group Policy with the ConfigMgrInstallation.adm template. The template is found on the Configuration Manager 2012 installation media in .SMSSetup\TOOLS\ConfigMgrADMTemplates.
Manually Installing the Client
This installation method might sound like a very time-consuming method; however, you will find yourself installing clients manually for several reasons. You can manually install the client by running CCMSetup.exe from the site server or from any management point. The file is located in the Program Files\Microsoft Configuration Manager\Client folder.
To manually install a client in an environment where the AD schema has been extended, do the following: From Start ⇒ Run, type \\ConfigMgr Server\SMS_<sitecode>\Client\ccmsetup.exe.
To manually install a client on a workgroup computer, follow these steps:
1. Make sure you can access the client installation files or copy them to the local client.
2. Open a command prompt as administrator.
3. Run ccmsetup.exe smssitecode=PS1 /Source:C:\CM2012Client smsmp=SCCM4.SCCMLAB.Local fsp=SCCM4.SCCMLAB.Local DNSSUFIX=SCCMLAB.Local.
This will install the Configuration Manager client from the local source C:\CM2012Client and assign it to primary site PS1 using SCCM4 as the management point and fallback status point. The client must be able to resolve the site system names; otherwise the installation will fail. You can use the Hosts and LMHOSTS files to provide the needed naming resolution support.
To support a DMZ installation where the client is not able to resolve the needed hostnames, you configure these settings in the LMHOSTS and Hosts files (in the example the site server is named SCCM4.SCCMLAB.LOCAL with 192.168.1.2 as the IP address). You can find the files in %windir%\System32\drivers\etc\. There must be exactly 15 characters between the first " and the \ in the LMHOSTS file.
Add these entries to the LMHOSTS file:
192.168.1.2 SCCM4 #PRE
192.168.1.2 "SMS_MP \0x1A" #PRE
Add this entry to the Hosts file:
192.168.1.2 SCCM4.SCCMLAB.local
Client Push
Client push is one of the most used installation methods because it requires very little work. All you need to do is to specify one or more client push installation accounts along with some client push installation settings. Before you use client push, you need to understand the preinstallation phase:
· When one of the discovery processes is running, a client configuration request (CCR record) will be generated for each object that does not have a client installed.
· Using the client push account, the Client Configuration Manager (CCM) component will make a connection to the client and copy the two files ccmsetup.exe and mobileclient.tcf to \\Client\Admin$\CCMSetup.
· Once the files have been successfully copied to the client, the server will verify that the CCMsetup service is starting successfully on the client before it disconnects.
· From this point on, the local client is responsible for installing the Configuration Manager agent.
Note: The client push installation feature of Configuration Manager 2012 does not support client installation on Linux/Unix or Mac computers. The client for these platforms must be installed manually or via a remote scripting solution.
All this information from the preinstallation phase is recorded in the CCM.log file on the site server. It is not uncommon to see errors in the log file for reasons like these:
· A local firewall is running on the client and no firewall rules have been created. This will generate an error message like this: ---> Failed to connect to \\Client\admin$ using machine account (67).
· The client push account does not have the correct permissions to access IPC$ and Admin$. This will generate an error message like this: Unable to connect to remote registry for machine name "client ", error 5.
· The client is not running. This will generate an error message like this: ---> Failed to connect to \\Client\admin$ using machine account (67).
· Configuration Manager is unable to locate the client because of naming resolution errors. This will generate an error message like this: The network path was not found (53).
If the client Configuration Manager component fails to start the installation on the client, it will retry the installation once an hour for seven days. All retry attempts are stored in \Program Files\Microsoft Configuration Manager\inboxes\ccrretry.box.
To configure the client firewall correctly you need to enable
· File and Printer Sharing
· Windows Management Instrumentation (WMI)
To configure the client push installation account correctly you need to assign it local administrative permissions on the client.
When you create the account, make sure you add it to the group within your Active Directory structure that has the proper security rights on each machine within the site. Once the account(s) are created, you can configure them as client push installation accounts in the Configuration Manager console. If none of the specified client push accounts are able to connect to the client, the site server will attempt to connect using the site server computer account. With that in mind, you can also assign the correct permissions to the site server computer account, thus eliminating the need for multiple client push accounts.
Configuring Client Push Settings
Once the discovery methods have been configured, you will need to configure the client push settings. In the Configuration Manager Administrator console, follow these steps:
1. Select the Administration workspace.
2. Browse to Overview ⇒ Site Configuration ⇒ Sites.
3. Choose Client Installation Settings ⇒ Client Push Installation on the ribbon.
Selecting the check box Enable Automatic Site-Wide Client Push Installation means that whenever a computer is discovered within a defined site boundary group, the client will be automatically installed.
Figure 6.16 shows the Client Push Installation Properties, and this is where you can enable and configure automatic client push installation. It is important to know that client push can be performed in several ways. Use the General tab to configure the options for the fully automated client push feature of Configuration Manager. For a collection-based or client-based client push, you only need to configure settings on the Accounts and Installation Properties tabs.
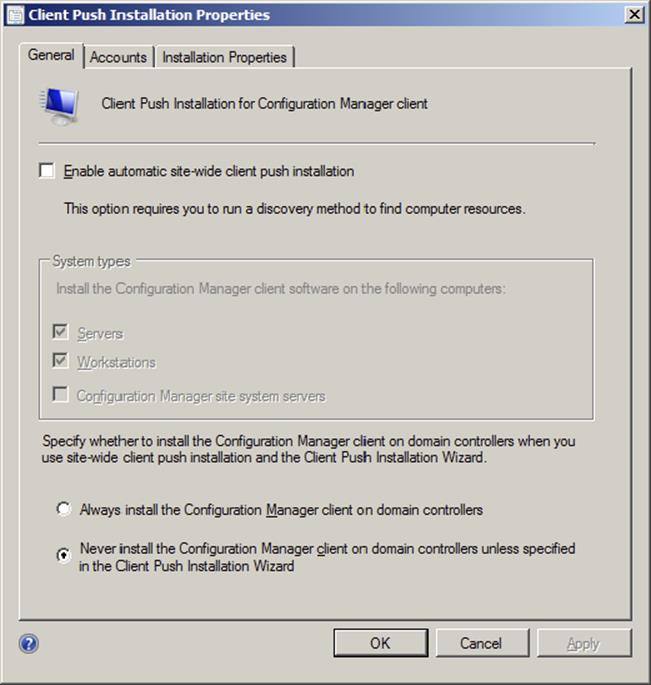
Figure 6.16 The General tab of Client Push Installation Properties
The Accounts tab, shown in Figure 6.17, allows you to specify the accounts to use to install the Configuration Manager client. Configuration Manager will try the accounts in order until it finds an account with administrative rights on the destination computer. It will always try using the site server’s computer account last if one or more accounts are listed and try the site server’s computer account only if no accounts are listed. In the figure you will notice that two different accounts, a domain account and a local account, have been specified. A maximum of 10 user accounts can be specified here.
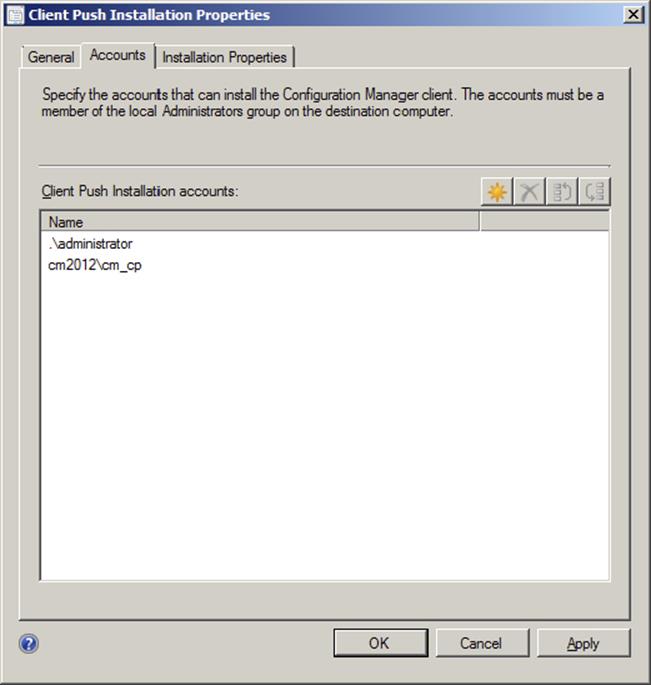
Figure 6.17 The Accounts tab of Client Push Installation Properties
In the Installation Properties tab of Client Push Installation Properties, shown in Figure 6.18, you control how the client is installed by entering installation properties within the text box. The properties that you enter here will be published as command lines in Active Directory. You can enter all available client.msi command lines.
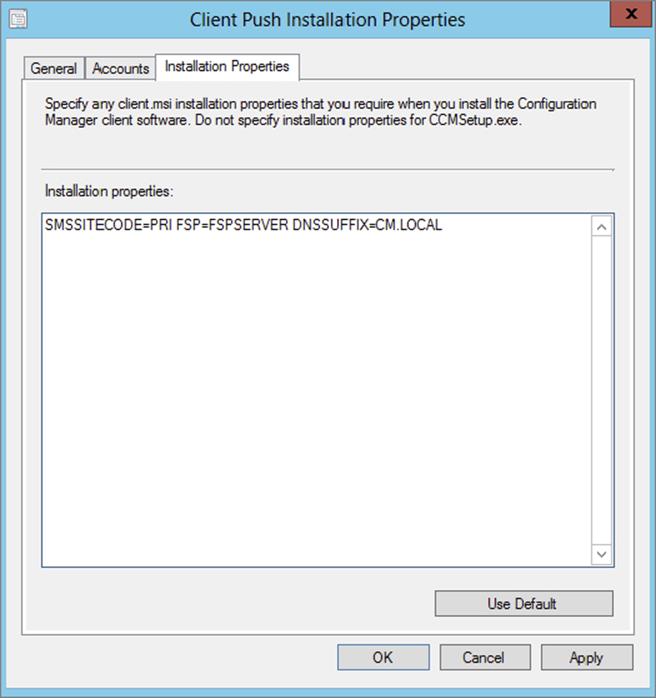
Figure 6.18 The Installation Properties tab of Client Push Installation Properties
In order to manually push the client install out from within the Configuration Manager administrative console, the target client system(s) needs to be discovered and visible in the Assets and Compliance workspace. Once a system is available, you can push the client to the individual system, or you can push the client to all of the systems within the collection. The simplest way to do this is with the Install Configuration Manager Client Wizard. To initiate the wizard, select a discovered system or collection and choose Install Client from the ribbon. This will open the Install Configuration Manager Client Wizard.
Although the properties and the installation account cannot be modified from the wizard, as Figure 6.19 shows, you can change some of the client push installation options on an individual basis. Especially notice that you can select which site you want to use to install the client. The site choice also affects from which server the client will download the needed software.
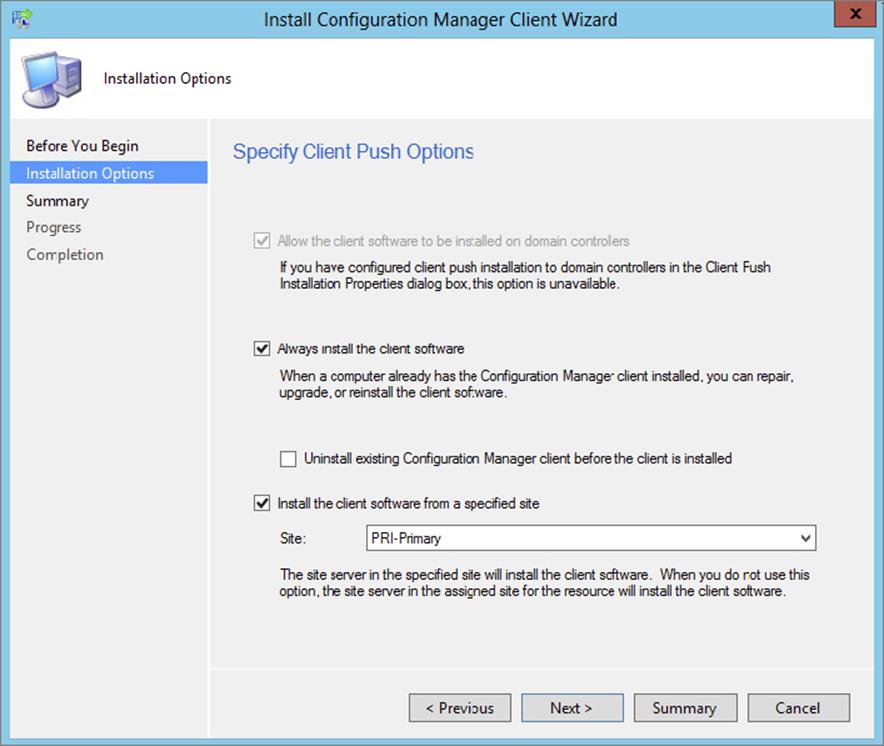
Figure 6.19 Client push Install Configuration Manager Client Wizard settings
From this page you can also choose to always install the client software. This will force the installation of the client, even if another client is already installed.
You can use the canned reports in the Client Push category to monitor the client push attempts. The reports will provide you with information about all client push attempts divided into days and installation status.
Group Policy
You can use a software installation GPO to install the client. For GPO installations you must use the ccmsetup.msi file. This file can be found in the folder .\Program Files\Microsoft Configuration Manager\bin\i386 on the site server. You cannot specify any command-line properties when publishing the client; instead the command lines that are published to Active Directory will be used. If you are installing the client in another forest, you can use a Group Policy based on the ConfigMgrInstallation.adm template to provision the command lines locally on the client in the registry before installing the client.
Software Update
This installation method requires that you have an existing WSUS server in the environment and that it is also configured as the software update point. (A Windows client can only be configured with a single WSUS server. For that reason you need to make sure that the WSUS server specified in the GPO is the same as the one being used as the software update point.) Once you enable this method, the Configuration Manager client will be published to WSUS as a required infrastructure update. You cannot specify any command-line properties when publishing the client; instead the command lines that are published to Active Directory will be used. If you are installing the client in another forest, you can use a Group Policy based on the ConfigMgrInstallation.adm template to provision the command lines in the registry before installing the client. You can monitor publishing between the site server and WSUS server by reading the wcm.log file on the site server.
Note that if you ever need to uninstall Configuration Manager for any reason, make sure you have disabled this client installation method. Failure to do so will leave the Configuration Manager client in WSUS as a required infrastructure update.
Software Distribution
You can deploy the client using the Software Deployment feature. This method is often used when upgrading the client to a new service pack. You will notice that a new installation of Configuration Manager ships with a Configuration Manager client package and a Configuration Manager client Upgrade package. If you want to create your own Configuration Manager client software package, follow these steps:
1. Open the Configuration Manager console and navigate to the Software Library workspace.
2. Select Overview ⇒ Application Management ⇒ Packages and click Create Package From Definition on the ribbon.
3. Under Name, select Configuration Manager Client Upgrade and click Next.
If you do not see the definition, verify that you have selected Microsoft as the publisher.
4. Select Always Obtain Files From A Source Directory and click Next.
5. In the source directory type \\<Server>\sms_<Sitecode>\Client where <Server> is the name of the Configuration Manager site server and <sitecode> is the site code.
6. Click Next and finish the guide.
You have now created a software package containing the client software that you can deploy using the deployment methods described in later chapters.
Logon Script Installation
Logon scripts have been used by companies for many years to apply settings to users and their systems. The parameters that you can use are the same as those described earlier in this chapter. When installing the client using this method, remember to add the /Logoncommand line to ccmsetup.exe; otherwise, the client installation will begin every time the user logs on to a system.
Imaging
If you are using the Operating System Deployment feature of Configuration Manager, there is a step in the task sequence that will install the Configuration Manager client. The task sequence step Set Up Windows And ConfigMgr is required and will install the Configuration Manager client correctly in both the reference image and the real image. If you are using another imaging solution and need the Configuration Manager client installed in the reference image, follow these steps:
1. Manually install the client.
2. Stop the SMS Agent Host service by running NET STOP CCMEXEC.
3. Remove the trusted root key and any other unique certificates. Remove the trusted root key by running CCMSetup RESETKEYINFORMATION = TRUE.
4. Run SYSPREP.EXE.
5. Capture the image.
Installing Linux/Unix Clients
Beginning with Configuration Manager 2012 SP1, Configuration Manager supports Linux and Unix computers as Configuration Manager clients. The Linux/Unix Configuration Manager client supports hardware and software inventory as well as software distribution. The client push feature of Configuration Manager 2012 cannot be used to install the client, and these computers are treated as workgroup-based devices. As a result, you must manually install the Configuration Manager client on Linux/Unix devices, or you can use a shell script that installs the client remotely.
The client installation process leverages a script named Install, which is included in the downloaded media for the Linux/Unix client. This installation media is available at www.microsoft.com/en-us/download/details.aspx?id=39360.
The Install script supports command-line properties, some of which are required and others are optional. For example, you must specify the management point for the site that the Linux/Unix client will utilize. Once the client is installed, you can use the Client Settings feature in the Configuration Manager 2012 console to configure the client agent as you would for Windows-based clients.
You must use the correct client installation package for the Linux/Unix computer that the Configuration Manager 2012 client will be installed on. Several versions of Linux/Unix can utilize the Universal Agent, while other versions will utilize a client installation package that is specific to each operating system version and platform. Use the TechNet article “Supported Distributions of Linux and UNIX” to determine which installation package to use:
http://technet.microsoft.com/en-us/library/gg682077.aspx#BKMK_SupConfigLnUClientReq
You can utilize the same installation process and command-line properties, regardless of which installation package is used. Also, the client installation package contains all of the files required to completely install the Configuration Manager 2012 client, and the computer will not download additional files from the management point or another source location during the install process.
As shown in Figure 6.20, the client installation command line will reference the Install script that is included with the client installation package and will also specify the management point, the assigned site, any optional installation configurations, and the client installation package file.
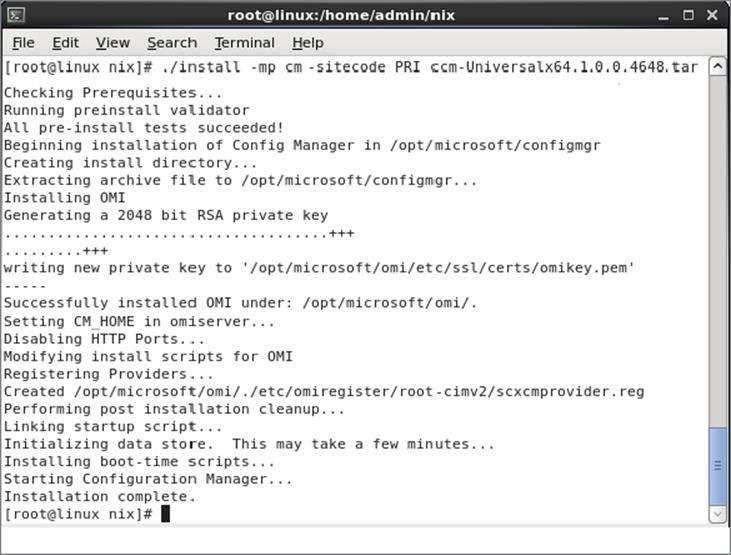
Figure 6.20 Linux/Unix client installation
To install the client on a Linux/Unix computer, follow these steps:
1. Copy the Install script file and the client installation .TAR file to a folder on the Linux/Unix computer.
2. Use root credentials to run the command to enable the Install script to run: chmod +x install.
3. Under the root credentials, run the command with the required parameters and optional items, if needed:
4. ./install -mp <management point> -sitecode <sitecode> <property #1>
<property #2> <client installation package>
5. Once the client installation is complete, you can validate the status of the installation via the log file /var/opt/microsoft/scxcm.log. You can also verify that the computer registered with Configuration Manager properly by viewing the Devices node in the Assets and Compliance workspace in the Configuration Manager 2012 console.
If optional command-line properties are needed during the install, they must be specified in the command before the statement that identifies the client installation package file that will be used. Also, the client installation package file must be specified last in the command line. Table 6.1 describes the available command-line options. You can utilize the property -h to display this list of properties that are available.
Table 6.1: Available command-line options
|
Property |
Required or Optional |
Comments |
|
-mp |
Required |
This is the FQDN of the management point server that the client will use for initial contact, but it does not specify the management point that the client will use after being assigned to a site. If the management point is configured to accept only HTTPS connections, you must also use the -UsePKICert property. |
|
-sitecode |
Required |
This specifies the Configuration Manager primary site server that the client will be assigned to. |
|
-fsp |
Optional |
This is the FQDN of the fallback status point server that the client will utilize to submit state messages. |
|
-dir |
Optional |
This provides an alternate location for the client installation package. The default location is /opt/microsoft. |
|
-nostart |
Optional |
This prevents the automatic start of the Configuration Manager client service after the client installation process is completed. After the client install process is complete, you must manually start the client service. The default option is to start the service after the client installation process is complete. |
|
-clean |
Optional |
This is used to remove all client files and data from a previously installed client before the new installation starts. |
|
-keepdb |
Optional |
This specifies that the local client database should be retained and reused when the client is reinstalled. The default option is to delete the database when the client is reinstalled. |
|
-UsePKICert |
Optional |
This specifies the full path and filename for the PKI certificate in the Public Key Certificate Standard format. Use the -certpw command-line parameter to provide the password associated with the PKCS#12 file. If the certificate is not valid or cannot be located, the client will use HTTP and use a self-signed certificate. Also, you must use this property if you use the -mp option to specify a management point that is configured to accept only HTTPS client connections. |
|
-certpw |
Optional |
This specifies the password associated with the PKCS#12 file that was specified with the -UsePKICert property. |
|
-NoCRLCheck |
Optional |
This specifies that the client should not check the certificate revocation list when it communicates over HTTPS. The default is that the client will check with the CRL before establishing an HTTPS connection. |
|
-rootkeypath |
Optional |
This specifies the path and filename for the trusted root key. |
|
-httpport |
Optional |
This specifies the port that the client uses to communicate with the management point via HTTP. The default value is 80. |
|
Note: After installing the client, you cannot change the port configuration. To change the port you will need to reinstall the client and specify the port to utilize. Use the -keepdb option to retain the client database and files. |
||
|
-httpsport |
Optional |
This specifies the port that the client uses to communicate with the management point via HTTPS. The default value is 443. |
|
Note: After installing the client, you cannot change the port configuration. To change the port you will need to reinstall the client and specify the port to utilize. Use the -keepdb option to retain the client database and files. |
||
|
-ignoreSHA256validation |
Optional |
This specifies that the client installation will skip SHA-256 validation. Use this option if you’re installing a client on an operating system that does not support SHA-256. |
|
-signcertpath |
Optional |
This specifies the full path and filename for the exported self-signed certificate of the site server. |
|
-rootcerts |
Optional |
This allows you to specify additional root certificates that the client may need to validate site servers. |
Installing a Mac Client
Configuration Manager 2012 also supports the management of Apple Mac computers as clients. The client for the Mac operating system allows you to discover, retrieve inventory, manage settings, and also deploy applications and security updates via Configuration Manager.
The management of Mac computers in Configuration Manager 2012 requires the use of public key infrastructure (PKI) certificates. Configuration Manager can utilize Microsoft Certificate Services with an enterprise certification authority (CA), or you can request and install computer certificates outside of Configuration Manager as long as the certificate meets the requirements of Configuration Manager. It is worth noting that Mac-based Configuration Manager clients always perform certificate revocation checking and cannot be disabled. If Mac clients cannot confirm the certificate revocation status via the certificate revocation list (CRL), they will not be able to connect to the Configuration Manager site servers. Mac devices will also require that the Configuration Manager enrollment point and enrollment proxy point site system roles are installed and configured.
Mac computers are automatically assigned to the Configuration Manager site that will manage them and are installed as Internet-only clients, even if the Mac computer will communicate only on an internal or intranet network. Thus, you will need to ensure that the site systems in the assigned Configuration Manager site are configured to allow client connections from the Internet.
The following is the process for installing the Configuration Manager client on a Mac computer:
1. Ensure that the proper certificates have been prepared and deployed. A web server certificate must be deployed to the management point, distribution points, the enrollment point, and the enrollment proxy point. Also, a client authentication certificate must be deployed to the management point and distribution point. If you need guidance on preparing a Configuration Manager site for supporting PKI and Internet-based clients, refer to the definitive article “Step-by-Step Example Deployment of the PKI Certificates for Configuration Manager: Windows Server 2008 Certification Authority” at http://technet.microsoft.com/en-us/library/gg682023.aspx.
2. Open the Configuration Manager 2012 console and select the Administration workspace.
3. In the Administration workspace, choose Client Settings and then select Default Client Settings. You must modify the default client settings in order to configure the enrollment process. These settings cannot be applied via a custom device settings group.
4. Right-click Default Client Settings and select Properties.
5. Select Enrollment and set Allow Users To Enroll Mobile Devices And Mac Computers to Yes.
6. Select Enrollment Profile and click Set Profile.
7. In the Mobile Device Enrollment Profile window, click Create.
8. In the Create Enrollment Profile window, enter a name for the enrollment profile and configure the site code for the Configuration Manager site that will manage the Mac computers.
9. Click Add and in the Add Certification Authority For Mobile Devices window select the certification authority that will issue certificates to Mac computers. Click OK.
10.In the Create Enrollment Profile window, select the Mac computer certificate template that was previously created and click OK.
11.Click OK to close the Enrollment Profile window, and click OK to apply the settings to the default client settings.
12.Download the Mac installation media client files and install the Mac client. The Mac client applications are contained in a file named ConfigmgrMacClient.msi and can be obtained at http://www.microsoft.com/en-us/download/details.aspx?id=36212.
13.On a Windows computer, run the ConfigmgrMacClient.msi file and extract the files that are included in the MSI.
14.Copy the Macclient.dmg file from the extracted files to the Mac computer.
15.Run the Macclient.dmg file on the Mac computer to extract the Mac client installation files. This will create a Tools folder and will contain several Mac client tools and files, including ccmsetup and cmclient.pkg.
16.For Configuration Manager 2012 R2 you have two options for enrolling the Mac client. You can use the CMEnroll tool that is included in the extracted media from the previous step, or you can use the Mac Computer Enrollment Wizard.
Here are the steps for the CMEnroll process:
a. To use the CMEnroll process, open the folder where the extracted files were stored and enter the following command line: Sudo ./ccmsetup. Wait for the Completed installation message to appear. Do not restart the computer.
b. Open the folder where the extracted files were stored and enter the following command line: Sudo ./CMEnroll -s <enrollment proxy server> -ignorecertchainvalidation -u <user name>. The user name must match an active account in Active Directory that has been granted Read and Enroll permissions on the Mac client certificate template. Also, this command will prompt for the password for the super user account first and then prompt for the password for the Active Directory user account. Make sure you use the correct passwords.
c. Wait for the message stating that the Mac client has been successfully enrolled, and then restart the computer.
Here are the steps for the Mac Computer Enrollment Wizard process:
d. To use the Mac Computer Enrollment Wizard, click Next at the welcome page. The Mac Computer Enrollment Wizard is shown in Figure 6.21.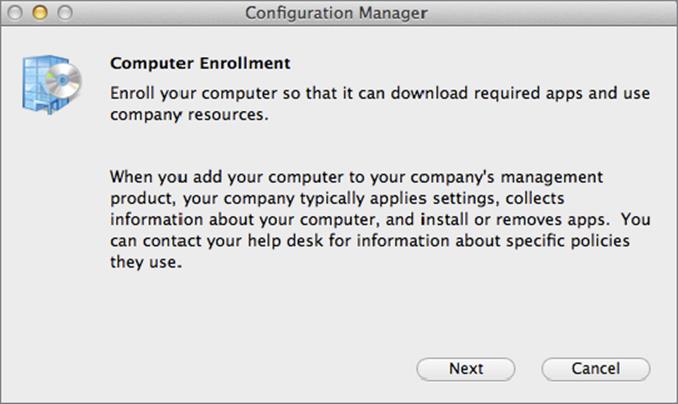
Figure 6.21 Mac Computer Enrollment Wizard
e. Enter the required information. The user name can be in domain\username format or username@domain.
f. The user name and the password must match an Active Directory account that has been granted Read and Enroll permissions on the Mac client certificate template.
g. Enter the password that is associated with the specified user account.
h. For server name, enter the name of the enrollment proxy point server.
i. Click Next and complete the wizard.
Once the client installation is complete, you can verify that the Mac computer registered properly by viewing the Devices node in the Assets and Compliance workspace in the Configuration Manager 2012 console.
Verifying Client Installation
While the installation is in progress, you can view the installation program running within Task Manager or monitor the installation by reading the log files. In Task Manager you will see ccmsetup.exe running. As it completes, you will see ccmsetup.exe replaced by the agent host program ccmexec.exe.
You can also verify that the client has obtained the correct site code and is communicating with the management point, as follows:
1. Open Control Panel, and you will find a new icon named Configuration Manager.
2. Double-click this icon, and the Configuration Manager Properties screen will appear.
3. Click the Site tab to find the site code within the Currently Assigned To Site Code box, as shown in Figure 6.22.
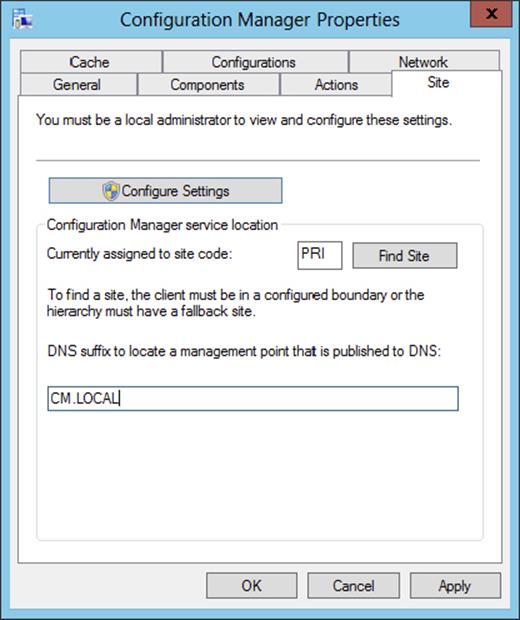
Figure 6.22 Verifying that the site code has been obtained
Within the Actions tab of the Configuration Manager Properties screen, you should also find several actions listed by default; other actions will appear in this list as the client agents are enabled. The default actions are Application Deployment Evaluation Cycle, Discovery Data Collection Cycle, Hardware Inventory Cycle, Machine Policy Retrieval & Evaluation Cycle, User Policy Retrieval & Evaluation Cycle, and Windows Installer Source List Update Cycle. Each of these actions will be covered when we discuss the related components.
Now, unless you have a very small environment, you will not be able to manually verify the installation of each client. Instead you will use the following reports in the Site - Client Information category:
· Client Deployment Success Report
· Client Deployment Status Details
· Client Assignment Status Details
· Client Assignment Success Details
The reports require that you have specified a fallback status point in the command line for the client installation.
Troubleshooting a Client Installation
To troubleshoot a client installation you will need to understand the three phases in the process. You can troubleshoot each of the phases in real time by reading the correct log files with CMtrace.exe.
1. The Preinstallation Phase This phase is described in the “Client Push” section of this chapter. A useful log file in this phase is ccm.log on the site server.
2. The Installation Phase This phase begins when ccmsetup.exe reads the mobileclient.tcf file and starts downloading the required files needed to complete the installation. Useful log files in this phase are ccmsetup.log and client.msi.log, both found in the%windir%\ccmsetup folder on the client.
3. The Post-installation Phase This phase is also known as the assignment phase, where the client is being added as a managed client to a primary site. Useful log files in this phase are clientidstartupmanager.log, clientlocation.log, and locationservices.log, all found in the %windir%\ccm\logs folder on the client.
Once you have identified where the problem is, you will be able to select the correct log file for further troubleshooting.
Ensuring Client Health
Client status and automatic client remediation are some of the new features in Configuration Manager 2012. In previous versions of Configuration Manager/Systems Management Server, organizations were forced to spend numerous hours creating custom client health solutions, and even more organizations did not even implement a client health process. In Configuration Manager an automatic remediation process runs daily on every client, and reports and alerts tell you if the number of active clients is dropping to a number below the defined service-level agreements for the company.
Automatic Client Remediation
During the client installation a schedule remediation task is created in Windows. Figure 6.23 shows the scheduled task in Task Scheduler. The process ccmeval will run daily and perform all the checks that are specified in the ccmeval.xml file found in the %windir%\ccmfolder. There are more than 20 different checks. If the evaluation process fails, the client will automatically be repaired. All ccmeval status messages will be forwarded to the management point. You can monitor the process by reading the ccmeval.log andCcmEvalTask.log files found in %windir%\ccm\logs and the ccmsetup-ccmeval.log file found in %windir%\ccmsetup\.
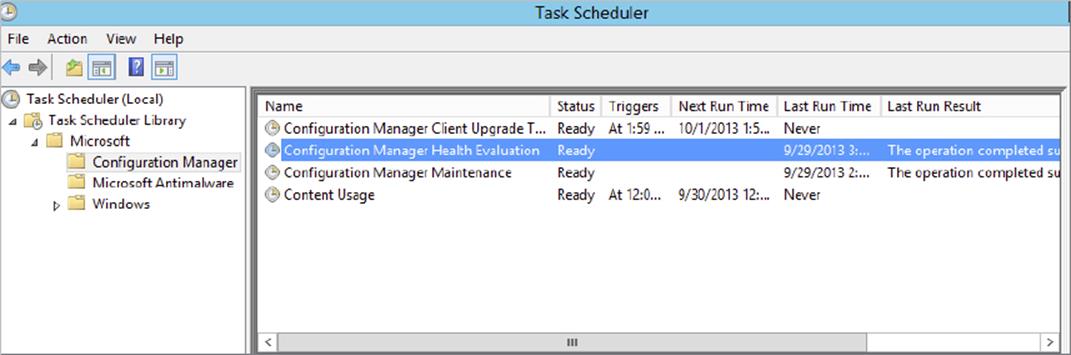
Figure 6.23 CCM evaluation task
You can monitor the client remediation process in the Configuration Manager console. Navigate to the Monitoring workspace and select Client Status ⇒ Client Check.
Determining Client Health
To determine the overall client health Configuration Manager uses multiple objects such as these:
· Discover records
· Hardware inventory
· Software inventory
· Status messages
· Policy requests
· Active Directory integration
As the administrator, you will define when a client goes from being considered active to inactive. To configure the client activity settings, follow these steps:
1. Navigate to the Monitoring workspace.
2. Select Client Status.
3. From the ribbon click Client Status Settings to open the window shown in Figure 6.24.
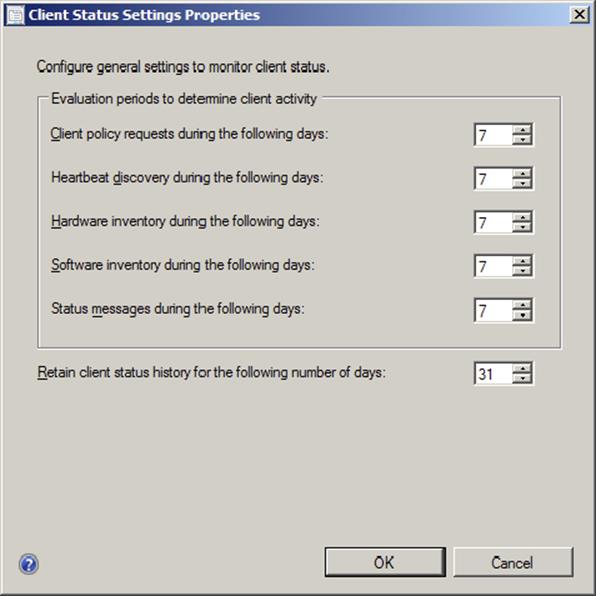
Figure 6.24 Client Status Settings Properties—General tab
There are no correct or incorrect settings; it all depends on the client behavior in your network. Do you have only workstations that are supposed to be started daily, or do you have a large number of laptops that are infrequently connected to the network? Don’t be too aggressive when configuring the settings. If you configure the wrong values, you might find yourself chasing ghosts and trying to troubleshoot clients that for obvious reasons are not connected to the network.
Monitoring Client Status
The client status data is displayed in the Monitoring workspace. When you click the Client Status node, you will see both the client activity and the client check data. If you click any of the different states, you will be taken to the Assets and Compliance workspace, where you will see all the devices that are in the selected state.
You can also use the canned reports in the Client Status category. They will provide you with valuable information about the overall health status and the client agility.
1. Client Status Summary Can be used as the main client health report. It will give an overview of the client health and client activity data.
2. Inactive Client Details Will list all inactive clients along with information about the last health check.
3. Client Status History Will provide a very good historic view for the last 30–90 days.
4. Client Time To Request Policy Will display how many clients have requested policies during the last 30 days.
Configuring Alerts
Having a mixed environment with laptops, desktops, and servers often means that you have different activity requirements. You can configure individual thresholds per collection and that way have different settings for the unique computer roles in your environment. Figure 6.25 shows the alerts settings that are configured for a collection containing all servers. Because you can use Configuration Manager to keep the servers compliant with software updates, it is unacceptable to have a server running without a healthy client.
Figure 6.25 Configuring alert settings on a collection
Configuring Client Health Alerts for the All Servers Collection
As the Configuration Manager administrator, you have been requested to ensure that alerts are generated if any servers become unhealthy. To do so, follow these steps:
1. Open the Configuration Manager 2012 administrative console.
2. Select the Assets and Compliance workspace, and browse to Device Collections.
3. Select your All Servers collection, and click Properties on the ribbon.
4. Select the Alerts tab, click Add, and select each of the three Client Status checks.
5. Click OK.
6. In Conditions select each of the Client Status checks and configure the threshold and alert severity.
7. Click OK to save the settings.
To monitor the alerts, do the following:
1. Navigate to the Monitoring workspace.
2. Select Alerts.
3. In the Search field, type Client and click Search.
You will now see a list of all client remediation, client health, and client activity alerts.
Automatic Client Upgrade
Configuration Manager 2012 provides the ability to automatically upgrade the Configuration Manager client software on Windows-based devices to the latest version when the site determines that the Configuration Manager client version that is being used is lower than the version that is being used in the hierarchy. The configuration options are shown in Figure 6.26.
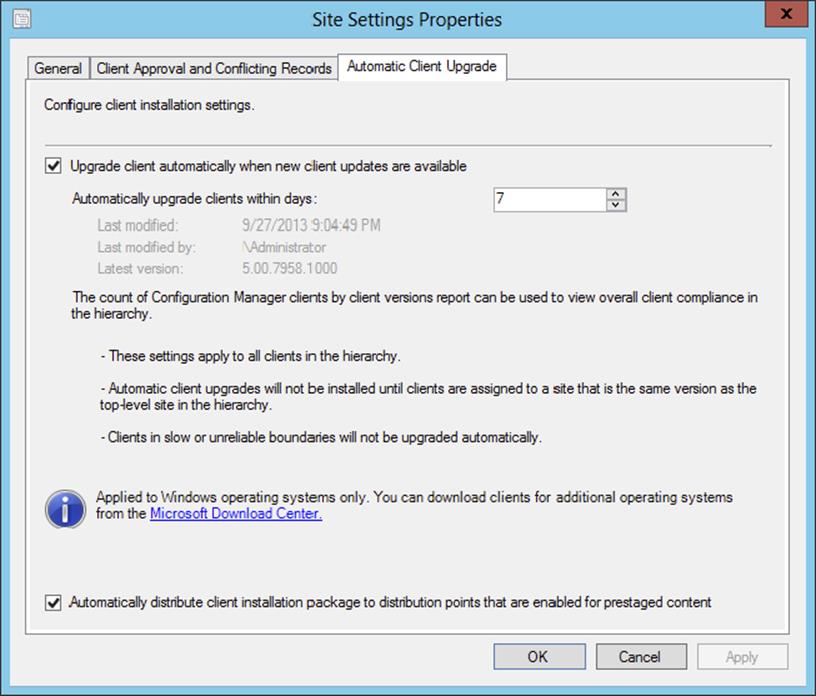
Figure 6.26 Automatic Client Upgrade configuration
Configuration Manager 2012 automatically creates a client upgrade package and deploys the content to all of the distribution points in the hierarchy (except for cloud-based distribution points). As changes are made to the client package, for example, adding a client language pack, Configuration Manager 2012 will automatically update the package and update the distribution points. If automatic client upgrade is enabled, all clients will install the new client language pack automatically. The automatic upgrade feature was originally intended for upgrading relatively small numbers of Configuration Manager 2012 clients, but with the performance improvements in SP1 and R2 it is possible that the automatic client upgrade feature is the primary method you will use for upgrading clients. As always, you should test heavily in your environment and verify that this feature will not cause unexpected performance or network issues.
The following is the process to configure the automatic client upgrade feature:
1. Open the Configuration Manager 2012 console and select the Administration workspace.
2. Select Site Configuration and then select Sites.
3. In the Home tab of the ribbon, click Hierarchy Settings.
4. In the Site Settings Properties window, select the Automatic Client Upgrade tab.
5. If you want to enable the automatic client upgrade feature, select the check box.
6. A window will appear confirming that you have chosen to enable automatic upgrade of all clients in the hierarchy and reminding you that all clients in the hierarchy will be upgraded. Click OK.
7. Configure the number of days in which the client computers must upgrade the client software. The clients will be upgraded at a random interval over the specified number of days. This will help prevent performing a large number of client upgrades at the same time.
8. The option Automatically Distribute Client Installation Package To Distribution Points That Are Enabled For Prestaged Content should be enabled if you want the client installation package to be copied to distribution points that are enabled for prestaged content.
9. Once the settings are configured, click OK to save the settings and close the Site Settings Properties window. Clients will receive the updated setting during their next policy polling check.
The Bottom Line
1. Configure boundaries and boundary groups. Before starting any client installation, verify that you have configured a boundary group for site assignment.
1. Master It Let Configuration Manager Forest Discovery automatically create the boundaries and add them to the correct boundary groups.
2. Select the relevant discovery methods. You configure discovery methods in the Configuration Manager console. The Active Directory discovery methods all require a schedule and an LDAP path. There are schedules for delta and full discovery. In Configuration Manager 2012, delta discovery will also find changes to existing objects; this eliminates the need to run a full discovery more than once a week.
1. Master It Always know what you want to discover and where. Based on that knowledge, configure the needed discovery methods.
3. Employ the correct client installation methods. When configuring the client installation methods, make sure you know the pros and cons for each method. Some require firewall settings; others require local administrative permissions. You need to make sure that all the required settings are in place. Do not start any installation until you have the needed site systems, boundary groups, and command lines specified.
1. Master It Configure the correct command-line properties and ensure they will work for all environments (local forest, workgroup, and DMZ). Create multiple client push installation accounts, and ensure that you have a good understanding of the three phases (preinstallation, installation, and post-installation).
4. Manage Unix/Linux and Mac devices. Configuration Manager 2012 provides support for managing Unix/Linux and Mac computers as devices. You are now able to manage your entire computer infrastructure from a single management console.
1. Master It Understand the installation methods available for deploying the Configuration Manager client to the Unix/Linux computers and Mac computers. Remember that client push cannot be used for these devices.
5. Ensure client health. Client status might not be the first task you think about when implementing a system like Configuration Manager. But it is crucial to the daily administration that you can trust the numbers you see in the reports and in the console. One way to ensure that is by making certain that all clients are healthy and are providing the server with up-to-date status messages and discovery information.
1. Master It Discuss the different environments that exist in your organization, and use that information when configuring client health alerts. Make sure that you know the client activity during a normal period and that you have a set of defined SLAs for each of the environments (laptops, road warriors, servers, call center, and so on).
All materials on the site are licensed Creative Commons Attribution-Sharealike 3.0 Unported CC BY-SA 3.0 & GNU Free Documentation License (GFDL)
If you are the copyright holder of any material contained on our site and intend to remove it, please contact our site administrator for approval.
© 2016-2026 All site design rights belong to S.Y.A.