Mastering System Center 2012 R2 Configuration Manager (2014)
Chapter 8. Application Deployment
The ability to deploy applications has long been a primary function of Configuration Manager. The Application Deployment feature of Configuration Manager 2012 is the new approach for software deployment and allows administrators to deploy almost any kind of content to Configuration Manager clients, affecting potentially thousands of systems or users.
The list of content deployable through Application Deployment includes virtually anything—from full applications (i.e., Office) to scripts and batch files. Beyond simply specifying what to deploy is also the ability to detail how to deploy, including whether an application should be delivered to systems versus users or whether the application should be a full installation on the target system versus a virtualized version using App-V.
With so much flexibility and power comes a great amount of responsibility. Configuration Manager provides robust ability to define and control Application Deployment to systems and users. When properly used, the experience with Application Deployment will be very positive, but it is also possible to make mistakes with this feature and deliver the mistakes to potentially thousands of systems or users. This underscores the need to completely understand the feature and its various options and also the need for proper testing before introducing a change to such a potentially large number of systems or users. This need for proper understanding and testing is not unique to Configuration Manager but applies to any product of enterprise scale.
This chapter will detail the various options and features of Application Deployment in Configuration Manager 2012.
In this chapter, you will learn to
· Explain the options available for Application Deployment
· Detail the various components required for Application Deployment
· Understand the role of and manage distribution points
What’s New in Application Deployment?
The label Application Deployment describes the new approach being taken in Configuration Manager 2012 for deploying content. Software Distribution, as it has been historically known, has not been removed from the product; it is still present in the console and represented by the Packages node of Application Management. Also note the Applications node, which is where configurations using the new approach are centered. This is shown in Figure 8.1.
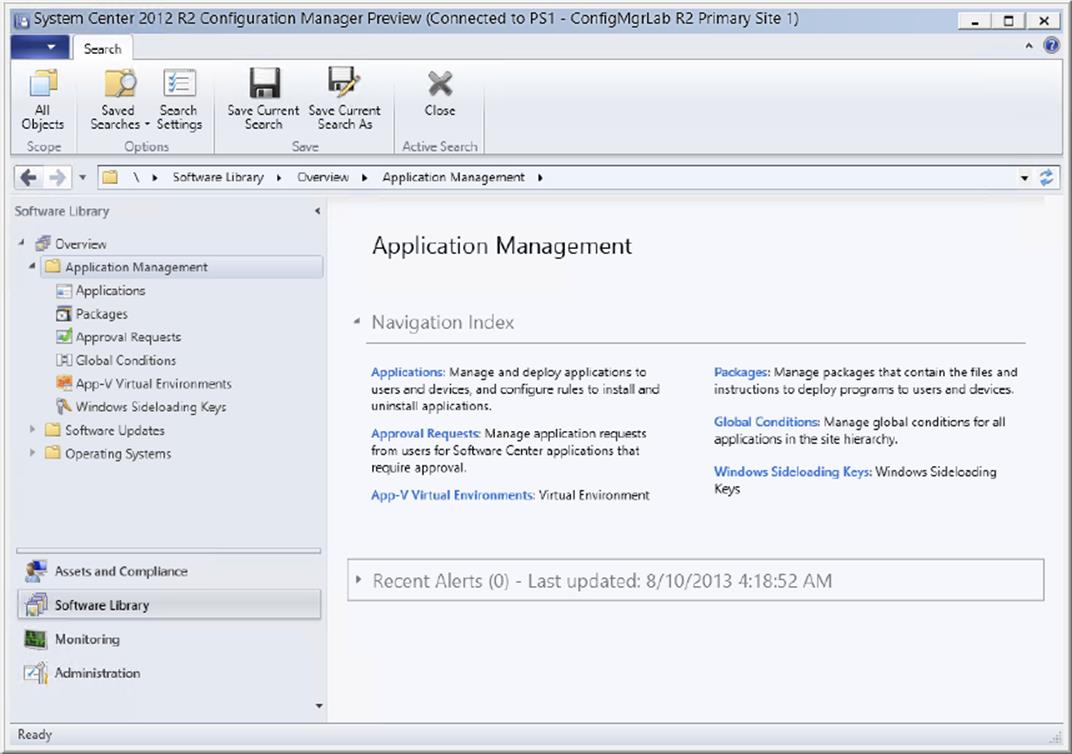
Figure 8.1 Applications and Packages nodes
Classic Software Distribution works very much the same way as it did in Configuration Manager 2007. Classic Software Distribution might be seen as available only to facilitate migration and to allow administrators the ability to deploy content the old way while learning the new approach in Configuration Manager 2012. Classic Software Distribution actually remains very useful in certain scenarios. Remember that the new Application Deployment approach is designed to deploy applications, and it offers very rich configurations. The Application Deployment model, however, may not be a good option for every potential deployment. Consider a scenario where an administrator simply needs to deploy a command line to systems. The Application Deployment model isn’t well suited for such a task, and instead administrators should use either classic Software Distribution or a task sequence. Classic software packages can be migrated to the new application model with the Package Conversion Manager discussed in Chapter 3, “Migrating to Configuration Manager 2012.”
With proper deference given to classic Software Distribution, it is much the same as it was in Configuration Manager 2007, so the discussion in this chapter will be solely focused on the new Application Deployment features.
If you need a full review of the classic Software Distribution model, an excellent discussion is available in the book Mastering Microsoft System Center Configuration Manager 2007 R2 (Sybex, 2009).
Note the difference in terminology, as shown in Table 8.1.
Table 8.1: Terminology differences
|
Application Deployment |
Classic Software Distribution |
|
Application |
Package |
|
Deployment type |
Program |
|
Deployment |
Advertisement |
Because Application Deployment is such a paradigm shift from classic Software Distribution, a bit of discussion about what exactly has changed is warranted.
Distribution Point Changes
Distribution points are key components for any kind of content delivery in Configuration Manager. Understanding the changes to and optimizations of this role will directly relate to the efficiency of your design and satisfaction with the product.
1. Workstations as Distribution Points Branch distribution points were first introduced in Configuration Manager 2007, and as of Configuration Manager 2012 they are gone! Don’t worry though; they have been replaced with the ability to directly configure any Windows 7 workstation as a distribution point. This may seem like simply a cosmetic difference—and in some ways that is true, but not totally—there are some significant differences.
2. The ability to specify a workstation as a distribution point directly means that instead of having a client component to fill the distribution point role, as was the case with Configuration Manager 2007 branch distribution points, now the client doesn’t even have to be present!
3. One limitation of distribution points located on workstation systems is the limit of 20 simultaneous connections. This is a workstation operating system limitation rather than a limit imposed by Configuration Manager.
4. Single Instance Storage The traditional distribution point structure and function are still available for very specific classic Software Distribution scenarios, namely, if a legacy package is configured to run from a distribution point. For every other kind of content deployment, whether classic Software Distribution or the new Application Deployment model, the distribution point engine is completely new. The change also brings some changes in administration, but they are well worth it!
5. Content storage on traditional distribution points often requires substantial hard drive space. The new distribution point model takes advantage of single-instance storage, which will result in less hard drive space required for content. There are a couple of things to note as a result of this change:
· Administrators or users are no longer able to connect to a known distribution point and execute an install remotely.
· The Run From Distribution Point option is not available for Application Deployment (but is still available with classic Software Deployment).
· The single-instance storage change increases security by obscuring the content and making it difficult for the content to be downloaded and used other than for the intended purpose.
6. Distribution Point Content Validation Many Configuration Manager administrators have faced the problem where content initially deploys to distribution points but later becomes corrupt, preventing further deployment until the corruption is resolved. Often the only way administrators have known about the corruption is through failed deployments. Configuration Manager 2012 offers the ability to proactively check content for corruption on both classic and new distribution points and, when found, notify the administrator so proactive corrective action may be taken.
7. Remote Distribution Point Throttling A common reason for maintaining secondary sites in a Configuration Manager hierarchy is to support locations where it is important to ensure that network bandwidth usage is tightly controlled when sending content to locations with slow, overloaded, or unreliable WAN connections.
8. Configuration Manager 2012 allows throttling of bandwidth directly between a site and its remote distribution points, helping eliminate the need for secondary sites to achieve this goal.
9. Hierarchy simplification was a design goal for Configuration Manager 2012. This one added feature helps achieve the simplification goal by drastically reducing the need for secondary sites in most Configuration Manager 2012 hierarchies.
10.Distribution Point Selection The ability to specify which distribution points are available to clients, an option known as protected distribution points, has been available in previous versions of Configuration Manager.
11.In Configuration Manager 2012, all distribution points are protected by default. The only way clients are able to access a distribution point is if the distribution point is part of a boundary group that matches the client’s current boundary. There is a fallback mechanism to allow clients to access distribution points when the client is in an unknown boundary. Allowing fallback is configured per distribution point and per deployment.
12.Prestaged Content Managing content in bulk on distribution points has historically been challenging for Configuration Manager administrators. When replacing a distribution point server or even simply renaming, replacing, or modifying hard disks, administrators were faced with the need to redistribute all content to the new server. If connectivity to the server in question was either unreliable or slow, the challenge was even more pronounced.
13.An initial thought to solve the problem might be to simply copy content from the current to the replacement server. A quick evaluation of this option reveals that it is not a workable choice because a simple file copy does not result in the needed database and other adjustments to reflect the new location of the content. Because of this, administrators either had to use external tools, such as preloadpkgonsite.exe, or suffer through overloading the network while copying potentially gigabytes of content.
14.Configuration Manager 2012 introduces an option allowing content to be prestaged on distribution points. There is a specific wizard used to accomplish this—as will be seen later in the chapter—but the net effect is that in situations where bandwidth is challenging, content can now be natively staged locally on systems without such strain on network links.
15.Distribution Point Groups The process of either adding or replacing a distribution point in Configuration Manager is fairly straightforward, but what about the content? If the distribution point being replaced is the storage point for many applications, administrators historically have been faced with either constructing a script to parse through applications and adding them to the new distribution point in bulk or working through applications one by one and enabling the new distribution point. Either task is time consuming!
16.The use of distribution point groups was possible in Configuration Manager 2007 but was not often used by administrators. Configuration Manager 2012 revamps the use of distribution point groups, and they now take center stage and offer very easy management of distribution points by allowing distribution points that should store similar content to be treated collectively. Simply choose a distribution point group when deploying or removing content, and all distribution points within that group will receive or remove the content. Better still, when a new distribution point is added to the group or removed, then all applicable content targeted to the group will also be added or removed.
17.User-Centric Focus In previous versions of Configuration Manager it was possible to target a deployment to users, but this ability was not robust and seemed like an afterthought. In Configuration Manager 2012, the user is the focus—or at least can be.
18.Yes, it is still possible to target deployments to systems, and many administrators will continue to do this because, in many cases such as server management, that is the best approach. Plus, the ability to target users for deployments and to do so with great specificity is a paradigm shift for Configuration Manager. Don’t overlook this feature though, because it offers the ability to significantly enhance a user’s experience with and impression of Configuration Manager.
19.User-centric focus allows administrators to define deployments that function differently based on the location of the user. Consider, for example, a user who is logged onto and using their main computer (known as a primary device in Configuration Manager terminology). Deployments can be configured to recognize this and, in such cases, install software directly onto the user’s device, including mobile devices managed directly or via Windows Intune—more on that in Chapter 16, “Mobile Device Management.” Conversely, if the user happens to be logged onto a device in another location, such as in a remote office, this can be recognized and the deployment can be delivered automatically as a virtualized application instead, allowing the deployment to be made available quickly and without persisting the installation. This allows the user the same experience regardless of which system they are actually logged onto and using, and it’s all seamless.
20.Software Center The Configuration Manager Software Center is an updated replacement to the Run Advertised Program option available in previous versions of Configuration Manager. The Software Center is the central location where users are able to view available or required deployments targeted for their system and to also make their own custom changes such as to specify working hours or whether Configuration Manager operations should be suppressed while presentations are taking place, or even whether their computer should honor assigned power-management settings.
21.The only required deployments visible in Software Center will be those that are configured with the ability for users to interact.
22.Application Catalog This often-requested and long-awaited feature is finally here! Configuration Manager 2012 allows administrators an option to publish deployments into a web-based Application Catalog. The Application Catalog web page is accessible to any user and is filtered to list only deployments specifically targeted to the given users. Through the catalog, users are able to request available software that is of interest. Entries in the Application Catalog can be configured as freely available or as requiring approval. Note the Approval Requests node under Application Management in Figure 8.1. When software is configured to require approval, the user is able to request the software, but an administrator will need to manually approve the request before deployment will continue. Administrators approve pending requests in the Approval Requests node.
Applications: Application References
The Application References mechanism allows administrators to view what dependency and supersedence relationships are associated with a given application. The best way to describe this is by example.
1. Dependency Assume two applications, Foxit Reader and .NET Framework 2.0. It is possible to specify a dependency so that Foxit Reader requires that .NET Framework 2.0 be present on a target device. If .NET Framework 2.0 isn’t present on the device when you attempt to deploy Foxit Reader, you can configure it to automatically deploy as part of the Foxit Reader deployment. If not, Foxit Reader will fail to install until .NET Framework 2.0 is present.
2. The dependencies themselves are configured on the Dependencies tab of the properties for the application deployment type. The References tab on the application properties dialog box simply displays the information for the application as a whole.
3. Supersedence Assume two applications, Foxit Reader and Adobe Acrobat 9 Pro. It is possible to specify a supersedence relationship to define that Foxit Reader supersedes Adobe Acrobat 9 Pro. Doing so effectively links the two applications and establishes a path for replacing one application with another, either by upgrade or by uninstalling the superseded application and replacing it with the current application.
Be careful when building relationships between applications. Relationships will prevent an application from being deleted, and excessive numbers of relationships will increase complexity and potential confusion.
Deployments
Deployments in Configuration Manager 2012 directly influence the flow of application deployment. There are a number of new options available to help control this flow, as described here:
1. Deployment Types Deployment types specify how a particular application should be deployed. As shown in Table 8.1 previously, think of deployment types as similar to programs in classic Software Distribution but with much greater flexibility and specificity. There are multiple deployment types available.
· Windows Installer (.msi file)
· Windows app package (Windows 8.*)
· Windows app package in the Windows Store
· Script Installer
· Microsoft Application Virtualization version 4
· Microsoft Application Virtualization version 5
· Windows Phone app package (.xap file)
· Windows Phone app package in the Windows Phone Store
· Windows Mobile Cabinet (.cab file)
· App Package for iOS (.ipa file)
· App Package for iOS from the Apple App Store
· App Package for Android (.apk file)
· App Package for Android on Google Play
· Nokia SIS file
· Mac OS X (.cmmac file)
· Web Application (URL)
2. Beyond these predefined types it is possible to manually define whatever other type of deployment may be needed.
3. Native Uninstall Support Previous versions of Configuration Manager allowed for software deployment but no native support for software uninstall. Uninstall was possible but required a separate program definition. Configuration Manager 2012 allows specifying options for both install and uninstall within a single deployment type. There is no requirement to use both, but they are available. When you create an application using the wizard, some deployment types—such as MSI-based deployments—will automatically create the uninstall option.
4. Detection Method Previous versions of Configuration Manager allowed administrators to define a deployment but no mechanism to determine if that deployment had already taken place by another mechanism. The result was that software could get reinstalled even if it was already present. Configuration Manager 2012 allows administrators the ability to define rules to determine if the deployment is already in place on a system and, if so, to simply exit without triggering a reinstall. This mechanism may seem similar to what historically has been seen with software patching. The two mechanisms are very similar.
5. Requirements In previous versions of Configuration Manager it was common practice to build collections of systems matching specific criteria or filters and then to target advertisement(s) to those collections. In Configuration Manager 2012, collections remain a requirement for deployment targeting, but the need to build a new collection or multiple new collections to provide filtering for a single deployment should be reduced. Administrators now have the ability to specify deployment requirements per deployment type. These requirements ensure a specific deployment type is not executed unless specific criteria are met. Once defined, requirement rules are reusable.
Targeting
Historically it has been recommended to avoid targeting the All Systems collection when deploying software. Doing so meant that the software would be received and executed by every device that is part of the All Systems collection, which is every device at a site and potentially every device in the hierarchy. It is still a good idea to avoid targeting the All Systems collection, but with deployment type requirements properly configured, it would be possible to safely do so if needed.
6. Dependencies The ability to specify dependencies between different deployments has been available since the release of SMS 2.0. Until Configuration Manager 2012, however, these dependencies were not so straightforward and creating multiple dependencies often resulted in confusion.
7. Dependencies in Configuration Manager 2012 are a much more elegant solution and allow administrators to configure other applications on which the one being configured depends. Single dependencies may be specified or multiple. When adding dependencies it is possible also to select whether a given dependency will be automatically installed in the event it is absent. Setting Auto Install for a dependency is not a requirement but can help ensure deployments execute error free.
8. Adding dependencies essentially joins the current application with whatever dependency is being specified, so later, if a dependent application is removed, a warning will be displayed about potentially breaking a dependency relationship.
9. While dependencies are a big step forward for controlling and predicting application deployment results, there is still no way to define order of installation for dependencies. Typically this fact isn’t a big deal, but if multiple dependencies are configured for an application, it could be a concern. If it is required to know the exact order of execution for a deployment and its related dependencies, consider using a task sequence instead.
10.Return Codes A successful install of most applications will result in a return code of either 0 or 3010 being generated. These return codes mean success or success pending reboot, respectively. In previous versions of Configuration Manager, if a return code other than these two is returned, then the application deployment is considered to have failed. Depending on the software manufacturer, a return code other than 0 or 3010 may actually be informative about the state of a deployment other than simply indicating success or failure. The number of such applications is relatively small, but when encountered they can be frustrating because a successful install will appear to have failed. The task sequence engine in Configuration Manager 2007 was the first place where administrators were able to account for exit code variations. In Configuration Manager 2012 this ability has been brought forward to Application Deployment as well, fully allowing administrators to define what specific exit codes from an application actually mean and responding accordingly when reporting status.
11.Deployment Settings Action Previous versions of Configuration Manager allowed deployments to be built that would be installed on clients. Configuration Manager 2012 also allows for that but introduces the ability to force an application uninstall on clients. This action will cause the uninstall command line configured on the deployment type to be executed.
12.Deployment Settings Purpose The deployment purpose can be configured as either available or required. These options are similar to specifying a deployment as optional or mandatory in previous versions of Configuration Manager, but with a twist. When a deployment is configured as required, the application will be forced onto the client. This is the same behavior as previous versions when selecting a mandatory deployment. The twist is that on a schedule, the deployment is reevaluated, and if the application is found to be missing, it is forced back onto the client system.
13.Alerts New to Configuration Manager 2012 is the ability to specify alerts when deployments fail to reach a certain threshold of success, specified as a percentage. The next question that often is asked when discussing this new alerting functionality is whether this ability is intended to replace monitoring by the System Center Operations Manager Configuration Manager 2012 management pack. The answer is a resounding no. The scope of the Configuration Manager 2012 management pack is more encompassing than what can be achieved by native Configuration Manager 2012 alerting. The alerting feature in Configuration Manager 2012 is introduced to allow administrators some ability to raise awareness of issues independently without System Center Operations Manager. In environments with System Center Operations Manager, the Configuration Manager 2012 management pack should be the primary monitoring resource, with the internal Configuration Manager alerting engine acting as a supplement.
Dependencies for Application Deployment
The Application Deployment feature makes use of several different dependencies. These dependencies must all be configured correctly for application deployment to be successful.
Management Point
The management point is the key interface between clients and their assigned site. Through management point policy updates, clients learn about assigned settings and activity requested by the site and also return data to the site, such as inventory or discovery data. It is through management point policies that clients are made aware of pending application deployments and associated settings, and it is through the management point that clients return status after attempting to run an application deployment. It is also through the management point that clients look up which distribution points are available when it comes time to execute an application deployment.
Thus, having a functioning management point is crucial not only for proper client operation but also for proper application deployment. Chapter 4, “Installation and Site Role Configuration,” includes full discussion of management point setup and configuration.
Distribution Point
The distribution point role is crucial for application deployment in that it is the location where all remote content that should be accessed and used during application deployment is stored. If a distribution point is not available to clients when you attempt to initiate an application deployment, the deployment will fail. Multiple distribution points may be present per primary site, including workstation-class machines running Windows 7 or greater. Distribution points installed for a site but on servers other than the site server, also known as remote distribution points, may be configured for content throttling in the distribution point’s properties. Chapter 4 includes full discussion of distribution point setup and configuration.
Application Deployment Failure
It is possible that an application deployment may fail even if content is available on some or all of the distribution points. In such cases verify that at least one distribution point within the client’s boundary is configured with content and, if the distribution point is running on a workstation system, ensure that it is not exceeding its connection limit. In addition, check whether the errors have been encountered when staging content to distribution points.
BITS-Enabled IIS
In previous releases of Configuration Manager it was optional to enable Background Intelligent Transfer Service (BITS) for a distribution point. In Configuration Manager 2012 BITS is required.
Default Client Settings
A word about client settings: The default list of client settings applies to all clients in the Configuration Manager 2012 hierarchy. It is possible to override the default settings and specify different values for specific sites or specific systems via collection targeting.
This flexibility allows administrators complete control of which settings apply to devices and removes the technical limitation that often resulted in multiple sites or hierarchies, such as scenarios where servers and workstations needed separate management settings. The flexibility offered with client settings applies generically throughout Configuration Manager, but several settings that are available have specific impact with Application Deployment, as discussed in the following sections.
Background Intelligent Transfer
BITS settings are part of the default client settings and are shown in Figure 8.2. In some environments clients are installed and managed across slow or heavily utilized WAN links. In such cases it may be important to ensure clients are able to sense a heavy load on the network and, during critical times, respond by reducing the amount of data that is being transferred, a process also known as throttling. Throttling controls are found throughout Configuration Manager 2012 to help reduce WAN impact. The BITS client settings specifically allow administrators to configure clients to limit the amount of network bandwidth they utilize when transferring content. This content includes application deployment data, along with several other types of information.
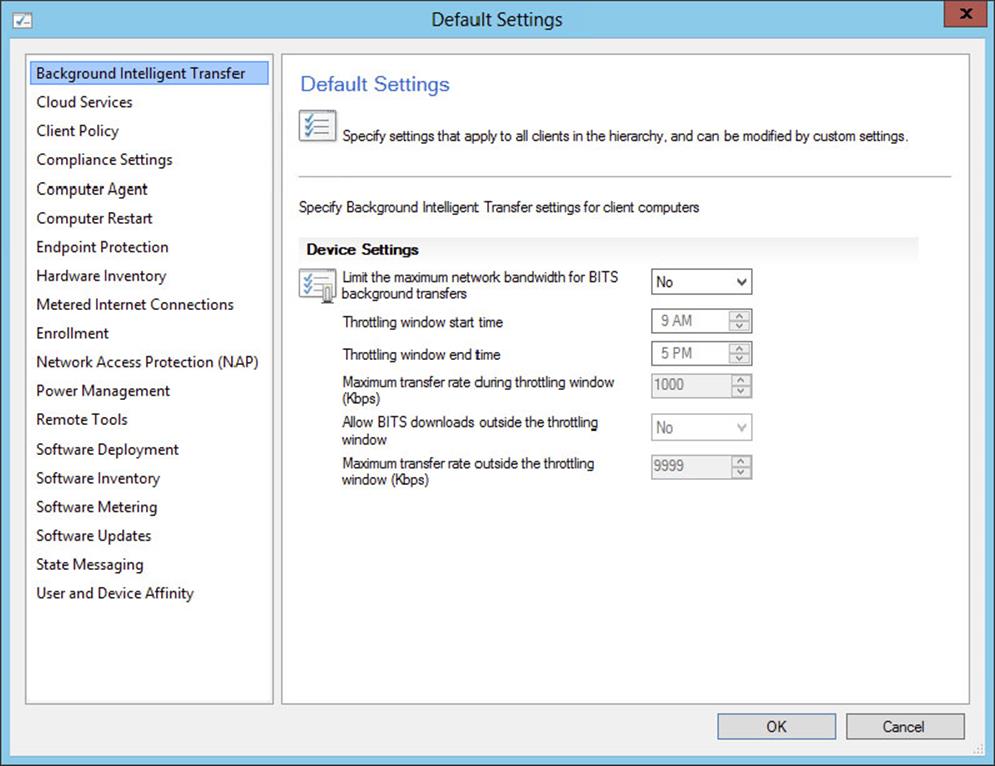
Figure 8.2 BITS settings
![]()
Configuring BITS Will Give You Good Options for Bandwidth Control
Configuring BITS settings through the client settings mechanism is very flexible and gives administrators good options for bandwidth control. These settings alone will work to achieve the desired result in most environments. Where these settings by themselves are not sufficient, it is also possible to introduce throttling directly through controls in Internet Information Server. While throttling through IIS is useful and easy to configure, it universally impacts traffic to and from IIS and should be considered only after other options have been exhausted.
Computer Agent
Computer Agent settings are part of the default client settings and are shown in Figure 8.3. These settings apply to all deployments, including software updates and operating system deployments, and allow the administrator control over the user experience while deploying content.
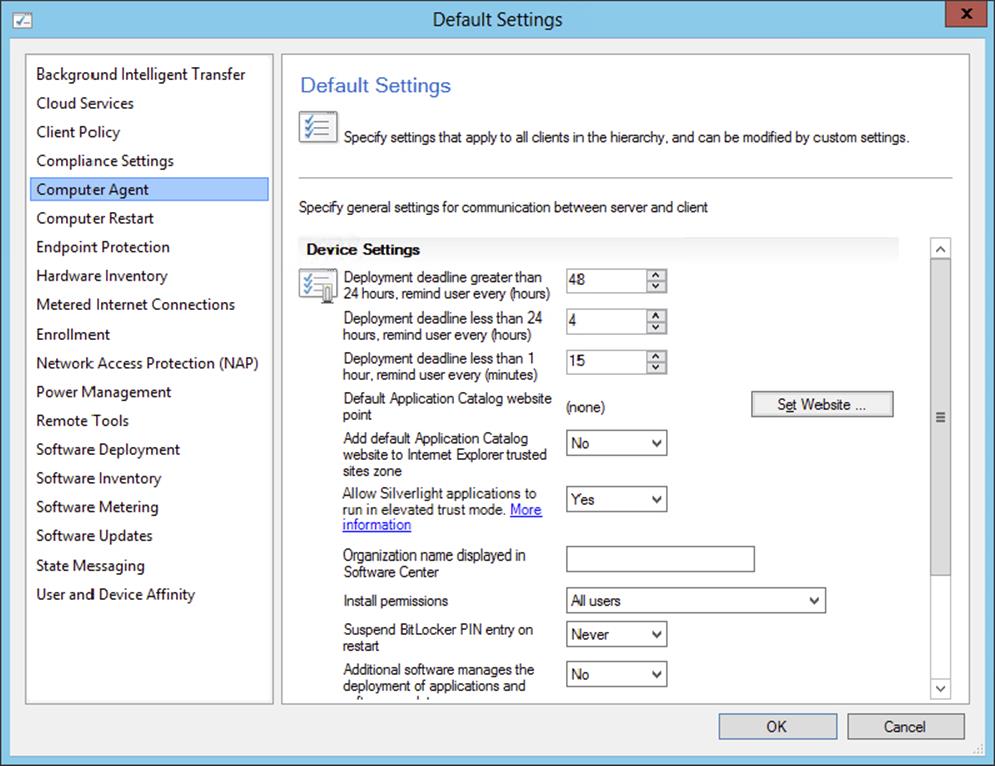
Figure 8.3 Computer Agent settings
The Computer Agent settings can be set up in different ways, depending on the types of clients in your environment. Types of clients can be laptops, desktops, kiosks, RDP clients, or VDI clients. In Table 8.2 you will find the options that can be configured with the Computer Agent settings.
Table 8.2: Computer Agent settings
|
Option |
Description |
|
Deployment Deadline Greater Than 24 Hours, Remind User Every (Hours) |
Every required deployment has a deadline; when this deployment has been received by the client, you can configure how often the user must be notified when the deadline is farther away than 24 hours. This reminder will help the user to run the deployment at the time it is most suitable for them. |
|
Deployment Deadline Less Than 24 Hours, Remind User Every (Hours) |
When a deployment comes within the period of 24 hours before the deadline, you can remind the user more often, every x hours. |
|
Deployment Deadline Less Than 1 Hour, Remind User Every (Minutes) |
If the user hasn’t run the deployment within one hour before the deadline, you can remind the user every x minutes. If the deadline is reached, the installation will start. |
|
Default Application Catalog Website Point |
When using the Application Catalog to allow users to select and install the applications they need, you are able to configure one of the available Application Catalog website points or a URL that can, for instance, be available through a network load balancer. |
|
Add Default Application Catalog Website To Internet Explorer Trusted Sites Zone |
To be able to install applications via the Application Catalog website, your Internet browser needs to trust the website. With this setting you can automatically configure the Application Catalog website to be recognized by the trusted sites zone within Internet Explorer. Adding the website to this zone will also take care of pass-through authentication to the website. |
|
Allow Silverlight Applications To Run In Elevated Trust Mode |
This setting is new for SP1 and R2 and must be enabled when using those versions. The Application Catalog website is a Silverlight application that needs to run in elevated trust mode. |
|
Organization Name Displayed In Software Center |
You can customize the Software Center by adding the company name. |
|
Install Permissions |
The Install Permissions option allows you to configure how users can initiate the installation of software, software updates, and task sequences. This option comes with four levels:
When this option is selected, all users who are logged on to the client can initiate an installation of software, software updates, and task sequences via the Software Center.
When this option is selected, only users who are local administrators and who are logged on to the client are able to initiate an installation of software, software updates, and task sequences via the Software Center.
When this option is selected, only users who are local administrators or are the primary user of the client that they are logged on to are able to initiate an installation of software, software updates, and task sequences via the Software Center.
When this option is selected, no users are able to initiate the installation of software, software updates, and task sequences via the Software Center. This option is often used when a user logs on to a Remote Desktop Services server that is shared with other users. |
|
Suspend BitLocker PIN Entry On Restart |
If you need to enter a BitLocker PIN when logging on to your clients, this option can bypass this requirement when the client needs to restart after a software installation. |
|
Additional Software Manages The Deployment Of Applications And Software Updates |
This option allows you to disable the deployment of applications and software updates on servers that are, for instance, used for Citrix XenApp, XenDesktop, or another shared VDI desktop solution that is using a shared image without disabling the Configuration Manager 2012 client. Tooling of the vendor will control the installation of the available deployments. |
|
PowerShell Execution Policy |
PowerShell scripts can be used to deploy software but also to check for the existence of software or to detect configuration items and check them for compliance. With this setting you can configure the execution policy for PowerShell scripts that run via the Configuration Manager client. |
|
Show Notifications For New Deployments |
You can enable or disable notification for new deployments that become available when a user is logged on to a client. |
|
Disable Deadline Randomization |
This option checks whether the client uses an activation delay of up to two hours to install required software updates and applications when the deadline is reached. By default the activation delay is disabled. For VDI environments it can help to not have to install an update on all VDI desktops at the same time. Disabling deadline randomization in big environments can negatively impact the performance of the VDI environment as well as the network, distribution points, and site servers. |
Computer Restart
Computer Restart settings are part of the default client settings and are shown in Figure 8.4. These settings apply to all deployments, including software updates and operating system deployments, and allow administrators to define countdown settings to be used in the event a computer must be restarted as a result of application deployment.
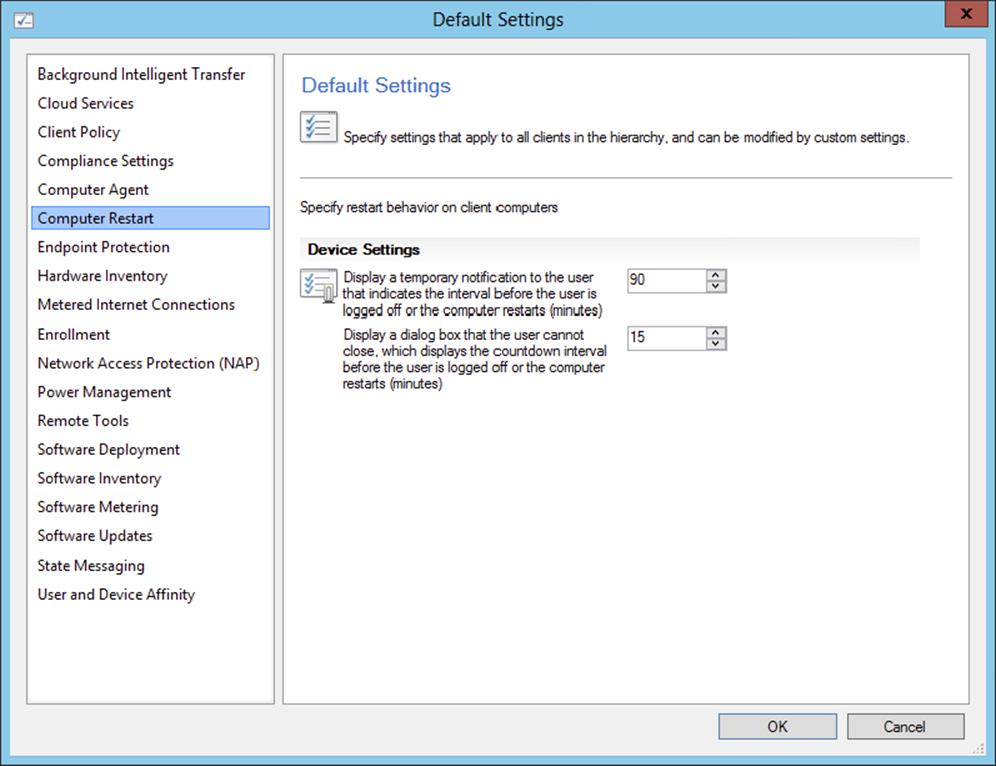
Figure 8.4 Computer Restart settings
Software Deployment
The Software Deployment settings are also part of the default client settings and are shown in Figure 8.5. The only option here allows administrators to determine what schedule should be used for reevaluating deployments.
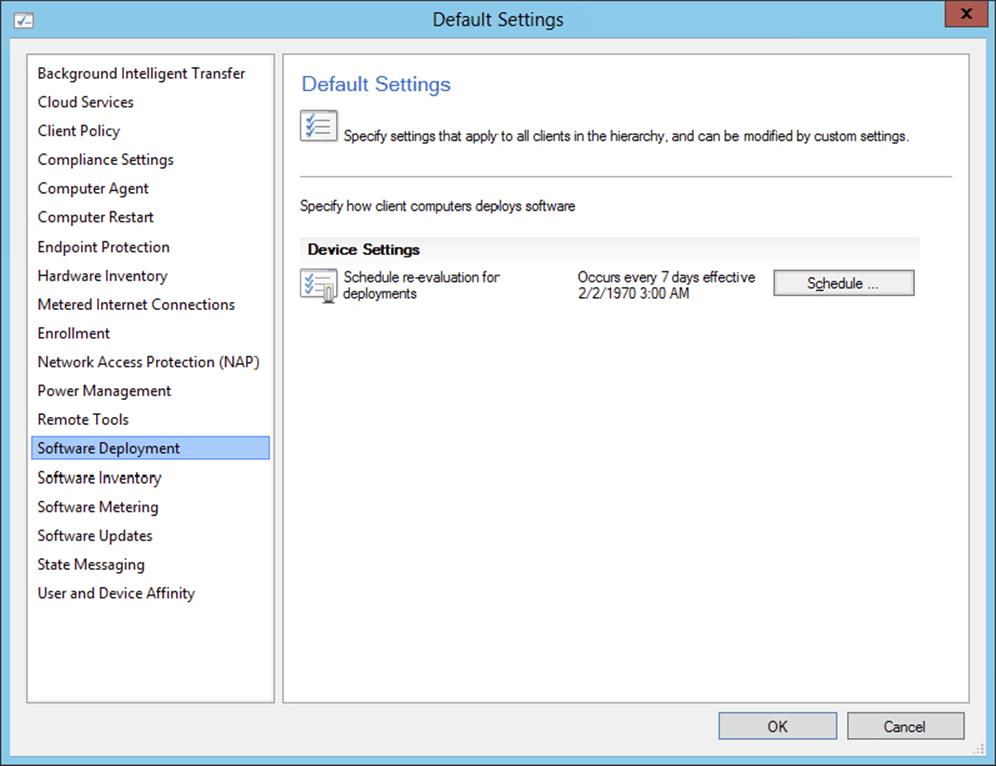
Figure 8.5 Software Deployment settings
When you, as a Configuration Manager administrator, decide to uninstall, for instance, an expensive version of Autodesk AutoCAD from your clients and a user then decides to reinstall the same version, they may make it so you are no longer compliant with your licenses.
When reevaluating the client, Configuration Manager will see that AutoCAD is installed on the client and will automatically uninstall it again.
User and Device Affinity
The User and Device Affinity settings are also part of the default client settings and are shown in Figure 8.6. These settings specify options that Configuration Manager 2012 will use when attempting to determine whether a user is logged onto a primary device or logged on elsewhere.

Figure 8.6 User and Device Affinity settings
Software Distribution Properties
Software Distribution properties are accessible from the Administrative node by selecting Administration ⇒ Overview ⇒ Site Configuration ⇒ Sites and then selecting a site server hosting distribution points. From the ribbon select Configure Site Components and then Software Distribution. This option allows administrators to configure concurrent package distribution settings and also retry settings if a failure is encountered. These settings are the same as what were available in previous versions of Configuration Manager.
The Network Access Account, shown in Figure 8.7, is used to define an account that can be used for network access when content is needed during deployment from a network location other than the Configuration Manager distribution point. The Network Access Account also is used in scenarios where clients are installed in an untrusted scenario, such as workgroup systems or machines in an untrusted forest. This account is also key for use in operating system deployment. With Configuration Manager 2012 R2 you can create more than one Network Access Account per site. When a client tries to access content and cannot use its local computer account, it will first use the last Network Access Account that was able to successfully connect to the distribution point. Configuration Manager supports adding up to 10 Network Access Accounts. The ability to add more than one Network Access Account to one site offers an option to simplify the Configuration Manager 2012 hierarchy, since the Network Access Account could be one of the reasons for installing more than one primary site.
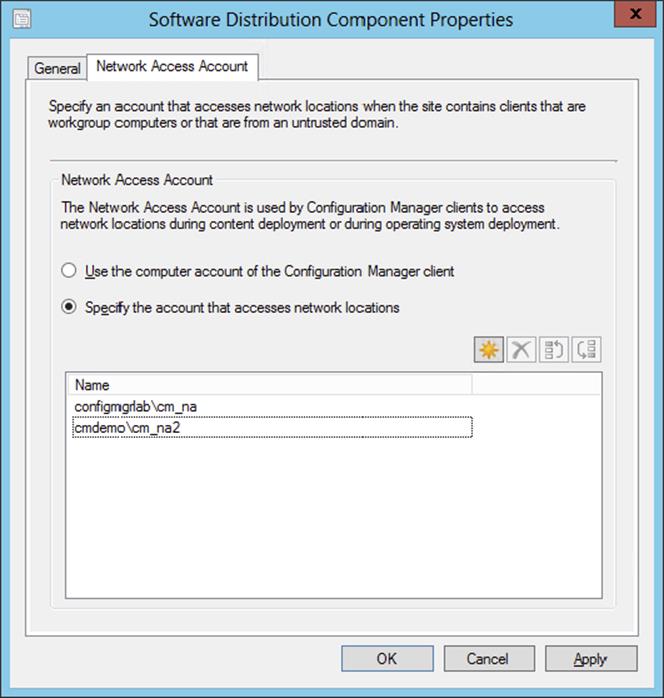
Figure 8.7 Software Distribution Component Properties
SQL Data Replication
Previous versions of Configuration Manager made use of standard site-to-site communications for sending all data between sites. Configuration Manager 2012 still uses site-to-site communications for some data, but for configuration data, such as application deployment configurations, that data is replicated between sites using SQL Server features. Thus, ensuring that the SQL data replication structure for Configuration Manager 2012 is healthy is key to guaranteeing consistent data throughout the hierarchy.
Site-to-Site Communications
The mechanism for site-to-site communications has been part of Configuration Manager for many versions. This mechanism is much the same in Configuration Manager 2012, but its scope is limited to sending data such as application deployment content. SQL data replication is used for transferring site settings information.
Collections
Collections remain integral to application deployment. Collections are the ultimate target for all deployments, and so the proper use of collections, including dynamic versus static collections, and the proper replication of collection data between sites via SQL data replication are key to successful application deployment.
Proper use of collections is crucial for successful application deployment, but collections are necessary to many functions in Configuration Manager 2012 beyond just application deployment. For that reason, collection management and strategy are not discussed in this chapter but are discussed in more detail in Chapter 17, “Role-Based Administration.”
Boundaries/Boundary Groups
Boundaries and boundary groups are the mechanisms Configuration Manager 2012 clients use to locate available distribution points for content access. Configuring these settings correctly will allow for efficient application deployment. Boundaries and boundary groups are detailed in Chapter 2, “Planning a Configuration Manager Infrastructure.”
Elements of Application Deployment
Several components are integral to successful configuration of Application Deployment in Configuration Manager 2012. Some of these components are specific to Application Deployment and others apply more generally. In either case, a proper understanding and configuration of these components are important.
Applications
Administrators build applications in Configuration Manager 2012 to describe software that is to be deployed. Administrators create an application to specify details regarding the application, such as the manufacturer, an internal contact for support, information that should appear in the Application Catalog, details regarding the action an application will take, or whether the application being built supersedes a previous version.
A sample application is shown in Figure 8.8. The process of building an application will be detailed shortly.
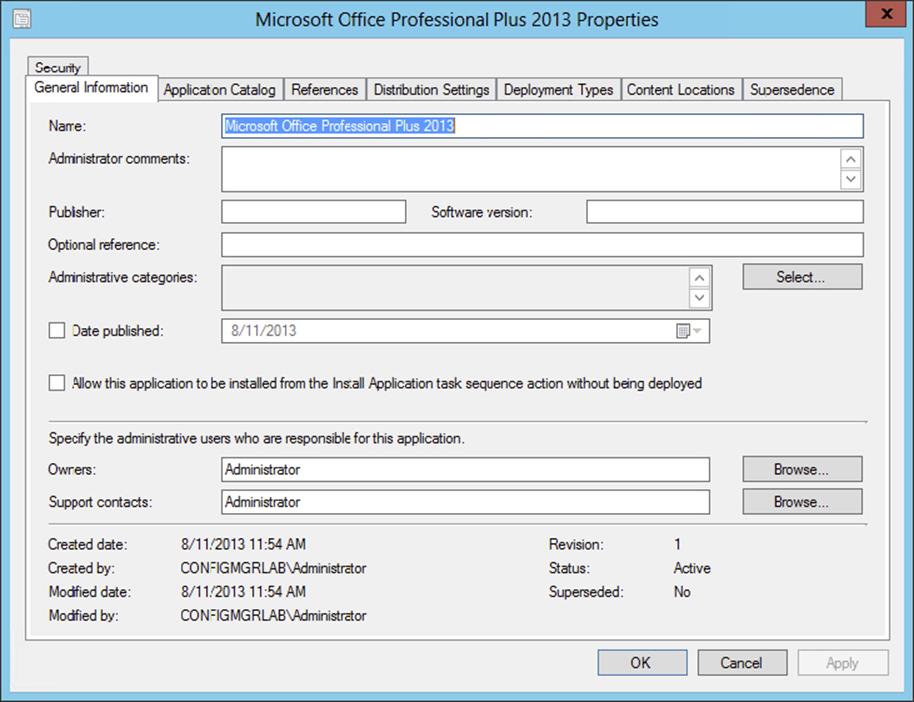
Figure 8.8 Sample application properties
Deployment Types
The act of creating an application by itself does not specify sufficient instruction for carrying out deployment of the application. Deployment types provide additional detail for how a given application should be handled in various situations, such as what type of action to take when the application is being deployed to various types of devices or users. In addition, a deployment type also describes mechanisms to detect whether an application is already installed or command lines needed to remove an application. The deployment type is created when building an application through the Create Application Wizard, so the difference between the application itself and the deployment type may not be clear. Figure 8.8 shows the General Information tab for the application definition. The Deployment Types tab, which will list all configured deployment types for the application, is also visible in Figure 8.8. Figure 8.9 shows the properties of a sample deployment type. The process of building deployment types will be detailed shortly.
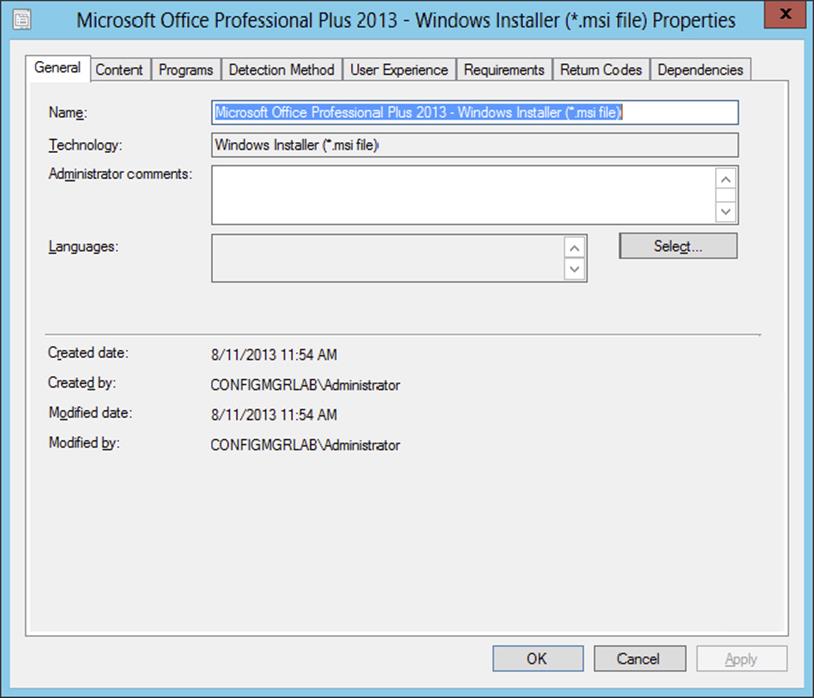
Figure 8.9 Sample deployment type properties
Deployments
A deployment in Configuration Manager 2012 is the mechanism that associates applications and deployment types with a collection of devices or users so that the deployment may proceed. The deployment is not created as part of building the application and deployment type. Deployments are created by selecting the Deploy option from the ribbon when focused on a particular application in the console. Figure 8.10 shows the properties of a sample deployment. The process of building deployments will be detailed shortly.
Figure 8.10 Sample deployment properties
The Application Deployment Process
The process of deploying applications in Configuration Manager 2012 has some similarity to previous versions but also has significant differences and additional options. One such example is the use of collections. It remains a requirement to have an application deployed to a collection in order for deployment to begin, but the use of collections is much changed from previous versions. In the past, application-specific collections of systems, and rarely users, would be created ahead of creating the package, program, and advertisement (classic Software Distribution terminology). The collections would be built according to specific criteria to define the scope of the distribution.
Configuration Manager 2012 Application Deployment introduces the concept of requirements. With requirements it is possible to define the rules of deployment within the deployment itself rather than build specific collections to do the same thing. When requirements are used instead of collections to specify deployment rules, the load of evaluation is effectively moved from the site server to individual client systems. Add to this that once a requirement rule is defined, it is retained and reusable for other deployments.
The use of requirements is optional, but they are both effective and efficient ways to validate deployment requirements. Administrators should consider strongly whether the old-style collection sprawl, which tends to junk up the console over time and can get fairly confusing to look at, really continues to be justified.
The best way to discuss the application deployment process is to create a sample application, deployment type, and deployment and then to demonstrate its execution in the environment. To start, a view of the Software Library⇒ Overview ⇒ Application Management ⇒ Applications node of the console is instructive.
Create Application Wizard
The Create Application Wizard creates an application and the first of potentially several deployment types. When you’re getting started with Application Deployment in Configuration Manager 2012, the console will be not be populated with any deployments.
A Word about Packages
If you’re migrating from Configuration Manager 2007, any packages are considered legacy (but still fully functional) in Configuration Manager 2012 and are migrated to the Packages node.
To get started with Application Deployment, you can either import an application from another Configuration Manager 2012 hierarchy by clicking the Import Application button or click Create Application. Both options are on the ribbon.
To build the sample application deployment, click Create Application to launch the Create Application Wizard. The general page of the Create Application Wizard is shown in Figure 8.11.
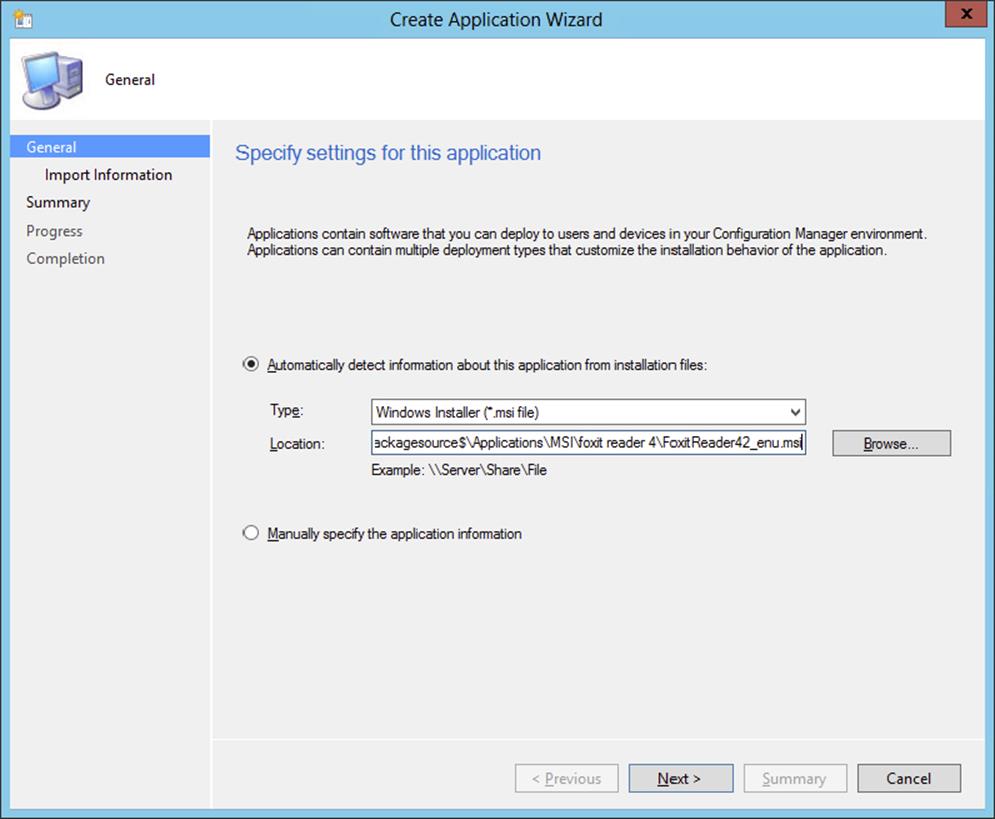
Figure 8.11 General page of the Create Application Wizard
The General page lets you choose either Automatically Detect Information About This Application From Installation Files or Manually Specify The Application Information. The quickest mechanism for configuring the sample application is to allow information to be automatically detected. This is particularly efficient when deploying an .MSI file. The option you choose on this page is dictated by preference and the type of application being defined. Using the option to manually define the information may be more appropriate depending on the type of content being deployed. Choosing this option simply requires manual entry of data that is otherwise supplied by the automatic option. In either case, reviewing all settings after they’re initially configured with the wizard is a good idea.
For the sample application deployment, select the automatic option and choose Windows Installer (*.msi file) in the Type field. Then click Next to proceed to the Import Information page of the wizard, shown in Figure 8.12. This page of the wizard is displayed while information is being gathered from the specified source, in this case the FoxitReader42_enu.MSI file.
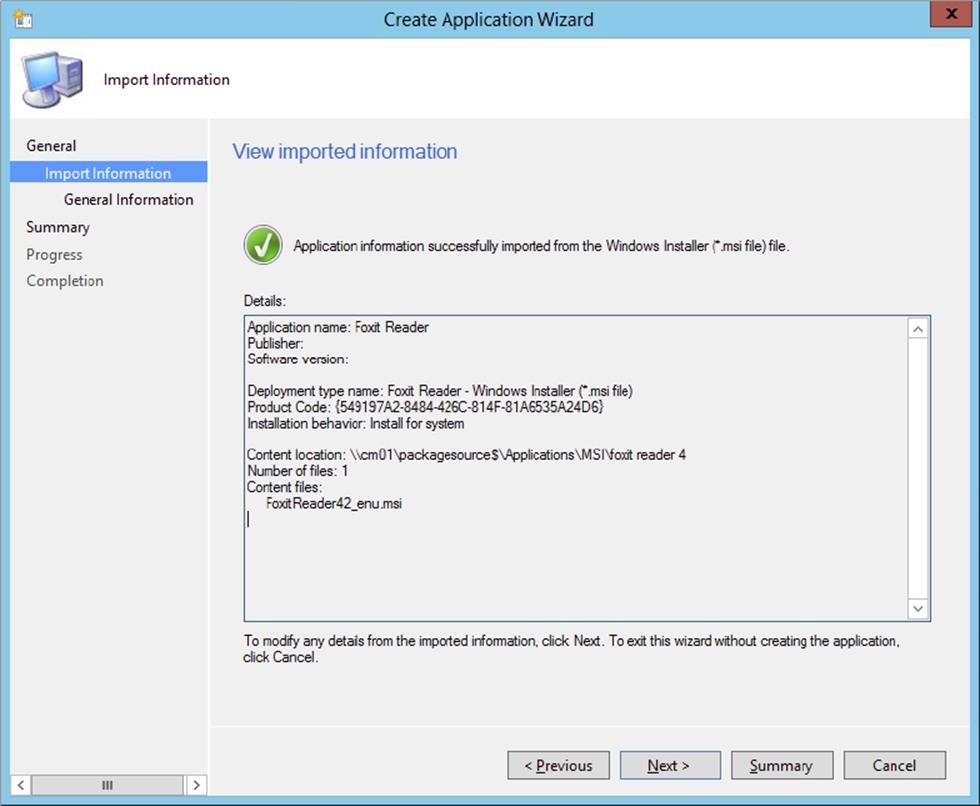
Figure 8.12 Import Information page of Create Application Wizard
Once the Next option becomes available, click it to proceed to the General Information page of the wizard, shown in Figure 8.13.
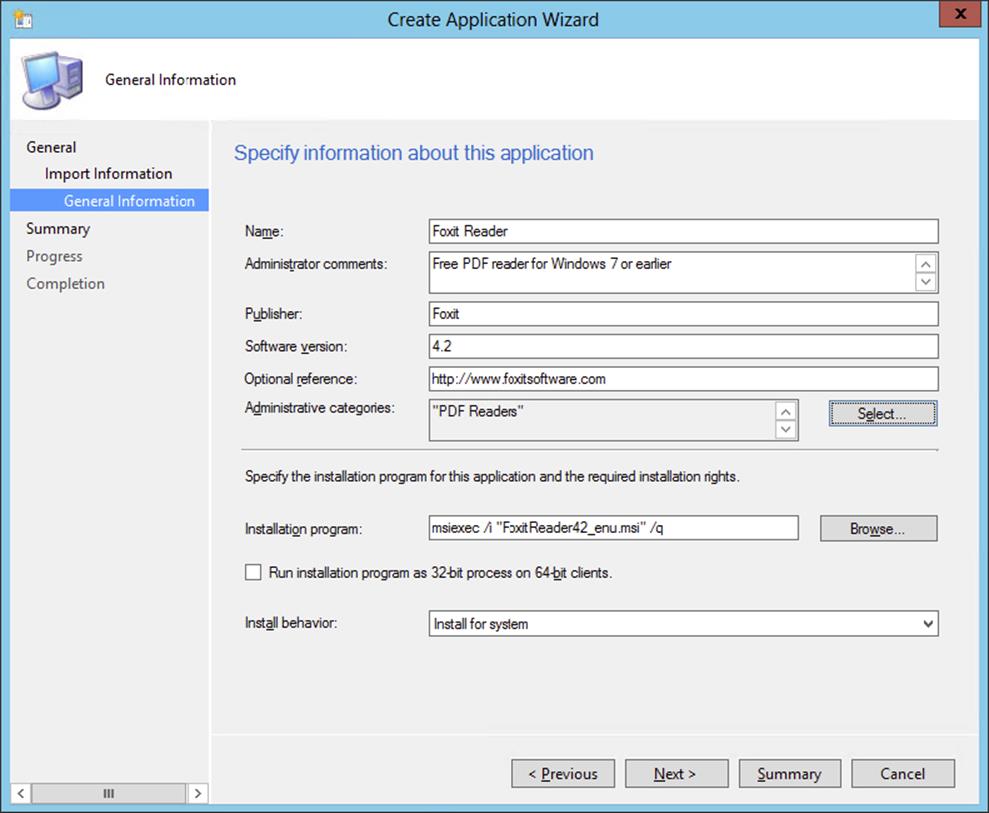
Figure 8.13 General Information page of Create Application Wizard
On the General Information page specify the requested information as follows:
1. Required Information The import process should have completed the required fields of the General Information page leaving only the optional fields to be completed.
1. Name The name of the application being created.
2. Installation Program The command line of the program to initiate application installation.
3. Install Behavior Options for this setting allow administrators to specify whether the deployment will be targeted to Install For User, Install For System, or Install For System If Resource Is Device, Otherwise Install For User.
2. Optional Information The information supplied as part of the optional fields is available for user review when applications are published in the Software Center or Application Catalog.
1. Administrator Comments Allows you to include any comments to further describe or detail the application.
2. Publisher Allows you to specify the software publisher.
3. Software Version Allows you to specify the software version.
4. Optional Reference Allows you to specify additional reference information for the application.
5. Administrative Categories Allows administrators to group applications together by user-defined categories that make sense in a given organization. Multiple categories may be specified.
6. There are two types of categories: administrative and user. The dialog here allows specification of administrative categories. Specifying user categories is done on the Catalog node of the application.
When you’ve finished entering information, click the Next button to proceed to the Summary page of the wizard. Review the summary information, and if it’s correct, click Next to create the application. If errors are encountered, the wizard will display them. If the application is created successfully, exit the Create Application Wizard and return to the main console.
Creating an Application with PowerShell
Creating an application can be done also with the new PowerShell cmdlets. The workflow of creating an application with PowerShell consists of four steps:
1. Create the application.
2. Create a deployment type.
3. Distribute the content.
4. Deploy the created application.
In this example, we want to create an application called Google Chrome; it is located at the packagesource$ share and will be deployed to the All Users collection.
Let’s first create the application, by calling the New-CMApplication cmdlet:
New-CMApplication -name "Google Chrome" -Owner "Corporate IT" -Keyword
"Alternative Test Browser"
Add-CMDeploymentType -MsiInstaller -ApplicationName "Google Chrome"
-AutoIdentifyFromInstallationFile -InstallationFileLocation
"\cm01\source$\Apps\MSI\Chrome\GoogleChromeStandaloneEnterprise.msi"
-ForceForUnknownPublisher $True
Start-CMContentDistribution -ApplicationName "Google Chrome"
-DistributionPointGroupName "All Content"
Start-CMApplicationDeployment -CollectionName "All Users" -Name
"Google Chrome" -DeployPurpose Available
Options for Application Deployment: the Ribbon
Now that an application is defined in the console, additional options appear on the ribbon. Let’s take a quick pause to explore the options, as shown in Figure 8.14.
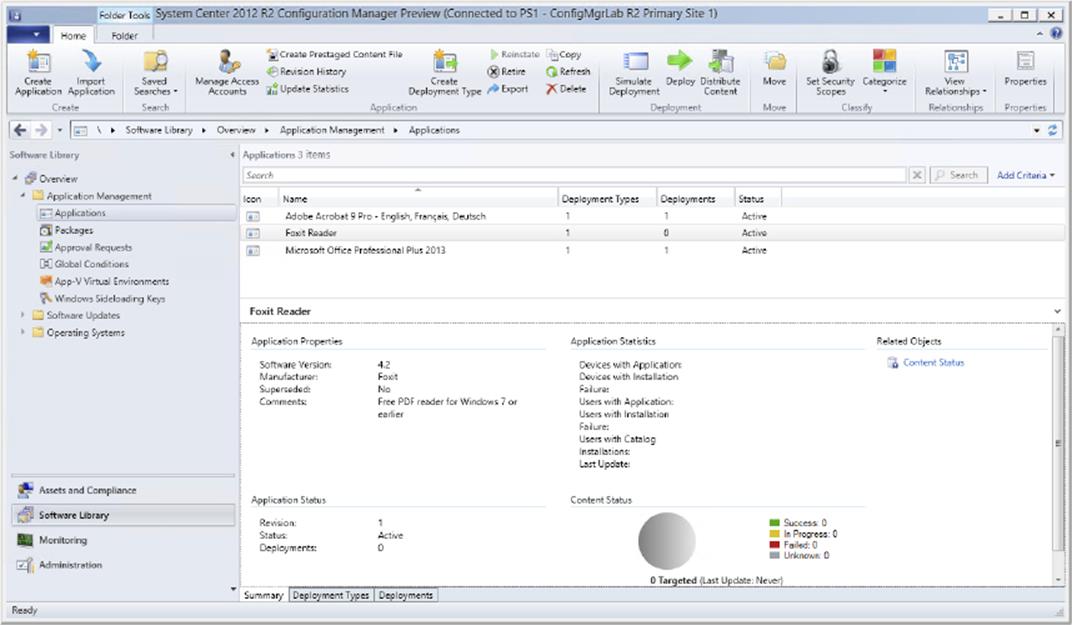
Figure 8.14 Ribbon options for application deployment
Wow, that’s a lot of new options! Yes, and this is the first place that you start to see some of the new choices available for applications in Configuration Manager 2012.
1. Revision History The Revision History option tracks all changes that have been made to an application. This tracking not only creates a record of changes but also allows you to revert to a previous version if you’ve made a mistake. For the sample Foxit Reader application, we made a simple change to the administrator comments text, resulting in a new version being created. You can view the change by selecting the revision of interest, selecting the record, and clicking View. Notice in Figure 8.15 that the word Microsofthas been added to the administrator comments. If for some reason you don’t want this change, you can simply pick the revision that is correct and click Restore to revert the application.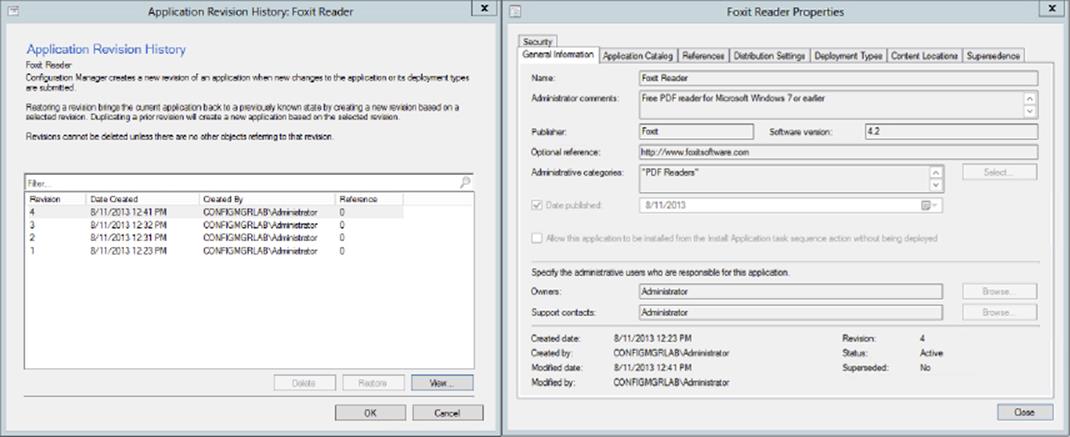
Figure 8.15 Viewing revision history
2. While this example is of a minor change, it does illustrate the power of revision tracking.
3. Create Prestaged Content File We’ve already discussed the challenges of managing distribution point content when replacing or adding distribution points in previous versions of Configuration Manager. The challenges are made worse when the distribution points are positioned across a slow or busy WAN connection from the site server. Historically, solutions for staging content in bulk without saturating such a WAN connection included utilities such as preloadpkgonsite.exe, scripts, or other third-party tools. But all of these tools came with their limitations and challenges. Configuration Manager 2012 introduces Prestaged Content as a mechanism to manage this type of scenario natively. When a distribution point supports Prestaged Content, administrators are able to choose applications that should be made available in a Prestaged Content file, along with all dependencies, which can then be copied locally onto the remote distribution point without the need for substantial WAN communication. Configuring Prestaged Content support requires setting the option on the distribution point and then using the Create Prestaged Content File Wizard to generate a file containing the content of interest. The Create Prestaged Content File Wizard is shown in Figure 8.16.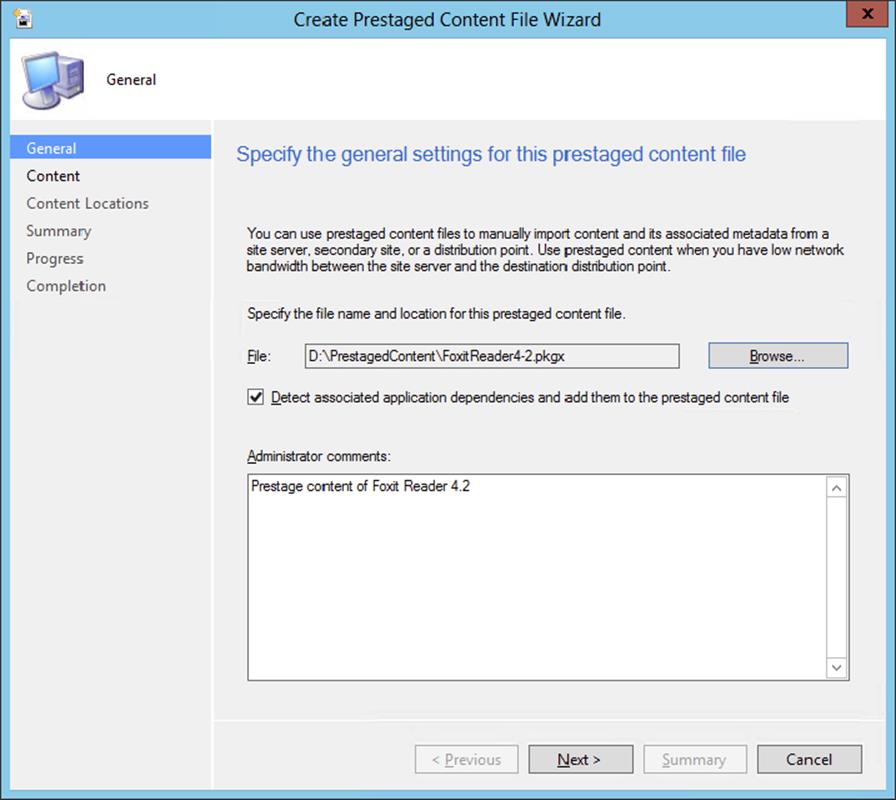
Figure 8.16 Create Prestaged Content File Wizard
4. Create Deployment Type A deployment type for the sample Foxit Reader application has already been created by the Create Application Wizard. We’ll review this shortly. For a given application it is possible to create multiple deployment types. Selecting this button from the ribbon launches a wizard that walks through the configurations needed for creating new deployment types to augment deployment of the selected application.
5. Retire/Reinstate The option to retire an application allows administrators to effectively mark an application as no longer deployable without deleting it from the console. There are a couple of advantages to this approach:
· The application deployment status is not removed.
· If questions arise about the application configuration, the configuration may easily be reviewed.
· If it becomes necessary to reinstate the application to an active status, it is possible to do so by simply selecting the Reinstate option.
6. Delete It is pretty obvious what this option does but it’s still worth a bit of discussion. As you will see shortly, it is possible (and likely) that applications will be tied to each other through dependencies and supersedence relationships. When these relationships exist, or when there is a deployment defined for an application, the deletion option will fail to work. This prevents potentially removing an application that is critical to the function of another. While this is good, it is important to understand and be able to resolve these relationships. The View Relationships option helps detail all configured links for a given application.
7. Simulate Deployment This is a really cool option in Configuration Manager 2012 that allows administrators to perform a test deployment of a configured application that will function only to validate associated relationships and report back on what kind of success might be expected. The Simulate Application Deployment Wizard is shown in Figure 8.17.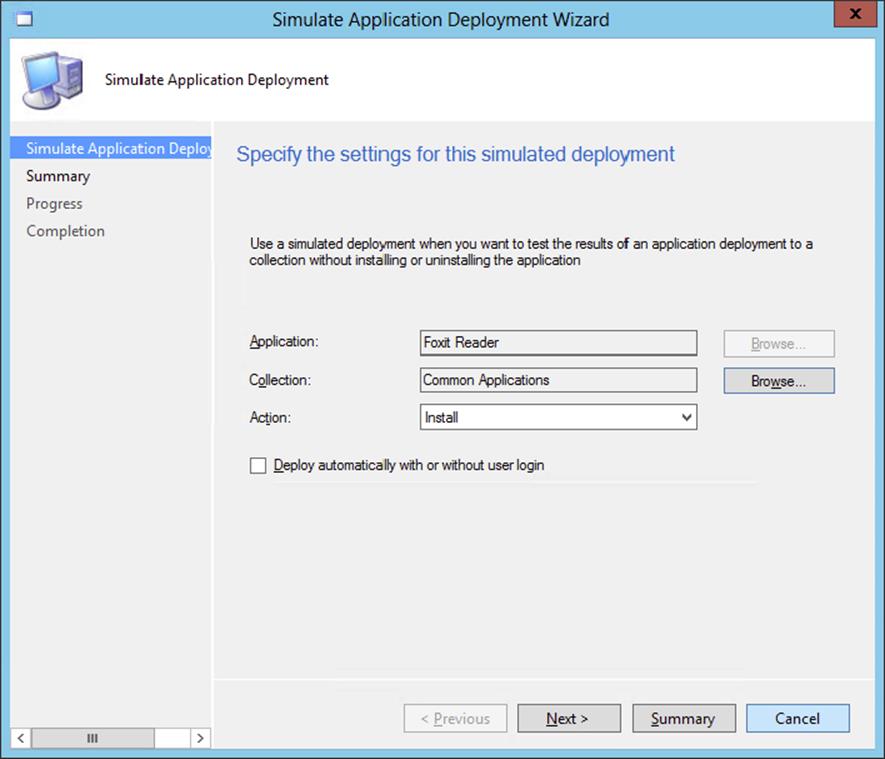
Figure 8.17 Simulate Application Deployment Wizard
8. Export A welcome addition to Configuration Manager 2012 is the ability to share almost any configuration, including application definitions, between Configuration Manager 2012 hierarchies if you do not want to use the migration feature. The Export button on the ribbon launches a wizard to walk through steps to complete the export. The wizard is shown in Figure 8.18.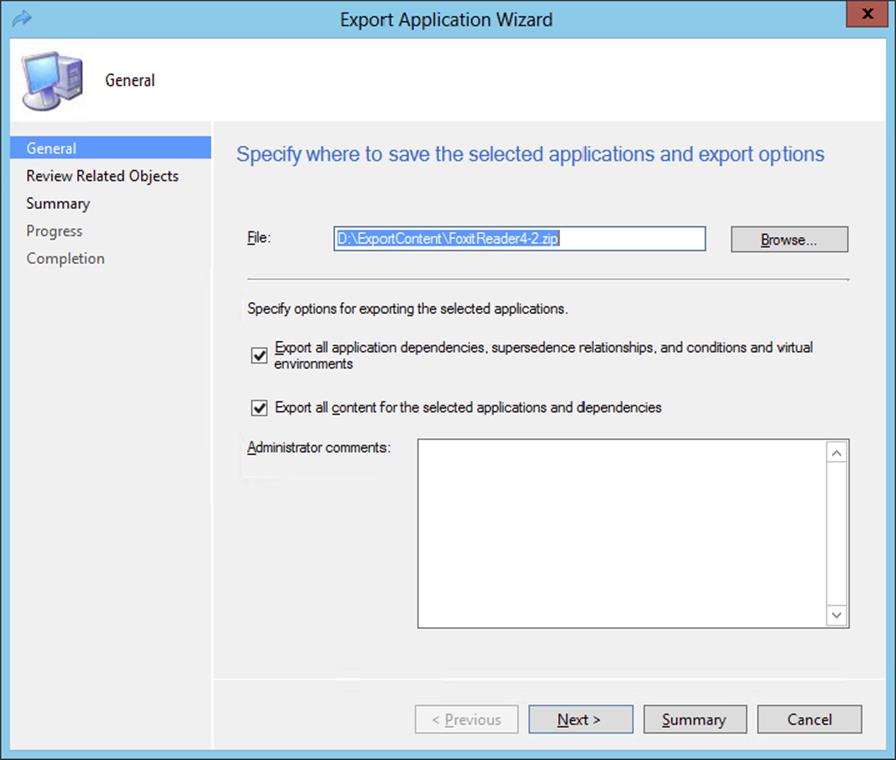
Figure 8.18 Foxit Reader 4.2 properties in the General tab of the Export Application Wizard
9. The content created by the Export Application Wizard is available for import into another Configuration Manager 2012 hierarchy using the Import Application button from the ribbon.
10.Another potentially interesting use of this functionality is as an extra level of backup for data configured in the site. Consider retiring an application as an example. It could be that the application is ready to be purged from the console, but you would like to keep a copy around for those scenarios where it might be needed again. Exporting before deletion is the perfect answer!
11.Deploy Creating an application and associated deployment type(s) does not result in any action taking place. To trigger action a deployment is needed. Deployments are not created as part of the Create Application Wizard and must be configured through the Deploy Wizard, as will be shown for the Foxit Reader sample application shortly.
12.Distribute Content Deploying applications requires that content needed for the application be distributed to target systems/users. To make content available to clients it must be staged on a distribution point. We’ll review the options to distribute content for the Foxit Reader sample application shortly.
13.At this stage we will just say that while this option is useful to stage content to distribution points, using it isn’t strictly required. By defining distribution point groups to include collection mappings, when a collection is targeted with a deployment the content needed will automatically deploy to the defined distribution points—a nice option to save a couple of extra mouse clicks!
14.Move This option allows administrators to move applications between defined folders. This helps keep things organized as the number of defined applications increases.
15.Set Security Scope Security scopes are more of a topic for security, covered in detail in Chapter 17. The role security scopes play with applications is interesting, though, and merits a brief discussion.
16.A significant change in Configuration Manager 2012 is in how security is handled, both in terms of assignment of user roles and the ability to mark certain objects, such as applications, as being part of one or more defined security scopes. Configuration Manager 2012 console users may also be assigned to one or more security scopes; by so doing, you limit the users’ visibility of the Configuration Manager 2012 environment, including applications, to just those items that are part of their assigned scope(s).
17.Categorize As already noted when creating the sample Foxit Reader application, it is possible to create and assign categories to applications for the purposes of organization or grouping. Managing categories can be done as part of the application creation, but that is cumbersome, so the Categorize option on the ribbon is available to enable easier category management.
18.Properties This option will open the Properties dialog for selected objects in the console and is useful for editing settings made through the various wizards.
Exploring the Sample Application
The wizard operations are complete. The result? An application and an associated deployment type. That was easy! But what options did the wizard actually set for these items, and what options are available? To take a look, select the application, and from the ribbon, select Properties. The Foxit Reader 4.2 application property screen opens to the General Information tab, as shown in Figure 8.19.
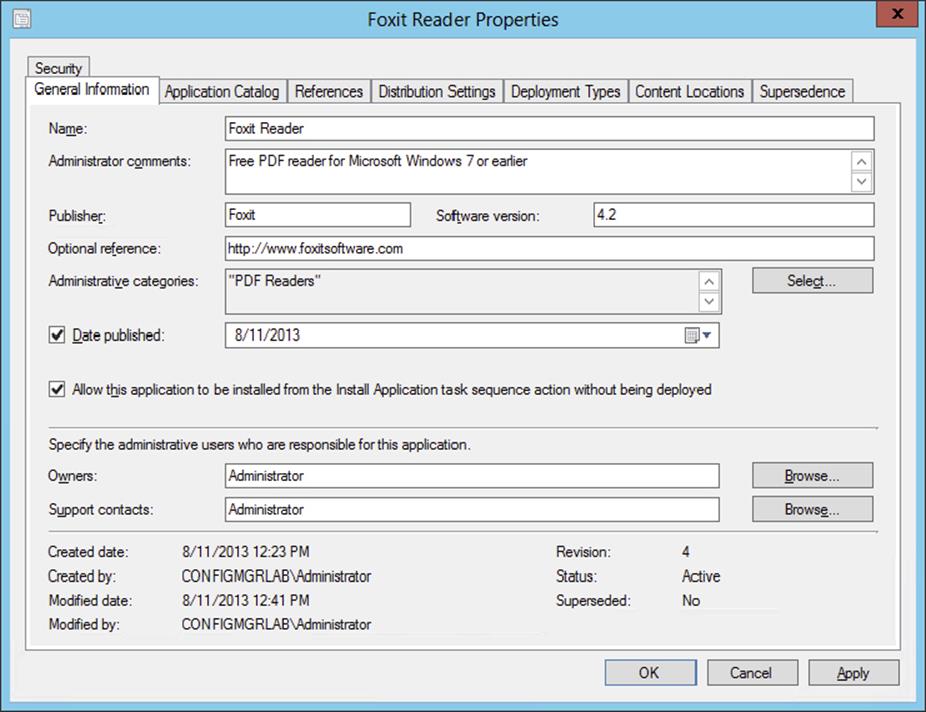
Figure 8.19 Foxit Reader 4.2 Properties—General Information tab
Most of the options on the General Information tab have already been discussed. In addition to those already mentioned, a few additional options are available:
1. Date Published The published date allows administrators to note when the application was published. This date defaults to the current date if not selected and modified.
2. Allow This Application To Be Installed From The Install Application Task Sequence Action Without Being Deployed This option is not selected by default. If the application should be deployable via a task sequence, you must select this box. If the option isn’t selected, the task sequence will fail, or you will not be able to select the application while creating a new task sequence.
3. Owners This option allows administrators to define who the owner is for the given application. This information is then displayed in Software Center and also in the Application Catalog.
4. Support Contacts This option allows administrators to define who users should contact if problems are encountered with the application. This information is then displayed in Software Center and also in the Application Catalog. The Browse button allows you to select users from Active Directory if desired, or you may enter users manually.
5. The bottom section of the General tab provides summary information for the application, including its status, whether it is superseded by another application, and the current revision number.
Selecting the Application Catalog tab details options related to publishing the application in the Application Catalog. Some options here will be provided already. If you’re publishing in the catalog, you’ll likely need to modify or supply some of the default options. Remember, publishing in the Application Catalog is not actually accomplished on this tab. Rather, this tab collects information to be used if the application is published in the catalog. Associating your deployment, described soon, with a collection of users or user groups will result in the application showing up in the catalog. Options for the Foxit Reader sample are shown in Figure 8.20.
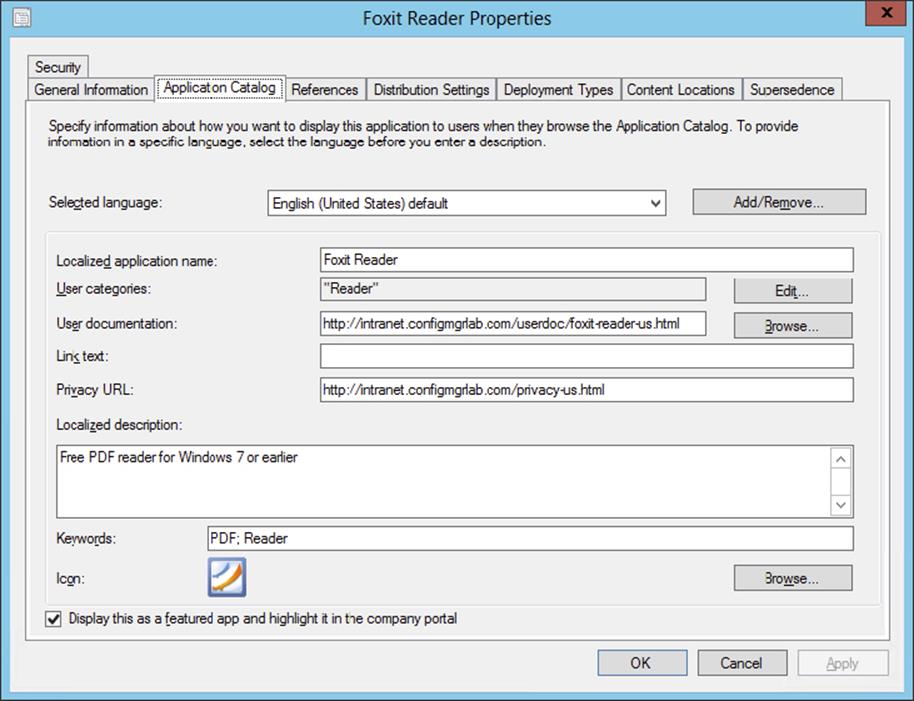
Figure 8.20 Foxit Reader 4.2 Properties—Application Catalog tab
1. Selected Language This option allows administrators to add or remove languages that should be supported by the application in the catalog and also to specify which language should be displayed.
2. Localized Application Name This option presents the application name localized by the current language selected.
3. User Categories User-targeted applications and device-targeted applications maintain separate category lists for grouping purposes. If publishing this application for users, administrators have the option to select an existing user category for describing the application or to create a new one.
4. User Documentation With this option, administrators are allowed to specify a path that is available to the user for additional information on the application. This path may be a web page that the user might visit or a link to an online document.
5. Link Text This option allows administrators to specify what specific text is displayed in the catalog instructing users how to obtain additional documentation.
6. Privacy URL An application can have a privacy policy. As an administrator, you can configure the URL that redirects you to the website with the privacy policy.
7. Localized Description This section allows users to specify text, localized to the language selected, to be displayed as the application description in the catalog.
8. Keywords When multiple applications and categories are present in the catalog, locating specific content may be difficult. To help with the location process, administrators have the option to specify search keywords for an application that will aid users in finding its location.
9. Icon Administrators can choose from a substantial list of custom icons that might be associated with the application.
10.Display This As A Featured App And Highlight It In The Company Portal An application can be configured as a featured app in the company portal.
Selecting the References tab will display any other defined applications that either depend on the one being configured or any applications that supersede the one being configured. Also, depended virtual environments, if available, are displayed on the References tab. In the case of the sample Foxit Reader application, no dependency or superseding application is defined.
The next tab is the Distribution Settings tab; here you can configure the distribution settings for the application. Configure the distribution priority or the prestaged distribution point settings.
The Deployment Types tab, as shown in Figure 8.21, lists all defined deployment types for the application. It is possible to configure multiple deployment types to cover all potential deployment scenarios for the application. Deployment types will be discussed in detail shortly.
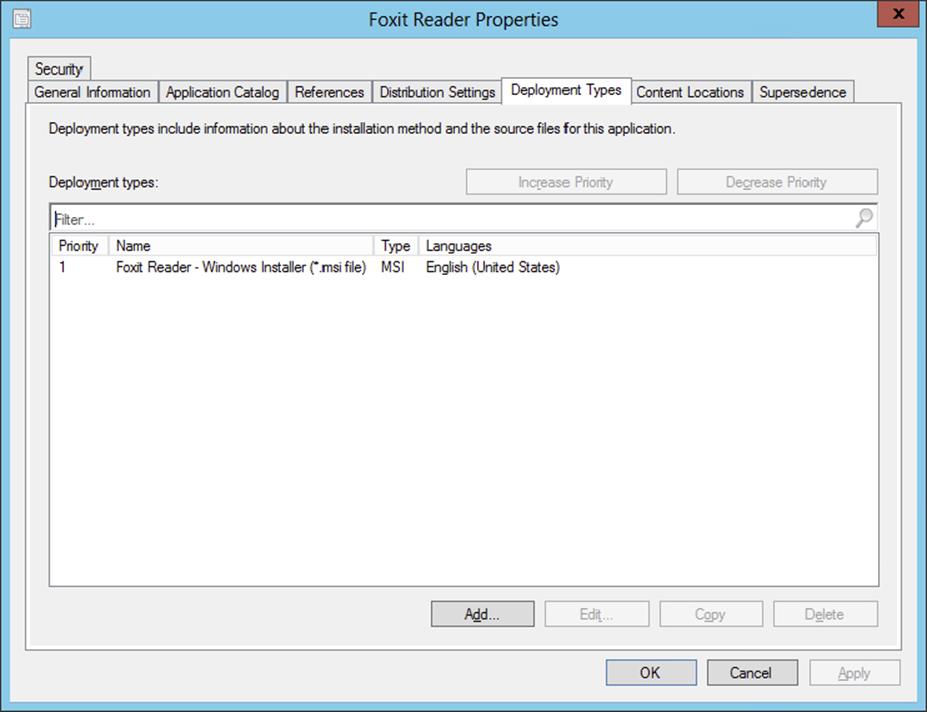
Figure 8.21 Foxit Reader 4.2 Properties—Deployment Types tab
The Content Locations tab, as shown in Figure 8.22, will list all distribution points or distribution point groups that have been configured to host the content. In the sample Foxit Reader application, distribution points have not yet been defined but will be shortly. If they are defined, this tab allows you to validate, redistribute, or remove the content from the distribution points or distribution point groups.
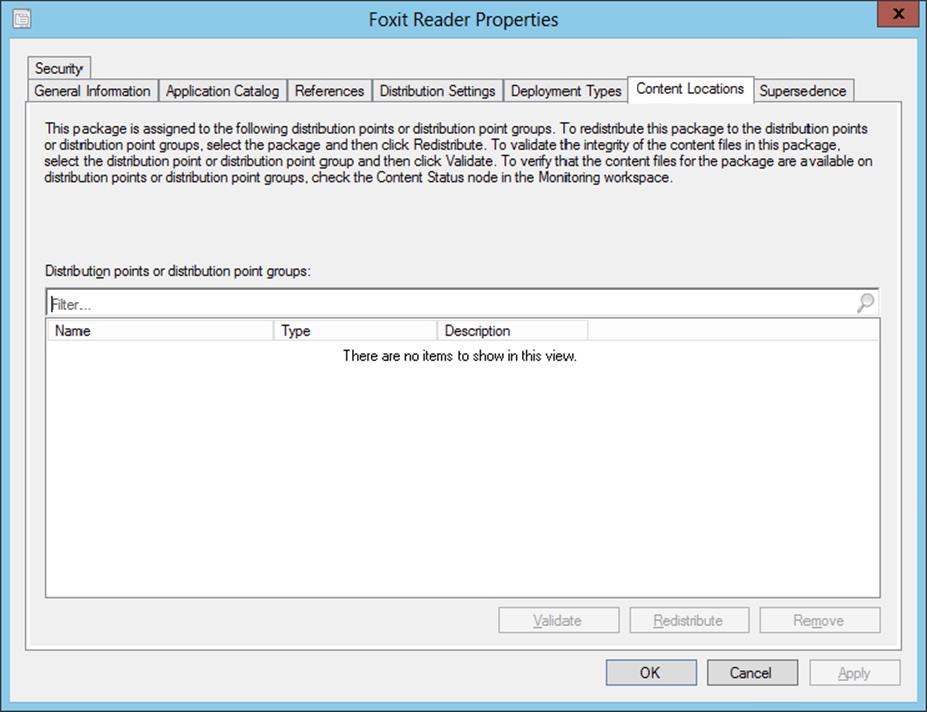
Figure 8.22 Foxit Reader 4.2 Properties—Content Locations tab
The Supersedence tab, as shown in Figure 8.23, lists any application that the current one supersedes. The ability to build links between applications that supersede each other is much like the experience that is seen with patches and brings significant benefit. (This is discussed in detail in the section “Supersedence” later in this chapter.) The sample Foxit Reader application does not currently have any superseding relationships defined. By clicking Add on this page it is possible to define the application that is superseded by the one being configured and also to specify the new deployment type to use and whether the previous application should be uninstalled prior to installing the current version. This allows administrators great flexibility in controlling how deployments take place, especially when upgrading from previous versions.
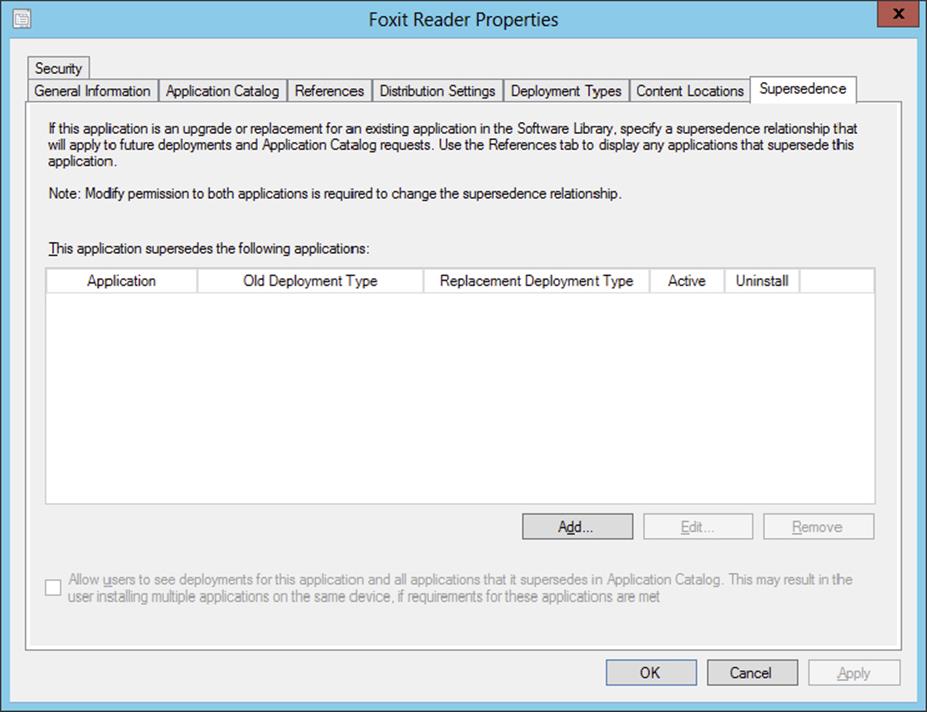
Figure 8.23 Foxit Reader 4.2 Properties—Supersedence tab
The Security tab allows administrators to specify users who may access the application and their effective rights to the application.
Exploring the Deployment Type
In addition to creating the sample application, the Create Application Wizard also created one deployment type. This was already noted briefly and is shown in Figure 8.21.
The current sample application has only a single deployment type configured. This is shown in Figure 8.24. Note from this same figure that deployment types have as part of their definition an assigned priority. When multiple deployment types are present, it is possible to rank how they should be evaluated in relationship to each other using the Priority option. The priority for a deployment type may be increased or decreased from either the context menu brought up by right-clicking the deployment type or from the Deployment Type option on the ribbon, which is also identified in Figure 8.24.
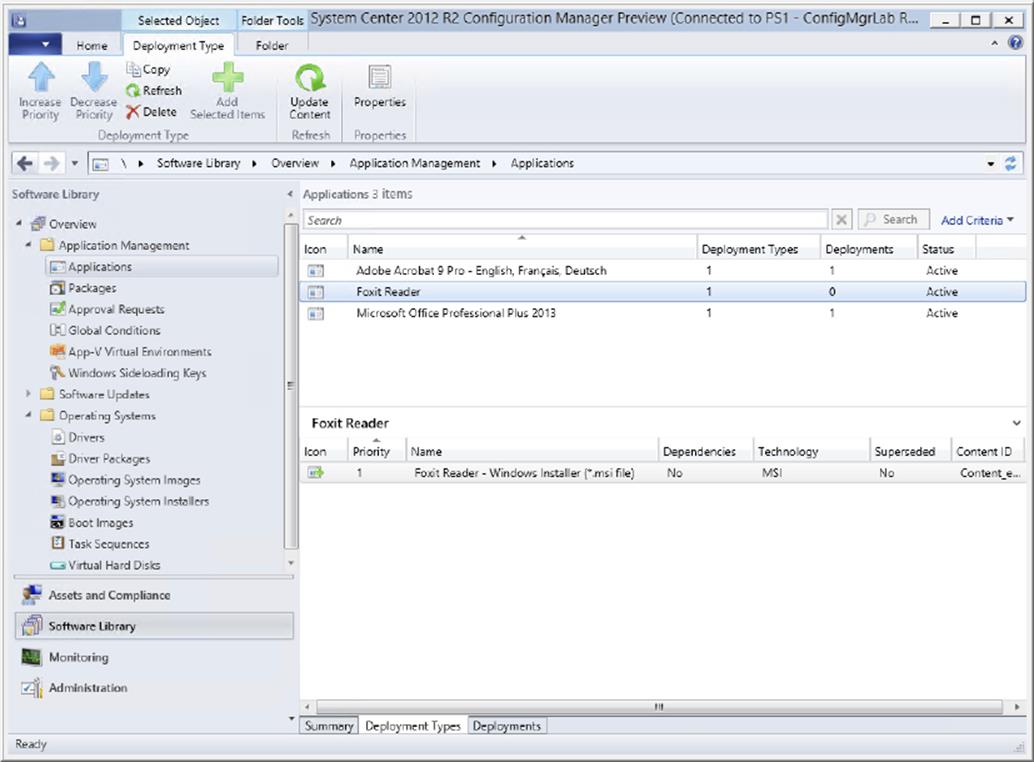
Figure 8.24 Displaying deployment type properties
There are several options when creating a deployment type. To access the sample deployment type, either navigate to it through the properties of the application and click Edit, or simply select the sample Foxit Reader application, and in the bottom of the screen select the Deployment Types tab. This is also shown in Figure 8.24. Right-click the only deployment type available and select Properties.
Selecting Properties will display the properties for the deployment type with the General tab showing, as shown in Figure 8.25. All of the information displayed on the General tab except for the Administrator Comments text was supplied by the Create Application Wizard.
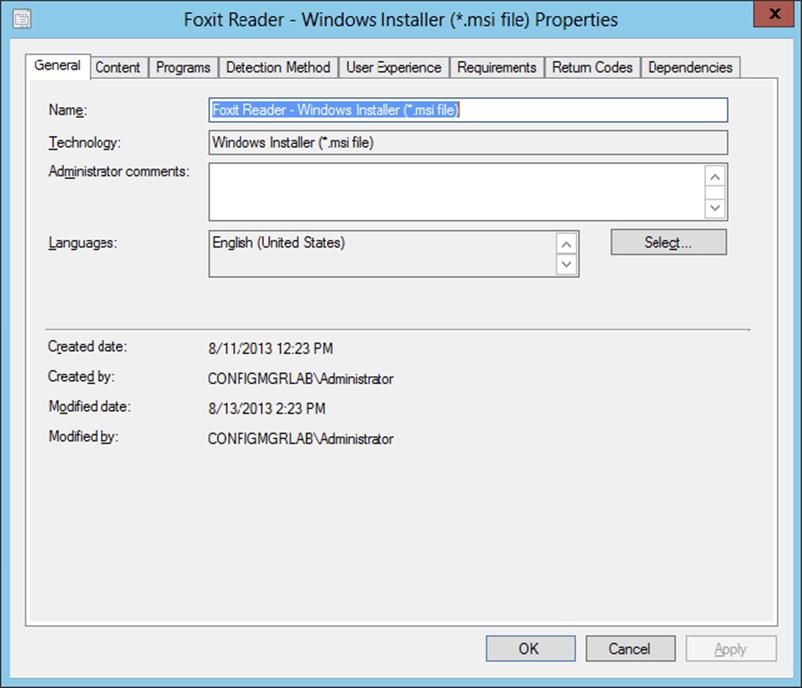
Figure 8.25 Sample deployment type properties—General tab
1. Name This is the name of the deployment type. Supplying a descriptive name for each deployment type helps administrators know the intended use of each deployment type configured.
2. Technology This describes what type of item is being deployed and will change based on whether an MSI (as in this case), script, or executable is being deployed.
3. Administrator Comments This field allows administrators to provide any needed additional information regarding the deployment type.
4. Languages This field allows administrators to optionally select the specific language for the deployment type.
The bottom section of the General tab provides additional information as to the creation and modified dates for the deployment type.
Selecting the Content tab of the deployment type properties, as shown in Figure 8.26, will list various options specific to configuring content.
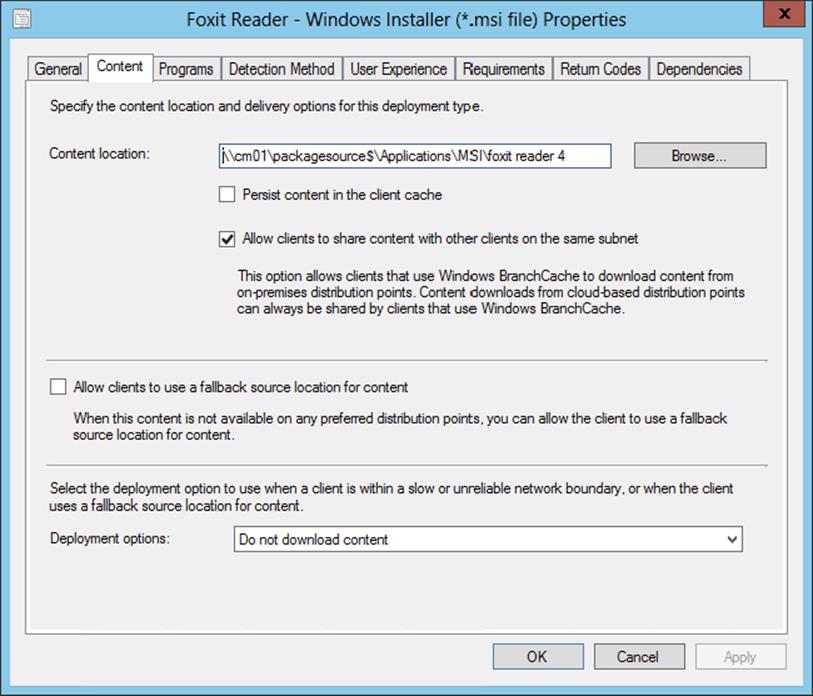
Figure 8.26 Sample deployment type properties—Content tab
1. Content Location The Content Location option allows administrators to specify the location on the network where Configuration Manager 2012 can find the content to be deployed. The path listed for this option must be specified in UNC format.
2. Persist Content In The Client Cache This option, disabled by default, flags that the content being deployed should remain in the client cache rather than being marked eligible for deletion. You should consider this option if the content being deployed will be reused. An example might be a script that runs periodically against clients. In such a case it is more efficient and predictable to persist the script in the client cache so it is available locally each time it is scheduled to run. If this option is not selected, after the script content runs successfully the first time, it will be eligible for deletion from the client cache if space is needed and will need to be downloaded again at the next runtime.
3. Allow Clients To Share Content With Other Clients On The Same Subnet This option, enabled by default, allows clients (Windows Vista and higher) on the network segment to leverage BranchCache capabilities of the operating system and act as a location cache for content that other clients on the same network segment may need. When a local peer client is detected that already has content available, clients needing the content will simply download it locally rather than from a distribution point.
4. There are multiple scenarios where this type of configuration is helpful. Consider the following:
· Clients reside in a small office with no local distribution point and limited bandwidth. When applications are configured to support shared content, when a single client in the office has downloaded the content, either in total or in part, then it will be possible for other clients in the same office to access the content locally rather than traversing the network.
· Clients reside in a small office with a local distribution point hosted on a workstation system and limited bandwidth. In this scenario a local distribution point exists. Depending on the total number of workstations acting as distribution points and the total number of clients, it may still be useful to enable shared content distribution. When a distribution point is configured on a workstation, there is a limit of 20 simultaneous connections possible. If this small office had 100 Configuration Manager clients all needing to run an application at the same time, connections to the distribution point may be exceeded. Having content persisted in the cache of various client systems would present another option for content download.
5. When an administrator is planning the Configuration Manager 2012 implementation, having the ability to factor in shared content distribution as an option may allow fewer distribution points to be installed at a given location.
6. Allow Clients To Use A Fallback Source Location For Content. In Configuration Manager 2012 and with the introduction of boundary groups, protected distribution points will be common. When clients are connected to the corporate network directly, and if Configuration Manager 2012 distribution point access is properly configured, there should be little problem finding a distribution point that is available for use. If a client connects remotely from a boundary not configured in Configuration Manager boundary groups, the client may not be able to find a distribution point that is accessible to it because of boundaries. Setting this option, disabled by default, to allow those clients to communicate with an unprotected distribution point is important to successful application deployment. It probably goes without saying, but to be clear, setting this option by itself is only part of the equation. Distribution points themselves must be configured to be used for fallback, which is not enabled by default.
7. Deployment Options When configuring boundary groups in Configuration Manager 2012, administrators are able to designate each included distribution point that is part of the boundary group as being across either a fast or slow connection. This option allows administrators to define how application deployment will proceed. The default option is Do Not Download Content, which means the client will delay content download until it moves inside a boundary noted as being fast. The other option is Download Content From Distribution Point And Run Locally, which will allow content to be downloaded regardless of connection quality. Remember that clients attempt to download content using BITS, which works to ensure transfers complete successfully, even across unreliable or slow network conditions.
The Programs tab of the deployment type properties, as shown in Figure 8.27, lists program installation and uninstallation options.
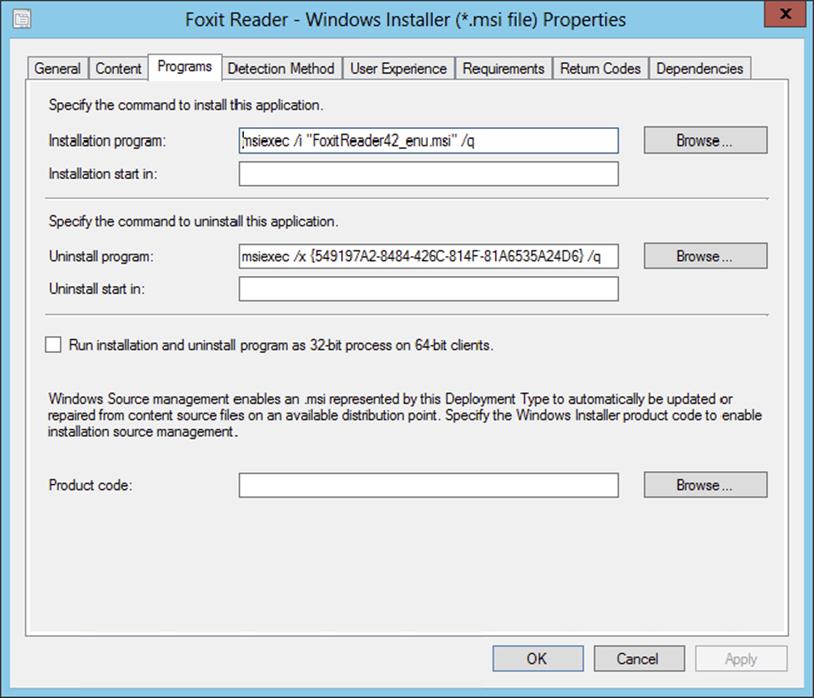
Figure 8.27 Sample deployment type properties—Programs tab
1. Installation Program This option allows administrators to specify the command line to be used for program installation. This command line will be initiated from the source content downloaded from the distribution point, as specified earlier.
2. Installation Start In This option allows administrators to specify a specific directory that installation should be initiated from. This option is useful when the root of the content folder on the distribution point does not contain the files needed to initiate an installation. In such a case it would be possible to specify which folder within the content does contain the needed information.
3. Uninstall Program This option allows administrators to specify a command that is useful to uninstall the given application. If you’re using an MSI, as in the example, the uninstall command is straightforward. It would also be possible to include a script to automate removal of any type of application install.
4. Uninstall Start In This option is the same as for Installation Start In discussed previously.
5. Run Installation And Uninstall Programs In 32-bit Process On 64-bit Clients This option allows administrators to toggle that 32-bit applications should be handled within their own 32-bit process when running on a 64-bit system.
6. Product Code This option is specifically for use when deploying MSI applications. The design of MSIs allows for application self-repair and also installation of additional features if the application user selects functions that require them. In order for MSIs to work properly, they must be configured to know where the original source files are located. This option serves that purpose.
Selecting the Detection Method tab of the deployment type’s properties, as shown in Figure 8.28, lets you see options for use in detecting whether an application being deployed is already present on the target device.
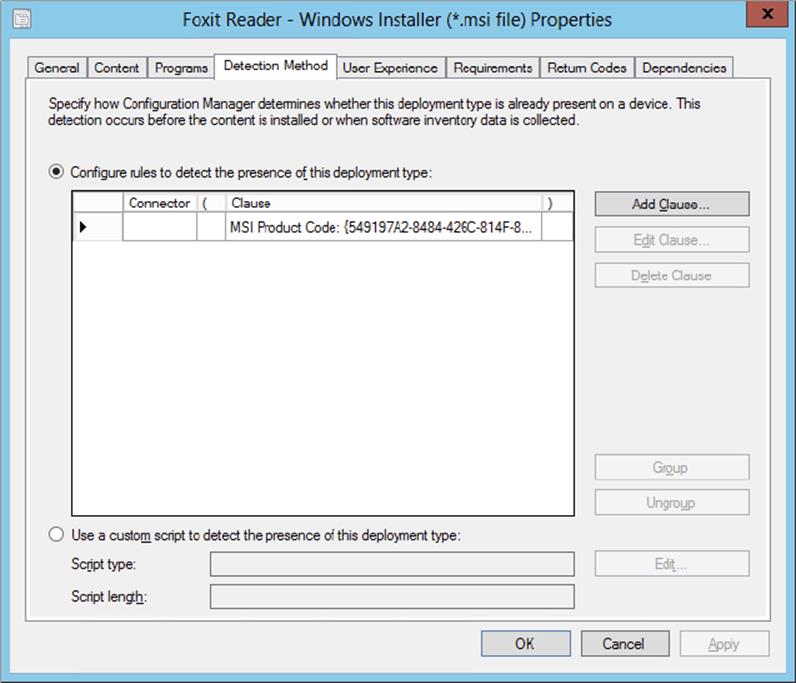
Figure 8.28 Sample deployment type properties—Detection Method tab
A new feature for application deployment in Configuration Manager 2012 is the ability to configure detection logic to determine if an application is already present on the target device before simply installing it again. This option is much like what is already part of software update deployment but has been brought into the Application Deployment feature. Properly configuring this option will avoid application reinstallations and is also pivotal to verifying dependencies and other configured relationships. When you’re using an MSI, as in the example Foxit Reader application, this information is supplied automatically and is straightforward. Regardless of the type of application being installed, it is possible to configure a useful detection mechanism. Clicking Add Clause opens the Detection Rule dialog box, which is used to add criteria needed to detect if the application is already installed. We’ll more fully explore this wizard later in the chapter. Also note the option to execute a custom script to detect an already installed application. In most cases, the available options for detection will suffice, but if not, the script option allows almost any scenario for detection to be handled.
The User Experience tab of the deployment type’s properties, as shown in Figure 8.29, lists options that allow administrators to define the experience users will have during application deployment.
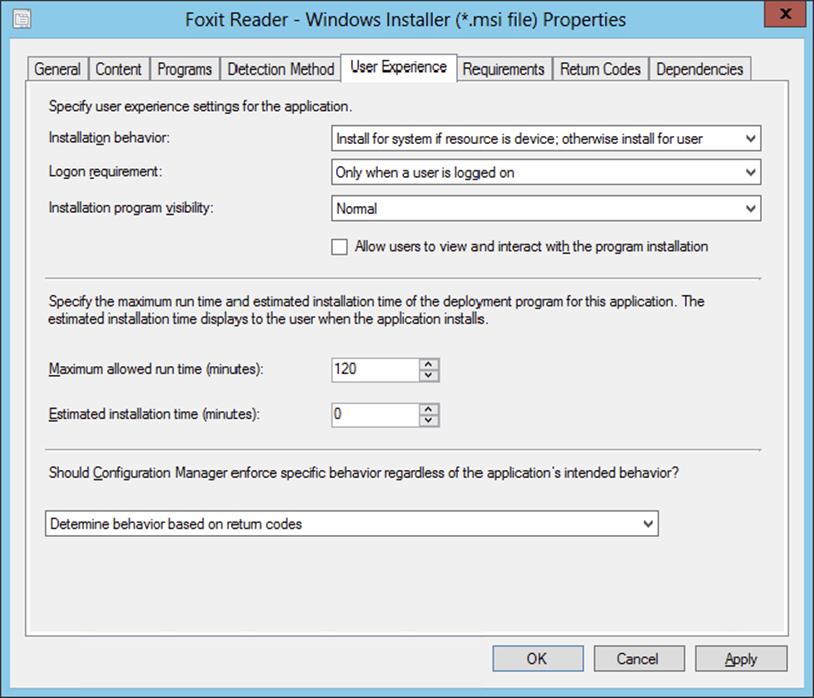
Figure 8.29 Sample deployment type’s properties—User Experience tab
1. Installation Behavior This option allows administrators to define whether the application will be a deployment for a system or for a user. A third choice allows administrators to define the deployment for a system if the resource is a device but for a user otherwise. Selecting a deployment to a user will gray out the next option so that a deployment can only be executed when a user is logged on.
2. When a deployment is configured for a system, this indicates that the deployment will take place under the security context of the local system account. When a deployment is configured for a user, this indicates the deployment will take place under the security context of the logged-on user.
3. Logon Requirement This option allows administrators to configure whether a user needs to be present during a deployment or not. When a deployment is identified as being for a user, this option is gray. When a deployment is identified as being for a system, there are three available choices:
1. Only When A User Is Logged On This option requires a user to be logged onto the client system before a deployment will proceed, even when the deployment is identified as being for a system.
2. Whether Or Not A User Is Logged On This is by far the most commonly used option because it allows a deployment to proceed without the user being present.
3. Only When No User Is Logged On This option ensures no application deployment takes place when a user is logged onto the system. This option would be very useful in a scenario where it is crucial to ensure users are not disrupted for application deployment, such as when a retail kiosk system is in use by a customer.
4. Installation Program Visibility Options here allow administrators to configure whether the program will run Maximized, Normal, Minimized, or Hidden. The default option is Hidden. Ultimately these choices really only come into play if an application is deployed to a user or to a system and the option Allow Users To View And Interact With The Program Installation is chosen. Deployments targeted to a system execute in the context of the local system account, so without that option, users wouldn’t be aware of any information displayed on the screen during installation since it is not happening in their logged-on context.
5. Allow Users To View And Interact With The Program Installation This option, only available when Only When A User Is Logged On is selected for the Logon Requirement, is enabled by default and cannot be disabled when the installation is identified as being for a user, but it can also be enabled when the installation is identified as being for a system.
1. User When an application is being deployed to a user, the installation proceeds under that user’s credentials, and thus the user is able to interact with the application unless it is being deployed silently.
2. System When the application is being deployed to a system, the installation proceeds under the local system’s credentials. Since the user’s credentials aren’t in use, this effectively hides any interaction from the user. Setting the option to Allow Users To View And Interact With The Program Installation causes the system to pass the local system’s interactive experience through to the logged-on user. While this option is not often used in production environments, it can be a useful troubleshooting option so that administrators are able to watch an application as it installs and identify any problems that might occur.
6. Maximum Allowed Run Time (Minutes) This option allows administrators to configure a maximum amount of time that an application install is able to run before being forcibly terminated. Typically the default setting of 120 minutes is more than sufficient, but in some cases application deployment errors may cause a deployment to appear hung, which will cause the installation to run past the configured window and be terminated. An example of such a situation would be if the application requires user input but is hidden from the user either because of the settings just discussed or because the application was set to run silently. In such cases, using the option Allow Users To View And Interact With The Program Installation would help identify the problem.
7. In many environments administrators didn’t think to adjust this setting, and in many cases this presented no issue. With the introduction of maintenance windows in Configuration Manager 2007, however, this setting took on great importance. If maintenance windows are defined for the environment, the Configuration Manager client will first check to see if it is in a maintenance window before attempting to execute the application. If the client is within a maintenance window, then the amount of time configured for the install (this setting) will be compared against the time remaining in the maintenance window. If insufficient time remains, the application deployment is canceled and attempted at the next opportunity. From this alone it is clear that configuring a realistic value for this setting is critical when making use of maintenance windows in the environment.
8. Estimated Installation Time (Minutes) This option allows administrators to specify how long they anticipate that an application will take, at most, to complete the install. This setting has been an option in previous versions of Configuration Manager.
9. The bottom part of the User Experience tab allows administrators to configure how the Configuration Manager 2012 client should respond after the application deployment is complete. There are four options available:
1. Determine Behavior Based On Return Codes This is the default option and likely makes the most sense in most scenarios. When this option is selected, the action taken by the Configuration Manager 2012 client will be determined by application return codes. Some return codes indicate that the application was successful, while others indicate the application was successful but requires a reboot. Still others may indicate some sort of failure. Administrators are able to specify custom return codes, discussed next, for applications that do not adhere to standards.
2. No Specific Action This option simply allows the Configuration Manager 2012 client to exit after the application install is complete, without any further action.
3. The Software Install Program Might Force A Device Restart This option indicates to the Configuration Manager 2012 client that once the application deployment completes, the application itself will force a reboot if necessary.
4. Configuration Manager Client Will Force A Mandatory Device Restart This option causes the Configuration Manager 2012 client to force the device to reboot following an application installation.
Selecting the Requirements tab of the deployment type’s properties, as shown in Figure 8.30, lists options that administrators can use to define requirements that must be met before the application installation is attempted. This page is a starting point, allowing administrators to review requirements already configured or add additional requirements.
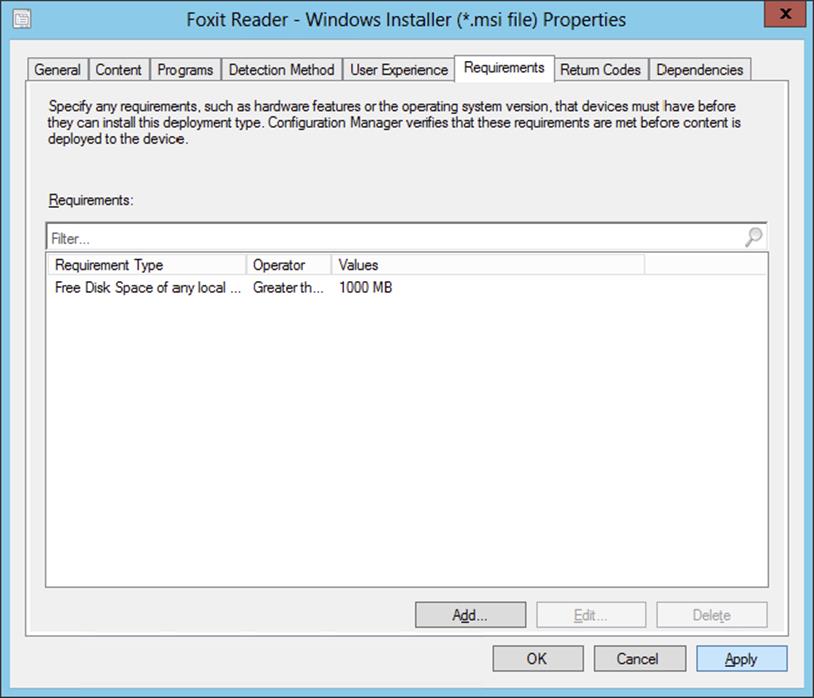
Figure 8.30 Sample deployment type’s properties—Requirements tab
The addition of deployment rules is a significant modification in Configuration Manager 2012 and will be detailed later in the chapter. For now, suffice it to say that rules are intended to either take the place of building unique collections with criteria per deployment that need to be managed by the site server or move the responsibility for rules checking to the client system instead. This practice will allow administrators to shift their thinking about how many collections they need to maintain, but they will need some learning time to fully acclimate to this change!
Selecting the Return Codes tab of the deployment type’s properties, as shown in Figure 8.31, allows administrators to define possible return codes for the application and how they should be interpreted by the Configuration Manager 2012 client. The default values are shown in the figure. Administrators choose whether the default values are sufficient or they need to augment them.
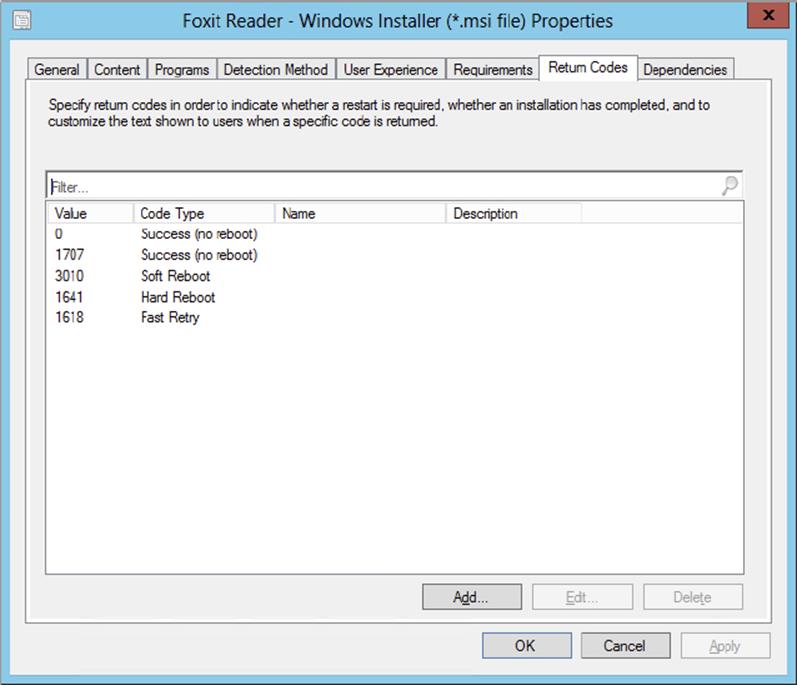
Figure 8.31 Sample deployment type’s properties—Return Codes tab
In most cases, the default return codes will be sufficient, but in some cases, applications introduce their own return codes in an effort to help identify certain conditions that may exist at deployment time. A return code of 1, for example, may indicate a successful deployment but one that needs some sort of post-deployment action. If a return code of 1 was not added to this list, then the Configuration Manager 2012 client would interpret it as a failed deployment.
Selecting the Dependencies tab of the deployment type’s properties, as shown in Figure 8.32, allows administrators to define any software items that must be installed prior to the current application being installed.
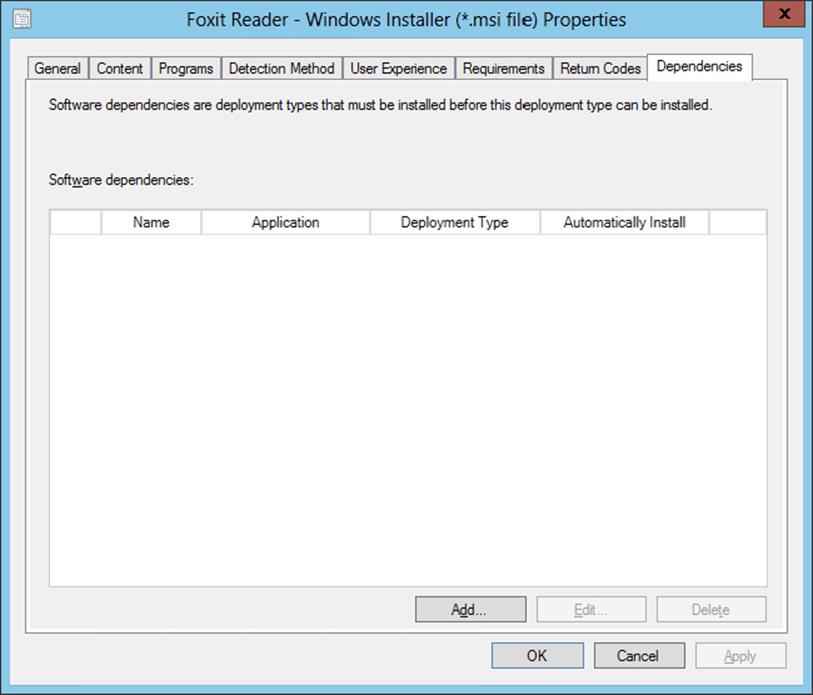
Figure 8.32 Sample deployment type’s properties—Dependencies tab
Dependencies will be detailed later in the chapter, but a quick look at the column headers reveals that along with specifying dependencies, administrators are also able to specify whether a given dependency, if absent, should be automatically installed as part of the application deployment.
Create Deployment Wizard
The Create Application Wizard worked to build the sample Foxit Reader application and deployment type but did nothing to build an actual deployment. To build the deployment, click Deploy from the ribbon to launch the Deploy Software Wizard. The General page of the Deploy Software Wizard is shown in Figure 8.33.
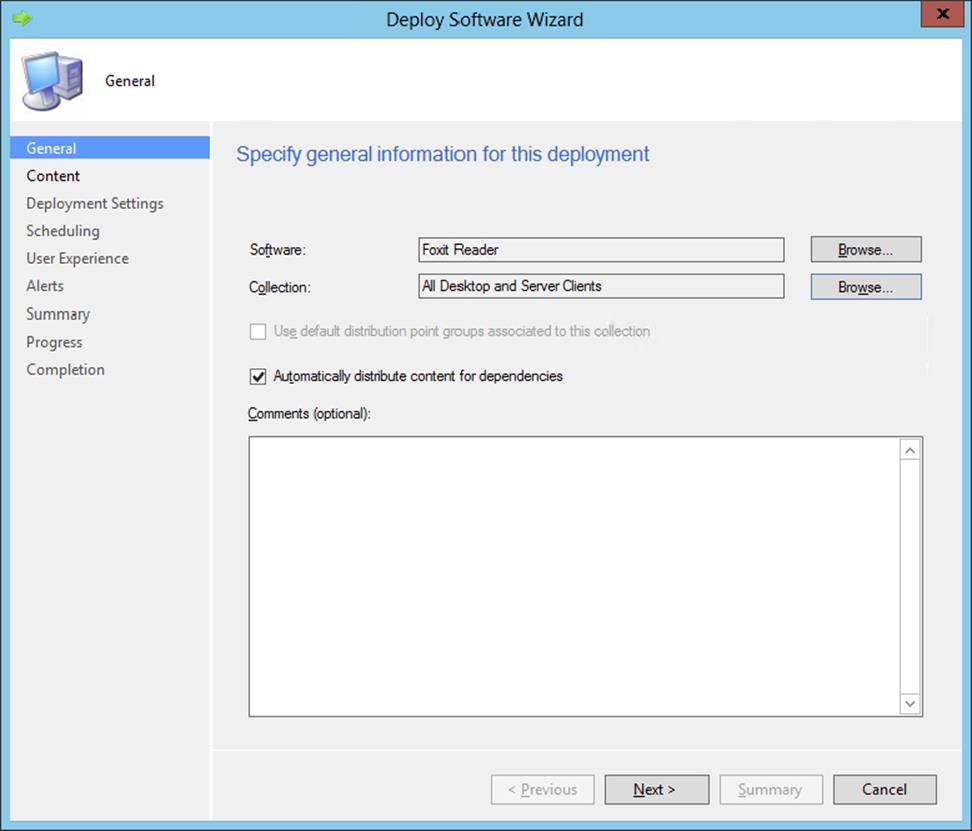
Figure 8.33 Deploy Software Wizard—General page
1. Software On the General page of the Deploy Software Wizard the software to be deployed likely is already specified, in this case Foxit Reader 4.2. If the provided selection is incorrect or is missing, clicking the Browse button will allow you to select the correct application.
2. Collection A deployment must be associated with a collection. A collection is a group of devices or users where the deployment should be made available. Administrators familiar with previous versions of Configuration Manager are accustomed to building collections specific to a given deployment. This can still be done in Configuration Manager 2012, or it is possible to target a generic collection and rely on the requirement rules, mentioned earlier and discussed in more detail later in this chapter, to determine which systems actually run the deployment. In practice, a hybrid approach will likely be used, where a collection is built containing systems that should be targeted with an application but without the various deployment criteria such as minimum disk space, minimum processor, minimum software version, and so on. These latter options will be managed as part of the application’s Requirements settings.
3. Use Default Distribution Point Groups Associated To This Collection In Configuration Manager 2012 it is possible to associate collections with a distribution point group. If this is done, the option shown would be available for selection and would result in the deployment being automatically distributed to distribution points based on collections chosen.
4. The benefit of being able to link a collection with a distribution point group allows administrators additional flexibility. As an example, it would be possible to build collections per machine type per a given geography or office location. Then, when building distribution groups, the relevant collections and distribution points that serve those collections could be grouped together, facilitating more efficient management.
5. Automatically Distribute Content For Dependencies If dependencies are defined for an application and if those dependencies have not been deployed to the distribution points selected for the deployment being configured, selecting this option will ensure that the content for the dependency is made available in the event it is needed.
6. Comments The Comments section allows administrators to optionally add any information that may be pertinent for the deployment.
The Content page is shown in Figure 8.34. On the Content page, administrators are able to view currently assigned distribution points and distribution point groups. If the content is not already on any of the distribution points, you can add the content to distribution points or distribution point groups. You can also select additional distribution points or distribution point groups that are appropriate locations to stage the content for client access.
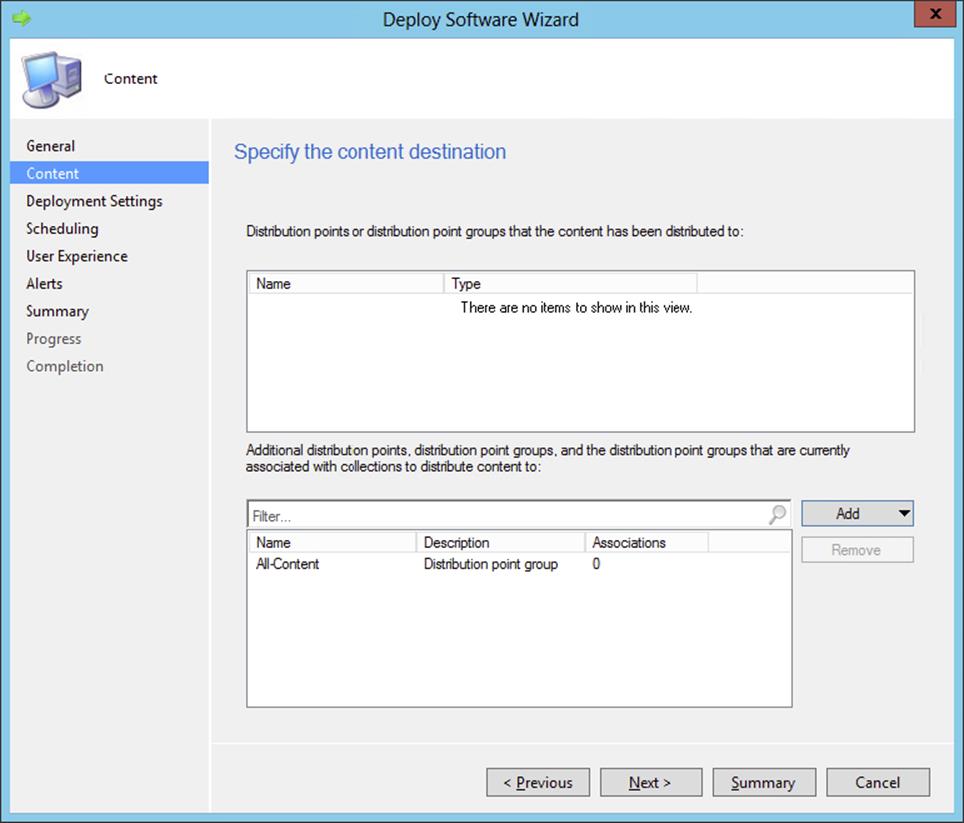
Figure 8.34 Deploy Software Wizard—Content page
When you’ve finished with the settings on the Content page, click Next to continue to the Deployment Settings page, as shown in Figure 8.35.

Figure 8.35 Deploy Software Wizard—Deployment Settings page
1. Action This setting is where administrators choose whether the deployment will act to install or uninstall the application.
2. Purpose This setting is where administrators choose whether the application simply is made available for manual installation, such as through the Software Center or the Web Catalog, or whether the application installation will be required.
3. If set to Required, the application will be enforced on targeted systems/users on the schedule specified. A change in Configuration Manager 2012—with the Required setting in place, the Configuration Manager 2012 client will periodically check to see if the application remains installed. If the application has been removed, it will be deployed again. As shown when discussing client settings earlier, the default detection cycle is weekly.
4. Require Administrator Approval If Users Request This Application If this application is targeted to a collection of users or user groups, this option becomes available and allows administrators to flag this application as one that will be listed as needing approval in the Application Catalog.
When you’ve finished with the settings on the Deployment Settings page, click Next to continue to the Scheduling page, shown in Figure 8.36.
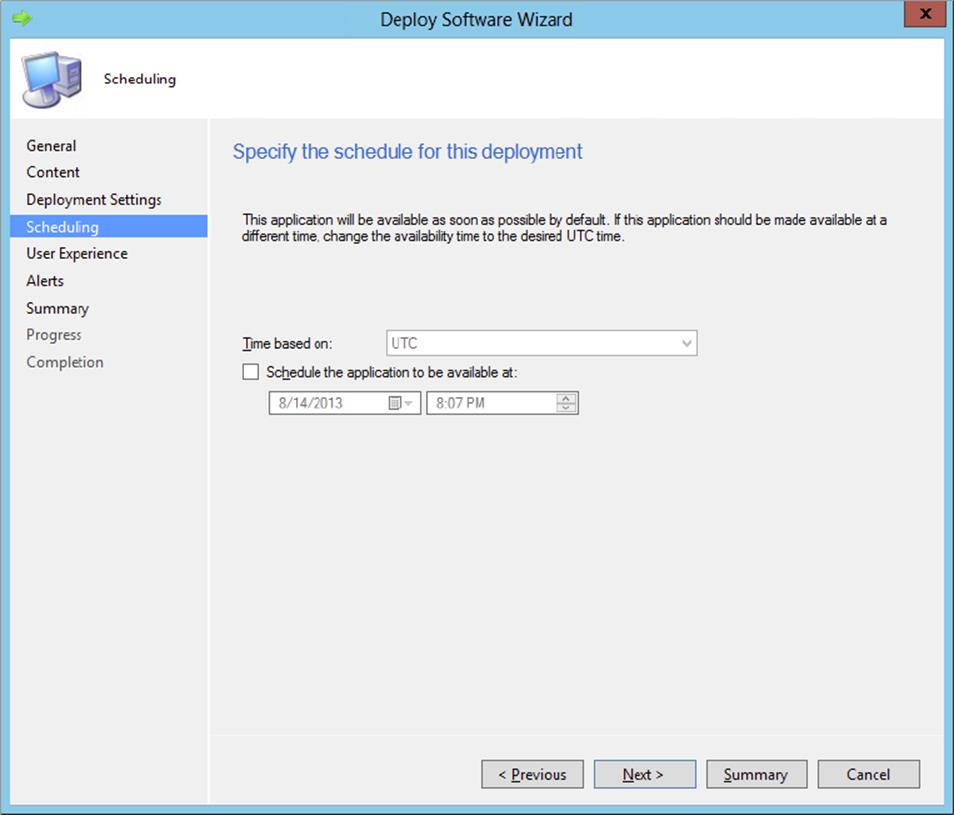
Figure 8.36 Deploy Software Wizard—Scheduling page
The options available on the Scheduling page are dependent on the setting chosen for Purpose on the Deployment Settings page:
· When Purpose is set to Available, then the only scheduling option available will be one that allows administrators to schedule application availability.
· When Purpose is set to Required, then the administrator will additionally be able to schedule the deadline for installation, either as soon as possible or for a specific time.
When you’ve finished with the settings on the Scheduling page, click Next to continue to the User Experience page, shown in Figure 8.37.
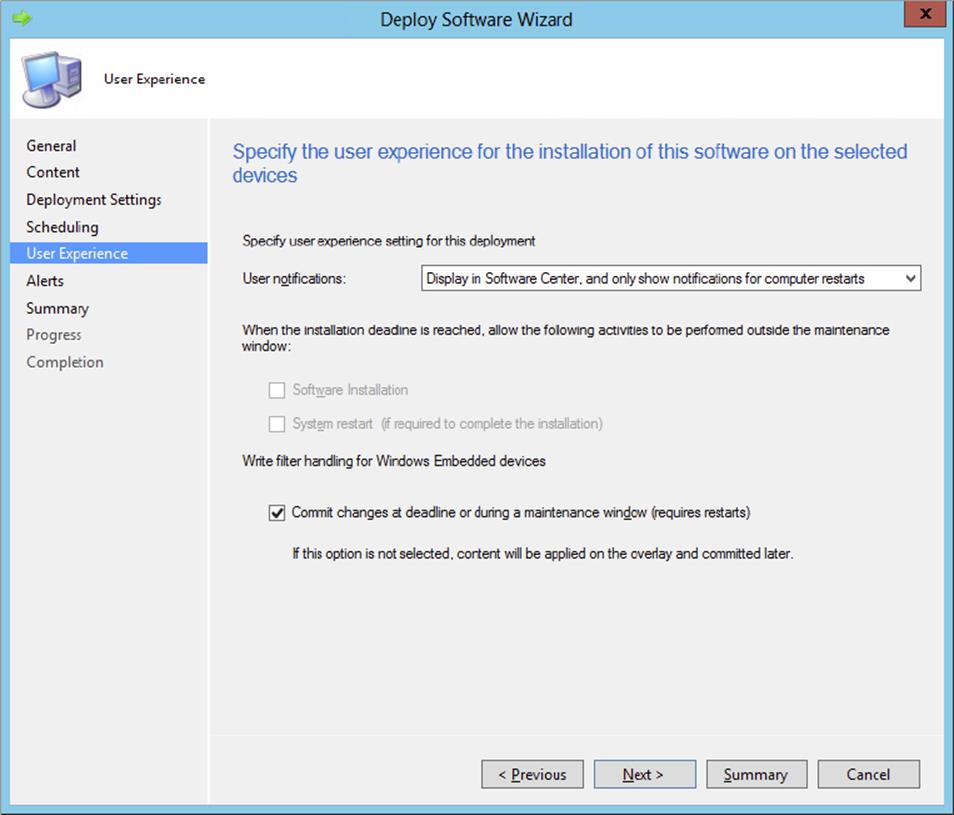
Figure 8.37 Deploy Software Wizard—User Experience page
The User Experience page allows administrators to configure user notifications. Available options are Display In Software Center And Show All Notifications or Display In Software Center, And Only Show Notifications For Computer Restarts. These options are self-explanatory.
The options for specifying activity to allow when an installation deadline has been reached are gray when the deployment is set with a Purpose of Available. When the deployment is set with a Purpose of Required, the options Software Installation and System Restart are configurable.
For Windows Embedded devices support is added for handling the write filters. You are able to commit the changes at the deadline or during a maintenance window, or the content will be applied in the overlay and committed in a later stage.
When you’ve finished with the settings on the User Experience page, click Next to continue to the Alerts page, shown in Figure 8.38.
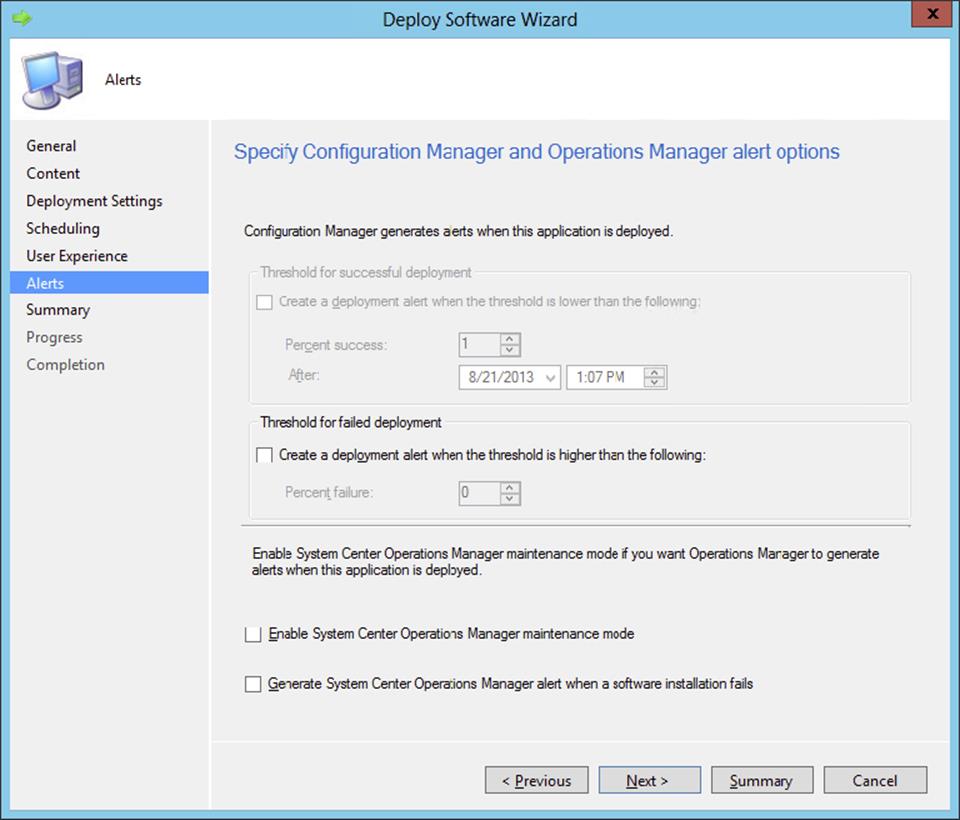
Figure 8.38 Deploy Software Wizard—Alerts page
The Alerts page allows administrators to configure criteria for when to generate alerts in response to deployment status. The alerting ability provided in Configuration Manager 2012 is new and provides an additional mechanism for awareness of deployment health.
1. Create A Deployment Alert When The Threshold Is Lower Than The Following This option allows administrators to specify a threshold of expected deployment success for a given deployment within a specific time frame. If the deployment success has not met or exceeded the configured threshold within the configured time, an alert will be generated to notify the administrator.
2. Create A Deployment Alert When The Threshold Is Higher Than The Following This option allows administrators to specify a threshold for a deployment that, if exceeded, will cause an alert to be triggered. This option would be useful in a scenario where a certain number of licenses have been purchased for an application. If a sufficient number of users install the application to cause the number of available licenses to near depletion, the administrator would be alerted and have the opportunity to either order additional licenses or scale back the usage of the application.
3. Enable System Center Operations Manager Maintenance Mode This option allows integration between Configuration Manager 2012 and Operations Manager. By selecting this option, when a deployment begins on a client, and if the client is also an Operations Manager agent, the agent will be placed in maintenance mode. After the deployment completes, the Operations Manager agent will be triggered to exit maintenance mode.
4. Generate System Center Operations Manager Alert When A Software Installation Fails This option causes an alert be generated in Operations Manager to raise immediate awareness when the installation of an application fails.
Monitoring deployments with System Center 2012 R2 Operations Manager
Although Operations Manager maintenance mode is beyond the scope of our discussion, one thing does need to be mentioned. This option does not cause true Operations Manager maintenance mode to start. Instead, the Health Service on the Operations Manager agent is simply paused for the duration of the application deployment. Once deployment completes, the health service resumes from that point in time without accounting for any problems that might have happened during application deployment, such as a system reboot. This is an effective approach to suppress noise in Operations Manager but will not be reflected as maintenance mode in the Operations Manager console.
Updated Integration Feature
In Configuration Manager 2007, this maintenance mode integration was not reliable. Configuration Manager 2012 has been updated so that this integration works as intended, regardless of platform.
When you’ve finished with the settings on the Alerts page, click Next to continue to the Summary page. Review the settings on the Summary page. If they’re all acceptable, click Next to save the configuration and then exit the wizard.
Application Deployment—Client Experience
The ultimate goal of Application Deployment is to take action on Configuration Manager 2012 clients. The work described so far has built an application deployment, a deployment type, and a deployment. The current sample was configured to be available and was targeted to a collection of devices. The current configurations will simply make the application available for install in the Software Center on all targeted clients.
As configured, the application will not show up in the user-centric Application Catalog. Inclusion in the Application Catalog requires that the application be deployed to a collection of users or user groups. To make the sample Foxit Reader application also show as available in the Application Catalog, a second deployment needs to be added. The only difference for this deployment is that a collection of users will be chosen rather than systems. The new deployment is shown in Figure 8.39.
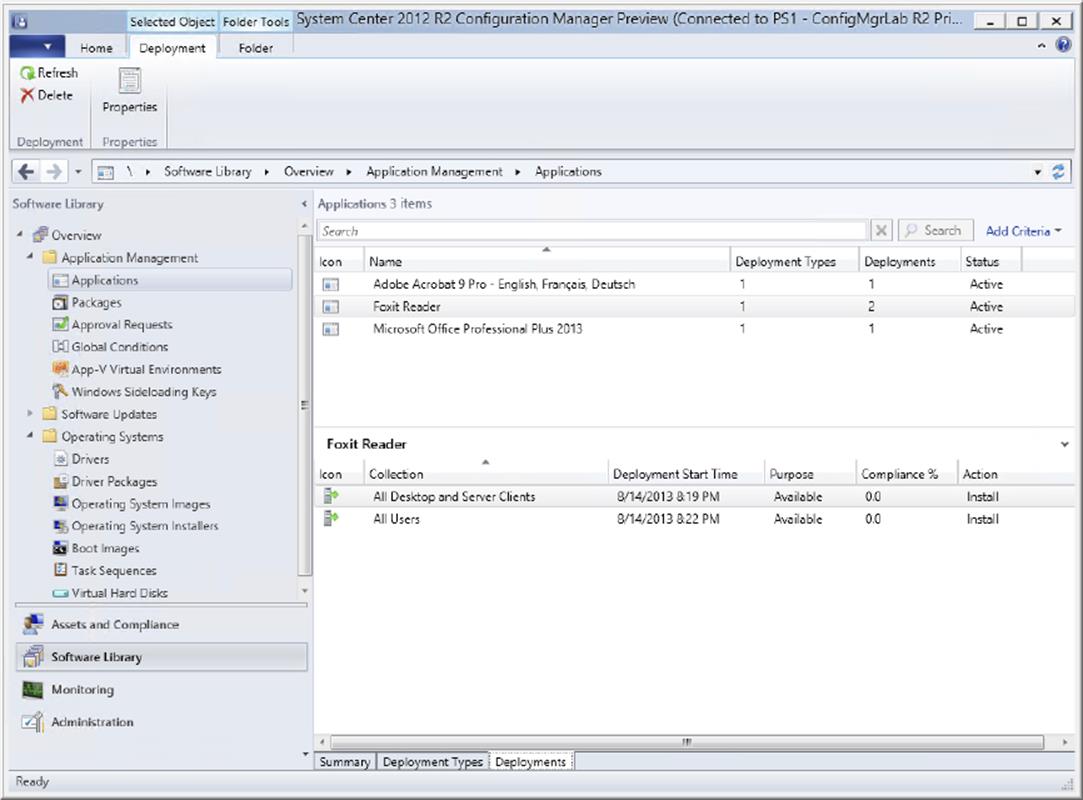
Figure 8.39 Second deployment added, targeted to a user collection
With the second deployment added, the application now shows as available in both the Software Center and the Application Catalog. Take a look at the way the applications are presented in both and the descriptive information that is available. Looking at Figure 8.19and Figure 8.20 you can see that the information you have supplied is presented in the Software Center in Figure 8.40 and the Application Catalog in Figure 8.41. It’s good to understand how these configurations map between the different components so that when you configure an application, the user will have meaningful and descriptive information to review.
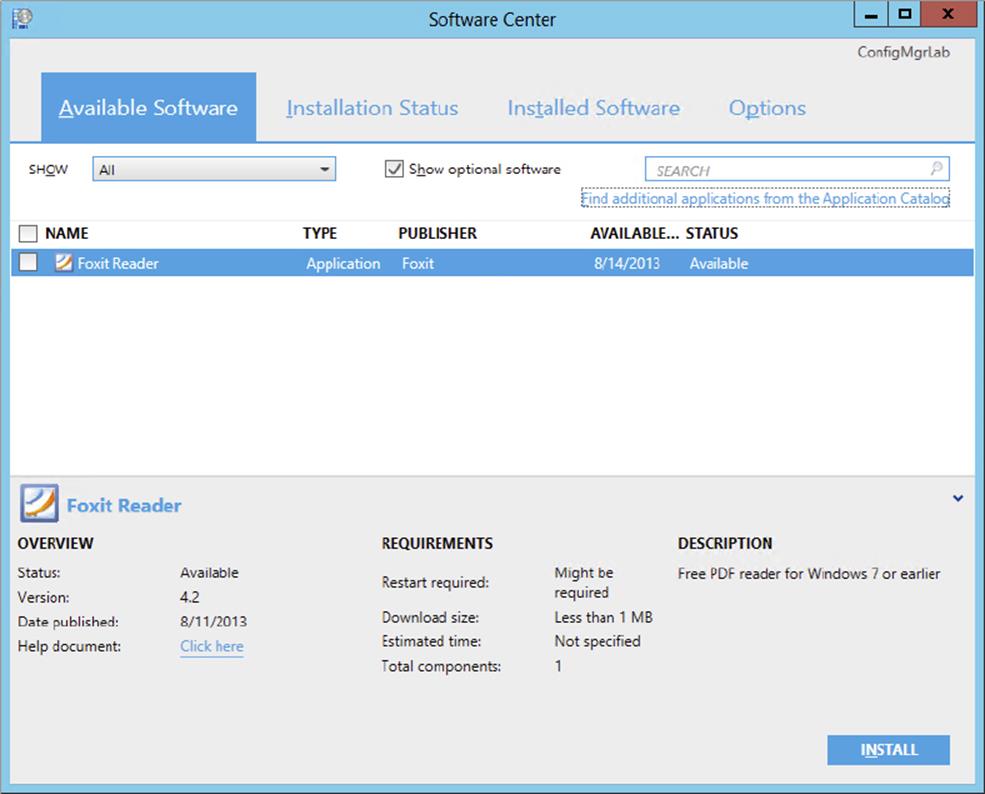
Figure 8.40 Foxit Reader 4.2 in the Software Center
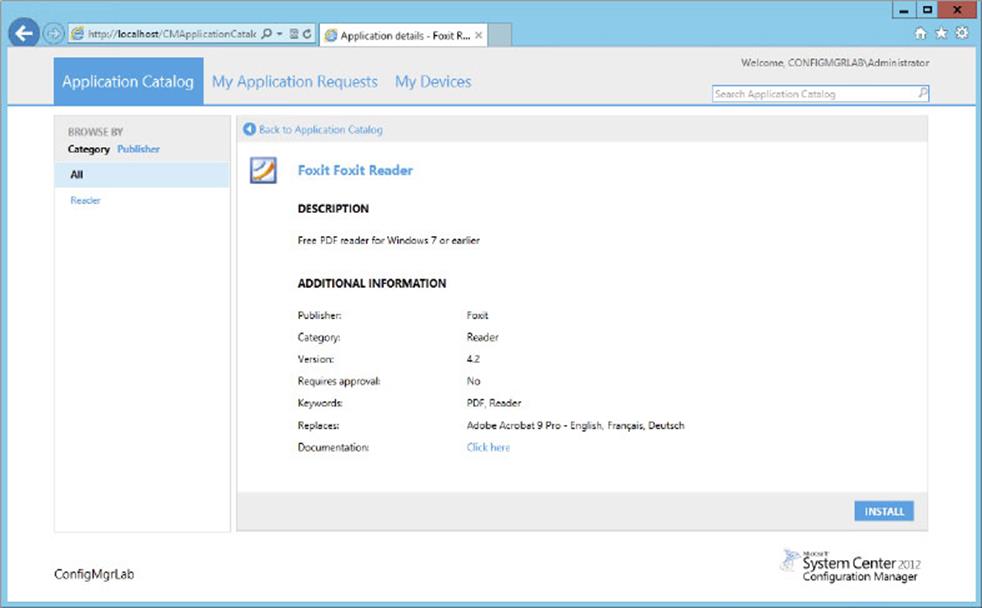
Figure 8.41 Foxit Reader 4.2 in the Application Catalog
Client Application Installation
When an application is configured to be required, it will be installed regardless of whether the user requests it in the Software Center or selects it in the Application Catalog. In some cases, applications may be marked as required but also as visible in the Software Center and Application Catalog, but that is not automatic. For applications that should be optional for the user, simply mark them as being available and, depending on other configurations such as requirements, they will appear for the user in the Software Center. If the application is targeted to a user collection, it will also appear in the Application Catalog.
Bottom line, the Software Center is available on each Configuration Manager 2012 client and allows the user to have control over at least some of their own experience with Configuration Manager 2012. As the name implies and as already discussed, the Software Center presents a list of applications to the user that are available for install, along with a good amount of potential detail to help the user understand the application. But the Software Center is more than just an application chooser. Click the Installed Software node, and you’ll see that it is also useful for tracking software that has been installed on the system historically.
The Options node, also part of Software Center and shown in Figure 8.42, allows users to specify their own work information and maintenance settings. Think of these settings as a user-controlled maintenance window. By specifying business hours, users are configuring their system so that they are not disrupted by application installs or system reboots in the middle of the day. Maintenance settings work with Work Information settings to specify when the computer will be available for software installations. Ultimately, the Configuration Manager 2012 administrator retains full control even at this level because, when necessary, application deployment can be configured to proceed regardless of the settings specified.
Figure 8.42 Software Center Options tab
Also available on the Options tab is the ability to configure local remote control settings and whether power management policy will apply to the system, but those topics are beyond the scope of software distribution, so we won’t discuss them here.
![]()
Application Deployment—Beyond the Lab
Stepping through creation of the sample application is enough to start the wheels turning about ways this new model could be used in production. There is tremendous flexibility in the new Application Deployment model, but don’t jump too far too fast. Spend time with the model and understand how things work before spinning up deployments in production. Remember, a lab environment is much more forgiving—and doesn’t result in the need to explain problems to management!
In addition, there are many layers to the Application Deployment model. Explore each layer completely—from the rules-based Requirements engine to the ability to link applications together, known as references, creating a tie between applications that is useful for application upgrade. There is also the ability to verify that prerequisites are in place before deploying a given application. And don’t forget a real gem of the new model, the ability to create multiple deployment types that can work with each other to detect information about the environment for the current deployment and deliver a version of the application best suited for each scenario; this includes deployments to devices, users, or both.
If you have trouble finding the right parameters for the setup of the application or the detection methods, a tool called Setup Commander can help you to create the deployment type with the right parameters and detection methods for lots of common software based on MSI setups and older legacy setups. Look for more information at www.setupcommander.com.
Application Deployment—Advanced Configurations
The steps just discussed demonstrated how to configure a basic application, deployment type, and deployment. These building blocks are pivotal to understanding the Configuration Manager 2012 Application Deployment model but in some ways just scratch the surface of what is possible. We’ve already mentioned several additional and more complex configurations but have not discussed them in any detail. This section takes a step back and reviews these additional configurations. With Application Deployment, all of the various configurations and options that are possible are simply too numerous to cover individually, but the hope is that with the discussion provided you will be able to see the possibilities, flexibility, and power available.
Supersedence
This example builds on the previous one by adding an additional deployment that is configured to deploy Adobe Acrobat 9 Pro. In this example the Configuration Manager admin must cut costs and replace the paid version of Adobe Acrobat 9 Pro with Foxit Reader, which is free. This introduces the first point of discussion: supersedence. In the definition of the application it is possible to configure a relationship where one application supersedes another application. This type of relationship is extremely valuable to maintain control of the application upgrade process and also to define how one application should operate during the upgrade process—but that’s jumping a bit too far ahead.
Configuring a supersedence relationship is easy. Simply do the following:
1. Open the properties of the application where a supersedence relationship is to be defined.
2. Click Browse.
3. Select the application that the current one should supersede, and then click OK.
The result is shown in Figure 8.43.
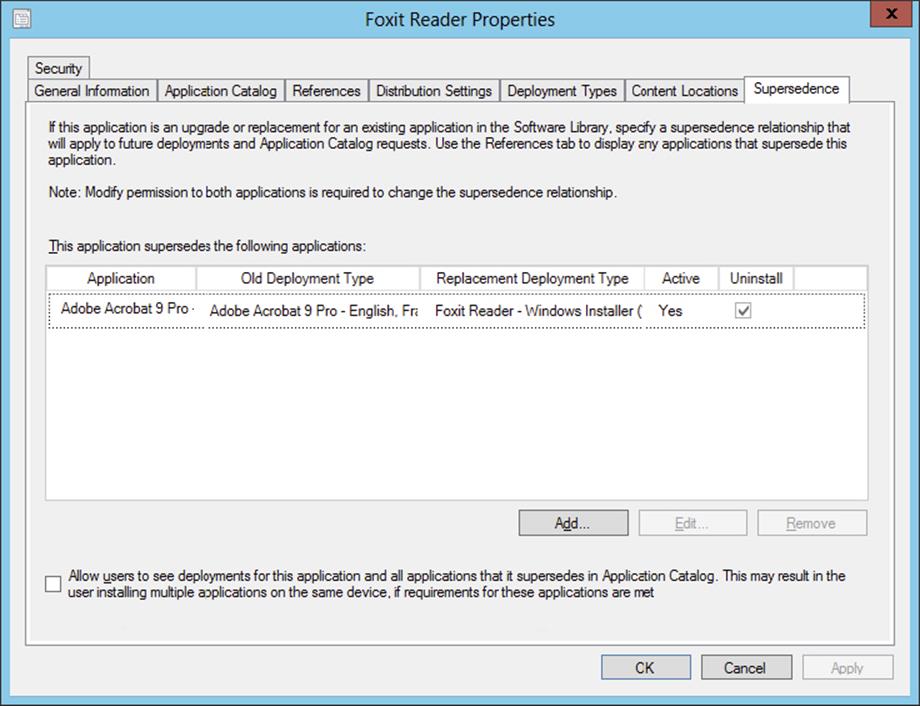
Figure 8.43 Supersedence relationship added to Foxit Reader application
Notice that when defining a supersedence relationship it is possible to specify whether the application being replaced should first be uninstalled. When selecting to uninstall an application, make sure that the uninstall command line setting for the previous application has been configured properly to accommodate the uninstall. A further configuration allows specifying which deployment type from the current application will be used during deployment.
To see the results of creating the supersedence relationship, simply look at the properties for the Adobe Acrobat 9 Pro application and select the References tab. There are three options for viewing data on this tab: Applications That Depend On This Application, Applications That Supersede This Application, and Virtual Environments That Contain This Application. For the current purpose, select the second option, which will show that the Foxit Reader application now supersedes the Adobe Acrobat 9 Pro application. This is shown in Figure 8.44.
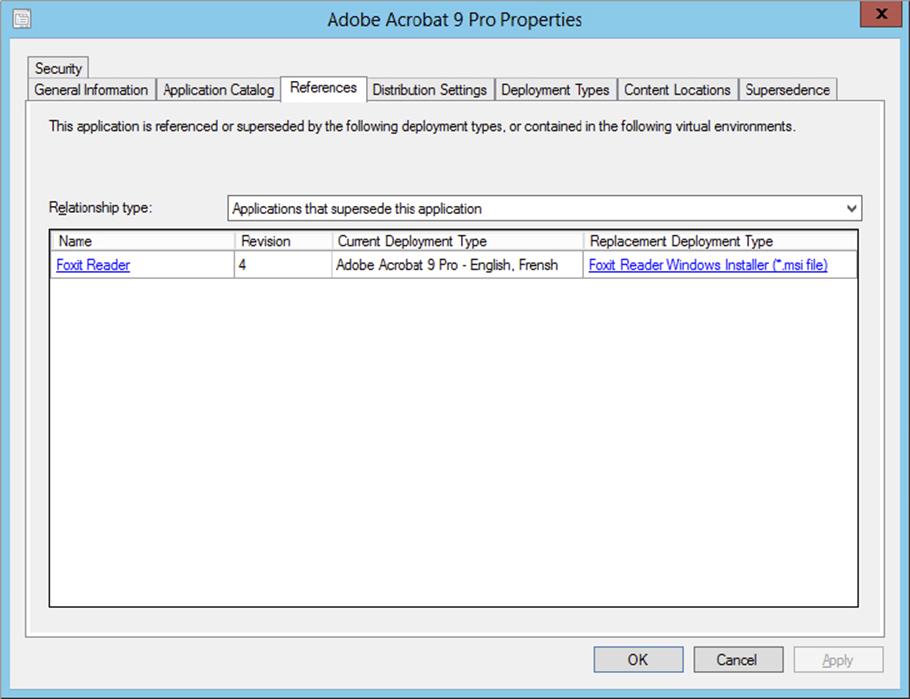
Figure 8.44 Supersedence reference
Dependencies
Going back to the deployment type for the sample Foxit Reader application, it’s time to configure a dependency. The dependency option specifically allows administrators to define software that must be installed before the current application can be deployed. The dependency option is not a vehicle to specify any other kind of requirement. As shown in Figure 8.45, the sample Foxit Reader application is configured to require that .NET Framework 2.0 be installed first. If this requirement isn’t met, and depending on the setting for the Automatically Install option, either the application installation will fail or the application installation will pause while .NET Framework installation completes.
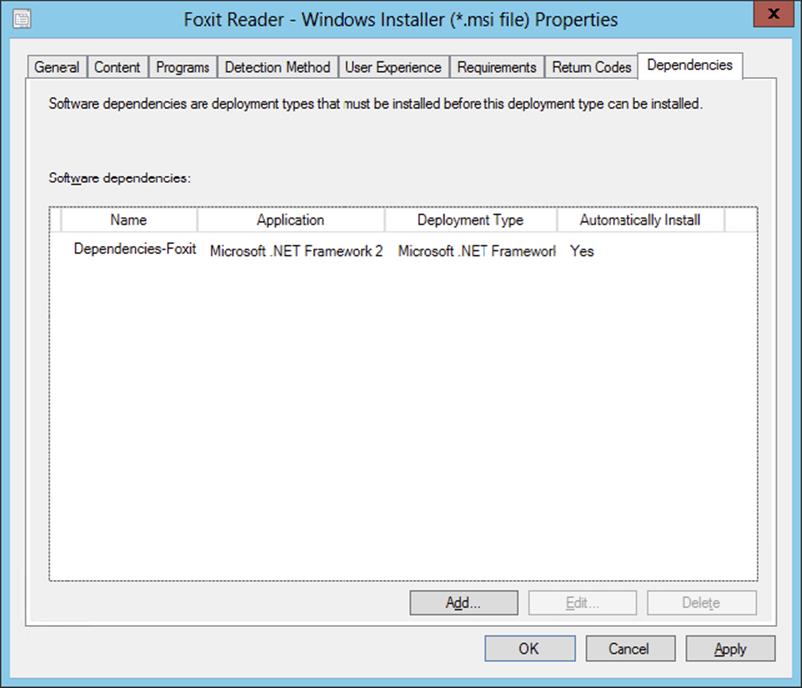
Figure 8.45 Dependency configuration
Detection Method
The ability to detect whether a dependency is installed or not depends on whether settings to do so are specified in the Detection Method tab for an application. Dependencies also allow administrators to configure potentially complex dependency relationships to ensure all needed applications are present before proceeding with a deployment.
Detections methods are also useful to determine whether a given application has already been deployed to a target system. If so, there is no need to deploy it again, and the application deployment will simply exit.
If a user, for instance, removed the application from the computer and the Application Deployment evaluation cycle detects that an application is not installed, the application will be installed (again).
You can create detection configurations to check the filesystem, a registry location or value, an MSI GUID, or a combination of these settings to determine if a given application is present. When you use the wizard to build an application deployment based on an MSI, as in the Foxit Reader example, the detection information is supplied by default. Figure 8.28, shown earlier, is a view of the Detection Method tab.
Besides the standard detection methods, custom PowerShell, JScript, or VBScript scripts can also be used to detect if an application is installed or not.
Requirements
When deploying an application, administrators may wish to specify rules to govern the application install. The Requirements tab of the deployment type allows deployment rules to be configured, from simple to complex. You can build rules to check attributes related to the device or user being targeted or build custom rules to cover most any scenario. The conditions that are available for both device and user-targeted applications are shown in Table 8.3.
Table 8.3: Rule options
|
Device |
User |
|
Active Directory site |
Primary device* |
|
Configuration Manager site |
|
|
CPU speed |
|
|
Disk space |
|
|
Number of processors |
|
|
Operating system |
|
|
Operating system language |
|
|
Organizational unit (OU) |
|
|
Ownership |
|
|
Total physical memory |
|
|
Windows Store inactive |
*The primary device and its use for application deployment will be discussed along with user affinity.
The mechanisms available for building custom rules are as follows:
1. Active Directory query
2. Assembly
3. Filesystem
4. IIS Metabase
5. Registry key
6. Registry value
7. Script
8. SQL query
9. WQL query
10.XPath query
As is noted by the combination of the rule options shown, literally any possible scenario can be covered by specifying the right type of rule.
For the sample Foxit Reader application, the only systems that should install it are those that run Windows 2008 or better and already have the superseded application, Adobe Acrobat 9 Pro, installed. Figure 8.46 shows the completed Requirements node, which details the checks that must pass before proceeding with application deployment.
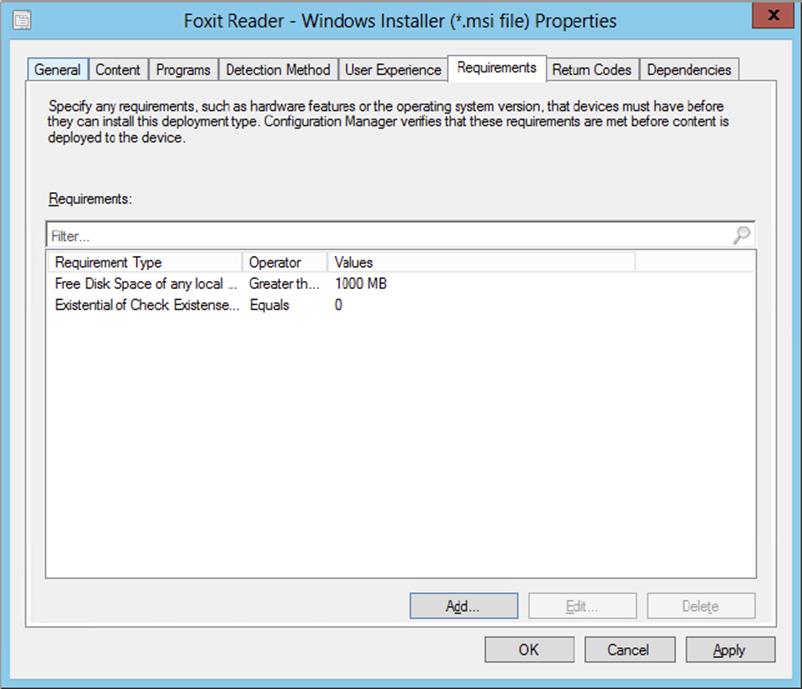
Figure 8.46 Requirements node completed
It’s interesting to note regarding the Requirements tab that when Configuration Manager 2012 clients receive notification of a new application and if that application has a list of requirements, those requirements will be evaluated upon receipt of the deployment policy, and if the requirements for deployment are not met, the application will not be displayed as available for deployment on the target system. Applications are evaluated periodically to determine if the conditions specified by the requirements have changed.
The rules available for use in the Requirements tab are visible in the Software Library ⇒ Overview ⇒ Application Management ⇒ Global Conditions node of the console. The list will also include any custom requirements that may be created. This is shown in Figure 8.47. Note that the custom global condition just created is stored in the list and selected.
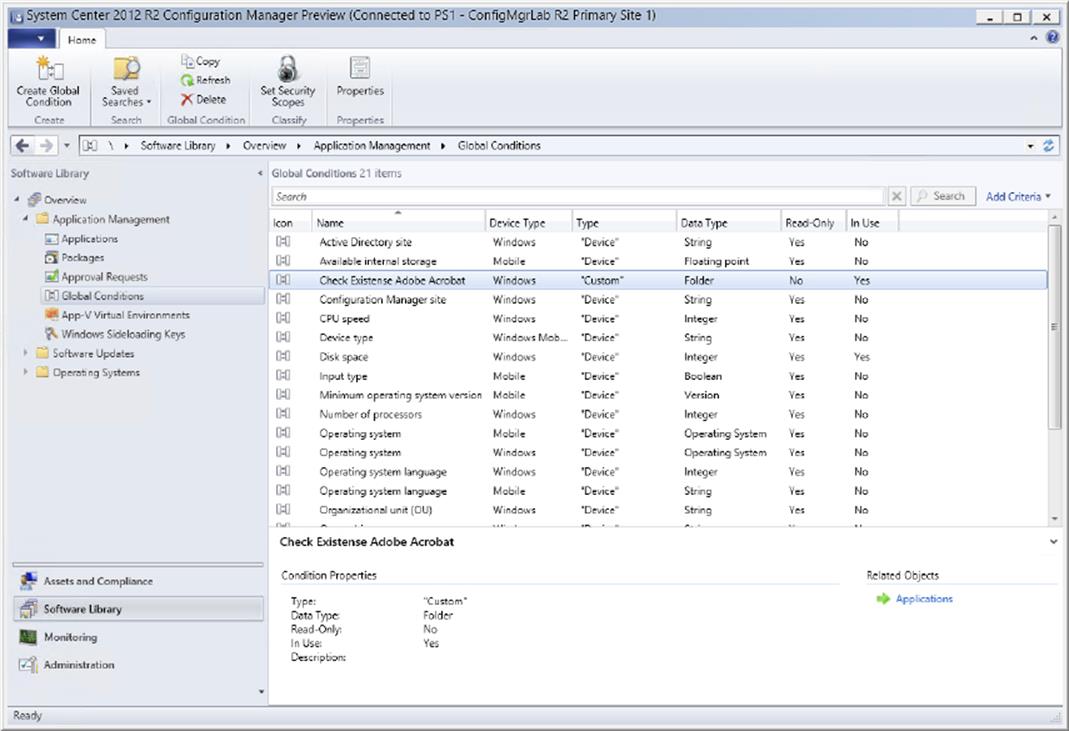
Figure 8.47 Global Conditions node
Global conditions can also be created from the node shown in Figure 8.47, when selecting the Create Global Condition option in the Home tab of the ribbon in the Configuration Manager 2012 console. The custom-created global conditions can be used in other applications throughout the hierarchy.
When retrieving the properties of the custom-created global condition, you can review the references and see in what application the global condition is used, as shown in Figure 8.48.
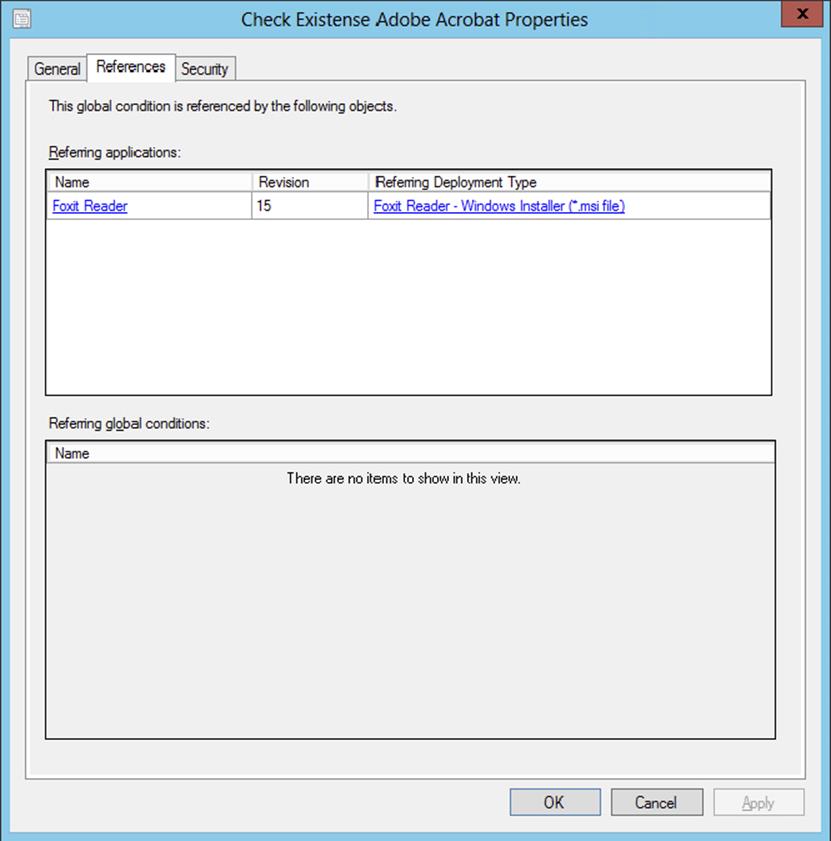
Figure 8.48 Reviewing the references of the Custom Global Condition
Deploying Applications Other Than MSI and Scripts
Not only MSI files, executables, or scripts can be deployed to users or devices. Configuration Manager 2012 R2 has more deployment types available. Since Chapter 16 is all about mobile device management, we focus here on the applications that can be deployed to Windows, Unix/Linux, or Mac OS X–based devices.
Application Virtualization 4.6/5
When you have sequenced an App-V 4.6 or App-V 5 application, you can deploy this application to devices depending on the requirement rules. Both App-V clients need to be deployed separately and are not included with Configuration Manager 2012.
In Configuration Manager 2012 you can create virtual environments for App-V 5. App-V applications in a virtual environment share the same filesystem and registry; this way the applications can interact with each other. You can create App-V virtual environments in the Software Library ⇒ Overview ⇒ Application Management ⇒ App-V Virtual Environments node of the console, as shown in Figure 8.49.
Figure 8.49 App-V virtual environment for Office 2010 and Visio 2010
Windows 8 Modern Applications
Deploying Windows 8 Modern applications for Windows 8.1 or Windows RT devices can be done in two different ways:
· Installing the application from the online Windows Store
· Installing the application from the distribution point, called sideloading the application
When you want to install an application from the online Windows Store, you need to install the application first on a Windows 8 reference computer. When selecting the Windows app in the Windows Store deployment type, you need to click Browse to be able to connect to the reference computer. Once you are connected, you should see a list like the one shown in Figure 8.50. Select the application you want and deploy it to your clients.

Figure 8.50 Select an application that is installed on the reference computer.
When you select the application from the Software Catalog you want to install, it will redirect you to the application in the Windows Store. You can install the application from the Windows Store.
To be able to sideload a Windows 8 line-of-business application, you need a trusted certificate to sign the application, since it is not signed by the Windows Store. This can be a trusted certificate from your own certificate authority or one from the trusted root CA such as VeriSign, GlobalSign, or Symantec. Using an external trusted root is a best practice.
You also need sideloading product activation keys for every device you want to sideload an application to. These keys can be acquired at the Microsoft Volume License website. Once you have the sideloading product activation keys, you need to add them to Configuration Manager. You can add these keys in the Software Library ⇒ Overview ⇒ Application Management ⇒ Windows Sideloading Keys node of the console. Click Create Sideloading Key to enable sideloading of applications for Windows RT, Windows RT 8.1, and Windows 8.1. This opens the Specify Sideloading Key dialog shown in Figure 8.51.
Figure 8.51 Adding sideloading keys
If you want to create and deploy a custom-developed application, you need to acquire a Microsoft developer license. Once you have the license, you can create a custom application, sign it, and sideload it via Configuration Manager.
Mac OS X
Configuration Manager 2012 supports the deployment of Mac OS X applications to the supported Mac OS X versions described in Chapter 2. Deploying an application to a Mac is somewhat different than deploying it to a Windows device using the new application model. Deploying the Mac OS X application is done with the new Mac OS X deployment type but has the following limitations:
· You need to first convert the Mac application package to a format that Configuration Manager 2012 recognizes and supports. You can convert the Mac application package with the CMAppUtil tool that comes with the Configuration Manager client for the Mac OS X platform.
· Applications cannot be deployed to users but only to devices. Predeploying software to the user’s primary device is not supported.
· Mac applications support simulated deployments, allowing you to test your requirement rules.
· Global conditions are not supported when you create deployment types for Mac OS X computers.
· All deployments must have a purpose of Required. There is no Software Center available for the Mac OS X.
· BITS is not supported on Mac computers. When a download of the content fails, the entire download will restart.
· Wake On LAN via the deployment is not supported on Mac computers.
The first step if you want to deploy an application to a Mac OS X computer is to convert the application to the Configuration Manager 2012–supported CMMAC format. The following application packages can be converted:
· Apple Disk Image (.dmg)
· Meta Package File (.mpkg)
· Mac OS X Installer Package (.pkg)
· Mac OS X Application (.app)
For example, we want to deploy Firefox, which comes in .dmg format (Firefox 23.dmg). The Configuration Manager 2012 client for the Mac includes the tool CMAppUtil. This tool can be found in the Tools folder after extracting the compressed file.
Running the following command will result in a Firefox23.0.cmmac file, as shown in Figure 8.52.
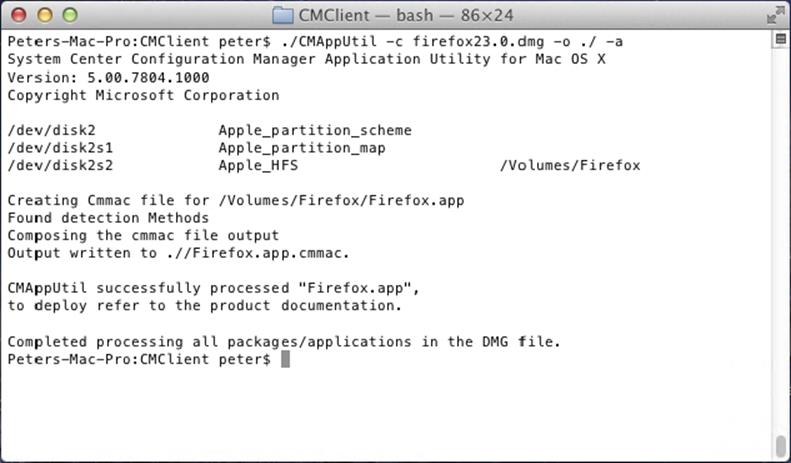
Figure 8.52 The DMG file is converted to a CMMAC file.
./CMAppUtil -c firefox23.0.dmg -o ./ -a
After you import the CMMAC file for Firefox, all the necessary information including the detection method is automatically configured. Figure 8.53 shows the detection method configured for detecting the application bundle org.mozilla.firefox version 23.0.
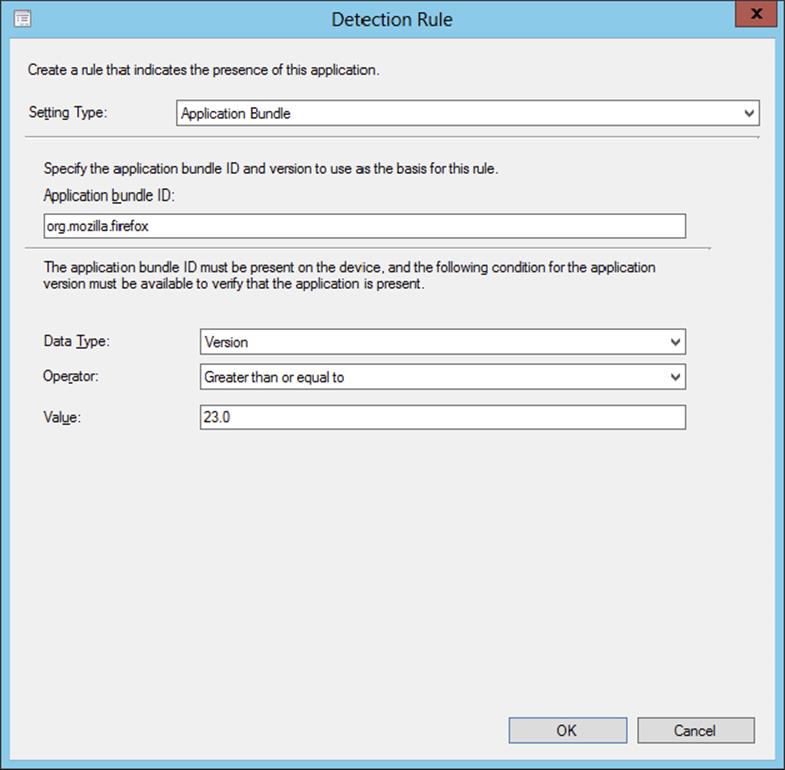
Figure 8.53 Detection method for a Mac OS X application
As mentioned, the application needs to be deployed to the Mac OS X device; it will be installed when the Configuration Manager 2012 client connects to the primary site.
Linux and Unix Applications
When you need to deploy an application to a Linux or Unix server, you will need the classic packages and programs instead of an application. With the classic packages you can deploy new software, operating system patches, and software updates for programs that are already installed on the server.
When deploying a Linux or Unix application to a server, you need to keep the following in mind:
· You should learn how to use and manage Linux or Unix, or you can ask the administrator of those servers to deliver the scripts that can be used to deploy the software or updates.
· You can run only native Linux and Unix commands.
· You can run only scripts that are already located on the Linux or Unix server.
· You can create a program for specific operating systems by selecting the option This Program Can Run Only On Specified Platforms, as shown in Figure 8.54.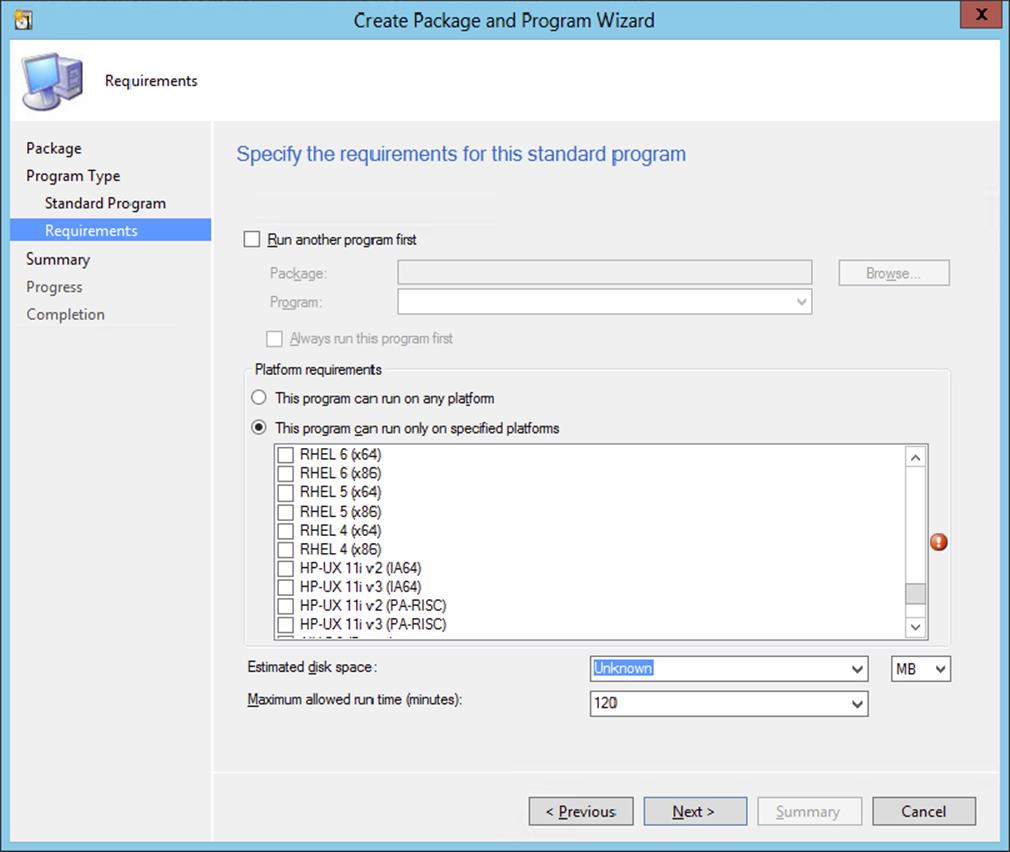
Figure 8.54 Select the platform for which the program is created.
· The Configuration Manager client for Linux and Unix does not support the deployment of scripts that make user environment configuration changes.
· The Network Access account is used to download the content from the distribution points.
· Only deployments with a Required purpose are supported.
· Include file types in the scripts that are supported on the destination operating systems.
Web Application
A web application is a link to a website; this deployment type installs a link on the device of the user.
User Device Affinity
As already described, the Application Deployment model in Configuration Manager 2012 is extremely flexible and provides administrators many options for delivering content. Configuration Manager 2012 provides flexibility in delivering applications to users so that users, regardless of what device they are using, will have a consistent experience. As an example, if a user is logged onto their primary device, then an application may be configured to be installed on the target system, whereas if a user is simply logged onto a shared computer, they may instead receive a virtualized copy of the application. If the user is logged onto a mobile device and a mobile version of an application is available, further options to accommodate software deployment are available there as well. Whatever the case, the user’s experience is that their required software is available, but the administrator has control over how the software is provided.
In order for a user to be properly detected as logged onto their primary device rather than a shared device, a mechanism must be in place to guide that decision. User Device Affinity settings provide that mechanism.
User Device Affinity allows a user to be associated with their primary device(s). User Device Affinity associations are configured in one of several ways:
· The user can configure that a device should be considered a primary device in the Application Catalog.
· The administrator can configure the My Devices option in the Application Catalog, shown in Figure 8.55.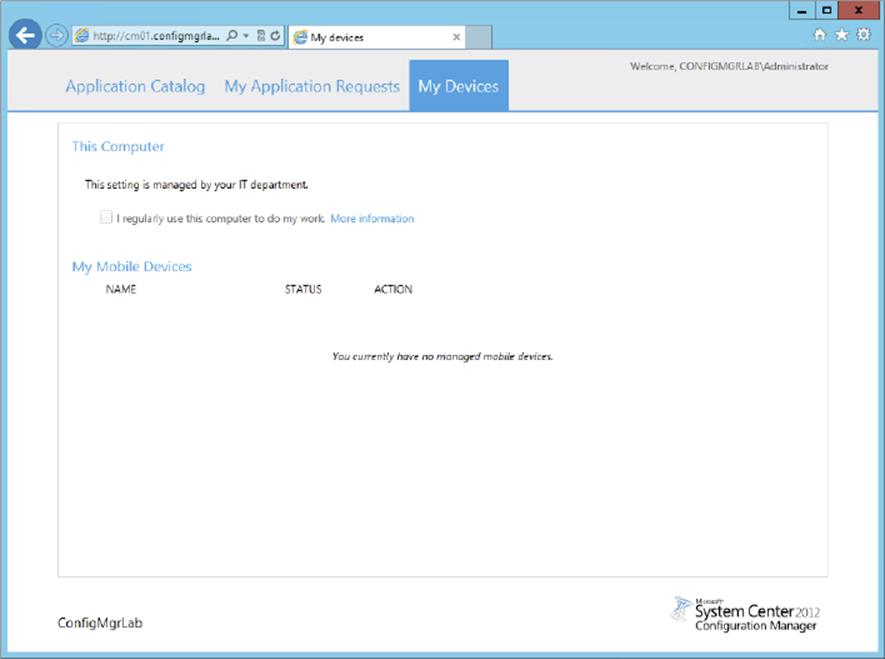
Figure 8.55 User-configurable Device Affinity option
· You can use a file to map a user to their primary device(s) and then import this file to Configuration Manager 2012.
· You can choose the option Import User Device Affinity settings, which is available in the Assets and Compliance node of the console. The Import User Device Affinity Wizard is shown in Figure 8.56.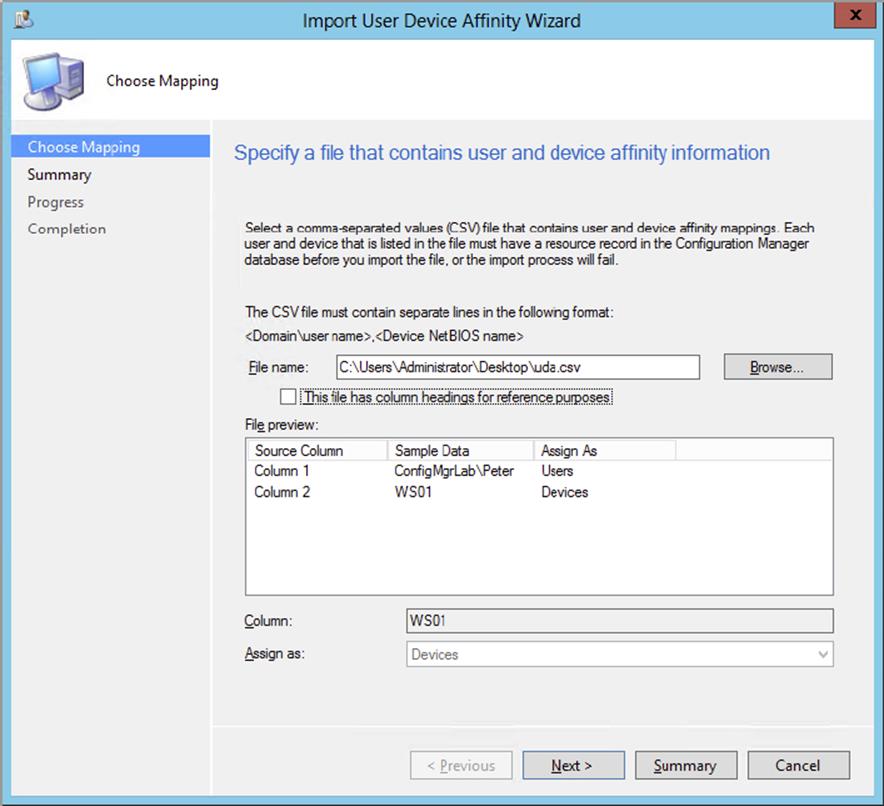
Figure 8.56 Import User Device Affinity Wizard screen
· You can configure Configuration Manager 2012 to automatically build user-to-primary device mappings based on information collected about devices used by a user. With this method administrators retain control over whether to automatically accept the detected settings.
· Configuration Manager 2012 can be configured to automatically detect primary device mappings through usage data, as shown in Figure 8.57. The default setting does not allow to automatically configure the user device affinity. Note that the required inventory class in the Hardware Inventory, SMS_SystemConsoleUsage, is enabled by default.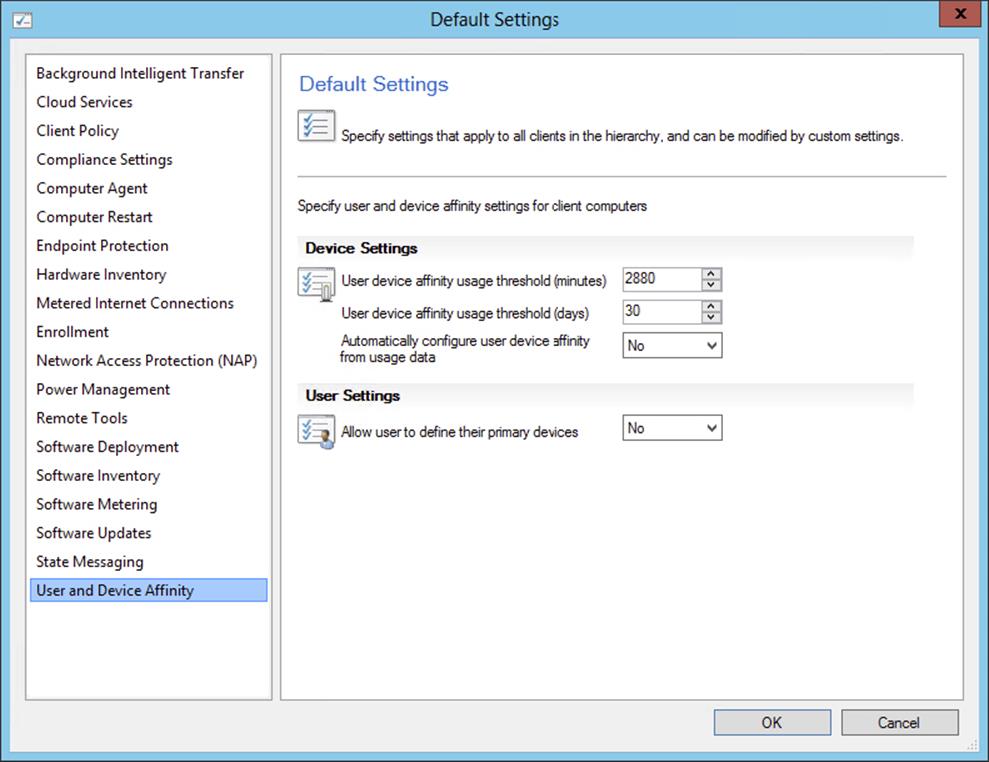
Figure 8.57 Configuring automatic user device affinity detection
· The Configuration Manager 2012 administrator can manually create relationships between users and device(s) by using the Edit Primary Devices node in the console. This is shown in Figure 8.58.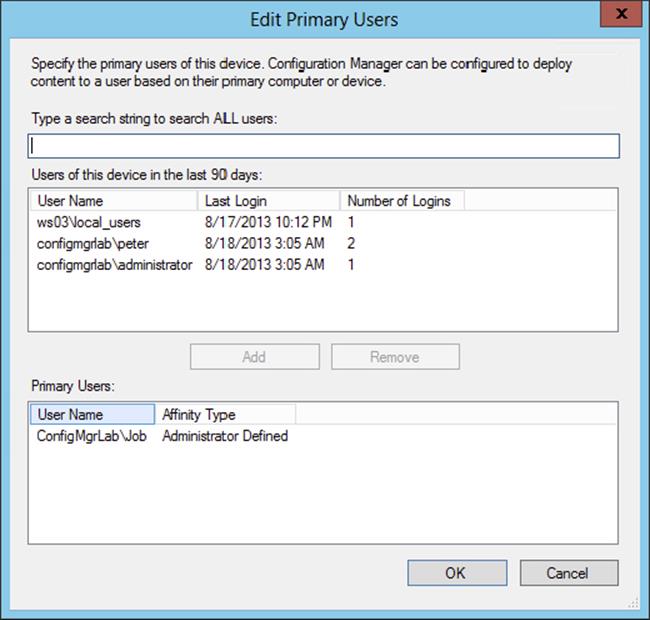
Figure 8.58 Edit Primary Users
· Specific to mobile devices, when a user enrolls a device, a relationship is automatically created between the user and the mobile device.
Also note that the User and Device Affinity settings are not limited to specifying one primary device per user. Very often a single user may have more than one primary device, such as a computer, as well as a mobile device. It’s also possible that a given device will be the primary device for multiple users, such as in a shared workstation scenario. Configuration Manager 2012 handles any of these device-to-user mapping scenarios.
Troubleshooting Application Deployment
With any product, in-depth troubleshooting requires a good understanding of the overall system to know where to look and common things that might go wrong. Configuration Manager 2012 is a large product with many moving parts, so understanding how to troubleshoot effectively comes with experience. The depth of troubleshooting attempted will depend on available time and your experience level with the system. The latter will grow over time. Chapter 19, “Troubleshooting,” discusses the troubleshooting options for Configuration Manager 2012 in general. It is useful to spend a few paragraphs discussing troubleshooting as it relates to Application Deployment. The intention here will be to augment the troubleshooting discussion from Chapter 19.
Monitoring
Configuration Manager 2012 is built to help administrators stay updated on the progress of various work and to flag when a problem is encountered; the Monitoring section of the console is designed specifically with that purpose in mind. Figure 8.59 shows the Deployments node of the Monitoring section.
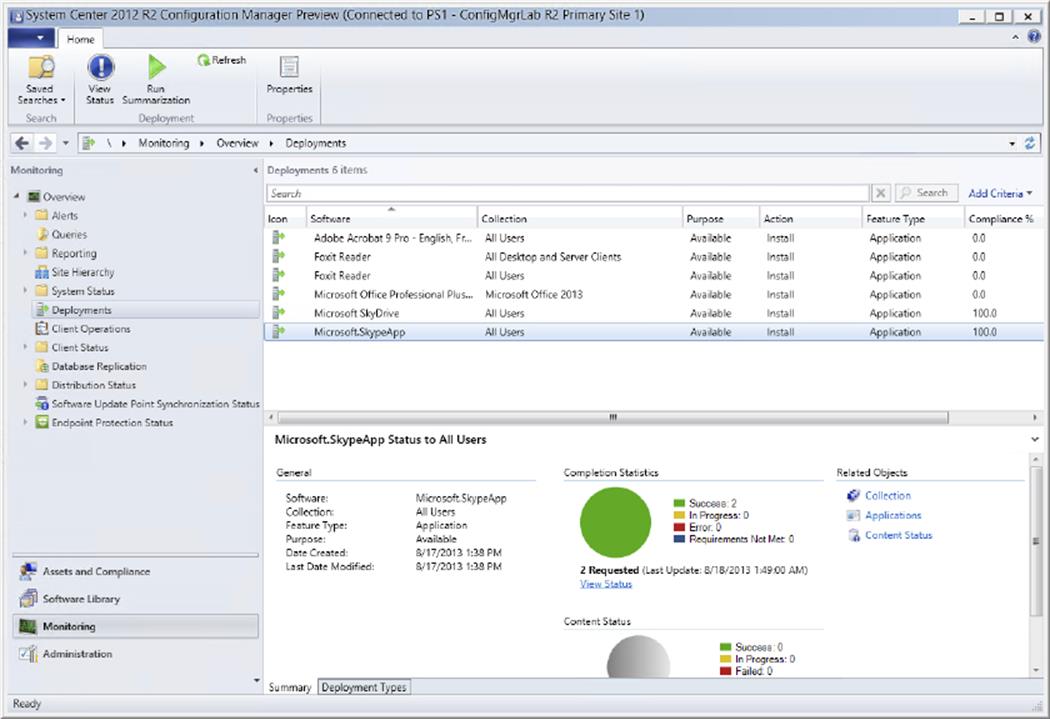
Figure 8.59 Deployments node of the Monitoring section
The Deployments node allows administrators to see at a glance the progress of deployments in the environment. The top section of the screen is just a summary. Note that the sample Foxit Reader deployment is listed twice, one instance being the deployment targeted to users and the other instance targeted to systems. In this node it might be possible that a given deployment is shown as 100 percent compliant, yet no systems may have attempted to run the Foxit Reader application yet. Why might that be the case? In this case, compliance reflects that 100 percent of the targeted systems have accepted the deployment and reported back with a status.
This would mean that the systems reporting back have evaluated the deployment and found it to fail the deployment validation—so status is reported back but no install is attempted. Taking this type of logic further, consider if this application had been delivered to a collection with six systems, but we receive status back for only two. Does that mean the other four are having issues? Maybe but not necessarily. If the application requirements exclude deployment to the other four systems, then they won’t even show up. Remember what was mentioned earlier about how it is feasible to deploy everything to the All Systems collection provided sufficient requirements are in place for an application? This is an example of how that would work. To restate, deploying to the All Systems collection is not recommended, but it would be possible.
From the Summary view it is also possible to review the target collection, the state of the software, and the status of deployed content (see Figure 8.60).

Figure 8.60 Deployment status
Deployment Status
The information available here is critical for understanding the actual state of a deployment. If a deployment has been configured but is not showing up on targeted systems, your initial thought might be that something isn’t working right. That may be, but more likely the problem is not with the system but with some configuration. In this case, the deployment arrived at the client, failed requirement evaluation, and simply wasn’t made available. The pie chart (Figure 8.60) and detail data lead right to the problem. Without them, an administrator would need to look elsewhere for the source of the problem.
Log Files
Configuration Manager 2012 provides an extensive set of log files to aid administrators in troubleshooting scenarios. The information provided by the log files is significant, but even more detail is possible if you configure verbose or debug logging (covered in Chapter 19).
Logs in Configuration Manager 2012 are very beneficial for experienced administrators to quickly pinpoint a problem. For beginning administrators, though, the logs may be intimidating. Experience will help increase your comfort level with logs. A few suggestions will help keep things on track:
· Determine which logs to review.
Configuration Manager 2012 processes generally can be broken into processing that happens on the server and processing that happens on the client. The management point is in the middle and can have elements that interact with both the server and the client. The place to start reviewing log information depends on where the processing problem seems to be happening: server side or client side.
· Be patient.
The logging system in Configuration Manager 2012 is extensive, and finding the right log to review at first might be challenging. Many different Configuration Manager 2012 client components are required when trying to process an application deployment. These components pass information back and forth as the work gets done. With experience it becomes easier to know which log to start with, and it’s well worth learning. Never fear though; if it gets too time consuming to dig through the information provided, Microsoft support is just a phone call away.
· Watch the time stamp.
Following data in the log files boils down to following the time stamps. As logs update, their time stamps do too. A quick look at which logs have been active recently will help you identify logs that might be good candidates for review after an action is attempted and a failure encountered.
· Use CMTrace.
The log files are viewable with Notepad, but it’s definitely not the best environment. The CMTrace utility (formerly known as Trace32) available in Configuration Manager is perfect for viewing Configuration Manager logs—and many other types of text logs as well. Trace includes an error-lookup capability, the ability to filter by keyword or processing thread, the ability to merge log files to view the entire conversation between components (remember the time stamp discussion?), and so on. The utility has been updated for Configuration Manager 2012.
The Bottom Line
1. Explain the options available for Application Deployment. The new Application Deployment model is a significant and welcome change for deploying software in the enterprise. There are many new components including a rules-based Requirements engine, the ability to detect whether the application is already installed, the option to configure application dependencies and relationships, and more.
1. Master It List several configuration options available for applications and deployment types.
2. Detail the various components required for Application Deployment. Success with Application Deployment requires that several other Configuration Manager 2012 components be available and properly configured. The list includes management point(s), distribution point(s), IIS, BITS, the client itself, and possibly more.
1. Master It List the components required for configuring an application deployment.
3. Understand the role of and manage distribution points. The role of distribution points has not changed significantly in that this is the role that makes content available to Configuration Manager 2012 devices and users. The options available for implementing the role have changed significantly with the inclusion of throttling control content flow from site server to remote distribution points, the single-instance storage approach for placing content on distribution points, the ability to detect content corruption, and the requirement that all distribution points be BITS enabled.
1. Master It Discuss the differences between implementing a distribution point role on the site server locally and remotely.
All materials on the site are licensed Creative Commons Attribution-Sharealike 3.0 Unported CC BY-SA 3.0 & GNU Free Documentation License (GFDL)
If you are the copyright holder of any material contained on our site and intend to remove it, please contact our site administrator for approval.
© 2016-2026 All site design rights belong to S.Y.A.