Windows 10. Absolute Beginner’s Guide (2016)
Part I: Getting Started
1. Meet Windows 10
In This Chapter
• What’s New in Windows 10
• Starting Up Windows 10
• Signing In to Windows 10
• Introducing the Start Menu
• Exiting Windows
Windows 10 brings several new and exciting features that are covered in detail throughout this book. A few of these features are mentioned here in the first chapter, and I’ll point you to chapters that discuss these in more detail. Whether you’re a new computer user or a veteran, this chapter is all part of getting to know Windows 10.
If you just brought home a new computer with Windows 10 preinstalled, or if your computer has been upgraded to Windows 10, maybe you’re thinking, “Now what?” The obvious answer is to power up your computer and sign in. If you’re making the jump to Windows 10 from Windows 7 or an even older version of Windows, you’ll notice this process is quite a bit different from what you’re used to. If you have been stuck with Windows 8 and are worried whether Windows 10 will be a good experience, stop worrying; Windows 10 will make you wonder why you stayed with Windows 8 as long as you did.
If you haven’t used Windows before, the start-up process can seem even more complicated. For these reasons, this chapter walks you through the steps necessary to start your computer and then sign in to Windows.
What’s New in Windows 10
Windows 10 improves on and introduces numerous features to make your computing life easier and more productive. Following is a list of important new features and the chapters where these are covered in greater detail:
• Start menu—The Start screen was introduced in Windows 8, and it quickly polarized long-time Windows users with its new-fangled navigation interface. Windows 10 has created a more flexible interface with the Start menu that still has colorful live tiles and a highly customizable layout. The Start menu is first shown later in this chapter and then examined in detail in Chapter 3, “Optimizing the Start Menu.”
• Cortana—Cortana is the personal assistant that is integrated into Windows 10. You can interact with Cortana using voice or keyboard commands. Use Cortana when searching for data on your device or out on the Web. Cortana is designed to learn about you so it can be an efficient personal assistant. Cortana is considered in detail in Chapter 9, “Using Search and Cortana.”
• Microsoft Edge—Microsoft has re-created the web browser to create a faster and more stable browser that works well with modern websites and adds new capabilities to the browsing experience. Microsoft Edge is covered in detail in Chapter 14, “Browsing the Web.”
• Action Center—Notifications are an important feature in today’s interconnected world. Windows uses the new Action Center, shown in Figure 1.1, to keep notifications and other tools highly available in one place. The Action Center is discussed in Chapter 6, “Finding Your Way Around the Windows Desktop.”
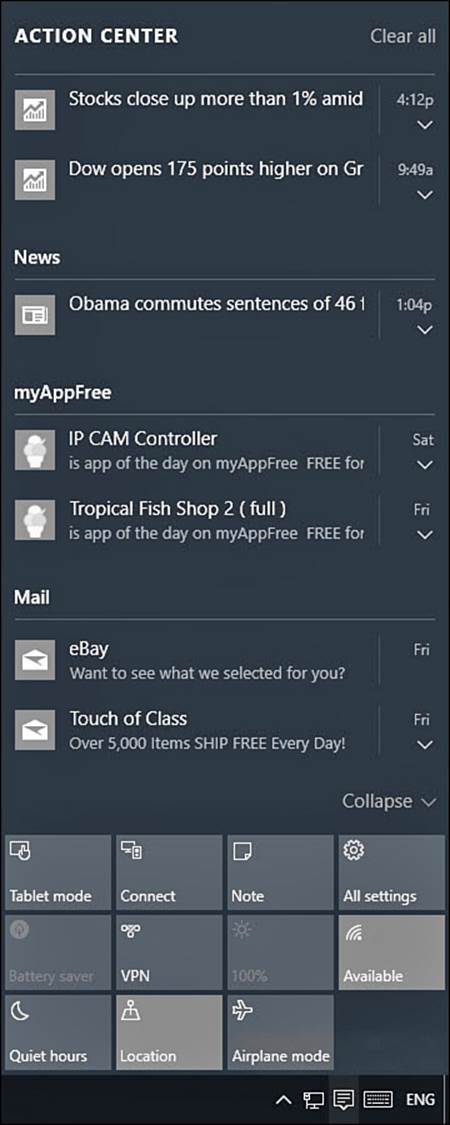
FIGURE 1.1 The Action Center is a one-stop location for notifications and important system tools.
• Continuum—Continuum is the name Microsoft uses to refer to the dynamic ability that allows a device to automatically switch between desktop and tablet mode. The layout is altered to make touch or mouse interaction more efficient. This enables devices like tablets with keyboards to jump from one mode to the other when a keyboard is removed or deactivated. This feature is examined in Chapter 2, “Interacting with Windows.”
• Task View—Task View is a new feature to Windows 10. It allows a computer user to organize virtual desktops that fit different tasks. For example, one desktop might have applications running for business tasks while another has email and news apps running. You can jump between these desktops easily without wishing you had a bigger display. Task View is covered in Chapter 6.
• OneDrive—OneDrive is by no means a new feature. It was integrated into Windows 8 (with the name SkyDrive at the time), and it is even available to Apple and Android devices. However, its integration might be new to many Windows users moving from older systems, and its value is hard to overemphasize. OneDrive is covered in Chapter 22, “Working with OneDrive.”
There are of course more new features that are less visible and many updates to apps that might get you excited or make you feel a bit lost. In either case, we’ll consider these throughout this book as you continue to get familiar with Windows 10.
Starting Up Windows
Before you start up Windows 10 for the first time, there are a few things you should keep in mind:
• If someone other than you installed Windows 10, check with that person for the user ID and password you should use. Be sure to ask whether a local account or a Microsoft account was used. You’ll learn more about these two account types and how to set them up in Chapter 19, “Sharing Your Windows Computer with Others.”
• If you sign in to Windows 10 for the first time at your place of business, check with a person from your IT or support organization for your user ID and password, and if required, your domain. The domain identifies what part of the corporate network you log in to. If your computer has been upgraded to Windows 10, your user ID, password, and domain are probably the same as you used previously.
• If you are upgrading or starting up a new personal Windows 10 device for the first time, you will be asked to set up the device and sign in with an existing Microsoft account as the recommended sign-in option. A Microsoft account is an email address and a password that Microsoft can authenticate. You can choose to create a local account as well, although this option is not immediately offered. While creating these accounts is considered in this chapter, Chapter 19 discusses the use of these two account types in more detail. Keep in mind that an Internet connection will be needed to log in with a Microsoft account for the first time.
When you boot up your device, you either will be prompted to sign in with an existing account that has been set up previously or will be creating a new account for the first time on a new computer. Both possible situations are considered in the following sections. With these login options in mind, go ahead and boot up your Windows 10 computer.
 Note
Note
If you’re wondering if “signing in” is the same as “logging in,” you are correct. Microsoft has adopted the term “signing in” to describe that process to identify one’s self to Windows.
Signing In with an Existing Microsoft or Local Account
When you sign in to a Windows 10 device that has been set up previously, you will need to know the password or sign-in method that was set up for you. If you already have an existing Microsoft account, you should already have a password in place and be able to log right in. However, if you’re working with an existing local account or one that someone else has set up for you, be sure to ask the person who did set up Windows what kind of password your account uses.
Beside a traditional password, Windows 10 allows for a few alternative sign-in methods depending on security settings and the device hardware. For example, some devices can now use biometrics by scanning fingerprints or a camera equipped for facial recognition; this is part of a new feature called Windows Hello. Two common alternative sign-in options can be later specified for sign-in: PIN and Picture Password. Besides saving you the repetitive stress of entering your password, these two options offer a lot of flexibility to determine how to access your user account:
• PIN—A PIN is a four-digit number you use to identify yourself when you sign in to Windows. A PIN is particularly useful to tablet users who normally do not have a physical keyboard.
• Picture Password—A picture password is a combination of a picture and touch gestures. To define a picture password, choose a picture from your Pictures folder and then make three gestures: you can choose to tap or draw lines or circles. Windows records the position of the gestures, their length, and the order in which you make them.
For information on setting up one of these two options, refer to Chapter 19. Examples of these two options are shown in this section.
With your account name and password in hand, follow these steps to sign in to Windows:
1. You can sign in to Windows by opening the Lock screen, sometimes referred to as the Welcome screen, as shown in Figure 1.2. The picture in your Lock screen might be different from the one shown here, but you can tell you’re in the right place if you see the time and date superimposed on your picture. You actually can choose your Lock screen or allow Microsoft Spotlight to update your Lock screen images (default). Microsoft Spotlight will also provide additional tips that will appear now and then right on the Lock screen. To set up your Lock screen, see Chapter 8, “Tweaking Windows to Reflect Your Personality.”

FIGURE 1.2 The Lock screen appears when Windows is locked, which automatically occurs if you do not enter your user ID and password promptly or have a period of inactivity.
2. From the Lock screen, swipe up, tap the spacebar, or click once on the screen. Any of these three gestures reveals the sign-in screen.
3. Select your account and username if more than one account appears (see Figure 1.3). If your portrait is the only portrait on the screen, skip this step and continue with step 4.
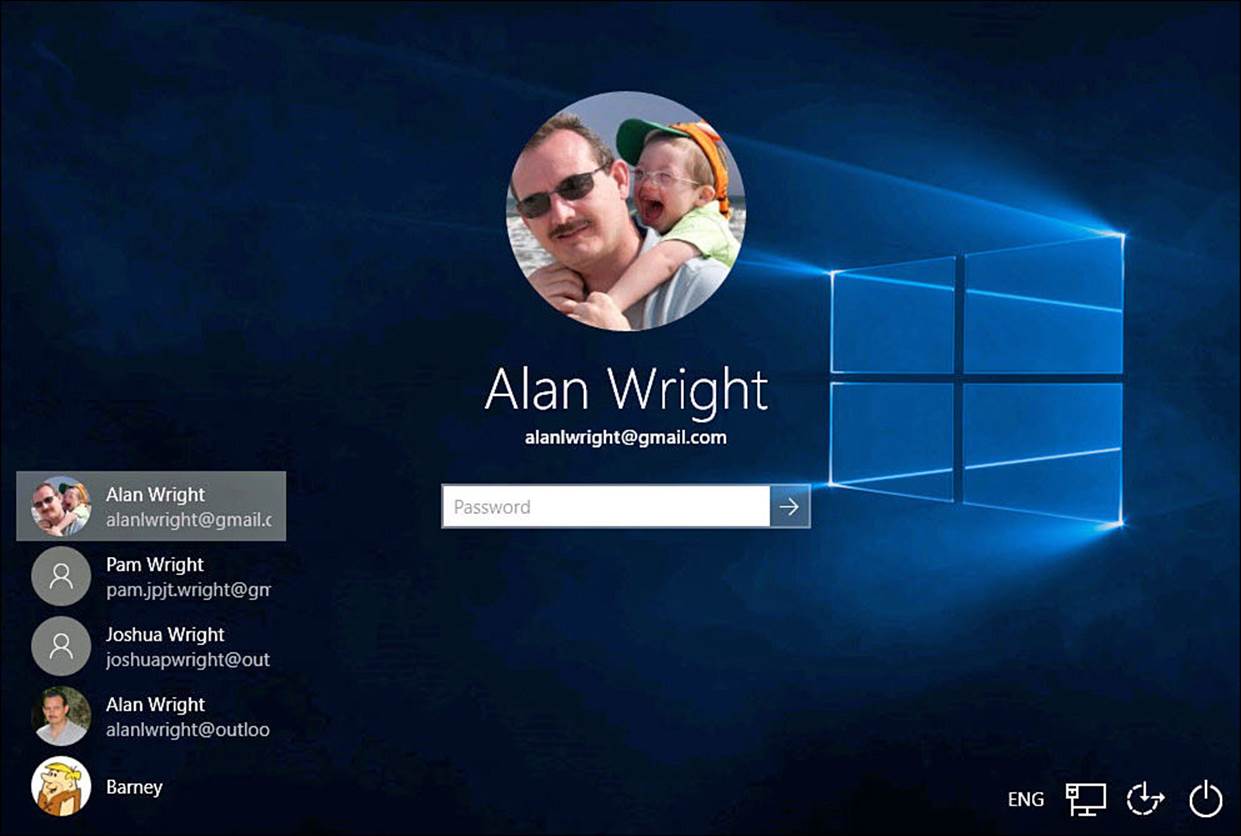
FIGURE 1.3 Select your account to sign in.
4. Your account should appear alone on the screen. From there, how you sign in depends on the type of password protection you have and the last method that was used. If more than one method is available, you can change options by selecting from the Sign-in Options icons shown below the password field. Alternative options are represented by icons. Select an alternative to use that method:
• To sign in with a conventional password, enter it into the Password box and press Enter. If you want to verify you entered your password correctly, tap and hold or click and hold the eye-shaped icon near the end of the Password box, as shown in Figure 1.4.
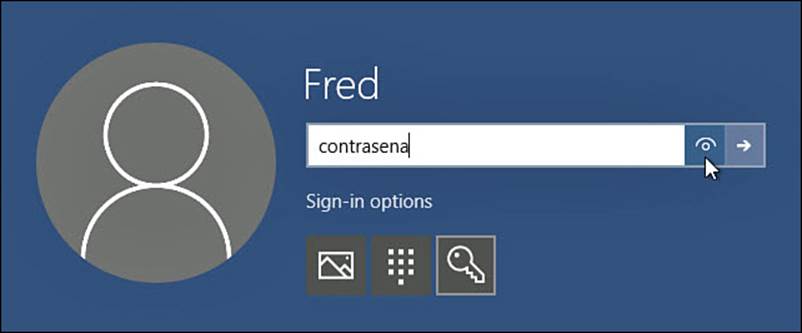
FIGURE 1.4 You can check that you entered your password accurately.
• To sign in with your PIN, enter its four digits. Note that you will be signed in immediately after correctly entering the last digit of your PIN.
• If you used your picture password the last time you signed in, a screen like the one shown in Figure 1.5 appears. (Your picture will be different from the one shown here.) Make your three gestures on the picture. If you successfully make the three gestures, you are signed in.
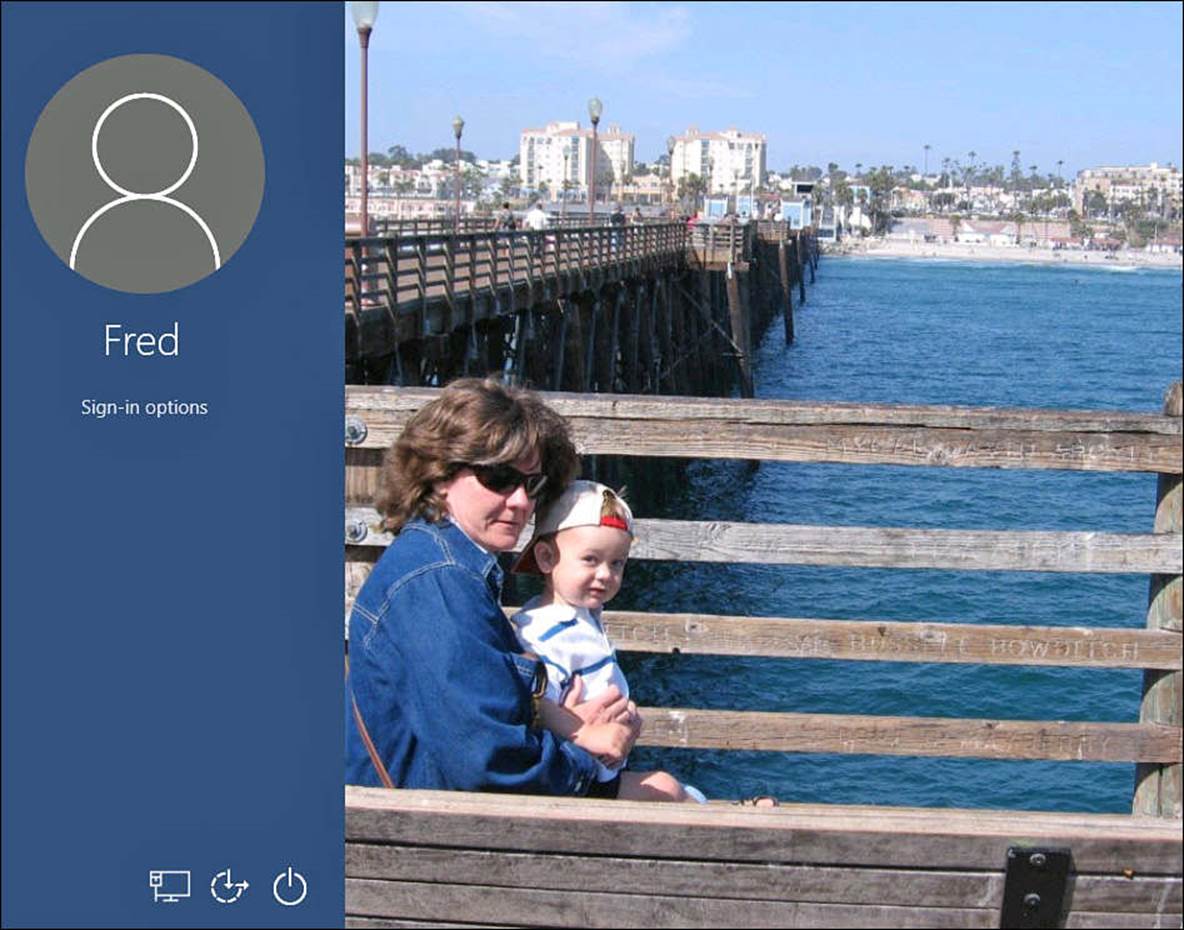
FIGURE 1.5 The Picture Password screen appears if you last signed in using your picture password.
5. If this is the first time this account is logging in to the device, you will be met with a series of colored status screens as Windows creates a new profile on the device for your account.
 Note
Note
If you made a mistake signing in with a picture password, Windows 10 prompts you to try again. Select OK and (more accurately) make your three touch gestures on the picture. To redo the gestures before Windows prompts you, select Start Over.
Signing In to a New Windows 10 Device
When you sign in to a Windows 10 device that has never been set up, you will be guided through the setup process with a series of screens that offer you options. During this setup process you either will sign in with an existing online account (such as a Microsoft account) that has been set up previously or will be creating a new account. Both scenarios are considered in this section.
When purchasing a new device, you will need to create a user account the first time you sign in. I recommend that you create a Microsoft account if you do not already have one. There are several advantages that you will enjoy when connected to the Internet. It is also possible that you need or prefer a local account. For details on these two account types, see Chapter 19. Both of these account types can be created easily when signing in by following these steps:
1. When first powering up a new device, you are greeted with a “Hi There” and prompted to set up the device with regional settings as shown in Figure 1.6. Indicate your choices and select Next.
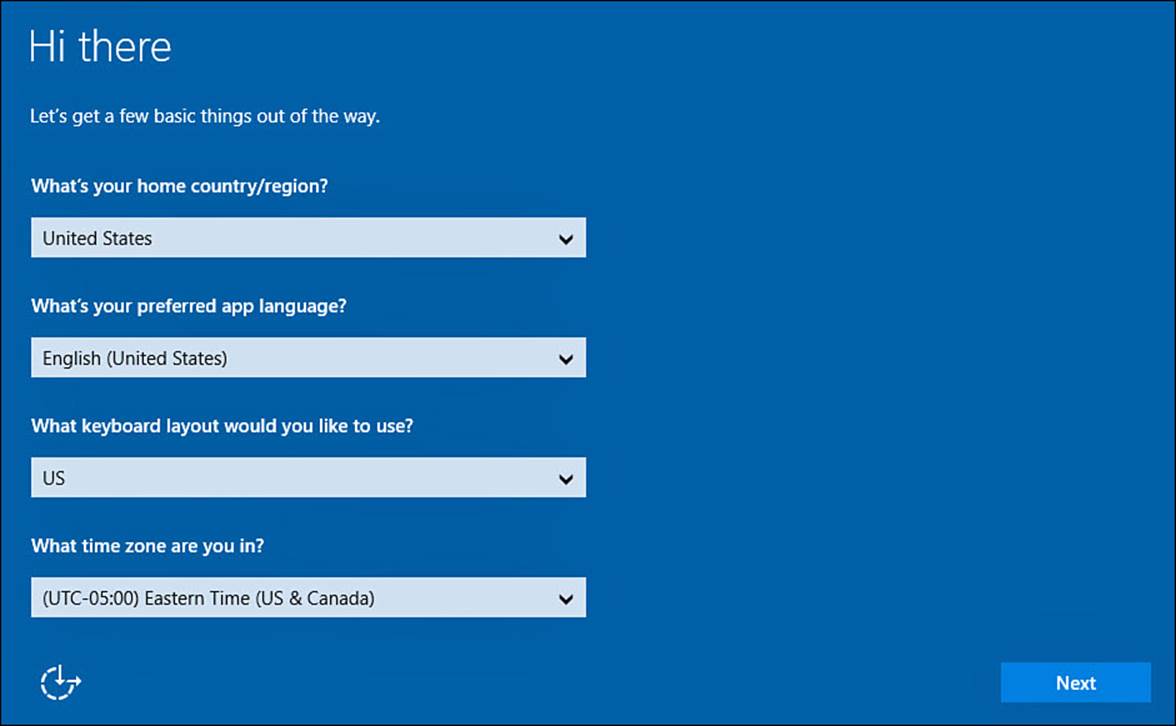
FIGURE 1.6 Set up a new device by first selecting your regional and language preferences.
2. Accept the Microsoft license terms to proceed.
3. As shown in Figure 1.7, Windows offers you a choice of Express settings or you may select Custom Settings to go through the default settings. (I recommend that you at least look through the Custom settings.) To proceed with the defaults, select Use Express Settings. Express settings are set to do the following:
• Send speech, typing, and ink input data to Microsoft to improve the response of input methods
• Send data to improve input recognition and suggestions
• Allow apps to use your advertising ID for more targeted advertising
• Allow apps to access location information and location history
• Enable SmartScreen for safer web browsing (this is a good option to keep enabled)
• Send browsing history to Microsoft to enable page prediction
• Automatically connect to suggested hot spots
• Automatically connect to networks shared by contacts
• Send problem reports to Microsoft
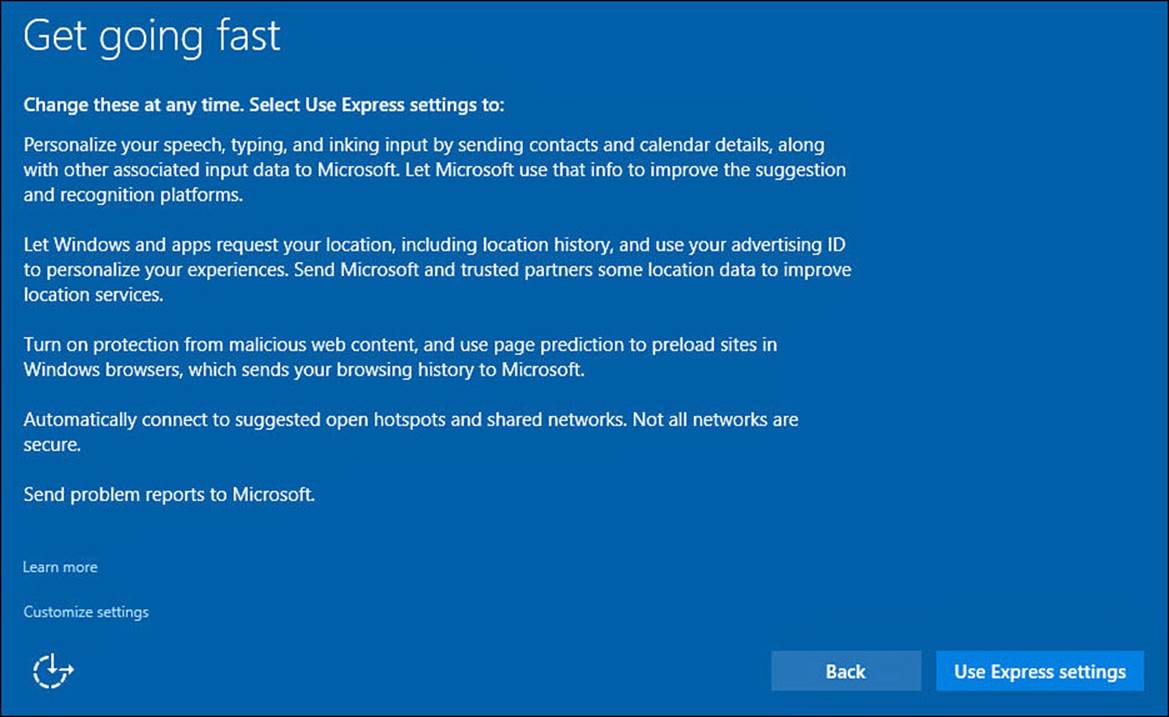
FIGURE 1.7 Start setting up your computer quickly with express settings, or feel free to look through the custom settings.
4. You are next asked if this is your PC or if it belongs to your organization as shown in Figure 1.8. Because organizations can enable certain features and they might use their own cloud account for improved security, be sure to check with your IT department for direction here. If this is your PC, go ahead and select I Do and then select Next.
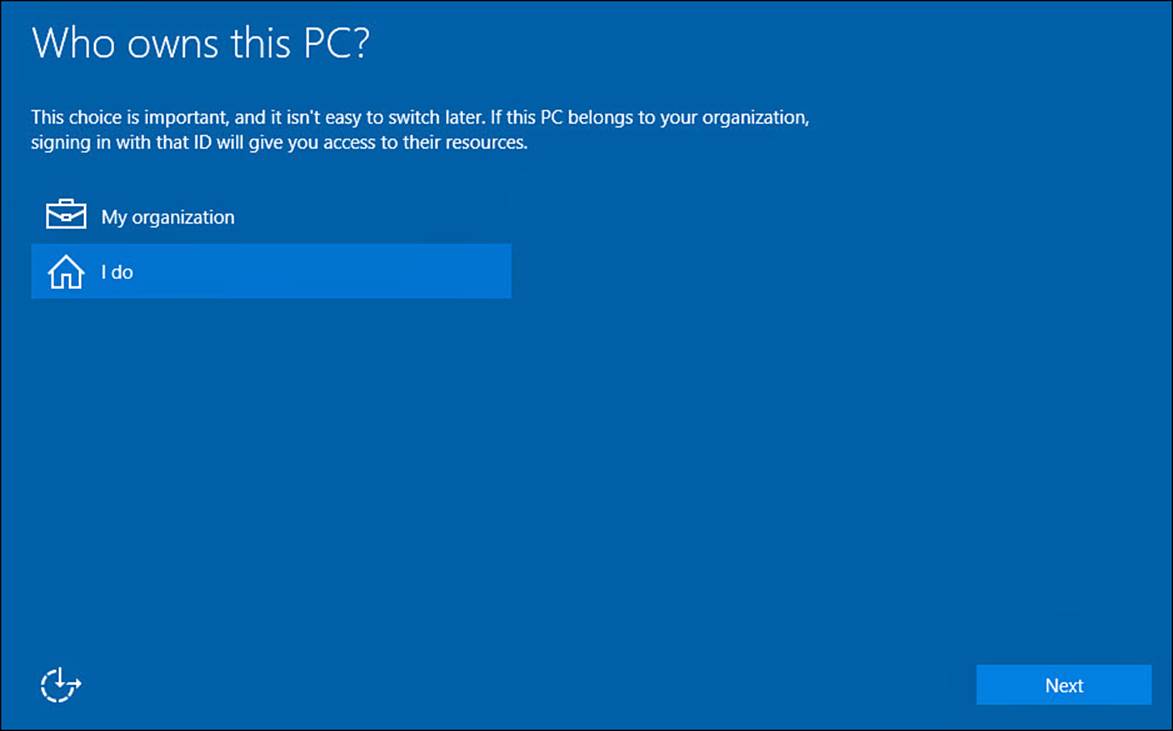
FIGURE 1.8 You might need to check with your IT department for instructions when first signing in to a PC owned by your organization.
5. You will be prompted to sign in to the device, as shown in Figure 1.9. If you have a Microsoft account, sign in with the current password. You must be connected to the Internet to verify the password and finish setting things up. Enter your credentials, select Sign In, and skip to step 6. To create a Microsoft account, select Create One and follow the directions given. Creating a Microsoft account is also detailed in Chapter 19.
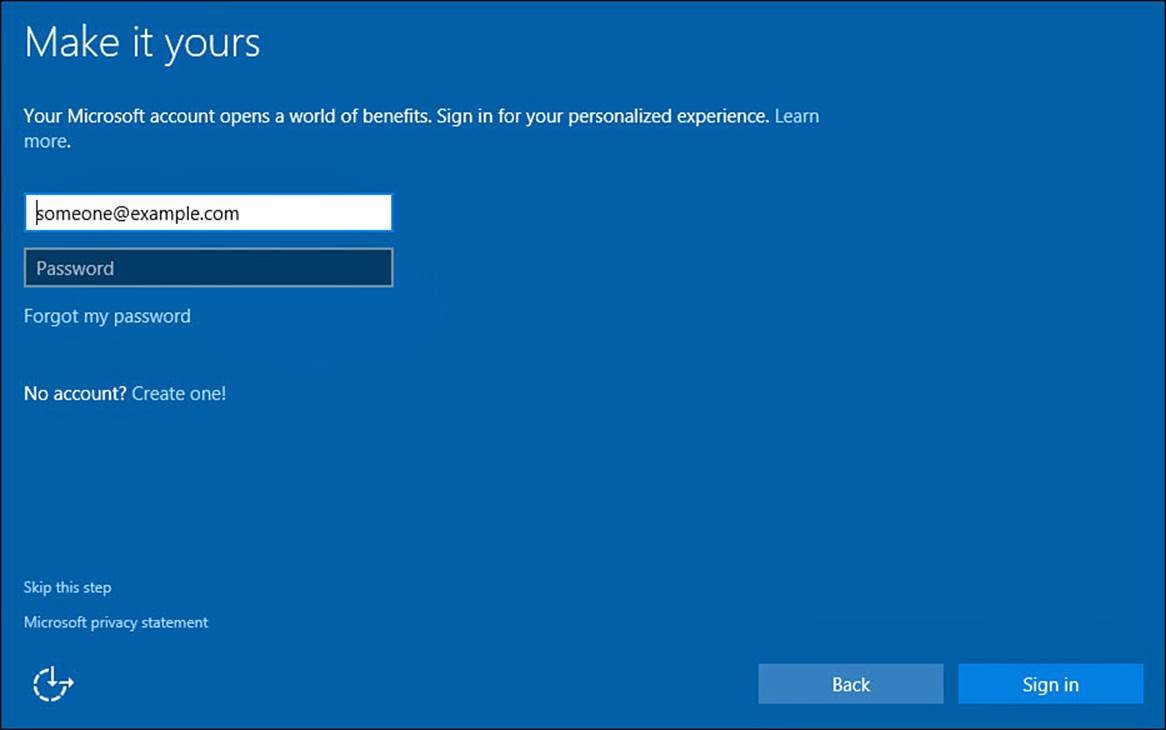
FIGURE 1.9 Select from different options when signing in for the first time, use an existing Microsoft account, create one, or create a local account by skipping this screen.
6. To create a local account, select Skip This Step. You will proceed to the next screen where you will create a local account, as shown in Figure 1.10. Select a username and enter a password twice to confirm spelling; you will be required to provide a password hint. When finished, select Next.

FIGURE 1.10 Create a local account if you prefer not to use a Microsoft account.
7. Windows will proceed to create a new account profile on this device starting with a friendly “Hi” followed by a series of colorful status updates. When this steps finishes, you will be looking at your Desktop.
8. You will likely see some notifications regarding optional Windows features such as OneDrive or other Windows apps that are already installed on your device. You will be prompted to classify the network to which you are currently connected, as shown in Figure 1.11. Select Yes to let Windows know that this is a private trusted network or No to indicate that this is a public network such as a coffee shop.
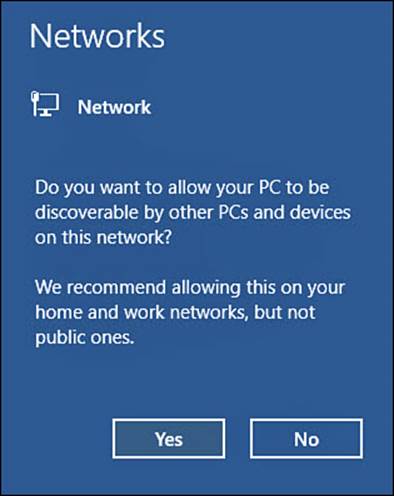
FIGURE 1.11 Let Windows know whether it is connected to a secure private network or an unsecure public one.
After you have signed in, you will be able to start exploring and personalizing how Windows 10 looks and acts. The first thing you will need to learn about is the Start menu.
Introducing the Start Menu
After signing in to Windows, you are dropped off at the Desktop. In Windows 10 the newly designed Desktop and Start menu introduce a few changes compared to previous versions of Windows. Select the Start button to show the Start menu, as shown in Figure 1.12. The Start menu shows your most used apps as well as tiles that have been pinned. The Start menu is highly customizable and can be resized, or it can fill the screen.

FIGURE 1.12 The Start menu is your gateway to everything Windows has to offer.
To start, here’s a short review of some of the key items you can see on the Start menu:
• Tiles—A tile is the representation of an application whether it is a desktop application or a Windows app. Tiles can be resized. Most tiles can be static, or they can be animated Live Tiles, displaying useful updated information from the app, such as new email alerts, weather details, news, or recent social network status updates. Live tiles may not display anything until you begin to use them, and they certainly grab your attention. Chapter 3 provides plenty of information about using, organizing, and manipulating tiles. To open the application, select the tile.
• Start button—The Start button is more than simply a way to invoke the Start menu. Right-click (or tap and hold using a touchscreen) the Start button to reveal a context menu with many advanced features and tools that power users will love, as shown in Figure 1.13.
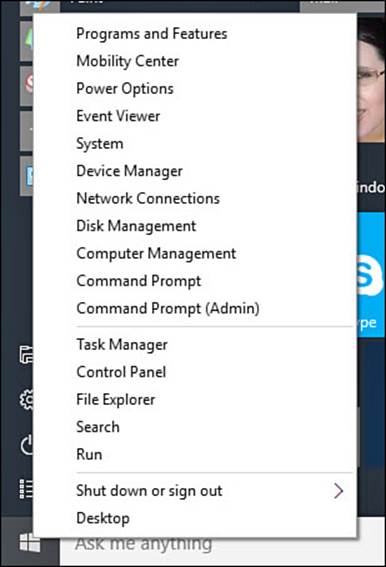
FIGURE 1.13 The Start button hides a lot of power user goodies when opening the context menu.
• Account menu—Touching or selecting the account that is currently signed in will reveal a drop-down menu with tools for signing out, locking the computer, and changing account settings.
When using some apps, the taskbar might autohide to allow more screen space for the app that is running. Because most of your work in Windows initiates from the Start menu, it is important to know how to quickly return here. Based on the device you use, follow one of these methods to return to the Start menu:
![]() Swipe up from the bottom of the screen to reveal the taskbar, and select the Start button. Many Windows tablets have a Start button that is always available, generally near the bottom of the display.
Swipe up from the bottom of the screen to reveal the taskbar, and select the Start button. Many Windows tablets have a Start button that is always available, generally near the bottom of the display.
![]() Press the Windows key.
Press the Windows key.
![]() Bring the mouse cursor to the bottom of the screen to reveal the taskbar, and select the Start button.
Bring the mouse cursor to the bottom of the screen to reveal the taskbar, and select the Start button.
Displaying All Apps
Unpinned apps and apps you use less often will not be immediately visible on the Start menu. To view everything installed on your device, select All Apps from where it appears above the Start button. The list of desktop applications and apps installed on your device appears as an alphabetical listing through which you can scroll, as shown in Figure 1.14. In some cases a folder is displayed that contains multiple applications. Select the folder to reveal its contents in a drop-down list. To return to the initial Start menu view, select the back arrow that appears above the Start button.
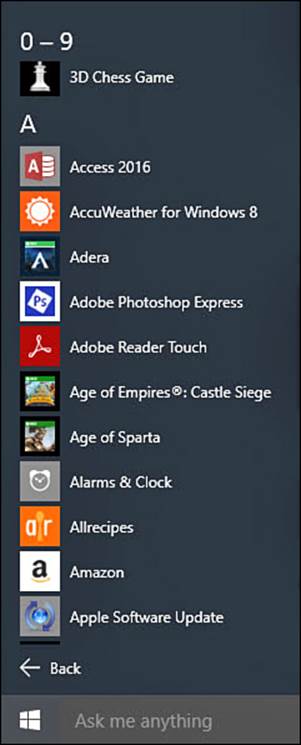
FIGURE 1.14 You can easily see all the apps installed in Windows by selecting All Apps from the Start menu.
Browsing apps installed on your device by scrolling through the alphabetical list of applications can become rather tedious if you have installed a lot of applications. You can select a letter from the All Apps list to quickly jump to another letter in the list, as shown in Figure 1.15.
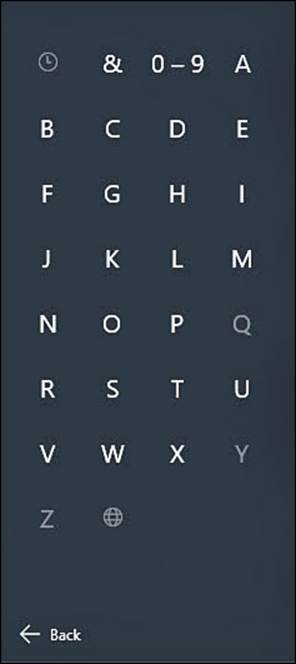
FIGURE 1.15 Jump to a letter when viewing the alphabetical All Apps list.
 Tip
Tip
One of my favorite features in Windows 10 is the ability to start typing the name of an app or a desktop application from a physical keyboard anytime the Start button has been pressed or selected. The cursor automatically appears in the search field, and you just start typing the name of an application to quickly locate it. Windows will display desktop applications and apps that are installed on your device (among other things); you can just select the item to launch the app from there. This can be much faster than navigating All Apps or even looking for a tile. This ability has other uses also—for example, Chapter 9 takes a more detailed look at how to search using this technique.
Pinning an Application to the Start Menu
Pinning an app to the Start menu is an important skill to learn right away. Pinned apps are easy to find, and with Windows apps, you can benefit from Live tile updates.
Follow these steps to pin an app to the Start menu:
1. From the Start menu, locate an application from the Most Used list or from the All Apps list.
2. Right-click (or tap and hold on a touchscreen) the application, as shown in Figure 1.16, to reveal the context menu. Select Pin to Start.
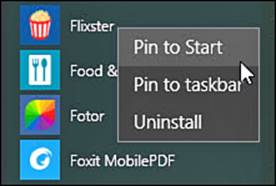
FIGURE 1.16 Pin applications to the Start menu so you can easily find them.
3. The application will be added to the bottom of your Start menu with other pinned applications.
Seeing Tiles That Are Offscreen
It doesn’t take long for new tiles to add up and overflow on the Start menu. When you pin new apps, pictures, and shortcuts to the Start menu, your display of tiles starts to grow. The collection of tiles won’t fit on a single screen, so you need to scroll down to see the rest of them; then you scroll back up to see the tiles you passed.
To see tiles off the screen, follow these steps based on the device you use:
![]() Scroll up and down by placing your finger on the screen in the area of the tiles and then swiping up or down in one smooth motion. If your attempt to swipe is mistaken as a tap, try to swipe on an empty spot on the Start menu, avoiding tiles.
Scroll up and down by placing your finger on the screen in the area of the tiles and then swiping up or down in one smooth motion. If your attempt to swipe is mistaken as a tap, try to swipe on an empty spot on the Start menu, avoiding tiles.
![]() Use your arrow keys to navigate the Start menu. You will need to use the right arrow first to move into the tile area before the up and down arrows will allow you to select tiles and scroll through the Start menu tiles.
Use your arrow keys to navigate the Start menu. You will need to use the right arrow first to move into the tile area before the up and down arrows will allow you to select tiles and scroll through the Start menu tiles.
![]() Use the scroll wheel if your mouse is so equipped, or use the vertical scrollbars to the right of the start menu.
Use the scroll wheel if your mouse is so equipped, or use the vertical scrollbars to the right of the start menu.
Using the Getting Started App
Microsoft knows that a lot of new features are included in Windows 10, and they have included a Get Started app to help. You will find this pinned to the Start menu by default. If you do not see it, search for Get Started. The app contains screenshots, videos, and links to Microsoft websites that are designed to briefly answer questions and show how to accomplish basic tasks using the new Windows features and apps. The Get Started app is shown in Figure 1.17.
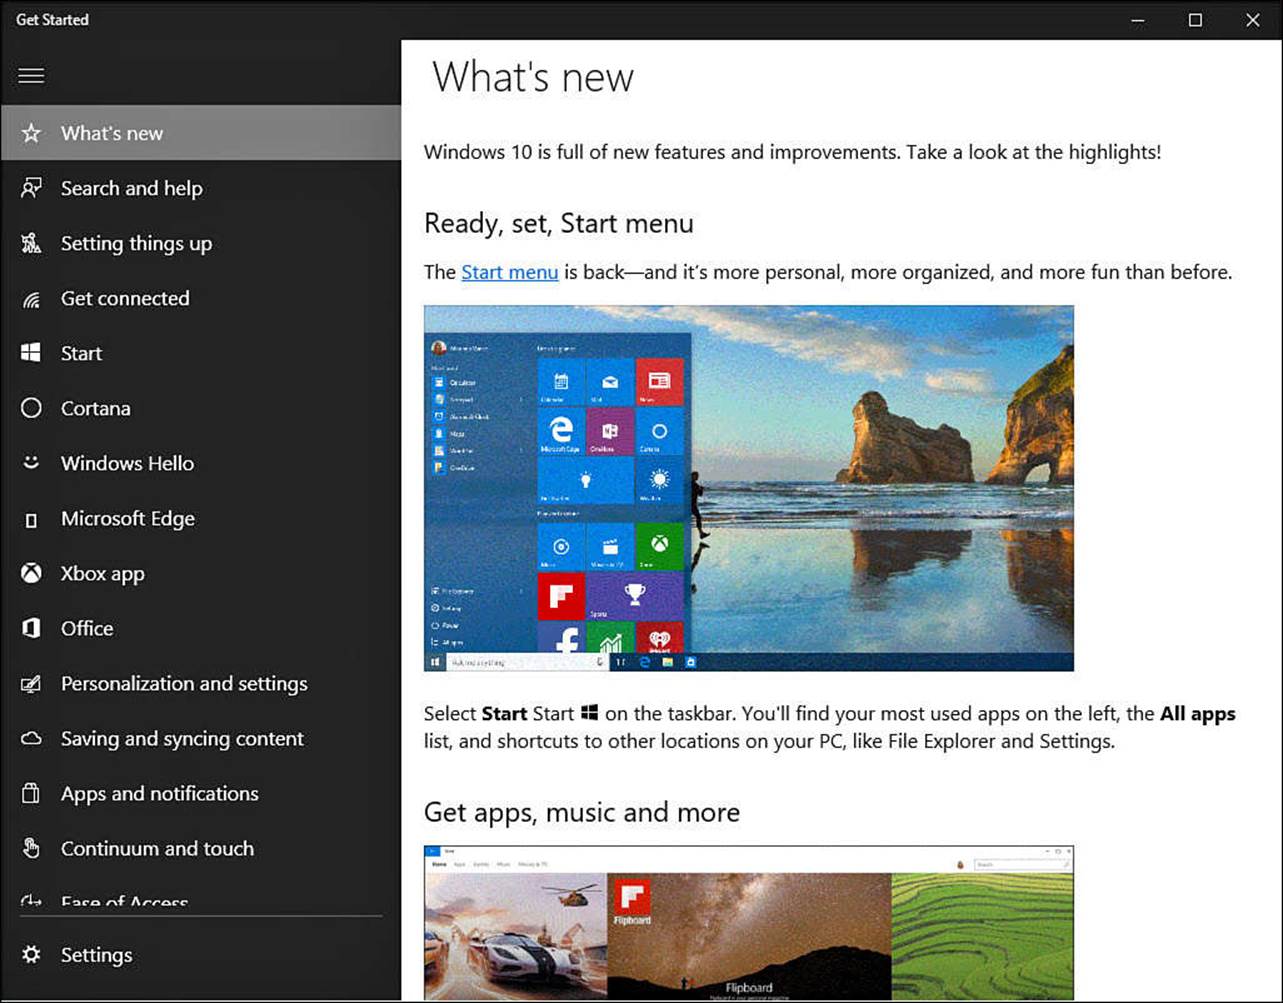
FIGURE 1.17 The Get Started app will also help answer questions about new Windows 10 features.
Exiting Windows
When you need to take a break from your computer—perhaps to shop for computer books—you should consider how long you will be away and in what state you should leave your computer. For example, if you are sharing your computer and are finished, then signing out of your account and letting the next person sign in is the best option. If you are going to be away from your computer for only a short period of time but are working on sensitive information, you should lock your computer.
Locking your computer immediately displays the Lock screen without affecting the programs running or the files that are open. This enables you to get back to work quickly as soon as you sign back in. With the sleep option, four choices are available to manage your computer while you take a break. You can also completely power down your computer if you think you’re going to be away for a longer period of time.
Signing Out of Windows 10
Signing out is a good idea on shared computers. You leave no trail behind when you sign out of Windows. Any programs running when you signed out are shut down, and any connections you had open are closed. To sign out, follow these steps:
1. On the Start menu, select your account portrait to reveal the drop-down menu shown in Figure 1.18.
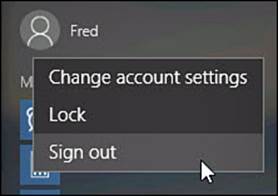
FIGURE 1.18 Sign out using the account drop-down menu located in the Start menu.
2. Select Sign Out.
3. If you attempted to sign out with unsaved work in either a Desktop or Windows app, Windows prompts you to save the work, as shown in Figure 1.19.
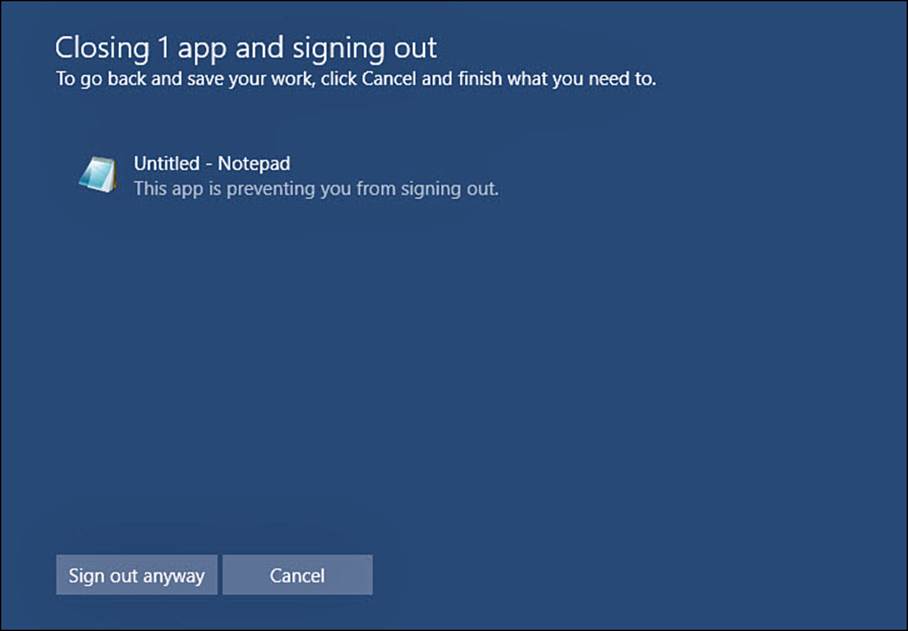
FIGURE 1.19 You see a warning on the Start menu if you try to sign out with unsaved work.
Signing out leaves your computer powered on but available for other users to sign in with their own accounts.
Locking Windows 10
Locking Windows 10 is useful if you are going to be away from your computer but want to resume your work or play when you return. Locking also prevents others from accessing the information on your computer.
To lock Windows, do one of the following:
• On the Start menu, select your account portrait and then select Lock.
• From a keyboard, press Windows+L.
Putting Windows 10 to Sleep
If you don’t intend to use your computer for a longer period of time (for example, a few hours or even a full day), it makes sense to put the computer to sleep. When a computer is asleep, it is still running, although in a low-power mode. Because you can leave your applications and documents open when you put your computer to sleep, it usually takes far less time to start work again by awakening a computer than to power it up from scratch and reopen whatever program you were working on.
To put Windows to sleep, do one of the following:
• From the Start menu, select Power, and then select Sleep.
• Press Ctrl+Alt+Delete. Then, click or press the power button in the lower right and select Sleep.
To wake your computer from sleep mode, moving the mouse, typing, or pressing and releasing the power button typically wakes it. Do not press and hold the power button; doing so will typically shut down your computer.
Shutting Down Your Windows 10 Computer
If you’re going to be away from your computer for an extended period of time and don’t want it sucking away even the minimal amount of power that sleep mode uses, you can shut it all the way down. If you do not close any running programs or apps, Windows will attempt to do this before shutting down for you, but you must save any unsaved work. Otherwise, you will lose your changes since the last time you saved.
To shut down Windows, do one of the following:
• From the Start menu, select Power, and then select Shut Down.
• Press Ctrl+Alt+Delete. Then, click or press the power button in the lower right and select Shut Down.
The Absolute Minimum
• Sign in to Windows with a Microsoft account if possible.
• You can use a PIN or a picture password instead of a password to sign in to Windows 10. These password types are particularly useful if you use a Windows 10 tablet.
• Get comfortable with using the Start menu; you will be using it frequently.
• Pin apps to the Start menu to quickly locate them when you need them.
• You have a wide choice of options when you want to pause your work and protect your files. Be sure to make the right choice—sleep, sign out, lock, or shut down—based on how long you will be away from your computer, whether you are sharing your computer, and where your computer is located.
All materials on the site are licensed Creative Commons Attribution-Sharealike 3.0 Unported CC BY-SA 3.0 & GNU Free Documentation License (GFDL)
If you are the copyright holder of any material contained on our site and intend to remove it, please contact our site administrator for approval.
© 2016-2026 All site design rights belong to S.Y.A.