Windows 10. Absolute Beginner’s Guide (2016)
Part II: Customizing Your Windows 10 Computer
11. Configuring Display and Sound Settings
In This Chapter
• Optimizing Your Display
• Working with Multiple Monitors
• Adjusting Brightness
• Setting Up Speakers
• Managing Notification Sounds
If you have ever shopped for a quality office chair, you know that the offerings range from very simple designs to very complex ones—with what appear to be dozens of levers and knobs that can mystify you with all the levels of adjustment offered. Windows 10 is naturally designed to be visually appealing and greener than any previous version of Windows with a simple and intuitive interface. From the first time you power up your device, many settings will be automatically configured and optimized to get the best usage out of your device without requiring you to consider every possible display or power option available. But make no mistake, all those levers and knobs are there, just out of sight. Although you should not feel that you need to make changes to enjoy your Windows 10 device, there are quite a few settings that you can control that can heighten your user experience.
In this chapter, you learn about settings included in Windows that you can easily adjust to control the display and sound features of your Windows 10 device. Setting up some aspects of your hardware might require you to consult instructions from a manufacturer, especially where third-party drivers or software need to be installed.
Setting Up Your Display
The computer component you work with the most is the display. The display interfaces with one of the most delicate parts of your body: your eyes. For this reason, you should set up the display to be easy for your eyes to use. Although Windows usually sets it correctly by default, Resolution is the key setting for a comfortable but efficient setup with your computer. In addition, Windows 10 has improved the way it works with multiple displays, which can make your work (and play) experience a more productive one. In this section, you learn how to set your resolution and how to set up a second monitor.
Understanding Resolution
The resolution of your display determines the level of detail or sharpness of the image you see on a computer screen. Other hardware on your computer will also contribute to the quality of the images. For instance, video cards and having the correct drivers affect quality settings such as the richness of colors and luminance.
Here is what you need to know about resolution:
• Displays on the screen are composed of pixels. Each pixel has the same size and shape (usually square or rectangular, but it can be any shape). Generally, we enjoy images that have very high pixel counts because they enable sharper images and are easier on the eyes. Lower pixel counts give rise to descriptive terms like pixelated—Minecraft is an example of a game that uses a low resolution to give it a pixelated appearance.
• Resolution is measured using a count of columns and rows of pixels to indicate how many pixels are actually in the display. Thus, you will see screens described with common resolutions such as 1024×768, 1366×768, and 1920×1080. The first number indicates the columns, and the second provides the number of rows of pixels.
• Screen resolution is often adjustable. You typically can lower or even raise the resolution used on a display using settings in Windows. Often video games offer the option to alter the resolution to improve game play when playing a video game on the computer.
• The greater the resolution, the more detailed images onscreen will appear to the eye. Two similar laptops might both offer 15.6″ screens, yet the amount of pixels squeezed into that screen space by the manufacturer might differ. Watch out for hot sales that offer very cheap prices for a laptop. One of the reasons they can afford to sell that device for so little is often due to the low-resolution screen!
• There is a trade-off when choosing a high resolution. Some screens are just not large enough when used at the highest resolutions to be practical for normal computer use. Text can be very sharp rendered, but it might be too small to read comfortably—especially if you already use reading glasses!
• An LCD monitor has a native resolution—that is, a resolution at which it’s designed to operate. Although LCD monitors can operate at different resolutions, using a nonnative setting incurs a considerable hit to image quality. So, if you’re planning to buy a new LCD monitor, you should note the resolution you prefer to work with and make sure the one you pick is designed to operate at that resolution. A typical 23″ LCD monitor operates at 1920×1080, which is a full HD display.
Resolution and Aspect Ratio
You also might see other references when considering displays that are commonly used for comparison. Numbers such as 1080p, 1080i, or 720p refer to the vertical count of pixels in each row on the screen; this is another way of referring to resolution. 720 and 1080 are both considered high definition (HD), and they are very easy on the eyes. The letters i and p refer to the way the display refreshes. Interlaced (i) screens are not as preferred as progressive (p) scan. You might even encounter larger numbers like 2160p, 4320p, and 8640p, which are considered ultra high definition (UHD).
Numbers such as 4:3 and 16:9 refer to the shape of the screen. The aspect ratio 4:3 simply lets you know that for every four horizontal pixels there are three vertical ones—and this was the standard square-ish computer monitor shape for a long time. 16:9 is also called widescreen and is common in larger flat screens and laptops.
If you ever need to change the screen resolution on your Windows 10 device, just follow these steps:
1. Open the Settings app by selecting it from the Start menu. On a touchscreen, swipe in from the right, and select All Settings from the Action Center.
2. Select System and then select Display from the navigation bar to the left. The Customize Your Display pane shown in Figure 11.1 appears. If you have more than one screen attached to your computer, you see each of them represented and numbered (refer to Figure 11.2 in the following section). Be sure to select the monitor you want to work with in the Display field (or click its representation on this screen). If you aren’t sure which monitor is identified in the list, select Identify to prompt Windows to flash a large number on your screens, making it easy to identify each display.
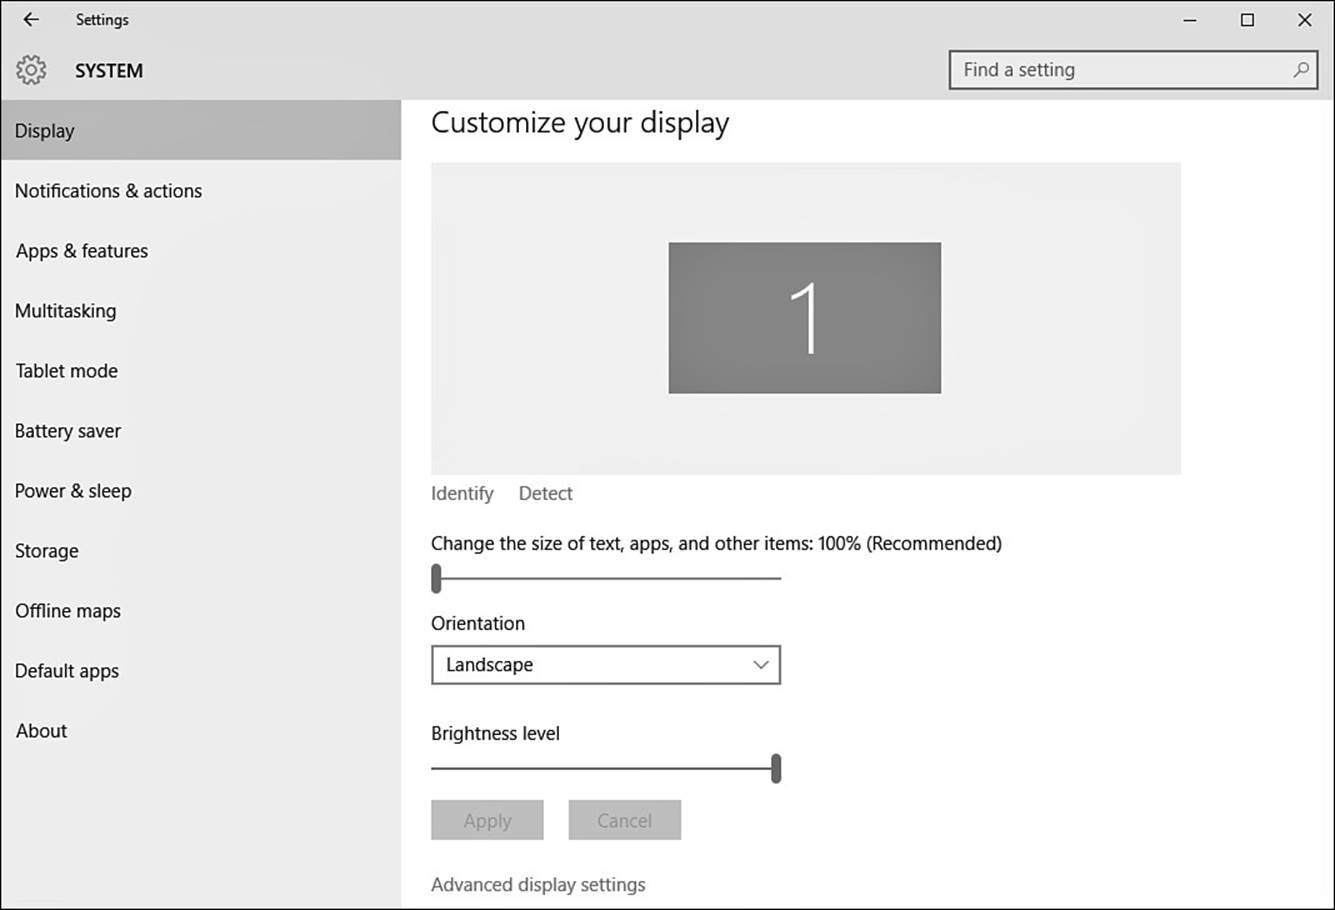
FIGURE 11.1 You can control your screen resolution through the PC settings app.
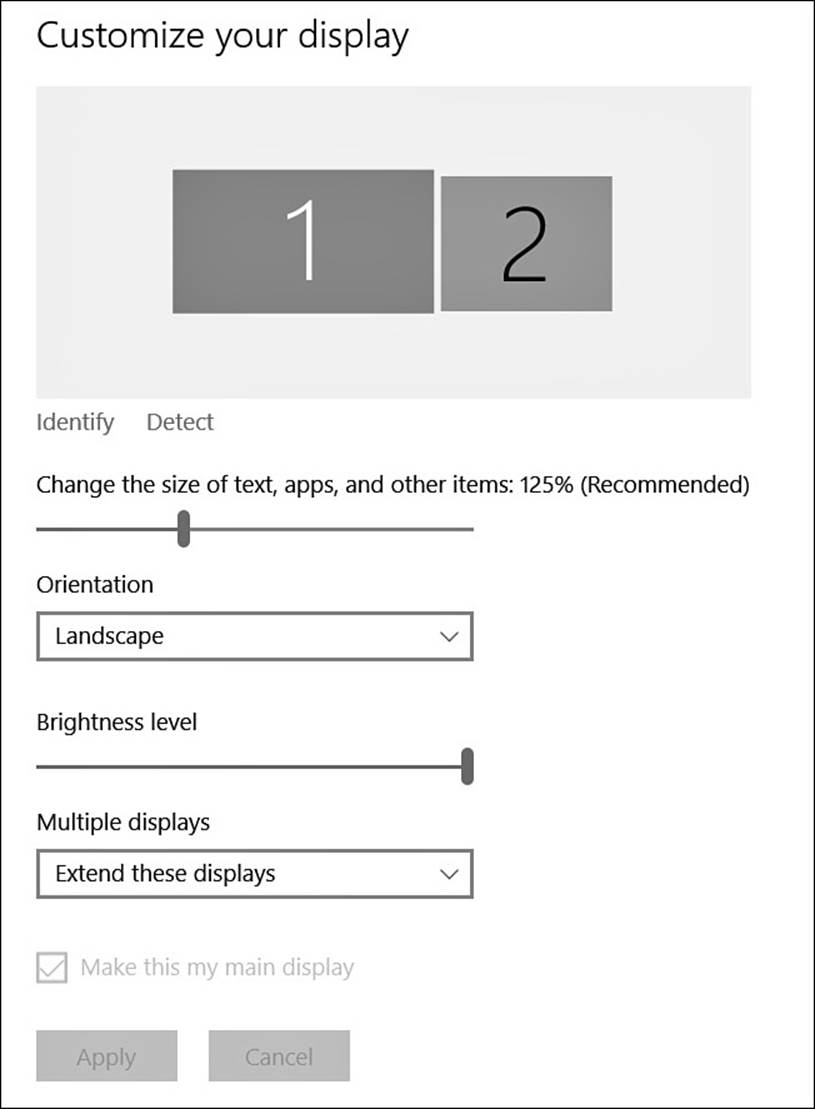
FIGURE 11.2 In Windows 10 you can change the behavior of multiple displays in the PC settings app.
3. Select Advanced Display Settings to adjust your resolution. Select the current resolution to display a drop-down menu for each display; select the new resolution from the available choices. You typically will see a recommended resolution, which will probably already be selected as the default.
4. Select Apply to see immediately the resolution you chose at work. The screen updates to the resolution you selected.
5. If you are happy with the new resolution, select Keep Changes. If you want to select another resolution or stick with the original resolution, select Revert.
6. To select a different resolution, repeat steps 3-5.
 Tip
Tip
You can potentially select a resolution your display doesn’t support, resulting in a blank screen when you attempt to change it. If this happens, just sit tight for a few seconds. If you don’t select Keep Changes in the confirmation dialog box, Windows reverts to the previous resolution in 15 seconds.
Setting Up Multiple Monitors
You can set up a second monitor if your computer has the capability. (Consult your computer’s documentation to verify whether it’s possible.)
There are a number of advantages to having a second monitor. If you use a tablet or laptop for mobility, you can use a larger display with higher resolution when working at your desk. You can extend your screen horizontally so you have more room across Windows. You also can extend your screen vertically to have more room top to bottom. You can open several programs at the same time and arrange them on your extended display. You can even have the same image generated on both displays (duplicate), something that can come in handy for presentation purposes. If you’re using a desktop computer, you can look at the back of your computer near where your monitor is plugged in. You might be able to recognize a second unused port equal or similar to the one the first monitor is using. It is not uncommon to see two different types of connectors for video on modern desktop computers. Some common port types are DVI, VGA, HDMI, and DisplayPort. Virtually all laptops manufactured in the last few years have an external monitor port that can work at the same time as your laptop’s built-in display. Even many Windows tablets, such as the Microsoft Surface, have a video out port you can use for attaching a second display.
When you add a second screen to your computer, you can configure it for use with Windows by following these steps:
1. Open the Settings app by selecting it from the Start menu. On a touchscreen, swipe in from the right, and select All Settings from the Action Center.
2. Select System and then select Display from the list to the left. Under Customize Your Display, look for the Multiple Displays setting shown in Figure 11.2. Use the drop-down arrow to choose from duplicating or extending your display. You can also select to display on only one display screen.
3. If you need to change the position of your displays relative to one another, you can select and drag a screen placing it to the right, left, above, or below (see Figure 11.3). This will determine how your mouse cursor moves between extended displays and affects panoramic wallpaper choices.
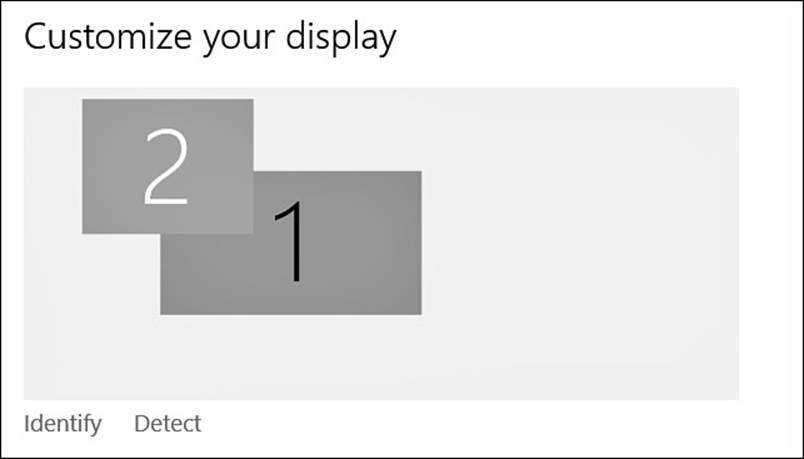
FIGURE 11.3 Select and drag a display to change the orientation of your displays to match their physical orientations.
4. Click Apply to make changes.
 Note
Note
Another way to quickly change how your Windows 10 device uses a second display is through the Commands menu that appears on the title bar in PC Settings. Select Project from the list; then choose from PC Screen Only, Duplicate, Extend, or Second Screen Only. This can be especially useful when working with a projector for a meeting.
Additionally, most laptops will have a function key designed to trigger this same option.
Windows 10 has other settings related to multiple displays that enhance the user experience in diverse situations. Consider some of these enhancements:
• Show different backgrounds on each display or extend the same background across several displays.
• Have taskbars set to display just the applications that are on each screen (see Figure 11.4).
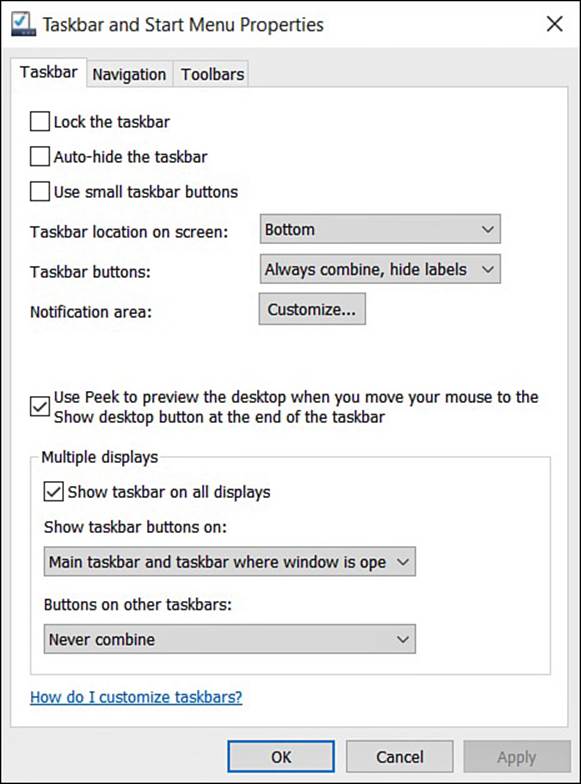
FIGURE 11.4 Control how the taskbar behaves across multiple displays.
• Dots per inch (DPI) scaling can optimize how apps are displayed on ultra-high-resolution screens. This can be set the same for all displays, or a unique setting can be used for each display. (See the next section for more information.)
Make Things Bigger on Your Display
If you find yourself squinting or reaching for glasses just to make out the text on your screen, why not try to just make things bigger on the screen? Unfortunately, some people opt to use a lower resolution so that items are rendered larger on the display. Although this seems like a good strategy, it leaves you with a less sharp image as a result. Windows 10 makes it much easier to scale items so that they are larger without taking a hit on the resolution and sharpness!
Follow these steps to use DPI scaling to change the size of apps and text:
1. Open the Settings app by selecting it from the Start menu. On a touchscreen, swipe in from the right; select All Settings from the Action Center.
2. Select System and then select Display from the navigation bar to the left. The Customize Your Display pane appears (refer to Figure 11.1).
3. Under Change the Size of Text, Apps, and Other Items, you can select the slider to make everything appear larger (or smaller). If your display allows, you might have a few choices on the slider, as shown in Figure 11.5.
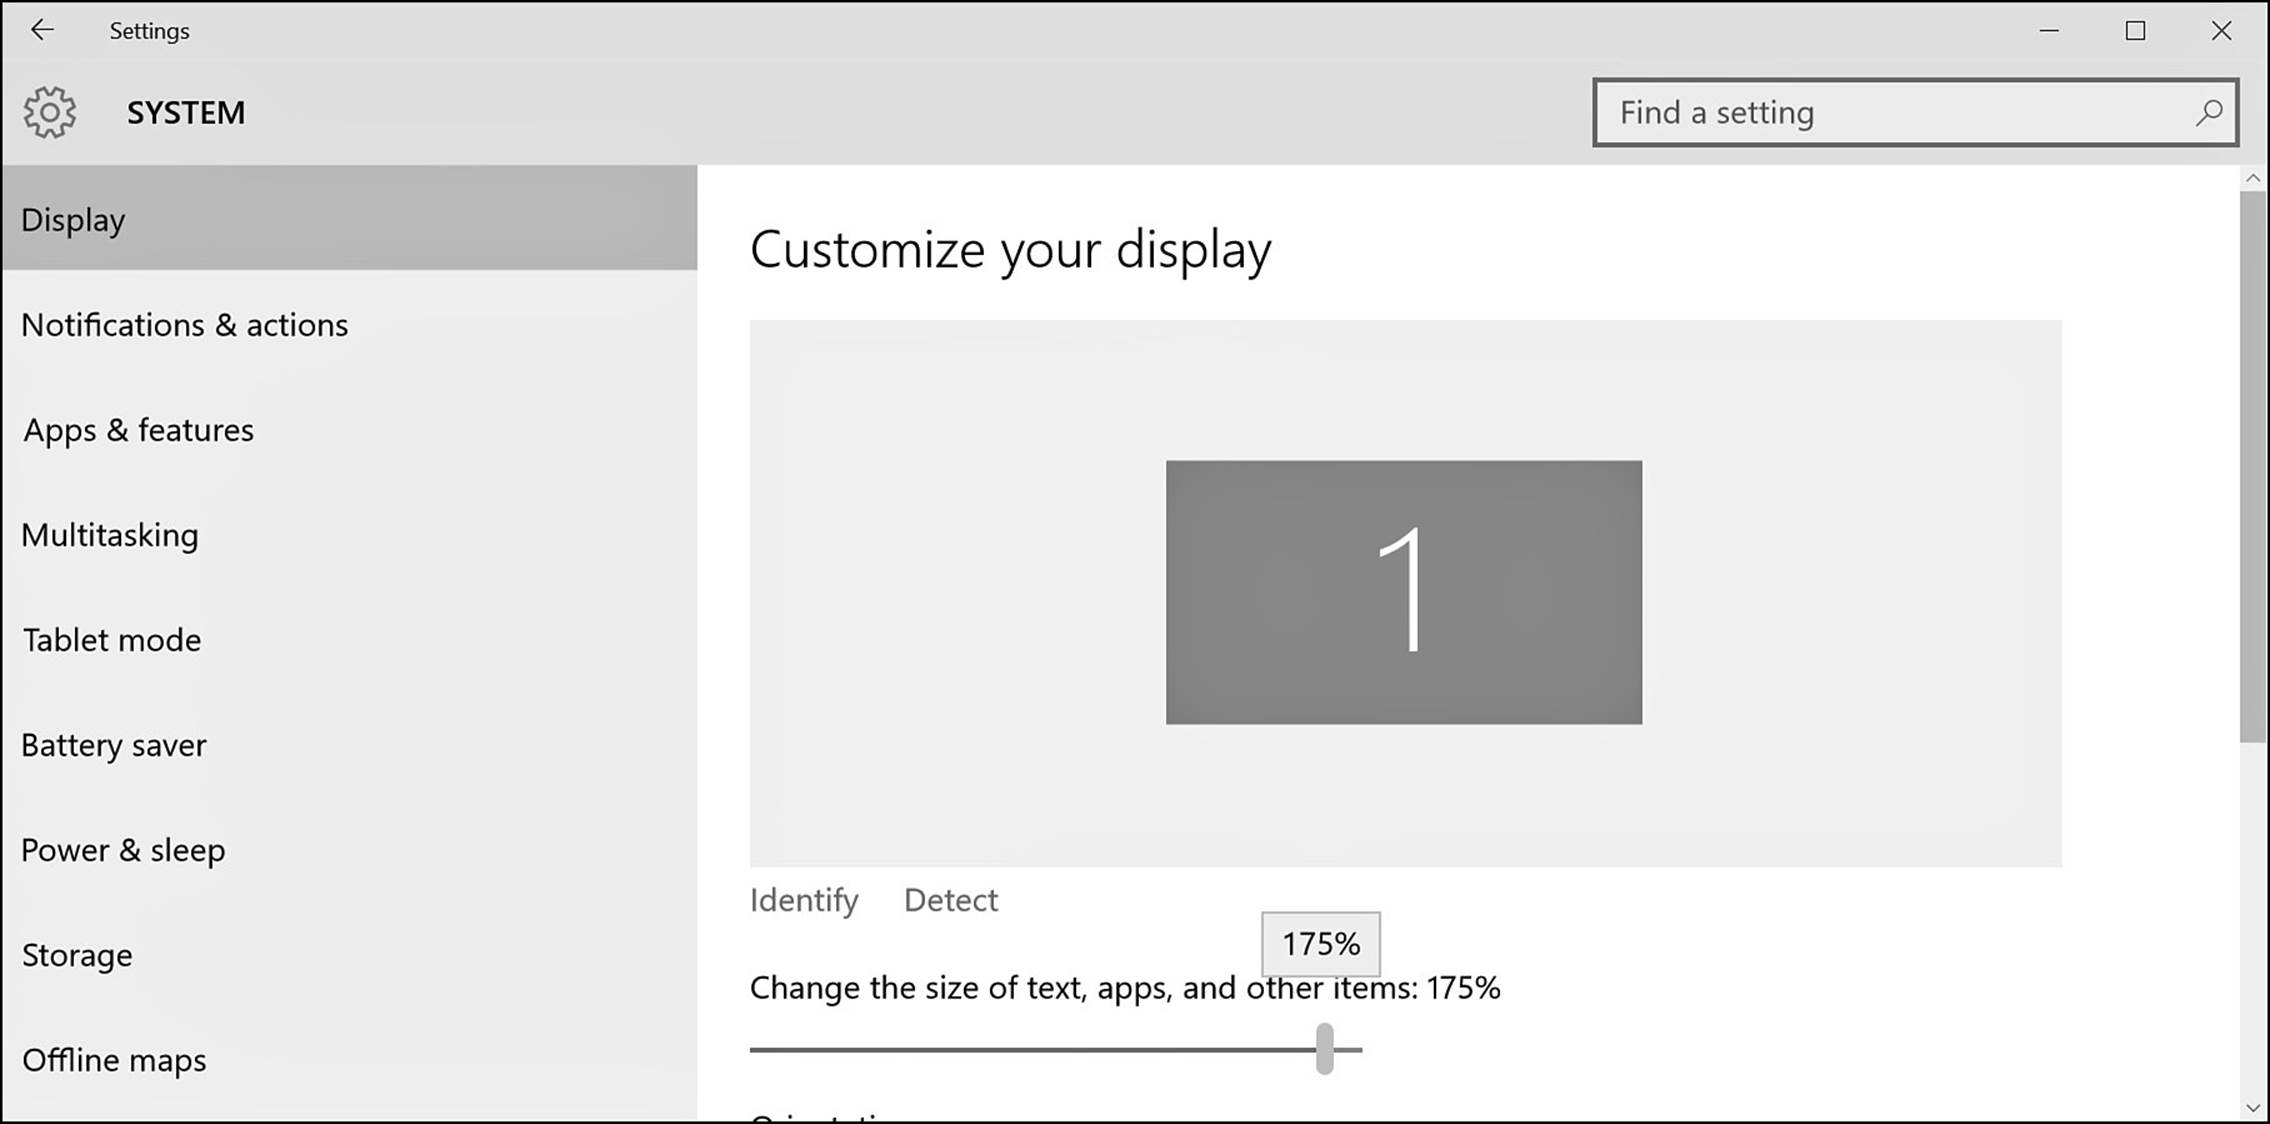
FIGURE 11.5 Change the scaling on your display from the Settings app to make everything appear larger without losing resolution.
You may not want everything to be larger. Follow these steps to use DPI scaling to change the size of text:
1. From the taskbar, type Display in the Search box. Select the Display applet.
2. Under Change Only the Text Size, you can select the drop-down menu to select which types of text you would like to change to make everything appear larger (or smaller). If your display allows, you might have a few choices on the slider, as shown in Figure 11.6. If you want to apply this scale to all displays when using multiple displays, select the box Let Me Choose One Scaling Level for All My Displays.
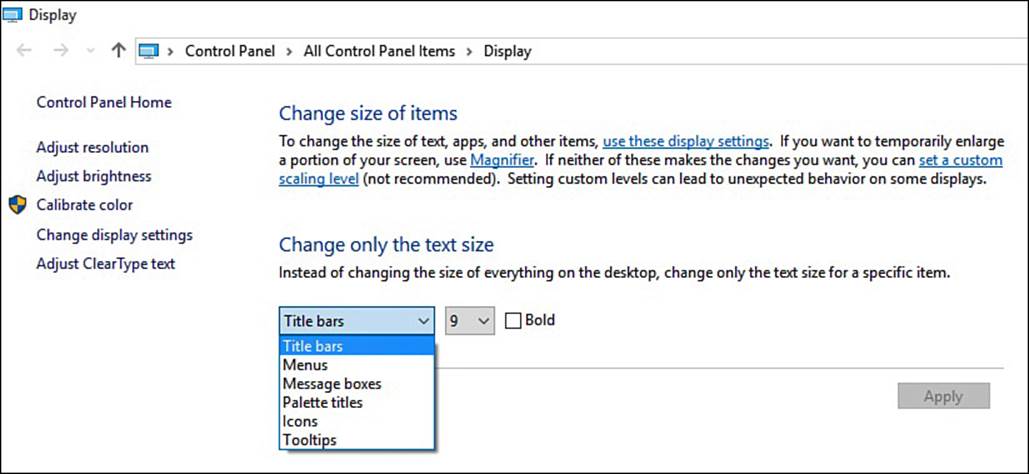
FIGURE 11.6 The Control Panel Display applet provides additional DPI scaling options.
3. If you want to change only the size of text, leave the scaling setting at the recommended level in step 2 and look to the section Change Only the Text Size. Use the drop-down menu to select types of text to scale and select the font size. You can even select Bold as a text effect, as shown in Figure 11.7.
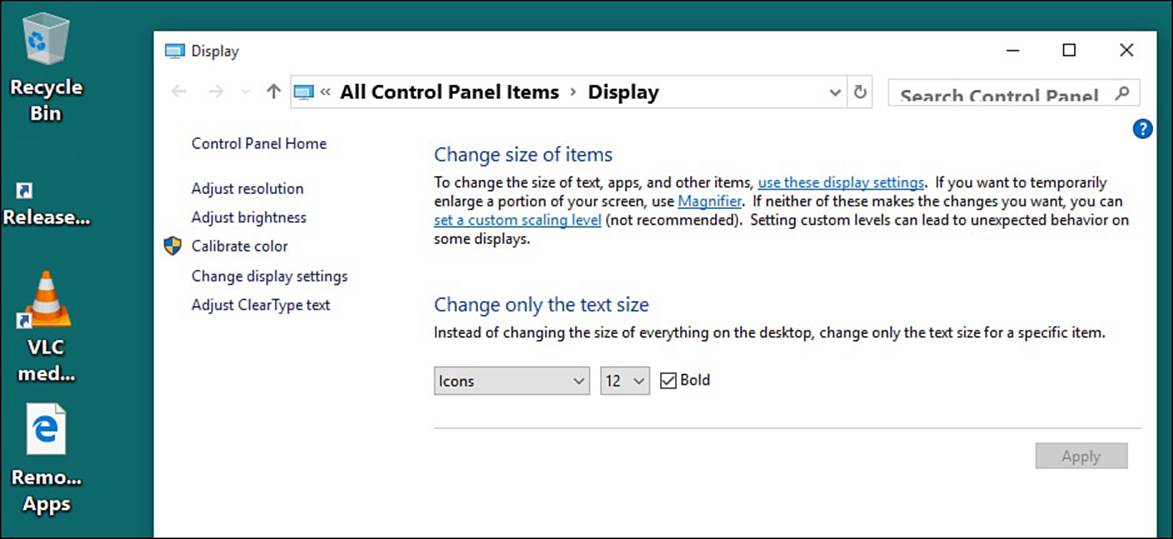
FIGURE 11.7 Scale the size of just specific types of text, such as Icons, to make navigation easier on the eyes.
4. Click Apply to make changes.
Note
You can also change the DPI scaling by selecting Set a Custom Scaling Level from the Display applet. This can cause unexpected results, and the preferred method is to use the Settings app or target just text, as shown here.
Adjusting Brightness
Brightness is often taken for granted. Windows devices that rely on batteries benefit from settings that dim the display while on battery power, thus extending how much time the battery can power your device. Not only can this add hours of life to your device between charges, but it is also better for the environment. An increasingly common feature found on portable devices adjusts screen brightness using a setting called adaptive brightness, which is intended to adjust display brightness based on ambient light using a light sensor.
Basic adjustments to display brightness can be made on most laptops using the keyboard to adjust screen brightness. Alternatively, you can search for brightness in the Search Everything tool, select Change Screen Brightness (with a touchscreen device you can swipe in from the right and select Settings), and then select Screen (or Brightness on some devices) to reveal a slider you can use to manually change the current display brightness.
If you find your tablet or laptop is inexplicably changing between a dim setting and bright setting, it is likely caused by an adaptive brightness sensor. This can become quite distracting at times. If you want to disable this feature, follow these steps:
1. Open the Settings app by selecting it from the Start menu.
2. Select System, and then select Display from the list to the left. If your device has adaptive brightness, you will see a switch below the Brightness level labeled Adjust My Screen Brightness Automatically (see Figure 11.8).
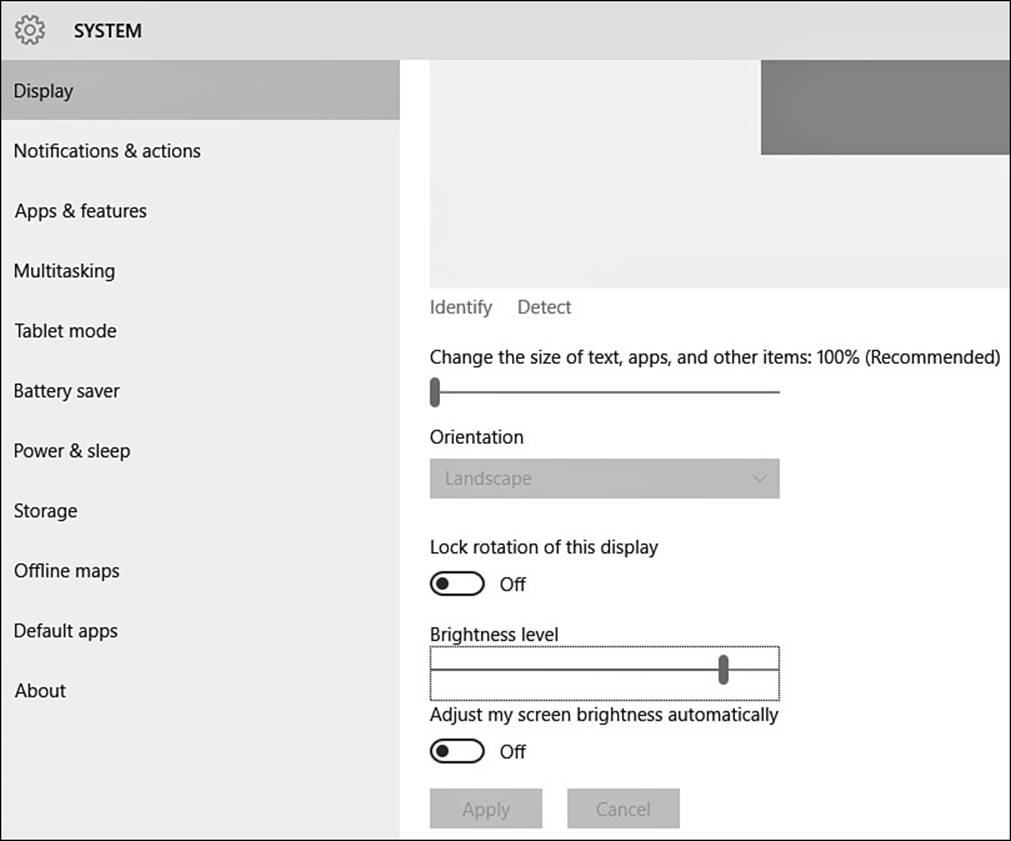
FIGURE 11.8 You can disable the adaptive brightness feature if it becomes too distracting.
3. Slide the toggle to Off and disable this feature. Then close the Settings app.
Tip
On a touchscreen, swipe in from the right and select the Brightness button from the Action Center. Each tap will adjust the brightness level by 25%. Tap and hold the brightness button to reveal and select Go to Settings to jump into the System > Display pane referred to in this section.
Although the next chapter deals with power plans in more detail, you might want to have more control over screen brightness, especially if you find yourself routinely changing screen brightness settings. You can find more granular control settings buried in your current power plan.
To make permanent changes to the brightness on your screen, you need to follow these steps:
1. From the taskbar type power into the Search box. Select the Power Options applet.
2. The Power Options window opens. Under Choose or Customize a Power Plan, your current power plan will be indicated—Balanced is the default. More than one possible plan might be listed with your current plan enabled, as shown in Figure 11.9. Select Change Plan Settings (to the right of your current plan).
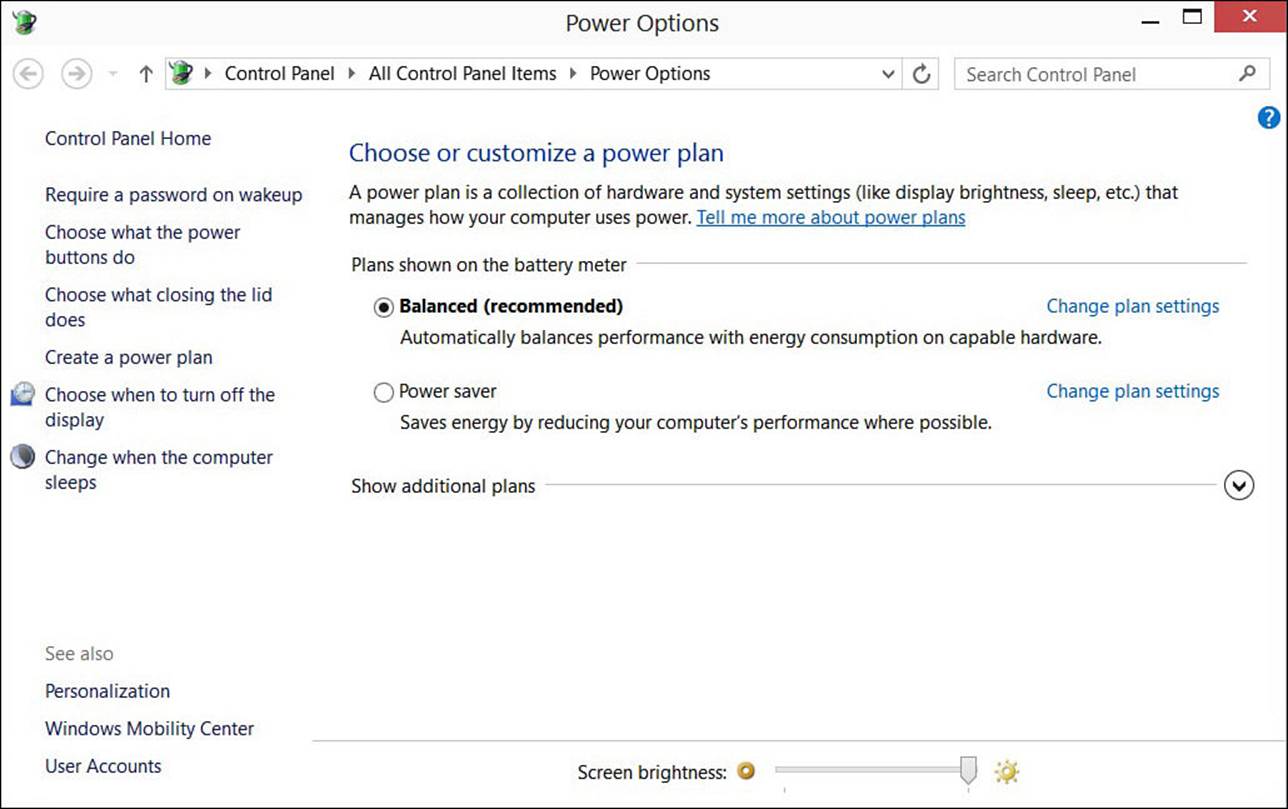
FIGURE 11.9 Brightness settings are part of your power plan.
3. The Edit Plan Settings window appears. Select Change Advanced Power Settings (at the bottom of the window). The Power Options dialog box appears, as shown in Figure 11.10.
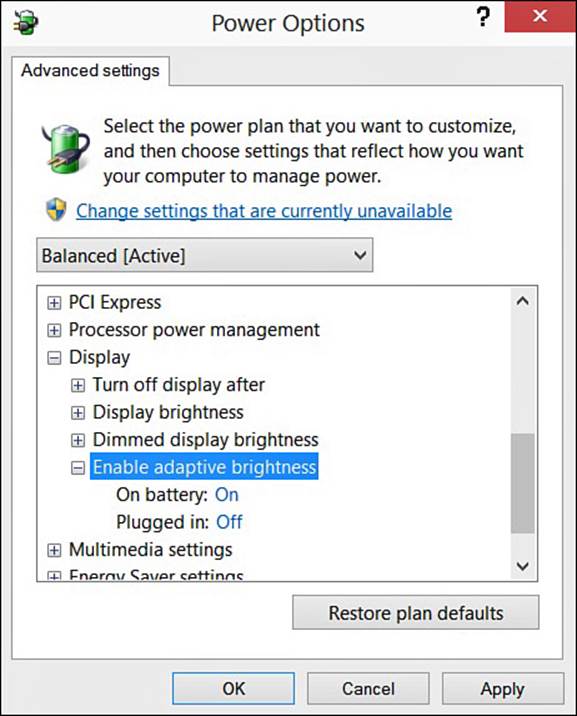
FIGURE 11.10 Tweak display settings from the Power Options dialog box.
4. Scroll down in the list of settings to find Display. Expand the menu by selecting the plus sign, and scroll down to find Display Brightness. Select the plus sign to see the current settings for On Battery and Plugged In. Adjust the setting if needed by selecting the current number and using the up and down arrows to change the number. 100% when plugged in is normal; if you want the brightest display even while using battery power, change this to 100% also.
5. Expand the Enable Adaptive Brightness settings. This is generally On by default. You can disable this feature when on battery or when plugged in. Disable this feature here by selecting On and then selecting Off from the drop-down list.
6. Click OK to apply the settings and close this window. Close all other windows if you are done changing your settings.
 Caution
Balanced power plan settings are meant to give you the best performance while on battery with the longest time possible. Changes to these settings can significantly cut your battery time. Also, the Adaptive Brightness is a great feature when it is working correctly. You might need to update your drivers if you are experiencing problems with this feature. Make changes here with caution. After making changes to these settings, you can always go back by selecting Restore Default Settings for This Plan in the Edit Plan Settings window in step 3 from the steps just outlined.
Setting Up Sound
Setting up how sound works in Windows might seem like a task that should not be required. Shouldn’t your computer play your music and beep and chime at all the appropriate occasions without your having to do anything? The answer, of course, is yes. In this section you learn a few handy tricks such as how to get the best sound from the speakers you just purchased and how to specify when sounds can be heard as certain computer events occur.
Setting Up Your Speakers
If you play videos or music on your computer, having a set of speakers, or at least headphones, is a given. Most computers today can produce amazing surround sound for movies and games with the right set of high-end speakers. Even if you are content with a couple of inexpensive desktop speakers, you might be able to achieve better sound quality.
These days, plugging in speakers is easy. On a desktop computer each of the plugs from your speakers is colored, and the jacks in the back of your computer also are colored. Just match the colors and you’re good to go. Follow the instructions provided with your hardware to be sure your speakers are set up correctly. After everything is plugged in correctly, follow these steps to set up the sound quality and configuration:
1. From the taskbar, type sound into the Search box. Select the Sound applet. The Sound dialog box appears on the Desktop.
2. Select the Playback tab.
3. Select Speakers and then select Configure. The Speaker Setup dialog box appears, as shown in Figure 11.11.
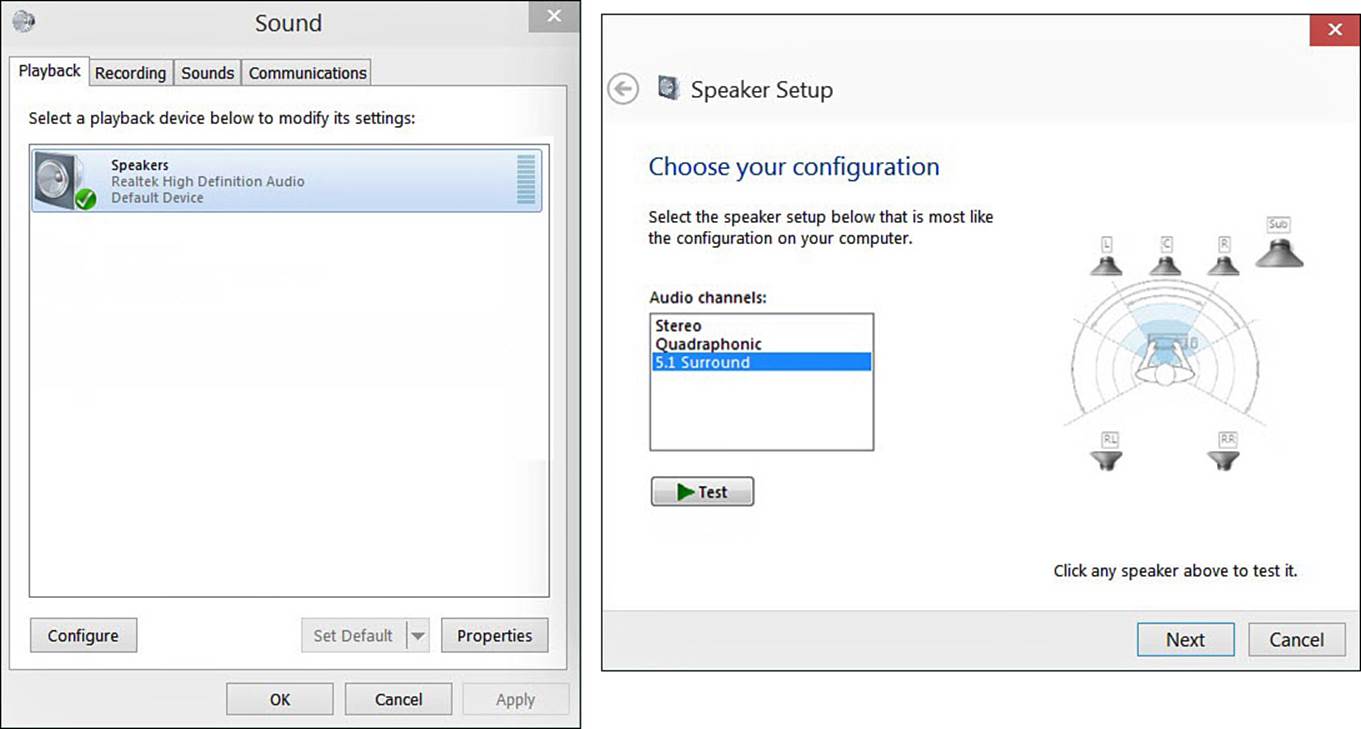
FIGURE 11.11 You can troubleshoot settings and test sound quality using the Sound applet.
4. Select your speaker setup from the list. The diagram shows you the configuration. Select Test to hear a test sound rotate through each of the speakers, or click a speaker to hear just one. Click Next.
5. On the Customize Your Configuration screen, you can confirm which speakers should be used by selecting them. Again, you can test individual speakers to ensure that they are producing sound as expected. Click Next.
6. You might have the option to select full-range speakers. You may need to consult the documentation for your speakers if in doubt. Click Next.
7. Click Finish.
8. Try your configuration with music, videos, and DVDs. Feel free to run through the steps again to fine-tune the setup. Finally, don’t be afraid to select a configuration that sounds great even if it doesn’t match your real setup. You’re the boss!
Managing Sound for Windows Events
Windows is set up to play certain sounds when various events occur. These can alert you to take some action, or they can be associated with a notification such as when an email message arrives, an app is installed or updated, and so on. Even though these sounds can be useful, sometimes they can be inappropriate. In this section we focus on notification settings you should know about that enable you to control whether notifications will use sounds.
To determine whether sounds can be used with notifications and to establish quiet time, follow these steps:
1. From the taskbar, type notifications into the Search box. Select Notification & Action Settings from the search results. The Settings app will open.
2. Scroll down to the section Show Notifications From These Apps, as shown in Figure 11.12. As you can see, most apps are enabled to provide sound notifications.
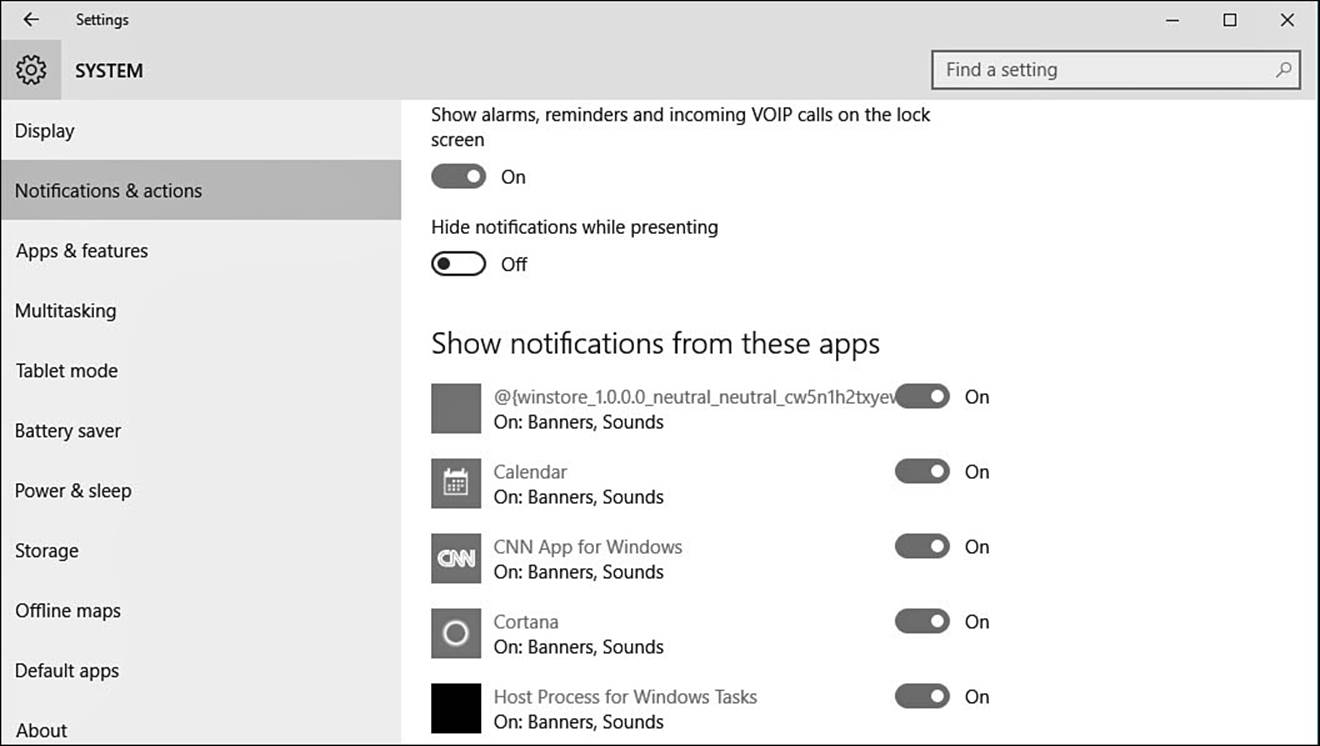
FIGURE 11.12 The Settings app provides you with a few tools to manage how apps alert you to updates under Notification settings.
3. Select an app that you do not want to generate audible notifications. The pane will focus to that app and display a few switches for notification options.
4. Locate the switch labeled Play a Sound When a Notification Arrives and slide the toggle to Off, as shown in Figure 11.13. This will prevent sounds from accompanying notifications for this app at all times.
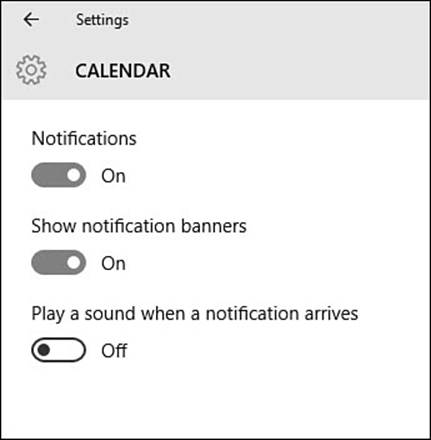
FIGURE 11.13 You can control whether your device makes sounds at the wrong time using Notification settings.
Windows includes a feature called Quiet Hours. It is designed to establish a quiet time to prevent sounds from disturbing you or others at 2 a.m. While the details of this tool are still in flux, you can manually use it to silence your notifications for meetings and other occasions. To enable Quiet Hours open the Action Center and select the button Quiet Hours. When you are ready to return to normal activity, use the same button to disable Quiet Hours.
The Absolute Minimum
• To change the resolution of your display, you can access the Display settings through the Settings app.
• Use DPI scaling to make items and text larger on your display.
• Windows can accommodate multiple monitors if your computer has the capability. You can specify whether the image from the computer appears on one screen, appears on both screens, or extends across the screens—in effect, doubling your screen real estate.
• You can disable Adaptive Brightness if you prefer to keep a steady brightness on your tablet or laptop.
• Use settings associated with Notifications to prevent sounds from disturbing others.
All materials on the site are licensed Creative Commons Attribution-Sharealike 3.0 Unported CC BY-SA 3.0 & GNU Free Documentation License (GFDL)
If you are the copyright holder of any material contained on our site and intend to remove it, please contact our site administrator for approval.
© 2016-2026 All site design rights belong to S.Y.A.