Windows 10. Absolute Beginner’s Guide (2016)
Part III: Being Productive
14. Browsing the Web
In This Chapter
• Introducing Microsoft Edge
• Using Cortana in Microsoft Edge
• Using Reading View
• Making Web Notes
• Navigating to Websites
• Enhancing Your Browsing
• Using Internet Explorer
Surfing the Web probably is the most popular activity in Windows, more so perhaps than checking email, and definitely more so than doing work! If you think the same way, you’ll also agree how important it is to like your web-surfing tool.
Microsoft thinks it’s important, too—so important that Windows 10 comes with two web browsers. Microsoft Edge is the new default web browser built for Windows 10 and designed for the future of web browsing. Microsoft Edge is slick, modern, and simple to use.
Internet Explorer 11 is the latest version of the familiar Microsoft web browser that first appeared back in 1995. Internet Explorer 11 is included with Windows 10 to provide backward compatibility for websites and web applications that require older rendering methods and features. For most of your browsing needs, Microsoft Edge will be your go-to browser, and you might never use Internet Explorer 11. Microsoft’s stated intention is to eventually discontinue support and development of Internet Explorer. For this reason, this chapter focuses on how to use the new Microsoft browser, with some discussion on situations that can require the use of Internet Explorer 11.
Introducing Microsoft Edge
Microsoft Edge is a modern universal Microsoft app that uses a minimal interface to keep the focus on your web browsing experience. Microsoft Edge can be opened directly by selecting its icon from the taskbar. As shown in Figure 14.1, a few essential navigation tools are visible, along with some tools that may look unfamiliar.
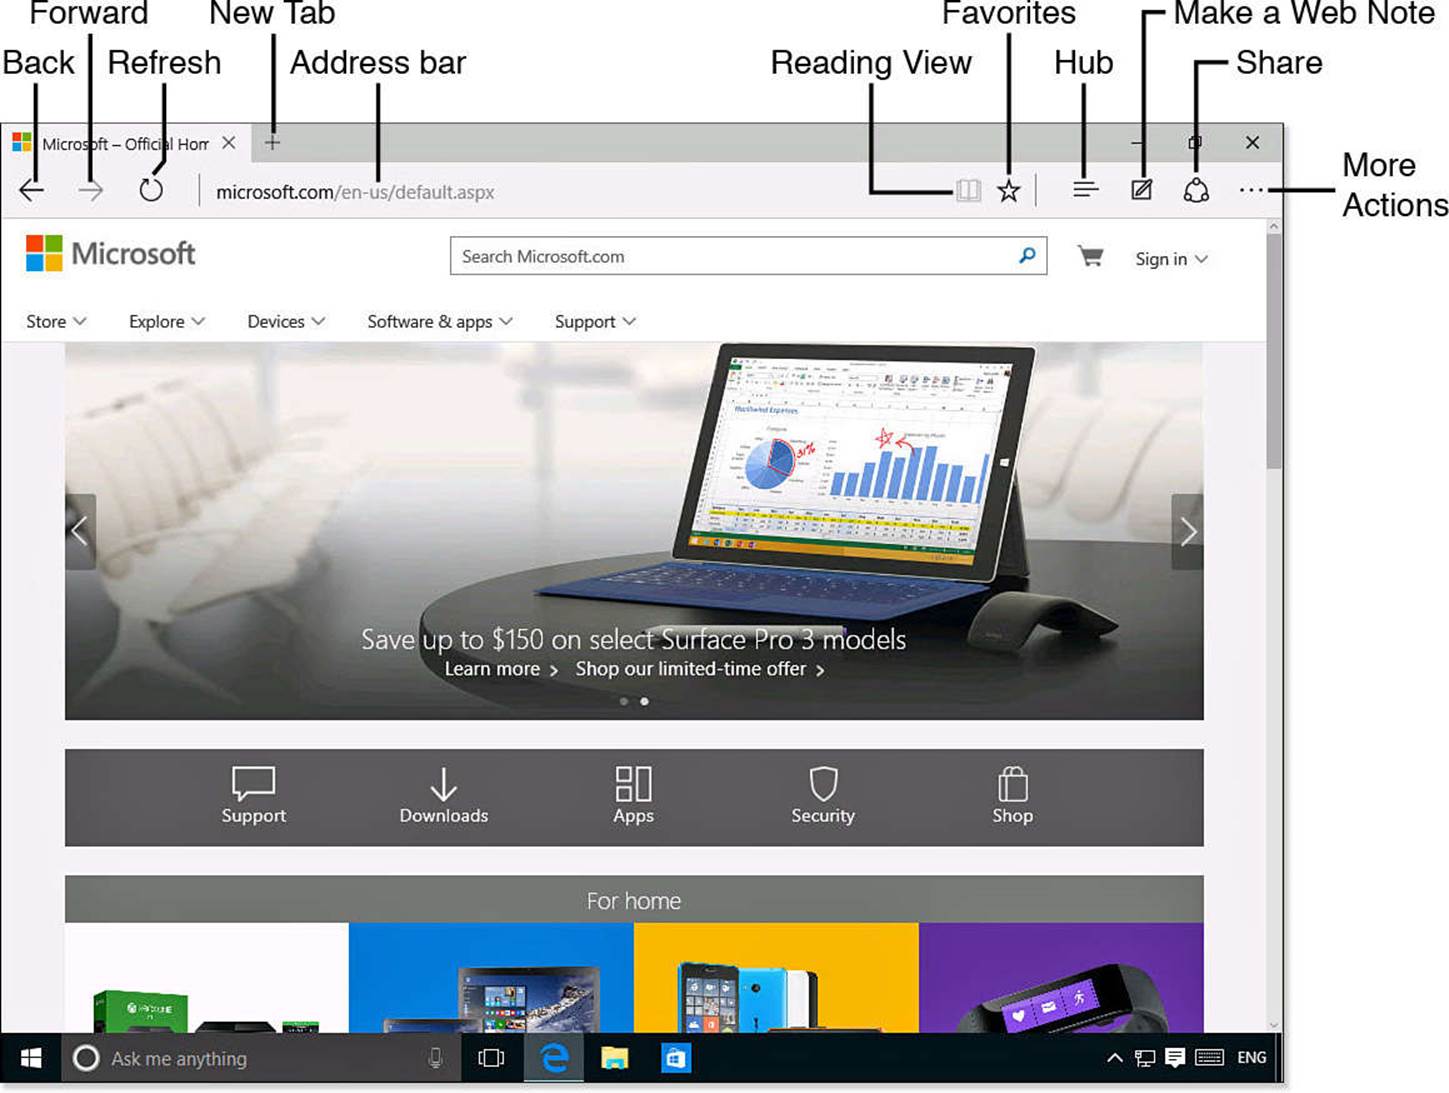
FIGURE 14.1 Microsoft Edge has a nice, clean interface.
Microsoft Edge is not a new version of Internet Explorer. It has been built from the ground up using very little of the older web browser code. Besides stripping away many of the features and code that provided compatibility with older websites, thought was given to how to put Microsoft Edge on the cutting edge of web browsing.
Microsoft Edge uses EdgeHTML for rendering websites. This addresses changes that have occurred on the Internet itself where new and improved codes allow web developers to build better and more interactive websites. Alternative web browsers such as Firefox, Chrome, and Safari have gained popularity based on a number of factors, including a cleaner interface and features such as synchronizing bookmarks and personalizing the browsing experience. Microsoft Edge addresses these issues as well and will be introducing several new features that are only going to improve with time.
Microsoft Edge includes some important improvements:
• Integration with Cortana
• Improved reading experience using Reading View
• New options for input and annotation with Web Notes
• Personalized new tab feature
• Improved security
• Increased speed
Two of the most important improvements brought to Microsoft Edge are Cortana integration and the Reading view. The following sections will look at these and other new features.
Surfing the Web with Cortana
Cortana’s integration with Microsoft Edge makes it much easier to retrieve information from the Internet, sometimes without even opening a web page. Similar to the way in which Cortana can retrieve information when you use the search box on the taskbar, Cortana can offer additional information while you use Microsoft Edge. To use Cortana, you must have first enabled Cortana in Windows 10. (Refer to Chapter 9, “Using Search and Cortana.”) Cortana is enabled by default within Microsoft Edge, but there is a setting that allows you to disable Cortana integration in the web browser.
Cortana is designed to watch for search queries entered in a new tab or in the address bar, and it can automatically offer information for queries related to temperature, calculations, and other types of simple questions typed into these search fields. If you open a website, Cortana might offer more information about a business or place, as shown in Figure 14.2. Select the Cortana link, and it will open as a pane from the edge of your browser window with information and tools you can use without even leaving the website. Cortana can show directions, phone numbers, maps, hours, reviews, photos, and much more. Cortana also can present tools for flight information, tracking information, and making reservations.
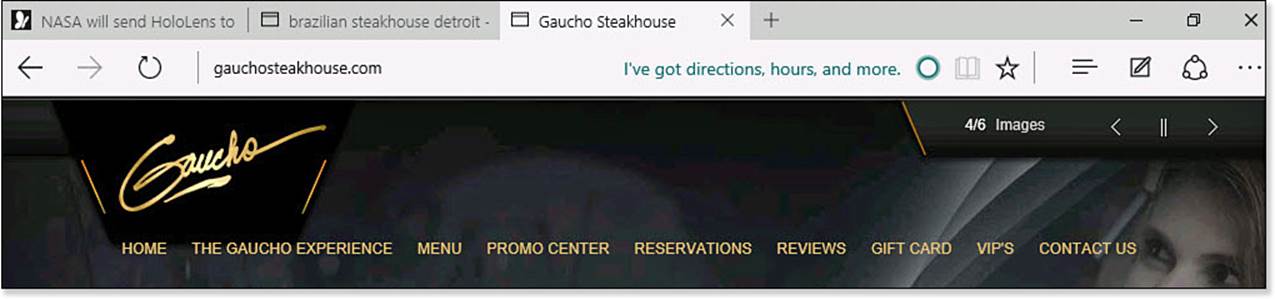
FIGURE 14.2 Cortana can proactively offer to show additional information for locations and businesses in Microsoft Edge.
Another practical way that Cortana can assist you while web browsing is through the Ask Cortana tool when you have selected text on a web page.
To use Ask Cortana in this way, follow these steps:
1. Open Microsoft Edge to a web page containing text such as you might find in a news article.
2. Select a word or phrase you would like to learn more about. (To select a word when using a touchscreen, simply tap a word and then use the control handles to adjust the selection.)
3. Right-click the selection (or tap and hold if using a touchscreen) to view the context menu, as shown in Figure 14.3.
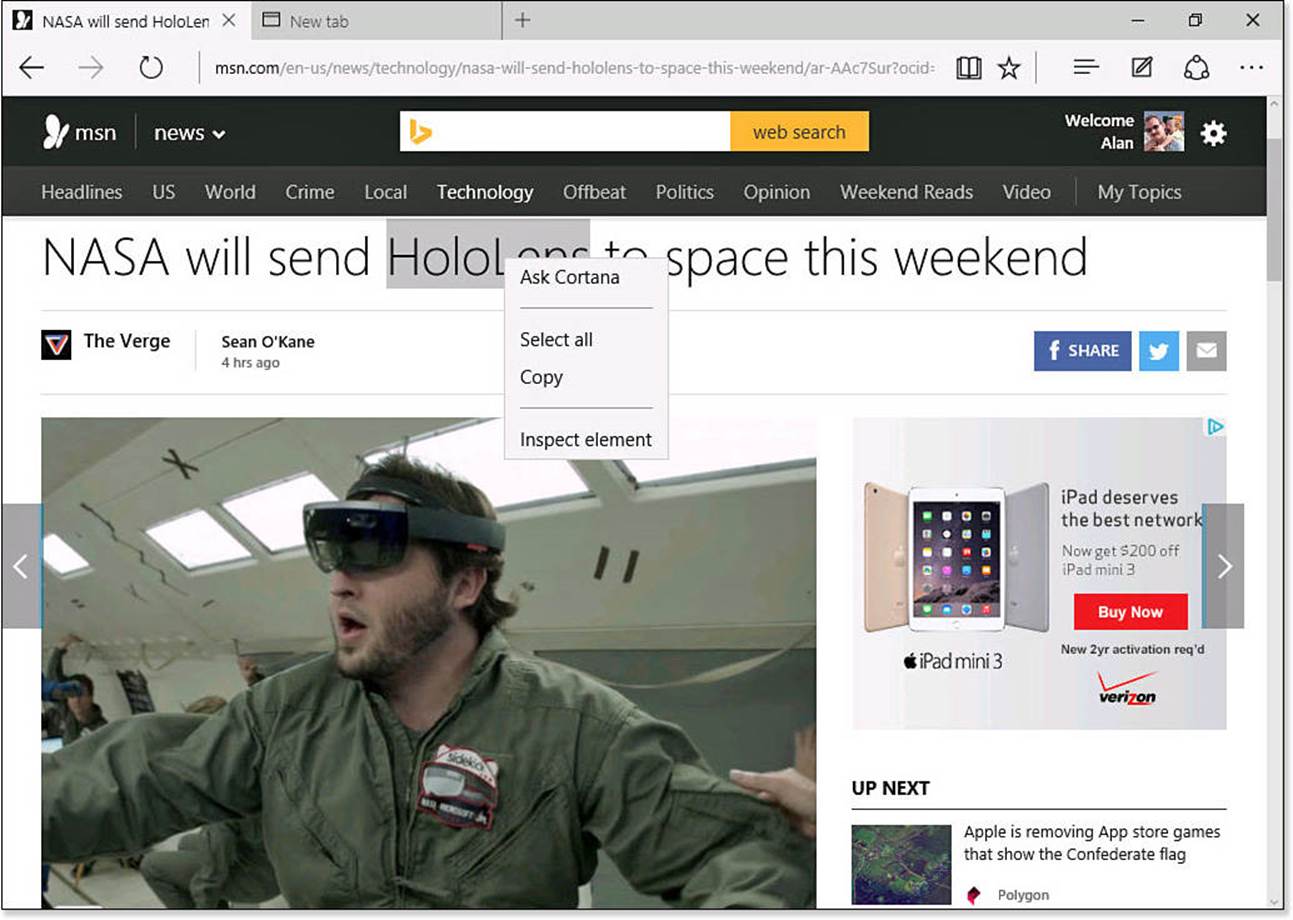
FIGURE 14.3 Cortana can help find information for selected text in Microsoft Edge.
4. Select Ask Cortana.
5. Cortana will open in a side pane, as shown in Figure 14.4, with additional information related to your selected text.
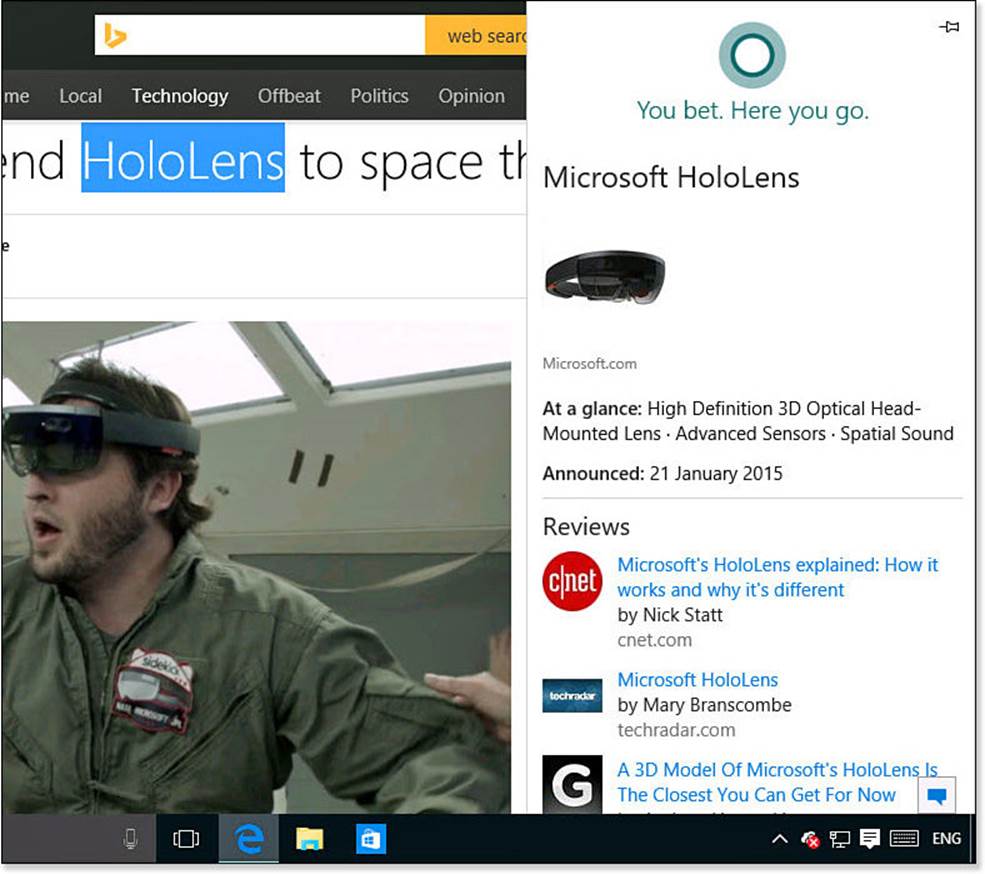
FIGURE 14.4 Cortana can deliver quite a bit of information when you use Ask Cortana.
Cortana certainly has the potential to change the way we find information and use the web browser. If you feel that you would prefer to turn off Cortana, see the section “Getting to Know Microsoft Edge Settings” later in this chapter.
Using Reading View
Reading View is an awesome feature if you like to get information in a web browser. I am sure you have come to dislike the advertising, videos, and annoying pop-ups that appear if you move your mouse cursor across text in an article. Wouldn’t it be great to just strip all the junk away and read in peace? Reading View is the tool you have been waiting for, and it is easy to use.
Follow these steps to use Reading View:
1. Open Microsoft Edge to a web page containing an article (refer to Figure 14.3).
2. Select the Reading View icon that appears next to the address bar to enable it (refer to Figure 14.1). The icon will show some animated pages turning as the view is prepared.
3. The page will reappear without the advertising and distractions, as shown in Figure 14.5. (Compare with the same website in Figure 14.3.) Enjoy reading your article in peace!
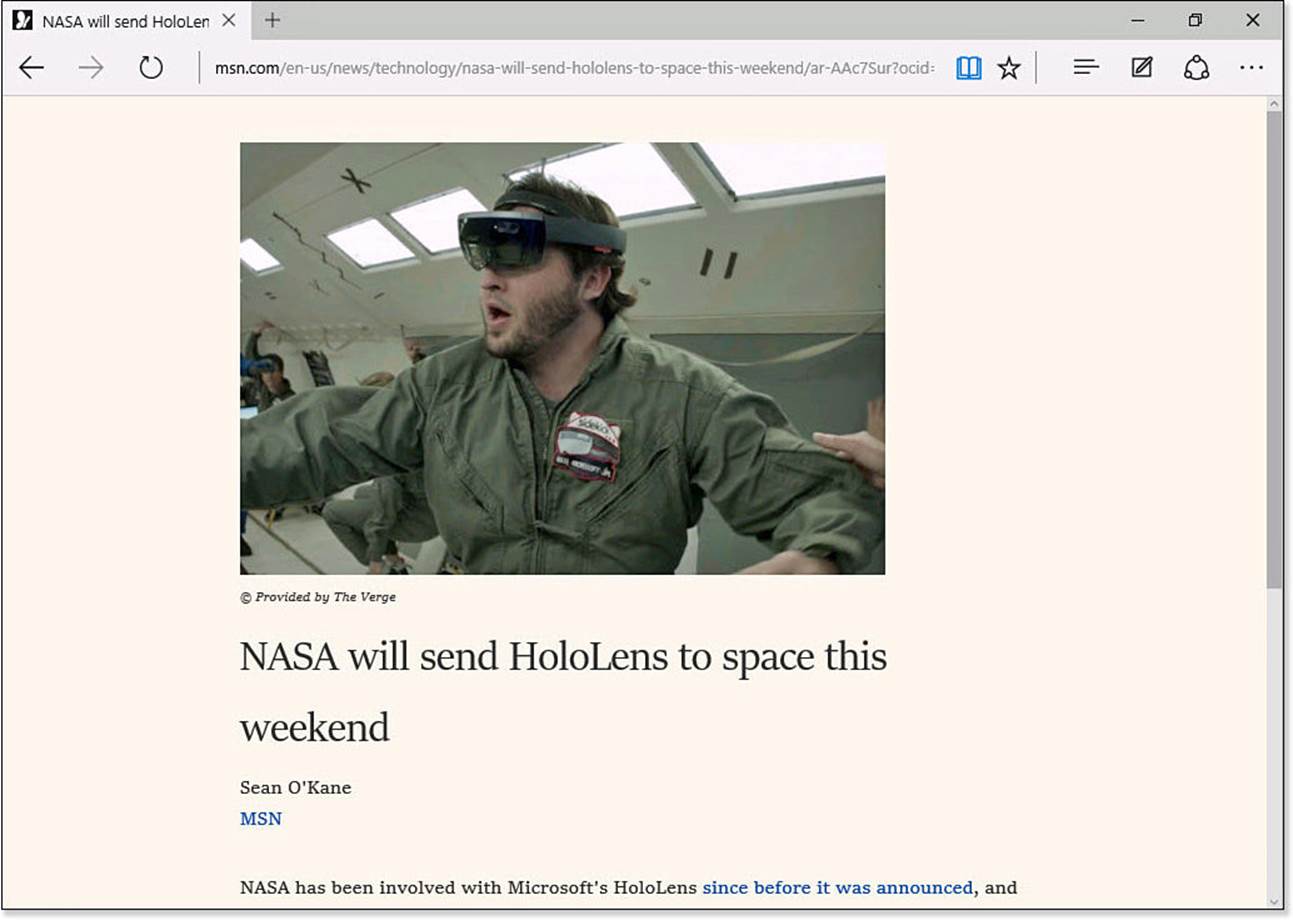
FIGURE 14.5 Reading View gets rid of the clutter that can frustrate your reading experience.
4. Select the Reading View icon again to return to the normal web page.
 Tip
Tip
The Settings pane of Microsoft Edge includes settings that control the way text is presented in Reading View. This pane can be accessed by selecting the More Actions button (refer to Figure 14.1) to open the Actions menu and then selecting Settings. Select the drop-down menu under Reading View Style to change the background color. The drop-down menu under Reading View Font Size lets you change the font size ranging from Small to Extra Large.
Making Web Notes
Web Notes provide you with Inking tools that enable you to annotate web pages. This is a great way to share your ideas and generate collaboration. You can make notes, draw freehand, highlight, type comments, and then share all these annotations with others.
To add a Web Note, follow these steps:
1. Open Microsoft Edge to a web page.
2. Select the Make a Web Note icon that appears to the right of the address bar (refer to Figure 14.1). The tab will change color, and the address bar will be replaced with the Web Notes toolbar, as shown in Figure 14.6.
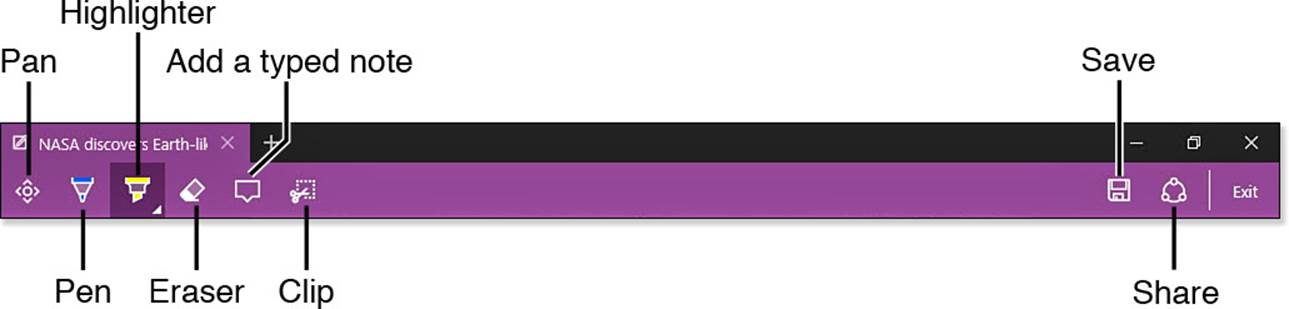
FIGURE 14.6 Web Notes includes several tools for annotating web pages and sharing your ideas.
3. Start drawing on the page with the Pen tool, or select a different tool to add notes, comments, or highlights.
4. Select the Eraser to remove a few notes just to see how it works. The Eraser tool can clear all notes.
5. Select the Pen or Highlight tool a second time to reveal and modify the color and size properties for each tool.
6. Select Add a Typed Note; then select a location on the page to anchor the note. Notice that typed notes are automatically numbered.
7. Type a note.
8. Select the numbered anchor point, and drag it to a different location on the web page.
9. Select the Clip tool. Select and drag to create a copy of an area of the web page. This selection is copied to the Windows clipboard and can then be pasted into another application using Paste or Ctrl+V.
10. Select Exit to return to the web page and clear all unsaved web notes.
Figure 14.7 shows a web page that was marked up with several web notes while in Reading View. Web notes you have created can be saved by clicking the Save button (as shown in Figure 14.6); your options are to save to Favorites, to the Reading List app for viewing later, or to the OneNote app.

FIGURE 14.7 Web notes can be created in the moment right in the web browser.
Web notes also can be shared. Currently, Microsoft Edge makes a flattened copy of the web page with your annotations and sends this to email recipients you indicate using the Mail app. Microsoft eventually intends Share to send a link that will open the same web page with your annotations present. People you share web notes with can add their own notes for collaboration.
Using the New Tab
Although using tabs is likely not new to you, you will find that Microsoft has thought a bit about what can be done with the tab that is created when selecting New Tab in Microsoft Edge. As shown in Figure 14.8, the New Tab personalizes itself by providing links and shortcuts that reflect your browsing history and favorites that have been noted in other apps that share their data with Microsoft Edge.
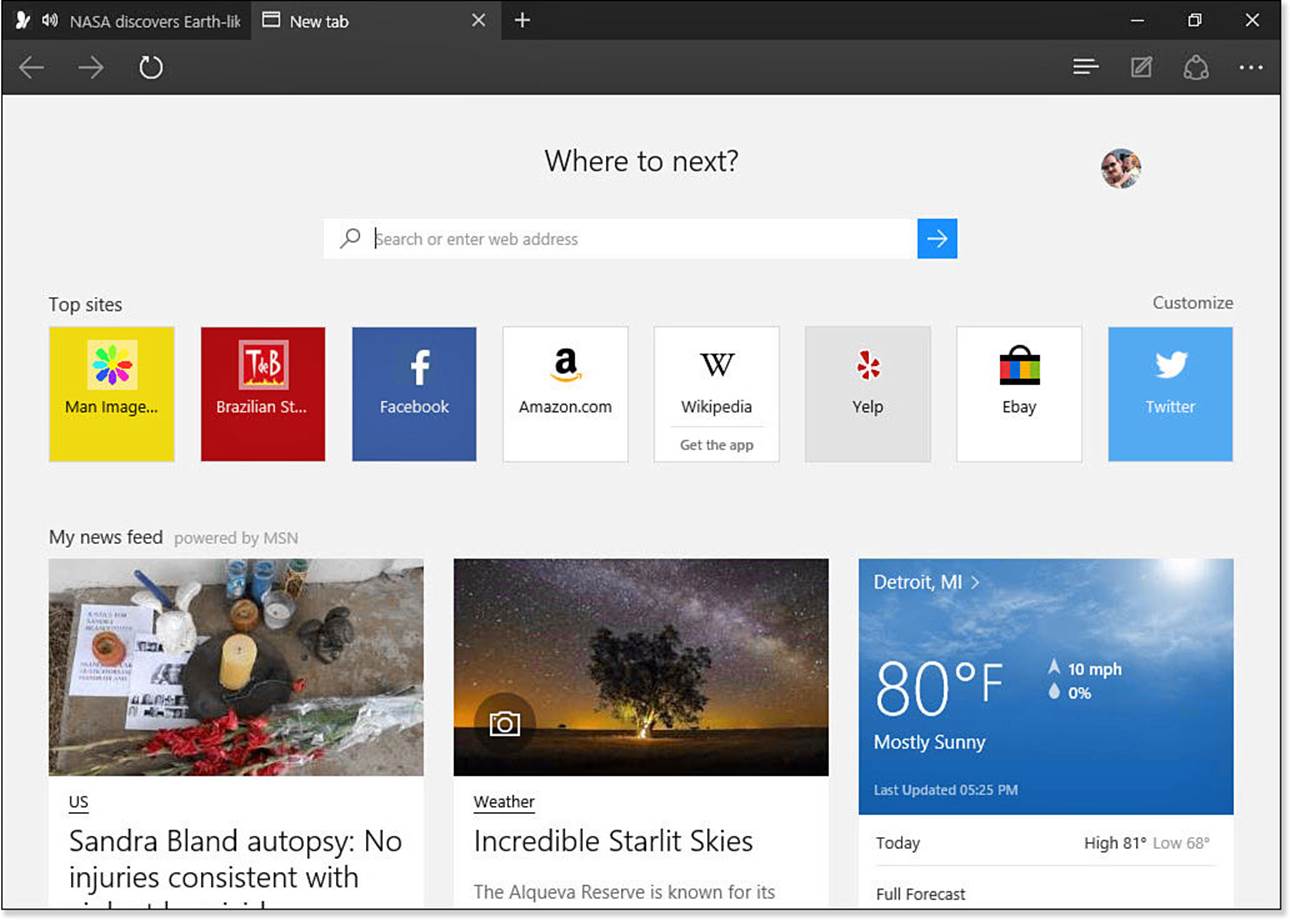
FIGURE 14.8 The New Tab can be a convenient, personalized starting point for your web browsing.
The New Tab includes several features that are worth noting:
• Customization and Account Settings—Select the icon with your picture to change account information, customize the New Tab page, or open a new InPrivate window.
• Search field—This figures prominently at the top of the page inviting you to start a search or enter a website address.
• Top Sites—These are indicated based on your navigating history. The sites you visit most often will appear here.
• Links—Links to new stories and other information are presented based on your favorites in MSN apps, such as News, Weather, Sports, Food & Drink, Money, and Health and Fitness.
Occasionally, you might see suggestions appear on the New Tab for apps or other suggestions based on the Windows Spotlight feature. If you decide that you do not benefit from all these suggestions, you can control what appears in the New Tab from the Microsoft Edge settings.
To control what appears on a new tab, follow these steps:
1. Open Microsoft Edge.
2. Select the More Actions button (refer to Figure 14.1) to open the Actions menu.
3. Select Settings. The Settings pane shown in Figure 14.9 will appear.
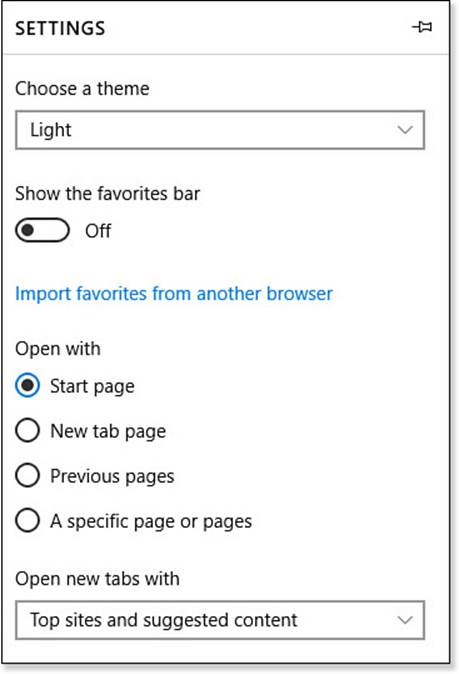
FIGURE 14.9 You can turn off the suggested content that appears in a new tab from the Microsoft Edge Settings pane.
4. Select the drop-down menu under Open New Tabs With. Choose between Top Sites and Suggested Content, Top Sites, and A Blank Page.
5. Click or tap a place outside of the Settings pane to close it; then select the New Tab button. Notice the content has changed based on your selection in step 4.
 Note
Note
Microsoft Edge also includes a Start tab. This is basically a New Tab that can be selected to open automatically when you open Microsoft Edge.
Browsing the Web with Microsoft Edge
Microsoft Edge has many great features. But none are worth anything if you can’t browse the Web and stop at sites you’re interested in. The following sections demonstrate a variety of ways you can get to your favorite websites or to websites you never knew existed.
Entering the URL of a Site You Want to Visit
The most direct way to navigate to a site is to type the name of the site you want to go to. Don’t worry—you don’t have to memorize complicated website addresses. Many times, just the main part of the address will do. For example, to visit Microsoft’s website, you don’t have to enterhttp://www.microsoft.com because just microsoft would do. Select the address bar and begin entering the name of the site you want to visit.
As you visit more sites, the browser is quick to recognize sites you have visited in the past after you enter just a few characters. As you enter characters into the address bar, the web browser tries to match your input with sites on these lists, as shown in Figure 14.10:
• The most popular sites on the Internet
• Sites you have visited in the past
• Search suggestions

FIGURE 14.10 Microsoft Edge suggests sites as you enter characters into the address bar. In this example, the characters y o u t u are entered, and a number of suggestions appear.
Searching the Web
Using Microsoft Edge’s address bar to perform searches is efficient. Searches can help you find sites on the Internet you probably never knew existed, as well as those you’re specifically searching for. Although Microsoft Edge is set up to use Bing as the default search engine, you can switch to other search engines that you prefer or that will provide more targeted searches. Depending on the topic you search for and the engine you want to use, you might see hundreds or even thousands of results returned.
To change the search engine used to perform searches from the address bar, follow these steps:
1. Open Microsoft Edge.
2. Select the More Actions button (refer to Figure 14.1) to open the Actions menu.
3. Select Settings. The Settings pane opens (refer to Figure 14.9).
4. Scroll down to Advanced Settings, and select View Advanced Settings. The Advanced Settings pane is shown.
5. Scroll down to Privacy and Services, as shown in Figure 14.11.
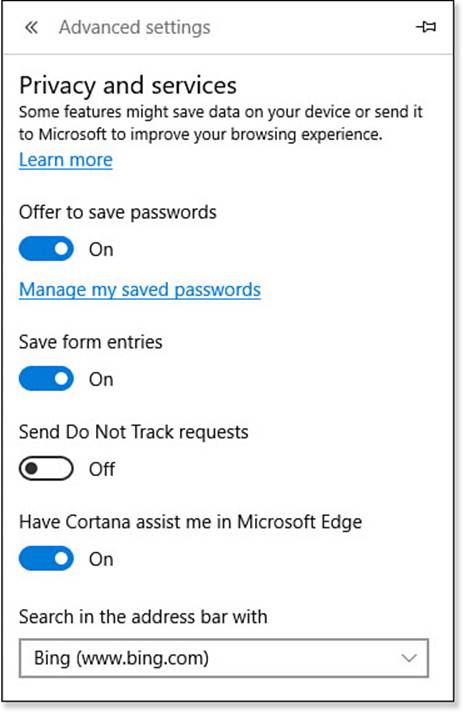
FIGURE 14.11 You can change the search engine used in the address bar of Microsoft Edge.
6. Select the drop-down menu below Search in the Address Bar With, and then select Add New.
7. Choose from search engines already listed, or follow prompts to add a new one. Select Add to add one to your list of search engines in Microsoft Edge.
8. Return to the Advanced Settings pane, and select the drop-down menu again under Search in the Address Bar With; then select the search engine you added.
9. Click or tap outside of the Settings pane to close it, and try the new search engine. Type a search word or phrase in the address bar. Figure 14.12 shows search results now are using the YouTube Video Search search engine.
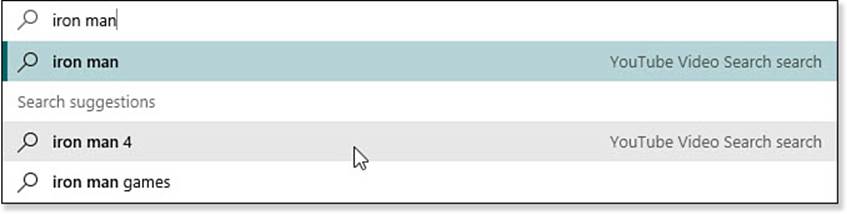
FIGURE 14.12 Microsoft Edge can suggest search results using whichever search engine you indicate.
10. Select a search result suggestion to open a web page with results using that search engine.
11. Repeat steps 2-6 to change the search engine that is used in the address bar.
Following a Hyperlink
It’s rare to come across a web page that does not have a link to another page. A link on a web page that brings you to another page is known as a hyperlink. A hyperlink normally has a color other than the rest of the text on the page, and often there is a line underneath the words of the hyperlink. A picture or even a word or headline larger than the other text on the pages also can be a hyperlink. On many sites, almost every element on the page links to another page.
Click or tap on a link to open the page targeted by the hyperlink. Whether that page opens in the same window or tab or in a new one depends on the website. If you want control over how it opens, right-click or tap and hold a link. This opens a context menu, as shown in Figure 14.13. From that menu, you can
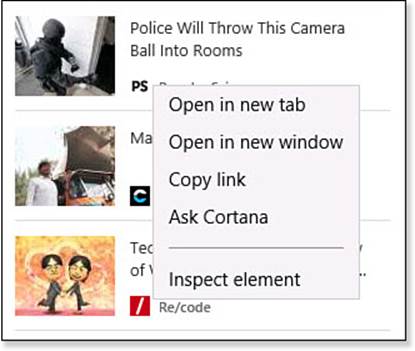
FIGURE 14.13 The context menu shows you the available options for a hyperlink.
• Copy the link so that you can use it somewhere else, such as in an email or another web browser.
• Open a new tab containing the page to which the link points.
• Open the page targeted by the hyperlink in a new page for side-by-side viewing.
• Use Ask Cortana to find other web pages related to the hyperlinked page.
• Perform some action based on the type of link you selected, such as saving a picture on the website to your computer.
Working with Favorites
Microsoft Edge keeps track of the sites you have visited recently, making it easy for you to revisit any of those sites, you likely will want to save some pages as Favorites. Sites that have been added as favorites will always be remembered even though you might visit them infrequently. You may even have a long list of favorite websites already saved in a browser on a different computer. The good news is that you can import that list of favorites rather than re-create all the work you have done in the past.
To add a website as a favorite, follow these steps:
1. Open Microsoft Edge to a web page you want to save.
2. Select the Favorites icon that appears to the right of the address bar (refer to Figure 14.1). A small pane will appear, as shown in Figure 14.14.
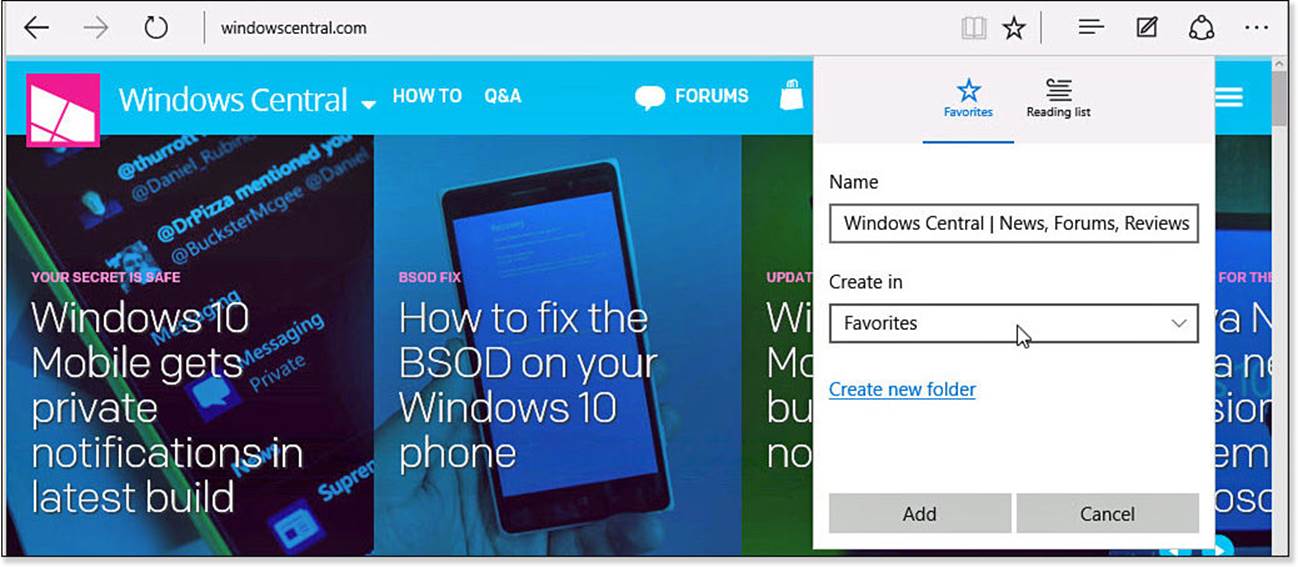
FIGURE 14.14 Add websites to your list of Favorites with as little as two clicks.
3. You might want to change the name of the favorite to something else. If you have many favorites, you should use a folder structure. Select the drop-down menu to change the folder for this link, or select Create New Folder to create one. Once everything looks the way you want, select Add to add it to the folder indicated. The Favorites icon will now be colored gold.
4. To view your Favorites, select the Hub icon (refer to Figure 14.1).
5. If it is not already shown, select the Favorites hub to see your saved websites, as shown in Figure 14.15.
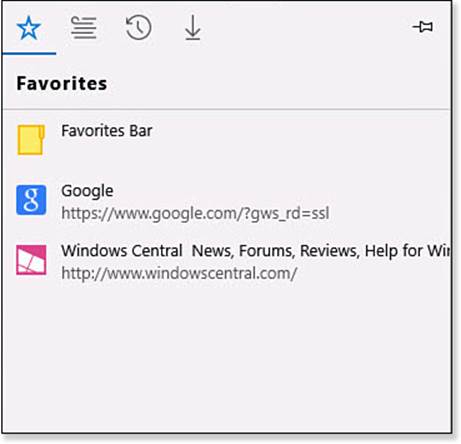
FIGURE 14.15 Favorite websites are saved to the Favorites hub.
Most modern web browsers allow you to import and export your favorites. Microsoft Edge currently supports only importing favorites from another web browser installed on the same device. In the future you might be able to import bookmarks directly from a file; until then, you should import bookmarks into Internet Explorer 11 first when bringing bookmarks over from a different device.
Tip
Importing favorites using a file from a different computer can be a bit of a challenge because this is a task that is not repeated very often. You might have to dig a bit to reveal the Import tool in Internet Explorer 11.
Right-click the title bar in an Internet Explorer window, and select Menu Bar. From the Menu bar, select File, Import and Export; then select Import from a File. Follow the prompts to navigate to a saved bookmark file. I tend to keep a copy of my bookmarks on my One Drive to make it easy to find from other devices.
To import bookmarks from Internet Explorer 11 to Microsoft Edge, follow these steps:
1. Open Microsoft Edge.
2. Select the More Actions button (refer to Figure 14.1) to open the Actions menu.
3. Select Settings. The Settings pane opens.
4. Select the link Import Favorites from Another Browser (refer to Figure 14.9).
5. Select the web browser from which you are importing favorites, and select Import. Microsoft Edge imports the bookmarks quickly. Select the Favorites hub to view the bookmarks and folders that were imported.
Using the Hub Pane
Microsoft Edge groups together a few important tools under the Hub button. Favorites, which was just discussed, is one of the hubs (refer to Figure 14.15). In addition to Favorites, you’ll see three more hubs:
• Reading List—You can select a web page for offline reading. The article also can be viewed directly from the Reading List app. When you select a web page as a favorite, you also have the option to add it to your Reading List (refer to Figure 14.14).
• History—History lets you backtrack to pages you have visited. This can be helpful to Microsoft Edge when you begin typing a website address that appears in your history. You can clear individual entries that appear in the History hub. Bring your cursor over an entry and select the Xfor any entries you want to remove. If you decide you would rather clear your entire history, select Clear All History.
• Downloads—If you download a document or an application, it will be found in the Downloads hub. Downloads can be cleared the same way as entries in the History hub. If you right-click a download, you also can report it as unsafe.
The Hub pane can be pinned to keep it visible. Select the thumbtack in the right corner to pin it. Click or tap outside the hub pane to autohide again.
Working with Tabs
A feature known as tabbed browsing enables you to have several websites open at one time in the same window, as shown in Figure 14.16. You can easily switch from one tab to another, which is helpful when comparing information or shopping for the same item on different websites. New tabs can be opened by selecting the New Tab button (refer to Figure 14.1) or selecting Open in New Tab from the context menu for hyperlinks (refer to Figure 14.13).
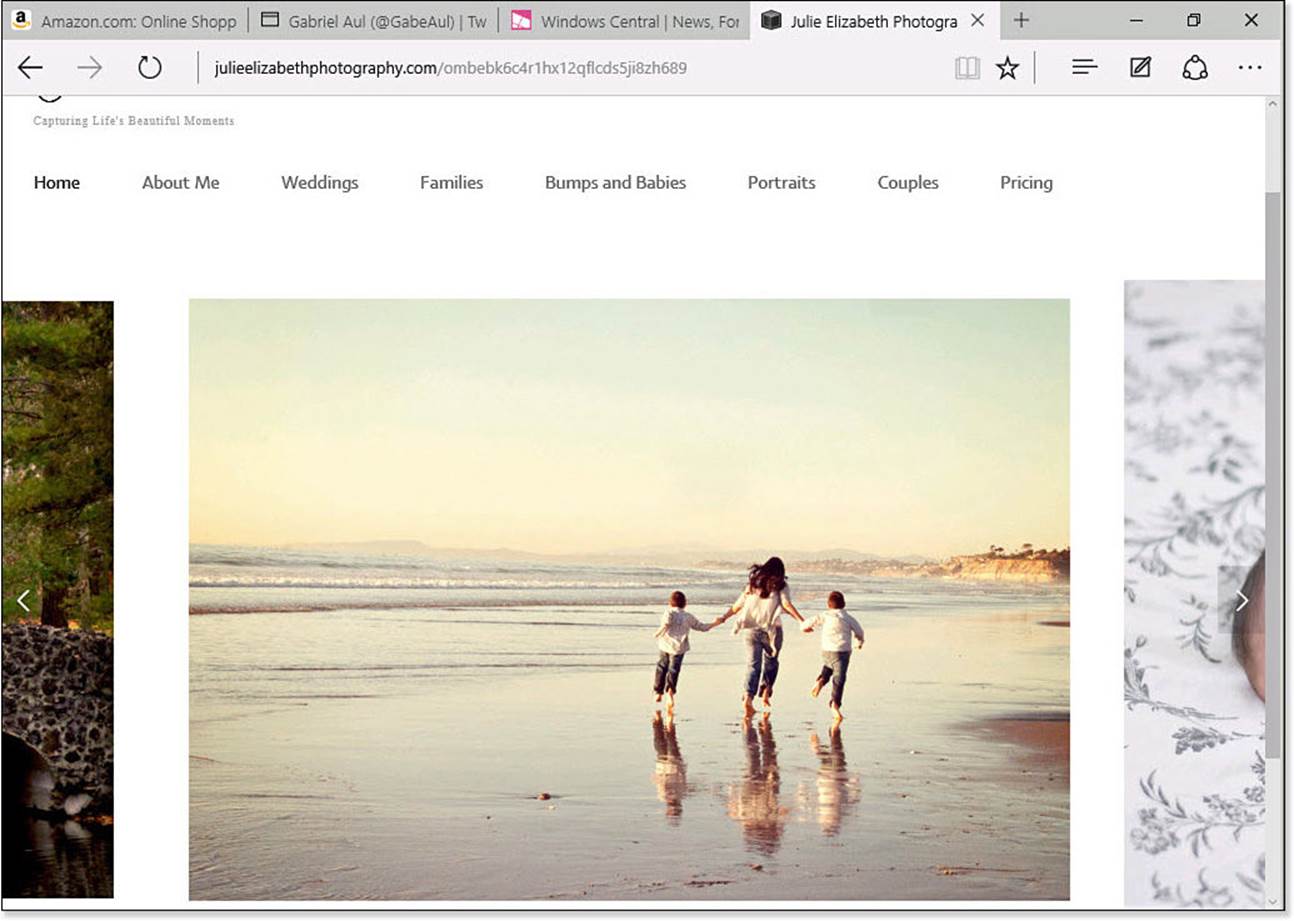
FIGURE 14.16 Microsoft Edge supports tabbed browsing.
Keep the following in mind when using tabbed browsing:
• Select tabs to jump from one tab to another.
• Select a tab and drag it out of position to open the tab in its own window.
• Close a single tab by selecting the X that appears on the right end of the tab.
• When closing Microsoft Edge while several tabs are open, you will be asked if you want to close all tabs. This is intended to prevent you from accidently closing a tab that you are not finished with. You can select Always Close All Tabs to make this a default action.
• Right-click a tab to bring up tab tools, as shown in Figure 14.17. Although some options are obvious, a couple should be pointed out:
• Reopen Closed Tab—Reopens a tab that was recently closed
• Close Other Tabs—Closes all other tabs in that instance of Microsoft Edge
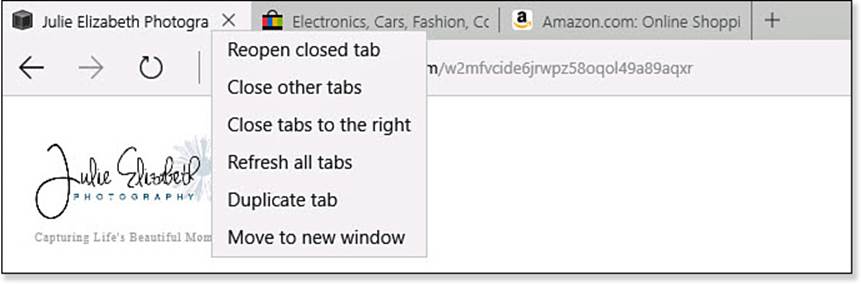
FIGURE 14.17 Right-click a tab to bring up tab tools.
Enhancing Your Browsing Experience
The actions menu provides you with several tools designed to improve your browsing experience and perform basic tasks. Select the More Actions button (refer to Figure 14.1) to open the Actions menu shown in Figure 14.18.
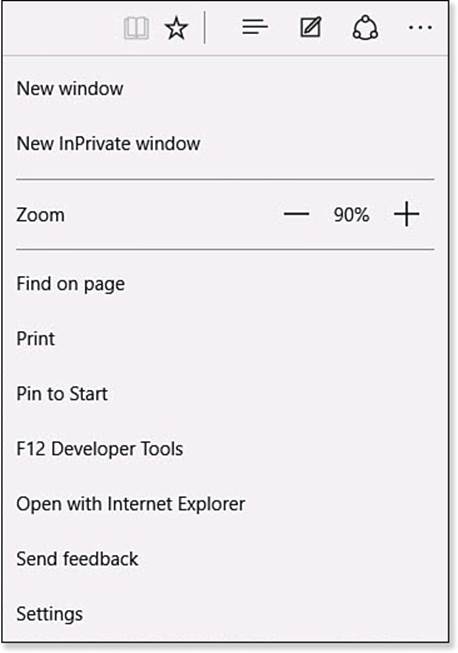
FIGURE 14.18 Use the More Actions menu to perform additional tasks in Microsoft Edge.
Actions you can perform include
• New Window—A new Microsoft Edge window is opened.
• New InPrivate Window—A new window is opened that will not leave anything behind after it’s closed. Using InPrivate browsing is covered in Bonus Chapter 4, “Keeping Your Computer Healthy.”
• Zoom—Enlarge or shrink text and images. You also can do this with a mouse by pressing the Ctrl key and then turning the scroll wheel on your mouse.
• Find on Page—Perform a search for a word or phrase on a web page. A great keyboard shortcut to remember for this is Ctrl+F.
• Print—Send the web page to the Windows Print pane. You can print to a physical printer or create a PDF file of the web page.
• Pin to Start—Add a shortcut to the web page that will appear in the Start menu.
• F12 Developer Tools—This is not something you are likely to use. Selecting this opens a new window with tools and visible code intended for individuals who need to work with and examine the actual code for a web page.
• Open with Internet Explorer—Use this when a web page is not displaying correctly or when tools are not working as expected. The web page might have older code that requires tools that are included in Internet Explorer 11.
• Settings—Select this to make changes to the appearance and behavior of Microsoft Edge.
Most of these options are no doubt familiar to you or are easily understood. The next section looks more closely at some of the settings that have not been considered elsewhere in this chapter.
Getting to Know Microsoft Edge Settings
Microsoft Edge is new, and as a result there are specific settings that might be unfamiliar to you and others located in unfamiliar places.
It is also worth noting that Microsoft is working hard to bring this universal web browser to devices running variations of Windows 10, such as HoloLens, Windows 10 smartphones, and the Xbox One game console. You can therefore expect new settings to appear and be rearranged as Microsoft Edge receives further updates.
Options available in the Settings pane include
• Choose a Theme—Microsoft Edge currently enables you to choose between light and dark theme choices (refer to Figure 14.19).
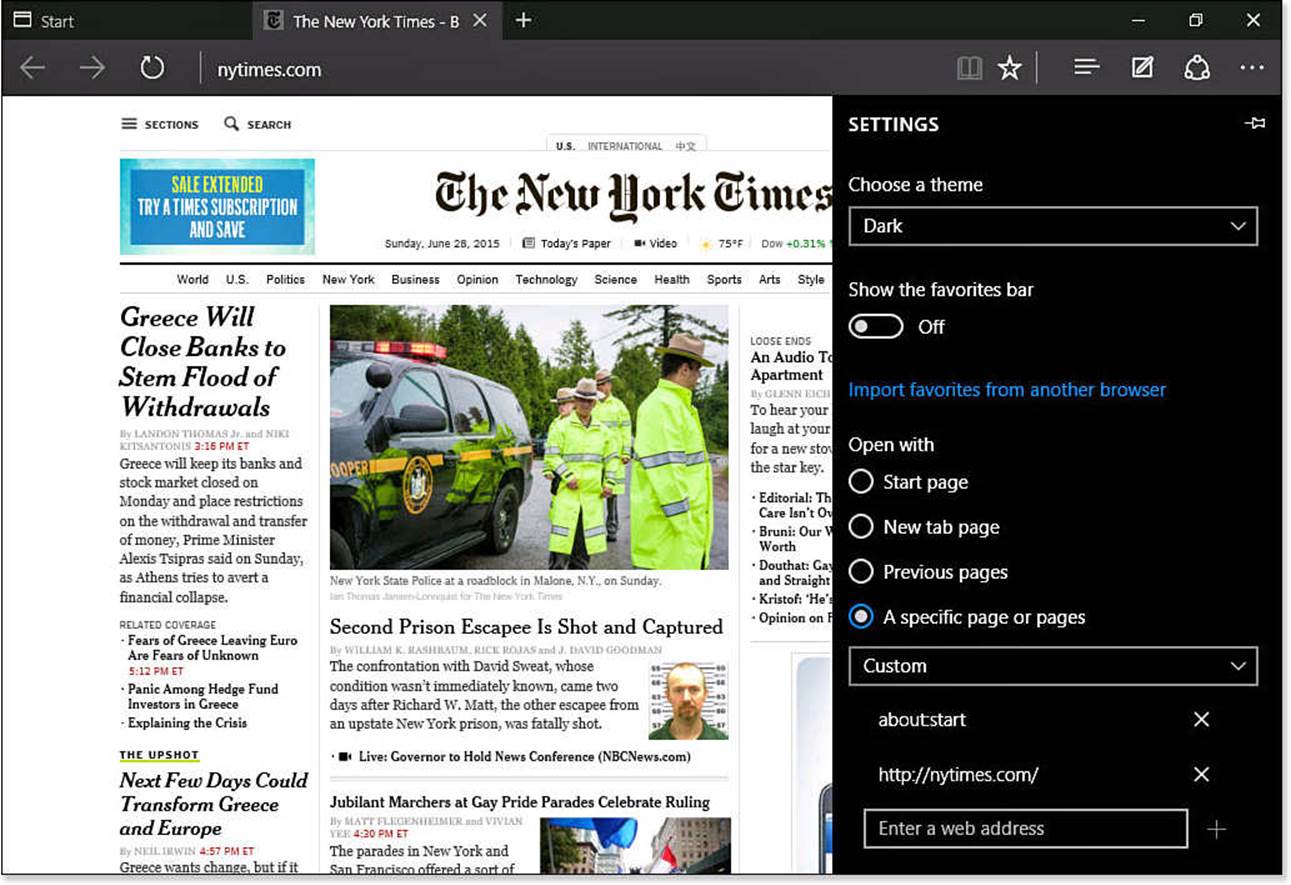
FIGURE 14.19 You can configure specific websites to open automatically when you open Microsoft Edge.
• Show the Favorites Bar—Use this switch to enable a toolbar that appears just below the address bar. Favorites added to the Favorites bar will always be visible.
• Open with—Choose one of the options to indicate the default content that will open with Microsoft Edge. As shown in Figure 14.19, you can select a specific page or pages to open automatically and use the Custom option to add your own URL to the list. Select the X for any choice you want to remove from this list. You can stick with the Start page or New tab page or have Microsoft Edge open the same tabs that were open in the last browsing session.
• Open New Tabs with—This was discussed earlier in this chapter in the section “Using the New Tab.”
• Clear Browsing Data—You can protect your privacy by clearing your browsing data. Select this button to selectively clear things like your browsing history, passwords, cookies, and much more. See Bonus Chapter 4 for more information on securely browsing the Internet.
• Reading—This was discussed earlier in this chapter in the section “Using Reading View.”
• Advanced Settings—Advanced Settings includes settings that control how your web browser interacts with web pages. Many settings here are covered in other portions of the book, especially those related to privacy and services. Some settings include
• Show the Home Button—Enable this setting and indicate your home web page. This is not enabled by default, though it can be a useful feature.
• Offer to Save Passwords—This is enabled by default, although in some situations it can be wise to turn this setting Off, such as when someone else is sharing your computer.
• Save Form Entries—Enabled by default, this setting can remember common entries such as addresses and phone numbers that will appear as you fill in a form on a website. This makes filling in forms easier, but again you might want to disable this on a device that is shared.
• Have Cortana Assist Me in Microsoft Edge—If Cortana is enabled on your device, you can disable it in Microsoft Edge by sliding the switch to Off.
There are additional settings that you can turn on and off. In some cases, disabling a feature can affect how well web pages work in Microsoft Edge. Other settings can make your device more secure. If you are in doubt about a setting, it is better to leave it as it is.
Using Internet Explorer
Even though Microsoft Edge is the new web browser that most people will use by default, some situations might require the use of Internet Explorer 11 (see Figure 14.20). Microsoft decided to include Internet Explorer 11 to ensure compatibility with websites and web applications that rely on older web technologies such as Silverlight or ActiveX. A business or an organization can even set up its computers to use Internet Explorer by default.
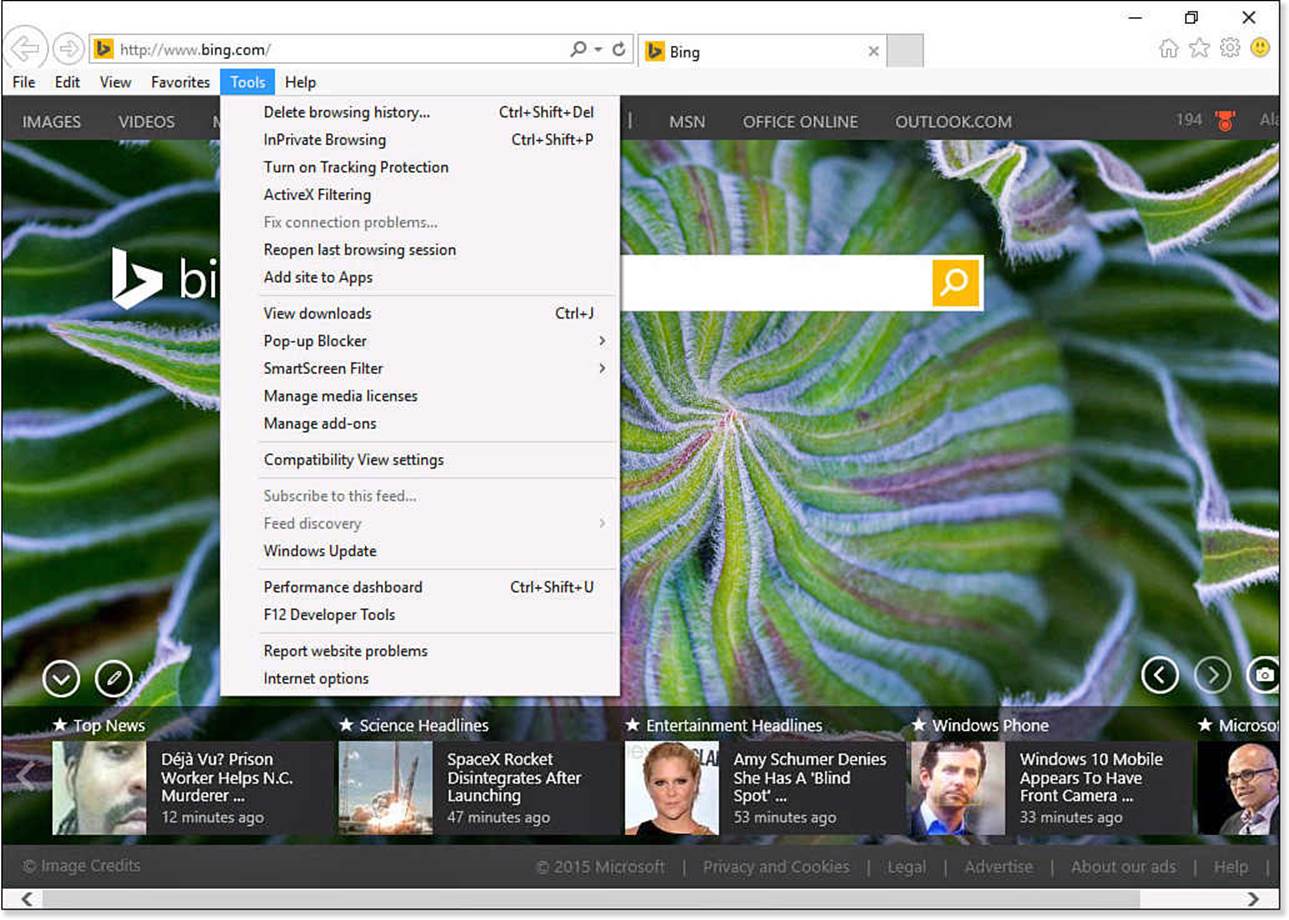
FIGURE 14.20 Internet Explorer 11 provides Windows users with a web browser that can still work with older websites and apps.
Tip
Should you use Internet Explorer or Microsoft Edge? Unless you have a specific reason to fall back on Internet Explorer, Microsoft Edge is the browser you should be using. If you need to use Internet Explorer, then there are a few things that are included here to make your life easier. The first thing you may want to do is pin Internet Explorer to the taskbar.
Creating Shortcuts to Websites
You have seen how Microsoft Edge enables you to pin websites to the Start menu using the Actions menu. Internet Explorer also includes a handy tool that allows you to add a website to the list of All Apps. These shortcuts automatically open in the Desktop browser.
To add a website from Internet Explorer to your list of apps, follow these steps:
1. From the search box on your taskbar type internet explorer. Select Internet Explorer from the search results.
2. Open a website you want to add to your All Apps menu.
3. From the menu bar, select Tools to open the Tools menu (refer to Figure 14.20).
4. Select Add Site to Apps.
5. In the Internet Explorer dialog box that appears, select the Add button.
Websites added as “apps” can be pinned to the Start menu or the taskbar using steps outlined back in Chapter 3, “Optimizing the Start Menu.” This shortcut in the Apps screen still lets you easily open websites in the correct browser when working in the modern user interface (UI) environment.
Opening All Links in the Desktop Browser
If you need or prefer to use the Desktop browser exclusively, there is a setting for that. Follow these steps:
1. From the Start menu, select Settings to open the Settings app.
2. Select System and then Defaults Apps.
3. Scroll down to Web Browser and select the current web browser listed.
4. From the drop-down menu, select Internet Explorer.
5. Close the Settings app.
Any websites, including ones that were pinned to the Start screen using the modern browser will now open on the Desktop browser. Use the preceding steps to change back if you want to at a later time.
The Absolute Minimum
• Two Internet browsers are available in Windows 10. Microsoft Edge is designed for a greater user experience with a minimum number of buttons and other onscreen elements. Internet Explorer 11 supports all the traditional browser requirements, such as plug-ins, toolbars, and older technologies like ActiveX.
• There are just a handful of visible controls in the Windows 10 browser. You can select More Actions (...) to reveal additional tasks and settings.
• Cortana can offer assistance while browsing the Web—watch for links that let you know it has additional information or select Ask Cortana from the context menu of selected text or a hyperlink.
• Reading View is a feature you should certainly try when reading articles on websites.
• Annotate websites using Web Notes and then save or share the results.
• Look over Settings in Microsoft Edge that allow you to customize the New Tab features.
• As you navigate to different sites, the sites remain open as tabs. This makes it easy to jump back to any open site you like.
All materials on the site are licensed Creative Commons Attribution-Sharealike 3.0 Unported CC BY-SA 3.0 & GNU Free Documentation License (GFDL)
If you are the copyright holder of any material contained on our site and intend to remove it, please contact our site administrator for approval.
© 2016-2026 All site design rights belong to S.Y.A.