Windows 10. Absolute Beginner’s Guide (2016)
Part III: Being Productive
16. Setting Up the Mail App
In This Chapter
• Exploring the Mail App
• Setting Up Email Accounts
• Tweaking Settings for Email Accounts
This chapter considers the initial setup of the Mail app included in Windows 10. The following chapter, “Using the Mail App,” considers the everyday ins and outs of using the Mail app to work with your email. The Mail app is a modern Windows app that can be launched directly from the Start menu.
There are certainly many applications that have been designed to help you manage your email. Perhaps you have used Outlook or Outlook Express in the past?
You will find the free Outlook Mail app to be powerful and easy to use with many of the essential features you expect to find in a go-to email application. Although it appears as simply the Mail app on your Start menu, it is actually part of the universal app named Outlook Mail and Outlook Calendar. This explains why you can use buttons to jump between the Mail and Calendar apps.
If your primary need is to exchange email with family and friends, including sending and receiving pictures and other attachments, this app should be perfect for you. It is already integrated with all the important parts of Windows, such as your contacts in the People app. (The People app is covered in detail in Chapter 15, “Keeping Up with Your Contacts in the People App.”)
Exploring the Mail App
To start the Mail app, select the Mail tile that is located in the Start menu, as shown in Figure 16.1.
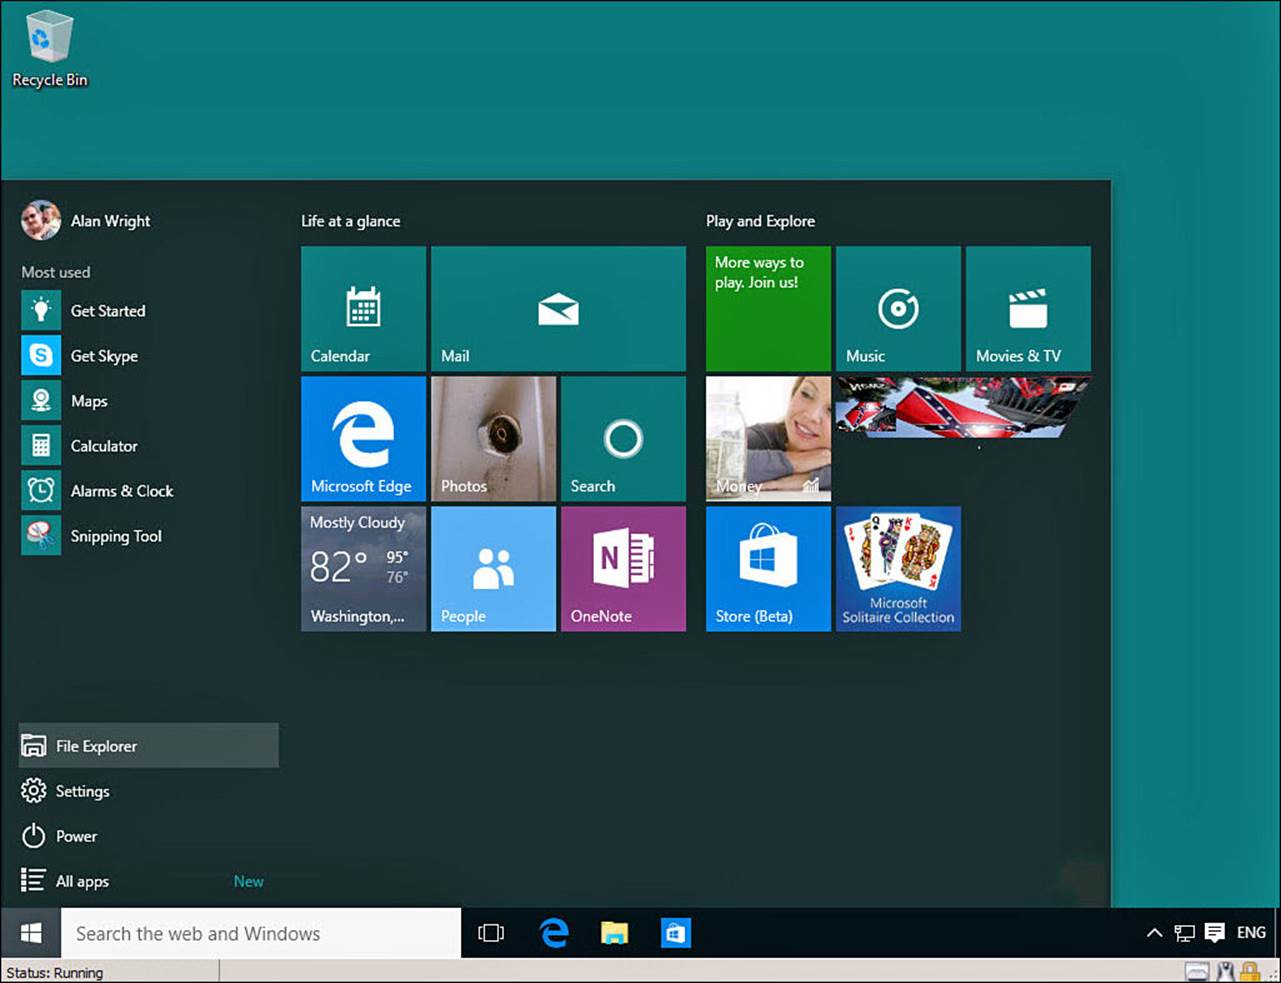
FIGURE 16.1 Select the Mail tile to launch the Mail app.
After starting the Mail app, you see a short bit of animation before the app starts. Depending on how many email accounts are set up in your Mail app, your screen will look more or less like the one shown in Figure 16.2. Your list of accounts and folders appears on the left in the Navigation bar. The middle pane shows a messages list containing the messages in the folder currently selected from the folder list in the hamburger menu. The message selected appears in the message pane on the right.
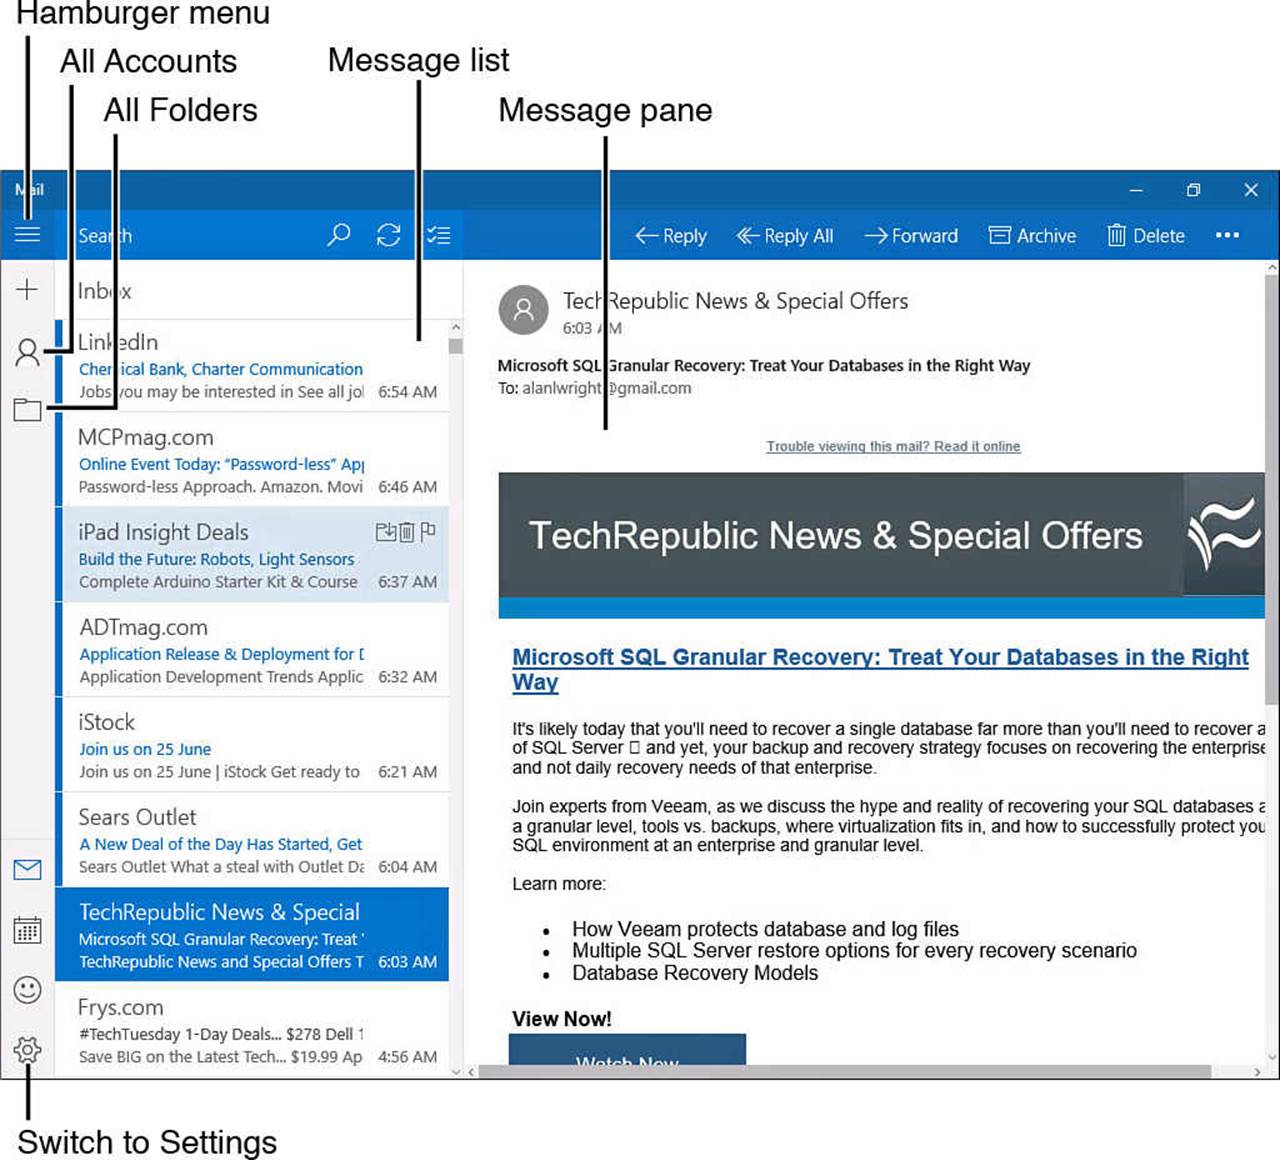
FIGURE 16.2 The Mail app shows your accounts and folders, your Inbox, and the selected message.
 Note
Note
If the account you use to sign in to Windows is a Microsoft account, an email account is set up automatically for you using the same credentials you use to sign in.
Setting Up Your Email Accounts
One of the best features of the Mail app is how it brings together your email from all sources. To see all your email, you need to set up the Mail app to retrieve and send mail from the various email services you use. The Mail app works with the following email providers:
• Outlook.com—Microsoft’s web email service is known as Outlook.com (previously named Hotmail); you still might see Hotmail.com or Live.com email addresses. Regardless of the name, Outlook.com is Microsoft’s primary email service, and the Mail app has been updated withOutlook.com in mind.
• Exchange—The Exchange option in the Mail app is for adding email accounts that use Exchange or that are included with an Office 365 subscription. Both of these email types are aimed at corporate customers. The Mail app is one of the first apps that enables users to retrieve their Exchange email without Microsoft Outlook.
• Google—Gmail is Google’s popular email service. You can learn about Google’s email service at www.google.com.
• Yahoo! Mail—Yahoo! is a popular email service supported in the Mail app.
• iCloud—iCloud email is supported in the Mail app.
• Other—You can automatically configure or use manual configuration for email accounts that use IMAP, POP, or Exchange ActiveSync.
You can create as many accounts in the Mail app as you need. If you use just one email service and the service meets your needs, there is no reason to create more accounts. When you’re ready to set up the mail account for the first time or add an email account, follow these steps:
1. Start the Mail app by selecting it from the Start menu.
2. If you are greeted by a welcome screen, select Get Started. The Accounts screen shown in Figure 16.3 will appear. Jump to step 4.
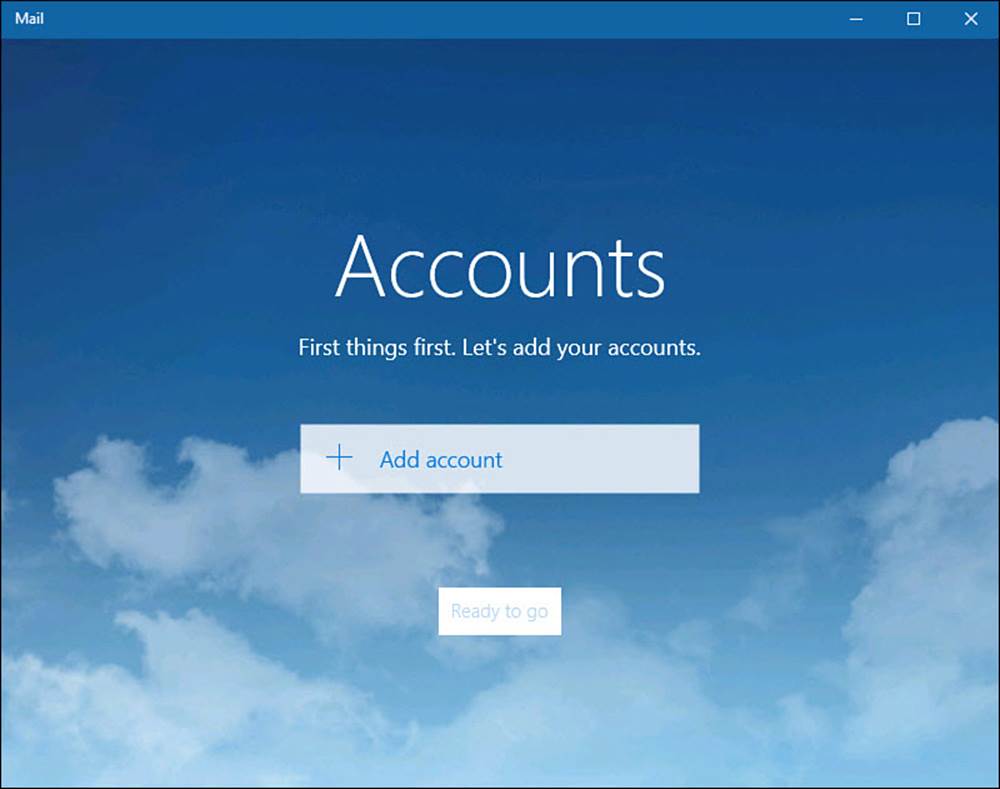
FIGURE 16.3 You are guided through the process of setting up your accounts the first time you open the Mail app.
3. If the Mail app opens to an email account that has been set up previously, select Switch to Settings and from the Settings pane select Accounts to add additional accounts.
4. Select Add Account to get started. A screen like the one shown in Figure 16.4 appears, with a list of the email services you can set up.
From here, check out the following section that applies to the type of email account you want to set up.
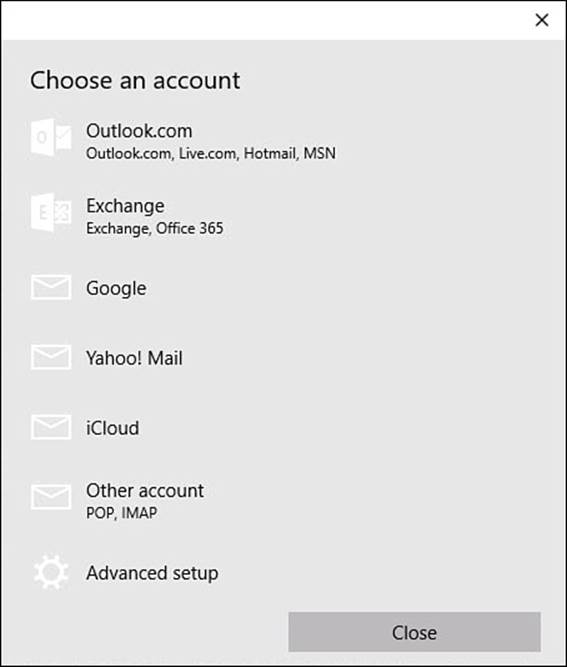
FIGURE 16.4 Select an email service to add to the Mail app.
Setting Up Your Outlook.com, Google, Yahoo!, iCloud, POP, or IMAP Account
These email account types are combined because they all have the same basic steps simply requiring a username and password. To set up your Outlook, Google, Yahoo!, iCloud, POP, or IMAP account with the Mail app, start with the four steps at the end of the preceding “Setting Up Your Email Accounts” section and then continue with the followings steps:
1. Select Outlook.com, Google, Yahoo!, iCloud, or Other Account. A screen like the one shown in Figure 16.5 appears.
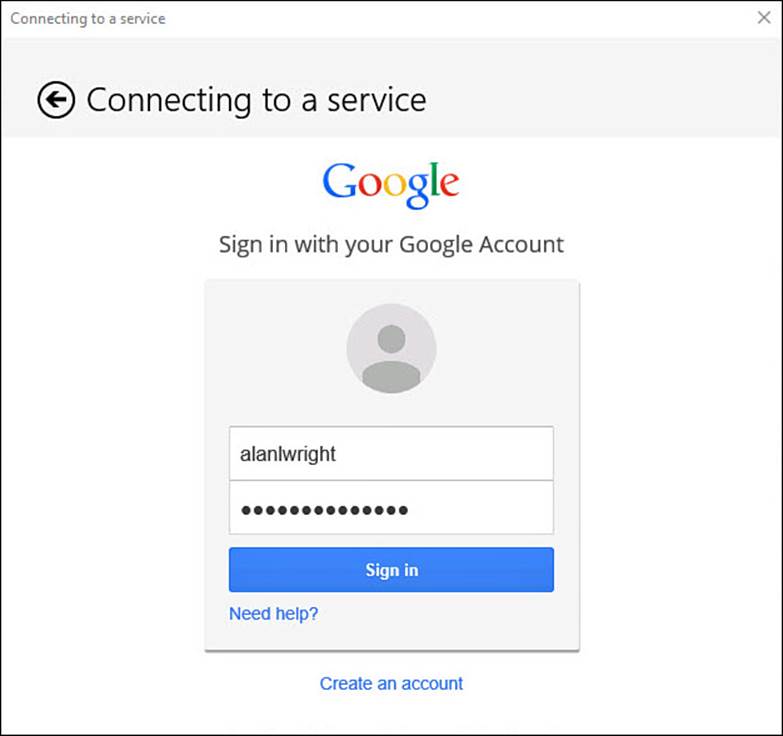
FIGURE 16.5 Google requires just two pieces of information to connect to the server.
2. Enter the email address and password for your account.
To verify you entered your password correctly, tap and hold or click and hold the Password Preview button at the end of the Password box.
3. Select Sign In. The Mail app connects to the email provider to complete setting up your account.
4. Depending on the email service, you may see a screen requesting permission to manage various features of the account like the one shown in Figure 16.6. Scroll down if necessary and select Accept to finish connecting the account.
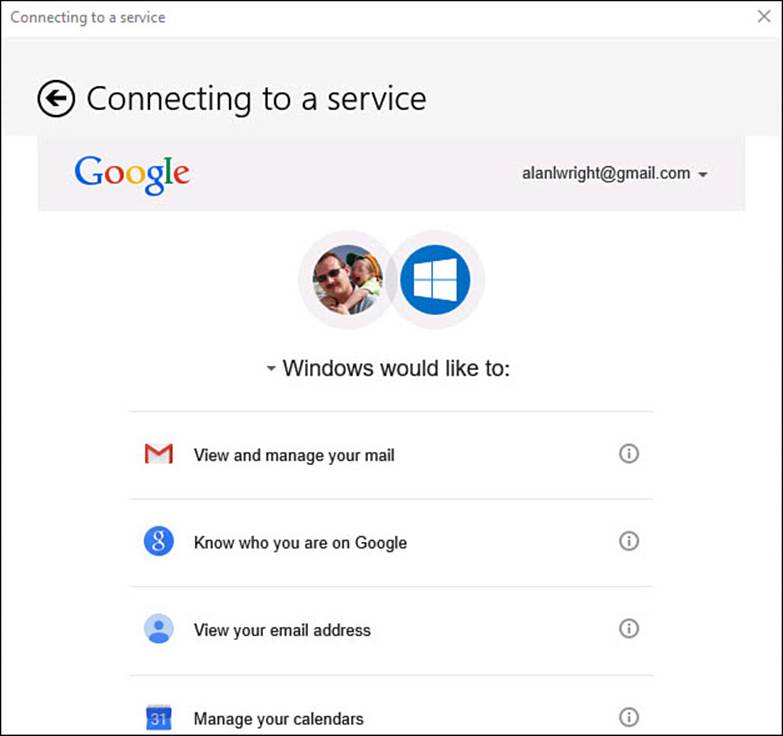
FIGURE 16.6 Windows 10 asks for your permission when accessing features in addition to email.
5. You will see a message letting you know the connection was successful; you can now select Done.
6. In some cases you will be asked for permission to allow Windows to save the account credentials. If you prefer to let Windows sign you in automatically, click Yes. Otherwise, click Skip and expect to be prompted for your password when you want to access this email account the next time. Your new account appears at the bottom of the list of accounts in the Navigation bar.
 Tip
Tip
For some accounts you need to enter your full email address in the Email Address field, including the @yahoo.com portion.
Setting Up Your Exchange or Office 365 Account
To set up your Exchange or Office 365 account with the Mail app, start with the four steps at the end of the “Setting Up Your Email Accounts” section and then continue with the followings steps:
1. Select Exchange.
2. Enter the email address for your account and select Next. The Mail app will attempt to locate your account settings.
3. Once the account settings are verified, you will be prompted to provide your password as shown in Figure 16.7. To verify you entered your password correctly, tap and hold or click and hold the Password Preview button at the end of the Password box. Select Sign In.
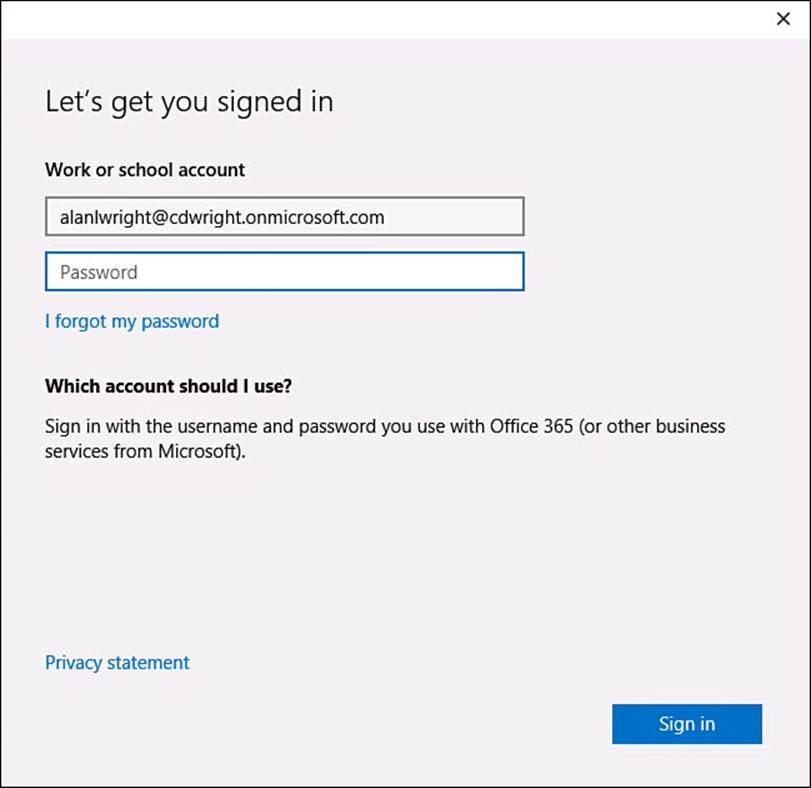
FIGURE 16.7 Exchange and corporate Office 365 accounts will ask for a password after the account has been verified.
4. You might have to enroll your device depending on the settings your organization has put in place, especially when using connecting to an Office 365 account that is managed by an organization. Follow the prompts to enroll your device.
5. You might see a screen notifying you that security settings will need to be changed on your computer to finish connecting this email account, as shown in Figure 16.8. This will appear if your password requirements and settings for logging in to the device are more relaxed than is specified by your organization. Corporate security settings tend to be more restrictive to protect sensitive data that can be accessed by means of the email account contents. You will need to select Enforce These Policies to finish setting up the account. The Mail app connects to the Exchange server to complete setting up your account.
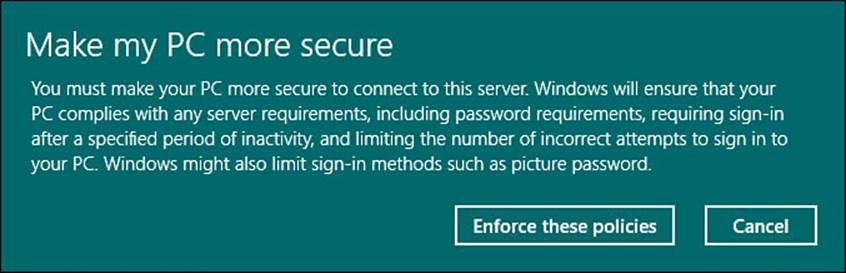
FIGURE 16.8 Exchange and Office 365 might require more restrictive security settings to be enforced on your device.
6. Select Done to close the setup window. Your new account appears at the bottom of the list of accounts in the Navigation bar.
Manually Setting Up an Email Account Using Exchange, EAS, POP, or IMAP
In some cases email accounts are not able to be configured automatically by the Mail app. Perhaps specific information related to server names or ports is required that the Mail app could not retrieve by itself. You will need to check with your email service provider for information related to email client setup. To set up an email account manually with the Mail app, start with the four steps at the end of the “Setting Up Your Email Accounts” section and then continue with the followings steps:
1. Select Advanced Setup.
2. Select Exchange Activesync (Exchange/EAS) or Internet Mail (IMAP or POP), as shown in Figure 16.9. If you’re selecting Exchange ActiveSync, continue on to the next step; jump to step 4 if you’re selecting Internet email.
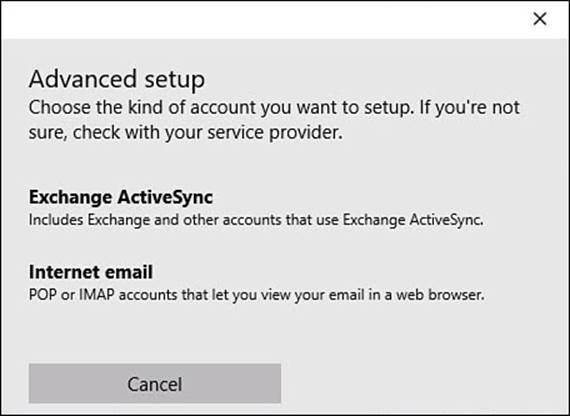
FIGURE 16.9 The Mail app provides an easy-to-use interface for manually configuring web-based email accounts like EAS, POP, and IMAP.
3. To set up Exchange ActiveSync, use the information fields shown in Figure 16.10 to provide the requested account information:
• Enter your Email Address and Password for your account. To verify you entered your password correctly, tap and hold or click and hold the Password Preview button at the end of the Password box.
• Enter the User Name for the account.
• Enter your Domain.
• Enter your Exchange Server.
• Indicate whether SSL is required for the connection.
• Provide the Account Name as you would like it to appear in the Mail app.
• Select Sign In when finished. Your new account appears at the bottom of the list of accounts in the Mail app.
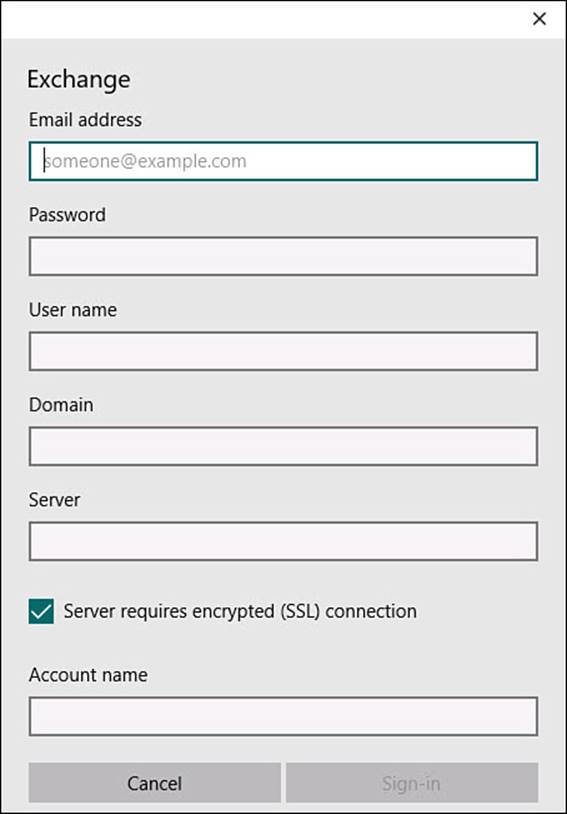
FIGURE 16.10 You can manually indicate settings to connect to an Exchange email account.
4. To set up Internet Mail, use the information fields to provide the requested account information:
• Enter the Account Name as you would like it to appear in the Mail app.
• Enter Your Name as you would like it to appear on sent messages.
• Indicate the Account Type (POP3 or IMAP4).
• Enter your User Name and Password for your account.
• To verify you entered your password correctly, tap and hold or click and hold the Password Preview button at the end of the Password box.
• Indicate the Incoming and Outgoing Email Servers.
• Use checkboxes to indicate the correct security settings as indicated by your email service provider (see Figure 16.11).
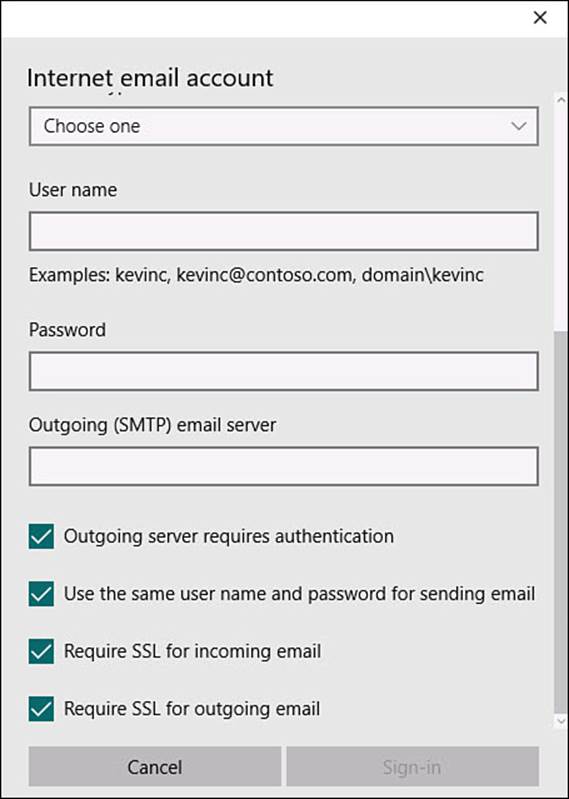
FIGURE 16.11 You can manually indicate settings to connect to an online email account using POP or IMAP.
• Select Sign In when you’re finished. Your new account appears at the bottom of the list of accounts in the Mail app.
Managing Your Email Accounts
After you have set up your email accounts, you can jump between your accounts easily by selecting Accounts in the hamburger menu of the Mail, as shown in Figure 16.12. Select an account to view emails and folders from that account. After the initial setup of your accounts, you can easily go back and tweak any settings or options you want. You can change how notifications occur, how long messages are kept locally, whether external images are downloaded, the default email signature, account credentials, and server and port information. Settings you can configure are unique to each email account.
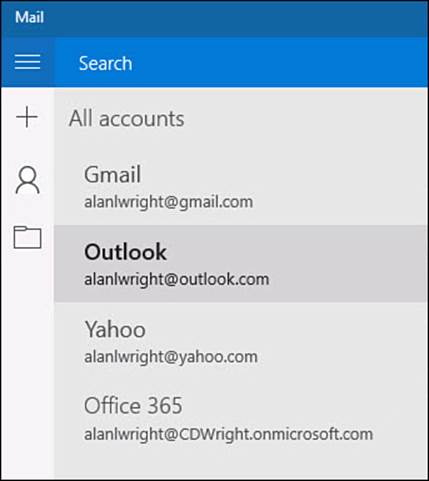
FIGURE 16.12 You can switch between your connected email accounts in the Mail app.
Managing Account Settings
Account Settings include the name of the account, sync and connection settings, and the ability to remove an account.
To modify the current settings for an email account in the Mail app, follow these steps:
1. Start the Mail app by selecting it from the Start menu.
2. From the Mail app, open the Settings pane by selecting Switch to Settings (refer to Figure 16.2).
3. From the Settings pane, select Accounts. A screen appears with a list of the mail accounts that have been set up so far.
4. Select an account from the list of configured accounts. The account settings pane will appear for that account similar to the one shown in Figure 16.13. From here you can change the name for the account that appears in the Mail app. Additional options appear in this pane as well:
• To manage other details for this account, select Change Mailbox Sync Settings and proceed to step 5.
• In some cases you may see the option to select Change Account Settings. Selecting this will open a web browser that goes to your online account where you can manage details related to your Microsoft account.
• To remove an account from the Mail app, select Delete Account. You will be asked to confirm your decision. Select Delete again to remove the account from the Mail app.
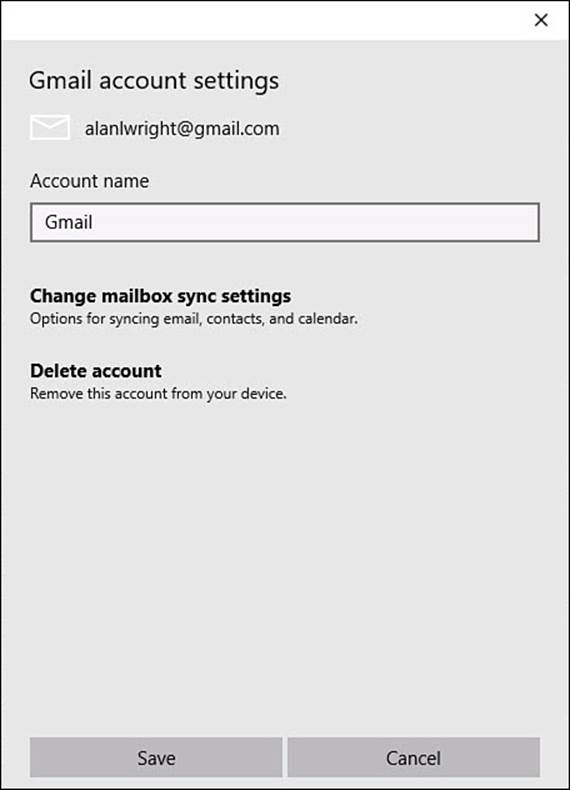
FIGURE 16.13 Adjust settings and customize how an account is configured from the Accounts pane.
5. After selecting Change Mailbox Sync Settings, you will see the available sync settings for that account, as shown in Figure 16.14. Make any changes for that account using the fields in the pane. Click Done to keep your changes and close the settings pane for that account, or clickCancel to close the pane, disregarding changes.
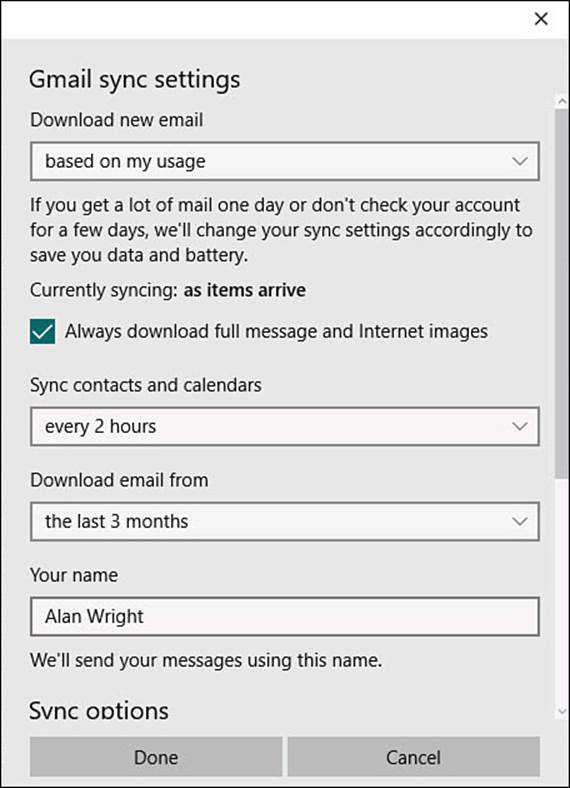
FIGURE 16.14 Manage very specific settings related to how your email is synced to your device in the Mail app.
6. You are returned to the account settings pane from step 4. Select Save to apply any changes. You are returned to the Mail app.
You can tweak several settings in the sync settings pane for each email account. Some accounts offer different options depending on the email service. Here are some of the common sync settings you will encounter:
• Download New Email—Select choices from the drop-down menu to control how often checks are made for new emails. Settings range from As Items Arrive to Manually.
• Always Download Full Message and Internet Images—Use a checkbox to enable or disable this option. Turn this off if you want to conserve space or data.
• Download Email From—Select from the drop-down menu to control how many days of email history will be maintained and displayed for this email account.
• Sync Options—Use the switches to select which items are synchronized to this device, You might see only Email, although Contacts and Calendar are also common choices.
• Your Name—Indicate the name that will show when emails have been sent from the Mail app for this account.
• Advanced Mailbox Settings—Select this to expand the settings that are configured to connect to the account service. Incoming email, outgoing email, contact, and calendar servers as well as the current security settings are listed.
Managing Account Options
Account options include features such as swiping on a touchscreen device, email signatures, and notifications.
To modify the current options for an email account in the Mail app, follow these steps:
1. Start the Mail app by selecting it from the Start menu.
2. From the Mail app, open the Settings pane by selecting Switch to Settings (refer to Figure 16.2).
3. From the Settings pane select Options.
4. The Options pane, shown in Figure 16.15, includes several features that you can manage:
• Quick Actions relates to how swipe gestures are used on a touchscreen device. They also control which icons appear on emails in the message list. Quick Actions can be set to Set or Clear a Flag, Mark as Read or Unread, Archive, Delete, or Move. To use a Quick Action, swipe the message to the right or left on a touchscreen or select the Quick Action icon on the message.
• Signature allows you to enable the insertion of a signature to sent emails using a switch. The Text field allows you to type in a signature.
• Notifications includes a switch to include notifications in your Actions Center. You can also enable banner notifications or sound notifications using checkboxes.
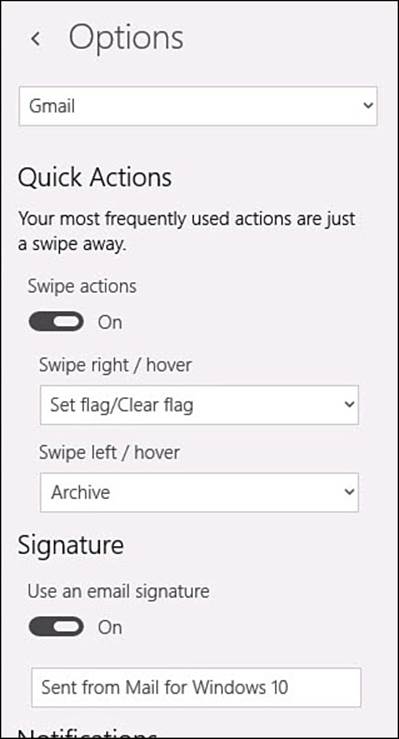
FIGURE 16.15 Manage options for your email accounts using settings for Quick Actions, signatures, and notifications.
Options can be set differently for each account. You can jump between accounts within the Options pane by selecting accounts from the drop-down menu that appears at the top of the Options pane.
The Absolute Minimum
• The Mail app is provided for free with Windows 10. Although you might find email programs with more functionality, it is hard to justify paying for a program when the Mail app is free.
• With the Mail app, you can bring together your email from many of your accounts and services, including Microsoft Exchange, Google, Yahoo!, and more. This means you can read email from all your accounts in one place but still author and send emails from any account you choose.
• You can tweak many account settings, including how many long messages are retained and whether email is synced for a given account.
• Use the Email Signature to add your own personalized message to all outgoing messages.
• Use settings for notifications to manage how you get alerted to new emails for each account.
• Set up Quick Actions to make often repeated tasks easy to find.
All materials on the site are licensed Creative Commons Attribution-Sharealike 3.0 Unported CC BY-SA 3.0 & GNU Free Documentation License (GFDL)
If you are the copyright holder of any material contained on our site and intend to remove it, please contact our site administrator for approval.
© 2016-2026 All site design rights belong to S.Y.A.