Windows 10. Absolute Beginner’s Guide (2016)
Part III: Being Productive
17. Using the Mail App
In This Chapter
• Reading Your Email Message
• Writing Your Email Message
• Formatting Your Message
• Addressing Your Message
• Managing Mail Folders
• Printing Email Messages
This chapter builds on the foundation laid in the previous chapter, “Setting Up the Mail App.” Refer to Chapter 16 if you have not already set up your email accounts for use in the Windows 10 Mail app. The Mail app has a nice set of features that will meet most of your needs. You will learn how to accomplish the basic tasks associated with email such as writing, replying to, and forwarding messages. You also will learn about some of the methods you can use in the Mail app that will help you manage your email through the use of tools like folders and flags.
Reading Your Email
The Mail app keeps the focus on your email messages. Navigation is simple and intuitive, and by now you are likely familiar with the basic elements of navigation when using a modern app. Because you will be referred to these quite often in this chapter, take just a moment to review the locations of these navigation features in the Mail app. As shown in Figure 17.1, all accounts will display a message list and a prominent message pane. To read a message, select the message from the message list in your Inbox. The message you select appears in the Message pane on the right side of the screen.
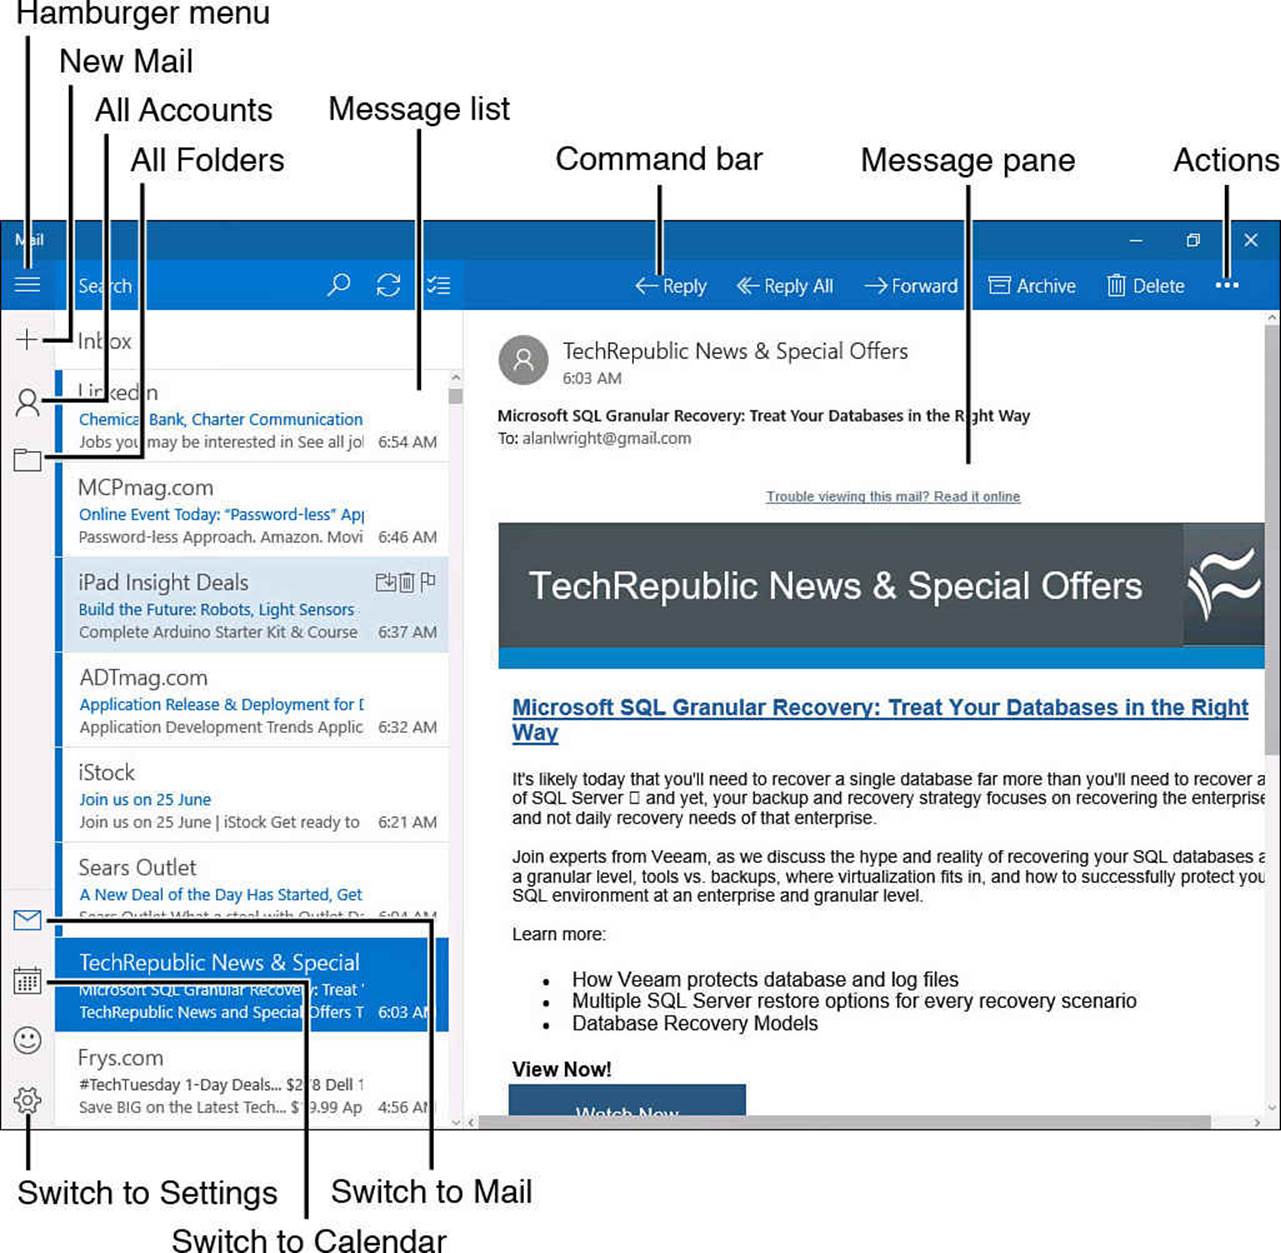
FIGURE 17.1 Navigation is easy if you know these basic features of the modern Mail app.
Your email can be organized using folders, and you can navigate between folders using the hamburger menu off to the left. To see the messages in a different folder, select All Folders from the hamburger menu. Select a folder in that email account and then select the message.
Additional tools can be accessed, and they will open to reveal additional choices as needed by selecting them from the hamburger menu or the upper command bar.
It’s easy to read through the email messages you receive. Numbers let you know how many messages in an account or a folder are currently unread. Unread messages are also indicated by a vertical bar of color at the left end of the message in the message list. This bar will disappear after a message has been looked at in the message pane. If you have multiple email accounts set up, they appear as a list when you select the All Accounts icon from the hamburger menu. When you select an account, the folders and options for that account appear.
The Mail app retrieves email from your accounts every few minutes. To force the Mail app to retrieve mail right away, select the Sync This View button that appears above the message list.
 Note
Note
Depending on the resolution of your screen or the position of your Mail app on the screen, you might not see the Message pane, which is on the right side of the screen. If you are sharing the screen or your resolution is too low, you might see just the Navigation pane and the message list. In this case, selecting a message will slide the message list offscreen to the left, and the message pane will appear. To return to the message list, select the back arrow that appears at the left end of the Command bar.
Replying to a Message
You can send a reply to a message you receive. You can send your reply message just to the author of the message you received or send your message to everyone who received the original message. You can attach documents or pictures to a reply, and you can format your reply however you like.
To reply to an email, follow these steps:
1. In the Message list, select the message to which you want to reply.
2. In the upper-right corner of the Message pane, select either the Reply, Reply All, or Forward button on the command bar, as shown in Figure 17.2.
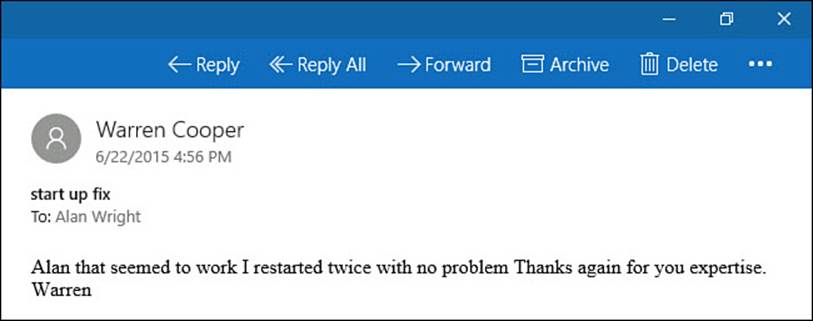
FIGURE 17.2 You can reply to only the sender, reply to everyone on the original email, or forward the message to a new recipient.
3. Write your reply message, as shown in Figure 17.3.
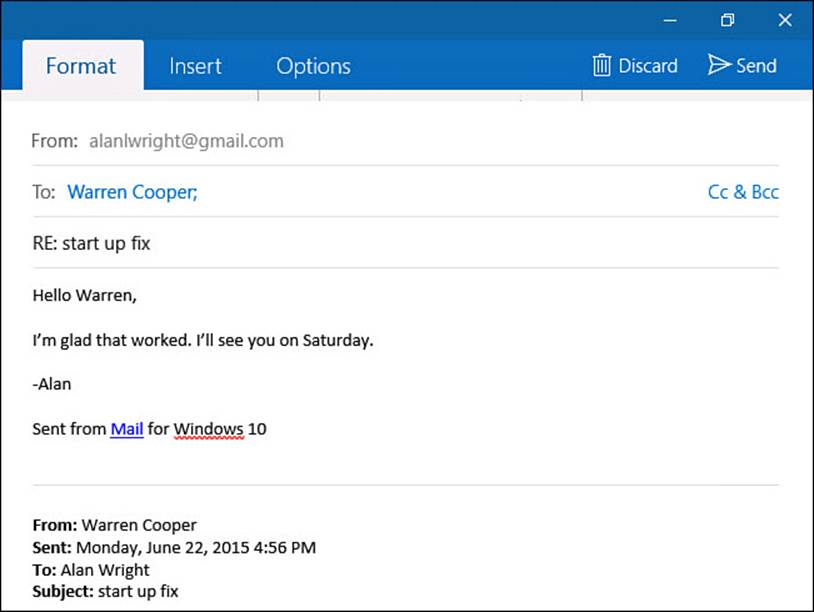
FIGURE 17.3 Type your reply message.
4. Format the message based on the instructions in the “Formatting Your Email Message” section later in this chapter.
5. Address the reply message using the instructions in the “Addressing Your Message” section later in this chapter.
6. To send a file with your message, such as a photo or spreadsheet, follow the instructions in the “Attaching a Photo, File, Table, or Hyperlink to Your Message” section later in this chapter.
7. Select the Send button. Your message is sent.
Filing a Message in a Folder
You can reduce the clutter in your Inbox not only by deleting messages that have no value, but also by filing messages that you might want to retrieve at a later date. You can create folders to organize your email. You can usually file your messages into those folders on the email service websites, such as on Google’s Gmail page, or with other email services. These folders are visible in the Mail app. Here is how the folders work:
• When you create a folder in your webmail account, the folder appears in the Mail app in that service’s list of folders.
• When you file a message in a folder using your webmail account, the message appears in the folder in the Mail app.
• When you file a message in a folder using the Mail app, the message is filed in the folder with the email service.
In Windows 10, you can use drag-and-drop to move messages from your Inbox to a folder, or vice versa. You also can use the Move tool from the Actions menu to file a message in a folder in the Mail app. Here are the steps:
1. In the Message list, locate the message to file.
2. Using drag and drop, select the message, and drag it toward the hamburger menu. The list of folders will expand under the heading Move To, as shown in Figure 17.4. Drag the selected message to the correct folder, and release the message to add it to that folder.
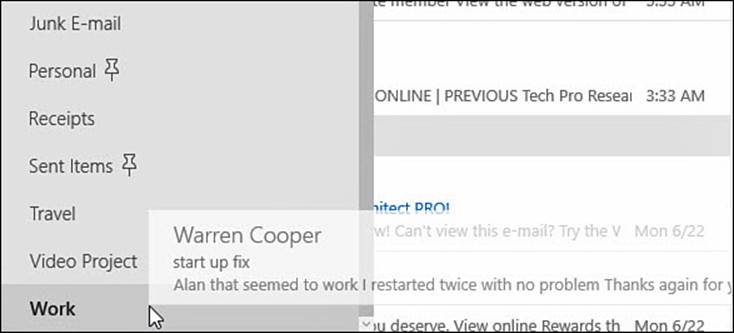
FIGURE 17.4 You can drag and drop a message to any of the folders created with your email service.
3. Right-click a message to reveal actions as shown in Figure 17.5.
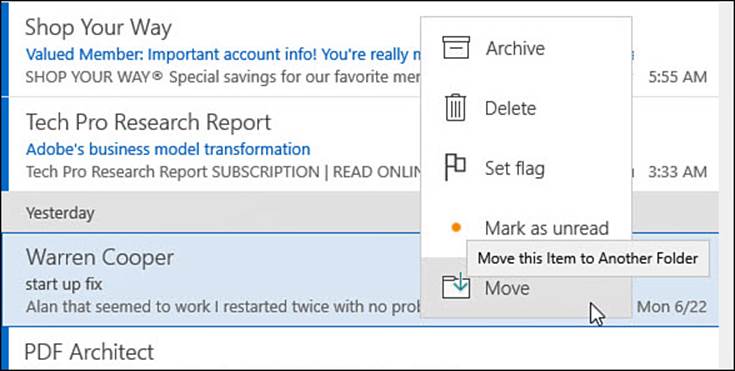
FIGURE 17.5 You can use Move to file a message in any of the folders created with your email service.
4. Select Move to display the folders for that email account.
5. Select the folder in which you want to store the message. The message is moved to the folder you pick.
 Tip
Tip
If you have selected Move as one of the Quick Actions for an email account, you can swipe the message to move it or select the Move icon right on the email in the message list. Managing Quick Actions is considered in Chapter 16.
Tip
When working with multiple messages, you can use the Select tool to select messages using checkboxes. The Select tool appears on the Command bar above the message list. After selecting your messages, you can select an action such as Move, Delete, Archive, Flag, or Mark as Read. The action will be applied to all selected messages at once.
Deleting a Message
If you no longer need a message, you can delete it. The message disappears from your Inbox.
To delete an open message, select the Delete button from the Command bar of the Message pane—the button is shaped like a trash can (refer to Figure 17.4). When viewing a message in the message list, hover over the message briefly with a mouse, wait for the trash can icon to appear, and select it as shown in Figure 17.6.
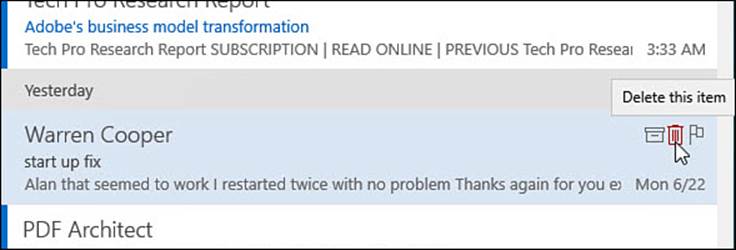
FIGURE 17.6 Delete a message using the Quick Actions icon that appears in the message list.
Forwarding a Message
When you forward a message, you send a message you received to someone else who did not receive it in the first place.
To forward a message, follow these steps:
1. Select the message to forward in the Message list.
2. In the Message pane, select Forward from the menu that appears (refer to Figure 17.2).
3. You can add your own text to the message you are forwarding. Your message will appear above the forwarded message. To add your own message to the email you’re forwarding, type it just as you would a normal reply. Format your message, if you choose, following the instructions in the “Formatting Your Email Message” section.
4. Address the message to be forwarded using the instructions in the “Addressing Your Message” section.
5. Click the Send button.
Marking a Message as Unread
When you select a message by clicking it, tapping it, or moving the focus to the message using the arrow keys, the message appears in the Message pane for viewing. If you don’t select another message or if you don’t leave the Message pane in five seconds, your message is marked as read (removing its bold formatting and the colored vertical bar). This system of formatting messages differently for those you have read makes it easy to see quickly what messages are new and deserve your attention. Though some experts suggest that using the read/unread status is a poor method to manage your Inbox, it remains a convenient way to quickly tag messages that have yet to be considered. You can easily switch a message back to unread if you know you want to go back to it later.
To mark a message as unread, tap and hold on a touchscreen or right-click with a mouse to reveal the list of actions available (refer to Figure 17.5). Select Mark Unread.
The Mail app also includes settings that determine how the Read / Unread function will work on your device. Select Switch to Settings to open the Settings pane. Select Reading. As shown in Figure 17.7, there are a few settings you should be aware of:
• Auto-open Next Item will simply display the next email in the message list after you have deleted or moved an email message. When disabled, the Mail app just shows your background image.
• Mark Item As Read has three possible settings:
• When Selection Changes changes an unread message to read as soon as you select a different message.
• Don’t Automatically Mark Item As Read leaves all messages as Unread until you manually mark them as Read.
• When Viewed In the Reading Pane allows you to indicate how many seconds pass before an unread message automatically changes to Unread.
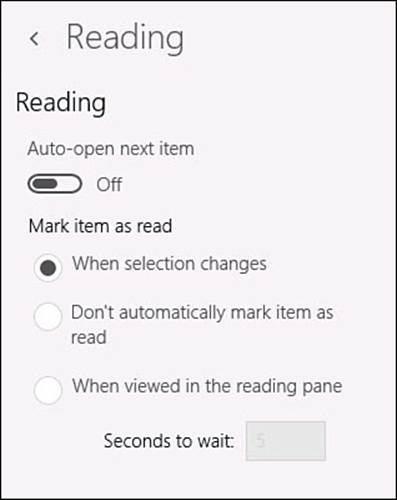
FIGURE 17.7 The Mail app allows you to change how the Read / Unread tool functions.
Writing an Email Message
Writing an email is a simple process. You write your message, format it as you like, address the message, and then click the Send button. There are no restrictions on the type of message you send. You can attach a picture or another document to a message and send it without any text of your own. Or you can write a 20-page letter if you choose. Make sure when sending an email message that you are in the account that you wish to send the message from. Options such as signature and sender name are often configured differently from one account to another. To write a message, follow these steps:
1. From the hamburger menu of the Mail app, select the New Mail button (refer to Figure 17.2).
2. A new email message will open, as shown in Figure 17.8.
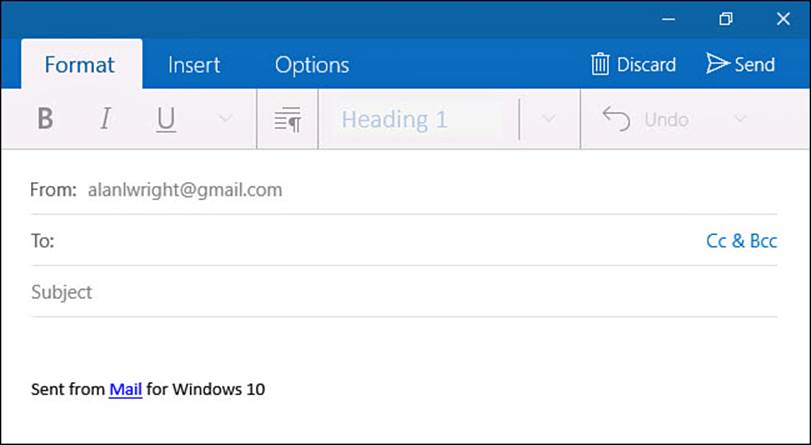
FIGURE 17.8 Select the New button to write a new email message.
3. Address your message using the instructions in the “Addressing Your Message” section.
4. Type your message and subject.
5. You can change the priority by selecting the Options tab and selecting High Importance, as shown in Figure 17.9, or Low Importance. A symbol will also appear on the subject line of your message. Generally, you are best leaving this set to normal. To disable High or Low importance, select the appropriate icon again to disable it.
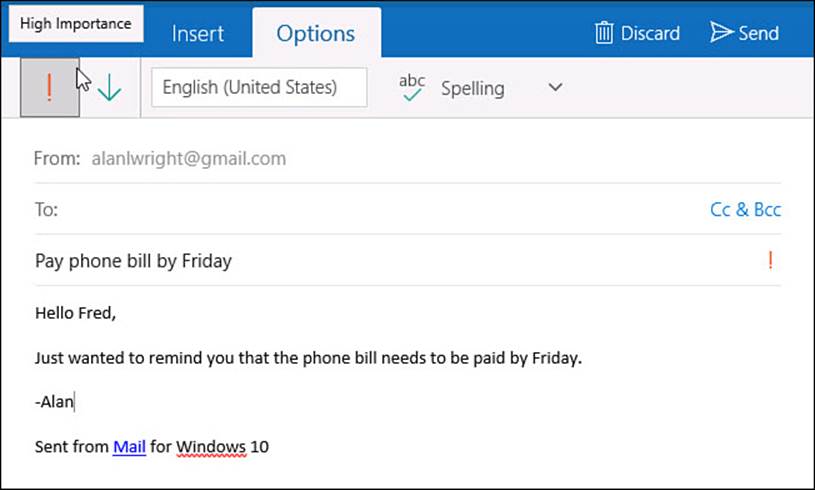
FIGURE 17.9 When addressing a new email message, you can add High Importance to ensure it catches the attention of your recipients.
6. Format your message using the instructions in the “Formatting Your Email Message” section.
7. To send a file, such as a photo or a spreadsheet, with your message, follow the instructions in the “Attaching a Photo, File, Table, or Hyperlink to Your Message” section.
8. If your message is ready to be sent, click the Send button.
Addressing Your Message
Addressing a message from the Mail app is a simple process.
1. In the To field, start typing an email address or the first or last name of a contact. As shown in Figure 17.10, a list of possible contacts will appear and will update as you add letters. Select the desired contact. Repeat to add additional contacts in the To field.
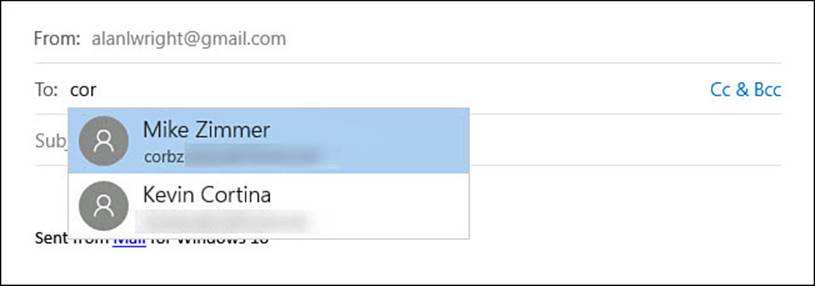
FIGURE 17.10 Select contacts quickly by simply typing letters into the recipient fields of your message.
2. You can also select or tap Cc & Bcc (carbon copy and blind carbon copy) to add these fields to the email.
3. Start typing names or email addresses in the Cc field as you did in step 1. This would be for contacts that you would like to be included in an email even though they may not be one of the main recipients of your email.
4. To “secretly” add recipients to the message, select the Bcc field and again choose the recipients you want to include. No one will see any of the Bcc addresses.
Note
Using Bcc, aside from the obvious benefit of maintaining privacy, can also prevent accidental or unwanted messages from being sent to a contact when someone uses Reply to All, which will not include Bcc contacts.
Formatting Your Email Message
At first glance, the Mail app can appear very simple; however, it has a number of options you can use to format and personalize your email message. You can use colors; different fonts; hyperlinks; and text options, such as bold, italic, and so on. You can also use emoticons to add personality to your message.
Using Text Formatting
To format the text in your message, select the text. To select text, click and drag with the mouse or press and drag with your finger over the characters to format. Select the Format tab in the message pane. Many basic formatting tools are immediately visible. Select the Font Formatting down arrow as shown in Figure 17.11 to reveal additional formatting tools like font colors. Figure 17.12 shows examples of the Styles menu that can be applied to selected text also.
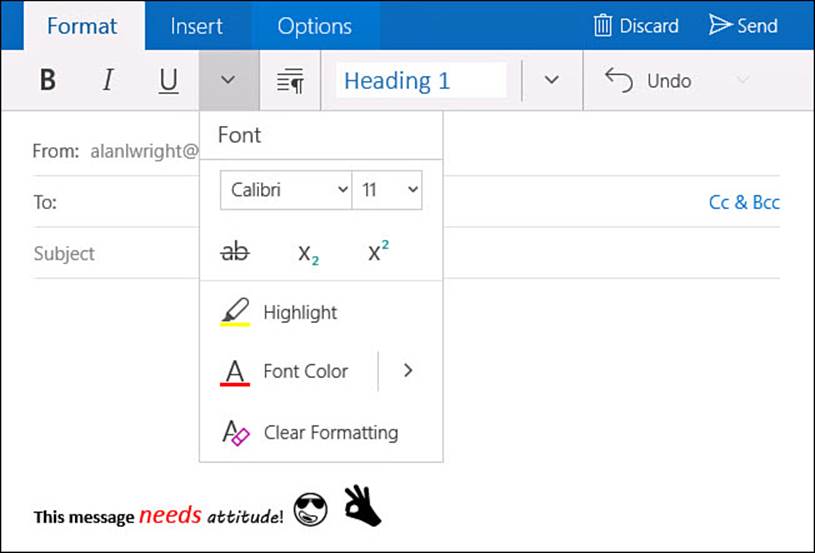
FIGURE 17.11 The Format tab reveals several formatting options.
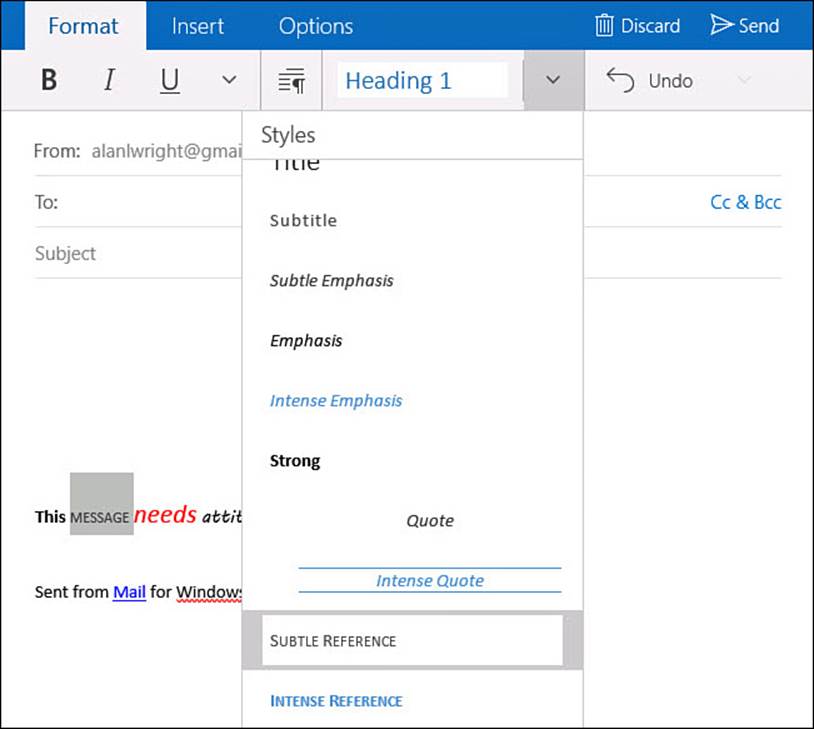
FIGURE 17.12 Drop-down menus like the Styles menu offer many nice formatting choices.
Using Emoticons
Who doesn’t like a smiley face or a cheeseburger in messages they write?
In the past the Mail app has included a large library of emoticons to help you add “character” to your emails. You can still easily add emoticons to your messages using the emoticons that are included in the Touch keyboard.
To add an emoticon to your message, do the following:
1. Click, tap, or use the arrow keys to move the cursor to the location in the message where you want the emoticon to appear.
2. Select emoticons from the Windows Touch keyboard. If you are using a keyboard and mouse, you may not see how to use the Touch keyboard while in Desktop mode. Right-click the taskbar and select Show Touch Keyboard Button. Now you can manually select the keyboard when it is needed.
3. Select the category and the symbol you like. You can add as many as you like while the emoticons fly-out panel is on the screen. To select an emoticon, do one of the following:
• Click it with your mouse.
• Tap it with your finger or stylus.
4. Continue writing your email.
Note
While working with formatting, it can be easy to get carried away. On the Format tab there is a prominent Undo button that can be used to roll back recent changes. You can also select a portion of text and then select the Font Formatting down arrow to reveal additional font tools (refer to Figure 17.11). Select Clear Formatting to return to the default theme font choices.
Attaching a Photo, File, Table, or Hyperlink to Your Message
To send one or more files, such as a photo, with your email, and select the Insert tab. As shown in Figure 17.13, you can select from several common attachments:
• Attach will open File Explorer to the Documents folder, which will allow you to navigate to the file you would like to send. File Explorer will be a familiar tool for navigating through the folders on your system and then choosing a file if you have used Windows in the past.
• Pictures will open File Explorer to the Pictures folder, which will allow you to navigate to the file you would like to send.
• Table will open a new Table tab with basic tools that allow you to create and format a table on the fly.
• Link will open a small dialog box with two text fields: Text to Display—the visible text that can be selected to launch the link in your message, and Address—the actual link to a website or network resource.
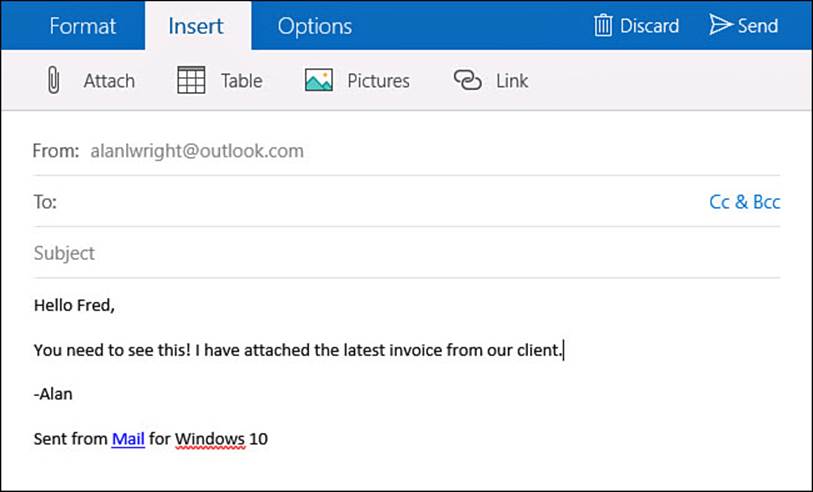
FIGURE 17.13 Select from various attachment types for emails using the Insert tab.
Checking Spelling in Your Message
If you are even mildly embarrassed to have an email you sent appear in your recipient’s Inbox with spelling errors or typing mistakes, it makes sense to take advantage of the built-in spell checking in Windows 10. The Mail app will show familiar proofing marks for misspelled words. These marks can be disabled or hidden. You can also trigger suggestions for misspelled words.
To manage Windows spelling features within the Mail app, follow these steps:
1. From the message pane of the Mail app, select the Options tab.
2. To start the spellchecker, select the Spelling button, as shown in Figure 17.14. The Mail app will start from you cursor and show suggested spellings for unidentified words. Select a word to replace your mistake. You can also add words to the Windows dictionary by selecting +(your word).
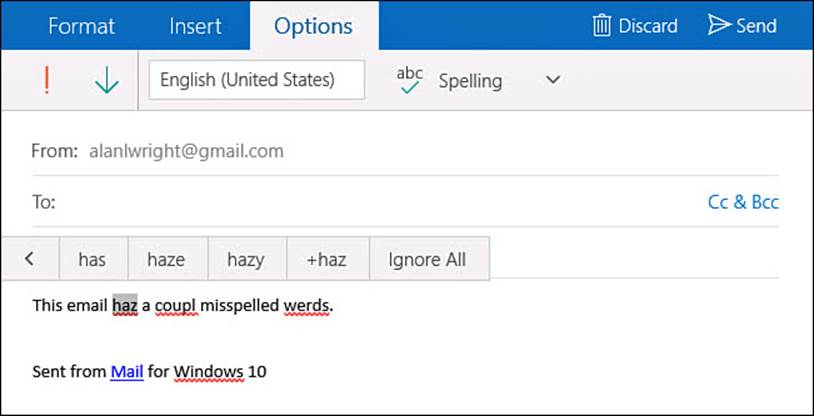
FIGURE 17.14 Let spell checker save you from embarrassing mistakes in the Mail app.
3. Select the down arrow next to the Spelling button. Two Proofing and Language settings are available here. Use a checkbox to enable these options: Hide All Proofing Marks and Hide Proofing Marks in Selected Text.
Managing Your Inbox
With the Mail app in Windows 10, you have many practical tools and techniques at your disposal for managing your email.
Pinning Accounts to the Start Menu
The Mail app is a live tile that appears in the Start menu by default in Windows 10. The live tile will show a number for new unread messages and, when using a larger sized tile, the most recent emails will appear in the live tile. While this is a handy way to keep track of new emails, it may not be as useful when you have multiple email accounts. In this case, pinning each individual account, as shown in Figure 17.15, allows the live tile functionality to show each account separately.
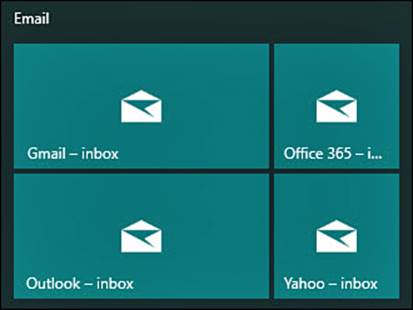
FIGURE 17.15 Pin separate accounts to the Start menu to monitor new emails for each account.
To pin an email account to the Start menu, follow these steps:
1. Open the Mail app and select the All Accounts icon from the hamburger menu (refer to Figure 17.1).
2. Press and hold on a touchscreen or right-click with a mouse to bring up the context menu, as shown in Figure 17.16.
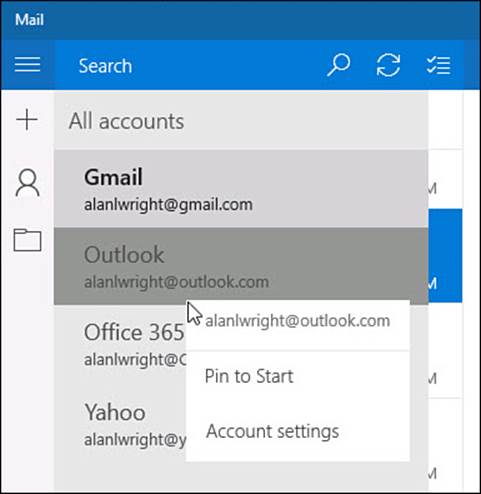
FIGURE 17.16 Select Pin to Start to quickly add an email account to the Start menu.
3. Select Pin to Start. A new tile is added to the bottom of the Start menu.
Tip
Consider grouping tiles for email accounts and positioning the group in a convenient location on the Start menu to benefit from the live tile notifications. Organizing your Start menu is considered in Chapter 3, “Optimizing the Start Menu.”
Flagging Messages
Flags can be very useful when you want to make sure you can find an important email again later.
To flag a message, do one of the following three options:
• Hover over a message in the message list using your mouse pointer to select the flag icon.
• Select the flag tool to the right of the subject line in an open email message.
• Open the App Commands bar and insert a flag.
Printing Emails
From time to time, you might need to print emails as part of your management process. Perhaps you want to keep hard copies of receipts or information needs to be filed away in case questions arise later. When you need to print an email, the Mail app hands the particulars off to Windows.
To print an email, follow these steps:
1. Select an email you want to print.
2. Select the Actions button (...) on the Commands bar, as shown in Figure 17.17.

FIGURE 17.17 Select Print from the Actions menu in the Mail app when you need to print an email.
3. Select Print. The Windows 10 Print pane will open.
4. From the list of printers, select the printer you want to use. You will see a preview of the print job with options for number of copies, page range, and size (see Figure 17.18).
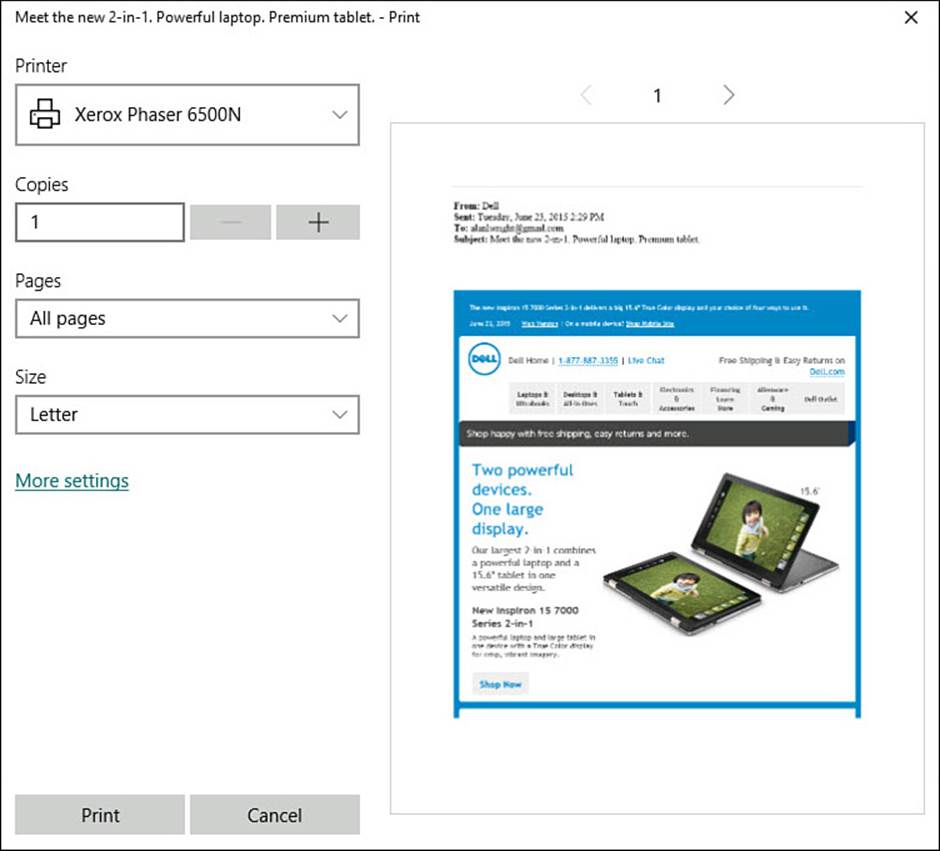
FIGURE 17.18 Make selections to control how your email will print from the Windows 10 Print pane.
5. Select More Settings to review options that are unique to your printer for paper, color, orientation, and source settings.
6. Make your choices and select Print.
Future Improvements
The Mail app will continue to be developed and improved. At the time of this writing, there are anticipated features that are expected to show up in the Mail app through updates. These features will help you to better manage your emails in the Mail app.
Some anticipated updates include
• Folder creation—Folders you have created online can be used to organize your email within the Mail app using the Move tool. While the Mail app does not offer the option to create new folders as of the time of this writing, don’t be surprised to see this feature return to the Mail app by means of an app update.
• Group Messages by Conversation—Group Messages by Conversation is a feature that existed in the Mail app for Windows 8.1. This useful feature allowed you to switch between viewing all emails in chronological order or grouped together when they are part of the same conversation.
• Flagged emails view—Flagged emails are useful, but the Mail app does not offer a means of viewing all flagged emails together. This useful way of filtering your email to view messages that had been flagged was included in the Mail app for Windows 8.1, and it would be a surprise to see it not return.
The Absolute Minimum
• When you’re writing an email, the Format, Insert, and Options tabs include multiple formatting and email authoring tools, including colors, attachments, font choices, and hyperlinks.
• Use drag-and-drop to move messages from your Inbox to folders you have set up.
• Pin separate email accounts to the Start menu to keep tabs on each account individually.
• Use flags to keep track of important or time-sensitive emails regardless of which folder they might be in.
• Use the Actions menu to print emails from the Mail app to any of your installed printers.
All materials on the site are licensed Creative Commons Attribution-Sharealike 3.0 Unported CC BY-SA 3.0 & GNU Free Documentation License (GFDL)
If you are the copyright holder of any material contained on our site and intend to remove it, please contact our site administrator for approval.
© 2016-2026 All site design rights belong to S.Y.A.