Windows 10. Absolute Beginner’s Guide (2016)
Part I: Getting Started
2. Interacting with Windows
In This Chapter
• Using the Mouse
• Using the Keyboard
• Using Your Fingers
• Using the Touch Keyboard
• Using Controls Found in Windows
Although this chapter’s title suggests a broad presentation about working with Windows and does not identify a specific version, the focus of this chapter is relatively narrow. Windows 10 enables new methods to control what happens on the screen while continuing to support more traditional techniques. The methods you employ will make your experience more satisfying, which is why this book devotes an entire chapter—this one—to helping you learn how to interact with the various switches, dials, knobs, buttons, and pulleys that enable you to control what Windows does.
One of the notable features in Windows 10 is the support for mobile devices. Microsoft has made much of the fact that Windows 10 can run on laptops, desktops, tablets, smartphones, game consoles, as well as new devices like HoloLens. Allowing for form factor differences, the user interface (the part of the software that you touch, look at, and respond to) is consistent across all these devices, even if the method you use to interact with each is different.
In this chapter we focus on the ways in which you will interact with Windows on desktop, laptop, and tablet form factors. There are some things the mouse can’t do that the finger or stylus can, and the keyboard can bring 100 keys to the party, whereas the mouse brings just 2 or 3.
Getting to Know the Windows 10 Interfaces
Because Windows 10 has to work across a range of hundreds of different models of desktops, laptops, and tablets, Microsoft dictated specific guidelines as to how all these hardware devices should work with it. These guidelines apply to traditional personal computers as well as tablets. So, the product of all this consistency is a batch of techniques (for example, “Click like this,” “Swipe like that”) that work across all kinds of devices.
In this section of the chapter, you can review how to interact with Windows 10 computers using the four main interfaces: touch, the mouse, the keyboard, and the Touch keyboard.
Working with Continuum and Tablet Mode
Windows 10 has introduced a new feature called Continuum that allows your device to be smart about the best interface based on the current hardware available. If you have a tablet, you will likely be using touch to interact with Windows. Your device can work in Tablet mode to make things more spaced out on the screen, allowing for an improved touch experience and fewer mistakes because things are too crowded together. Your Start menu can be full screen rather than just occupying a portion of the screen, and the taskbar can hide app icons. If a keyboard and mouse are connected, Windows can exit Tablet mode to allow for more precise mouse input. Continuum makes these changes happen automatically. You can override the way Tablet mode is engaged or which actions are taken.
To make changes to Tablet mode, follow these steps:
1. From the Desktop, type tablet mode in the search box.
2. Select Tablet Mode Settings from the search results. The Settings app will open to Tablet mode, as shown in Figure 2.1.

FIGURE 2.1 Windows lets you control just how automatically Tablet mode will work on your device.
3. You can manually switch Tablet mode Off or On for the device using the first switch. (This task can also be accomplished much easier from the Action Center.)
4. Change whether Tablet mode is automatically selected when starting your device by using the drop-down list When I Sign In:
• Immediately Enter Tablet Mode—This will start your device in Tablet mode regardless of your hardware configuration. The Start menu will be open full screen and ready to use.
• Take Me to the Desktop—This will open to the Desktop, and the Start menu will be minimized. Tablet mode will not be enabled.
• Keep the Mode I Was in Previously—This choice allows the device to remember which mode was in use last time, and it will return to that.
5. Change how Continuum reacts to hardware changes by using the drop-down list When My Device Wants to Switch Modes. The choices are
• Never Prompt Me and Always Stay in My Current Mode
• Always Prompt Me to Confirm
• Never Prompt Me and Always Switch Modes
6. The last switch, Hide App Icons on the Taskbar When in Tablet Mode is On by default. You can turn this Off if you prefer to see icons for apps that are open while in Tablet mode.
 Tip
Tip
You can manually change modes at any time using the Action Center. An example is presented later in this chapter in the section “Using the Touch Keyboard.”
 Note
Note
Windows 10 includes stylus support, and many tablets include this accessory. The stylus input is discussed briefly in relation to the new web browser Microsoft Edge in Chapter 14, “Browsing the Web.” Voice has become another important way to interact with Windows. Voice interaction is covered in Chapter 9, “Using Search and Share.”
Using the Mouse in Windows 10
The mouse is a great choice for any device when precision is a factor, although touch is more efficient and easier to use with a tablet. Following are the commands you see associated with use of the mouse:
• Point—Unless you have a special version of Windows that can read your mind, you use a mouse to point to the item on the screen with which you want to work. The mouse pointer is usually in the shape of an arrow, but you can always change it to another shape, as explained inChapter 10, “Configuring Input Device Settings.” You can also download Windows themes that bring together a new color scheme and fun graphics, including cool, new mouse pointers, to give Windows a different look and feel.
• Click—Besides picking up dust, the most common action you take with the mouse is click. You click to select items, to start and stop actions in Windows, to indicate where text you write should be inserted, and more. To click with your mouse, just tap the primary mouse button.
• Double-click—The double-click mouse action traditionally has been used in Windows to start a program or launch a task. In Windows 10 most of those double-clicks have been changed to single-clicks, mainly to make things more consistent for all users. Any of the programs you ran in previous versions of Windows that required a double-click have the same requirements if you run the same programs on the Desktop.
• Right-click—The right-click traditionally is used to display a context menu of commands related to the item you right-click. For example, right-clicking a photo might present commands to open your photo editing application and to add the picture to a slide show. This convention still works on the Desktop but not on the Start screen. On the Start screen, right-clicking displays the Apps bar, and in Windows 10 apps, right-clicking displays the Command bar. The App bar and Command bar are described in Chapter 5, “Working with Windows Apps.”
Note
When you see the command to select or click, this always refers to the primary mouse button, as described in this section. Any task that requires you to click the secondary mouse button clearly says to use the secondary or right-click mouse button. You also can specify which button on your mouse is the primary button. Refer to Chapter 10 for help with configuring the mouse.
• Click and drag—The click-and-drag action is used to select and move files, folders, or any other item from one place to another in Windows 10. You can always use the cut-and-paste menu convention (when available) to move things, but you can save time and look smarter by usingclick and drag. Click and drag is also known as drag and drop. One of the most prominent areas in which you can employ click and drag on the Windows 10 Start screen is where you can drag a tile to a new location on the Start screen. Click and drag can also be used to select a group of items that are next to one another.
Tip
Windows always treats click and drag as a move action. This means the item you were dragging will no longer be in the location from which you dragged it. To use click and drag as a copy action, press and hold down the Ctrl key before you release the mouse key to drop the file in its new location. Windows will copy the file rather than move it.
• Right-click and drag—A cousin to the click and drag is the right-click and drag. Just as the right-click displays a menu with commands specific to the item you click, so does the right-click and drag. Windows recognizes the item you are dragging and pops up a menu relevant to the item and the destination of your drag. Right-click and drag can also be used to select a group of items that are next to one another.
Using the Keyboard in Windows 10
Windows 10 includes an onscreen keyboard that appears when you need it. This section is dedicated to the physical keyboard. You can read about the Touch keyboard in a bit, in the section “Using the Touch Keyboard.”
The keyboard is an important tool for interacting with Windows 10, but its role is for more than entering text and punctuation. You can use a large number of key shortcuts to issue commands to Windows 10. A keyboard shortcut (or key combination) refers to two keys (or more) pressed simultaneously to issue a specific command, such as Windows Key+F to use the Search tool. Some of the newer key combinations in Windows 10 use the Windows key as the first key in the combination. Keep in mind when using keyboard shortcuts that you should always press the Windows key slightly before pressing the second key.
Table 2.1 lists some useful key combinations you can use with Windows 10.
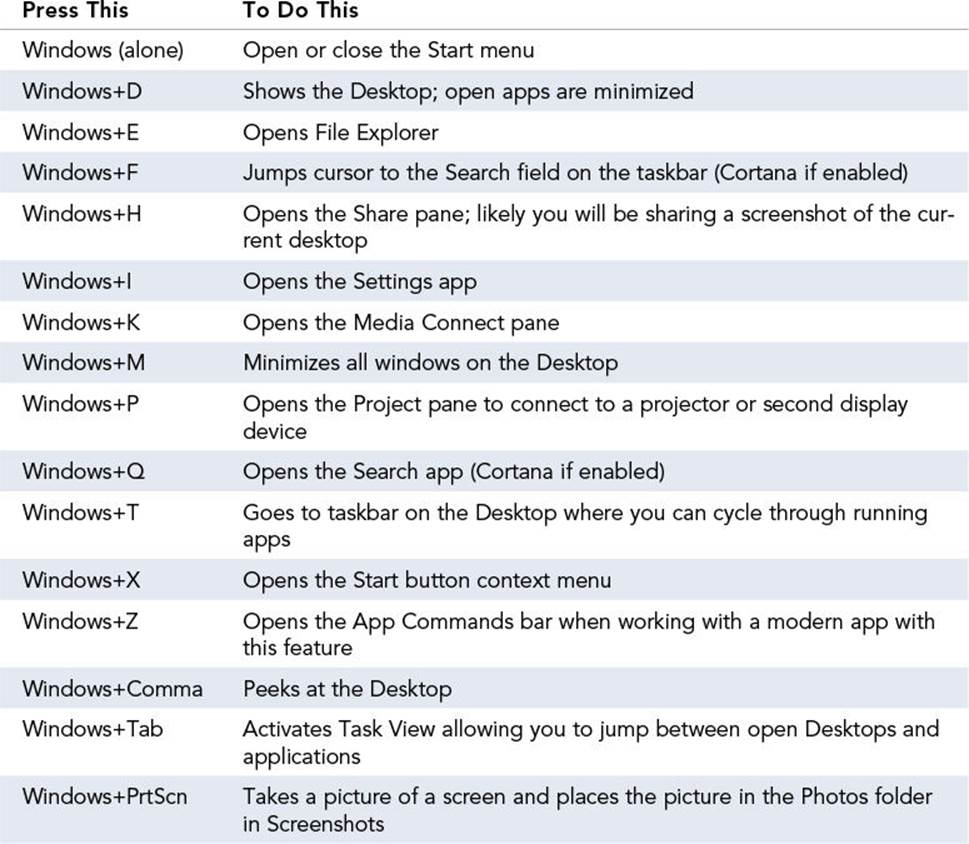
TABLE 2.1 Windows Keyboard Shortcuts
There are of course dozens—if not hundreds—of keyboard shortcuts you can use to simplify your life. Many software makers integrate keyboard shortcuts into their interfaces; therefore, a key combination can differ from one application to another. Certain combinations have become standard, and a quick Internet search will present a very long list of results. Rather than try to memorize all of them, try to learn a few that really help you. They will quickly become second nature. Once you get those down, you can add more gradually.
In Table 2.2 I offer my top 10 keyboard shortcuts.
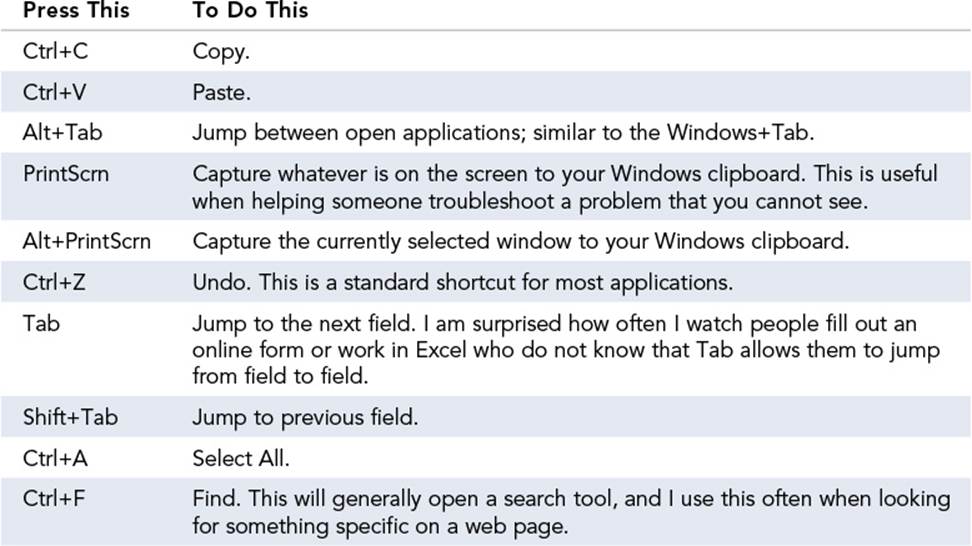
TABLE 2.2 Favorite Keyboard Shortcuts
Using Touch in Windows 10
The touch interface was introduced in Windows 8, and its implementation has become more polished in Windows 10. In previous versions of Windows, you could use a stylus, a mouse, and the keyboard to work with Windows, such as to sketch and trace. With Windows 10, you can use your finger or another touch device to completely interact with Windows and issue commands. A number of hardware manufacturers have brought mobile devices to market to take advantage of the new Windows touch interfaces, including Microsoft with its own popular Surface brand of tablets. Here are some of the devices that leverage the new touch capabilities:
• Tablets
• Laptops with touchscreens
• Touch-sensitive displays
• Phones
Whereas you use the word click to specify the action you take with a mouse to interact with Windows, touch-specific commands generally use the word gesture because it’s a word that describes just about any action you take with your touch device. Here is a list of the gestures used with Windows 10, including some tidbits on how the gesture works:
• Swipe—The swipe is a short movement with your finger or fingers across the screen of the device. The fingers are on the screen only for a short period of time. A direction is usually given when you are instructed to swipe, such as Swipe Down from the top of the screen.
• Tap—It doesn’t get any easier than this gesture. To tap, just touch your finger to the screen.
• Tap and hold—The tap-and-hold action is the touch equivalent of the mouse right-click. You usually press and hold a specific item, such as a file or folder. This action is used predominantly to display a special menu that contains commands relevant to the item you pressed and held. You can tell you pressed long enough by the appearance of the small square symbol at the point on the screen where you held.
• Pinch and stretch—Use the pinch gesture and the stretch gesture to zoom into an image (stretch) or to shrink an image (pinch). To pinch, place two fingers on the display separated a bit over the image you want to change. While keeping contact with the screen, slowly draw both fingers together as if you were softly pinching a baby’s cheek. You can stop drawing your fingers together when you are happy with the results of the pinch, such as reducing the size of an image.
To stretch, place two fingers on the display slightly touching one another over the image you want to affect. While keeping contact with the screen, slowly draw both fingers apart. You can stop drawing your fingers apart when you are happy with the new size of the image.
Using the Touch Keyboard
Windows 10 displays an onscreen touch-friendly keyboard when it detects that one is necessary, as shown in Figure 2.2. As you type letters, predictive text will present words you can select rather than typing the entire word. The keyboard can display letters, numbers, symbols, and emoticons. To toggle these keyboards, use the &123 key and the emoticon key. Windows 10 includes a deep emoticon library, as shown in Figure 2.3.
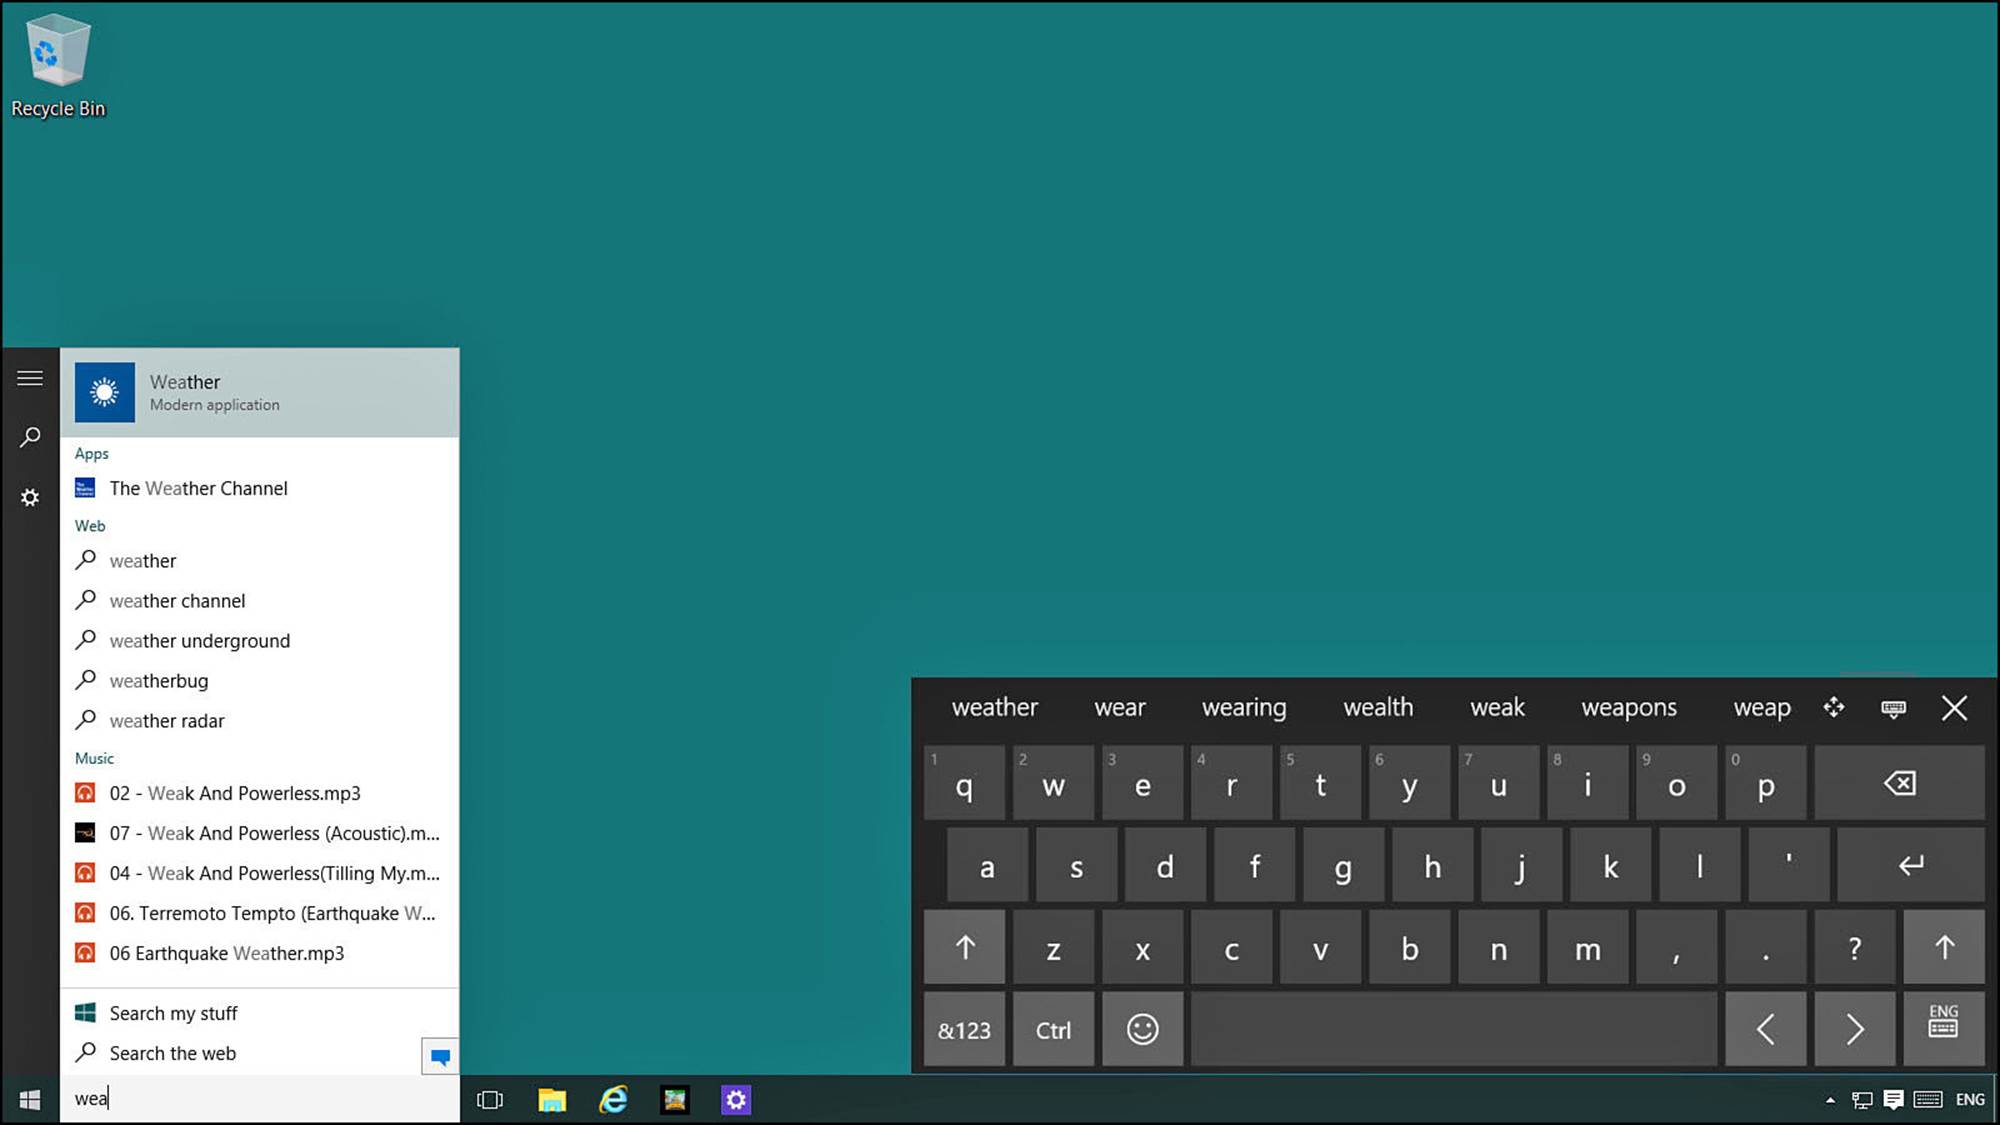
FIGURE 2.2 Windows displays the Touch keyboard automatically when it believes you need it.
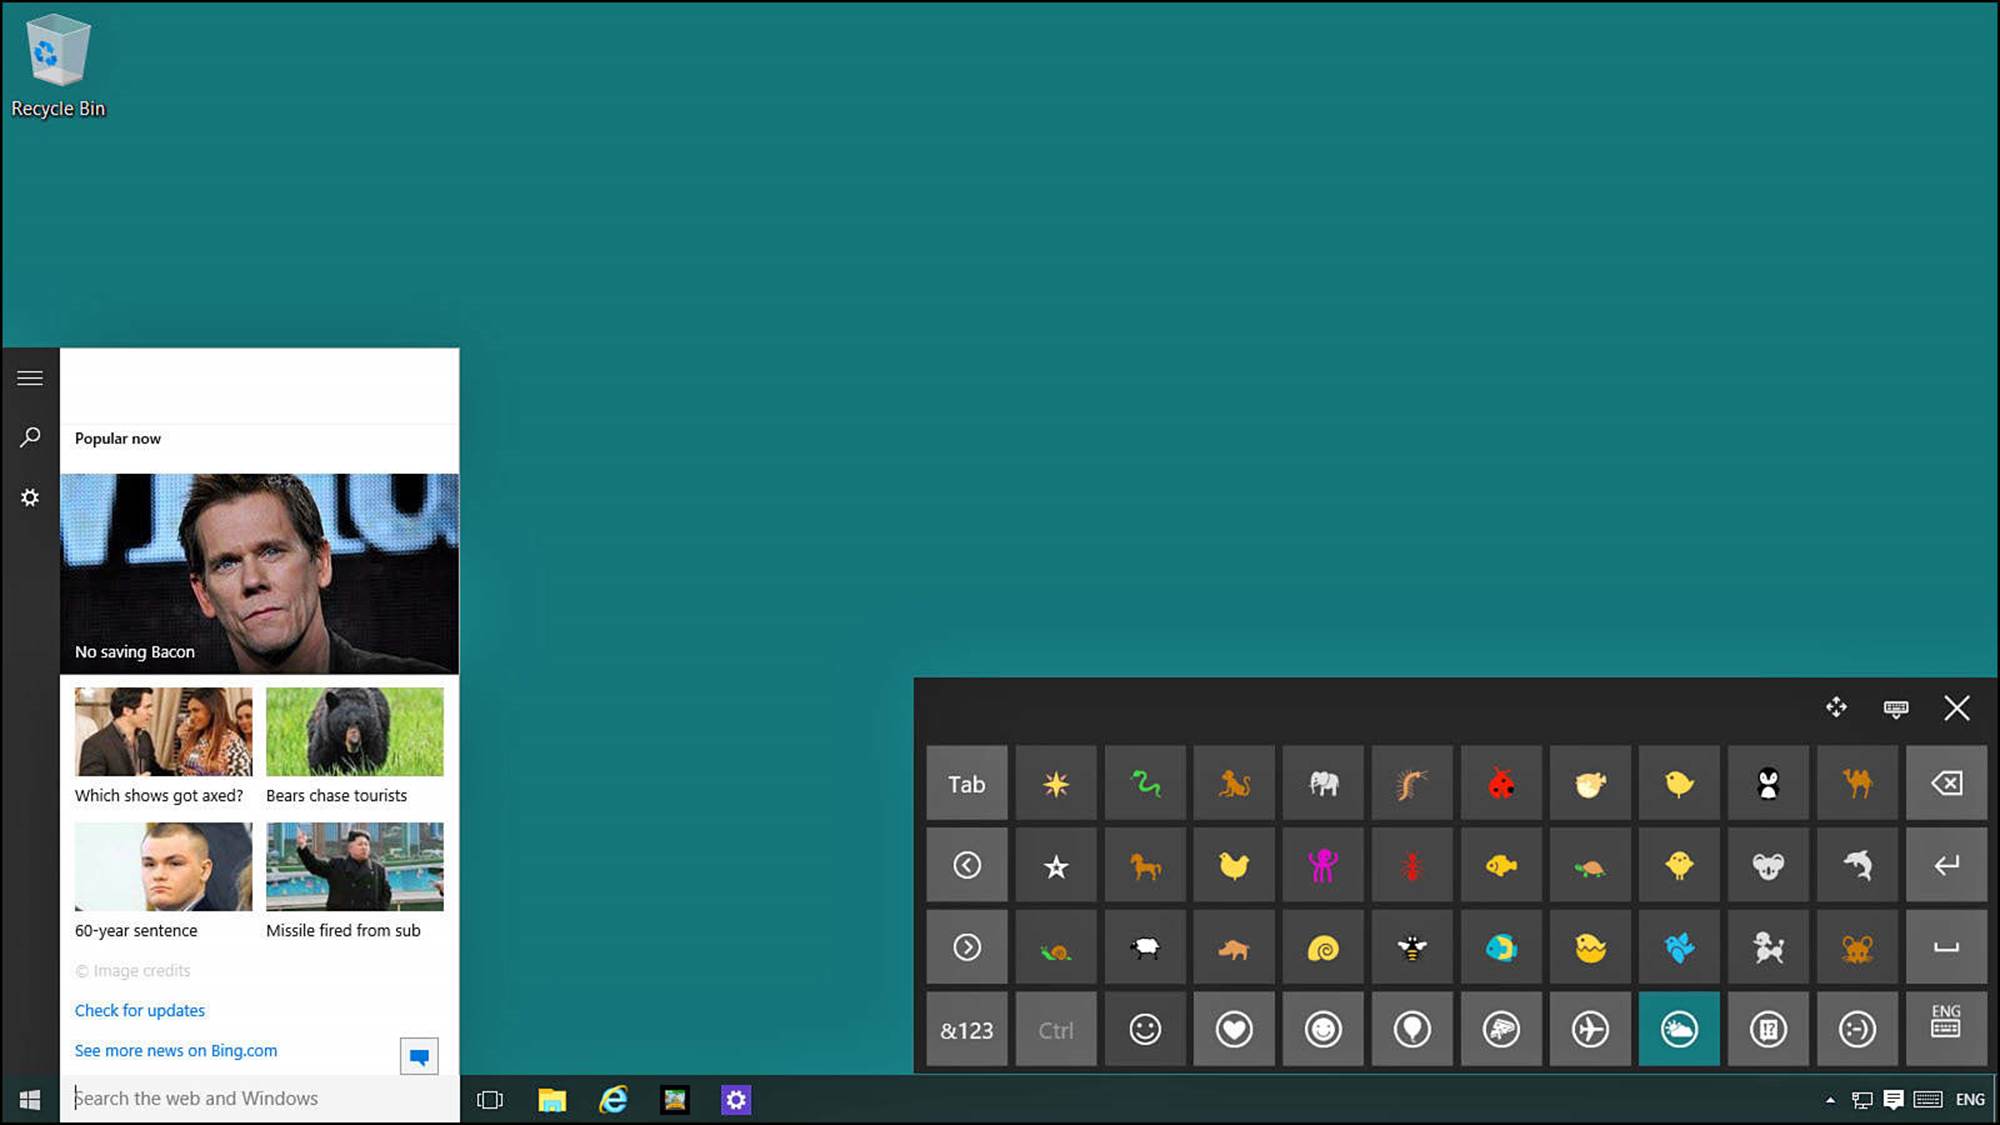
FIGURE 2.3 The Touch keyboard offers an extensive library of emoticons.
There are two conditions that, together, let Windows 10 know that a touch keyboard is needed:
• You use a touch device, such as a tablet or a touch screen. (Windows 10 can detect it.)
• You are on a screen requiring text input and no physical keyboard is detected.
You can choose between three keyboard layout modes. To choose the keyboard mode, tap the main language key at the bottom-right corner of the Touch keyboard (refer to Figure 2.2), and then tap the tile for the keyboard mode you need (see Figure 2.4):
• Regular Keyboard
• Split Keyboard (sometimes referred to as a thumb keyboard)
• Handwriting Recognition
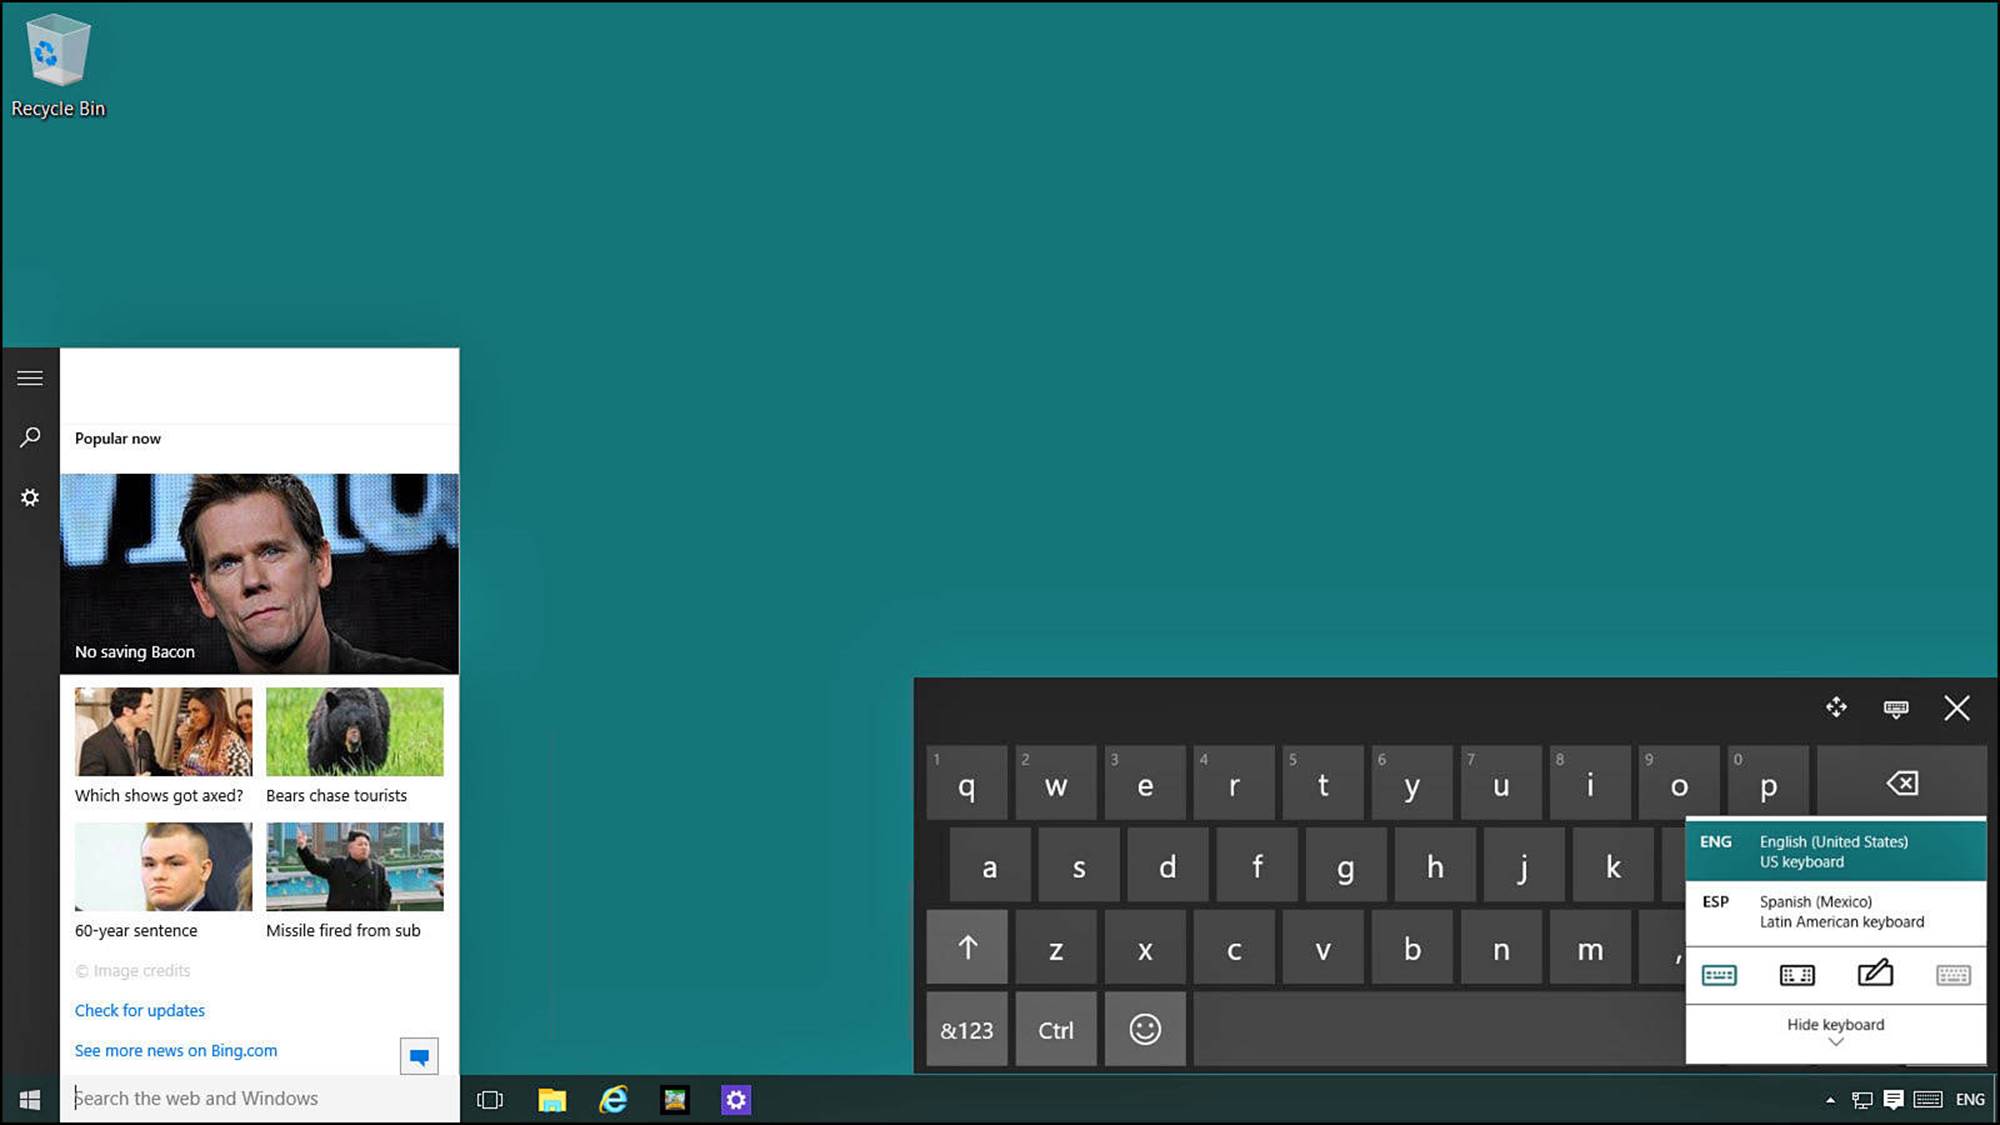
FIGURE 2.4 Change the layout modes for the Touch keyboard.
While the Touch keyboard normally appears when needed, you occasionally might find that the keyboard does not display automatically. If you do not see the Touch keyboard while using a touchscreen device, follow these steps:
1. Select the keyboard icon on the taskbar to manually invoke the Touch keyboard (refer to Figure 2.2).
2. If you do not see a keyboard icon on the taskbar, select and hold the taskbar until the context menu appears as shown in Figure 2.5. Make sure that the option Show Touch Keyboard Button is checked.
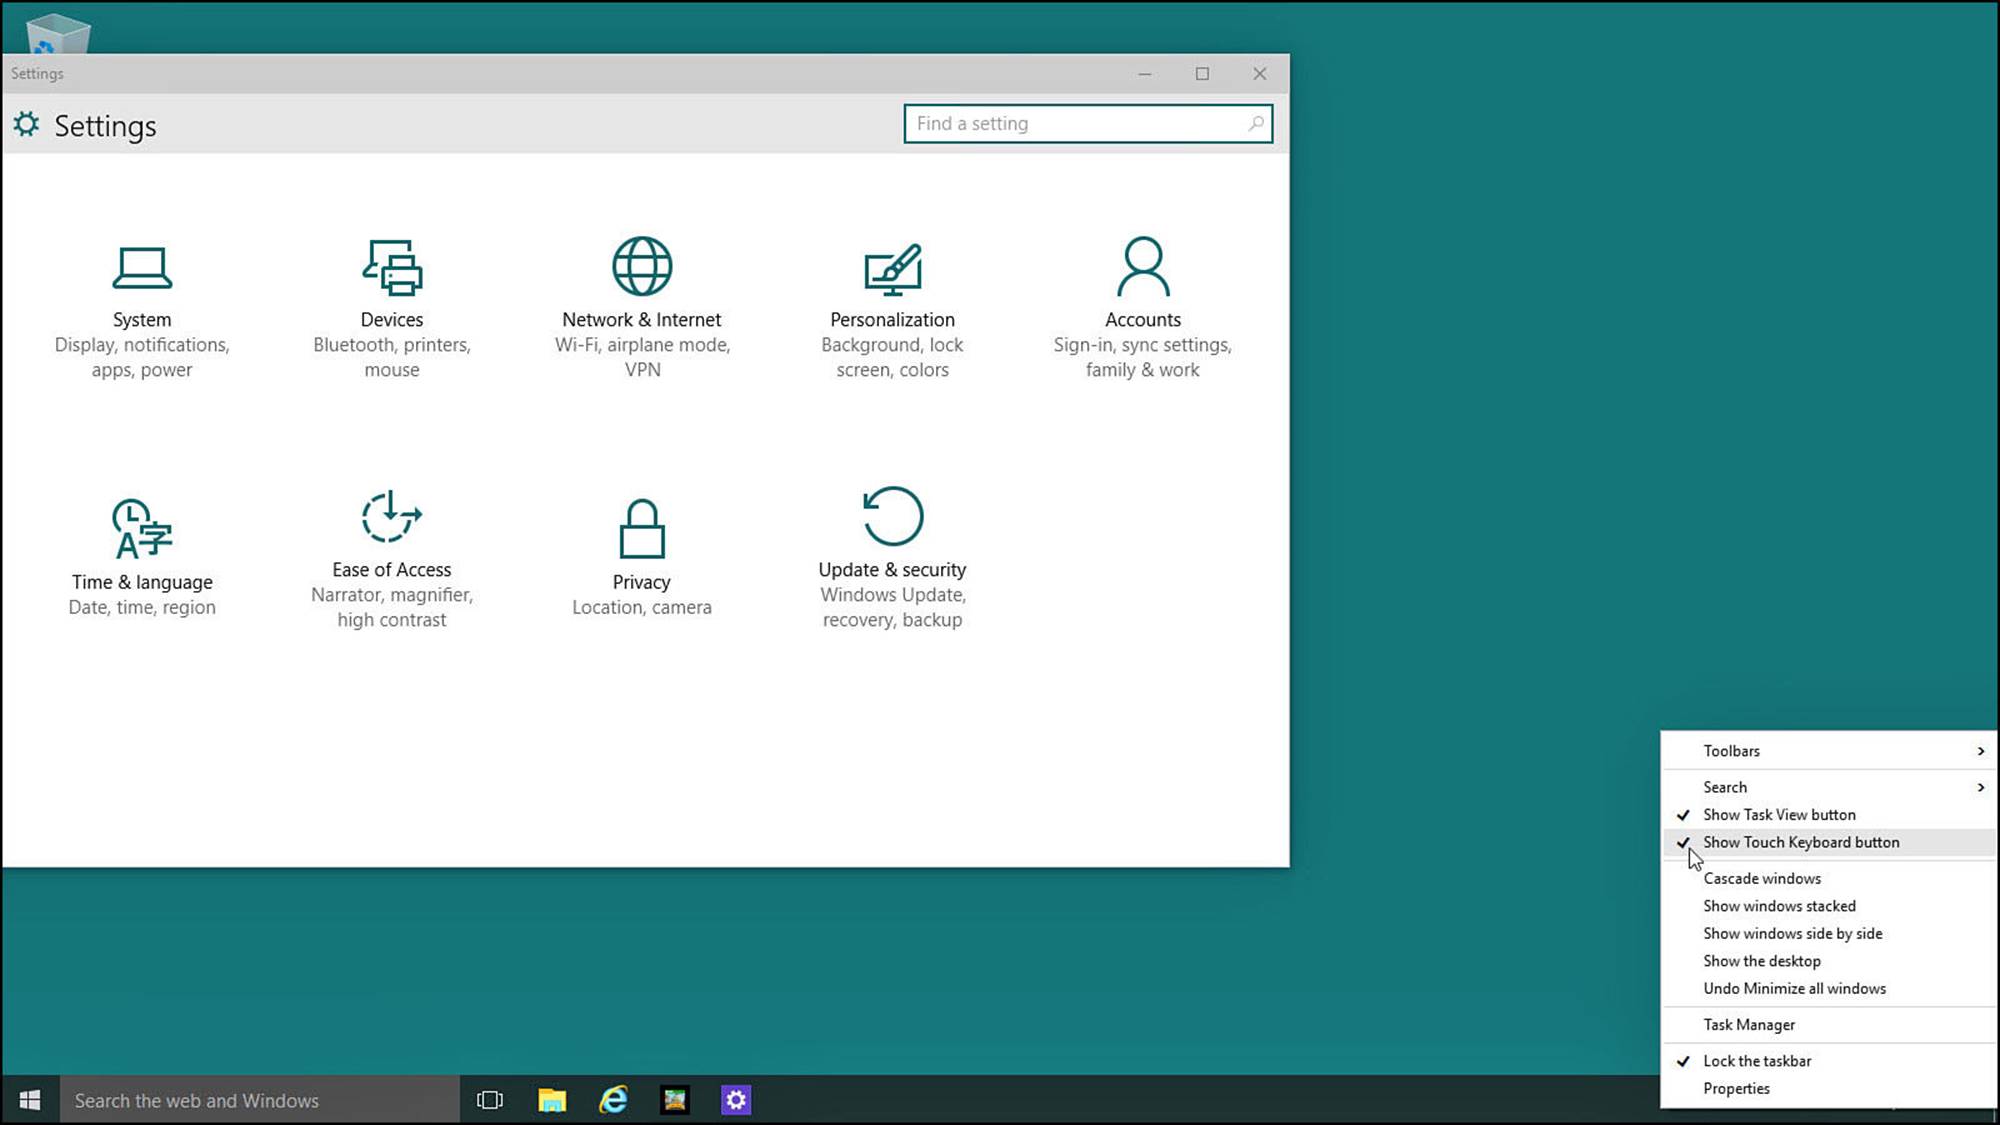
FIGURE 2.5 The Touch keyboard icon will not appear on the Taskbar if it’s not enabled.
3. Enable Tablet mode by swiping in from the right on your touchscreen (or by selecting the Action Center icon on the taskbar) to reveal the Action Center. Locate the Tablet Mode tile in the bottom section of the Action Center pane (see Figure 2.6). Select it to enable Tablet mode. Windows will now expect touch interaction rather than keyboard and mouse input. (For more information about the Action Center, see Chapter 6, “Finding Your Way Around the Windows Desktop.”)
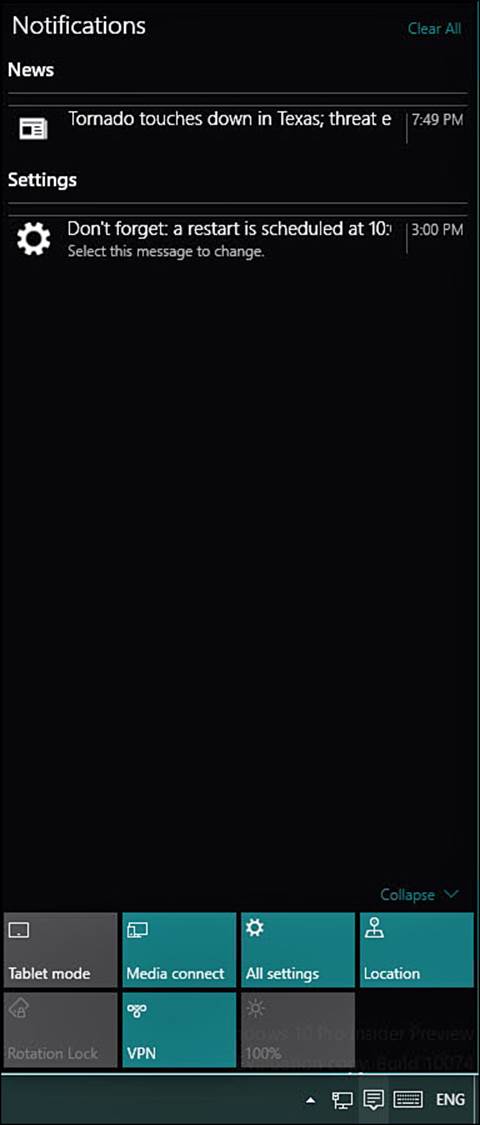
FIGURE 2.6 Make sure your touchscreen device is in Tablet mode when looking for the Touch keyboard.
 Note
Note
The Touch keyboard should not be confused with the On-screen keyboard that can be enabled using Ease of Access tools. To learn more about setting up and using Ease of Access tools, see Chapter 12, “Configuring Notifications and Advanced Settings.”
Using Controls
If you have experience with Windows 7 or an earlier version of Windows, you can probably skip this section unless you would like a refresher. If you are a beginner to Windows or are new to computers in general, this section helps you get comfortable with the tools and objects you use on the Desktop.
Window
A window is the control that organizes and stores other controls. It is the main organization unit in all Windows software that powers millions of computers and devices around the world. It might help you to think of a window as a container that allows you to see or interact with an app or a Desktop application. The window is so important that Microsoft named its operating system after it. Software programs present their options and settings in a window, you supply information to those programs in a window, and the messages the program reports back to you are presented in a window.
Figure 2.7 shows a window and points out a few key parts. You can find a lot of information about windows in Chapter 6.
FIGURE 2.7 A typical window found on the Desktop.
Button
A button’s use is fairly obvious. You click a button to execute the command indicated by the text on the button. In many cases, a button that is labeled OK means proceed as planned or I am through making choices—go ahead and finish the job. A button with the label Cancel usually indicates forget it, I changed my mind or don’t finish what you started. Sometimes a picture or an image is used as a button. You click the picture to execute the command portrayed by the picture. Figure 2.8 shows examples of different buttons, including both traditional buttons and new tile buttons used in Windows 10.
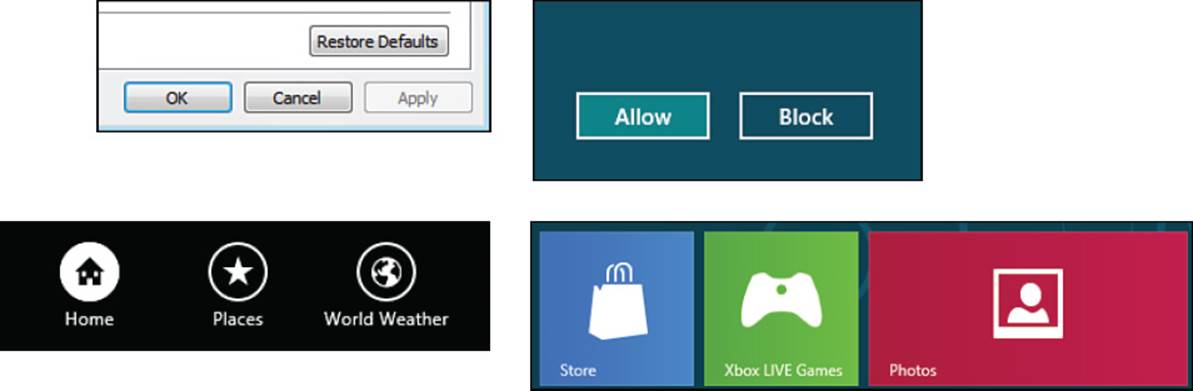
FIGURE 2.8 Buttons in Windows come in a variety of shapes and sizes.
Text Box
If you have ever entered your name or address to register a new program or to identify yourself to a website, you have used a text box. If the program you use requires more information from you than just a single line of information, you will see a much larger text box.
 Tip
Tip
Most text boxes work properly with the Windows cut/copy/paste mechanism. This means you can copy information from a document or an email message and then paste it into a text box (Ctrl+C is the keyboard shortcut to copy selected text). Sometimes you can’t access a menu when entering information into a text box, and sometimes you can’t choose Paste. In these cases you can usually use the keyboard command to paste by pressing Ctrl+V while the cursor is inside the text box.
Check Box
You might see a check box when you must select whether some state or condition is on or off. The presence of a check in the box generally indicates an option or choice is enabled, or on. In most uses, a check box actually isn’t checked. Rather, an “x” symbol fills the box part of the control.Figure 2.9 shows examples of check boxes used both to enable options and to select items.
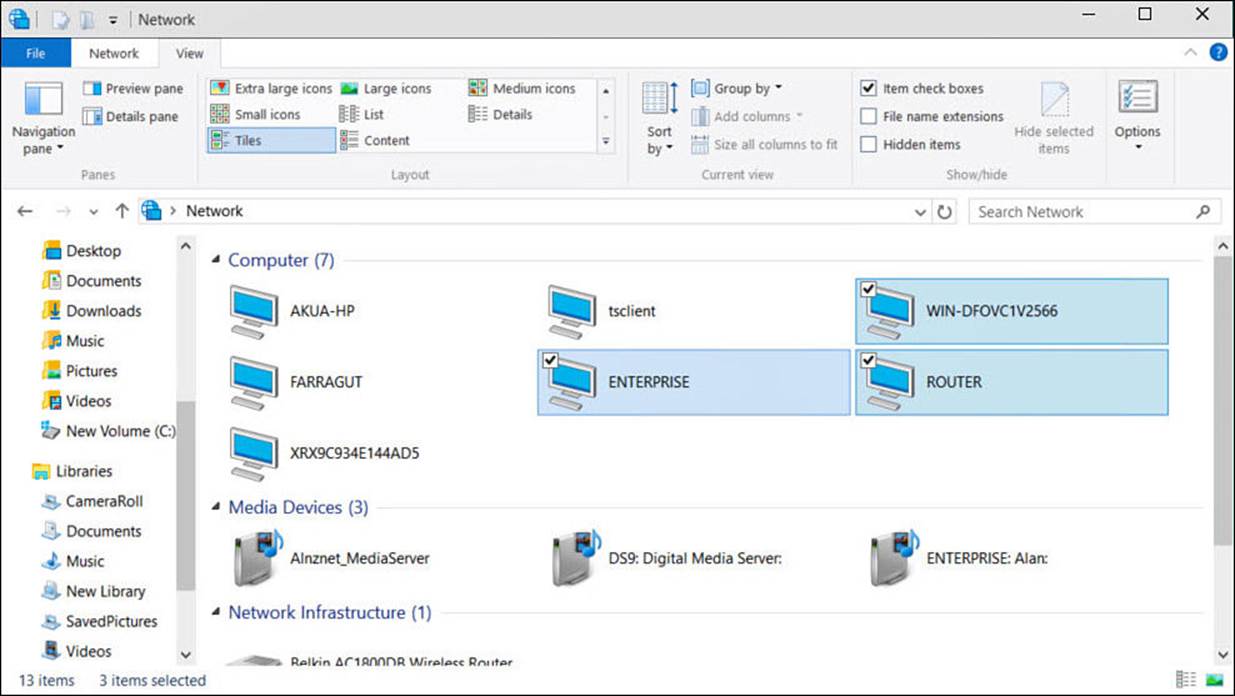
FIGURE 2.9 A check box indicates an on or off condition.
To check or uncheck a check box, do one of the following:
• Click in the check box or on the text to change it.
• Tap in the check box or on the text to change it.
Switch
Windows 10 introduces the toggle switch control. Like the check box control, the switch presents an on or off condition. The label next to the switch tells you what setting is controlled. It’s easy to toggle the switch to on or off with the mouse or touch, as shown in Figure 2.10.

FIGURE 2.10 The switch is used to turn some setting on or off.
To switch a Windows 10 toggle, do one of the following:
• Click and drag the bar to the other end of the toggle.
• Press and hold on the bar, and then drag it to the far end of the toggle.
Drop-Down List
A drop-down list, also called a drop-down menu, presents a list of items from which you can choose. The items in the list appear to drop when you select the text or the arrow button on the right side of the control, as shown in Figure 2.11. The currently selected item in the list is always shown in the visible portion of the drop-down list when it is minimized, and it appears highlighted within the drop-down list. Long lists enable you to scroll to browse the entire list.
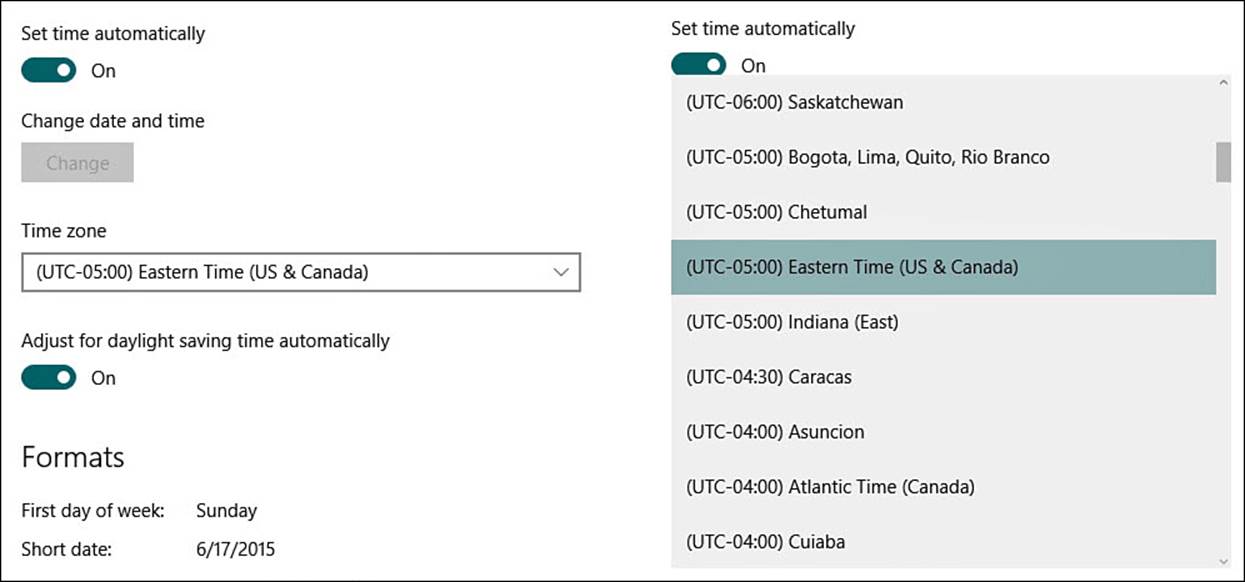
FIGURE 2.11 A drop-down list takes up less room, but it can contain many choices.
To select an item from a list in a drop-down control, do one of the following:
• Select the arrow at the end of the control or the visible text of the current selection. Then scroll through the list to find your item. Select your item when you find it.
• Tap the arrow beside the control to drop down the list of choices. Scroll through the list until you find your item. When you do, tap it.
Combo Drop-Down List
A combo drop-down list is similar to the drop-down list control described earlier. The only difference is you can enter the name of the item you want to select in the part of the control that displays the selected item with the combo drop-down list.
The list automatically selects the first item in the list whose name matches the text you type. This control is used when it is believed you might not know whether the item you’re interested in is actually in the list. It’s quicker to verify that the item you want is listed by entering its name rather than scrolling through the list. Examples include typing letters into a search box and the way website suggestions appear when you manually type in a URL address.
Hamburger Menus
Hamburger menus have invaded Windows with Windows 10. Called hamburger menus due to a resemblance to a hamburger patty with a top and bottom bun, this type of menu has been a common feature in other operating systems and has gained wide acceptance. The hamburger menu in Windows generally is used to reveal important controls that do not need to always be visible in a modern app. The hamburger menu can expand a vertical list of icons to reveal their purpose, or it can reveal a hidden list of controls, as shown in Figure 2.12.
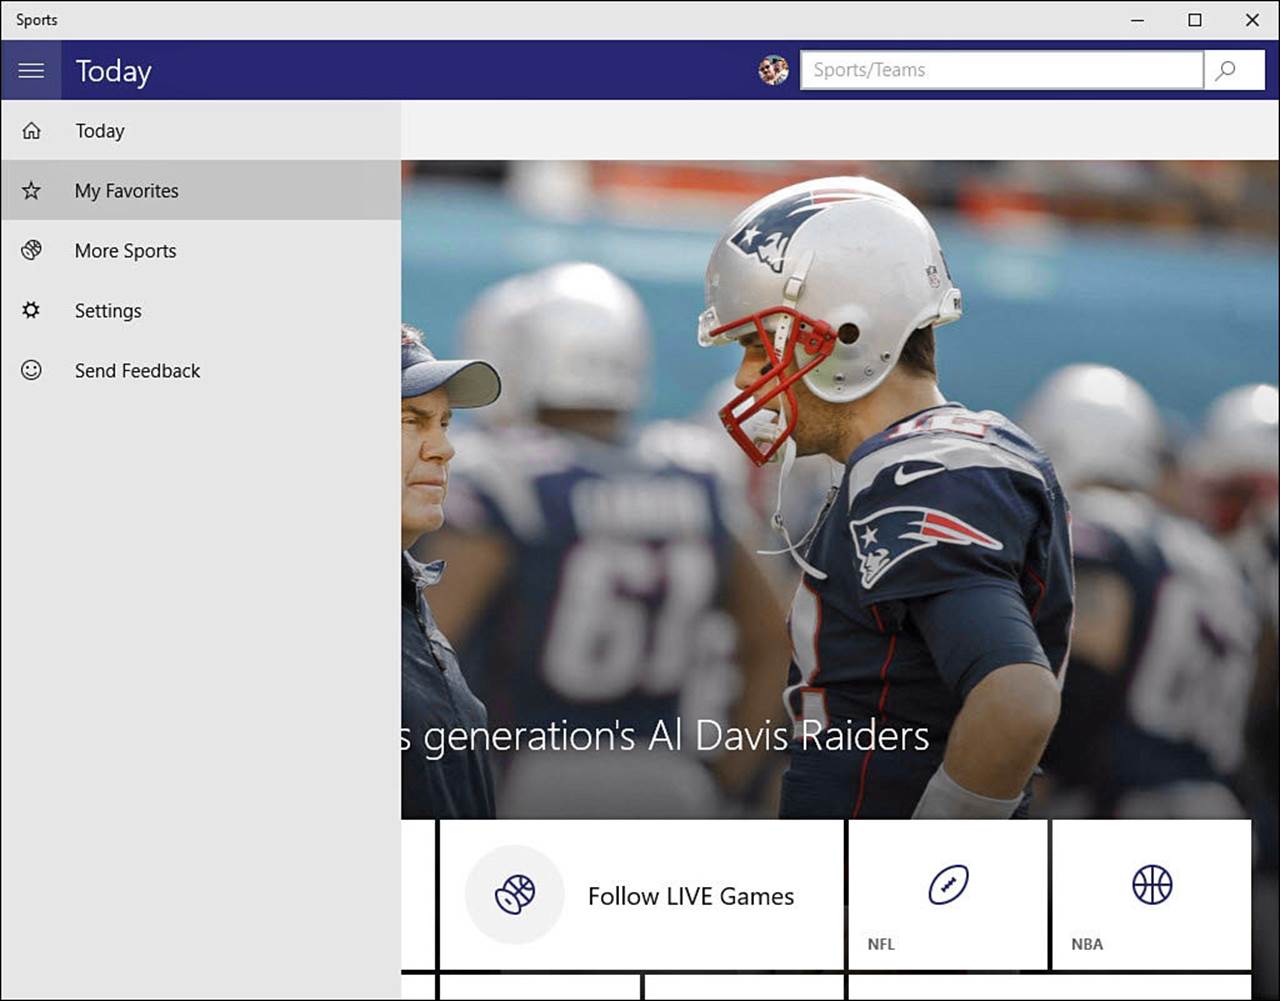
FIGURE 2.12 Hamburger menus reveal important controls when needed.
To expand the contents of a hamburger menu, simply select the menu icon. To hide the menu, either select the icon again or make a selection inside or outside of the menu.
The Absolute Minimum
• There are four primary interfaces you can use to interact with Windows 10: mouse, keyboard, Touch keyboard, and touch.
• Windows 10 appears and operates almost identically on different devices.
• Make sure you recognize and know how to use the tools to interact with Windows 10, such as the On/Off toggle switch and drop-down menus.
• Although the keyboard alone does not have the capability to access all the buttons, lists, and switches that a mouse or your finger does, keyboard shortcuts are available that automate many of the important tasks in Windows.
All materials on the site are licensed Creative Commons Attribution-Sharealike 3.0 Unported CC BY-SA 3.0 & GNU Free Documentation License (GFDL)
If you are the copyright holder of any material contained on our site and intend to remove it, please contact our site administrator for approval.
© 2016-2026 All site design rights belong to S.Y.A.